
Parts and Controls
Supplied Items
Product Overview
Power Button
How to Reset your HP Sprocket Studio
Caring for your HP Sprocket Studio
Lighting and Troubleshooting
Status LED Indicator Light
Troubleshooting
Getting Started
Installing Mobile App
Loading Paper
Install the Cartridge
Connect Power Cord and Power On/Off
Printer Clearance
Pairing a Mobile Device and the HP Sprocket Studio
Printer Tray Removal
HP Sprocket Studio Power Bank
Power Bank Overview
Using the HP Sprocket Studio Power Bank
Power Bank: Charging Information
Power Bank Safety
Technical Information
Specications
Print and relive memories with HP Sprocket Studio!
The information contained herein is subject to change without notice.
© Copyright 2021 HP Development Company, L.P.
HP Sprocket Studio Printer
1
1
Supplied Items
HP Sprocket Studio Printer
Setup Instructions
HP Sprocket 3.9 x 5.8” (100 x 148 mm) Photo Paper and Cartridge (10 sheets included)
AC Power Adapter
Power Cord
Regulatory Information
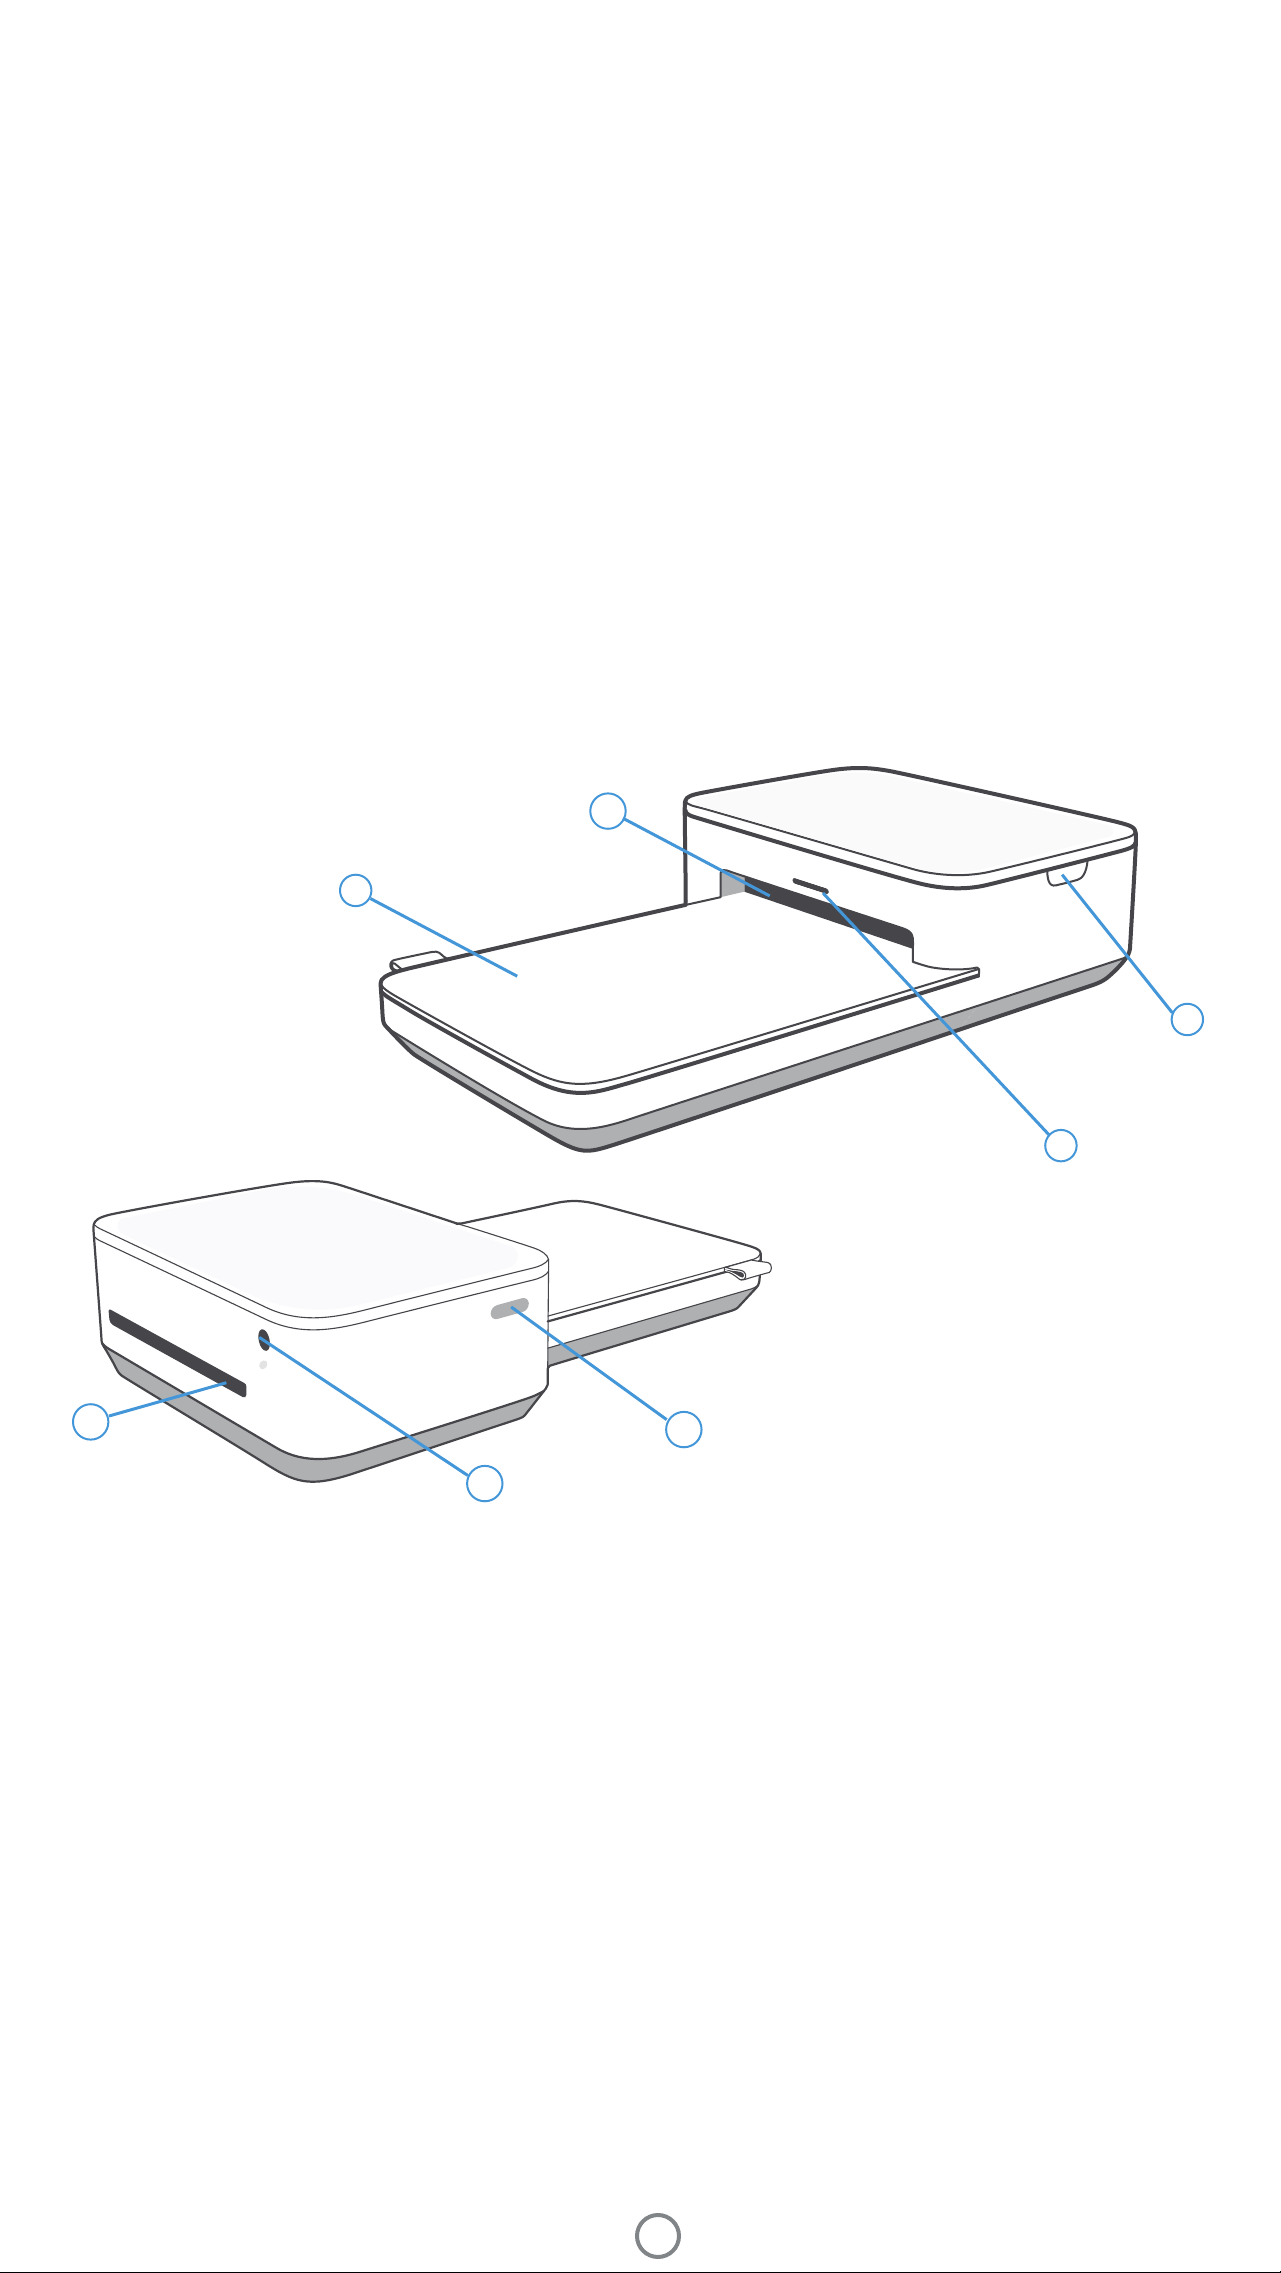
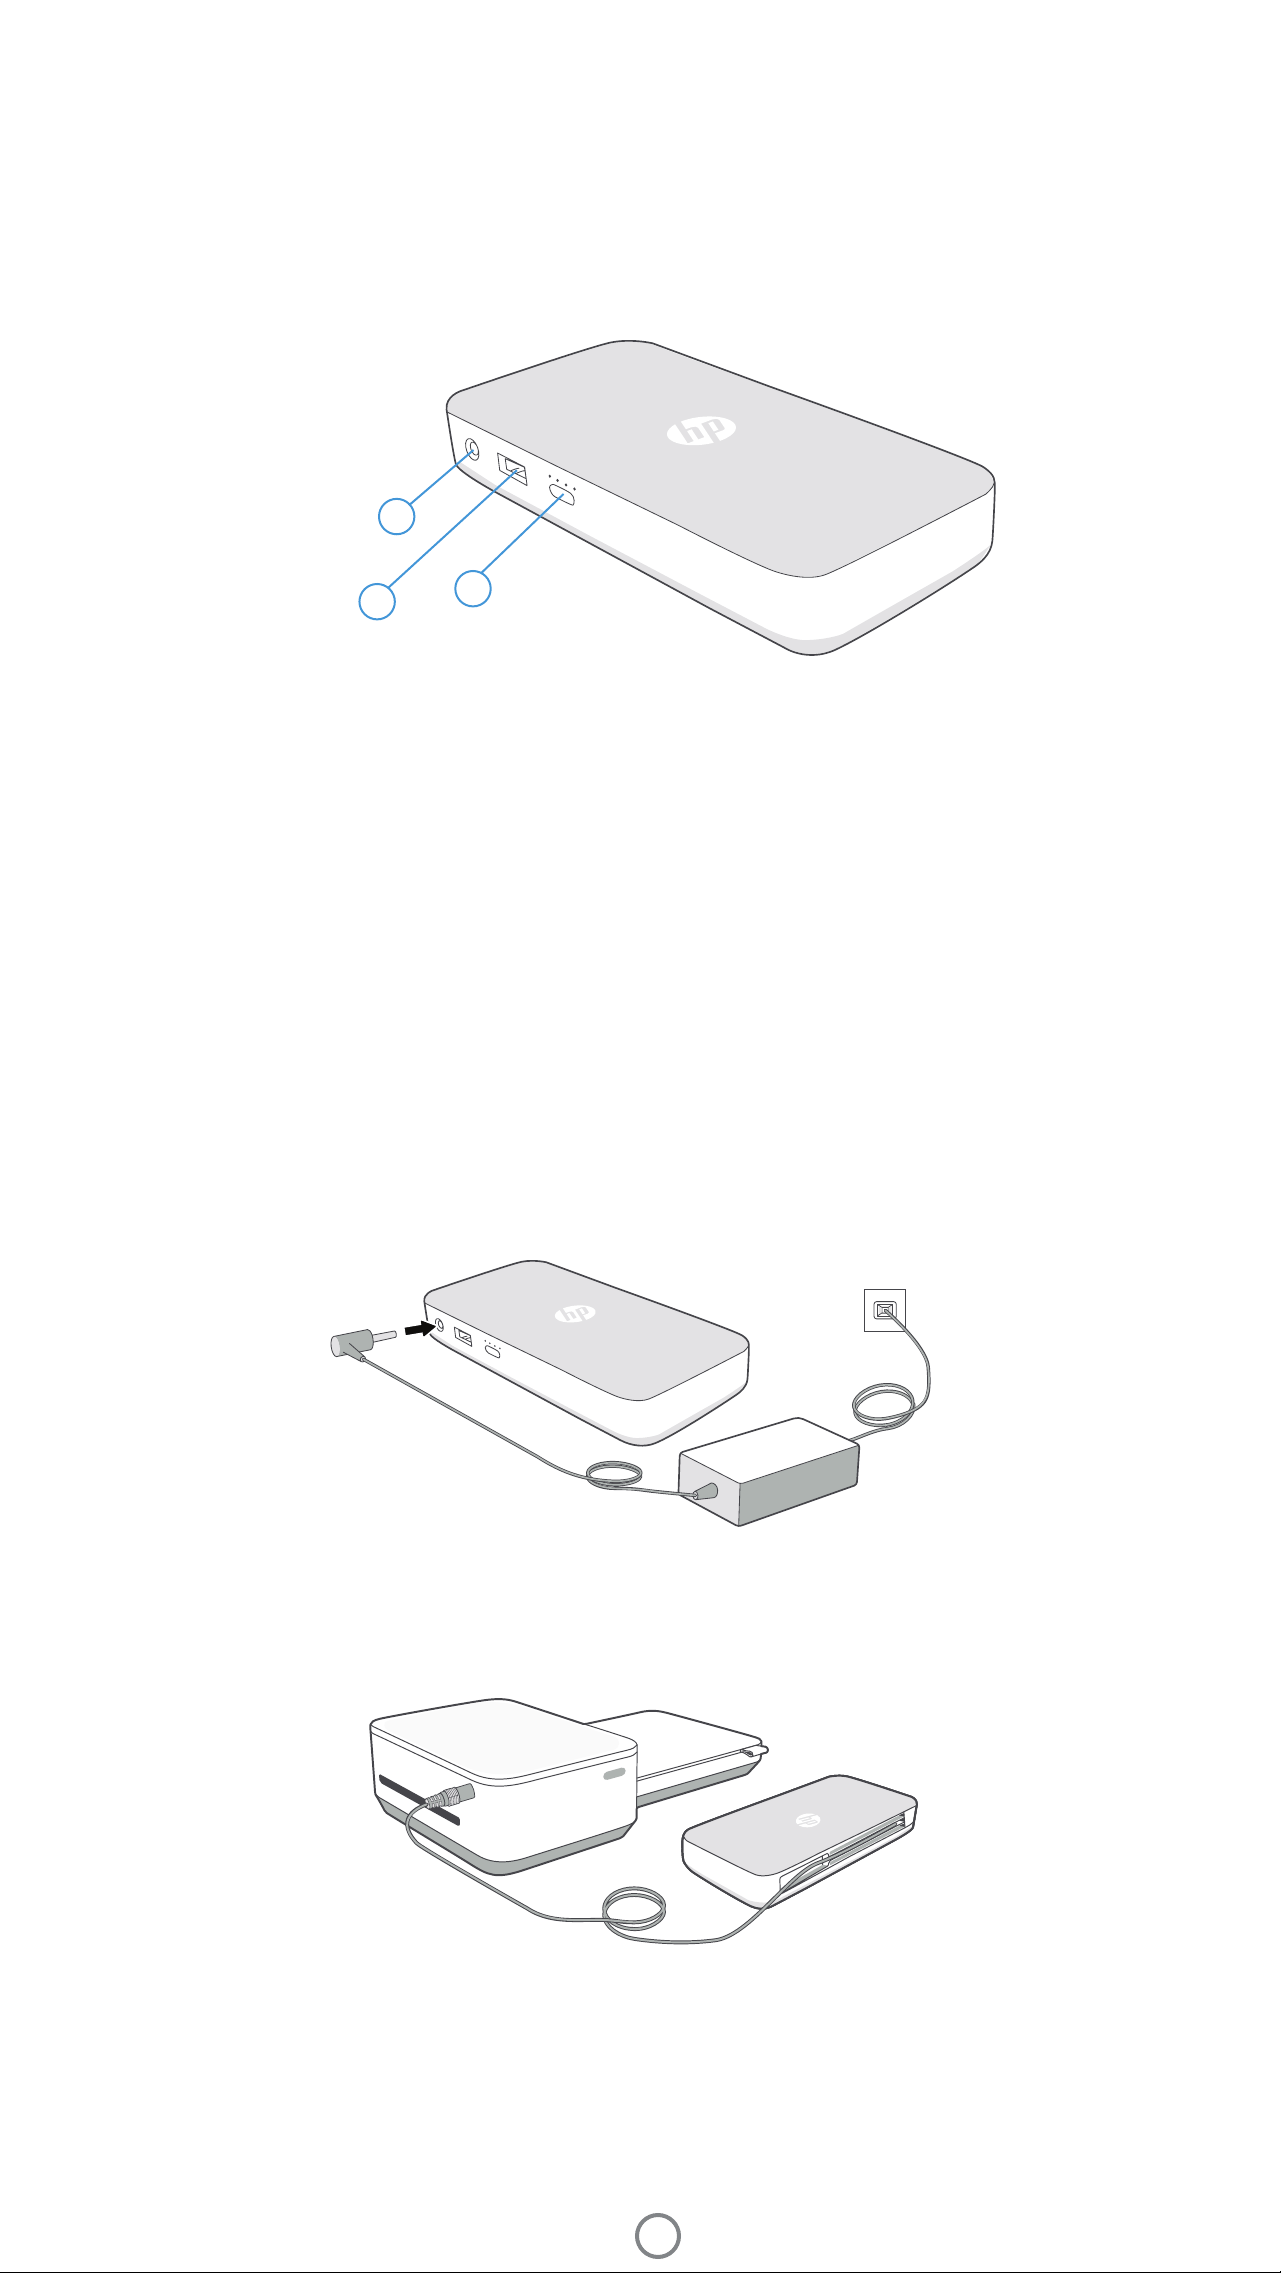
Product Overview
1. Power Button
2. Power Cord Port
3. Status LED Indicator Light
4. Cartridge-Door
5. Paper Tray Cover
6. Paper Path Slots (a & b)
3
2
4
5
6a
6b
Power Button
Press and hold the power button for 2-3 seconds to turn on or power off the printer. If the printer is on, the LED lights
on the front of the printer paper path slot will be on. Press and release the power button quickly to wake the HP
Sprocket Studio printer from its sleep/idle state, or go from powered on and active to sleep/idle.
If you press the power button for 2-3 seconds while your device is printing, the printer will nish the print and then
turn off. If you sent multiple jobs to the printer, it will turn off between prints and the rest will be put in the Sprocket app
Print Queue for later.
Note:
Parts and Controls

2
Caring for your HP Sprocket Studio
There are two ways you might need to reset your Sprocket printer:
Hardware Reset
If the printer isn't responding or won't connect to your mobile device, try performing a hardware reset. If you have
connectivity issues with your printer, unuplug the power cord from the wall outlet and wait for a few seconds. Then,
plug the printer in again and power on.
Perform a factory reset to return to the default settings if you want to gift your Sprocket to someone else. A factory
reset might also be used if Privacy is turned on for your mobile device and the device is lost. Completing a factory reset
would allow a new phone to connect. Before completing a factory reset, update your printer rmware.
When you complete a hardware reset, your personalized settings will be saved (Custom Name, Personal Color, etc.).
How to Reset your HP Sprocket Studio
Factory Reset
You can initiate a factory reset by using the steps below. A factory reset can be completed when connected to a wall
outlet or to the HP Sprocket Studio Power Bank.
1.
2. Release the power button. The LEDs will continue blinking for about 6 seconds.
While the LEDs are blinking, press and release the power button. The device will remain off until you power on
again.
Power on; the printer will be reset to factory settings. After a factory reset, all settings are reset to factory
defaults (Custom Name, LED color, Sleep Time, Auto-Off, etc.).
Hold the power button for about 7 seconds. After 3 seconds, the Status LED light will turn off to indicate
the printer is shutting down; continue to hold the Power button until the LED lights start to ash.
3.
4.
If you decide you do NOT want to reset the printer to factory defaults, you can abandon the reset. While the LEDs are
blinking, do not press the Power button as directed in step three above. This will cancel the factory reset.
Note:
If you want to pair again with your device after a Factory Reset, make sure to "forget" your device in your operating
system's Paired Devices list. Then, re-pair in the Sprocket app.
•
• Keep the Paper Tray Cover closed to prevent dust and debris from entering the paper path.
Update the printer rmware. Make sure your mobile device is connected to the Internet and then open the
Sprocket app. Turn on the printer and connect it to the Sprocket app. If there is a rmware update available, a
rmware update screen displays. Follow the on-screen prompts to complete the update. Make sure the printer is
plugged in to a wall outlet to complete a rmware update. If you are connected to the power bank, make sure you
plug the power bank into a wall outlet using the included AC power adapter and power cord.
Remove ngerprints, dust, and dirt from the printer using a dry microber cloth.
•
• Keep your Sprocket app updated. If you don’t have your mobile app set to automatically update, go to the
appropriate app store and make sure the latest version is installed.

3
Status LED Indicator Light
The color of the Status LED Indicator Light can be personalized in the Sprocket app. The default color is Light blue,
indicated in this table.
Color/Status HP Sprocket Condition Description
Device is turned off, in Sleep mode, or the power bank is
completely drained. If the power bank is Critically Low or
drained, you cannot print.
The LED will quickly ash light blue/personal color three
times when a print job is sent from an Owner's mobile
device. While printing, the LED will slowly pulse white/
personal color.
The LED will quickly ash the owner/guest’s color three
times when a print job is sent by a particular user. While
printing, the LED will slowly pulse the owner/guest's color.
Light blue (default)
(Or owner's personal
color)
Idle
Powered off/SleepOff
Printer is idle. The color of this LED can be personalized in
the Sprocket app.
Light blue (default),
Blinking
(Or owner's personal
color)
Sprocket is printing from the
Owner's mobile device
Personal or Assigned
Guest Color
(Yellow, Blue, Green,
Purple, Pink. Color set in
the Sprocket app)
Sprocket is printing from a
Guest mobile device
Owner/Guest color,
Blinking slowly
Sprocket is overheated The printer will pause printing until temperature returns
to normal and resume automatically.
Red, Blinking slowly Printer Error State Printer might be out of paper or missing a cartridge.
Check the Charge LED light for power bank status.
Resolve the error to continue printing.
Solid Red Printer Error State The printer is in an unrecoverable state. Complete a
hardware reset to resolve.
Red, Blinking fast Printer Error State The printer might have a paper jam. The printer will
restart and automatically clear the jam.
Alternating colors,
Sparkling
Firmware Update
Printer rmware updating. Make sure not to close the
Sprocket app or unplug from power during the update.
Troubleshooting
The Sprocket app will alert you to various error conditions through in-app messaging. Follow the app instrutions to
resolve issues.
For additional help on specic issues with your HP Sprocket Studio printer, see the Troubleshooting documents and
FAQs on the HP Support site (www.hpsupport.com).
Lighting and Troubleshooting
4
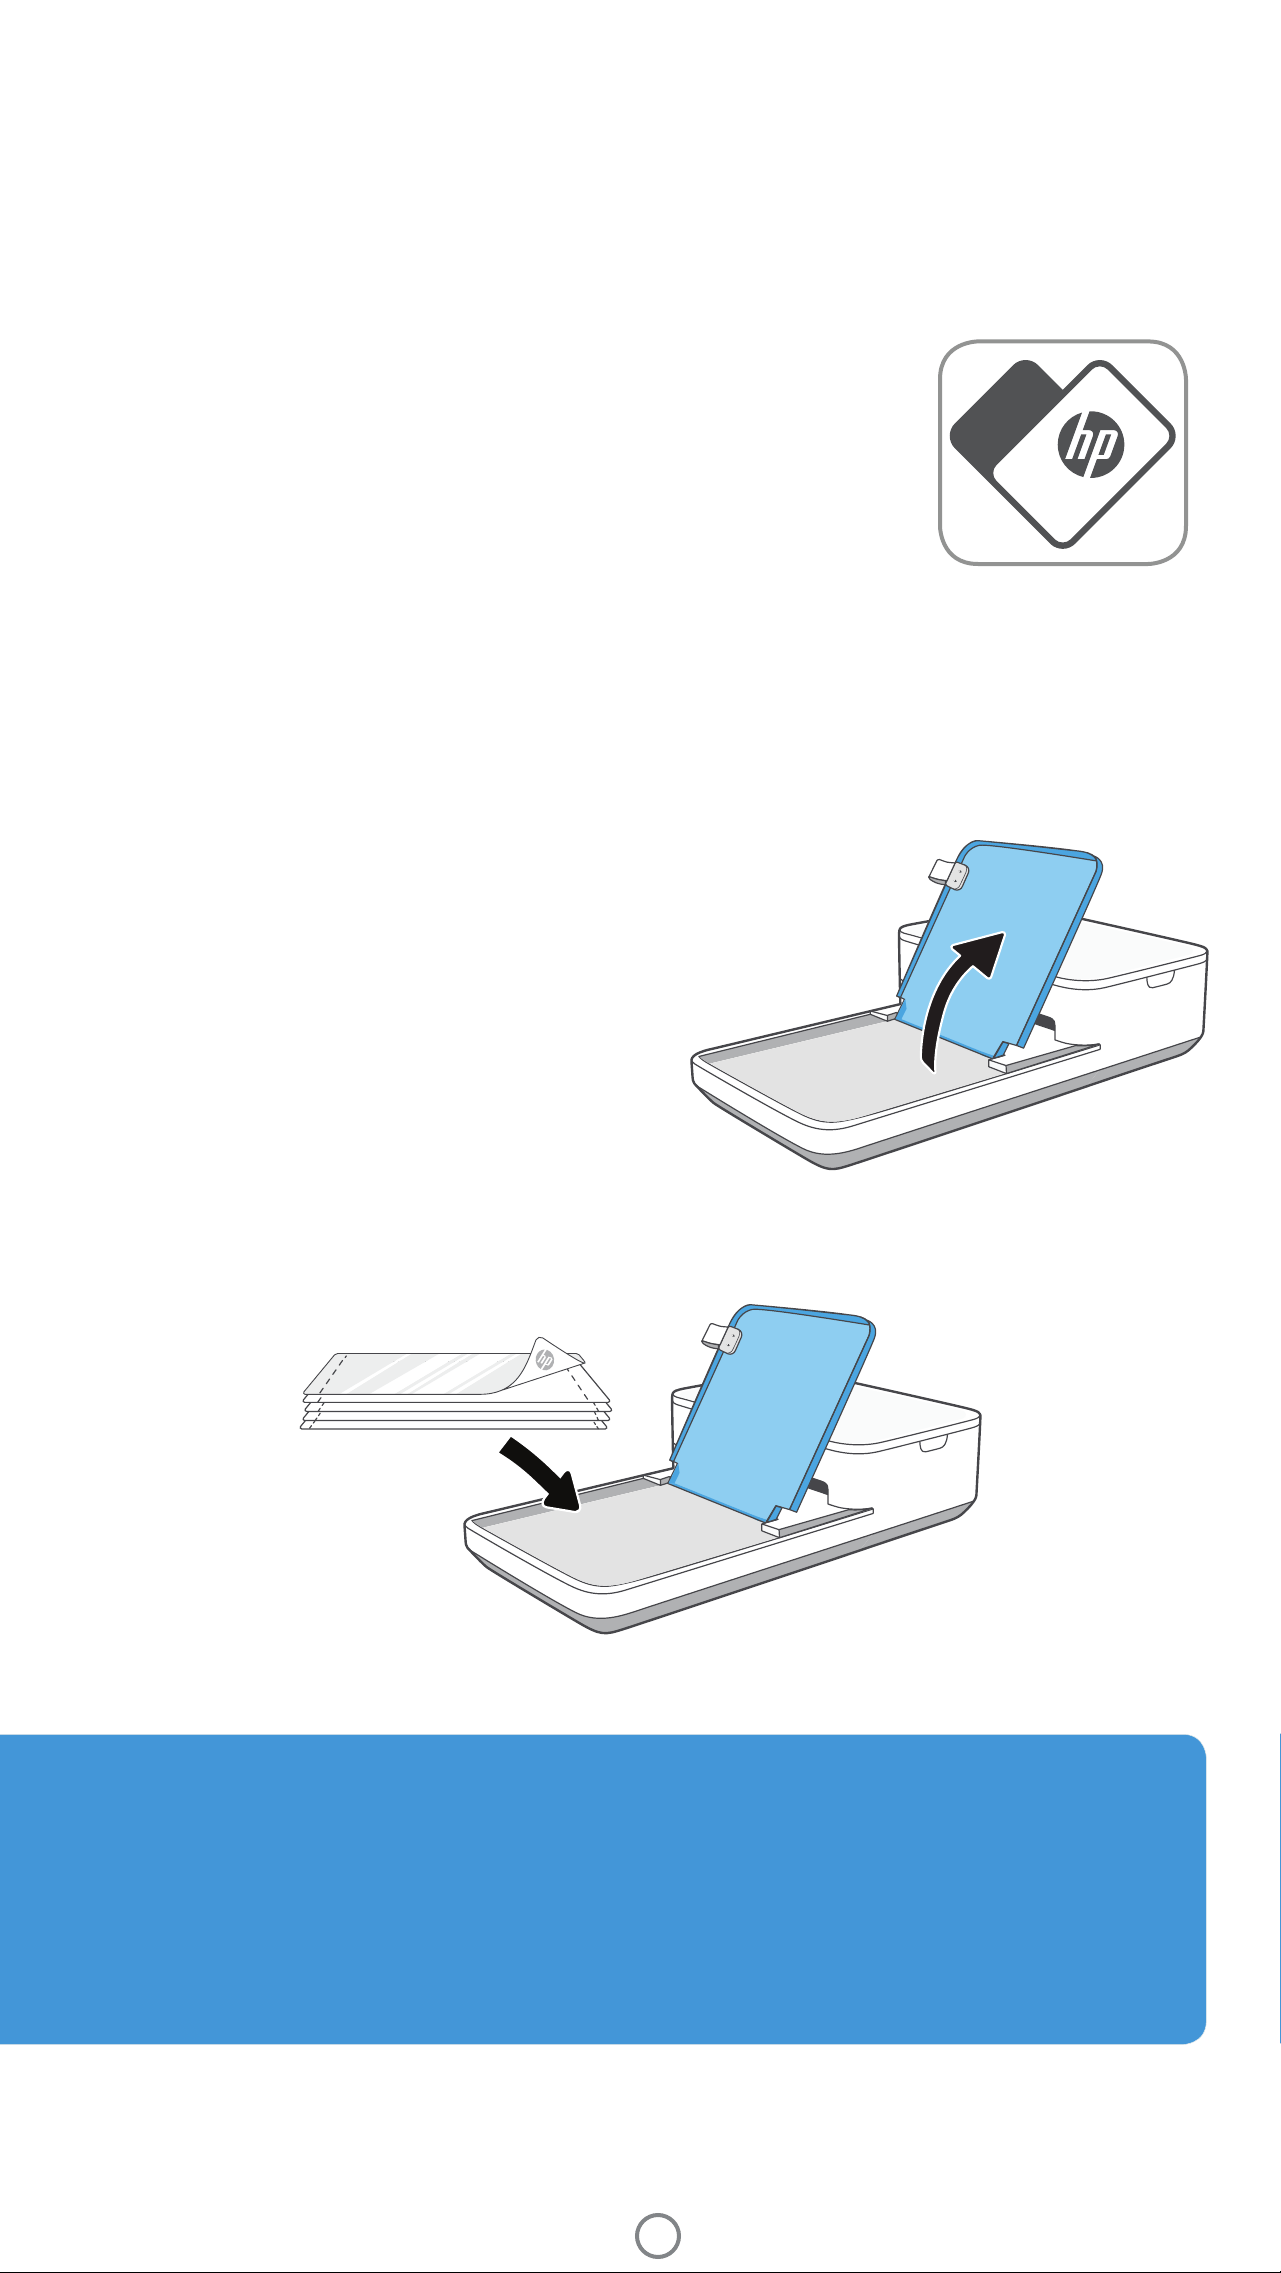
Installing Mobile App
To use your HP Sprocket Studio with your mobile device, you must download the companion Sprocket app from the App
Store® or on Google Play™ (or your local app store). To download the Sprocket app, visit hpsprocket.com/start. There,
you will be directed to the appropriate app store for your device.
• The Sprocket app is supported by Android™ devices using OS v. 5.0.
• Compatible with iPhone XS Max, iPhone XS, iPhone XR, iPhone X, iPhone 8,
iPhone 8 Plus, iPhone 7, iPhone 7 Plus, iPhone SE, iPhone 6s, iPhone 6s Plus,
iPhone 6, iPhone 6 Plus, iPhone 5s, iPhone 5c, iPhone 5, iPad (6th generation),
iPad Pro 12.9-inch (2nd generation), iPad Pro 12.9-inch (3rd generation), iPad
Pro 11-inch, iPad Pro 10.5-inch, iPad (5th generation), iPad Pro 9.7-inch, iPad
Pro 12.9-inch (1st generation), iPad Air 2, iPad Air, iPad mini 2, iPad mini 3, iPad
mini 4, iPad (4th generation), iPod touch (6th generation).
• You must install the companion Sprocket app to operate the HP Sprocket with your mobile device.
• If you previously installed the Sprocket app, you can access setup instructions for HP Sprocket Studio in the
Help & How To menu.
2. Lift the Paper Tray Cover and place the photo paper in the tray, glossy-side facing up. Close the Paper Tray
Cover.
Loading Paper
1. Unwrap a pack of HP Sprocket 3.9 x 5.8” (100 x 148 mm)
Photo Paper. Be careful not to touch the glossy side of
the paper.
• Only insert up to one pack of paper into the tray at
a time.
What paper and cartridges do I need to buy for my HP Sprocket Studio?
Make sure to buy HP Sprocket 3.9 x 5.8” (100 x 148 mm) Photo Paper and Cartridges for your HP Sprocket
Studio! The cartridge and paper are sold together and are specially designed to work with your Sprocket printer.
Only use HP Sprocket 3.9 x 5.8” (100 x 148 mm) Photo Paper and Cartridges with HP Sprocket Studio. You can
purchase additional paper and cartridges in the Sprocket app by tapping “Buy Paper” in the Main Menu or from
hpsprocket.com/start. You can purchase genuine supplies from the app or from other retailers.
Apple, the Apple logo, iPhone, iPad, iPod, and iPod touch are trademarks of Apple Inc., registered in the U.S. and other countries. App Store is a service mark of
Apple Inc.
Android and Google Play are trademarks of Google Inc. Google and Google Logo are registered trademarks of Google Inc.
Getting Started
5
Caution:
• Do not insert more than one pack of paper of HP Sprocket 3.9 x 5.8” (100 x 148 mm) Photo Paper into the
device at a time to avoid paper jams or print errors.
Only use HP Sprocket 3.9 x 5.8” (100 x 148 mm) Photo Paper with the device to avoid paper jams and
malfunctions. You can purchase additional paper and cartridges within the Sprocket app by tapping “Buy Paper”
in the Main Menu.
•
• In the case of a paper jam, do not pull on the paper. Instead, follow app instructions to automatically clear the
jam.
• Do not pull the paper out of the device during printing.
• If spills or moisture collect on a photo, wipe it away as soon as possible to prevent color damage.
• Keep photo paper clean and free of bends, dust, or damage for best print quality.
Remove perforated edges (2) on each photo by folding rst, then tearing slowly from one side.
Do not touch the glossy-side of the photo paper. Oils from your ngers will impact how the ink adheres to the
paper when printing.
•
•
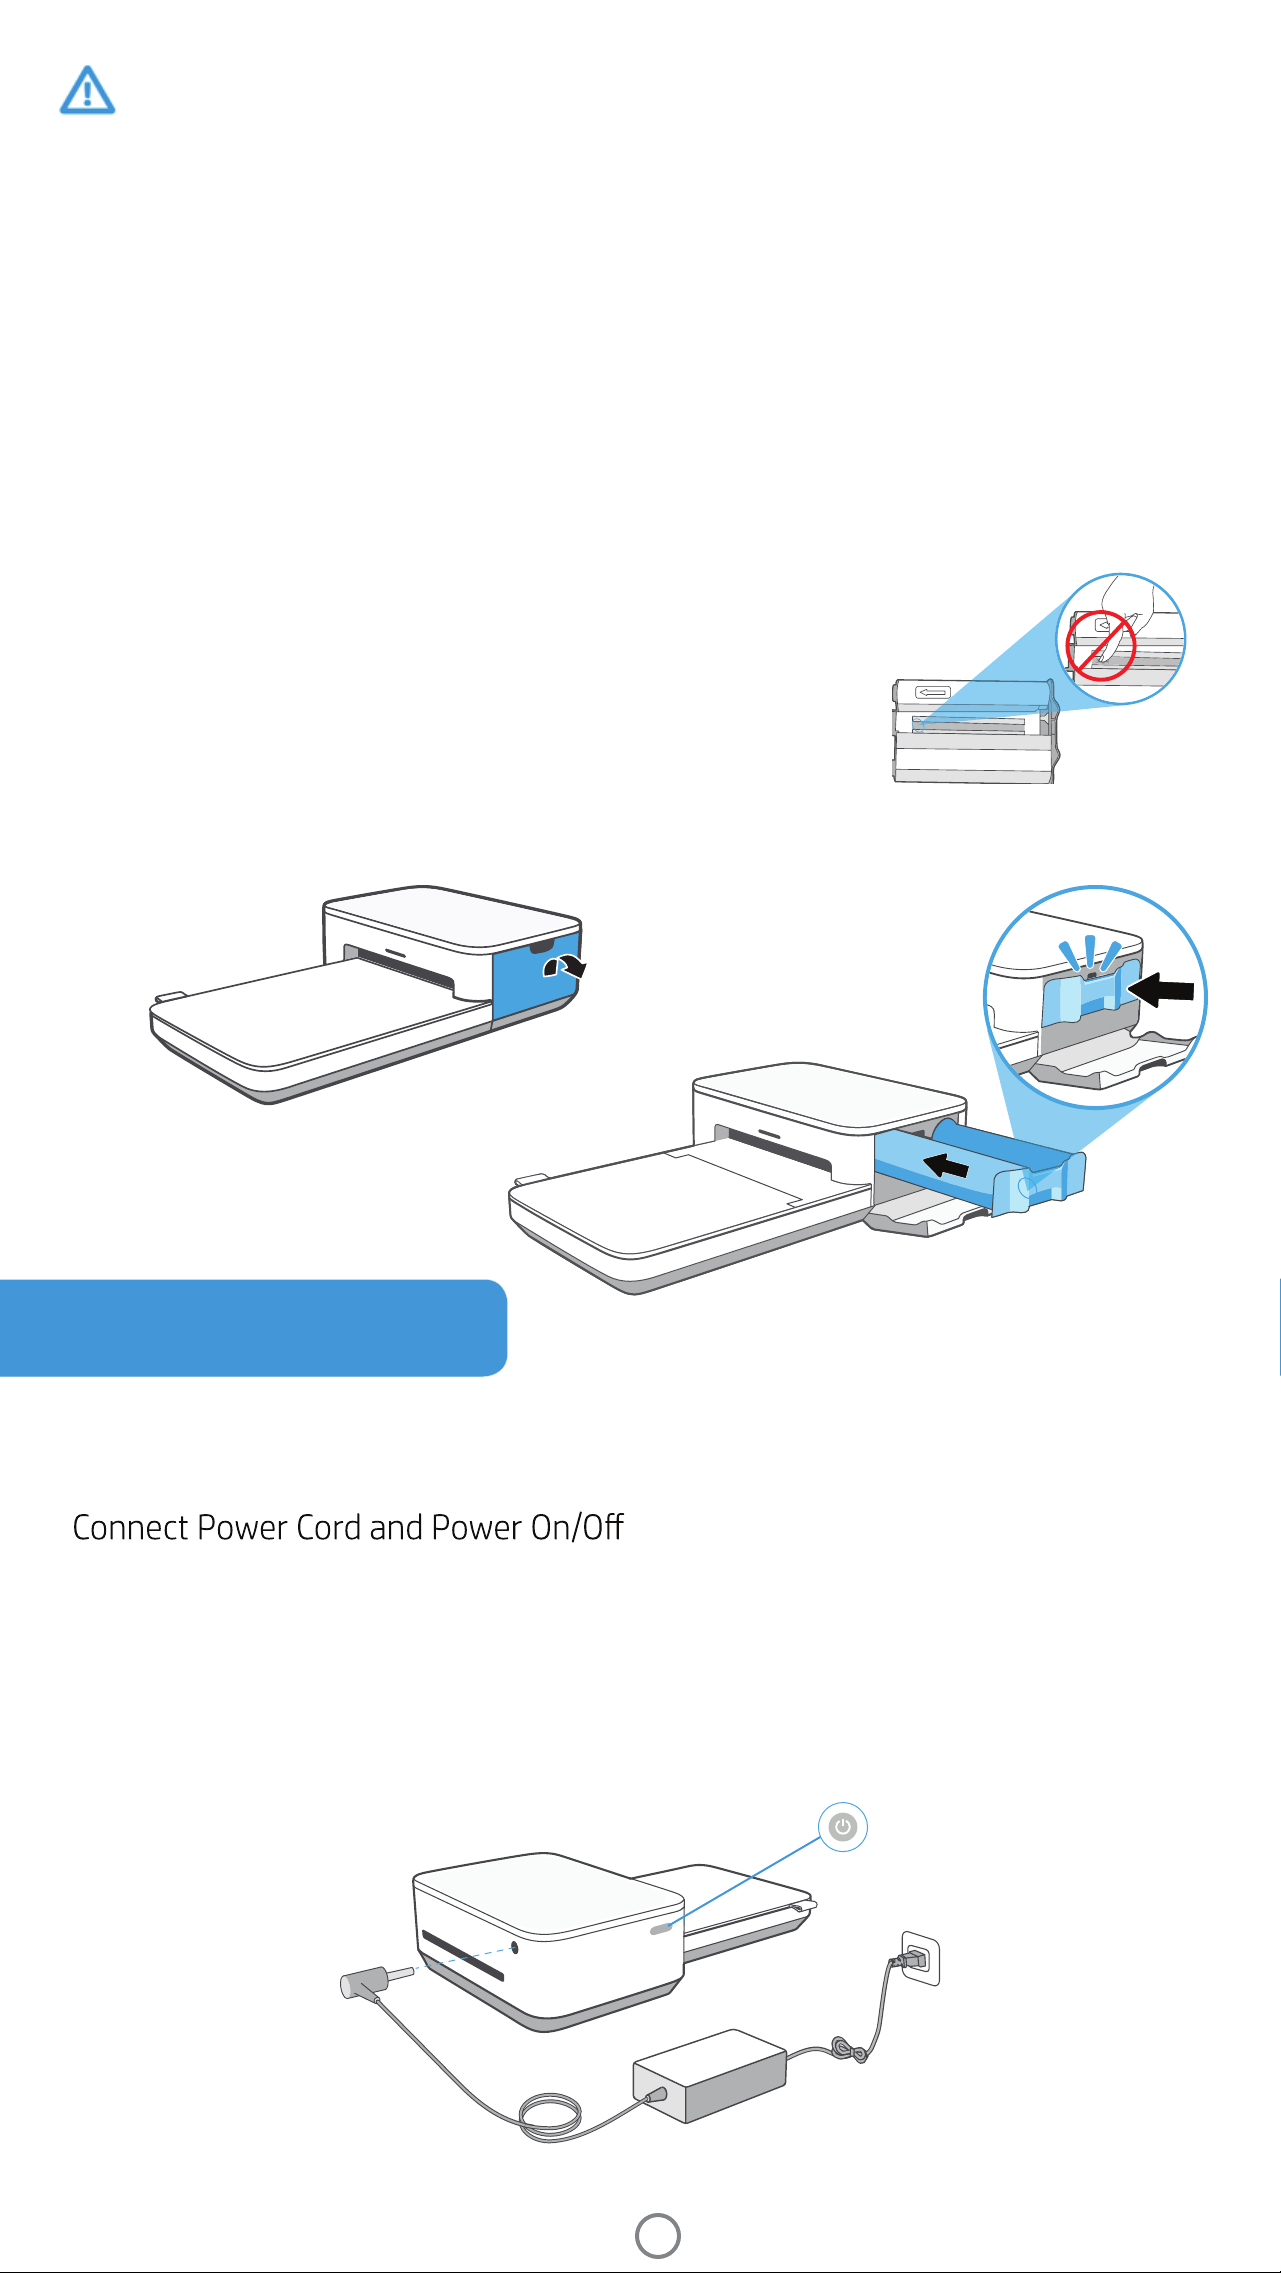
Install the Cartridge
1. Unwrap an HP Sprocket Studio cartridge. Make sure not to touch the
cartridge ribbon.
1. Connect included AC Power Adapter and included Power Cord together.
Turn off the device by pressing and holding the Power Button until the Status LED Indicator Light goes dark.
2. Insert the AC Power Adapter plug into your printer and connect the Power Cord plug to a wall outlet. Push the
power button until the Status LED Indicator Light illuminates and turns light blue (default) or a personalized
color.
3.
Note: To remove the cartridge, press down on the colored latch
underneath the slot to release the cartridge. When it releases,
remove the cartridge.
2. Open the printer side-door and insert the cartridge into the slot until it clicks. Close the door.
6
For Android™ and iPhone®
1. Press and hold the Power Button to turn on the printer. The Status LED Indicator Light will light up when fully
powered on.
2. Open the Sprocket app. Expand the Main menu and tap sprocket.
3. Tap Manage Printers. This opens a dropdown list of printers you have previously connected to. Select your
printer, or tap Add new printer.
4. If you are adding a new printer, select the printer you want to connect to from the list. Follow the on-screen
messages.
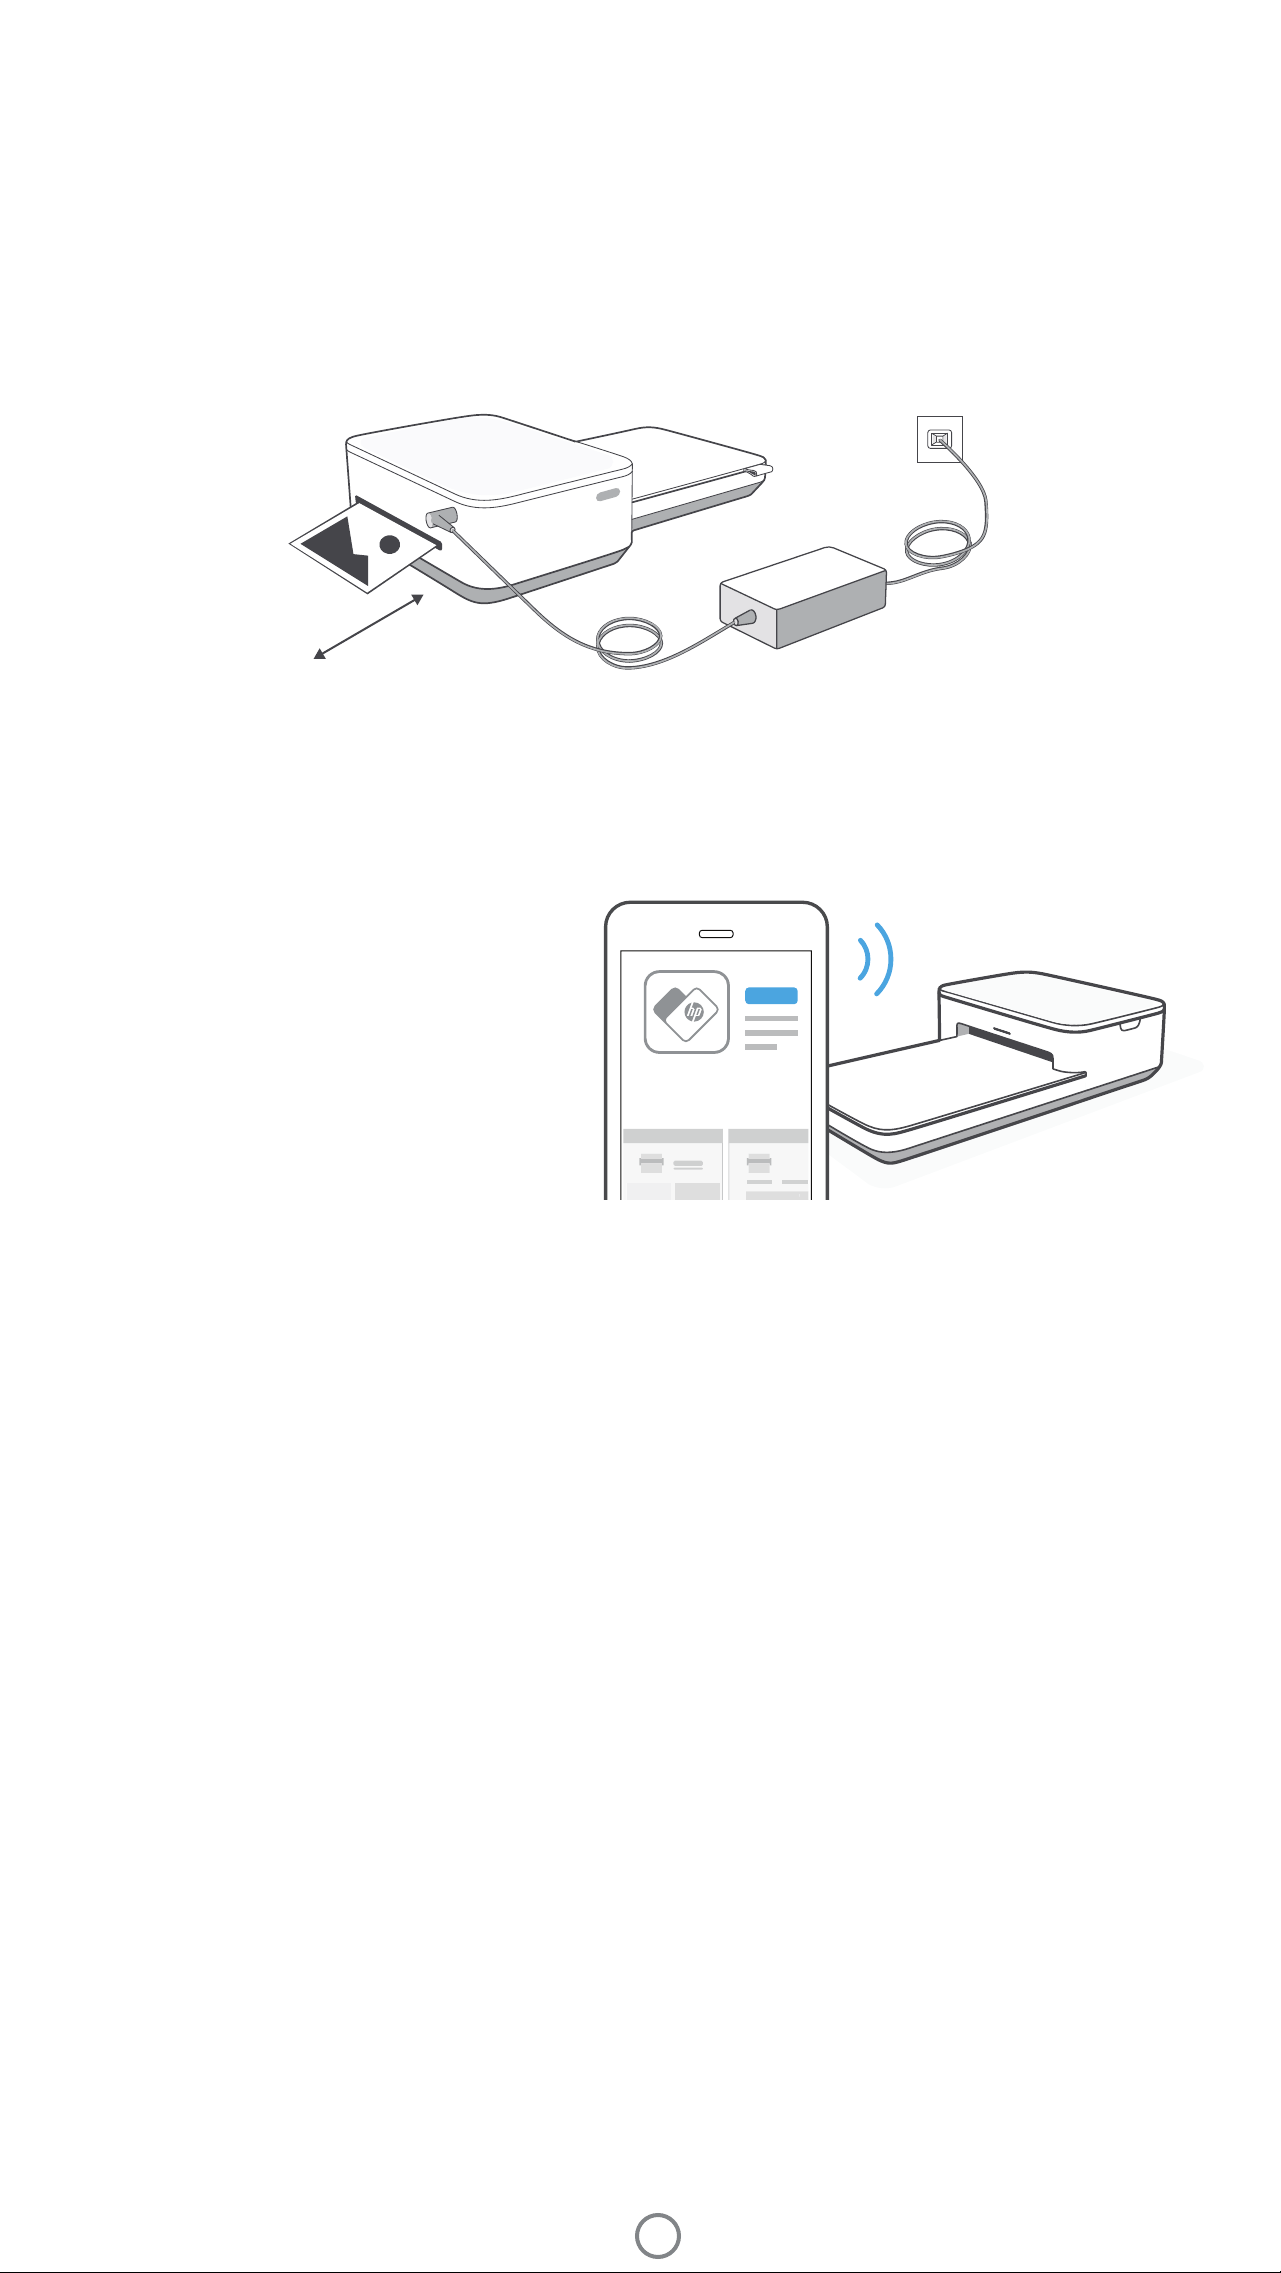
When the photo prints from the HP Sprocket printer, it passes through the printer and emerges multiple times. The
picture gets colors applied to the photo with each iteration. Do not touch or pull the photo until the print is nished and
lands on the top of the Paper Tray Cover.
Pairing a Mobile Device and the HP Sprocket Studio
Pair quickly and easily with your HP Sprocket Studio
using the in-app setup instructions. On rst launch
of the Sprocket app, select “my sprocket”. The in-
app instructions will help you easily pair with your
mobile device within the app. You can also access
the setup instructions anytime from the Help & How
To menu.
HP Sprocket
Printer Clearance
Check the rear of the printer for any obstructions. Make sure the power cord, power bank, or other items don’t block
the rear of the printer. Allow at least 5 inches (12.7 cm) of space while printing.
5 in / 12.7 cm
Note:
• Connect the AC Power Adapter and Power Cord to a power source capable of delivering 24 V DC/1.5 A.
• Only use the AC Power Adapter and Power Cord provided with your HP Sprocket Studio printer to power the printer itself and the optional power bank
accessory.
Check out the HP Sprocket app user guide to learn more about the Sprocket app and all
the fun features available for your printer!
Paper Tray Removal
You can remove the paper tray from the printer to transport it. To remove the tray:
1. Turn the printer upside-down.
2. Locate the latch on the underside of the printer. Slide and hold it to the left.
3. Hold the latch in the slid position and gently pull the paper tray away from the printer body. The two pieces will
disconnect.
4. To reconnect, line up the tray with the printer body and slide together. The tray will automatically lock when it
clicks into place.
7
Using the HP Sprocket Studio Power Bank
1. Charge the portable power bank using only the AC Power Adapter and Power Cord included with your printer. Insert
the AC Power Adapter plug into your power bank and connect the Power Cord plug to a wall outlet. Monitor the LED
lights on the power bank to see the charge status.
2. When charged, use the nested cord on the power bank and plug it into the HP Sprocket Studio. Monitor the LED
lights on the power bank to see the charge status.
1. AC Power Adapter Port. Connect the AC Power Adapter (included with your HP Sprocket Studio printer) to the HP
Sprocket Studio Power Bank to charge it. You can also use the AC Adapter and Power Cord that were included with
your HP Sprocket Studio printer to charge the power bank while it is still connected to the printer.
2. USB-A Port. Connect a USB-A cable to your HP Sprocket Studio Power Bank to use it as a power source for other
devices.
3. Charge Status Button and LED Lights. Press the button to check the current charge level using the LED lights.
When the power bank is charging, the LED lights will also indicate charging progress. See "Power Bank Accessory:
Charging Information" for more information.
2
3
Power Bank Overview
You can buy an HP Sprocket Studio Printer with a portable power bank included. You can also buy the power bank as an
accessory to your printer. If you are interested in purchasing a power bank, shop here.
s
p
r
o
c
k
e
t
s
t
u
d
i
o
s
p
r
o
c
k
e
t
s
t
u
d
i
o
1
HP Sprocket Studio Power Bank

8
Power Bank: Charging Information
If your HP Sprocket Studio Power Bank is not connected to the power supply cable or to the HP Sprocket Studio printer,
press the Charge Status button to check the current charge level based on the LED lights.
Charge Percentage LED pattern from Charge Indicator Button
0-24% 1 LED blinks fast white.
25-49% 1 LED glows solid white. You can print approx. 10 photos.
50-74% 2 LEDs glow solid white.
75-94% 3 LEDs glow solid white.
95-100% All LEDs glow solid white. You can print approx. 40 photos.
When the HP Sprocket Studio Power Bank is connected to a power supply and charging, the LEDs on the power bank
will indicate charging progress.
Charge Percentage LED pattern while charging
0-24% All 4 LEDs blink slowly, sequentially.
25-49% 1 LED glows solid white. 3 LEDs blink slowly, sequentially.
You can print approx. 10 photos.
50-74% 2 LEDs glow solid white. 2 LEDs blink slowly, sequentially.
75-94% 3 LEDs glow solid white. Remaining LED blinks slowly.
95-100% All LEDs glow solid white.
Note:
• When the power bank accessory is connected to the HP Sprocket Studio printer, the LEDs will indicate the level of charge.
• For a brand-new power Bank , it should take about 2-3 hours to charge from 0% to 100%.
• Connect the power cord and power adapter to a power source capable of delivering 24 V DC/1.5 A.
• Only use the power cord and power adapter provided with your HP Sprocket Studio printer to power the printer itself and the optional power bank.
Power Bank Safety
• Do not disassemble the product or power bank or short the power bank terminals.
• Avoid contact with a leaking or damaged power bank.
• Adult supervision is recommended when the product is being used by young children.
•
• Do not use the printer if the product power bank is swelling and causing product expansion.
• Keep the device clear of high temperatures and moisture.
Do not disassemble, strike, press, or put in a re.
9
DescriptionSpecication
Product number
HPISP
Dimensions and weight
• Dimensions: 6.65 x 10.75 x 2.68 in (169 x 273 x 68 mm)
• Weight: 2.06 lbs (0.93 kg)
Connectivity
Bluetooth 5.0
Printer management
Sprocket app
Power supply
• Power Supply: External power supply (Class 1 with input functional
ground);
• Power Bank (External and optional): Li-Polymer external power
bank pack. Charged by external power supply capable of delivering
24 V DC/1.5 A.
• Power Consumption Description: Idle: 1.8 W; Printing average 19.4 W,
Printing max 60 W
• Power Supply Required
• Power supply: AC input voltage 100-240 V AC (+/- 10% tolerance).
Input frequency 50-60 Hz (+/- 3Hz tolerance). Maximum input
current 1.5A AC.
• Power supply European Union: AC input voltage 200-240 V AC
(+/- 10% tolerance). Input frequency 50-60 Hz (+/- 3Hz
tolerance). Maximum input current 1.5 A AC.
• Power Bank (External and optional): Power Bank output: 21 V DC-
24 V DC/1.2 A, 5 V DC/2 A, 2600 mAh
Printer Cartridges
1 HP Sprocket 3.9 x 5.8” (100 x 148 mm) Cartridge
Power consumption
1.8 W (idle)
Printing Average 19.4 W
Printing Maxiumum 60 W
Print technology
Dye-sublimation Technology
Supported paper
HP Sprocket 3.9 x 5.8” (100 x 148 mm) Photo Paper
Borderless printing
Supported le types
Yes, borderless after r
emoving 2 tabs
•
Paper tray capacity
One pack of HP Sprocket 3.9 x 5.8” (100 x 148 mm) Photo Paper
Supported Media Types
HP Sprocket 3.9 x 5.8” (100 x 148 mm) Photo Paper and Cartridges
Print quality
300 dpi
Mobile connectivity
• Supported by Android™ devices using OS v5.0 and above.
• Made for iPhone XS Max, iPhone XS, iPhone XR, iPhone X, iPhone 8,
iPhone 8 Plus, iPhone 7, iPhone 7 Plus, iPhone SE, iPhone 6s, iPhone
6s Plus, iPhone 6, iPhone 6 Plus, iPhone 5s, iPhone 5c, iPhone 5, iPad
(6th generation), iPad Pro 12.9-inch (2nd generation) iPad Pro 12.9-
inch (3rd generation), iPad Pro 11-inch, iPad Pro 10.5-inch, iPad (5th
generation), iPad Pro 9.7-inch, iPad Pro 12.9-inch (1st generation),
iPad Air 2, iPad Air, iPad mini 2, iPad mini 3, iPad mini 4, iPad (4th
generation), iPod touch (6th generation).
Control panel
Power Button; Status Indicator LED Lights
Environmental parameters
• Operating humidity: 5% to 80% RH
• Recommended operating humidity: 20% to 80% RH
• Non-operating humidity: <5% or >81% RH
• Operating temperature: 32° F to 104° F (0° C to 40° C)
• Recommended operating temperature: 59° F to 90° F (15° C to 32° C)
• Storage temperature: -40° F to 140° F (-40° C to 60° C)
Warranty
One-year limited hardware warranty
Visit www.support.hp.com for more information.
Regulatory Model Number
Specications
Note: If you send a non-supported le type, the print job does not print.
.jpeg, .tiff (iOS only), .gif, .bmp, and .png
For regulatory identication purposes, your product is assigned with a
Regulatory Model Number. The regulatory model number should not be
confused with the marketing names or product numbers. The Regulatory
Model Number for your product is VCVRA-1901.

10
FCC statement
This equipment has been tested and found to comply with the limits for a Class B digital device, pursuant to Part 15 of
the FCC Rules. These limits are designed to provide reasonable protection against harmful interference in a residential
installation. This equipment generates, uses, and can radiate radio frequency energy and, if not installed and used
in accordance with the instructions, may cause harmful interference to radio communications. However, there is no
guarantee that interference will not occur in a particular installation. If this equipment does cause harmful interference
to radio or television reception, which can be determined by turning the equipment off and on, the user is encouraged
to try to correct the interference by one or more of the following measures:
-- Reorient or relocate the receiving antenna.
-- Increase the separation between the equipment and receiver.
-- Consult the dealer or an experienced radio/TV technician for help.
-- Connect the equipment into an outlet on a circuit different from that to which the receiver is connected.
to operate the equipment.
Modications (part 15.21)
Any changes or modications made to this device that are not expressly approved by HP may void the user’s authority
For further information, contact:
Manager of Corporate Product Regulations
HP Inc.
1501 Page Mill Road, Palo Alto, CA 94304, U.S.A
Email contact: ([email protected]) or Telephone contact: 877-424-9746
This device complies with Part 15 of the FCC Rules. Operation is subject to the following two conditions: (1) this device
may not cause harmful interference, and (2) this device must accept any interference received, including interference
that may cause undesired operation.
Notice to users in Canada/Note à l’attention des utilisateurs canadiens
Under Innovation, Science and Economic Development Canada regulations, this radio transmitter may only operate
using an antenna of a type and maximum (or lesser) gain approved for the transmitter by Innovation, Science and
Economic Developent Canada. To reduce potential radio interference to other users, the antenna type and its gain
shoul
d be so chosen that the equivalent isotropically radiated power (e.i.r.p.) is not more than that necessary for
successful communication.
This device complies with Innovation, Science and Economic Developent Canada licence-exempt RSS standard(s).
Operation is subject to the following two conditions: (1) this device may not cause interference, and (2) this device must
accept any interference, including interference that may cause undesired operation of the device.
The device has been evaluated to met general RF exposure requirement. The device can be used in portable exposure
condition without restriction.
• FCC Statement
•
•
Notice to Users in Canada
Power Cord Instructions
Regulatory notices
For regulatory, environmental, and safety notices, refer to the included sheet in your product packaging and the
following statements. This printer meets product regulatory requirements from regulatory agencies in your country/
region. This section contains the follow topics:
Technical Information
The United States Federal Communications Commission (in 47 CFR 15.105) has specied that the following notice be
brought to the attention of users of this product.

11
Power consumption
Auto-Off
•
Auto-Off is enabled when the printer is turned on and connected to a power bank, if the printer does not have
network, fax or Wi-Fi Direct capability, or is not using these capabilities.
Auto-Off is disabled when this product is connected to a wall outlet power supply, to a a printer’s wireless or
Wi-Fi Direct capability is turned on or when a printer with fax, USB, or Ethernet network capability establishes a
fax, USB, or Ethernet network connection.
•
Tip: To conserve power bank power, you can enable Auto-Off, even when the printer is connected or wireless is turned
on.
Power cord instructions
Make sure your power source is adequate for the product voltage rating. The voltage rating is on the product label. The
product uses either 100-240 V AC or 200-240 V AC and 50/60 Hz.
CAUTION: To prevent damage to the product, use only the power cord that is provided with the product.
• Power Consumption
•
• Sleep Mode
Auto-Off
Environmental Product Stewardship Program
For regulatory, environmental, and safety notices, refer to the included sheet in your product packaging and the
following statements. This section contains the follow topics:
Additional ENERGY STAR certied imaging product model information is listed at: http://www.hp.com/go/energystar.
HP printing and imaging equipment marked with the ENERGY STAR® logo is certied by the U.S. Environmental
Protection Agency. The following mark will appear on ENERGY STAR certied imaging products:
This feature turns the printer off after 2 hours of inactivity to help reduce energy use, only when connected to the
HP Sprocket Studio Power Bank. Auto-Off turns the printer off completely, so you must use the Power button to turn
the printer back on. If your printer supports this energy saving feature, Auto-Off is automatically enabled or disabled
depending on printer capabilities and connection options. Even when Auto-Off is disabled, the printer enters Sleep
mode after 10, 5, or 3 minutes of inactivity to help reduce energy use (set in the Sprocket app). By default, Auto-off is
disabled when connected to a wall outlet power supply.

12
Apple, iPad, iPad Air, iPad Pro, iPod touch, iPad mini, and iPhone are trademarks of Apple Inc., registered in the U.S. and other
countries.
Get in Touch:
www.sprocketprinters.com/pages/support
HP Inc., 1501 Page Mill Road, Palo Alto, CA 94304 © Copyright 2021 HP Development Company, L.P. All Rights Reserved.
Made in Vietnam.
All other products, brand names, company names, and logos are trademarks of their respective owners, used merely to identify
their respective products, and are not meant to connote any sponsorship, endorsement, or approval.
HP and Sprocket are owned by HP Inc. or its affiliates.
Manufactured and distributed by C&A Marketing, Inc. under license from HP Inc.
App Store is a service mark of Apple Inc. Android and Google Play are trademarks of Google Inc. Google and Google Logo are
registered trademarks of Google Inc.
Sleep mode
When an HP Sprocket Studio printer is connected to a wall outlet, the printer will not automatically power off, it will
enter Sleep mode. Power usage is reduced while in Sleep mode. After setup, the printer will enter Sleep mode within
5 minutes of inactivity. Using the Sprocket app, change the default time to enter Sleep Mode in Printer Settings (Always
On, 3 minutes, 5 minutes, or 10 minutes).
If the printer is connected to the power bank accessory, the app will show an “Auto-off” time setting instead of Sleep
mode.
1 Program availability varies. For details, see www.hp.com/recycle.