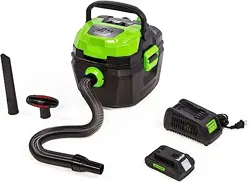
24V CORDLESS WET / DRY SHOP VACUUM
Read all safety rules and instructions carefully before operating this tool.
Owner’s Manual
TOLL-FREE HELPLINE: 1-888-90WORKS (888.909.6757)
www.GreenWorksTools.com
BVU24211

2
CONTENTS
Contents .............................................................................................................................. 2
Product Specications ........................................................................................................ 2
Safety Instructions ............................................................................................................... 3
Symbols ............................................................................................................................... 6
Know Your Vacuum Cleaner ................................................................................................ 8
Assembly ........................................................................................................................... 10
Operation ........................................................................................................................... 16
Maintenance........................................................................................................................... 21
Environmentally Safe Battery Disposal .................................................................................23
Troubleshooting..................................................................................................................24
Limited Warranty................................................................................................................25
Exploded View and Part List .................................. ..............................................................26
PRODUCT SPECIFICATIONS
24V CORDLESS WET / DRY SHOP VACUUM
Tank size .................................................................................................. 11L(3 U.S. gallons)
Max air ow ................................................................................................................38 CFM
Suction power ..............................................................................................................40 W
Hose ...................................................................................................... 1.25 inch *25.2 inch
Power ........................................................................................................................DC 24V
Tank ................................................................................................................Polypropylene
Max suction (sealed pressure)......................................................................28 Inches water lift
Weight (without battery) ............................................................................3.9 kg/ 8.6 lbs.
Weight (with 2Ah battery) .............................................................................. 4.4 kg / 9.6 lbs.
Run time (with 2Ah battery) ..................................................................................15 minutes
TOOL
YEARS
WARRANTY

3
SAFETY INSTRUCTIONS
WARNING
READ AND UNDERSTAND ALL INSTRUCTIONS BEFORE USING THIS PRODUCT.
Failure to
follow all instructions listed below may result in electric shock, re, and/or serious personal injury.
• Use only identical manufacturer’s replacement parts and accessories. Use of any other parts
may create a hazard or cause product damage.
• Always wear safety glasses with side shields marked to comply with ANSI Z87.1. Everyday
glasses have only impact resistant lenses. They are NOT safety glasses. Following this rule
will reduce the risk of eye injury. Use face mask if operating in dusty work spaces.
• Do not use in rain.
• Keep all bystanders, children, and pets at least 50 ft. away.
• Do not use the appliance for any job except that for which it is intended.
• Avoid Unintentional Starting – Do not carry appliance with ngers on the switch. Be sure the
battery is removed while transporting.
• Do not operate the equipment while barefoot or when wearing sandals or similar lightweight
footwear. Wear protective footwear that will protect your feet and improve your footing on
slippery surfaces.
• Don’t overreach - Keep proper footing and balance at all times.
• Stay alert - Watch what you are doing. Use common sense. Do not operate this unit when you
are tired, ill or under the inuence of alcohol, drugs or medication.
• Always store idle appliance indoors - When not in use, appliance should be stored indoors in
a dry place, out of reach of children.
• Check Damaged Parts – Before further use of the appliance, a guard or other part that is
damaged should be carefully checked to determine that it will operate properly and perform its
intended function. Check for alignment of moving parts, binding of moving parts, breakage of
parts, damaged mountings, and any other condition that may affect its operation. A guard or
other part that is damaged should be properly repaired or replaced by an authorized service
center unless indicated elsewhere in this manual.
• Remove or disconnect battery before servicing, cleaning or removing material from the
appliance.
• Do not run the wet/dry vacuum unattended.
• Do not vacuum, or use this wet/dry vacuum near liquids, gases, or explosive vapours like
gasoline or similar fuels, lighter uid, cleaners, oil-based paints, natural gas or hydrogen.
• Do not vacuum or use this wet/dry vacuum near explosive dusts like coal dust, magnesium
dust, grain dust, or gunpowder as sparks inside the motor can ignite ammable vapours or
dust.
• Do not vacuum burning or smoking items such as cigarettes, matches, or hot ashes.
• Do not expose to rain. Store indoors.
• Do not handle the battery or the wet/dry vacuum with wet hands.
• To reduce the risk of health hazards from vapours or dust, do not vacuum toxic materials.
• Do not use or store near hazardous materials.

4
SAFETY INSTRUCTIONS
• Do not use this wet/dry vacuum with a torn lter or without installing the lter except when
vacuuming liquids as described in the operation section of this manual.
• Do not use the wet/dry vacuum as a toy. Pay particularly close attention when it is being used
by or near children.
• Turn off the wet/dry vacuum before inserting the battery. Turn off switch before removing
battery pack.
• Do not put any objects into the ventilation openings. Do not vacuum with any ventilation
openings blocked.
• Keep free of dust, lint, hair or any other items that may reduce the air ow.
• Keep hair, loose clothing, ngers, and all body parts away from opening and moving parts.
• To reduce the risk of falling, use extra care when cleaning on stairs.
• Do not use to pick up ammable or combustible liquids, such as gasoline, or use in areas
where they may be present.
• Always install oat before any wet pick up operation
When using as blower :
• Direct air discharge only at work area.
• Do not use wet/dry vacuum as a sprayer.
• Do not direct air at bystanders.
• Keep children away when blowing.
• Wear safety goggles.
• Use this wet/dry vacuum only as described in this manual.
• Observe the warnings that appear on the motor housing of this wet/dry vacuum.
WARNING
For your own safety, read and understand this instruduction manual. Do not operate unattended.
Do not use this wet /dry vacuum to pick up hot ashes, coals, toxic, fammable or other hazardous
materials. Do not use near explosive liquids or vapours.
• For household use only.
• To reduce the risk of electric shock, remove the battery pack before cleaning or servicing.
• Do not use without lters in place.
• Do not dispose of the batteries in a re. The cells may explode. Check with local codes for
possible special disposal instructions.
• Do not open or mutilate the batteries. Released electrolyte is corrosive and may cause
damage to the eyes or skin. It may be toxic if swallowed.
• Exercise care in handling batteries in order not to short the battery with conducting materials
such as rings, bracelets, and keys. The battery or conductor may overheat and cause burns.
• Dress Properly – Do not wear loose clothing or jewelry. They can be caught in moving parts.
Use of rubber gloves and substantial footwear is recommended when working outdoors. Wear
protective hair covering to contain long hair.

5
SAFETY INSTRUCTIONS
• Do not add unnecessary force to your appliance – It will do the job better and with less
likelihood of a risk of injury at the rate for which it was designed.
• Recharge only with the charger specied by the manufacturer. A charger that is suitable for
one type of battery pack may create a risk of re when used with another battery pack.
• For use only with batteries LB24A210 (2 amp-hour)
/
2902702 (4 amp-hour). For use only with
charger 2903102.
• When battery pack is not in use, keep it away from other metal objects, like paper clips, coins,
keys, nails, screws or other small metal objects, that can make a connection from one terminal
to another. Shorting the battery terminals together may cause a re.
• Under abusive conditions, liquid may be ejected from the battery; avoid contact. If contact
accidentally occurs, ush with water. If liquid contacts eyes, additionally seek medical help.
Liquid ejected from the battery may cause irritation or burns.
• Do not use a battery pack or appliance that is damaged or modied. Damaged or modied
batteries may exhibit unpredictable behavior resulting in re, explosion or risk of injury.
• Do not expose a battery pack or appliance to re or excessive temperature. Exposure to re
or temperature above 265°F (130°C) may cause explosion.
WARNING(PROPOSITION 65)
This product contains a chemical known to the state of California to cause cancer, birth defects or
other reproductive harm.
Some dust created by power sanding, sawing, grinding, drilling, and other construction activities
contains chemicals known to cause cancer, birth defects or other reproductive harm. Some
examples of these chemicals are:
• Lead from lead-based paints
• Crystalline silica from bricks and cement and other masonry products, and
• Arsenic and chromium from chemically treated lumber.
Your risk of exposure to these chemicals varies depending on how often you do this type of
work. To reduce your exposure to these chemicals, work in a well-ventilated area, and work with
approved safety equipment, such as dust masks that are specially designed to lter out microscopic
particles.
SAVE THESE INSTRUCTIONS
6
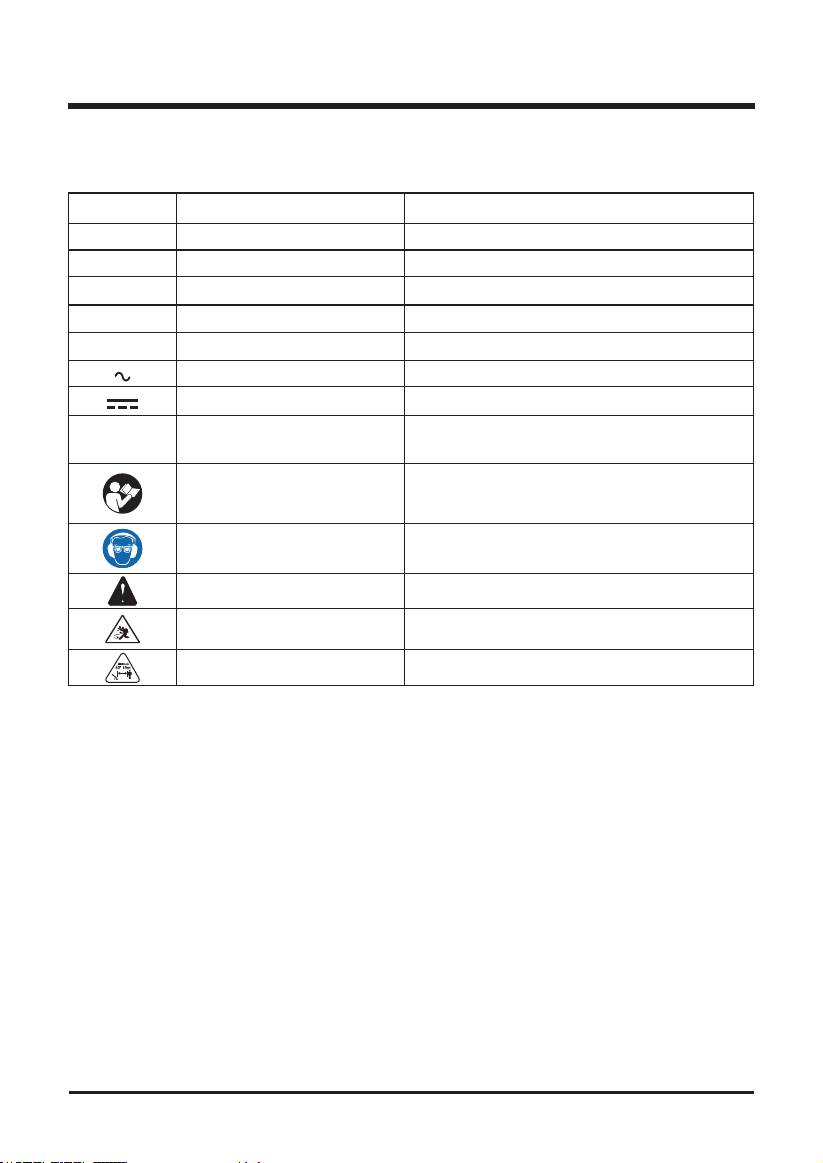
Some of the following symbols may be used on this product. Please study them and learn their
meaning. Proper interpretation of these symbols will allow you to operate the product better and safer.
SYMBOL NAME DESIGNATION/EXPLANATION
V Volts Voltage
A Amperes Current
Hz Hertz Frequency (cycles per second)
W Watts Power
min Minutes Time
Alternating current Type of current
Direct current Type or a characteristic of current
/min Per Minute
Revolutions, strokes, surface speed, orbits
etc., per minute.
Read the operator’s manual
To reduce the risk of injury user must read and
understand operator’s manual before using
this product.
Eyes and ears protection Wear eyes protection and ears protection.
Safety alert Precautions that involve your safety.
Ricochet
Thrown objects can ricochet and result in
personal injury or property damage.
Keep bystanders away Keep all bystanders at least 50 ft. away.
SYMBOLS
7
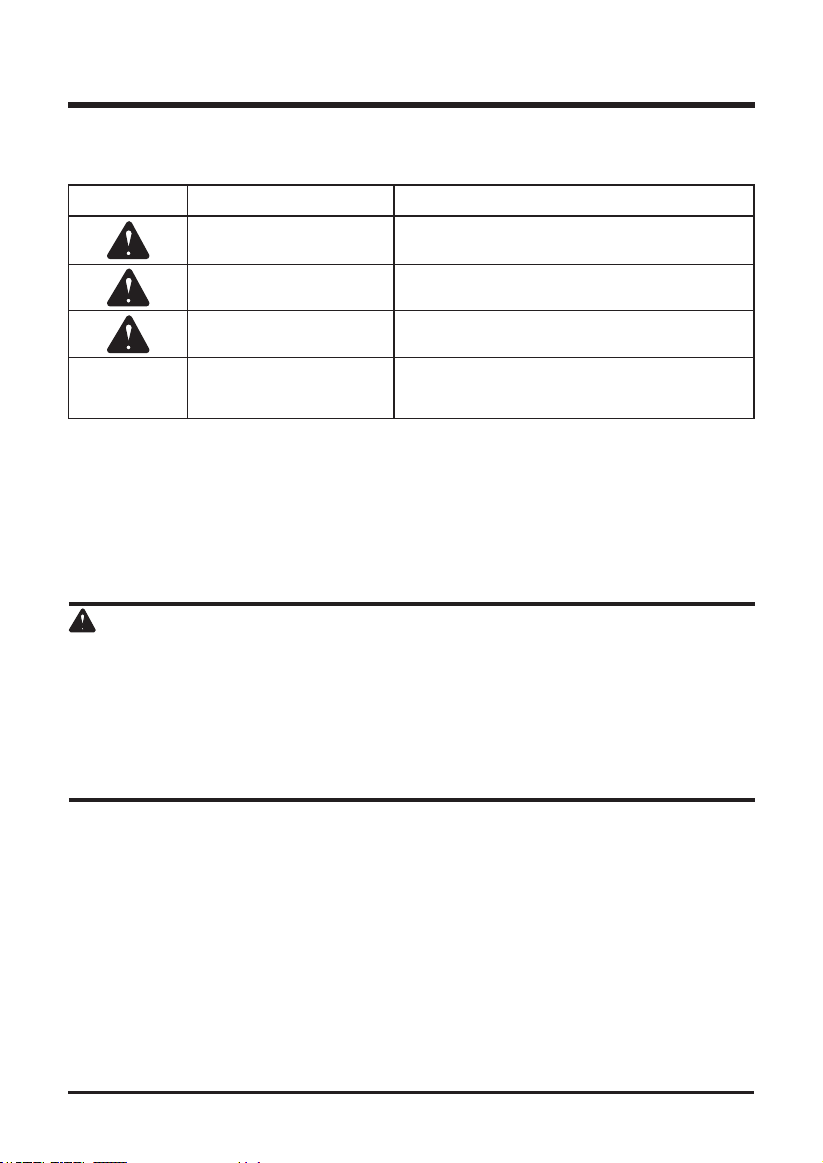
The following signal words and meanings are intended to explain the levels of risk associated
with this product.
SERVICE
Servicing requires extreme care and knowledge and should be performed only by a qualified
service technician. For service we suggest you return the product to your nearest
AUTHORIZED
SERVICE CENTER
for repair. Use only identical manufacturer’s replacement parts and
accessories.
WARNING
To avoid serious personal injury, do not attempt to use this product until you have read this Owner's
Manual thoroughly and understand it completely. If you do not understand the warnings and
instructions in this Owner's Manual, do not use this product. Call the Toll-free Helpline (1-888-909-
6757) for assistance. The operation of any appliance can result in foreign objects being thrown into
your eyes, which can result in severe eye damage. Before operating an appliance, always wear
safety goggles, safety glasses with side shields, or a full face shield when needed. We recommend
a Wide Vision Safety Mask for use over eyeglasses or standard safety glasses with side shields.
Always use eye protection that is marked to comply with ANSI Z87.1.
SYMBOLS
SAVE THESE INSTRUCTIONS
SYMBOL SIGNAL MEANING
DANGER
Indicates an imminently hazardous situation, which,
if not avoided, will result in death or serious injury.
WARNING
Indicates a potentially hazardous situation, which, if
not avoided, could result in death or serious injury.
CAUTION
Indicates a potentially hazardous situation, which, if
not avoided, may result in minor or moderate injury.
CAUTION
(Without Safety Alert Symbol) Indicates a situation
that may result in property damage.
8
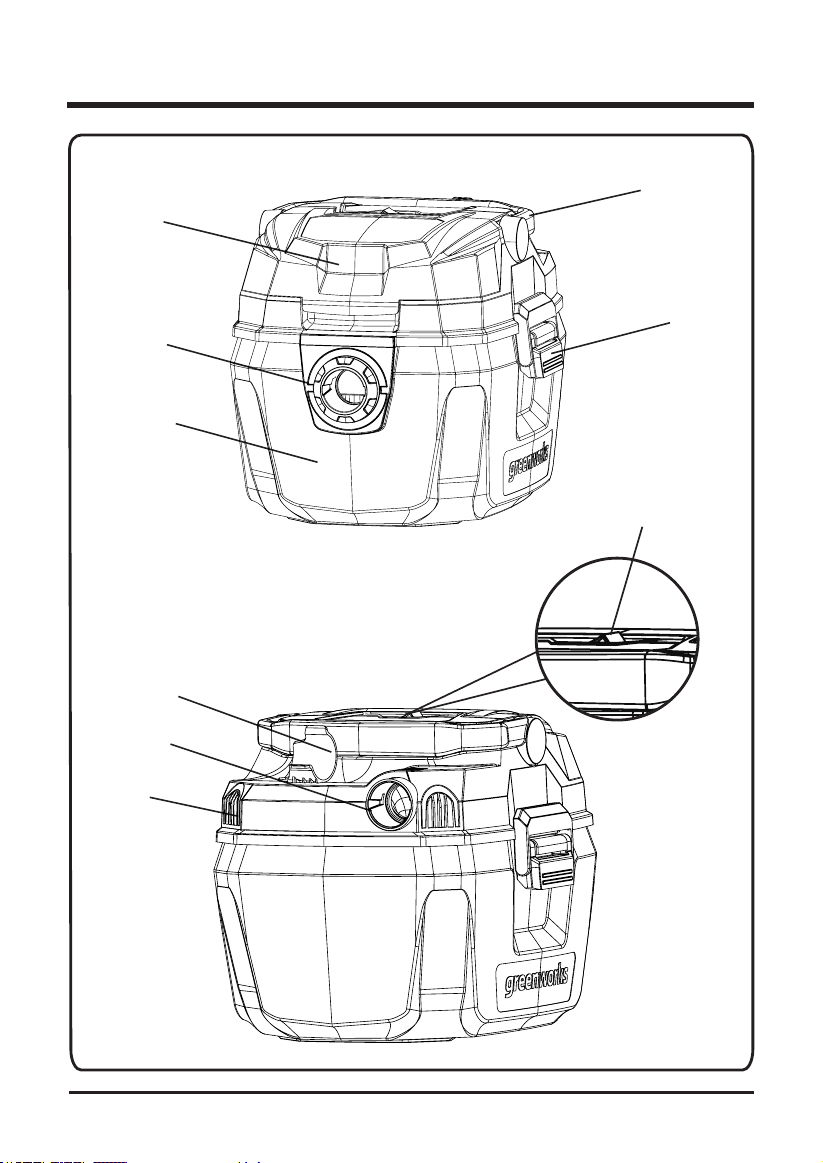
KNOW YOUR VACUUM CLEANER
Fig. 1
HANDLE
BATTERY
DOOR
LATCH
VACUUM PORT
COLLECTION TANK
HOSE
STORAGE
BLOWING PORT
ACCESSORY
HOLDER
ON / OFF
BUTTON

9
KNOW YOUR VACUUM CLEANER (See Figure 1.)
The safe use of this product requires an understanding of the information on the product and in
this operator’s manual as well as a knowledge of the project you are attempting. Before use of this
product, familiarize yourself with all operating features and safety rules.
1. HANDLE
The vacuum cleaner is equipped with an handle for ease of moving.
2. BATTERY DOOR
The battery door and protects the batteries from dust, debris and water.
3. LATCH
The latchs fasten the collection tank to the top cover assembly.
4. VACUUM PORT
Connect the port to
the hose for vacuuming.
5. COLLECTION TANK
Use collection tank to collect the garbage.
6. HOSE STORAGE
This vacuum cleaner is equipped with a hose.
7. BLOWING PORT
Connect the port to
the hose for blowing dust and bebris.
8. ACCESSORY STOAGE
Attach the accessory to the built in storage area.
9. ON/OFF BUTTON
Press this power button to turn on/off the vacuum cleaner.
KNOW YOUR VACUUM CLEANER
10
ASSEM B LY
WARNING
Do not use this product if any parts on the packing list are already assembled to your product when
you unpack it. Parts on this list are not assembled to the product by the manufacturer and require
customer installation. Use of a product that may have been improperly assembled could result in
serious personal injury.
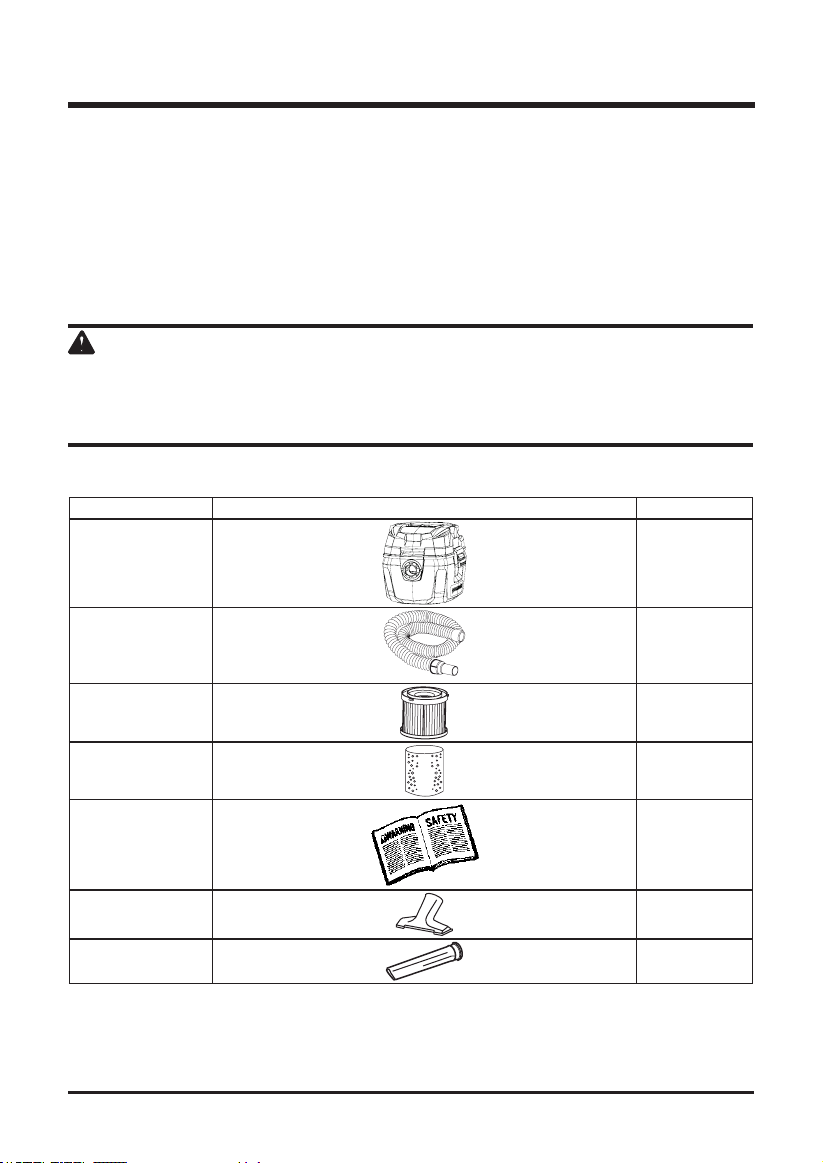
PACKING LIST
UNPACKING
This product requires assembly.
• Carefully remove the product and any accessories from the box. Make sure that all items
listed in the packing list are included.
• Inspect the tool carefully to make sure no breakage or damage occurred during shipping.
• Do not discard the packing material until you have carefully inspected and satisfactorily
operated the tool.
• If any parts are damaged or missing, please call 1-888-90WORKS (888.909.6757).
Part Name Figure Qty
Vacuum Cleaner
1
Hose
1
Cartridge Filter
1
Foam Filter
1
Owner’s Manual
1
Utility Nozzle
1
Crevice Tool
1
* The lter may come preassembled to the power head.
11
ASSEM B LY
WARNING
If any parts are damaged or missing, do not operate this product until the parts are replaced. Use
of this product with damaged or missing parts could result in serious personal injury.
WARNING
Do not attempt to modify this product or create accessories not recommended for use with this
vacuum cleaner. Any such alteration or modification is misuse and could result in a hazardous
condition leading to possible serious personal injury.
WARNING
Do not use the cartridge lter for liquid vacuuming. For wet vacuum cleaning, install the supplied
foam lter.
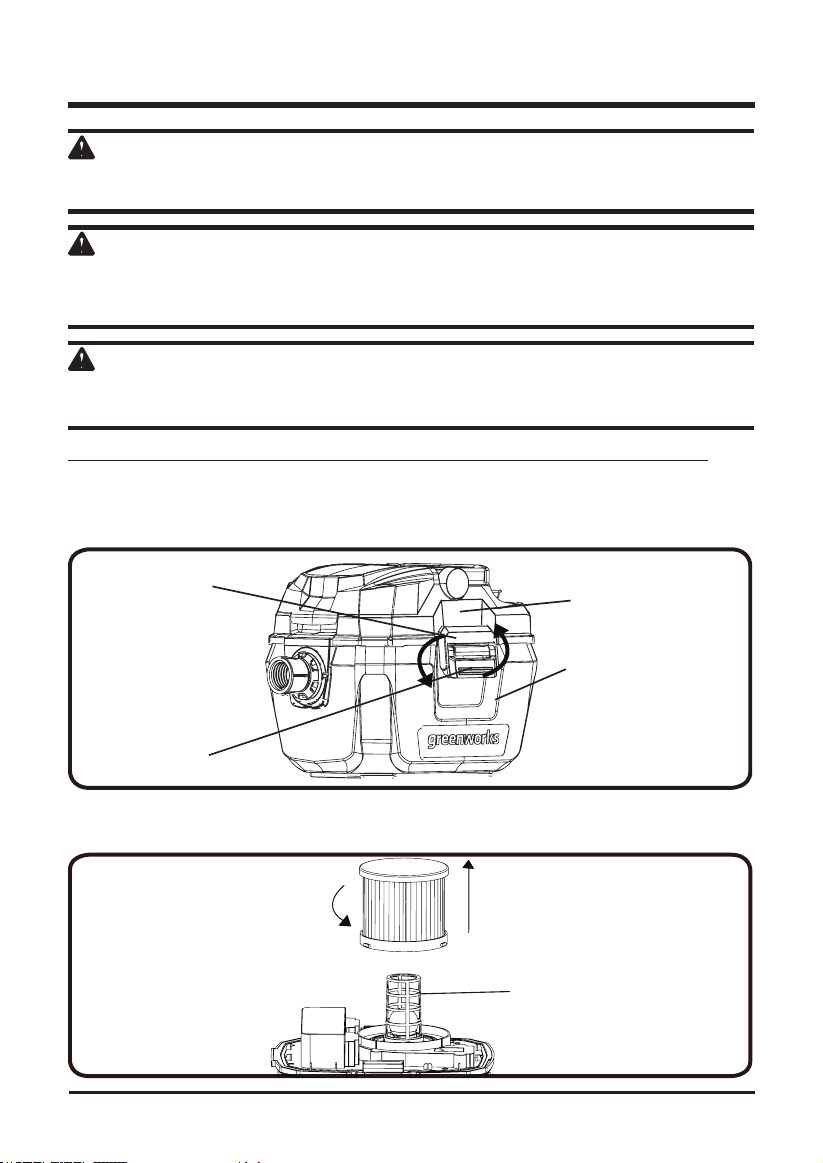
FILTER REMOVAL AND INSTALLATION
(See
Figure 2
)
NOTE: To avoid damage to the blower wheel and motor, always reinstall the lter before using the vac.
Cartridge lter Removal:
1. Lift the lower latch then pull down the upper latch to disconnect the top cover assembly
from bottom tank.
Fig. 2.1
LOWER LATCH
COLLECTION TANK
UPPER LATCH
TOP COVER
ASSEMBLY
2. Turn the top cover assembly upside down while holding the cartridge lter.
3. Turn the cartridge lter counterclockwise. This action will cause the lter to release from
the lter cage. Slide lter off cage.
Fig. 2.2
FILTER CAGE
12
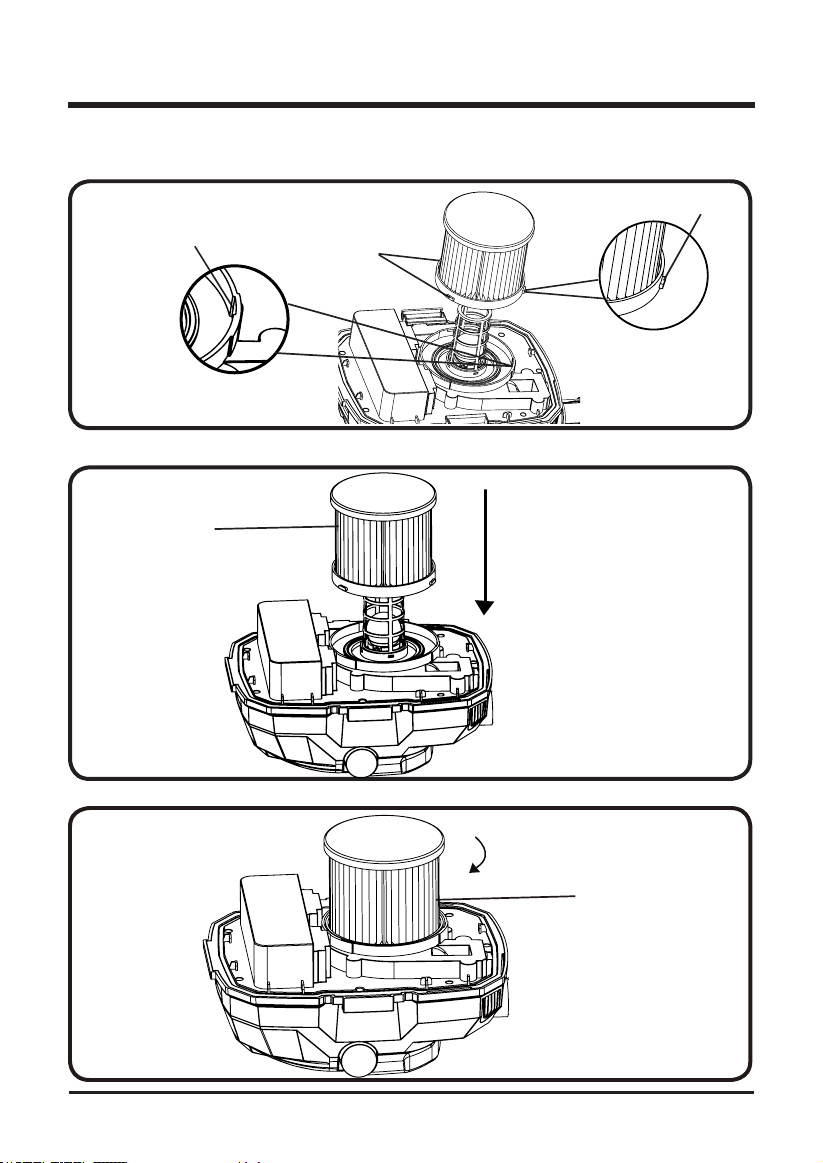
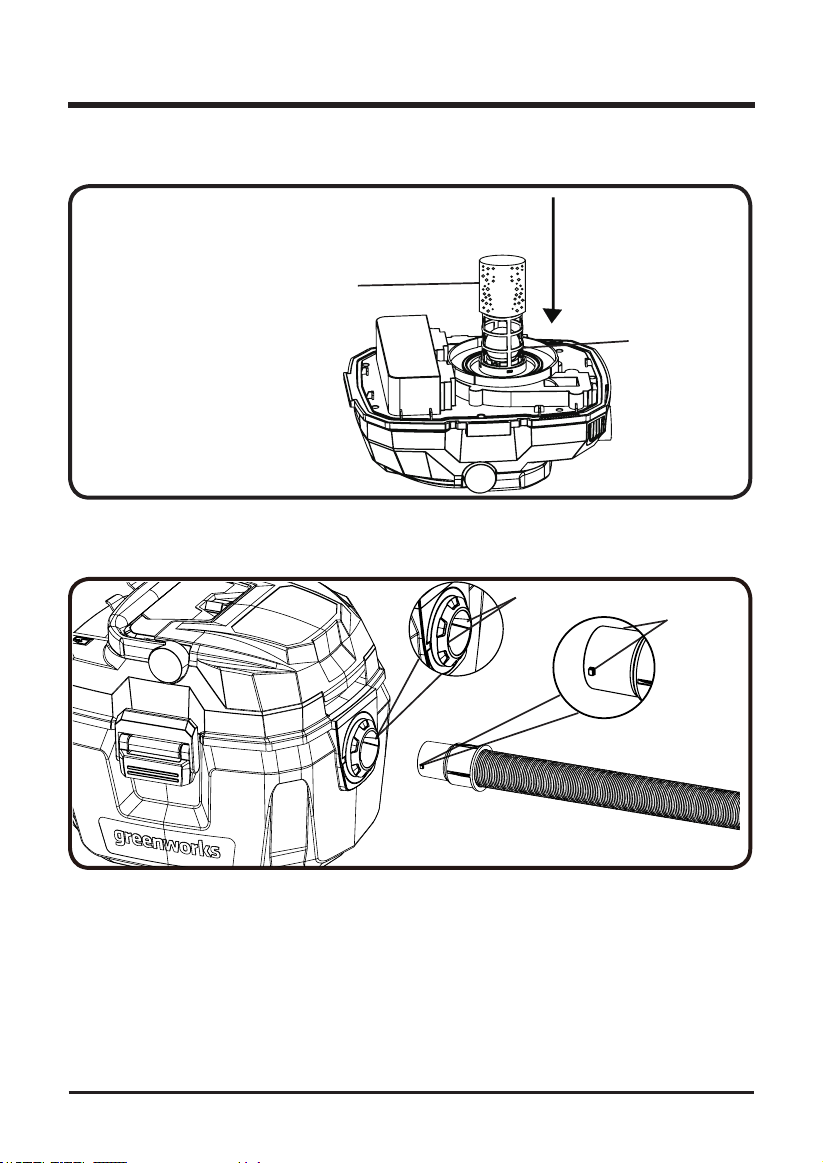
Cartridge lter Installation:
1. Align the grooves on the cartridge lter with the raised points on the housing.
GROOVE
Fig. 2.3
RAISED POINT
RAISED POINT
2. Carefully slide the cartridge lter over the lter cage.
CARTRIDGE
FILTER
Fig. 2.4
3. Turn the cartridge lter clockwise. The lter is now attached.
Fig. 2.5
CARTRIDGE
FILTER
ASSEM B LY
13
ASSEM B LY
Foam lter removal and installation:
1. Remove the cartridge lter and install a foam lter over the lter cage.
FOAM FILTER
Fig. 2.6
FILTER CAGE
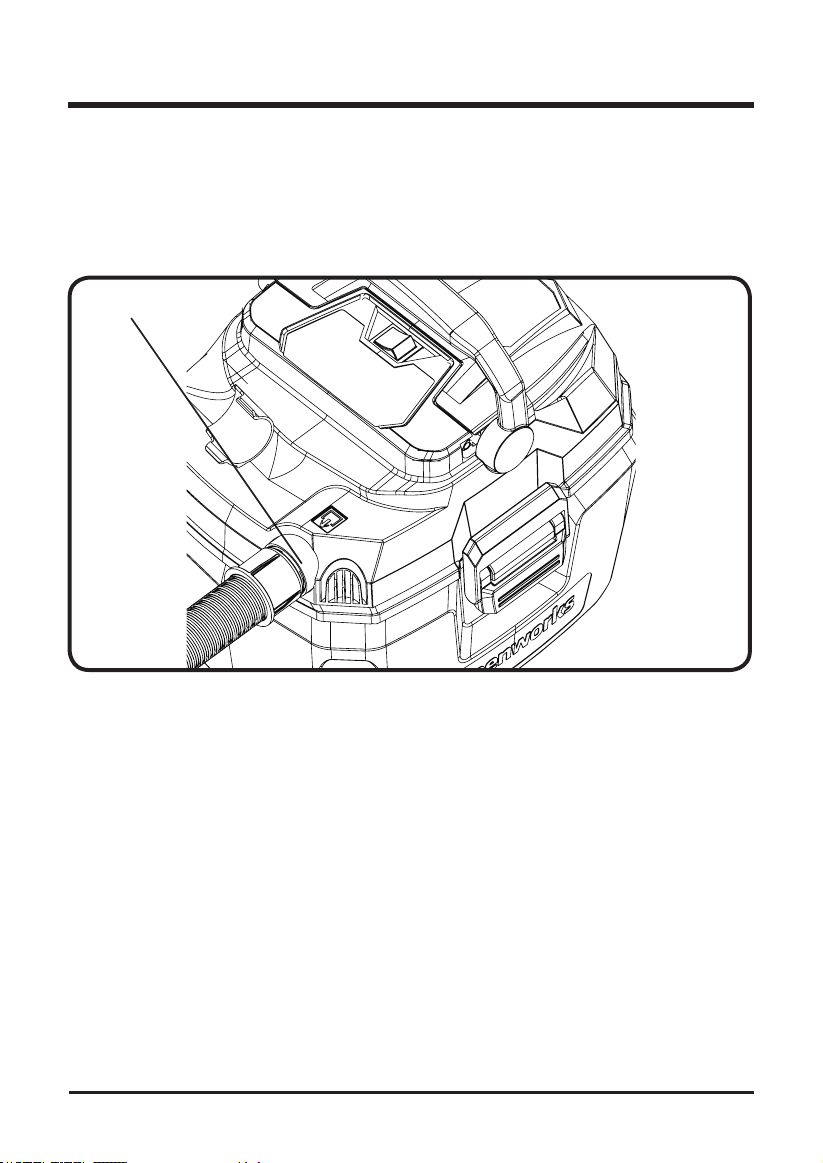
INSERTING THE HOSE
(See
Figure 3
)
1. Align either of the grooves in the tube with the tabs on the hose.
Fig. 3.1
GROOVES
TABS
14
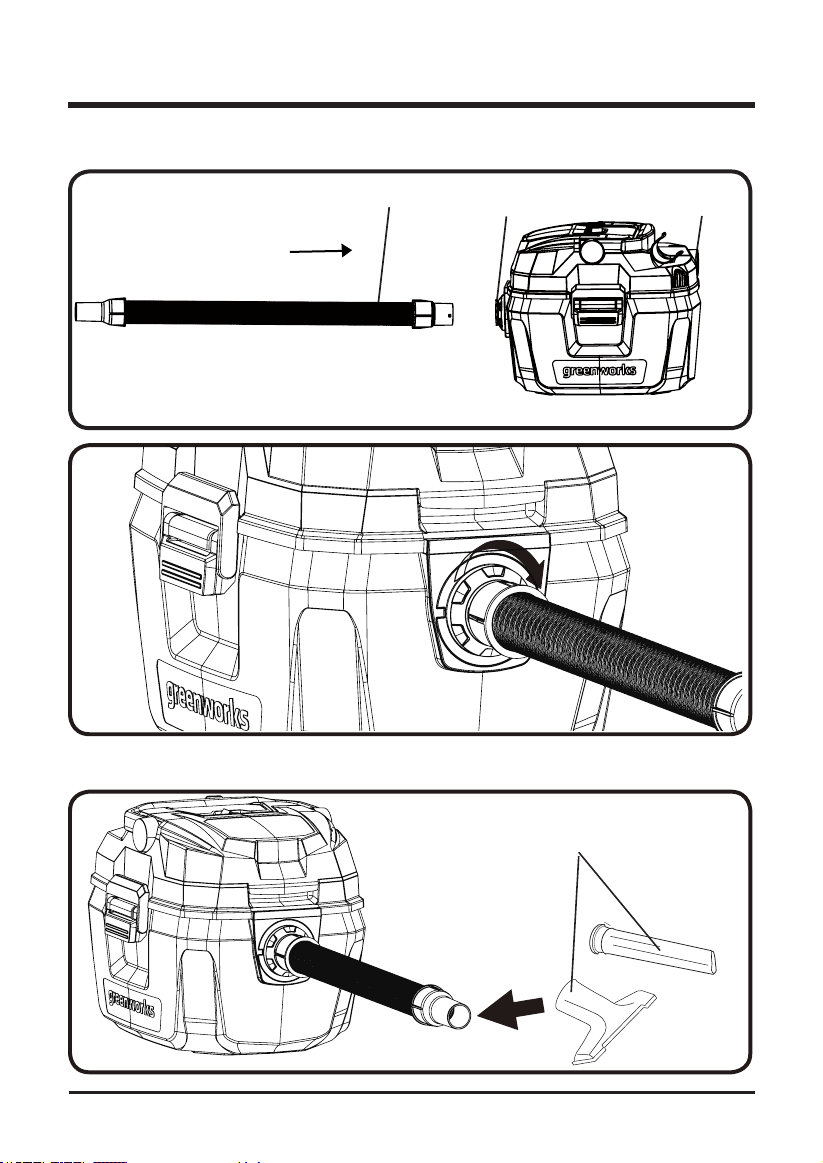
ASSEM B LY
2. Insert the locking end of the hose into the port on the collection tank and turn clockwise to
lock into place.
HOSE
VACUUM PORT
BLOWING PORT
Fig. 3.2
Fig. 3.3
3. Choose the desired accessory and insert onto the end of the hose securely. Now the
vacuum is ready for use.
ACCESSORIES
Fig. 3.4
15
OPERATION
WARNING
Do not allow familiarity with this product to make you careless. Remember that a careless fraction
of a second is sufcient to inict serious injury.
WARNING
Do not use any attachments or accessories not recommended by the manufacturer of this product.
The use of attachments or accessories not recommended can result in serious personal injury.
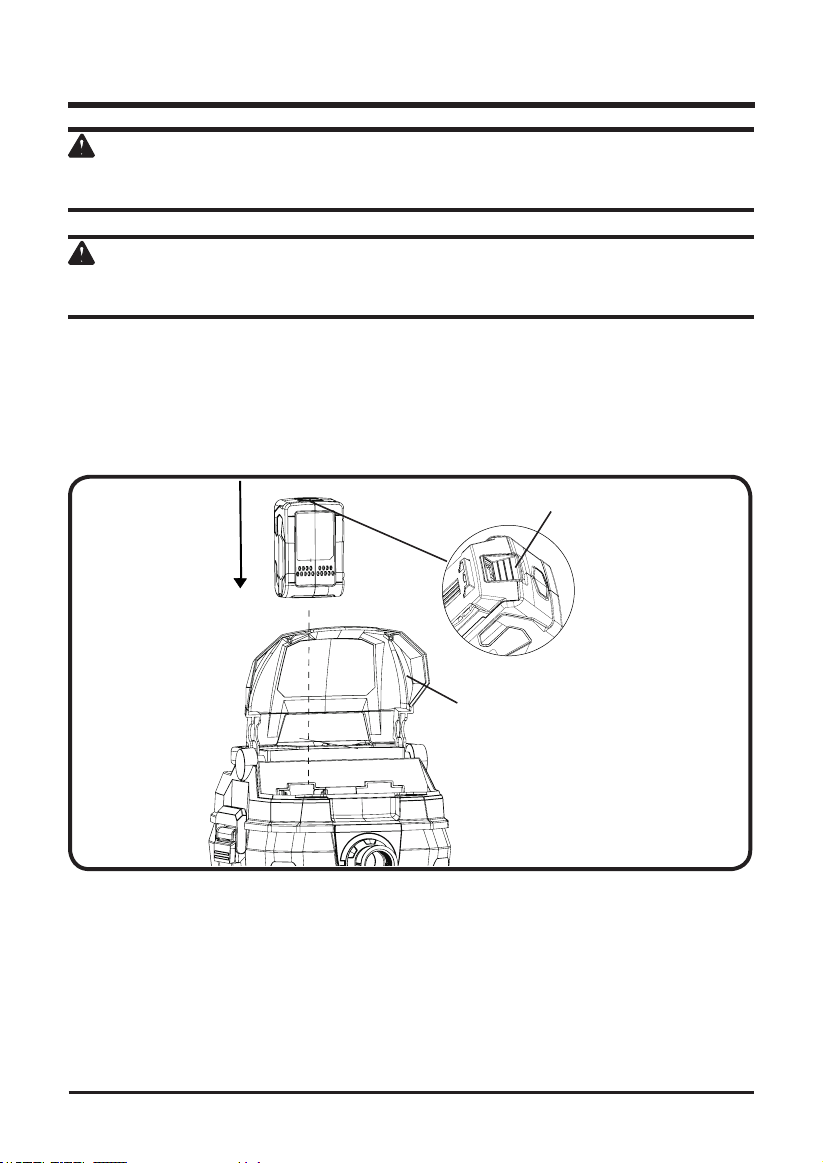
INSTALLING THE BATTERY PACK (See Figure 4.)
1. Open the battery door.
2. Align the battery with the cavity on the top cover.
3. Hold the unit.
4. Insert the battery in the opening until the battery release button locks into place. You
should hear a “click” once it is installed.
BATTERY RELEASE
BUTTON
BATTERY
DOOR
Fig. 4.1

16
OPERATION
5. For better performance, inserting two batteries at the same time is recommended (second
battery not included).
BATTERY
Fig. 4.2
REMOVING THE BATTERY PACK (See Figure 5.)
Note: The battery ts into the unit snugly in order to prevent accidental dislodging. It may require a strong pull
to remove it.
1. Open the battery door.
2. Press the battery release button. This will cause the battery to raise out of the tool.
3. Hold the unit. Pull the battery pack out of the vacuum cleaner.
BATTERY RELEASE
BUTTON
BATTERY
DOOR
Fig. 5
17
WARNING
Before starting please read, understand and apply the safety instructions.
WARNING
Do not handle battery pack, switch, or vacuum cleaner with wet hands. Do not expose to rain or
allow liquid to enter the motor compartment.
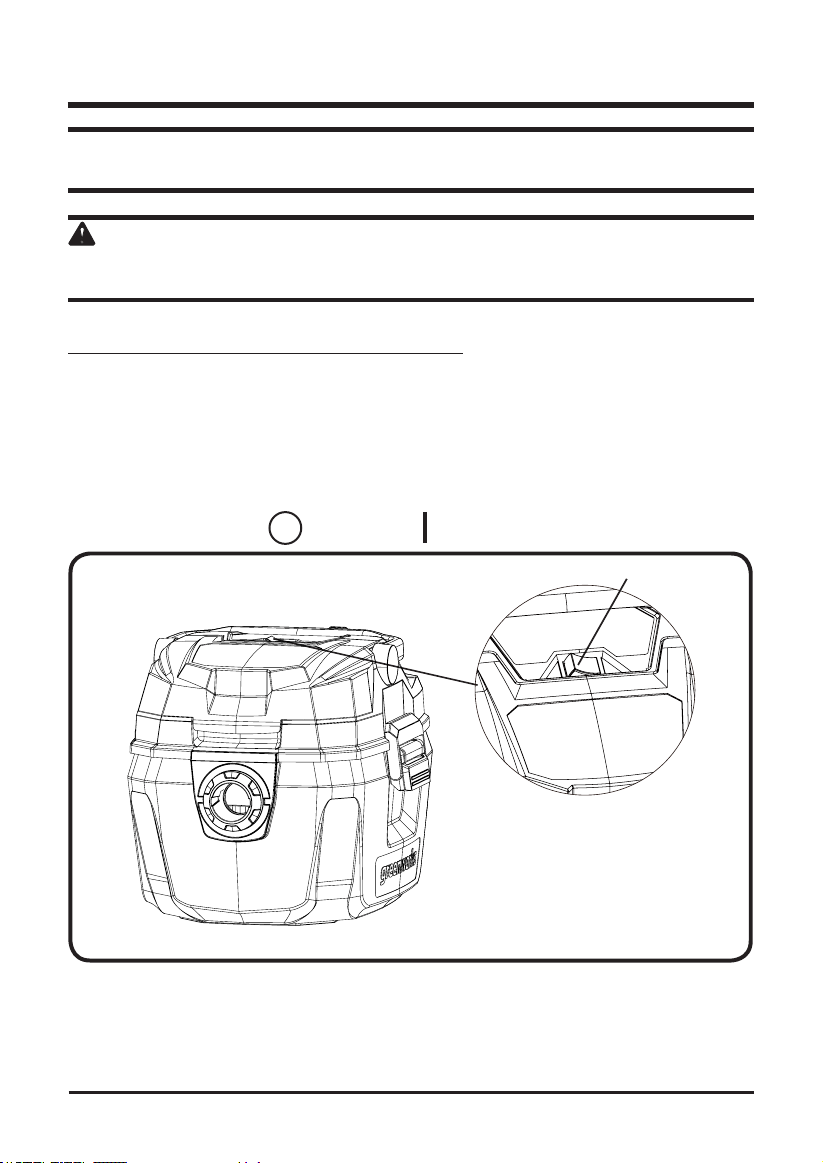
STARTING AND STOPPING THE VACUUM CLEANER
(See
Figure 6.
)
NOTE: Please restart the vac after completely stop ( about 5s).
1. Insert the battery pack.
2. Insert the locking end of the hose into the port on the collection tank and turn to lock into
place.
3. Choose the desired nozzle and insert onto the end of the hose.
4. Turn the unit on by pushing the switch from position "O" to position "l".
5. The symbols used on the switch actuator are international "On & Off" symbols:
=
OFF
=
ON
OPERATION
ON/OFF BUTTON
Fig. 6
18
OPERATION
EMPTYING THE COLLECTION TANK
(See
Figure 7.
)
1. Unlock the latches.
2. Lift the top cover assembly up and away from the collection tank.
3. Dump the collection tank contents into the proper waste disposal container.
LATCH
Fig. 7
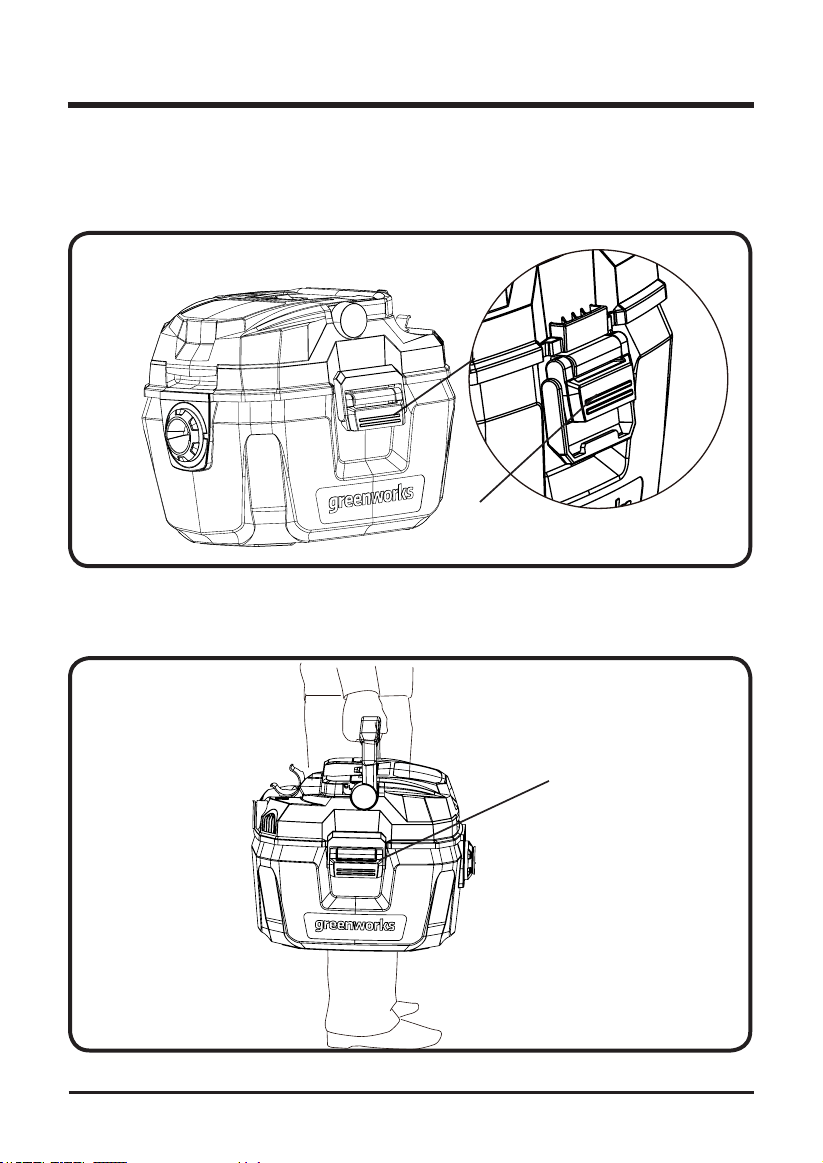
MOVING THE VACUUM CLEANER
(See
Figure 8.
)
1. Should it become necessary to pick the vacuum up to move it, do not pick the vacuum up
by the latch handle
.
Fig. 8
LATCH
19
OPERATION
BLOWING FEATURE
(See
Figure 9.
)
It can blow sawdust and other debris. Follow the steps below to use your vac as a blower.
1. Locate blowing port of your wet/dry vac.
2. Insert the larger end of hose into the blowing port of the vacuum.
3. Attach extension wand
( not included )
to swivel end of hose.
4. Turn vacuum on and you are ready to use your vacuum as a blower.
BLOWING PORT
Fig. 10
VACUUMING TIPS
1. The lter must always be in correct position at all times to avoid leaks and possible damage
to vac.
2. When using your vac to pick up ne dust, it will be necessary for you to empty the
collection tank and clean the lter at more frequent intervals to maintain peak vac
performance.
3. When the liquid in the collection tank reaches a predetermined level, the oat mechanism
will rise automatically to cut off air-ow. You will know that the oat has risen because
suction stops and the motor noise will become higher in pitch, due to increased motor
speed.When this happens, turn off the vac, remove the battery pack, and empty the
collection tank.
4. After using the vac to pick up liquids, the lter must be dried to avoid possible mildew and
damage to the lter.

20
MAINTENANCE
GENERAL MAINTENANCE
Before each use, inspect the entire product for damaged, missing, or loose parts such as screws,
nuts, bolts, caps, etc. Tighten securely all fasteners and caps and do not operate this product
until all missing or damaged parts are replaced
.
Avoid using solvents when cleaning plastic parts. Most plastics are susceptible to damage from
various types of commercial solvents and may be damaged by their use. Use clean cloths to
remove dirt, dust, lubricant, grease, etc.
Always store the machine clean and in a dry enclosure with the battery charged.
FILTER CLE ANING
Your lter should be cleaned often to maintain peak vac performance. Allow the lter to dry
before storing or picking up debris.
IMPORTANT:
After cleaning, check the cartridge lter for tears or small holes. Do not use a
cartridge lter with holes or tears in it. Even a small hole can allow dust to come out of your vac.
Replace it immediately.
CLEANING A DRY FILTER
1. Some removal of dry debris can be accomplished without removing the lter from the vac.
Slap your hand on top of the lid while the vac is turned off.
2. For best cleaning results due to accumulated dust, clean the lter in an open area.
Cleaning SHOULD be done outdoors and not in the living quarters.
3. After lter removal from vac, remove the dry debris by gently tapping lter against the
inside wall of your dust collection tank. The debris will loosen and fall.
4. For thorough cleaning of dry lter with ne dust (no debris), run water through it as
described under "Cleaning A Wet Filter"
CLEANING A WET FILTER
After lter is removed, run water through the lter from a hose or spigot. Take care that water
pressure from the hose is not strong enough to damage lter.
REPLACEMENT FILTER
ModeL #BVU24211 that ts at COSTCO or call customer service for information on compatible
lters.

21
CLEANING AND DISINFECTING THE VACUUM
To keep your wet/dry vac looking its best, clean the outside with a cloth dampened with warm
water and mild soap.
To clean the collection tank:
1. Dump debris out.
2. Wash collection tank thoroughly with warm water and mild soap.
3. Wipe out with dry cloth.
NOTE: Before prolonged storage or as needed (i.e.; waste water pick up) the collection tank should be disinfected.
To disinfect the collection tank:
1. Pour 1 gallon of water and 1 teaspoon chlorine bleach into the collection tank.
2. Let solution stand for 20 minutes, carefully swishing every few minutes, making sure to
wet all inside surfaces of the collection tank.
3. Empty collection tank after 20 minutes. Rinse with water until bleach smell is gone. Allow
collection tank to dry completely before sealing the motor on the collection tank.
MAINTENANCE
22
ENVIRONMENTALLY SAFE BATTERY DISPOSAL
The following toxic and corrosive materials are in the batteries used in this vacuum cleaner
battery pack:
Lithium-Ion, a toxic material
.
WARNING
All toxic materials must be disposed of in a specified manner to prevent contamination of the
environment. Before disposing of damaged or worn out Lithium-Ion battery packs, contact your
local waste disposal agency, or the local Environmental Protection Agency for information and
specific instructions. Take the batteries to a local recycling and/or disposal centre, certified for
lithium-ion disposal.
WARNING
If the battery pack cracks or breaks, with or without leaks, do not recharge it and do not use.
Dispose of it and replace with a new battery pack. DO NOT ATTEMPT TO REPAIR IT!
To avoid injury and risk of re, explosion, or electric shock, and to avoid damage to the
environment:
• Cover the battery's terminals with heavy-duty adhesive tape.
• DO NOT attempt to remove or destroy any of the battery pack components.
• DO NOT attempt to open the battery pack.
• If a leak develops, the released electrolytes are corrosive and toxic. DO NOT get the
solution in the eyes or on skin, and do not swallow it.
• DO NOT place these batteries in your regular household trash.
• DO NOT incinerate.
• DO NOT place them where they will become part of any waste landll or municipal solid
waste stream.
• Take them to a certied recycling or disposal centre.

23
TROUBLESHOOTING
Problem Cause Solution
Parts
accessories
missing
Packed in tank Check inside tank
Vacuum cleaner
will not start
Defective switch or defective
motor
Contact Customer Service
Dust
discharging
from exhaust
Filter not installed Properly install lter
Filter damaged Replace lter
Filter clogged or dust is too
ne
Use more efcient lter
Filter not functional Clean or replace lter
Loss of suction
Loose hose connection Tighten hose connection
Filter clogged Clean or replace lter
Full tank Empty tank
Hole in hose Replace hose
Static shock
Dry environment
Add moisture to air (if practical, use a console
or installed humidier)
Relative humidity of air is low
This situation is temporary and does not
affect the use of the vacuum cleaner

24
LIMITED WARRANTY
GREENWORKS hereby warranties this product, to the original purchaser with proof
of purchase, 4 year warranty against defects in materials, parts or workmanship.
GREENWORKS, at its own discretion will repair or replace any and all parts found to be
defective, through normal use, free of charge to the customer. This warranty is valid only for
units which have been used for personal use that have not been hired or rented for industrial/
commercial use, and that have been maintained in accordance with the instructions in the
owners’ manual supplied with the product from new.
ITEMS NOT COVERED BY WARRANTY:
1. Any part that has become inoperative due to misuse, abuse, neglect, accident, improper
maintenance, or alteration; or
2. The unit, if it has not been operated and/or maintained in accordance with the owner's
manual; or
3. Normal wear, except as noted below;
4. Routine maintenance items such as lubricants, blade sharpening;
5.
GREENWORKS HELPLINE (1-888-909-6757):
Warranty service is available by calling our toll-free helpline at (1-888-909-6757).
TRANSPORTATION CHARGES:
Transportation charges for the movement of any power equipment unit or attachment are the
responsibility of the purchaser. It is the purchaser’s responsibility to pay transportation charges
for any part submitted for replacement under this warranty unless such return is requested in
writing by GREENWORKS.
TOOL
YEARS
WARRANTY
USA address: Canadian address:
Greenworks Tools Greenworks Tools Canada Inc.
P.O. Box 1238 1110 Stellar Drive Unit 102
Mooresville, NC 28115 Newmarket, ON, L3Y 7B7
25
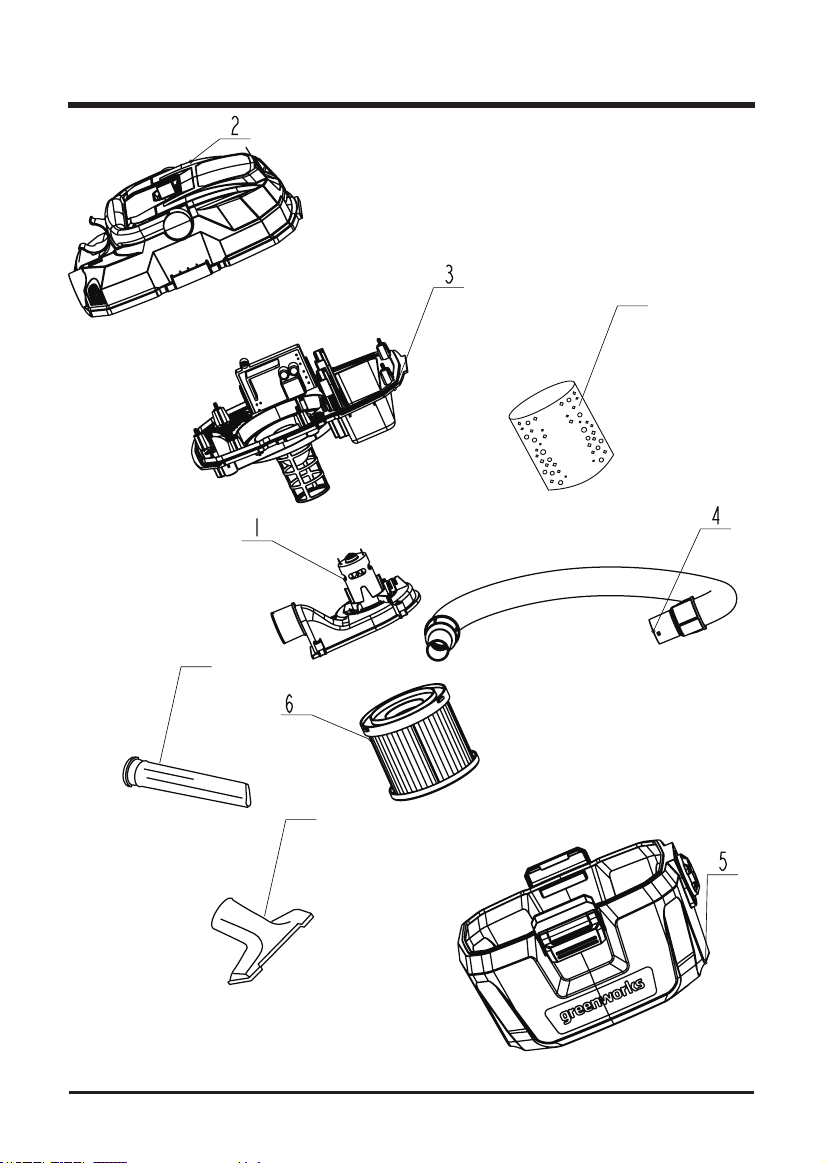
EXPLODED VIEW
7
8
9
26
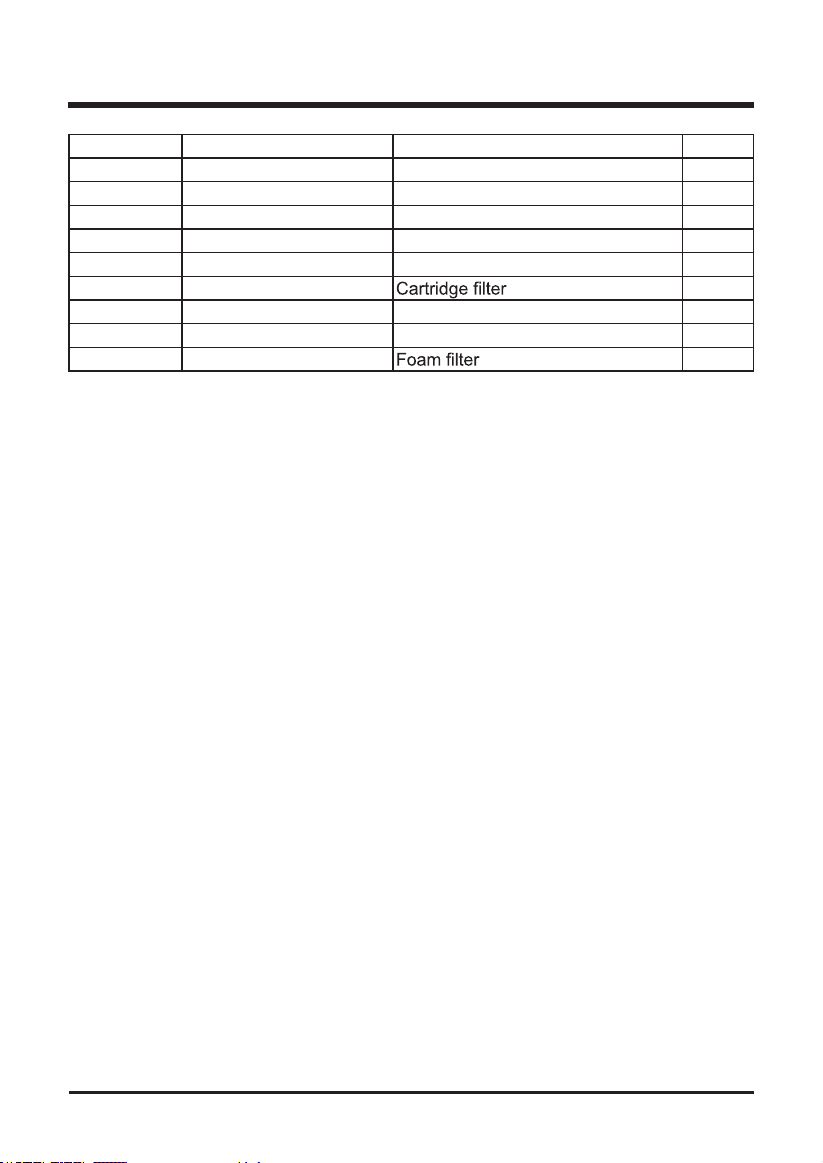
PARTS LIST
Item No. Part No. Description QTY
1 311051160 Blower assembly 1
2 311011160 Top cover assembly 1
3 311021160 Middle cover assembly 1
4 311061160 1.25'' Hose assembly 1
5 311031160 Collection tank assembly 1
6 311041160
1
7 341301160 Crevice tool 1
8 341311160 Utility nozzle 1
9 349101160
1
