

My home
Gabriela
Cam M1
Common Functions
>
EN
EN EN
EN
EN
EN
EN
Cam M1
7.Litokam Customer Care
Online Customer Service
For additional support, please refer to the
following resources:
Follow us on social media: @Litokam
Please note the following warranty terms:
FAQs and Guide Video: available on the Littlelf Smart app or
official website. (Scan the code on the right side for quick
access)
Available via app, telephone, and website during the following hours:
PT 08:00-10:00/17:30-20:00/21:30-08:00
1. 30-day return policy and 12-month limited warranty.
2. Lifetime professional tech support provided by Litokam.
1.Service Upgrade
Chat with us:
We are pleased to announce a recent service upgrade to the Littlelf Smart APP, which
now features a 24/7 online chat function. Should you have any inquiries, simply click
the "Live Chat" button to connect with our team of support specialists who are readily
available to assist you. Thank you for choosing Litokam.
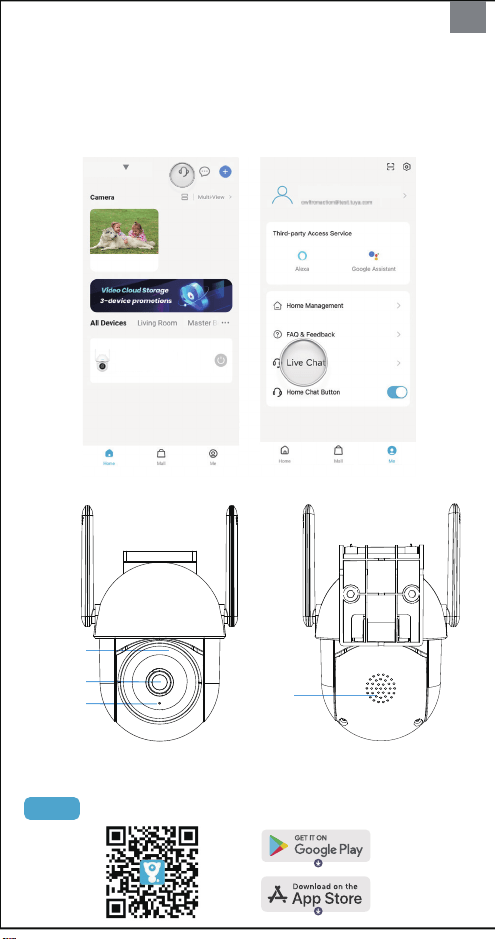
2.Camera Introduction
3.How to Set Up
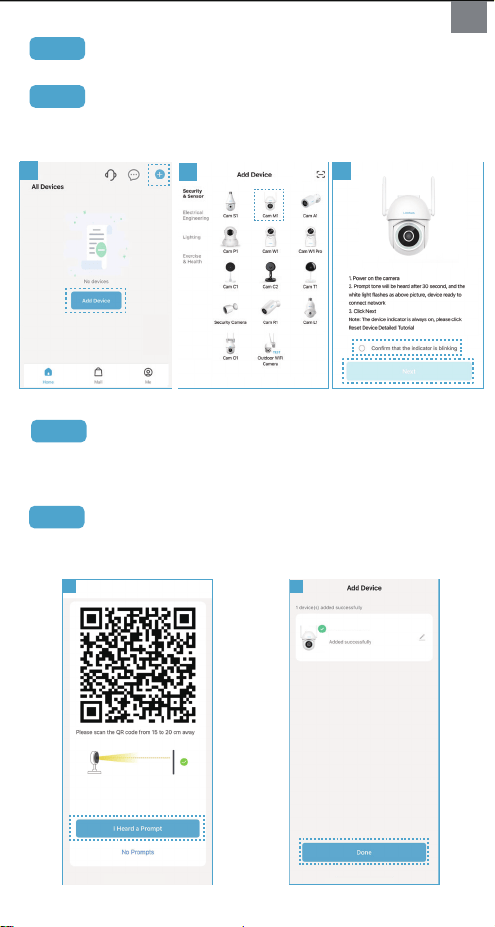
Step2 Power on the camera, and make sure your mobile phone is already
connected to WiFi (only 2.4Ghz WiFi is supported)
Step3 Open the "Littlelf Smart" APP, click "+" or "Add Device" button on the home
page (Picture 1); Then click "Cam M1" (Picture 2) , please check and confirm the
camera status then click " Next" (Picture 3).
Step1 Download “Littlelf Smart” APP , and register an account on APP via Email.
To set up your Litokam camera, please follow these steps:
Step4 Align the QR code on the phone screen with the camera lens (at a
distance of 15-20cm), and upon hearing the “Scan QR code successfully”, click
"Hear the beep" (refer to Picture 4).
• Install the camera 2-3 meters (7-10 ft) above the ground. This height maximizes the
detection range of the Ai detection.
Installation Tips
• Do not face the camera towards any light sources.
• Do not point the camera towards a glass window. Otherwise, it may result in poor
image quality because of the window glare caused by infrared LEDs, ambient
lights or status lights.
• Please do not position the camera in a shaded area and instead aim it towards a
well-lit area, as this may lead to subpar image quality. To ensure optimal image q
uality, it is advisable to place the camera and the subject being captured in a similar
lighting environment.
• Make sure the power port is not directly exposed to water or moisture and not
blocked by dirt or other elements.
• The IP65 weather-resistance camera can work properly under conditions like rain
and snow. However, it doesn’t mean the camera can work underwater.
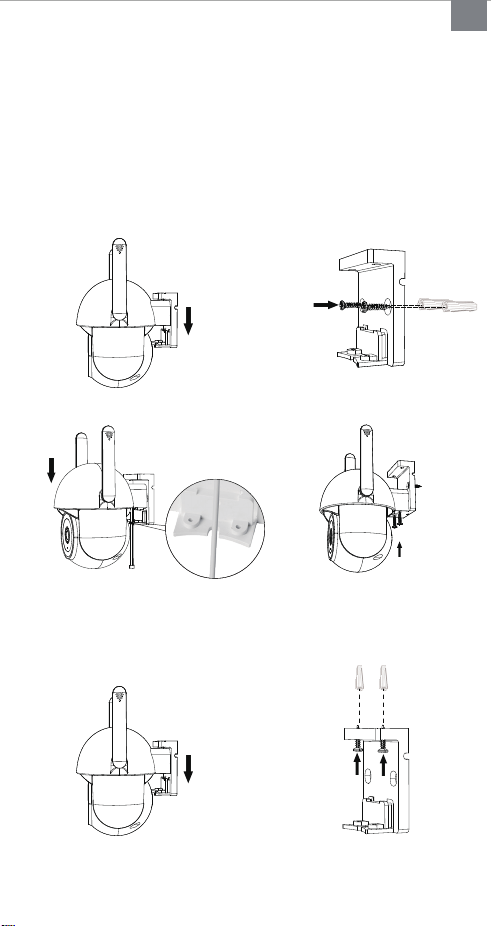
Mount the Camera to the Wall
Mount the Camera to Ceiling
Step5 5.Wait for the network configuration to complete successfully, and then
begin using your camera (refer to Picture 5).
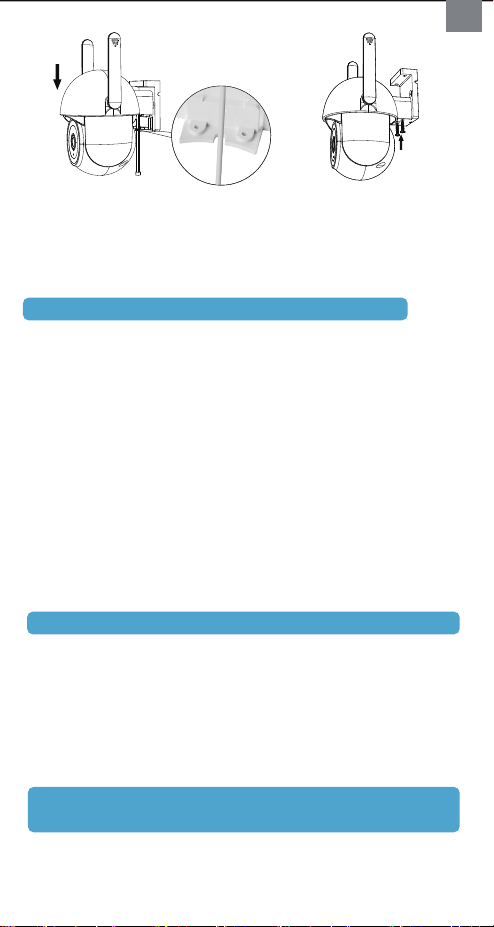
1. Remove the bracket from the camera.
2. Drill holes in accordance with the
installation holes on the bracket and
Install the bracket with longer screws
included in the package.
5.Install the Camera
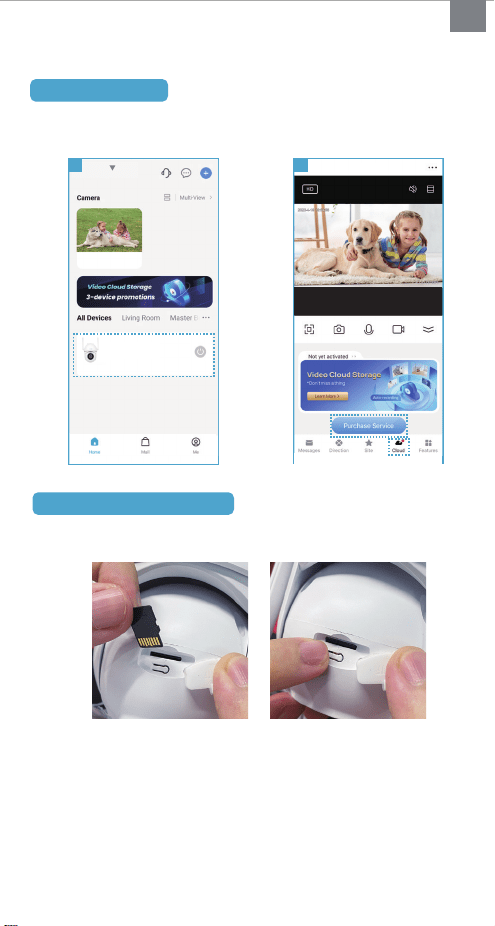
4.Storage Methods
1. Cloud storage
You may opt to subscribe to a cloud storage package, which will enable the camera
to automatically save videos. Please follow the necessary steps to activate this option.
There are two storage methods available for your convenience:
2. Micro SD card storage
6.Frequently Asked Questions
Q1: How do you troubleshoot a security camera?
A: If your camera's red light flashes rapidly during connections, it can usually be
connected normally. However, if the light is in another abnormal state, please follow
these 6 quick tips to fix your security camera troubleshooting:
1. Try using a different cable and plug if the light is not flashing red.
2. Update the software and firmware.
3. Reset the camera to its factory settings.
4. Check whether the router password (WiFi password, but not app account password)
is correct.
5. Place the camera close to the router and ensure that the network environment has
strong and stable signals.
6. Verify that your device has been added over a Wi-Fi band of 2.4 GHz. Check
whether the 2.4 GHz band and 5 GHz band share the same Wi-Fi account. If so, we
recommend that you configure two accounts and switch to the 2.4 GHz band during
network connection.
Alternatively, you may insert a micro SD card and turn on the Record Button to
save event recordings.
A: Please follow these instructions:
1.Click the "..." icon located in the top right corner of the live video interface.
2.Click on "Recording Settings".
3.Turn on "Local Recording". The camera will automatically begin recording video.
4.Select "Recording Mode", and "Event Recording". The camera will now automatically
record video when motion is detected.
5.Select "Recording Mode", and "Non-Stop". The camera will continue to record video.
If you want to watch motion detection videos you will need to use either an Micro SD
card or a cloud service, if you are already using one of these, follow these steps to
check for motion detection videos:
Q2: How do I record after inserting the Micro SD card?
Q3: How can I view motion detection videos instead of
screenshots?
1. Please open your app and click on Home;
2. Select your camera and go to the camera live video page;
3. Click on “Message” in the left bottom corner;
4. Click on “All”;
5. Click on the “View” button to view the recording video.
1
2
3
2
4
5
Cam M1
My home
1
2
Cam M1
Common Functions
>
Cam M1
① ②
③ ④
3. Install the camera onto the bracket.
Note that the power cord needs to be
aligned with the holes on the bracket.
NOTE: Use the drywall anchors included in the package if needed.
NOTE: Use the drywall anchors included in the package if needed.
4. Tighten the shorter screws to secure
the mounting bracket to the camera.
Littlelf Smart APP Live chat
Website: www.litokam.com
Tel: US&Canada Toll Free PT 1 (866)722-6296
(Mon-Sun: 11:00 AM- 6:30 PM)
Email: [email protected]
Litokam
1. Remove the bracket from the camera.
2. Drill holes in accordance with the
installation holes on the bracket and
Install the bracket with longer screws
included in the package.
① ②
③ ④
3. Install the camera onto the bracket.
Note that the power cord needs to be
aligned with the holes on the bracket.
4. Tighten the shorter screws to secure
the mounting bracket to the camera.
Status Light
Microphone
Lens
Speaker
Cam M1
My home
Gabriela
Cam M1
Common Functions
>
EN
EN EN
EN
EN
EN
EN
Cam M1
7.Litokam Customer Care
Online Customer Service
For additional support, please refer to the
following resources:
Follow us on social media: @Litokam
Please note the following warranty terms:
FAQs and Guide Video: available on the Littlelf Smart app or
official website. (Scan the code on the right side for quick
access)
Available via app, telephone, and website during the following hours:
PT 08:00-10:00/17:30-20:00/21:30-08:00
1. 30-day return policy and 12-month limited warranty.
2. Lifetime professional tech support provided by Litokam.
1.Service Upgrade
Chat with us:
We are pleased to announce a recent service upgrade to the Littlelf Smart APP, which
now features a 24/7 online chat function. Should you have any inquiries, simply click
the "Live Chat" button to connect with our team of support specialists who are readily
available to assist you. Thank you for choosing Litokam.
2.Camera Introduction
3.How to Set Up
Step2 Power on the camera, and make sure your mobile phone is already
connected to WiFi (only 2.4Ghz WiFi is supported)
Step3 Open the "Littlelf Smart" APP, click "+" or "Add Device" button on the home
page (Picture 1); Then click "Cam M1" (Picture 2) , please check and confirm the
camera status then click " Next" (Picture 3).
Step1 Download “Littlelf Smart” APP , and register an account on APP via Email.
To set up your Litokam camera, please follow these steps:
Step4 Align the QR code on the phone screen with the camera lens (at a
distance of 15-20cm), and upon hearing the “Scan QR code successfully”, click
"Hear the beep" (refer to Picture 4).
• Install the camera 2-3 meters (7-10 ft) above the ground. This height maximizes the
detection range of the Ai detection.
Installation Tips
• Do not face the camera towards any light sources.
• Do not point the camera towards a glass window. Otherwise, it may result in poor
image quality because of the window glare caused by infrared LEDs, ambient
lights or status lights.
• Please do not position the camera in a shaded area and instead aim it towards a
well-lit area, as this may lead to subpar image quality. To ensure optimal image q
uality, it is advisable to place the camera and the subject being captured in a similar
lighting environment.
• Make sure the power port is not directly exposed to water or moisture and not
blocked by dirt or other elements.
• The IP65 weather-resistance camera can work properly under conditions like rain
and snow. However, it doesn’t mean the camera can work underwater.
Mount the Camera to the Wall
Mount the Camera to Ceiling
Step5 5.Wait for the network configuration to complete successfully, and then
begin using your camera (refer to Picture 5).
1. Remove the bracket from the camera.
2. Drill holes in accordance with the
installation holes on the bracket and
Install the bracket with longer screws
included in the package.
5.Install the Camera
4.Storage Methods
1. Cloud storage
You may opt to subscribe to a cloud storage package, which will enable the camera
to automatically save videos. Please follow the necessary steps to activate this option.
There are two storage methods available for your convenience:
2. Micro SD card storage
6.Frequently Asked Questions
Q1: How do you troubleshoot a security camera?
A: If your camera's red light flashes rapidly during connections, it can usually be
connected normally. However, if the light is in another abnormal state, please follow
these 6 quick tips to fix your security camera troubleshooting:
1. Try using a different cable and plug if the light is not flashing red.
2. Update the software and firmware.
3. Reset the camera to its factory settings.
4. Check whether the router password (WiFi password, but not app account password)
is correct.
5. Place the camera close to the router and ensure that the network environment has
strong and stable signals.
6. Verify that your device has been added over a Wi-Fi band of 2.4 GHz. Check
whether the 2.4 GHz band and 5 GHz band share the same Wi-Fi account. If so, we
recommend that you configure two accounts and switch to the 2.4 GHz band during
network connection.
Alternatively, you may insert a micro SD card and turn on the Record Button to
save event recordings.
A: Please follow these instructions:
1.Click the "..." icon located in the top right corner of the live video interface.
2.Click on "Recording Settings".
3.Turn on "Local Recording". The camera will automatically begin recording video.
4.Select "Recording Mode", and "Event Recording". The camera will now automatically
record video when motion is detected.
5.Select "Recording Mode", and "Non-Stop". The camera will continue to record video.
If you want to watch motion detection videos you will need to use either an Micro SD
card or a cloud service, if you are already using one of these, follow these steps to
check for motion detection videos:
Q2: How do I record after inserting the Micro SD card?
Q3: How can I view motion detection videos instead of
screenshots?
1. Please open your app and click on Home;
2. Select your camera and go to the camera live video page;
3. Click on “Message” in the left bottom corner;
4. Click on “All”;
5. Click on the “View” button to view the recording video.
1
2
3
2
4
5
Cam M1
My home
1
2
Cam M1
Common Functions
>
Cam M1
① ②
③ ④
3. Install the camera onto the bracket.
Note that the power cord needs to be
aligned with the holes on the bracket.
NOTE: Use the drywall anchors included in the package if needed.
NOTE: Use the drywall anchors included in the package if needed.
4. Tighten the shorter screws to secure
the mounting bracket to the camera.
Littlelf Smart APP Live chat
Website: www.litokam.com
Tel: US&Canada Toll Free PT 1 (866)722-6296
(Mon-Sun: 11:00 AM- 6:30 PM)
Email: [email protected]
Litokam
1. Remove the bracket from the camera.
2. Drill holes in accordance with the
installation holes on the bracket and
Install the bracket with longer screws
included in the package.
① ②
③ ④
3. Install the camera onto the bracket.
Note that the power cord needs to be
aligned with the holes on the bracket.
4. Tighten the shorter screws to secure
the mounting bracket to the camera.
Status Light
Microphone
Lens
Speaker
Cam M1
