
User Manual
Applicable to the MT500 products
Revised on 9 October 2022

Chapter 1: Introduction………………………………………………………………….1
1. Product Profile……………………………………………………………………………1
2. Features……………………………………………………………………………………1
Diagnostic function……………………………………………………………………1
Personal center…………………………………………………………………………1
Data management……………………………………………………………………1
Support………………………………………………………………………………………2
Settings………………………………………………………………………………2
Upgrade………………………………………………………………………………2
3. Knowledge of This Device…………………………………………………………2
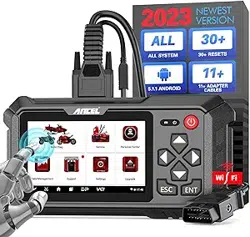
The whole set……………………………………………………………………………2
The tablet computer…………………………………………………………………2
4. Technical Parameters…………………………………………………………………3
5. Accessories (Standard Configuration).………………………………………3
Main test cable…………………………………………………………………………3
Other connectors……………………………………………………………………….3
Others accessories………………………………………………………………………4
6. Charge This Device……………………………………………………………………4
7. Using Battery………………………………………………………………………………4
8. Power On/power off This Device………………………………………………5
Power on……………………………………………………………………………………5
Power off……………………………………………………………………………………5
9. About Desktop……………………………………………………………………………5
10. Customize Your Desktop…………………………………………………………6
Add items on the desktop…………………………………………………………6
Move items on the desktop………………………………………………………6
Delete items on the desktop………………………………………………………6
Change your wallpaper………………………………………………………………6
Create a folder on the desktop……………………………………………………6
11. On Using Touch Screen……………………………………………………………6

12. Lock & Unlock…………………………………………………………………………7
Lock the screen…………………………………………………………………………7
Unlock the screen……………………………………………………………………7
13. Notification Bar………………………………………………………………………7
Turn on the notification panel……………………………………………………7
Turn off the notification panel……………………………………………………7
14. Input Method……………………………………………………………………………7
Set input method………………………………………………………………………7
15. How to Set as Airplane Mode…………………………………………………8
Chapter 2: Upgrade………………………………………………………………………9
1. Detection System Upgrade…………………………………………………………9
2. Diagnostic Function Upgrade……………………………………………………10
Chapter 3: Diag Notes………………………………………………………………….12
1. Connect VCI Connector…………………………………………………………….12
Procedure to Connect VCI Connector………………………………………12
2. Diagnosis Flowchart…………………………………………………………………12
3. Personal Center………………………………………………………………………12
User Registration………………………………………………………………………13
User Login…………………………………………………………………………………15
Modify Information…………………………………………………………………16
Change Password……………………………………………………………………16
View Distributor Information……………………………………………………17
Recover Password……………………………………………………………………17
Recharge CREDIT………………………………………………………………………18
Authorization Center………………………………………………………………18
Order History……………………………………………………………………………19
4. Diagnostic Software Main Interface Introduction……………………19
5. Start Diagnosing ………………………………………………………………………20
6. Data Management…………………………………………………………………27
File Management……………………………………………………………………28

Data Playback…………………………………………………………………………28
Uninstall Model………………………………………………………………………29
Workshop…………………………………………………………………………………29
Picture Viewer…………………………………………………………………………30
7. Support…………………………………………………………………………………30
Video………………………………………………………………………………………31
Manual……………………………………………………………………………………31
FAQ…………………………………………………………………………………………32
Log Upload………………………………………………………………………………32
TeamViewer……………………………………………………………………………33
8. Settings……………………………………………………………………………………34
VCI Info……………………………………………………………………………………34
Language…………………………………………………………………………………35
Unit…………………………………………………………………………………………35
Network Test……………………………………………………………………………36
Clear Cache………………………………………………………………………………37
Settings………………………………………………………………………………37
About………………………………………………………………………………………38
Chapter 4: Others…………………………………………………………………………39
1. Wi-Fi……………………………………………………………………………………39
Turn on Wi-Fi……………………………………………………………………………39
Connect to WLAN……………………………………………………………………39
2. Browser……………………………………………………………………………………39
Open the browser……………………………………………………………………39
Browser webpage……………………………………………………………………40
Zoom in/Zoom out a page…………………………………………………………40
Save favorite webpages to bookmarks……………………………………40
Open multiple pages…………………………………………………………………40
Customize internet settings………………………………………………………41
3. Gallery………………………………………………………………………………………41

Open the gallery………………………………………………………………………41
View a photo……………………………………………………………………………41
4. Music………………………………………………………………………………………41
5. Calculator…………………………………………………………………………………41
6. Calendar………………………………………………………………………………42
7. Clock…………………………………………………………………………………………42
Add an alarm……………………………………………………………………………42
Delete an alarm………………………………………………………………………42
Customize your alarm………………………………………………………………42
Timer setting……………………………………………………………………………43
Stopwatch setting……………………………………………………………………43
8. Es File Explorer…………………………………………………………………………43
9. Display……………………………………………………………………………………43
Brightness…………………………………………………………………………………43
Auto-rotate the screen……………………………………………………………43
10. Set Screen Lock………………………………………………………………………44
11. Application……………………………………………………………………………44
View installed applications………………………………………………………44
View the running applications…………………………………………………44
12. Language & Input……………………………………………………………………45
Language setting………………………………………………………………………45
Input method setting………………………………………………………………45
13. Set Date & Time……………………………………………………………………45
14. Restore to Factory Settings……………………………………………………46
15. Storage………………………………………………………………………………46
16. App Installation/Uninstallation………………………………………………46
Chapter 5: Remark….……………………………………………………………………47
1. Copyright Information………………………………………………………………47
2. Trademark Information……………………………………………………………47
3. Safety Precautions……………………………………………………………………48

4. Precautions on Using This Device……………………………………………49
5. Precautions for ECU Operation………………………………………………49
6. Safety Warnings and Precautions……………………………………………49
7. Medical Equipment…………………………………………………………………49
8. Flammable and Explosive area…………………………………………………50
9. Traffic Safety……………………………………………………………………………50
10. Operating Environment…………………………………………………………50
11. Child Health……………………………………………………………………………51
12. Environment Protection………………………………………………………51
13. Original Accessories………………………………………………………………51
14. Use Batteries and Chargers……………………………………………………52
15. Repair and Maintenance………………………………………………………52
16. Warranty………………………………………………………………………………53
17. Order Notification…………………………………………………………………53
18. Customer Service Center………………………………………………………53
19. Disclaimer……………………………………………………………………………54
Chapter 6: FAQ……………………………………………………………………………55
1. Startup Failure…………………………………………………………………………55
2. Touchscreen Interference…………………………………………………………55
3. Slow or Failed One-Key Upgrade………………………………………………55
4. Crash…………………………………………………………………………………55
5. Test Failure…………………………………………………………………………55
6. Unable to Charge……………………………………………………………………56
7. Software Upgrade……………………………………………………………………56
8. Software Delete………………………………………………………………………56
9. System Language Switch…………………………………………………………56

1
Chapter 1: Introduction
1. Product Profile
This device is a new Android-based vehicle trouble diagnostic
device developed for Internet applications. It is characterized by
covering wide range of vehicles, featuring powerful function, and
providing precise result. Through vehicle diagnostic OBD connector
and variant mobile intelligent terminals, it achieves vehicle trouble
diagnosis for full car model and full system vehicle.
Meanwhile, taking advantage of mobile Internet, this device
integrates more application and service, such as Maintenance
Database, remote assistant, One Key Upgrade etc.
2. Features
• Diagnostic function
Diagnose the electronic control system of prevailing vehicle models
covering Asian, Americas, European. Diagnosis functions include:
Read DTC, Clear DTC, Read data stream, Special functions etc.
Classification functions: Including Moto Diag, Service etc.
Specifically designed for the Android platform, the interface is simpl
e and beautiful, and the operation is simple.
• Personal center
User information and the device's configuration information.
• Data management
Including File Management, Data Playback, Uninstall Model,
Workshop, Picture Viewer.
2
• Support
Equipped with powerful database. Large number of videos help
users to operate the device easily.
• Settings
Set VCI Info, Language, Unit, Network Test, Clear cache, Settings
and About etc.
• Upgrade
Built-in WIFI mode can realize application downloading and
diagnostic function by one-key upgrade.
3. Knowledge of This Device
• The whole set
This device is composed of one tablet computer, one main test
cable and some kinds of cables.
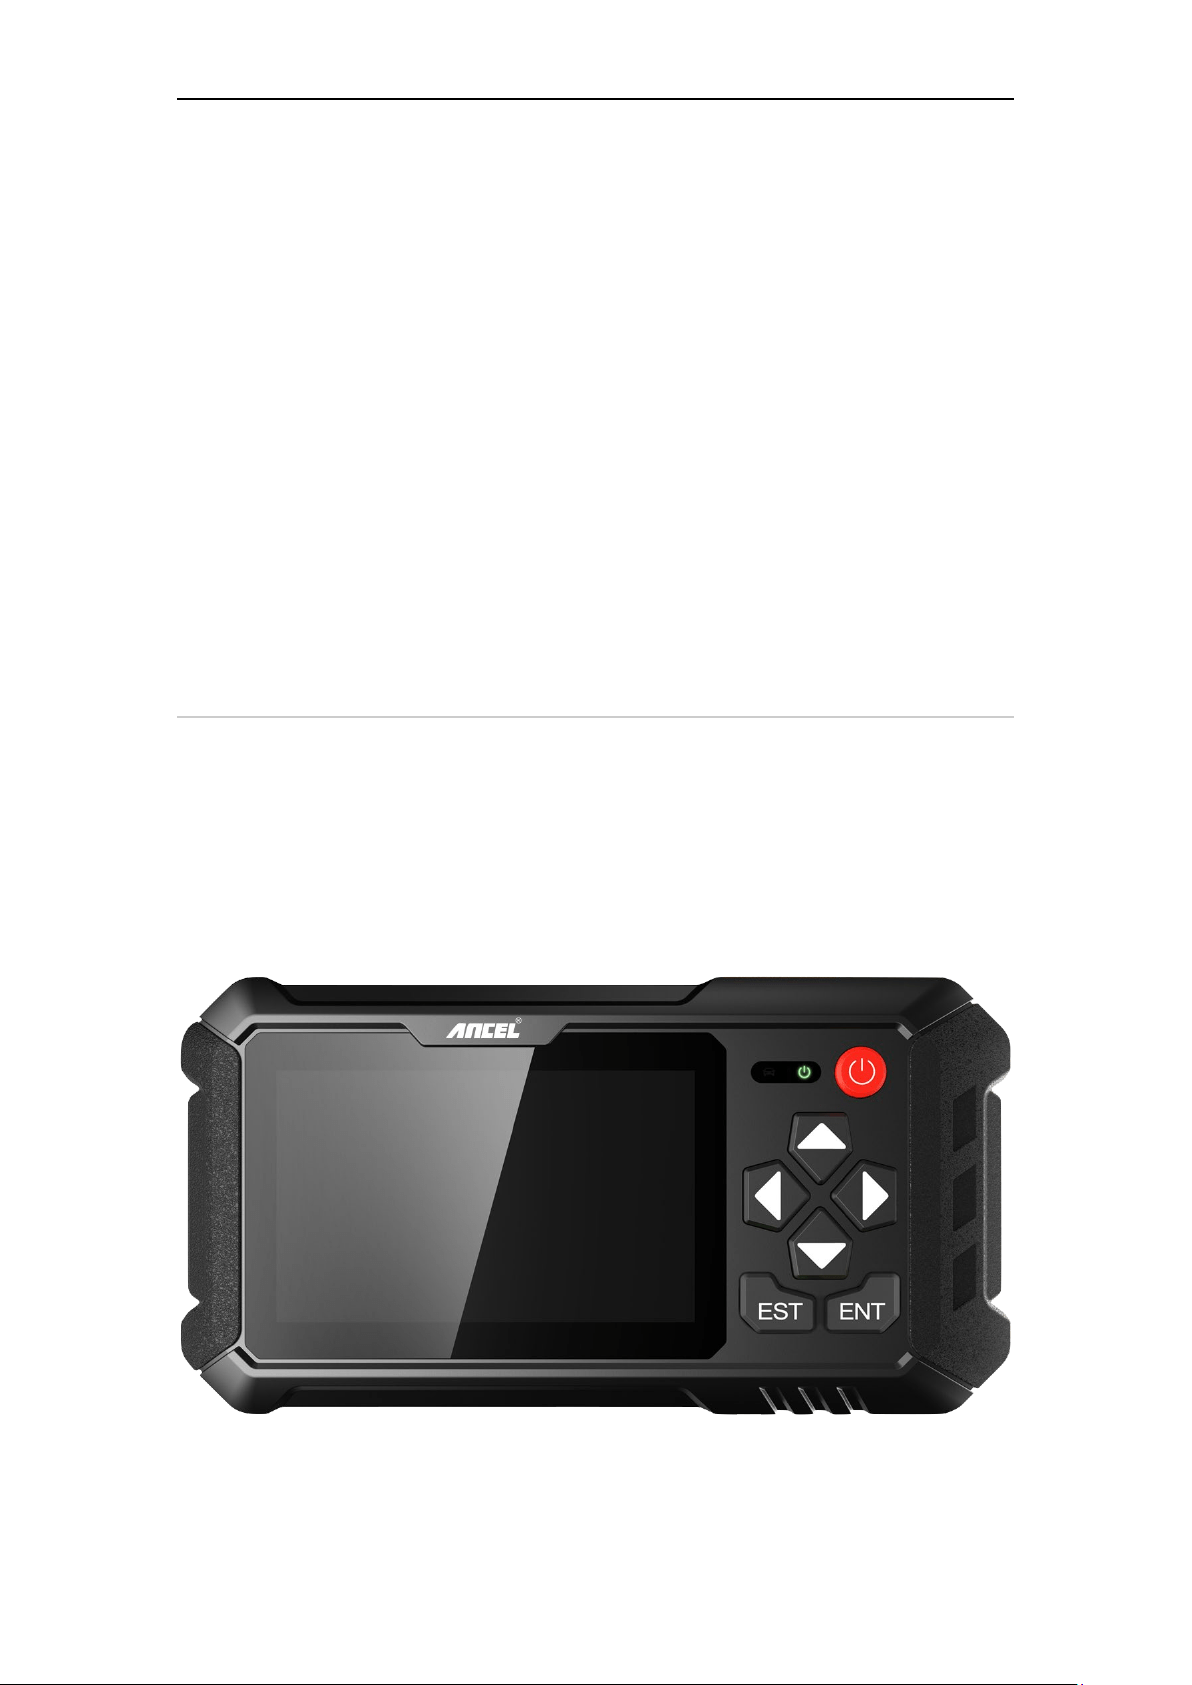
• The tablet computer

3
4. Technical Parameters
• Operation system: Android 5.1.1
• CPU: RK3128 Quad-Core, ARM Cortex A7@1.2Ghz
• Battery: 2600mAh, rechargeable polymer lithium battery
• Expansion memory card: 32G Micro SD (TF) card supported
• LCD: 5.0 inch
• LCD resolution: 800*480
• Touch screen: Capacitive touch screen
• Wi-Fi: supported
• Working temperature: -10℃ ~ 55℃ (14℉ ~ 131℉)
• Storage temperature: -20℃ ~ 70℃ (-4℉ ~ 158℉)
• Weight: about 0.47kg
• Dimension: 220mm*116mm*29mm
5. Accessories (Standard Configuration)
• Main test cable
Pack different main cable according to different configurations.
• Other connectors
Other connectors are used to connect the diagnosis socket of non
OBD II vehicles. To choose the connector according to the vehicle
brand and models.
Note: Different configurations may choose different accessories.

4
• Others accessories
DC Power Adapter (Output DC 12V/2A), To power up the tablet via
connecting with outside power Supply.
6. Charge This Device
1. Connect the included USB cable with charger.
2. Plug the charger into AC outlet.
3. When it connects to charger, battery logo indicates , it
indicates that the battery is in charging.
4. When battery logo changes into , it indicates that the
battery is fully charged.
5. Unplug USB cable on the charger from this device.
7. Using Battery
• If the battery keeps unused for a long time or battery is
completely discharged, it is normal if it cannot be turned on
while being charged. Please charge it for a period and then turn
it on.
• Using data service will cause more power consumption and
shorten the stand by time.
• The charging time of battery varies with temperature condition
and battery consumption status.
• While this device has low battery, a beep will sound. If it is very
low, this device will be switched off automatically.
Note: Do one of the followings to save power:
5
• When this device keeps unattended, press POWER key to turn
off the LCD.
• Shorten the standby time: Enter the main menu, choose
"Settings" > "DEVICE" > "Display" > "Sleep" to select a shorter
standby time.
• Decrease the brightness of LCD display: Enter main menu,
choose "Settings" > "DEVICE" > "Display" > "Brightness", and
then drag the slider to adjust it.
• Change "Live wallpaper" into "Gallery".
• Set Bluetooth off: Enter the main menu, choose "Settings" >
"Bluetooth", and then switch to OFF.
• Press VOLUME key to decrease the volume.
8. Power On/power off This Device
• Power on
Press and hold Power button for three seconds to turn on this
device.
• Power off
Press and hold Power button for three seconds to turn off this
device.
9. About Desktop

6
10. Customize Your Desktop
• Add items on the desktop
On the main menu, hold and press the desired item, the system will
automatically enter the desktop and place the icon into the
circle. Hint: If many applications occupy the desktop, hold and press
the desired one to move it to other extended desktop.
• Move items on the desktop
Hold and press the item to be moved. After a movable circle
appears on the screen, drag it to the target location.
• Delete items on the desktop
Hold and press the desired item, "Delete" appears in the upper
middle of the screen. Drag the item to "Delete". When the item and
icon turn red, then release it.
• Change your wallpaper
Hold and press a blank area on the desktop, a pop-up wallpaper will
be shown on the screen. Choose desired wallpaper. Click upper left
corner "√" to set wallpaper.
• Create a folder on the desktop
Drag one icon to another icon, the system will create a folder. Input
the folder name.
11. On Using Touch Screen
• Tap: Tap the corresponding item with your finger to confirm the
selection or start the application.
• Long press: Long press the icon or input field to open the
operation option menu of the current interface.
• Slide: Slide your finger horizontally or vertically on the screen.

7
• Drag: Long press the selected item with your finger, and then
drag the item to any position on the screen.
12. Lock & Unlock
• Lock the screen
o When the device is ON, press POWER key to lock the screen.
o The system will lock the screen automatically if this device
remains idle for a long time.
• Unlock the screen
o Press POWER key to activate the screen and then drag the lock
to "Unlock position. "
13. Notification Bar
The notice bar is used to display some activities, messages to
remind and inform users.
• Turn on the notification panel
o When a new notification icon appears on the status bar, slide the
status bar downwards to open it.
o In the notification panel, click the desired notification item to
open it.
• Turn off the notification panel
o When the notification panel is opened, click on the blank space
of the screen and the notification panel will automatically retract.
14. Input Method
• Set input method

8
o Enter the main menu and then select "Settings"-> "Personal" ->
"Language & input" to choose the desired input method.
o The default input method supports a powerful thesaurus engine,
multiple keyboard modes. Android keyboard and Google input
methods make input easier. To start text input mode, please
click any text input entry.
15. How to Set as Airplane Mode
• According to the regulations of some countries or regions, PC
device must be turned off before boarding on the airplane.
• The way to disable functions of this device is to set it as airplane
mode. In this mode, all wireless radio waves will be off, including
mobile network, Bluetooth and WLAN.
• Do one of the followings to enable or disable airplane mode:
• Press POWER key and choose "Airplane mode" from the pop-up
option menu.
• Access the main menu, and choose "Settings" > "WLAN" >
"More" > "Airplane mode".
9
Chapter 2: Upgrade
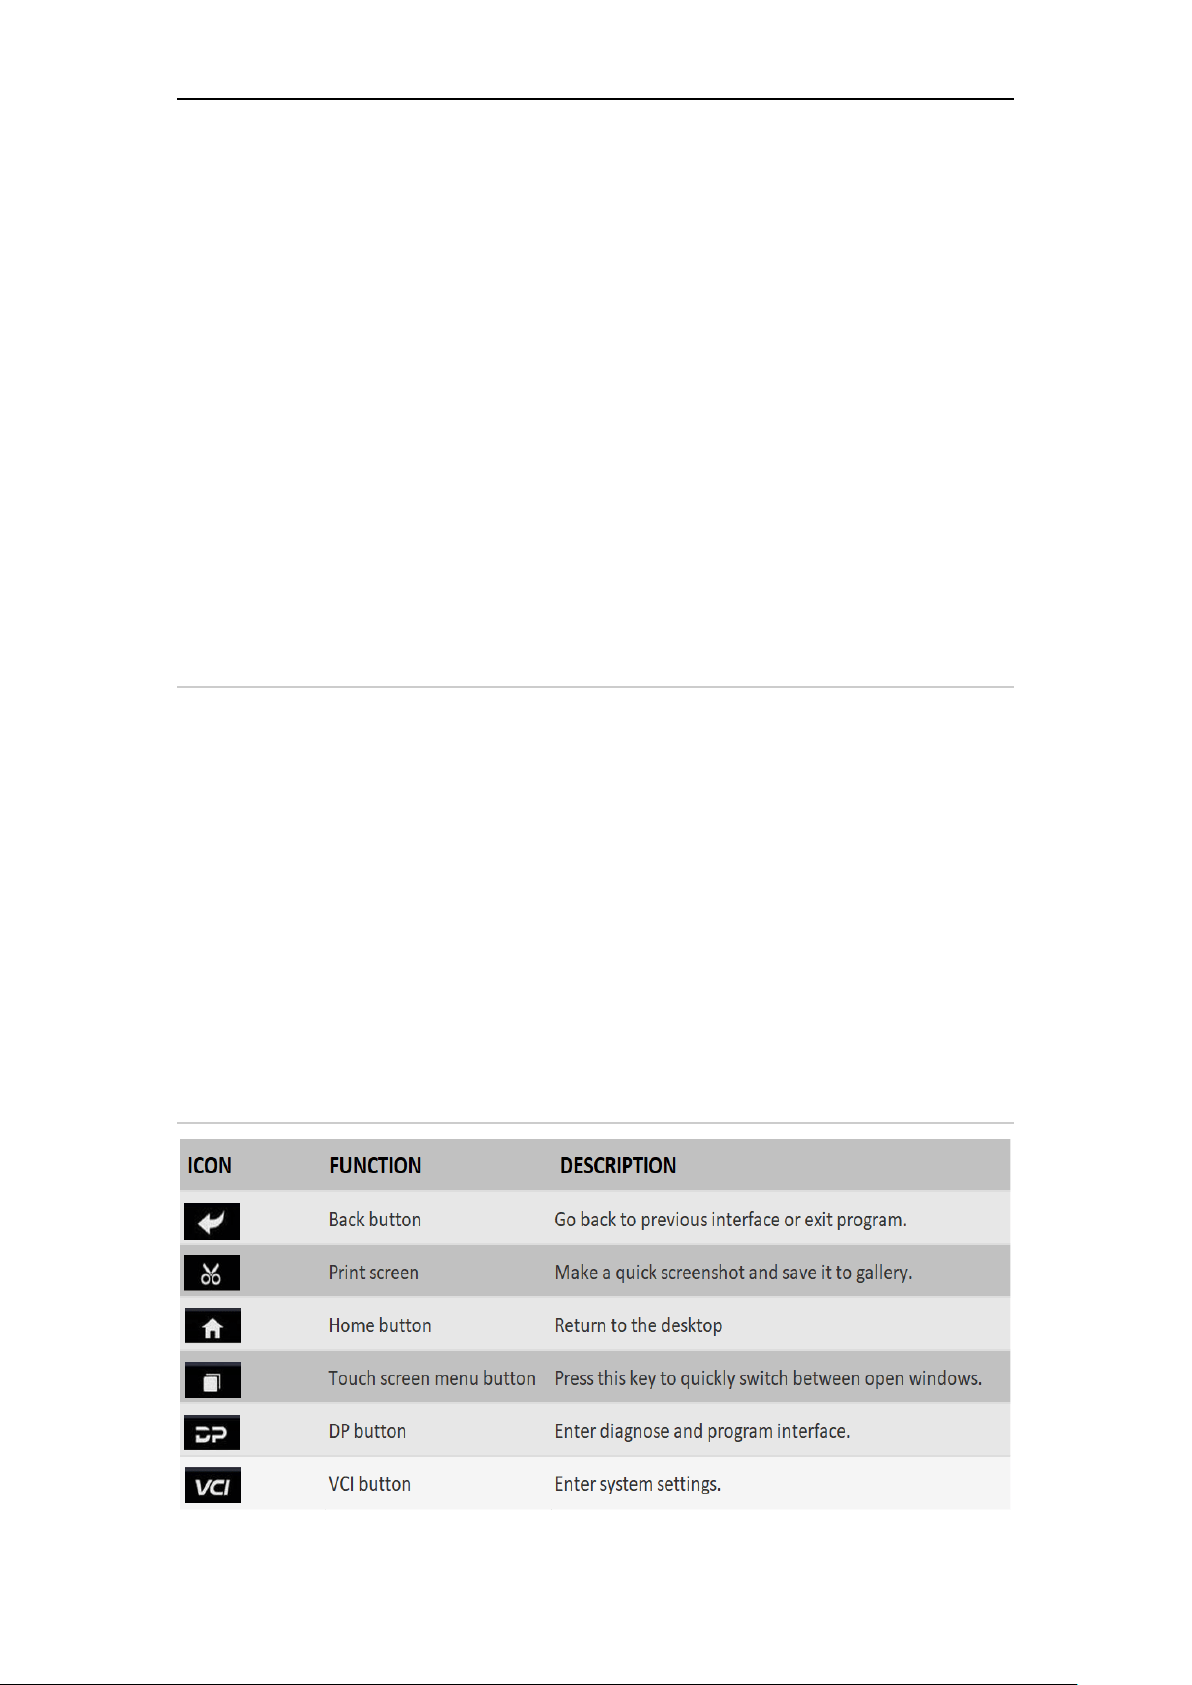
1. Detection System Upgrade
The system APK automatically detects the version. If there is a
version update, a red dot is in the upper right corner of the upgrade
button. Click on the upgrade button to the prompt "Whether to
upgrade software?":
If you choose "ESC" not to upgrade, it will directly return to the
main interface; if you choose "Enter" an APK upgrade and
installation prompt will appear.
10
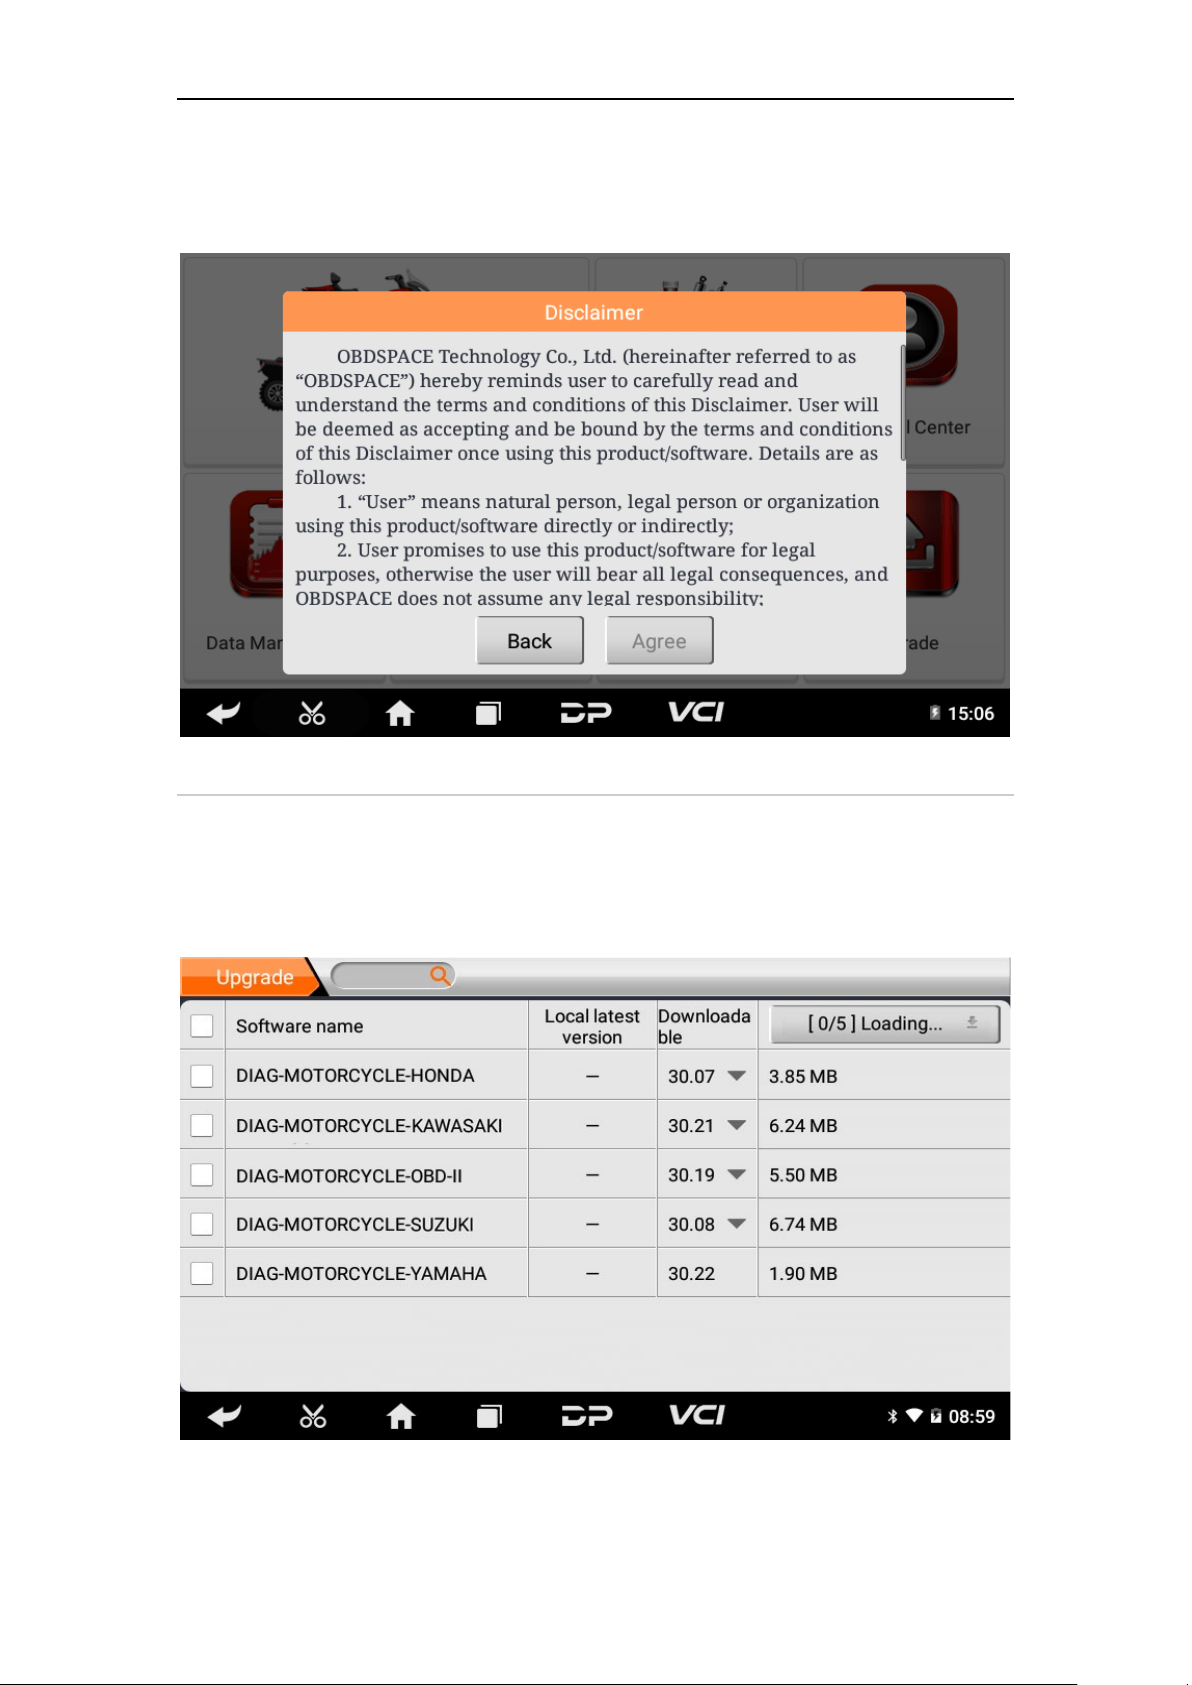
Click "INSTALL" to upgrade and install the APK, after the upgrade
and update, a disclaimer will appear and click "Agree" to enter the
diagnostic function interface.
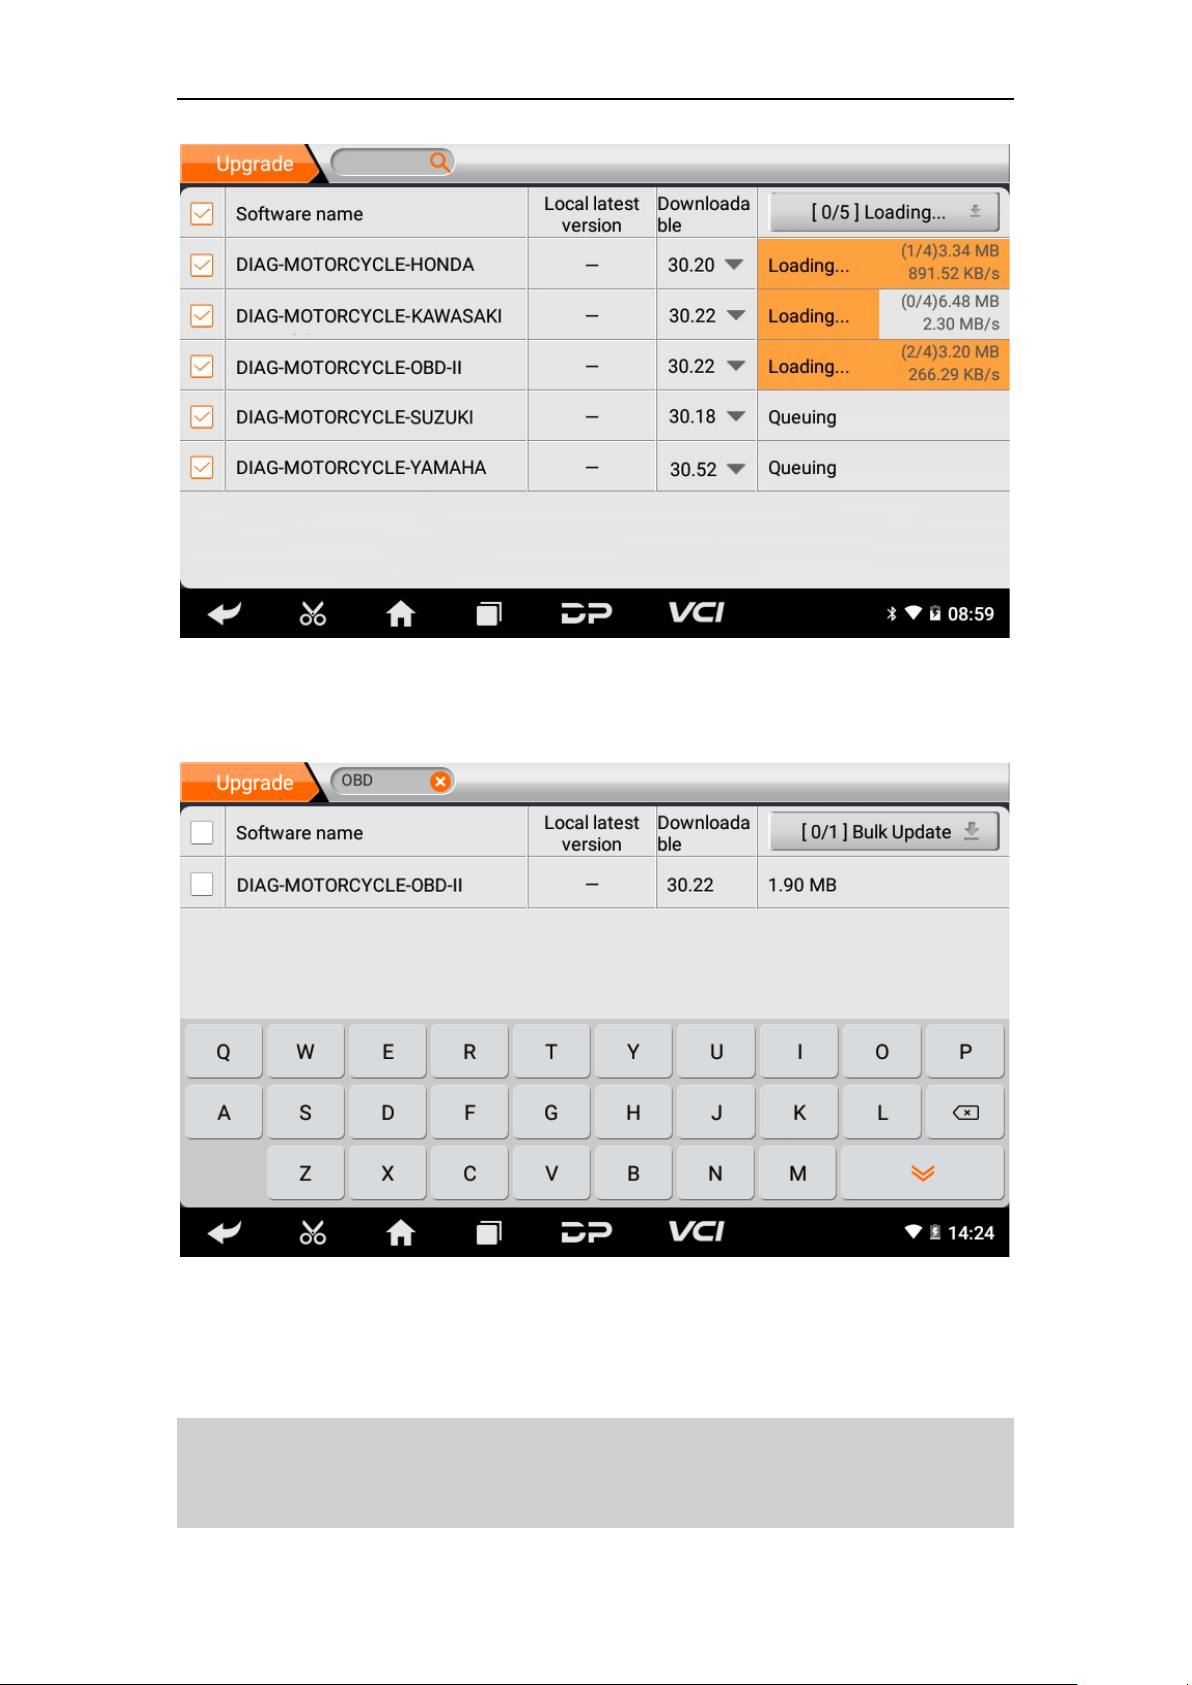
2. Diagnostic Function Upgrade
If more than one downloaded model diagnosis software needs to
be updated, download and upgrade software by "Bulk Update".
The software provided in the following operations is only for
reference and guidance.
Click the check box in front of the software name, and then click
"Bulk Update" to start downloading and updating.
11
If a software needs to be canceled, just tap the corresponding
Check Box. You can search for the updated model required in the
search box (Fuzzy Search function). As the following photo shown:
After the upgrade is completed, you can enter the diagnostic
programming to view the upgrade version description and the
version number, and you can perform related diagnostic operations
and functions.
Notes: Ensure Internet connection is normal when updating.
Besides, because of many software, it may take several minutes,
please wait patiently.

12
Chapter 3: Diag Notes
1. Connect VCI Connector
• Procedure to Connect VCI Connector:
1. Locate motorcycles' diagnostic socket. The connectors of the
diagnostic socket of different models are inconsistent. You
need to use the corresponding model adapter. You can check
the approximate location of the model adapter in the
diagnostic bitmap in the software data.
2. Plug the diagnostic connector of this device into the diagnostic
socket.
2. Diagnosis Flowchart
For new users, please follow step 3 to operate and start using the
product.
Connect the diagnostic connector –>user registration–>user login–
>download or upgrade software–>select function or vehicle type–
>proceed diagnosis.
3. Personal Center
13
Used to set up and manage account details, and you can view the
dealer information:
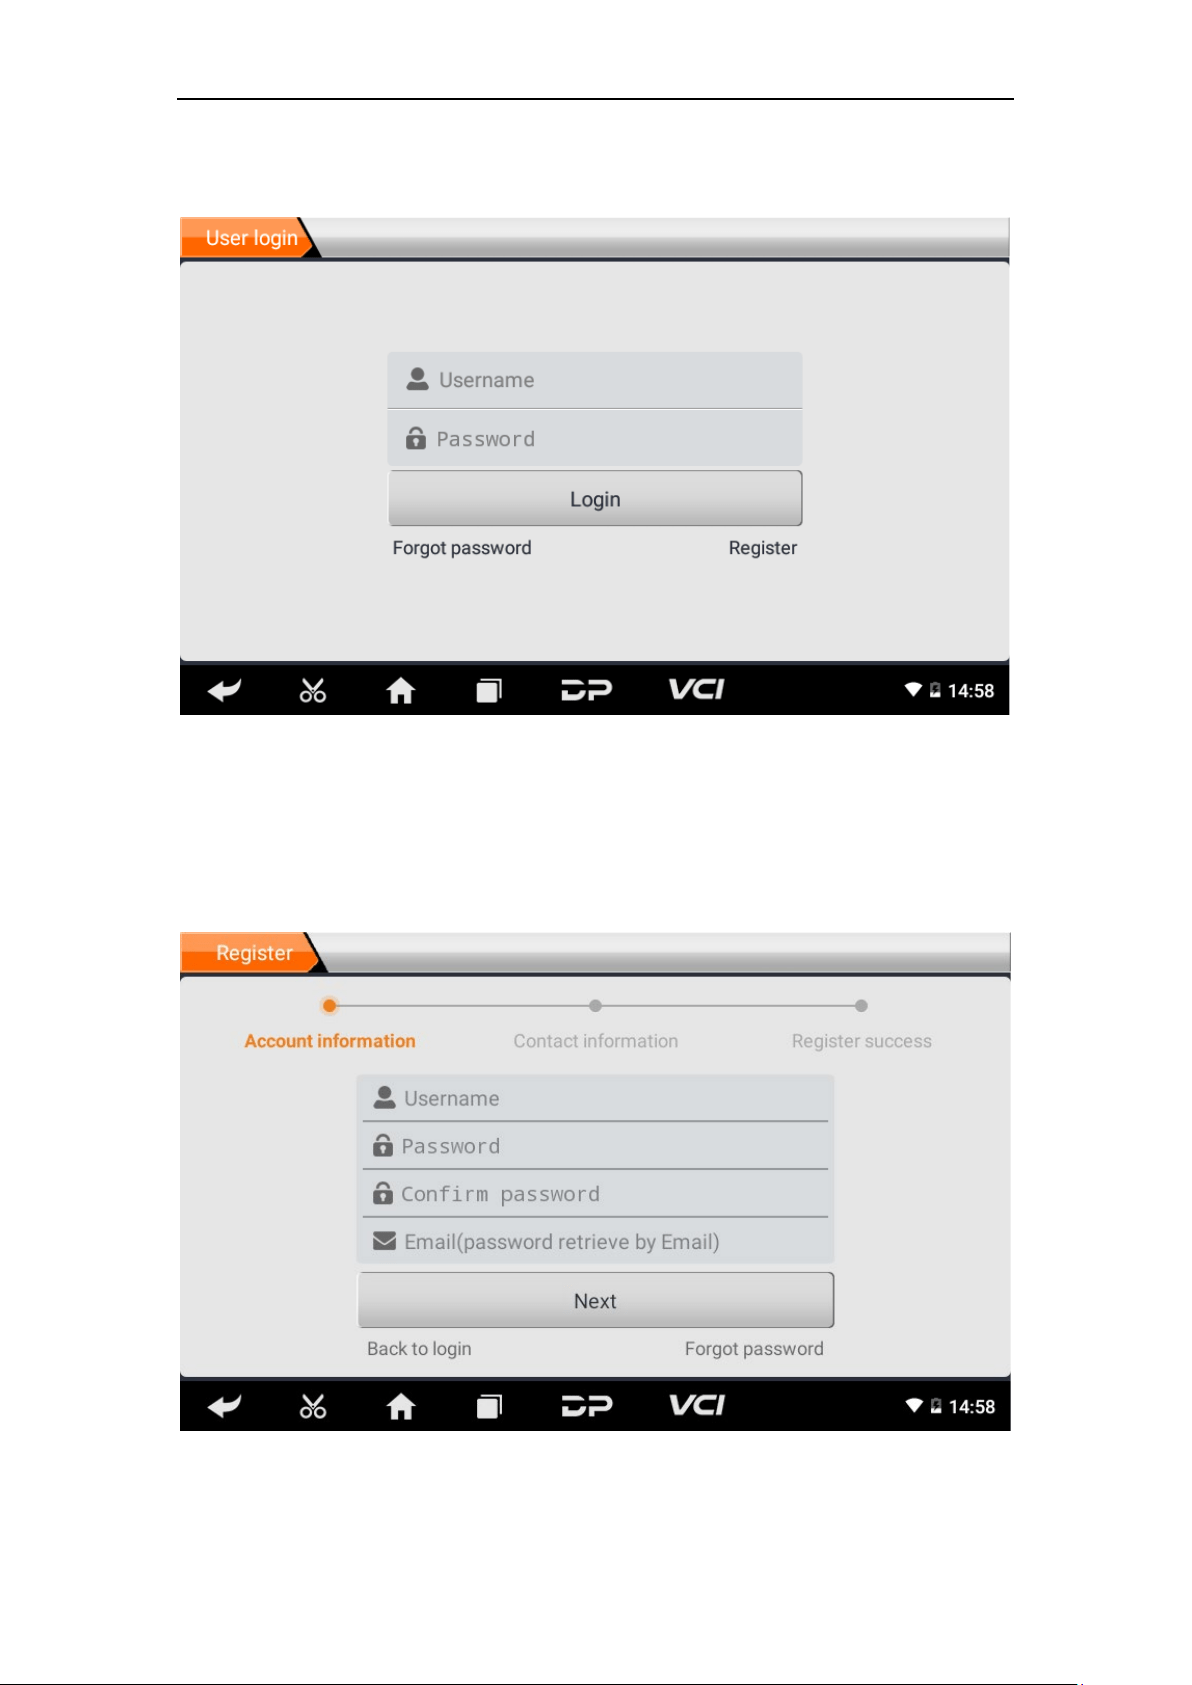
• User Registration
Enter the Personal Center interface, display the login interface, click
the “Register” button in the lower right corner to enter the user
registration interface. As shown:
14

15
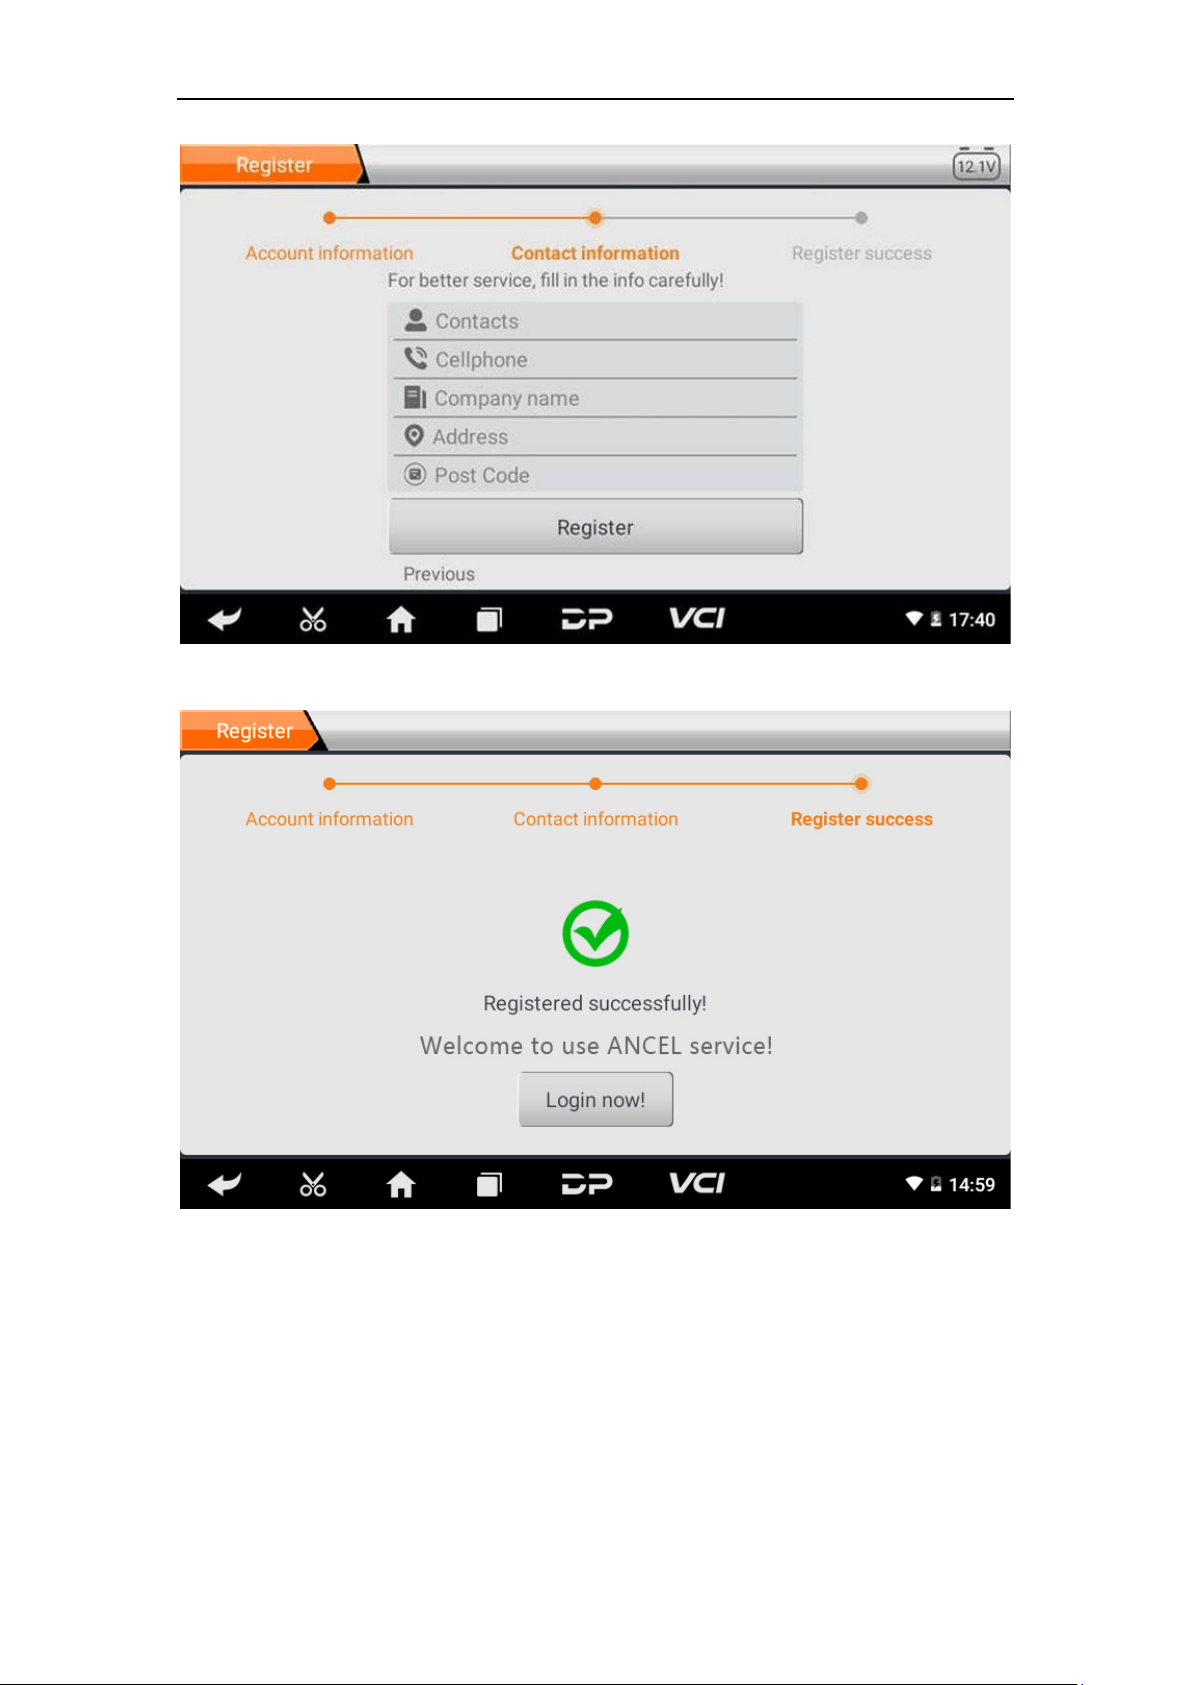
Fill in the information in each field. After that, the registration is
successful, click “Login now!” If you have registered to be a
member, click “User login” to enter user login page. As the
following picture shown:
• User Login
After the registration is completed, fill in the account number and
password and click login:
Display personal basic information and modify information and
password.

16
• Modify Information
• Change Password
17
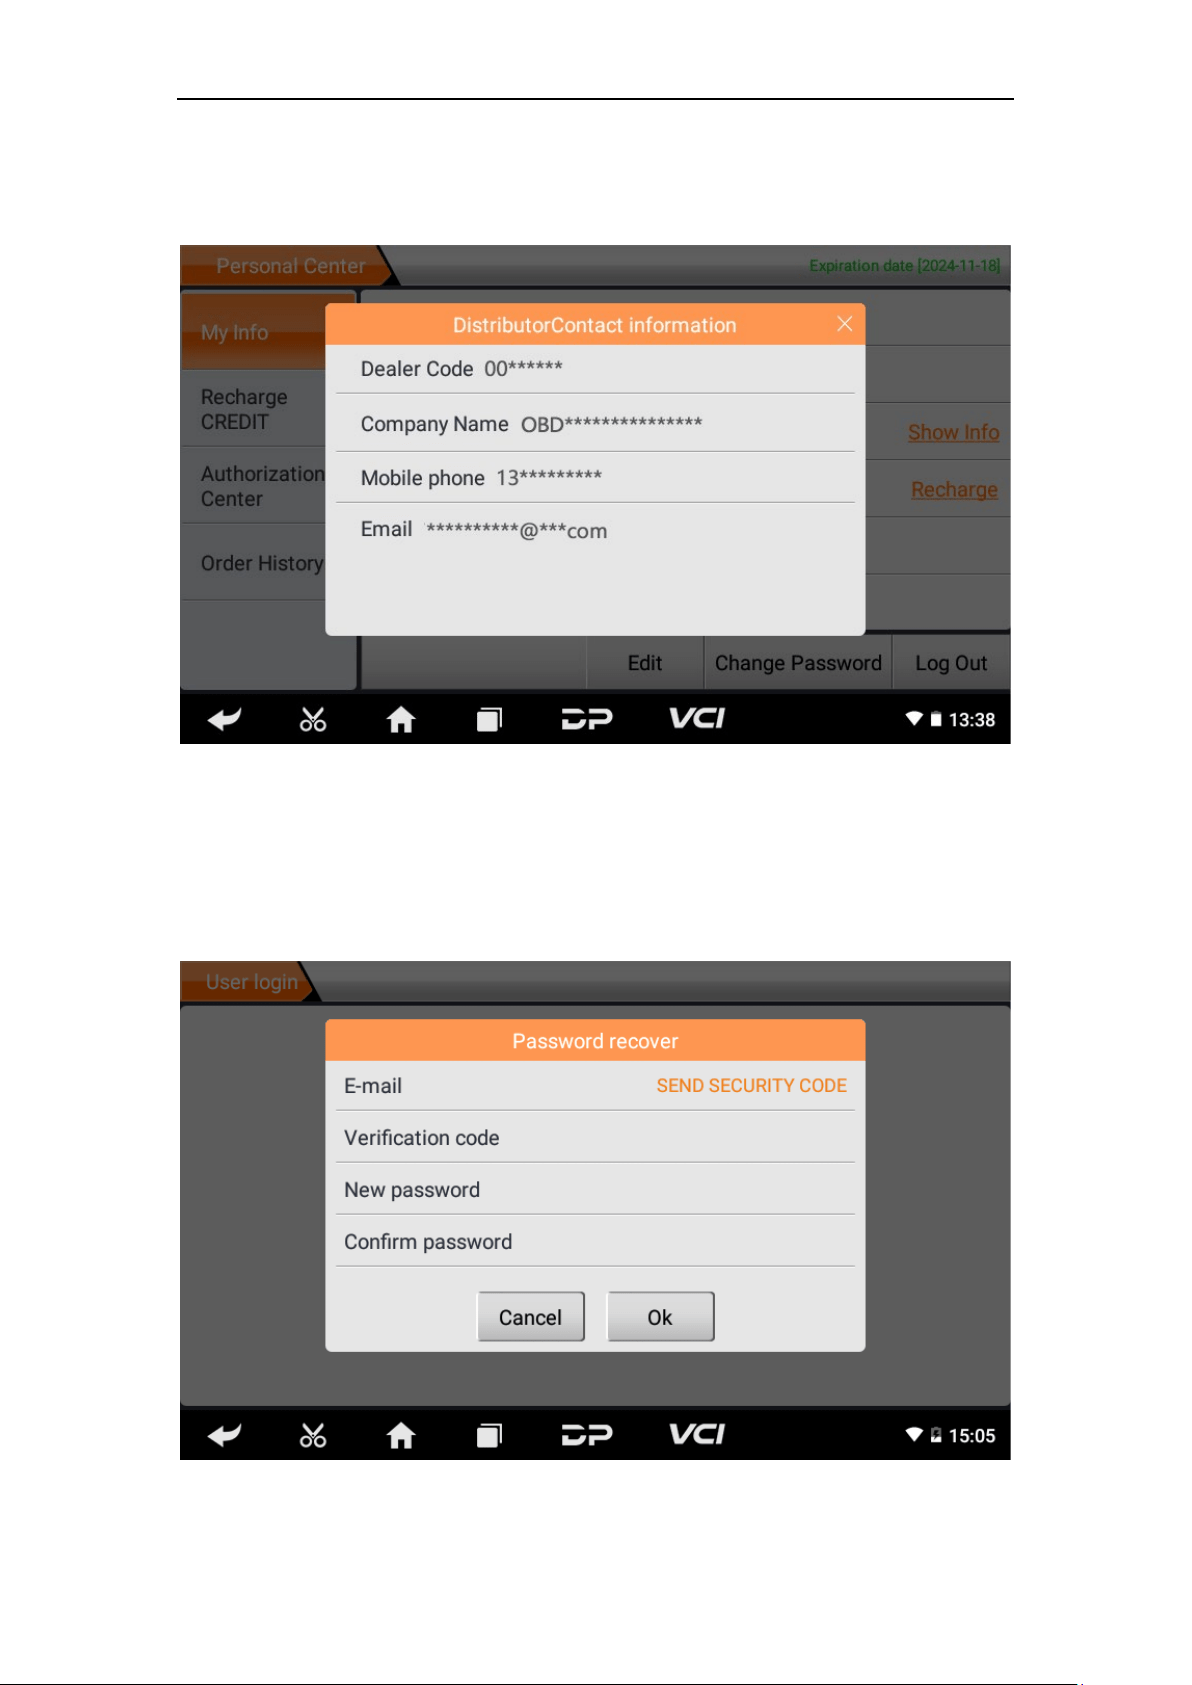
• View Distributor Information
Click "Show Info" to view the Distributor Contact Information.
• Recover Password
Click on the forgotten password in the login interface to enter the
password recover interface, fill in the relevant information to
recover the password.
18
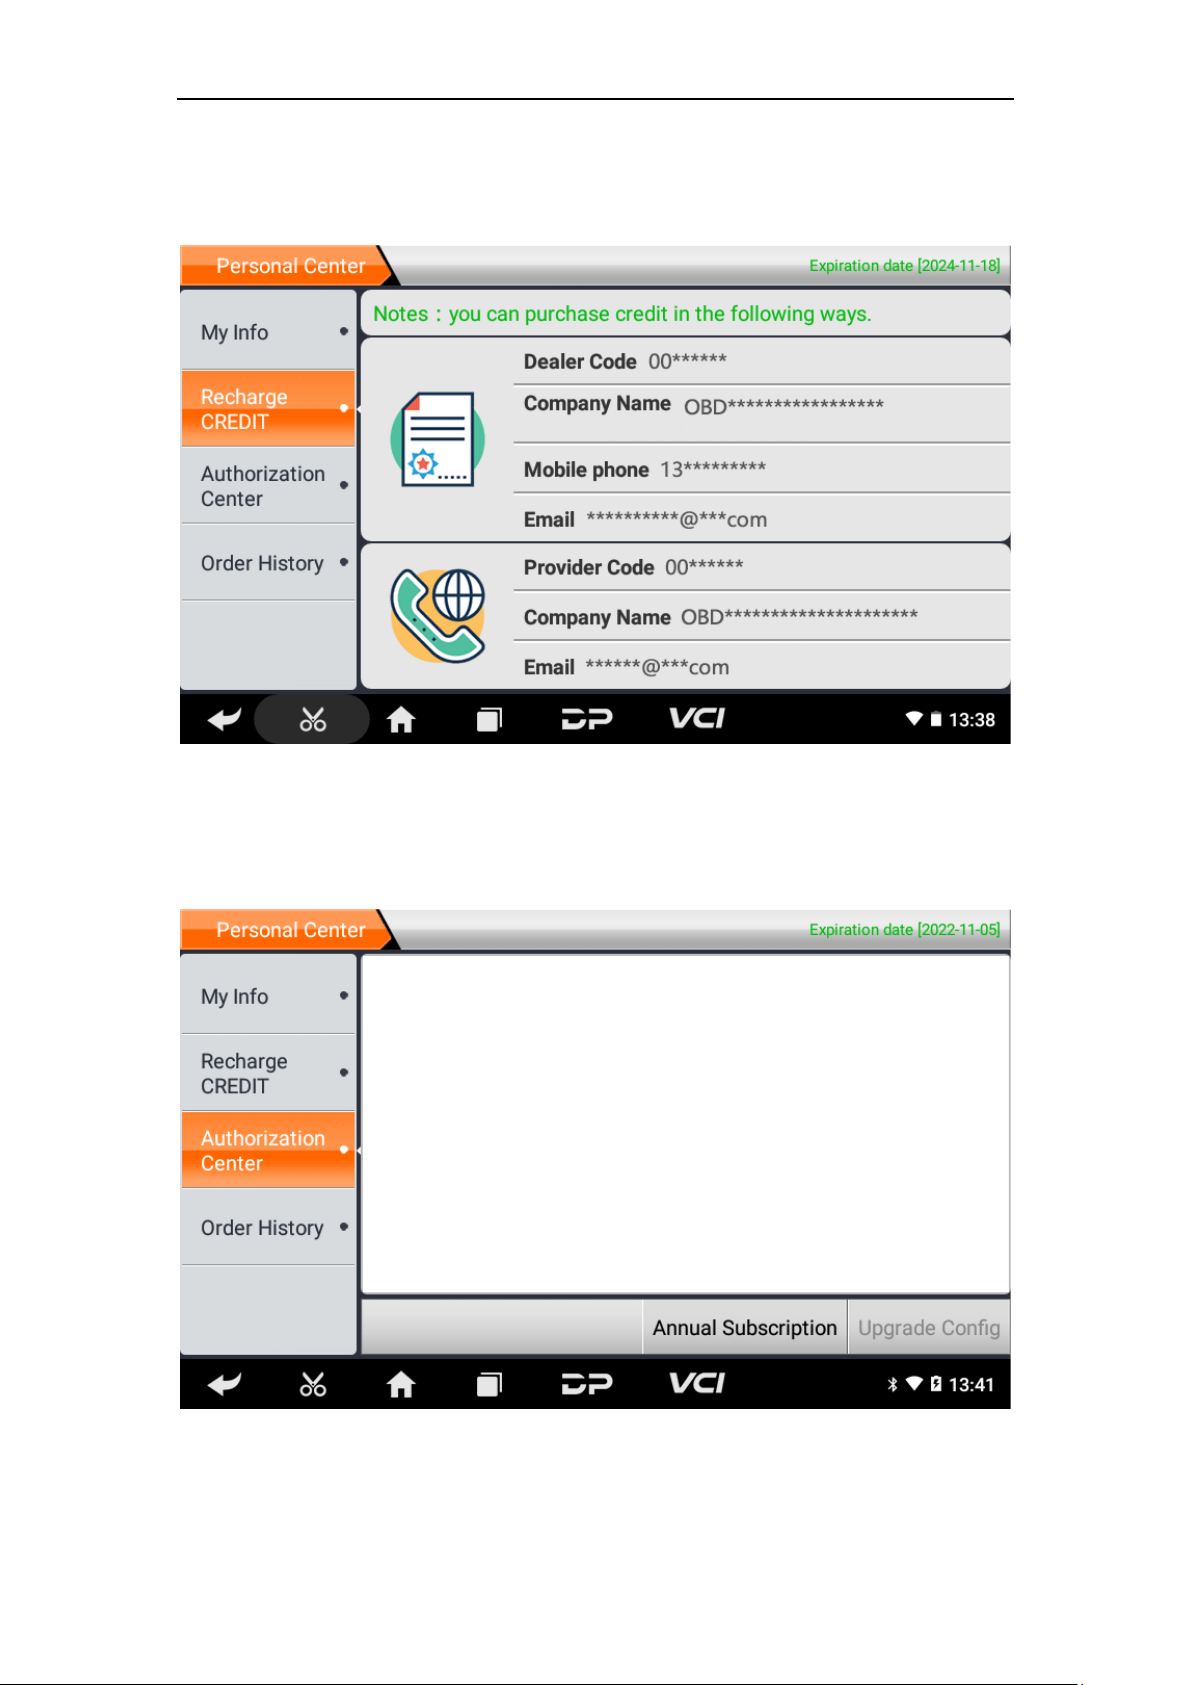
• Recharge CREDIT
Click "Recharge CREDIT" to recharge through 2 contact methods.
• Authorization Center
Click "Authorization Center" for the yearly subscription and
configuration update. (Note: this function is currently not active)
19
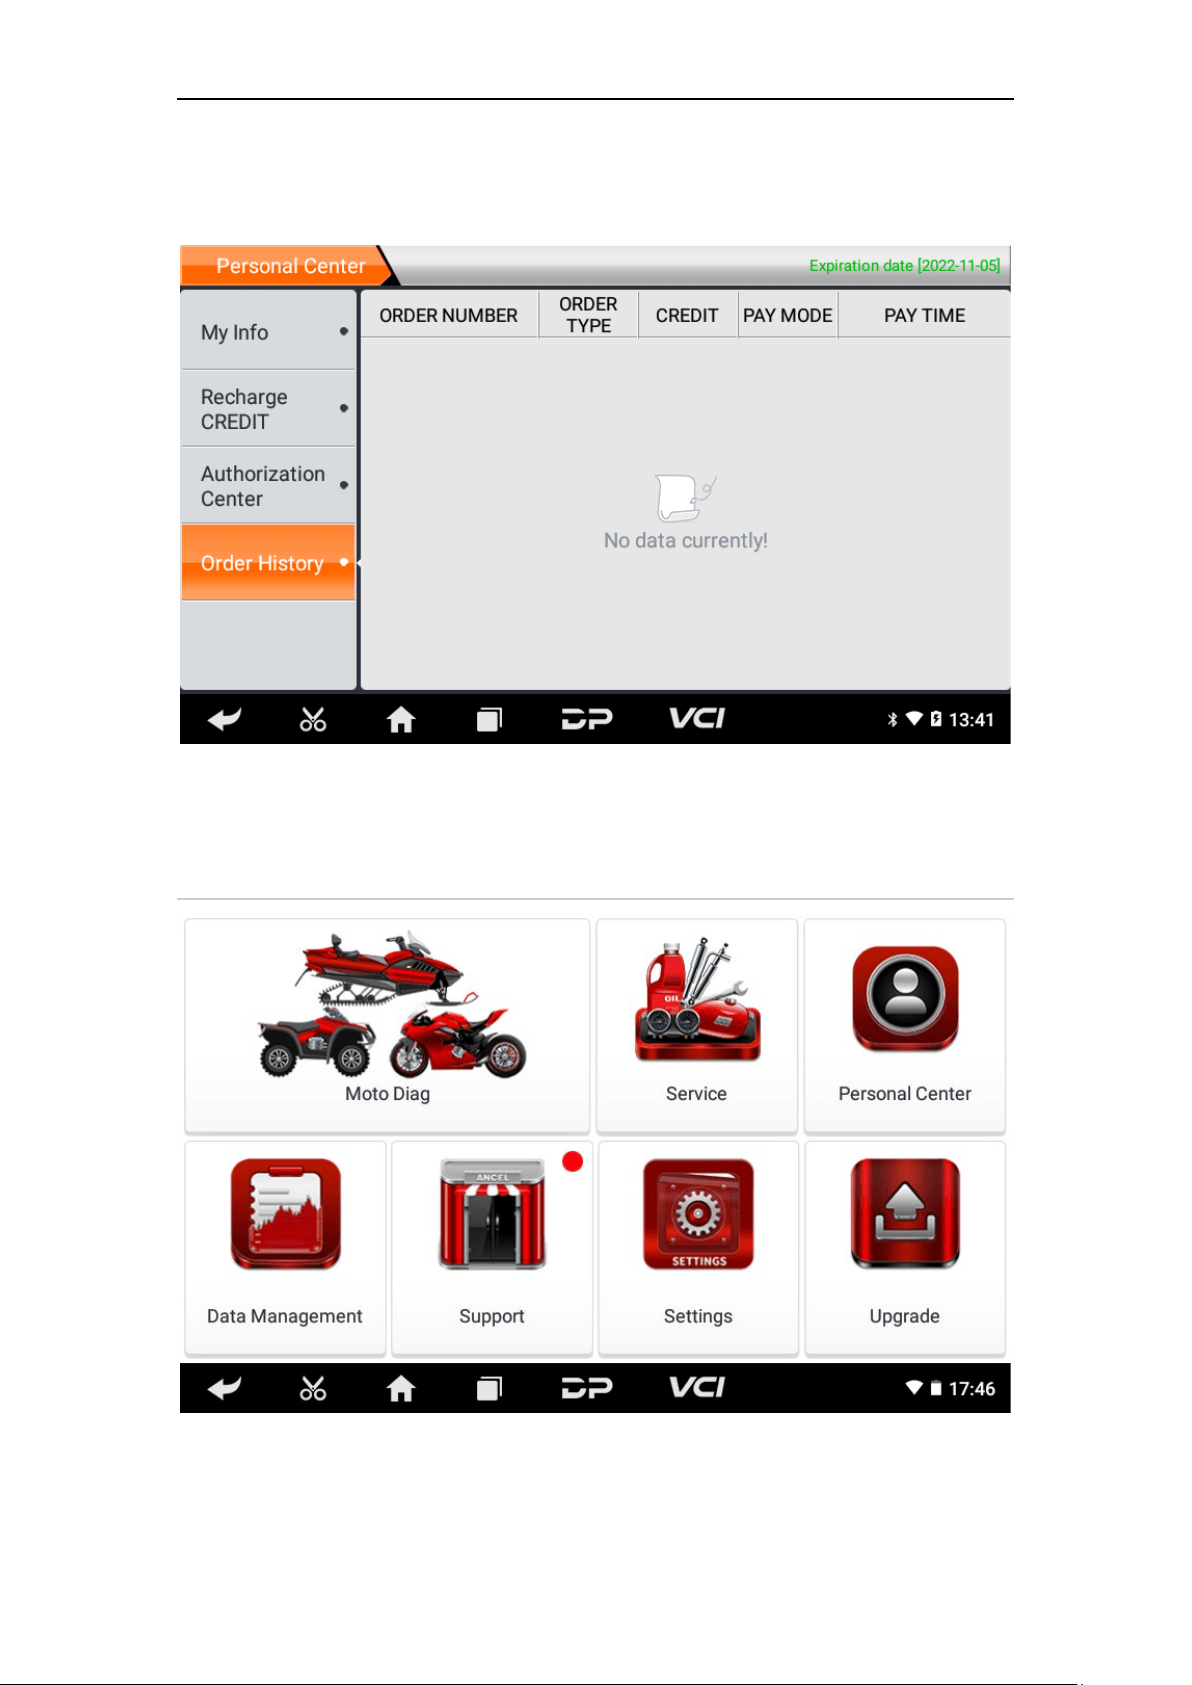
• Order History
Click "Order history" to view the history of orders.
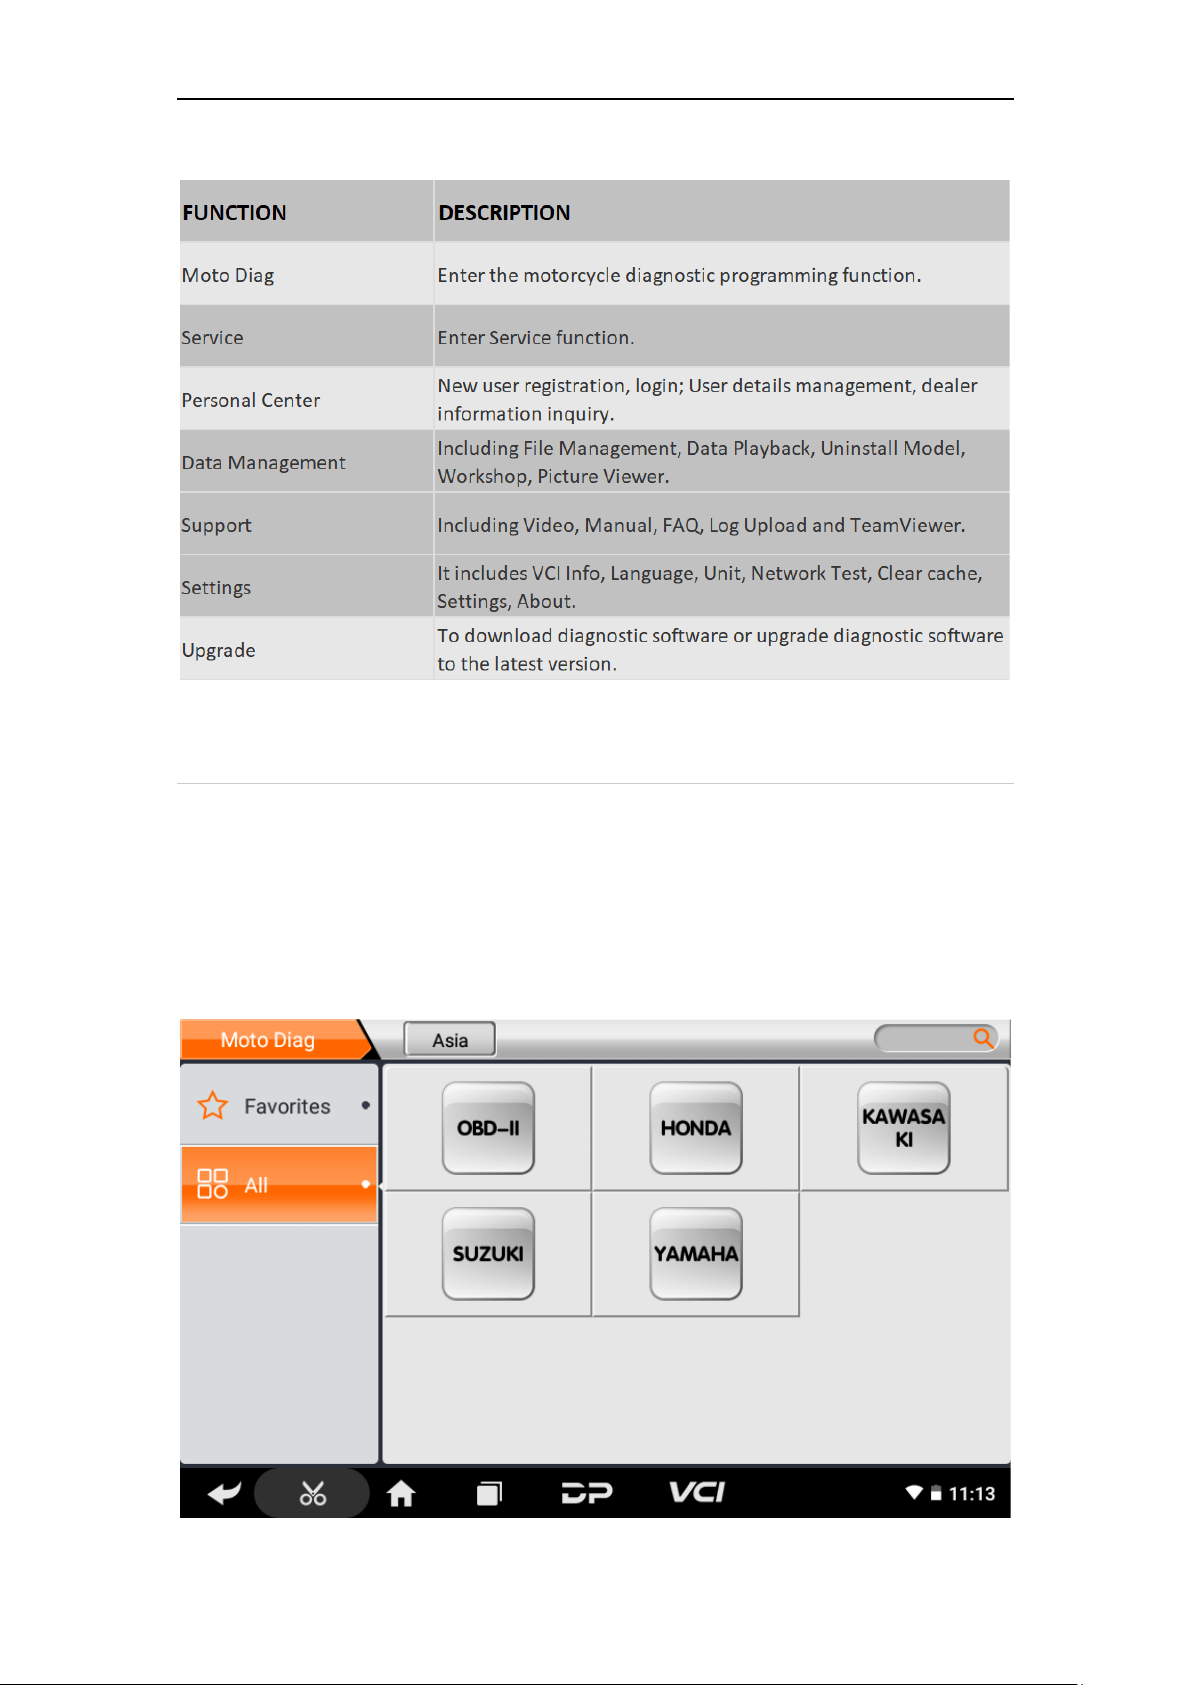
4. Diagnostic Software Main Interface Introduction
20
The main interface is divided into the following functions:
5. Start Diagnosing
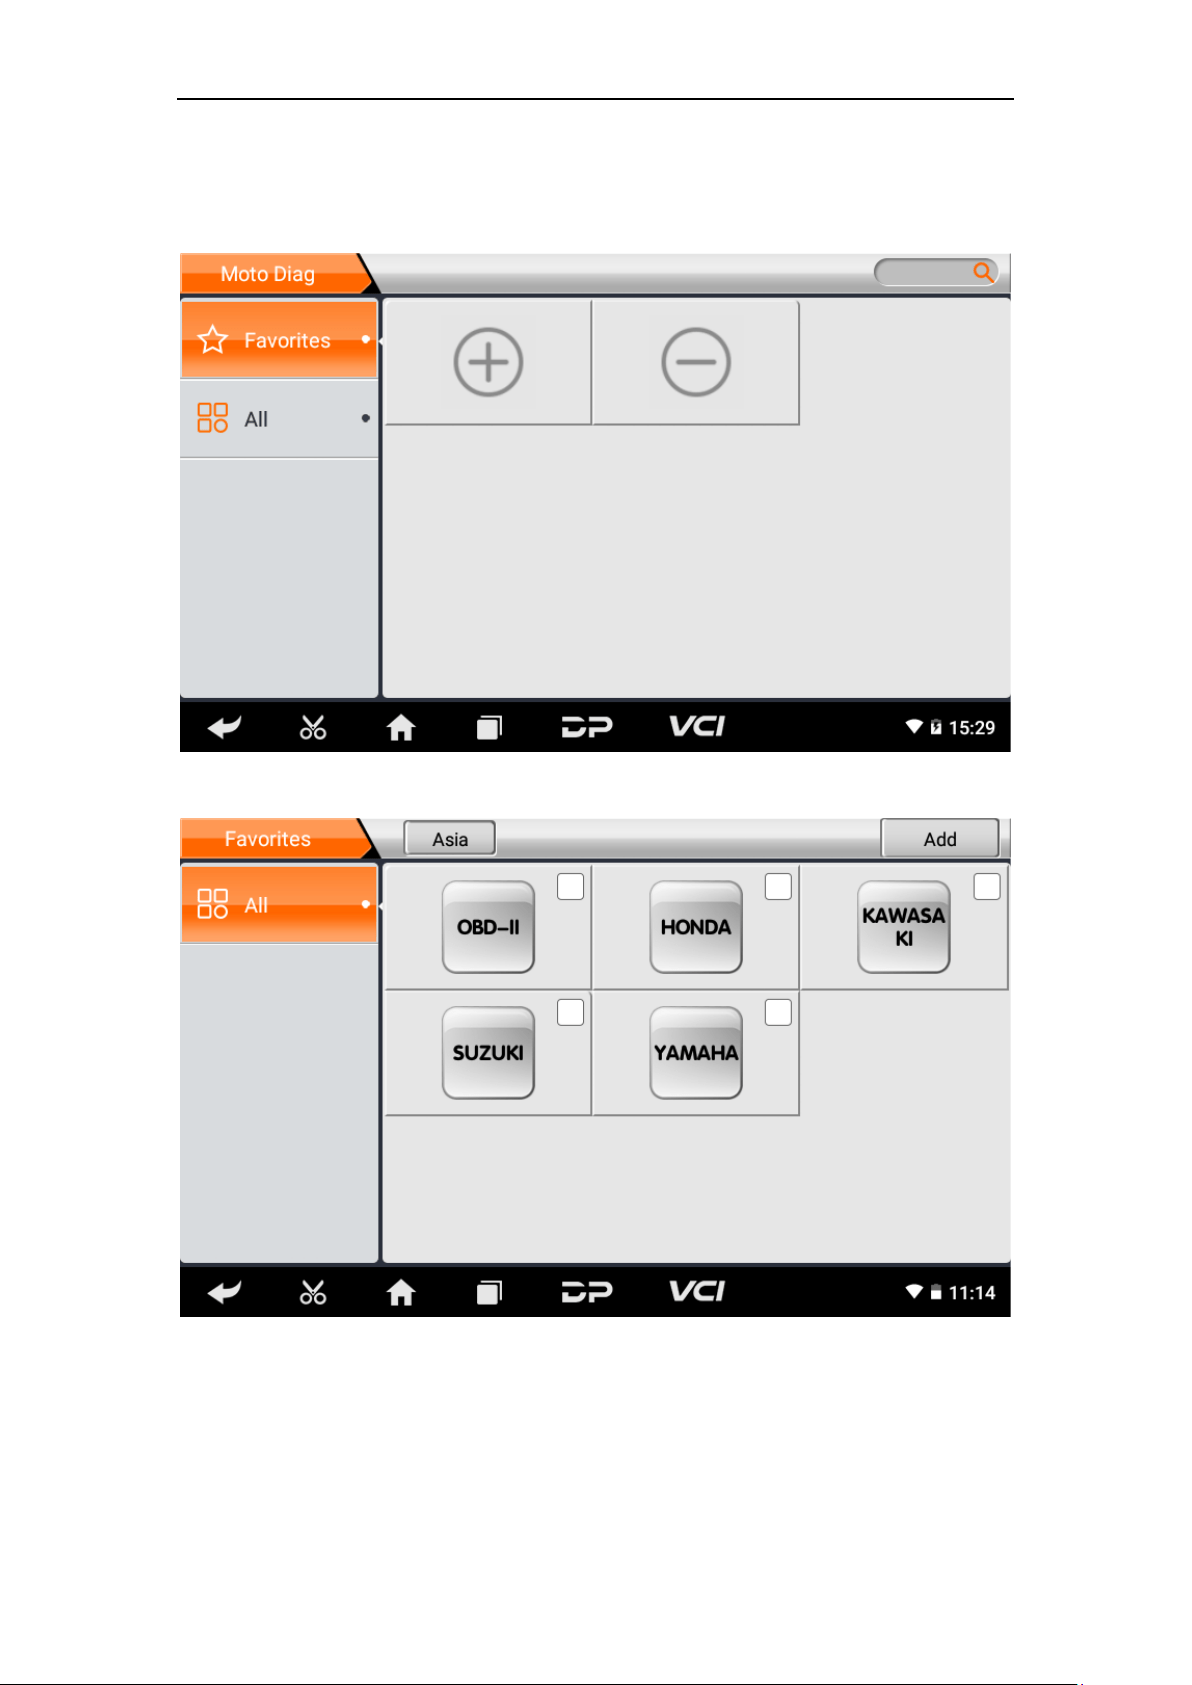
Click "Moto Diag" in the main interface to enter the function selecti
on and model selection interface, and enter the "All" menu path by
default.
Different product configurations are equipped with different softwa
re, please refer to the actual software. The software provided in the
following operations is only for reference and guidance.
21
Select "Favorites", click the plus sign to enter the interface for
selecting vehicle series, tick the square in the upper right corner of
vehicle logo, and choose to add to favorites:
22
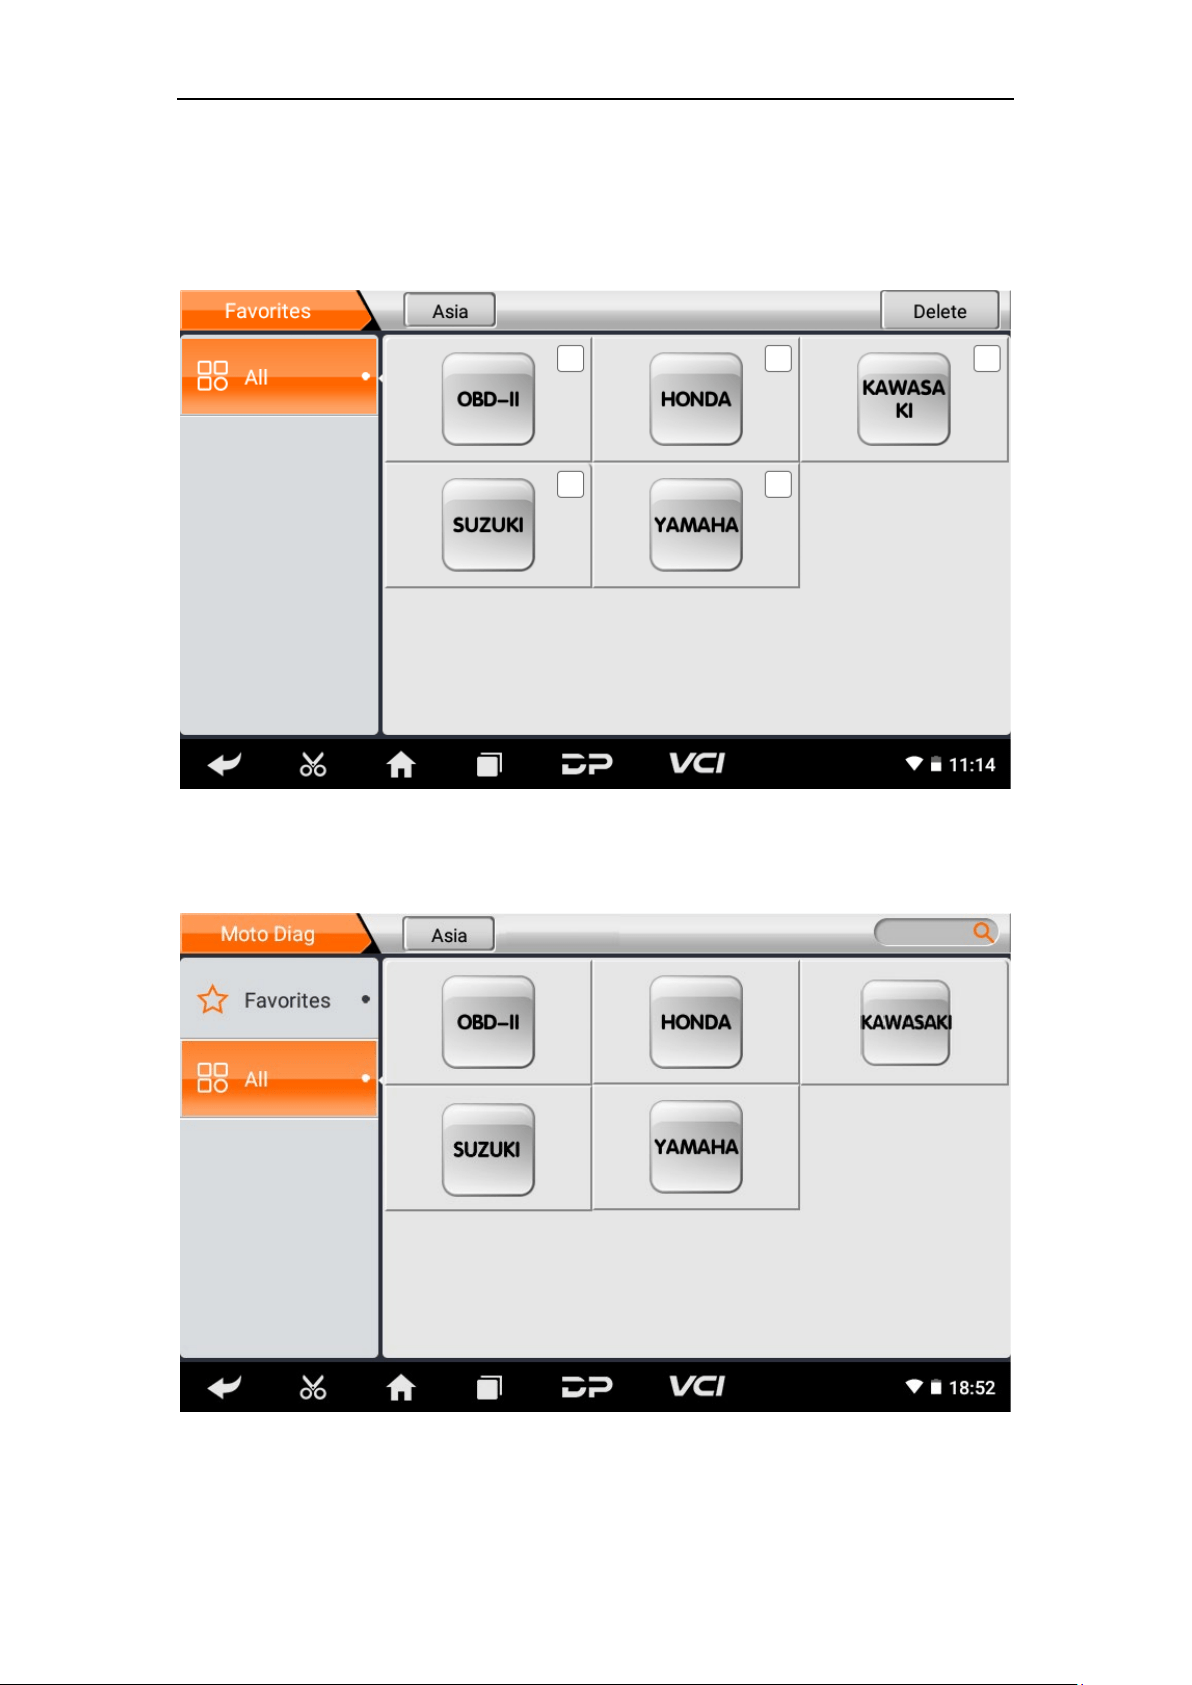
If you want to delete favorite vehicles from Favorites, click the
minus sign to enter the interface for selecting vehicle series, tick the
check box in the upper right corner of vehicle logo, and select
Delete.
You can see all the downloaded software of the machine
configuration. OBD II software defaults to each area, and in the first
position:

23
The following takes OBD II as an example to introduce how to start
the diagnosis. Click the “OBD-II Engine” icon under the menu of
other special functions and select the software version. As shown
below:
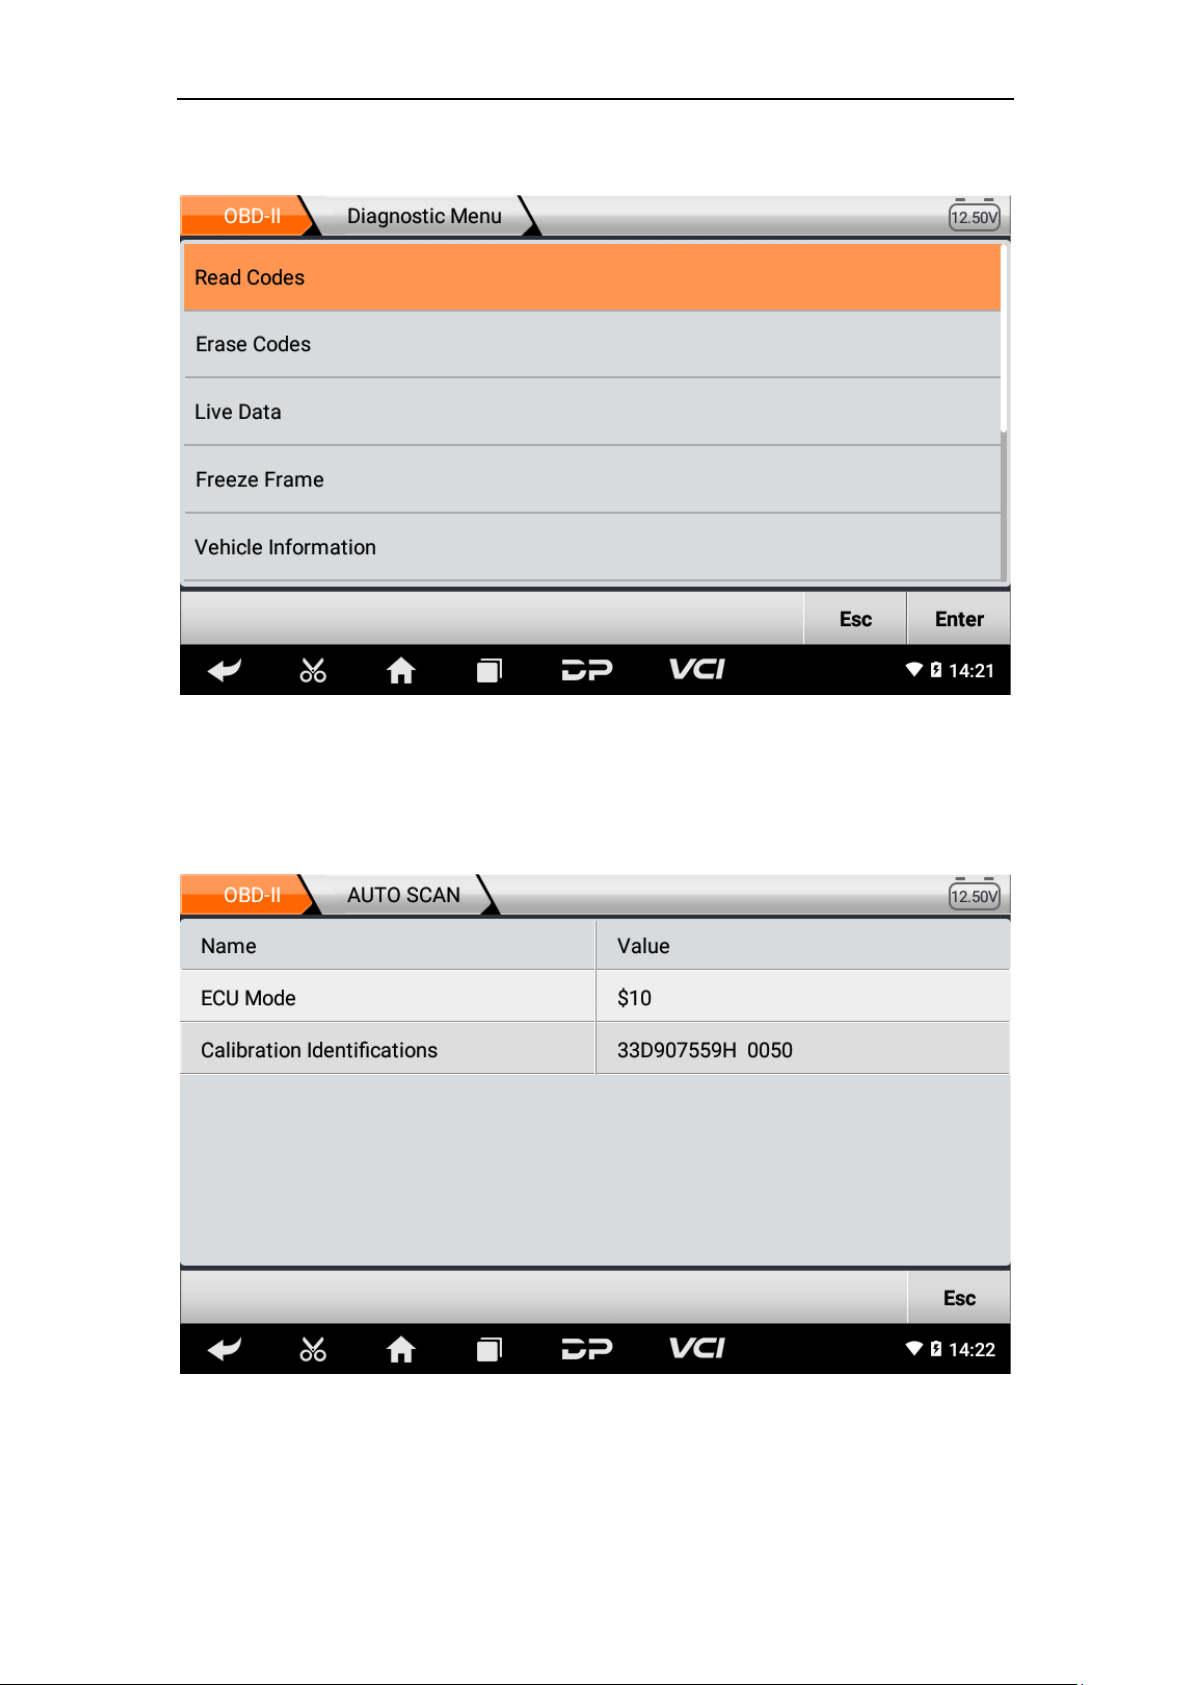
To enter diagnostic function menu. As shown in the figure below:
24
Select AUTO SCAN. As shown below:
1. Read vehicle information
Tap “Vehicle information”. As shown below:

25
2. Read Stored Codes
Tap “Stored Codes”. As shown in the figure below:
26
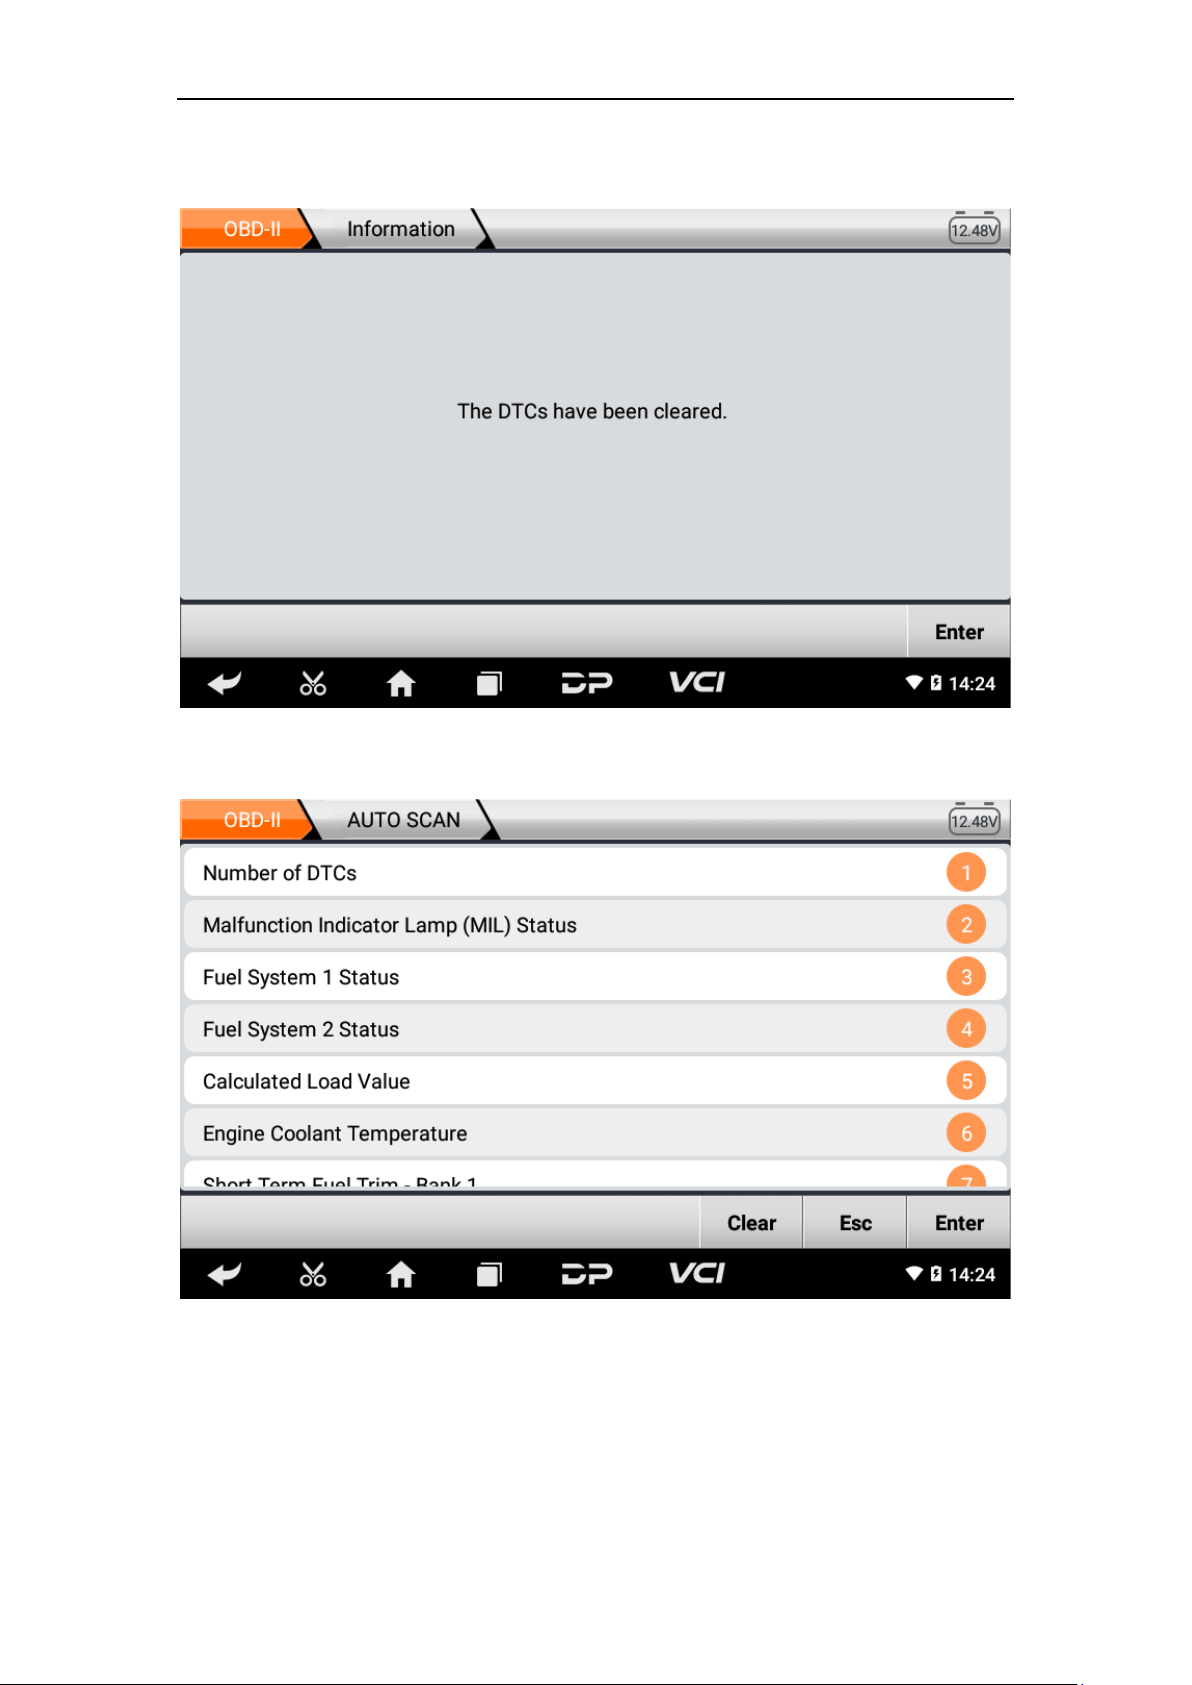
3. Clear trouble codes
4. Read data stream

27
6. Data Management
You can enter File Management, Data Playback, Uninstall Model,
Workshop and Picture Viewer.
28
• File Management
You can view the related information in the files;
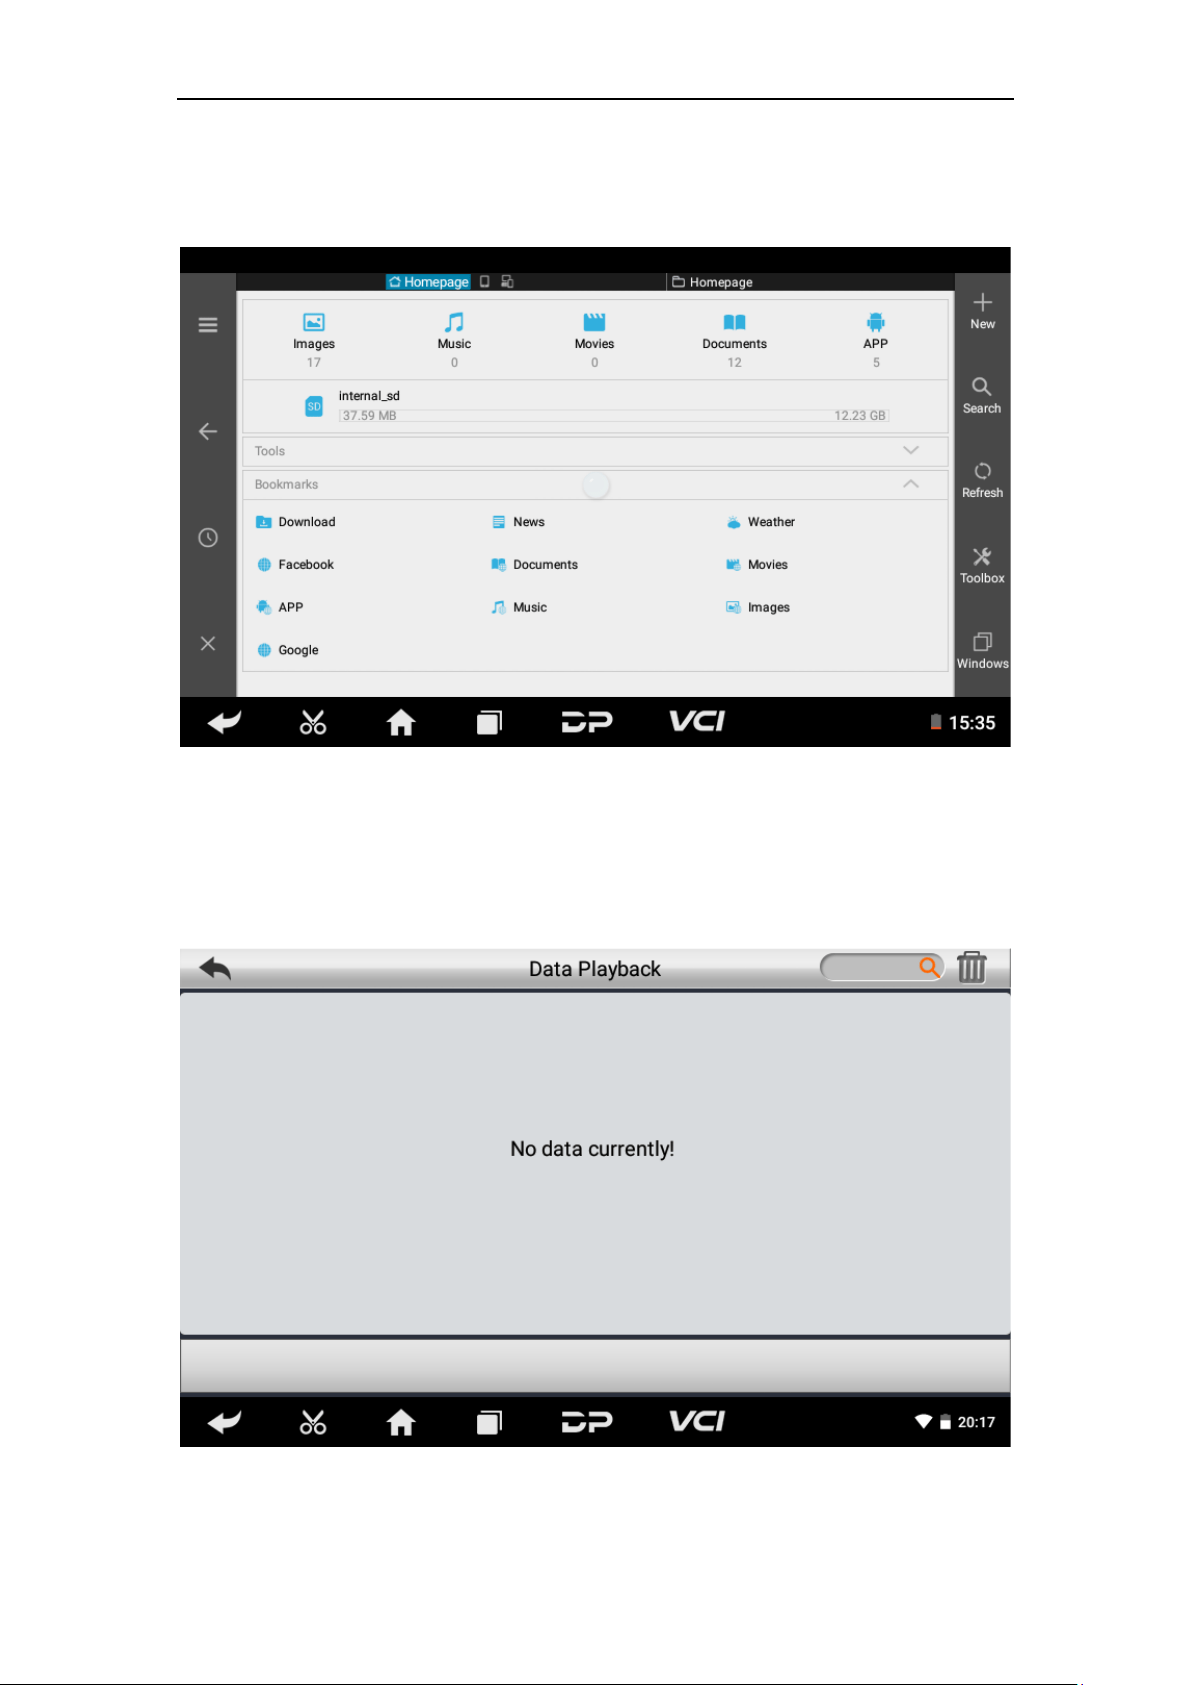
• Data Playback
Data stream has the function of recording and playback, which can
realize dynamic data comparison with the interface, and can easily
and quickly find the abnormal data.
29
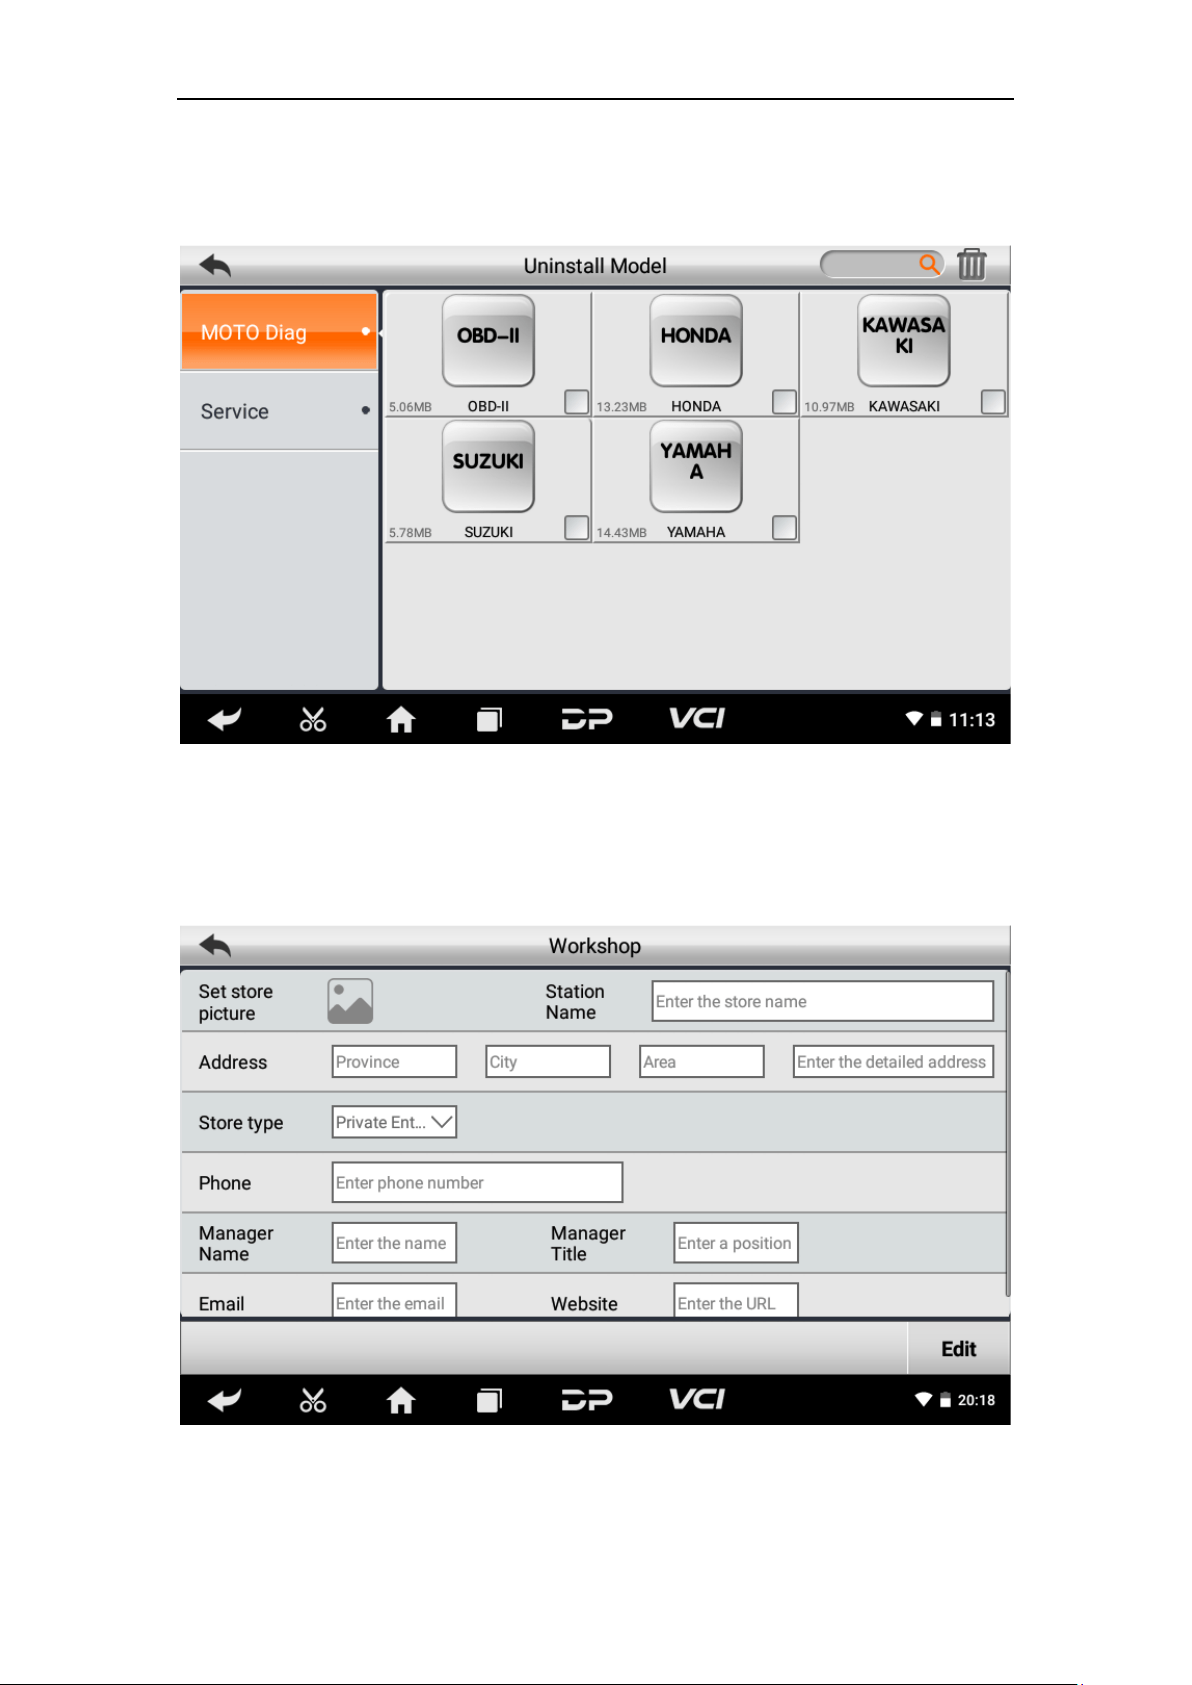
• Uninstall Model
You can uninstall related vehicle models;
• Workshop
You can use it to set the information of shops;
30
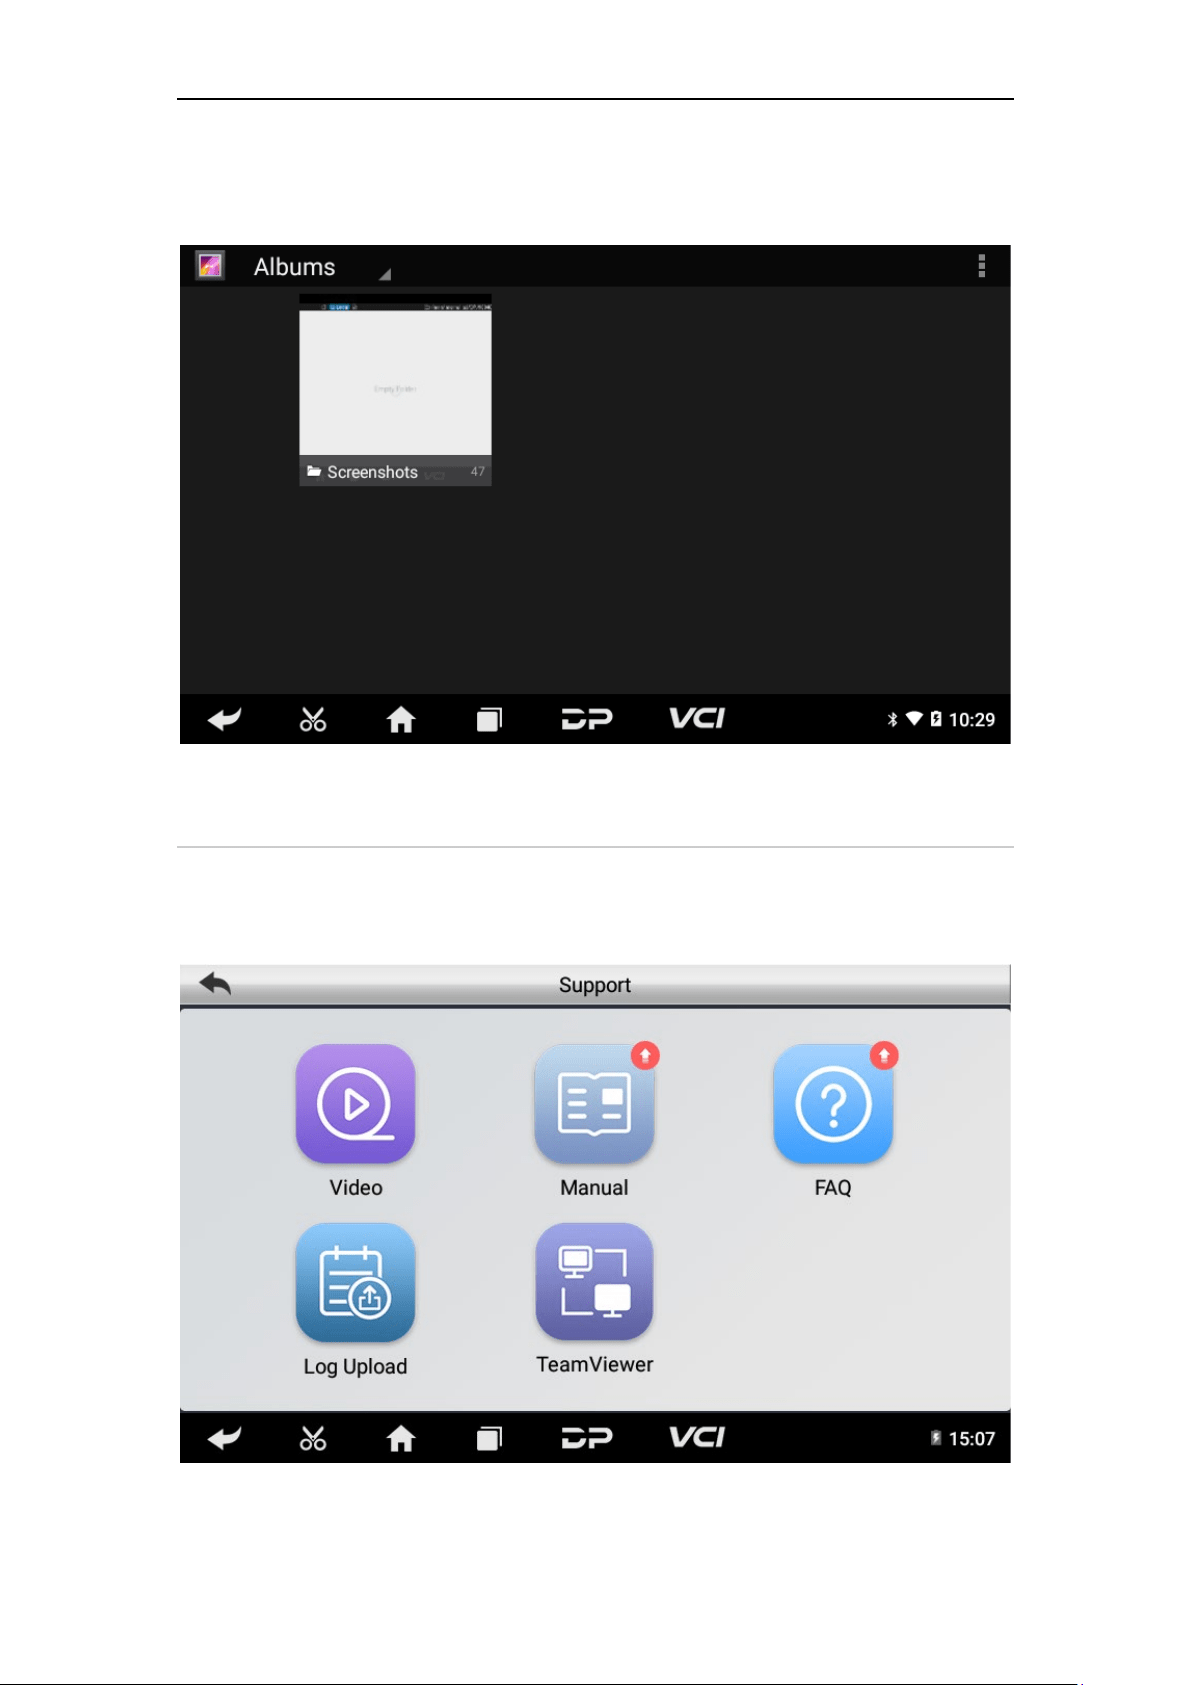
• Picture Viewer
You can browse the related pictures saved in this machine.
7. Support
We have a powerful maintenance database and detailed product
introduction information.

31
• Video
Connect the diagnosis function operation videos of the actual
vehicles.
• Manual
Introduce the instruction manual of this product, and exhibit the
basic information of the device, diagnostic instructions, upgrades,
other applications and additional explanations of the company's
products in the device.
32
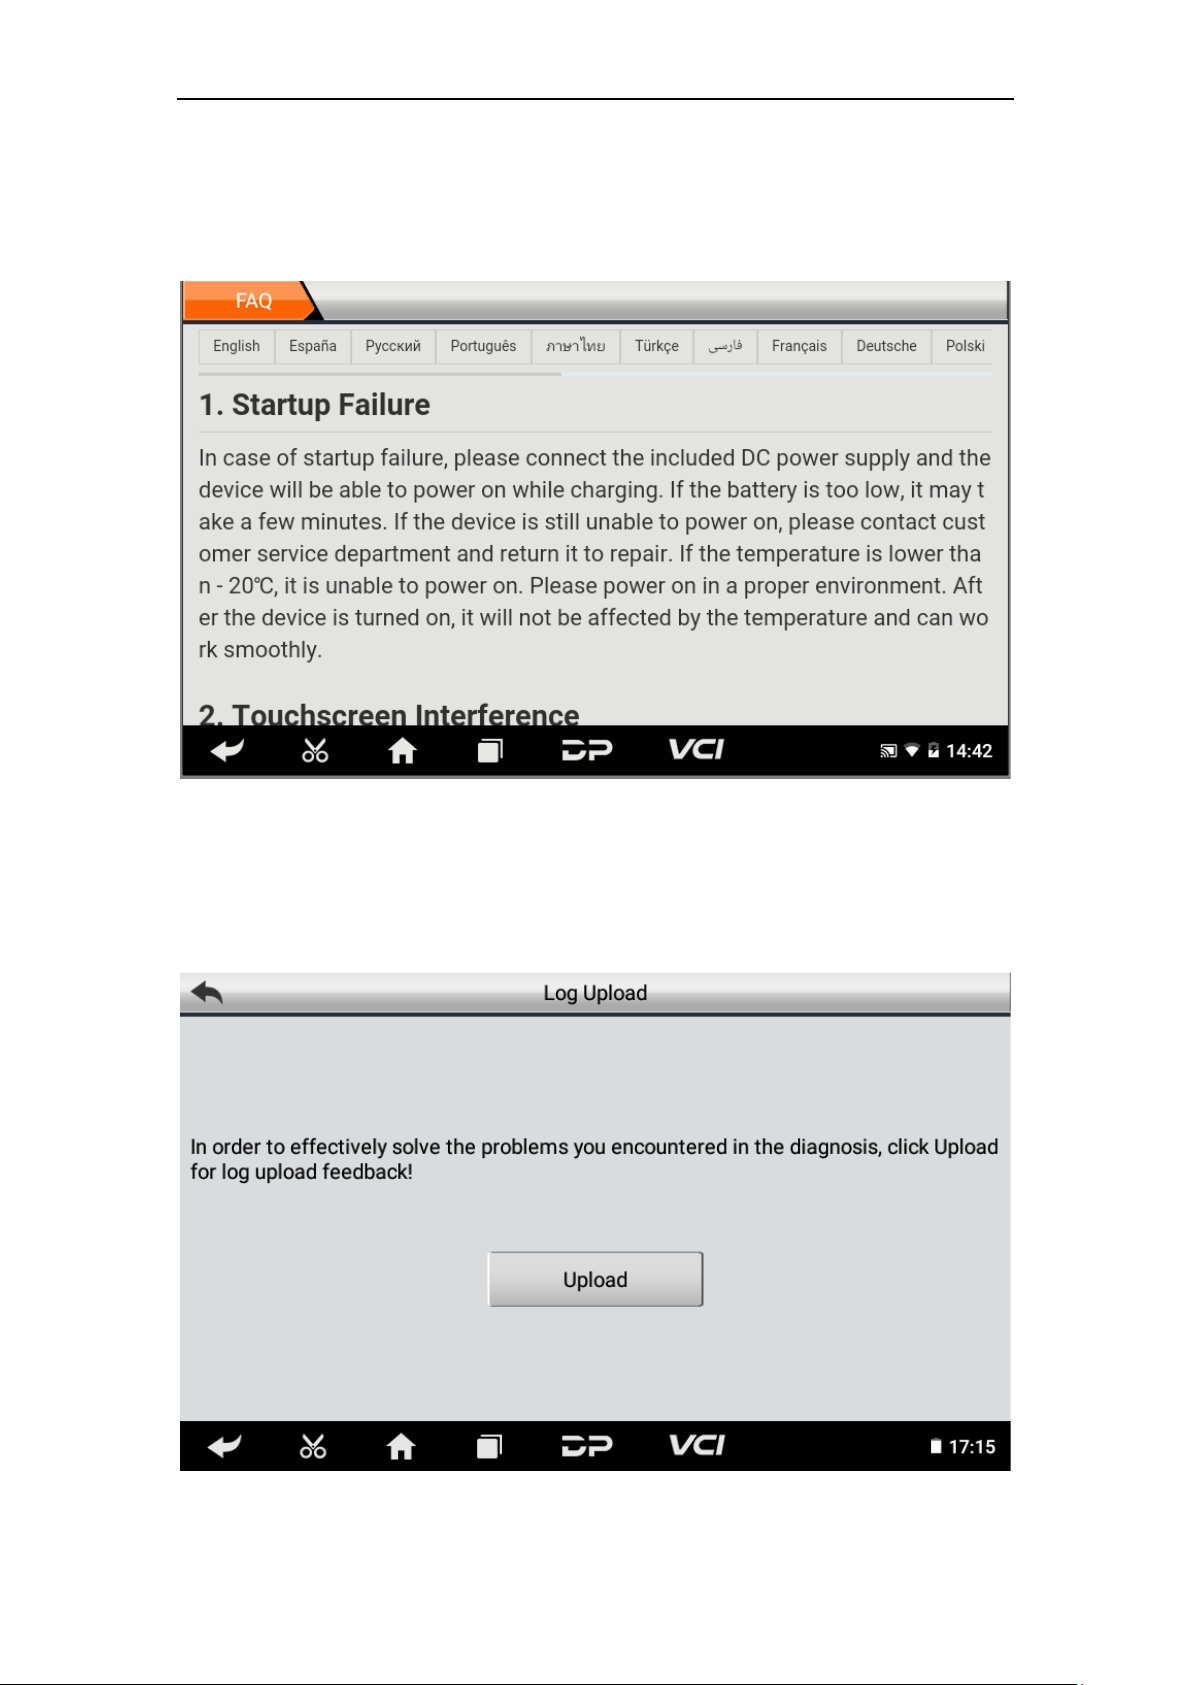
• FAQ
Summarize some common problems encountered during product
use.
• Log Upload
Manually upload the log files generated by the abnormality when
diagnosing the vehicle.
33
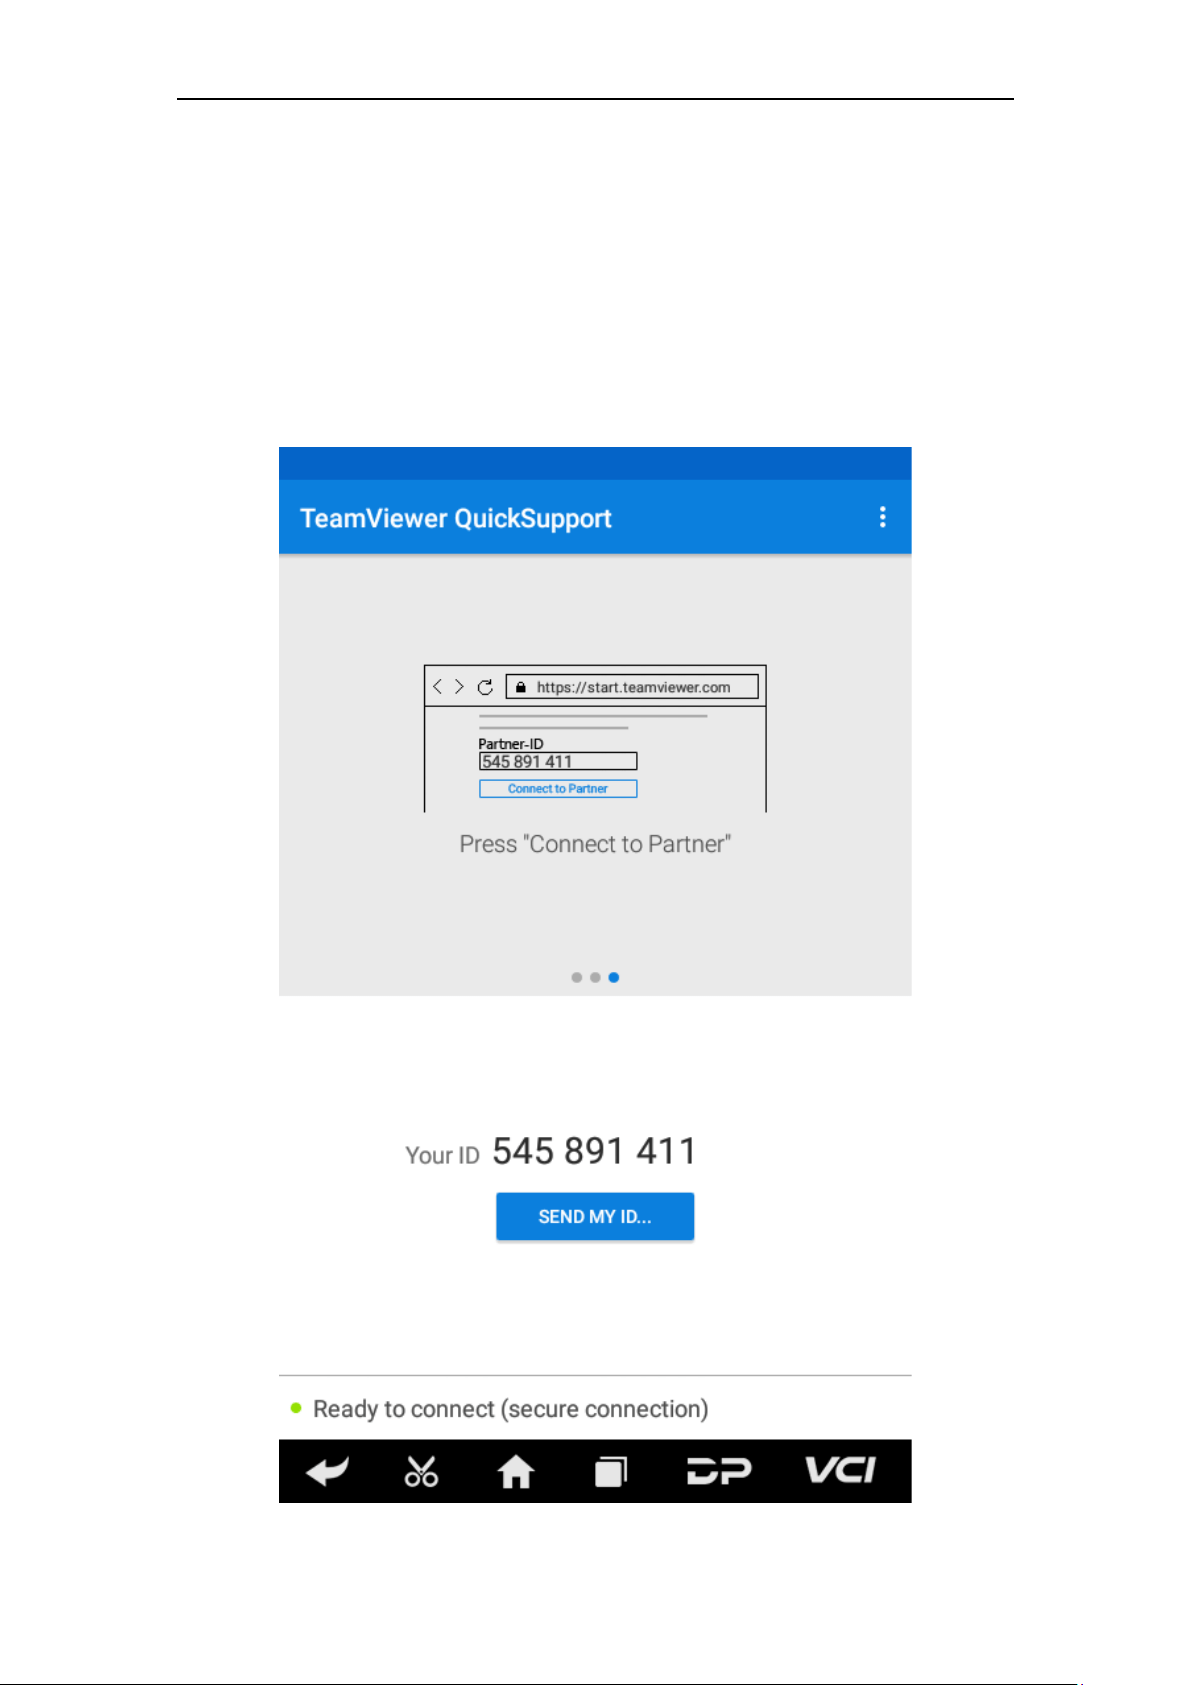
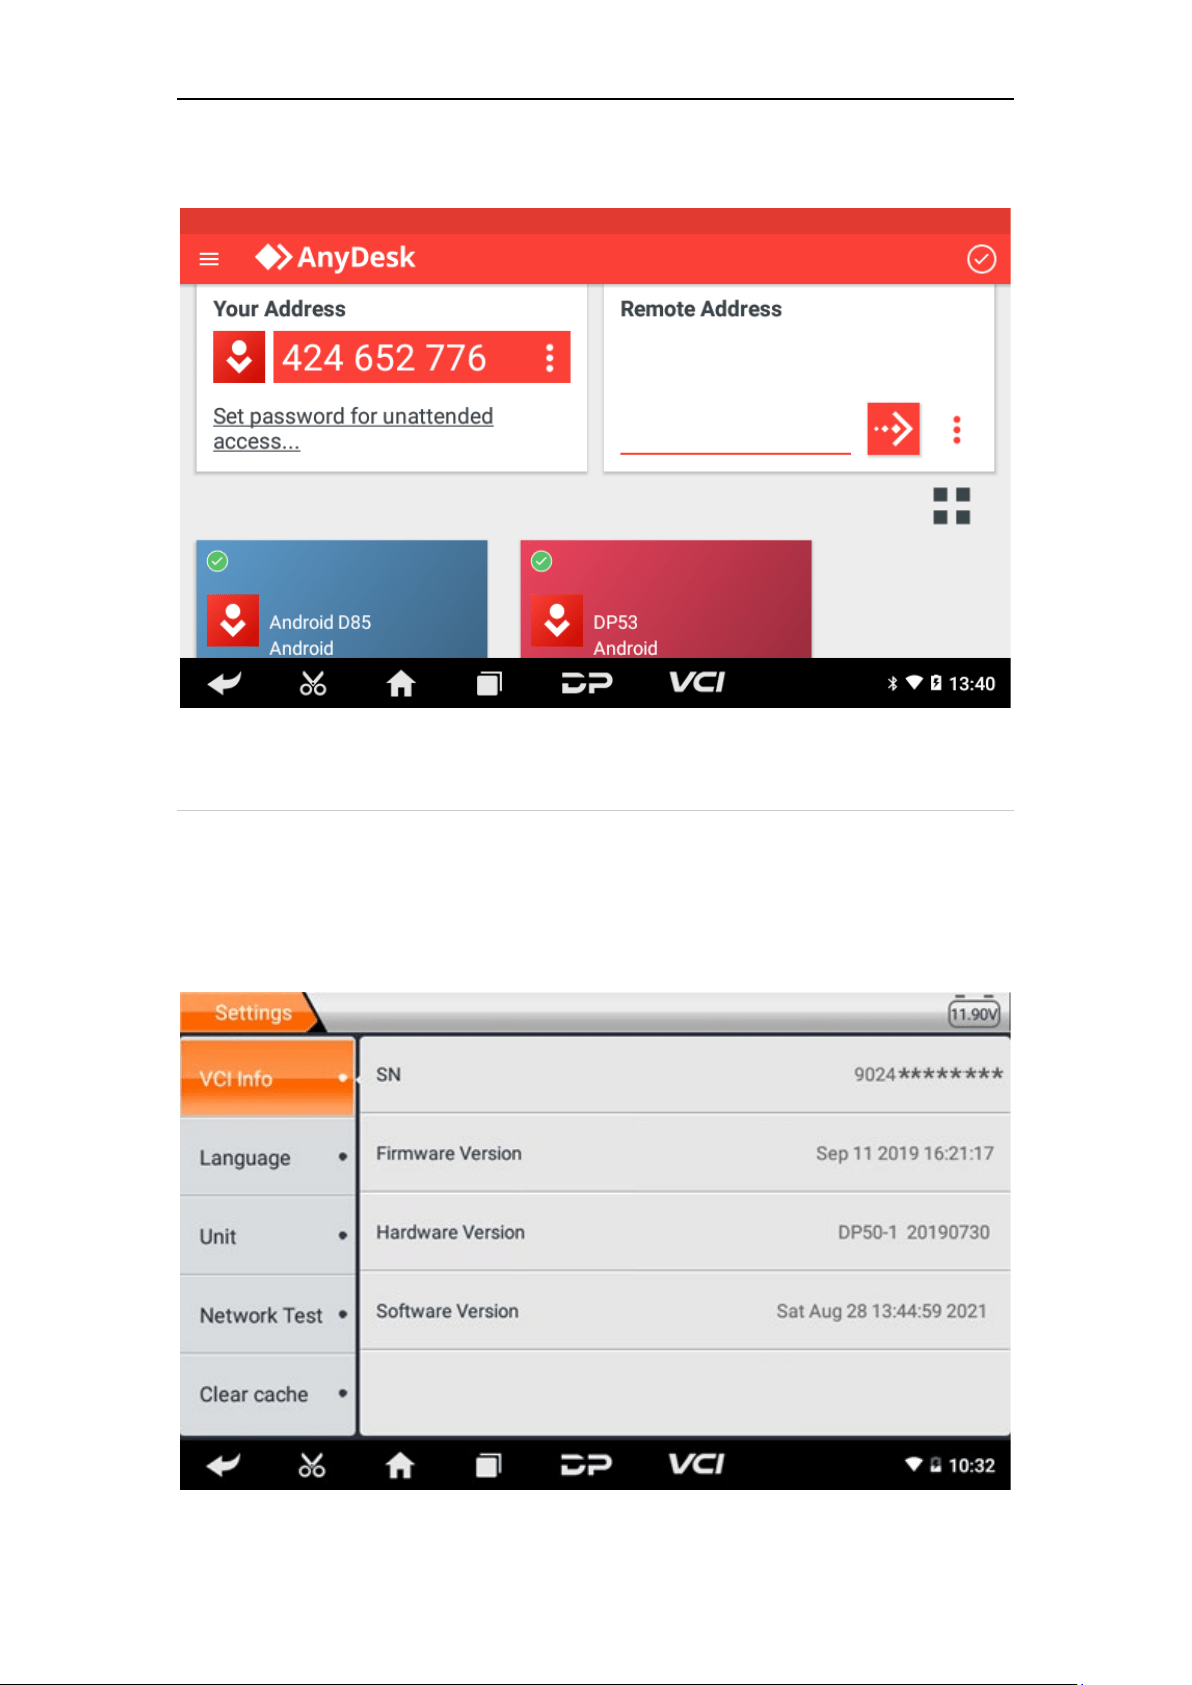
• TeamViewer
This application can realize remote hos operation via third party's
software: "Quick Support" or "Any Desk". (If only Quick Support is
detected, you need to use Any Desk and then return to the main
menu interface to enter.)
o Quick Support:
34
o Any Desk:
8. Settings
It includes VCI Info, Language, Unit, Network Test, Clear cache,
Settings and About etc.
• VCI Info
35
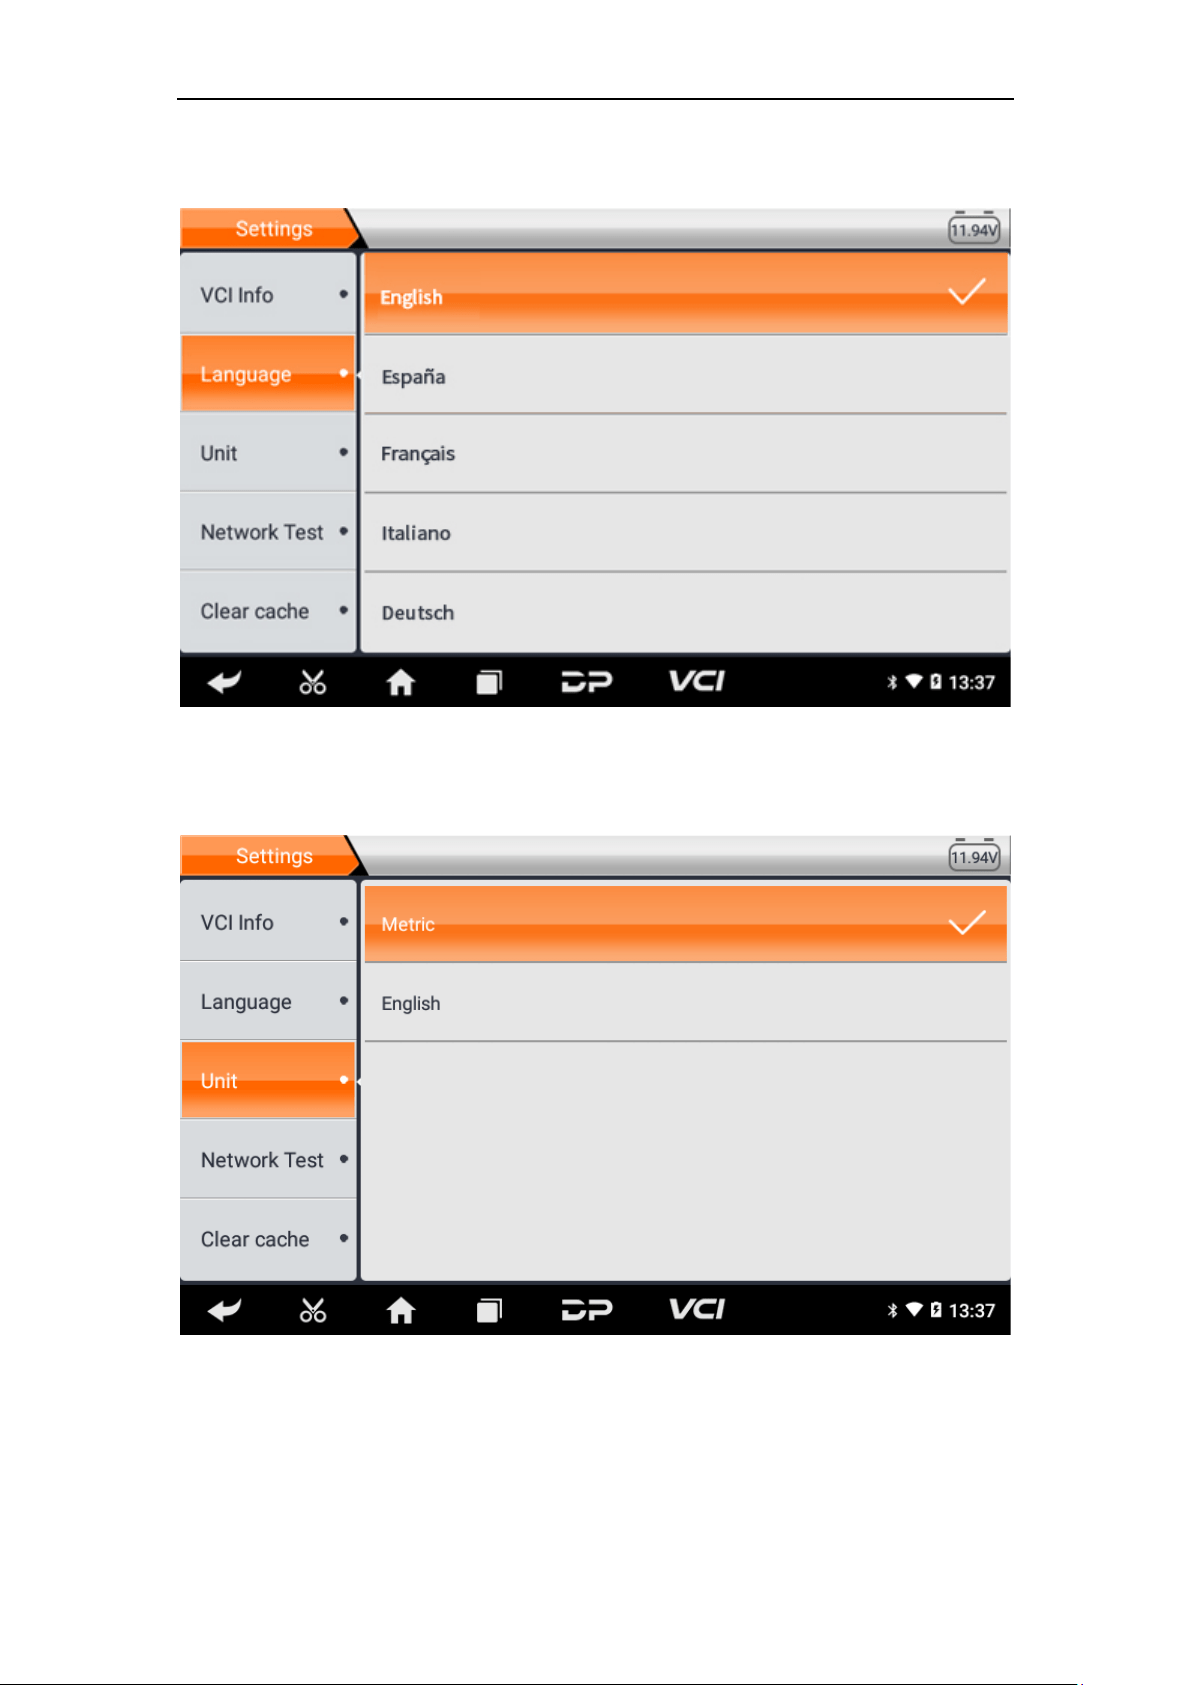
• Language
• Unit
36
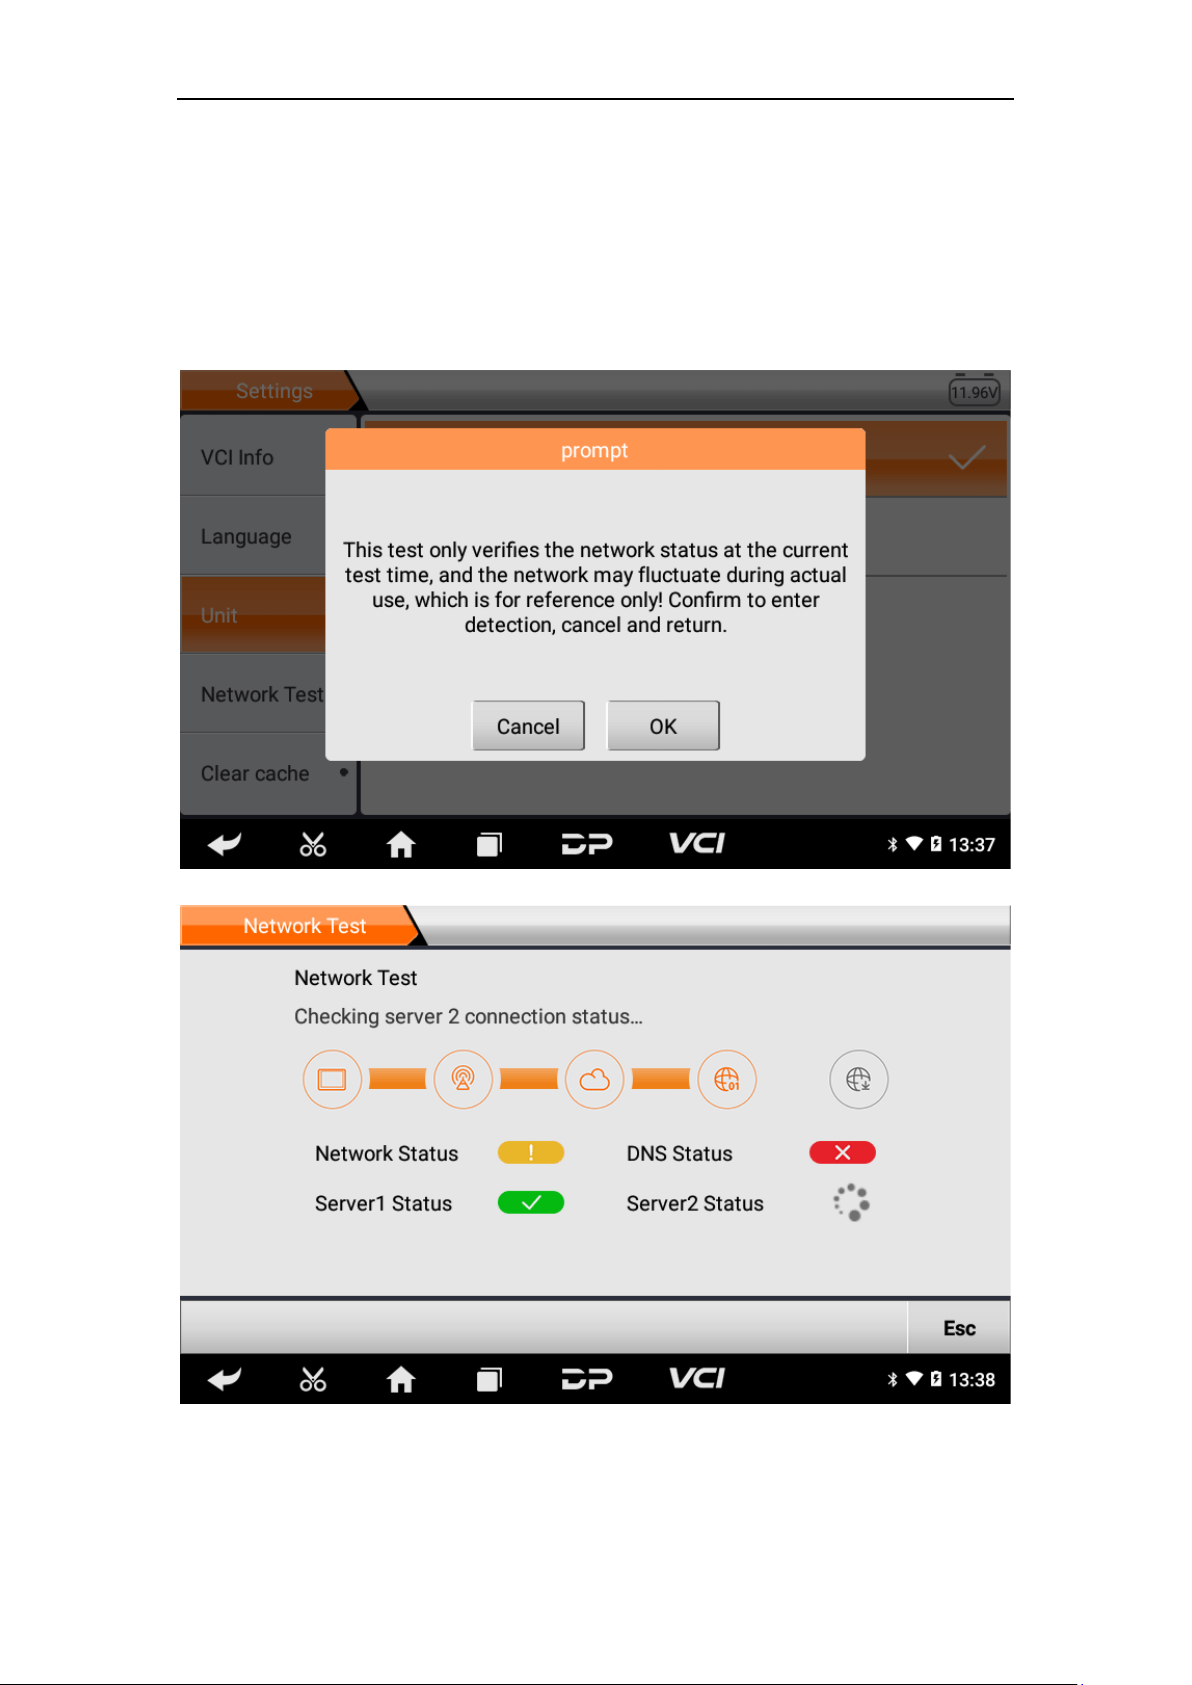
• Network Test
The network test function is convenient for network connection
failure and other phenomena during use. After submitting test logs,
engineers can analyze the network status of the machine through
the test log.
37
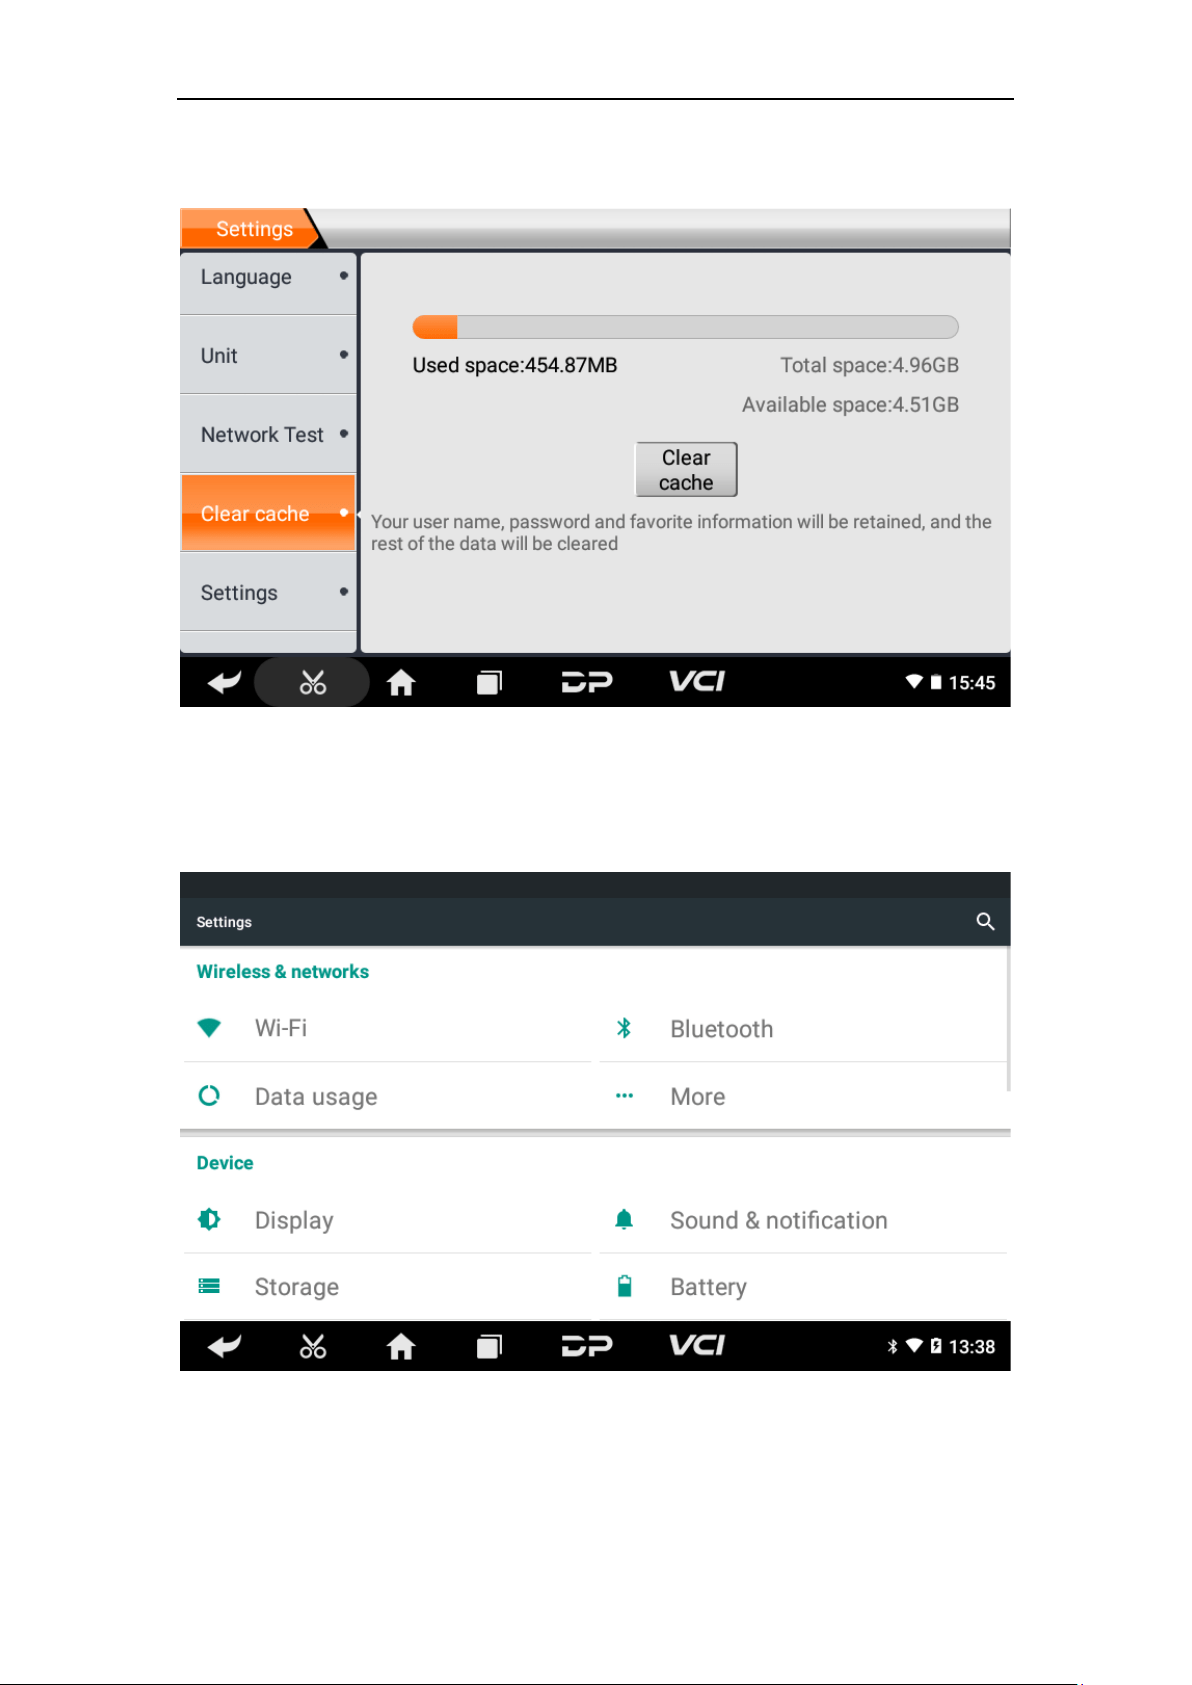
• Clear Cache
• Settings
38
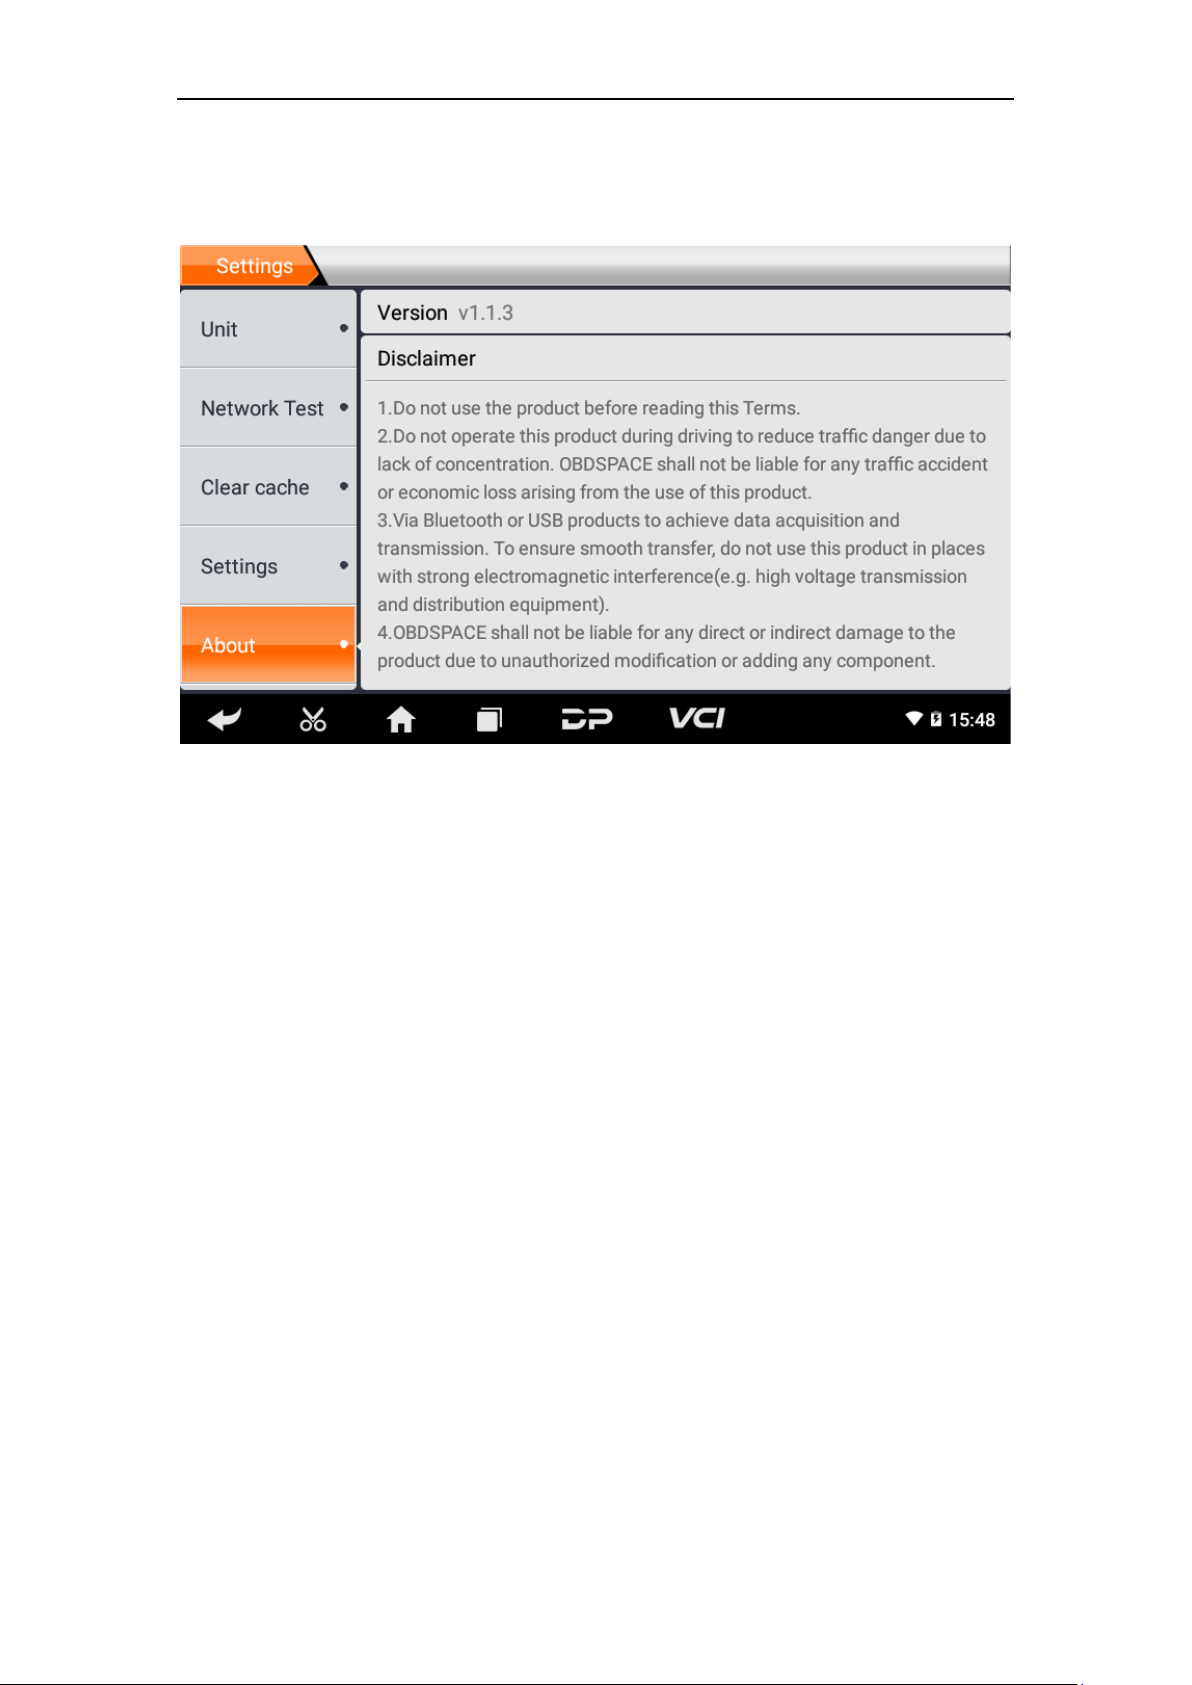
• About
Display software version updates and product announcements.

39
Chapter 4: Others
1. Wi-Fi
This function enables you to enjoy surfing on the Internet and
downloading data from the Internet via Wi-Fi.
• Turn on Wi-Fi
o Enter main menu screen, choose "Settings" > "Wi-Fi"
o When the WLAN sign appears blue, it indicates Wi-Fi has been
activated already.
Note: To prolong the battery life, please switch Wi-Fi off when
unattended.
• Connect to WLAN
Turn on WLAN, if the device is within WLAN range, it will
automatically detect and connect to the current WLAN, select the
desired network and input password, then you can surf the internet
by WLAN.
2. Browser
You can use any APP by way of browse website and network.
• Open the browser
Enter the main menu interface, click the browser to open the
browser homepage, you can choose the desired homepage or input
the website address to browse.
o Tap to input or edit the web link.
o Web page display area.
o Tap to open bookmarks, view history and saved web pages.

40
• Browser webpage
o Open the browser.
o Input the web address, and tap "Go" on the keyboard to visit the
website.
Tips: Alternatively, you can also tap and select "Bookmarks/History"
from the pull-down list to choose the web link you want to access.
o Once a webpage is open, slide the screen with your fingertip to
view other hidden content.
• Zoom in/Zoom out a page
There are two ways to zoom in/ zoom out while browsing a
webpage.
o To zoom in so that the text on a webpage appears in a column
that fits your device’s screen, double-tap with the tip of your
finger.
o To zoom in manually, place two fingers on the screen and then
spread them apart. To zoom out, either double-tap again or
place two fingers apart on the screen and then pinch them
together.
• Save favorite webpages to bookmarks
o While browsing a webpage, tap , and choose "Save to
bookmarks".
o Edit a label for the bookmark.
o Tap "OK" to confirm and save it.
• Open multiple pages
The browser allows you to open multiple web pages and you can
toggle between these pages.
o While browsing a webpage, tap and open new window.
o Another web page will be displayed in the new window.

41
• Customize internet settings
While browsing a webpage, choose "Settings", you can view or
change browser settings, privacy & security setting and advanced
setting etc.
3. Gallery
This option is used to manage pictures and video files.
• Open the gallery
Enter main menu screen, tap "Gallery" to access it. The system
searches images and videos in this device and SD card automatically,
and categorizes it into corresponding folders.
• View a photo
1. Enter main menu screen, tap "Gallery".
2. Tap the picture folder you want to view.
3. Tap the desired image to browse.
4. Swipe the screen rightwards or leftwards to view the
next/previous picture.
4. Music
Music files are stored into 4 categories: Artists, Albums, Songs and
Playlist. Tap the desired music to play music.
Tips: While playing, tap the back button to switch to other
applications and the player will be running in background. Open the
status bar and choose the audio file to return to the player screen.
5. Calculator
You can use the calculator to perform addition, subtraction,
multiplication and division operations, as well as function
operations for sin, cos, tan and log.

42
6. Calendar
This function allows you to view calendar or create to-do lists. Enter
main menu screen, tap "Calendar". Swipe up and down to switch
months; Tap a day, the followings can be done. Tap to refresh,
search, and hide controls and settings.
7. Clock
• Add an alarm
1. Enter main menu, and tap "Alarm".
2. Tap to add alarms.
3. Set the detailed information of the alarm.
4. Tap to pack up the alarm to store the setting.
• Delete an alarm
1. Enter main menu, and tap "Alarm".
2. Tap the desired alarm.
3. Tap to delete it.
Tips: After the alarm is deleted, you can choose to cancel the
deleted alarm on the right side from the option menu.
• Customize your alarm
1. Enter main menu, and tap "Alarm".
2. Tap menu button, and then choose "Settings".
3. Alarm volume: Set the volume of alarms.
4. Set the duration of alarm.
5. Set the duration the alarm snooze next time.
6. Volume buttons: set what these buttons function when pressed
during an alarm.
7. Set default ringtone: choose the alarm ringtone.

43
• Timer setting
1. Enter the main menu to tap to choose timer;
2. Set countdown time;
3. Tap to add timer, and tap to delete;
4. Tap to start the timer, and tap to stop counting down;
Notice: when the countdown ends, the device will sound an alarm.
• Stopwatch setting
1. Enter the main menu to tap to choose stopwatch;
2. Tap to start stopwatch, and tap to stop;
3. Tap to reset the stopwatch;
4. Tap on the right side to display the smaller unit counter of
the stopwatch;
8. ES File Explorer
Open ES file viewer and enter the main menu. You can manage SD
card, browse by category and browse all music, picture, video,
document application, package, favorites, installation package,
management recommended through catalogue.
9. Display
• Brightness
1. Enter the main menu screen, tap "Settings" > "Display".
2. Tap "Brightness" to enter.
3. Drag the slider leftward to lower the screen brightness. Drag
the slider rightward to increase the screen brightness.
• Auto-rotate the screen
1. Enter the main menu screen, tap "Settings" > "Display".

44
2. When setting the rotation of the device, keep the orientation of
the rotated screen.
10. Set Screen Lock
You can set a screen lock pattern. When the screen is locked, it will
not be unlocked until you draw the right pattern.
1. Enter the main menu screen, tap "Settings" > "Security" >
"Screen lock".
2. There are several options available for your selection. To define
a pattern, follow the on-screen prompts to draw your pattern.
3. After drawing, tap "Confirm" to save your setting.
11. Application
• View installed applications
1. Enter the main menu screen, tap "Settings" > "Apps" to open
the downloaded application list.
2. The following operations can be done:
Tap the desired one to view the application information.
Tap and choose "Sort by size" from the pull-down menu, the
applications will automatically appear in size order.
Tap and choose "Reset app preferences" from the pull-down
menu, a confirmation dialog box will appear on the screen, tap
"Reset apps" to proceed; tap "Cancel" to abort.
3. To uninstall an application, tap it to enter the application
information screen.
4. Tap "Uninstall" and then follow the on-screen instructions to
finish it.
• View the running applications
1. Enter the main menu screen, tap "Settings" > "Apps". Scroll the
screen from right to left to the RUNNING tab to open the list of
currently running applications.
2. The following operations can be done:

45
View the currently running applications;
Tap any one to stop it.
12. Language & Input
• Language setting:
1. Enter the main menu screen, tap "Settings" > "Language &
input"> "Language".
2. Tap "Language" and choose the desired language in this device.
• Input method setting:
1. The device provides several kinds of input methods. Tap setting
before the desired input method.
13. Set Date & Time
This device is preset to use the network-provided date, time zone
and time. Note: If Automatic date & time is set as Use network-
provided time, date, time and time zone will not be defined.
1. Enter the main menu screen, and tap "Settings" > "Date &
time".
2. Tap "Set date", and scroll the screen upwards or downwards
until the desired number appears in the highlight area.
3. Tap "Select time zone", and choose the desired one from the
time zone list. Scroll the screen upwards or downwards to view
more.
4. Tap "Set time" and scroll the screen upwards or downwards to
adjust the hour and minute. After setting, tap "Done" to
confirm.
5. Select or deselect "Use 24-hour format" to switch between 12-
hour format and 24-hour format.
6. Tap "Choose date format" to choose the desired date for this
device format from the list.

46
14. Restore to Factory Settings
This option enables you to restore this device to the default factory
settings. Once it is reset, all data (including downloaded
applications) will be deleted. Note: Before factory data reset, please
back up all important data saved in your device.
1. Enter the main menu screen, tap "Settings" > "Backup & reset" >
"Factory data reset".
2. Follow the instructions on the screen to proceed.
15. Storage
Enter the main menu, and tap "Settings"> "Storage", check the
storage conditions of the device. Store downloads in the default
browser to the download list.
16. App Installation/Uninstallation
• Install: Put the application package in the root directory of the
SD card, enter "File Manager", and then tap the desired package
to start installing.
• Uninstall: Tap "Settings" > "Apps", and choose the desired one to
uninstall.

47
Chapter 5: Remark
1. Copyright Information
Without the written consent of OBDSPACE Technology Co., Ltd.
(hereinafter referred to as " OBDSPACE "), no company or individual
shall copy and back up this manual in any form (electronic,
mechanical, photocopying, recording or other forms).
This manual is specially designed for the use of OBDSPACE products,
the company does not assume any responsibility for the
consequences caused by using it to guide the operation of other
equipment.
This manual and all examples contained therein are subject to
change without notice.
OBDSPACE and its branches shall not be liable for any accidents
caused by users or third parties, misuse of the equipment,
unauthorized modification and repair of the equipment, or damage
and loss of the equipment due to non-compliance with the
operation and maintenance requirements.
OBDSPACE shall not be liable for any damages or problems of the
equipment caused by the use of other optional accessories or
consumables rather than the original products of OBDSPACE or the
products approved by OBDSPACE.
This equipment is for professional technicians or maintenance
personnel.
2. Trademark Information
OBDSPACE has registered its trademark in China and several
overseas countries, and its logo is "ANCEL". In countries where any
of the OBDSPACE trademarks, service marks, domain names, logos
and company names are not registered, OBDSPACE claims other
rights associated with unregistered trademarks, service marks,
domain names, logos, and company names. Other products or
company names referred to in this manual may be trademarks of

48
their respective owners. You may not use any trademark, service
mark, domain name, logo, or company name of OBDSPACE or any
third party without permission from the owner of the applicable
trademark, service mark, domain name, logo, or company name.
You may contact OBDSPACE by visiting the website at
www.anceltech.com, or writing to OBDSPACE Technology Co., Ltd.,
D03, Block A, No 973 Minzhi Ave, Longhua District, Shenzhen
Guangdong, China, to request written permission to use Materials.
3. Safety Precautions
Before using this device, please read the following safety
information carefully. For more detailed information, see the
appendix "Safety Warnings and Precautions".
• Never collide, throw, or punch this device, and avoid falling,
extruding and blending it.
• Do not use this device in exceptionally cold or hot, dusty, damp
or dry environments.
• In places where this device is forbidden or using this device may
cause interference or generate a potential risk, please turn off it.
• Do not use this device while driving.
• At medical sites, please observe the relevant regulations or rules,
in areas close to medical equipment, please turn off this product.
• Turn off this device before boarding any airplane.
• Never place this device into apparatus with strong
electromagnetic field.
• Do not dismantle this device by yourself. If there is any inquiry,
please contact the dealer.
• Do not place the product and accessories in appliances with
strong electromagnetic fields.
• Keep this device far away from magnetic devices because its
radiations may erase the data stored on the devices.
• Do not use this device in high temperature and other
environment with flammable gas, such as gas station.
• Keep this device out of the reach of children and do not allow
children to use it unsupervised.

49
• Please use the included battery and charger. Otherwise,
explosion may happen.
• Comply with laws and regulations and respect people's privacy
and legal rights when operating this device.
4. Precautions on Using This Device
The ignition switch should be OFF while plugging or unplugging the
diagnostic connector.
5. Precautions for ECU Operation
• Do not disconnect the inner consumer when the ignition switch
is on. High voltage transients may be encountered when
disconnected, which may damage the sensors and the ECU.
• Keep the computer away from magnetic objects.
• Do cut off the power supply of ECU system before performing
any welding operations on the vehicle.
• Pay more attention to the ECU and the sensors when performing
any operation near them.
• Ground yourself when you disassemble PROM, otherwise, ECU
and sensors will be damaged by static electricity.
• Do connect ECU harness connector firmly, otherwise, electronic
elements, such as IC inside ECU, will be damaged.
6. Safety Warnings and Precautions
Before using or operating the device, please read and observe the
following precautions to avoid dangerous or illegal conditions and
to ensure the best performance of this device.
7. Medical Equipment
• In the express provision for healthcare facilities that prohibits
the use of wireless equipment, please comply with the
provisions of the premises to shut down this device.

50
• Radio waves generated by this device may affect the normal
operation of implantable medical devices or personal medical
devices such as pacemakers, implantation of cochlea, hearing
aids, etc. If you are using these medical devices, consult your
manufacturer for restrictions on the use of this device.
8. Flammable and Explosive Area
• Do not use this device at the gas station (repair station) or near
flammable materials or chemicals, and follow all graphic or text
instructions. This device may cause an explosion or fire in or
around the fuel or chemical storage and transport area or in an
explosive area.
• Do not store or transport the equipment and its accessories in
flame or flammable liquids, gases or explosive materials in the
same box.
9. Traffic Safety
• Do not hold this device while driving and comply with the
regulations in your area or country.
• Do not place the device above the vehicle's airbag or in the area
that can be reached after the airbag is deployed, otherwise,
when the airbag is inflated, the device will be pushed by a strong
external force, causing serious injury to the occupants.
• The wireless device may interfere with the aircraft's flight system,
please comply with the relevant provisions of the airline. When
the use of wireless devices is prohibited, please turn off this
device.
10. Operating Environment
• Do not charge or use this device in a dusty, humid, dirty, or near
magnetic field to avoid malfunction of the internal circuits of the
device.

51
• Do not use this device during thunderstorms to avoid lightning
strike or other damage.
• Turn off this device where it is expressly prohibited to use the
wireless device.
• When this device is powered by a power adapter, the choice of
the product altitude is determined by the matching adapter. For
the tropical ambient temperature conditions, keep the ambient
temperature between 0℃ and 40℃. When the device is
powered by batteries, keep the ambient temperature between -
10℃ and 40℃. Do not use the above temperature range when
the ambient temperature is too high or too low, otherwise, it
may cause a malfunction.
11. Child Health
• This device and its accessories may contain small parts, please
keep them out of the reach of children.
• Children may unintentionally damage this device and its
accessories, or swallow small parts to cause suffocation or other
hazards.
12. Environmental Protection
Please comply with local laws and regulations regarding device,
batteries and their accessories, and support recycling operations.
Do not dispose of the device, batteries and their accessories as
ordinary household waste.
13. Original Accessories
Use only original accessories provided by the device manufacturer.
If you use any non-original accessories, it may affect the
performance of this device, violate the warranty terms of this
device or the relevant national and regional regulations on
communication terminal products, and even lead to personal harm.

52
14. Use Batteries and Chargers
• When charging is complete, disconnect the device from the
power outlet.
• Do not connect metal conductors to the battery, or touch the
end of the battery to avoid short circuits and physical damage
caused by burnout due to overheating.
• Do not place the battery or device around the heating
equipment, such as a microwave oven, oven or radiator.
Batteries may explode when overheated.
• Do not disassemble or modify the battery to prevent the battery
from leaking, overheating, igniting or bursting.
• If the battery leaks, do not expose the skin or eyes to the leaked
liquid; if it gets on the skin or eyes, rinse immediately with water
and go to the hospital for medical treatment.
• If the charger's cable is damaged, do not use it to avoid electric
shock or fire.
• Do not throw the battery into the fire, otherwise it will cause the
battery to fire and burst.
15. Repair and Maintenance
• Keep this device and its accessories dry. Do not use a microwave
oven or other external heating equipment to dry it.
• Do not subject this device and its accessories to strong shock or
vibration to avoid damage to the equipment and its accessories
or to cause the battery to explode.
• Do not expose the unit or its accessories to excessively high or
low temperatures. Doing so may result in malfunction, fire or
explosion of the device, battery and charger. When the
temperature is below 0℃, the battery performance will be
limited.
• Do not use potent chemicals, cleaning agents or strong
detergent to clean the device or accessories. Before cleaning and
maintenance, please turn off and disconnect the charger.

53
• Do not disassemble the device and its accessories, otherwise the
device and accessories will not be covered by our warranty.
• If the device collides with a hard object or the device is subjected
to strong external impact, which causes the screen to break, do
not touch or attempt to remove the broken part, stop using it
immediately and contact the designated service point in time.
16. Warranty
The warranty is only applicable to users and distributors who
purchase the company products through normal procedures.
Within one year from the date of delivery, the company warrants
its electronic products against defects in materials or workmanship.
Damage to the device or components caused by abuse,
unauthorized modification, use for purposes not designed for this
product, or operation not in accordance with the instructions in the
manual is not covered by this warranty.
17. Order Notification
Replaceable parts and optional accessories can be ordered directly
from the company authorized supplier, please specify the following
when ordering:
• Order quantity
• Serial number
• Part name
18. Customer Service Center
1. If you encounter any problem during the operation, please
contact authorized supplier.
2. When the device needs repair, please send it to OBDSPACE
Technology Co., Ltd. together with the purchase invoice and
problem description. If the device is covered under the warranty,
company will provide free maintenance; if the device is not

54
under the warranty, company will charge maintenance and
return freight.
3. OBDSPACE Technology Co., Ltd. After-Sales Service Information:
o After-Sales Address: D03, Block A, No 973 Minzhi Ave, Longhua
District, Shenzhen Guangdong, China
o After-Sales Email: [email protected]om
o Company Website: www.anceltech.com
19. Disclaimer
OBDSPACE reserves the right to change the product design and
specifications without notice. Physical appearance and color may be
a little different from the one shown in the instruction, please refer
to the device. We have made every effort to make all descriptions
in the manual accurate, but some inaccuracies are still inevitable. If
in doubt, please contact the dealer or after-sales service center. The
company does not bear any consequences due to misunderstanding.
Official statement: The names of other products mentioned in this
manual are intended to explain how this equipment is used, and
the registered trademark ownership still belongs to the original
company.

55
Chapter 6: FAQ
1. Startup Failure
In case of startup failure, please connect the included DC power
supply and the device will be able to power on while charging. If the
battery is too low, it may take a few minutes. If the device is still
unable to power on, please contact customer service department
and return it to repair. If the temperature is lower than - 20℃, it is
unable to power on. Please power on in a proper environment.
After the device is turned on, it will not be affected by the
temperature and can work smoothly.
2. Touchscreen Interference
In case of any abnormal touchscreen, please disconnect the power
or restart, or remove static. If the touchscreen is still abnormal,
please contact customer service department and return it to repair.
3. Slow or Failed One-Key Upgrade
Check if the Wi-Fi connection is normal and the signal is good. If it
cannot be solved, please check whether the upgrade period has
expired. If so, please contact customer service department to
resolve.
4. Crash
If any crash occurs, please long press power button for more than
five seconds to power off and then restart.
5. Test Failure
Solution: exclude software problems ----- re-upgrade the latest
software ---- unable to solve ---- offer feedback ---- Exclude vehicle
problems ---- vehicle without any problem ---- (if permitted) exclude

56
main wire problems ---- replace the same type of main wire ----
confirm the device problem and send it back to repair (along with
the main wire).
6. Unable to Charge
Check whether the charger has 12 V voltage output. In case of no
voltage or abnormal voltage, please replace the charger; if it still
doesn’t work after replacement, please contact customer service
department to repair (along with the charger).
7. Software Upgrade
Solution:DP interface----Personal center registration----Login
account----Enter Upgrade app----Tick the software to be upgraded--
--Tick batch upgrade (Detailed steps: Support app--Product
instruction--Diagnosis instruction and upgrade).
8. Software Delete
Solution 1: DP----Data management----Uninstall vehicle models----
Tick the vehicle model to be uninstalled---Click delete mark in the
upper right corner (Details: See uninstall vehicle models in the sixth
part of product instruction/diagnosis instruction).
Solution 2: Enter the DP interface, click the vehicle logo, enter the
software version page, long press until a prompt appears, and
finally select delete.
9. System Language Switch
Enter the multi-function interface from the multi-function icon on
the desktop, select "Settings" ---"Language & input" --- "Language"
and then select the desired language.
