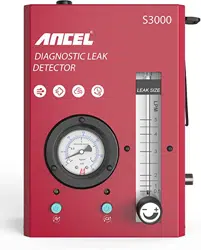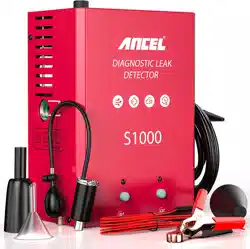

S100 User manual
Applicable to:
EVAP system, gaskets and fittings, throttle shafts, catalytic converters, diaphragms and seats headlight and taillight
housings, EGR valves, hoses, brake boosters, central locking, door and window seals, oil leaks and more.
Specifications
Output pressure: 0.5PSI
Output Volume: <8LPM
Power Supply: DC 12V
Current: 5AMP
Packing List
01 x Main Unit
01 x Hook
01 x Power Cord
01 x Smoke Hose
01 x EVAP Kit
01 x Shop Air Adapter
Properties
Uses shop air.
Nitrogen compatible.
Can be used on all cars, motorcycles, snowmobiles, ATVs, light trucks, boats, etc. Fast smoke generation.
Environmentally friendly and non-hazardous smoke.
Control of smoke flow.
Quick Start-up Instructions
1. Attach the hook to the device.
2. Attach the workshop air adapter to the unit.
3. Plug the power cord into the power outlet.
4. Screw the smoke hose to the unit.
5. Fill smoke oil (mineral oil based) into the unit via the refill opening on the top. (Note: The oil level must not be
higher than the level indicator. )
6. Connect the factory air supply.
7. Connect the vehicle's 12V power supply.
8. Introduce workshop air into the unit.
9. Turn the flow control knob counterclockwise to open the air flow.
10. Turn on the power on the back of the unit, then the unit will start to generate smoke.
11. Introduce the smoke into the system.
Remark:
Turn the flow regulator clockwise to close the valve after use before shutting off shop air to prevent backflow of
smoke oil into the metre.

Smoke Oil
Use only medicated mineral oil or baby oil that does not contain lotions, aloe, vegetable oil or creams. An added
fragrance is acceptable.
Fuel Vapor Recovery System (EVAP) Introduction.
According to the Environmental Protection Agency, the EVAP system is the most neglected of all the emission
systems in an automobile. A leak as small as 0.020 inch in diameter can result in more than 30 times the allowable
amount of hydrocarbons being released into the atmosphere through the exhaust than is currently permitted. In
addition, leaks in the EVAP system can be a major cause of check engine lights. In the past, problems associated with
EVAP were difficult to locate and repair. Today, these problems can be quickly diagnosed and repaired, which has
become a lucrative business for service companies.
- There are several acceptable methods for inspecting the EVAP system. Basically, we need to close all the bleed
solenoid valves, fill the system with smoke and look for the smoke coming from the leak. Since these systems are
different on different vehicles and have evolved over the years, we will attempt to describe operating guidelines that
should be helpful in inspecting these EVAP systems.
- Beginning with the 1996 model year, U.S. vehicles are manufactured with a EVAP service port for access to this
system. The port is usually located under the hood, but may be located elsewhere on the vehicle. To access this port,
remove the cap and remove the Schrader valve from the service port using the Schrader valve removal tool provided.
Important note: The Schrader valve has a left-hand thread, turn it clockwise to remove it! Connect the supplied
service port adapter to the service port.
- Onboard diagnostics on 1996 and newer vehicles will determine if there is a leak. The following fault codes may be
displayed to report the leak: 11 PO442 for a 0.040 leak Standard PO456 for a 0.020 leak Standard. - Using a scan tool,
close the bleed solenoid valves so that the EVAP system is closed to atmosphere.
•Setting up the machine
- Remove the tank cap and begin filling the system through the service port adapter until dense smoke comes out of
the tank nozzle. This procedure ensures that the system is full of smoke. Replace the fuel cap and continue pumping
smoke into the system.
- Inspect the hood with a bright halogen light for leaks. Raise the vehicle onto a lift and examine the underside of the
vehicle, tracing the path of the EVAP system. Note: It may be necessary to hang the fog machine under the vehicle so
it is visible to the driver.
- As the system fills with smoke and the pressure in the system equalizes, keep an eye on the flow meter and pressure
gage. If there is no leakage in the system, the pressure gage will go to maximum pressure and the flow meter will
drop to zero. 12 For error code PO456, the gage should stabilize at 0.1 LPM or less with the Smoke Machine. For error
code PO442, the meter should stabilize at 0.5 LPM or less with the Smoke Machine. Note: These readings are
approximate and are for reference only.
- Once you have found and repaired the leak, you should repeat the above procedure with air only. It is not necessary
to turn on the smoke to check for a leak with the flow meter.
- Reinstall the Schrader valve and cover. (Note: The valve has a left-hand thread.) Below are some common codes for
OBD EVAP:
P0443 Purge Control Valve Circuit
P0444 Purge Control Valve Circuit Open
P0445 Purge Control Valve Circuit Shorted
P0446 Vent Control Circuit

P0447 Vent Control Circuit Open
P0448 Vent Control Circuit Shorted
P0449 Vent Valve/Solenoid Circuit
P0450 Pressure Sensor 13
P0451 Pressure Sensor Range/Performance
P0452 Pressure Sensor Low Input
P0453 Pressure Sensor High Input
P0454 Pressure Sensor Intermittent
P0455 System Leak Detected (gross leak)
P0456 System Leak Detected (very small leak)
P0457 System Leak Detected (fuel cap loose/off)
P0465 EVAP Purge Flow Sensor Circuit
P0466 EVAP Purge Flow Sensor Circuit Range/Performance
P0467 EVAP Purge Flow Sensor Circuit Low Input
P0468 EVAP Purge Flow Sensor Circuit High Input
P0469 EVAP Purge Flow Sensor Circuit Intermittent