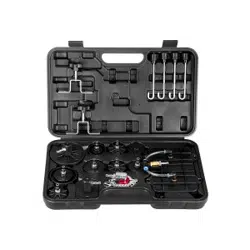
Operating Instructions and Parts Manual
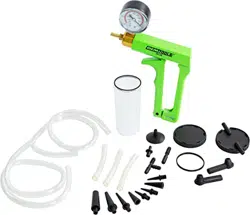
ONE-MAN BRAKE BLEEDER KIT
Please read and save these instructions. Read through this owner’s manual carefully before using product. Protect yourself
and others by observing all safety information, warnings, and cautions. Failure to comply with instructions could result in
personal injury and/or damage to product or property. Please retain instructions for future reference.
CAUTIONS:
• Always wear eye protection. If brake fluid contacts eyes, flush with water immediately and seek medical
attention.
• Brake fluid is poisonous do not ingest. If you do ingest brake fluid, seek medical attention immediately.
• Always use new brake fluid from sealed container when bleeding hydraulic system.
• Do not allow brake fluid to contact vehicle paint. Wash with water immediately if brake fluid gets on paint.
• Never operate vehicle if you are in doubt of the effectiveness of the braking system. A firm brake pedal is re-
quired before you can operate the vehicle.
NOTES:
• Check fluid level in master Cylinder before and after the bleeding of any brake component. Keep reservoir full.
• Do not allow the bleeder bottle to fill to the top during bleeding. Brake fluid will be expelled from bottle vent if
you allow this to happen.
INSTRUCTIONS FOR THE BLEEDING OF CALIPERS AND WHEEL CYLINDERS:
1) Make sure master cylinder is full of brake fluid and sealed.
2) Attach bleeder bottle to a point above bleeder screw using supplied magnet.
3) Open bleeder screw one turn.
4) Connect the long piece of clear tubing to bleeder bottle. Connect the tapered adapter to other end of tubing.
Insert tapered adapter into bleeding screw hole. Make sure you have a tight fit.
5) Now stroke brake pedal fully three to four times. Check clear tubing for air bubbles. If no air bubbles exist
retighten bleeder screw and move on to the next wheel. If there are air bubbles in tubing repeat step #5.
Remember to watch brake fluid level in master cylinder. Refill whenever fluid gets low and before and after you
bleed each wheel.
BLEEDING ORDER
The rule of thumb is to bleed the component that is furthermost from the master cylinder first. Most rear wheel
drive vehicles with brake systems split front to rear are bled in this order: Right rear, left rear, right front, left front.
Most front wheel drive vehicles with brake systems diagonally split: Right rear, left front, left rear, right front.
Thank you very much for choosing an OEMTOOLS
®
Product!
For future reference, please register your new tool at www.oem-tools.com and complete the owner’s record below:
Model: ______________ Purchase Date: ____________________
Save the receipt, warranty and these instructions. It is important that you read the entire manual to become familiar with this
product before you begin using it. This product is designed for certain applications only. OEMTOOLSfor issues arising from
modification. We strongly recommend that this product is not modified and/or used for any application other than that for
which it was designed. If you have any questions relative to a particular application, DO NOT use the product until you have
first contacted customer service to determine if it can or should be performed on the product.
25036
WARNING:
Pursuant to California Proposition 65, this product contains chemicals known to the state of California to
cause cancer and birth defects or other reproductive harm. Wash hands after handling.
4/21
2021 OEMTOOLS
®
25036
Operating Instructions and Parts Manual
ONE-MAN BRAKE BLEEDER KIT
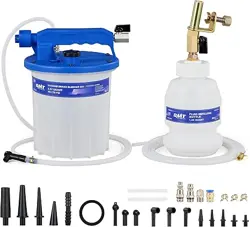
INSTRUCTIONS FOR THE BLEEDING OF MASTER CYLINDERS MOUNTED ON VEHICLE:
Note: Whenever the master cylinder is removed from the vehicle, the entire brake
systems should be bled.
1) If master cylinder is mounted so that it is raised at the front, you must first raise the rear of the vehicle until the
master cylinder is parallel to the ground.
2) Make sure master cylinder is full of fluid and sealed.
3) Fill bleeder bottle half full and seal.
4) Connect the long piece of tubing to the double tubing adapter. Then connect the two shorter pieces of hose.
Now connect the long piece of tubing to the bleeder bottle. Attach the bleeder bottle using magnet some-
where near the master cylinder.
5) Insert the two tapered adapters into the break line seats. Make sure you have a good seal.
6) Pump the brake pedal slowly all the way to the floor. (This will force any air out of the master cylinder.) Repeat
this until no air remains in the tubing, four strokes is usually enough. Remember to make sure you do not run
master cylinder dry.
7) Remove bleeder and attach the brake lines to the master cylinder. If fluid is lost from the master cylinder
during this step it may be necessary to loosen the brake lines one at a time and depress the brake pedal to
force out any air and retighten the brake line before releasing the pedal.
8) You will now need to bleed the rest of your brake system.
CAUTION: DO NOT DRIVE YOUR VEHICLE UNTIL YOU HAVE TESTED THE BRAKE PEDAL FOR A FIRM
TIGHT PUSH WITH NO SPONGINESS
LIMITED LIFETIME WARRANTY
If for as long as you own this OEMTOOLS® product you find any defect in material or workmanship, through
normal usage and not including standard wear, either return it to the place of purchase, or send it to
OEMTOOLS® for repair or replacement at our discretion. In order to obtain this service send your tool and proof
of purchase, transportation pre-paid, to OEMTOOLS® Q.A. Dept, 3580 E. Raines Rd. #3, Memphis, TN 38118.
This warranty gives you specific legal rights, and you may also have other rights, which vary from state to state.
Please see our website for full warranty information.
CONTACT US
4/21
2021 OEMTOOLS
®
3580 E. Raines Road, Suite 3, Memphis, TN 38118
Tel: 1-866-458-2472
www.oem-tools.com