WiFi Connectivity with Smart
Device App
5-Element Glass Ceramic
Cooktop
6.3 Cubic Feet Total Oven
Capacity
Glass Touch Controls
"Built In" Appearance
version A - 3 - 2020
MODEL NUMBERS
MES30S2AST
MES30S4AST
www.midea.com
en
Note:
Before using this product, please
read this manual carefully and
keep it for future reference.
Contact Midea Customer Service
at 1-866-646-4332 or visit
assistance.
(Pictures are for reference only and may not
accurately represent all models covered by this manual.)
USER’S MANUAL
30" Slide-In Electric Range
midea.com/us/support for


Electric
www.midea.com
USER’S
en
MODEL NUMBERS
MANUAL
< MODEL NUMBERS HERE>INSERT
Dear user
for letting Midea help you "make yourself at home. "
your total satisfaction.
P
lease read this manual carefully before use and keep it in a
convenient place for future reference.
To help us serve you better, please consider registering your
product using our convenient Midea app MSmartlife, by visiting
http://www.midea.com, or by texting a picture of your proof of
purchase to 1-844-224-1614.
By using the text option you will earn an additional 3 month
warranty extension immediately following the completion of the
product’s original warranty.
Thankyou
This manual is part of our commitment to
Electric Range
......................................................................
5
.........................................................
12
......................................................................................
12
.................................................................................
13
...................................................................................
14
....................................................................................
14
......................................................................................
15
................................................................
16
....................................................................................................
16
................................................................
16
.................................................. 19
........................................................................20
...................................................................................
20
............................................................................
21
..................................................................
22
.........................................................
23
........................................................................................................
24
..............................................
.....
....
2
5
.................................................................................................................
26
...............................................................................................................
26
........................................................................................
28
SAFETY WARNINGS
Bake
Keep Warm (some models)
Broil
Proof
Convection Bake
PREPARING FOR FIRST USE
Range Overview
Review of Controls
WiFi Connection
Setting the Clock
Before First Use
COOKTOP OPERATION
Warnings
Types of Cooking Elements
Cooktop Indicators
Controlling the Cooking Element s
Controlling the Warming Elements
OVEN OPERATION
Warnings
Oven Racks
Removing/Inserting Ra cks
Rack P ositions: Preheating
Pan Size/Element Size Selection
......................................................
17
.................................................................................
17
..................................................
18

Dear
.....................................................................5
..........................................................12
.................................................................15
........................................................................19
user
USE
................................................................................
28
......................................................................................................... 29
........................................................................................................ 30
.............................................................................................
31
ls)
........................................................................
33
.....................................................................................
34
.......................................................................................... 34
.............................................................................................. 35
... ........................................................... 36
......................................................................................................... 37
.............................................................................................. 37
S .................................................................. 38
E ............................................... 40
..................................................................................
40
ookto
p .......................................................................................
40
Panel ......................................................................................... 41
nterior
......................................................................................... 42
n Light s .......................................................................................... 43
Door .......................................................................................................... 44
Drawer...................................................................................................... 43
OTING.
.
..................................................................
46
ooktop
.................................................................................................. 46
n .......................................................................................................
.
47
arrant .................................................................................................. 49
CONTROL
SETTING
Convection Roast
Pizza
Delay
Cook Time
Probe (some mode
Sabbath Mod e
Steam Clea n
Self Clean
WiFi (Remote Operation)
Timer
Oven Light
Glass C
Control
Oven I
Ove
TROUBLE SHO
C
Ove
W
CLEANING
AND MAINTENANC
Tip-Over Hazard
.....................................................................32
..................................................34
.....................................................................40
MAINTENANCE
WARNING
CAUTION
NOTICE
NOTE
This symbol indicates the presence of a
hazard which may result in death or serious
injury if not avoided.
This symbol indicates the presence of a
hazard which may result in minor or
moderate personal injury if not avoided.
This symbol indicates the presence of a
hazard which may result in minor property
damage if not avoided.
This alerts the user to information that will
help avoid confusion or common cooking
mistakes and obtain the best possible user
experience.
Read all safety instructions before using this product. Failure to follow
these instructions may result in fire, electrical shock, serious injury, or
death. It is the owner's responsibility to ensure that anyone using the
appliance knows how to operate it safely.
PREPARING
FOR FIRST USE
COOKTOP
OPERATION
OVEN
OPERATION
CONTROL
SETTINGS
TROUBLESHOOTING
CLEANING AND
MAINTENANCE
5
Warnings and safety instructions in this manual do not cover all possible
conditions and situations that may occur. It is your responsibility to use
common sense, caution, and care when installing, maintaining, and
operating your oven. Known hazards and their severity are identified in
this manual with the following symbols:
IMPORTANT SAFETY INSTRUCTIONS
READ ALL INSTRUCTIONS BEFORE USING THE APPLIANCE
SAFET Y DEFINITIONS
READ AND SAVE THESE INSTRUCTIONS FOR FUTURE REFERENCE
WARNING
SAFETY
INSTRUCTIONS
SAFETY DEFINITIONS
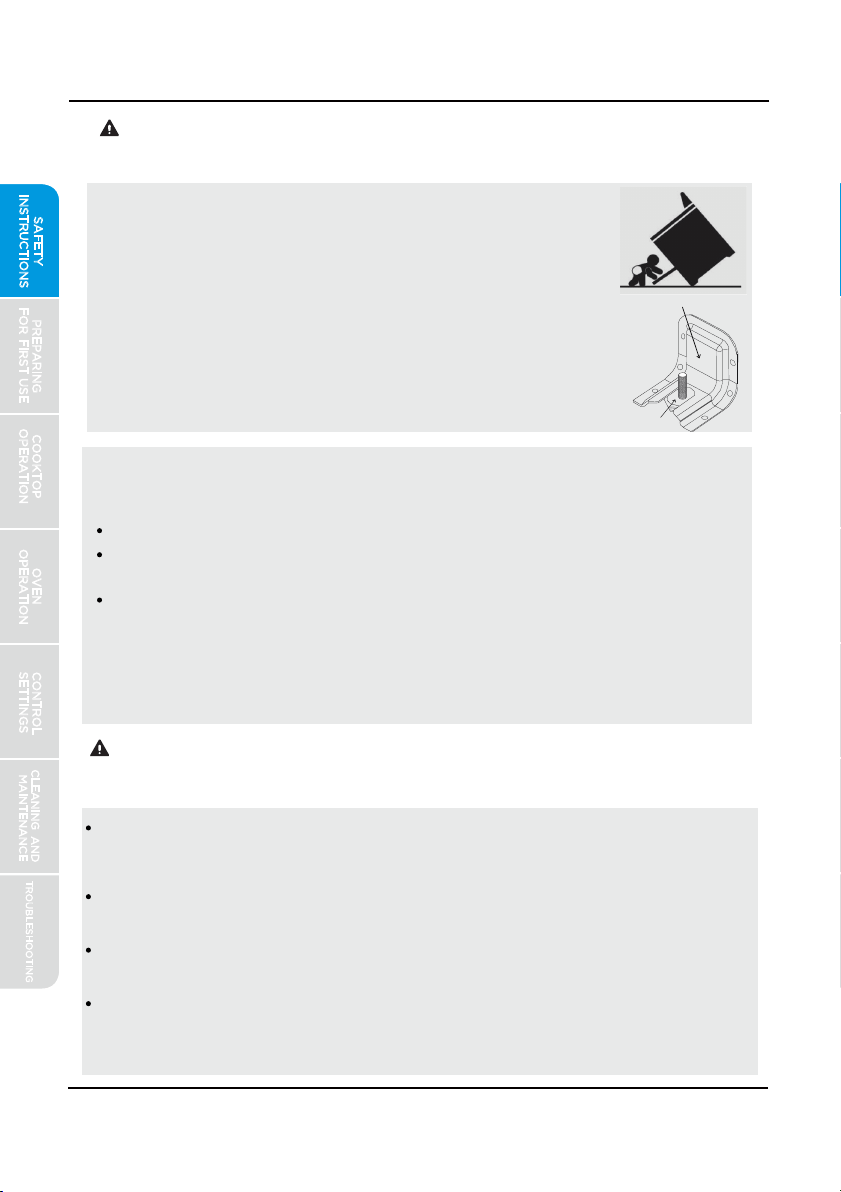
To confirm the anti-tip bracket is properly installed, look underneath the
range to
confirm rear leveling leg is engaged in bracket. If visual
inspection is not possible:
Slide range forward
Confirm anti-tip bracket is securely attached to floor or wall in correct
position according to installation instructions.
Fully slide the range back against the wall so that leveling leg engages
with anti-tip bracket.
Do not operate the range without the anti-tip device in
place and engaged. Failure to do so can result in death
or serious burns to children or adults. Do not remove
the leveling legs. Doing so will prevent the range from
being secured by the anti-tip device.
If range is removed from service, secure door closed or remove door to
minimize tip over risk. (See "Door" section under "Cleaning and
Maintenance" in this manual
for instructions on how to remove door.)
INSTALLATION AND MAINTENANCE
This appliance is intended for normal residential use. It is not approved
for commercial use, outdoor installation, or any other application not
specifically allowed by this manual.
Be sure your appliance is properly installed and grounded by a qualified
service provider.
DO NOT operate this appliance if it has been damaged or is not working
properly. Contact a qualified service provider for repairs.
DO NOT repair or replace any part of the appliance unless specifically
recommended in the manual. All other servicing should be referred to a
qualified service provider.
PREPARING
FOR FIRST USE
COOKTOP
OPERATION
OVEN
OPERATION
CONTROL
SETTINGS
TROUBLESHOOTING
CLEANING AND
MAINTENANCE
6
WARNING
TIP OVER HAZARD
A child or adult can tip the range and be killed. Verify
the anti-tip device has been properly installed and
engaged per installation instructions. Ensure the anti-
tip device is re-engaged when the range is moved.
IMPORTANT SAFETY INSTRUCTIONS
READ ALL INSTRUCTIONS BEFORE USING THE APPLIANCE
WARNING
READ AND SAVE THESE INSTRUCTIONS FOR FUTURE REFERENCE
Anti-Tip Bracket
Leveling Leg
SAFETY
INSTRUCTIONS
DO NOT allow cooking grease or other flammable materials accumulate
in or on the range. Grease in the oven or on the cooktop may ignite.
Clean kitchen ventilating hoods frequently. Grease should not be allowed
to accumulate on hood or filter.
Clean cook-top with caution – To avoid steam burns, do not use wet
sponge or cloth while cooking area is hot. Some cleaners can produce
noxious fumes if applied to a hot surface.
DO NOT use oven cleaners. No commercial oven cleaner or oven liner
protective coating of any kind should be used with any part of this
appliance.
Do not clean door gasket – The door gasket is essential for a good
seal. Care should be taken not to rub, damage, or move the gasket.
Clean only parts and areas listed in the "Cleaning and Maintenance"
section of this manual.
GENERAL USAGE
not store any flammable materials or temperature sensitive items inside
oven, in storage drawer, or on top or near cooktop heating elements of
the appliance.
Never use your appliance for warming or heating the room.
Children should not be left alone or unattended in the area where
appliance is in use.
Do not allow anyone to climb, stand, lean, sit, or hang on any part of an
appliance,especially a door, drawer or operation panel.
CAUTION - Do not store items of interest to children in cabinets above
a range or on the backguard of a range – children climbing on the range
to reach items could be seriously injured.
Loose-fitting or hanging garments should never be worn while using the
appliance.
This appliance has not been evaluated for use with any 3rd party after-
market systems. Do not attempt to use this appliance with a working or
any other after-market device.
PREPARING
FOR FIRST USE
COOKTOP
OPERATION
OVEN
OPERATION
CONTROL
SETTINGS
TROUBLESHOOTING
CLEANING AND
MAINTENANCE
7
This appliance is configurable to allow remote operation at any time. Do
WARNING
IMPORTANT SAFETY INSTRUCTIONS
READ ALL INSTRUCTIONS BEFORE USING THE APPLIANCE
READ AND SAVE THESE INSTRUCTIONS FOR FUTURE REFERENCE
SAFETY
INSTRUCTIONS
It is strongly recommended that a CLASS ABC or CLASS K fire
extinguisher be kept near the range in an easily accessible location, and
that household members are familiarized in advance with its operating
instructions.
Never leave cooktop heating elements unattended. Boil-over causes
smoking and greasy spillovers that may ignite.
Only certain types of glass, glass/ceramic, ceramic, earthenware, or
other glazed utensils are suitable for range-top service without break-
ing due to the sudden change in temperature.
PREPARING
FOR FIRST USE
COOKTOP
OPERATION
OVEN
OPERATION
CONTROL
SETTINGS
TROUBLESHOOTING
CLEANING AND
MAINTENANCE
8
To reduce the risk of burns, ignition of flammable materials, and spillage
due to unintentional contact with the utensil, the handle of a utensil
should be positioned so that it is turned inward, and does not extend
over the front of the counter top or over adjacent cooktop heating
elements.
Do not cook on a broken cook-top – If cook-top should break, cleaning
solutions and spillovers may penetrate the broken cook-top and create
a risk of electric shock. Contact a qualified service provider immediately
for repairs.
DO NOT TOUCH COOKTOP HEATING ELEMENTS OR AREAS NEAR
ELEMENTS –
Cooktop heating elements may be hot even though they
are dark in color. Areas near cooktop heating elements may become hot
enough to cause burns. During and after
use, do not touch, or let
clothing or other flammable materials contact cooktop heating elements
or areas near elements until they have had sufficient time to cool. Among
these areas are the cook-top and surfaces facing the cook-top.
Use proper pan size. This appliance is equipped with cooktop heating
elements of different size. Select utensils having flat bottoms large
enough to cover the entire cooktop heating element heating element.
The use of undersized utensils will expose a portion of the heating
element to direct contact and may result in ignition of clothing. Proper
relationship of utensil to burner will also improve efficiency.
IMPORTANT SAFETY INSTRUCTIONS
READ ALL INSTRUCTIONS BEFORE USING THE APPLIANCE
READ AND SAVE THESE INSTRUCTIONS FOR FUTURE REFERENCE
SAFETY
INSTRUCTIONS
COOKTOP HAZARDS
DO NOT USE WATER ON GREASE FIRES. Smother fire or flame with a
close-fitting lid or metal tray. Never pick up a flaming pan. Dry chemical
or foam-type extinguisher may be used if it is CLASS ABC or CLASS K
and you already know how to use it.
WARNING
PREPARING
FOR FIRST USE
COOKTOP
OPERATION
OVEN
OPERATION
CONTROL
SETTINGS
TROUBLESHOOTING
CLEANING AND
MAINTENANCE
9
IMPORTANT SAFETY INSTRUCTIONS
READ ALL INSTRUCTIONS BEFORE USING THE APPLIANCE
OVEN HAZARDS
READ AND SAVE THESE INSTRUCTIONS FOR FUTURE REFERENCE
Never place anything (aluminum foil, spill mat, baking stone, cookware,
etc.) on the bottom of the oven cavity. These items can trap heat or
melt, resulting in damage to the appliance and risk of electric shock,
smoke, or fire.
Use care when opening the door. Let hot air or steam escape before
removing or replacing food.
Use only dry pot holders. Moist or damp pot holders on hot surfaces
may result in burns from steam. Do not let pot holder touch hot grates
or flames. Do not use a towel or other bulky cloth.
Do not heat unopened food containers – Build-up of pressure may cause
container to burst and result in injury.
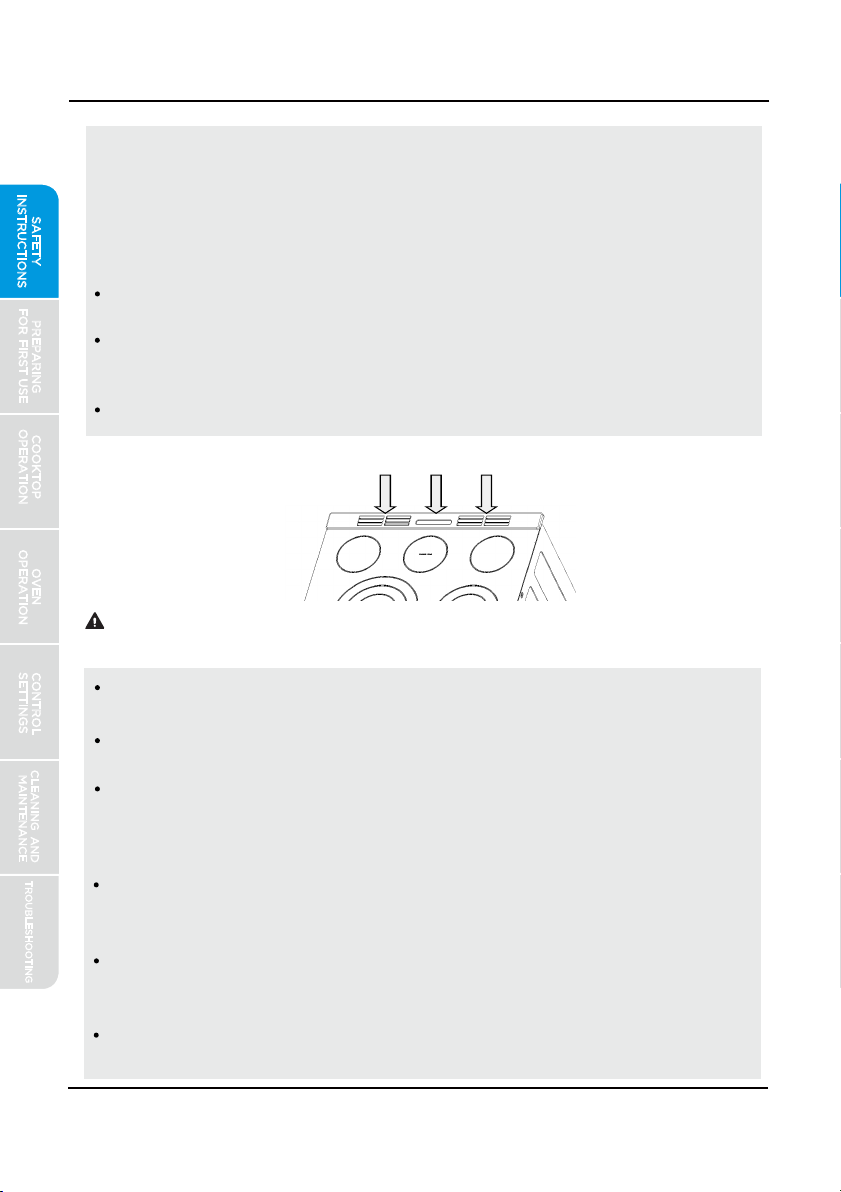
Do not obstruct oven vents.
Always place oven racks in the desired location while oven is cool. If
rack must be moved while oven is hot, do not let pot holder contact hot
heating element in oven.
DO NOT TOUCH OVEN HEATING ELEMENTS OR INTERIOR SURFACES
OF OVEN – Heating elements may be hot even though they are dark in
color. Interior surfaces of an oven become hot enough to cause burns.
WARNING
Use high heat settings only when necessary. To avoid splattering, heat
oil slowly on medium-low settings.
To prevent cooktop glass breakage, do not slide cookware across the
cooking surface or otherwise scratch cooktop glass.
In the event of house power failure, turn off any cooktop elements that
were in use.This will prevent the cooktop from unexpectedly turning
back on when power is restored.
SAFETY
INSTRUCTIONS
In the event that personal clothing or hair catches fire, drop and roll
immediately to extinguish flames.
Always turn hood ON when cooking at high heat or when flambéing
food (i.e. Crepes Suzette, Cherries Jubilee, Peppercorn Beef Flambé).
Hot oil is capable of causing severe burns. Never move cooking utensils
containing hot grease. Wait until it has cooled before disposing of grease.
Before self-cleaning the oven, ensure oven is empty. Remove broiler pan,
racks, cookware, and anything else.
To avoid ignition inside the oven, clean excess grease or food out of the
oven before starting self clean.
The door will lock several minutes after the start of a self-clean function.
If the door is opened prior to being locked, the self-clean function will be
automatically cancelled. If door does not lock within 15 minutes, cancel
self-clean and contact a qualified service provider for repairs.
In the event of ignition inside the oven during self-clean, turn off the oven
and wait for the fire to extinguish. DO NOT FORCE THE DOOR OPEN.
Wait for the oven to cool before removing contents and cleaning the oven.
If the self-cleaning mode malfunctions, keep door closed, turn off the
appliance, disconnect the circuit at the circuit breaker box, and contact
a qualified service provider for repairs.
Some birds are extremely sensitive to the fumes produced during a
self-clean cycle. Move birds to another well-ventilated room.
WARNING
SELF CLEAN HAZARDS
PREPARING
FOR FIRST USE
COOKTOP
OPERATION
OVEN
OPERATION
CONTROL
SETTINGS
TROUBLESHOOTING
CLEANING AND
MAINTENANCE
10
IMPORTANT SAFETY INSTRUCTIONS
READ ALL INSTRUCTIONS BEFORE USING THE APPLIANCE
READ AND SAVE THESE INSTRUCTIONS FOR FUTURE REFERENCE
Oven and Cooling Vents
During and after use, do not touch, or let clothing or other flammable
materials contact heating elements or interior surfaces of oven until
they have had sufficient time to cool. Other surfaces of the appliance
may become hot enough to cause burns – among these surfaces are
oven vent openings and surfaces near these openings, oven doors, and
windows of oven doors.
Do not use a broiler pan without its insert. Do not cover the broiler
insert with aluminum foil, as exposed fat and grease could ignite.
If materials inside the oven should ignite, keep door closed and turn off
power at the fuse or breaker box. Wait for the oven to cool before
removing contents, cleaning the oven, and restoring power.
Do not obstruct oven vents or any other slots or openings on the unit.
SAFETY
INSTRUCTIONS
This device complies with part 15 of the FCC Rules. Operation is subject
to the following two conditions: (1) This device may not cause harmful
interference, and (2) this device must accept any interference received,
including interference that may cause undesired operation.
PREPARING
FOR FIRST USE
COOKTOP
OPERATION
OVEN
OPERATION
CONTROL
SETTINGS
TROUBLESHOOTING
CLEANING AND
MAINTENANCE
11
IMPORTANT SAFETY INSTRUCTIONS
READ ALL INSTRUCTIONS BEFORE USING THE APPLIANCE
Connect the equipment into an outlet on a circuit different from that
to which the receiver is connected.
Consult the dealer or an experienced radio/TV technician for help.
READ AND SAVE THESE INSTRUCTIONS FOR FUTURE REFERENCE
Reorient or relocate the receiving antenna.
Increase the separation between the equipment and receiver.
According to Federal Communication Commission requirements, this
equipment has been tested and found to comply with the limits for a
Class B digital device, pursuant to part 15 of the FCC Rules. These limits
are
designed to provide reasonable protection against harmful interference
in a
residential installation.
This equipment generates, uses and can radiate radio
frequency energy and, if
not installed and used in accordance with
the
instructions, may cause harmful interference to radiocommunications.
However, there is no guarantee that
interference will not occur in a particular
installation. If this equipment does cause harmful interference to radio or
television reception, which can be determined by turning the equipme nt
off and on, the user is encouraged to try to correct the interference by one
or more of the following measures:
CAUTION
FCC NOTICE
SAFETY
INSTRUCTIONS
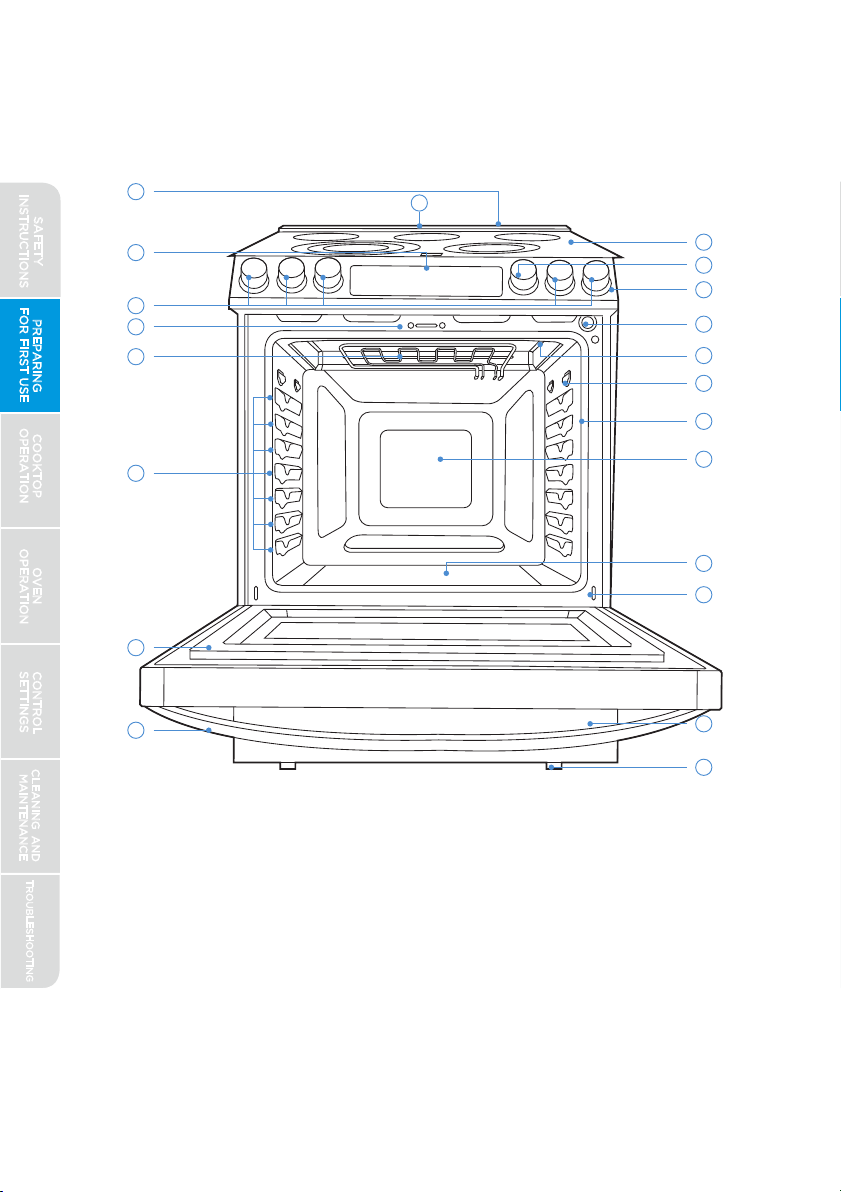
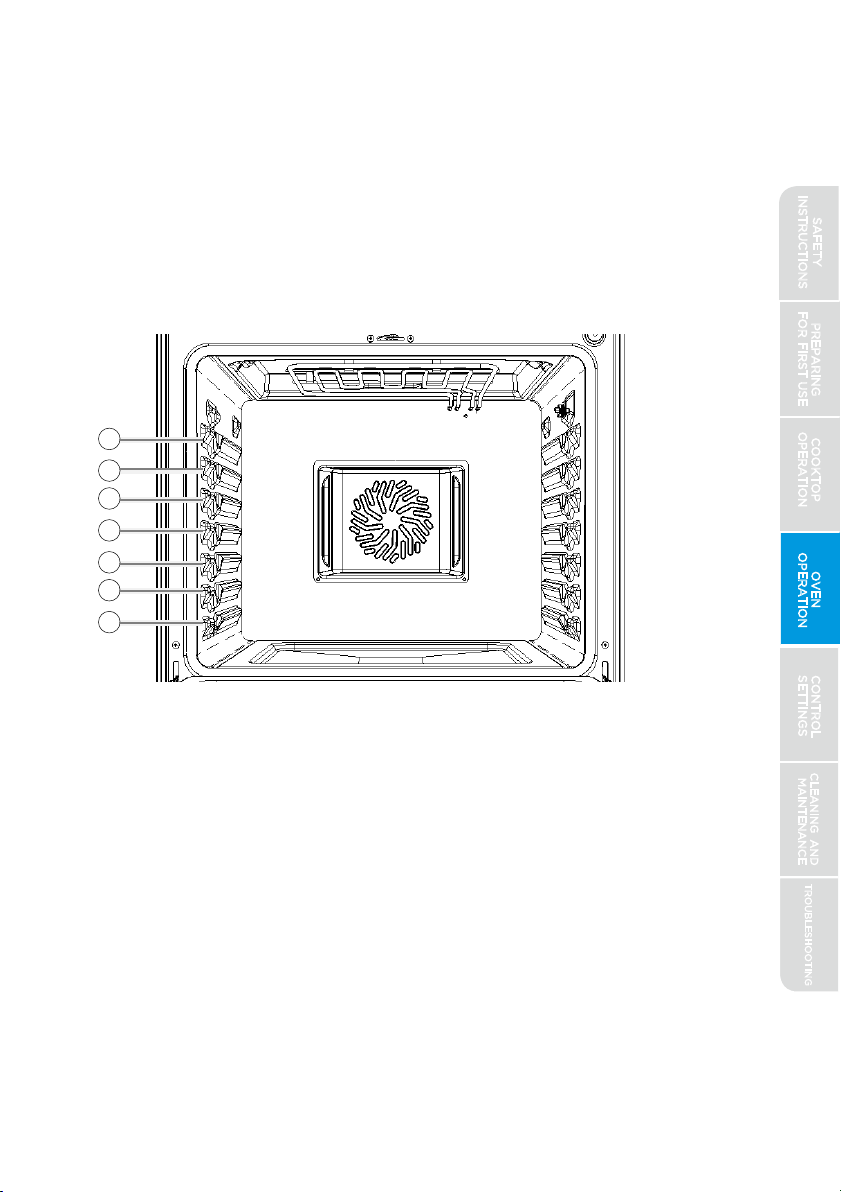
Range Overview:
12
1 Cooling Vents
2 Oven Control
3 Cooktop Control K nobs
4 Door Lock
5 Broil element
6 Rack Positions
7 Door
8 Door Handle
9 Oven Vent
10 Cooktop
11 Control input knob or
oven light sw itch
12 Control Panel
13 Door Switch
14 Meat Probe J ack
15 Oven Lights
16 Door Gasket
17 Convection Fan
18 Oven Bottom (hidden bake
element)
19 Door Hinge (each side)
20 Storage Drawer
21 Leveling Legs (front and
back)
PREPARING
FOR FIRST USE
COOKTOP
OPERATION
OVEN
OPERATION
CONTROL
SETTINGS
TROUBLESHOOTING
CLEANING AND
MAINTENANCE
SAFETY
INSTRUCTIONS
1
9
10
2
11
12
3
4
13
5
15
14
16
17
6
18
19
7
8
20
21
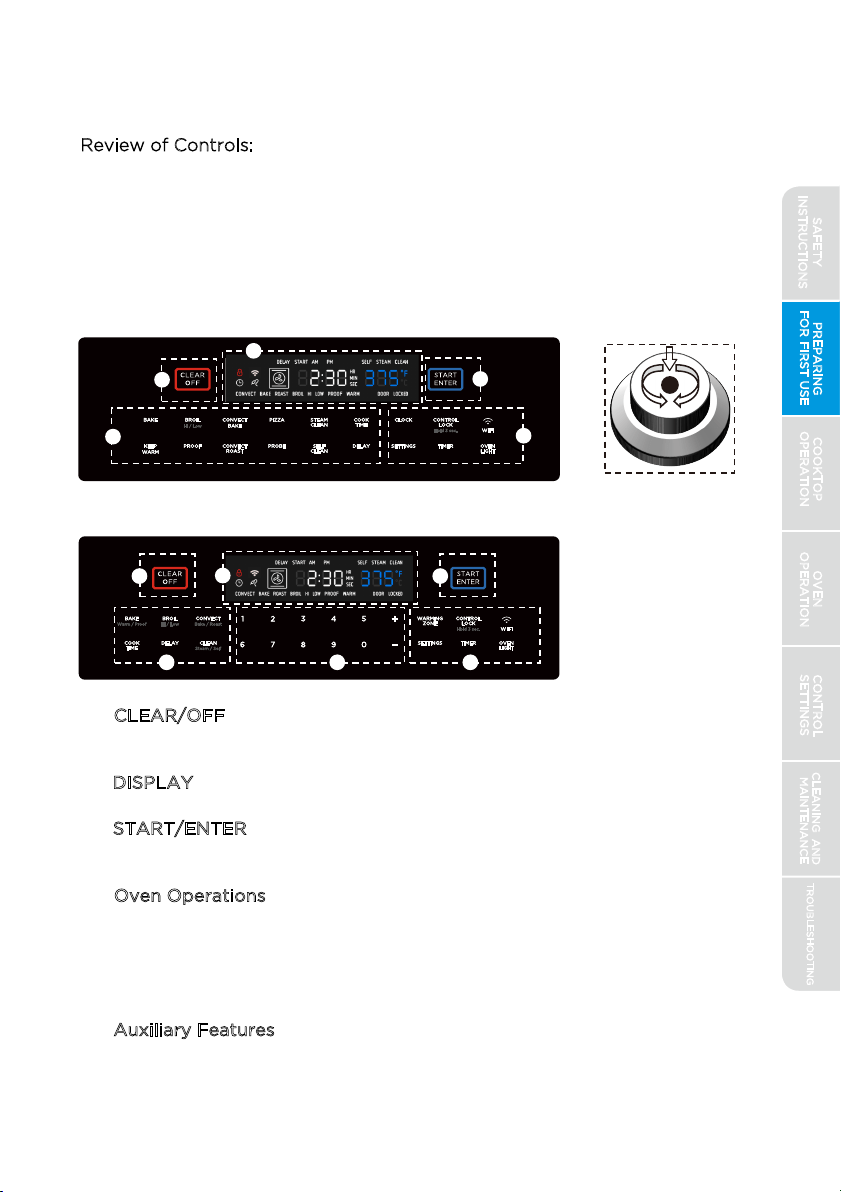
All Midea ranges are provided with intuitive touch controls to help you
easily take advantage of the features available in your oven. Depending on
the model and configuration, your oven may be controlled in one of two
ways. 6-knob models will have a dedicated knob used to set temperatures
and select options. 4-knob models have a numeric keypad for entering
times and temperatures.
1. CLEAR/OFF
key - Immediately halts any oven operation. If the door
is locked for self-clean, it will not unlock until the oven temperature
has dropped to a safe level.
2. DISPLAY
- Communicates information to the user, such as time-of-
day, oven temperature, and cooking mode.
3. START/ENTER
key - Initiates the selected oven operation or selects
an available option. NOTE: On 6-Knob models, pressing in on the
knob performs the same function as pressing the START/ENTER key.
4.
Oven Operations
- Select from the available operating modes to
perform the desired task. Some modes, such as PROBE, COOK TIME,
and DELAY, can only be used in conjunction with other modes. See
mode-specific instructions in this manual for details.
5.
Numeric Input- Used to enter desired oven temperature, set the clock,
change settings, or input other information into the appliance.
6. Auxiliary Features
- Useful features that are not specifically associated
with oven operation, such as TIMER, CONTROL LOCK, and SETTINGS.
5
Control user interface (Control input Knob Models:)
2
1
3
4
6
Control user interface (Numeric Keypad Input Models:)
1
2
3
4 5 6
(use keypad for
numeric input)
13
Review of Controls:
PREPARING
FOR FIRST USE
COOKTOP
OPERATION
OVEN
OPERATION
CONTROL
SETTINGS
TROUBLESHOOTING
CLEANING AND
MAINTENANCE
Control input Knob
SAFETY
INSTRUCTIONS
WiFi Connection:
Your oven is equipped to communicate with the Midea "MSmartLife" app,
providing you with access to certain features and controls from your
smartphone or tablet.* To take advantage of these features, you must
first connect your oven to your WiFi network and the Midea "MSmartLife"
app.
To connect additional devices, repeat step 2 above for each device.
Setting the Clock:
If you have successfully connected the oven to the Midea App, the clock will
automatically be set based on your location. If the app has incorrectly
identified your location or you otherwise want to set a different time, the
automatic setting can be disabled through the app. To set the clock
manually at the appliance:
14
1. Have the smart devices nearby with internet access for
downloading the app.
2. Have the home WiFi "Network Name" and password ready.
3. Download and install the "MSmartLife" app from Google Play or
the App Store.
4. Open the app. If you have an existing account, login. Otherwise,
create a new account and login.
5. Press the "Add Device" button and follow the app instructions
onscreen to complete the connection.
6. icon located
instructions on the app to reconnect. If issues continue, please
contact Midea customer service at 1-866-646-4332 or by
Once the connection is complete, the connected
on your range display will be illuminated and the app will also
confirm you are connected.
PREPARING
FOR FIRST USE
COOKTOP
OPERATION
OVEN
OPERATION
CONTROL
SETTINGS
TROUBLESHOOTING
CLEANING AND
MAINTENANCE
*Compatible Apple or Android device(s) and home WiFi network required.
SAFETY
INSTRUCTIONS
7. If the connection icon does not turn on, repeat the connection
visiting Midea.com/us/support for assistance.
5.
Start the oven in BAKE mode at the highest available temperature setting.
Allow oven to run for 1 hour to remove any dust or impurities. There will be
a distinctive odor - this is normal. Ensure your kitchen is well ventilated
during this conditioning period.
15
BEFORE USING YOUR NEW RANGE FOR THE FIRST TIME:
1.
Ensure all packaging, literature, removable labels, and protective plastic
film are removed. Check inside oven, inside drawer, and around door
and trim edges carefully.
2 . While cool, wipe down all surfaces, including inside oven and drawer,
with a damp cloth to remove dust that may have settled during
shipping and storage.
3.
Familiarize yourself with the controls and features described in this manual.
4.
Confirm that surface elements and oven operate as intended. Contact
support immediately if appliance
is not working as expected.
PREPARING
FOR FIRST USE
COOKTOP
OPERATION
OVEN
OPERATION
CONTROL
SETTINGS
TROUBLESHOOTING
CLEANING AND
MAINTENANCE
2. Enter the time using either the input knob or the numeric keypad,
depending on your model
3.
Press START/ENTER to accept the currently displayed time, or press
CLOCK or CLEAR/OFF to exit to the previous time setting.
1.
SETTINGS menu. See "Control Settings" section later in this manual.
Press the "CLOCK" button - the time display will begin to flash.
NOTE: Some models do not have a dedicated "CLOCK" button on the
control display. For these models, select the option under the
SAFETY
INSTRUCTIONS
Midea customer service at 1-866-646-4332 or by visiting midea.com/us/
NOTICE
COOKTOP OPERATION
WARNING
FIRE HAZARD
DO NOT USE WATER ON GREASE FIRES. Smother fire or flame with a
close-fitting lid or metal tray. Never pick up a flaming pan.
Do not place items that can melt or burn on the cooktop, even when it is
not being used.
CAUTION
BURN, CUT, ELECTRIC SHOCK HAZARDS
PREVENTING DAMAGE
Do not allow cookware to boil dry or otherwise overheat.
Do not cook foods packaged in aluminum foil directly on the cooktop.
Do not otherwise use aluminum foil, or any material that could melt,
directly on the cooktop.
Never cook directly on the grates. Always use appropriate cookware.
Never leave cooktop heating elements unattended. Boil-over causes
smoking and greasy spillovers that may ignite. Turn off all controls when
done cooking.
Do not use if cooktop is broken. Cleaning solutions and spillovers may
penetrate the broken cook-top and create a risk of electric shock.
Contact a qualified service provider immediately for repairs.
To prevent cooktop glass breakage, do not slide cookware across cooking
surface or otherwise scratch cooktop glass. Do not use the glass cooktop
as a cutting board.
Do not store heavy items above the cooktop. They could fall and break
the glass.
To minimize burn risk and maximize cooking efficiency, cookware should
completely cover the outlined area of the cooking element.
Until the cooktop has completely cooled after use, the surface may still
be hot and burns may occur after the cooking element has been turned off.
To avoid steam burns, do not use wet sponge or cloth while cooking area
is hot.
1 6
PREPARING
FOR FIRST USE
COOKTOP
OPERATION
OVEN
OPERATION
CONTROL
SETTINGS
TROUBLESHOOTING
CLEANING AND
MAINTENANCE
Types of Cooking Elements:
All Midea ranges are provided with 4 cooking elements (capable of raising
foods to safe cooking temperatures). Some models may also include a
warming element (capable of maintaining already-cooked food at safe
temperatures). Some models may include elements with multiple heating
areas. The number of heating areas on each element are indicated by the
rings on the glass cooktop. (Images do not represent all possible
configurations.) As the cooking elements operate, they will automatically
cycle on and off - even at the highest setting - to maintain power levels.
NOTE: Higher powered elements are placed towards the front for higher
temperature or shorter duration cooking, such as boiling, searing, and pan
frying. Lower powered elements are placed towards the rear for lower
temperature or longer duration cooking, such as simmer or melting
chocolate.
SAFETY
INSTRUCTIONS
Cooktop heang element with
mulple heang zones
Lower
Power
Warming
Zone
Lower
Power
Lower
Power
Warming
Zone
Lower
Power
Higher
Power
Higher
Power
Higher
Power
Higher
Power
COOKTOP OPERATION
Cooktop Indicators:
All Midea ranges are provided with separate indicators alerting the user
that the cooktop is in use and that the cooktop surface is hot.
Surface-On Indicator: Some models will indicate which cooktop heating
element is on by use of illumination around the knob. Alternatively, other
models will only indicate that a cooktop element is on using a single light
on the control panel.
1
7
PREPARING
FOR FIRST USE
COOKTOP
OPERATION
OVEN
OPERATION
CONTROL
SETTINGS
TROUBLESHOOTING
CLEANING AND
MAINTENANCE
Pan Size/Element Size Selection
:
completely cover the outlined area of
the cooking element as indicated below:
To minimize burn risk and maximize cooking efficiency, cookware should
Correct Selection:
Small Pan on Small Element Large Pan on Large Element Small Pan on Large Element
(with only inner ring of activated )
Hot Surface
Indicator Lights
Pan O
-Center on Element
Incorrect Selection:
Small Pan on Large Element
SAFETY
INSTRUCTIONS
Numeric Keypad
Input models
Control Input Knob
models
Cooktop Indicators (continued):
Hot Surface Indicator: Some models will have individual indicators for each
element under the cooktop glass. Alternatively, other models may only
have a single light under the cooktop glass indicating that one or more
elements are still hot. The Hot Surface Indicator will illuminate shortly after
turning an element on, and it will remain illuminated after the element has
been turned off.
NOTE: When the Hot Surface Indicator turns off, the glass surface may still
feel slightly hot to the touch. Avoid touching or placing anything on the
cooktop until it has completely cooled. The Hot Surface Indicator may
illuminate when the cooktop heats up during self-clean or long baking
cycles. This is normal.
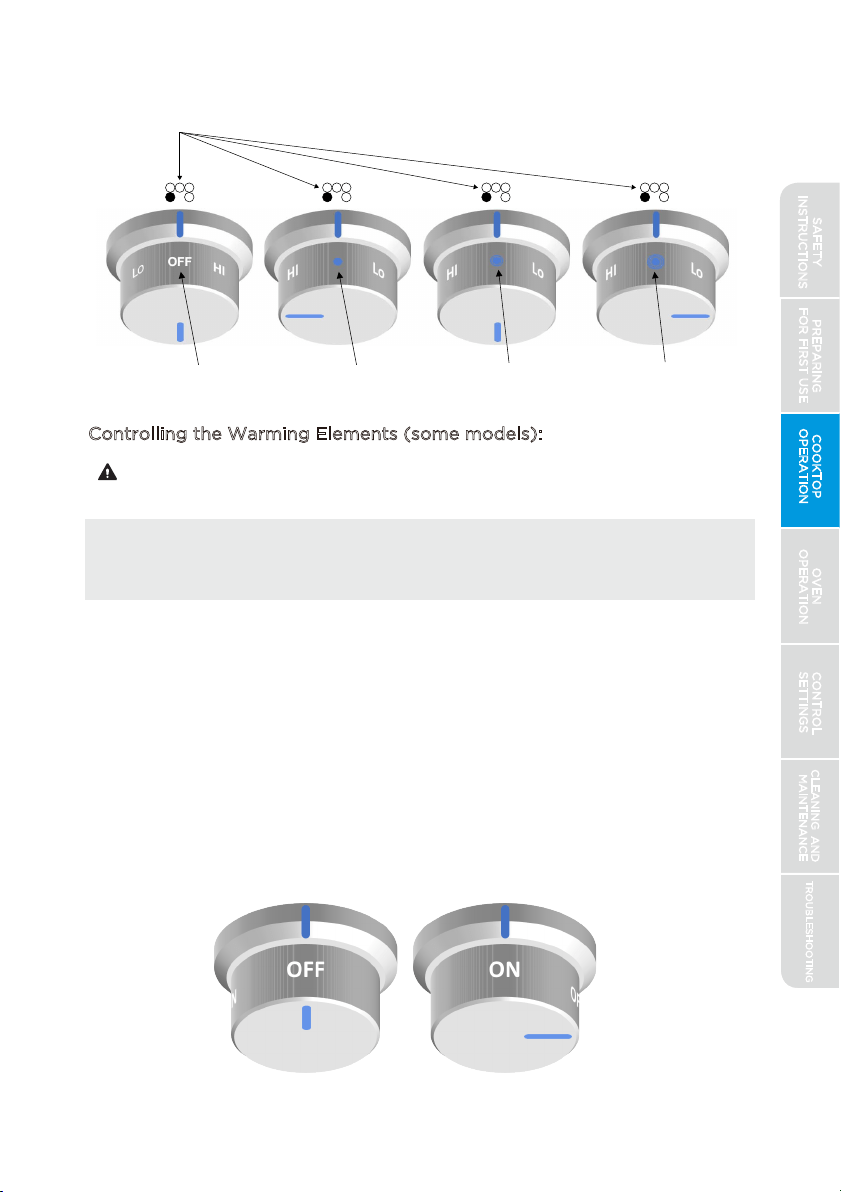
Controlling the Cooking Elements:
To turn a cooking element on, push in on the control knob and turn in either
direction. The small icon above the control knob indicates the location of
the element being controlled. The various settings (from OFF to HI) are
located on the knob itself. Adjust to the desired heat setting by aligning the
power level on the knob to the indicator mark on the control panel. To turn
an element off, simply rotate the control knob to the OFF position.
Controlling Elements with Multiple Heating Areas
(some models): Even if a
cooking element has multiple heating areas, each cooking element is
controlled by a single knob. When controlling a cooking element with
multiple heating areas, pay close attention to the markings on the knob.
The region being controlled is indicated by a series of concentric rings
corresponding to the areas being controlled.
1. A single dot " " indicates only the smallest or center most section of the
cooking element is being powered.
2. A dot with a ring " " indicates that two center sections of the cooking
element are being powered. (On an element with only two heating areas,
this means both heating areas are active.)
3. A dot with two rings " " indicates that all three sections of the cooking
element are being powered.
1 8
PREPARING
FOR FIRST USE
COOKTOP
OPERATION
OVEN
OPERATION
CONTROL
SETTINGS
TROUBLESHOOTING
CLEANING AND
MAINTENANCE
Surface-On Indication
by Knob Backlighting
Surface-On Indication
by Panel Indicator
SAFETY
INSTRUCTIONS
WARNING
Controlling the Warming Elements (some models):
Bacteria may grow in food at temperatures below 140°F. Do not attempt
to cook food using the warming element. Warming element is designed to
keep cooked foods warm, not to heat cold foods.
Depending on the model and configuration, warming elements may be
controlled in one of two ways. 6-knob model will have a dedicated knob for
controlling the warming element. 4-knob model will control the warming
element using a button on the oven control screen. Because of the limited
power available in the warming element, the control is always a simple ON/
OFF control and does not have adjustable settings.
Knob Control of Warming Element:
To turn on the warming element, simply
turn the knob 90 degrees to the ON position. This knob does not require to
be pushed in before turning. To turn off, turn back to the OFF position.
19
PREPARING
FOR FIRST USE
COOKTOP
OPERATION
OVEN
OPERATION
CONTROL
SETTINGS
TROUBLESHOOTING
CLEANING AND
MAINTENANCE
FOODBORNE ILLNESS HAZARD
Controlling Single or
Center Element Only
Controlling Triple
Element
Controlling Dual or Center
Two Elements Only
Icon on Control Panel indicating
which element the knob controls
Element Control
is "OFF"
SAFETY
INSTRUCTIONS
WARNING
CAUTION
Use only dry pot holders or oven mitts when using the oven.
The oven is vented along the rear of the cooktop. When the oven is in use,
this area may get very hot. Do not block or cover the oven vent.
OVEN OPERATION
FIRE HAZARD
Never place anything (aluminum foil, spill mat, baking stone, cookware,
etc.) on the bottom of the oven cavity. These items can trap heat or melt,
resulting in damage to the appliance and risk of electric shock, smoke, or
fire.
If materials inside the oven should ignite, keep door closed, turn off the
appliance, and disconnect the circuit at the circuit breaker box. Wait for
the oven to cool before removing contents, cleaning oven, and restoring
power.
BURN HAZARD
20
PREPARING
FOR FIRST USE
COOKTOP
OPERATION
OVEN
OPERATION
CONTROL
SETTINGS
TROUBLESHOOTING
CLEANING AND
MAINTENANCE
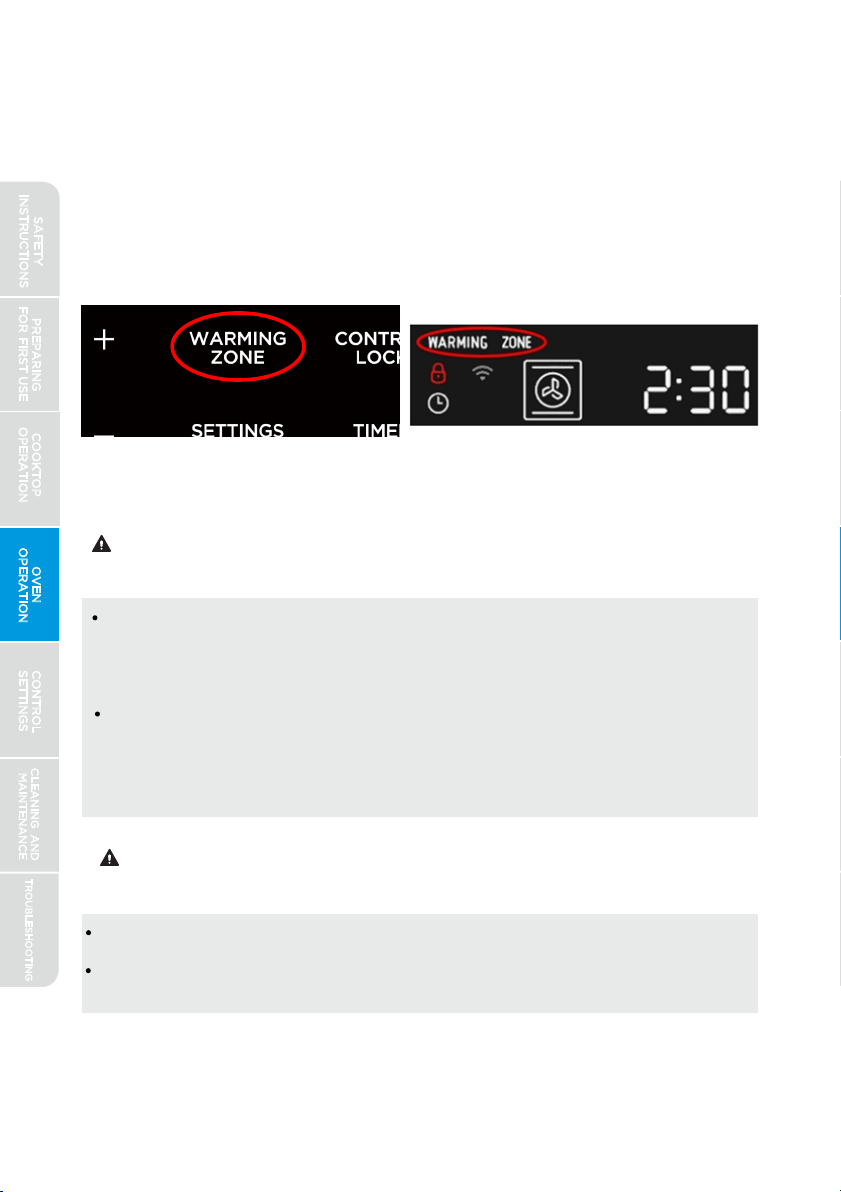
Button Control of Warming Element:
The warming element control button
is located on the user interface. (See Oven Controls section for depiction of
user interface.) To turn on the warming element, simply press the
WARMING ZONE button once. To turn off, press the WARMING ZONE
button again.The words "WARMING ZONE" will be shown in the control
display when the warming zone is active.
SAFETY
INSTRUCTIONS
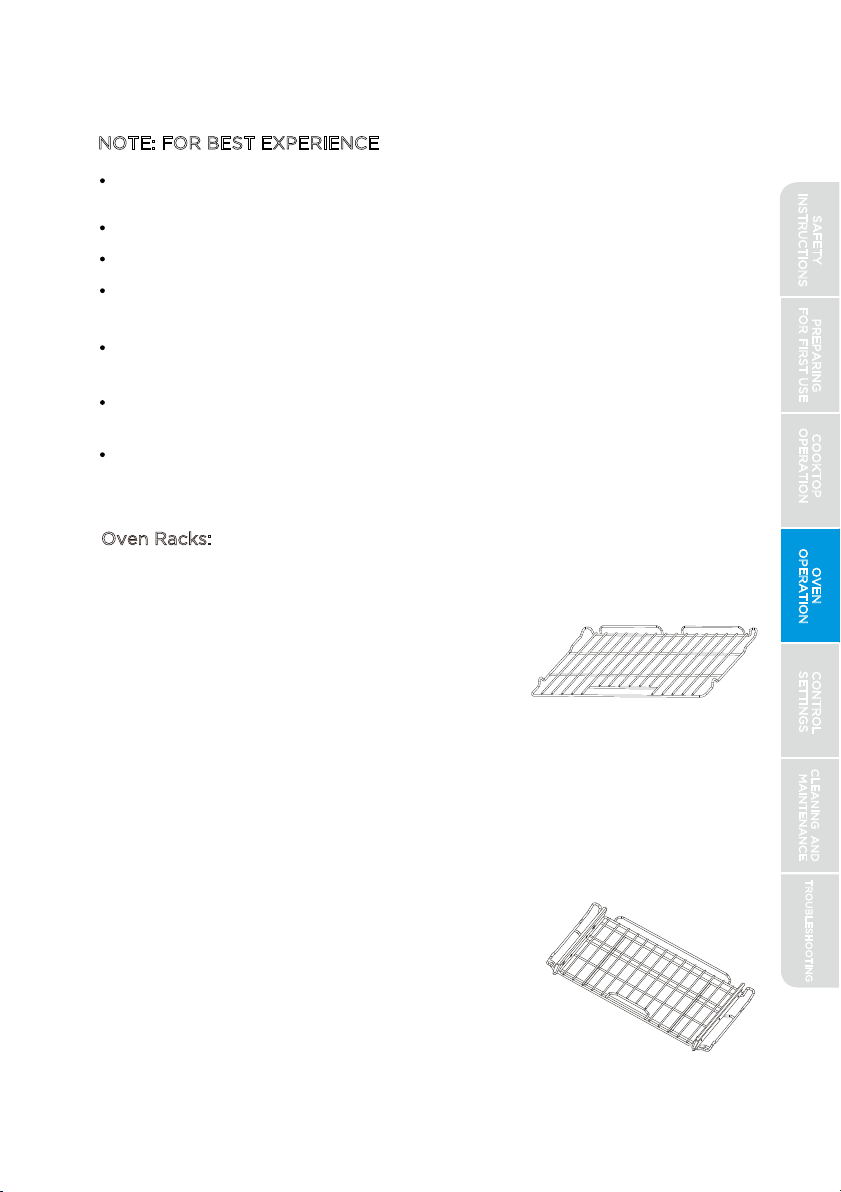
Oven Racks:
Flat Rack: Versatile and low profile, each range is
supplied with one or more flat oven racks. Flat
racks slide in and out of oven on rack guides
formed into side of oven wall. Multiple racks can
be used simultaneously, if desired. REMOVE
DURING SELF-CLEAN TO PREVENT
DISCOLORATION. If racks do not move smoothly,
use the corner of a paper towel to apply a thin
layer of vegetable oil to reduce friction. Wipe off
any excess before use.
Extension Rack: Slides in and out of oven on ball
bearing slides, allowing heavier dishes to be
moved smoothly and easily. REMOVE DURING
SELF-CLEAN TO PREVENT DISCOLORATION
AND DAMAGE TO BALL BEARING SLIDES. If ball
bearing slides do not move smoothly, they can be
lubricated with graphite powder lubricant. Do
not lubricate with grease or oil.
21
PREPARING
FOR FIRST USE
COOKTOP
OPERATION
OVEN
OPERATION
CONTROL
SETTINGS
TROUBLESHOOTING
CLEANING AND
MAINTENANCE
o˜. Bake modes shut o˜ after 12 hours, Broil will shut o˜ after 1 hour.
NOTE: FOR BEST EXPERIENCE
Proper preheating is important for good results. Unless the recipe specificall
instructs di˜erently, place food in the oven only after preheating is complete.
For best results, place food in immediately after preheat beep is sounded.
Steam or moisture may appear at the oven vent - this is normal.
If your model is equipped with a convection fan, it is normal for fan to
operate during preheat, even if not in convection baking mode.
Do not leave the door open any longer than necessary. If the door is left
open too long, the baking mode will be automatically cancelled.
If in operation, the convection fan will automatically shut off any time door
is opened.
If oven is left in operation for extended periods, it will automatically shut
SAFETY
INSTRUCTIONS
CAUTION
BURN HAZARD
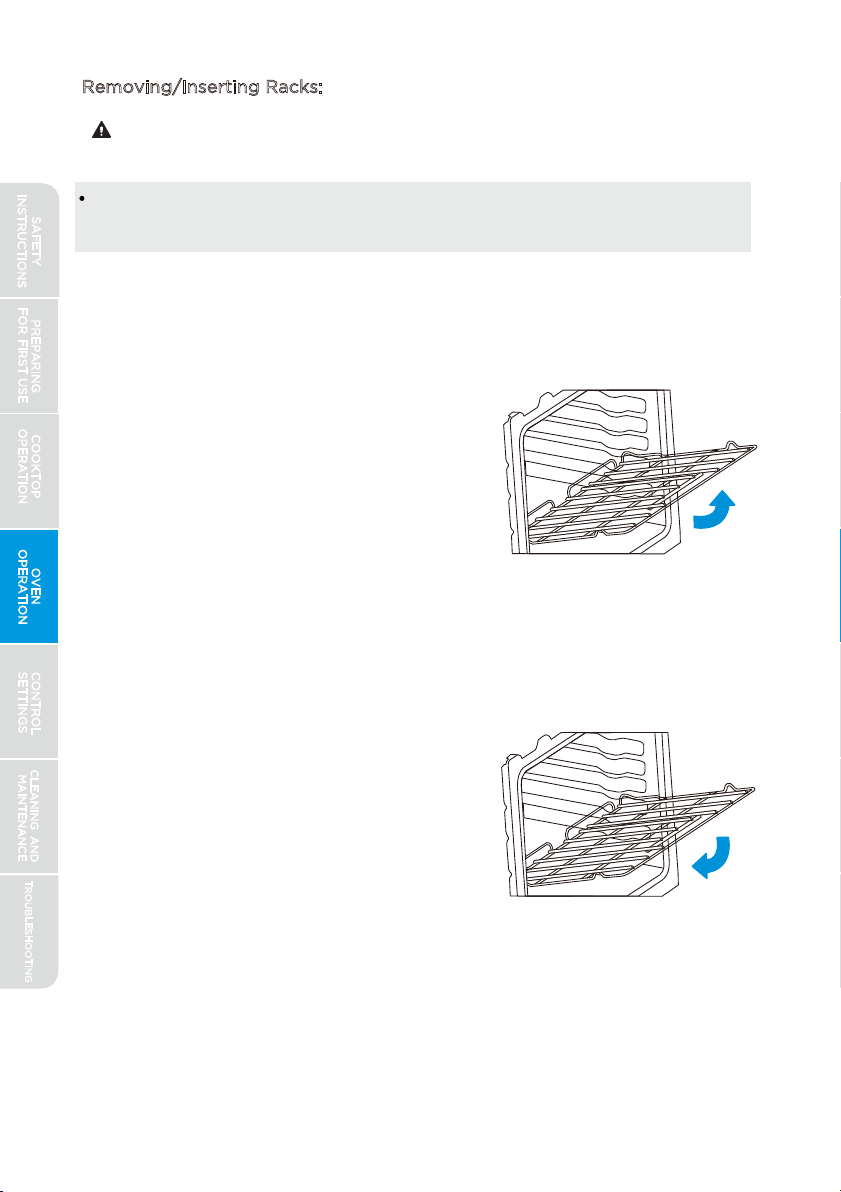
Removing/Inserting Racks:
Always place oven racks in the desired location while oven is cool. If rack
must be moved while oven is hot, do not let pot holder contact hot oven
surfaces.
Removing Rack:
Racks are designed to stop
before coming completely out of the oven to
reduce the risk of dropped or spilled foods.
To remove the rack:
1.
Remove all food and utensils from rack.
2.
Grasp firmly from both sides.
3.Pull rack out until it contacts the stop
position.
4.Lift up on the front of the rack and continue
pulling outward.
Inserting Rack:
The rack can be installed in only
one direction.
To insert the rack:
1.Orient the rack so that the handle is towards
the front and the interlock features are on
the top side.
2.Tip rack so that the front is several inches
higher than the back.
3.Slip the interlock features under the stop
position on the rack guides formed in the
oven walls.
4.Rotate rack down while pushing back to
NOTE: The extension rack frame inserts into the rack guides formed into the
oven wall in the same manner as the flat rack. Be careful to hold the
extension rack firmly so that the ball bearings do not slide during the
removal/insertion process.
complete the insertion process.
22
PREPARING
FOR FIRST USE
COOKTOP
OPERATION
OVEN
OPERATION
CONTROL
SETTINGS
TROUBLESHOOTING
CLEANING AND
MAINTENANCE
SAFETY
INSTRUCTIONS
Rack Positions:
For best performance, adjust rack so food is placed at the center of the
oven. For most foods this will be rack position #4. For larger foods like
roasts and turkey, move the rack position down to #3 or #2 to keep the food
centered in the oven. When using multiple racks simultaneously, try to space
the food out around the oven center (rack position #3 and #5 for two racks).
Broiling performs best with the food close to the broil burner - typically rack
position #6 or #7.
Preheating:
For oven modes that require preheating, the control will automatically
enter preheat mode after START/ENTER is pressed. Preheating is
generally desirable, although not absolutely necessary in all
circumstances. Some foods are more robust and may have acceptable
results without preheating. These foods include large pieces of meat
(whole roasts, hams, or poultry) where the total cooking time is much
longer than the time required to preheat. These foods also include
frozen potato products and frozen processed dinners that, by their
nature and design, are more robust to baking variations. More delicate
foods, such breads (including cakes, cookies, pastries, and pizzas),
desserts, soufflés, etc. will likely not have acceptable results without
proper preheating.
23
PREPARING
FOR FIRST USE
COOKTOP
OPERATION
OVEN
OPERATION
CONTROL
SETTINGS
TROUBLESHOOTING
CLEANING AND
MAINTENANCE
SAFETY
INSTRUCTIONS
7
6
5
4
3
2
1

If a baking mode (Bake, Convection Bake, Convection Roast, Pizza, etc.)
utilizes preheat, after START/ENTER is pressed, the temperature display
will show the current oven temperature. The display will continue to show
the oven temperature increasing until the set temperature is reached. Once
the set temperature is reached, the control will beep to alert the user that
preheat is complete.
Bake:
Designed for general baking recipes, BAKE applies heat from both above
and below to achieve exceptional baking performance. Works best for
small- and medium-sized foods that require only one rack position at the
center of the oven, such as casseroles, frozen dinners, single-layer cakes,
and individual racks of cookies.
Directions:
1.
Press the BAKE button.
2.The control will default to 350°F (175°C). If desired, and depending on
your model, use either the numeric keypad or the available knob to
adjust the desired oven temperature.
3.Press the START/ENTER button or click the Control Input Knob
(if present).
4.Allow oven to preheat before placing food in oven. Higher temperatures
will take longer to preheat. Oven display will show oven temperature as
it increases. Control will beep when preheat is complete.
5.
Press CLEAR/OFF to exit.
24
PREPARING
FOR FIRST USE
COOKTOP
OPERATION
OVEN
OPERATION
CONTROL
SETTINGS
TROUBLESHOOTING
CLEANING AND
MAINTENANCE
SAFETY
INSTRUCTIONS
WARNING
TROUBLESHOOTING
OVEN
OPERATION
CONTROL
SETTINGS
CLEANING AND
MAINTENANCE
25
•
The broil heating element is very powerful. Follow recipe directions and
monitor food closely to reduce risk of burning food.
For broiling meat, it is recommended to use a broiling pan to allow grease
and juices to drain away from the meat. Do not line broiling pan with
aluminum foil, as this will prevent greases from draining properly.
Broil:
NOTE: FOR BEST EXPERIENCE
•
PREPARING
FOR FIRST USE
COOKTOP
OPERATION
Keep Warm (some models):
FOODBORNE ILLNESS HAZARD
Bacteria may grow in food at temperatures below 140°F. Do not attempt to
cook food using the KEEP WARM mode. This mode is designed to keep
cooked foods warm, not to heat cold foods.
Designed for keeping hot foods hot. Cover dishes to prevent from drying
out. For best results, do not use KEEP WARM for more than 2 hours.
2
. Press the START/ENTER button.
3. Press CLEAR/OFF to exit.
Directions (6-knob models):
1
. Press the KEEP WARM button.
Directions (4-knob models):
1
. Press the BAKE button twice.
2
. Press the START/ENTER button.
3. Press CLEAR/OFF to exit.
This is a "closed-door broil" system. Broil will not operate with the door
open. If the door is left open, an alert will sound to close the door. If the
door is not closed, the broil mode will ultimately cancel itself.
•
Designed to provide similar results to grilling, BROIL is a method of
cooking that exposes food to direct radiant heat. BROIL can be used to
cook steaks or other foods where a seared exterior is preferred. It can also
be used in short durations to brown tops of casseroles or melt cheese.
BROIL performs best with food placed closest to heating element, typically
at rack position #6 or #7, depending on the size of the dish.
SAFETY
INSTRUCTIONS

OVEN
OPERATION
CONTROL
SETTINGS
CLEANING AND
MAINTENANCE
Directions (6-knob models):
1.
Press the PROOF button.
2.
Press the START/ENTER button.
Preheat is not required - place food in the oven immediately.
3.
4.
Press CLEAR/OFF to exit.
Directions (4-knob models):
1.
Press the BAKE button three times.
2.
Press the START/ENTER button.
Preheat is not required - place food in the oven immediately.
3.
4.
Press CLEAR/OFF to exit.
PREPARING
FOR FIRST USE
COOKTOP
OPERATION
TROUBLESHOOTING
26
Proof (some models):
Designed to use the oven lights to provide a gently warm environment for
the rising of bread or roll dough. In order to not kill the yeast in the dough,
this mode will not start if the oven temperature is too warm. If the mode
will not start, allow dough to rise on the kitchen counter. Generally, PROOF
performs best with food at rack position #4. After dough has risen as
desired, bake according to recipe directions. The word PROOF will be
shown below the clock in the control display when this mode is active.
Convection Bake:
Designed for baking recipes that require the use of multiple racks, such as
4-layer white cakes, multiple racks of cookies, or baking multiple recipes
simultaneously. CONVECT BAKE performs best with racks spaced evenly
out from center of oven (see section on rack positions).
3.
Press the START/ENTER button.
2.
The control will default to high broil. To select low broil, press
Directions:
1.
Press the BROIL button.
the BROIL button again. (The different between high broil and
low broil is small and will only be noticed on recipes of longer
duration.)
4.
Allow broil to operate for 5-10 minutes before placing food in the
oven. No preheat beep will sound.
5. Press CLEAR/OFF to exit.
OVEN
OPERATION
SAFETY
INSTRUCTIONS
OVEN
OPERATION
CONTROL
SETTINGS
TROUBLESHOOTING
CLEANING AND
MAINTENANCE
27
PREPARING
FOR FIRST USE
COOKTOP
OPERATION
Rack
Position
Directions:
1.
2.
The control will default to 350°F (175°C). If desired, and depending on
3.
Press the START/ENTER button.
2.
3
.
Use convection bake mode
.
the back of the oven, and layers
the oven so that one pan is not
directly above another.
Press the CONVECT BAKE button.
your model, use either the numeric keypad or the available knob to adjust
the desired oven temperature.
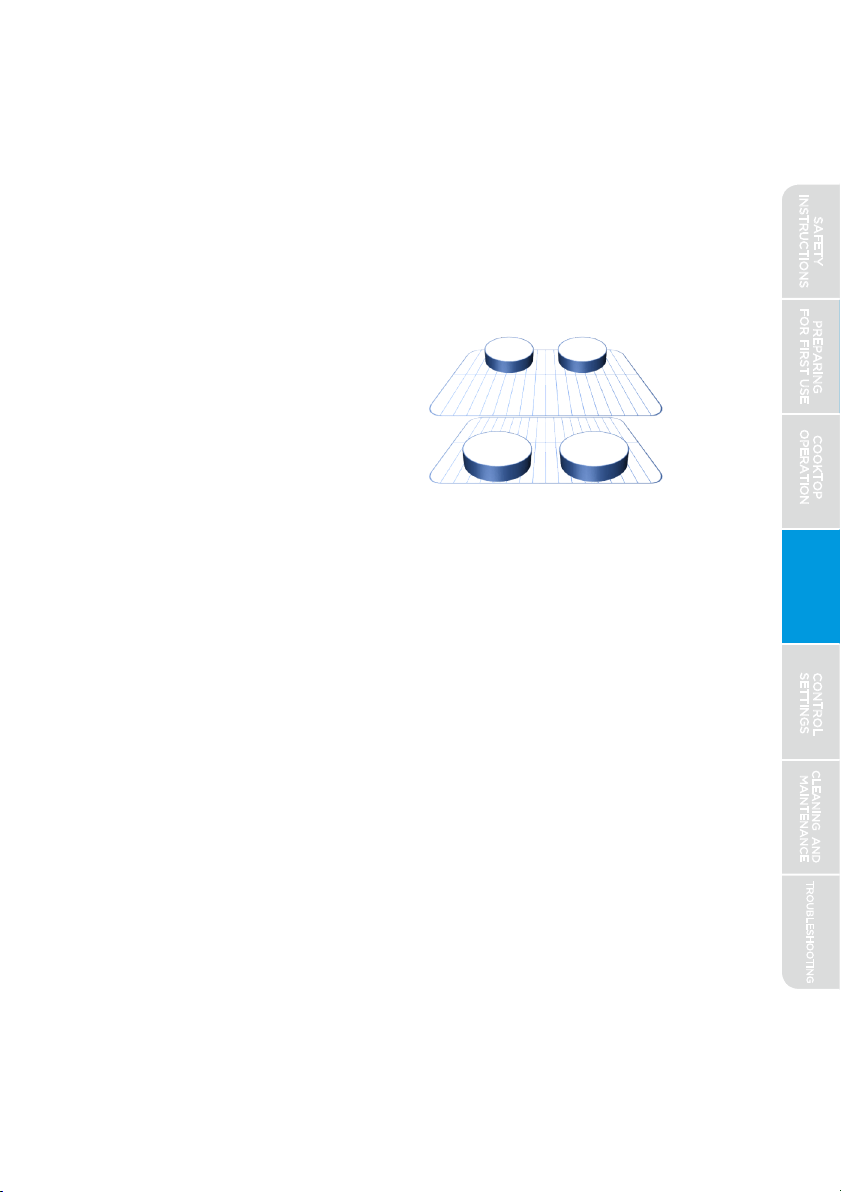
Special instructions for baking four cake layers simultaneously:
1.
OVEN
OPERATION
Special instructions for Air-Frying and getting crispy foods from your
oven:
1.
Place oven rack at position 6 (closer to broiler).
2.
3.
4.
5.
6.
8.
7.
Press CONVECT BAKE button.
The control will default to 350 F (175 C). Adjust temperature based on
the food to cook (see attached chart).
Press the START/ENTER button or click the Control Input Knob (if
present).
Allow oven to preheat before placing food in oven. Higher
temperatures will take longer to preheat. Oven display will show
oven temperature as it increases. Control will beep when preheat is
complete.
Use any flat, non-stick cookie sheet
Place food inside the oven and cook per recommended time. (see
chart below).
Adjust time, temperature, or rack position based on your preferences.
SAFETY
INSTRUCTIONS
Place racks at positions 3 and 5
.
Place layers on rack 5 towards
on rack 3 towards the front of
5
3
PREPARING
FOR FIRST USE
COOKTOP
OPERATION
Convection Roast (some models):
OVEN
OPERATION
CONTROL
SETTINGS
TROUBLESHOOTING
CLEANING AND
MAINTENANCE
Designed for cooking large pieces of meat, such as roast, ham, turkey, or
chicken. CONVECT ROAST performs best with the rack position adjusted
to place the center of the meat at the approximate center of oven.
Directions:
Pizza (some models):
Designed to optimize the cooking of fresh pizza. Fresh pizza can be
homemade or purchased from many grocery stores or specialty shops.
1.
2.
5.
Press the CONVECT ROAST button.
The control will default to 350°F (175°C). If desired, and depending on
your model, use either the numeric keypad or the available knob to
3.
4.
adjust the desired oven temperature.
Press the START/ENTER button.
Allow oven to preheat before placing food in oven. Higher temperatures will
take longer to preheat. Oven display will show oven temperature as it
increases. Control will beep when preheat is complete.
Press CLEAR/OFF to exit.
28
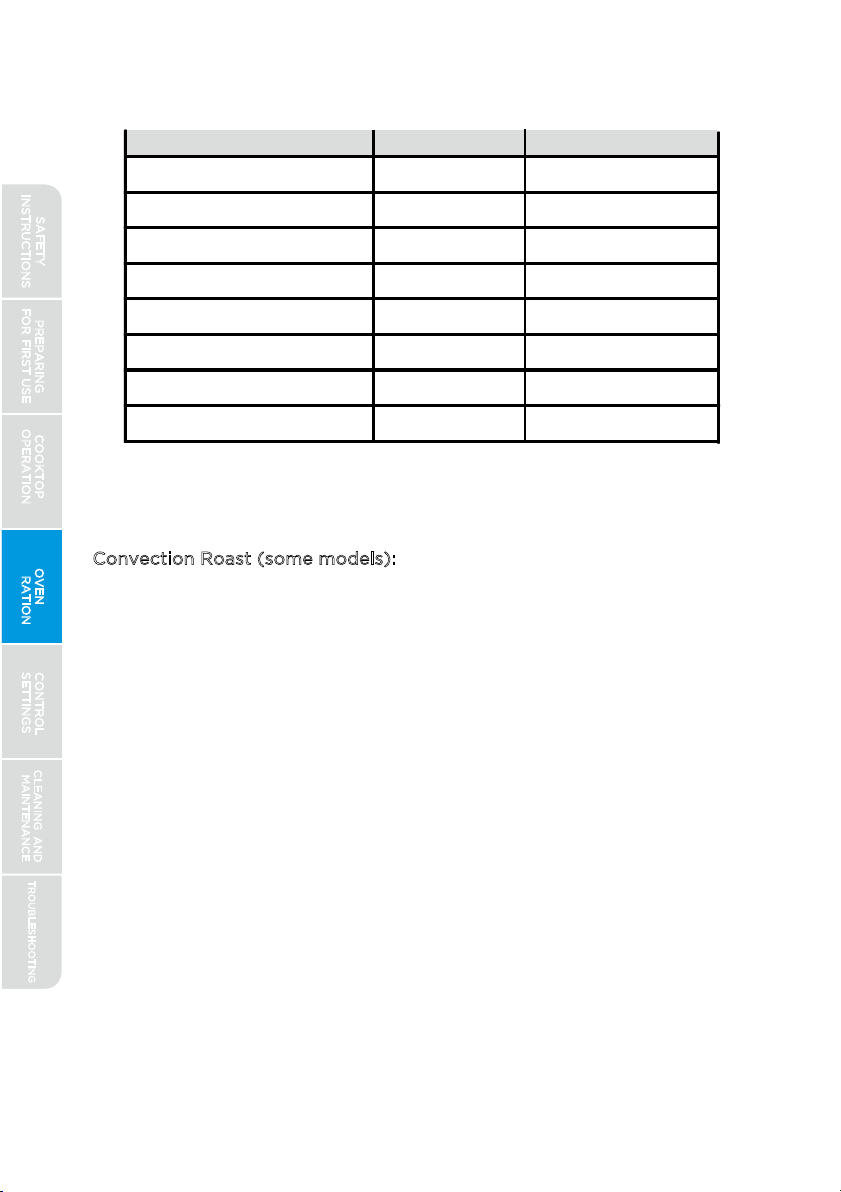
Foods Recommended
Frozen Fries
Temp [
F]
Cook Time [min]
475
20
Fresh Fries*
475
18
Frozen Wings
450
45
Fresh Wings
450
35
Frozen Mozarella Sticks
475
6
Frozen Chicken Nuggets
440
12
Brussel Sprouts
440
15
Breaded Chicken Breasts
440
30
o
NOTE: For more even and crispy results, flip foods half way through
the cooking time.
SAFETY
INSTRUCTIONS
CONTROL
SETTINGS
TROUBLESHOOTING
CLEANING AND
MAINTENANCE
PREPARING
FOR FIRST USE
COOKTOP
OPERATION
OV
OVEN
EN
OPERA
OPERATION
TION
29
Directions:
1.
2.
5.
Press the PIZZA button.
The control will default to 350°F (175°C). If desired, and depending on
your model, use either the numeric keypad or the available knob to
adjust the desired oven temperature.
Press the START/ENTER button.
Allow oven to preheat before placing food in oven. Higher
temperatures will take longer to preheat. Oven display will show oven
temperature as it increases. Control will beep when preheat is
complete.
Press CLEAR/OFF to exit.
3.
4.
modified - oven operation must be cancelled and restarted from the
beginning to set a different DELAY value. DELAY cannot be set for more
than 12 hours in advance.
WARNING
Delay (some models):
Foods that spoil easily, such as milk, eggs, fish, stuffing, poultry, and
pork, should not be allowed to sit for more than 1 hour before cooking.
Spoilage may occur sooner if oven is warm.
Designed to allow user to delay the start of a baking operation until a
specified time of day. Works only with BAKE, KEEP WARM, CONV BAKE,
CONV ROAST, PROOF, SELF CLEAN, and STEAM CLEAN. (Does NOT
work
with PIZZA or BROIL.) Once DELAY has been set, it cannot be
FOODBORNE ILLNESS HAZARD
SAFETY
INSTRUCTIONS
PREPARING
FOR FIRST USE
COOKTOP
OPERATION
OVEN
OPERATION
CONTROL
SETTINGS
TROUBLESHOOTING
CLEANING AND
MAINTENANCE
30
Directions:
1.
Place food in the oven.
Select oven baking mode by pressing the appropriate button (i.e. BAKE,
CONV BAKE, etc.)
2.
Press the DELAY button.
3.
4.
must be entered. Enter the time of day when the oven is to begin
operation and press the START/ENTER button.
Display will alternate between the current time of day and the time when
the oven will turn on.
When the start time is reached, a signal will alert user that oven is starting.
5.
Clock will begin to flash, indicating that a time of day to start the ove
6.
Upon starting, the display will convert to show the normal information for the
bake mode selected.
7.
Cook Time (some models):
Designed to allow user to end oven operation after a specified time. Works
only with BAKE, KEEP WARM, CONV BAKE, or CONV ROAST. Once a COOK
TIME has been set, it can not be modified - baking mode must be cancelled
and restarted from the beginning to set a different COOK TIME. Duration
cannot be set for longer than 12 hours. Can be used in conjunction with
DELAY feature - set DELAY feature first (see above), and then set COOK
TIME.
Directions:
1.
Start oven operation normally as described above.
2.
Press the COOK TIME button.
3.
Clock will display "00:00" indicating that a time duration must be entered.
Enter time in hours and minutes (hh:mm) and press the START/ENTER
button.
4.
Clock will begin to count down. When "00:00" is reached, oven will flas
the display and alert user with an audible signal. Oven will either turn o°or
revert to KEEP WARM mode, depending on the settings. See Control
Settings section of this manual for instructions on changing settings.)
Allow oven to preheat before placing food in oven. Higher temperatures
will take longer to preheat. Oven display will show oven temperature as
it increases. Control will beep when preheat is complete.
Press COOK TIME to clear the signal after timed bake ends, or press
CLEAR/OFF to exit the timed bake early.
5.
6.
SAFETY
INSTRUCTIONS
WARNING
PREPARING
FOR FIRST USE
COOKTOP
OPERATION
OVEN
OPERATION
CONTROL
SETTINGS
TROUBLESHOOTING
CLEANING AND
MAINTENANCE
31
Probe (some models):
FOODBORNE ILLNESS & BURN HAZARDS
Consuming undercooked food can result in foodborne illness. Use probe
feature only according to the following instructions to ensure all portions
of the food reach minimum safe cooking temperatures. Consult reputable
government sources, such as USDA, FDA, or CDC, for recommended safe
minimum cooking temperatures.
Check the internal temperature at multiple locations with a food
thermometer after
cooking to ensure that all portions of the food have
reached the minimum safe internal temperature for that food.
If oven has been preheated, use oven mitts to open the receptacle and
insert probe to avoid burn injury.
Use only the probe supplied with your oven - do not use any accessories
not specifically designed to work with your appliance.
Designed to work in conjunction with BAKE, CONVECT BAKE, or
CONVECT ROAST, the oven probe supplied with your oven can monitor the
internal food temperature and turn off the oven when the food reaches the
desired temperature. Some foods, particularly small or thin items, are not
suited for cooking with the probe due to their size or shape. Position
rack at
optimal position prior to preheating or initiating the PROBE function.
Common Directions (works with all models):
1.Place meat in an appropriate baking dish or pan. Insert meat probe into
meat. Use only the probe provided with your appliance. To avoid damage
to the probe, meat should be completely defrosted prior to inserting probe.
SAFETY
INSTRUCTIONS

PREPARING
FOR FIRST USE
COOKTOP
OPERATION
OVEN
OPERATION
CONTROL
SETTINGS
TROUBLESHOOTING
CLEANING AND
MAINTENANCE
32
A.
Position probe so that the tip is in the approximate center of the
C.
The probe should not touch bone, fat, or gristle.
thickest part of the food. For whole poultry, insert the probe into
the thickest part of the breast.
B.
For best results, insert at a point that allows as much of the probe
to be inserted into the food as possible.
2.
Place baking dish into oven, plug probe into receptacle, and close the door.
Preheating is not required.
3.
Select the baking mode (BAKE, CONV BAKE, or CONV ROAST), select oven
temperature, and press the START/ENTER button or click the Control Input
Knob (if present).
4.
Once oven temperature has been set, the blue text and probe icon will flash
indicating that the desired food temperature is to be set next. Adjust food
temperature to the desired value and press START/ENTER.
While the probe mode is in operation, the display will alternate
between the oven set temperature and the probe temperature reading.
Once the oven probe reaches the desired temperature, the display will
flash and sound an alert to indicate the bake mode has ended. Oven
will either turn off or revert to KEEP WARM mode, depending on the
settings. (See Control Settings section of this manual for instructions
on changing settings.)
Press PROBE to clear the signal after probe bake ends, or press
CLEAR/OFF to exit the probe bake early.
5.
6.
7.
SAFETY
INSTRUCTIONS
Designed to allow kosher oven usage during Jewish Sabbath and holidays.
When in Sabbath Mode, the oven operation may be controlled as described
below, however audible signals will not sound, the clock is disabled, oven
lights are disabled, and changes to the display may be delayed from 30 to
60 seconds. (There is no need to remove oven lightbulbs during Sabbath
Mode.) The oven will be allowed to operate indefinitely until Sabbath Mode
is exited, overriding the factory 12-hour default maximum continuous oven
operation. Baking during Sabbath Mode is a two-step process; first the
Sabbath mode must be selected and then the bake mode must be set.
Entering Sabbath Mode:
1.
Select the SETTINGS button, select the
option, and turn this
setting to "ON." See "Settings" under "Preparing for First Use" at the
beginning of this manual for more information on adjusting settings.
2.A single bracket "]" will appear in the display, indicating that Sabbath
Mode is active.
Controlling the Oven:
PREPARING
FOR FIRST USE
COOKTOP
OPERATION
OVEN
OPERATION
CONTROL
SETTINGS
TROUBLESHOOTING
CLEANING AND
MAINTENANCE
33
1.
During Sabbath Mode, the function of the buttons on the control are
2.
3.
4.
modified to perform the functions described in the diagrams below
For continuous baking operation, select the button corresponding to the
desired oven temperature, then press the START/ENTER button.
For a timed baking operation, select the button corresponding to the
desired oven temperature, then select the button corresponding with the
operating time, then press the START/ENTER button.
After having pressed the START/ENTER button, a random delay between
30 and 60 seconds will pass, and a second bracket "] [" will appear in the
display, indicating that the oven has started baking.
Modifying the probe temperature:
2.
Press PROBE button, set food temperature
to the desired value, and press
START/ENTER. Control will begin to beep, indicating that probe needs to
be connected to oven.
1.On Control Input Knob models with a separate PROBE key on the oven
control, pressing this key allows user to change the desired food
temperature at which the bake cycle will end.
SAFETY
INSTRUCTIONS
CAUTION
PREPARING
FOR FIRST USE
COOKTOP
OPERATION
OVEN
OPERATION
CONTROL
SETTINGS
TROUBLESHOOTING
CLEANING AND
MAINTENANCE
34
Func n During
Sabbath Mode:
Bake 200F Bake 250F Bake 300F Bake 350F Bake 400F
3 hours 4 hours
5 hours
Func
n During
Sabbath Mode:
Bake 200F Bake 250F Bake 300F Bake 350F Bake 400F
90 minutes 2 hours 3 hours 4 hours
5 hours
Exiting Sabbath Mode:
NOTE:
If a power outage occurs while in Sabbath Mode, when power is
restored the appliance will return to Sabbath Mode, but it will not resume
any baking operations that may have been in progress.
Steam Clean (some models):
BURN HAZARD
Oven surfaces - especially oven bottom - may be hot. Use caution to avoid
contact with hot surfaces.
Hot surfaces may create hot steam in wet sponge or cloth while cleaning.
If steam is evident when wiping out oven, wait until oven has cooled slightly.
Designed to generate steam and gently warm the oven surfaces to loosen
grease and light soils.
1.
Quickly press the SETTINGS button three times to reopen the settings menu.
2.
Locate the Sabbath Mode setting, and change this setting to OFF.
Control Input Knob models:
90 minutes 2 hours
Numeric Keypad Input models:
5.
Temperature can be adjusted at any time by pressing the button
corresponding to the desired oven temperature, then pressing the
START/ENTER button.
6.
Press the CLEAR/OFF button to cancel any baking operation in
progress. After a random delay between 30 and 60 seconds, the display
will return to a single bracket "]".
SAFETY
INSTRUCTIONS
• When using the self-clean function, confirm that the door locks and wil
not open. If the door does not lock, do not run self-clean. Contact a
qualified service provider for repairs
To avoid ignition inside the oven, clean excess grease or food out of the
oven before starting self-clean.
In the event of ignition inside the oven during self-clean, turn o° the
oven and wait for the fire to extinguish. DO NOT FORCE THE DOO
OPEN. Wait for the oven to cool before removing contents and cleaning
the oven.
•
•
• See also other warnings in the "Self Clean Hazards" section at the
beginning of this manual before using Self Clean.
PREPARING
FOR FIRST USE
COOKTOP
OPERATION
OVEN
OPERATION
CONTROL
SETTINGS
TROUBLESHOOTING
CLEANING AND
MAINTENANCE
35
Self Clean:
WARNING
FIRE & BURN HAZARDS
NOTE: FOR BEST EXPERIENCE
Due to the high temperatures generated, it may be preferable to delay
using the self clean feature until the weather is colder to avoid unnecessarily
burdening the home air conditioning system.
Directions:
1.
Start with oven at room temperature.
2.
3.
4.
5.
6.
7.
Press START/ENTER button.
or clicking the Control Input Knob (if
10.
Remove all items from oven, including oven racks.
Wipe out any large spills or excess debris prior to starting steam
utensil (hard plastic spatula, plastic paint scraper, old credit card, etc.)
For improved softening of tough stains, spray inside surfaces with water
spray bottle or wipe surfaces with a wet sponge before starting.
Place 1 cup (8 oz.) of water in the center bottom of the oven and close
the door.
For 6-knob model, press STEAM CLEAN button. For 4-knob model,
press CLEAN button once.
present).
Depending on the model, the oven door may lock during steam clean. If
oven door does not lock, do not open the door until the steam clean cycle
has completed fully.
After steam clean cycle is complete, soak up any remaining water from
oven bottom and wipe down surfaces within oven with soft, damp sponge
or cloth.
Press CLEAR/OFF to exit at any time.
8.
9.
•
SAFETY
INSTRUCTIONS

PREPARING
FOR FIRST USE
COOKTOP
OPERATION
OVEN
OPERATION
CONTROL
SETTINGS
TROUBLESHOOTING
CLEANING AND
MAINTENANCE
36
(Remote Operation):
Allows use of most oven functions using a connected smart device, such as
smart phone or tablet. Remote operation has two modes: Manual and Auto
Recipe. Manual mode allows you to turn on/off selected oven operations
manually using a smart device. Auto Recipe mode allows you to program a
series of oven operations that will sequence and end automatically according
to the settings selected.
Provides the ability to monitor oven and cooktop operation, and control
selected oven functions. Follow the instructions in the app for more details.
Directions:
1.Remove all items from oven, including oven racks.
2.Wipe out any large spills or excess debris prior to starting self clean.
3.
For 6-knob model, press SELF CLEAN button. For 4-knob model, press
CLEAN button twice.
4.
Select the number of hours you wish self clean to operate and press
START/ENTER button or clicking the Control Input Knob (if present).
5.Oven door will lock while self clean is performed.
6.
Designed to generate very high oven temperatures that are capable of
reducing stubborn oven soils to ash that can be easily wiped out after
the oven has cooled.
•
Your oven can be set to operate self clean for 3, 4, or 5 hours. This time
does not include the time required for the oven to cool down and unlock.
Shorter times use less energy, but longer times generally provide more
through cleaning. To conserve energy, use shorter times for light to
moderate soiling, and use longer times only for heavy soiling.
•
After oven has unlocked and cooled completely, wipe out any ashy residue
with a damp, non-abrasive sponge or cloth.
Press CLEAR/OFF to exit at any time. If self-clean is cancelled early, the
oven will remain locked until it has cooled sufficiently.
7.
SAFETY
INSTRUCTIONS

PREPARING
FOR FIRST USE
COOKTOP
OPERATION
OVEN
OPERATION
CONTROL
SETTINGS
TROUBLESHOOTING
CLEANING AND
MAINTENANCE
37
Timer:
Midea ovens come equipped with a built-in kitchen timer function for your
convenience.
Directions:
Oven Light:
Controls the oven lights.
Directions: Simply press the LIGHTS button to cycle oven lights on and off.
1.
2.
3.
Press TIMER button.
Clock will display "00:00". Enter time in hours and minutes (hh:mm) and
press START/ENTER button
or clicking the Control Input Knob (if
present).
Clock will begin to count down. When "00:00" is reached, timer will signal.
Cancel or clear the timer function by pressing the TIMER button.
(CLEAR/OFF is reserved for canceling baking modes only.)
must be enabled at the range control before remote operation can be
used. See app
connection instructions in the "Preparing for First Use" section
in this manual.
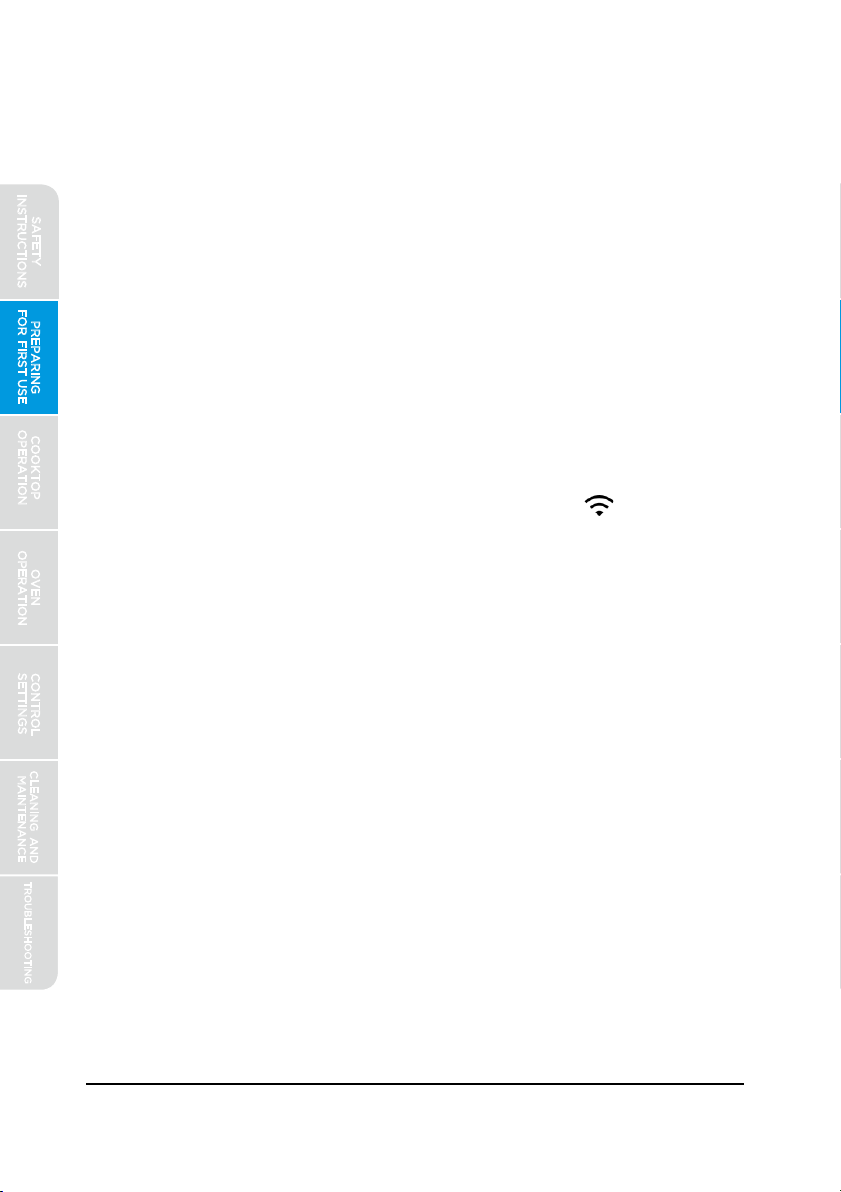
The connected icon in the display section (located left
of the clock)
will indicate your connection status and whether remote
operation is enabled:
Icon to turn on WiFi
2.
3. Icon is flashing quickly: WiFi is in the process of connecting to your home
network. Follow app instructions.
4. Icon is solid: WiFi has successfully connected to your home network, and
the range can now be controlled via the MSmartLife app.
1. Icon is off: WiFi has not been turned on. Press the
capability
Icon is flashing slowly: WiFi has been turned on, but it is not connected.
Follow the instructions under “Preparing for First Use” in this manual.
SAFETY
INSTRUCTIONS
Directions: Simply press the button to activate or deactivate the WiFi
functionality. To disable remote operation from smart devices, deactivate the
WiFi feature.

PREPARING
FOR FIRST USE
COOKTOP
OPERATION
OVEN
OPERATION
CONTROL
SETTINGS
TROUBLESHOOTING
CLEANING AND
MAINTENANCE
38
CONTROL SETTINGS
Settings:
Midea ovens are provided with a variety of settings available to help you
customize the appliance to your personal preferences. The ability to adjust
settings is only available when no other oven operation is in progress.
Oven Calibration - If you find your oven is running hotter or colder
than expected based on the outcome of recipes with which you
oven's target temperature in order to achieve the results you
2.
3.
Use START/ENTER button or clicking the Control Input Knob (if present)
to select a menu option to be adjusted. The menu option selected will turn
solid, and the blue setting will begin to flash indicating the setting can now
be adjusted.
4.
Depending on your model, use the selector knob or "+" and "-" buttons to
adjust the setting value.
5.
Use START/ENTER button or clicking the Control Input Knob (if
present) to confirm modification to setting value, use SETTINGS or
CLEAR/OFF buttons to reject modifications an return to the menu
options level.
6.
Press SETTINGS or CLEAR/OFF again to exit the settings menu entirely.
Depending on your model, use the selector knob or "+" and "-" buttons to
navigate between menu options.
Enter the settings menu by pressing the "SETTINGS" button on the control
panel. The first menu option will be displayed in white (flashing) with t
current setting displayed in blue (solid).
Navigation of the settings menu:
1.
Clock-Only present on models where no dedicated CLOCK botton is
available on the control. Used to set the time of day on the display
clock.
SAFETY
INSTRUCTIONS
PREPARING
FOR FIRST USE
COOKTOP
OPERATION
OVEN
OPERATION
CONTROL
SETTINGS
TROUBLESHOOTING
CLEANING AND
MAINTENANCE
39
Degree Units - Your oven is programmed by default to use
degrees Fahrenheit, but it can be set to operate in degrees
Celsius using this setting.
Display Brightness - The user interface is programmed by
default to operate at maximum brightness. If desired, you can
reduce the brightness of the display using this setting.
Reducing the brightness will reduce the standby energy usage
of the oven control and could extend the life of the display.
Hold After Cook - When using the timed bake or probe
function, by default the oven will turn off when the bake
mode ends. You have the option to have the oven switch to
KEEP WARM at the end of a timed bake function by
altering this setting.
Sabbath Mode - For customers who observe the Jewish
Sabbath, selecting this mode will place the range into an
operating mode that observes kosher law for oven operation.
Complete details on the operation of Sabbath Mode are
found in a dedication section within this manual.
Volume - The audible feedback of the control is programmed
by default to operate at the maximum level. If desired, you can
reduce the volume using this setting.
Demo (Sales) Mode - This sets the appliance for "demo mode."
In this mode, the controls will function as normal but will not
allow any cooking mode to be initiated. This is intended to be
used only by retailers on showroom floors, and is not intended
to be used once the appliance has been purchased. By default,
demo mode is o˜.
SAFETY
INSTRUCTIONS
PREPARING
FOR FIRST USE
COOKTOP
OPERATION
OVEN
OPERATION
CONTROL
SETTINGS
TROUBLESHOOTING
CLEANING AND
MAINTENANCE
40
CLEANING AND MAINTENANCE
WARNING
For best results and prolonged cooktop life, it is recommended to clean
the cooktop after each use.
Confirm leveling leg i
engaged with anti-tip bracket
See installation instructions
for details
Tip-Over Hazard
If range is moved for cleaning, servicing,
or any other reason, confirm the anti-ti
device is engaged per the installation
instructions.
A child or adult can tip the range and
be killed.
Failure to follow these instructions can
result in deathor serious burns to children
and adults.
Leveling
Leg
Anti-Tip
Bracket
Glass Cooktop:
CAUTION
LACERATION, SHOCK, BURN, INHALATION HAZARDS
Glass cooktop is durable, but may break when heated if scratched or
otherwise damaged during cleaning. Clean only as described below to
avoid glass breakage.
Clean cook-top with caution - To avoid steam burns, do not use wet
sponge or cloth while cooking area is hot. Wear oven mitt if cleaning
with razor while cooktop is hot (see special instructions below for sugary
spills and melted plastic).
Some cleaners can produce noxious fumes if applied to a hot surface.
Allow cooktop to cool completely before applying any cleaning chemicals.
SAFETY
INSTRUCTIONS
CAUTION
ELECTRIC SHOCK HAZARD
Do not use excessive amounts of water or cleaners to clean knob areas.
If moisture is forced into openings behind knobs, there is a potential for
electric shocks.
Avoid spraying kitchen cleaners directly into the openings behind knobs.
Light soiling:
Clean with general purpose kitchen cleaner, followed by glass cleaner to
remove streaks.
PREPARING
FOR FIRST USE
COOKTOP
OPERATION
OVEN
OPERATION
CONTROL
SETTINGS
TROUBLESHOOTING
CLEANING AND
MAINTENANCE
41
Control Panel:
Sugary spills/plastic - Sugary spills and melted plastics may cause damage
the cooktop not covered by warranty if not removed immediately.
cooktop.
As described above, use a clean, new razor blade scrape and wear oven
mitt for protection to quickly remove sugary spills or melted plastic from
cooktop glass while cooktop is hot.
Quickly wipe removed material away from hot cooktop heating element
using dry paper towel.
Wait until the cooktop glass has completely cooled before attempting
a more thorough cleaning as described above.
Heavily burned on residue:
Clean using commercially available glass cooktop cleaner. Follow
instructions on product packaging.
Use a razor blade scraper designed for cleaning glass surfaces. Ensure
razor is clean and new to minimize risk of scratching cooktop.
Hold razor at approximately 45° angle, apply firm pressure, and smoothl
press razor through residue.
After heavy residue is removed, clean again using glass cooktop cleaner
compound.
Moderate soiling:
Commercially available glass cooktop cleaners may be used. Follow
instructions on product packaging.
SAFETY
INSTRUCTIONS
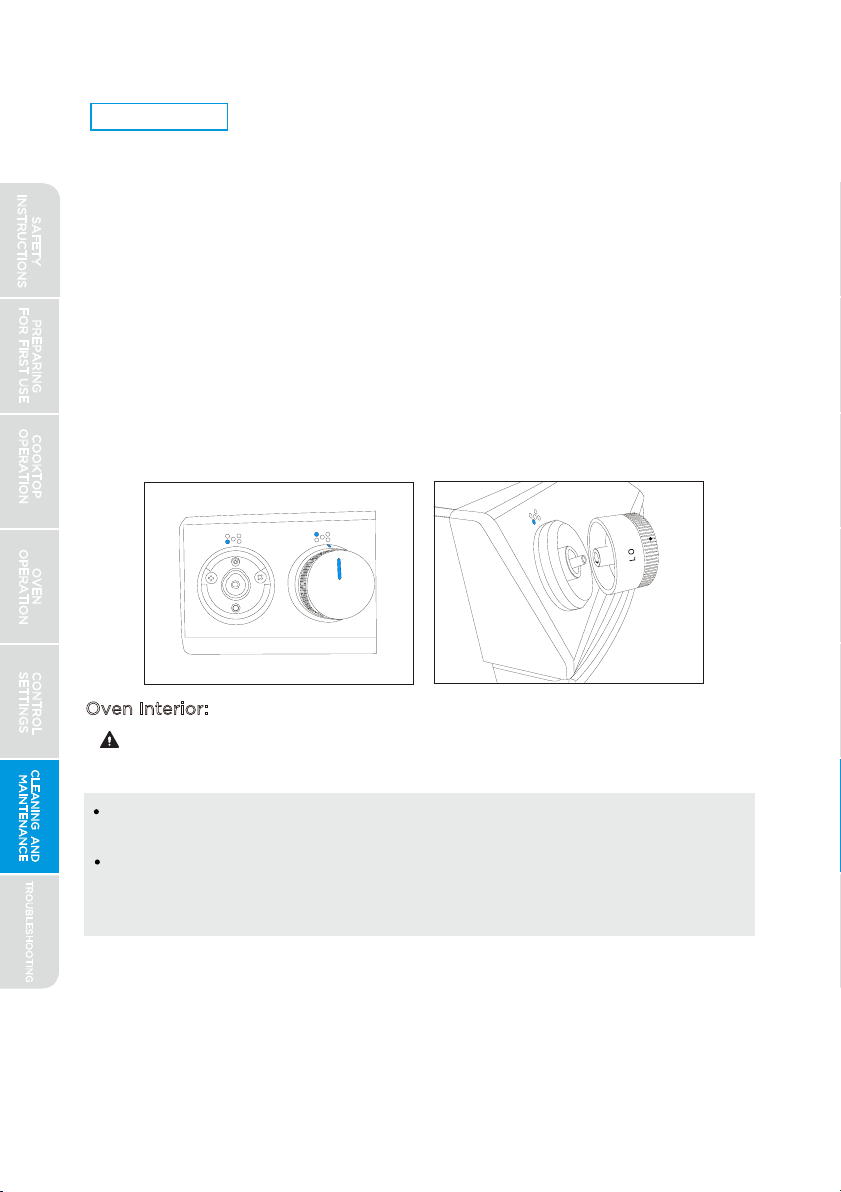
CAUTION
PREPARING
FOR FIRST USE
COOKTOP
OPERATION
OVEN
OPERATION
CONTROL
SETTINGS
TROUBLESHOOTING
CLEANING AND
MAINTENANCE
42
NOTICE
TO PREVENT COSMETIC DAMAGE
Do not use scouring pads, abrasive cleaners, strong liquid chemicals, steel
wool, or oven cleaners, as these may damage the control panel finish.
For best results, it is recommended to clean the user interface and control
panel after each use. Control knobs can be removed for easier cleaning.
Ensure knobs are in the "OFF" position before removing. Pull straight back
with a firm pressure to remove knob from stem. Clean entire panel with a
lightly damp soft cloth using mild soap and water. Glass cleaner can be
used on oven control to remove streaks. Stainless steel cleaner can be used
on the exposed metal to remove streaks. Knobs should be washed by hand
in warm soapy water - do not wash in dishwasher. Wait until knobs are dry
before placing back on stem. Be sure to align profile in knob to stem shape
to ensure smooth fit and avoid damage to knob or control.
Oven Interior:
BURN HAZARD
Check oven after each use to determine if any spills or splattering occurred
that require cleaning. Wipe out oven interior with a lightly damp soft cloth
using mild soap and water to remove light spills. Follow the STEAM CLEAN
instructions under "Oven Operation" to remove moderate soiling. For
stubborn or heavy soiling, follow the SELF CLEAN instructions under
"Oven Operation."
Oven surfaces - especially oven bottom - may be hot. Use caution to
avoid contact with hot surfaces.
Hot surfaces may create hot steam in wet sponge or cloth while
cleaning.
If steam is evident when wiping out oven, wait until oven
has cooled.
SAFETY
INSTRUCTIONS
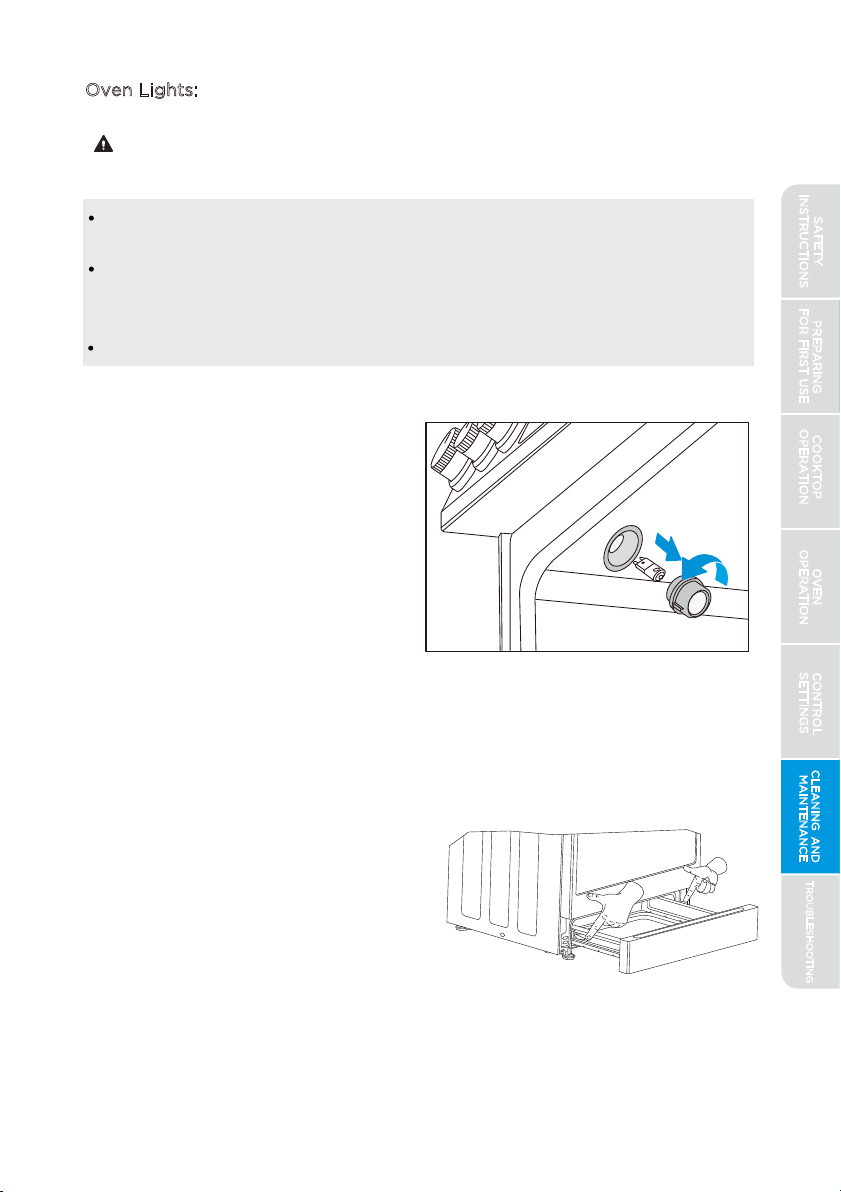
CAUTION
PREPARING
FOR FIRST USE
COOKTOP
OPERATION
OVEN
OPERATION
CONTROL
SETTINGS
TROUBLESHOOTING
CLEANING AND
MAINTENANCE
43
Oven Lights:
SHOCK, BURN, AND LACERATION HAZARDS
Disconnect power to oven and wait until oven is cool before attempting
to service light bulbs.
Handle glass cover carefully to reduce risk of breakage. If lamp cover is
difficult to remove, do not force. Contact a qualified service provider for
repairs.
Do not operate oven without glass cover in place.
Oven lamps are located in the top
of the oven, close to the oven
door. To replace the light bulb,
first twist glass cover to unscrew it
from base. Light bulb can be
removed by pulling firmly straight
out from the light socket. Replace
bulb only with G8 style 120V
halogen bulb rated 25W or less.
Twist glass cover back onto lamp
socket before using oven.
To reinstall the drawer, align the rails
on the drawer with the slides on the
range and push drawer in until fully
closed. Open and close drawer to
ensure slide rails are operating
properly.
Drawer:
Clean drawer by wiping down interior
surfaces with soft, damp, non-abrasive
sponge or cloth. Removal of drawer is
not required for cleaning, but can be
done if desired. To remove drawer,
fully extend drawer and operate the
release levers on each side while
pulling lightly on drawer.
SAFETY
INSTRUCTIONS
PREPARING
FOR FIRST USE
COOKTOP
OPERATION
OVEN
OPERATION
CONTROL
SETTINGS
TROUBLESHOOTING
CLEANING AND
MAINTENANCE
44
soapy water and a non-abrasive sponge. Glass cleaner can be used on door
glass to remove streaks. Stainless steel cleaner can be used on the exposed
metal to remove streaks.
Door can be removed for easier cleaning, servicing, or installation:
1.Open door fully.
2.On each door hinge, flip up the lock mechanism so that it engages with th
oven face when the door is rotated towards being closed.
3.Once both lock mechanisms are engaged, continue to rotate door until
~2-3 inches from being fully closed.
4.Grasp door firmly from the sides and lift door up and out from oven face
Do not lift door by door handle to reduce risk of broken door glass.
Clean door as frequently as desired to remove dust, splatter, and fingerprints.
Wipe door surfaces with a lightly damp soft cloth using mild soap and water.
Burned-on residue on interior door glass can be cleaned with glass cleaning
compound and/or razor scraper - see "Glass Cooktop" section above for
instructions. Enameled portions of the door interior can be cleaned using
WARNING
To maintain proper door seal during baking operations and self clean, do
not rub or clean the door gasket. It has a very low resistance to abrasion.
FIRE HAZARD
If door is removed, confirm that door operates correctly and seals
properly when reinstalled. If door gasket does not seal completely,
heat escaping from around doors could ignite cabinetry.
If the gasket becomes worn, frayed, or damaged in any way, contact a
qualified service provider for repair
NOTICE
TO PRESERVE APPEARANCE
To prevent streaking of internal door glass, do not allow excess water or
spray cleaner to enter any holes or slots in the door.
Do not use scouring pads, abrasive cleaners, strong liquid chemicals, steel
wool, or oven cleaners, as these may damage the door finish
Door:
SAFETY
INSTRUCTIONS
PREPARING
FOR FIRST USE
COOKTOP
OPERATION
OVEN
OPERATION
CONTROL
SETTINGS
TROUBLESHOOTING
CLEANING AND
MAINTENANCE
45
Reinstalling door:
1.Holding door from the sides, align door so that hinges slip back into
openings and door drops into notches on hinges.
2.Rotate door out until fully open.
3.Secure the hinge locking mechanisms back down into hinges.
4.Check that door opens and closes correctly.
5.If door does not operate correctly, re-engage locking mechanisms,
remove door, and reattempt installation.
SAFETY
INSTRUCTIONS
TROUBLESHOOTING
(read before calling for service)
Midea is committed to providing you with a quality appliance that works as
expected. If you find something that is not working as anticipated, check
the table below for helpful hints and advice that might save you the time
and expense of calling for repair.
PREPARING
FOR FIRST USE
COOKTOP
OPERATION
OVEN
OPERATION
CONTROL
SETTINGS
TROUBLESHOOTING
CLEANING AND
MAINTENANCE
46
Cooktop:
Problem: Possible Reason:
MSmartLife app will
not control cooktop
Cooktop cannot be controlled through MSmartLife app.
Unable to maintain a
rolling boil or will not
cook fast enough.
Cooktop will
not operate.
Cooktop heating element
does not glow steadily.
Cooktop heating element
does not glow when power
level is reduced.
Cooktop glass
is scratched.
Cooktop is discolored.
Cooktop is pitted.
Improper cookware - Only use pans with flat bottoms and
that match the diameter of the cooktop heating element
selected.
Large pots and pans can lose a lot of heat from the top -
cover pan with a lid to retain heat better.
If control panel display is not lit, appliance may not be
receiving power - check circuit breaker or fuse has not
tripped and that cord is properly plugged in.
This is normal - cooktop heating element will cycle off/on
to maintain the power level selected at the knob. This is
normal even on the highest setting.
This is normal - cooktop heating element will begin
cycling again once the heating element has cooled
slightly.
Incorrect cleaning method used - scratches cannot be
removed, but further scratching can be avoided by
following the cleaning instructions in this manual.
Cookware with rough bottom has been used or cookware
has been slid across cooktop - scratches cannot be
removed, but further scratching can be avoided by
ensuring cookware is flat-bottomed, smooth, clean, and
not slid across cooktop.
Cooktop is not cleaned thoroughly - see section in this
manual on care and cleaning of cooktop.
Sugary spill has occurred on hot glass - this cannot be
repaired. Service must be called to replace the cooktop
glass.
SAFETY
INSTRUCTIONS
PREPARING
FOR FIRST USE
COOKTOP
OPERATION
OVEN
OPERATION
CONTROL
SETTINGS
TROUBLESHOOTING
CLEANING AND
MAINTENANCE
4
7
Problem:
Oven:
Unable to use
MSmartLife app
to control oven
Strong "burning" or
"oily" odor when using
new oven.
Control is dark and
will not respond
Control is on but
will not respond
Oven door is locked
and will not open.
This is normal with a new range and will disappear after
a few uses. Still, to be careful, you should double-check
that all packaging has been removed from the appliance
- check around door sides and inside drawer.
If control panel display shows only "]" or "] [", the
control is in Sabbath Mode. Refer to that section for
how to operate control and how to exit Sabbath Mode.
Check that CONTROL LOCK has not been activated.
If self-clean recently finished, this is normal. Wait for the
oven to cool fully and it will unlock. Otherwise, try
resetting the appliance by cycling the circuit breaker
off and on.
Oven is taking
too long to cook.
All ovens operate slightly differently from each other.
Adjust oven calibration upwards to make oven cook
faster. See "Control Settings" section of this manual.
Food is overcooked.
All ovens operate slightly differently from each other.
Adjust oven calibration downwards to reduce
overcooking. See "Control Settings" section of this
manual.
Food is not baking
evenly - top gets done
faster/slower than
bottom.
Make sure you are using the recommended rack settings.
See "Rack Positions" at the start of the "Oven Operation"
section.
Recipe may perform better at different rack position. Try
moving food down a rack position to make the bottom
darker. Try moving food up a rack position to make the
top darker.
Turning power off and back on at the breaker box can
usually reset the oven control and clear response issuses.
Condensation on door
glass
This is normal. Condensation will evaporate as oven
heats up.
Door will not close
properly
Door is not installed properly. See instructions on
removing and re-installing door in "Cleaning and
Maintenance" section.
SAFETY
INSTRUCTIONS
Possible Reason:
If WiFi signal icon is flashing slowly, WiFi has not been
connected. See instructions in "Preparing For First Use."
is flashing quickly, WiFi signal has If WiFi signal icon
been lost. Check that router is on and no obstructions
are hindering signal. Can try to reset router and wait 15
minutes to reconnect. Otherwise repeat connection
instructions in "Preparing For First Use."
signal icon is off,
ress the button to en
If WiFi signal iconIf WiFi
enabled. Press theenabled. P
will turn on.icon
Problem: Possible Reason:
Oven light is
not working
Oven light may be burned out. Follow instructions in
"Cleaning and Maintenance". If diaplay also show "]" or
"][" then Sabbath Mode setting must be turned off.
The oven will not start
self-clean
If oven was in use recently, this is normal. Self-clean can
only be initiated when the oven has cooled sufficiently.
Metal "popping" sounds
during self-clean.
This is normal as the extreme temperatures cause the
metal frame to expand.
After self-clean, the remaining white/grey ash must still
be wiped out by hand.
Oven not clean
after a self-
clean cycle.
If black soiling still remains, oven may have been too
heavily soiled to clean with the settings selected. Rerun
self-clean using the longest possible setting.
Some areas, such as bottom door corners, may be too
cool to turn soils into ash. These areas may need to be
cleaned by hand.
Convection fan runs in
modes other than
convection
This may be normal - convection fan typically runs during
preheat to ensure oven is evenly preheated.
Convection fan also runs in Convection Bake, Convection
Roast, Pizza, and Steam Clean
Hot air is coming from
the openings at the back
of the cooktop
This is normal - the oven vents out and a cooling fan also
discharges hot air from the openings at the back of the
cooktop.
It is normal for steam to be released from the oven vent
at the back of the cooktop. If the exhaust has no smell
(or smells like normal baking food), do not be alarmed.
If the exhaust smells like burning food, check that the
food is not burning and that there is no spillage or
splattering in the oven that may be producing the smoke.
Smoke or steam is coming
from the openings at the
back of the cooktop.
If the oven is in self-clean, this may be normal. Monitor
progress of self-clean to ensure smell is only the result
of soiling in the oven cavity being converted to ash.
If the exhaust smells like anything else is burning (plastic,
wood, etc.), turn oven off and make sure smoking stops.
Contact a qualified service provider for repairs
Cooling fan continues
to run after oven has
been turned off
This is normal to prevent remaining oven heat from
damaging controls. Fan will turn off when oven is
sufficiently cool.
This is a error code. Press CLEAR/OFF to clear the
display and stop beeping. If necessary, reset power to
the oven by cycling circuit breaker off and on. If error
code remains or repeats, write down error code and
contact a qualified service provider for repairs
"E" and a number
appears in display
PREPARING
FOR FIRST USE
COOKTOP
OPERATION
OVEN
OPERATION
CONTROL
SETTINGS
TROUBLESHOOTING
CLEANING AND
MAINTENANCE
48
If cooktop is in use,self-clean cannot be started.This is
normal.
SAFETY
INSTRUCTIONS
Name, address and telephone number
Model number and serial number
A clear, detailed description of the problem
Proof of purchase including dealer or retailer name
and address
WARRANTY
MIDEA
RANGE
LIMITED
WARRANTY
ATTACH YOUR RECEIPT HERE. PROOF OF PURCHASE IS
REQUIRED TO OBTAIN WARRANTY SERVICE.
Please have the following information available when
you call the Customer Service Center:
IF YOU NEED SERVICE:
1. Before contacting us to arrange service, please determine whether your product requires repair.
Some questions can be addressed without service. Please take a few minutes to review the
2.
All warranty service is provided exclusively by our authorized Midea Service Providers, in the U.S.
and Canada.
Midea Customer Service
In the U.S.A. or Canada, call 1-866-646-4332.
If outside the 50 States of the United States or Canada, contact your authorized Midea dealer to
determine whether another warranty applies.
LIMITED WARRANTY
WHAT IS COVERED
For one year from the date of purchase, if this major appliance is installed, operated and
maintained according to instructions attached to or furnished with the product, Midea
America Corporation (hereafter “Midea”) will pay for factory specified replacement parts
and repair labor to correct defects in materials or workmanship that existed when this
major appliance was purchased, or at its sole discretion replace the product. In the event
of product replacement, your appliance will be warranted for the remaining term of the
original unit’s warranty period.
YOUR SOLE AND EXCLUSIVE REMEDY UNDER THIS LIMITED WARRANTY SHALL BE
PRODUCT REPAIR OR REPLACEMENT AS PROVIDED HEREIN. Service must be provided
by a Midea designated service company. This limited warranty is valid only in the 50
States of the United States or Canada and applies only when the major appliance is used
in the country in which it was purchased. This limited warranty is effective from the date
of original consumer purchase. Proof of original purchase date is required to obtain
service under this limited warranty.
FIRST YEAR LIMITED WARRANTY (PARTS AND LABOR)
49
Troubleshooting section of the User Manual, or visit http://Midea.com/us/support

MIDEA
RANGE
LIMITED
WARRANTY
LIMITED WARRANTY
IS COVERED
(PARTS AND LABOR)
LIMITED WARRANTY
WHAT IS NOT COVERED
The cost of repair or replacement under these excluded circumstances shall be borne
by the customer.
IMPLIED WARRANTIES, INCLUDING ANY IMPLIED WARRANTY OF
MERCHANTABILITY OR IMPLIED WARRANTY OF FITNESS FOR A PARTICULAR
PURPOSE, ARE LIMITED TO ONE YEAR OR THE SHORTEST PERIOD ALLOWED BY
LAW. Some states and provinces do not allow limitations on the duration of implied
warranties of merchantability or fitness, so this limitation may not apply to you. This
warranty gives you specific legal rights, and you also may have other rights that vary
from state to state or province to province.
DISCLAIMER OF IMPLIED WARRANTIES
50
1. Commercial, non-residential or multiple-family use, or use inconsistent with published
user, operator or installation instructions.
2.
3. Service to correct improper product maintenance or installation, installation not in
4.
5.
6. Damage from accident, misuse, abuse, fire, floods, electrical issues, acts of God or u
7. Repairs to parts or systems to correct product damage or defects caused by
8. Cosmetic damage including scratches, dents, chips, and other damage to appliance
9.
10. Products that were purchased “as is” or as refurbished products.
11.
12. Discoloration, rust or oxidation of surfaces resulting from caustic or corrosive
13.
14. Travel or transportation expenses for service in remote locations where an authorized
15. Removal or reinstallation of inaccessible appliances or built-in fixtures (i.e. trim
16.
In-home instruction on how to use your product.
accordance with electrical codes or correction of household electrical system (i.e.
house wiring, fuses, etc.).
Consumable parts (i.e. light bulbs, batteries, air or water filters, etc.)
Defects or damage caused by the use of non-genuine Midea parts or accessories.
with products not approved by Midea.
unauthorized service, alteration or modification of the appliance
finishes unless such damage results from defects in materials and workmanship and i
reported to Midea within 30 days.
Routine maintenance of the product.
Products that have been transferred from its original owner.
environments including but not limited to high salt concentrations, high moisture or
humidity or exposure to chemicals.
Pick-up or delivery. This product is intended for in-home repair.
Midea servicer is not available.
decorative panels, flooring, cabinetry, islands, countertops, drywall, etc.) that interfer
with servicing, removal or replacement of the product.
Service or parts for appliances with original model/serial numbers removed, altered or
not easily identified
LIFETIME LIMITED WARRANTY
NOT COVERED
Midea makes no representations about the quality, durability, or need for service or
repair of this major appliance other than the representations contained in this warranty.
If you want a longer or more comprehensive warranty than the limited warranty that
comes with this major appliance, you should ask Midea or your retailer about buying an
extended warranty.
DISCLAIMER
OF REPRESENTATIONS OUTSIDE WARRANTYOF
YOUR SOLE AND EXCLUSIVE REMEDY UNDER THIS LIMITED WARRANTY SHALL BE
PRODUCT REPAIR AS PROVIDED HEREIN. MIDEA SHALL NOT BE LIABLE FOR
INCIDENTAL OR CONSEQUENTIAL DAMAGES. Some states and provinces do not allow
the exclusion or limitation of incidental or consequential damages, so these limitations
and exclusions may not apply to you. This warranty gives you specific legal rights, and
you also may have other rights that vary from state to state or province to province.
AND
CONSEQUENTIAL DAMAGES
LIMITATION OF REMEDIES;EXCLUSION INCIDENTALOF
51


Parsippany, NJ, 07054
Document No.: XXXXXXX
Rev. XX - 03/20
© Midea Group, 2020
If appliance is not working as expected, please contact Midea customer service at:
1-866-646-4332
or
Free 3 months
extension* of the
original limited warranty
period! simply text a
picture of your proof of
purchase to:
*The warranty extension is for the
three months immediately following
the completion of the product’s
original warranty period.
1-844-224-1614
http://midea.com/us/support
