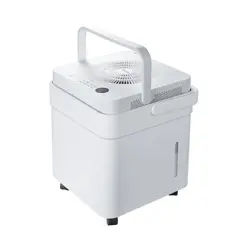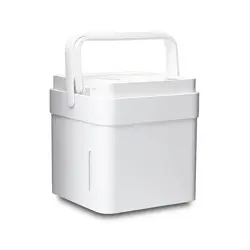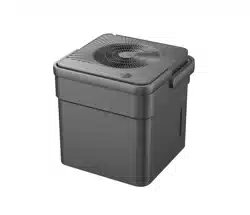

Cube Dehumidifier
version A - 12 - 2020
USER MANUAL
en
MAD
Warning notices: Before using
this product, please read this
manual carefully and keep it
for future reference.
The design and specifications
are subject to change without
prior notice for product
improvement.
Rated voltage: 115V
Frequency: 60Hz
version C - 11 - 2021
MAD35S1QWT
MAD35PS1QGR
MAD20S1QWT
MAD50S1QWT
MAD50PS1QWT
MAD50PS1QGR
Page 2
Read This Manual
Inside you will find many helpful hints on how to use and maintain your Dehumidifier
properly. A little preventive care on your part can save you a great deal of time
and money over the life of your Dehumidifier. You’ll find many answers to common
problems in the troubleshooting tips - you should be able to fix most of them quickly
before calling service. These instructions may not cover every possible condition of
use, so common sense and care for safety is required when installing, operating and
maintaining this product.
Owner’s Manual
Safety Precautions ............................................................................................. 3
Unit Specifications and F
eatures .................................................................. 6
Set Up Instructions ............................................................................................ 7
Installation Instructions .................................................................................... 8
Operating Instructions ..................................................................................... 10
Care and Cleaning ............................................................................................. 16
Nesting and Storing Instructions ................................................................. 17
Troubleshooting Tips ....................................................................................... 18
App Instructions ................................................................................................ 19
CAUTION
• For support, please call the Service Center at 1-866-646-4332.
• This appliance is not intended for use by people (including children) with reduced
physical, sensory, or mental capabilities or lack of experience and knowledge,
unless they have been given supervision or instruction concerning use of the
appliance by a person responsible for their safety.
• Children should be supervised to ensure that they do not play with the appliance.
• The appliance shall be installed in accordance with National wiring regulations and
local electrical codes.
NOTICE
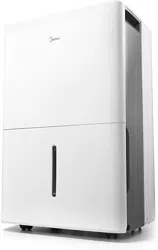
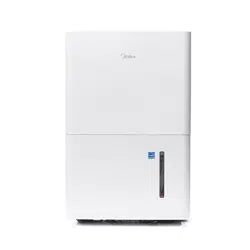
All the pictures in this manual are for illustrative purposes only. The actual shape
of the dehumidifier you purchased may be slightly different, but its operations and
functions are similar.
Page 3
Safety
Precautions
To prevent injury to the user or personal and property damage, these instructions must
be followed. Incorrect operation due to ignoring of instructions may cause harm or
damage. The level of risk is shown by the following indications.
• Do not modify power cord length or share the outlet with other appliances.
It may cause electric shock or fire due to overheating.
• Do not operate or stop the unit by inserting or pulling out the power plug.
It may cause electric shock.
• Do not allow water to enter into electric parts.
It may cause failure or electric shock.
• Do not use the power outlet if it is loose or damaged.
It may cause fire and electric shock.
• Do not use or keep the power cord close to heating appliances or heat sources
such as fireplaces.
It may cause fire and electric shock.
• Do not disassemble or modify unit.
It may cause failure and electric shock.
• Do not damage or use an unspecified power cord.
It may cause fire and electric shock.
• Do not use the unit near flammable gas or combustibles, such as gasoline,
benzene, thinner, etc.
It may cause fire.
• Do not operate with wet hands.
It may cause electric shock.
• Do not open the unit during operation.
It may cause electric shock.
• Do not drink the water from the bucket.
• Do not use the unit in small spaces or place in a sink or shower.
Lack of ventilation can cause overheating and fire.
• Do not attempt to repair the unit yourself.
WARNING
This symbol indicates a hazardous situation which, if not
avoided, could result in death or serious injury.
CAUTION
This symbol indicates a hazardous situation, which, if not
avoided, could result in minor or moderate injury.
NOTICE
This symbol addresses practices not related to physical injury.
WARNING
SAFETY PRECAUTIONS

Page 4
Safety
Precautions
• Avoid fire hazard or electric shock.
Do not use an extension cord or an adaptor plug. Do not remove any prongs
from the power cord.
• Plug in power plug properly.
Otherwise, it may cause electric shock or fire due to excess heat generation.
• Always ensure effective grounding.
Incorrect grounding may cause electric shock.
• Unplug the unit if strange sounds, smells, or smoke come from it.
A damaged product may cause fire and electric shock.
• Ventilate room before operating the unit if there is a gas leak from other appliances.
• If the power cord is damaged, it must be replaced by the manufacturer or an
authorized service center in order to avoid electrical risk.
• Before cleaning, turn off the power and unplug the unit.
• Be sure the dehumidifier has been securely and correctly installed according to
the installation instructions in this manual. Save this manual for possible future
use in removing or installing this unit.
• Be sure the dehumidifier is properly grounded. To minimize shock and fire
hazards, proper grounding is important.
The power cord is equipped with a three-prong grounding plug for protection
against shock hazards.
• Your dehumidifier must be used in a properly grounded wall receptacle. If the
wall receptacle you intend to use is not adequately grounded or protected by a
time delay fuse or circuit breaker, have a qualified electrician install the proper
receptacle. Ensure the receptacle is accessible after the unit installation.
• Be sure the electrical service is adequate for the model you have chosen. This
information can be found on the serial plate, which is located on the side of the
cabinet and behind the grille.
• Make sure the bucket is empty of water before nesting unit.
It could cause electric shock and/or damage the unit.
• Unplug the unit before nesting it in the bucket.
It could cause electric shock and/or damage the unit.
• When unplugging the unit, be sure to grab the plug, not the cord.
WARNING

Page 5
Safety
Precautions
• Do not use in places where water may splash onto the unit.
Water may enter the unit and degrade the insulation. It may cause an electric
shock or fire.
• Place the unit on a level, sturdy section of the floor.
If the unit falls over, it may cause water to spill and damage belongings, or cause
electrical shock or fire.
• Never insert your finger or other foreign objects into grills or openings. Take
special care to warn children of these dangers.
It may cause failure or electric shock.
• Do not climb up on or sit on the unit.
You may be injured if you fall or if the unit falls over.
• Always insert the filters securely, and take caution to avoid injuries to hand and
fingers. Clean filter once every two weeks.
• If water enters the unit, turn the unit off and disconnect the power, contact the
Service Center at 1-866-646-4332.
• If the unit is knocked over during use, turn off the unit and unplug it from the
main power supply immediately. Visually inspect the unit to ensure there is no
damage. If you suspect the unit has been damaged, contact customer service.
• In a thunderstorm, the power should be disconnected to the unit due to lightning.
• Do not run power cord under carpeting. Do not cover cord with throw rugs,
runners, or similar coverings. Do not route cord under furniture or appliances.
Arrange cord away from traffic area and where it will not be tripped over.
• Do not place anything on top of the unit.
This would restrict airflow, possibly damage the unit and decrease performance.
• Always lift unit with 2 hands using proper lifting technique.
• Before turning the unit on, make sure it is seated correctly on the bucket.
• Before lifting ensure the handle is properly attached.
• Only use the bucket that came with the unit. Do not use any other bucket.
• Clean the bucket regularly.
CAUTION
Page 6
Unit
Specifications
and Features
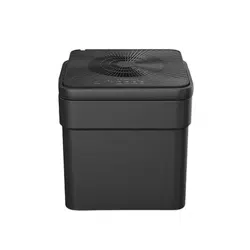
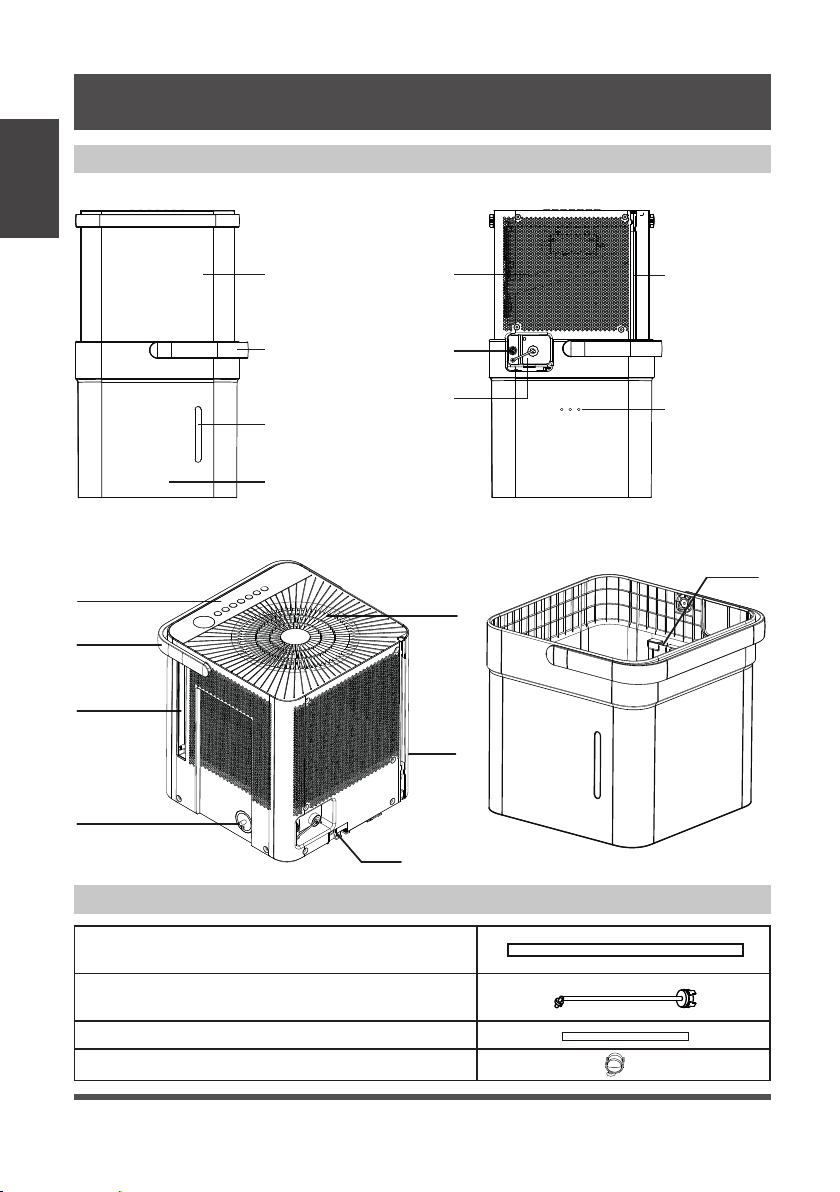
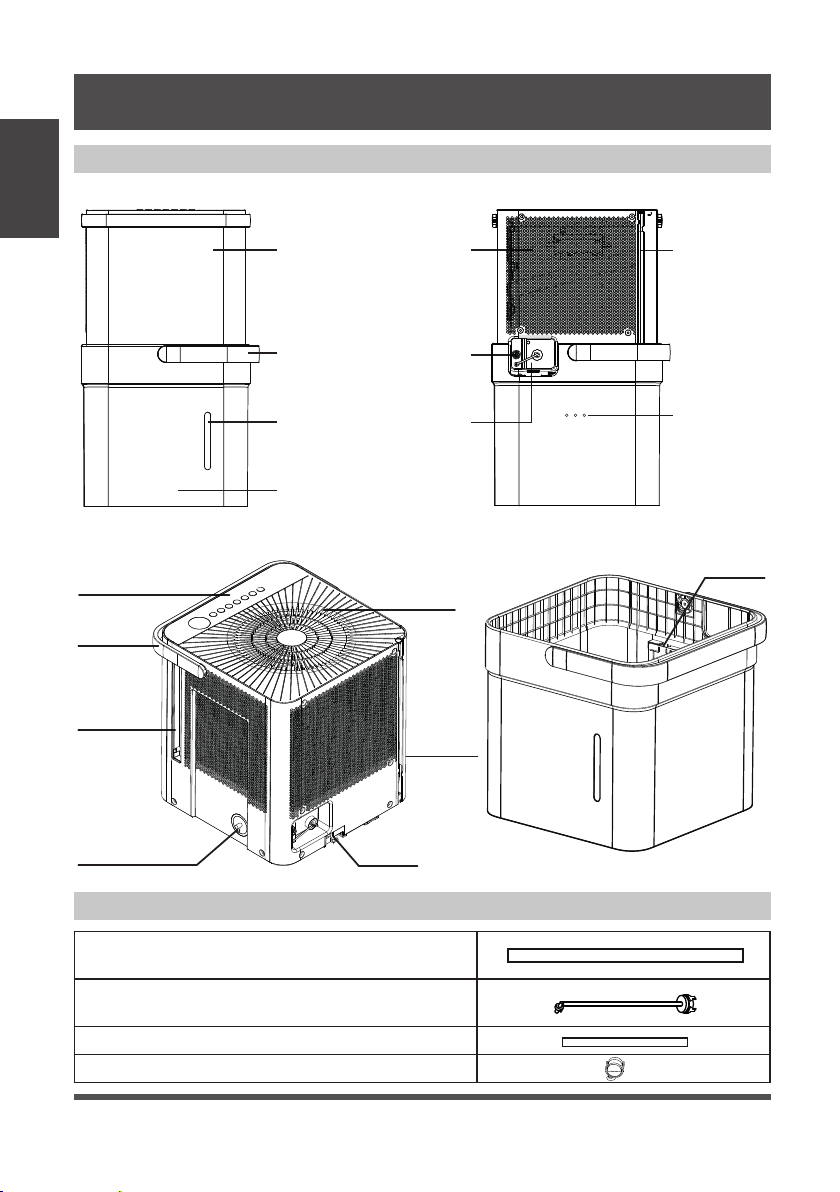
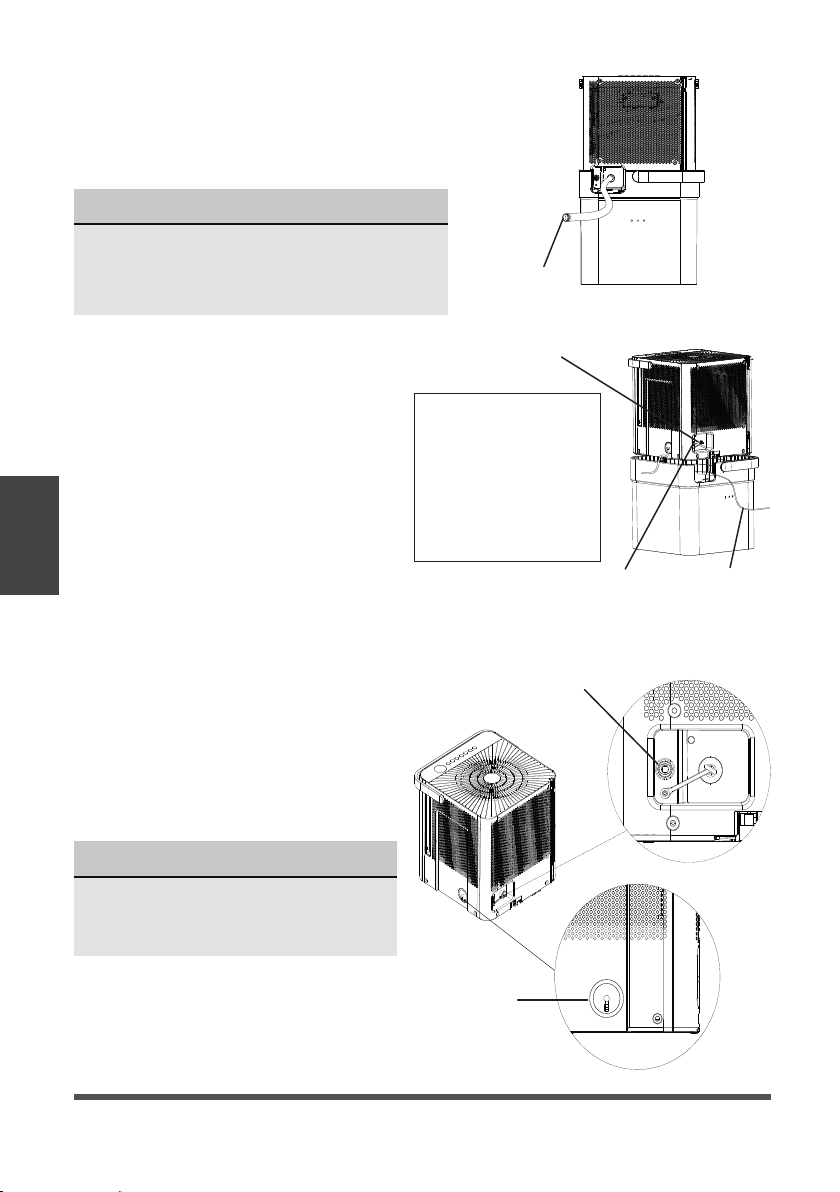
Product overview
Accessories
Fig. 1
Fig. 2
Front Panel Air Intake Power Cord
Storage Channel
Relief Holes
Garden
Hose Outlet
Pump Hose Outlet
(some models)
Bucket Water
Level Window
Bucket
Bucket
Handle
Front Rear
Lock tabs
Air Outlet
Air Filter Handle
(Both Sides)
Dehumidifier
Bucket
Bucket
Sensor
Power
Cord
Pump Inlet
Hose Connection
(some models)
Control panel
and Display
Unit Handle
UNIT SPECIFICATIONS AND FEATURES
Pump drain hose (only for units with the drain
pump feature)
Pump inlet hose (only for units with the drain
pump feature)
Nor
Casters
mal drain hose
x 4
Page 7
Set Up
Instructions
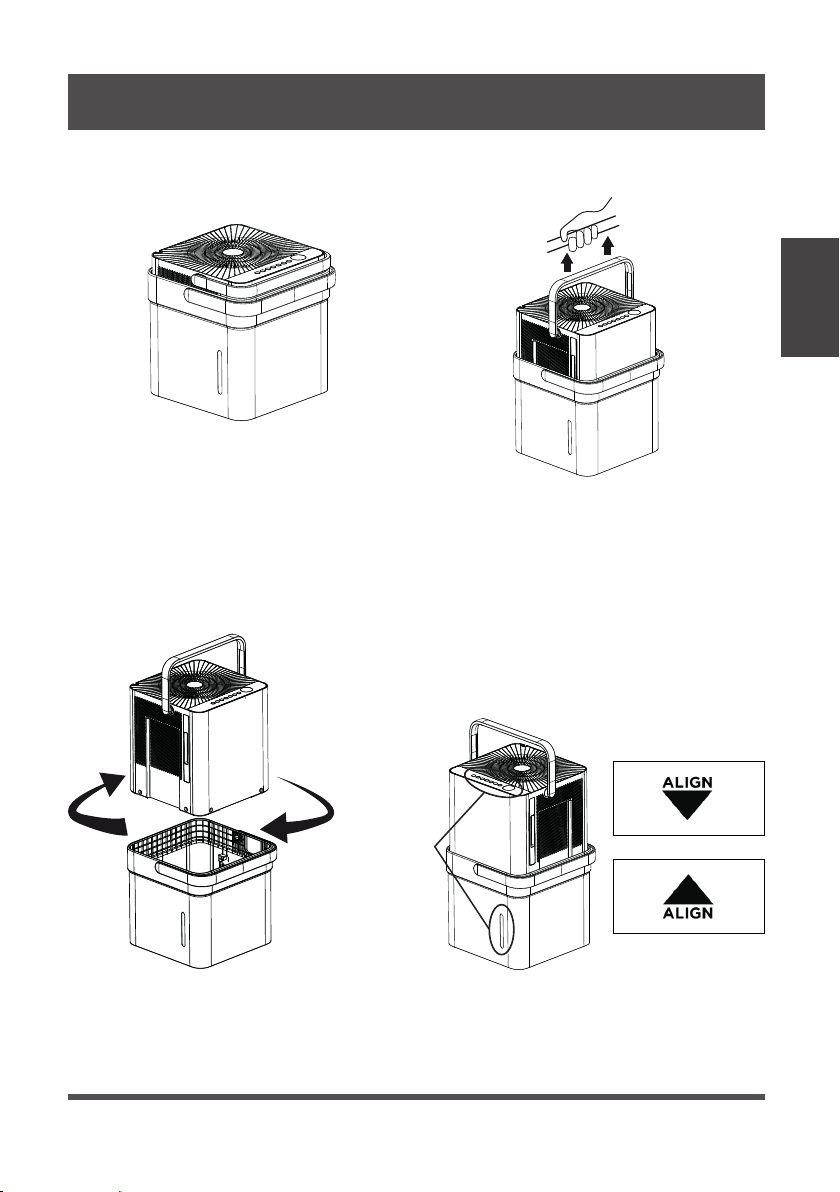
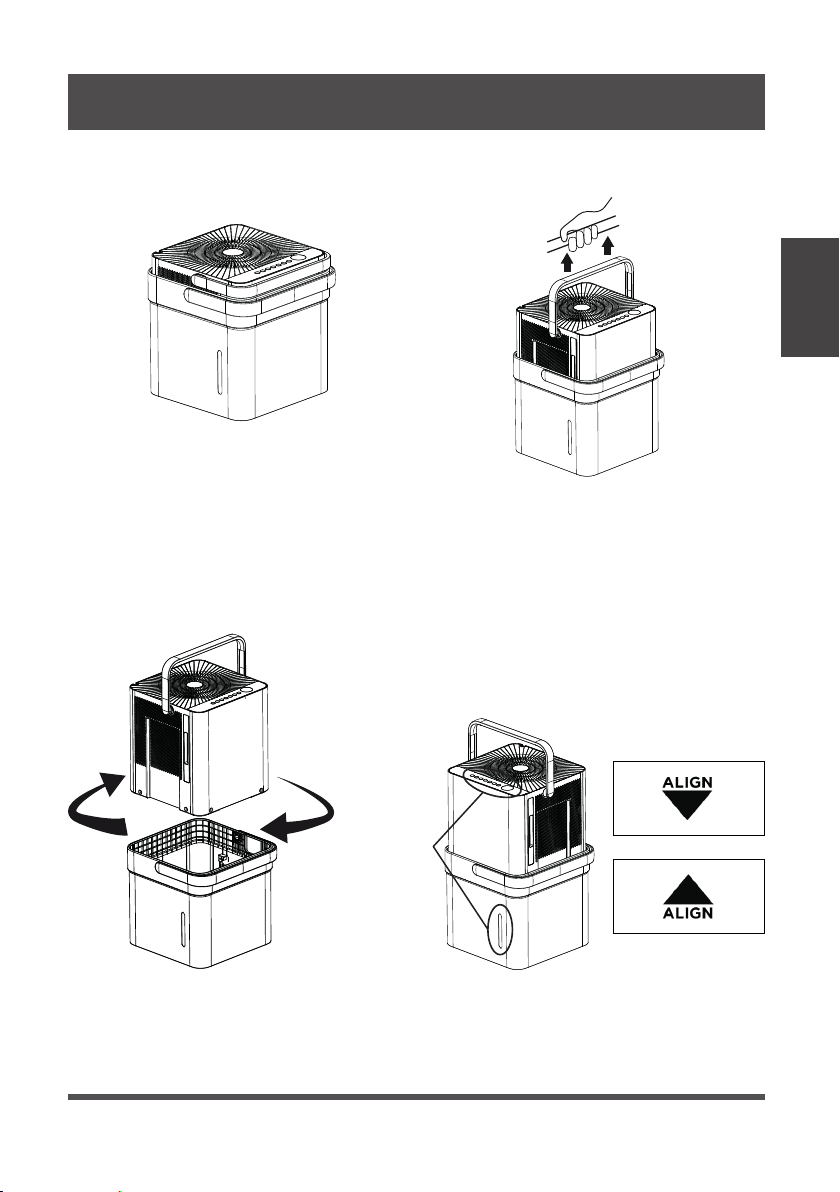
SET UP INSTRUCTIONS
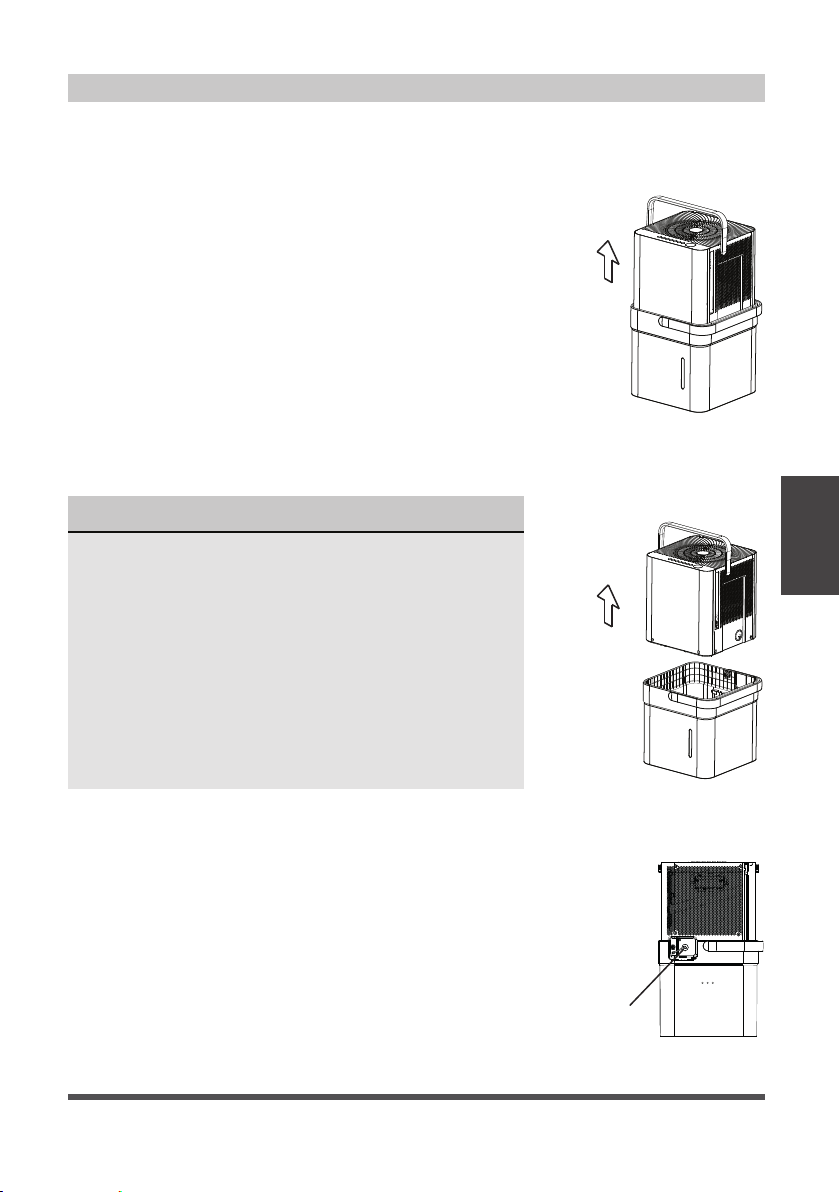
Step 1:
Separate dehumidifier & bucket from the nested shipping/storage position. Remove all
packaging materials from the unit.
Step 2:
Rotate dehumidifier 90° and align the arrows on the two labels (one on the bucket
and one on the dehumidifier) and carefully sit the dehumidifier down onto the bucket.
The water level window in the bucket and the user interface buttons on the
dehumidifier should be on the same side when properly stacked. Check to ensure
the arrows on the unit and bucket are aligned as in Fig. 4c for proper operation.
Step 3:
Plug the unit in and press the power button and the unit is ready to run in normal
(bucket) mode.
Nested Shipping &
Storage Position
Fig. 3a
Fig. 3b
Rotate dehumidifi er 90°
Fig. 4a
User Interface
Buttons and
Water Level
Window
Aligned on the
Same Side
Fig. 4b
Fig. 4c
Page 8
Installation
Instructions
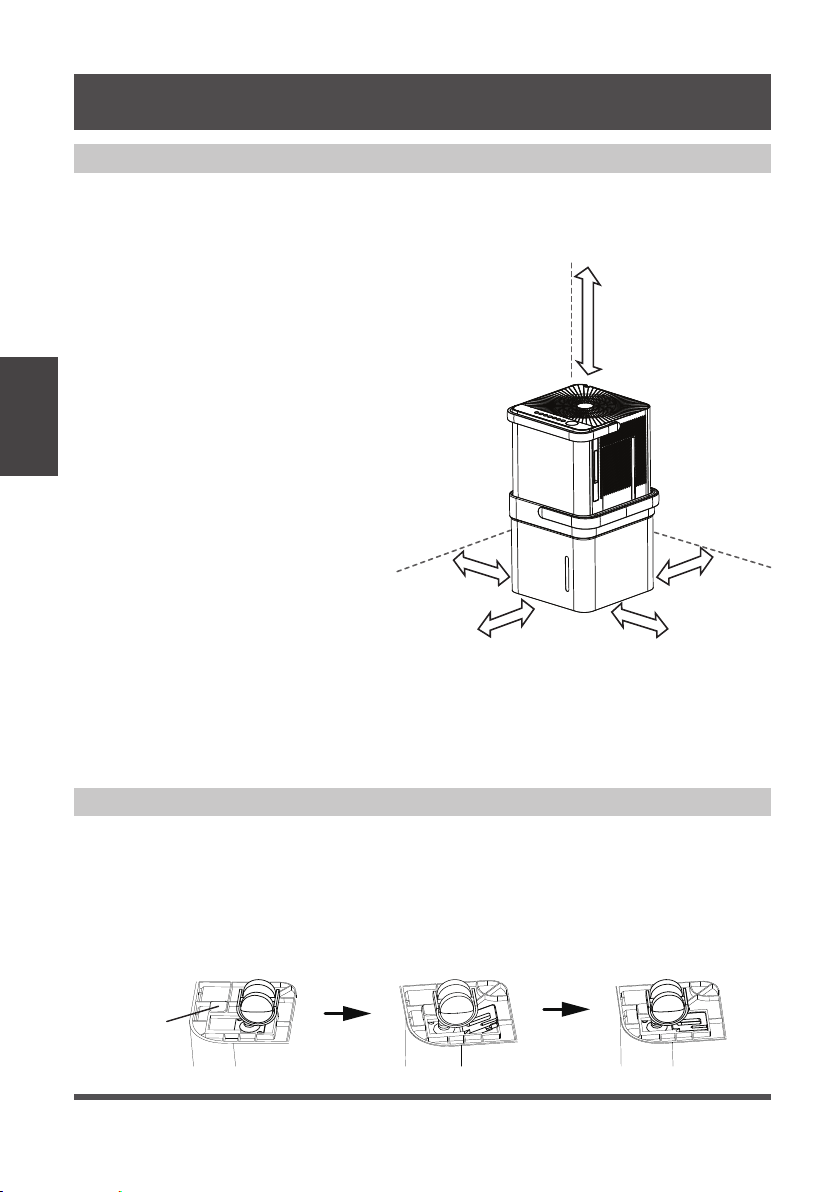
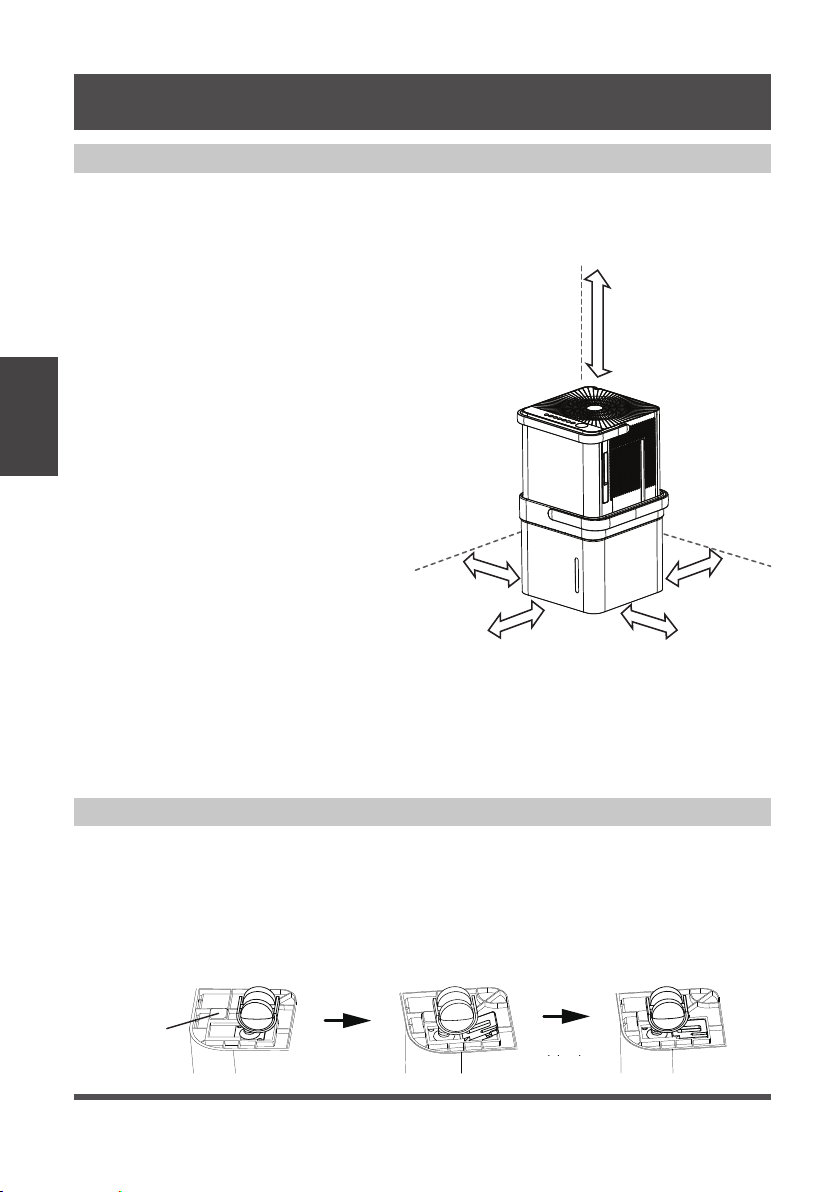
Positioning the Unit
The dehumidifier should be placed in the area where dehumidification is desired most.
Adjacent rooms in which dehumidification is also desired should allow adequate
airflow in and out of the space containing the dehumidifier.
• Do not use outdoors.
• This dehumidifer is intended for
indoor residential applications
only. This dehumidifier should
not be used for commercial or
industrial applications.
• Place the dehumidifier on a smooth,
level floor strong enough to support
the unit with a full bucket of water.
• Allow at least 8” of air space on all
sides of the unit for air circulation
(at least 16” for air outlet).
• Place the unit in an area where
the temperature will not fall below
41°F (5°C). The coils can become
covered with frost at at lower
temperatures, which may reduce
performance.
• Place the unit away from any
clothes dryer, heater or radiator.
• Close all doors, windows, and
other openings to the outdoors in
the room.
Fig. 5
Fig. 6
More
than
16”
More than
8”
More than
8”
More than
8”
More than
8”
INSTALLATION INSTRUCTIONS
Optional Caster Installation
To install the casters:
1. Remove the Dehumidifier from the bucket.
2. Slide each caster into the slot on the bucket’s bottom corner as shown below.
3. Place the retaining block into the slot to hold the caster in place.
4. Repeat this for each corner of the bucket until all 4 casters are installed.
blockcaster
bottom
of unit
Page 9
Installation
Instructions
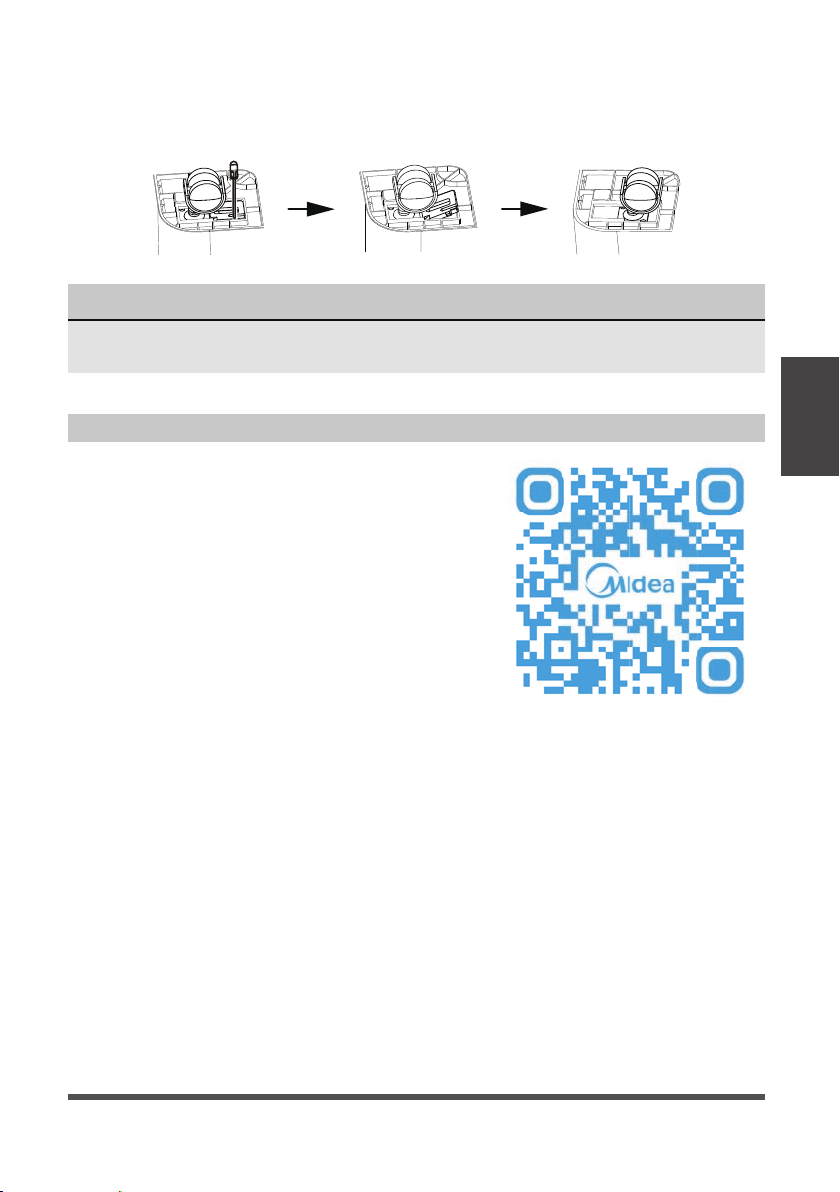
Additional Setup and Usage Information
Scan this QR code with your mobile device to see
a playlist of helpful videos about your new Cube
Dehumidifier.
Fig. 7
To remove the casters:
1. Use a flathead screwdriver to actuate the tab on the retaining block.
2. Remove the retaining block and slide the casters out of the slot on the bucket.
NOTICE
With the casters attached, do not move the unit and bucket assembly while there is
water in the bucket. Before rolling the bucket, remove the unit.
Page 10
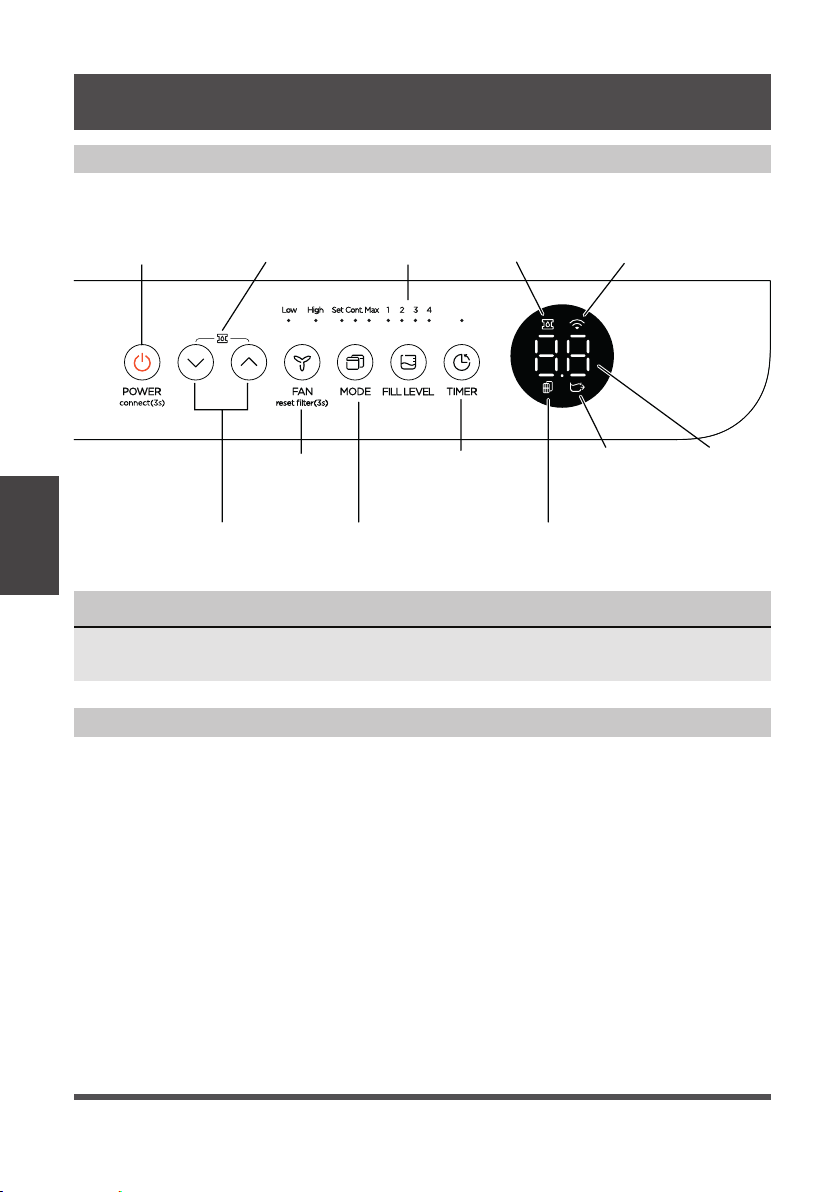
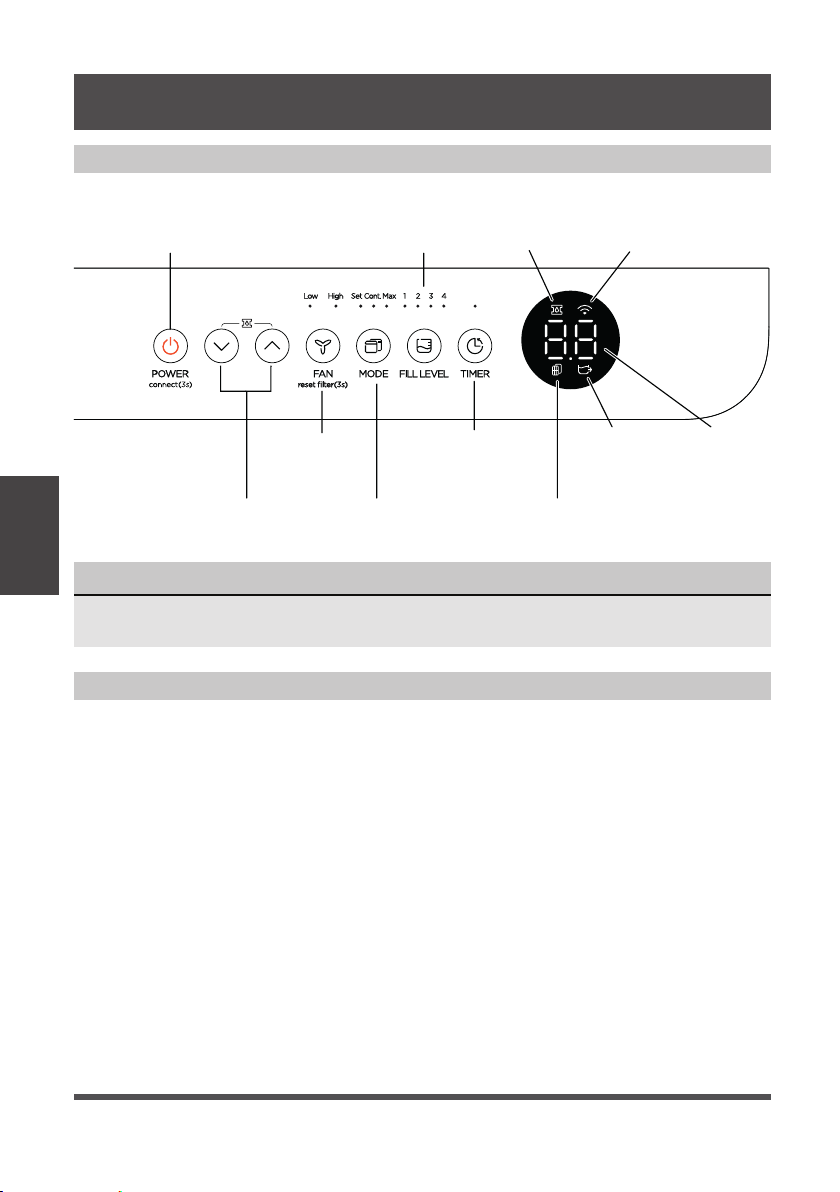
Key Pad Features
NOTICE
The appearance of the control panel on your unit may vary slightly. Functions will
be similar.
OPERATING INSTRUCTIONS
Power Button
(connect)
Up/Down
Buttons
Fan Button
and Indicators
(reset filter)
Mode Button
and Indicators
Filter Indicator
LED DisplayBucketless
Indicator
Timer Button
and Indicator
Fill Level
Button and
Indicators
Pump
Indicator
(some models)
Network
Connection
Indicator
Pump Icon
(some models)
Operating Instructions
Power Button:
Press this button to turn the unit On/Off.
Connect:
Holding the power button for 3 seconds
will place the unit in network connection
mode to setup wireless control.
Up/Down Buttons:
Press these buttons to adjust the setpoint
or to set the time feature.
Pump:
Holding the Up and Down buttons for 3
seconds will activate pump mode if the
bucket is in place (some models).
Fan Button:
Press this button to change the fan speed
between High and Low.
Filter Reset:
To reset the change filter indicator, hold
the fan button for 3 seconds.
When you push the button to change operation modes, the unit will make a beep
sound to indicate that it is changing modes.
Operating
Instructions
Page 11
Operating
Instructions
NOTICE
For accurate fill levels, ensure the bucket
is empty before beginning operation.
Fill
level
Models
MAD20S1QWT
Models
MAD35S1QWT
MAD50S1QWT
MAD50PS1QWT
MAD50PS1QGR
1
1.5 gallons
(17 lb)
2.25 gallons
(24 lb)
2
2 gallons
(21 lb)
3 gallons
(30 lb)
3
2.75 gallons
(27.5 lb)
3.75 gallons
(36.5 lb)
4
3 gallons
(29.5 lb)
4.25 gallons
(40.5 lb)
Fill Level Button:
Press this button to change the required
water level before the bucket full switch
activates. The options will fill approximately
to the amounts shown in the table below:
Choose the option which is most comfortable
for you when emptying the bucket.
When the bucket is full, the Display will show
P2. The weights above are approximate
weights of the bucket when filled with the
corresponding volume of water.
NOTICE
While operating on continuous and Max
modes, the humidity setpoint cannot be
adjusted manually.
Mode Button:
Press this button to change the mode of the
dehumidifier between Set mode, Max mode,
and Continuous run mode.
Set – The dehumidifier runs until the humidity
setpoint has been reached. The dehumidifier
will begin running once the humidity rises
above the setpoint again.
Max – The dehumidifier will run continuously
on High Fan.
Continuous – The dehumidifier will run
continuously and the fan speed can be
changed in this operating mode.
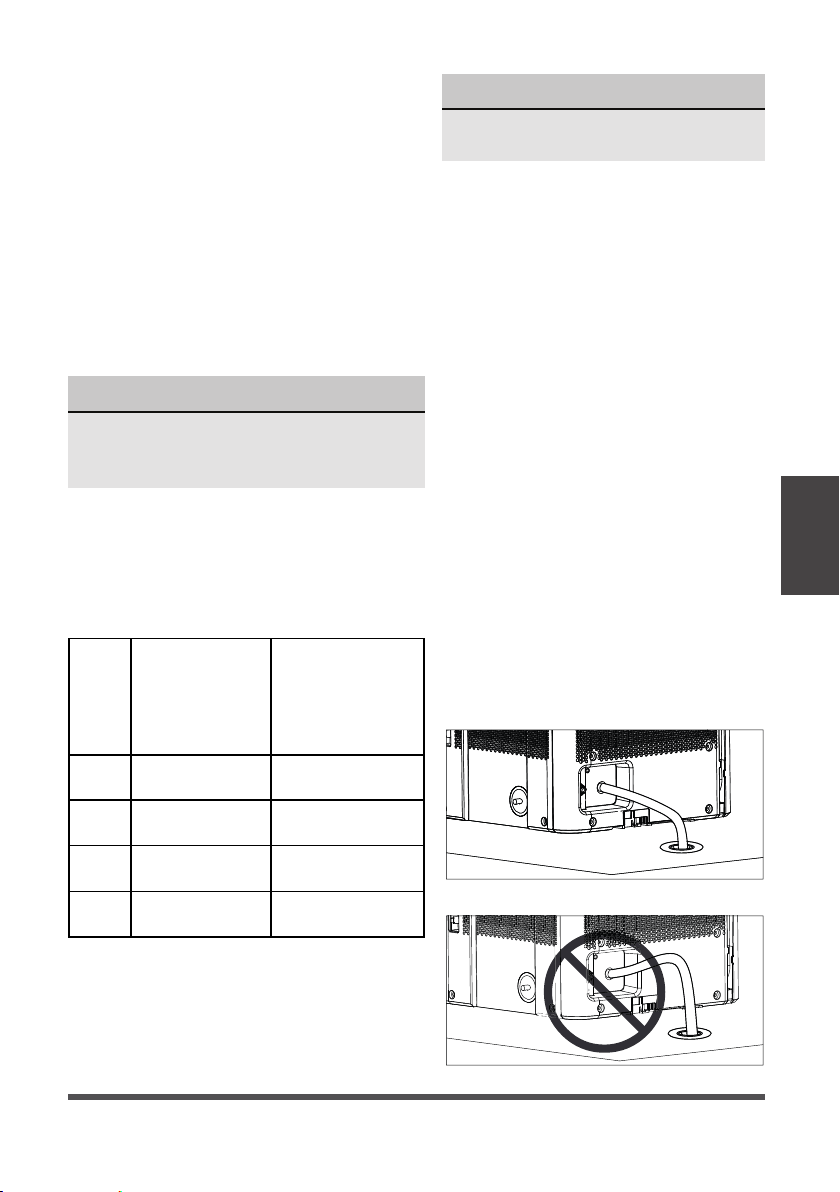
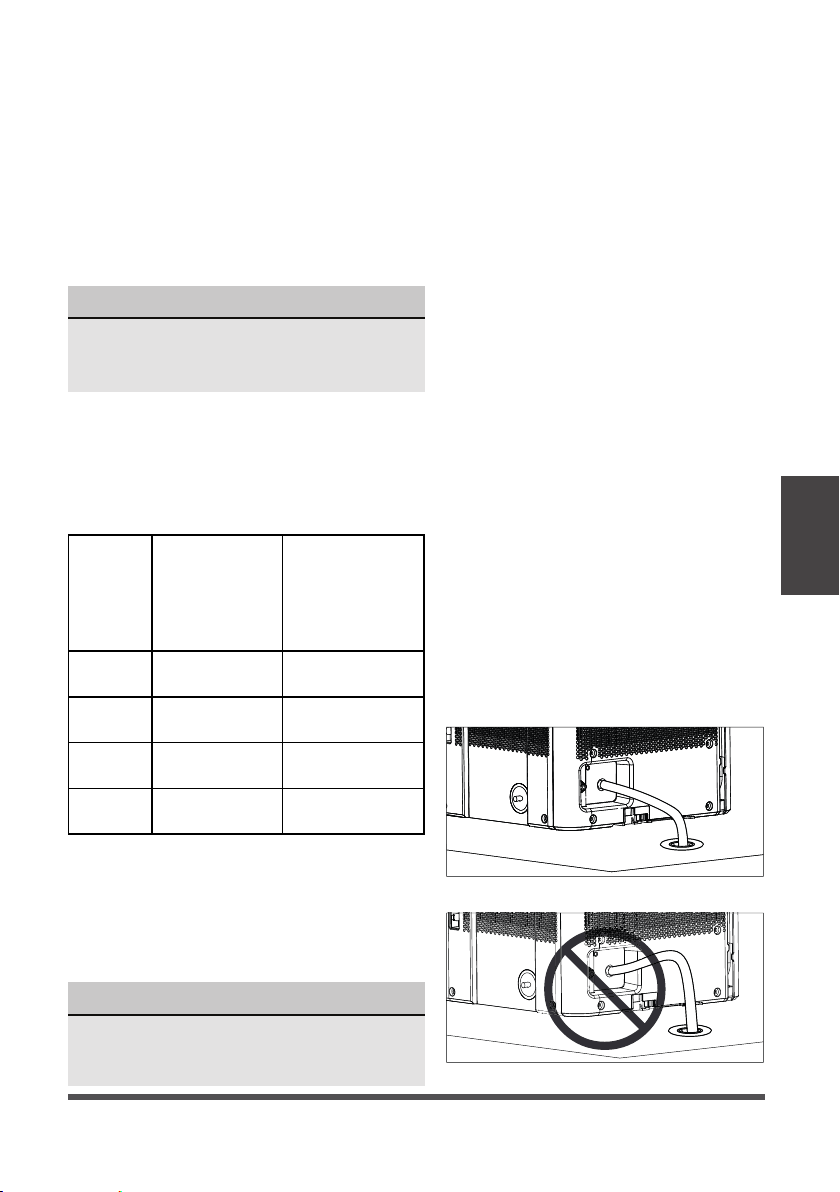
Bucketless mode:
Bucketless mode allows you to run the
unit without the bucket in place. The
included drain hose or a garden hose
must be attached and sloped towards
the drain for proper bucketless mode
operation. Figure 8 shows a proper slope
while figure 9 shows an improper slope.
The drain must be located below the
dehumidifier. For best drain performance,
we recommend the end of the drain hose
be 4 inches below the hose connection.
To activate bucketless mode, the following
steps must be completed within three
minutes of plugging the dehumidifier in.
1. Press and hold the up and fill level
buttons for 3 seconds until the
bucketless icon appears on the display.
2. Ensure the dehumidifier is on a flat
level surface (free of debris).
3. Make sure the hose for Bucketless
mode is sloped down to the drain
(see fig. 8) and does not rise above
the connection point (see fig. 9).
To remov
e the unit from bucketless
mode, place the unit back on the bucket.
Fig. 8
Fig. 9
MAD35PS1QGR

Page 12
Error Codes and Protection Code:
AS - Humidity sensor error - Unplug
the unit and plug it back in. If error
persists, contact Customer Service.
ES - Tube Temperature sensor of the
evaporator error - Unplug the unit
and plug it back in. If error persists,
contact Customer Service.
P2 - Bucket has reached the set Fill
Level– Empty the bucket and place
the unit on the bucket properly.
EC - Refrigerant leakage detection -
Display area will show EC when
the unit detects refrigerant
leakage. If error persists, contact
Customer Service.
E3 - Unit malfunction - Unplug the unit
and plug it back in. If error persists,
contact Customer Service.
Eb - Bucket is removed or not in right
position - Replace the bucket in
the right position. (only available
for the unit with pump feature.)
Auto Defrost
When frost builds up on the evaporator
coils, the compressor will cycle off
and Auto Defrost function will run
automatically.
3 minute compressor operation delay
protection
After the unit has stopped, it can not be
restarted in the first 3 minutes to protect
compressor operation. The unit will restart
automatically after 3 minutes.
Auto-Restart
If the unit stops unexpectedly due to power
being cut, it will restart with the previous
function setting (except bucketless mode)
automatically when the power resumes.
Timer Function
• When activating the Timer function,
you are setting the time until the unit
changes its power state. This means,
if the unit is on, activating the timer
function will set the time until the unit
will turn off. If the unit is off, activating
the timer function will set the time until
the unit will turn on.
• The time can be set after pressing the
timer button then using the up or down
buttons. These buttons will change
the time in 0.5 hour increments up to
10 hours. After 10 hours, the time will
change in 1 hour increments up to 24.
• If an error code appears during this time,
the timer function will be cancelled.
NOTICE
• When first using the dehumidifier,
operate the unit continuously 24 hours.
Make sure the plastic cover on the
continuous drain hose outlet is installed
properly so there are no leaks.
• This unit is designed to operate in a
working environment between 5°C/41°F
and 35°C/95°F.
• Make sure the water bucket is positioned
correctly so that the unit can operate
properly. When the water in the bucket
reaches a certain level, please be careful
while moving the unit to avoid spilling.
Operating
Instructions
Other Features
Timer Button:
Press this button to activate the Timer
function. The Timer LED will illuminate
indicating timer mode is being set.
0.0 will also appear on the display
indicating the number of hours from
now until the timer function will initiate.
When the timer function initiates, the
unit will change its power state. For
more information see Timer function
under other features on the next page.
Page 13
Operating
Instructions
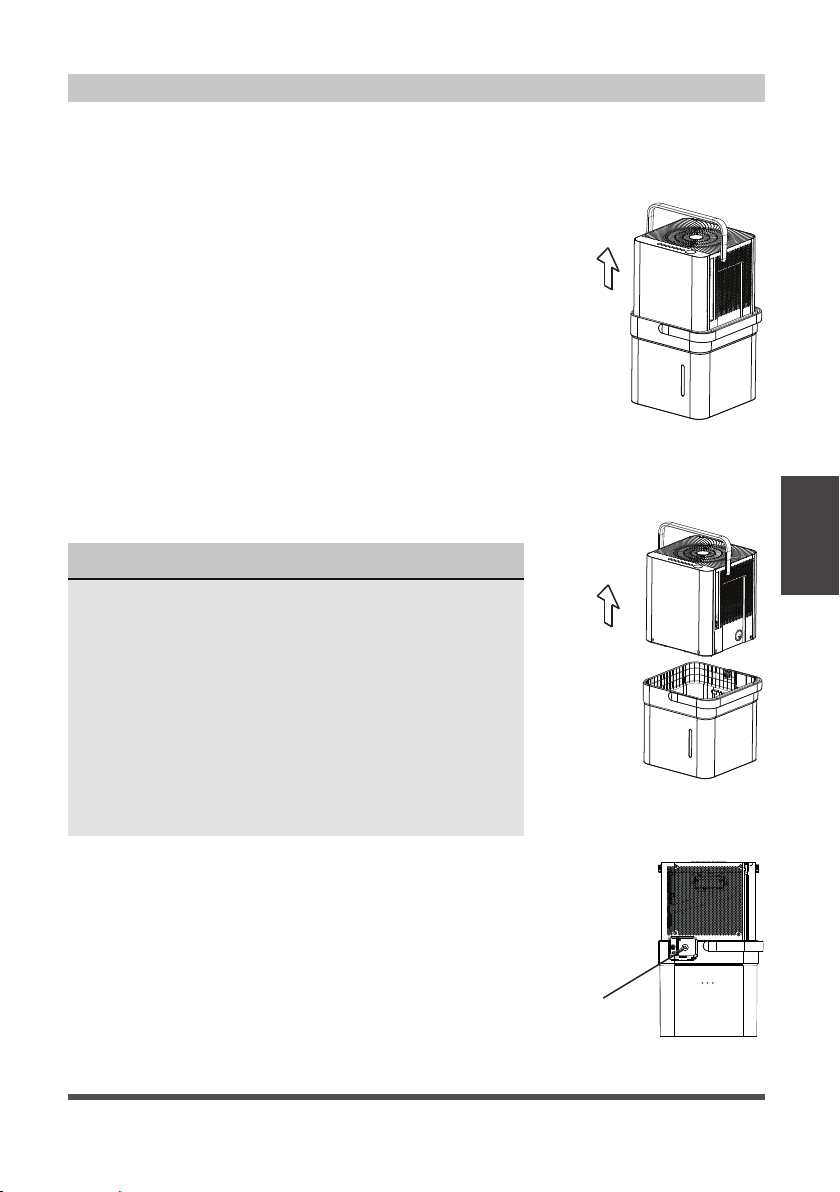
Removing Collected Water
There are three ways to remove collected water:
1. Lift the unit off the bucket and
place it on a level surface.
1. Emptying the bucket
• When the bucket reaches the set Fill Level, the unit’s
display will show P2 regardless of power status.
• Using proper lifting techniques, remove the unit from
the bucket. Be aware, some residual water may spill
from the bottom of the unit while not on the bucket.
• Using two hands, grab the bucket handle and carry
it to the desired drainage point. Pouring from a front
corner of the bucket (the bucket window is on the
front side), empty the bucket. If pouring from the
back of the bucket, some water may spill from the
relief holes.
• Return the bucket to the desired operating location
and place the unit back on the bucket. Be sure the
unit is aligned properly.
Fig. 10
Fig. 11
NOTICE
• When you remove the unit from the bucket do not
set the unit on any electrical components as the
bottom may be wet.
• Do not set the unit on an uneven surface after
removing it from the bucket.
• Ensure the unit is seated properly after returning it
to the bucket.
• If the unit is removed from the bucket during
operation, the display will show the error code Eb
and cease operation until returned to the bucket
or changed to bucketless mode.
2. Lift the bucket using 2 hands
and carry to drainage point.
3. Pour out all of the water.
Remove the
plastic cover
rotating
counter-clockwise
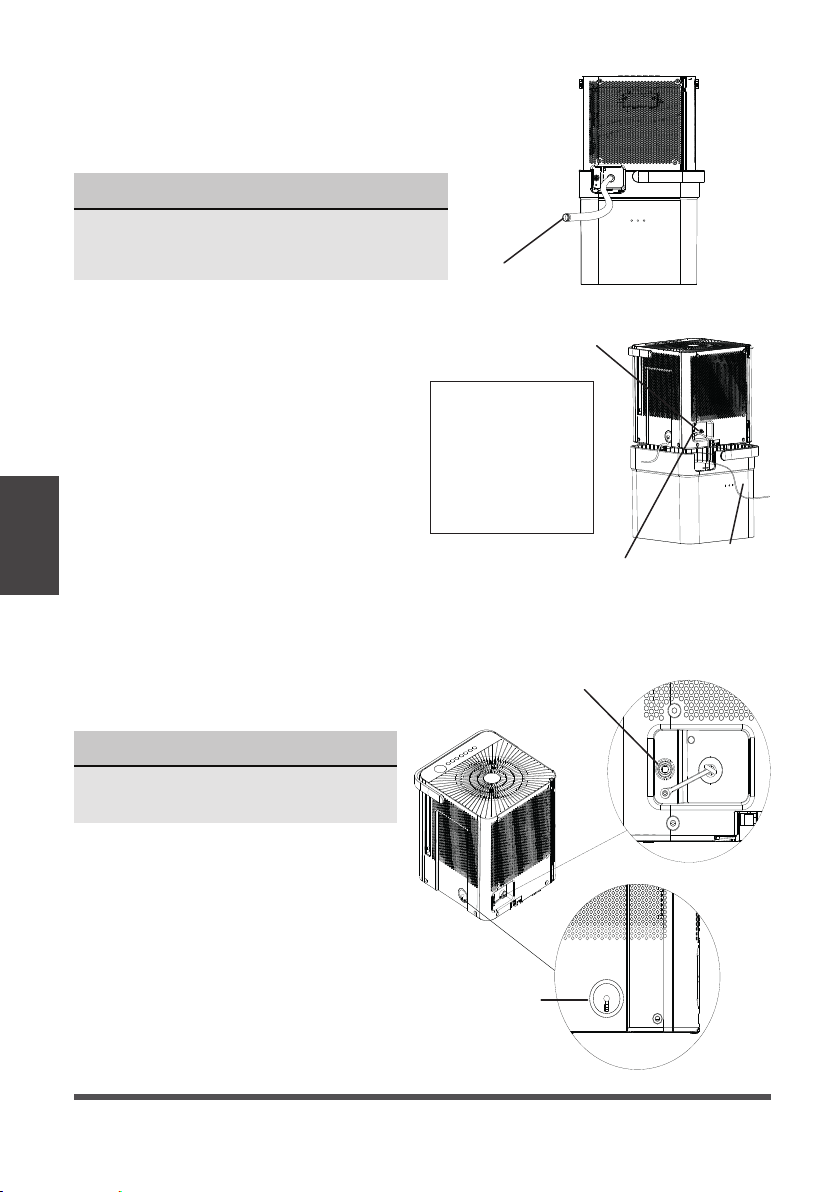
2. Continuous draining
• Water can be automatically emptied from the unit
into a sink, or other type of drain using the included
hose.
• To install the hose, remove the drain cap from the
rear of the unit and set aside. Insert the included drain
hose, or attach a garden hose to the drain outlet.
Place the other end of the hose on or near the drain
so that water will drain properly.
Fig. 12
Page 14
Drain hose
Pump drain
hose
Pump drain
hose outlet
Pump drain hose outlet
connection
Pump drain hose
inlet connection
Reinstall the plastic cover
Max pump height: 14 ft.
Make sure the hose is
properly seated.
To remove the pump
hose, push in on the
collar around the hose
and pull the hose out.
NOTICE
The pump may generate a loud noise
for the first 3~5 minutes of operation.
NOTICE
When using the continuous draining feature,
ensure the unit is placed above the sink or drain
being used. This will ensure proper draining.
Fig. 15
Fig. 13
Fig. 14
3. Pump draining (some models)
• Water can be pumped from the unit
into a sink or other type of drain by
putting the unit in pump mode and
attaching the included pump hose.
Be sure to install both the inlet and
outlet pump hoses as shown in the
figures on the right.
• To install the pump hose, remove the
plug from the pump drain hole and
firmly attach the the included pump
hose as shown in Fig. 14.
• Initiate pump mode by holding both
the up and down arrows for three
seconds.
• The pump inlet hose must be
placed in the bucket in order to
pump the water out of the bucket.
Operating
Instructions
• When removing the drain hose, some water
may remain in the hose or the drain outlet.
Be sure this water will not spill by drying
the wet area before moving the unit.

Page 15
Operating
Instructions
• Make sure the hose is secure so there are no leaks.
• Direct the hose toward the drain, making sure that there are no kinks that will stop
the water flowing.
• Place the end of the hose into the drain.
• Select the desired humidity setting and fan speed on the unit for pump draining
to start.
• When operating in Bucketless mode the pump cannot be used.
NOTICE
The pump operation light blinks when a failure occurs. Please turn off the unit and
disconnect the power cord. Check the following items:
• Cleaning the pump filter:
- Clean the pump filter following the instructions below.
• Check if the drain hose is clean and free of debris.
• Empty the water from the bucket.
• Check the hose connection and the bucket for proper fitment. If the error
persists, contact Customer Service.
NOTICE
If routing the drain hose outdoors, do not operate when the outdoor temperature
is at or below 32°F (0°C) as the water will freeze, blocking the hose and causing
the unit to stop.
Make sure to empty the bucket at least once a week a week when using the pump
draining feature. When the pump draining feature is not being used, remove the
pump drain hose from the outlet.

Page 16
Turn the dehumidifier off and disconnect the plug from the power source before cleaning.
Care and
Cleaning
1. Clean the Grill and Case
• Use water and a mild detergent. Do not
use bleach or abrasives.
• Do not splash water directly onto the unit.
Doing so may cause an electrical shock,
cause the insulation to deteriorate, or
cause the unit to rust.
• The air intake and outlet may get dirty
during operation, use a vacuum cleaner
or brush to clean.
2. Clean the bucket
• Every few weeks, clean the bucket
thoroughly. Partially fill the bucket with
clean water and mild detergent. Swish it
around in the bucket, empty and rinse.
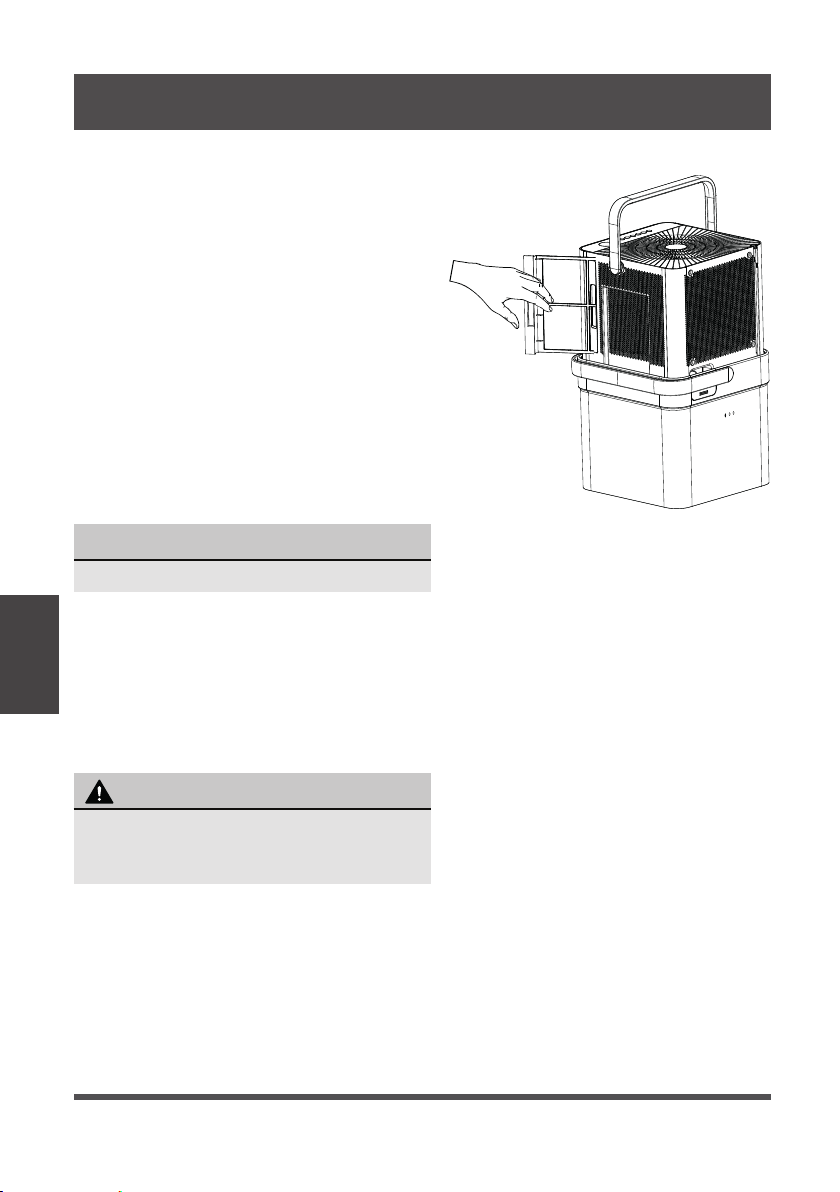
3. Clean the air filters
• To remove the filters, pull each filter
outwards.
• Wash the filters with clean water then dry.
• Re-install each filter.
• Reset the filter indicator light following
operating instructions on page 10.
4. When not using the unit for long time periods
• Before storing the unit and bucket, let it rest for one full day so that the system can
dry out naturally.
• Clean the unit, water bucket and air filters.
• Ensure the power cord is in the power cord storage channel.
• Nest the unit inside the bucket.
• Cover the unit with a plastic bag.
• Store the unit upright in a dry, well-ventilated area.
NOTICE
Do not use a dishwasher to clean the bucket.
CARE AND CLEANING
To avoid loss of performance or damage to
the unit, do not operate the dehumidifier
without the filters.
CAUTION
Fig. 16

Page 17
Nesting
and Storing
Instructions
Fig. 18
NESTING AND STORING INSTRUCTIONS
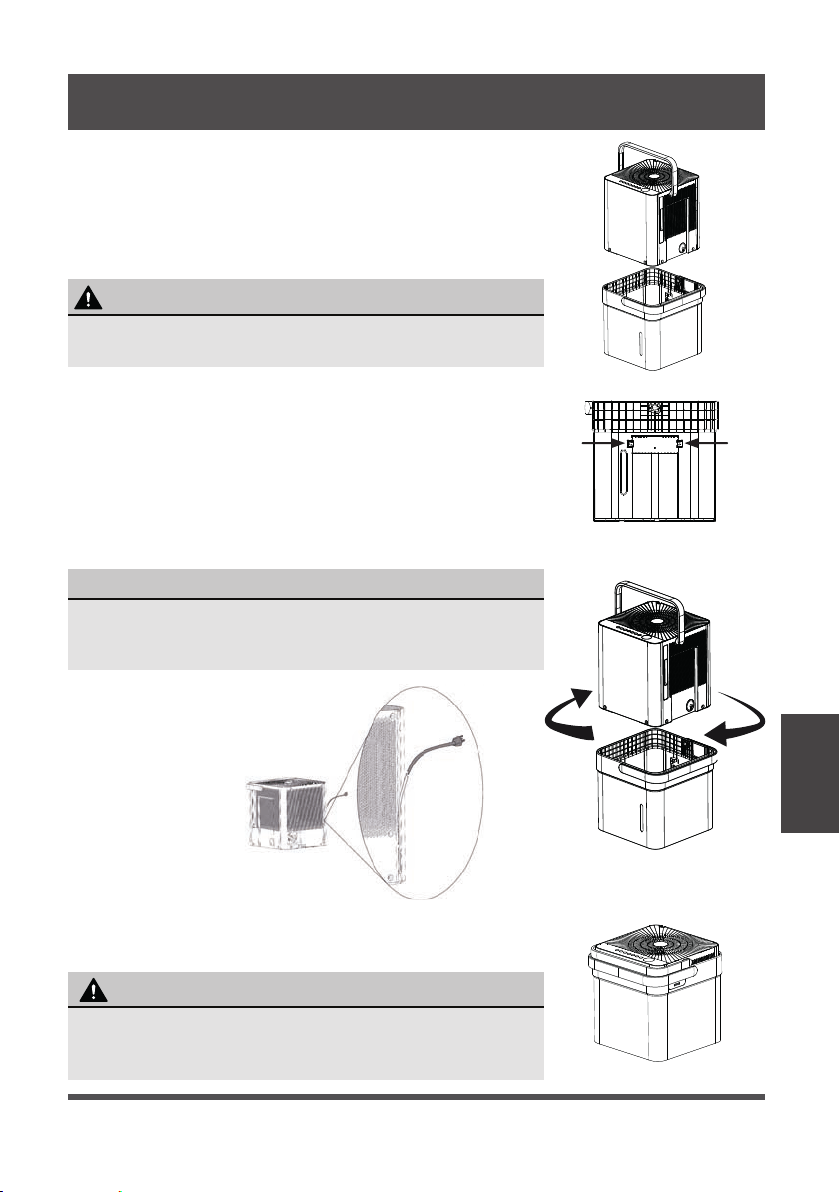
WARNING
Make sure the bucket is empty before nesting the
dehumidifier to avoid risk of electrical shock.
NOTICE
Make sure the power cord is properly tucked into the power
cord storage channel on the back of the dehumidifier to
prevent damage.
When carrying the nested unit, be sure and use the bucket
handle to ensure both the dehumidifier and bucket are
safely carried.
CAUTION
Fig. 17
Fig. 20
Fig. 19a
t into bucket to nest
Fig. 19b
Step 1:
Power off and unplug the unit. Then lift the dehumidifier off
the bucket.
Step 2:
Empty all water from bucket.
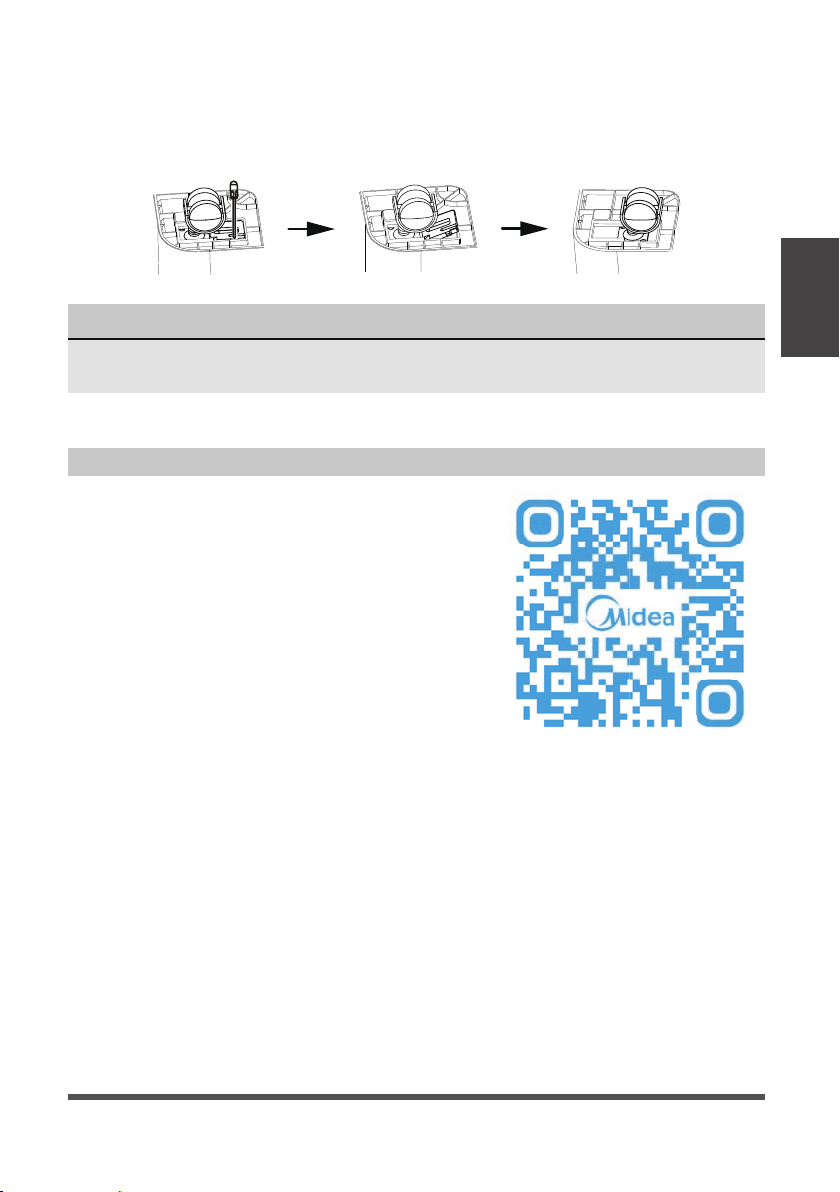
Step 3:
Make sure to press the tabs on the inside bucket feature in
so that the unit can nest correctly. See Fig. 18.
Step 4:
Rotate dehumidifier 90° in either direction and insert into
bucket to nest.
Step 5:
The dehumidifier is nested and ready to store.
Page 18
Before calling for service, review this list. It may save you time and money. This list
includes common occurrences that are not the result of defective workmanship or
materials in this appliance.
Problem Solution
Unit does not
start
Make sure the dehumidifiers plug is connected firmly into the wall
outlet.
Check the house fuse/circuit breaker box.
Dehumidifier has reached its preset level or bucket is full.
Water bucket is not in the proper position.
Dehumidifier
does not dry
the air as it
should
Not enough time to remove the moisture.
Make sure there are no curtains, blinds or furniture blocking the front
or back of the dehumidifier.
The humidity control may not be set low enough.
Check that all doors, windows and other openings are securely
closed.
Room temperature is too low, below 5°C (41°F).
There is a water vapor source in the room.
The unit makes
a loud noise
when operating
Air filter may be dirty. Clean filter. Refer to Care and Cleaning
section.
The unit is tilted instead of upright as it should be.
The floor surface is not level.
Frost appears
on the coils
This is normal. The dehumidifier has Auto defrost feature.
Water on floor
Hose to connector or hose connection may be loose.
Intended to use the bucket to collect water, but the back drain plug
is removed.
ES, AS, P2,
EC, Eb and E3
appear in the
display
These are error codes and protection code. Check Operating
Instructions.
The pump
operation on
light blinks at
1 Hz
Clean the pump filter.
Check the pump hose is not blocked or leaking.
Empty the water bucket.
When operating
in bucketless
mode, water
collects around
the bottom of
the unit
Check to ensure the unit is level, and there is no debris on the
surface.
Check the drain hose connection and ensure it is properly seated in
the outlet.
TROUBLESHOOTING TIPS
Troubleshooting
Tips
Page 19
App
Instructions
We hereby declare that this Dehumidifier is in compliance with the essential
requirements and other relevant provisions of Directive 1999/5/EC.
1. Supports operating systems: iOS 7+ or Android 4+.
2. In the event of a OS update, there may be a delay between the update of the OS
and a related software update during which your OS may or may not be supported
until a new version is released. Your specific mobile phone or problems in your
network may prevent the system from working and Midea will not be responsible
for any problems that could be caused by incompatibility or network issues.
3. This Smart Dehumidifier only supports WPA-PSK/WPA2-PSK (recommended)
encryption.
4. To ensure proper scanning of the QR code, your smartphone must have at least a
5-megapixel camera.
5. Due to unstable network connectivity, requests may time out. If this happens, re-
run the network configuration.
6. Due to unstable network connectivity, commands may time out. If this happens,
the smartphone app and the actual product may display conflicting information.
The information displayed on the actual product is always the most accurate
available. Refresh the app to re-sync.
Midea will not be responsible for any problems that could be caused by
incompatibility or network issues, your wireless router and mobile phone.
NOTICE
DECLARATION OF CONFORMITY
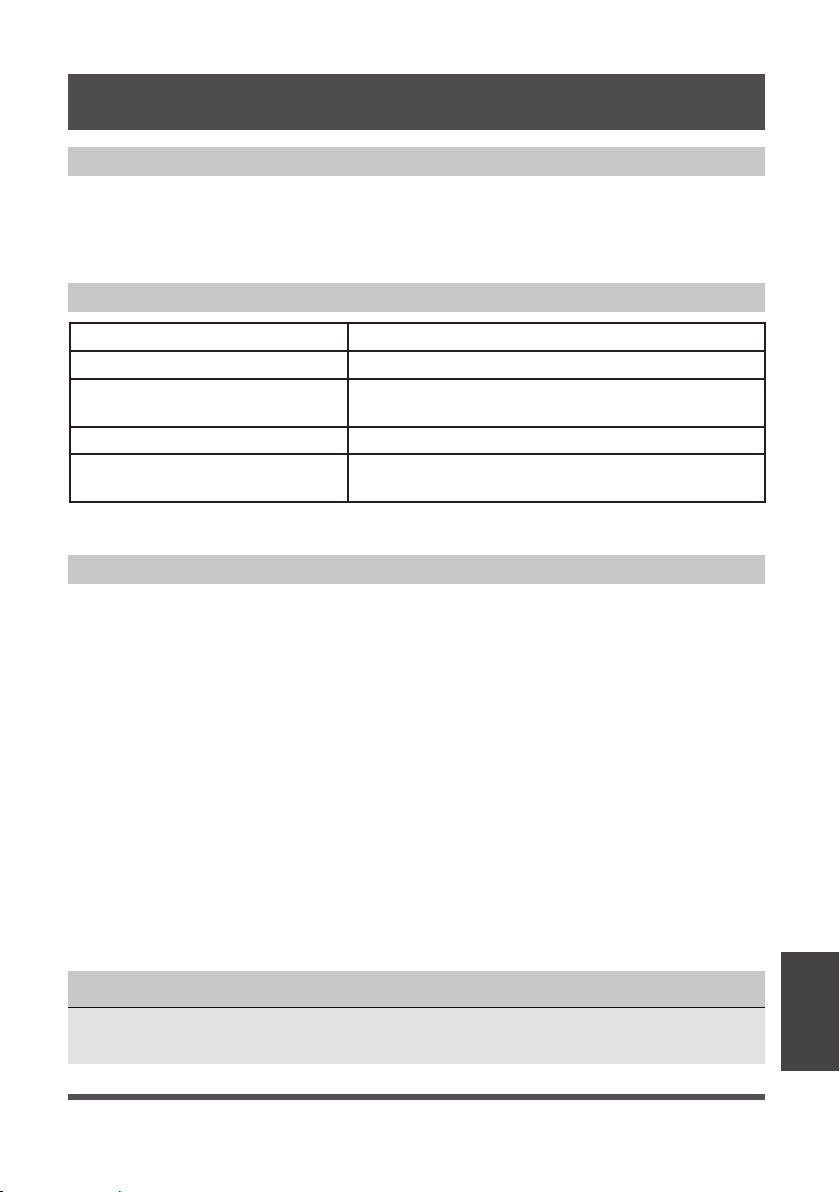
SPECIFICATION OF WIRELESS MODULE
PRECAUTIONS
APP INSTRUCTIONS
Model: US-SK105 Dimensions: 41 x 24 x 5 (mm)
Standard: IEEE 802.11 b/g/n Operation Temperature: 0°C ~ 45°C / 32°F ~ 113°F.
Antenna Type: Printed PCB
Antenna
Operation Humidity: 10% ~ 85%
Frequency band:
2400-2483.5MHz
Power Input: DC 5V/300 mA
Maximum Transmitted Power:
<20 dBm Max
Page 20
Devices required to use the Smart Dehumidifi er:
1. Smart Phone with compatible iOS or Android system.
2. Wireless Router
3. Smart Dehumidifier
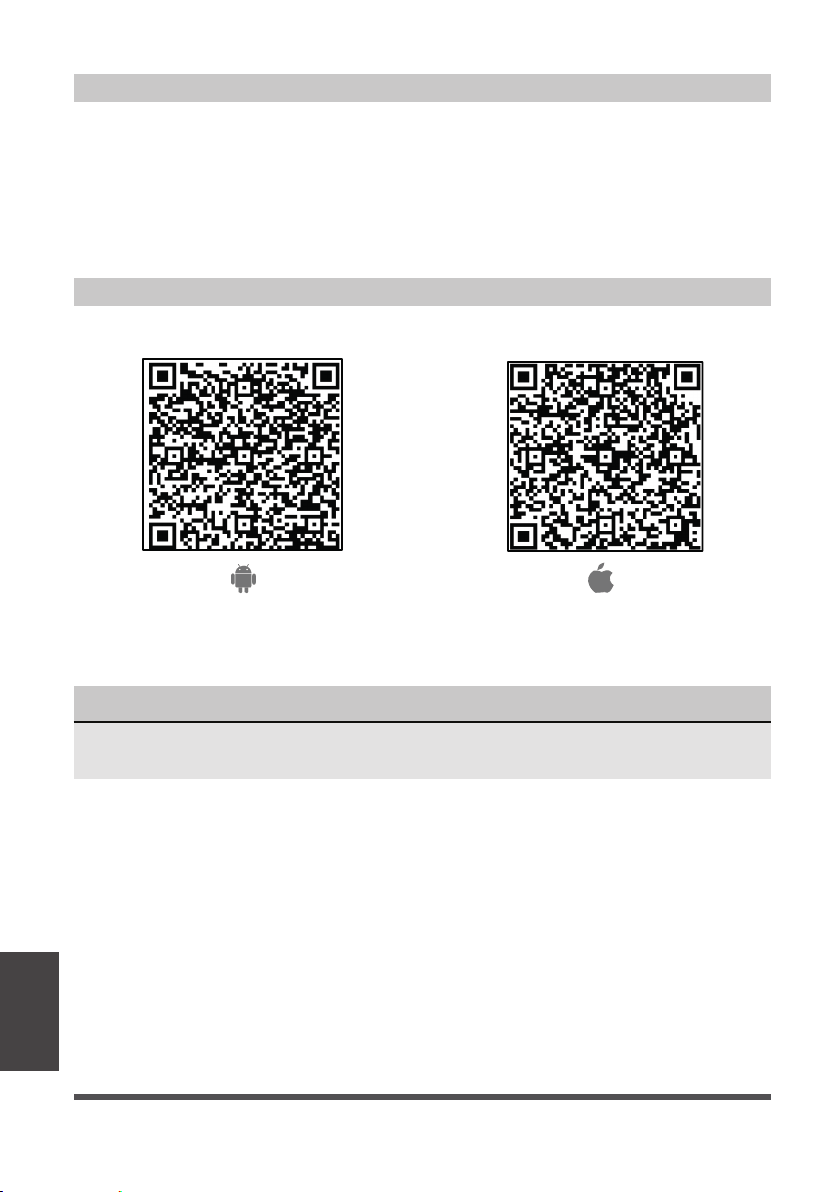
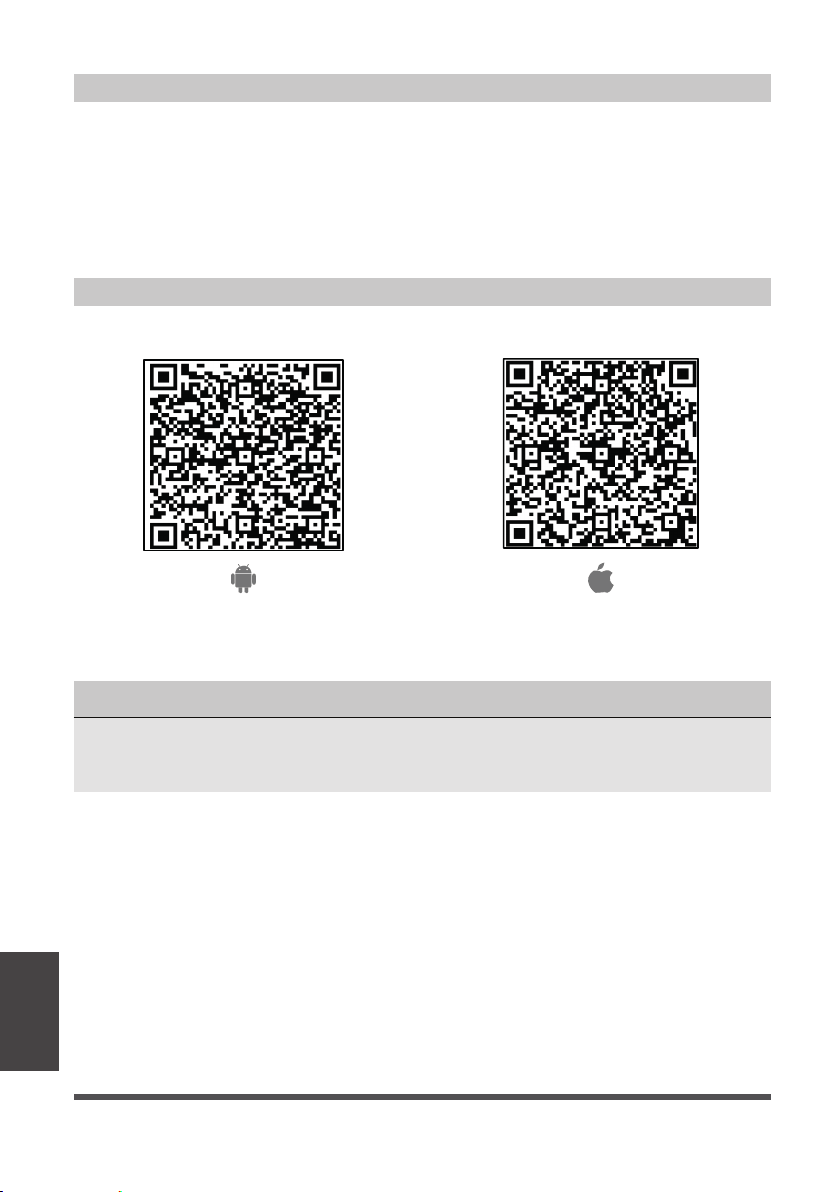
Android QR code Apple QR code
Scan to download app.
• You can also go to Google Play or App Store and search for Midea Air.
DOWNLOAD AND INSTALL THE APP
SYSTEM OVERVIEW
NOTICE
All the images in this manual are for reference only, your product and app may look
slightly different. The actual product and app instructions have to be considered.
App
Instructions
Page 21
App
Instructions
• Make sure your smartphone is connected to your wireless router and your wireless
router has a working 2.4GHz internet connection.
• It is recommended to activate your account immediately to be able to recover your
password by email.
NOTICE
• Make sure your smartphone is able to connect to the wireless network which will be used.
• Make sure also that the device is not connecting to other networks in range.
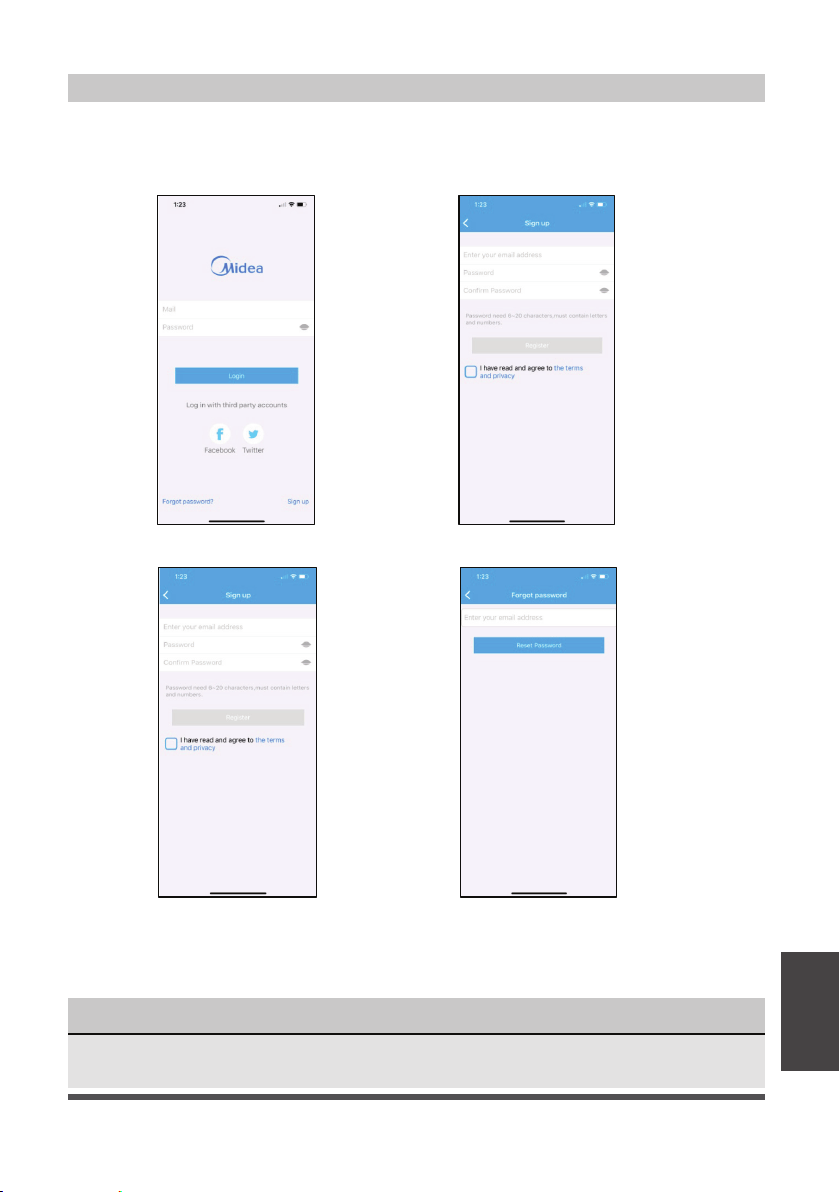
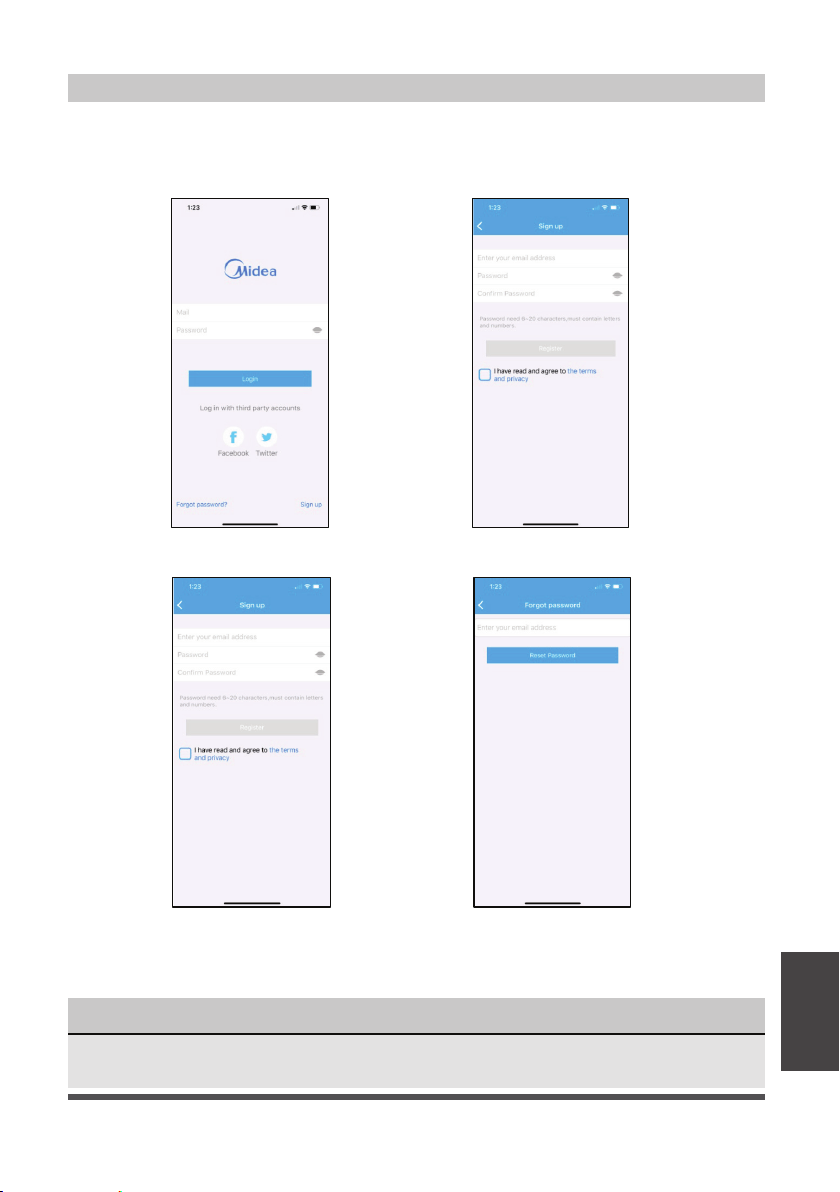
CREATE YOUR ACCOUNT
1. Press “Sign Up”. 2. Enter your email address and password.
3. Press “Registration”. 4. If you forget your password, press
“Forgot password?” on the main
menu and enter your email address.
Then press “Reset Password”.

Page 22
ADDITIONAL APP AND SMART HOME FUNCTIONS
For additional instructions regarding the features of the app and Smart Home skill
capabilities, scan the QR code below.
App
Instructions
Deshumidificador Cube
versión A - 12 - 2020
MANUAL DEL USUARIO
sp
MAD
Avisos de advertencia:
Antes de usar este producto, lea
atentamente este manual y
consérvelo para futuras referencias.
El diseño y las especificaciones
están sujetos a cambios sin previo
aviso para la mejora del producto.
Voltaje Nominal: 115V
Frecuencia: 60Hz
versión C - 11 - 2021
MAD35S1QWT
MAD35PS1QGR
MAD20S1QWT
MAD50S1QWT
MAD50PS1QWT
MAD50PS1QGR

Page 24
Manual del Usuário
Precauciones de Seguridad .......................................................................... 25
Especificaciones y Car
acterísticas del Aparato ................................... 28
Instrucciones de Configuración ................................................................. 29
Instrucciones de Instalación ........................................................................ 30
Ins
trucciones de Operación .......................................................................... 32
Cuidado y Limpieza ........................................................................................ 38
Instrucciones de Alineación y Almacenamiento ................................. 39
Solución de Problemas ..................................................................................
40
Instrucciones del App ..................................................................................... 41
AVISO
Todas las ilustraciones en esta manual son para explicar sólo. La apariencia de su
deshumidificador podría ser un poco diferente. Prevalezca a la forma real , pero sus
operaciones y funciones son similares.
• Para obtener asistencia, llame el Central de Servicio Técnico al 1-866-646-4332.
• Este aparato no está indicado a ser utilizado por personas (incluidos niños) con
capacidades físicas, sensoriales o mentales reducidas o falta de experiencia y
conocimientos, a menos que hayan recibido supervisión o instrucción sobre el uso del
aparato por parte de una persona responsable de su seguridad.
• Los niños deben supervisarse para asegurar que ellos no jueguen con el aparato.
• El aparato deberá ser instalado de acuerdo con las Normas y Regulaciones nacionales
de cableado y códigos eléctricos locales.
ATENCIÓN
Lea este Manual
En su interior encontrará muchos consejos útiles sobre como usar y mantener su
deshumidificador
correctamente. Unos pocos cuidados por su parte pueden ahorrar una
gran cantidad de tiempo y dinero, alargando la vida útil de su
deshumidificador
. Encontrará
muchas respuestas a los problemas más comunes en el cuadro de solución de problemas
– Podrá resolver la mayoría de ellos rápidamente antes de llamar al servicio técnico. Estas
instrucciones pueden no cubrir todas las condiciones posibles de uso, así que sentido
común y atención a la seguridad é necesario al instalar, operar y mantener este producto.

Page 25
PRECAUCIONES DE SEGURIDAD
Para prevenir daños al usuario o a otras personas y a la propiedad, las instrucciones
que se muestran aquí deben ser seguidas. El uso incorrecto debido a ignorar las
instrucciones podría causar perjuicios o lesiones. El nivel de riesgo está clasificado por
las siguientes indicaciones.
ADVERTENCIA
Este símbolo indica una situación peligrosa que, si no
evitada, podría causar la muerte o lesiones graves.
PRECAUCIÓN
Este símbolo indica una situación peligrosa que, si no
evitada, podría resultar en lesiones leves o moderadas.
AVISO
Este símbolo aborda las prácticas no relacionadas con
lesiones físicas.
ADVERTENCIA
• No modificar la longitud del cable de alimentación ni comparta la tomacorriente
con otros aparatos.
Puede provocar una descarga eléctrica o un incendio debido al sobrecalentamiento.
• No accione ni detenga el aparato insertando o extrayendo el enchufe de la
tomacorriente.
Puede causar una descarga eléctrica.
• No permita que el agua entre en contacto con ninguna pieza eléctrica.
Puede causar fallas o descarga eléctrica.
• No lo use el enchufe si está suelto o dañado.
Puede causar incendio y descarga eléctrica.
• No lo use ni mantenga el cable de alimentación cerca de los aparatos de
calefacción o fuentes de calor como chimeneas.
Puede causar incendio y descarga eléctrica.
• No desmonte ni modifique el aparato.
Puede causar fallas y descarga eléctrica.
• No dañe ni utilice un cable de alimentación alternativo.
Puede causar incendio y descarga eléctrica.
• No utilice el aparato cerca de gases inflamables o combustibles, como gasolina,
benceno, diluyente, etc.
Puede causar una explosión o un incendio.
• No lo maneje con las manos mojadas.
Puede causar una descarga eléctrica.
• No abra el aparato durante el funcionamiento.
Puede causar descarga eléctrica.
• No beba el agua de drenaje del deshumidificador.
• No utilice el aparato en espacios pequeños ni la coloque en un fregadero o ducha.
La falta de ventilación puede provocar sobrecalentamiento e incendio.
Precauciones
de Seguridad

Page 26
ADVERTENCIA
Precauciones
de Seguridad
• Evite el peligro de incendio o la descarga eléctrica.
No utilice un cable de extensión ni un enchufe adaptador. No extraiga ninguna
clavija del cable de alimentación.
• Enchúfalo en el enchufe de alimentación eléctrica correctamente.
De lo contrario, puede causar una descarga eléctrica o un incendio debido a la
excesiva generación de calor.
• Asegúrese siempre de una conexión a tierra eficaz.
Una conexión a tierra incorrecta puede provocar una descarga eléctrica.
• Desenchufar el aparato si nota sonidos extraños o olores o humo proveniente de ella.
Un producto dañado puede causar incendio y descarga eléctrica.
• Ventile la habitación antes de utilizar el deshumidificador si hay una fuga de gas
desde otros aparatos.
• Si el cable de alimentación está dañado, debe ser reemplazado por el fabricante o
un centro de servicio técnico autorizado o una persona igualmente calificada para
evitar un peligro.
• Antes de limpiar, apague la alimentación y desenchufe el aparato.
• Asegúrese de que el deshumidificador esté instalado de forma segura y correcta
de acuerdo con las instrucciones de instalación de este manual. Guarde este
manual para un posible uso futuro al retirar o instalar este aparato.
• Asegúrese de que el deshumidificador esté correctamente conectado a tierra. Para
minimizar descargas eléctricas y riesgos de incendio, es importante realizar una
conexión a tierra adecuada.
El cable de alimentación está equipado con un enchufe de conexión a tierra de
tres clavijas para la protección contra los riesgos de choque.
• Su deshumidificador debe utilizarse en una tomacorriente de pared correctamente
conectado a tierra. Si la tomacorriente de pared que tiene intención de utilizar
no está adecuadamente conectada a tierra o protegida por un fusible de
retardo de tiempo o un disyuntor, pida a un electricista cualificado que instale
una tomacorriente adecuada. Asegúrese de que la tomacorriente sea accesible
después de la instalación del aparato.
• Asegúrese de que el servicio eléctrico es adecuado para el modelo que ha elegido.
Esta información se puede encontrar en la placa de serie, que se encuentra en el
lado del gabinete y detrás de la rejilla.
• Asegúrese de que el depósito esté vacío de agua antes de alinear el aparato.
Podría provocar una descarga eléctrica y/o dañar el aparato.
• Desenchufe el aparato antes de alinearla en el depósito.
Podría provocar una descarga eléctrica y/o dañar el aparato.
• Al desenchufar el aparato asegúrese de tomar el enchufe y no el cable.

Page 27
PRECAUCIÓN
Precauciones
de Seguridad
• No sitúe el aparato en lugares donde el agua pueda salpicarle.
El agua puede entrar en el aparato y degradar el aislamiento que podría conducir
a una descarga eléctrica.
• Coloque el aparato en una zona nivelada y resistente del suelo.
Si el aparato se cae, puede hacer que el agua se derrame y dañe sus pertenencias,
o provocar una descarga eléctrica o un incendio.
• No introduzca los dedos u objetos extraños en las rejillas o aberturas del aparato.
Advierta a los niños de este riesgo.
Puede causar fallas y descarga eléctrica.
• No se suba ni se siente sobre el aparato.
Puede resultar herido si se cae o si el aparato se cae.
• Siempre inserte los filtros de forma segura. Limpie el filtro una vez cada dos semanas.
El funcionamiento sin filtros puede causar un error.
• Si entra agua en el aparato, apáguela, desconecte la alimentación y llame el Central de
Servicio Técnico al 1-866-646-4332.
• Si el aparato se cae al suelo mientras está en uso, apáguelo y desconecte el
cable de alimentación inmediatamente. Inspeccione visualmente el aparato para
asegurarse de que no haya daños. Si sospecha que el aparato se ha dañado,
comuníquese con el
Central de Servicio
al cliente.
• En caso de tormenta eléctrica, desconecte el cable de alimentación para evitar
que los efectos de un rayo dañen el aparato.
• No coloque el cable de alimentación debajo de una alfombra. No cubra el cable
con tapetes o revestimientos similares. No coloque el cable debajo de muebles o
electrodomésticos. Coloque el cable lejos del área de tráfico y donde no se pueda
tropezar.
• No coloque nada encima del aparato.
Esto restringiría el flujo de aire, posiblemente dañaría el aparato y disminuiría el
rendimiento.
• Siempre levante el aparato con las dos manos utilizando la técnica de elevación
adecuada.
• Antes de encender el aparato, asegúrese de que esté asentada correctamente en
el depósito.
• Antes de levantar, asegúrese de que la asa esté colocada correctamente.
• Utilice únicamente el depósito que viene con el aparato. No use ningún otro
depósito.
• Limpiar el depósito con regularidad.
Page 28
Especificaciones
y Carcterísticas
del Aparato
Descripción del Producto
Accesorios
Fig. 1
Fig. 2
Panel Frontal Entrada
de Aire
Canal de
almacenamiento
del cable de
alimentación
Agujeros
de Alivio
Salida de
Manguera
de Jardín
Salida de
Manguera
de Bomba
(algunos modelos)
Ventana de Nivel
de Água del
Depósito
Depósito
Asa del
Depósito
Frontal Trasera
Lengüetas
de Bloqueo
Salida de Aire
Asa del Filtro
de Aire
(Ambos lados)
Deshumidificador
Depósito
Sensor del
Depósito
Cable de
Alimentación
Conexión de la
Manguera de
Entrada de la bomba
(algunos modelos)
Panel de Control
y Display
Asa de la
Unidad
ESPECIFICACIONES Y CARACTERÍSTICAS DEL APARATO
Manguera de drenaje de la bomba (solo para
aparatos con la función de bomba de drenaje)
Manguera de entrada de la bomba (solo para
aparatos con la función de bomba de drenaje)
Manguera de drenaje nor
Ruedas
mal
x 4
Page 29
Instrucciones de
Configuración
INSTRUCCIONES DE CONFIGURACIÓN
Paso 1:
Separe el deshumidificador y el depósito de la posición de envío/almacenamiento alineado.
Retire todos los materiales de embalaje de la unidad.
Paso 2:
Gire el deshumidificador 90° y alinee las flechas en las dos etiquetas (una en el depósito y
otra en el deshumidificador) y coloque con cuidado el deshumidificador sobre el depósito.
La ventana del nivel de agua en el depósito y los botones del panel en el deshumidificador
deben estar en el mismo lado cuando se apilan correctamente. Verifique que las flechas en el
aparato y del depósito estén alineadas como en la Fig. 4c para un funcionamiento adecuado.
Paso 3:
Enchufe el aparato y presione el botón de encendido y el aparato estará listo para
funcionar en modo normal (depósito).
Posición de envío/
almacenamiento alineado
Fig. 3a
Fig. 3b
Gire 90° el deshumidifi cador
Fig. 4a
Botones
del panel
y ventana
del nivel
de agua
alineados
en el
mismo lado
Fig. 4b
Fig. 4c
Page 30
Instrucciones
de Instalación
Colocación del Aparato
El deshumidificador debe colocarse en el área donde más se desee deshumidificar. Las
habitaciones adyacentes en las que también se desea la deshumidificación deben permitir
un flujo de aire adecuado dentro y fuera del espacio que contiene el deshumidificador.
Fig. 5
blockcaster
bottom
of unit
parte
inferior de
la unidad
BloqueRuedas
Más
de
16”
Más de
8”
Más de
8”
Más de
8”
Más de
8”
INSTRUCCIONES DE INSTALACIÓN
• No lo use al aire libre.
• Este deshumidificador está diseñado
para aplicaciones en interiores
residenciales únicamente. Este
deshumidificador no debe usarse para
aplicaciones comerciales o industriales.
• Coloque el deshumidificador en
una superfície lisa y nivelada lo
suficientemente resistente para
soportar el peso del aparato con el
depósito lleno de agua.
• Deje al menos 8 pulgadas de espacio
en todos los lados del aparato para
que circule el aire (al menos 16
pulgadas para la salida de aire).
• Coloque el aparato en un área
donde la temperatura no descienda
por debajo de los 41°F (5°C). Los
serpentines pueden cubrirse de hielo a
temperaturas más bajas, lo que puede
reducir el rendimiento.
• Coloque el aparato lejos de cualquier
secadora de ropa, calentador o radiador.
• Cierre todas las puertas, ventanas y otras
aberturas exteriores a la habitación.
Fig. 6
Instalación de ruedas - opcional
Para instalar las ruedas:
1. Retire el deshumidificador del
depósito
.
2. Deslice cada rueda en la ranura en la esquina inferior del aparato como se muestra
a continuación.
3. Coloque el bloque de retención en la ranura para mantener la rueda en su lugar.
4. Repita esto para cada esquina del aparato hasta que las 4 ruedas estén instaladas.
Page 31
Configuración Adicional e Información de Uso
Escanee este QR Code con su dispositivo móvil
para ver una lista de videos útiles sobre su nuevo
deshumidificador Cube.
Fig. 7
Para quitar las ruedas:
1. Utilice un destornillador de punta plana para accionar la pestaña en el bloque de
retención.
2. Retire el bloque de retención y deslice las ruedas fuera de la ranura del aparato.
AVISO
Con las ruedas colocadas, no mueva la unidad ni el conjunto todo del mientras haya
agua en el depósito. Antes de hacer rodar, retire la unidad.
Instrucciones de
Configuración
Page 32
Mandos de Control
AVISO
La apariencia del panel de control de su aparato puede variar ligeramente, pero las
funciones serán similares.
Instrucciones
de Operación
INSTRUCCIONES DE OPERACIÓN
Botón del Power
(conexión)
Botones
Abajo/Arriba
Botón del Ventilador
e Indicadores
(restablecer filtro)
Botón del Modo
e Indicadores
Indicador
del Filtro
Display LEDsIndicador
Sin Depósito
Botón del Timer
e Indicador
Botón del Nivel
de Llenado
e Indicadores
Indicador de
la Bomba
Indicador de
la Conexión
de Red
Instrucciones de Operación
Botón Power:
Pulse este botón para encender/apagar
el aparato.
Conexión:
Si mantiene pulsado el botón de
encendido durante 3 segundos, el
aparato entrará en modo de conexión de
red para configurar el control inalámbrico.
Botones Arriba (Up)/Abajo (Down):
Pulse estos botones para ajustar el punto
de referencia o para configurar la función
del Timer.
Pump (bomba):
Si mantiene pulsado los botones durante 3
segundos, se activará el modo de bomba si el
depósito está en su lugar (algunos modelos).
Botón del Ventilador (Fan):
Pulse este botón para cambiar la velocidad del
ventilador entre Alta (High) y Baja (Low).
Restablecer Filtro:
Para restablecer el indicador de cambio de
filtro, mantenga pulsado el botón del ventilador
durante 3 segundos.
Botón del Modo (Mode):
Presione este botón para cambiar el modo
del deshumidificador entre el modo de
configuración, el modo máximo y el modo de
funcionamiento continuo.
Cuando pulsar el botón para cambiar los
modos de funcionamiento, el aparato
emitirá un pitido para indicar que está
cambiando de modo.
Page 33
AVISO
Para obtener niveles de llenado precisos,
asegúrese de que el depósito esté vacío
antes de comenzar la operación.
Nivel de
Llenado
Modelos
MAD20S1QWT
Modelos
MAD35S1QWT
MAD35PS1QGR
MAD50S1QWT
MAD50PS1QWT
MAD50PS1QGR
1
1.5 galones
(17 lb)
2.25 galones
(24 lb)
2
2 galones
(21 lb)
3 galones
(30 lb)
3
2.75 galones
(27.5 lb)
3.75 galones
(36.5 lb)
4
3 galones
(29.5 lb)
4.25 galones
(40.5 lb)
Botón del Nivel de Llenado:
Pulse este botón para cambiar el nivel de
agua requerido antes de que se active el
interruptor de depósito lleno. En la tabla abajo
se muestran aproximadamente el volumen de
llenado en cada una de las cuatro opciones:
Elija la opción que le resulte más cómoda a la
hora de vaciar el depósito. Cuando el depósito
está lleno, la pantalla mostrará P2.
Los pesos (lb) en la tabala son pesos
aproximados del depósito cuando se llena
con el volumen de agua correspondiente.
Modo Sin Depósito:
Ese modo le permite hacer funcionar
la unidad sin el depósito en su lugar.
La manguera de drenaje incluida o
una manguera de jardín debe estar
conectada e inclinada hacia el drenaje
para un funcionamiento adecuado en
modo sin depósito. La figura 8 muestra
una inclinación adecuada, mientras
que la figura 9 muestra una inclinación
incorrecta. El drenaje debe estar
ubicado debajo del deshumidificador.
Para un mejor rendimiento del drenaje,
recomendamos que el extremo de la
manguera de drenaje esté 4 pulgadas por
debajo de la conexión de la manguera.
P
ara activar el modo sin depósito, los
siguientes pasos deben completarse
dentro de los tres minutos posteriores a la
conexión del deshumidificador.
1. Pulse y mantenga pulsados los botones
de nivel de llenado y arriba durante 3
segundos hasta que aparezca el icono
sin depósito en la pantalla.
2.
Asegúrese de que el deshumidificador
esté en una superficie plana y nivelada
(sin residuos).
3. Asegúrese de que la manguera para
el modo sin depósito esté inclinada
hacia el drenaje (ver fig. 8) y no
se eleve po
r encima del punto de
conexión (ver fig. 9).
Para salir del modo sin depósito, vuelva a
c
olocar la unidad en el depósito.
AVISO
Mientras funciona en los modos continuo y
máximo, no se puede ajustar manualmente
el punto de ajuste de humedad.
Configuración (set) – El deshumidificador
funciona hasta que se alcanza el punto de
ajuste de humedad. El aparato comenzará a
funcionar toda vez que la humedad vuelva a
subir por encima del punto de ajuste.
Máximo (max) – El deshumidificador
funcionará con velocidad del ventilador alta.
Continuo (cont) – El deshumidificador
funcionará continuamente y se puede
cambiar la velocidad del ventilador.
Instrucciones
de Operación
Fig. 8
Fig. 9

Page 34
Códigos de Error y Códigos de Protección:
AS - Error del sensor de humedad: desenchufe
el aparato y vuelva a enchufarla. Si el error
persiste, comuníquese con el Central de
Servicio.
ES - Error del sensor de temperatura del tubo
del evaporador: desenchufe el aparato y
vuelva a enchufarla. Si el error persiste,
comuníquese con el Central de Servicio.
P2 - El depóstito ha alcanzado el nivel de
llenado establecido: vacíe el depósito y
coloque el deshumidificador en el depósito
correctamente.
EC -
Detección de fugas de refrigerante: la pantalla
mostrará EC cuando el aparato detecte
fugas de refrigerante. Si el error persiste,
comuníquese con el Central de Servicio.
E3 - Mal funcionamiento del aparato: desenchufelo
y vuelva a enchufarlo. Si el error persiste,
comuníquese con el Central de Servicio.
Eb - El depósito está retirado o no está en la
posición correcta: vuelva a colocarlo en la
posición correcta. (solo disponible para los
aparatos con función de bomba).
Deshielo Automático
Cuando se acumula hielo en los serpentines del
evaporador, el compresor se apagará y la función
se ejecutará automáticamente.
Protección de 3 minutos de retardo de
funcionamiento del compresor
Después de que el aparato se haya detenido, no se
puede reiniciar en los primeros 3 minutos, esto para
proteger el funcionamiento del compresor. El aparato
se reiniciará automáticamente después de 3 minutos.
Reinicio automático
Si el aparato se detiene inesperadamente
debido a un corte de energía, se
reiniciará con la configuración de
función anterior (excepto el modo sin
depósito) automáticamente cuando se
reanude la energía.
Funcionamiento del Timer
• Al activar la función de Timer, está
configurando el tiempo hasta que el
aparato cambia el funcionamiento.
Esto significa que, si el aparato
está encendido, la activación de
la función de Timer establecerá
el tiempo hasta que el aparato se
apague. Si el aparato está apagado,
la activación de la función de Timer
establecerá el tiempo hasta que el
aparato se encienda.
• El tiempo se puede configurar
después de pulsar el botón del Timer
y también los botones Arriba y/o
Abajo. Estos botones cambiarán la
hora en incrementos de 0,5 horas
hasta 10 horas. Después de 10 horas,
la hora cambiará en incrementos de 1
hora hasta 24 horas.
• Si aparece un código de error durante
este tiempo, la función del Timer se
cancelará.
AVISO
• Cuando utilice el aparato por primera
vez, hagalo funcionar continuamente
por 24 horas. Asegúrese de que
la tapa plástica en la salida de la
manguera de drenaje continuo esté
instalada correctamente para que no
haya fugas.
• Este aparato está diseñado para
funcionar en un entorno de trabajo
entre 5°C/41°F y 35°C/95°F.
• Asegúrese de que el depósito de
agua esté colocado correctamente
para que el aparato pueda
funcionar correctamente. Cuando
el agua del depósito alcance un
cierto nivel, tenga cuidado al mover
el aparato para evitar derrames.
Otras Características
Instrucciones
de Operación
Botón del Timer :
Pulse este botón para activar la función del
t
emporizador. El LED del Timer se iluminará
para indicar que se está configurando el modo,
y 0.0 aparecerá en la pantalla indicando el
número de horas desde ahora hasta que se
inicie la función de Timer. Cuando se inicia
la función, el aparato cambiará su estado de
energía, o sea, enciende o apaga. Para obtener
más información, consulte Función de se en
Otras Características en la página siguiente.
Page 35
Eliminar el Agua Acumulada
Hay tres maneras de eliminar el agua acumulada:
1. Levante el aparato del depósito
y colóquela en una superfi cie
nivelada.
1. Vaciar el depósito
• Cuando el depósito alcanza el Nivel de Llenado
establecido, la pantalla del aparato mostrará P2
independientemente del estado de energía.
• Utilizando técnicas de elevación adecuadas, retire el
deshumidificador del depósito. Tenga en cuenta que un
poco de agua residual puede derramarse desde la parte
inferior del aparato mientras no esté en el depósito.
• Con las dos manos, agarre el asa del depósito y
llévela al punto de drenaje deseado. Vertiendo desde
una esquina delantera del depósito (la ventana está
en el lado delantero), vacíe el depósito. Si vierte
desde la parte posterior del depósito, es posible que
se derrame algo de agua por los orificios de alivio.
• Devuelva el depósito a la ubicación de operación
deseada y coloque el deshumidificador de nuevo en el
depósito. Asegúrese de que el aparato esté alineado
correctamente.
Fig. 10
Fig. 11
AVISO
• Cuando retire el aparato del depósito, no coloquelo
sobre ningún componente eléctrico ya que el
fondo puede estar húmedo.
• No coloque el aparato sobre una superficie
irregular después de sacarla del depósito.
• Asegúrese de que el aparato esté asentado
correctamente después de devolverlo al depósito.
• Si el aparato se retira del depósito durante el
funcionamiento, la pantalla mostrará el código de
error Eb y dejará de funcionar hasta que vuelva al
depósito o cambie al modo sin depósito.
2. Levante el depósito con las 2
manos y llévelo al punto de
drenaje.
3. Vierta toda el agua.
Eliminar la tapa
plástica giratorio
en sentido contra los
punteros del reloj
2. Drenaje continua
• El agua se puede vaciar automáticamente del
aparato en un fregadero (lavabo, tanque) u otro tipo
de drenaje usando la manguera incluida.
• Para instalar la manguera, retire la tapa de drenaje
de la parte trasera de del aparato y déjela a un lado.
Inserte la manguera de drenaje incluida o conecte una
manguera de jardín a la salida de drenaje. Coloque
el otro extremo de la manguera sobre o cerca del
drenaje para que el agua se drene correctamente.
Fig. 12
Instrucciones
de Operación
Page 36
Manguera
de Drenaje
Manguera de
drenaje de la bomba
Salida de la manguera
de drenaje de la bomba
Conexión de salida de
la manguera de drenaje
de la bomba
Conexión de
entrada de la
manguera de
drenaje de la
bomba
Vuelva a instalar la
tapa de plástico
Altura máxima de la bomba:
14 pies
Asegúrese de que la manguera
esté asentada correctamente.
Para quitar la manguera de
la bomba, presione el collar
alrededor de la manguera y tire
de la manguera hacia afuera.
AVISO
La bomba puede generar un ruido
fuerte durante los primeros 3 a 5
minutos de funcionamiento.
AVISO
Cuando utilice la función de drenaje continuo,
asegúrese de que el aparato esté colocado
sobre un fregadero o el drenaje que se está
utilizando. Esto asegurará un drenaje adecuado.
Fig. 15
Fig. 13
Fig. 14
3. Bomba de drenaje (algunos modelos)
• El agua se puede bombear desde
el aparato
a un fregadero u otro
tipo de drenaje poniendo
el aparato
en modo bomba y conectando
la manguera de la bomba
incluida. Asegúrese de instalar las
mangueras de la bomba de entrada
y salida como se muestra en las
figuras a la derecha.
• Para instalar la manguera de la
bomba, retire el tapón del orificio
de drenaje de la bomba y conecte
firmemente la manguera de la
bomba incluida, como se muestra
en la Fig. 14.
• Inicie el modo de bomba
manteniendo pulsados los botones
Arriba y Abajo durante 3 segundos.
• La manguera de entrada de la
bomba debe colocarse en el
depósito para bombear el agua fuera
del depósito.
• Al retirar la manguera de drenaje, puede
quedar algo de agua en la manguera o
en la salida de drenaje. Asegúrese de que
esta agua no se derrame secando el área
húmeda antes de mover el aparato.
Instrucciones
de Operación

Page 37
• Asegúrese de que la manguera esté segura para que no haya fugas.
• Dirija la manguera hacia el drenaje, asegurándose de que no haya torceduras que
detengan el flujo de agua.
• Coloque el extremo de la manguera en el drenaje.
• Seleccione la configuración de humedad deseada y la velocidad del ventilador en
el deshumidificador para que comience el drenaje de la bomba.
• No se puede utilizar la bomba cuando funciona en modo sin depósito.
AVISO
La luz de funcionamiento de la bomba parpadea cuando ocurre una falla. Apague el
aparato y desconecte el cable de alimentación. Compruebe los siguientes elementos:
• Limpieza del filtro de la bomba:
- Limpie el filtro de la bomba siguiendo las instrucciones a continuación.
• Verifique si la manguera de drenaje está limpia y libre de residuos.
• Vacía el agua del depósito.
• Verifique que la conexión de la manguera y el depósito estén bien ajustados. Si el
error persiste, comuníquese con el Central de Servicio.
AVISO
Si dirige la manguera de drenaje al exterior, no la opere cuando la temperatura
exterior sea de 32°F (0°C) o menos, ya que el agua se congelará, bloqueando la
manguera y haciendo que el aparato se detenga.
Asegúrese de vaciar el depósito al menos una vez a la semana cuando utilice
la función de drenaje de la bomba. Cuando no se esté utilizando la función de
drenaje de la bomba, retire la manguera de drenaje de la bomba de la salida.
Instrucciones
de Operación
Page 38
Apague el deshumidificador y desconecte el enchufe de la pared antes de limpiar.
Mantenimiento
y Limpieza
1. Limpiar la Rejilla y la Carcasa
• Use agua y un detergente suave. No use
lejía ni abrasivos.
• No salpique agua directamente sobre
el aparato. Hacerlo puede causar una
descarga eléctrica, hacer que el aislamiento
se deteriore o hacer que el aparato se oxide.
• La entrada y salida de aire pueden
ensuciarse durante el funcionamiento, utilice
una aspiradora o un cepillo para limpiar.
2. Limpiar el depósito
• Cada pocas semanas, limpie el depósito a
fondo para evitar el crecimiento de moho,
hongos y bacterias. Llene parcialmente el
depósito con agua limpia y detergente suave.
Agítelo en el depósito, vacíe y enjuague.
3. Limpiar los filtros de aire
• Para quitar el filtro, tirelo hacia afuera.
• Lave el filtro con agua limpia y luego séquelo.
• Vuelva a instalar los filtros.
• Restablezca la luz indicadora del
filtro siguiendo las instrucciones de
funcionamiento de la página 32.
4. Cuando no utilizar el aparato durante períodos prolongados
• Antes de almacenar el aparato, déjela reposar durante un día completo para que el
sistema se seque naturalmente.
• Limpiar el aparato, el depósito de agua y los filtros de aire.
• Asegúrese de que el cable de alimentación esté en el canal de almacenamiento.
• Alinear el aparato dentro del depósito
• Cubra el aparato con una bolsa de plástico.
• Almacene el aparato en posición vertical en un lugar seco y bien ventilado.
AVISO
No utilice un lavavajillas para limpiar el depósito.
MANTENIMIENTO Y LIMPIEZA
NO opere el deshumidificador sin un filtro
para evitar la pérdida de rendimiento y
daños a el aparato.
PRECAUCIÓN
Fig. 16
Page 39
Instrucciones
de Alineación y
Almacenamiento
Fig. 18
INSTRUCCIONES DE ALINEACIÓN Y ALMACENAMIENTO
ADVERTENCIA
Asegúrese de que el depósito esté vacío antes de colocar el
deshumidificador para evitar el riesgo de descarga eléctrica.
AVISO
Asegúrese de que el cable de alimentación esté insertado
correctamente en el canal de almacenamiento del cable, en
la parte posterior del deshumidificador, para evitar daños.
Cuando transporte el aparato alineada, asegúrese de usar el asa
del depósito para asegurarse de que tanto el deshumidificador
como el depósito se transporten de forma segura.
PRECAUCIÓN
Fig. 17
Fig. 20
Fig. 19a
t into bucket to nest
Fig. 19b
Paso 1:
Apague y desenchufe el aparato. Luego levante el
deshumidificador del depósito.
Paso 2:
Vacíe toda el agua del depósito.
Paso 3:
Asegúrese de presionar las lengüetas de la función del
depósito interior para que el aparato pueda encajar
correctamente. Ver Fig. 18.
Paso 4:
Gire el deshumidificador 90° en cualquier dirección e
insértelo en el depósito para encajar.
Paso 5:
El deshumidificador está alineado y listo para almacenar.
Page 40
Antes de llamar al servicio técnico, revise esta lista. Puede ahorrarle una gran cantidad
de tiempo y dinero. Esta lista incluye ocurrencias comunes que no son consecuencia
de un trabajo o materiales defectuosos en el equipo.
Problema Solución
El
deshumidificador
no se enciende
Asegúrese de que el enchufe del deshumidificador esté conectado
firmemente al tomacorriente de la pared.
Compruebe los fusibles / cuadro del interruptor automático.
El deshumidificador ha alcanzado su nivel predeterminado o el depósito
está llena.
El depósito de agua no está en la posición adecuada.
El
deshumidificador
no seca el aire
como debiera
No ha habido sufi ciente tiempo para eliminar la humedad.
Asegúrese de que no haya cortinas, persianas o muebles que bloqueen la
parte delantera o trasera del deshumidificador.
Es posible que el control de humedad no esté ajustado lo suficientemente bajo.
Compruebe que todas las puertas, ventanas y otras aberturas están
cerradas completamente.
La temperatura ambiente es demasiado baja, por debajo de los 41°F (5°C).
Hay una fuente de vapor de agua en la habitación.
El aparato hace
un ruido fuerte
cuando está
funcionando
El filtro de aire puede estar sucio. Limpie el Filtro. Consulte la sección
Cuidado y limpieza.
El aparato está inclinada en vez de una posición vertical como debería estar.
La superficie del piso no está nivelada.
Aparece hielo en
los serpentines
Esto es normal. El deshumidifi cador tiene función de deshielo automático.
Agua en el suelo
El conector o la parte de conexión con la manguera pueden estar sueltas.
Desea utilizar el depósito para recoger agua, pero el tapón de drenaje
trasero está quitado.
ES, AS, P2, EC,
Eb y E3 aparecen
en la pantalla
Estos son códigos de error y código de protección. Consulte la sección
Instrucciones de Operación.
La luz de
funcionamiento
de la bomba
encendida
parpadea a 1 Hz
Limpiar el filtro de la bomba.
Compruebe que la manguera de la bomba no esté bloqueada ni tenga fugas.
Vacíe el depósito de agua.
Cuando funciona
en modo sin
depósito, el
agua se acumula
alrededor de la
parte inferior del
aparato
Verifique que el aparato esté nivelada y que no haya basura o residuos
en la superficie.
Verifique la conexión de la manguera de drenaje y asegúrese de que esté
asentada correctamente en la salida.
SOLUCIONES DE PROBLEMAS
Soluciones de
Problemas
Page 41
INSTRUCCIONES DEL APP
Declaramos que este Deshumidificador cumple los requisitos esenciales y otras
disposiciones pertinentes de la Directiva 1999/5/CE.
1. Soporte para los sistemas operativos: iOS 7+ o Android 4+.
2. En el caso de una actualización del sistema operativo, puede haber un retraso entre
la actualización del sistema operativo y una actualización de software durante la cual
su sistema operativo puede o no ser compatible hasta que una nueva versión sea
lanzada. Su teléfono móvil específico o problemas en su red pueden impedir que el
sistema funcione y Midea no será responsable de ningún problema que pueda ser
causado por incompatibilidad o problemas de red.
3. Este deshumidificador inteligente solo permite el cifrado WPA-PSK/WPA2-PSK
(recomendado).
4. Para garantizar el escaneo adecuado del código QR, su smartphone debe tener al
menos una cámara de 5 megapíxeles.
5. Debido a la conectividad de red inestable, las solicitudes pueden agotar el tiempo de
espera. Si esto sucede, vuelva a ejecutar la configuración de red.
6. Debido a la conectividad de red inestable, los comandos pueden agotar el tiempo
de espera. Si esto sucede, la aplicación del smartphone y el producto actual pueden
presentar información conflictiva. La información presentada en el producto
actual es siempre la más precisa disponible. Actualice la aplicación para volver a
sincronizarla.
Modelo: US-SK105 Dimensiones: 41 x 24 x 5 (mm)
Estándar: IEEE 802.11 b/g/n Temp. de funcionamiento: 0°C ~ 45°C / 32°F ~ 113°F.
Tipo de Antena: Antena
Printed PCB
Humedad de funcionamiento: 10% ~ 85%
Frecuencia: 2400-2483.5MHz
Entrada de potencia: DC 5V/300 mA
Potencia máxima transmitida:
<20 dBm Max
Midea no será responsable de ningún problema que pueda ser causado por
incompatibilidad o problemas de red, su router inalámbrico y teléfono móvil.
AVISO
DECLARACIÓN DE CONFORMIDAD
ESPECIFICACIÓN DEL MÓDULO INALÁMBRICO
PRECAUCIONES
Instrucciones
del App
Page 42
Dispositivos necesarios para utilizar el deshumidifi cador inteligente:
1. Smartphone con sistema iOS o Android compatible.
2. Router inalámbrico
3. Deshumidificador Inteligente
Código QR de Android Código QR de Apple
Escanear para descargar la aplicación.
• También puede ir a Google Play o App Store y buscar Midea Air.
DESCARGAR E INSTALAR LA APLICACIÓN
VISIÓN GENERAL DEL SISTEMA
AVISO
Todas las im ágenes de este manual son solo para referencia, su producto y
aplicación pueden tener un aspecto ligeramente diferente. Las instrucciones reales
del producto y de la aplicación deben ser consideradas.
Instrucciones
del App
Page 43
• Asegúrese de que su Smartphone esté conectado a su router inalámbrico y que su
router inalámbrico tenga una conexión a Internet de 2,4 GHz.
• Se recomienda activar su cuenta inmediatamente para poder recuperar su contraseña
por correo electrónico..
AVISO
• Asegúrese de que su Smartphone es capaz de conectarse a la red inalámbrica que se utilizará.
• Asegúrese también de que el dispositivo no se está conectando a otras redes al alcance.
CREA TU CUENTA
1. Pulse “Registrarse”. 2. Introduzca su dirección de correo electrónico y
contraseña.
3. Pulse “Registro”.
4. En caso de que olvide su contraseña, pulse
“¿Olvidó su contraseña?” en el menú principal e
introduzca su dirección de correo electrónico.
A continuación, pulse “Restablecer contraseña”.
Instrucciones
del App

Page 44
FUNCIONES ADICIONALES DE LA APLICACIÓN Y SMART HOME
Para obtener instrucciones adicionales sobre las características de la aplicación y las
capacidades del sistema Smart Home, escanee el código QR a continuación.
Instrucciones
del App