Loading ...
Loading ...
Loading ...

– 6
contact with water and can thus hamper the func-
tioning of the machine.
– Always place the machine in a horizontal position
during operation.
– Only use cleaners recommended by the manufac-
turer and comply with their application, disposal
and warning guidelines.
몇 Risk of electric shock
– Only connect the appliance to properly eart
hed
sockets.
– The appliance may only be connected to alternat-
ing current. The voltage must correspond with the
type plate on the appliance.
– Never touch the mains plug and the socket with wet
hands.
– Do not pull the plug from the socket by pulling on
the connecting cable.
– Check the power cord with mains plug for damage
before every use. To avoid risks, arrange immedi-
ately the exchange by an authorized customer ser-
vice or a skilled electrician, if the power cord is
damaged.
– To avoid accidents due to electrical faults we rec-
ommend the use of sockets with a line-side current-
limiting circuit breaker (max. 30 mA nominal trip-
ping current).
– Only use a splash proof extension cable with a min-
imum section of 3x1 mm².
– If couplings of the power cord or extension cable
are replace the splash protection and the mechan-
ical tightness must be ensured.
– Please switch off the machine first using the main
switch before disconnecting the machine from t
he
mains.
몇 WARNING
Certain materials may produce explosive vapours or
mixtures when agitated by the suction air!
Never vacuum up the following materials:
– Explosive or combustible gases, liquids and dust
particles (reactive dust particles)
– Reactive metal dust particles (such as aluminium,
magnesium, zinc) in combination with highly alka-
line or acidic detergents
– Undiluted, strong acids and alkalies
– Organic solvents (such as petrol, paint thinners, ac-
etone, heating oil).
In addition, these substances may cause the appliance
materials to corrode.
DANGER
Immediate danger that can cause severe injury or even
death.
몇 WARNING
Possible hazardous situation that could lead to severe
injury or even death.
몇 CAUTION
Possible hazardous situation that could lead to mild in-
jury to persons or damage to property.
ATTENTION
Pointer to a possibly dangerous situation, which can
lead to property damage.
When you unpack the system, check that everything is
complete.
If there are any missing parts or you detect any trans-
port damage when unpacking, please inform your deal-
er immediately.
Illustrations on fold-out page!
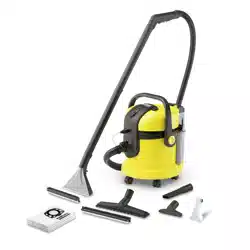
Illustration
1 Motor casing
2 Carrying handle
3 Foam filter
4 Filter lock
5 Power cord with plug
6 Storage, power cord
7 Switch for suction (0 / I)
8 Switch for spraying (0 / I)
9 Release fresh water reservoir
10 Fresh water tank
11 Container
12 Swivel casters
13 Connection for the suction hose of the multi-pur-
pose vacuum cleaner
14 Connection spray hose
15 Spray/suction hose
16 Handle
17 Surrounding air separator
18 Spray lever
19 Lock key for spray mist
20 Lock lever
21 Spray / suction tubes 2 x 0.5 m
22 Storage for suction tubes and accessories
23 Spray-ex floor nozzle for carpet cleaning, with hard
surface attachment
24 Washer nozzle for cleaning upholstery
Accessories wet and dry vacuuming
25 Attachment for wet/dry vacuuming
26 Floor nozzle with hard surface insert
2
7 Crevice nozzle
28 Upholstery nozzle
29 Filter bag
Illustration
Remove the fresh water reservoir. Press the re-
lease and remove the tank.
Note:
The motor casing can only be removed if the fresh
water reservoir was removed first.
Illustration
Remove the motor casing. For this, fold the car-
rying handle forward to unlatch the reservoir. Re-
move the accessories and swivel casters from the
reservoir.
Illustration
Turn the container, press in the steering roller in the
openings at the base of the container till the end-
point.
Illustration
Turn the motor casing around and attach the foam
filter to the filter basket.
Insert the filter cover and turn to lock.
Install the motor casing. Pull up on the carryin
g
ha
ndle to lock.
Symbols in the operating instructions
Start up
Description of the Appliance
Before Startup
11EN
Loading ...
Loading ...
Loading ...