Loading ...
Loading ...
Loading ...

DW089/DW089CG
14
E
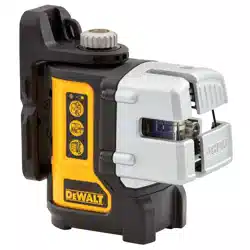
Batteries (fig. 1)
BATTERY TYPE
This laser operates on four LR6 (AA-size) batteries.
TO INSTALL BATTERIES
1. Lift up the battery compartment cover (a) as shown in figure 1.
2. Insert four fresh LR6 (AA-size) batteries in the compartment,
placing the batteries according to (+) and (–) on the inside of the
battery door.
WARNING: When replacing batteries, always replace the
complete set. Do not mix old batteries with new ones.
Preferably use alkaline batteries.
Operating Tips
• Use only new, high-quality, name brand batteries for best results.
• Ensure batteries are in good working condition. If the low battery
red indicator light is flashing, the batteries need replacement.
• To extend battery life, turn laser off when not working with or
marking the beam.
• To ensure the accuracy of your work, check often to make sure
your laser is calibrated. See Field Calibration Check.
• Before attempting to use the laser, make sure it is positioned
securely, on asmooth, flat surface.
• Always mark the centre of the beam created by the laser.
• Extreme temperature changes may cause movement of internal
parts that can affect accuracy. Check your accuracy often while
working. See Field Calibration Check.
• If the laser has been dropped, check to make sure your laser is still
calibrated. See Field Calibration Check.
LOW BATTERY INDICATION (FIG. 1)
The DW089/DW089CG laser is equipped with ared indicator light (b),
as shown in figure 1. The red indicator light is located to the left of the
on/off buttons (c, d, e).
DW089_DW089CG - User Manual - NA - May 2018.indd 14 5/25/2018 10:40:48 AM
Loading ...
Loading ...
Loading ...