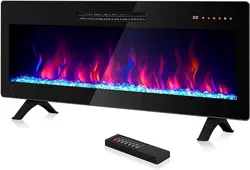
36" Fireplace Heater
42" Fireplace Heater
www.belleze.com
support@belleze.com
1-800-682-6376
@bellezefurniture
FOLLOW US: CONTACT INFO: ITEM NO. 050-HA-50036 / 050-HA-50042
The instruction booklet contains IMPORTANT
safety information. Please read it in full and
keep it for future reference.
2
06
07
14
15
17
19
08Installation
Package Contents
3
READ ALL INSTRUCTIONS BEFORE USE AND KEEP THESE INSTRUCTIONS
v.08112022

Model No.: 050-HA-50
050-HA-50042
036
This device complies with Part 15 of the FCC Rules. Operation is subject to the
following two conditions: (1) this device may not cause harmful interference, and
(2) this device must accept any interference received, including interference that
may cause undesired operation.
Changes or modifications to this unit not expressly
approved by the party responsible for compliance could void the
user’s authority to operate the equipment.
NOTE: This equipment has been tested and found to comply with the limits for
a Class B digital device, pursuant to Part 15 of the FCC Rules. These limits are
designed to provide reasonable protection against harmful interference in a
residential installation. This equipment generates, uses and can radiate radio
frequency energy and, if not installed and used in accordance with the instructions,
may cause harmful interference to radio communications. However, there is no
guarantee that interference will not occur in a particular installation. If this equipment
does cause harmful interference to radio or television reception, which can be
determined by turning the equipment off and on, the user is encouraged to try to
correct the interference by one or more of the following measures:
-- Reorient or relocate the receiving antenna.
-- Increase the separation between the equipment and receiver.
-- Connect the equipment into an outlet on a circuit different from that
to which the receiver is connected.
-- Consult the dealer or an experienced radio/TV technician for help.
WARNING:
4
Importer: ONEBIGOUTLET
Importer Address: 19301 E Walnut Dr. N., City of Industry CA 91745 United States
Importer Tel: 1-800-682-6376
5
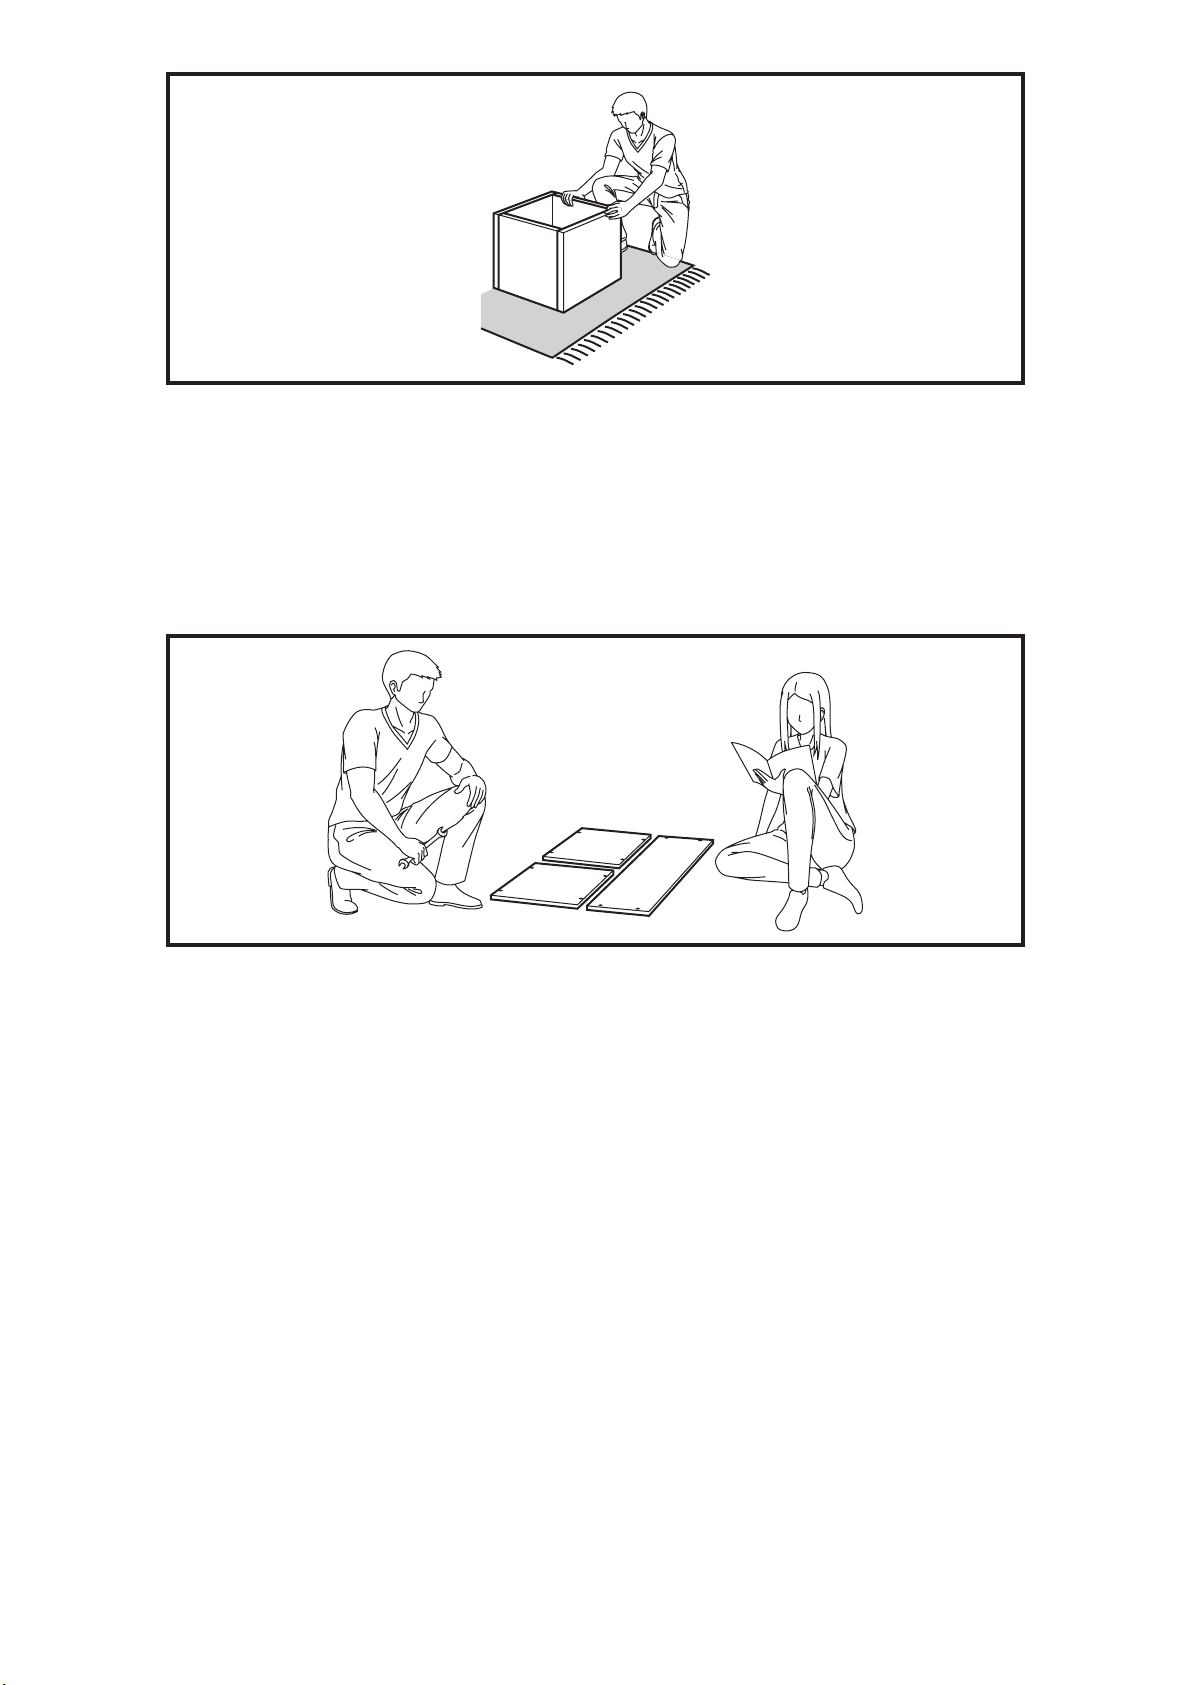
Assemble the furniture on an empty carton, carpet, or rug to prevent scratches
or damage.
For safety, please keep pets and children away from the assembly area.
Ensure the product is fully assembled before use. If you are missing any
hardware or products, do not use it until you have restored the missing parts.
This furniture requires 2 people for assembly.
Read this instruction manual prior to assembly to familiarize yourself with the
various steps.
Lay out all components and hardware separately on a at surface and make
sure that no parts are missing or damaged before assembly. Do not destroy or
discard any packaging until you are certain that you have all the necessary parts
for assembly.
Hand tight all hardwares and careful not to over tighten to avoid damaging the
product.
CAUTION
There are small components used in the construction of this product.
Loose items should be kept away from pets and children to avoid a choking
hazard.
Keep all plastic bags and packaging lm away from pets and children to avoid
suocation.
v.08112022
6
DC
4x 4x 2x
4x
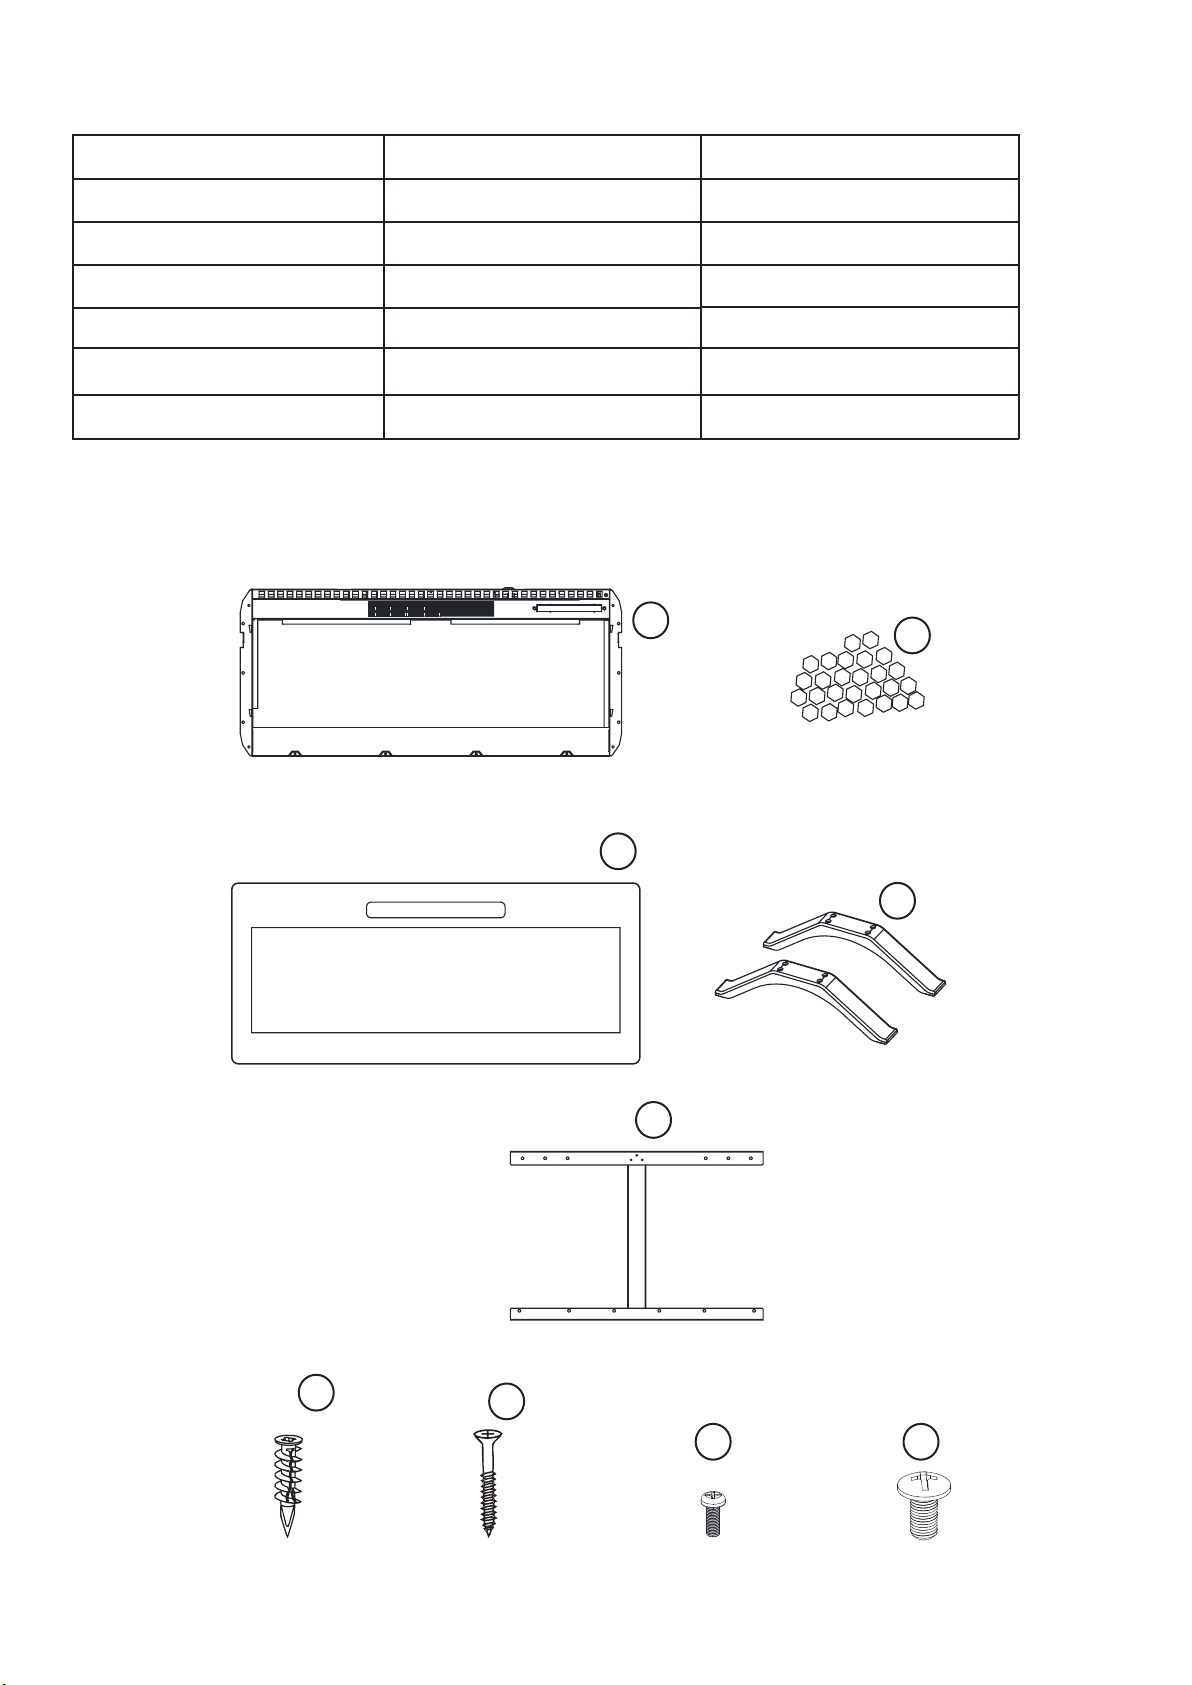
PACKAGE CONTENTS
A
B
1
2
3
4
5
TECHNICAL SPECIFICATION
Model Number 050-HA-50036
36”x4.2”x16”
23.8 lbs
28.0 lbs
050-HA-50042
42”x4.2”x16”
27.3 lbs
32.6 lbs
Power Rating
Dimensions(WxDxH)
Net Weight
Gross Weight
1400 W
Voltage 120 V
Frequency 60 Hz
1400 W
120 V
60 Hz

7
PACKAGE CONTENTS
CODE DESCRIPTION QTY
1 Heater 1
2 Glass Front Panel 1
3 Mounting Bracket 1
4 Decorative Crystals 1 bag
5
6
7
8
9
Table Top Support 2
4
4
2
4
screw A
screw B
screw C
screw D
v.08112022
8
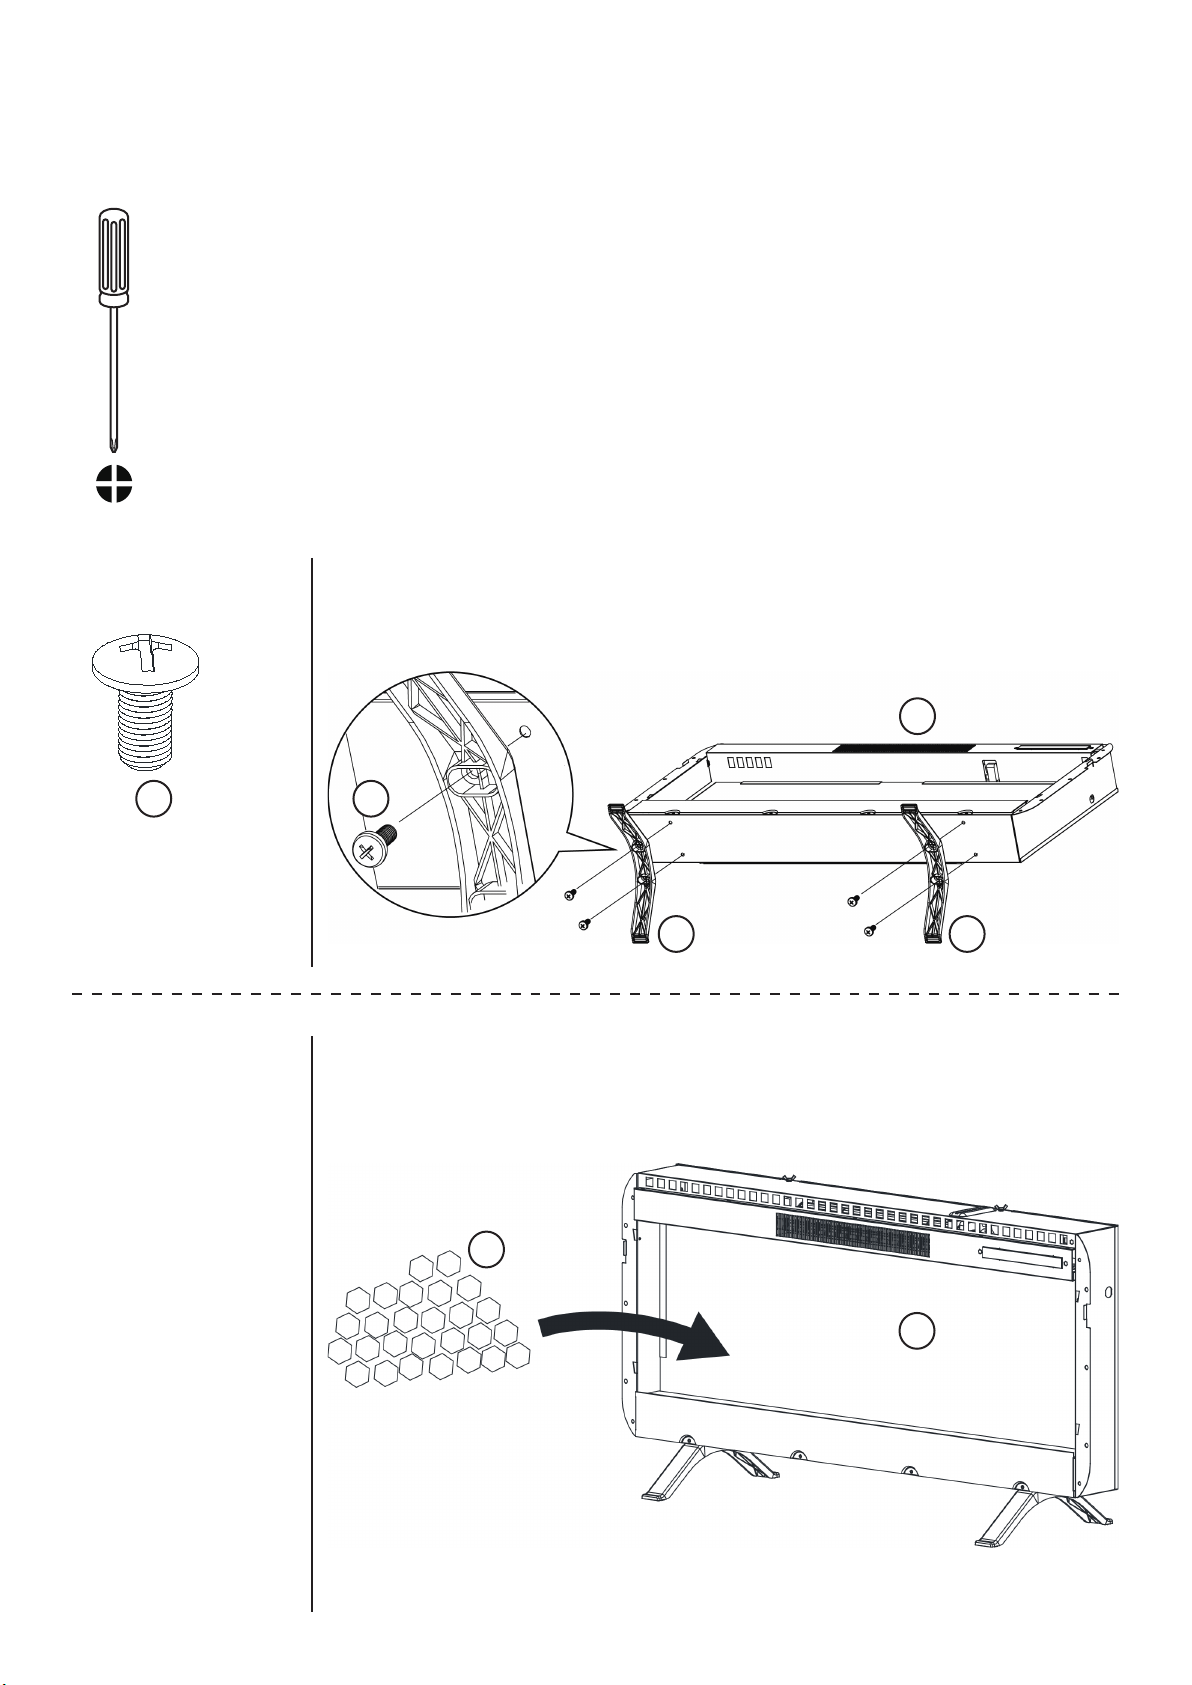
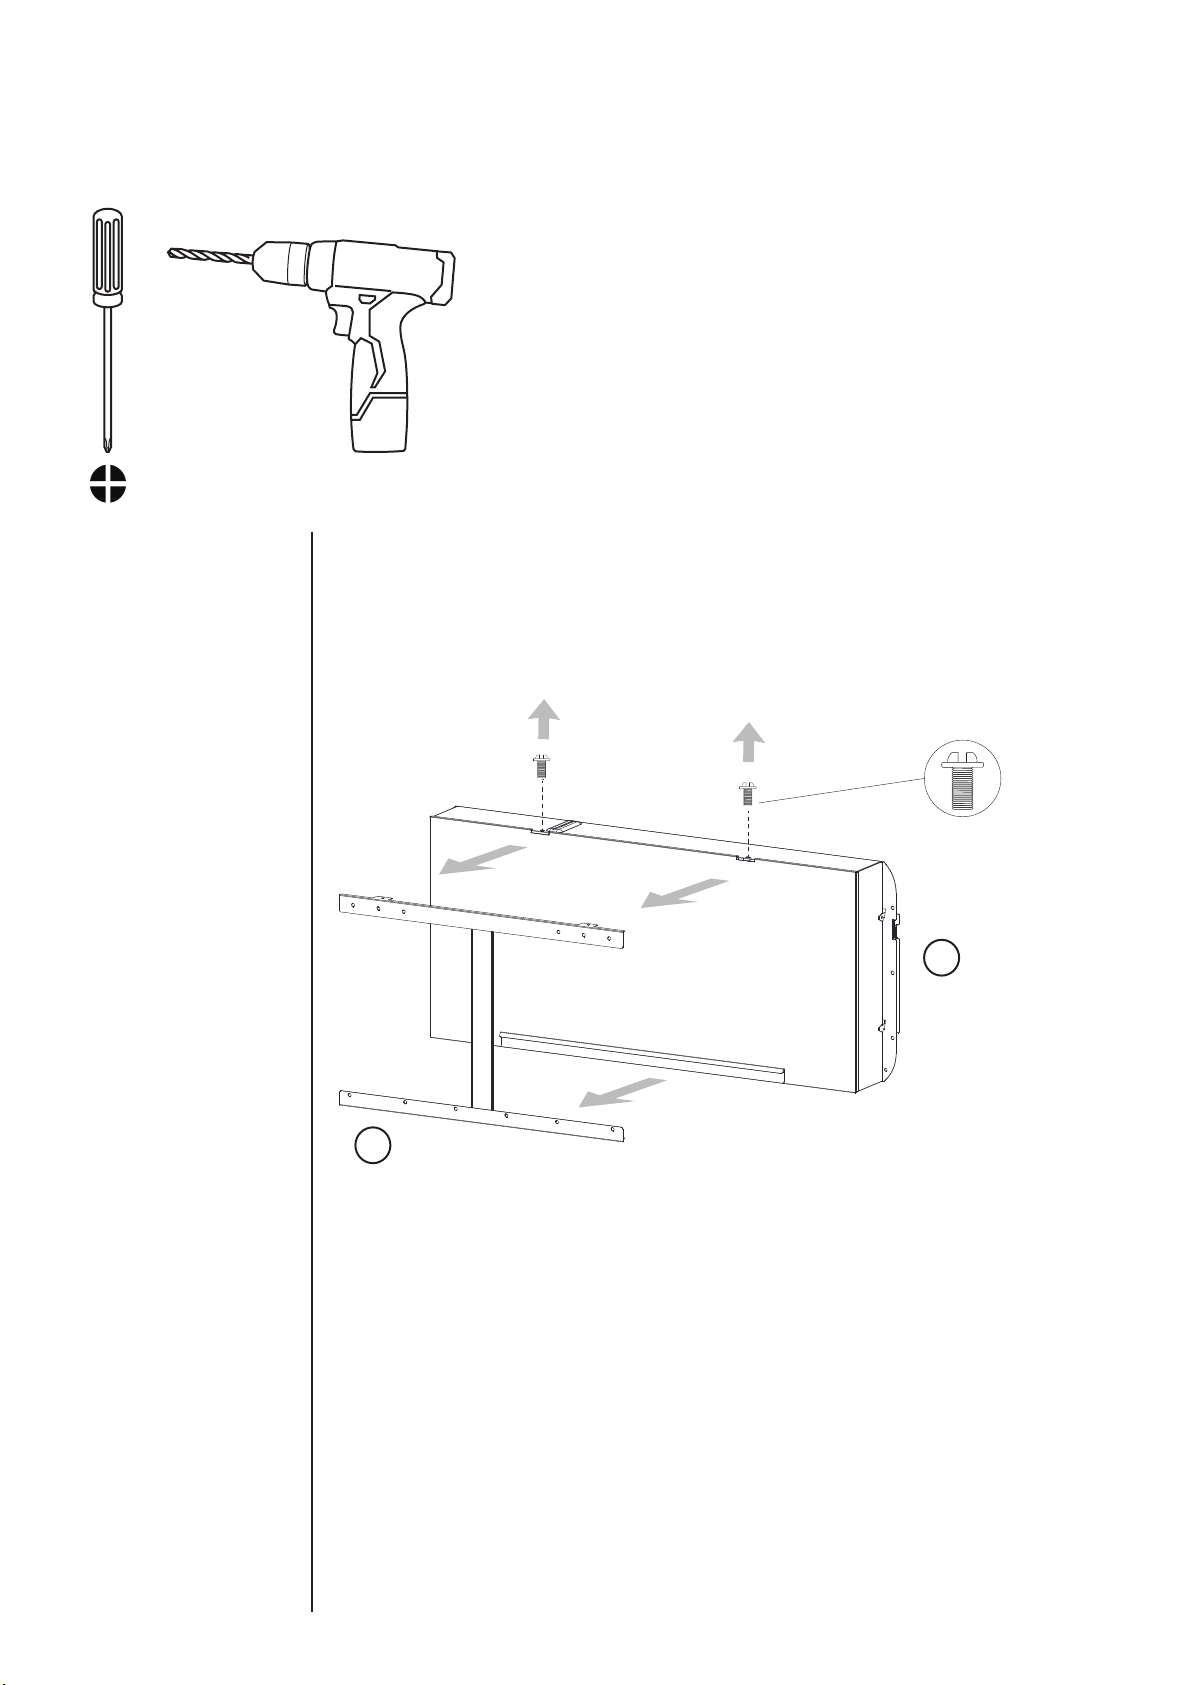
INSTALLATION (TABLE TOP)
Required tools for assembly (Not included)
1
2
Attach the table top supports underneath the heater.
Place decorative crystals inside the heater.
5 5
D
1
1
4
4x
D
9
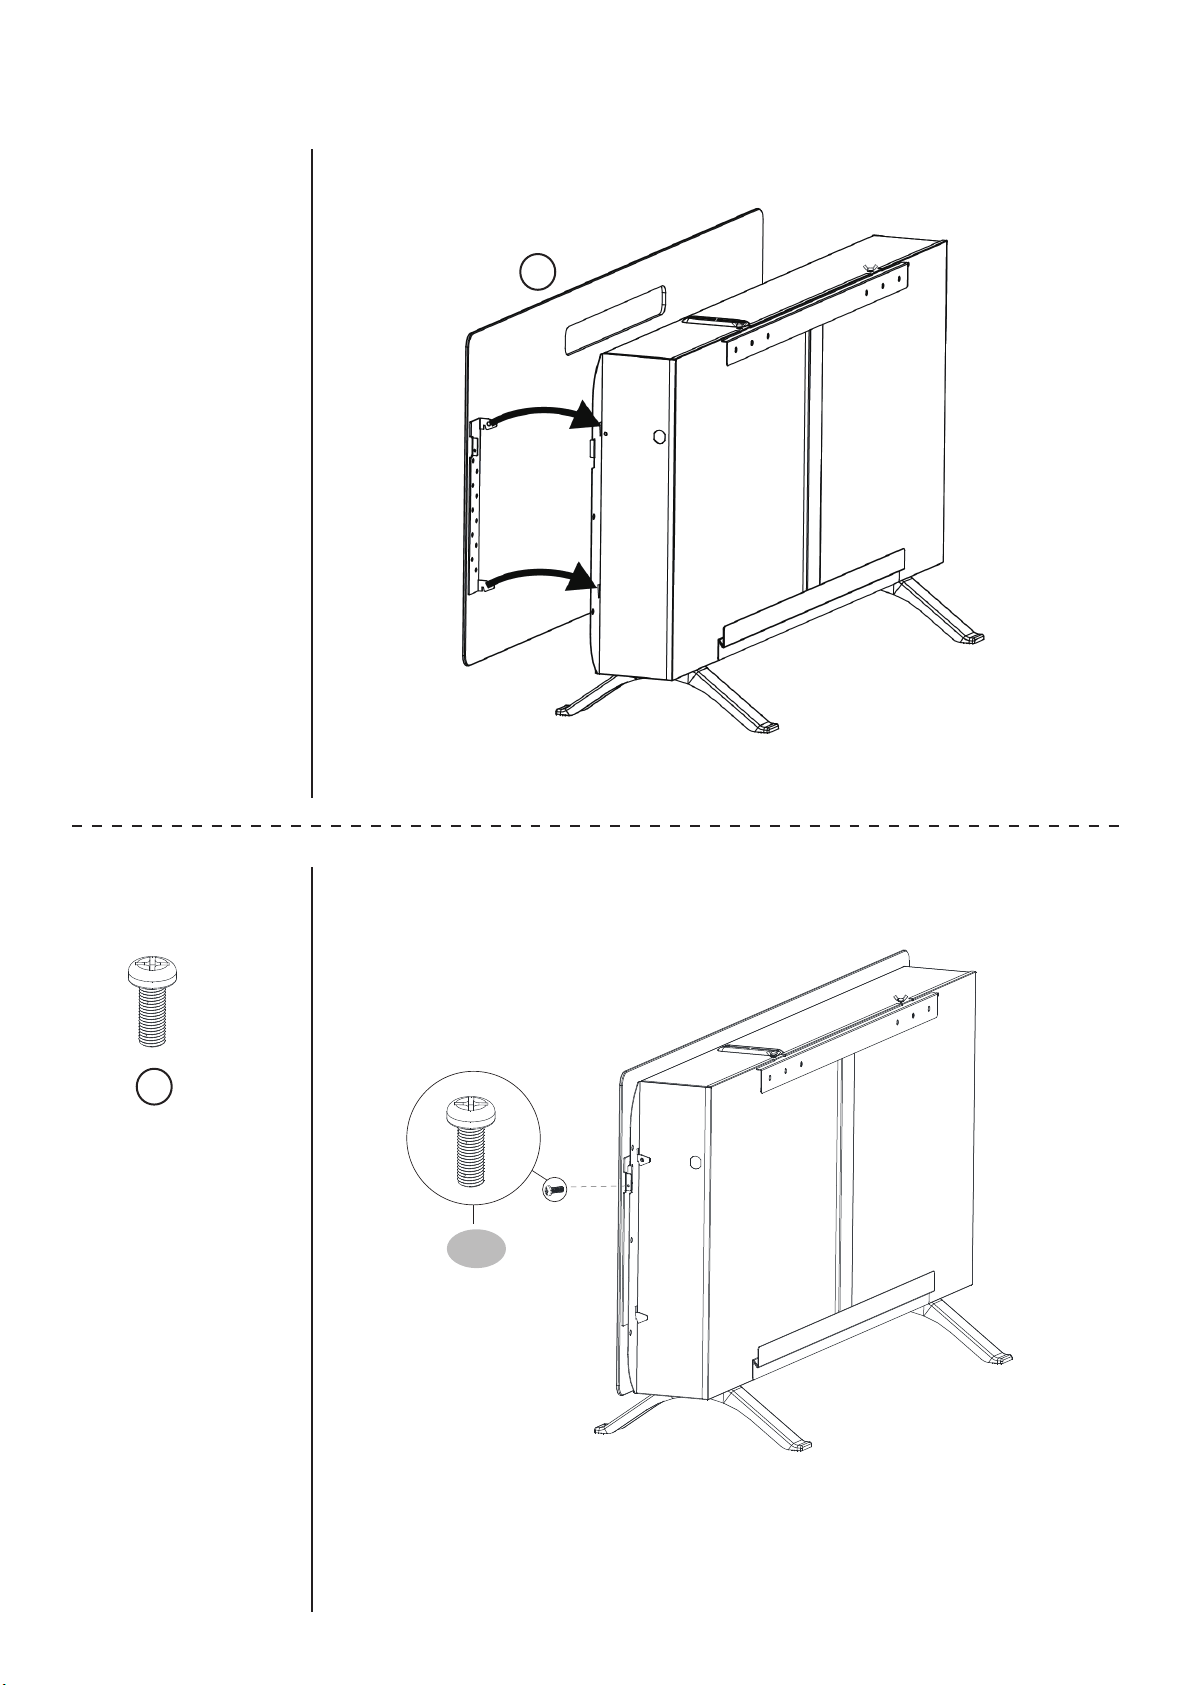
INSTALLATION (TABLE TOP)
3
4
Put the glass front panel on the heater.
Secure the glass front panel to the heater with the provided screws
2
2x
C
CAUTION
Careful when handling glass to prevent injury or damage.
v.08112022
C
⚠
10
INSTALLATION (WALL MOUNTING)
Required tools for assembly (Not included)
1
Remove the mounting bracket from the back of the heater.
3
1
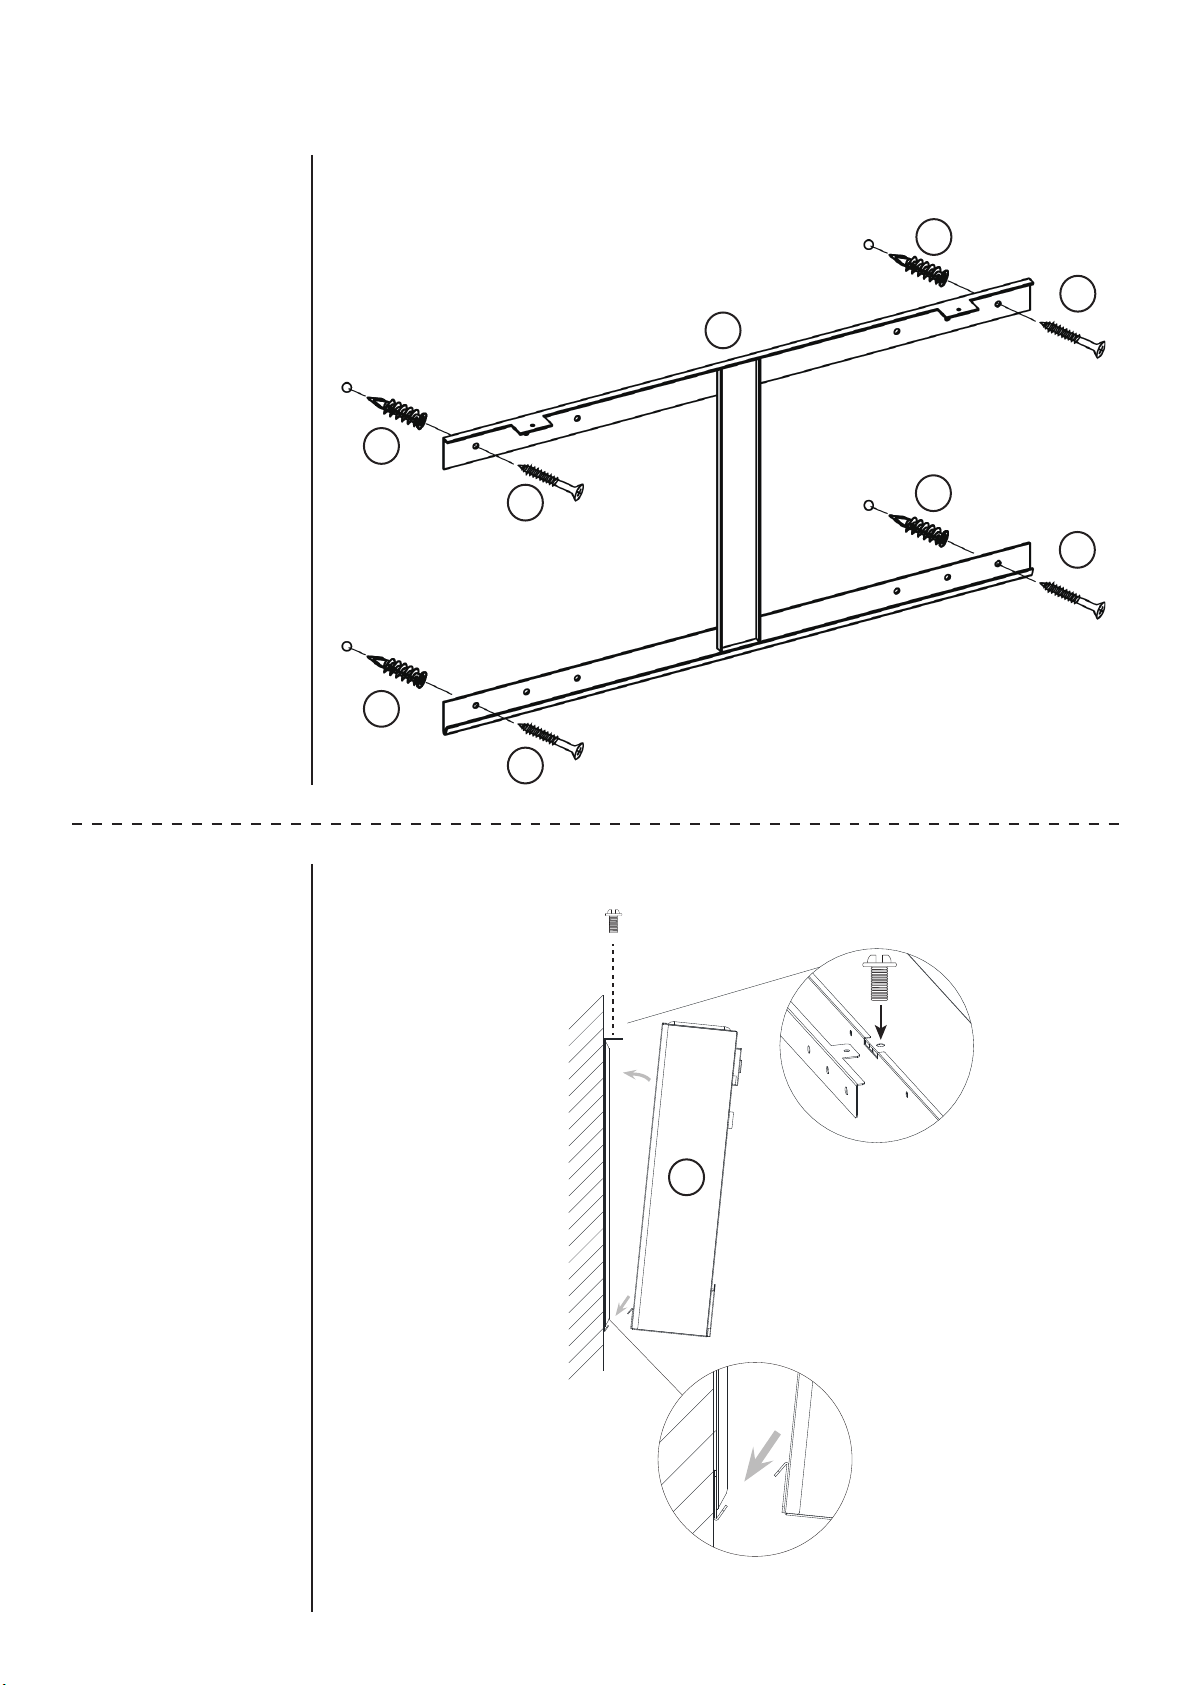
11
INSTALLATION (WALL MOUNTING)
2
3
Attach the mounting bracket to a wall.
Mount the heater to the mounting bracket.
3
1
A
A
A
A
B
B
B
B
v.08112022
NOTE: Wall anchor is not needed if the bracket
is to be mount directly on the wall studs.
wall
12
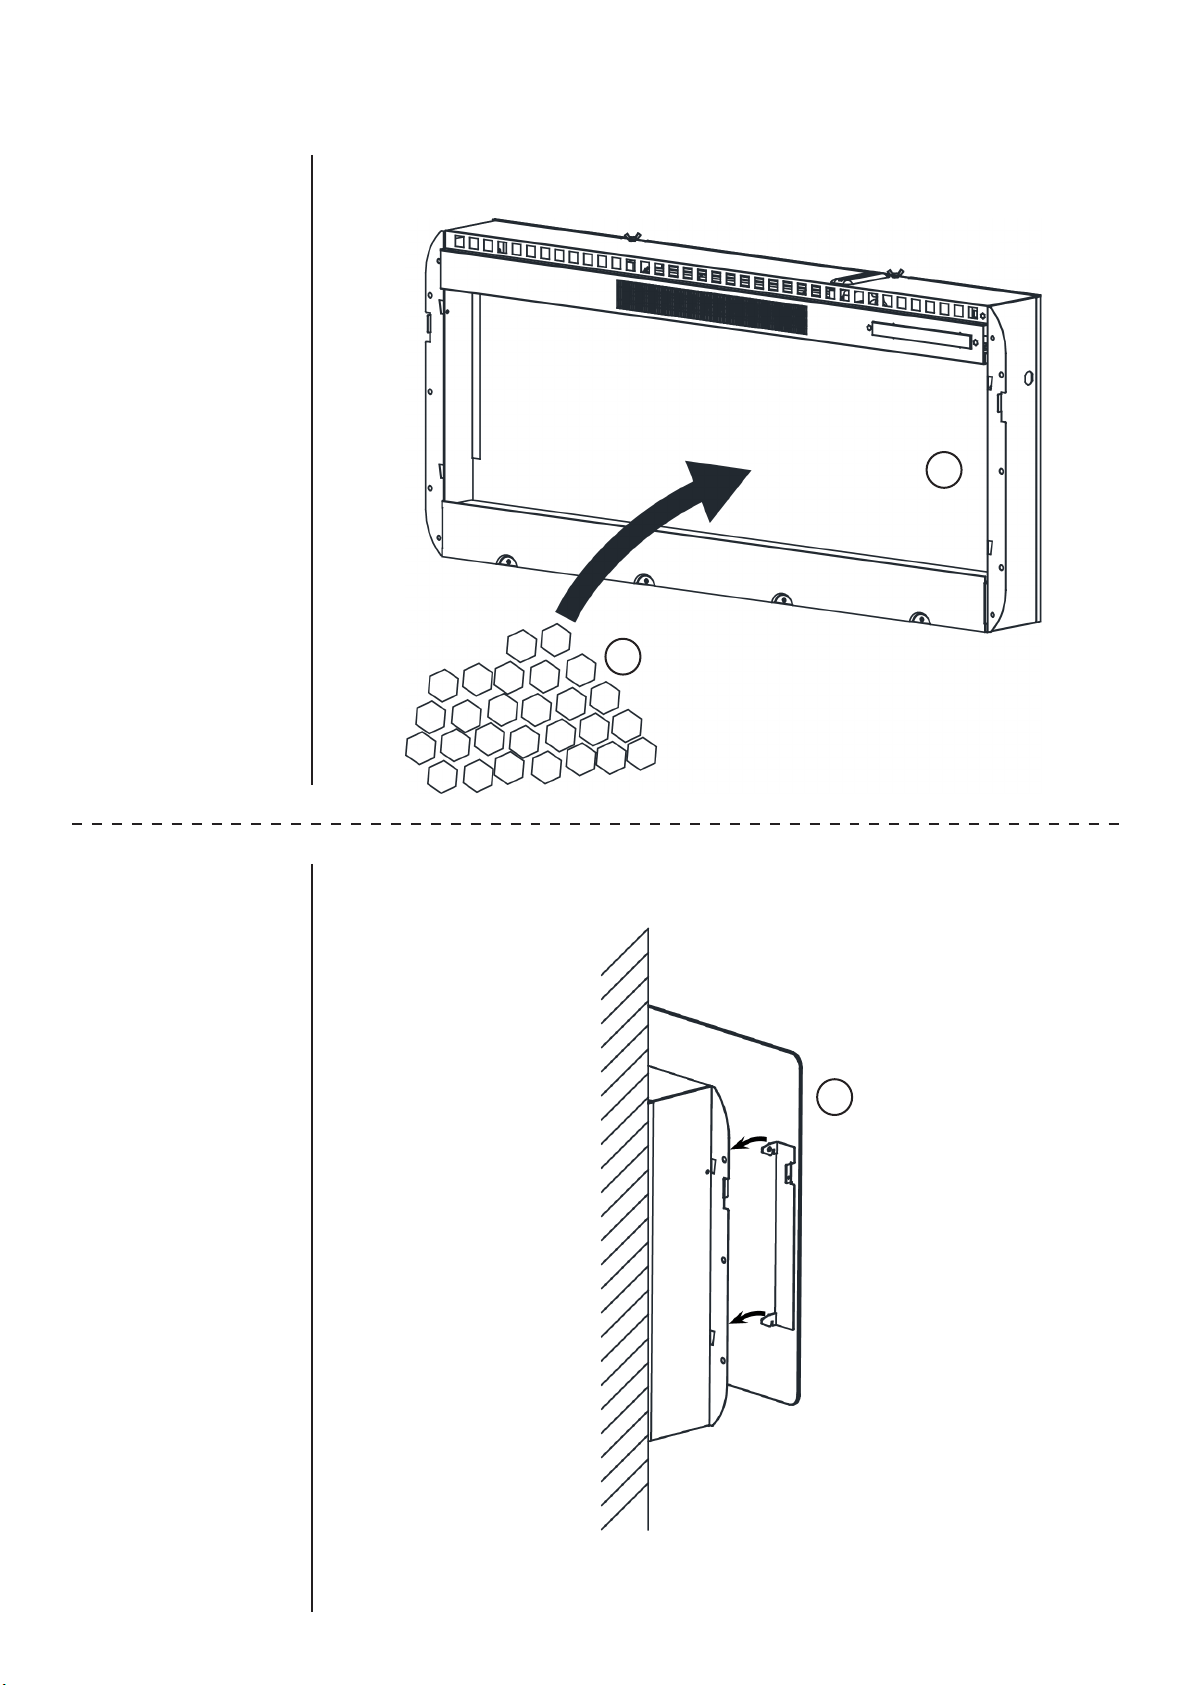
INSTALLATION (WALL MOUNTING)
4
Place decorative crystals inside the heater.
5
4
1
2
Put the glass front panel on the heater.
⚠
CAUTION
Careful when handling glass to prevent injury or damage.
13
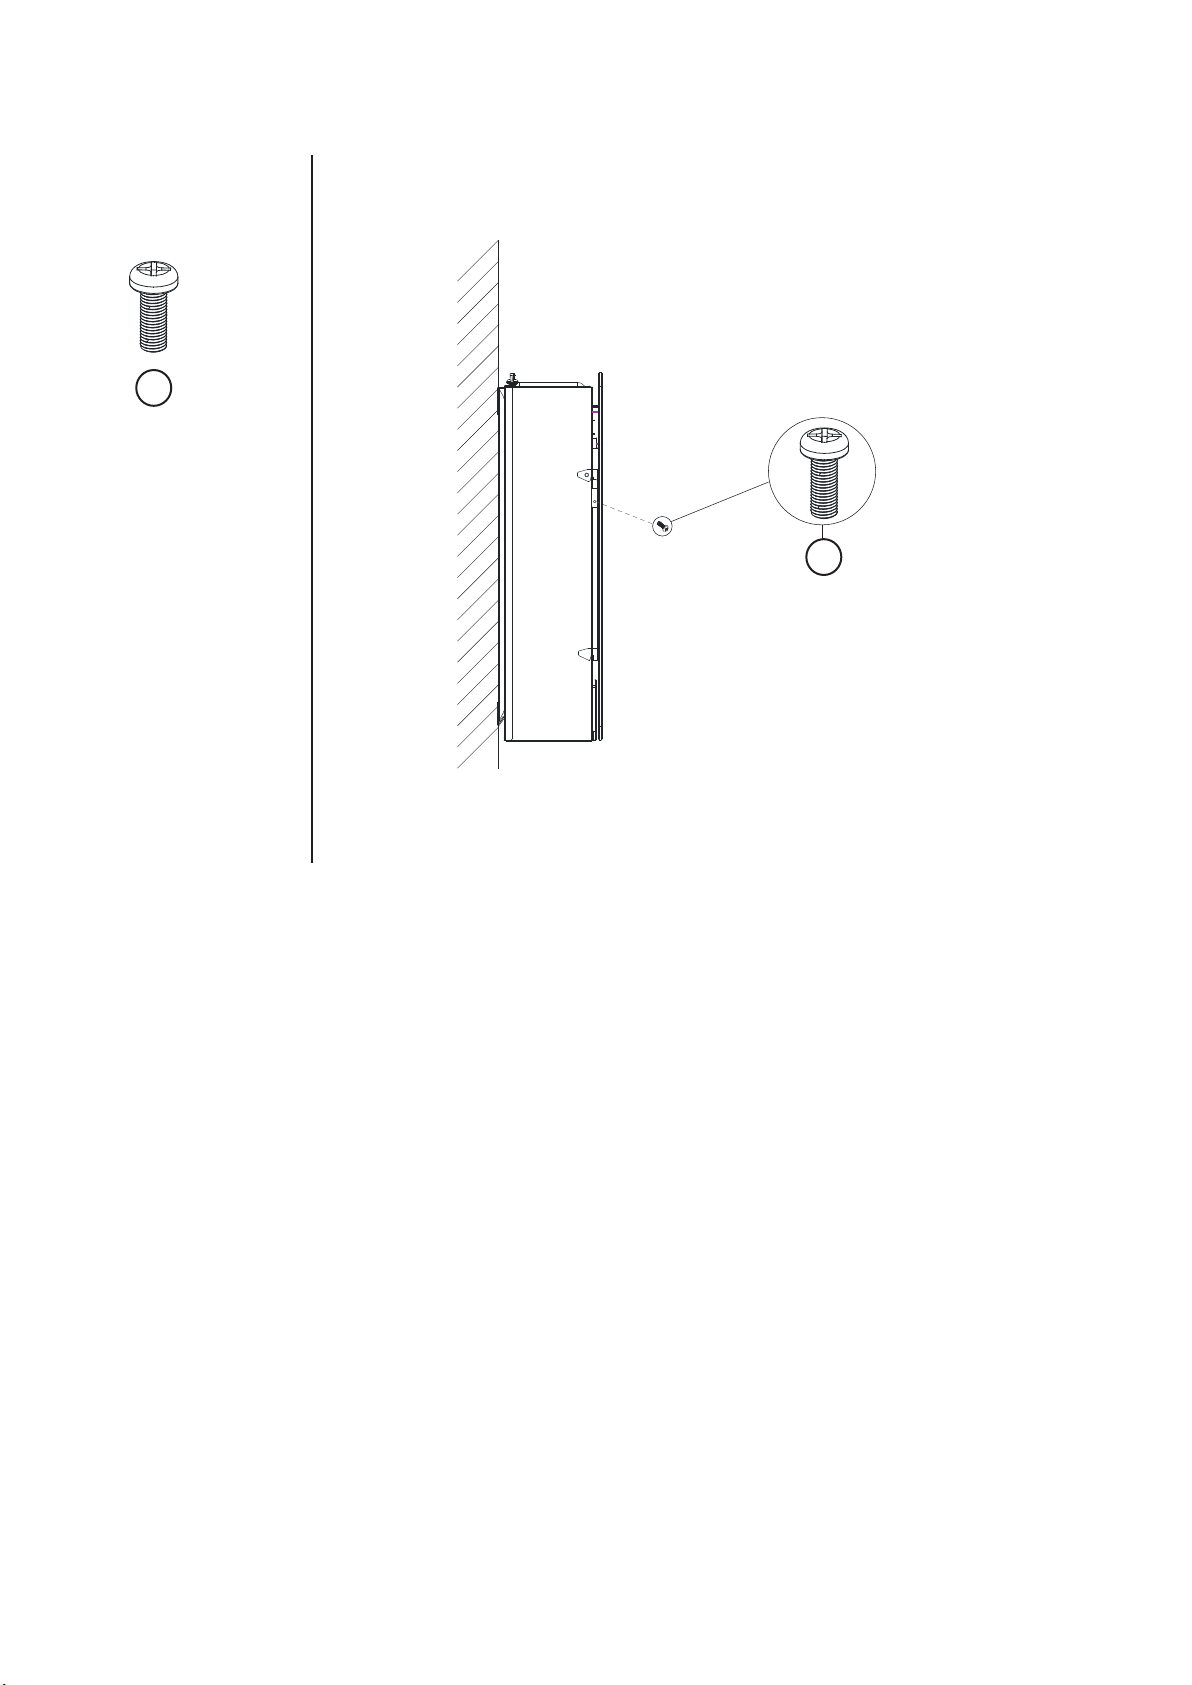
INSTALLATION (WALL MOUNTING)
6
Secure the glass front panel to the heater with the provided screws
2x
C
C
v.08112022
wall
14
USER INSTRUCTION
• Improper connection of the equipment grounding conductor can result in a
risk of electric shock. Check with a qualied electrician or serviceman if you
are in doubt as to whether the product is properly grounded.
• DO NOT modify the plug provided with the product nor using any bypass
device if the plug does not t the outlet. Have a proper outlet installed by a
qualied electrician.
⚠CAUTION / WARNING
Before use
• Check that the air intake and exhaust is not covered or obstructed in anyway.
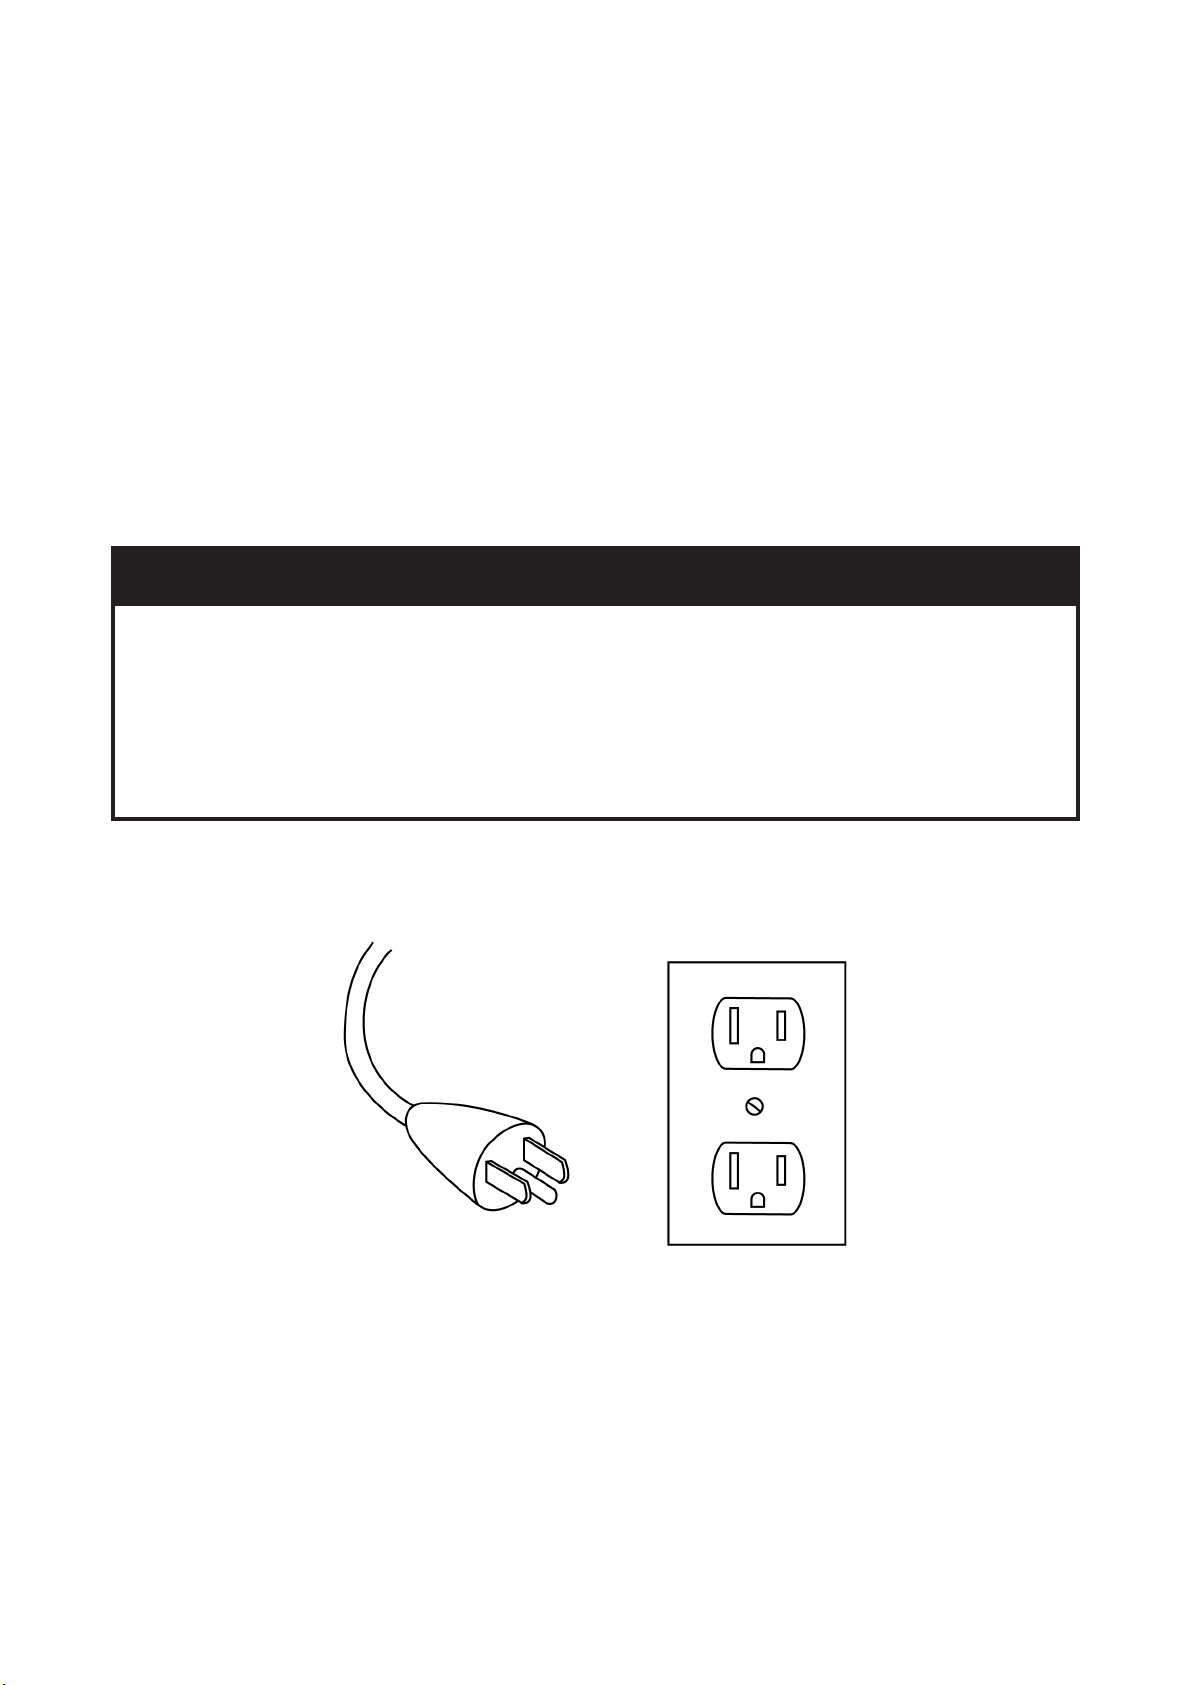
• Keep combustible objects at least 3 ft (0.9 m) away from the unit.
• Plug the unit to a grounded power socket.
Grounding
• This product must be grounded. If it should malfunction or breakdown, grounding provides a
path of least resistance for electric current to reduce the risk of electric shock.
• Follow your local codes or CSA C22.1 Canadian Electrical Code or National Electrical Code
ANSI / NSPA NO.70.
15
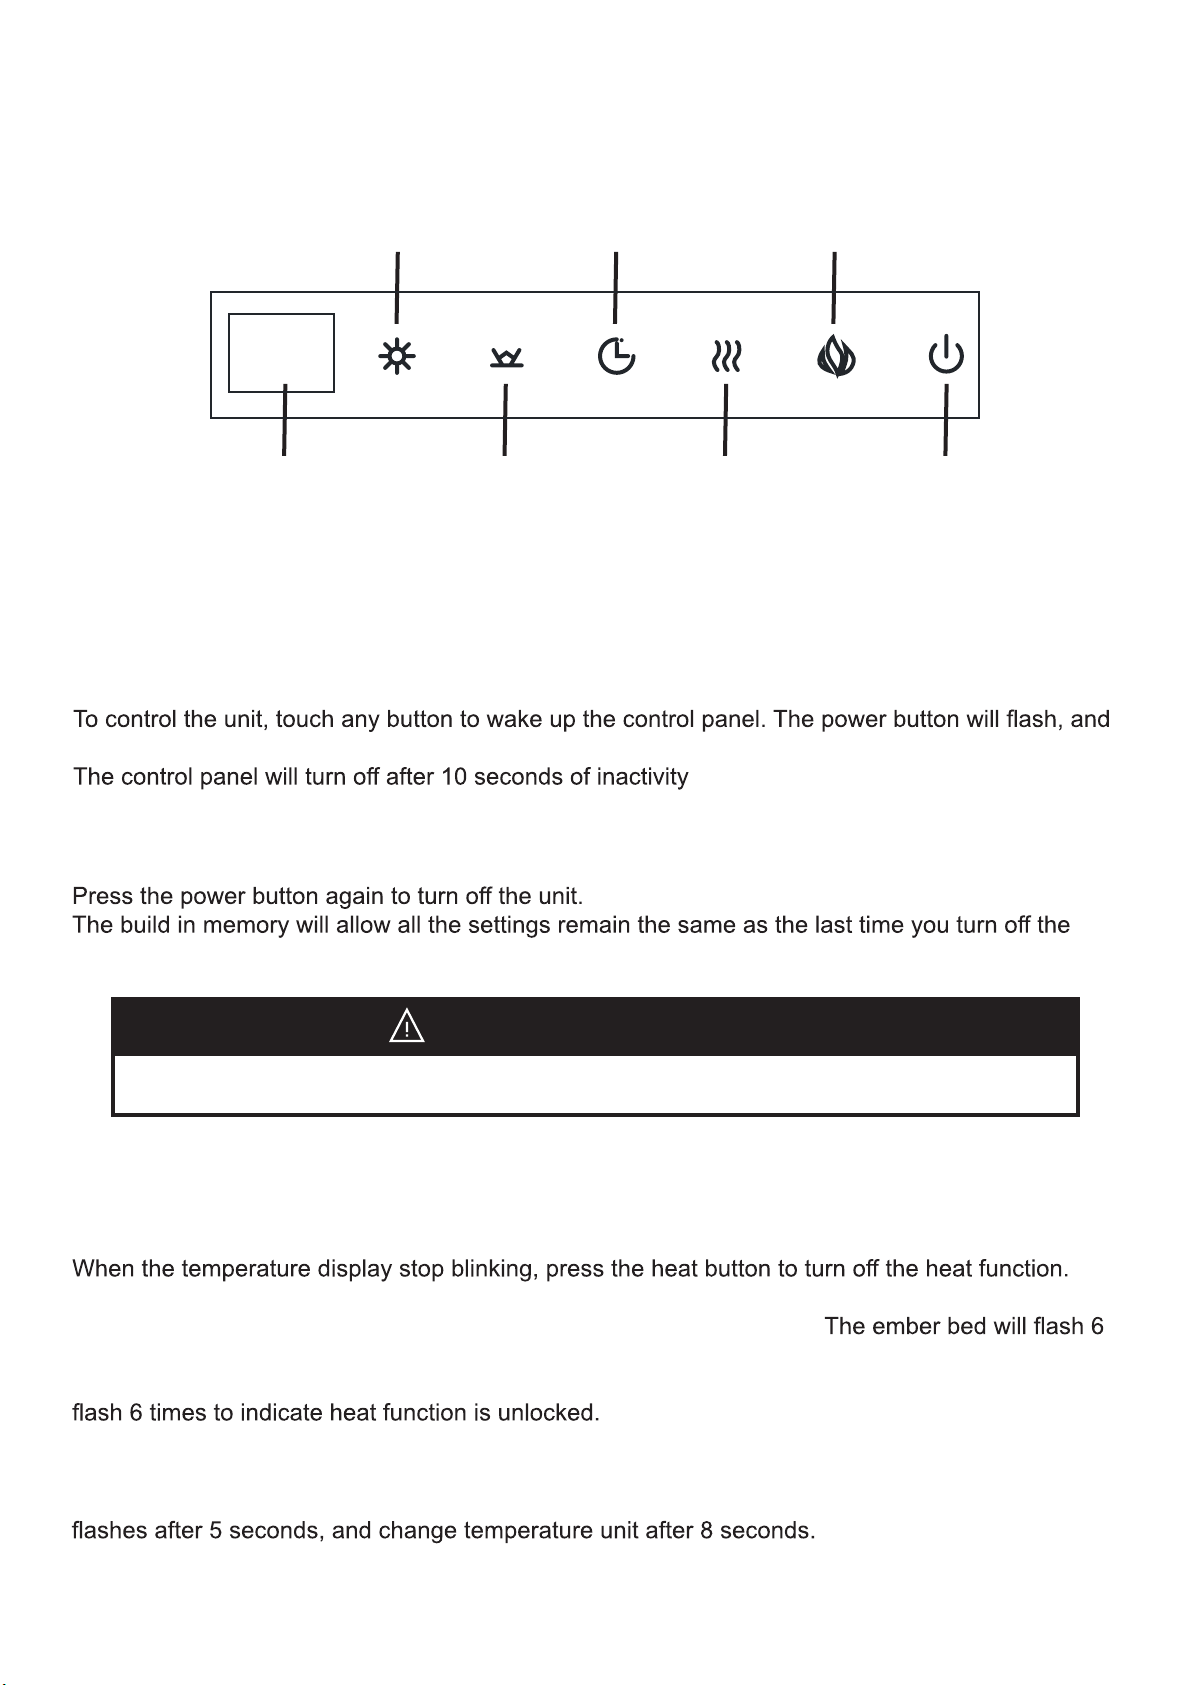
USER INSTRUCTION (CONTROL PANEL)
Power ON / OFF
Press the power button to turn on the unit.
unit (except timer).
• DO NOT unplug the unit when it is still “ON”
CAUTION / WARNING
Display
Brightness
Button
Timer
Button
Flame
Button
Ember Bed
Button
Heat
Button
Power
Button
Heater Control
Press the heat button to enable the heat function. The display window will blink and show the
temperature, The default temperature is 82°F.
Keep pressing the heat button to set temperature between 64°F to 82°F or 18°C to 27°C.
Press and hold the heat button for 10 second to lock the heat function.
times to indicate heat function is locked.
Press and hold the heat button for 10 second again to unlock the heat function. The ember bed will
v.08112022
Control Panel
The control panel is located on the top right corner of the unit.
all other buttons will light up.
F / °C Convertion
When the heat function is ON, press and hold the power button. The temperature indicator will
16
USER INSTRUCTION (CONTROL PANEL)
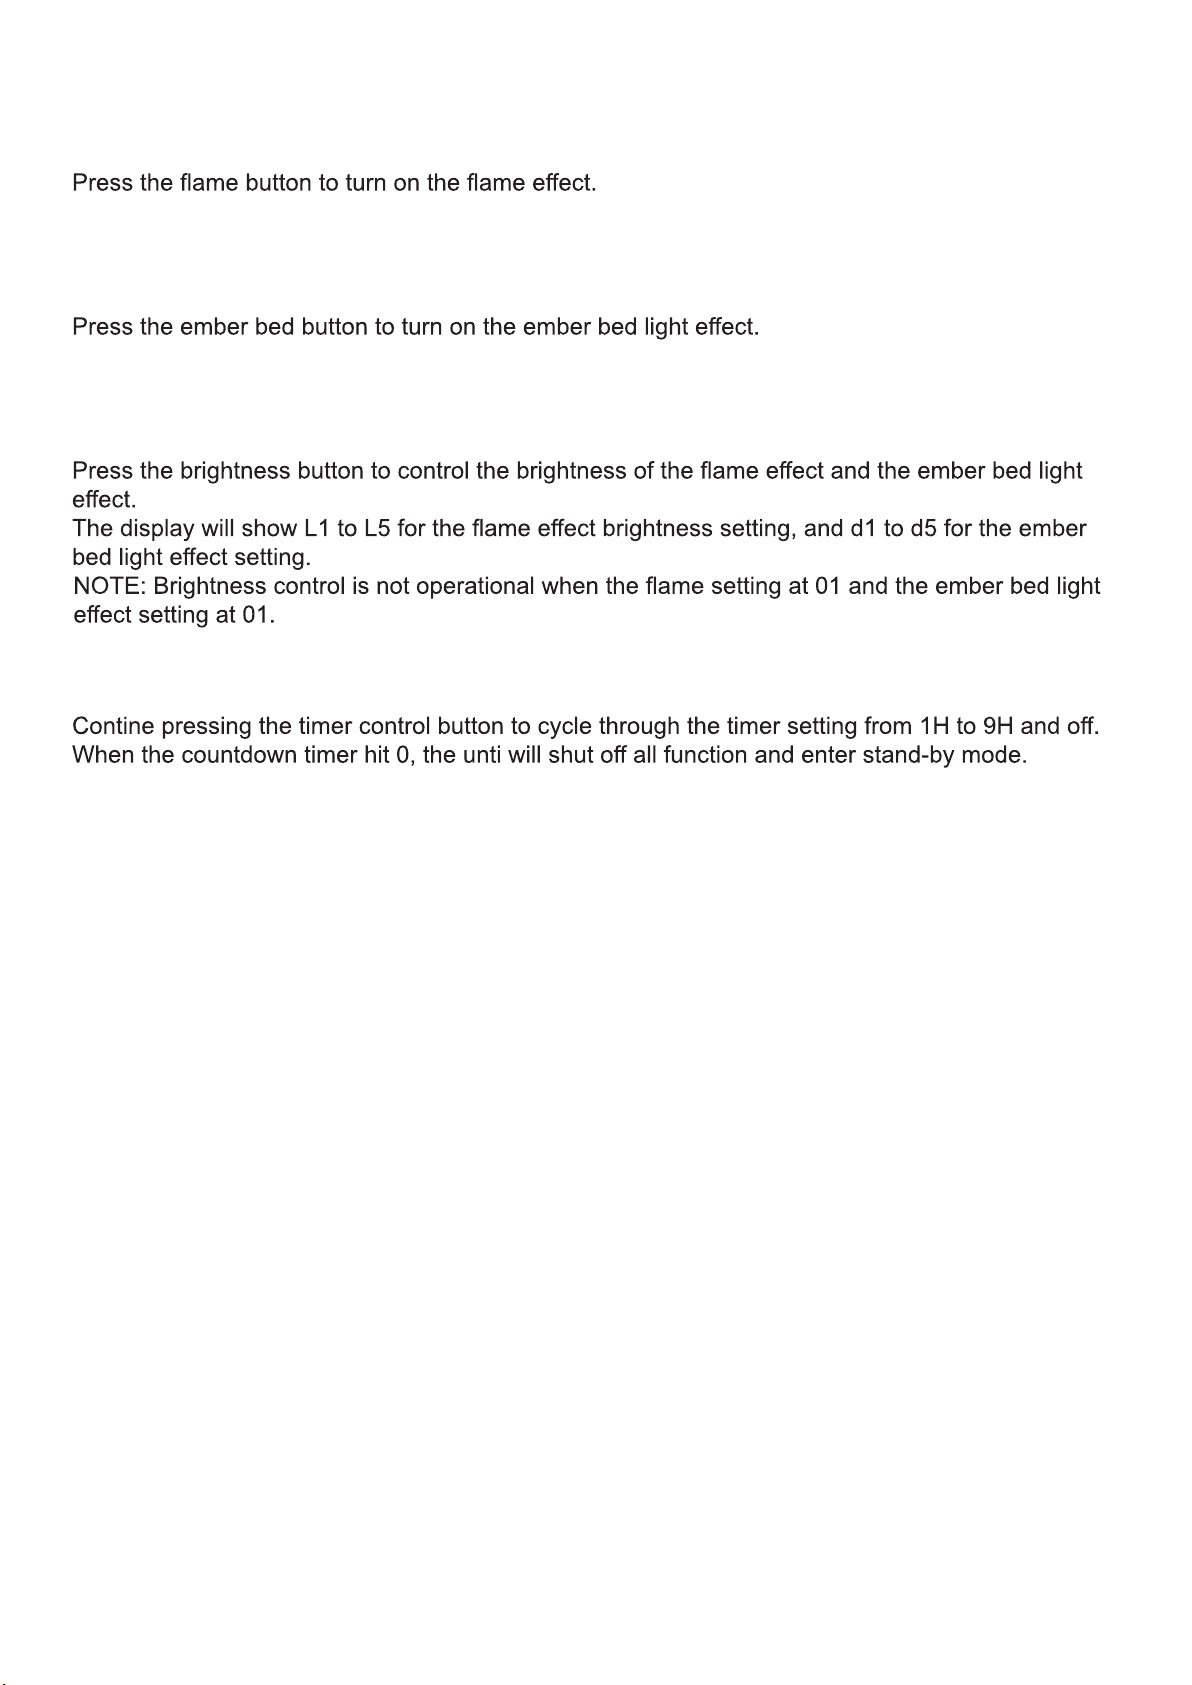
Flame Control
Ember Bed Control
Brightness Control
Timer Control
Press the timer control button to turn the timer on.
Press the power button again to turn on the unit.
Press the Flame button multiple times to cycle through color rotation option (01), 15 color options
(02, 03, 04, 05, 06, 06, 07, 08, 09,10, 11, 12, 13, 14, 15, 16) and flames OFF.
Press the Ember Bed button multiple times to cycle through color rotation option (01), 15 color
options (02, 03, 04, 05, 06, 06, 07, 08, 09, 10, 11, 12, 13, 14, 15, 16) and ember bed OFF.
17
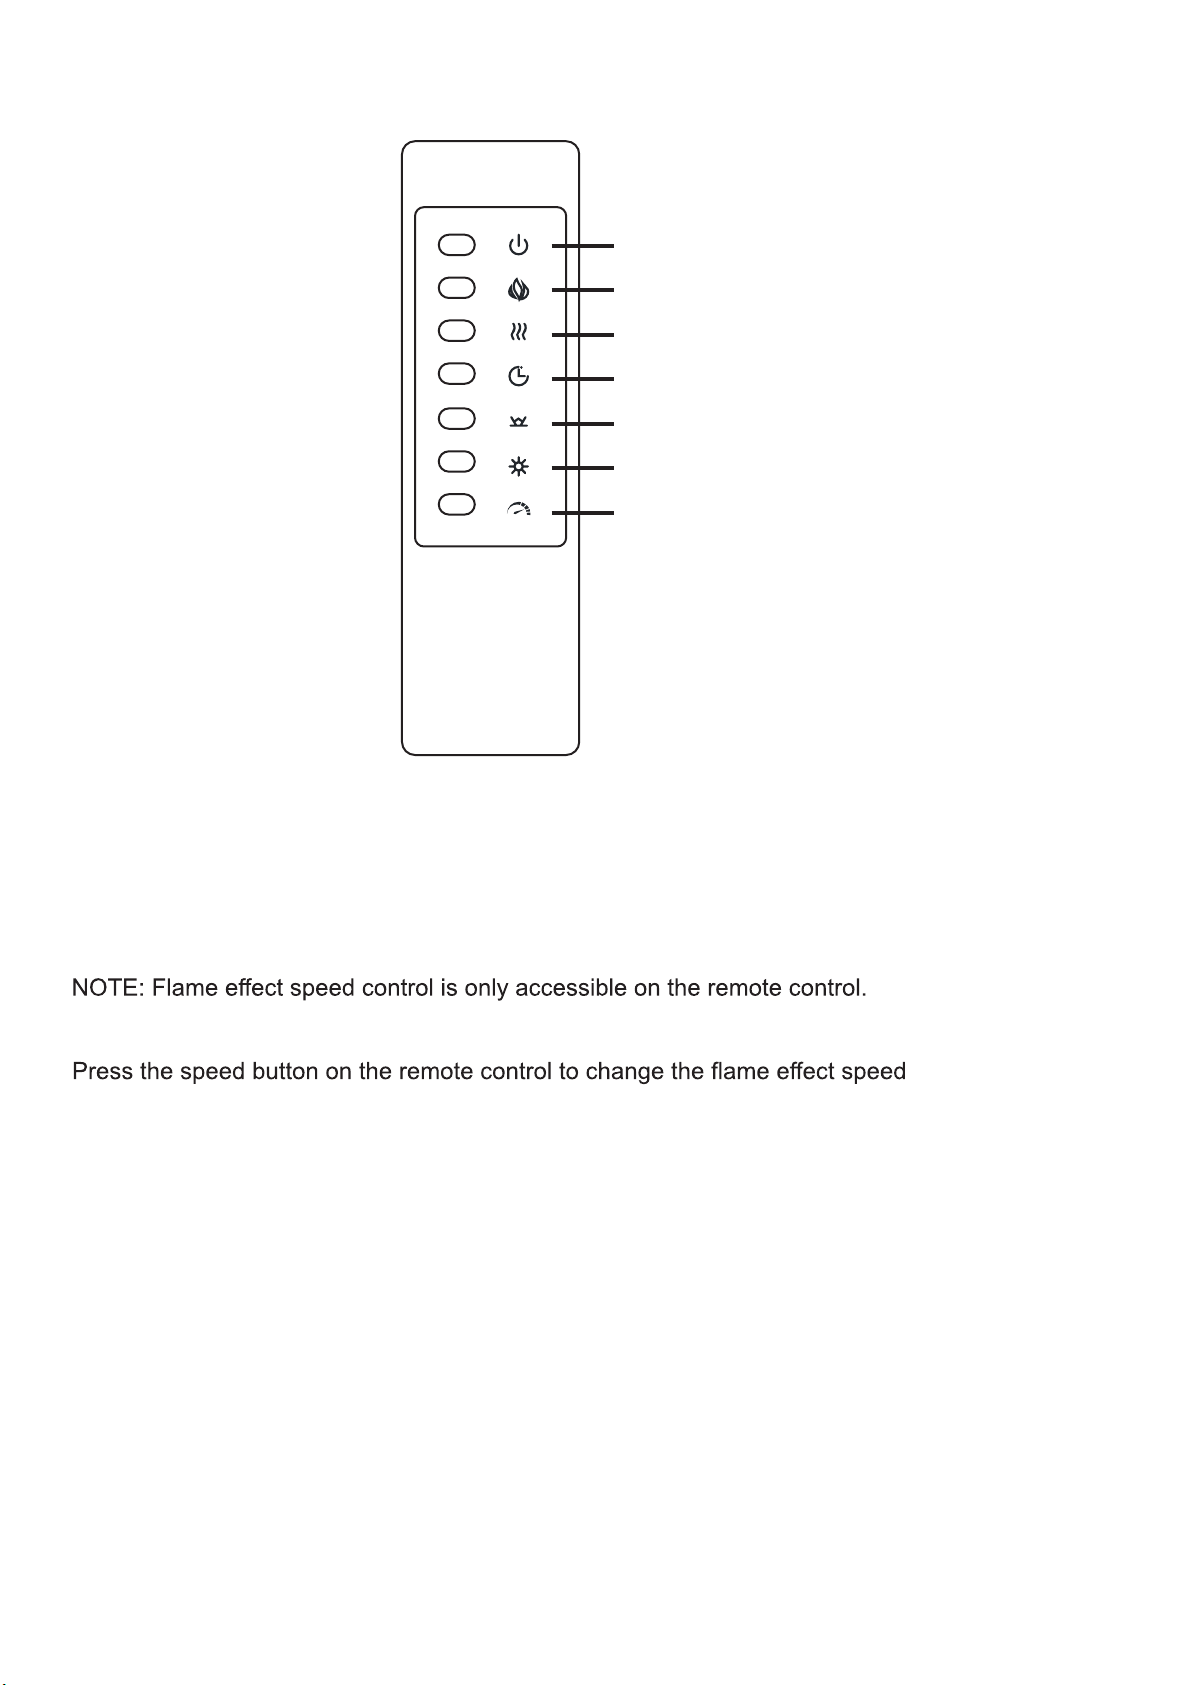
USER INSTRUCTION (REMOTE CONTROL)
Remote Control
The operation of the remote control buttons work the same as the button on the control panel.
Speed Control (Remote Control Only Function)
Power Button
Heat Button
Ember Bed Button
Flame Button
Timer Button
Speed Button
Brightness Button
v.08112022
NOTE: Remote control cannot be used to change temperature unit on the heater.
NOTE: Remote control cannot be used to lock or unlock the heat function on the heater.
18
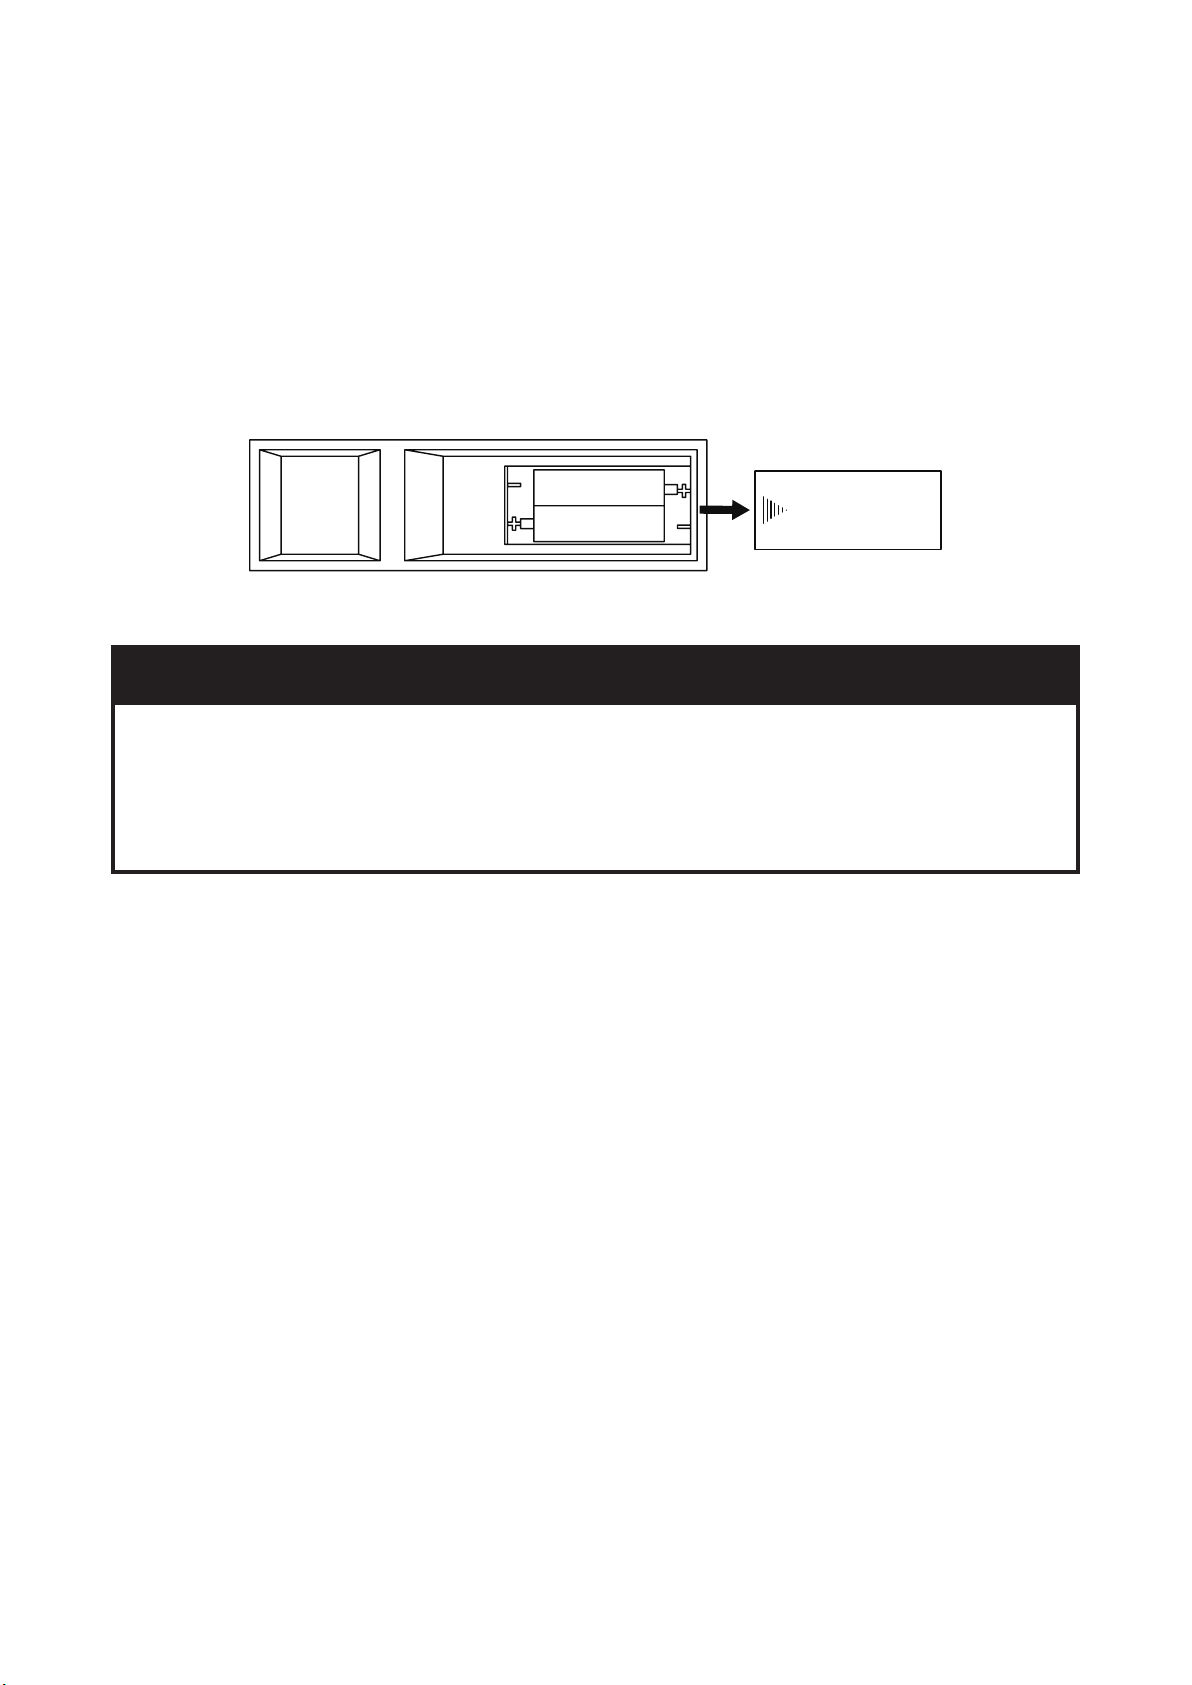
USER INSTRUCTION (REMOTE CONTROL)
Install / Replace Battery
The remote control is provided with 2 AAA batteries.
1. Press and slide o the back cover from the remote control.
2. Insert 2 AAA betteries into the battery compartment and make sure to intall batteries in the
correct polarity.
3. The negative end of the battery should be install against the spring inside the battery
compartment.
• Dispose old / used battery at a suitable recycling point or according to local
regulations.
• DO NOT ingest battery. If accidentally swallowed, seek for medical help
immediately.
• Do not mix dierent kinds of batteries.
⚠CAUTION / WARNING
AAA 1.5V
AAA 1.5V
19
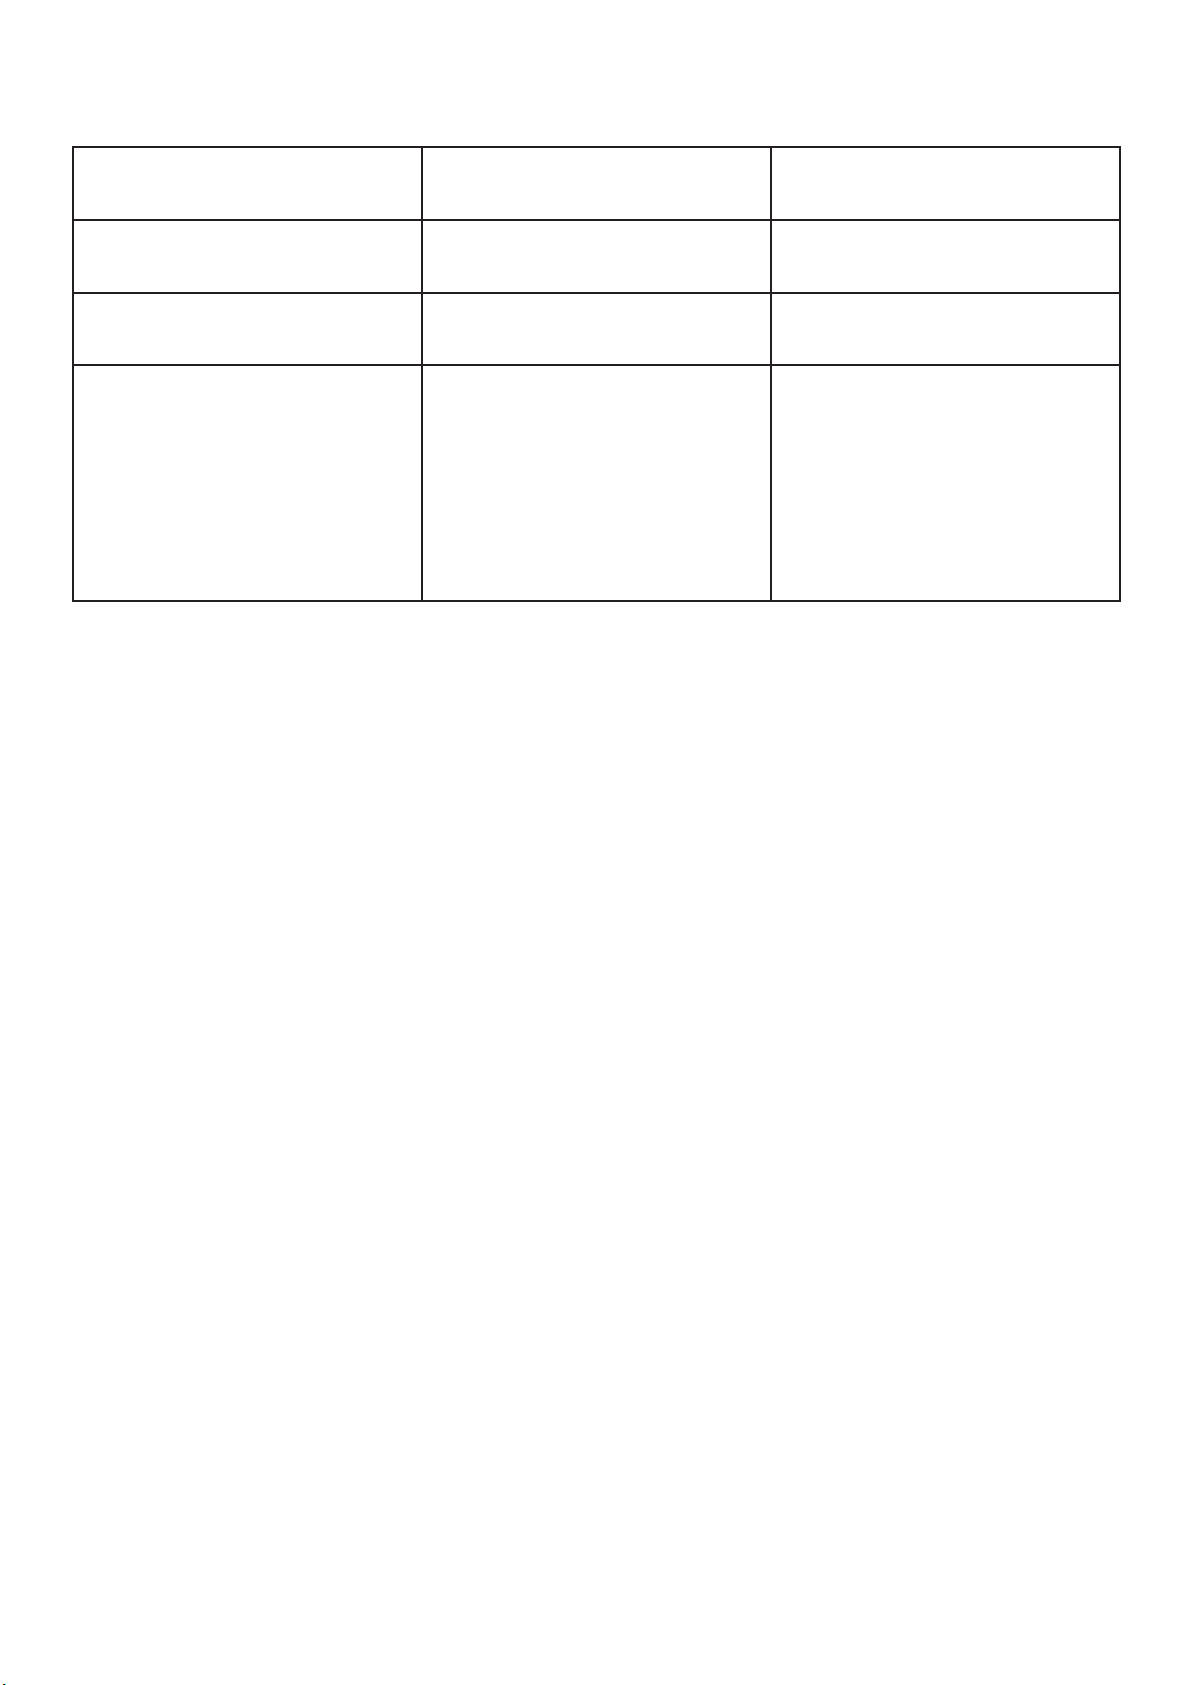
TROUBLE SHOOTING
Error Code Possible Cause Solution
E1 The heater is overheating Call Customer Service
E2 NTC is defective Call Customer Service
E3 The heat is not working
Make sure the vents are not
dirty or clogged. Unplug the
power and wait for 5 minutes.
Plug in the power again and
turn on the heater.
Call customer service if the
problem is not resolved.
v.08112022

20
FURNITURE CARE AND MAINTENANCE
⚠ WARNING
The manufacturer and seller are not responsible for any and all liability relating to personal injury,
property damage or losses, whether direct, indirect, or incidental, resulting from the incorrect
attachment, improper use, inadequate maintenance, unapproved modication or neglect of this
product.
Thank you for your purchase. We want your item to last as long as possible.
To ensure the product gives you years of longevity, please follow the recommendations
in this care and maintenance guide.
CLEANING
• Always turn o and unplug the unit from the power outlet before cleaning.
• Always wait until the unit has cooled down before performing any
maintenace or cleaning.
• Remove any accumulated dust on the unit with a vacuum cleaner or duster.
• Clean the furniture surface with a lightly dampened cloth or soft brush.
• Dry the surface immediately after cleaning.
⚠ DO NOT use abrasive cleaner to clean the surface.

21
© All copyright of this document belongs to BELLEZE .
This document may not be printed, translated, reproduced, or distributed in whole or in
part without written permission from BELLEZE.
v.08112022
AFTER-SALE SERVICE
We hope you enjoy your new BELLEZE furniture!
Share your photos on Instagram and tag us: @bellezefurniture.
Encounter any diculties or missing parts?
Contact us at 1-800-682-6376 or email us at [email protected]
We will send you replacement.
Hassle free!
No need to worry about repackaging and sending your item back.
WARRANTY
BELLEZE products come with a 1-year warranty from the date of delivery.
Register your product on our website to enjoy our limited lifetime warranty!
1-800-682-6376
@bellezefurniture
FOLLOW US: CONTACT INFO:
