Loading ...
Loading ...
Loading ...
11
ASSEMBLY
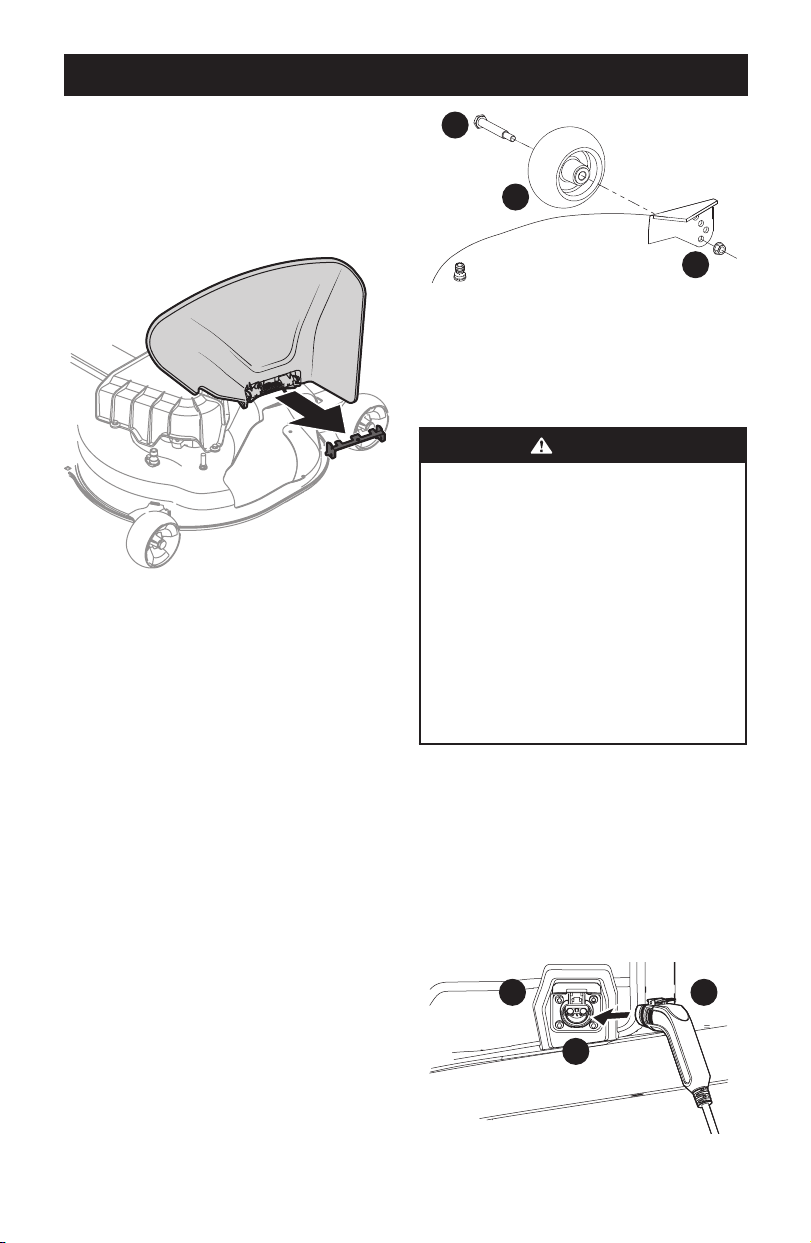
REMOVING THE STOP BRACKET IF NECESSARY
1. If the chute is shipped attached and with a stop bracket
holding the chute upright, the stop brackets must be
removed prior to operating the tractor.
2. Holding the chute deflector fully upward, remove the stop
bracket. Lower the chute deflector and discard the stop
bracket (Figure 9).
Figure 9
Setting Deck Wheels (If equipped)
NOTE: The deck wheels are an anti-scalp feature of the deck and
are not designed to support the weight of the cutting deck.
1. Move the tractor to a level surface, preferably pavement.
2. Check tire pressure, adjust, if necessary. See tire side wall for
proper tire pressure.
3. Make sure the deck is level side-to-side and properly pitched.
See the Service and Maintenance section for deck leveling
information and instructions.
4. Place deck lift lever or knob in the desired mowing height
position and lower deck.
5. Check the wheels for contact or excessive clearance with the
surface below.
NOTE: The deck wheels should have between ¼” (6.35mm) and
½” (12.7mm)clearance above the ground.
6. Remove the lock nut (a) gauge wheel (b) and shoulder screw
(c) from the deck (Figure 10).
7. Insert the shoulder screw into one of four index holes on deck
wheel bracket. Allow a 1⁄4-1⁄2” (6.35-12.7 mm)clearance
between the ground and gauge wheel.
8. Note the index hole used on previously adjusted wheel.
Repeat adjustment on opposite side to align both gauge
wheels.
NOTE: Refer to Adjusting the Deck section of this manual for
more detail.
a
b
c
Figure 10
Checking Tire Pressure
See the tire sidewall for the proper inflation pressure. Proper
inflation pressure should be maintained at all times.
Charging the Battery
WARNING
California Proposition 65: Cancer and reproductive harm
– www.P65Warnings.ca.gov.
The battery contains corrosive fluid and toxic material
— HANDLE WITH CARE. Keep away from children. Do not
puncture, disassemble, mutilate, or incinerate. Explosive
gases could be vented during charging or discharging.
Charge in a well ventilated area, away from sources of
ignition.
Recharge only with the charger provided with this
tractor. A charger that is not suitable for this tractor may
damage the batteries or create the risk of fire.
Do not charge or operate the tractor in the rain or in wet
conditions.
Refer to the manual packed with your battery charger for
further information and instructions on charging the battery.
The charging port on the tractor is located on the left side of the
mower.
To charge the battery:
1. Lift the charging port cover (a) (Figure 11).
2. Insert the charging cord (b) into the charging port (c)
(Figure 11).
3. Plug charger power cord into wall receptacle (outlet).
a
c
b
Figure 11
Loading ...
Loading ...
Loading ...