
Loading ...
Loading ...
Loading ...
www.BISSELL.ca
1-800-263-2535
5
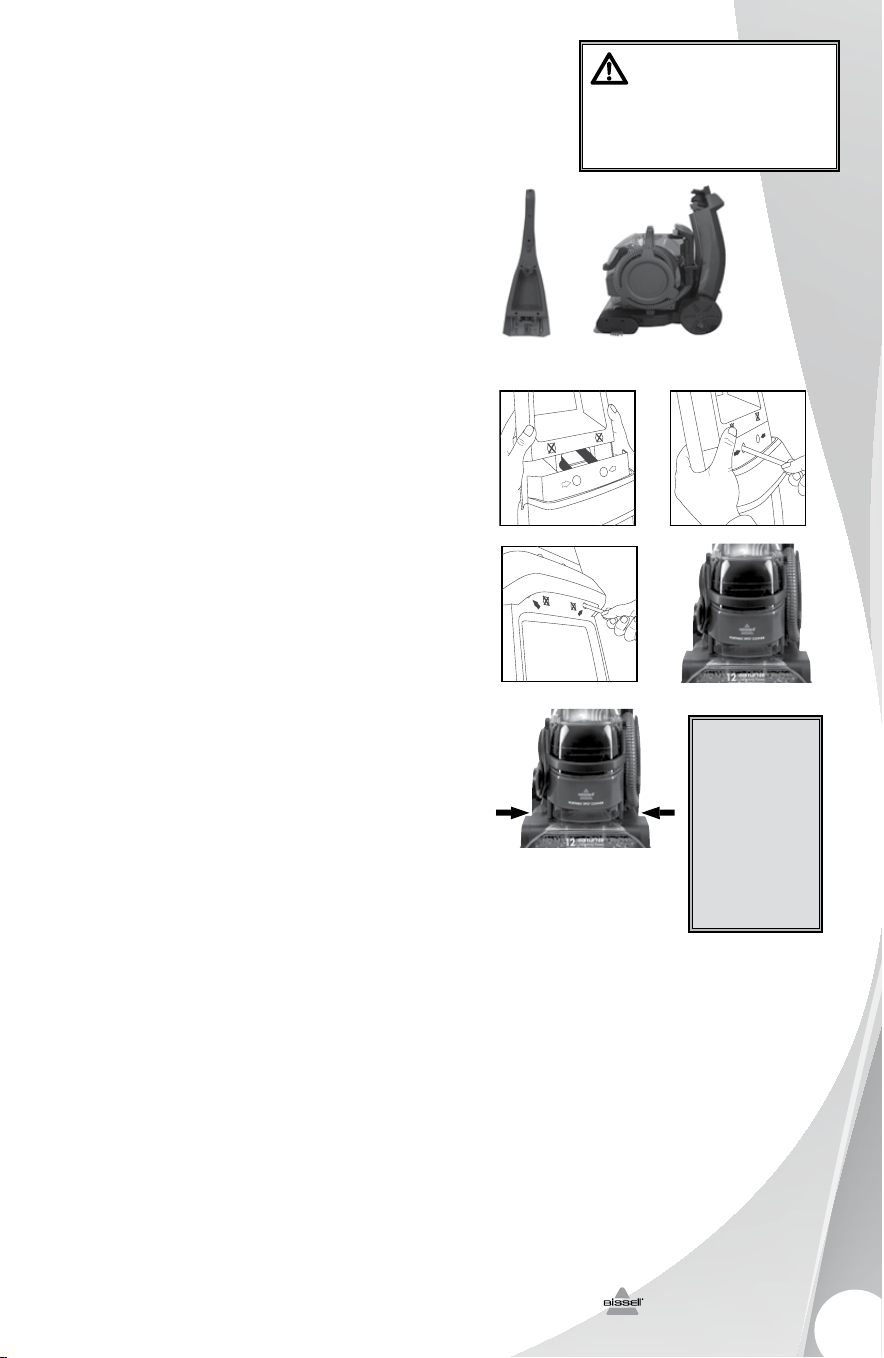
Your deep cleaner comes in two easy to
assemble components:
a. Upper handle
b. Portable spot cleaner/Base
The only tool you will need to assemble
your cleaner is a Phillips screwdriver.
1. Slide the upper handle onto the body of
the machine by guiding the 2 posts on the
body into the opening on the upper handle.
2. Firmly holding the upper handle in place,
screw 2 screws into the marked holes at an
upward angle above the support handle.
3. At an upward angle, screw the remaining
2 screws into the marked outermost holes
under the support handle.
4. Wrap power cord around Quick Release
Cord Wrap.
5. Wrap flex hose around the hose wrap and
secure with hose secure latch.
6. Align the product as image 4 shows and
firmly push down the portable spot cleaner
until it is secured on both sides.
7. Check latches on both sides to confirm it is
secured.
8. To confirm that the portable spot cleaner is
secure, plug in and turn on the product. If the
heat indicator light is illuminated, the portable
spot cleaner is secure. If not, turn off and unplug
the product, then release the pod and return to
step 6.
9. Snap attachment(s) into the back of machine.
NOTE: Portable spot cleaner must be fully
secure to operate in the upright mode.
As mbly
WARNING
Do not plug in your deep cleaner until
you are familiar with all instructions and
operating procedures.
» Deep cleaning
carpeting regularly
can reduce dust
and allergens in
your home.
Tip
a.
1.
3.
7.
4.
2.
b.
IMPORTANT
ASSEMBLY INSTRUCTIONS
Use a minimum of a #2 x 4" or #2 x 100mm Philips screwdriver for assembly.
Slide the upper handle onto
the body of the machine by
guiding the 2 posts on the
body into the opening on
the upper handle.
Firmly holding the upper
handle in place, screw 2
screws into the marked
holes at an upward angle
above the support handle.
At an upward angle, screw
the remaining 2 screws into
the marked outermost holes
under the support handle.
Cord
side
Hose
side
www.BISSELL.ca
1-800-263-2535
5
Votre appareil de nettoyage en profondeur
est livré en deuxblocs faciles à assembler:
a. Manche supérieur
b. Base et nettoyeur de taches portatif
Le seul outil dont vous aurez besoin pour
assembler votre appareil de nettoyage en
profondeur est un tournevis cruciforme.
1. Glissez le manche supérieur sur le corps de
l'appareil en guidant les deuxtiges du corps
dans l'ouverture du manche supérieur.
2. En tenant fermement en place le manche
supérieur, vissez, avec la pointe du tournevis
orientée vers le haut, deuxvis dans les trous
indiqués par une marque, au-dessus de la
poignée de soutien.
3. Toujours avec la pointe du tournevis orientée
vers le haut, vissez les deuxdernières vis dans
les trous les plus éloignés et indiqués par une
marque, sous la poignée de soutien.
4. Enroulez le cordon d’alimentation autour du
range-cordon Quick Release.
5. Enroulez le tuyau flexible autour du porte-
tuyau et fixez-le à l'aide du verrou sécuritaire
pour tuyau.
6. Alignez l'appareil comme l'illustre l'image4
et poussez fermement vers le bas sur le
nettoyeur de taches portatif jusqu'à ce qu'il soit
fixé de chaque côté.
7. Vérifiez les verrous de chaque côté pour vous
assurer qu'ils sont bien fixés.
8. Afin de vous assurer que le nettoyeur de
taches portatif est bien assemblé, branchez-le et
mettez-le en marche. Si le témoin de chauffe est
allumé, l'appareil est correctement fixé. Dans le
cas contraire, éteignez et débranchez l'appareil,
puis libérez le module et retournez à l'étape6.
9. Logez les accessoires à l’arrière de l’appareil.
REMARQUE: Le nettoyeur de taches portatif
doit être correctement fixé pour fonctionner
en mode vertical.
As mblage
AVERTISSEMENT
Ne branchez pas votre aspirateur avant de vous être
familiarisé avec toutes les instructions et toutes les
procédures d’utilisation.
» Le nettoyage en
profondeur régulier
des tapis peut
réduire la poussière
et les allergies dans
la maison.
C il
a.
1.
3.
7.
4.
2.
b.
IMPORTANT
ASSEMBLY INSTRUCTIONS
Use a minimum of a #2 x 4" or #2 x 100mm Philips screwdriver for assembly.
Slide the upper handle onto
the body of the machine by
guiding the 2 posts on the
body into the opening on
the upper handle.
Firmly holding the upper
handle in place, screw 2
screws into the marked
holes at an upward angle
above the support handle.
At an upward angle, screw
the remaining 2 screws into
the marked outermost holes
under the support handle.
IMPORTANT
ASSEMBLY INSTRUCTIONS
Use a minimum of a #2 x 4" or #2 x 100mm Philips screwdriver for assembly.
Slide the upper handle onto
the body of the machine by
guiding the 2 posts on the
body into the opening on
the upper handle.
Firmly holding the upper
handle in place, screw 2
screws into the marked
holes at an upward angle
above the support handle.
At an upward angle, screw
the remaining 2 screws into
the marked outermost holes
under the support handle.
IMPORTANT
ASSEMBLY INSTRUCTIONS
Use a minimum of a #2 x 4" or #2 x 100mm Philips screwdriver for assembly.
Slide the upper handle onto
the body of the machine by
guiding the 2 posts on the
body into the opening on
the upper handle.
Firmly holding the upper
handle in place, screw 2
screws into the marked
holes at an upward angle
above the support handle.
At an upward angle, screw
the remaining 2 screws into
the marked outermost holes
under the support handle.
Côté du
cordon
Côté du
tuyau
Loading ...
Loading ...
Loading ...