
Loading ...
Loading ...
Loading ...
9Section 4 — controlS & operation
• When cultivating, use very shallow depth
settings to prevent injury to plants whose
roots often grow close to the surface. If
needed, lift up on the handlebars slightly to
prevent the tines from digging too deeply.
Cultivating on a regular basis not only
eliminates weeds, it also loosens and aerates
the soil for better moisture absorption and
faster plant growth.
Avoid Tilling Soggy, Wet Soil
• Tilling wet soil often results in large, hard
clumps of soil that can interfere with planting.
If time permits, wait a day or two after heavy
rains to allow the soil to dry before tilling. Test
soil by squeezing it into a ball. If it compresses
too easily, it is too wet to till.
Avoid Making Footprints
• When possible, walk on the untilled side of
the machine to avoid making footprints in
the freshly tilled soil. Footprints cause soil to
compact, which can hamper root penetration
and contribute to soil erosion. They can also
“plant” unwanted weed seeds back into the
freshly tilled ground.
Choosing Correct Wheel and Tine Speeds
With experience, you will find the tilling depth
and tilling speed combination that is best for your
garden.
• Set the Engine Throttle Control Lever to a
speed that will give the engine adequate
power and still allow it to operate at the
slowest possible speed until you have
achieved your desired tilling depth.
• Selection of the correct engine speed, in
relation to the tilling depth, will ensure a
sufficient power level to do the job without
causing the engine to labor.
• Faster engine speeds may be desirable when
making final passes through the seedbed or
when cultivating.
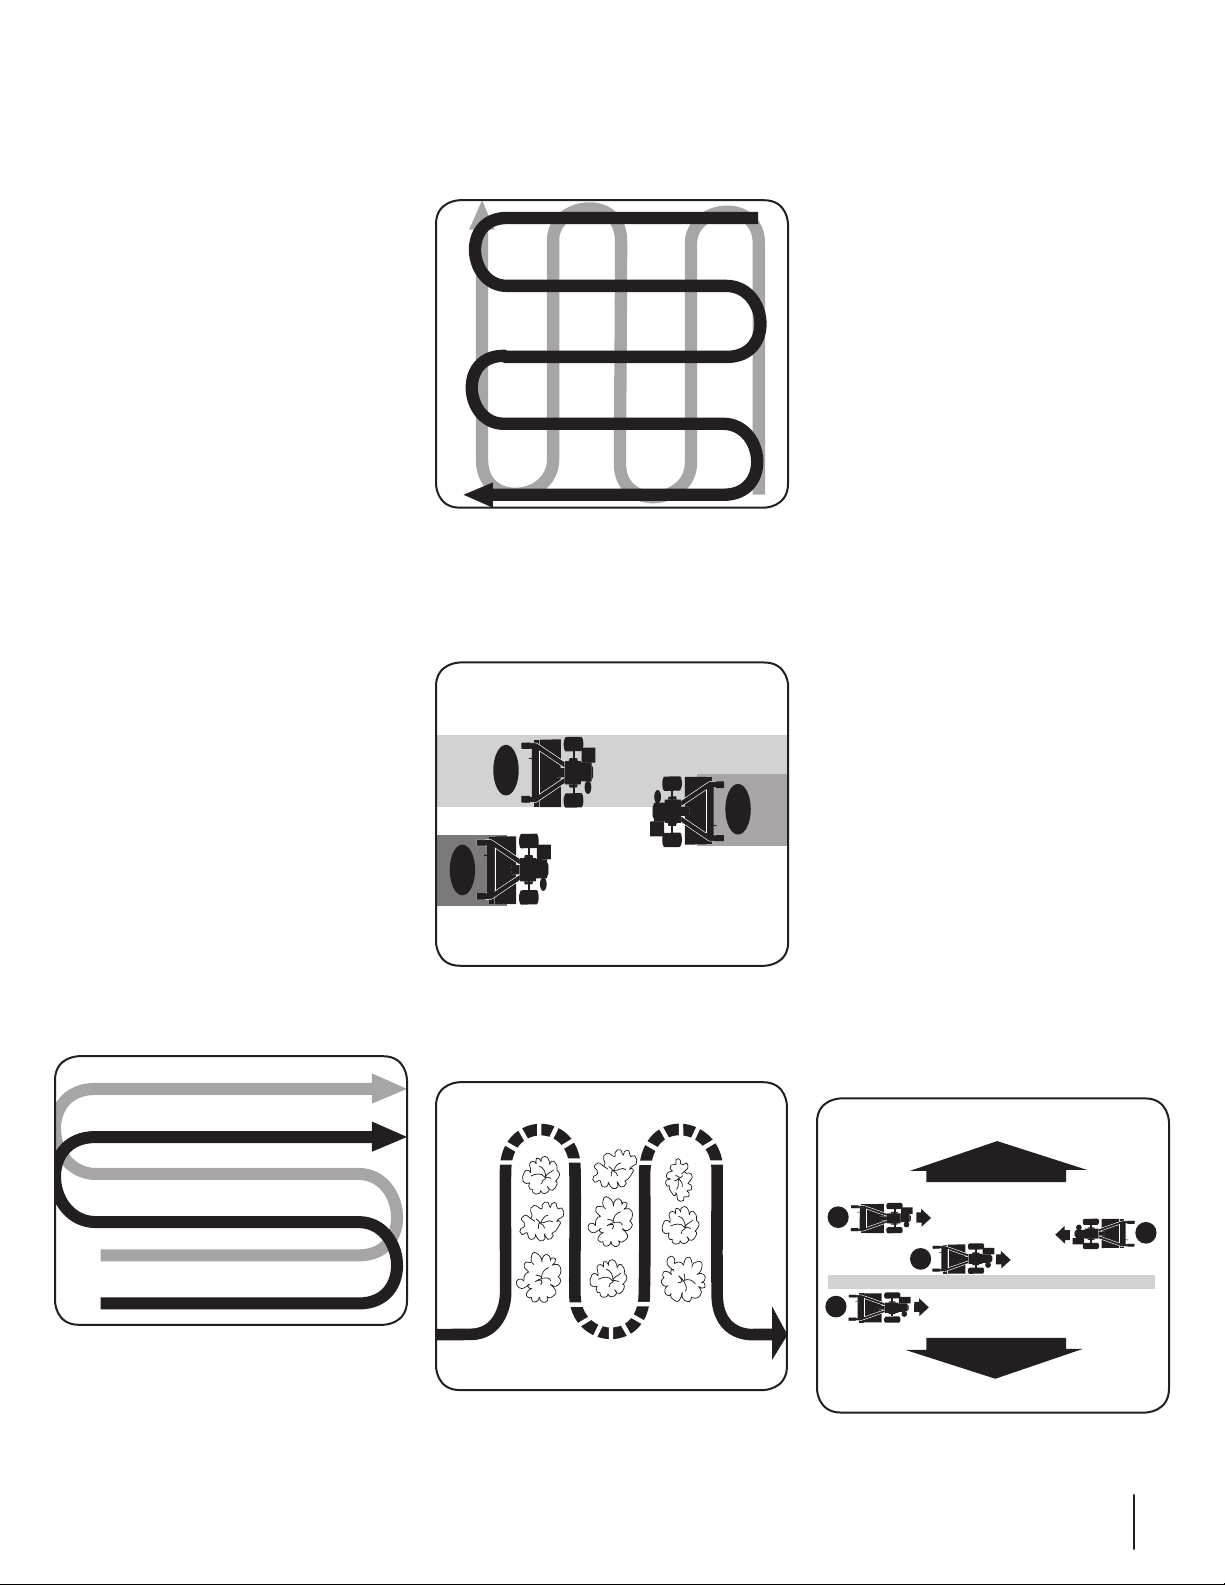
Suggested tilling patterns
• When preparing a seedbed, go over the same
path twice in the first row, then overlap one-
half the tiller width on the rest of the passes.
See Figure 4-7.
Figure 4-7
• When finished tilling in one direction, make
a second pass tilling the same area in the
opposite direction. See Figure 4-8. Overlap
each pass for the best results. In very hard
ground it may take three or four passes to
thoroughly pulverize the soil.
Figure 4-8
• If the garden size will not permit lengthwise
and then crosswise tilling, then overlap the
first passes by one-half a tiller width, followed
by successive passes at one-quarter width
See Figure 4-9.
1
2
3
Figure 4-9
• With planning, you can allow enough room
between rows to cultivate. See Figure 4-10.
Leave extra room for future plant growth.
Figure 4-10
Tilling on slopes
If you must garden on a moderate slope, please
follow two very important guidelines:
1. Till only on moderate slopes, never on
steep ground where the footing is difficult.
Review the safety rules in the Safe Operation
Practices Section.
2. It is recommended to till up and down the
slopes rather than terracing. Tilling vertically
on a slope allows maximum planting area and
leaves room for cultivating.
NOTE: When tilling on slopes, be sure the
correct oil level is maintained in the engine.
Check the oil level every one-half hour of
operation. The incline of the slope will cause
the oil to slant away from its normal level and
this can starve engine parts of the required
lubrication. Keep the engine oil level full at
all times.
Tilling up and down slopes:
• To keep soil erosion to a minimum, be sure to
add enough organic matter to the soil so that
it has good moisture holding texture and try
to avoid leaving footprints or wheel marks.
• When tilling vertically, try to make the first
pass uphill as the tiller digs more deeply
going uphill than it does downhill. In soft soil
or weeds, you may have to lift the handlebars
slightly while going uphill. When going
downhill, overlap the first pass by about one-
half the width of the tiller.
Terrace Gardening:
• When a slope is too steep or too short for
vertical tilling, it may be necessary to till
across the slope and create terraced rows.
Terraces are rows that are cut into the side
of a slope, creating a narrow, but flat area on
which to plant.
• On a long slope, you can make several
terraces, one below the other.
• Terraces should be only 2-to-3 feet wide.
Digging too far into the side of the slope will
expose poor subsoil that is unproductive for
plants.
• To create a terrace, start at the top of the
slope and work down. Go back and forth
across the first row as shown in Figure 4-11.
1
2
3
12" UNTILLED
1
REPEAT
DOWNHILL
UPHILL
Figure 4-11
Loading ...
Loading ...
Loading ...