
Loading ...
Loading ...
Loading ...
8 Section 4— controlS & operation
NOTE: Electric start models may also be
equipped with a STOP switch. Consult the
seperate engine operator’s for detailed
starting and stopping instructions.
Engaging the Drive & Tines
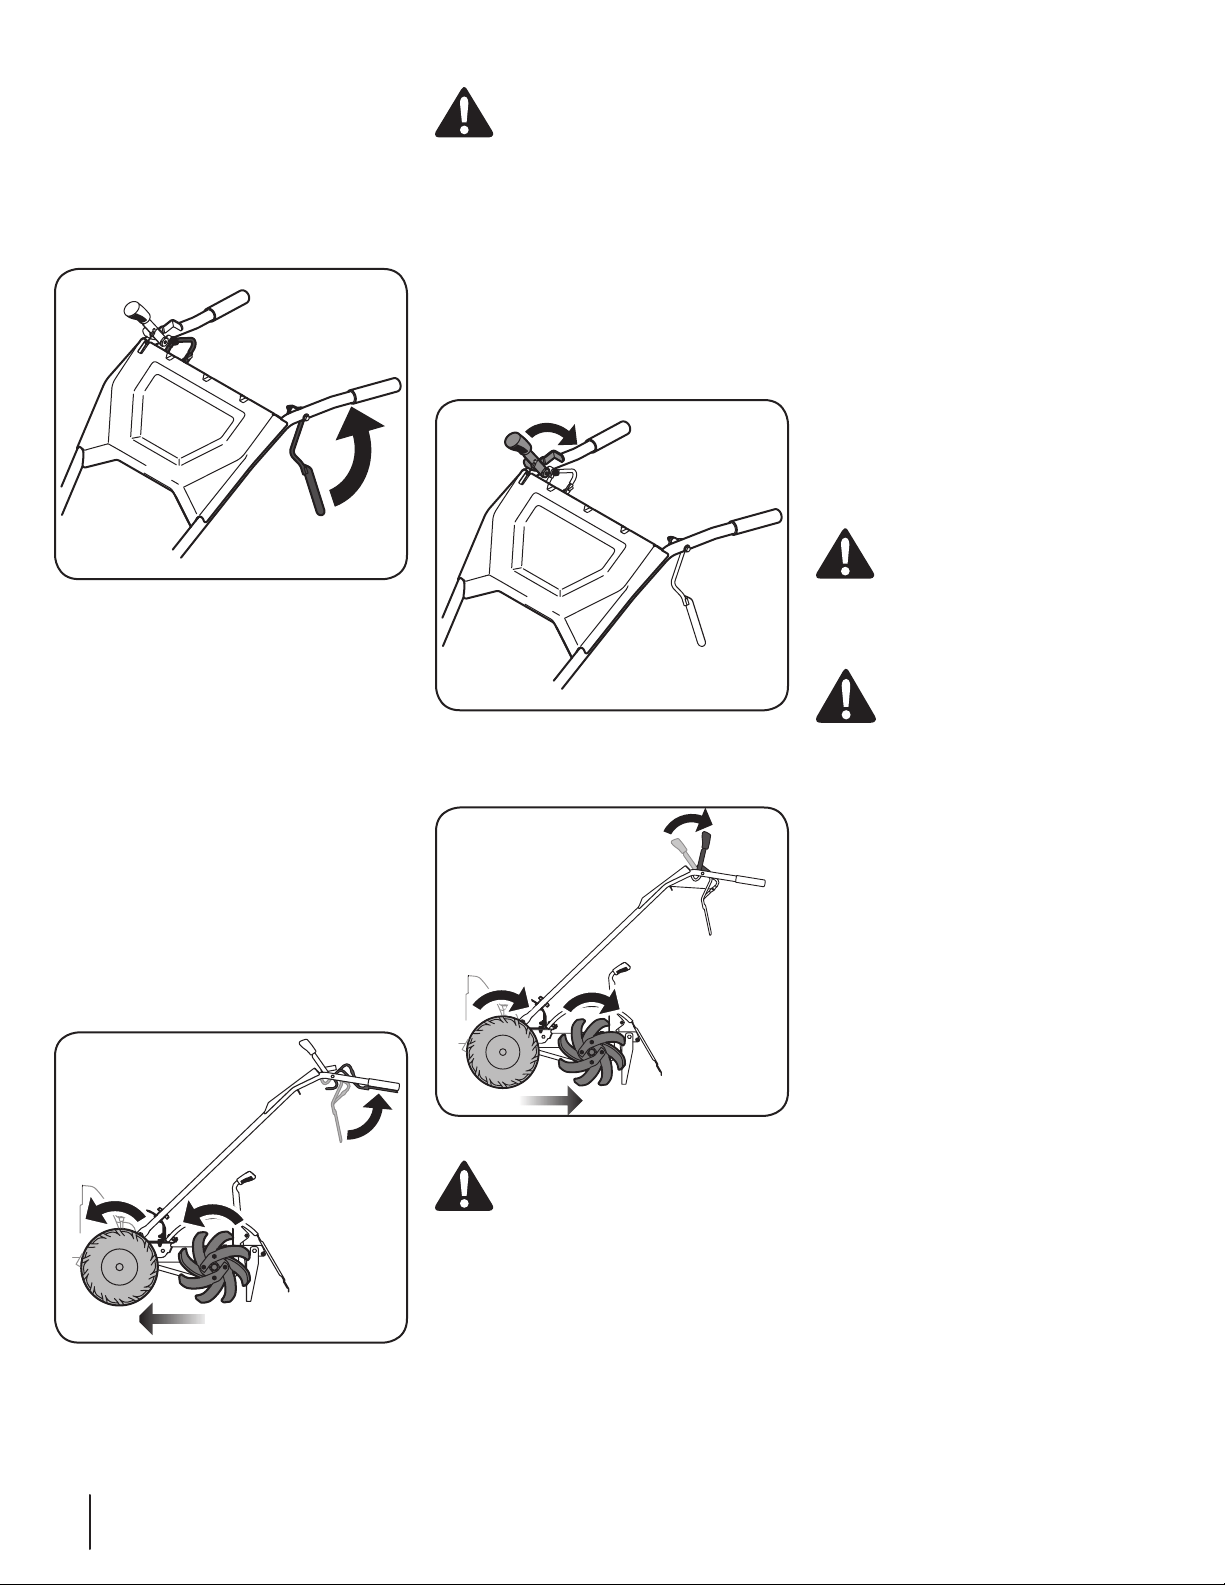
1. For forward motion of the wheels and tines:
a. Pull the bail up and hold it against the
handlebars. See Figure 4-3.
Figure 4-3
NOTE: When placing the neutral
ENGAGE/DISENGAGE lever in the ENGAGE
position, there may be a delay between
pressing the bail and the transmission
beginning to drive. This is normal. Though
pressing the bail should cause the lever to
ENGAGE the unit in drive, to quickly and
accurately ENGAGE the transmission into
drive gently rock the tiller backward and
forward on the wheels. The transmission will
click into drive and you will be able to feel the
proper drive resistance from the wheels.
b. As the tiller drives forward the tines will
also rotate, digging into the ground.
Walk behind and a little to one side
of the tiller. Use a secure, comfortable
grip on the handlebars. Let the tiller
move ahead at its own pace. See Figure
4-4. To stop the forward motion of the
wheels and tines, release the bail.
Figure 4-4
WARNING! Do not push down on the
handlebars to try to make the tiller till
more deeply. This prevents the wheels
from holding the tiller back and can allow
the tines to rapidly propel the tiller
forward, which could result in loss of
control, property damage or personal
injury.
2. For reverse motion of the wheels and tines:
a. Stop all forward motion before
reversing.
b. Lift the handlebars until the tines are
slightly off the ground and then pull the
Reverse Control knob out to engage the
reverse motion. See Figure 4-5.
Figure 4-5
c. While driving in reverse the tines will
also rotate in reverse. See Figure 4-6.
Figure 4-6
WARNING! Look behind and exercise
caution while operating in reverse. Do not
attempt to till when in reverse.
d. To stop the reverse motion, let go of
the Reverse Drive Control knob.
Turning the Tiller
1. Practice turning the tiller in a level, open area.
Be very careful to keep your feet and legs
away from the tines.
2. To make a turn, reduce the drive speed and
lift the handlebars slightly until the tines are
balanced just above the ground.
3. With the tiller balanced, push the handlebars
to one side to turn. After completing the
turn, slowly lower the tines into the soil and
increase the drive speed.
Clearing the Tines
The tines have a self-clearing feature that cuts down
tangling of debris in the tines. However, debris
may occasionally become entangled. Follow these
procedures to help avoid tangling and to clean the
tines if necessary:
• To reduce tangling, set the depth regulator
deep enough to get maximum “chopping”
action as the tines chop the material against
the ground.
• Try to till under crop residues or cover crops
while they are green, moist and tender.
• While power composting, try swaying the
handlebars from side to side in a controlled
manner (about 6” to 12”). This “fishtailing”
action often clears the tines of debris.
• If tangling occurs, lift the tines out of the soil
and run the tiller in reverse for a few feet. This
reversing action should unwind a good deal
of debris.
• If reversing the tiller doesn’t clear the debris,
it may be necessary to remove the debris by
hand.
WARNING! Before clearing the tines
by hand, stop the engine, allow all
moving parts to stop and disconnect the
spark plug wire. Failure to follow this
warning could result in personal injury.
Tilling Tips & Techniques
WARNING! Before tilling, contact your
telephone or utilities company and
inquire if underground equipment or
lines are used in your area. Do not till near
buried electric cables, telephone lines,
pipes or hoses.
Let the Tiller Do the Work
• While tilling, relax and let the wheels pull the
tiller along while the tines do the digging.
Walk on the side that is not yet finished to
avoid making footprints in the freshly tilled
soil. Lightly, but securely grip the handlebar
with just one hand.
• Avoid pushing down on the handlebars in
an attempt to force the tiller to dig deeper.
Doing so takes the weight off the powered
wheels, causing them to lose traction.
Without the wheels helping to hold the tiller
back, the tines will attempt to propel the
tiller — often causing the tiller to skip rapidly
across the ground.
• Sometimes, slight downward pressure on
the handlebars will help get through a
particularly tough section of sod or unbroken
ground, but in most cases this won’t be
necessary at all.
Tilling Depths
• Avoid trying to dig too deeply too quickly,
especially when busting sod or when tilling
soil that hasn’t been tilled for some time.
Use the shallow depth regulator settings
— only an inch or two deep — for the first
passes through the garden area. With each
succeeding pass, adjust the depth regulator
to dig an inch or two deeper. Watering the
garden area a few days prior to tilling will
make tilling easier, as will letting the newly
worked soil set for a day or two before
making a final, deep tilling pass.
Loading ...
Loading ...
Loading ...