
Loading ...
Loading ...
Loading ...
Important: Ensure that the product is correctly prepared
and positioned before operation.
CAUTION! After assembly or tipping the
dehumidier for any reason, allow it to rest in an
upright position for at least 2 HOURS before
connecting it to mains power and switching it on.
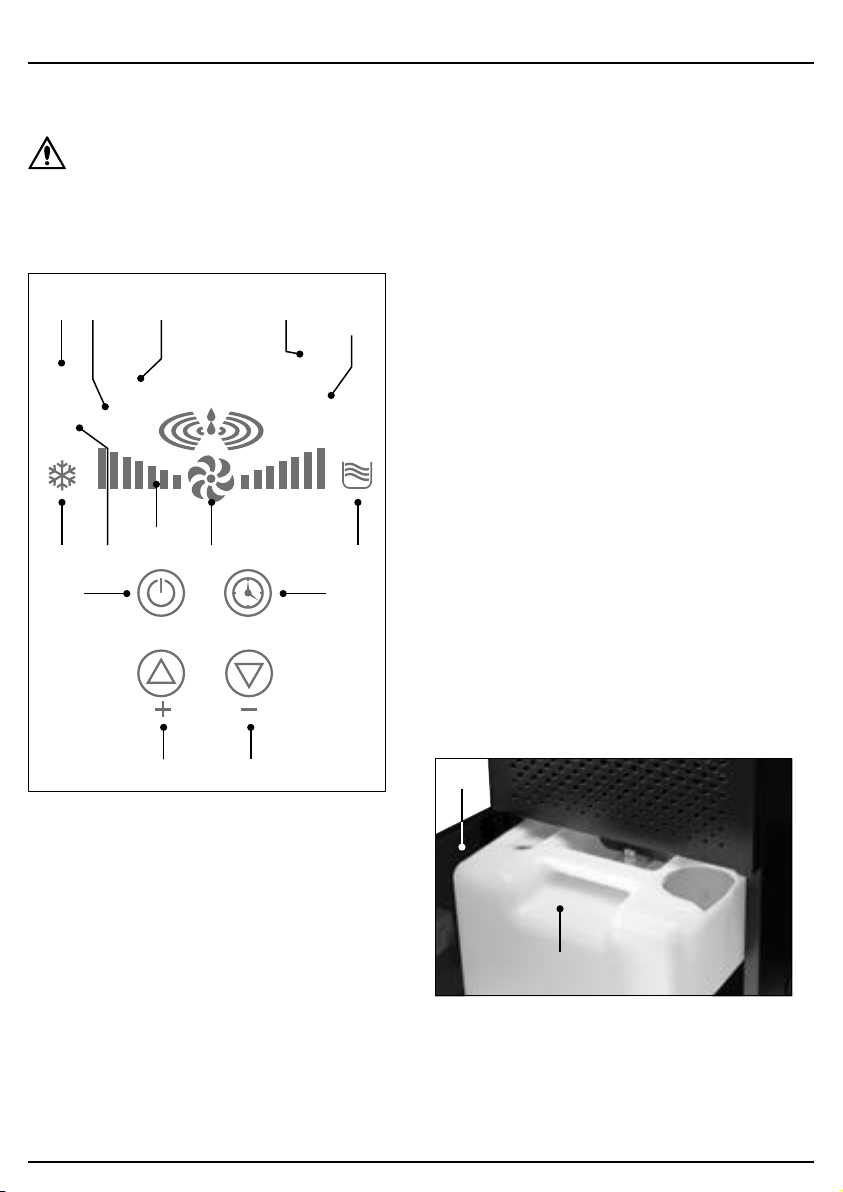
7.1 The Control Panel
POWER TIMER
DEHUMIDIFIER
T ON
T OFF
H
°C
PRES
PHASE
LACK
SET
CURRENT
DEHUM
FULL
%
PIPE TEMP
ROOM TEMP
88 88
88
FROST
6 Fig.
(23) (16)(21) (20)
(17)
(12) (24)
(13)
(14)
(18) (11)
(15)
(22)(19)
(11) Decrease value button
(12) Defrost indicator
(13) Dehumidication indicator
(14) Fan indicator
(15) Full tank indicator
(16) Humidity status indicator
(17) Humidity value indicator
(18) Increase value button
(19) Power button
(20) Temperature mode indicator
(21) Temperature value indicator
(22) Timer button
(23) Timer status indicators
(24) Timer value indicator
7.2 Switching the Dehumidier
On and O
Important: ALWAYS ensure that the air lter (1) is
installed before switching on the product.
Important: When using Continuous Drainage mode,
ensure that the discharge hose is positioned correctly
before switching on the product.
To switch the dehumidier on, ensure that it is positioned
correctly with suitable clear space around each side of
the unit, then connect the plug (5) to a power supply.
While the dehumidier is connected to mains power but
not switched on, it remains in standby mode. To switch
on the unit, press the power button (19) once. Press the
power button again to return the unit to standby mode.
To completely shut down the unit, disconnect the plug
from mains power.
Important: The fan continues to operate for a few
seconds after the unit is switched o.
Important: ALWAYS switch o the unit using the power
button BEFORE disconnecting the plug from the power
supply.
7.3 Emptying the Water Tank (Manual
Drainage Mode)
When a discharge hose is not installed on the water tank
(7) and the tank outlet is sealed, the dehumidier will
automatically stop operating when the water tank is full
and the full tank indicator (15) illuminates on the control
panel.
7 Fig.
(7)
(8)
Important: Switch o the dehumidier using the power
button (19) BEFORE removing the water tank.
1. To access the water tank, open the water tank access
panel (8) on the front of the unit.
– 12 –
7. Operating Instructions
Loading ...
Loading ...
Loading ...