Loading ...
Loading ...
Loading ...
4 Settings
This chapter gives information about the settings for
the product that you can make in the Automower
®
Connect app. All setting for the product are available in
Automower
®
Connect. Some settings can also be made
in Automower
®
Access, refer to
Automower
®
Access on
page 9
. The product has factory settings but the settings
can be adapted for each work area.
4.1 Schedule
In
Schedule
you can change the schedule settings for
the product.
The
Schedule
function controls which hours the product
operates. When the product does not operate, it is
parked in the charging station. You can see which hours
and days the product operates in the schedule overview
in the app.
You can set the Schedule if the work area is less
than the maximum area capacity of the product. This
prevents wear on the grass and the product. The factory
schedule setting lets the product operate around the
clock 7 days a week.
To calculate the schedule setting, refer to
To calculate
the schedule setting on page 20
.
4.1.1 To calculate the schedule setting
1. Calculate the dimension of your lawn in m
2
/ ft
2
.
2. Divide the m
2
/ ft
2
of the lawn with the approximate
operation capacity. Refer to table below.
3. The result is equal to the number of hours that the
product must operate each day.
Note:
The operation capacity is approximate and is
calculated for flat and open work area. If the work area
has a lot of slopes or obstacles, you need to increase
the
Schedule
settings.
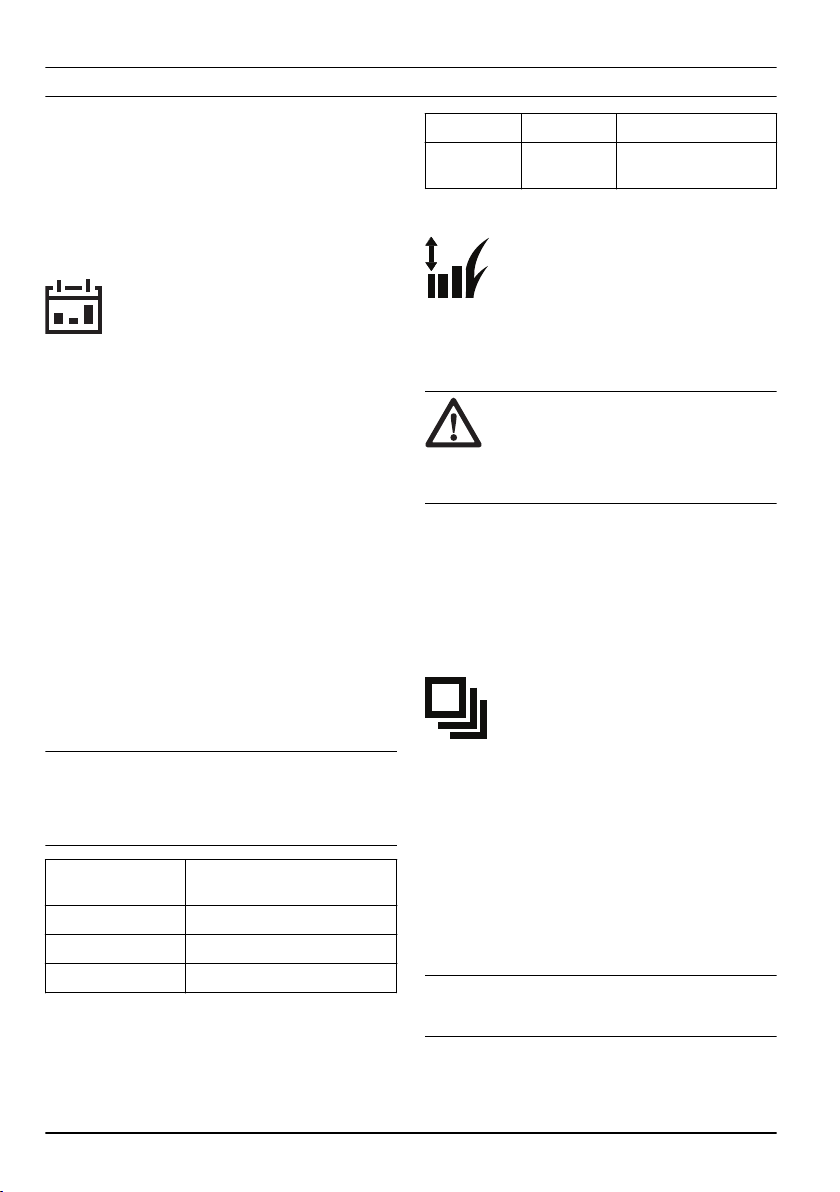
Model Approximate operation capaci-
ty, m
2
/h / ft
2
/h
Automower
®
320 92 / 990
Automower
®
430X 133 / 1430
Automower
®
450X 208 / 2240
Example: A lawn of 1000 m
2
/ 10700 ft
2
, cut with an
Automower
®
320.
1000 m
2
/ 92 ≈ 11 h.
10700 ft
2
/ 990 ≈ 11 h.
Days / week
h / day Schedule settings
7 11 07:00-18:00 / 7:00
am-6:00 pm
4.2 Cutting height
4.2.1 Adjust the cutting height
The cutting height can be adjusted from 2 cm / 0.8 in. to
6 cm / 2.4 in.
CAUTION: The first weeks after a new
installation, the cutting height must be set to
6 cm / 2.4 in. to prevent damage to the loop
wire. The cutting height can then be lowered
each week.
4.2.2 TargetHeight
Use the TargetHeight function to lower the cutting height
from the maximum cutting height to the specified cutting
height gradually during 10 days. If you change the
cutting height manually during this time it will disable the
TargetHeight function.
4.3 Operation
In
Operation
you can change the operation settings of
the product.
4.3.1 Spiral cutting
If the product enters an area where it senses the grass
is longer than average, it can change the movement
pattern to
Spiral cutting
. This means that the product
mows in a spiral pattern to faster cut the area with
longer grass. It is possible to set the intensity of the
Spiral cutting
.
Very low / Low
intensity means that
Spiral
cutting
begins less often.
High / Very high
intensity
means that
Spiral cutting
begins more often.
Note:
Spiral Cutting
does not start in slopes steeper
than 17%.
20 - Settings 2071 - 001 - 29.03.2023
Loading ...
Loading ...
Loading ...