
imageCLASS
MF3010 / MF3010VP
User
's Guide
USRM1-9803-03 2022-04 en Copyright CANON INC. 2022

Contents
Important Safety Instructions
........................................................................................................... 2
Important Safety Instructions ................................................................................................................................... 3
Installation ........................................................................................................................................................... 4
Power Supply ....................................................................................................................................................... 6
Handling .............................................................................................................................................................. 8
Maintenance and Inspections ............................................................................................................................... 10
Consumables ..................................................................................................................................................... 12
Others ............................................................................................................................................................... 14
Installation and Handling ........................................................................................................................................ 15
Basic Operation ............................................................................................................................................ 19
Parts and Their Functions ........................................................................................................................................ 20
Front Side .......................................................................................................................................................... 21
Back Side ........................................................................................................................................................... 22
Interior .............................................................................................................................................................. 23
Paper Cassette ................................................................................................................................................... 24
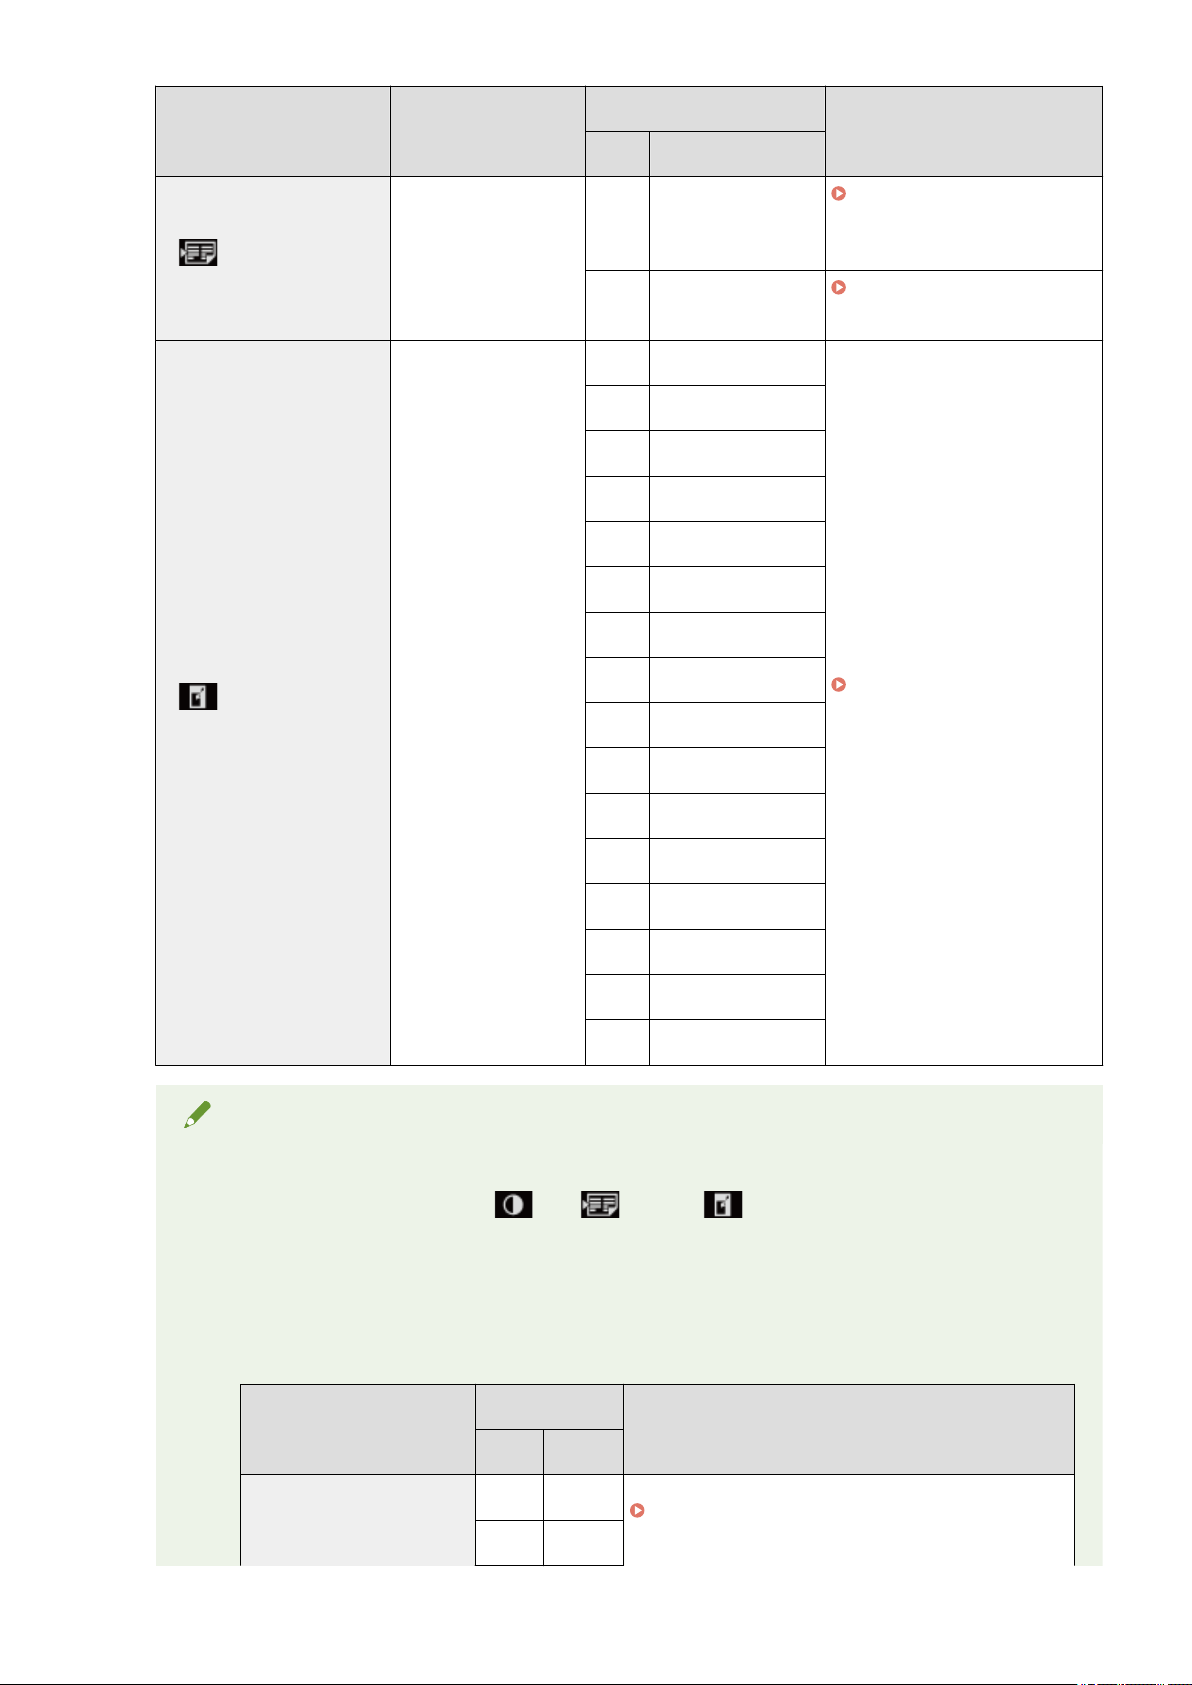
Operation Panel and Display ................................................................................................................................ 25
Using the Quick Reference Guide ............................................................................................................................. 27
Energy Saving Functions (Sleep Mode) ..................................................................................................................... 29
How to Operate Menus ............................................................................................................................................ 30
Setting List ............................................................................................................................................................. 31
Toner Cartridges ..................................................................................................................................................... 36
About the Supplied Toner Cartridge ...................................................................................................................... 37
About Replacement Toner Cartridges .................................................................................................................... 38
Handling Toner Cartridges ................................................................................................................................... 39
Storing Toner Cartridges ..................................................................................................................................... 41
Purchasing Consumables .................................................................................................................................... 42
Placing Documents ................................................................................................................................................. 43
Attention (Placing Documents) ............................................................................................................................. 45
Loading Paper ......................................................................................................................................................... 46
In the Paper Cassette .......................................................................................................................................... 47
Attention (Loading Paper) .............................................................................................................................. 50
Paper Loading Capacity ....................................................................................................................................... 51
Paper Loading Orientation ................................................................................................................................... 52
Setting a Paper Type ............................................................................................................................................... 54
Initializing Menus ................................................................................................................................................... 56
Printing the User Data List ...................................................................................................................................... 57
Upgrading Firmware ............................................................................................................................................... 58
Locating the Serial Number ..................................................................................................................................... 59
I

Specications .................................................................................................................................................. 61
Machine Specications ............................................................................................................................................ 62
Copy Specications ................................................................................................................................................. 63
Printer Specication ................................................................................................................................................ 64
Scanner Specications ............................................................................................................................................. 65
Document Type ....................................................................................................................................................... 66
Supported Document Types ................................................................................................................................. 67
Scan Area .......................................................................................................................................................... 68
Paper ...................................................................................................................................................................... 69
Supported Paper Types ....................................................................................................................................... 70
Printable Area .................................................................................................................................................... 73
Copy ........................................................................................................................................................................ 75
Basic Copy Operations ............................................................................................................................................. 76
Registering the Quantity that You Frequently Copy (Up to Twenty-nine Copies) ......................................................... 78
Adjusting the Density .............................................................................................................................................. 79
Enlarging/Reducing Copy ........................................................................................................................................ 81
Copying Both Sides of Cards onto One Side (ID Card Copy) ........................................................................................ 83
Copying Two Documents onto One Sheet (2 on 1 Copy) ............................................................................................. 86
Selecting Copy Type (Speed Priority/Resolution Priorlty) ........................................................................................... 88
Emphasizing the Outline of an Image (Sharpness) .................................................................................................... 90
Print ........................................................................................................................................................................ 93
Preparing to Print from Your Computer ................................................................................................................... 94
Setting Up Printer Sharing ....................................................................................................................................... 95
Printing Fundamentals ............................................................................................................................................ 97
Printing ............................................................................................................................................................. 98
Conguring the Default Print Settings ................................................................................................................. 101
Viewing the Online Help .................................................................................................................................... 103
Printing on Custom Paper Size ............................................................................................................................... 105
Registering a Custom Paper Size ........................................................................................................................ 106
Canceling Print ..................................................................................................................................................... 107
Selecting and Canceling Jobs .............................................................................................................................. 108
Scan ....................................................................................................................................................................... 110
Preparing to Use the Scan Functions ...................................................................................................................... 111
System Requirements (Scan) ................................................................................................................................. 112
Basic Scan Flow ..................................................................................................................................................... 113
Scanning Using the MF Toolbox .......................................................................................................................... 114
Scanning an Image Using an Application ............................................................................................................. 116
Scanning Using the WIA Driver ........................................................................................................................... 117
[New Scan] Dialog Box ...................................................................................................................................... 121
Attention (WIA Driver) ................................................................................................................................. 123
II

Using the MF Toolbox ............................................................................................................................................
124
Combining Multiple Documents into One PDF File .................................................................................................. 130
Using the ScanGear MF .......................................................................................................................................... 132
Using Simple Mode ........................................................................................................................................... 133
Using Advanced Mode ...................................................................................................................................... 136
Dening a Scan Area (Cropping Frame) ............................................................................................................... 148
Setting Resolution ............................................................................................................................................ 150
Troubleshooting ......................................................................................................................................... 152
Clearing Jams ........................................................................................................................................................ 153
Removing Jammed Paper .................................................................................................................................. 155
Troubleshooting ................................................................................................................................................... 160
Paper Feeding Problems .................................................................................................................................... 162
Cannot Print, or the Images on Printouts are Spotted or Distorted ......................................................................... 163
Copying Problems ............................................................................................................................................ 164
The Copy Output is Hardly Readable and Copied Poorly .................................................................................. 165
Printing Problems ............................................................................................................................................. 166
Cannot Print Documents from a Computer .................................................................................................... 167
Scanning Problems ........................................................................................................................................... 168
Cannot Scan a Document ............................................................................................................................ 170
Installation and Uninstallation Problems ............................................................................................................. 172
Miscellaneous Problems .................................................................................................................................... 173
Printing Results are Not Good ............................................................................................................................... 174
Paper Curls ...................................................................................................................................................... 175
Paper Creases .................................................................................................................................................. 176
Printing is Uneven ............................................................................................................................................ 177
White Specks or Spots Appear on the Printout ...................................................................................................... 178
The Toner does Not Flow Well into the Paper ....................................................................................................... 179
Vertical Streaks Appear on the Output ................................................................................................................. 180
Toner Smudges and Spatters Appear around Text and Images ............................................................................... 181
The Printout is Too Dark .................................................................................................................................... 182
Printed Bar Codes Cannot be Scanned ................................................................................................................ 183
Images may be partially cut off on the output ...................................................................................................... 184
Uninstalling the Software ...................................................................................................................................... 185
When a Service Error Has Occurred ........................................................................................................................ 188
When a Problem cannot be Resolved ..................................................................................................................... 189
Maintenance ................................................................................................................................................. 192
Cleaning the Machine ........................................................................................................................................... 193
Cleaning the Exterior ........................................................................................................................................ 194
Cleaning the Inside of the Machine ..................................................................................................................... 195
Cleaning the Fixing Unit .................................................................................................................................... 198
Cleaning the Platen Glass .................................................................................................................................. 199
Attention (Cleaning the Machine) .................................................................................................................. 200
III

Replacing Toner Cartridges ...................................................................................................................................
202
Before Replacing the Toner Cartridge ................................................................................................................. 203
Replacing the Toner Cartridge ............................................................................................................................ 206
Attention (Replacing the Toner Cartridge) ...................................................................................................... 210
Special Mode ......................................................................................................................................................... 213
Relocating the Machine ......................................................................................................................................... 216
Attention (Relocating the Machine) ..................................................................................................................... 219
Appendix ........................................................................................................................................................... 221
Third Party Software ............................................................................................................................................. 222
Manuals and Their Contents .................................................................................................................................. 223
Basic Windows Operations .................................................................................................................................... 224
Disclaimers ........................................................................................................................................................... 227
Copyright ............................................................................................................................................................. 228
Trademarks .......................................................................................................................................................... 229
Using User's Guide ................................................................................................................................... 231
Screen Layout of the User's Guide .......................................................................................................................... 232
Top Page ......................................................................................................................................................... 233
Topic Page ....................................................................................................................................................... 235
Search Method ................................................................................................................................................. 236
Viewing the User's Guide ....................................................................................................................................... 237
IV

Important Safety Instructions
Important Safety Instructions ...................................................................................................................
2
Important Safety Instructions .............................................................................................................................. 3
Installation ........................................................................................................................................................ 4
Power Supply .................................................................................................................................................... 6
Handling ........................................................................................................................................................... 8
Maintenance and Inspections ......................................................................................................................... 10
Consumables .................................................................................................................................................. 12
Others ............................................................................................................................................................ 14
Installation and Handling ................................................................................................................................... 15
Important Safety Instructions
1

Important Safety Instructions
85RS-000
Please r
ead these "Important Safety Instructions" thoroughly before using the machine.
These instructions are intended to prevent injuries to you and other persons as well as equipment damage.
Failure to follow these instructions could result in serious personal injury, product damage, or improper
operation.
Please follow the instructions in this manual.
Important Safety Instructions
2

Installation
85RS-002
T
o use this machine safely and comfortably, carefully read the following precautions and install the machine in
an appropriate location.
WARNING
● Do not install the machine in a location near alcohol, paint thinner, or other ammable substances. If
ammable substances come into contact with electrical parts inside the machine, this may r
esult in a
re or electrical shock.
● Do not connect unapproved cables to this machine. Doing so may result in a re or electrical shock.
● If any foreign substance falls into this machine, unplug the power plug from the AC power outlet and
contact your local authorized Canon dealer.
● Do not place the follo
wing items on the machine.
- Necklaces and other metal objects
- Cups, vases, owerpots, and other containers lled with water or liquids
If these items come into contact with a high-voltage area inside the machine, this may result in a re
or electrical shock.
If these items are dropped or spilled inside the machine, immediately turn off the power switches of
the machine and computer (1) and disconnect the interface cable if it is connected (2). Then, unplug
the power plug from the AC power outlet (3) and contact your local authorized Canon dealer.
CAUTION
● Do not install the machine in unstable locations, such as on unsteady platforms or inclined oors, or in
locations subject to e
xcessive vibrations, as this may cause the machine to fall or tip over, resulting in
personal injury.
● The ventilation slots ar
e provided for proper ventilation of working parts inside the machine. Never
place the machine on a soft surface, such as a bed, sofa, or rug. Blocking the slots can cause the
machine to overheat, resulting in a re.
● Do not install the machine in the follo
wing locations, as this may result in a re or electrical shock.
Important Safety Instructions
4

- A damp or dusty location
-
A location exposed to smoke and steam, such as near a cookery or humidier
- A location exposed to rain or snow
- A location near a water faucet or water
- A location exposed to direct sunlight
- A location subject to high temperatures
- A location near open ames
● When installing the machine, gently lo
wer the machine to the installation site so as not to catch your
hands between the machine and the oor or between the machine and other equipment, as this may
result in personal injury.
● When connecting the interface cable, connect it properly by following the instructions in this manual.
If not connected properly, this may result in malfunction or electrical shock.
● When moving the machine, follow the instructions in this manual to hold it correctly. Failure to do so
may cause you to drop the machine, resulting in personal injury.
" Relocating the Machine(P
. 216) "
● Machines with a hard disk may not operate properly when used at high altitudes of about 3,000
meters above sea level, or higher.
IMPORTANT
If the operating noise concerns you
Depending on the use envir
onment and operating mode, if the operating noise is of concern, it is
recommended that the machine be installed in a place other than the oce.
Important Safety Instructions
5

Power Supply
85RS-003
WARNING
● Do not damage or modify the po
wer cord. Also, do not place heavy objects on the power cord or pull
on or excessively bend it. This can cause electrical damage, resulting in re or electrical shock.
● Keep the po
wer cord away from all heat sources. Failure to do so can cause the power cord insulation
to melt, resulting in a re or electrical shock.
● The po
wer cord should not be taut, as this may lead to a loose connection and cause overheating,
which could result in a re.
● The po
wer cord may become damaged if it is stepped on, xed with staples, or if heavy objects are
placed on it. Continued use of a damaged power cord can lead to an accident, such as a re or
electrical shock.
● Do not plug or unplug the po
wer plug with wet hands, as this can result in electrical shock.
● Do not plug the po
wer cord into a multiplug power strip, as this can result in a re or electrical shock.
● Do not bundle up or tie up the po
wer cord in a knot, as this can result in a re or electrical shock.
● Insert the po
wer plug completely into the AC power outlet. Failure to do so can result in a re or
electrical shock.
● If e
xcessive stress is applied to the connection part of the power cord, it may damage the power cord
or the wires inside the machine may be disconnected. This could result in a re. Avoid the following
situations:
- Connecting and disconnecting the power cord frequently.
- Tripping over the power cord.
- The power cord is bent near the connection part, and continuous stress is being applied to the
power outlet or the connection part.
- Applying a shock to the power connector.
● The machine must be connected to a socket-outlet with grounding connection by the provided power
cord.
● Do not use po
wer cords other than the one provided, as this can result in a re or electrical shock.
● The provided power cord is intended for use with this machine. Do not connect the power cord to
other devices.
● As a gener
al rule, do not use extension cords. Using an extension cord may result in a re or electrical
shock.
● Remo
ve the power plug from the AC power outlet and refrain from using the machine during a
thunder storm. Lightning can result in a re, electrical shock or malfunction.
● Make sure that the power supply for the machine is safe, and has a steady voltage.
CAUTION
Important Safety Instructions
6

● Do not use a po
wer supply voltage other than that listed herein, as this may result in a re or electrical
shock.
● Always gr
asp the power plug when unplugging the power plug. Do not pull on the power cord, as this
may expose the core wire of the power cord or damage the cord insulation, causing electricity to leak,
resulting in a re or electrical shock.
● Leave sucient space ar
ound the power plug so that it can be unplugged easily. If objects are placed
around the power plug, you may be unable to unplug it in an emergency.
Important Safety Instructions
7

Handling
85RS-004
WARNING
● Do not disassemble or modify the machine. Ther
e are high-temperature and high-voltage components
inside the machine which may result in a re or electrical shock.
● Electrical equipment can be hazar
dous if not used properly. Do not allow children to touch the power
cord, cables, internal gears, or electrical parts.
● If the machine mak
es an unusual noise or emits smoke, heat, or an unusual smell, immediately turn
off the power switches of the machine and computer and disconnect the interface cable if it is
connected. Then, unplug the power plug from the AC power outlet and contact your local authorized
Canon dealer. Continued use can result in a re or electrical shock.
● Do not use ammable spr
ays near the machine. If ammable substances come into contact with
electrical parts inside the machine, this may result in a re or electrical shock.
● Always turn off the po
wer switches of the machine and computer, and then unplug the power plug
and interface cables before moving the machine. Failure to do so can damage the cables or cords,
resulting in a re or electrical shock.
● Conrm that the po
wer plug or power connector is inserted completely after moving the machine.
Failure to do so can result in an overheating and re.
● Do not dr
op paper clips, staples, or other metal objects inside the machine. Also, do not spill water,
liquids, or other ammable substances (alcohol, benzene, paint thinner, etc.) inside the machine. If
these items come into contact with a high-voltage area inside the machine, this may result in a re or
electrical shock. If these items are dropped or spilled inside the machine, immediately turn off the
power switches of the machine and computer and disconnect the interface cable if it is connected.
Then, unplug the power plug from the AC power outlet and contact your local authorized Canon
dealer.
● When plugging or unplugging a USB cable when the po
wer plug is plugged into an AC power outlet,
do not touch the metal part of the connector, as this can result in electrical shock.
CAUTION
● Do not place heavy objects on the machine. The object or the machine may fall, r
esulting in personal
injury.
● T
urn off the power switch when the machine will not be used for a long period of time, such as
overnight. Turn off the machine and unplug the power plug if the machine will not be used for an
extended period of time, such as for several days.
● Open or close co
vers and install or remove cassettes gently and carefully. Be careful not to hurt your
ngers.
● Keep your hands and clothing away fr
om the roller in the output area. Even if the machine is not
printing, the roller may suddenly rotate and catch your hands or clothing, resulting in personal injury.
Important Safety Instructions
8
● The output slot is hot during and immediately after printing. Do not touch the ar
ea surrounding the
output slot, as this may result in burns.
● Printed paper may be hot immediately after being output. Be car
eful when removing the paper and
aligning the removed paper, especially after continuous printing. Failure to do so may result in burns.
● When performing tasks such as clearing paper jams, take care be careful not to reach your hand too
far into the machine. Doing so could result in injury.
● When performing cop
y with a thick book placed on the platen glass, do not press the platen glass
forcefully. This may damage the platen glass and cause personal injury.
● Be car
eful not to drop a heavy object, such as a dictionary, on the platen glass. This may damage the
platen glass and cause personal injury.
● Close the platen glass gently so as not to catch your hand. This may r
esult in personal injury.
● The laser beam can be harmful to the human body
. The laser beam is conned in the laser scanner
unit by a cover, so there is no danger of the laser beam escaping during normal machine operation.
Read the following remarks and instructions for safety.
- Never open covers other than those indicated in this manual.
- Do not remove the caution label attached to the cover of the laser scanner unit.
- If the laser beam should escape and enter your eyes, exposure may cause damage to your eyes.
Important Safety Instructions
9

Maintenance and Inspections
85RS-005
WARNING
● When cleaning the machine, turn off the machine and computer, and unplug the interface cables and
po
wer plug. Failure to do so can result in a re or electrical shock.
● Unplug the po
wer plug from the AC power outlet periodically and clean the area around the base of
the power plug's metal pins and the AC power outlet with a dry cloth to remove all dust and grime. In
damp, dusty, or smoky locations, dust can build up around the power plug and become damp, which
can cause a short circuit, resulting in a re.
● Use a damp, well wrung-out cloth to clean the machine. Dampen cleaning cloths with water only
. Do
not use alcohol, benzine, paint thinner, or other ammable substances. Do not use tissue paper or
paper towels. If these substances come into contact with electrical parts inside the machine, they may
generate static electricity or result in a re or electrical shock.
● Some ar
eas inside the machine are subject to high voltage. When removing jammed paper or when
inspecting inside of the machine, be careful not to allow necklaces, bracelets, or other metal objects to
touch the inside of the machine, as this can result in burns or electrical shock.
● Do not dispose of used toner cartridges in open ames. This may cause the toner r
emaining inside the
cartridges to ignite, resulting in burns or re.
● If you accidentally spill or scatter toner, car
efully gather the toner particles together or wipe them up
with a soft, damp cloth in a way that prevents inhalation.
Never use a vacuum cleaner that does not have safeguards against dust explosions to clean up spilled
toner. Doing so may cause a malfunction in the vacuum cleaner, or result in a dust explosion due to
static discharge.
● Conrm that the po
wer plug or power connector is inserted completely after cleaning the machine.
Failure to do so can result in an overheating and re.
● Check the po
wer cord and plug regularly. The following conditions may result in re, so please contact
your local authorized Canon dealer or the Canon help line.
- There are burn marks on the power plug.
- The blade on the power plug is deformed or broken.
- The power is turned OFF or ON when bending the power cord.
- The coating of the power cord is damaged, cracked, or dented.
- A part of the power cord becomes hot.
● Check r
egularly that the power cord and plug are not handled in the following manner. Failure to do
so can result in a re or electrical shock.
- The power connector is loosened.
- Stress is being applied to the power cord by a heavy object or by xing it with staples.
- The power plug is loosened.
- The power cord is tied in a bundle.
- A part of the power cord is put in an aisle.
- The power cord is put in front of the heating appliance.
Important Safety Instructions
10
CAUTION
● The xing unit and its surr
oundings inside the machine become hot during use. When removing
jammed paper or when inspecting the inside of the machine, do not touch the xing unit and its
surroundings, as this may result in burns.
● When r
emoving jammed paper or when inspecting the inside of the machine, do not expose yourself
to the heat emitted from the xing unit and its surroundings for a prolonged period of time. Doing so
may result in low temperature burns, even though you did not touch the xing unit and its
surroundings directly, as this may result in burns.
● If paper is jammed, r
emove the jammed paper so that any pieces of paper do not remain inside the
machine. Also, do not put your hand in an area other than indicated areas, as this may result in
personal injuries or burns.
● When r
emoving jammed paper or replacing a toner cartridge, be careful not to get any toner on your
hands or clothing, as this will dirty your hands or clothing. If toner gets on your hands or clothing,
wash them immediately with cold water. Washing with warm water sets the toner, making it
impossible to remove the toner stains.
● When r
emoving jammed paper, be careful not to allow the toner on the paper to scatter. The toner
may get into your eyes or mouth. If toner gets into your eyes or mouth, wash them immediately with
cold water and consult a physician.
● When loading paper or r
emoving jammed paper, be careful not to cut your hands with the edges of
the paper.
● When r
emoving a toner cartridge, remove the toner cartridge carefully so as to prevent the toner from
scattering and getting into your eyes or mouth. If toner gets into your eyes or mouth, wash them
immediately with cold water and consult a physician.
● Do not attempt to disassemble the toner cartridge. The toner may scatter and get into your e
yes or
mouth. If toner gets into your eyes or mouth, wash them immediately with cold water and consult a
physician.
● If toner leaks fr
om the toner cartridge, be careful not to inhale the toner or allow it to come into direct
contact with your skin. If the toner comes into contact with your skin, wash with soap. If the skin
becomes irritated or you inhale the toner, consult a physician immediately.
Important Safety Instructions
11

Consumables
85RS-006
WARNING
● Do not dispose of used toner cartridges in open ames. This may cause the toner to ignite, r
esulting in
burns or re.
● Do not stor
e toner cartridges or paper in a location exposed to open ames. This may cause the toner
or paper to ignite, resulting in burns or re.
● When disposing of a toner cartridge, place the toner cartridge into a bag to pr
event the toner from
scattering, and then dispose of the toner cartridge according to local regulations.
● If you accidentally spill or scatter toner, car
efully gather the toner particles together or wipe them up
with a soft, damp cloth in a way that prevents inhalation.
Never use a vacuum cleaner that does not have safeguards against dust explosions to clean up spilled
toner. Doing so may cause a malfunction in the vacuum cleaner, or result in a dust explosion due to
static discharge.
If you are using a cardiac pacemaker
The toner cartridge generates a low level magnetic ux. If you are using a cardiac pacemaker and feel
abnormalities, please move away from the toner cartridge and consult your physician immediately.
CAUTION
● Keep the toner cartridges and other consumables out of the r
each of small children. If the toner or
other parts are ingested, consult a physician immediately.
● Do not attempt to disassemble the toner cartridge. The toner may scatter and get into your e
yes or
mouth. If toner gets into your eyes or mouth, wash them immediately with cold water and consult a
physician.
● If toner leaks fr
om the toner cartridge, be careful not to inhale the toner or allow it to come into direct
contact with your skin. If the toner comes into contact with your skin, wash with soap. If the skin
becomes irritated or you inhale the toner, consult a physician immediately.
● Do not pull out the sealing tape for
cefully or stop at midpoint, as this may cause toner to spill out. If
toner gets into your eyes or mouth, wash them immediately with cold water and consult a physician.
IMPORTANT
Be careful of counterfeit toner cartridges
Please be awar
e that there are counterfeit Canon toner cartridges in the marketplace. Use of counterfeit
toner cartridge may result in poor print quality or machine performance. Canon is not responsible for
any malfunction, accident or damage caused by the use of counterfeit toner cartridge.
For more information, see global.canon/ctc.
Toner cartridge packing materials
● Save the packing materials for the toner cartridge. They are required when transporting this machine.
● The packing materials may be changed in form or placement, or may be added or removed without
notice.
Important Safety Instructions
12

● After you pull out the sealing tape fr
om the toner cartridge, dispose of it in accordance with the
applicable local regulations.
When disposing of a used toner cartridge or the like
When discarding a toner cartridge or the like, place it in the original packing material to prevent toner
from scattering from inside, and dispose of it in accordance with the applicable local regulations.
Important Safety Instructions
13

Others
85RS-007
WARNING
If you are using a cardiac pacemaker
This machine gener
ates a low level magnetic eld. If you use a cardiac pacemaker and feel abnormalities,
please move away from this machine and consult your physician immediately.
Important Safety Instructions
14

Installation and Handling
85RS-008
T
o make sure safe and trouble-free operation, the following installation requirements must be observed.
Read the instructions carefully before installing the machine.
T
emperature and Humidity Conditions(P. 15)
Po
wer Supply Requirements(P. 15)
Installation Requir
ements(P. 16)
Installation Space
(P. 17)
Maintenance and Inspections
(P. 17)
Customer Support
(P. 17)
IMPORTANT
Important Safety Instructions
Be sur
e to read "Important Safety Instructions" before installing the machine.
Temperature and Humidity Conditions
● T
emperature range: 10 to 30°C (50 to 86°F)
● Humidity range: 20 to 80 % RH (no condensation)
IMPORTANT
Protecting the machine from condensation
● Allo
w the machine to adjust to the installation environment (room temperature and humidity) for at
least two hours before using, to prevent condensation from forming inside the machine when:
- the installation location is warmed up too rapidly.
- the machine has been moved to a hot, humid location from a cool, dry location.
● If water dr
oplets (condensation) form inside the machine, this may result in paper jams or poor print
quality.
To use an ultrasonic humidier
W
e recommend that puried or impurity-free water be used when using an ultrasonic humidier.
The use of tap water or well water may result in contamination by impurities in the air, as well as print
quality degradation due to water trapped inside the machine.
Power Supply Requirements
110 to 127 V
, 50/60 Hz
IMPORTANT
Precautions when connecting the power cord
● Do not connect the machine to an uninterruptible power source.
Important Safety Instructions
15

● Mak
e sure to plug an AC power plug into the AC outlet. Do not use the other sockets of the AC outlet.
● Do not plug the po
wer plug into the auxiliary outlet on a computer.
Do not connect the machine and any of the following devices to the same AC outlet.
- Copy machine
- Air conditioner
- Shredder
- Equipment that consumes a large amount of electricity
- Equipment that generates electrical noise
● W
ait for at least ve seconds to plug the power cord into the outlet again after the cord has been
unplugged.
Miscellaneous precautions
● The maximum po
wer consumption of the machine is 900 W or less.
● Electrical noise or a dr
amatic voltage drop may result in improper operation and irretrievable data
loss.
Installation Requirements
● A location that has sucient fr
ee space
● A location that has good ventilation
● A location that has a at, even surface
● A location that can withstand the weight of the machine
IMPORTANT
Do not install the machine at the following locations, as this may result in product
damage.
● A location subject to dramatic temperature and humidity changes
● A location subject to condensation
● A poorly ventilated location
(If you perform high-volume printing for an e
xtended period of time using the machine placed in a
poorly ventilated room, you may be exposed to ozone and odors generated by the machine, as well as
chemical particles released during printing.
It is highly important that proper ventilation be assured at the installation location.)
● A location near equipment that gener
ates magnetic or electromagnetic waves
● A labor
atory or location where chemical reactions occur
● A location e
xposed to salt air, corrosive gases, or toxic gases
● A location wher
e the oor is covered with a carpet or oor mat, to cause the machine to slide easily
over or sink into the carpet or mat from its weight
Important Safety Instructions
16
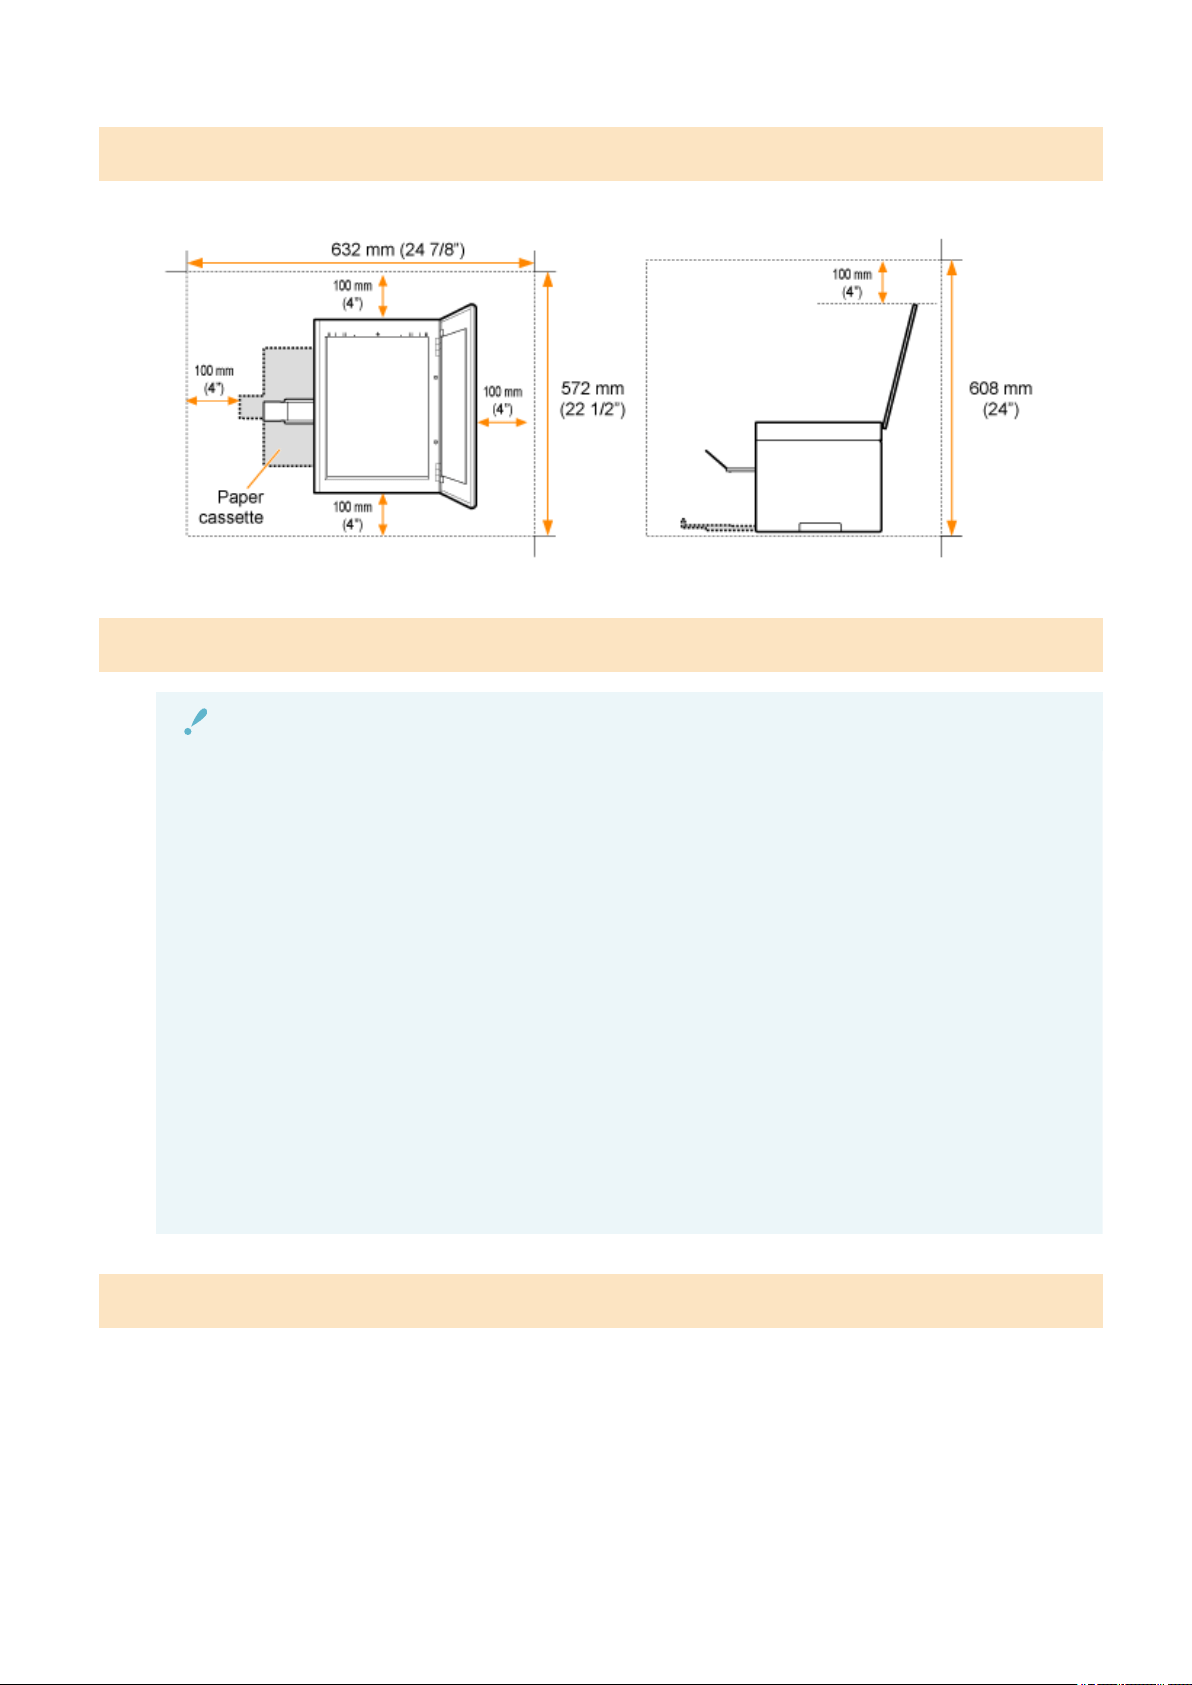
Installation Space
Required installation space
Maintenance and Inspections
IMPORTANT
● Follo
w the instructions written on the caution label attached to this machine.
● Avoid shaking or applying a shock to the machine.
● T
o prevent a paper jam, do not turn the power ON/OFF, open/close the operation panel or rear cover,
and load/unload paper in the middle of printing operation.
● Be sur
e to remove the toner cartridges from the machine when moving the machine.
● T
o avoid exposing the toner cartridge to light, place it in the protective bag that comes with the
machine or wrap it in a thick cloth.
● Clean this machine periodically
. If dust accumulates, the machine may not operate properly. If a
problem occurs during operation, see " Troubleshooting(P. 152) ". If the problem cannot be resolved
or you feel the machine requires an inspection, see " When a Problem cannot be Resolved(P. 189) ".
● The r
epair parts and toner cartridge for use with the machine will be available for at least seven (7)
years after this machine model has been discontinued.
Customer Support
The machine is designed to mak
e sure safe use and be maintenance-free. If a problem occurs during operation,
see " Troubleshooting(P. 152) ." When the problem cannot be resolved after referring to the appropriate
trouble shooting section, contact your local authorized Canon dealer or the Canon help line.
Important Safety Instructions
17

Basic Operation
Basic Operation .................................................................................................................................................
19
Parts and Their Functions ................................................................................................................................... 20
Front Side ....................................................................................................................................................... 21
Back Side ........................................................................................................................................................ 22
Interior ........................................................................................................................................................... 23
Paper Cassette ................................................................................................................................................ 24
Operation Panel and Display .......................................................................................................................... 25
Using the Quick Reference Guide ....................................................................................................................... 27
Energy Saving Functions (Sleep Mode) ............................................................................................................... 29
How to Operate Menus ....................................................................................................................................... 30
Setting List ........................................................................................................................................................... 31
Toner Cartridges .................................................................................................................................................. 36
About the Supplied Toner Cartridge ............................................................................................................... 37
About Replacement Toner Cartridges ............................................................................................................. 38
Handling Toner Cartridges ............................................................................................................................. 39
Storing Toner Cartridges ................................................................................................................................ 41
Purchasing Consumables ............................................................................................................................... 42
Placing Documents .............................................................................................................................................. 43
Attention (Placing Documents) ....................................................................................................................... 45
Loading Paper ...................................................................................................................................................... 46
In the Paper Cassette ..................................................................................................................................... 47
Attention (Loading Paper) ........................................................................................................................ 50
Paper Loading Capacity .................................................................................................................................. 51
Paper Loading Orientation ............................................................................................................................. 52
Setting a Paper Type ........................................................................................................................................... 54
Initializing Menus ................................................................................................................................................ 56
Printing the User Data List ................................................................................................................................. 57
Upgrading Firmware ........................................................................................................................................... 58
Locating the Serial Number ................................................................................................................................ 59
Basic Operation
18

Basic Operation
85RS-009
This chapter describes the featur
es and useful functions of the machine.
The following sections give a brief overview of the machine and instructions on how to use the machine
eciently. Read these sections thoroughly before using the machine.
Learning about parts of the machine See " Parts and Their Functions
(P. 20) ."
Learning about energy saving functions (sleep functions) See " Energy Saving Functions (Sleep Mode)(P. 29) ."
Navigating the Menu See " How to Operate Menus(P. 30) ."
Checking the details of the toner cartridges See " Toner Cartridges(P. 36) ."
Placing documents See " Placing Documents(P. 43) ."
Loading paper See " Loading Paper(P. 46) ."
Setting the paper type See " Setting a Paper Type(P. 54) ."
Restoring the setup menus to the default value See " Initializing Menus(P. 56) ."
To check menu settings
See " Printing the User Data List
(P. 57) ."
Checking the counter
Learning about rmware upgrades See " Upgrading Firmware(P. 58) ."
Locating the serial number See " Locating the Serial Number(P. 59) ."
Basic Operation
19

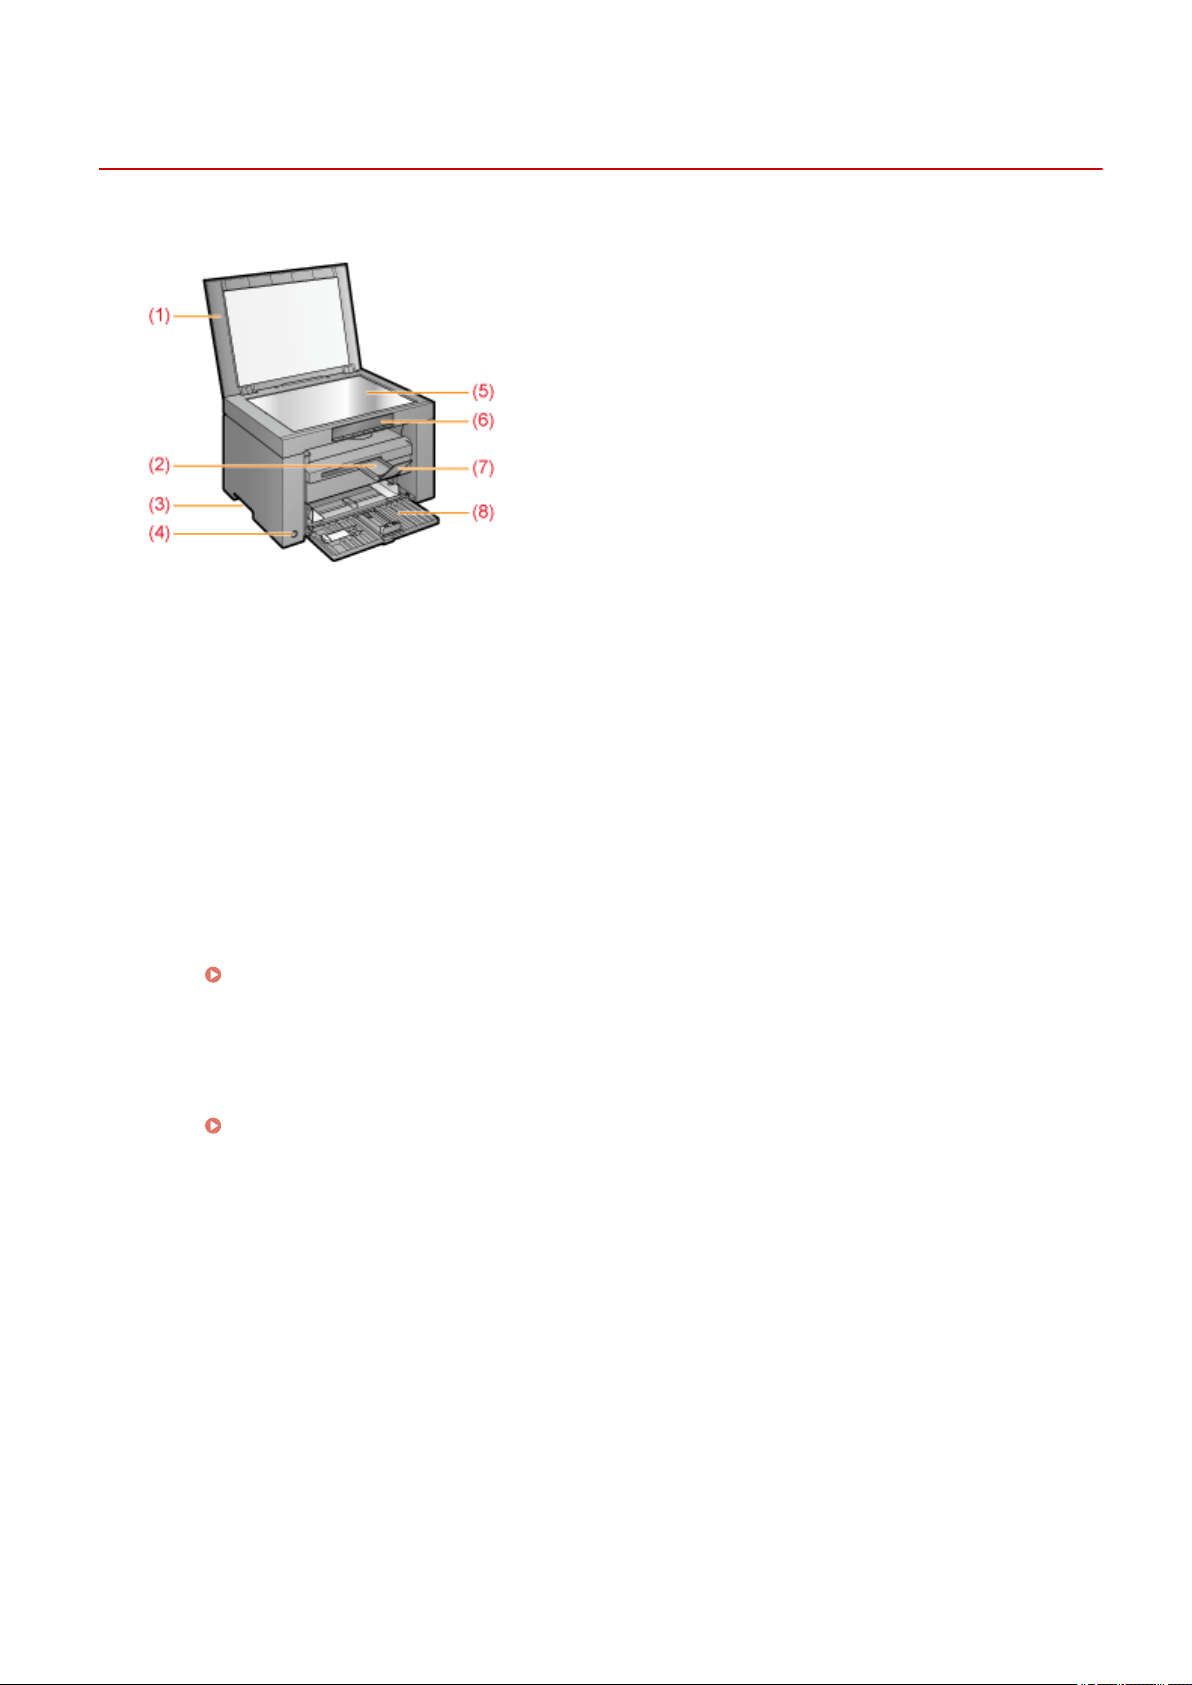
Front Side
85RS-00C
(1) Platen Glass Cover
Pr
otects the platen glass.
(2) Output Tray Extension
Extend this tray to load large size documents.
(3) Lift Handles
Hold this handles to lift or transport the machine.
(4) Power Switch
Used to switch the machine ON or OFF.
(5) Platen Glass
Load paper.
(6) Operation Panel
Used to control the machine.
" Oper
ation Panel and Display(P. 25) "
(7) Paper Stopper
Prevents paper from falling from the output tray.
(8) Paper Cassette
Load the paper.
" Paper Cassette(P
. 24) "
Basic Operation
21

Back Side
85RS-00E
(1) Rating Label
The curr
ent value indicated in this rating label shows the average power current consumption.
(2) USB Port
Connect the USB cable.
(3) Power Socket
Connect the power cord.
Basic Operation
22

Interior
85RS-00F
(1) Scanning Platform
Open this co
ver to replace the toner cartridge or clear paper jams.
(2) Toner Cover
Open this cover to replace the toner cartridge or clear paper jams.
( 3) Toner Guides
Used to insert the toner cartridge so that the protrusion on the side of the toner cartridge ts into these
guides.
(4) Transfer Roller
Used to transfer toner onto paper.
Basic Operation
23

Paper Cassette
85RS-00H
(1) Paper Guides
Adjust these guides to t the document.
Basic Operation
24
Operation Panel and Display
85RS-00J
Oper
ation Panel(P. 25)
Vie
wing the Display(P. 25)
Operation Panel
NOTE
When [ ], [ ], and [ ] are on at a time
A service error is occurring.
" When a Service Err
or Has Occurred(P. 188) "
Viewing the Display
Cop
y settings, menu setting items, or setting values are displayed.
" Setting List(P
. 31) "
Also, they are displayed according to the printer status as follows.
Display Status
Basic Operation
25
Display Status
● Printing
● Printing the User Data List
● Cleaning
● Updating the rmwar
e
● Scanning
Cancellation is processing after the [ ] key was pressed.
Sleep state
" Ener
gy Saving Functions (Sleep Mode)(P. 29) "
The toner cover is open.
A service error has occurred.
" When a Service Error Has Occurred(P. 188) "
● Resetting the settings
● Setting value limit display
(For each cop
y setting, the display turns off when an attempt is made to exceed the upper or
lower setting limits by pressing the [ + ] or [ - ] keys.)
Basic Operation
26
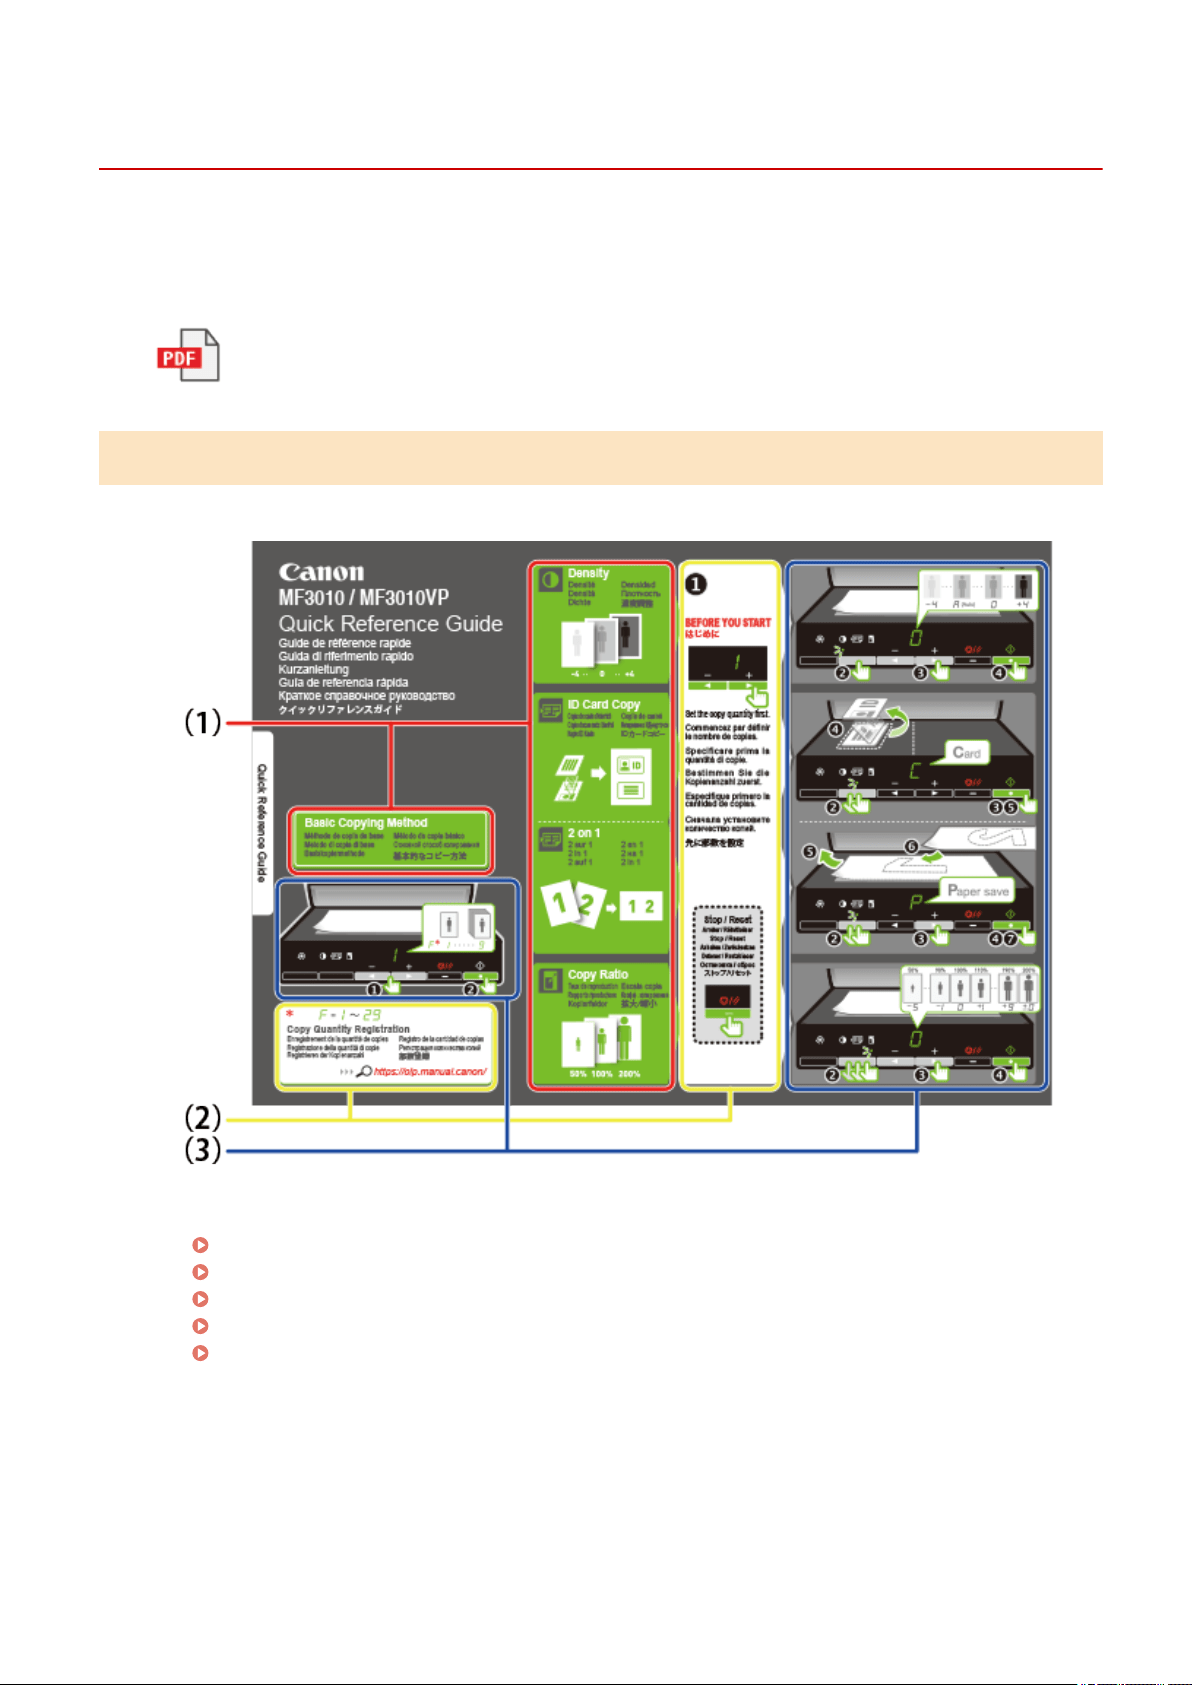
Using the Quick Reference Guide
85RS-00K
Place this guide near the printer for effective usage.
Quick Refer
ence Guide
Front side (operating instruction page)
(1) Description of Various Copy
" Basic Cop
y Operations(P. 76) "
" Adjusting the Density
(P. 79) "
" Enlar
ging/Reducing Copy(P. 81) "
" Cop
ying Both Sides of Cards onto One Side (ID Card Copy)(P. 83) "
" Cop
ying Two Documents onto One Sheet (2 on 1 Copy)(P. 86) "
(2) Quantity Settings
If you frequently copy with the xed quantity, see " Registering the Quantity that You Frequently Copy
(Up to Twenty-nine Copies)(P. 78) ."
(3) Operating Procedures
Follow the procedure in numerical order.
For details on the setting values for each setting, see " Setting List(P. 31) ."
Basic Operation
27

Energy Saving Functions (Sleep Mode)
85RS-00L
A function is pr
ovided that transitions the printer into an energy saving mode with low power consumption
(sleep function) when it is not used for a set period of time. After 5 minutes* has elapsed during which time
data is not received from the computer and there are no changes to the printer, it transitions into the sleep
mode.
*
You cannot change the transition time.
IMPORTANT
Power consumption when the printer is turned OFF
Even when the printer is turned OFF a tiny amount of po
wer is still being consumed while the printer is
plugged into an AC power outlet. In order to eliminate power consumption completely, unplug the power
cord from the AC power outlet.
When entering the sleep mode
All indicators turn off and the display shows " - ".
Situations where the machine does not enter the sleep mode
● When the machine is in operation
● When data remains in the memory
● When an error, such as open cover, occurs in the printer
● When the machine is operating such as adjusting and cleaning
● When a paper jam occurs in the machine
● When it updates the rmware
The machine resumes from the sleep mode
● When any key on the printer's operation panel is pressed
● When a print job is sent from a computer, and printing starts
● When USB cables are connected
Basic Operation
29
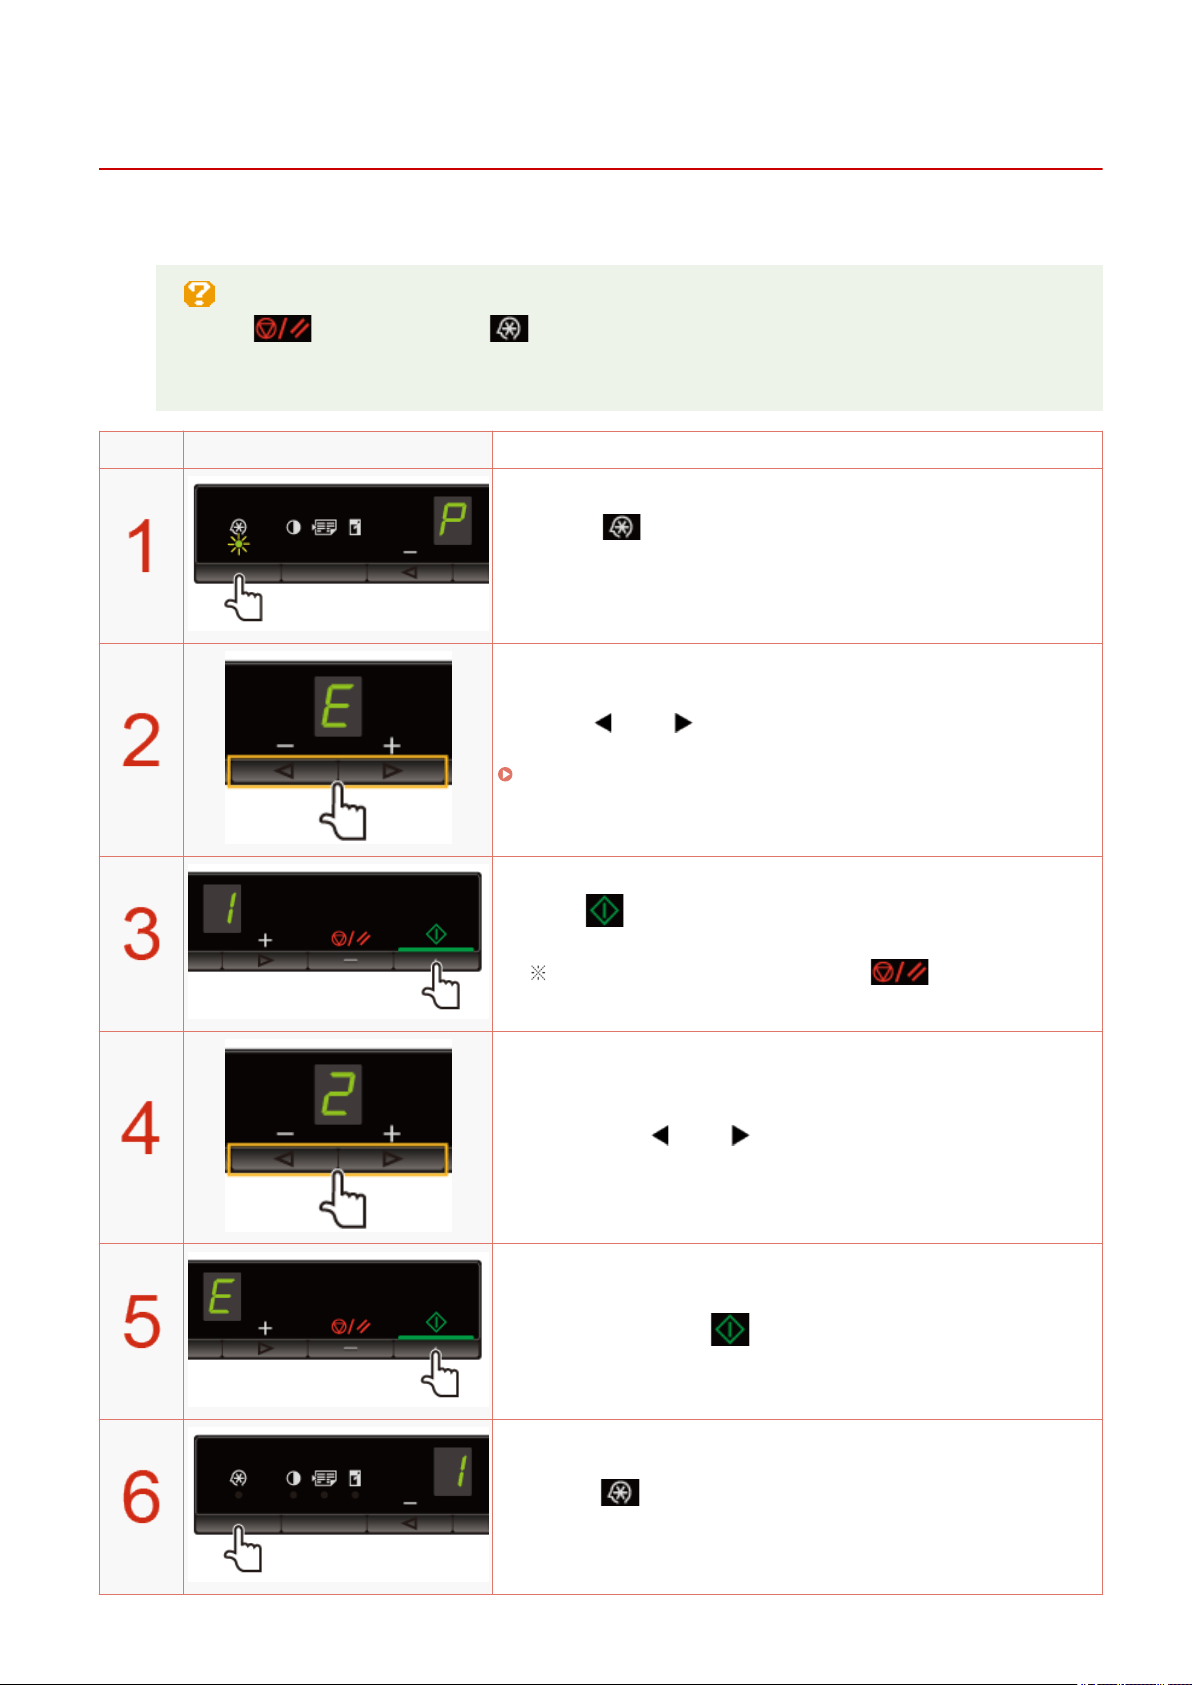
How to Operate Menus
85RS-00R
This section describes haw to oper
ate or set up the menu.
T
o cancel operations
Press [
], and then press [ ] (Menu setting key).
It cancels oper
ations without saving the settings and returns to a status where normal operation is
possible.
Operating results Operating procedures
Press [ ] (Menu setting key), and then start the menu
oper
ation.
When the menu is operating, the menu indicator blinks.
Press [ ] or [ ], select the items which you want to set.
Letters sho
wing menu items are displayed on the display.
" Setting List(P
. 31) "
Press [ ], set the menu to be able to change the settings.
To return to the previous screen, press [ ].
Press [ ] or [ ], change the setting values.
Press [ ], conrm the setting.
Press [ ] (Menu setting key), exit the menu operation.
The menu indicator turns off.
Basic Operation
30
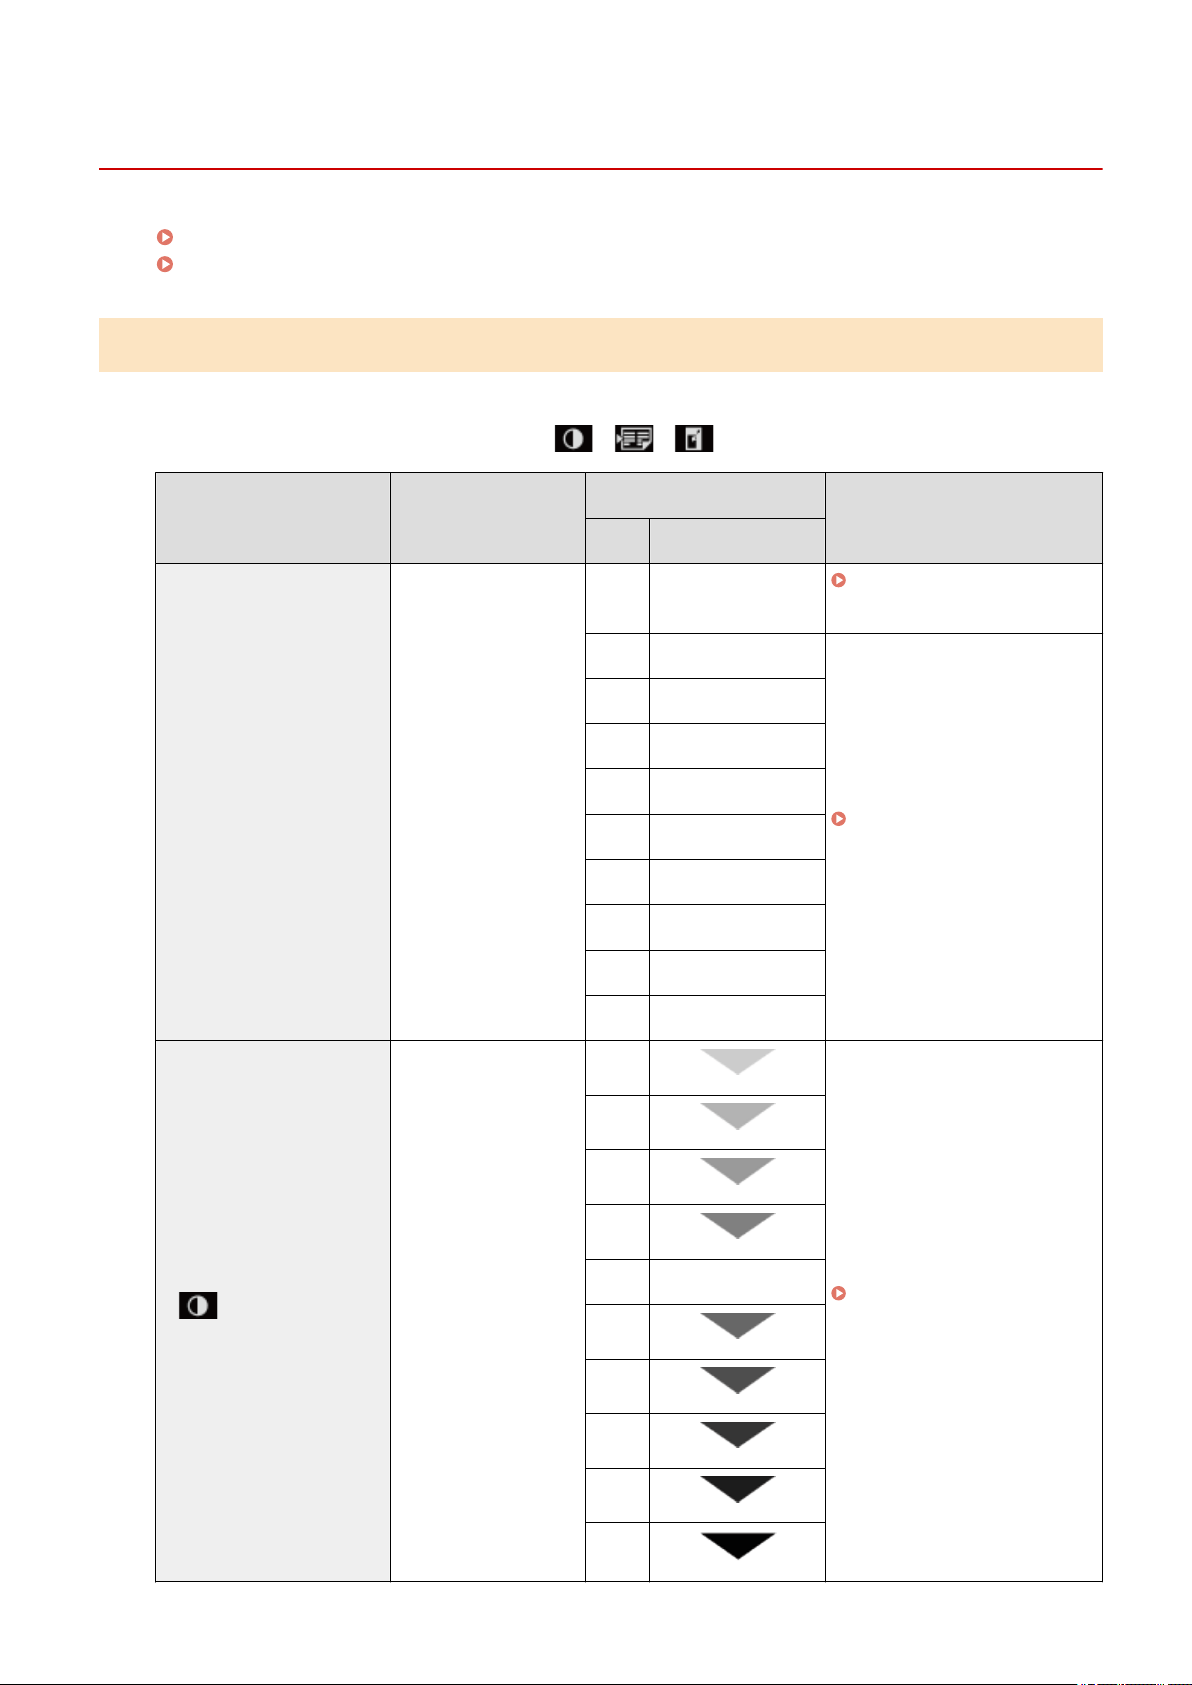
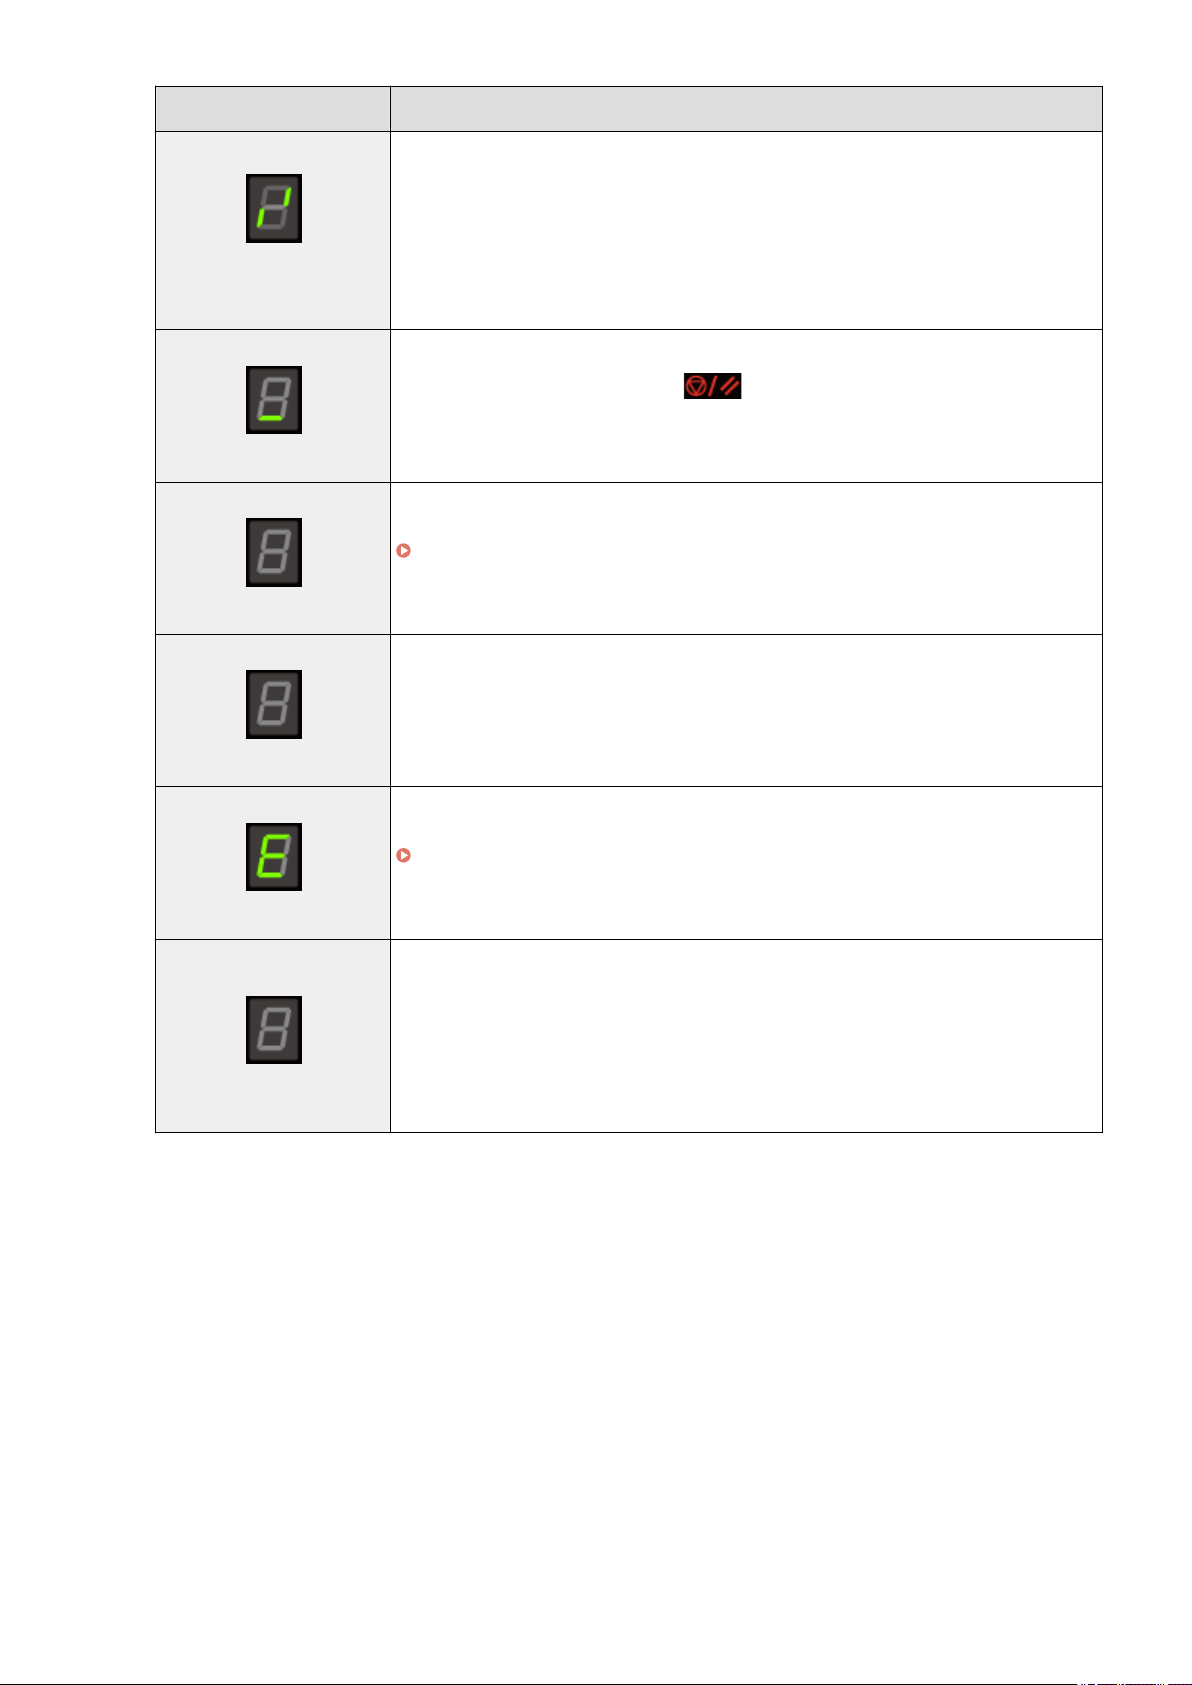
Setting List
85RS-00S
Cop
y Setting List(P. 31)
Menu Setting List(P
. 33)
Copy Setting List
The following copy settings are available for the printer.
You can switch the copy settings by pressing [ ] (Copy setting key).
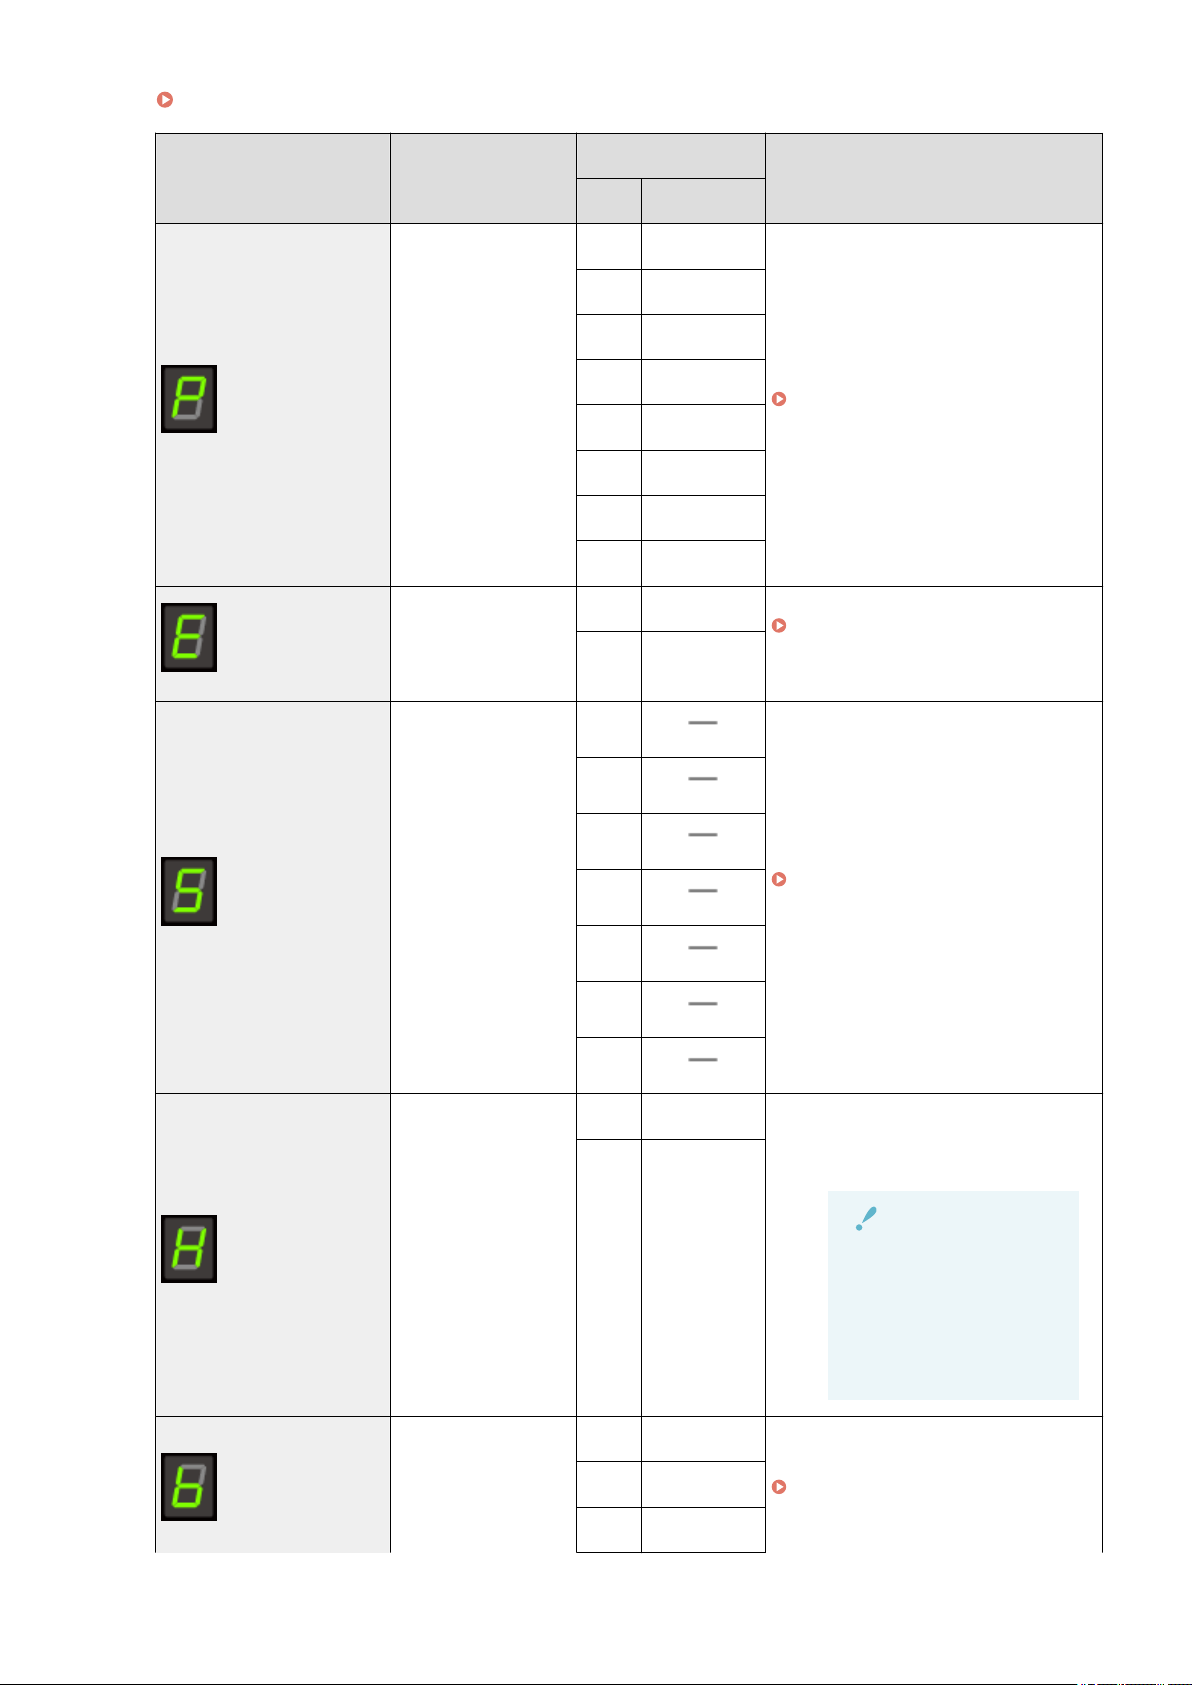
Indicator
Function name
(Default value)
Setting value
Reference
Display Detail
No blinking
Copy quantity setting
(Default value: 1)
F Custom copy quantity
" Custom cop
y quantity(P. 32)
"
1 1 copy
" Basic Cop
y Operations(P. 76)
"
2 2 copies
3 3 copies
4 4 copies
5 5 copies
6 6 copies
7 7 copies
8 8 copies
9 9 copies
[
] indicator
Copy density
(Default value: 0)
-4
" Adjusting the Density(P. 79)
"
-3
-2
-1
A Auto
0
+1
+2
+3
+4
Basic Operation
31
Indicator
Function name
(Default value)
Setting value
Reference
Display Detail
[ ] indicator
2 on 1/ID card copy
(Default value: C)
C ID card copy
" Cop
ying Both Sides of Cards
onto One Side (ID Card Copy)
(P. 83) "
P 2 on 1 copy
" Cop
ying Two Documents onto
One Sheet (2 on 1 Copy)(P. 86) "
[
] indicator
Enlarging/reducing copy
(Default value: 0)
-5 50%
" Enlar
ging/Reducing
Copy(P. 81) "
-4 60%
-3 70%
-2 80%
-1 90%
0 100% (magnication)
+1 110%
+2 120%
+3 130%
+4 140%
+5 150%
+6 160%
+7 170%
+8 180%
+9 190%
±0 200%
NOTE
Indicator display
The display is changed for each of [
], [ ], and [ ] indicators according to the status.
Blinking : The function indicator in the setting process blinks.
Lighted : After the setting is done, the corresponding indicator lights up.
Custom copy quantity
Function name
(Default value)
Setting value
Reference
Display Detail
Custom copy quantity
(Default value: ±0)
1 1 copy
" Registering the Quantity that Y
ou Frequently Copy
(Up to Twenty-nine Copies)(P. 78) "
2 2 copies
Basic Operation
32
Function name
(Default value)
Setting value
Reference
Display Detail
3 3 copies
4 4 copies
5 5 copies
6 6 copies
7 7 copies
8 8 copies
9 9 copies
+0 10 copies
+1 11 copies
+2 12 copies
+3 13 copies
+4 14 copies
+5 15 copies
+6 16 copies
+7 17 copies
+8 18 copies
+9 19 copies
±0 20 copies
±1 21 copies
±2 22 copies
±3 23 copies
±4 24 copies
±5 25 copies
±6 26 copies
±7 27 copies
±8 28 copies
±9 29 copies
Menu Setting List
The follo
wing menu settings are available for the printer.
After pressing [
] (Menu setting key), press [ ] or [ ] to switch the menu settings.
Basic Operation
33
Ho
w to Operate Menus(P. 30)
Indicator
Function name
(Default value)
Setting value
Reference
Display Detail
Paper type setting
(Default value: 1)
1 Plain paper
" Setting a Paper T
ype(P. 54) "
+1 Plain Paper L
2 Heavy Paper 1
+2 Heavy Paper 2
3 Rough Paper
4 Envelope
5 Transparency
6 Label
Copy type setting
(Default value: 1)
1 Speed Priority
" Selecting Cop
y Type (Speed Priority/
Resolution Priorlty)(P. 88) "
2
Resolution
Priorlty
Sharpness setting
(Default value: 0)
-3
" Emphasizing the Outline of an Image
(Sharpness)(P
. 90) "
-2
-1
0
+1
+2
+3
Product Extended
Surve
y Program
On/Off
(Default value: 1)
0 Off Enable or disable the Product Extended
Surve
y Program (a program for the
machine usage survey).
IMPORTANT
When the setup is
complete
Restart the machine to
tak
e effect the
settings.
1 On
Special Mode b
(Default value: 1)
0 Off
" Special Mode
(P. 213) "
1 Mode 1
2 Mode 2
Basic Operation
34

Indicator
Function name
(Default value)
Setting value
Reference
Display Detail
3 Mode 3
4 Mode 4
Special Mode c
(Default value: 0)
0 Off
" Special Mode
(P. 213) "
1 Mode 1
2 Mode 2
3 Mode 3
Special Mode d
(Default value: 0)
0 Off
" Special Mode
(P. 213) "1 Mode 1
2 Mode 2
Special Mode h
(Default value: 0)
0 Off
" Special Mode
(P. 213) "
1 On
Cleaning the Fixing
Unit
" Cleaning the Fixing Unit
(P. 198) "
Printing the User Data
List
" Printing the User Data List(P
. 57) "
Upgrading Firmware " Upgr
ading Firmware(P. 58) "
Initializing Menus " Initializing Menus
(P. 56) "
Basic Operation
35

Toner Cartridges
85RS-00U
For mor
e information on the toner cartridges, see the following sections.
" About the Supplied T
oner Cartridge(P. 37) "
" About Replacement T
oner Cartridges(P. 38) "
" Handling T
oner Cartridges(P. 39) "
" Storing T
oner Cartridges(P. 41) "
" Pur
chasing Consumables(P. 42) "
Basic Operation
36

About the Supplied Toner Cartridge
85RS-00W
The aver
age yield of the toner cartridge that comes with the machine is as follows.
Canon Cartridge 125 Starter
Average yield
*1
: 700 sheets
*1
The average yield is on the basis of "ISO/IEC 19752"
*2
under the condition that A4 size paper is used for
printing with the default print density setting.
*2
"ISO/IEC 19752" is an ISO standard method for "the determination toner cartridge yield for
monochr
ome electrophotographic printers and multi-function devices that contain printer
components." The term ISO stands for International Organization for Standardization.
The average yield of the replacement toner cartridge varies from that of the supplied toner cartridge.
Basic Operation
37

About Replacement Toner Cartridges
85RS-00X
Pur
chase replacement toner cartridges from your local authorized Canon dealer.
Follow the instructions provided in the following sections to replace the toner cartridge. Note that you may
need to replace the toner cartridge earlier than the suggested replacement interval, depending on where the
machine is installed, what kinds of paper used for printing, and what types of documents that you are printing.
Canon genuine toner cartridge Replacement Intervals
Canon Cartridge 125
Average yield
*1
: 1600 sheets
*1
The average yield is on the basis of "ISO/IEC 19752"
*2
under the condition that A4 size paper is used for
printing with the default print density setting.
*2
"ISO/IEC 19752" is an ISO standard method for "the determination toner cartridge yield for
monochr
ome electrophotographic printers and multi-function devices that contain printer
components."
IMPORTANT
About replacement toner cartridges
For optimum print quality
, using Canon genuine toner cartridges is recommended.
Model name Supported Canon genuine toner cartridge
MF3010 / MF3010VP Canon Cartridge 125
Basic Operation
38

Handling Toner Cartridges
85RS-00Y
Note the follo
wing when handling the toner cartridge.
WARNING
Do not place the toner cartridge in r
e.
This may cause toner remaining inside the cartridge to ignite and result in burns.
When cleaning up spilled or scattered toner
If you accidentally spill or scatter toner, carefully gather the toner particles together or wipe them up
with a soft, damp cloth in a way that prevents inhalation.
Never use a vacuum cleaner that does not have safeguards against dust explosions to clean up spilled
toner. Doing so may cause a malfunction in the vacuum cleaner, or result in a dust explosion due to
static discharge.
CAUTION
If toner leaks from the toner cartridge
Be car
eful not to inhale the toner or allow it to come into direct contact with your skin. If the toner comes
into contact with your skin, wash with soap. If the skin becomes irritated or you inhale the toner, consult
a physician immediately.
When removing a toner cartridge
Make sure to remove it carefully. If not removed with care, the toner powder may scatter and come in
contact with your eyes and mouth. If toner gets into your eyes or mouth, wash them immediately with
cold water and consult a physician.
Keep the toner cartridge away from small children.
If the toner or other parts are ingested, consult a physician immediately.
Do not disassemble the toner cartridge.
The toner may scatter and get into your eyes or mouth. If toner gets into your eyes or mouth, wash them
immediately with cold water and consult a physician.
IMPORTANT
Handling toner cartridges
● Keep the toner cartridge away fr
om computer screens, disk drives, and oppy disks. They may be
damaged by magnet which is in inside of the toner cartridge.
● Avoid locations subject to high temperature, high humidity, or rapid changes in temperature.
● Do not expose the toner cartridge to direct sunlight or bright light for more than ve minutes.
● Store the toner cartridge in its protective bag. Do not open the bag until you are ready to install the
toner cartridge in the machine.
● Keep the protective bag for the toner cartridge. They are required when transporting the machine
such as during relocation.
● Do not store the toner cartridge in a salty atmosphere or where there are corrosive gases such as
from aerosol sprays.
● Do not remove the toner cartridge from the machine unnecessarily.
● Print quality may deteriorate if the drum surface is exposed to light or is damaged.
● Always hold the toner cartridge by its handle to avoid touching the drum.
Basic Operation
39

● Do not place the toner cartridge in an upright or an upside do
wn position. If the toner is kept upright
or upside down, the toner will solidify and may not return to its original condition even if it is shaken.
● When disposing of a used toner cartridge, place the toner container into its protective bag to prevent
the toner from scattering, and then dispose of the toner cartridge according to local regulations.
Be careful of counterfeit toner cartridges.
Please be awar
e that there are counterfeit Canon toner cartridges in the marketplace.
Use of counterfeit toner cartridge may result in poor print quality or machine performance.
Canon is not responsible for any malfunction, accident or damage caused by the use of counterfeit toner
cartridge.
For more information, see http://www.canon.com/counterfeit.
Basic Operation
40

Storing Toner Cartridges
85RS-010
Be awar
e of the following points when storing a new toner cartridge or handling the toner cartridge that was
taken out of the machine for maintenance or relocating the machine somewhere.
IMPORTANT
Precautions when storing toner cartridges
T
o use toner cartridges in a safe and trouble-free manner, store them in a place that fullls the following
conditions.
● Do not store toner cartridges in a location exposed to direct sunlight.
● Do not store toner cartridges in a location subject to high temperature or humidity or in a location
with dramatic changes in temperature or humidity.
- Storage temperature range: 0 to 35°C (32 to 95°F)
- Storage humidity range: 35 to 85% RH (no condensation)
● Do not store toner cartridges in a place where corrosive gases, such as ammonia, are generated, or
where a considerable amount of salt is contained in the air, or where there is a lot of dust.
● Keep toner cartridges out of the reach of small children.
● Keep toner cartridges away from products that may be damaged by magnetism, such as a oppy disk
or disk drive.
Store toner cartridges in the same orientation as when they are installed in the
machine.
Do not stor
e toner cartridges vertically or upside-down.
When removing the toner cartridge which is being used from the machine
Immediately place the r
emoved toner cartridge into the original protective bag or wrap it with a thick
cloth.
About a new toner cartridge
Do not tak
e a new toner cartridge out of the protective bag until it is ready to be used.
NOTE
About condensation
Even within the stor
able humidity range, water droplets may develop both inside and outside toner
cartridges due to the difference in temperature. The formation of water droplets is called condensation.
Condensation will adversely affect the quality of toner cartridges.
Basic Operation
41

Purchasing Consumables
85RS-011
T
o purchase replacement toner cartridges, contact your local authorized Canon dealer.
To nd a dealer near, contact the Canon help line.
Basic Operation
42

Placing Documents
85RS-012
This section describes ho
w to place documents on the platen glass.
Before placing the documents on the platen glass, see " Attention (Placing Documents)
(P. 45) ."
1
Open the platen glass.
2
Place your document face down.
3
Align the document with the appropriate paper size marks.
If the document does not match any of the paper size marks, align the center of your document with the arrow
mark.
Basic Operation
43

4
Close the platen glass gently.
The machine is ready to scan or copy the document.
When scanning or cop
ying is complete, remove the document from the platen glass.
Basic Operation
44

Attention (Placing Documents)
85RS-013
CAUTION
Precautions when closing the platen glass
● Be car
eful not to get your ngers caught. This may cause personal injury.
● Do not press down the feeder forcefully. This may damage the platen glass and cause personal injury.
Basic Operation
45

Loading Paper
85RS-014
This section describes ho
w to load paper in the paper cassette.
NOTE
To set your choice of paper type
By default, the paper type is set to Plain paper (60 to 90 g/m² (16 to 24 lb Bond)). T
o use a different paper
type, you need to change the default settings.
" Setting a Paper T
ype(P. 54) "
" In the Paper Cassette
(P. 47) "
Basic Operation
46
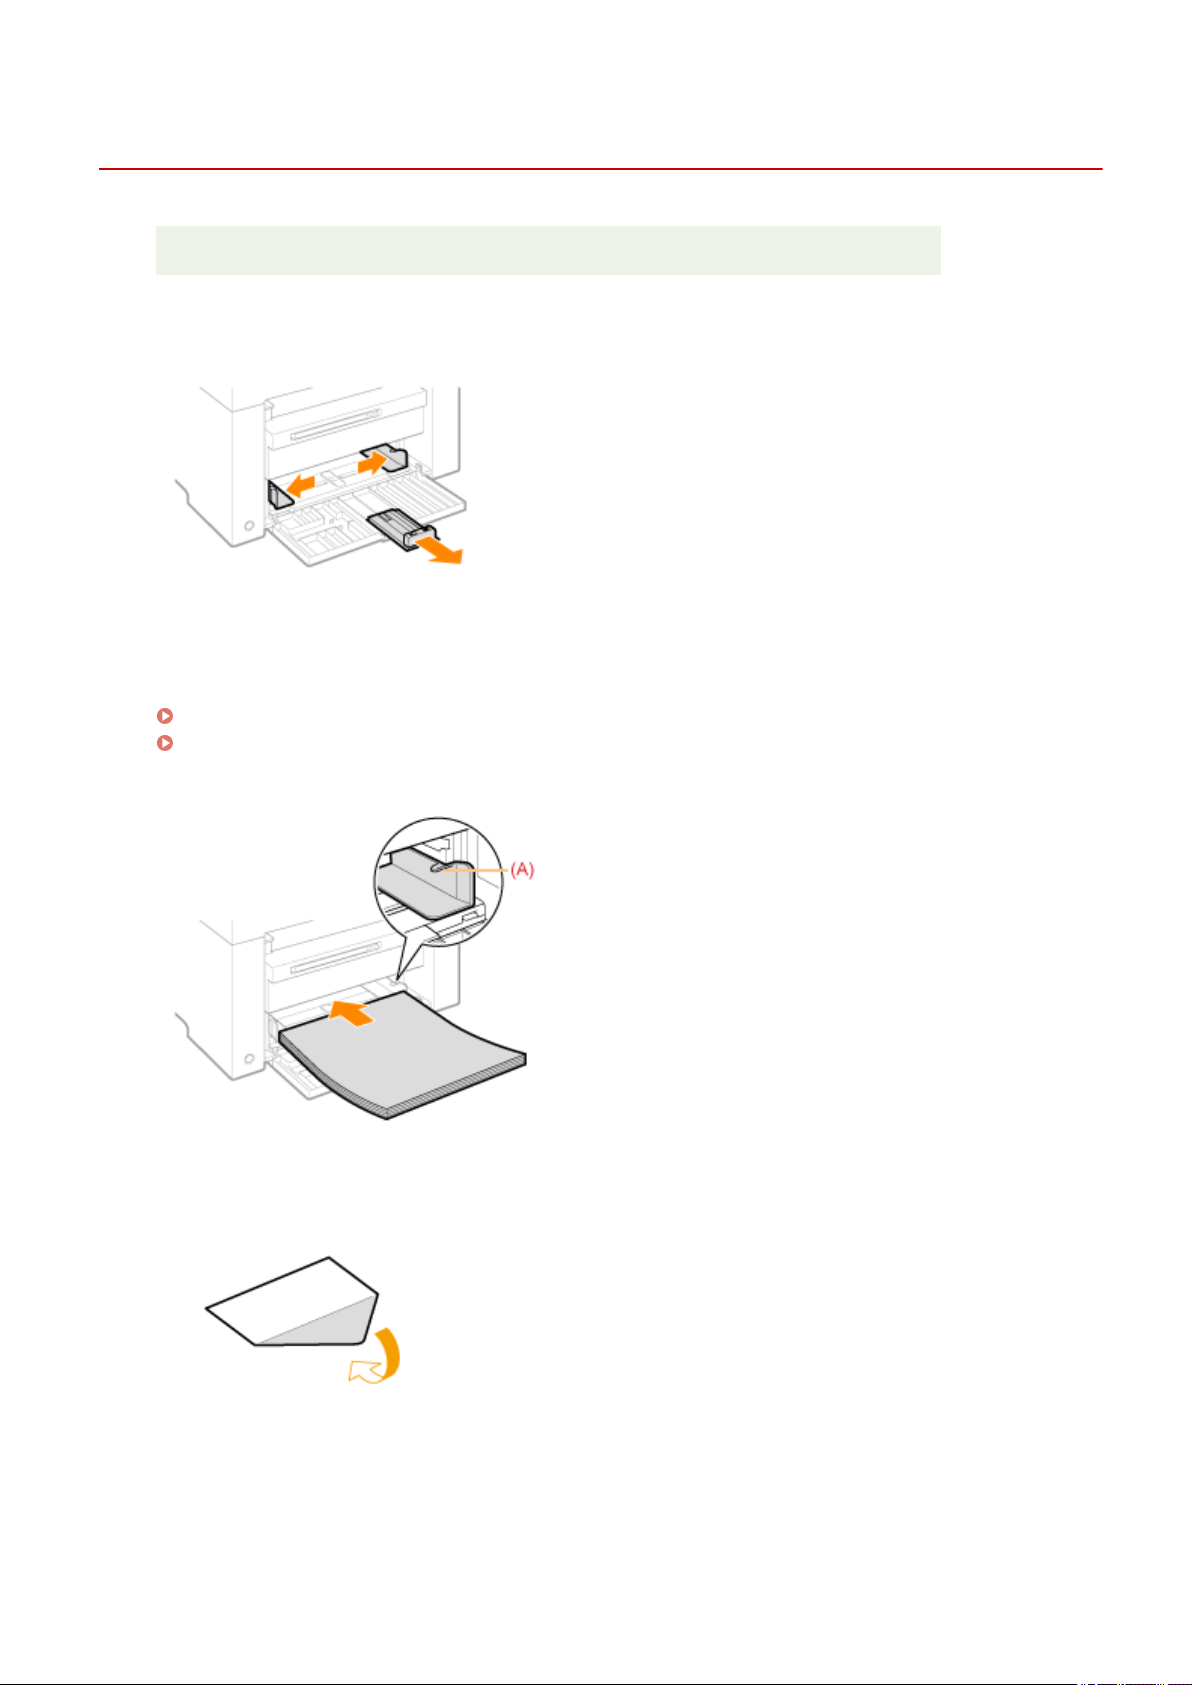
In the Paper Cassette
85RS-015
Before loading paper in the paper cassette, see " Attention (Loading Paper)(P
. 50) ."
1
Spread the paper guides a little wider than the paper size.
2
Gently load the paper stack into the paper cassette with the print side face up, until
the edge of the paper stack meets the back of the paper cassette.
" Paper Loading Capacity
(P. 51) "
" Paper Loading Orientation(P
. 52) "
Make sure that the paper stack does not exceed the load limit guides (A).
When loading envelopes
(1) Fold the envelope ap.
(2) Place the stack of envelopes on a at surface, atten them to r
elease any remaining air, and make sure that
the edges are pressed tightly.
Basic Operation
47
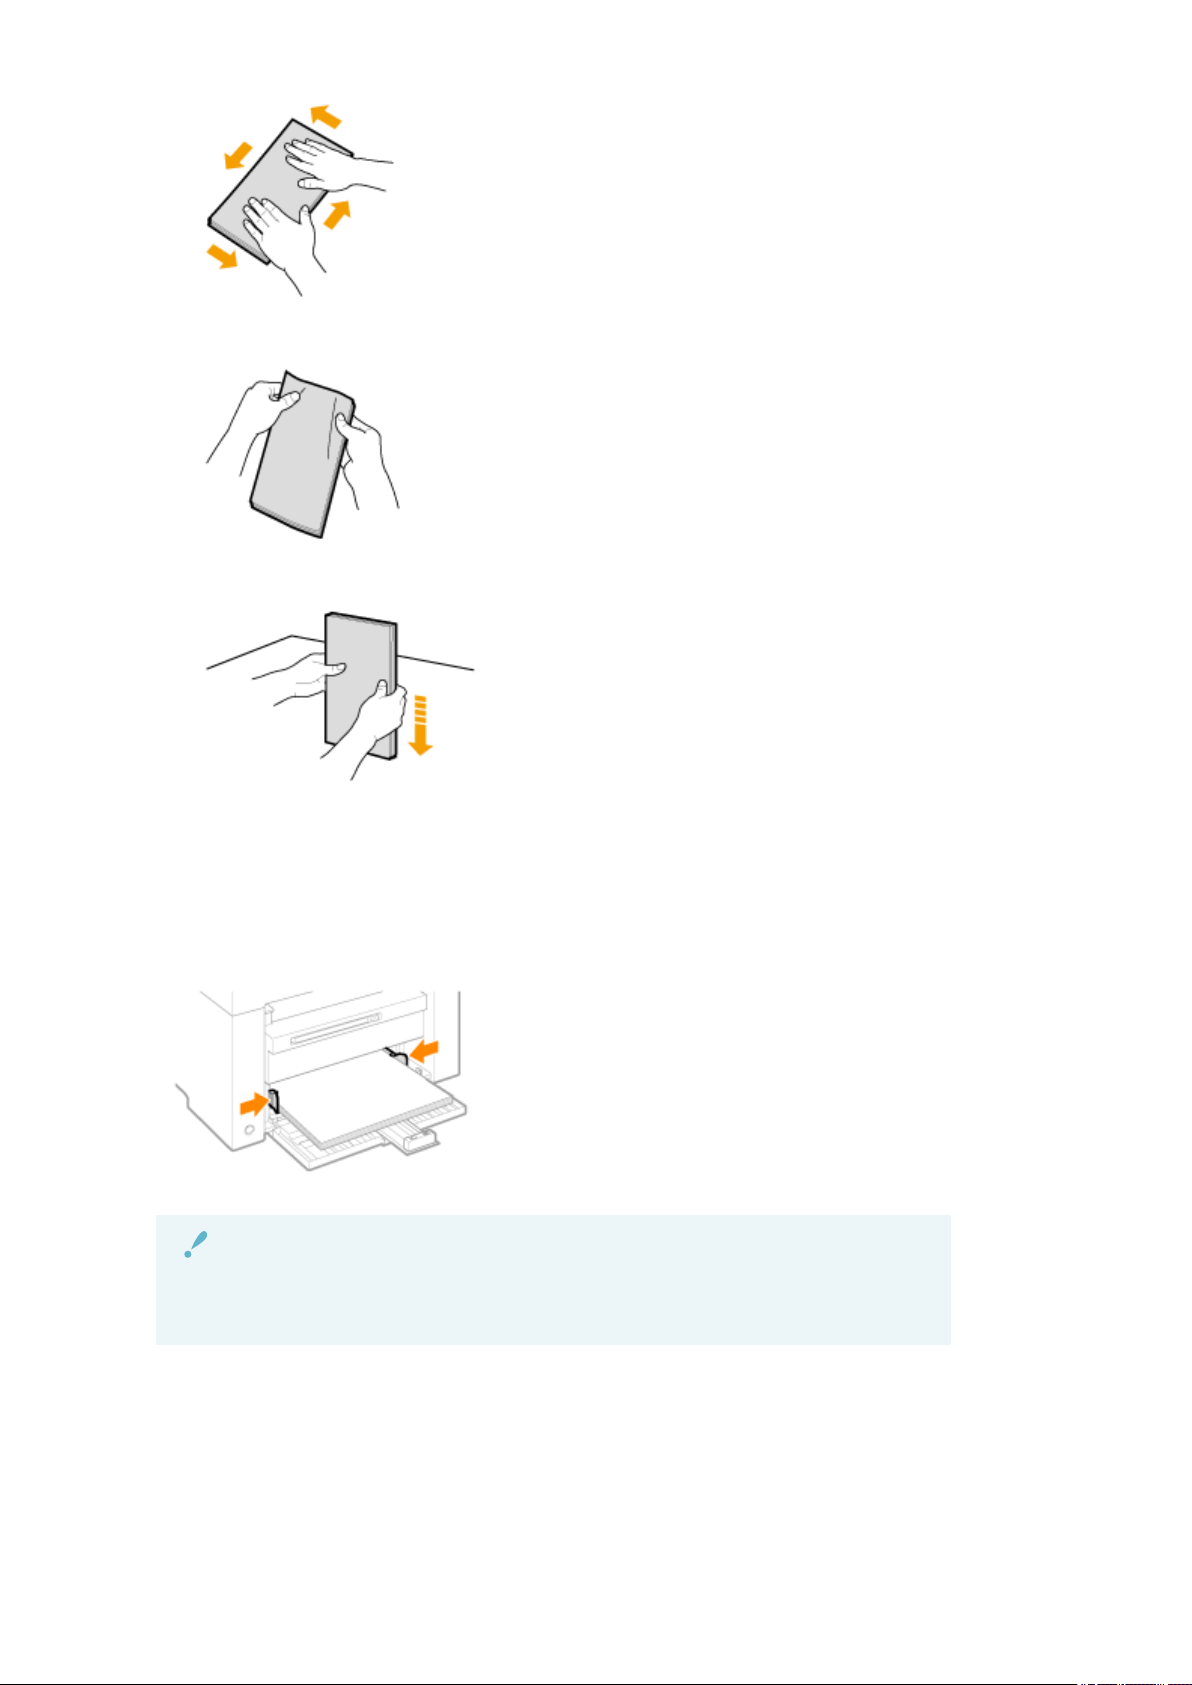
(3) Loosen any stiff corners of the envelopes and atten curls as sho
wn in the gure.
(4) Align the edges of the envelopes on a at surface.
(5) Gently load the envelopes into the paper cassette with the print side face up, until the edge of the envelope
stack meets the back of the paper cassette.
3
Adjust the paper guides to the paper width without space.
IMPORTANT
Adjust the paper guides to the paper width without space.
If the paper guides ar
e too loose or too tight, this may result in misfeeds or paper jams.
Basic Operation
48
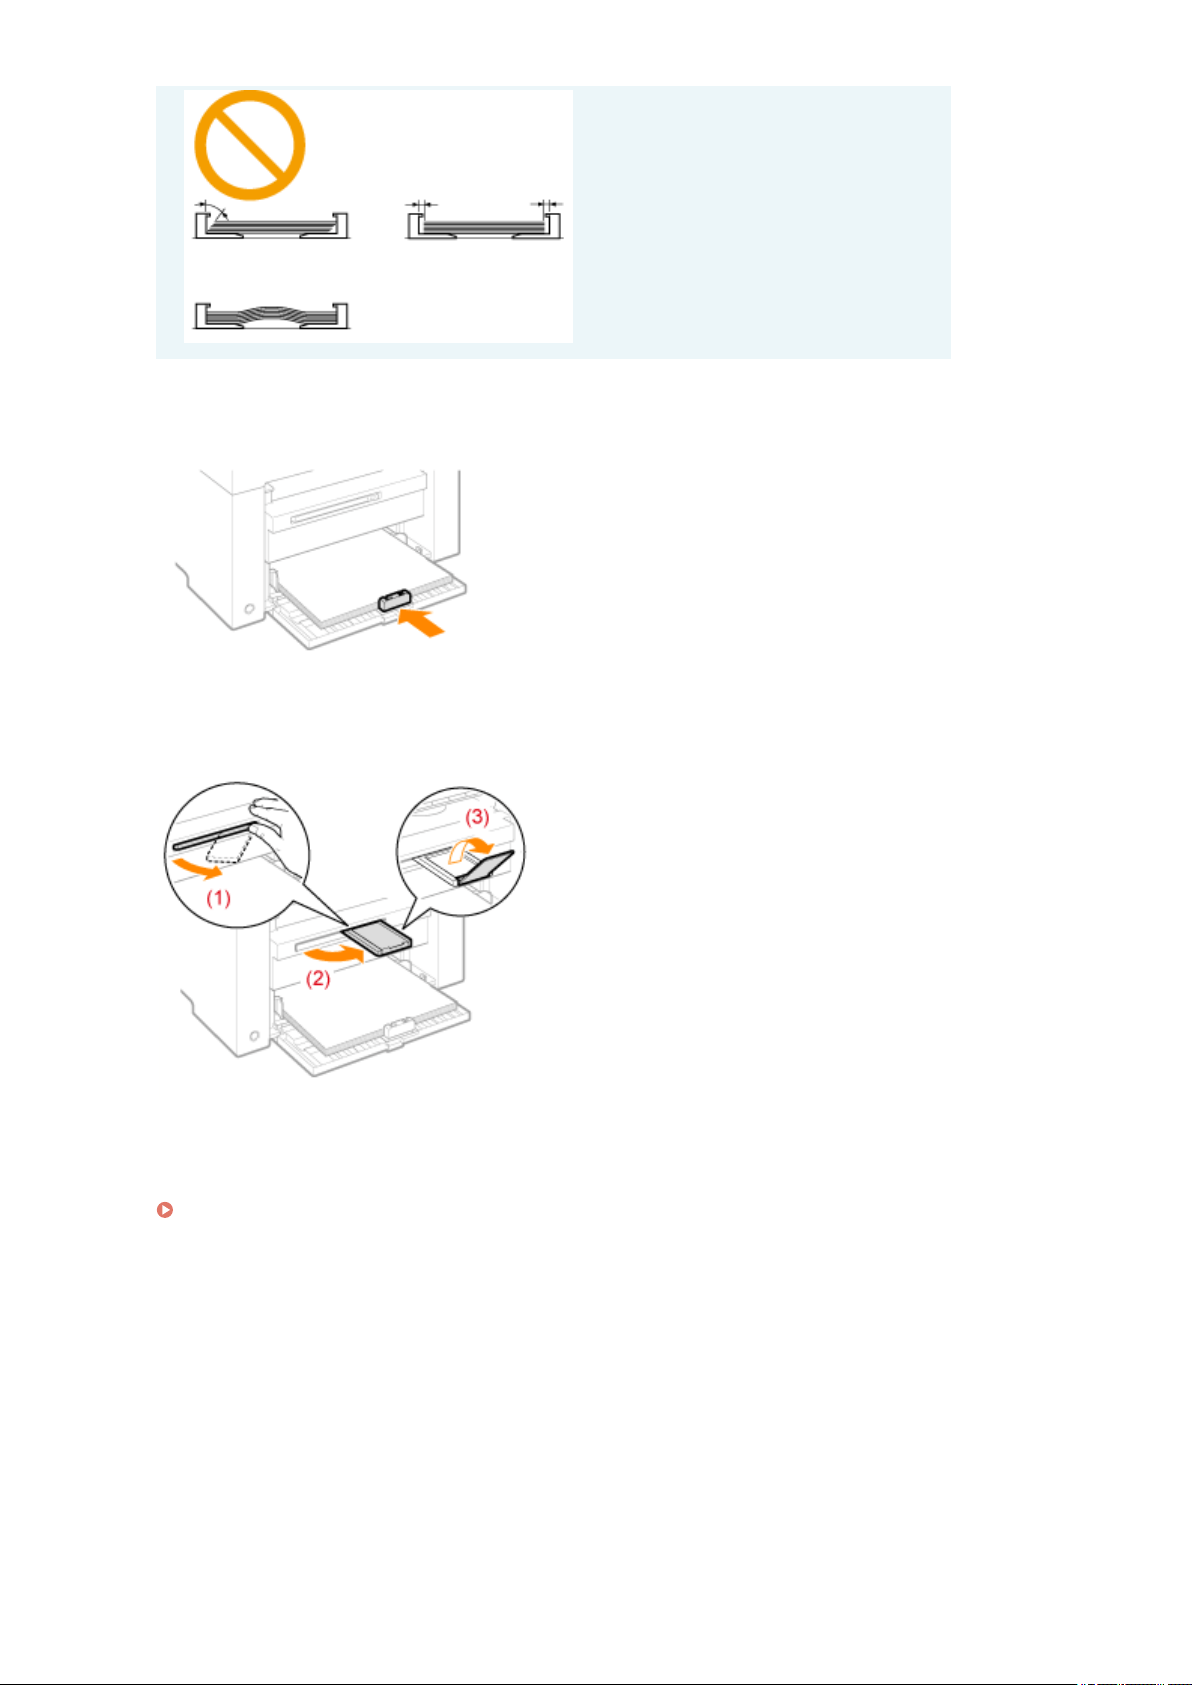

Attention (Loading Paper)
85RS-016
CAUTION
Adjust the paper guides to the paper width without space.
Handle paper car
efully not to cut your hands with the edges of the paper.
IMPORTANT
Be sure to align the paper guides with the width of the paper.
● If the paper guides ar
e too loose or too tight, this may result in misfeeds or paper jams.
● Printouts may be askew depending on the printing environment. Properly load paper to avoid this.
Be sure to adjust paper sizes to the documents.
Adjust the size of the paper loaded in the paper cassette to the documents.
When the paper which is loaded in the paper cassette is smaller than the documents, the output may be
dirty with the toner that is placed outside of the paper.
When using paper that has been poorly cut
If you use paper that has been poorly cut, multiple sheets of paper may be fed at once. In this case, fan
the paper thor
oughly, and then align the edges of the stack properly on a hard, at surface.
Do not exceed the load limit mark when loading paper.
Mak
e sure that the paper stack does not exceed the line of the load limit mark. If the paper stack exceeds
the load limit mark lines, this may result in misfeeds.
When printing on envelopes
Load envelopes with the fr
ont side (non-glued side) facing up. You cannot print on the reverse side of
envelopes.
Also, be sure to close the ap before loading envelopes.
NOTE
For more information on supported paper types
" Supported Paper T
ypes(P. 70) "
Abbreviations on the paper guides inside the paper cassette
Paper size Paper guide
Legal LGL
Letter LTR
Executive EXEC
Basic Operation
50
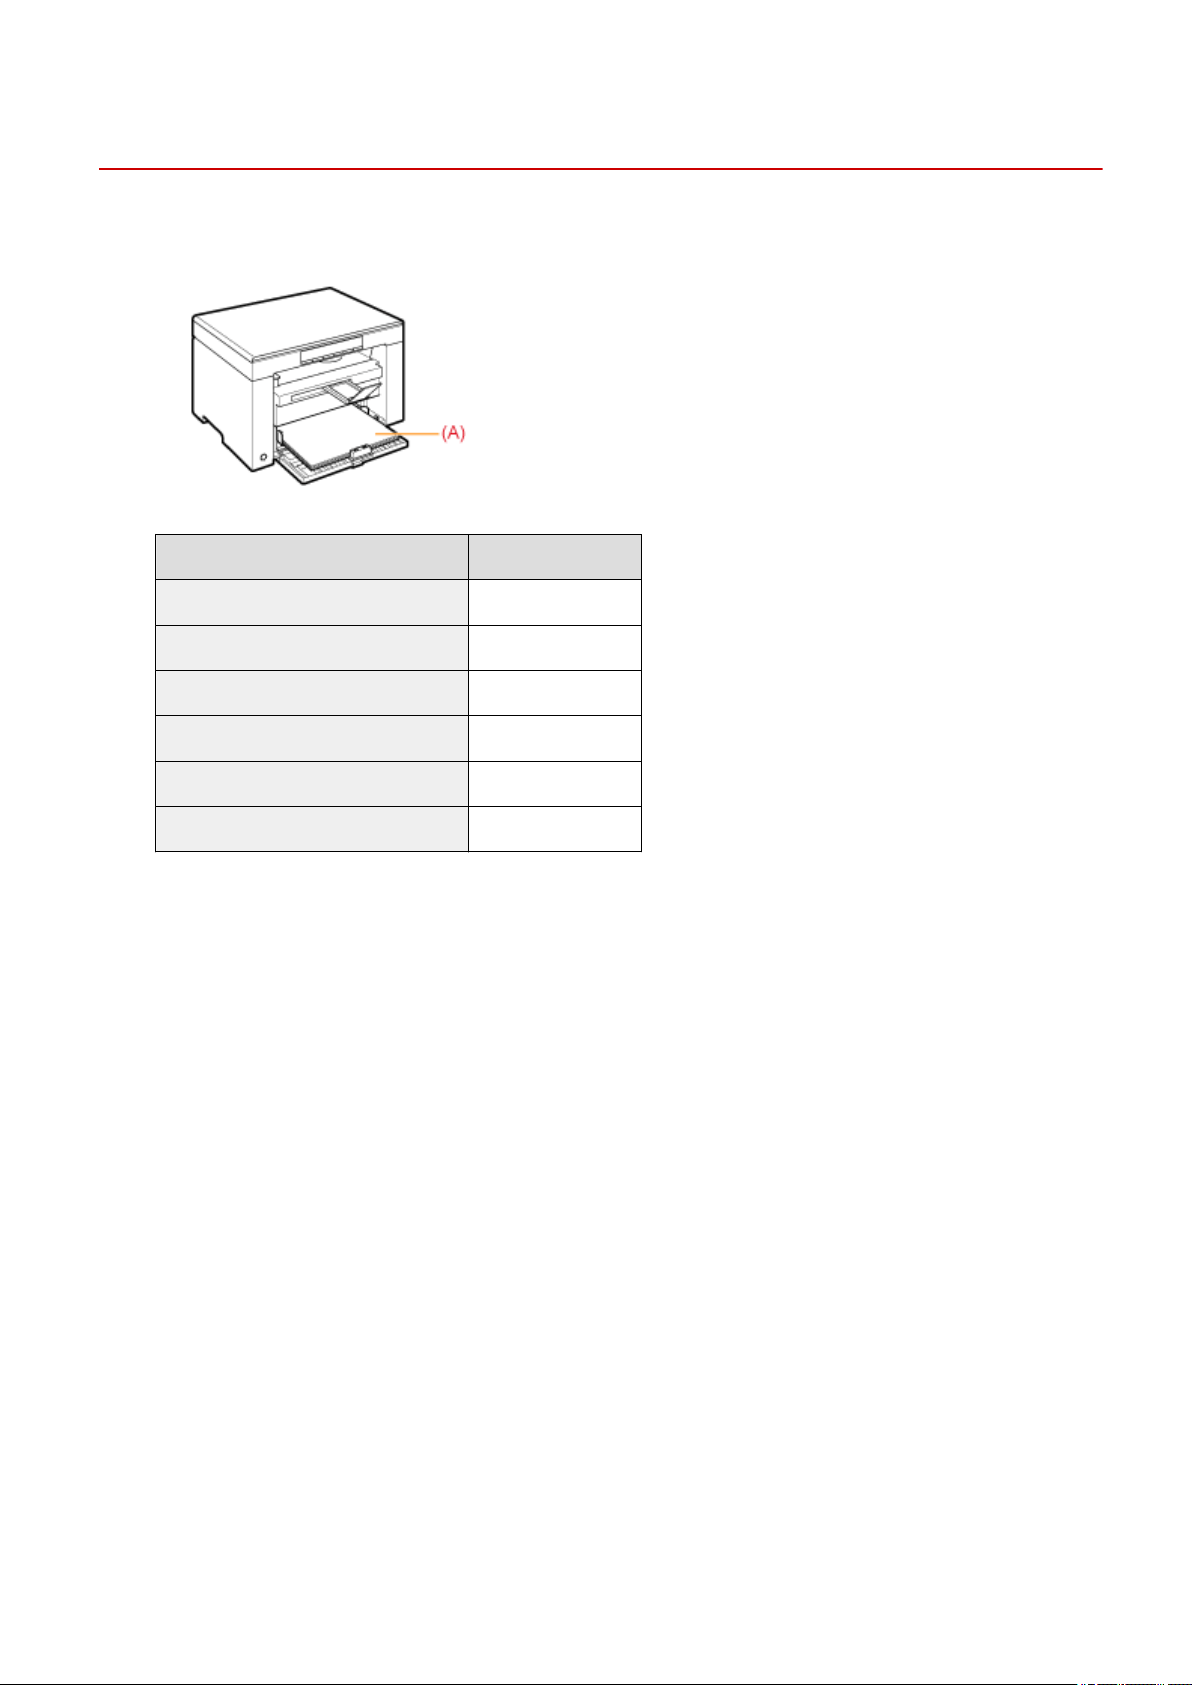
Paper Loading Capacity
85RS-017
Paper type Paper cassette
Plain paper (Ex. 80 g/m² (21 lb Bond)) Approx. 150 sheets
Heavy paper (Ex. 91 g/m² (24 lb Bond)) Approx. 100 sheets
Heavy paper (Ex. 128 g/m² (50 lb Cover)) Approx. 60 sheets
Transparency Approx. 100 sheets
Label Approx. 50 sheets
Envelope Approx. 10 envelopes
Basic Operation
51
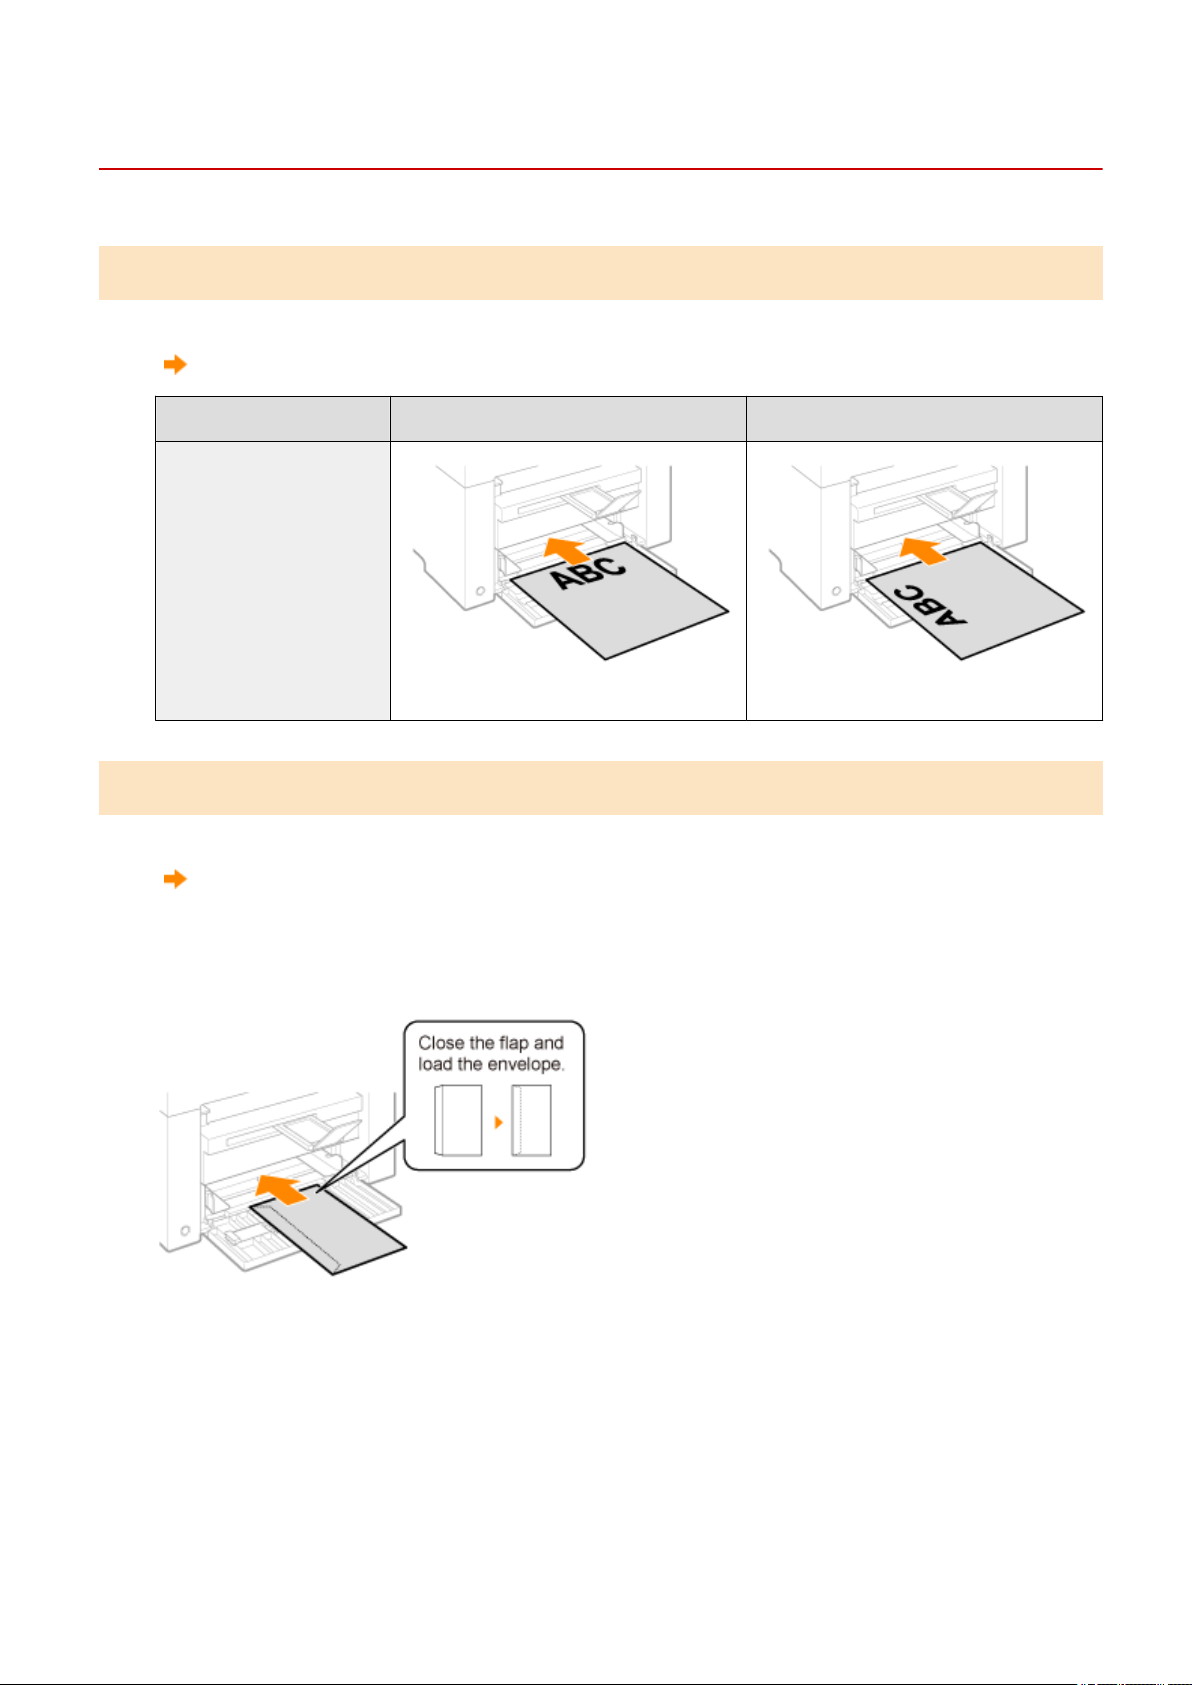
Paper Loading Orientation
85RS-018
When printing on paper that has a preprinted letterhead or logo
Load paper as shown below.
( : Feeding direction)
Portrait orientation Landscape orientation
1-sided printing
(with the printed side face up) (with the printed side face up)
Printing on envelopes
Load envelopes with the fr
ont side (non-glued side) face up as shown below.
(
: Feeding direction)
Envelope No.10, DL, ISO-C5
Load the envelopes with the ap toward the left side of the paper cassette when viewed from the front.
Envelope ISO-B5
Load the envelopes with the ap to
ward the back of the paper cassette when viewed from the front.
Basic Operation
52

Basic Operation
53
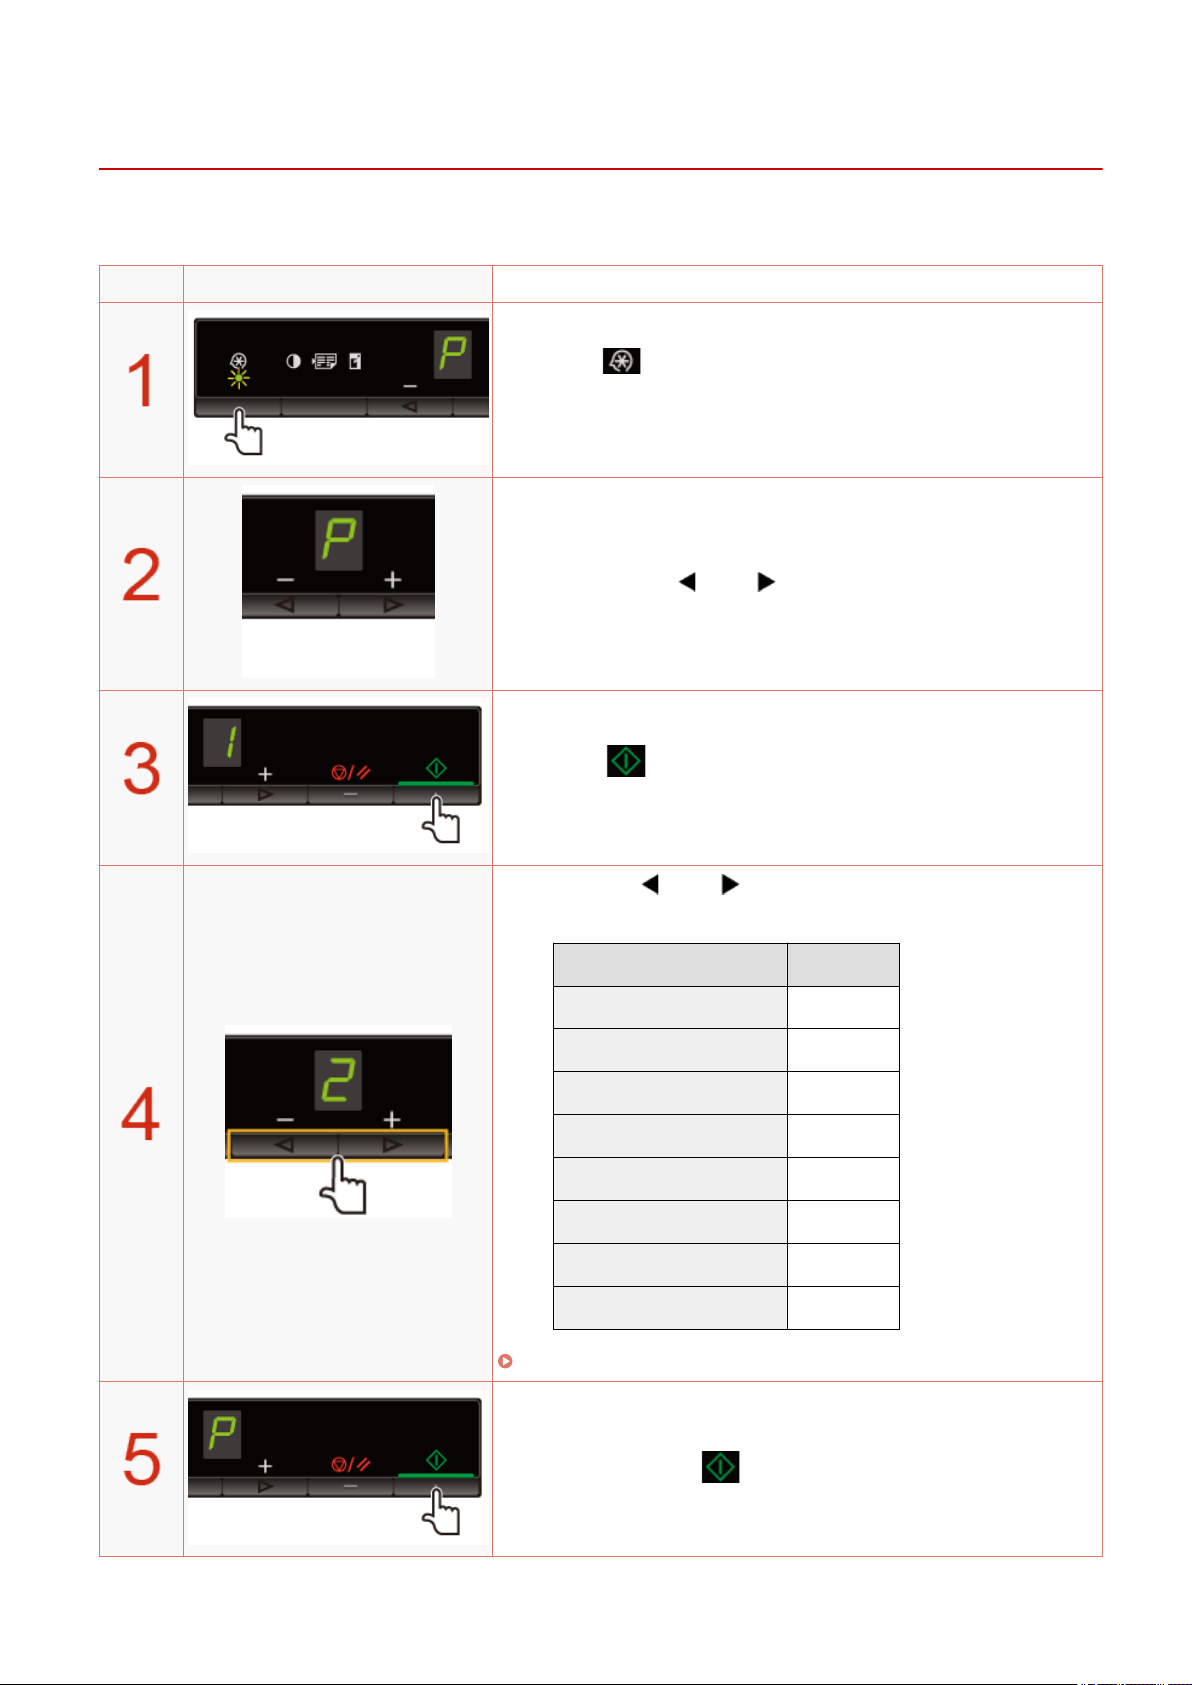
Setting a Paper Type
85RS-019
After loading paper in the cassette, change the menu settings accor
ding to the paper type.
Operating results Operating procedures
Press [ ] (Menu setting key), and then start the menu
oper
ation.
When the menu is operating, the menu indicator blinks.
Press [ ] or [ ] until "P" is displayed.
Press [ ], and set the menu to be able to change the
settings.
Press [ ] or [ ] to change the setting values.
The display and the paper types are matched as follows.
Display Paper type
1 Plain paper
+1 Plain paper L
2 Heavy paper 1
+2 Heavy paper 2
3 Rough paper
4 Envelopes
5 Transparencies
6 Labels
" Supported Paper T
ypes(P. 70) "
Press [ ] to conrm the setting.
Basic Operation
54

Press [ ] (Menu setting key) to exit the menu operation.
The menu indicator turns off.
Basic Operation
55
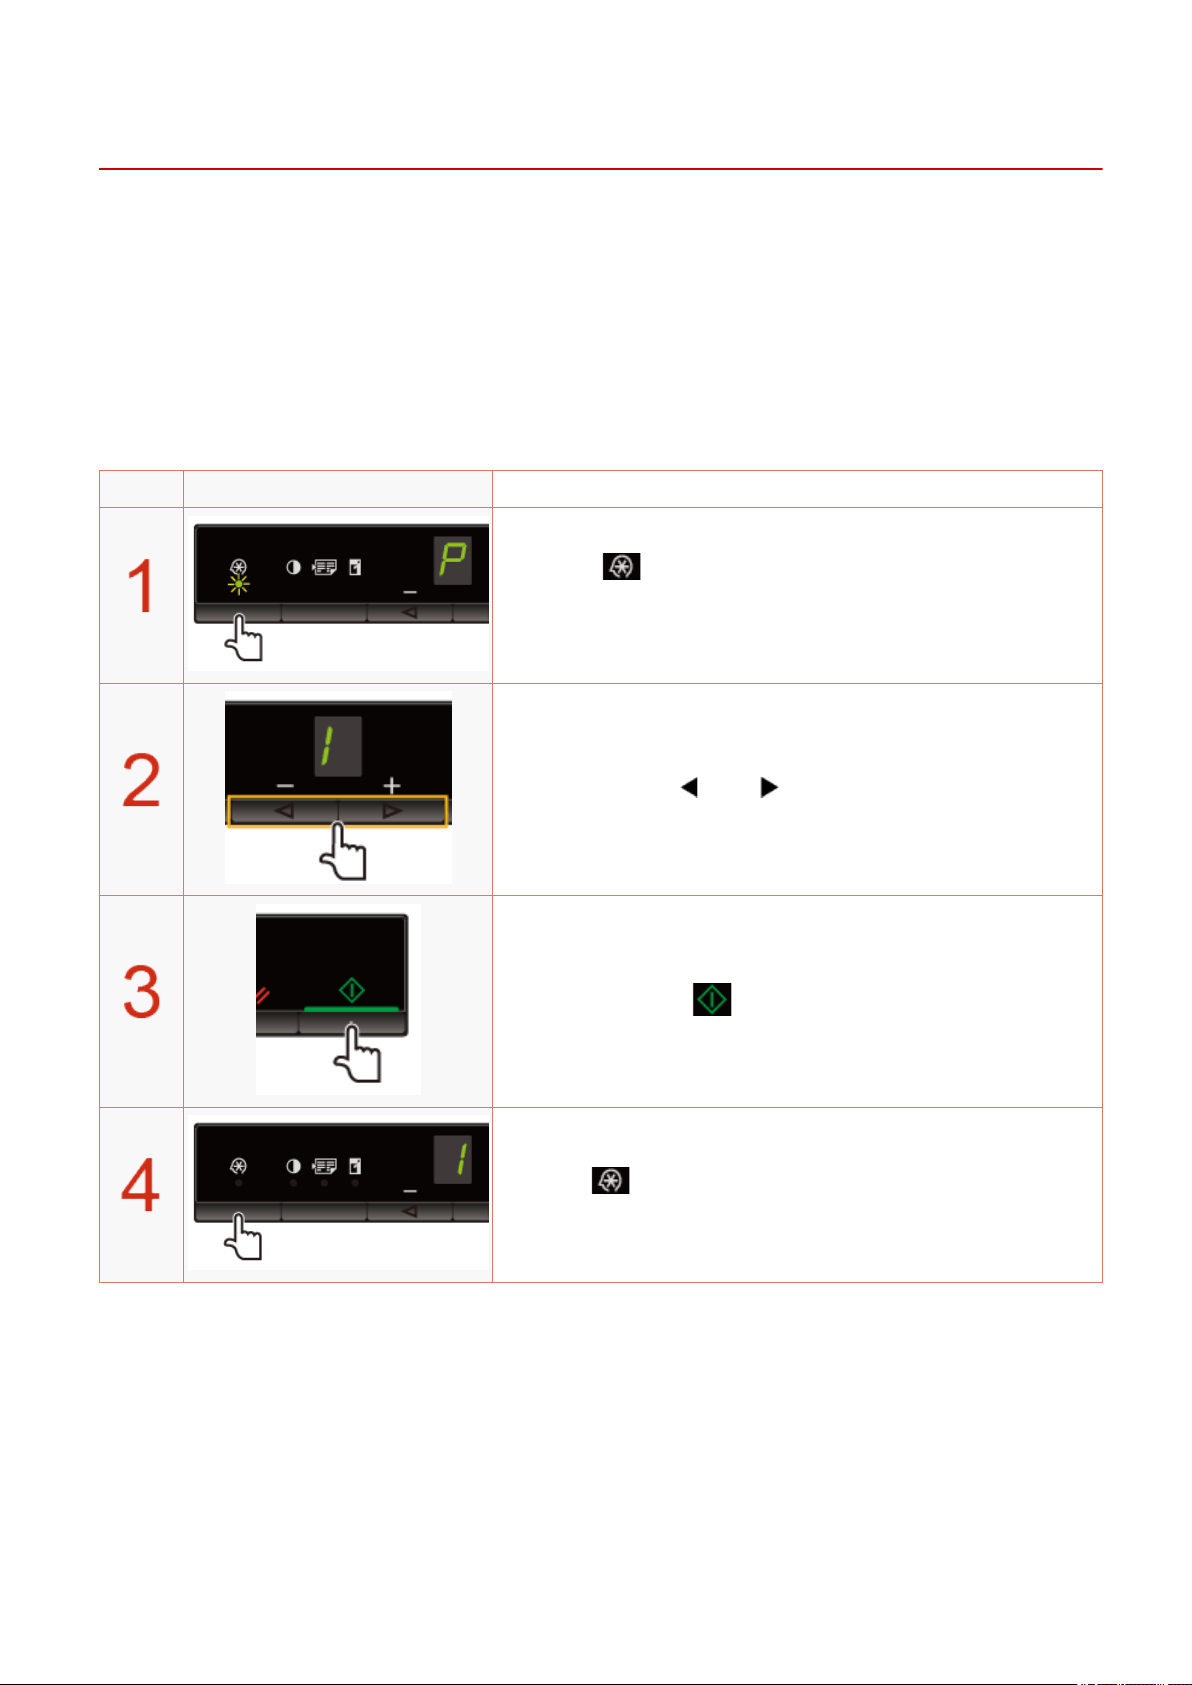
Initializing Menus
85RS-01A
Y
ou can reset the following settings to the default value.
● Paper type settings
● Registering the quantity
● Setting copy type
● Setting sharpness
● Setting special mode
● The quantity registered in "F"
Operating results Operating procedures
Press [ ] (Menu setting key), and then start the menu
oper
ation.
When the menu is operating, the menu indicator blinks.
Press [ ] or [ ] until "I" is displayed.
Press [ ] to perform initialization.
Press [ ] (Menu setting key) to exit the menu operation.
The menu indicator turns off.
Basic Operation
56
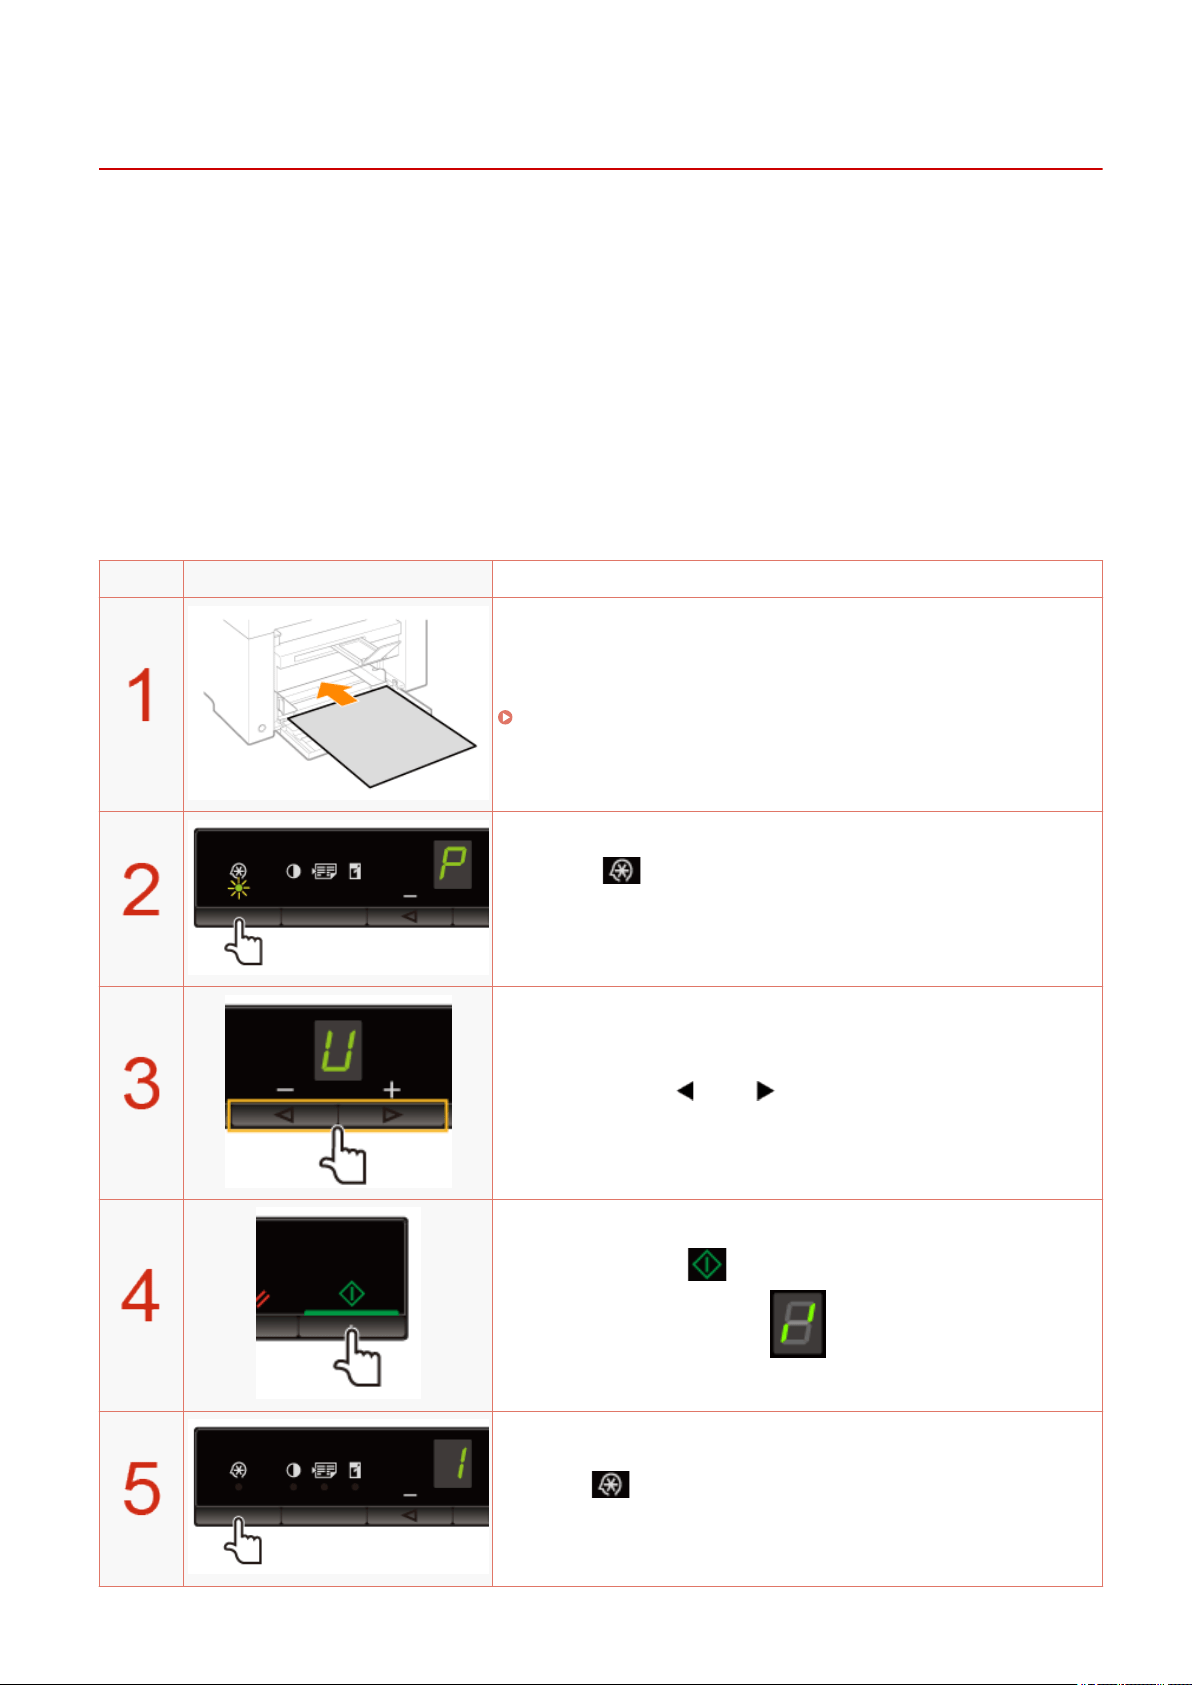
Printing the User Data List
85RS-01C
Print the user data list.
The follo
wing items are printed.
● Controller ROM version
● Country/region code
● No. of printed pages/No. of scanned pages
● Registering the quantity
● Paper type settings
● Setting copy type
● Setting sharpness
● Setting special mode
Operating results Operating procedures
Load A4 or Letter size paper.
" In the Paper Cassette(P. 47) "
Press [ ] (Menu setting key), and then start the menu
operation.
When the menu is operating, the menu indicator blinks.
Press [ ] or [ ] until "U" is displayed.
Press [ ] to print the user data list.
Press [ ] (Menu setting key) to exit the menu operation.
The menu indicator turns off.
Basic Operation
57
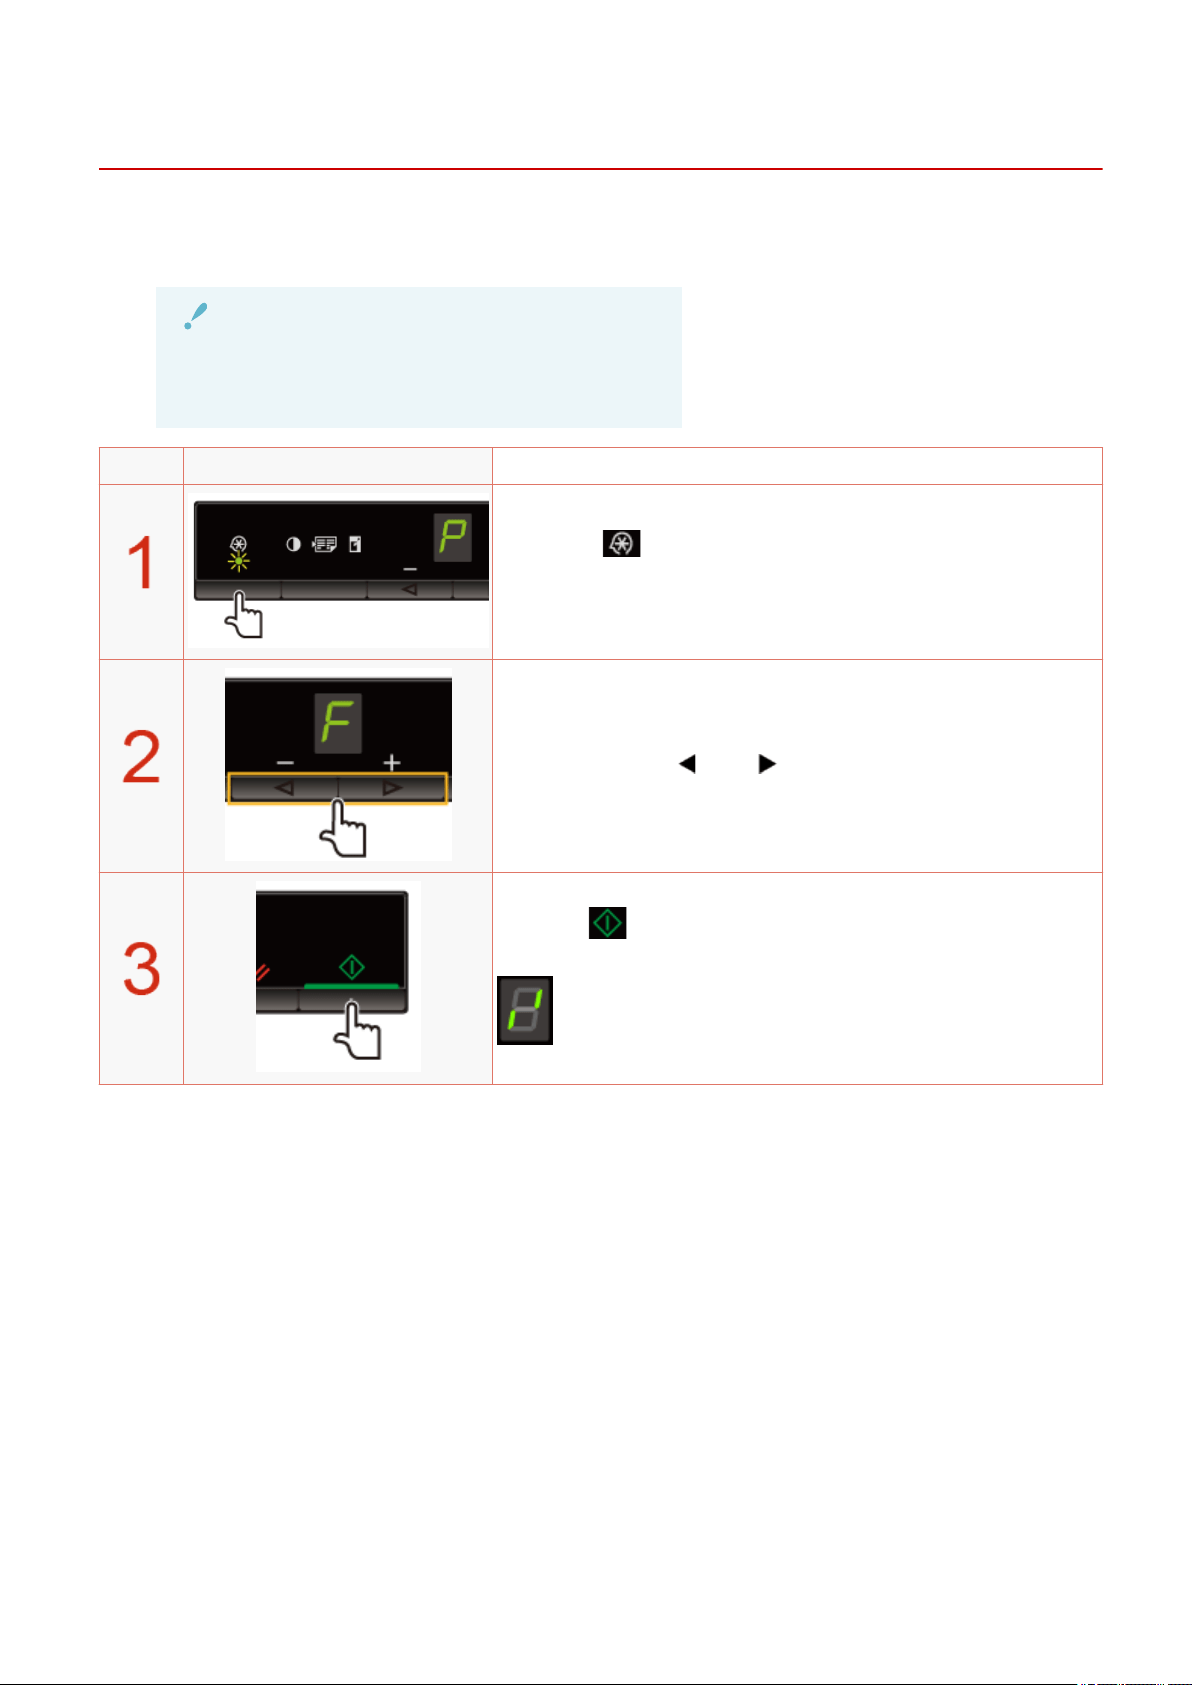
Upgrading Firmware
85RS-01E
This section describes the pr
ocedure to upgrade the printer rmware.
For details on the procedure for upgrading the rmware, see the manual supplied with the rmware.
IMPORTANT
Performing only when it is necessary
Upgr
ade the printer rmware only when it is necessary.
Operating results Operating procedures
Press [ ] (Menu setting key), and then start the menu
oper
ation.
When the menu is operating, the menu indicator blinks.
Press [ ] or [ ] until "F" is displayed.
When [ ] is pressed, the update mode for the rmwar
e is
displayed as shown below.
Basic Operation
58
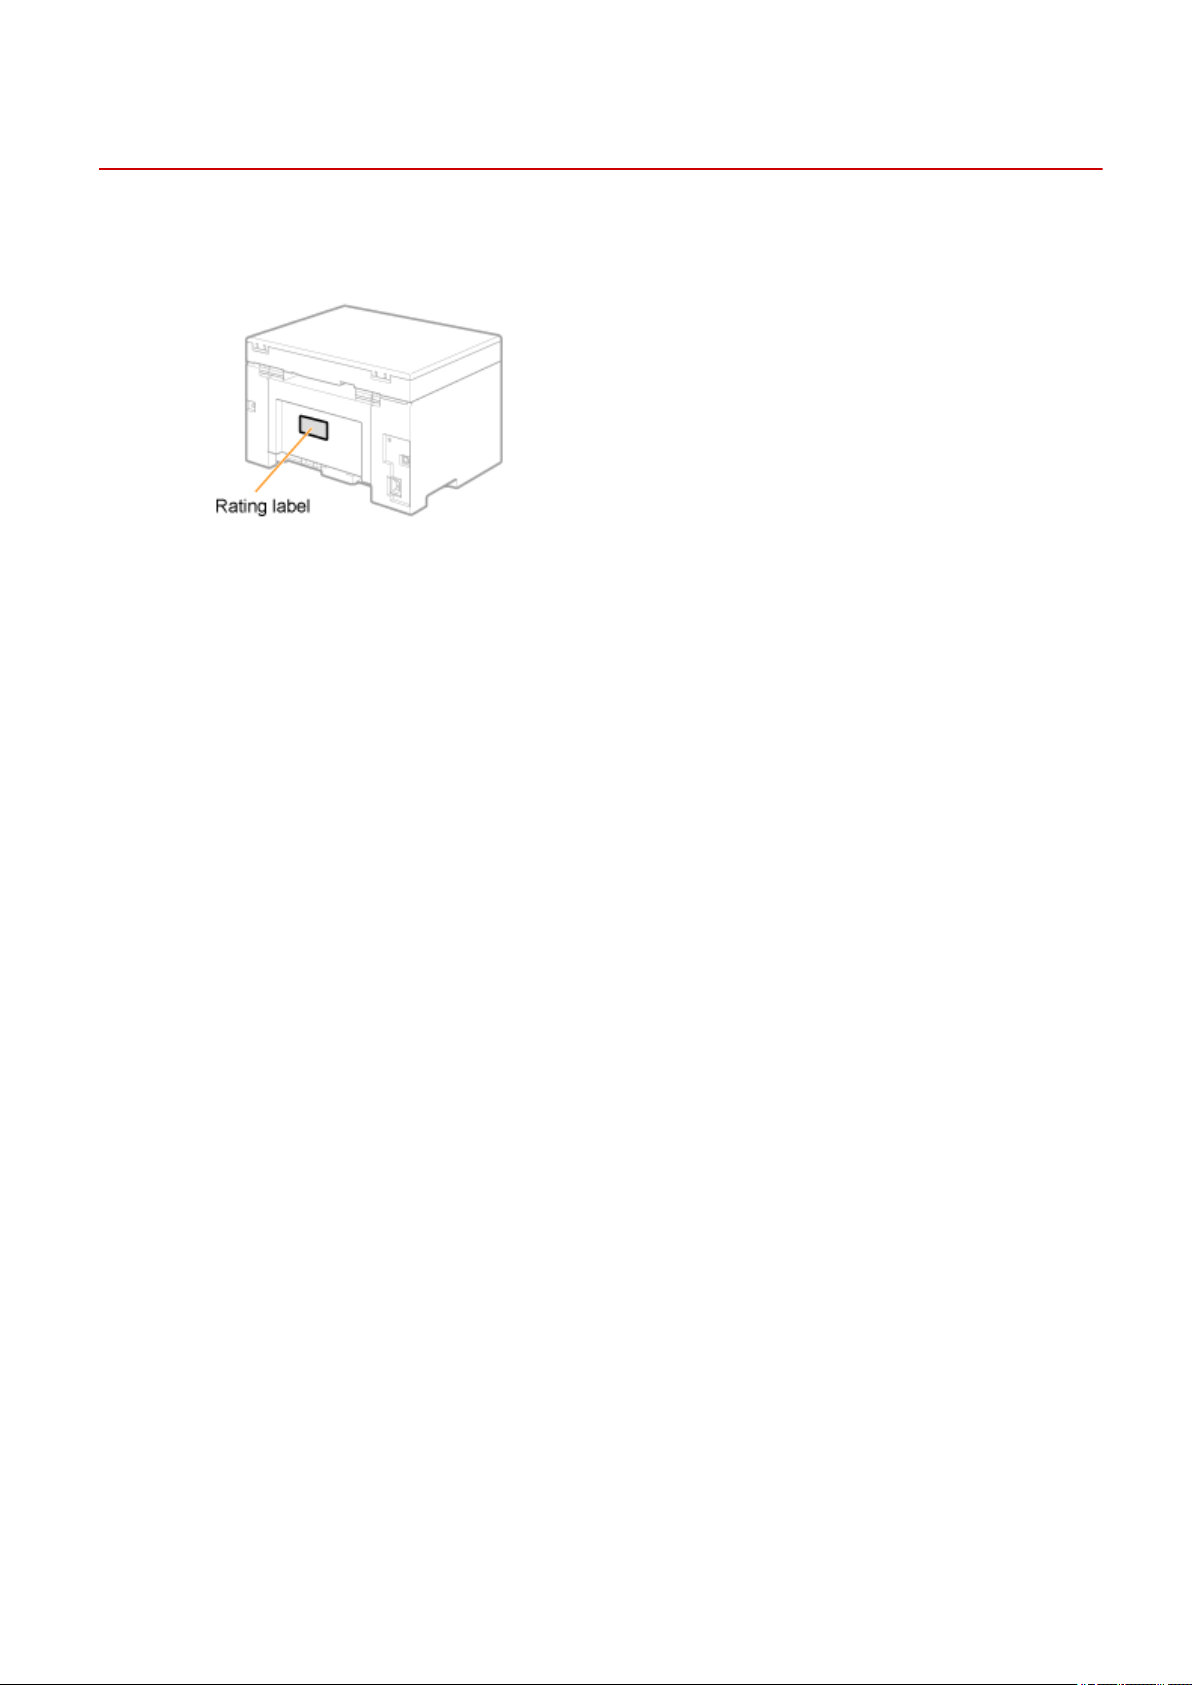
Locating the Serial Number
85RS-01F
The serial number (a char
acter string of three letters and a 5-digit number) is written on the rating label on the
rear side of the machine.
Basic Operation
59

Specications
Specications .....................................................................................................................................................
61
Machine Specications ....................................................................................................................................... 62
Copy Specications .............................................................................................................................................. 63
Printer Specication ............................................................................................................................................ 64
Scanner Specications ........................................................................................................................................ 65
Document Type .................................................................................................................................................... 66
Supported Document Types ........................................................................................................................... 67
Scan Area ........................................................................................................................................................ 68
Paper .................................................................................................................................................................... 69
Supported Paper Types .................................................................................................................................. 70
Printable Area ................................................................................................................................................. 73
Specications
60

Specications
85RS-01H
Note that specications ar
e subject to change without notice.
Specications
61

Machine Specications
85RS-01J
Machine Specications
Type Personal Desktop
Power Supply
110 to 127 V, 50/60 Hz (Power requirements can vary by country. They depend on where you
pur
chased the product.)
Power Consumption
Maximum: 900 W or less
Average consumption during standby mode: Approx. 2.3 W
Average consumption during sleep mode: Approx. 1.2 W
When the main power switch is turned OFF: 0.5 W or less
Warm-up Time
10 second or less
*
(T
emperature: 20 °C (68 °F), humidity: 65% RH ; from when the printer is turned ON to when
"1" is displayed)
*
Warm-up time may vary depending on the conditions of the installation
environment.
Weight Main unit (the toner cartridge included): Approx. 8.2 kg (18.1 lb)
Dimensions
(W x L x H)
● With the paper cassette closed
372 mm x 276 mm x 254 mm (14 5/8" x 10 7/8" x 10")
● With the paper cassette open
372 mm x 371 mm x 254 mm (14 5/8" x 14 5/8" x 10")
Installation Space
(W x L x H)
572 mm x 632 mm x 608 mm (22 1/2" x 24 7/8" x 24")
Environmental Conditions
Temperature: 10 to 30°C (50 to 86°F)
Humidity: 20% to 80% RH (no condensation)
Acceptable Documents
" Supported Document T
ypes(P. 67) "
Acceptable Paper Stock
" Supported Paper T
ypes(P. 70) "
Printable Area
" Printable Ar
ea(P. 73) "
Scan Area
" Scan Ar
ea(P. 68) "
Specications
62

Copy Specications
85RS-01K
Copy Specications
Scan Resolution
● Speed priority: 600 dpi x 400 dpi
● Resolution priority: 600 dpi x 600 dpi
Output Resolution
● Speed priority: 600 dpi x 400 dpi
● Resolution priority: 600 dpi x 600 dpi
Copy Ratio
● Dir
ect 1:1 ± 1.0 %
● Zoom 0.50 to 2.00, 10 % increments
Copy Speed (Letter Plain Direct)
*
19 cpm
Continuous Copying Capacity Maximum 29 copies
First Copy Time (Letter) 11.8 seconds or less
* The copy speed on Letter size plain paper on one-side printing is measured during continuous copying. Copy
speeds vary depending on the output r
esolution, the paper type and size, and the paper feeding direction.
Copy speeds on smaller paper sizes may be slower. Plus, the machine may experience downtime or decrease
the copy speed in the middle of a continuous copy run to adjust the temperature inside the machine or
maintain the optimal print quality.
Specications
63

Printer Specication
85RS-01L
Printer Specication
Printing Method Indirect electrostatic system (On-demand xing)
Paper Capacity Approx. 150 sheets (60 to 80 g/m² (16 to 21 lb Bond))
Output Tray Capacity (a fresh stack of Letter size paper)
Approx. 100 sheets (60 to 80 g/m² (16 to 21 lb Bond))
*1
Print Speed (Letter Plain Direct)
*2
19 ppm
Output Resolution
● Speed priority: 600 dpi x 400 dpi
● Resolution priority: 1200 dpi equivalent x 600 dpi
Gradation 256 gradations
Toner Cartridges
" T
oner Cartridges(P. 36) "
First Print Time (Letter)
7.7 seconds or less
*3
*1
The actual paper capacity varies depending on the installation environment and paper type used.
*2
The print speed on Letter size plain paper on one-side printing is measured during continuous printing.
Print speeds vary depending on the output r
esolution, the paper type and size, and the paper feeding
direction. Print speeds on smaller paper sizes may be slower. Plus, the machine may experience downtime
or decrease the print speed in the middle of a continuous print run to adjust the temperature inside the
machine or maintain the optimal print quality.
*3
May vary depending on the output environment.
Specications
64

Scanner Specications
85RS-01R
Scanner Specications
Type Color scanner
Maximum Scan Size up to 216 mm x 297.0 mm (8 1/2" x 11 5/8")
Scan Resolution
● Optical r
esolution
up to 600 x 600 dpi
● Software interpolation resolution
9600 dpi x 9600 dpi
Scan Speed (Letter, 300 x 300 dpi)*
Color: 8 seconds/sheet
Grayscale: 3 seconds/sheet
Host Interface
● Hi-Speed USB
● USB
Operating System Windows 7/8/10
Driver
● TWAIN
● WIA 2.0 (Windows 7/8/10)
* Scan speeds were only measured.
Specications
65


Supported Document Types
85RS-01U
Type
● Plain paper
● Heavy paper
● Photogr
aph
● Small documents (for example, index cards)
● Special types of paper (for example, tracing paper, transparencies, etc.)
*1
● Booklet (thickness not specied)
Size (W x L) Maximum 216 mm x 297 mm (8 1/2" x 11 3/4")
Weight Maximum 2 kg (4.4 lb)
Paper Capacity 1 sheet
*1
To copy transparent documents (for example, tracing paper or transparencies), make sure to place the
documents face do
wn on the platen glass and cover them with plain white paper.
IMPORTANT
To place your document
Make sure any glue, ink, or correction uid on the document is completely dry before placing it on the
platen glass or into the feeder.
Specications
67
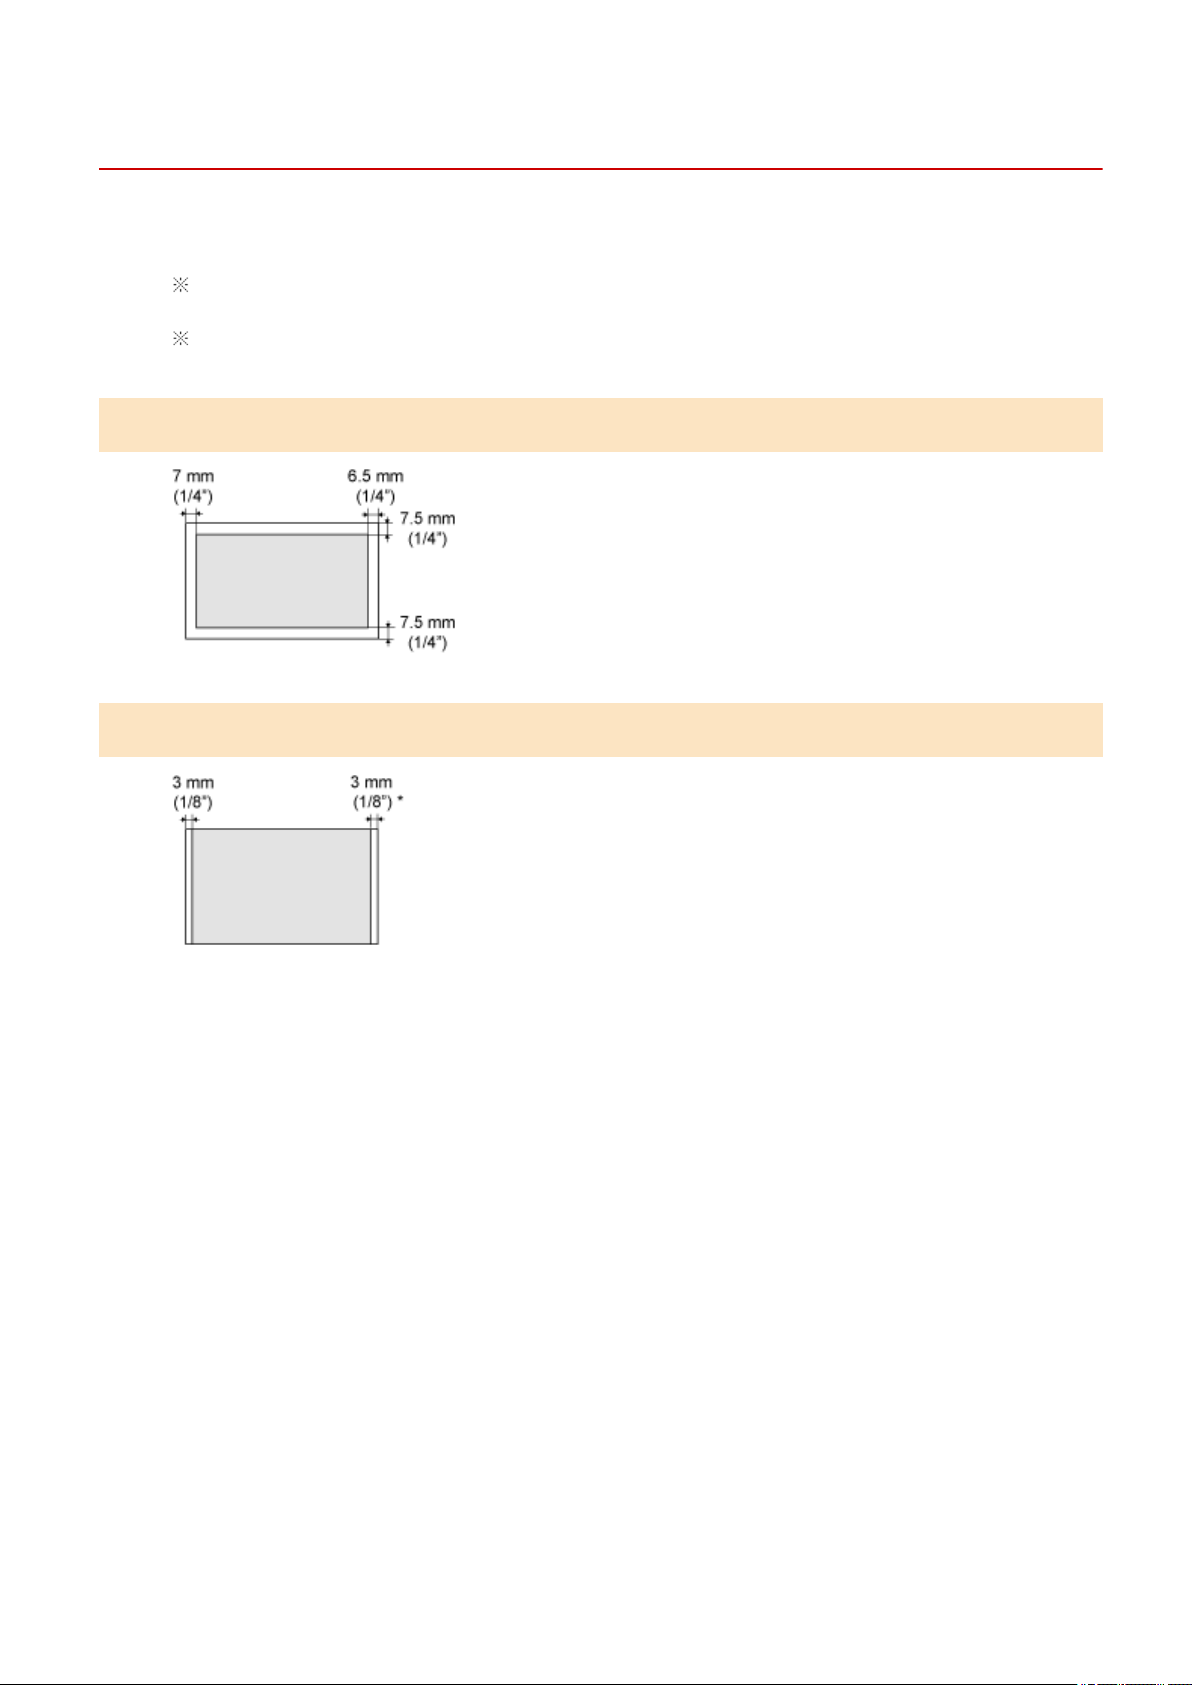
Scan Area
85RS-01W
Mak
e sure that your scan area ts within the shaded area, as shown in the illustrations on the following page.
Note that the margins indicated in the illustrations are for your reference. Actual margins can vary.
Place the document face down.
Copy
Scan
* A4 size paper only
Specications
68

Supported Paper Types
85RS-01Y
Paper Size
The following paper sizes are supported.
: Supported
Paper Size
Paper Source
Paper cassette
A4 (210 mm x 297 mm (8 1/4" x 11 3/4"))
B5 (182 mm x 257 mm (7 1/8" x 10 1/8"))
A5 (148 mm x 210 mm (5 7/8" x 8 1/4"))
Legal (216 mm x 356 mm (8 1/2" x 14"))
Letter (216 mm x 279 mm (8 1/2" x 11"))
Statement (140 mm x 216 mm (5 1/2" x 8 1/2"))
Executive (184 mm x 267 mm (7 1/4" x 10 1/2"))
Ocio (216 mm x 318 mm (8 1/2" x 12 1/2"))
B-ocio (216 mm x 355 mm (8 1/2" x 14"))
M-ocio (216 mm x 341 mm (8 1/2" x 13 3/8"))
Government - Letter (203 mm x 267 mm (8" x 10 1/2"))
Government - Legal (203 mm x 330 mm (8" x 13"))
Foolscap (216 mm x 330 mm (8 1/2" x 13"))
A-foolscap (206 mm x 338 mm (8 1/8" x 13 3/8"))
Envelope COM10 (104.7 mm x 241.3 mm (4 1/8" x 9 1/2"))
*1
Envelope Monarch (98.4 mm x 190.5 mm (3 7/8" x 7 1/2"))
*1
Envelope C5 (162 mm x 229 mm (6 3/8" x 9"))
*1
Envelope B5 (176 mm x 250 mm (6 7/8" x 9 7/8"))
*1
Envelope DL (110 mm x 220 mm (4 3/8" x 8 5/8"))
*1
Specications
70

Paper Size
Paper Source
Paper cassette
Custom Paper Size
*2
*1
Make sure the ap is folded.
*2
You can set custom paper size of Width: 127 to 356 mm (5" to 14") and Length: 76.2 to 216 mm (3" to 8
1/2").
Specify the paper size in portr
ait orientation (Height Width) and within the range that can be dened.
NOTE
Using chlorine-free paper
Chlorine-free paper can be used with this machine.
Type
The follo
wing paper types are supported.
Paper Type Printer Driver Setting Paper Capacity
Plain paper
60 to 80 g/m² (16 to 21 lb Bond)
[Plain Paper]
[Plain Paper L]
150 sheets
80 to 90 g/m² (21 to 24 lb Bond) 120 sheets
Heavy paper
90 to 105 g/m² (24 to 28 lb Bond) [Heavy Paper 1] 100 sheets
105 to 163 g/m² (28 lb Bond to 60 lb Cover)
[Heavy Paper 2]
*1
60 sheets
Rough paper 60 to 163 g/m² (16 lb Bond to 60 lb Cover) [Rough Paper] 100 sheets
Transparency
*2
[Transparency] 100 sheets
Label [Labels] 50 sheets
Index Card [Index Card] Not available
Envelope [Envelope] 10 sheets
*1
If you want to improve the xation when printed with [Heavy Paper 1] selected, select [Heavy Paper 2].
*2
Use only the types designed for laser printers.
To prevent paper jams, do not use the following paper types.
● W
rinkled or creased paper
● Curled or rolled paper
● Torn paper
● Damp paper
● Very thin paper
● Paper printed by a thermal transfer printer (Do not copy on the reverse side.)
The following paper types do not print well:
● Highly textured paper
Specications
71

● V
ery smooth paper
● Glossy paper
Make sure that the paper is free of dust, lint, and oil stains.
Make sure to test print before purchasing large quantities of copy paper.
Keep the paper wrapped in its original package (unopened or opened) and stored in a
cool, dry place until ready to use. Make sure to keep it on a at surface.
Store paper stacks in a place where temperatures are somewhere between 18 to 24°C
(64.4 to 75.2°F) and humidity is somewhere between 40 % to 60 % RH.
CAUTION
To print on damp paper
The follo
wing problems may occur.
● Steam is emitted from the machine's output area.
● Water droplets form on the back side of the operation panel and in the output area.
Moisture evaporates from damp paper due to the heat generated inside the xing unit (it is most likely to
occur at low room temperatures). This is not a malfunction, but you can prevent this by using a stack of
new unopened paper.
Should you smell something burning, immediately turn OFF the machine, unplug the power plug from
the AC power outlet, and contact your local authorized Canon dealer or the Canon help line. Continued
use may lead to a re or electrical shock.
Specications
72

Printable Area
85RS-020
The shaded ar
ea in the illustration on the following page represents the printable area (A4 size paper).
Note that the margins indicated in the illustration are for your reference. Actual margins can vary.
When an envelope is printed, the margin is 10 mm (3/8") on top, bottom, right, and left.
Specications
73

Copy
Copy .........................................................................................................................................................................
75
Basic Copy Operations ........................................................................................................................................ 76
Registering the Quantity that You Frequently Copy (Up to Twenty-nine Copies) ........................................... 78
Adjusting the Density .......................................................................................................................................... 79
Enlarging/Reducing Copy .................................................................................................................................... 81
Copying Both Sides of Cards onto One Side (ID Card Copy) .............................................................................. 83
Copying Two Documents onto One Sheet (2 on 1 Copy) .................................................................................... 86
Selecting Copy Type (Speed Priority/Resolution Priorlty) ................................................................................. 88
Emphasizing the Outline of an Image (Sharpness) ........................................................................................... 90
Copy
74

Copy
85RS-021
This chapter describes ho
w to use the copy functions.
Using the copy
functions for the rst
time
See " Basic Cop
y Operations(P. 76) ."
Using various copy
functions
See the following sections.
● " Copying Both Sides of Cards onto One Side (ID Card Copy)(P. 83) "
● " Copying Two Documents onto One Sheet (2 on 1 Copy)(P. 86) "
● " Selecting Copy Type (Speed Priority/Resolution Priorlty)(P. 88) "
● " Emphasizing the Outline of an Image (Sharpness)(P. 90) "
Copy
75
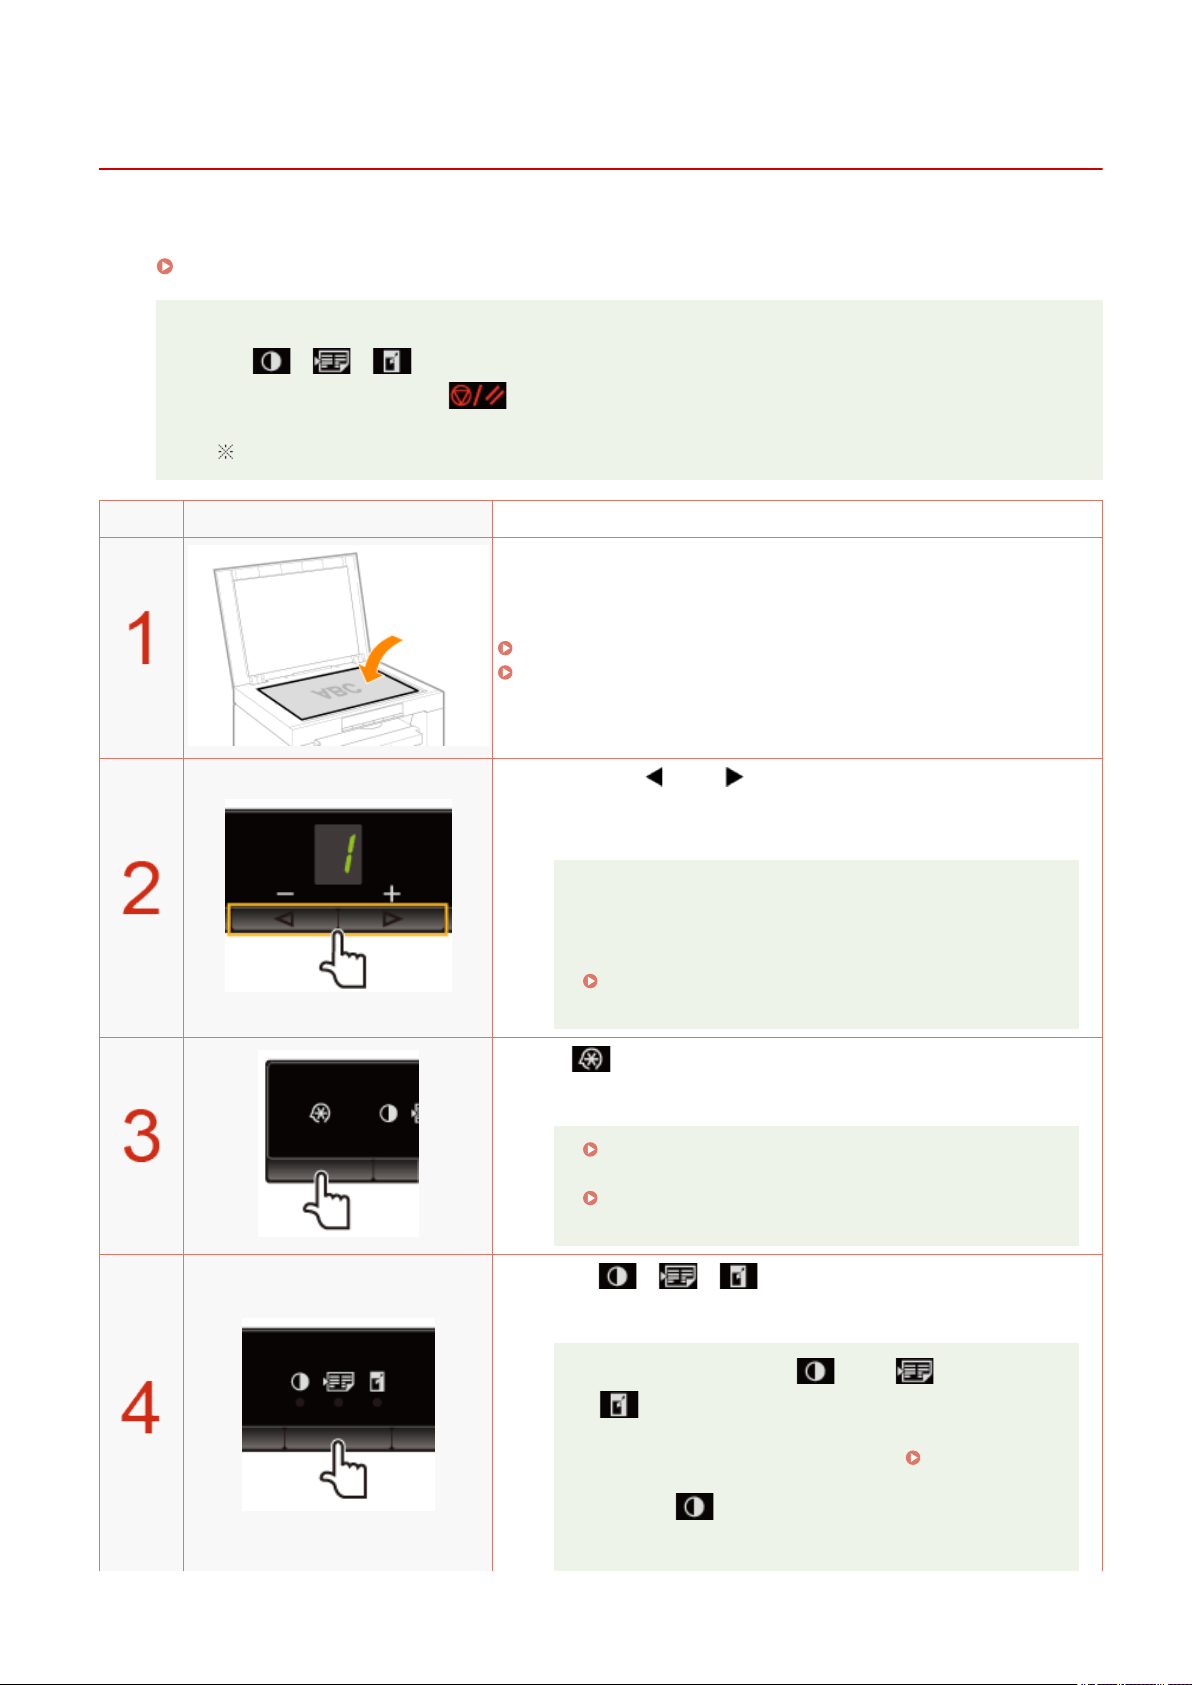
Basic Copy Operations
85RS-022
For details on each k
ey function for the operation panel and the display, see the following items.
" Oper
ation Panel and Display(P. 25) "
<Before copying>
If the [ ] indicator is on or other than [1] is displayed, the previous copy settings are
r
emained. In this case, press [
] to reset the copy settings.
If a key is not pressed for 2 minutes, the copy settings will be automatically reset.
Operating results Operating procedures
Place the document.
" Placing Documents
(P. 43) "
" Supported Paper T
ypes(P. 70) "
Press [ ] or [ ] to specify the copy quantity.
Specify the cop
y quantity rst.
You can set the copy quantity to "F" or "1" to "9."
You can register the custom copy quantity (user-dened
number up to twenty-nine copies) to "F
." The pre-dened
settings comes useful if you copy a certain number of
quantity, or want to copy more than 10 sets.
" Registering the Quantity that Y
ou Frequently Copy
(Up to Twenty-nine Copies)(P. 78) "
Press [ ] (Menu setting key) to specify the following settings
if necessary
.
" Selecting Copy Type (Speed Priority/Resolution
Priorlty)(P. 88) "
" Emphasizing the Outline of an Image (Sharpness)
(P. 90) "
Press [ ] (Copy setting key) to specify the
follo
wing settings if necessary.
The indicator is moved to [ ] → [ ] →
[ ] each time you press the key.
[ ]
:
"
Adjusting
the
Density(P
.
79) "
Copy
76
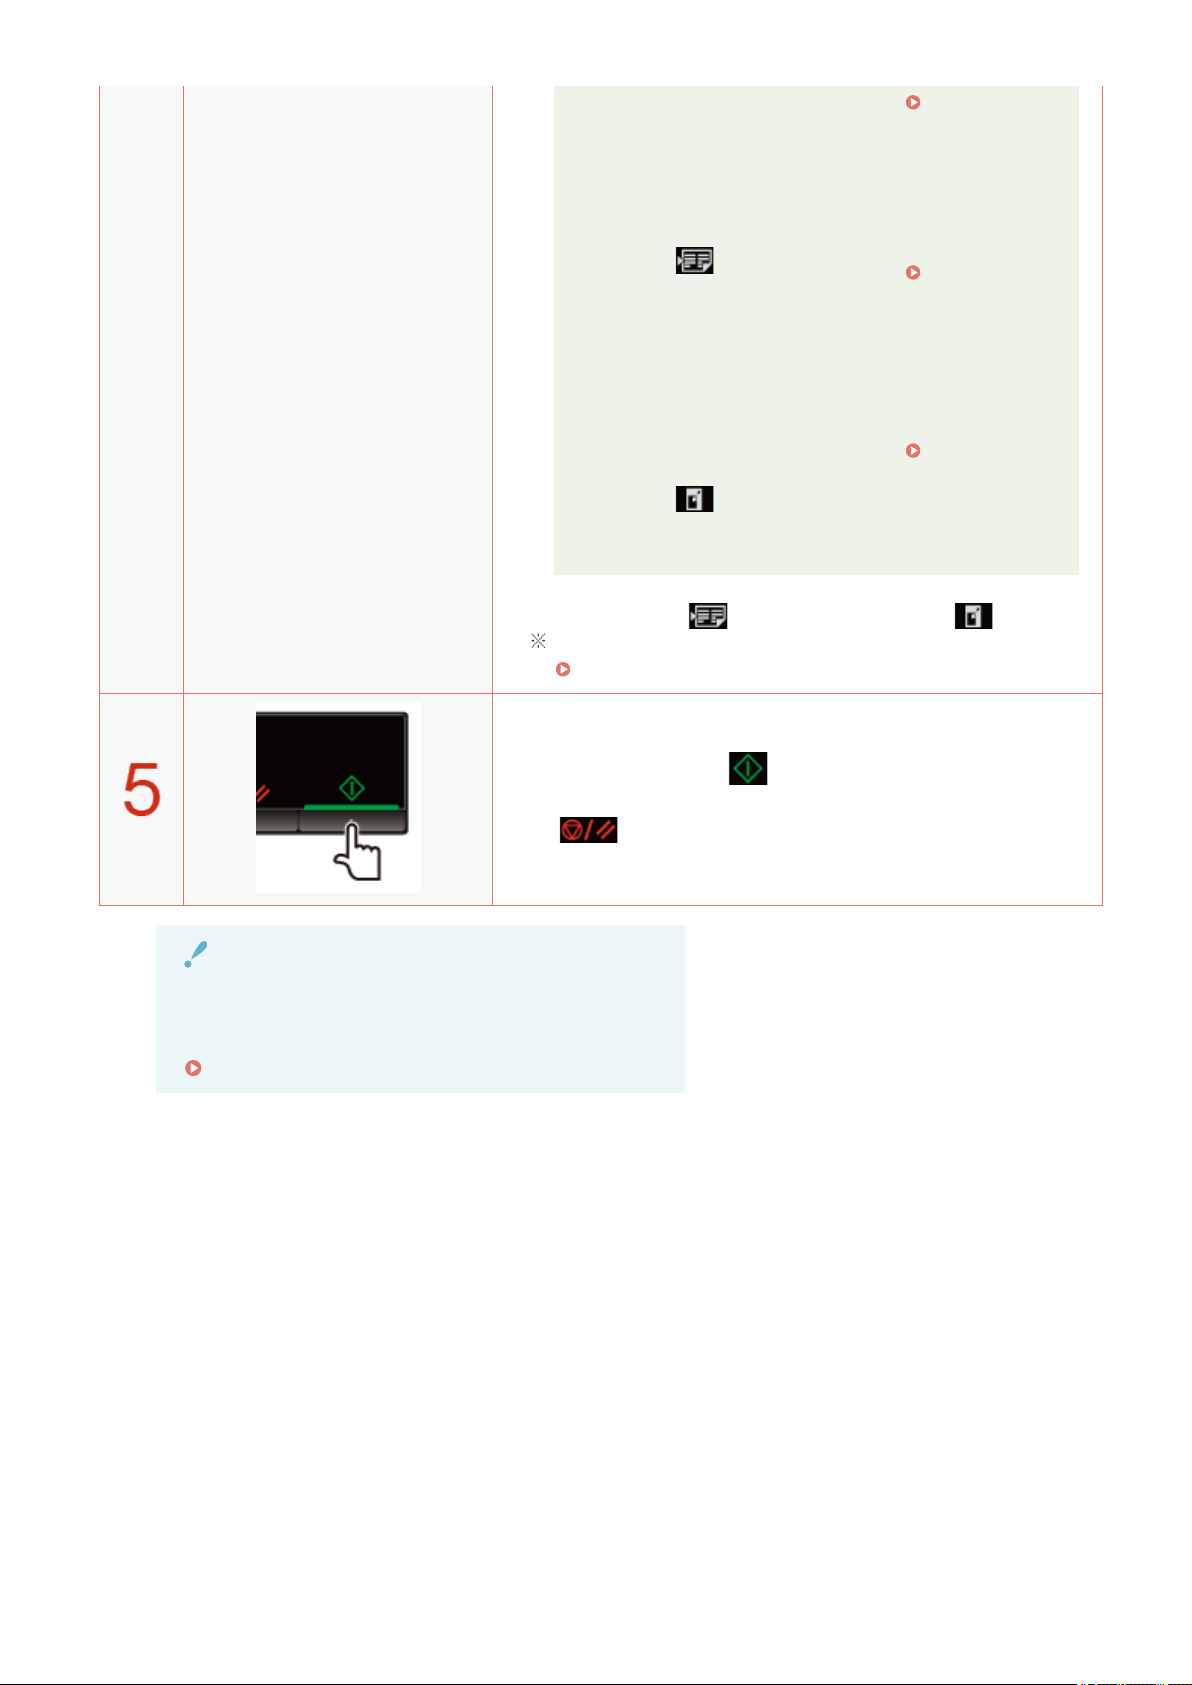
[ ]
:
" Cop
ying
Both Sides
of Cards
onto One
Side (ID
Card Copy)
(P. 83) "
" Cop
ying
Two
Documents
onto One
Sheet (2 on
1 Copy)
(P. 86) "
[
]
:
"
Enlar
ging/
Reducing
Copy(P. 81)
"
You cannot set [ ] (2 on 1/ID card cop) and [ ] (enlarge/
r
educe copies) at a time.
" Oper
ation Panel and Display(P. 25) "
Press [ ] to start copying.
<Canceling cop
y jobs>
Press [
].
IMPORTANT
When copying a document without margins
Images may be partially cut off on the output.
" Scan Area(P. 68) "
Copy
77
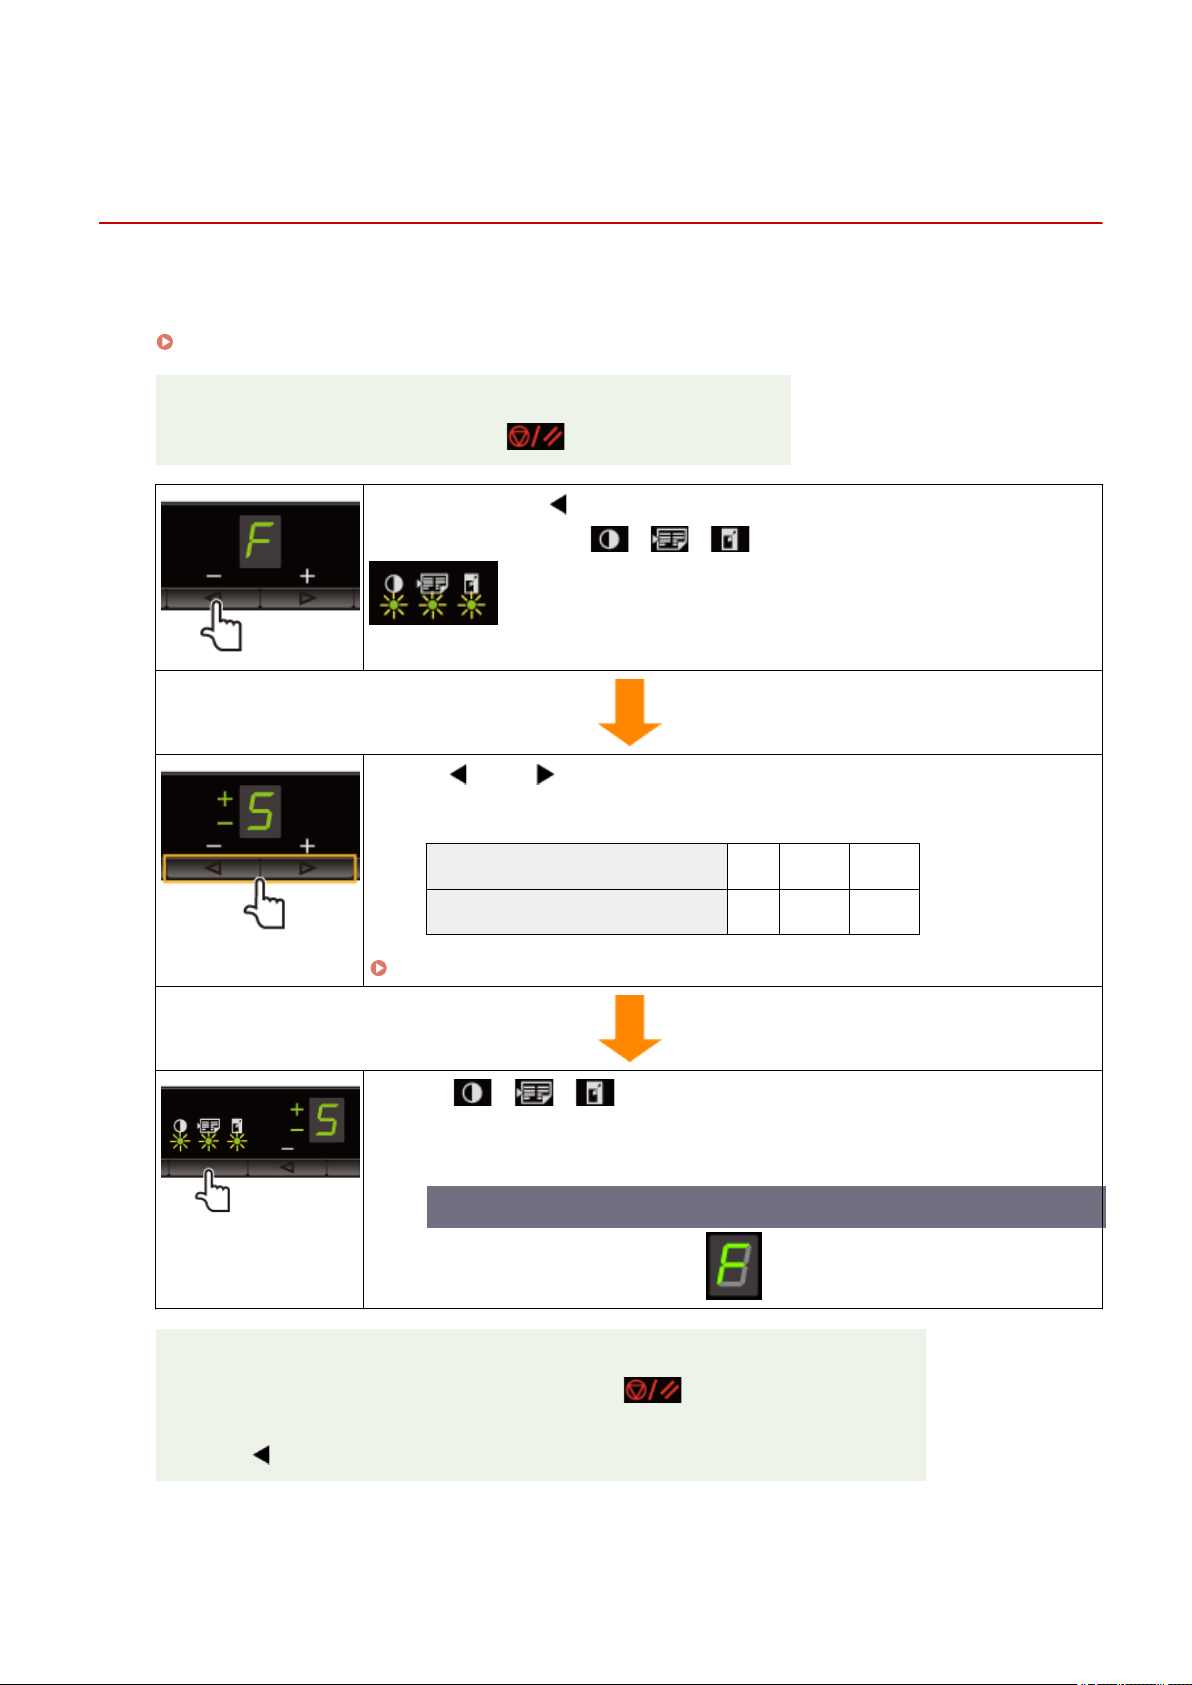
Registering the Quantity that You Frequently Copy (Up
to T
wenty-nine Copies)
85RS-023
Y
ou can call a registered quantity using one-touch button to copy by registering a copy quantity.
You can register the copy quantity up to twenty-nine copies.
" Basic Cop
y Operations(P. 76) "
<Before registering the copy quantity>
Register the quantity after pr
essing [
] to reset the settings.
Press and hold [ ] more than 5 seconds.
After this, "F" is on, and [ ] (Copy setting key) blinks.
Press [ ] or [ ] to display the quantity that you want to
register.
The quantity that you want to register: 1 to 9 10 to 19 20 to 29
Display: 1 to 9 +0 to +9 ±0 to ±9
" Setting List(P
. 31) "
Press [ ] (Copy setting key) to conrm the setting.
→ The specied quantity is displayed after "F
."
Example) When the quantity is set to twenty-five copies
Saving the registered quantity
The r
egistered quantity is saved even if you press [
] or turn the power OFF.
T
o display "F"
When [
] is pressed, "F" is displayed.
Copy
78
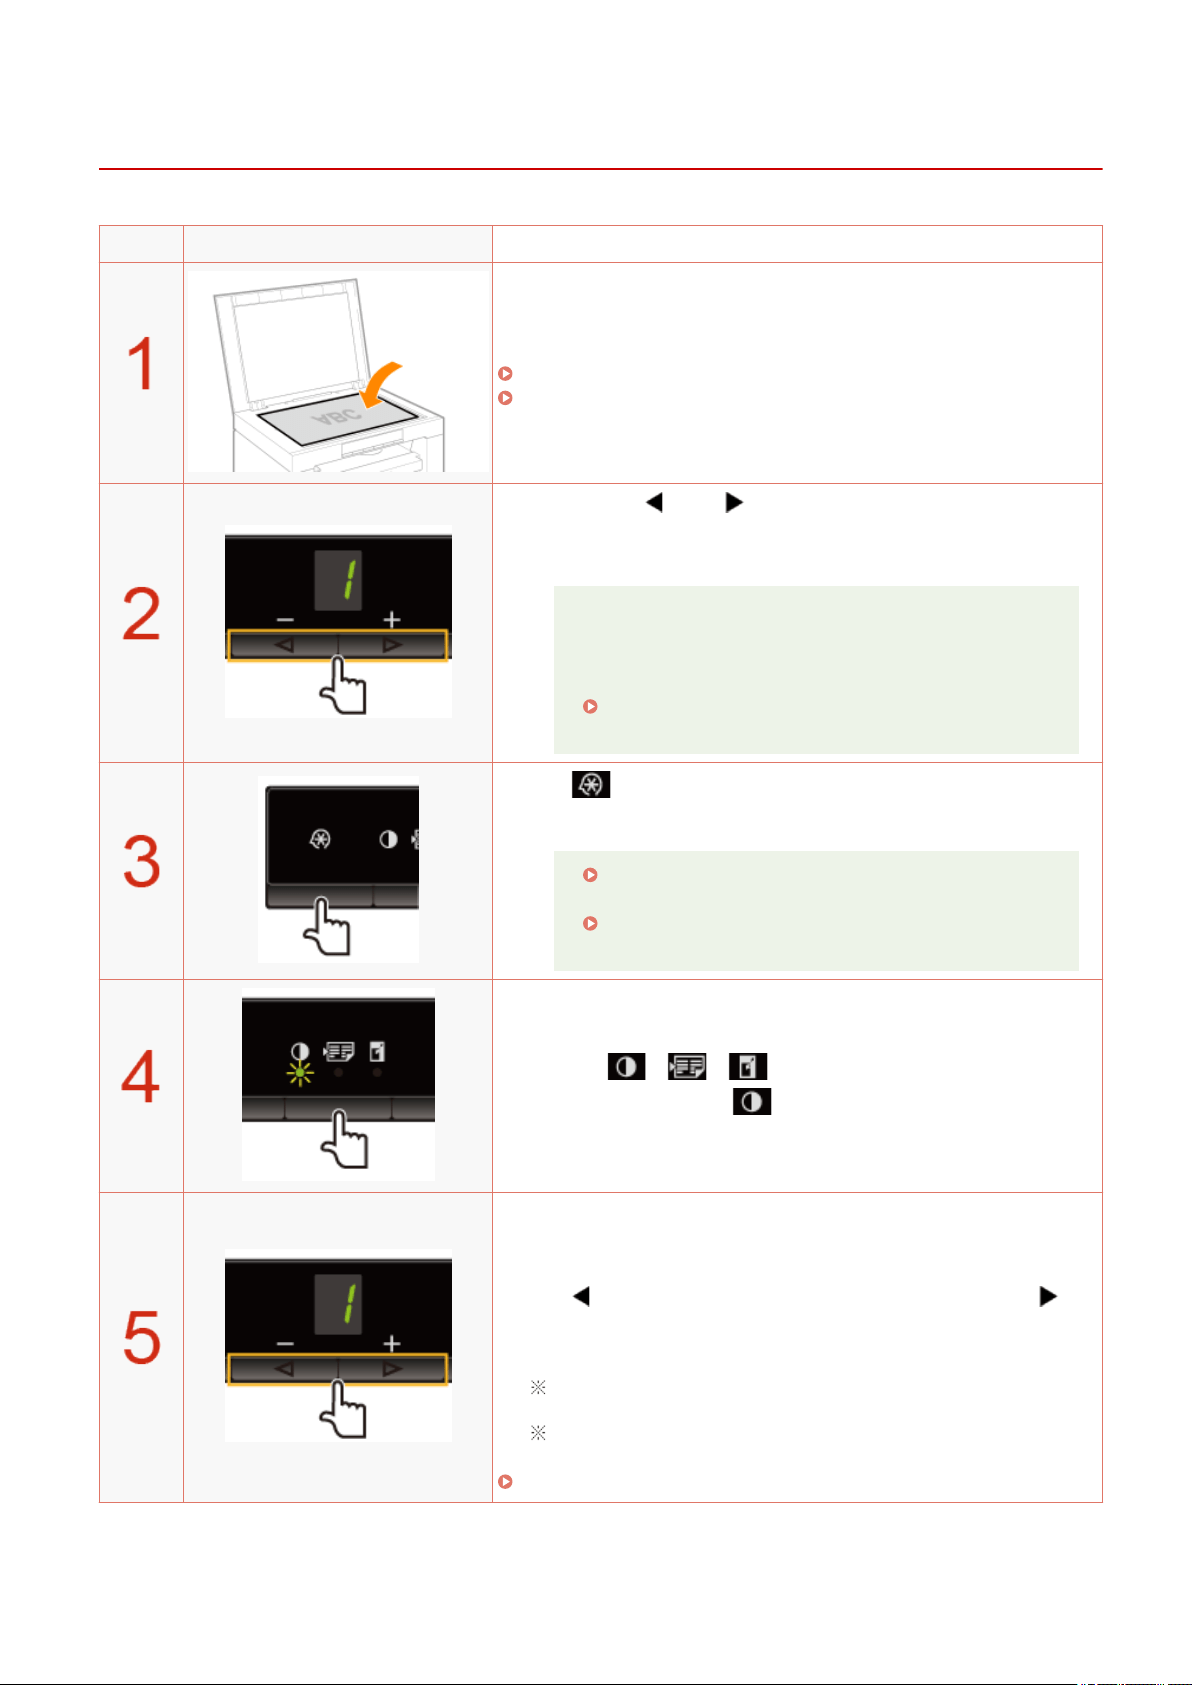
Adjusting the Density
85RS-024
Operating results Operating procedures
Place the document.
" Placing Documents
(P. 43) "
" Supported Paper T
ypes(P. 70) "
Press [ ] or [ ] to specify the copy quantity.
Specify the cop
y quantity rst.
You can set the copy quantity to "F" or "1" to "9."
You can register the custom copy quantity (user-dened
number up to twenty-nine copies) to "F." The pre-dened
settings comes useful if you copy a certain number of
quantity, or want to copy more than 10 sets.
" Registering the Quantity that You Frequently Copy
(Up to Twenty-nine Copies)(P. 78) "
Press [ ] (Menu setting key) to specify the following settings
if necessary
.
" Selecting Cop
y Type (Speed Priority/Resolution
Priorlty)(P. 88) "
" Emphasizing the Outline of an Image (Sharpness)
(P
. 90) "
Press [ ] (Copy setting key) to blink the
[ ] indicator.
Adjust the density.
-4 to A to 0 to +4
[ ]
(Lighter)
Default
value
[ ]
(Dark
er)
When setting the value to [A], the density is automatically set
accor
ding to the documents.
[A] is the only suitable mode for text documents.
" Setting List(P
. 31) "
Copy
79

Press [ ] to start copying.
<Canceling cop
y jobs>
Press [
].
Copy
80
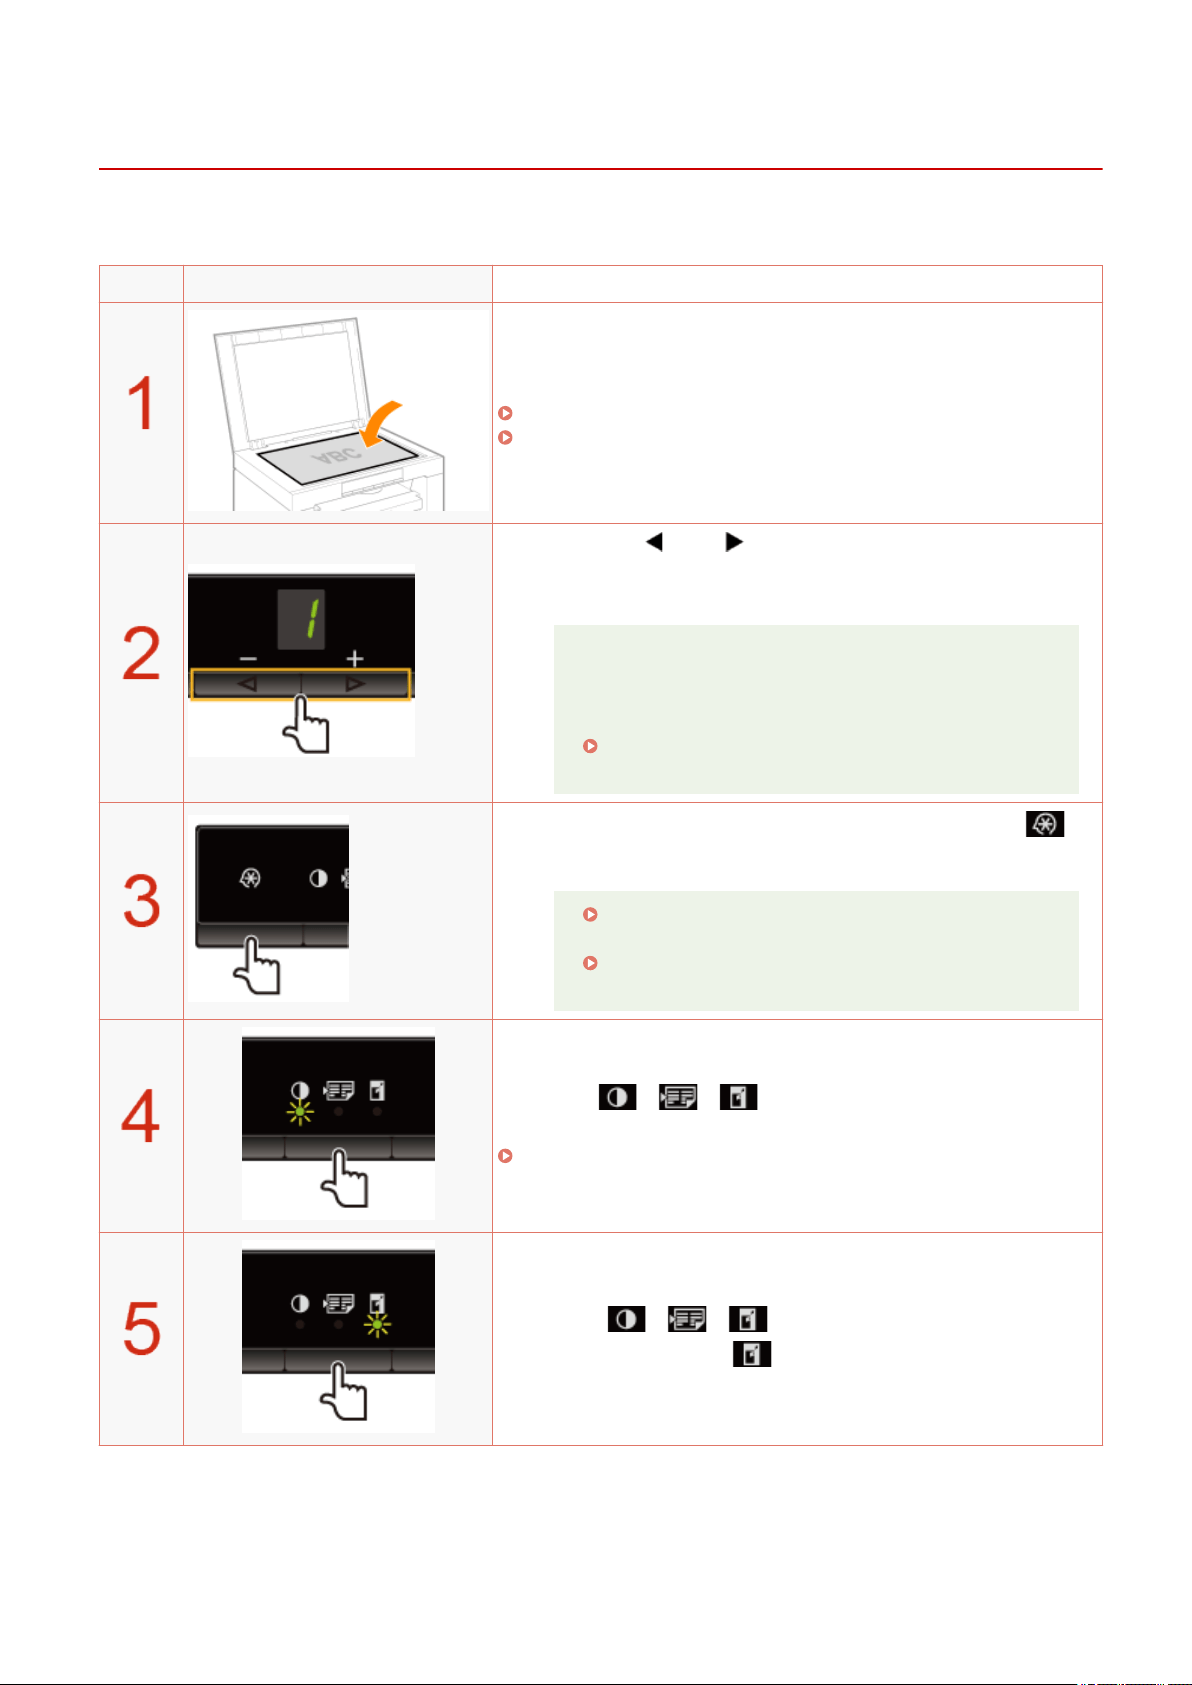
Enlarging/Reducing Copy
85RS-025
Y
ou can specify a copy ratio (50 to 200%) in 10% increments.
Operating results Operating procedures
Place the document.
" Placing Documents
(P. 43) "
" Supported Paper T
ypes(P. 70) "
Press [ ] or [ ] to specify the copy quantity.
Specify the cop
y quantity rst.
You can set the copy quantity to "F" or "1" to "9."
You can register the custom copy quantity (user-dened
number up to twenty-nine copies) to "F." The pre-dened
settings comes useful if you copy a certain number of
quantity, or want to copy more than 10 sets.
" Registering the Quantity that You Frequently Copy
(Up to Twenty-nine Copies)(P. 78) "
Specify the following settings if necessary by pressing [ ]
(Menu setting k
ey).
" Selecting Cop
y Type (Speed Priority/Resolution
Priorlty)(P. 88) "
" Emphasizing the Outline of an Image (Sharpness)
(P
. 90) "
Press [ ] (Copy setting key) to specify the
density settings if necessary
.
" Adjusting the Density
(P. 79) "
Press [ ] (Copy setting key) to blink the
[ ] indicator.
Copy
81

Change the ratio.
50% to 90% 100% 110% to 190% 200%
-5 to -1 0 +1 to +9 ±9
" Setting List(P
. 31) "
Press [ ] to start copying.
<Canceling copy jobs>
Press [ ].
You cannot perform the enlarged or reduced copy when combined with the following functions.
" Cop
ying Both Sides of Cards onto One Side (ID Card Copy)(P. 83) "
" Cop
ying Two Documents onto One Sheet (2 on 1 Copy)(P. 86) "
Copy
82
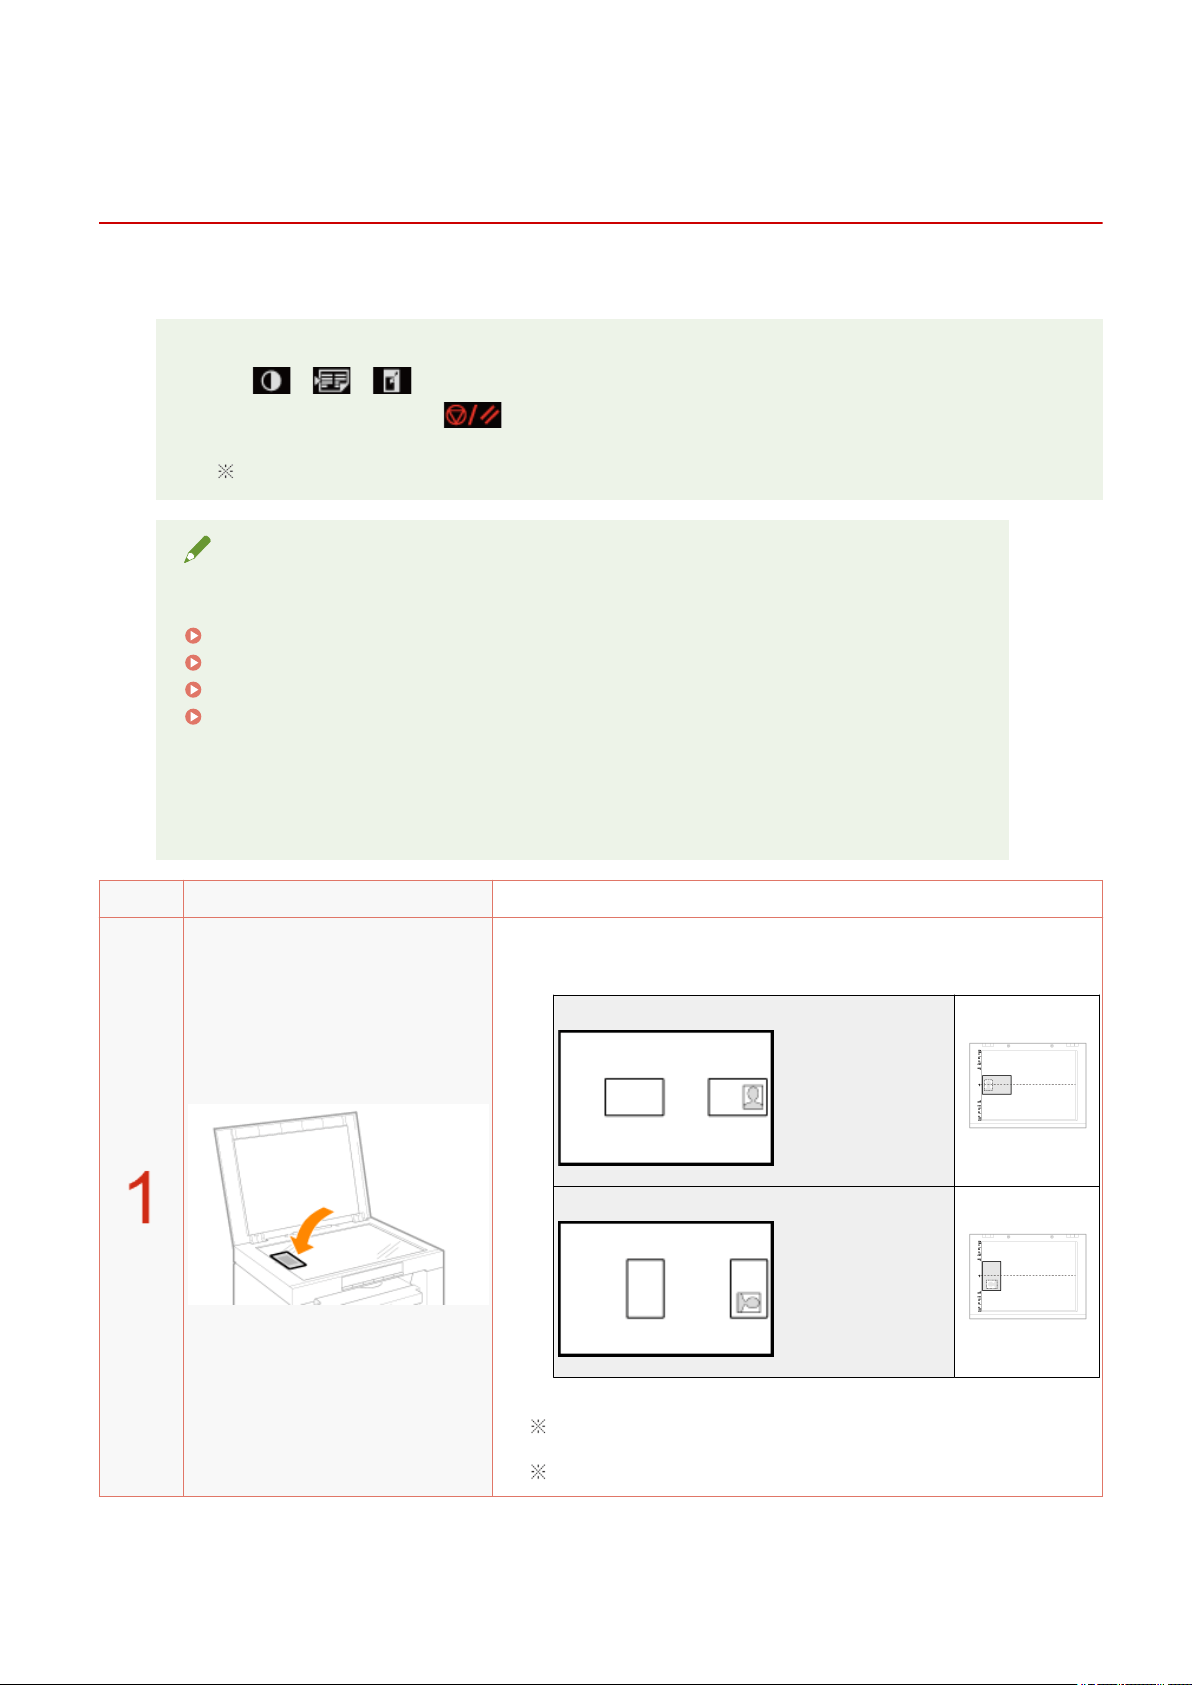
Copying Both Sides of Cards onto One Side (ID Card
Cop
y)
85RS-026
Y
ou can copy both sides of cards onto one side.
<Before copying>
If the [ ] indicator is on or other than [1] is displayed, the previous copy settings are
r
emained.In this case, press [
] to reset the copy settings.
If a key is not pressed for 2 minutes, the copy settings will be automatically reset.
NOTE
You can copy with combined the functions.
" Registering the Quantity that Y
ou Frequently Copy (Up to Twenty-nine Copies)(P. 78) "
" Adjusting the Density
(P. 79) "
" Selecting Cop
y Type (Speed Priority/Resolution Priorlty)(P. 88) "
" Emphasizing the Outline of an Image (Sharpness)(P
. 90) "
Changing the copy ratio
The output size is the same as the documents (100%).
Paper size requirements
A size larger than A4 or Letter.
Operating results Operating procedures
Place the card on the platen glass, and then close it.
Place the car
d to align the center of the card with the arrow mark.
If you want to arrange the cards horizontally
If you want to arrange the cards vertically
Place the card with a 5 mm space created from the left edge of the
platen glass.
Place the card to t in the left half of the platen glass.
Copy
83
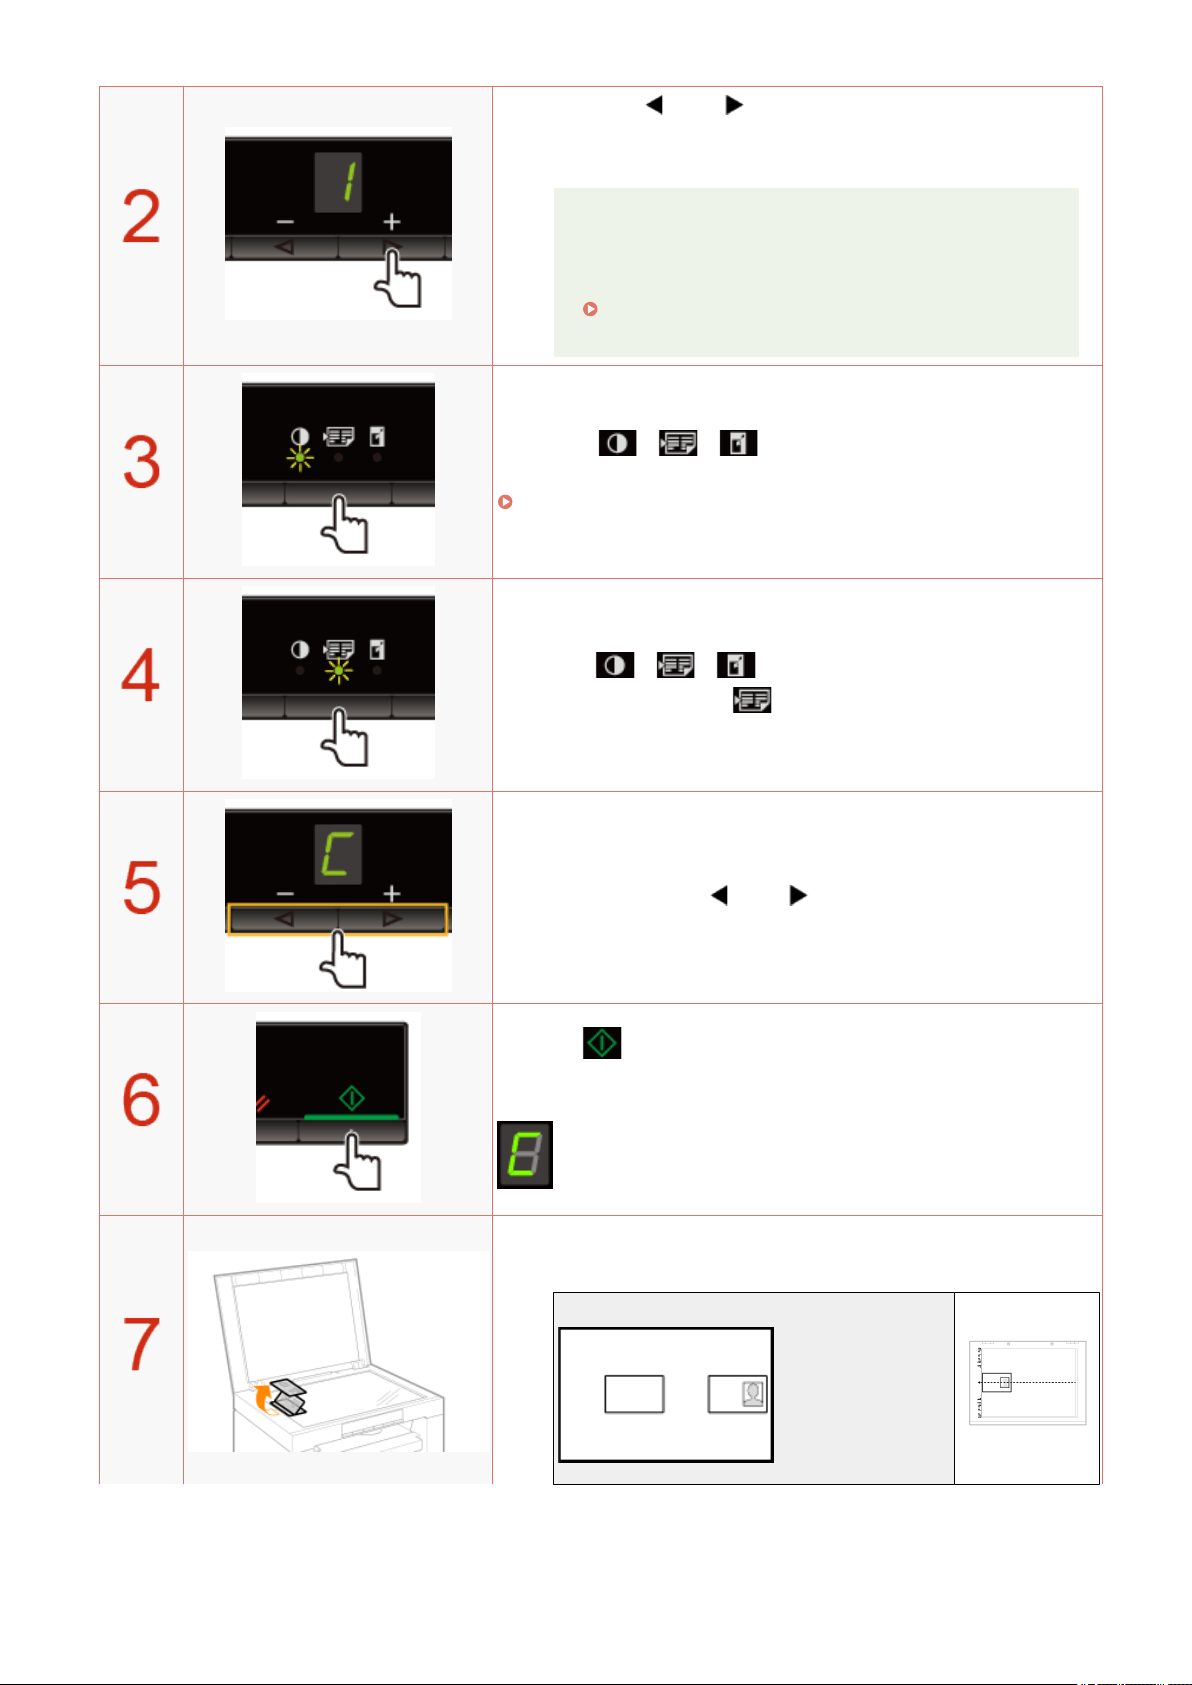
Press [ ] or [ ] to specify the copy quantity.
Specify the cop
y quantity rst.
You can set the copy quantity to "F" or "1" to "9."
You can register the custom copy quantity (user-dened
number up to twenty-nine copies) to "F." The pre-dened
settings comes useful if you copy a certain number of
quantity, or want to copy more than 10 sets.
" Registering the Quantity that You Frequently Copy
(Up to Twenty-nine Copies)(P. 78) "
Press [ ] (Copy setting key) to specify the
density settings if necessary
.
" Adjusting the Density
(P. 79) "
Press [ ] (Copy setting key) to to blink the
[ ] indicator.
Press [ ] or [ ] to display "C".
Press [ ]. One side of the card (the side toward the platen
glass) is scanned.
After scanning, "C" blinks.
Turn and place the card.
Place the car
d to align the center of the card with the arrow mark.
If you want to arrange the cards horizontally
Copy
84
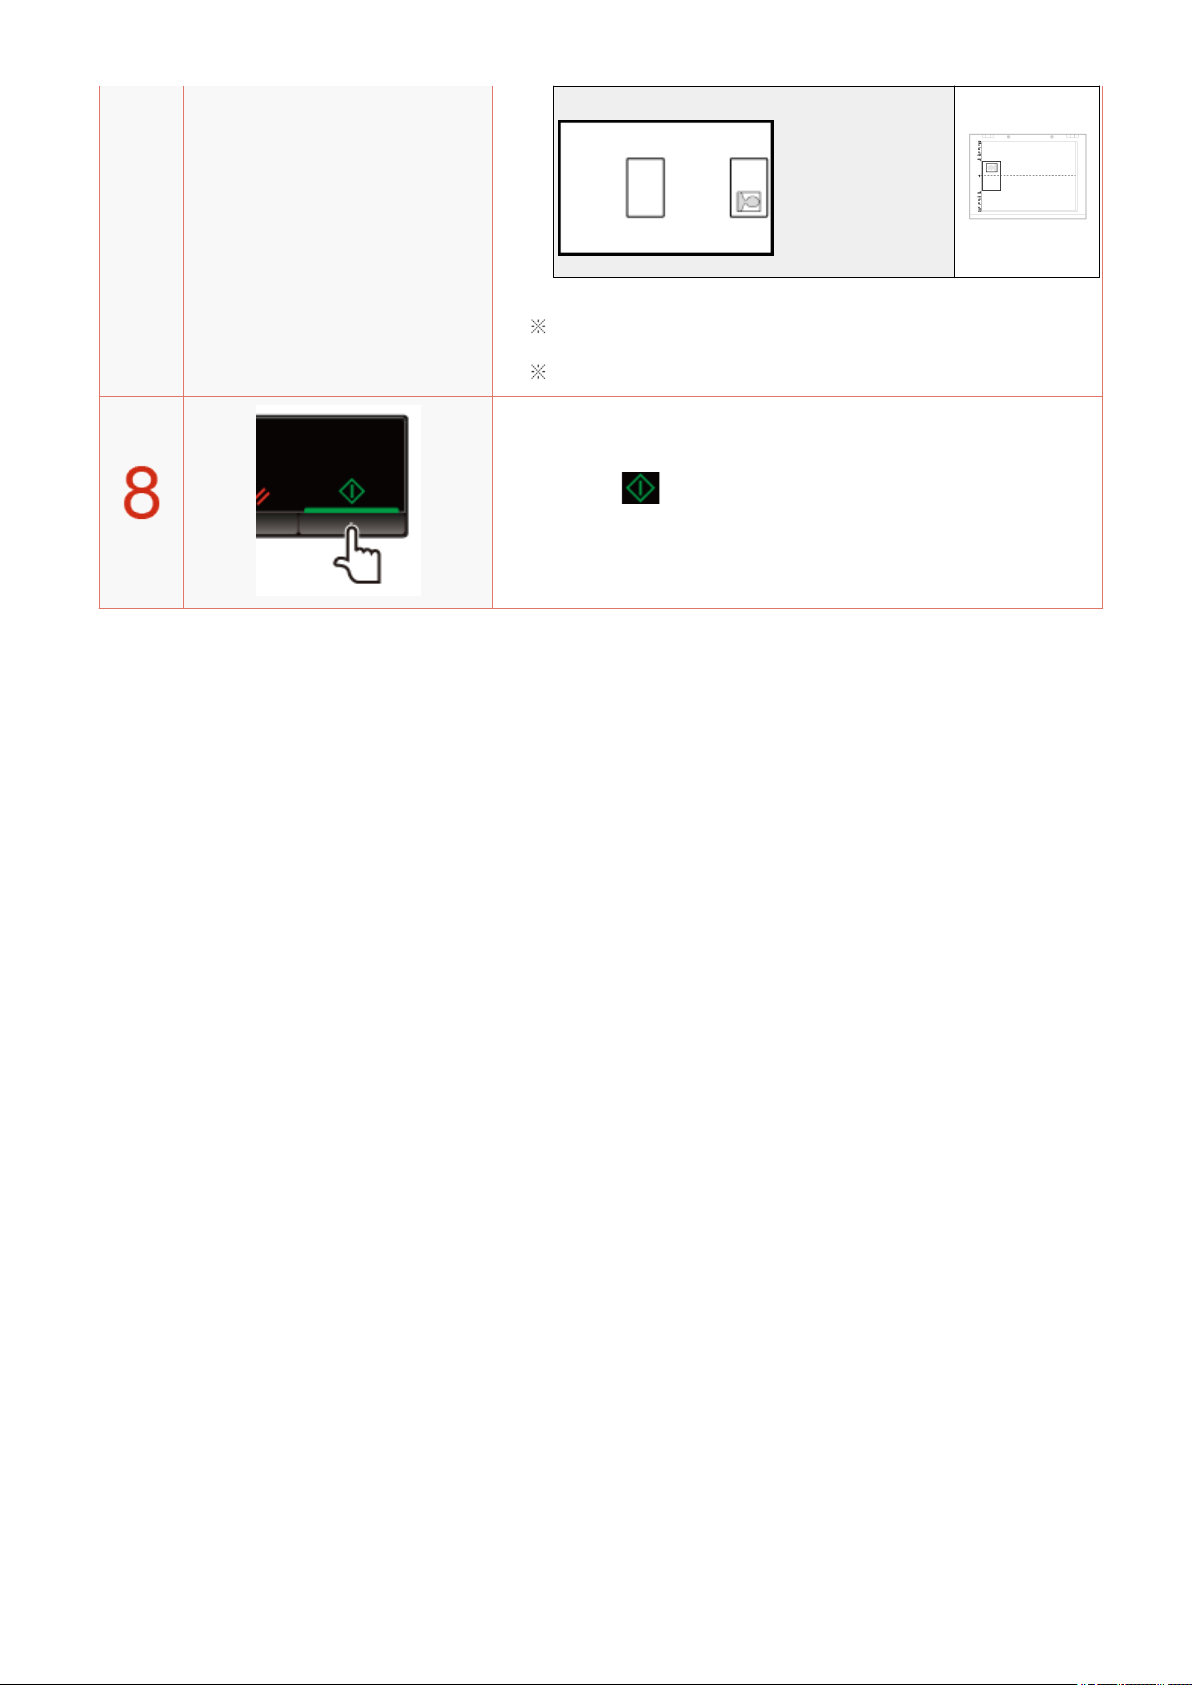
If you want to arrange the cards vertically
Place the card with a 5 mm space created from the left edge of the
platen glass.
Place the card to t in the left half of the platen glass.
Press [ ]. The reverse side of the card is scanned.
After scanning, printing starts.
Copy
85
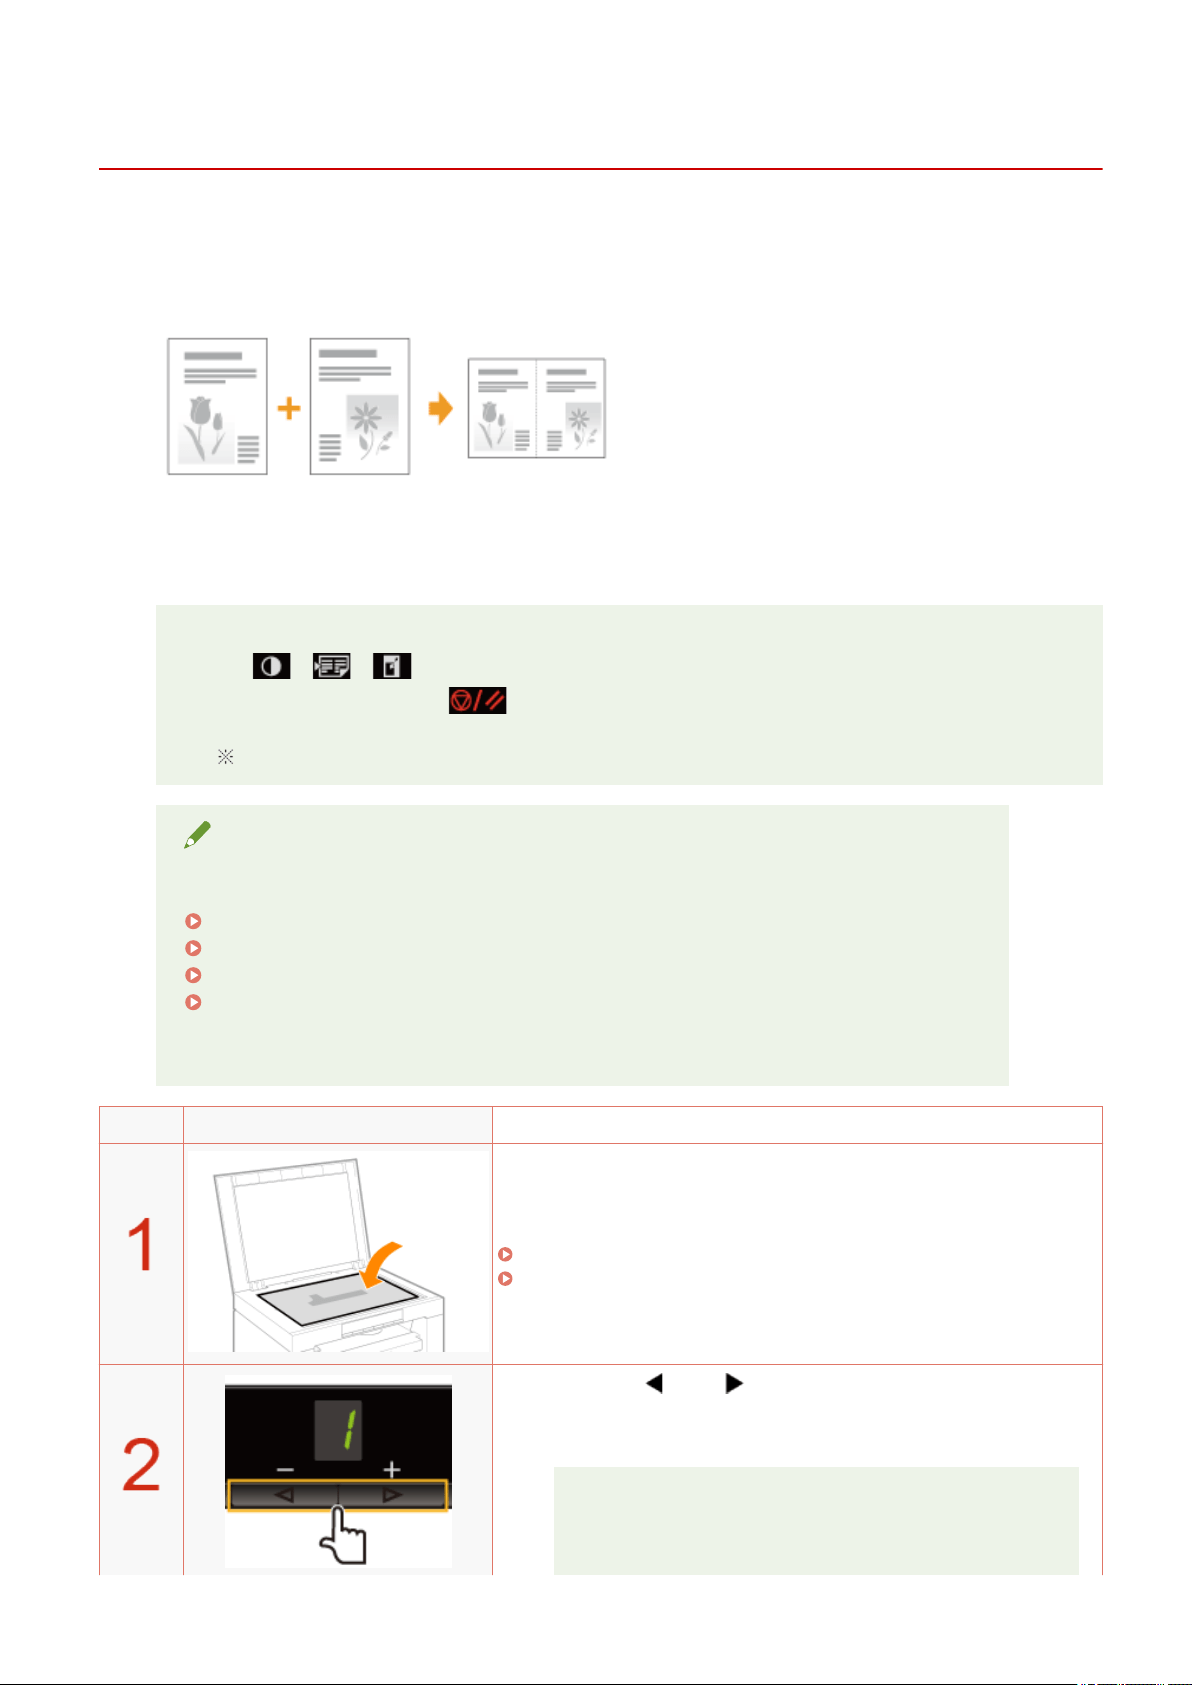
Copying Two Documents onto One Sheet (2 on 1 Copy)
85RS-027
Y
ou can copy the two documents onto one sheet by reducing the size.
<Before copying>
If the [ ] indicator is on or other than [1] is displayed, the previous copy settings are
r
emained. In this case, Press [
] and reset the settings.
If a key is not pressed for 2 minutes, the copy settings will be automatically reset.
NOTE
You can copy with the combined functions.
" Registering the Quantity that Y
ou Frequently Copy (Up to Twenty-nine Copies)(P. 78) "
" Adjusting the Density
(P. 79) "
" Selecting Cop
y Type (Speed Priority/Resolution Priorlty)(P. 88) "
" Emphasizing the Outline of an Image (Sharpness)(P
. 90) "
Paper size requirements
A size larger than A4 or Letter.
Operating results Operating procedures
Place the document.
" Placing Documents
(P. 43) "
" Supported Paper T
ypes(P. 70) "
Press [ ] or [ ] to specify the copy quantity.
Specify the cop
y quantity rst.
You can set the copy quantity to "F" or "1" to "9."
You can register the custom copy quantity (user-dened
number up to twenty-nine copies) to "F
." The pre-dened
settings comes useful if you copy a certain number of
quantity, or want to copy more than 10 sets.
Copy
86
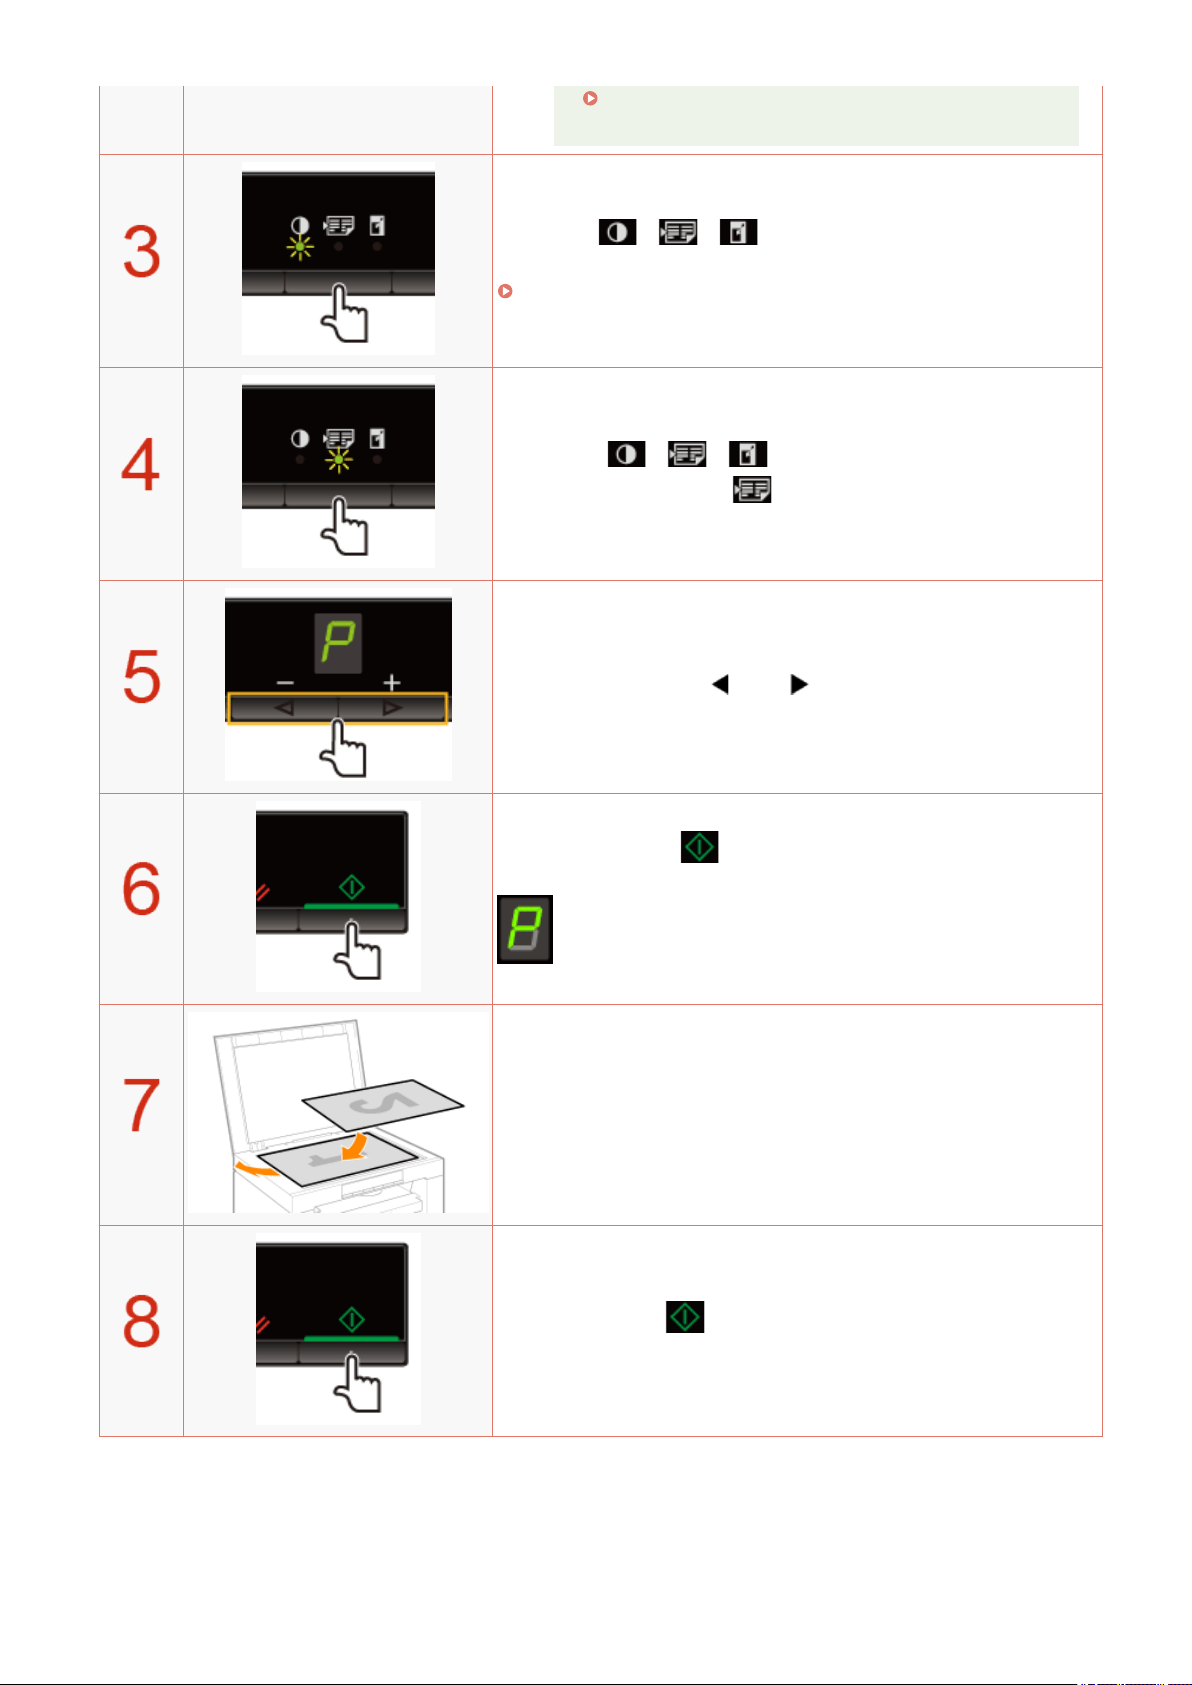
" Registering the Quantity that Y
ou Frequently Copy
(Up to Twenty-nine Copies)(P. 78) "
Press [ ] (Copy setting key) to specify the
density settings if necessary
.
" Adjusting the Density
(P. 79) "
Press [ ] (Copy setting key) to blink the
[ ] indicator.
Press [ ] or [ ] to display "P."
Press [ ] to scan the rst document.
After scanning, "P" blinks.
Place the second document.
Press [ ] to scan the second document.
After scanning, printing starts.
Copy
87
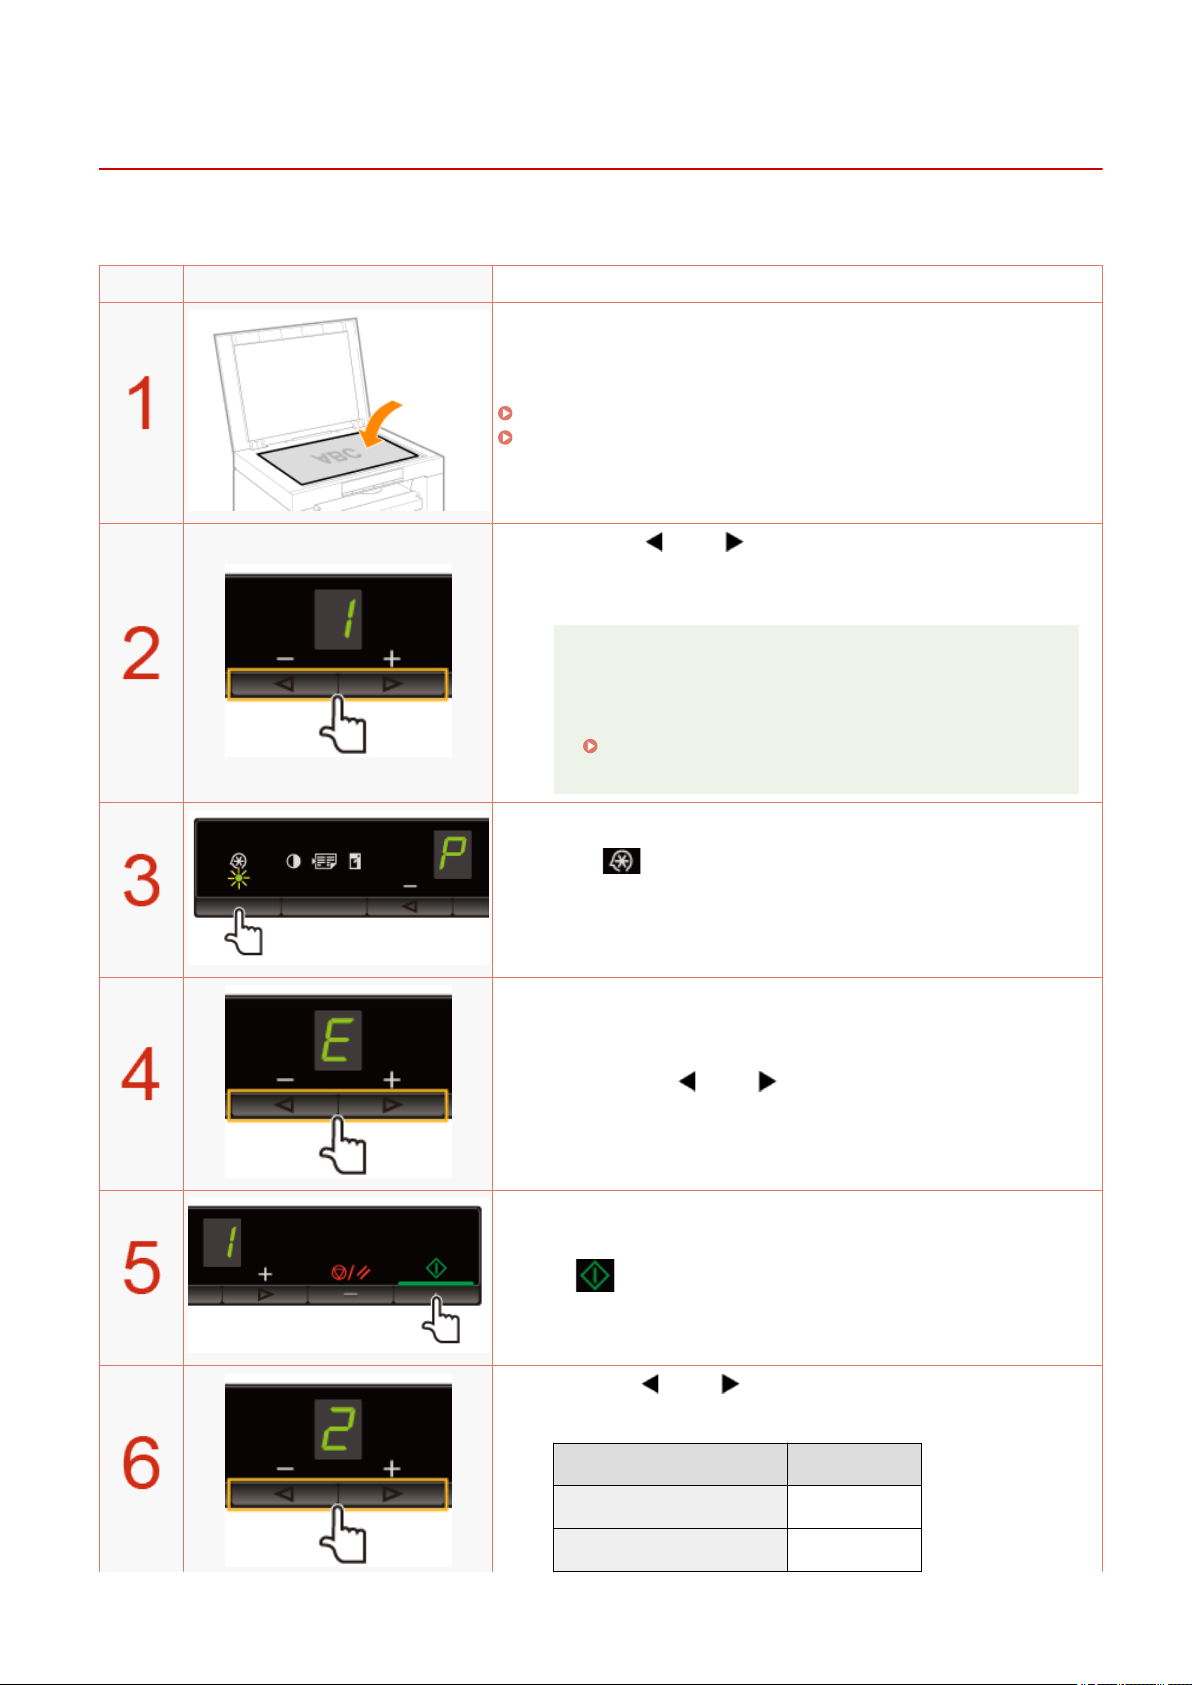
Selecting Copy Type (Speed Priority/Resolution Priorlty)
85RS-028
Select whether to set priority on cop
y speed or resolution to copy.
Operating results Operating procedures
Place the document.
" Placing Documents
(P. 43) "
" Supported Paper T
ypes(P. 70) "
Press [ ] or [ ] to specify the copy quantity.
Specify the cop
y quantity rst.
You can set the copy quantity to "F" or "1" to "9."
You can register the custom copy quantity (user-dened
number up to twenty-nine copies) to "F." The pre-dened
settings comes useful if you copy a certain number of
quantity, or want to copy more than 10 sets.
" Registering the Quantity that You Frequently Copy
(Up to Twenty-nine Copies)(P. 78) "
Press [ ] (Menu setting key), and then start the menu
oper
ation.
When the menu is operating, the menu indicator blinks.
Press [ ] or [ ] until "E" is displayed.
Press [ ] to set the menu to be able to change the settings.
Press [ ] or [ ] to change the setting values.
The display and the cop
y type are matched as follows.
Display Copy type
1 Speed priority
2 Resolution priority
Copy
88

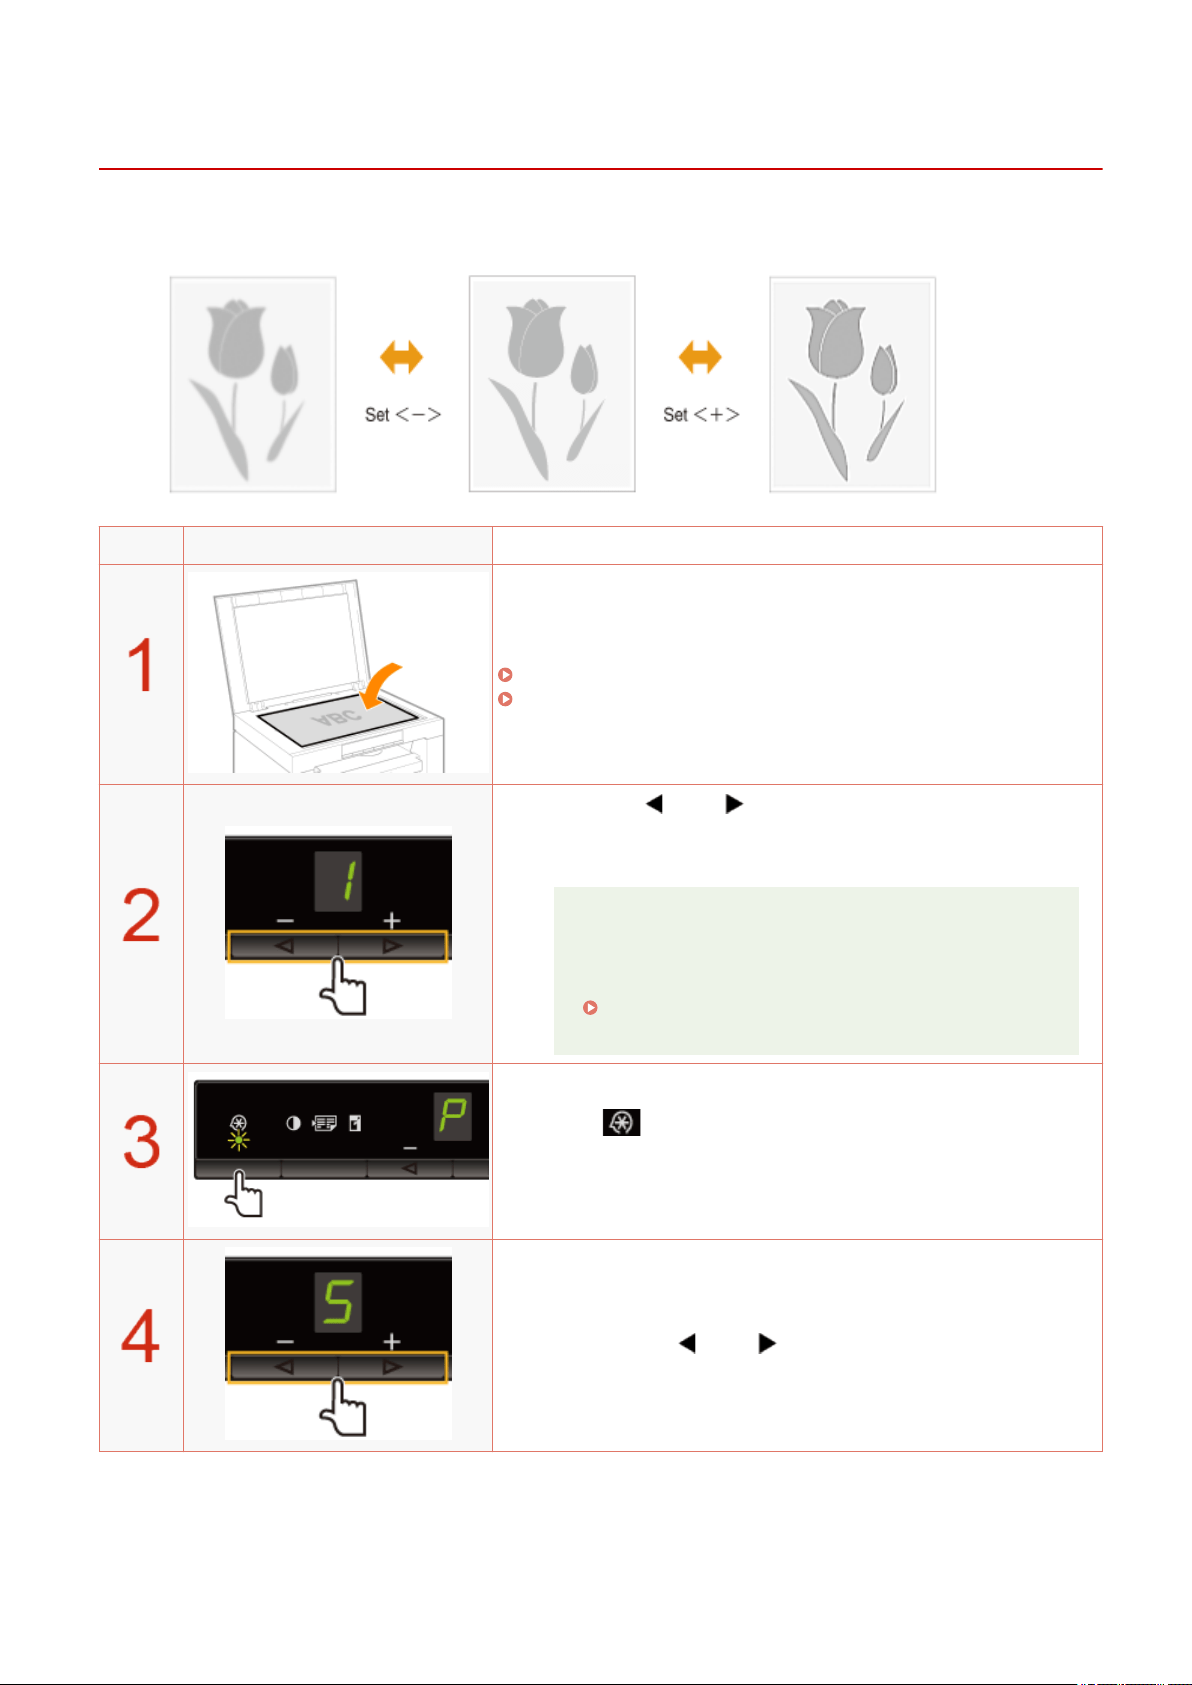
Emphasizing the Outline of an Image (Sharpness)
85RS-029
Y
ou can emphasize the outline of the image in the documents or decrease the contrast.
Operating results Operating procedures
Place the document.
" Placing Documents
(P. 43) "
" Supported Paper T
ypes(P. 70) "
Press [ ] or [ ] to specify the copy quantity.
Specify the cop
y quantity rst.
You can set the copy quantity to "F" or "1" to "9."
You can register the custom copy quantity (user-dened
number up to twenty-nine copies) to "F." The pre-dened
settings comes useful if you copy a certain number of
quantity, or want to copy more than 10 sets.
" Registering the Quantity that You Frequently Copy
(Up to Twenty-nine Copies)(P. 78) "
Press [ ] (Menu setting key), and then start the menu
operation.
When the menu is operating, the menu indicator blinks.
Press [ ] or [ ] until "S" is displayed.
Copy
90
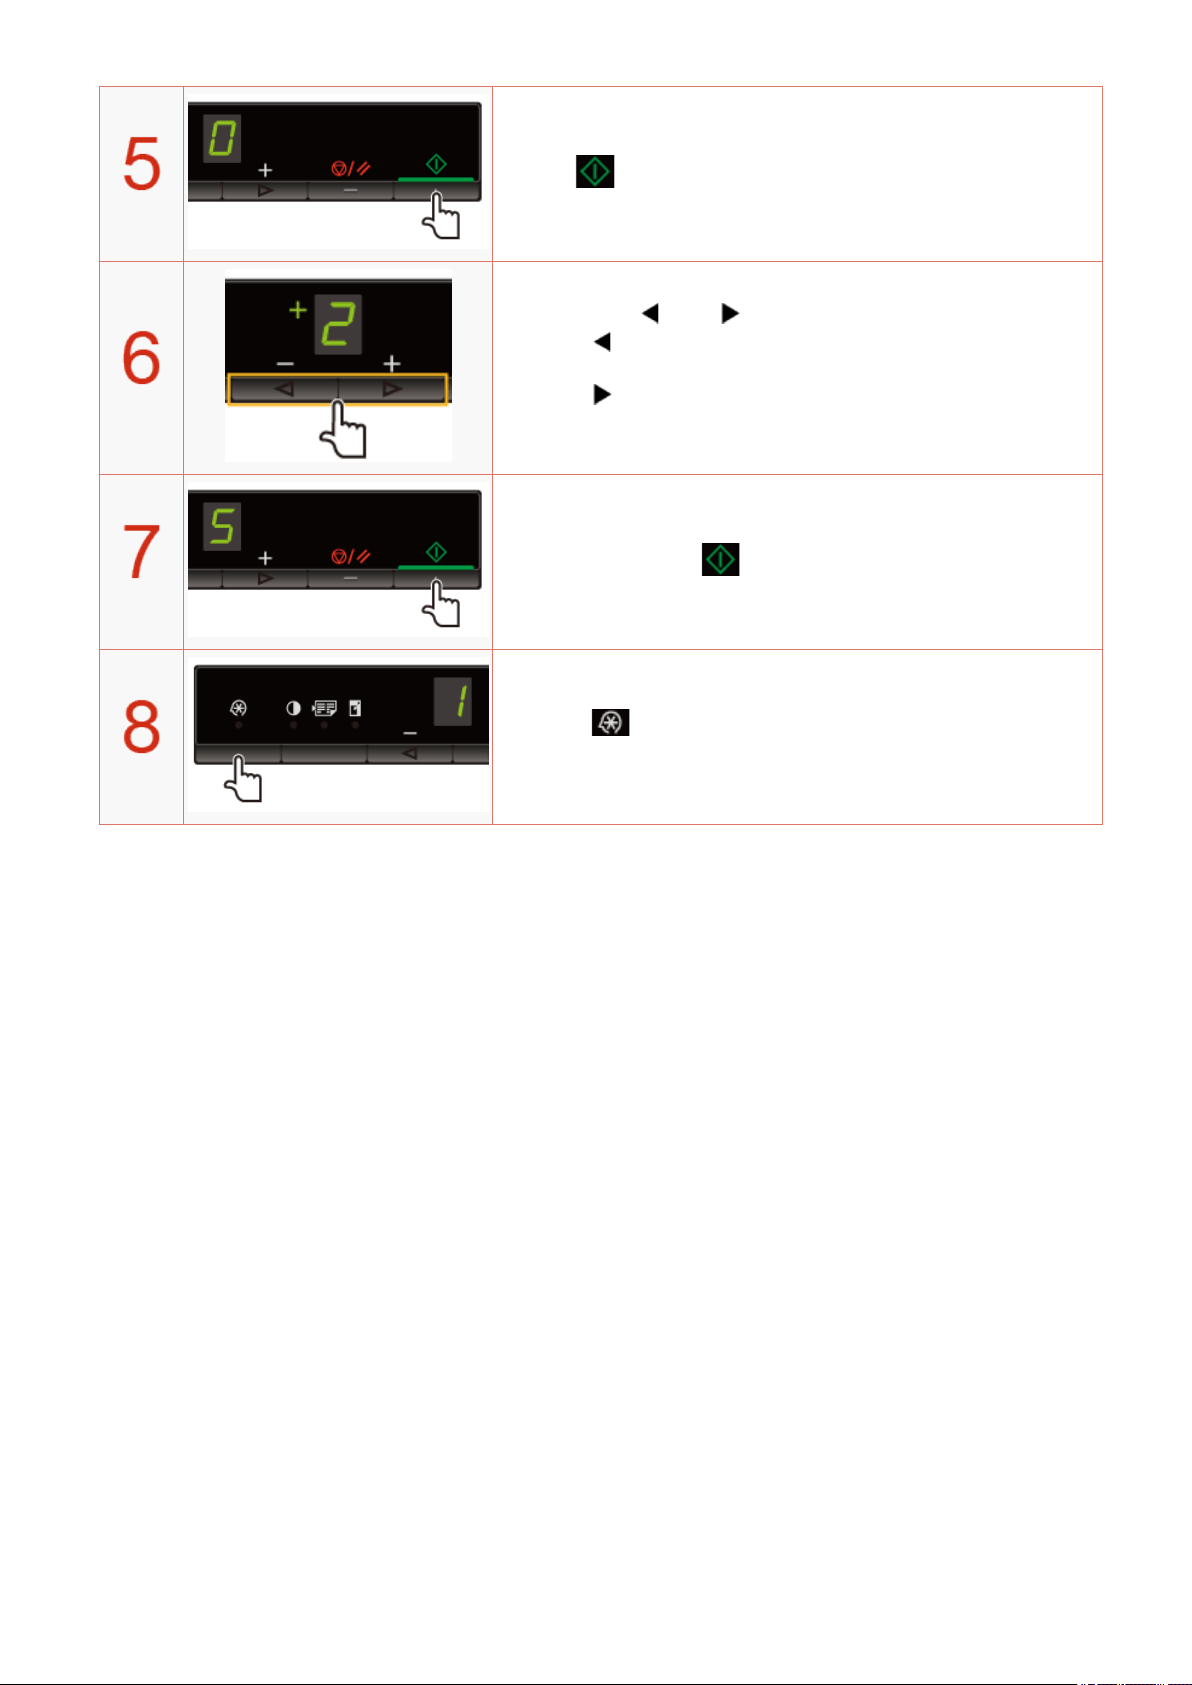
Press [ ] to set the menu to be able to change the settings.
Press [ ] or [ ] to change the setting values.
<Pr
essing [
] to decrease the values>
It is appr
opriate when you want to copy documents clearly such as photos.
<Pressing [
] to increase the values>
It is appr
opriate when you want to copy text and lines clearly.
Press [ ] to conrm the setting.
Press [ ] (Menu setting key) to exit the menu operation.
The menu indicator turns off.
Copy
91

Print
Print .........................................................................................................................................................................
93
Preparing to Print from Your Computer ............................................................................................................ 94
Setting Up Printer Sharing .................................................................................................................................. 95
Printing Fundamentals ....................................................................................................................................... 97
Printing ........................................................................................................................................................... 98
Conguring the Default Print Settings .......................................................................................................... 101
Viewing the Online Help ............................................................................................................................... 103
Printing on Custom Paper Size ......................................................................................................................... 105
Registering a Custom Paper Size .................................................................................................................. 106
Canceling Print .................................................................................................................................................. 107
Selecting and Canceling Jobs ........................................................................................................................ 108
Print
92

Print
85RS-02A
This chapter describes ho
w to print from your computer to the machine.
Once you have the printer driver installed on your computer, you can print your document les to the machine
eciently. In addition, the printer driver offers various nishing options, such as scaling and gutters.
Preparing for printing
Preparing to use the print functions See " Pr
eparing to Print from Your Computer(P. 94) ."
Setting up printer sharing See " Setting Up Printer Sharing(P. 95) ."
Printing
Learn about ways to print from your computer See " Printing Fundamentals
(P. 97) ."
Learning about print options See the online help to nd what you can congure in each sheet.
Using various print options
See the online help.
" Viewing the Online Help(P. 103) "
Checking jobs or changing settings using the operation panel
Checking or deleting print jobs See " Canceling Print
(P. 107) ."
Print
93

Preparing to Print from Your Computer
85RS-02C
In or
der to print, install the printer driver in the printer.
See the MF Driver Installation Guide in " Manuals and Their Contents
(P. 223) ".
NOTE
About the printer driver
The printer driver is softwar
e required for printing from an application. The printer driver will convert
application software's print data to print data for the printer.
The printer driver for this machine has the following features.
● The printer driver for this machine enables you to output print data at an optimum speed by dividing
the workload using a computer and the printer.
● As well as providing faster and more stable printing than conventional models, the printer driver for
this machine uses less memory to operate.
● In addition to the conversion of print data, the printer driver for this machine is equipped with the
functions capable of spooling print data and conguring the print condition, and various types of print
nishing can be set such as scaling or gutter adjustment.
Print
94

Setting Up Printer Sharing
85RS-02E
Once you have set up a print server on your network, you can eciently manage print jobs thr
ough the print
server. Additionally, you can install the alternate printer driver for the machine on your computer from the
network by adding it to the print server.
IMPORTANT
You may be unable to install drivers over the network depending on the operating system and the bit
ar
chitecture (32-bit or 64-bit) of the print server and client computers.
1
Open the printer folder.
" Basic Windo
ws Operations(P. 224) "
2
Display the [Sharing] tab.
For Windows 7:
1. Right-click the icon for the machine and select [Printer properties] from the pop-up menu.
2. Display the [Sharing] tab.
For Windows 8:
1. Right-click the icon for the machine and select [Printer properties].
2. Click the [Sharing] from the pop-up menu.
For Windows 10:
1. Right-click the icon for the machine and select [Printer properties].
2. Display the [Sharing] tab.
3
Select [Share this printer] or [Shared as] and enter the share name of the machine.
When [Change sharing options] appears
Click [Change sharing options].
When the [User Account Contr
ol] dialog box appears, click [Continue].
☞ Continue with the steps in the pr
ocedure below and install the alternate printer driver on your
computer.
4
Insert the User Software CD-ROM into the slot on your computer and click [Additional
Drivers].
Print
95

5
Install the alternate printer driver.
The installation dialog box appears when the alternate printer driver is selected and [OK] is clicked. Browse to
the folder wher
e the printer driver les are stored and follow onscreen instructions.
6
Click [OK].
The procedure is complete.
NOTE
To install the printer driver on another computer
1. From the [Start] menu, select [Programs] or [All Programs] -> [Accessories] -> [Windows
Explor
er].
2. Select the print server from [My Network Places] or [Network].
3. Double-click the shared printer or drag and drop it into the printer folder.
4. Follow the onscreen instructions to install the printer driver.
Print
96

Printing Fundamentals
85RS-02F
This section e
xplains the basic printing method using the printer driver, how to set the printer options, and how
to display the online help.
NOTE
To use the printer, you need an appropriate printer driver.
Refer to the MF Driver Installation Guide and install the printer driver.
Manuals and Their Contents
(P. 223)
" Printing(P
. 98) "
" Conguring the Default Print Settings
(P. 101) "
" Vie
wing the Online Help(P. 103) "
Print
97

Printing
85RS-02H
This section e
xplains the basic printing method using the printer driver.
NOTE
● Printing methods may differ depending on the application you ar
e using. For details, see the
instruction manuals provided with the application.
● The display may differ according to the operating system, as well as the type and version of the printer
driver.
● The machine may not be able to print data such as color photos if the data size of a single page is too
large. If such is the case, reduce the data size by lowering the resolution or by changing the le
format.
● If a printer icon is displayed in the task tray at the bottom right of your computer monitor, you can
stop printing from your computer. Double-click the printer icon -> click the name of the le you want
to stop printing -> click [Document] -> [Cancel].
● In Windows 8, when printing from the Windows Store app, if you have previously selected settings that
require input or a procedure when printing such as secure printing, edit + preview, department ID
management, etc., the message [The printer requires your attention. Go to the desktop to take care of
it.] is displayed. If this happens, move to the desktop and follow the instructions in the displayed
dialog box.
1
Open the document you want to print from the application.
2
Select [Print] from the [File] menu.
NOTE
In Windows 8, if you want to print from the Windows Store app, display the charm bar to the right of the
scr
een, and tap [
] (Devices) -> the printer you are using -> [Print]. When you print in this way, you
can only set some of the print functions.
3
Select your printer from [Name] -> click [Preferences] (or [Properties]).
Print
98
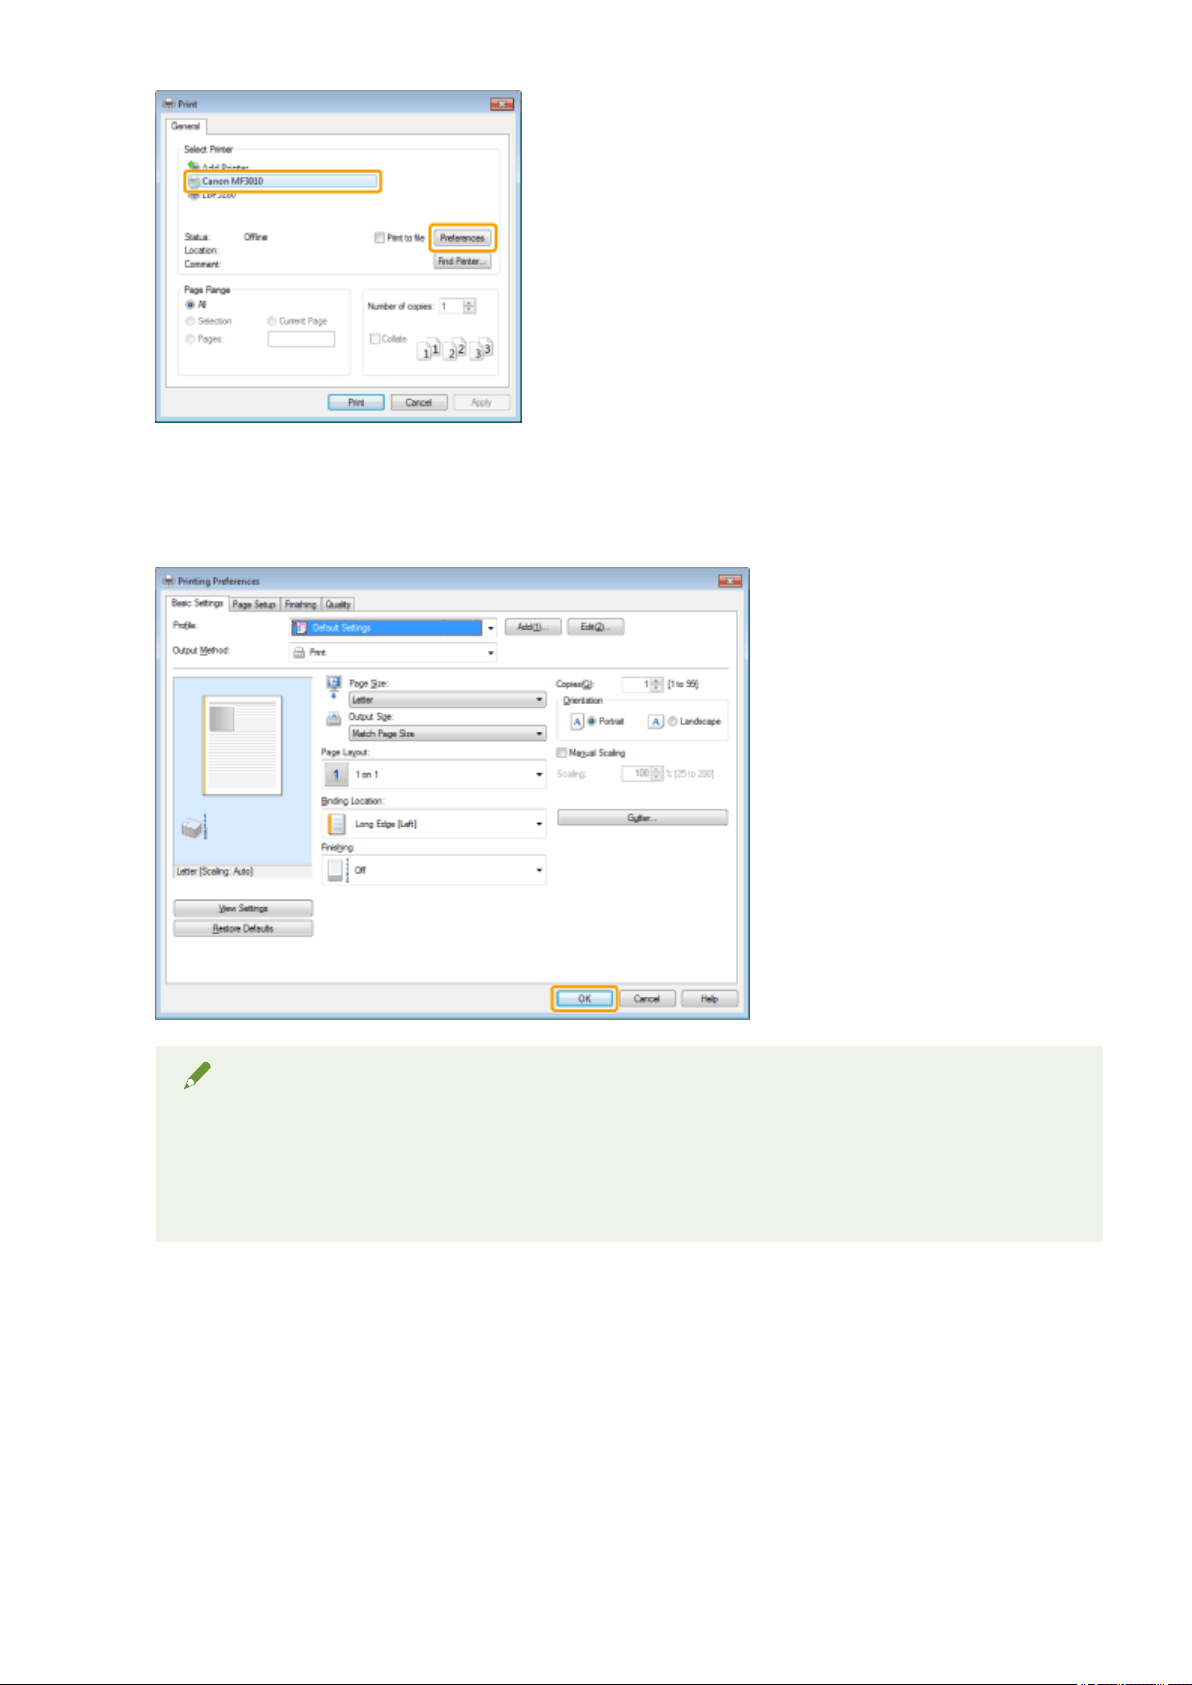
4
Specify the desired settings in the printer driver screen -> click [OK].
Click each tab and specify the desired items.
NOTE
● The [Basic Settings] tab comprises a fe
w of the basic settings of the driver. The settings that you can
congure in the [Basic Settings] tab can also be congured in other tabs.
● For information on available printing functions, view the online help to nd what you can congure in
each sheet. (See " Viewing the Online Help(P. 103) .")
5
Click [Print] (or [OK]).
Print
99

Printing begins.
Print
100
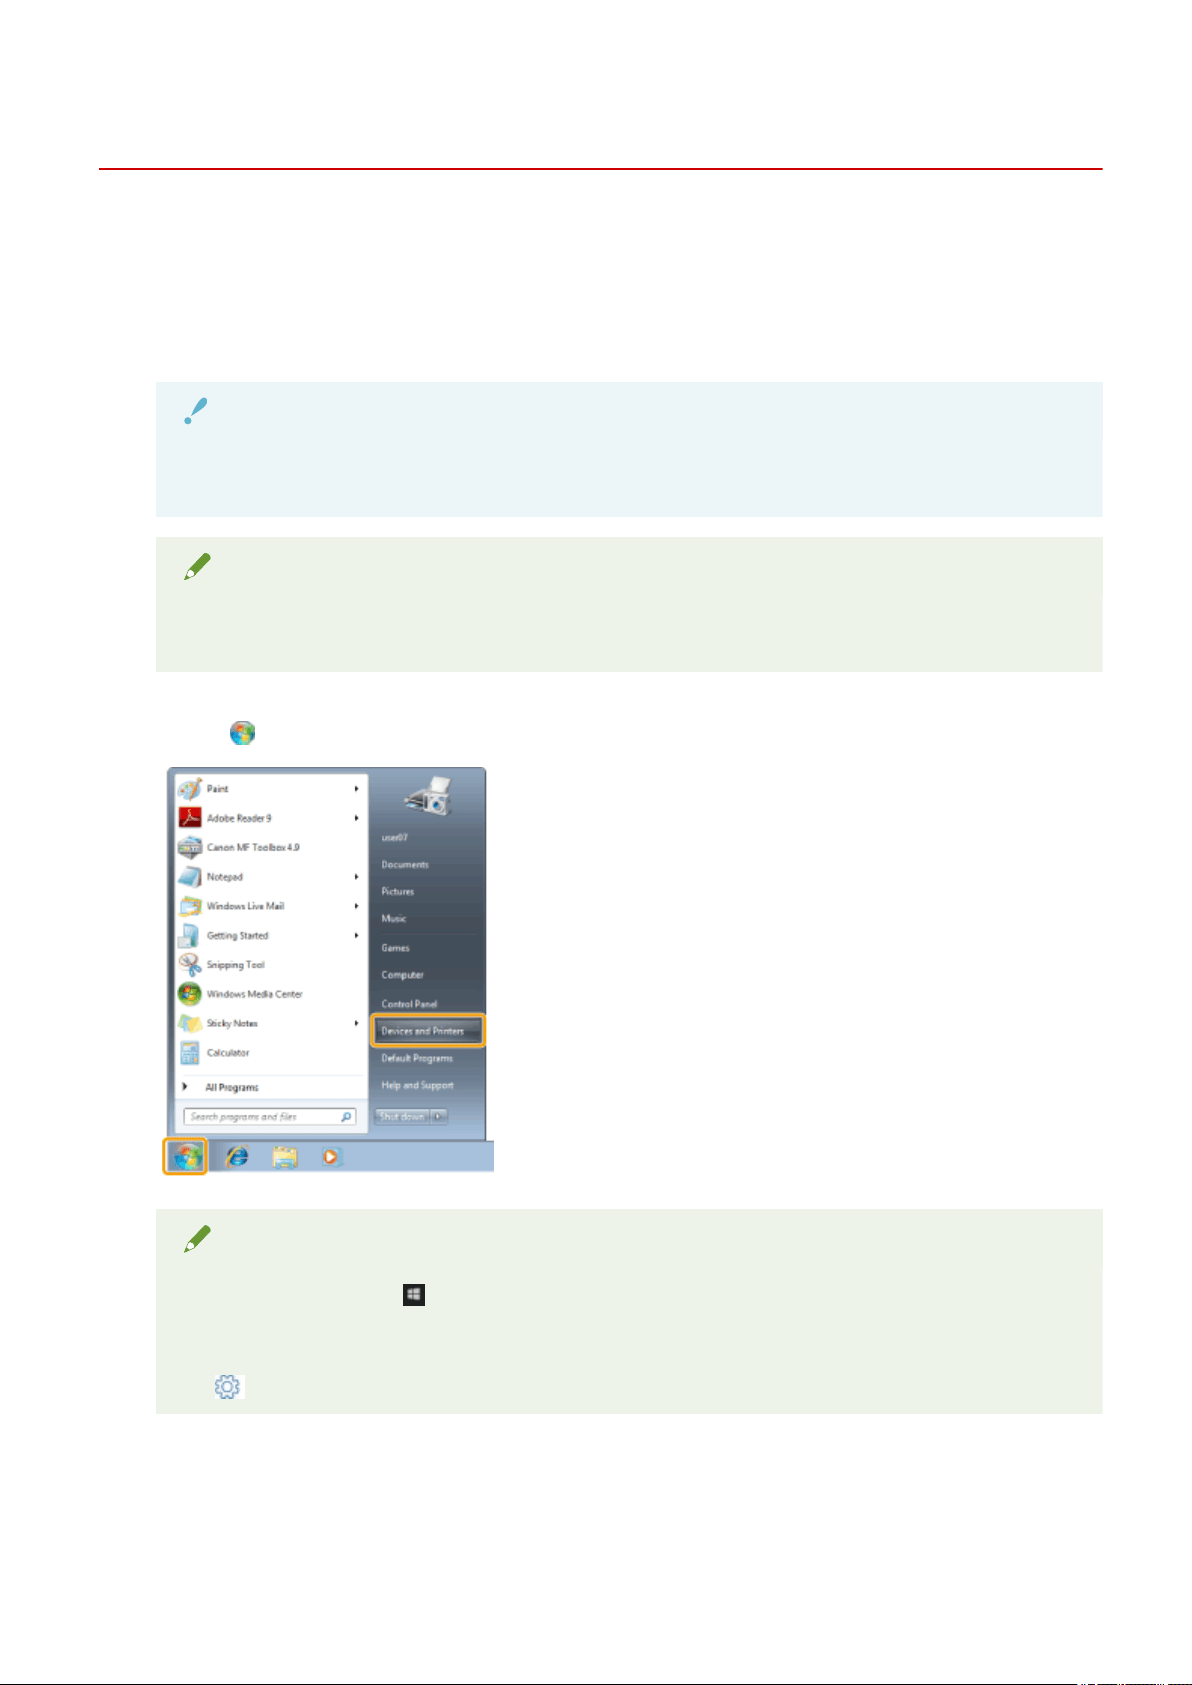
Conguring the Default Print Settings
85RS-02J
This section describes ho
w to access the printer setup screen from [Control Panel] and how to specify printing
functions beforehand.
The printer whose settings you have specied will print with the same settings every time.
When printing, you can change the settings specied beforehand whenever required.To change the settings,
congure them in the [Print] dialog box from the application (see " Printing(P. 98) ").
IMPORTANT
To change the default print settings, you must log on to your computer as a member of the
Administr
ators or Power Users group.
NOTE
The display may differ according to the operating system, as well as the type and version of the printer
driver.
1
Click [
] (Start) -> [Devices and Printers].
NOTE
● For Windo
ws 10: Click [
] (Start) -> select [Windows System] -> [Control Panel] -> [Hardware and
Sound] -> [De
vices and Printers].
● For Windows 8: From the desktop, display the charm bar to the right of the screen, and click or tap
[
] (Settings) -> [Control Panel] -> [Devices and printers].
2
Right-click the icon of the printer whose settings you want to specify -> click [Printing
pr
eferences].
Print
101
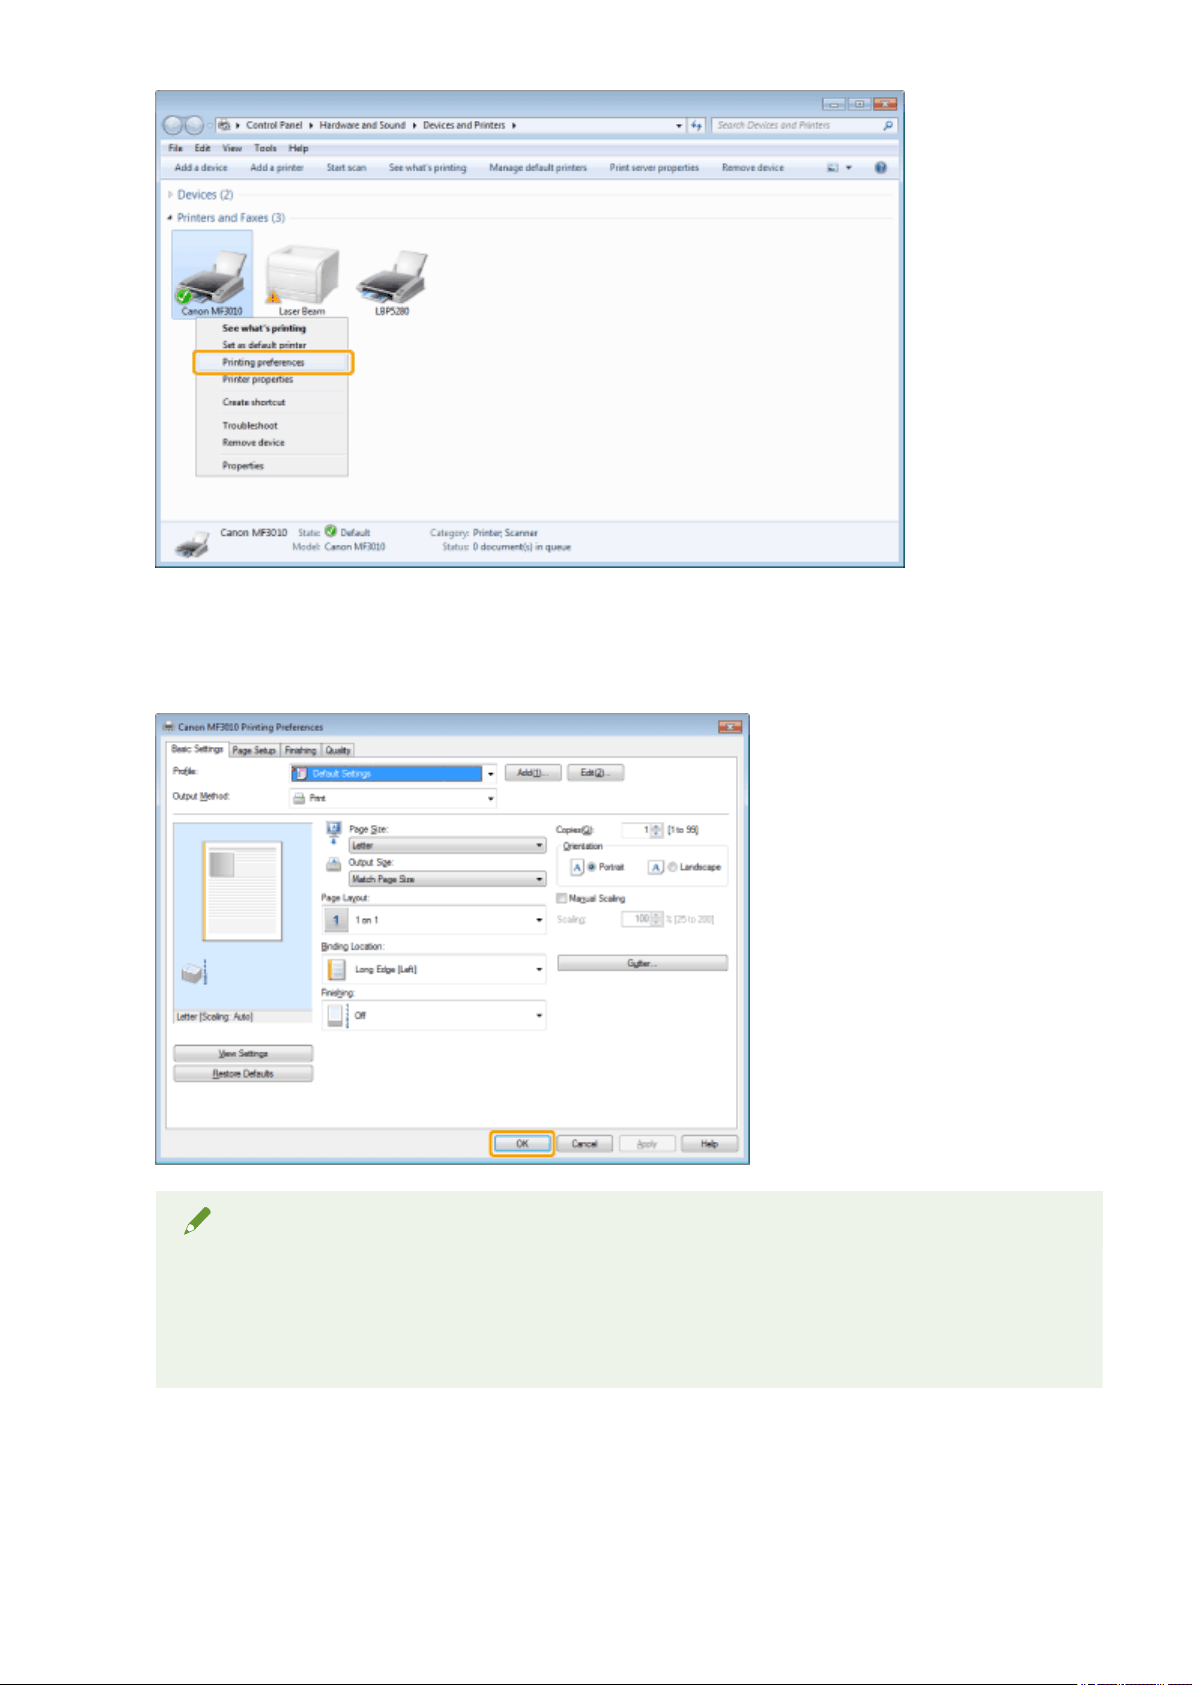
3
Specify the desired settings in the printer driver screen -> click [OK].
Click each tab and specify the desired items.
Note
● The [Basic Settings] tab comprises a fe
w of the basic settings of the driver. The settings that you can
congure in the [Basic Settings] tab can also be congured in other tabs.
● For information on available printing functions, view the online help to nd what you can congure in
each sheet. (See " Viewing the Online Help(P. 103) .")
Print
102
Viewing the Online Help
85RS-02K
Y
ou can display the online help by clicking [Help] on the printer driver screen.
The online help includes additional information about each printing option. If the User's Guide does not provide
the information you need, see the online help.
NOTE
The display may differ according to the operating system, as well as the type and version of the printer
driver.
1
Click [Help].
The online help is displayed.
Topic pane (right side) Displays the description of the information.
Print
103

Navigation pane (left side) Click [Contents] / [Search] to search for information.
Print
104

Printing on Custom Paper Size
85RS-02L
Checking available custom paper size
Custom paper sizes with width of 76.2 to 216.0 mm and height of 127.0 to 356.0 mm can be used with this
printer.
Loading custom paper size
Load paper in the paper cassette.
" In the Paper Cassette
(P. 47) "
Registering custom paper size
When printing on custom paper size, you need to register the custom paper size in the printer driver
beforehand.
" Registering a Custom Paper Size
(P. 106) "
Printing from application software
Perform printing after loading custom paper size.
" Print(P
. 93) "
Printing on heavy paper, rough paper, or labels slows down the print speed.
Print
105

Registering a Custom Paper Size
85RS-02R
Combinations of printer driver settings corr
esponding to a variety of printing purposes are provided with the
printer driver as "proles". This enables you to print documents according to a desired objective by simply
selecting a prole from the [Prole] list.
1
Display the printer folder.
" Basic Windo
ws Operations(P. 224) "
2
Right-click the icon for this printer, and select [Printing Preferences] from the popup
menu.
3
Display the [Custom Paper Size Settings] dialog box.
(1) Display the [Page Setup] tab.
(2) Click [Custom Paper Size].
4
Set a custom paper size.
[Name of Custom Paper Size] Enter the register name of the custom paper size. You can enter up to thirty one characters.
[Unit] Select the units to use when setting the custom paper size.
[Paper Size]
Set height and width ([Height] [Width]) of custom paper.
Specify the paper size in portr
ait orientation ([Height]
[Width]) and within the range that
can be dened.
5
Register the custom paper size.
(1) Click [Register].
The number of custom paper sizes that can be r
egistered differs according to your system environment.
(2) Check [Paper List] to make sure that the custom paper size you registered has been added.
(3) Click [OK].
See " Printing(P. 98) " for basic printing procedures.
Print
106

Canceling Print
85RS-02S
Y
ou can cancel the job that is currently printing.
If multiple jobs are printing, see the following to select and cancel the jobs using the print queue (Windows
function).
" Selecting and Canceling Jobs(P
. 108) "
NOTE
Displaying Job Processing
Operating results Operating procedures
Press [ ] (Job cancel key) to cancel the job.
If you cannot cancel the job
Y
ou cannot cancel pages that have already started
printing.
Jobs cannot be canceled if they are switched (the job when
you press the key differs from the job when you release
the key) while you are pressing the job cancel key.
Print
107
Selecting and Canceling Jobs
85RS-02U
1
Display the print queue.
1. Display the printer folder.
" Basic Windo
ws Operations(P. 224) "
2. Double-click the icon for this printer.
2
Right-click the job you want to cancel, and select [Cancel] from the popup menu.
If the job is not displayed
Other user
's jobs are not displayed. (In a print server environment, all jobs are displayed on the print
server.)
NOTE
For details on the print queue
See Windo
ws Help.
3
Clicking [Yes] cancels the print job.
If you cannot cancel printing
Y
ou cannot cancel pages that have already started printing.
Print
108

Scan
Scan ........................................................................................................................................................................
110
Preparing to Use the Scan Functions ............................................................................................................... 111
System Requirements (Scan) ............................................................................................................................ 112
Basic Scan Flow .................................................................................................................................................. 113
Scanning Using the MF Toolbox ................................................................................................................... 114
Scanning an Image Using an Application ..................................................................................................... 116
Scanning Using the WIA Driver ..................................................................................................................... 117
[New Scan] Dialog Box .................................................................................................................................. 121
Attention (WIA Driver) ............................................................................................................................ 123
Using the MF Toolbox ........................................................................................................................................ 124
Combining Multiple Documents into One PDF File ......................................................................................... 130
Using the ScanGear MF ..................................................................................................................................... 132
Using Simple Mode ...................................................................................................................................... 133
Using Advanced Mode .................................................................................................................................. 136
Dening a Scan Area (Cropping Frame) ........................................................................................................ 148
Setting Resolution ........................................................................................................................................ 150
Scan
109
Scan
85RS-02W
This chapter describes ho
w to save scanned data to your computer.
You can easily save the documents that were scanned by computer operation.
The machine provides a wide variety of scan settings for you to choose from. You can save a scanned document
in the "Sear
chable PDF" le format, which converts scanned images to searchable text data, without having to
specify advanced scan settings.
Plus, you can scan documents using the MF Toolbox available for the machine, or the WIA driver. There are
many ways to convert your paper documents into electronic les. All you need to do is to select one based on
your scan needs.
Preparing to scan your document
Preparing to use the scan functions See " Pr
eparing to Use the Scan Functions(P. 111) ."
Performing a scan
Learn about ways to perform a scan See " Basic Scan Flow(P. 113) ."
Scanning using the machine's scanning software See " Scanning Using the MF Toolbox(P. 114) ."
Scanning using an application See " Scanning an Image Using an Application(P. 116) ."
Scanning using the WIA driver See " Scanning Using the WIA Driver(P. 117) ."
Making best use of the scan functions
Learn how to use the MF Toolbox See " Using the MF Toolbox(P. 124) ."
Learn how to combine multiple documents into one PDF le
See " Combining Multiple Documents into One PDF
File(P. 130) ."
Learn how to use the ScanGear MF See " Using the ScanGear MF(P. 132) ."
Scan
110


System Requirements (Scan)
85RS-02Y
Har
dware requirements
● IBM or IBM-compatible PC
● A computer having a USB port with the USB class driver installed
Supported Operating Systems
● Windows 7 (32-bit/64-bit)
● Windows 8 (32-bit/64-bit)
● Windows 10 (32-bit/64-bit)
NOTE
The following server operating systems are not supported.
● Windo
ws Server 2012
● Windows Server 2016
● Windows Server 2019
To use a Hi-Speed USB
Mak
e sure that your computer meets the following system requirements.
● CPU
Intel Pentium II or more
● RAM
128 MB or more
● Operating system
- Windows 7
- Windows 8
- Windows 10
● Driver
The Hi-Speed USB driver needs to be installed on the computer.
Scan
112

Basic Scan Flow
85RS-030
The follo
wing three scanning methods are available:
" Scanning Using the MF T
oolbox(P. 114) "
Scanning can be performed using the machine's available scanning software. You can ne-tune the scan
settings based on your scan needs.
" Scanning an Image Using an Application(P
. 116) "
Scanning can be performed using your application. You can import scanned images directly into the application.
" Scanning Using the WIA Driver(P
. 117) "
Scanning can be performed using Windows OS drivers.
Scan
113
Scanning Using the MF Toolbox
85RS-031
1
Place your document.
" Placing Documents
(P. 43) "
" Supported Document T
ypes(P. 67) "
NOTE
To scan from the platen glass
Y
ou can scan a multiple-page document only when
● [Save as Type] is set to [PDF (Multiple Pages)].
" Combining Multiple Documents into One PDF File
(P. 130) "
● [Paper Size] in Step 6 is set to "t the image."
2
Double-click the [Canon MF Toolbox 4.9] icon on the desktop.
The MF Toolbox starts.
3
Click one of the MF Toolbox command buttons based on your purpose of the scan.
[Mail] The document is scanned and sent as an e-mail attachment from your e-mail application.
[OCR] The document is scanned and read by Optical Character Recognition (OCR) software.
[Save] The document is scanned and saved.
[PDF] The document is scanned and saved as a PDF le.
[Color Scan]
[B&W Scan]
[Custom 1]
[Custom 2]
The document is scanned and displayed in the registered application. A dialog box appears
for each of the buttons.
4
Specify the scanner settings as needed.
Click [Apply] to save the settings.
See " Using the MF T
oolbox(P. 124) " for more information.
Scan
114

Scanning an Image Using an Application
85RS-032
Y
ou can scan an image from a TWAIN- or WIA- compliant application and use the image in that application. The
procedure varies depending on the application. This section shows an example.
1
Place your document.
" Placing Documents
(P. 43) "
" Supported Document T
ypes(P. 67) "
NOTE
When scanning from the platen glass
Scanning multiple pages is not available when scanning fr
om the platen glass.
2
Start the application to be used.
3
Select a scan command.
4
Select a scanner driver.
5
Specify the scanner settings as needed and click [Scan].
Scanning starts.
See the follo
wing sections for more information.
" Using the ScanGear MF
(P. 132) "
" Scanning Using the WIA Driver(P
. 117) "
Scan
116

Scanning Using the WIA Driver
85RS-033
Before scanning with the WIA driver, see " Attention (WIA Driver)
(P. 123) ."
This section describes how to scan documents using the WIA driver.
Scanning fr
om the [Windows Fax and Scan] dialog box(P. 117)
Scanning Using Windo
ws Live Photo Gallery (Windows 7/8 only)(P. 118)
Scanning using an application
(P. 119)
You can ne tune settings for each scan.
" [Ne
w Scan] Dialog Box(P. 121) "
Scanning from the [Windows Fax and Scan] dialog box
1
Place your document.
" Placing Documents
(P. 43) "
" Supported Document T
ypes(P. 67) "
NOTE
To scan from the platen glass
Y
ou cannot scan more than one document at a time.
2
Open the [Windows Fax and Scan] dialog box.
" Basic Windo
ws Operations(P. 224) "
3
Click [New Scan] on the toolbar.
4
Double-click the scanner icon when the following screen appears.
5
Specify the scan settings.
Scan
117

See " [Ne
w Scan] Dialog Box(P. 121) " for more information.
6
Click [Scan].
Scanning Using Windows Live Photo Gallery (Windows 7/8 only)
1
Place your document.
" Placing Documents
(P. 43) "
" Supported Document T
ypes(P. 67) "
NOTE
To scan from the platen glass
Y
ou cannot scan more than one document at a time.
2
Start [Windows Live Photo Gallery].
From the [Start] menu, select [All Programs] -> [Windows Live] -> [Windows Live Photo Gallery].
3
Open the [Import Pictures and Videos] dialog box.
From the [File] menu, select [Import from camera or scanner].
4
Double-click the scanner icon.
5
Specify the scan settings.
See " [Ne
w Scan] Dialog Box(P. 121) " for more information.
6
Click [Scan].
7
Click [Import].
● [T
ag these pictures (optional)]
You can classify the scanned image by typing a tag.
Scan
118

Scanning using an application
When the WIA driver is displayed, use the following steps. For the instructions on how to display the WIA driver,
see " Scanning an Image Using an Application(P. 116) ".
1
Place your document.
" Placing Documents
(P. 43) "
" Supported Document T
ypes(P. 67) "
NOTE
To scan from the platen glass
Y
ou cannot scan more than one document at a time.
2
Select a picture type.
Select one of the following types.
● [Color pictur
e]
● [Grayscale picture]
● [Black and white picture or text]
● [Custom settings]
3
Click [Adjust the quality of the scanned picture] as needed.
The [Advanced Properties] dialog box appears.
4
Adjust the image quality and click [OK].
[Appearance] A sample image is displayed.
[Brightness] Specify the brightness (-127 to 127).
[Contrast] Specify the contrast (-127 to 127) (only for color or grayscale scans).
[Resolution (DPI)]
Supported resolutions vary, depending on the operating system or the selected [Paper
sour
ce] setting.
[Picture type] Specify the color type.
Scan
119

[Reset] Restore all the settings to the defaults.
NOTE
The options that are displayed in the [Advanced Properties] tab and their default
values.
These vary acr
oss the selected image type.
5
Click [Preview] and drag [
] to specify the scanning area.
6
Click [Scan].
Scan
120

[New Scan] Dialog Box
85RS-034
[Scanner] Display a list of available scanners. Click [Change] and select the scanner.
[Prole]
Select one of the following document types.
● [Add pr
ole]
● [Documents]
● [Last used settings]
● [Photo (Default)]
NOTE
When [Add prole] is selected
Add new proles in the [Add New Prole] dialog box. Once these
proles have been added, you can delete or edit these proles
using [Scan Proles] in the [Scanners and Cameras] folder.
See the Windows documentation for more information.
[Source]
Select the location where documents are set.
Click [Pr
eview], and the drag [
] to specify the scanning area.
[Color format]
Select one of the following color types.
● [Color]
● [Gr
ayscale]
● [Black and white]
[File type]
Select one of the following le formats.
● [BMP (Bitmap image)]
● [JPG (JPEG image)]
● [PNG (PNG image)]
● [TIF (TIFF image)]
[Resolution (DPI)] Specify the scanning resolution in dpi (50 to 600 dpi).
[Brightness] Specify the brightness (-100 to 100).
Scan
121

[Contrast] Specify the contrast (-100 to 100) (only for color or grayscale scans).
[Preview or scan images as
separ
ate les]
The images scanned from [Flatbed] (the platen glass) are automatically cropped and
saved as separate les.
Scan
122

Attention (WIA Driver)
85RS-035
Scanning fr
om the [Windows Fax and Scan] dialog box
NOTE
When scanning is complete
The scanned images ar
e displayed within the [Windows Fax and Scan] folder.
File name and location where the scanned images are saved
Sequential numbers ar
e automatically added to the end of the le names, and the les are saved in the
[Scanned Documents] folder within the [Document] folder. You can change the le name later.
Scanning from Windows Live Photo Gallery (Windows 7/8 only)
NOTE
To save the scanned image without a tag
The scanned image is saved in a ne
w folder bearing the scanning date within the [Pictures] folder.
File name
Sequential numbers ar
e automatically added. You can change the le name later.
Scanning from an application
NOTE
About the displayed screen
The displayed screen varies across the operating system, as well as the type and version of the scanner
driver.
Scan
123
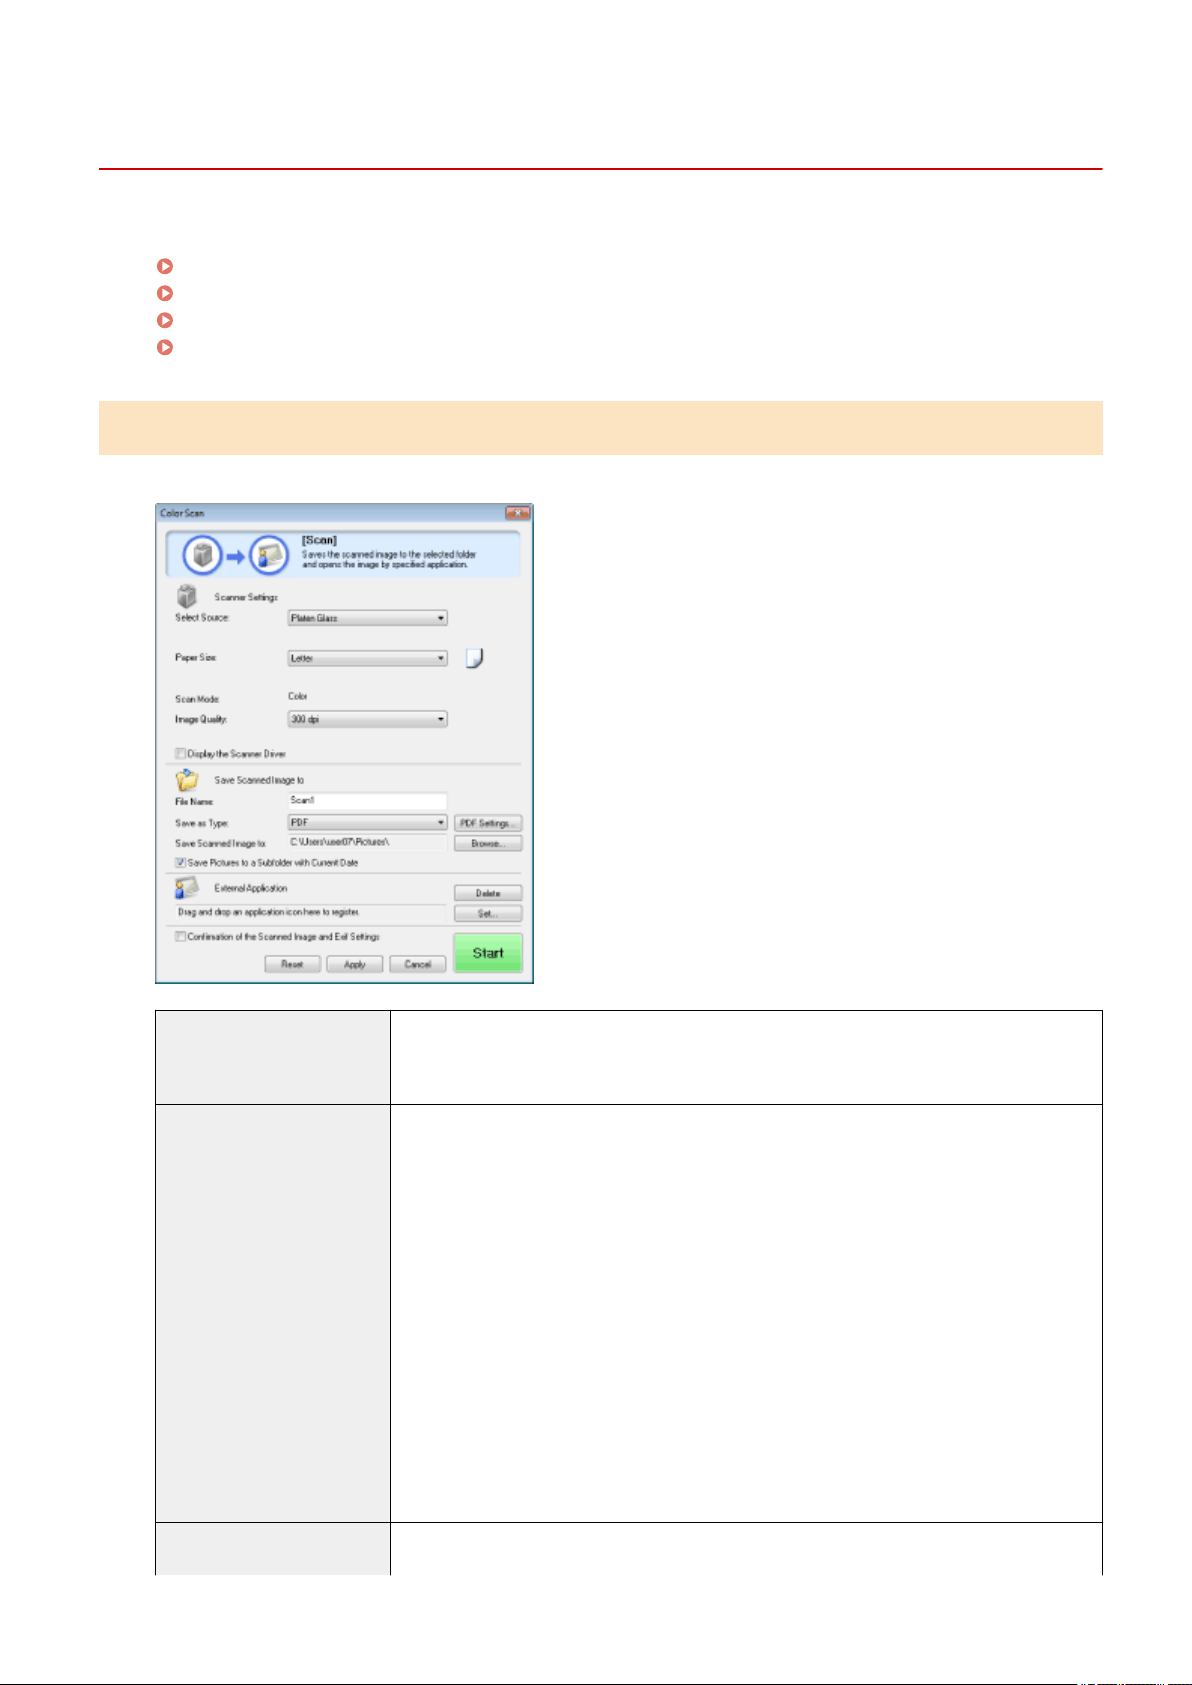
Using the MF Toolbox
85RS-036
The follo
wing can be specied in the MF Toolbox:
Specifying scan settings
(P. 124)
Saving scanned images(P
. 125)
Conguring an application (an e-mail client application)
(P. 126)
Pr
eviewing the scanned image and entering Exif information (Viewing the scanned image)(P. 128)
Specifying scan settings
You can specify the scan mode, resolution, original document size, and le size of the scanned images.
[Paper Size]
Species the original document size.
When [Custom] is selected, the [Paper Size Settings] dialog bo
x appears for you to specify a
custom size.
[Scan Mode]
Select the scan mode. The modes selectable vary depending on the MF Toolbox command
button clicked.
● [Black and White]
Scan a document as a black-and-white image.
● [Black and White (OCR)]
Scan a document as a black-and-white image which can be read by OCR software.
● [Grayscale]
Scan a document as a grayscale image (equivalent to a monochrome printed image). This
mode is best suited for scanning photos.
● [Color]
Scan a document as a color image.
● [Color (Magazine)]
Scan a document in color using the descreening function. This mode helps reduce
uneven gradation and striped patterns (moiré patterns) generated when scanning
printed images. Scanning takes longer than usual.
[Image Quality]
Select the scan resolution.
Available resolution varies depending on the [Select Source] or [Save as Type] settings.
Scan
124
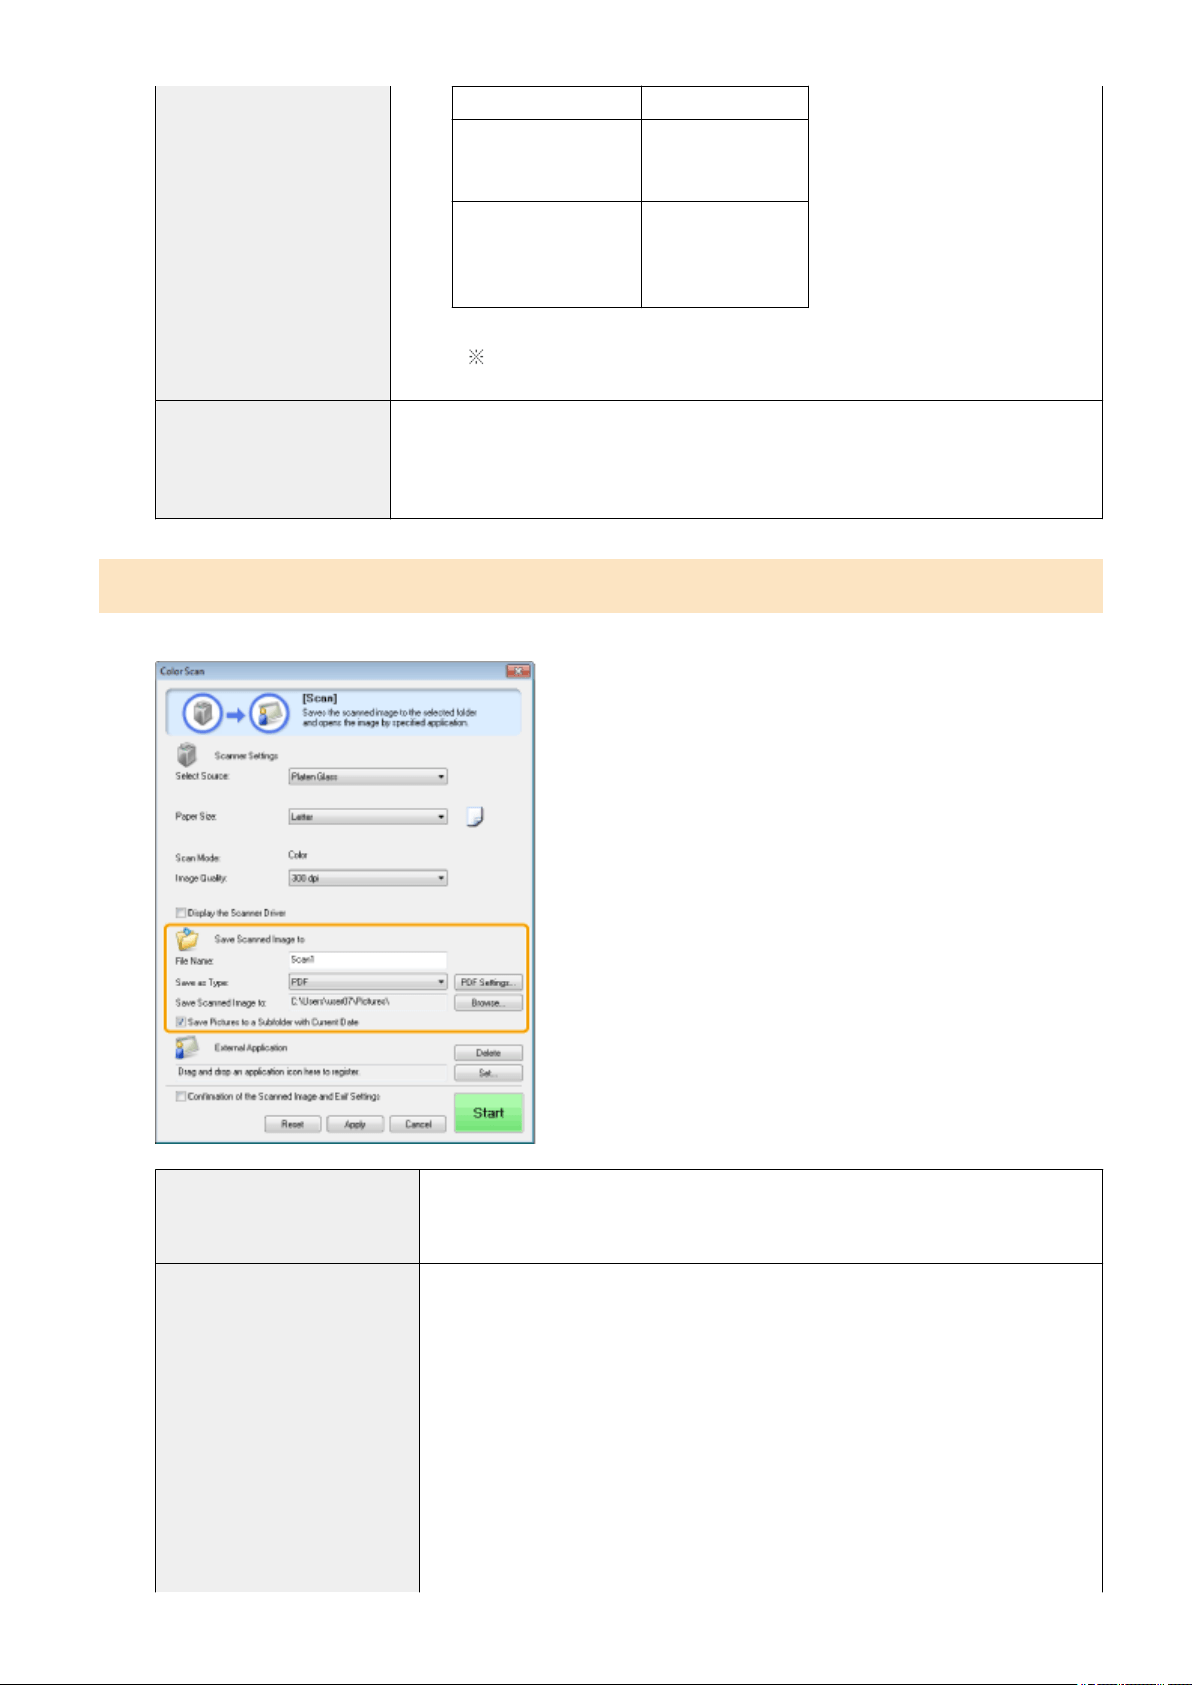
File Type Settable Resolution
BMP
JPEG/EXIF
TIFF
75 to 600 dpi
PDF
PDF (1 page)
PDF (multiple pages)
PDF (additional pages)
75 to 400 dpi
When [Mail] is selected, supported resolutions vary, depending on the [Upper
Limit of Attached File] setting specied.
[Display the Scanner Driver]
When this check box is checked, the settings for [Scanner Settings] are unselectable.
When [Start] is click
ed, the [ScanGear MF] dialog box appears for you to specify advanced
scan settings.
This option is inaccessible when scanning using the [OCR] command button.
Saving scanned images
You can specify the le name, le format, and location where the scanned images are saved.
[File Name]
Enter the le name of the scanned image.
If ther
e has already been a le saved under the same name, a four-digit number is
automatically added to the end of the le name. The number starts with [0001].
[Save as Type]
Specify the le type to save the scanned image in.
● [BMP]
Bitmap format
● [JPEG/Exif]
JPEG/Exif format (This option is selectable only when [Grayscale], [Color] or [Color
(Magazine)] is selected for [Scan Mode].)
● [TIFF]
TIFF format
● [PDF]
PDF format (multiple pages or single page)
● [PDF (Single Page)]
Create a single-page PDF le.
Scan
125
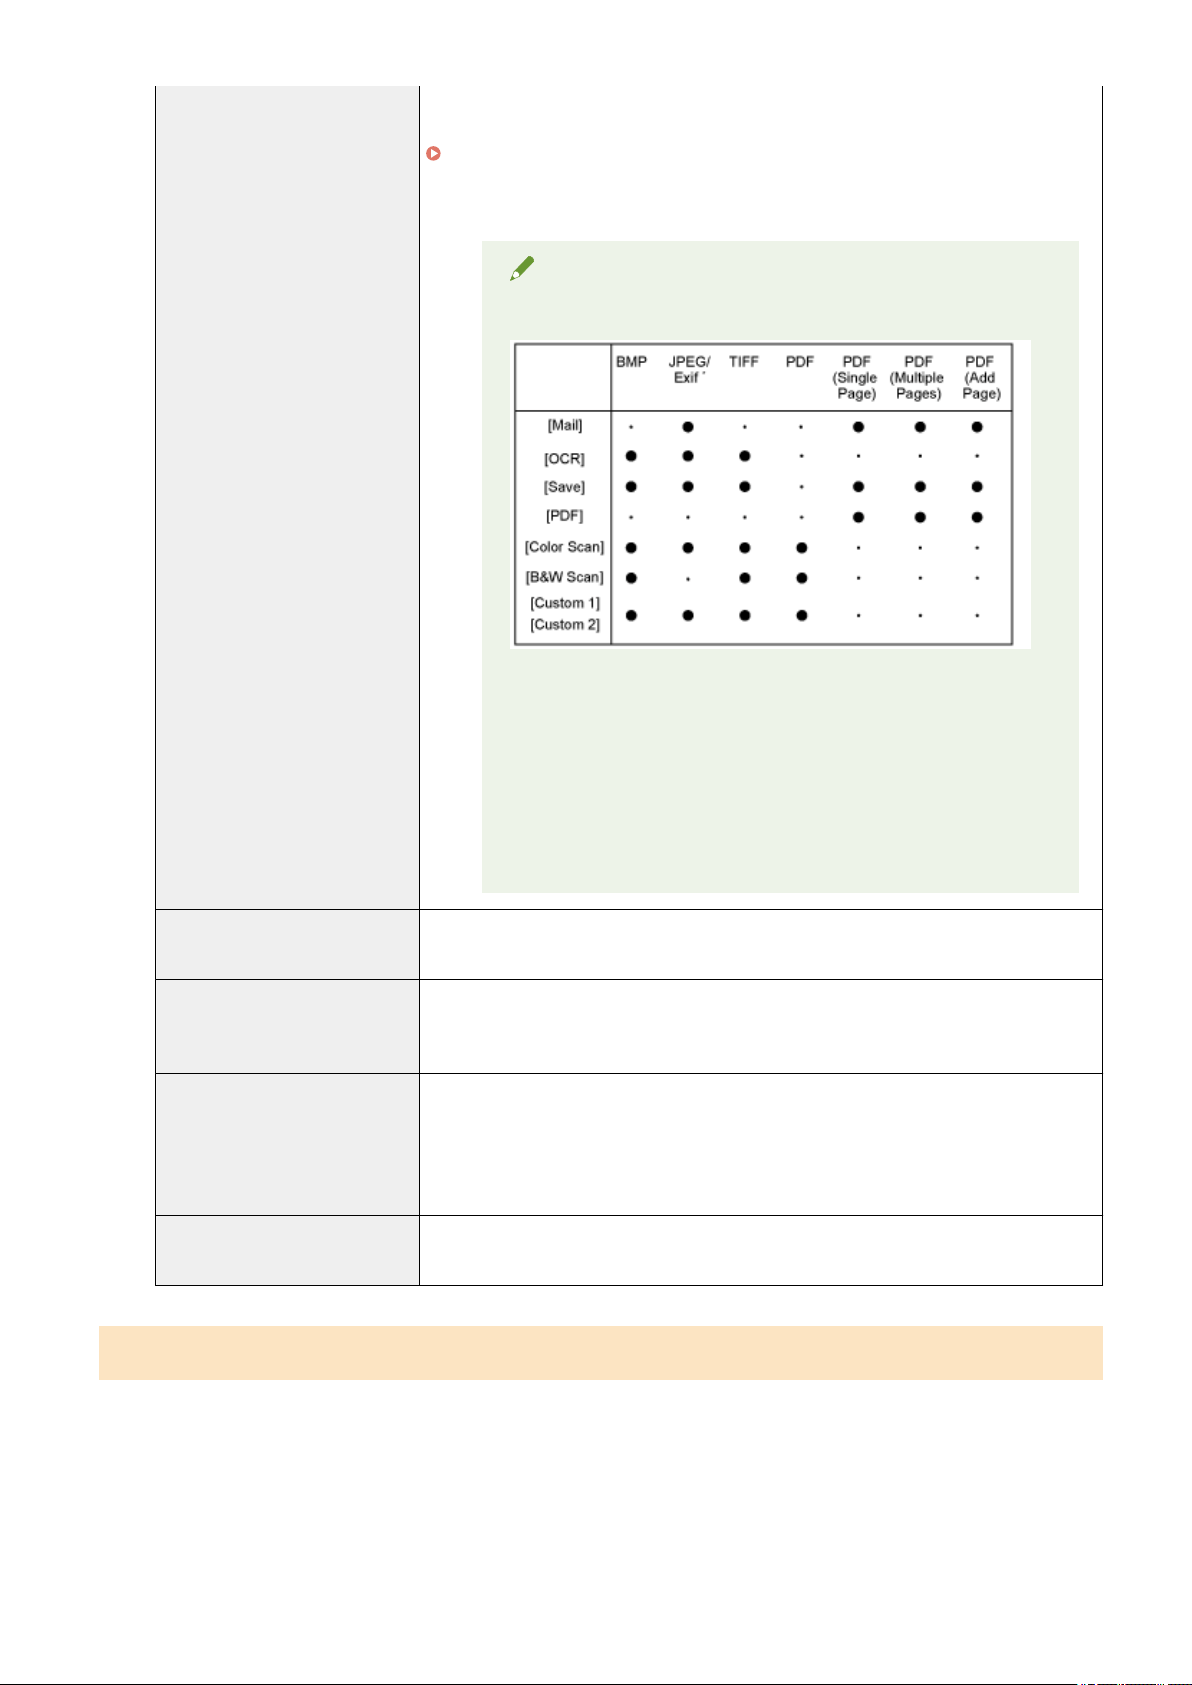
● [PDF (Multiple Pages)]
Combine multiple documents into one PDF le.
" Combining Multiple Documents into One PDF File
(P. 130) "
● [PDF (Add Page)]
Add the scanned image to the last page of a PDF le created by the MF Toolbox.
NOTE
File formats supported by command buttons
*
Y
ou can select the option when [Scan Mode] is set to [Grayscale],
[Color], or [Color (Magazine)].
When [PDF], [PDF (Single Page)], [PDF (Multiple
Pages)] or [PDF (Add Page)] is selected
The err
or message <Image size is too large to create File.> may
appear. If this happens, specify a smaller size for [Paper Size] and a
lower quality level for [Image Quality] to reduce the data size of the
scanned image.
[PDF Settings]
When [PDF], [PDF (Single Page)], [PDF (Multiple Pages)] or [PDF (Add Page)] is selected
for [Save as T
ype], you can specify advanced le settings.
[Save Scanned Image to]
Display the location where the scanned image is saved when a setting other than [PDF
(Add Page)] is selected for [Save as Type]. To save the image in a different location, click
[Browse], select a folder, and click [OK].
[Add Scanned Image to]
This item appears instead of [Save Scanned Image to] when [PDF (Add Page)] is selected
in [Save as Type]. You can select a PDF le to which the scanned image is added.
However, you may only add scanned images to PDF les that have been created using
MF Toolbox. You may not add scanned images to PDF les that have been created using
other applications.
[Save Pictures to a Subfolder with
Current Date]
Create a folder bearing the current date in the specied location to save the scanned
image in this folder.
Conguring an application (an e-mail client application)
Y
ou can specify a host application to view the scanned image.
Scan
126
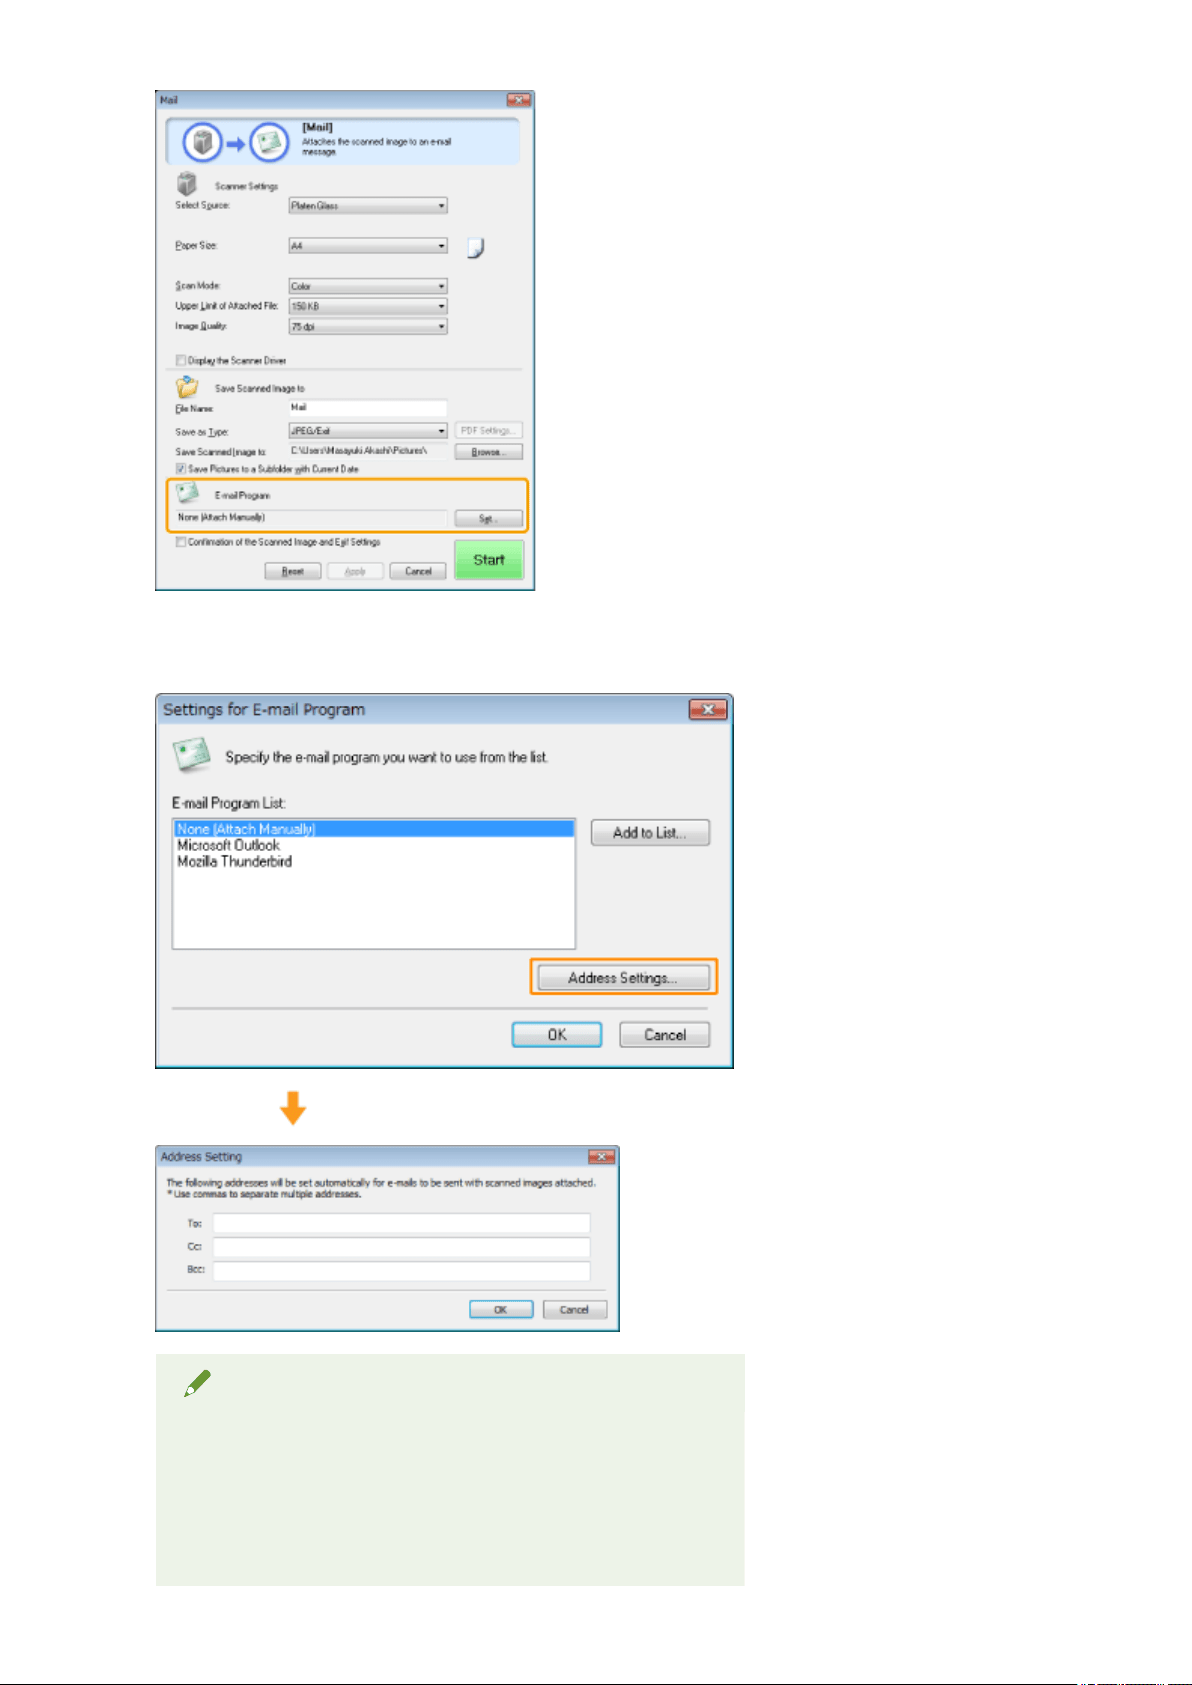
Click [Set], select an e-mail program to be used and click [OK]. (You can specify an application other than e-mail
pr
ograms by dragging and dropping the application icon directly onto the dialog box.)
For [Settings for E-mail Program], you can enter an e-mail address by clicking [Address Settings].
NOTE
When scanning using the [Mail] command button
The MF T
oolbox supports the following e-mail applications.
● Microsoft Outlook Express
● Microsoft Outlook
● Microsoft Exchange
Scan
127
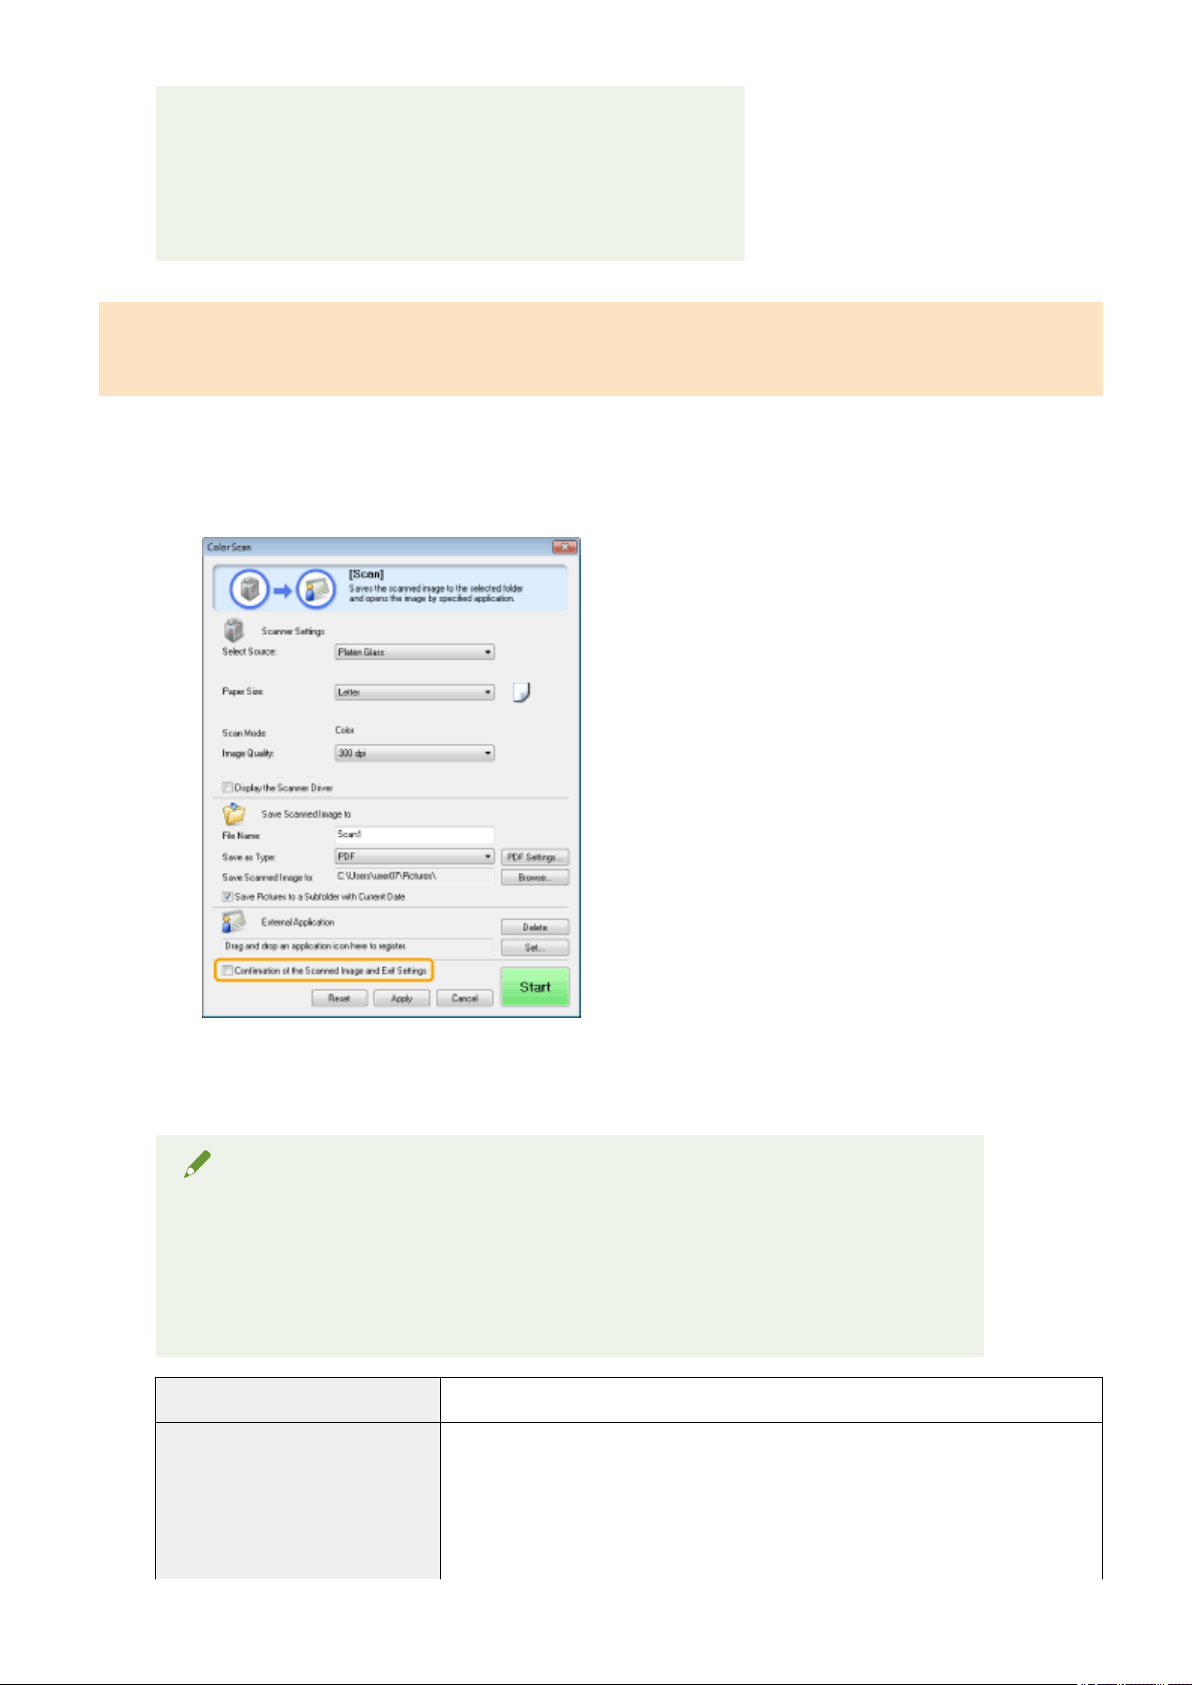
● EUDORA
● Netscape Messenger
● Windo
ws Mail
● Becky! Ver.2
● Mozilla Thunderbird
Previewing the scanned image and entering Exif information (Viewing the
scanned image)
Follo
w the steps in the procedure below to display a thumbnail preview of the scanned image before specifying
the le format and location where the scanned image is saved.
(1) Select the [Conrmation of the Scanned Image and Exif Settings] ([Conrm the Scanned Image] for the
[PDF] button) check bo
x.
(2) Press [Start].
The scanned image is displayed in the [Scanned Image] dialog bo
x. See the following instructions to
specify the le format and location where the image is saved.
NOTE
When scanning using the [OCR] command button
This check bo
x is unselectable.
When scanning using the [PDF] command button
Y
ou can only preview the scanned image and specify the location where the image is saved.
[Save as Type] Specify the le format to save the scanned image in.
[Exif Settings]
When [JPEG/EXIF] is selected for [Save as Type], display the [Exif Settings] dialog box
for you to enter the Exif information. Y
ou can add such information as comments and
the scanning date to the JPEG le. Choose a le from the drop-down list and add
information.
● [Basic Information]
Display the information acquired automatically when the image was scanned.
Scan
128

● [Advanced Information]
Display the ne
wly added information.
● [Apply the Same Setting of Input Items Automatically]
When the check box is checked, the last specied scan settings are applied.
[PDF Settings]
When [PDF], [PDF (Single Page)], [PDF (Multiple Pages)] or [PDF (Add Page)] is selected
for [Save as Type], you can specify advanced le settings.
[Save Scanned Image to] Specify the location where the scanned image is saved.
[Add Scanned Image to]
This option appears instead of [Save Scanned Image to] when [PDF (Add Page)] is
selected for [Save as Type]. Select a PDF le to which the scanned image is added.
Note that you may not be able to add scanned images to PDF les, if the images are
scanned using different applications.
[Save Pictures to a Subfolder with
Current Date]
Create a folder bearing the current date in the specied location to save the scanned
image in this folder.
This option is unselectable when [Save as Type] is set to [PDF (Add Page)].
[Save] Save the scanned image in the specied location.
[Forward]
This button appears instead of [Save] when an application is selected for [Mail
Program] or the [External Application]. You can forward the scanned image to the
application.
[Cancel]
Undo any changes made within the dialog box and return to the previous screen. All
scanned images are deleted.
Scan
129
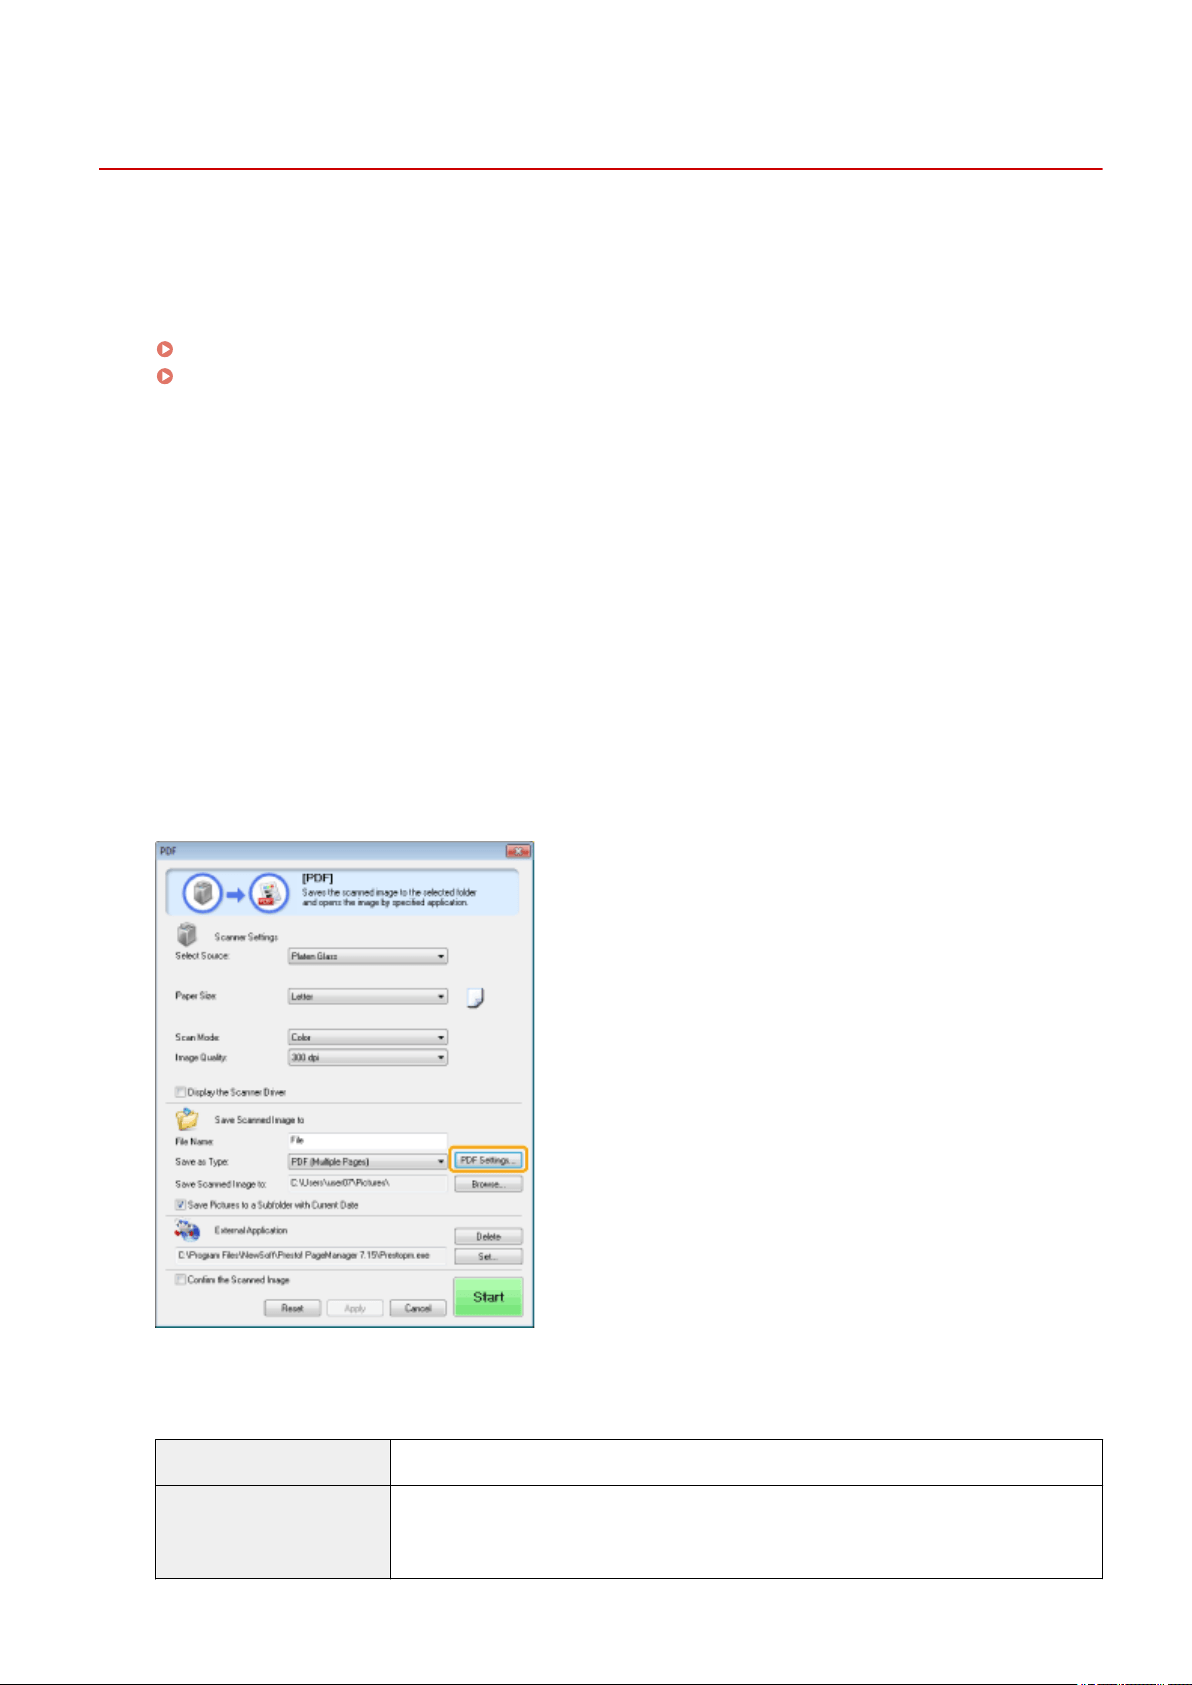
Combining Multiple Documents into One PDF File
85RS-037
Y
ou can combine multiple documents into one PDF le.
1
Place your documents on.
" Placing Documents
(P. 43) "
" Supported Document T
ypes(P. 67) "
2
Double-click the [Canon MF Toolbox 4.9] icon on the desktop.
The MF Toolbox starts.
3
Click [PDF].
4
Select [PDF (Multiple Pages)] for [Save as Type].
5
Specify the required settings as needed and click [PDF Settings].
The [PDF Settings] dialog box appears.
6
Specify the required settings as needed and click [OK].
[Create Searchable PDF] Convert character data within the document to text data to create a searchable PDF le.
[Text Language]
Select the document language. When you select [English] from the drop-down list and set
[Image Quality] to [300 dpi] or a higher dpi for [Scanner Settings], char
acter data can be
more accurately scanned.
Scan
130

[PDF Compression] Select [High] to compress photos and illustrations to reduce the le size.
7
Click [Start].
8
Place the next page and click [Next].
9
When scanning is complete, click [Finish].
Scan
131

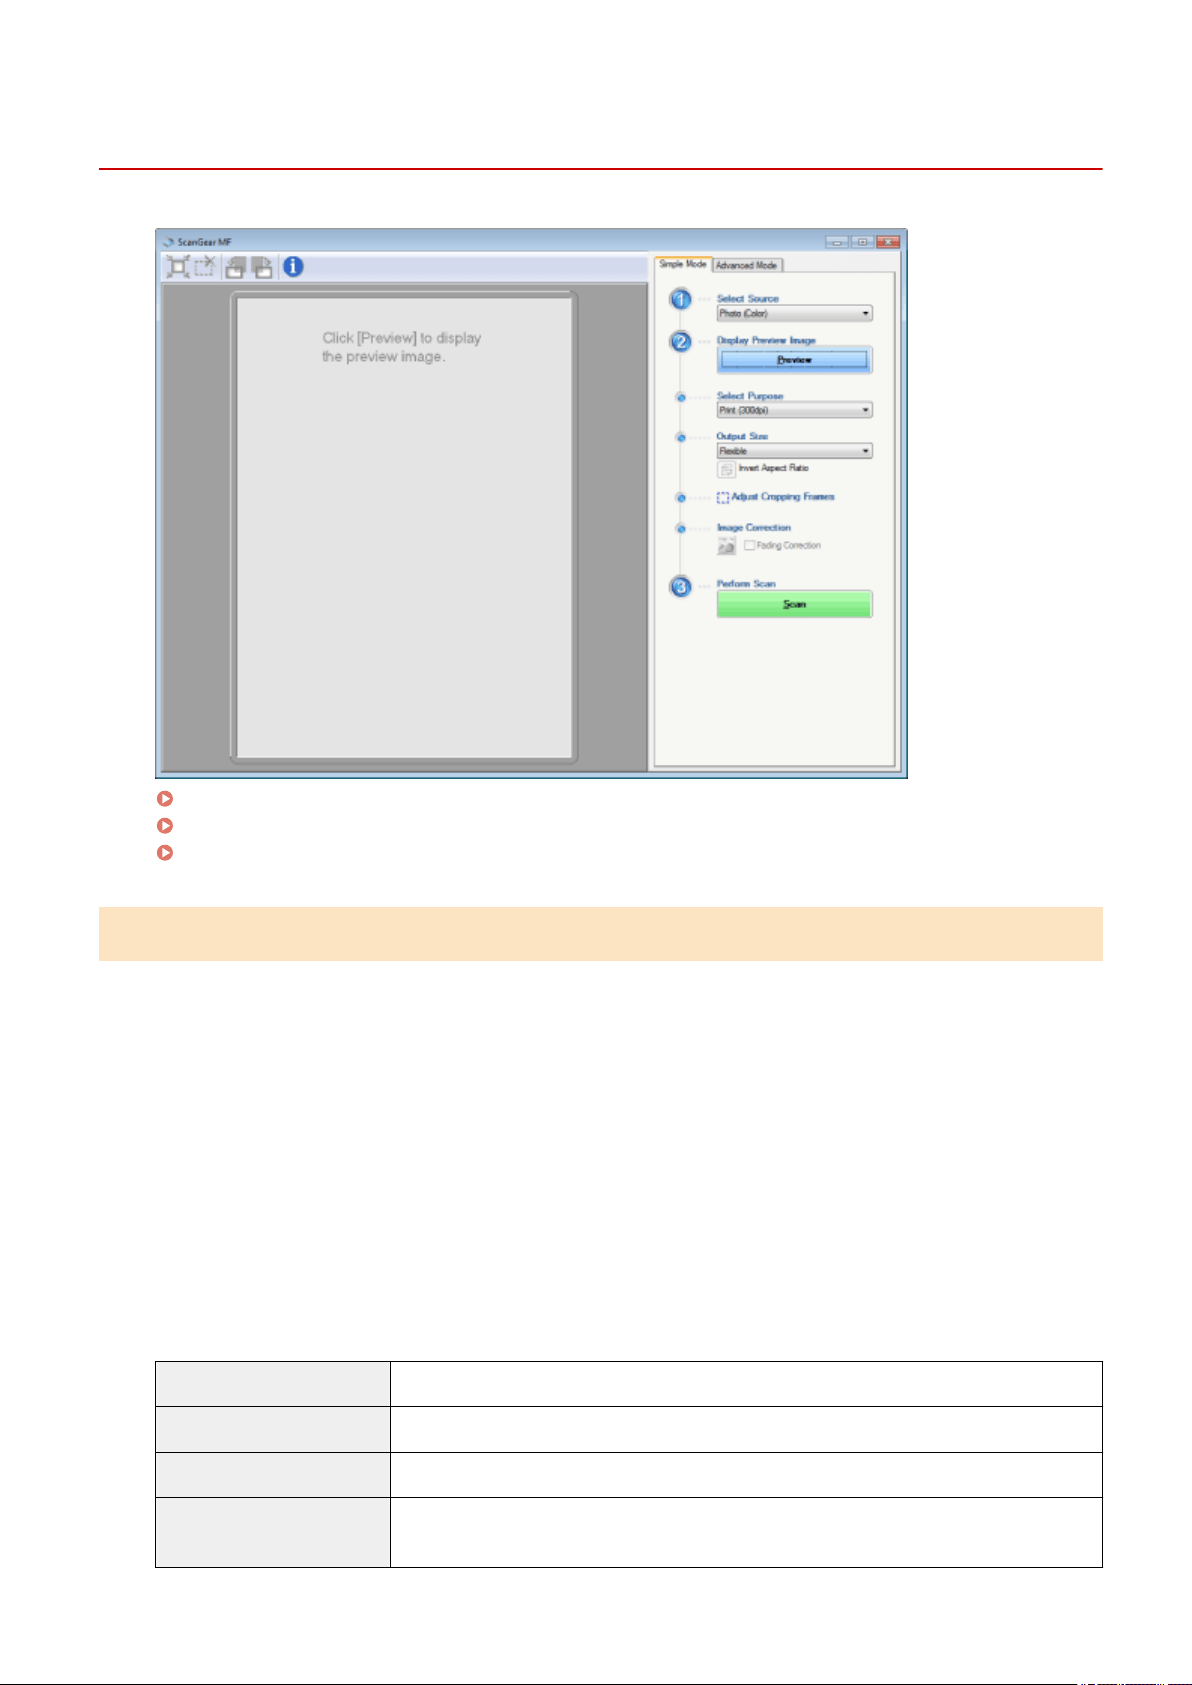
Using Simple Mode
85RS-039
Scanning in simple mode(P
. 133)
Simple mode toolbar(P
. 134)
Adding/Deleting the output size(P
. 135)
Scanning in simple mode
1
Display the ScanGear MF.
Start the ScanGear MF using either of the following methods.
● Selecting [Display the Scanner Driver] in the MF T
oolbox
● Starting from an application
2
Select a document type for [Select Source].
When selecting a document type other than [Newspaper (B&W)], the automatic color adjustment function is
activated.
See "
Using Advanced Mode(P. 136) " for the instructions on how to cancel this function.
[Photo (Color)] Select when scanning color photos.
[Magazine (Color)] Select when scanning color magazines (the Descreening function supported).
[Newspaper (B&W)] Select when scanning text and line drawings.
[Document (Grayscale)]
Select when scanning color photos or documents in monochrome. This option is best suited
for scanning high-r
esolution monochrome images.
Scan
133
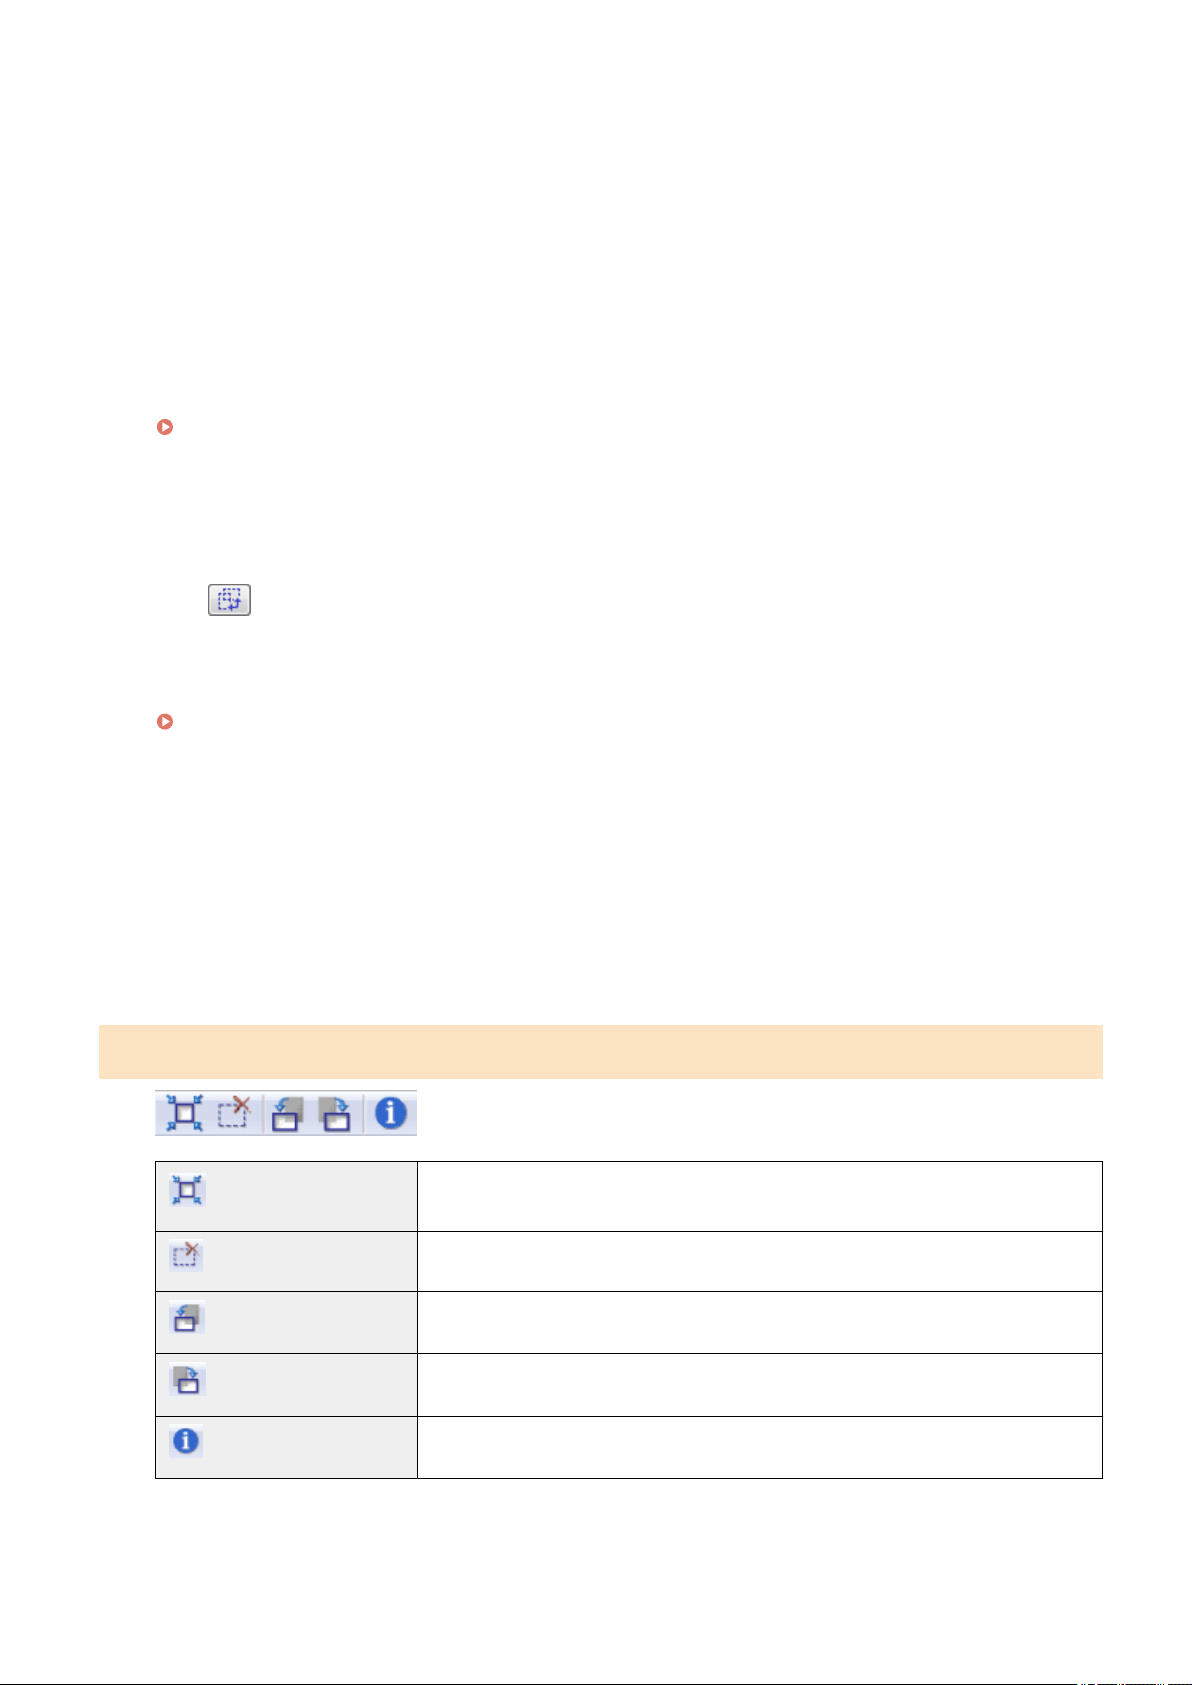
3
Click [Preview].
The preview of the image is displayed.
4
Select the purpose of the scan for [Select Purpose].
● [Print (300dpi)]
● [Image Display (150dpi)]
● [OCR (300dpi)]
" Setting Resolution
(P. 150) "
5
Select the output size of the scanned image.
The options displayed in the window vary depending on the purpose of the scan specied in Step 4(P
. 134) .
Click [ ] to choose the orientation of the output size between landscape and portrait.
6
Adjust the cropping frames as needed.
" Dening a Scan Ar
ea (Cropping Frame)(P. 148) "
7
Select [Fading Correction] as needed.
● It can only be selected when color documents ar
e scanned.
● It cannot be specied when the image is not displayed in the preview area.
8
Click [Scan].
Simple mode toolbar
[ ] (Auto Crop)
Specify scan areas (cropping frames) automatically. See " Dening a Scan Ar
ea
(Cropping Frame)(P. 148) " for more information.
[
] (Remove Cropping Frame)
Delete the selected cropping frames.
[ ] (Left Rotate)
Rotate the image 90 degrees to the left.
[ ] (Right Rotate)
Rotate the image 90 degrees to the right.
[ ] (Information)
Display the information of the scanned image.
Scan
134

Adding/Deleting the output size
The [Add/Delete the Output Size] dialog box appears when [Add/Delete] for [Output Size] is selected. You can
add or delete output sizes within this dialog box.
[Output Size List] Display the registered output size name.
[Output Size Name] Enter the output size name you want to register.
[Width] Specify the width of the output size.
[Height] Specify the height of the output size.
[Unit] Select the unit of measurement for the output size.
[Add] Add the specied output size to [Output Size List].
[Delete] Delete the selected output size from [Output Size List].
[Save] Save the settings specied within the dialog bo
x.
Scan
135
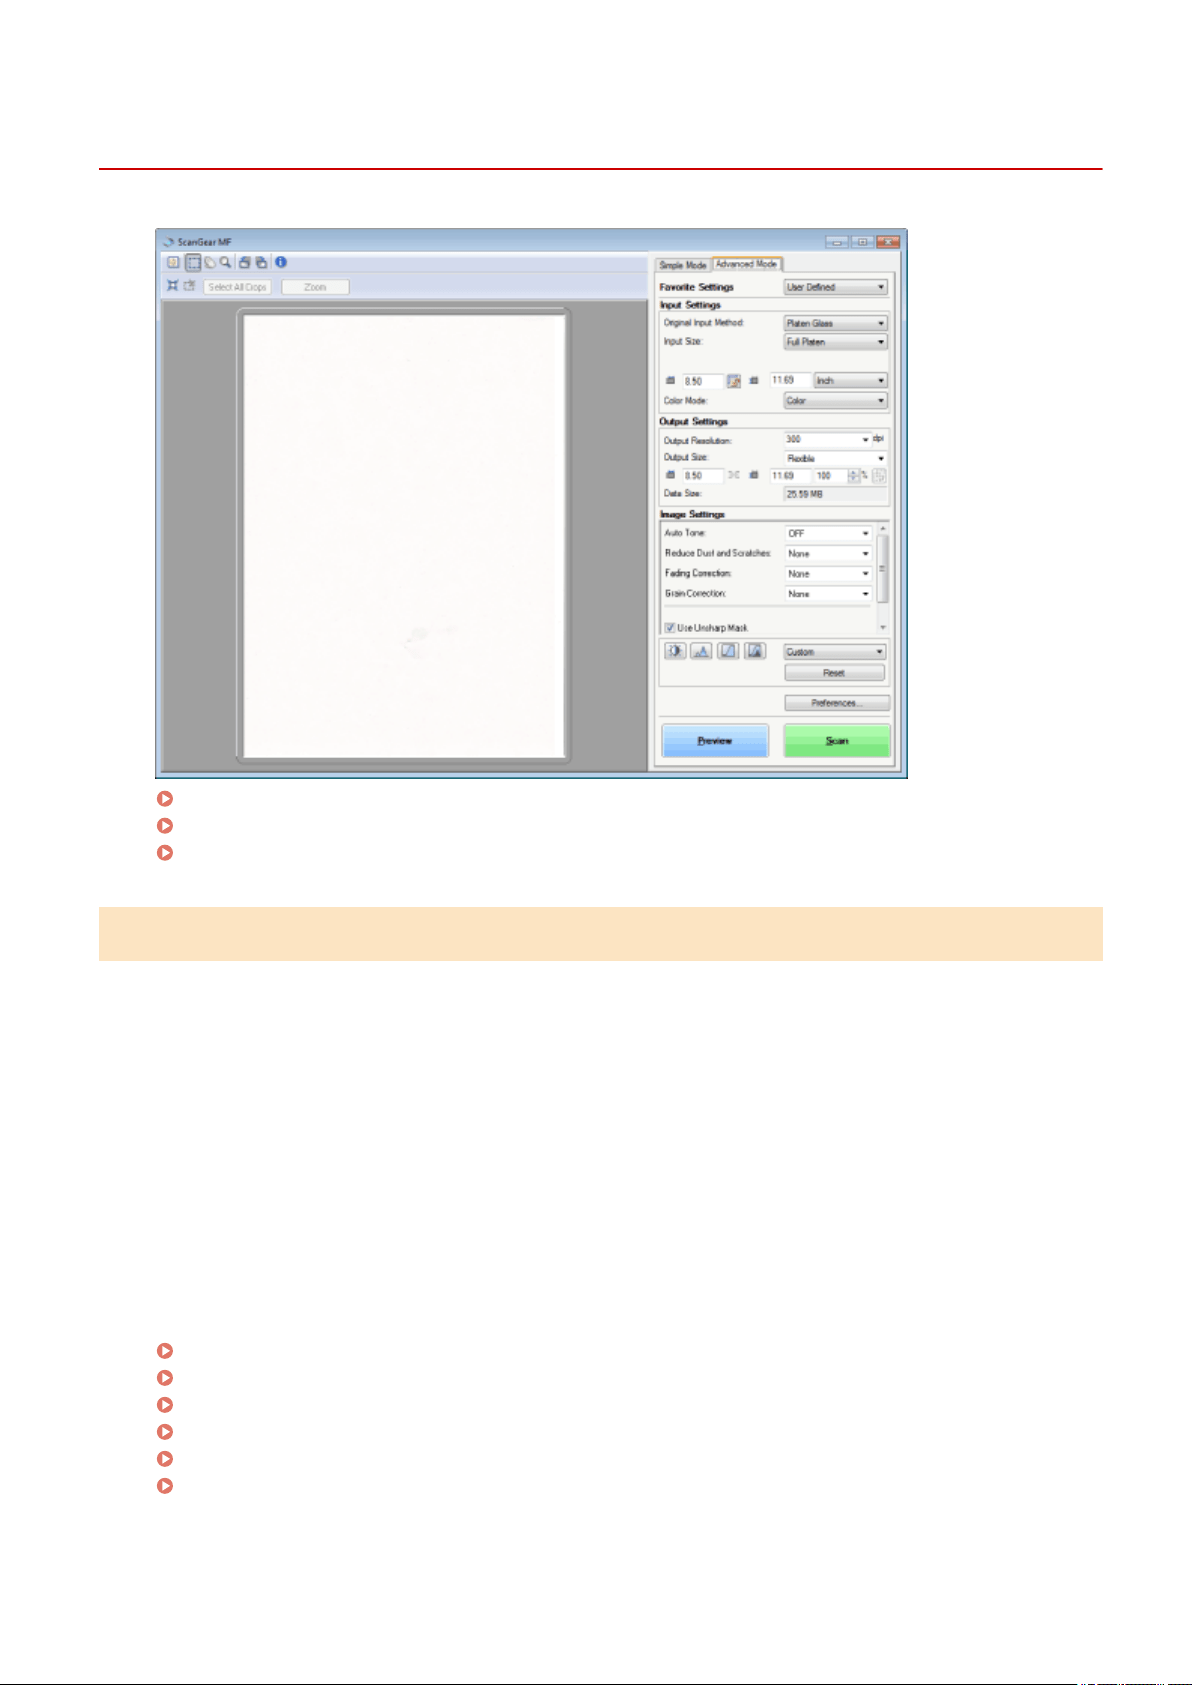
Using Advanced Mode
85RS-03A
Scanning in advanced mode(P
. 136)
Advanced mode toolbar(P
. 137)
Advanced mode settings(P
. 138)
Scanning in advanced mode
1
Display the ScanGear MF.
Start the ScanGear MF using either of the following methods.
● Selecting [Display the Scanner Driver] in the MF T
oolbox
● Starting from an application
2
Click [Advanced Mode].
3
Specify the settings.
Favorite Settings(P
. 138)
Input Settings
(P. 138)
Output Settings
(P. 139)
Image Settings(P
. 139)
Color Settings
(P. 141)
Pr
eferences(P. 144)
4
Click [Preview].
Scan
136
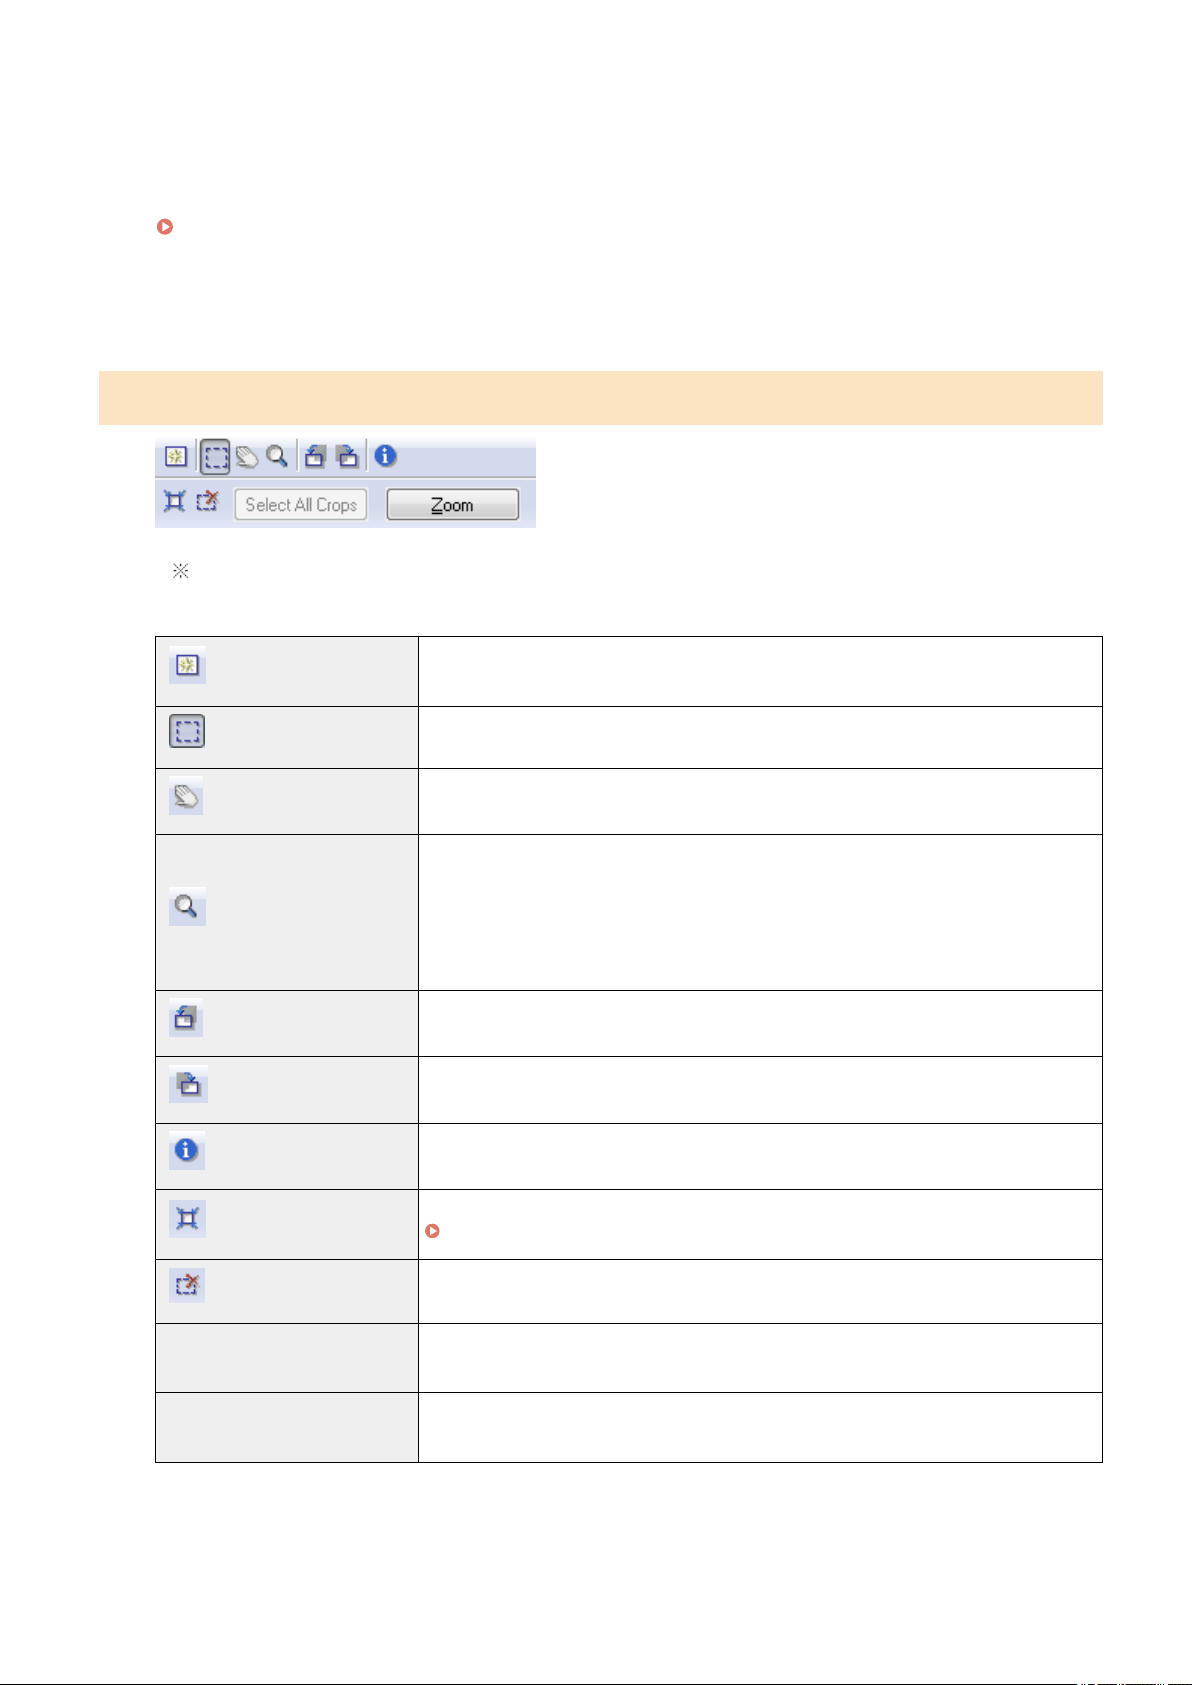
The preview of the image is displayed.
5
Specify scan areas if you want to scan specic ar
eas within the document.
" Dening a Scan Ar
ea (Cropping Frame)(P. 148) "
6
Click [Scan].
Advanced mode toolbar
To perform all tasks using commands available on the toolbar, you need to display the image in the
pr
eview area.
[ ] (Clear)
Delete the preview image. The settings specied using the toolbar commands as well as
color settings ar
e all cleared.
[
] (Crop)
Specify the scan area.
[ ] (Move)
Move the enlarged image.
[ ] (Zoom)
Enlarge or reduces the preview image.
● Left-clicking
Enlar
ges the image.
● Right-clicking
Reduces the image.
[
] (Left Rotate)
Rotate the image 90 degrees to the left.
[ ] (Right Rotate)
Rotate the image 90 degrees to the right.
[ ] (Information)
Display the information of the scanned image.
[ ] (Auto Crop)
Select the scan area within the image automatically.
" Dening a Scan Ar
ea (Cropping Frame)(P. 148) "
[
] (Remove Cropping Frame)
Delete the selected cropping frames.
[Select All Crops]
The settings specied within the [Advanced Mode] tab ar
e applied to all cropping
frames.
[Zoom]
Enlarge and scan the scan area specied within the preview image.
When this button is clicked, it changes to [Undo].
Scan
137
Advanced mode settings
Favorite Settings
You can register frequently used input settings, output settings, image settings, color settings, and preferences
as favorite settings. Once these settings have been r
egistered as favorite settings, you can apply them to the
entire image or specic scan areas of the image displayed in the preview area.
IMPORTANT
The following cannot be registered as favorite settings:
● Width and height values set for [Input Settings] and [Output Settings]
● The [
] button's enabled state (to allow maintaining height-width proportions) for [Input Settings]
● [%] values (Scale) set for [Output Settings]
[User Dened] Enter and specify each setting.
[Default]
Restore all current settings to default settings. The image in the preview area is deleted
accor
dingly.
[Add/Delete]
Display the [Add/Delete Favorite Settings] dialog box. You can register the current settings
set for the image in the preview area under a specied name. This option is not displayed
when no image is displayed in the preview area.
Input Settings
[Original Input Method] [Platen Glass] is selected.
[Input Size]
Select the document size.
NOTE
If you modied the setting after pr
eviewing the image
The image is deleted from the preview area.
● Width:
Specify the width of the input size.
● Height:
Specify the height of the input size.
NOTE
To change the unit of measurement
Select [Pix
el], [Inch], or [Millimeter] from the drop-down list on the right.
The data size limit
Some applications have the data size limit for scanning images. If the
size exceeds 21,000 x 30,000 pixels, the image cannot be scanned.
Scan
138
The smallest data size
The smallest data size is 4 b
y 4 pixels size. (It can be specied when
[Output Resolution] is set to 25 dpi.)
To maintain the current height-width proportions
Click [
].
[Color Mode]
Select the document type and scan mode.
● [Black and White]
Select to output documents in black and white. The image is e
xpressed in black and white
based on the threshold value specied. See " Color Settings(P. 141) " for the instruction
on how to specify a threshold value.
● [Grayscale]
Select to scan black and white printed photos or scan printed photos in black and white.
The image is expressed in 256 shades, from 0 up to 255.
● [Color]
Select to scan color printed photos. The image is expressed in 256 colors (8 bits) for each
R(ed), G(reen) and B(lue) color channel.
● [Color (Documents)]
Select when scanning documents that contain text or tables. The image is expressed in
256 levels (8-bit) of R(ed), G(reen), and B(lue).
● [Text Enhanced]
Select to capture text clearly. This mode is suited for reading text using OCR software.
The image is expressed in black and white.
Output Settings
[Output Resolution]
Select the scan resolution from the drop-down list or manually enter a value from 25 up to
9600 dpi.
" Setting Resolution
(P. 150) "
[Output Size]
Select the output size of the scanned image.
● When [Add/Delete] is selected
The [Add/Delete the Output Size] dialog box appears. You can add or delete output sizes
within this dialog box.
" Using Simple Mode
(P. 133) "
● When [Flexible] is selected
Enter width, height , or [%] (Scale) values. The ratio of width and height is proportional to
the width and height set for [Input Settings]. The scan resolution switches based on the
[%] (Scale) value specied. Values can be from 25 up to 38,400. Note that the upper value
limit varies depending on the value set for [Output Resolution].
Click [
] to change the orientation of the output size between landscape and portrait.
This button is inaccessible when [Fle
xible] is selected.
[Data Size] Display the data size of the image scanned using the specied settings.
Image Settings
[Auto Tone]
When [On] is selected, the colors of the image are automatically adjusted. This setting has
no effect when no image is displayed in the pr
eview area.
Scan
139

NOTE
Condition to specify the settings
This setting is available when [Color], [Color (Documents)], or
[Gr
ayscale] is selected in [Color Mode].
[Reduce Dust and Scratches]
Minimize dust and scratches of the photo.
● [None]
No dust and scr
atches are minimized.
● [Low]
Remove only a small amount of dust and scratches.
● [Medium]
This setting is best recommended in most cases.
● [High]
Remove large dust spots and scratches of the photo. Note that this setting may remove
subtle details of the image.
NOTE
Condition to specify the settings
This setting can be enabled when:
[Color], [Color (Documents)], or [Gr
ayscale] is selected for [Color Mode].
[Fading Correction]
Correct the fading of the image, as well as increase saturation to enhance obscure, tinted
images. This setting is unselectable when no image is displayed in the pr
eview area.
● [None]
No fading correction is made.
● [Low]
Make low-level fading correction.
● [Medium]
This setting is best recommended in most cases.
● [High]
Make extensive fading correction. Note that this setting may change the tone of the
image.
NOTE
Condition to specify the settings
This setting can be enabled when:
[Color] or [Color (Documents)] is selected for [Color Mode], and
[Recommended] or [Color Matching] is selected for [Color Corr
ection]
within the [Preferences] dialog box.
Pr
eferences(P. 144)
[Grain Correction]
Smooth the lm gr
ain of the image shot on fast lm, to make sure excellent image quality
and smooth gradation.
● [None]
No lm grain correction is made.
● [Low]
This setting is best recommended for images showing little noticeable banding.
● [Medium]
This setting is best recommended in most cases.
● [High]
Smooth the lm grain extensively. Note that this setting may deteriorate image
sharpness and quality.
Scan
140

NOTE
Condition to specify the settings
This setting can be enabled when:
[Color], [Color (Documents)], or [Gr
ayscale] is selected for [Color Mode].
In the preview area
This setting is not r
eected to the image displayed in the preview area.
[Use Unsharp Mask]
If this option is selected, outline of the image is emphasized, making it sharp. It is effective
for scanning photos etc., which have a soft focus.
NOTE
Condition to specify the settings
This setting can be enabled when:
[Color], [Color (Documents)], or [Gr
ayscale] is selected for [Color Mode].
[Use Descreen]
Select to reduce the distorted pattern (moire) when scanning printed photographs and
pictur
es.
NOTE
Condition to specify the settings
This setting can be enabled when:
[Color], [Color (Documents)], or [Gr
ayscale] is selected for [Color Mode].
When [Use Unsharp Mask] is set to [ON]
Some moir
é patterns may be generated if [Use Descreen] is set to [ON].
If this happens, set [Use Unsharp Mask] to [OFF].
To r
eect the changes
Scan the document again.
Color Settings
Using Color Settings command buttons, you can adjust the brightness and contrast of the entire image, specify
highlights and shado
ws, and adjust the contrast and color balance of the image.
The displayed command buttons vary depending on the setting selected for [Color Mode]. When [Text
Enhanced] is selected, no command button is displayed.
When the tone curve/threshold drop-down list is clicked, the dialog box appears to specify the corresponding
option. When [Reset] is clicked, all current settings are restored to default settings.
● When [Color], [Color (Documents)], or [Grayscale] is selected for [Color Mode]:
● When [Black and White] is selected for [Color Mode]:
When you select [Add/Delete] from the drop-down menu, you can register a set of color settings. See " T
one
curve/threshold drop-down list(P. 144) " for more information.
Scan
141
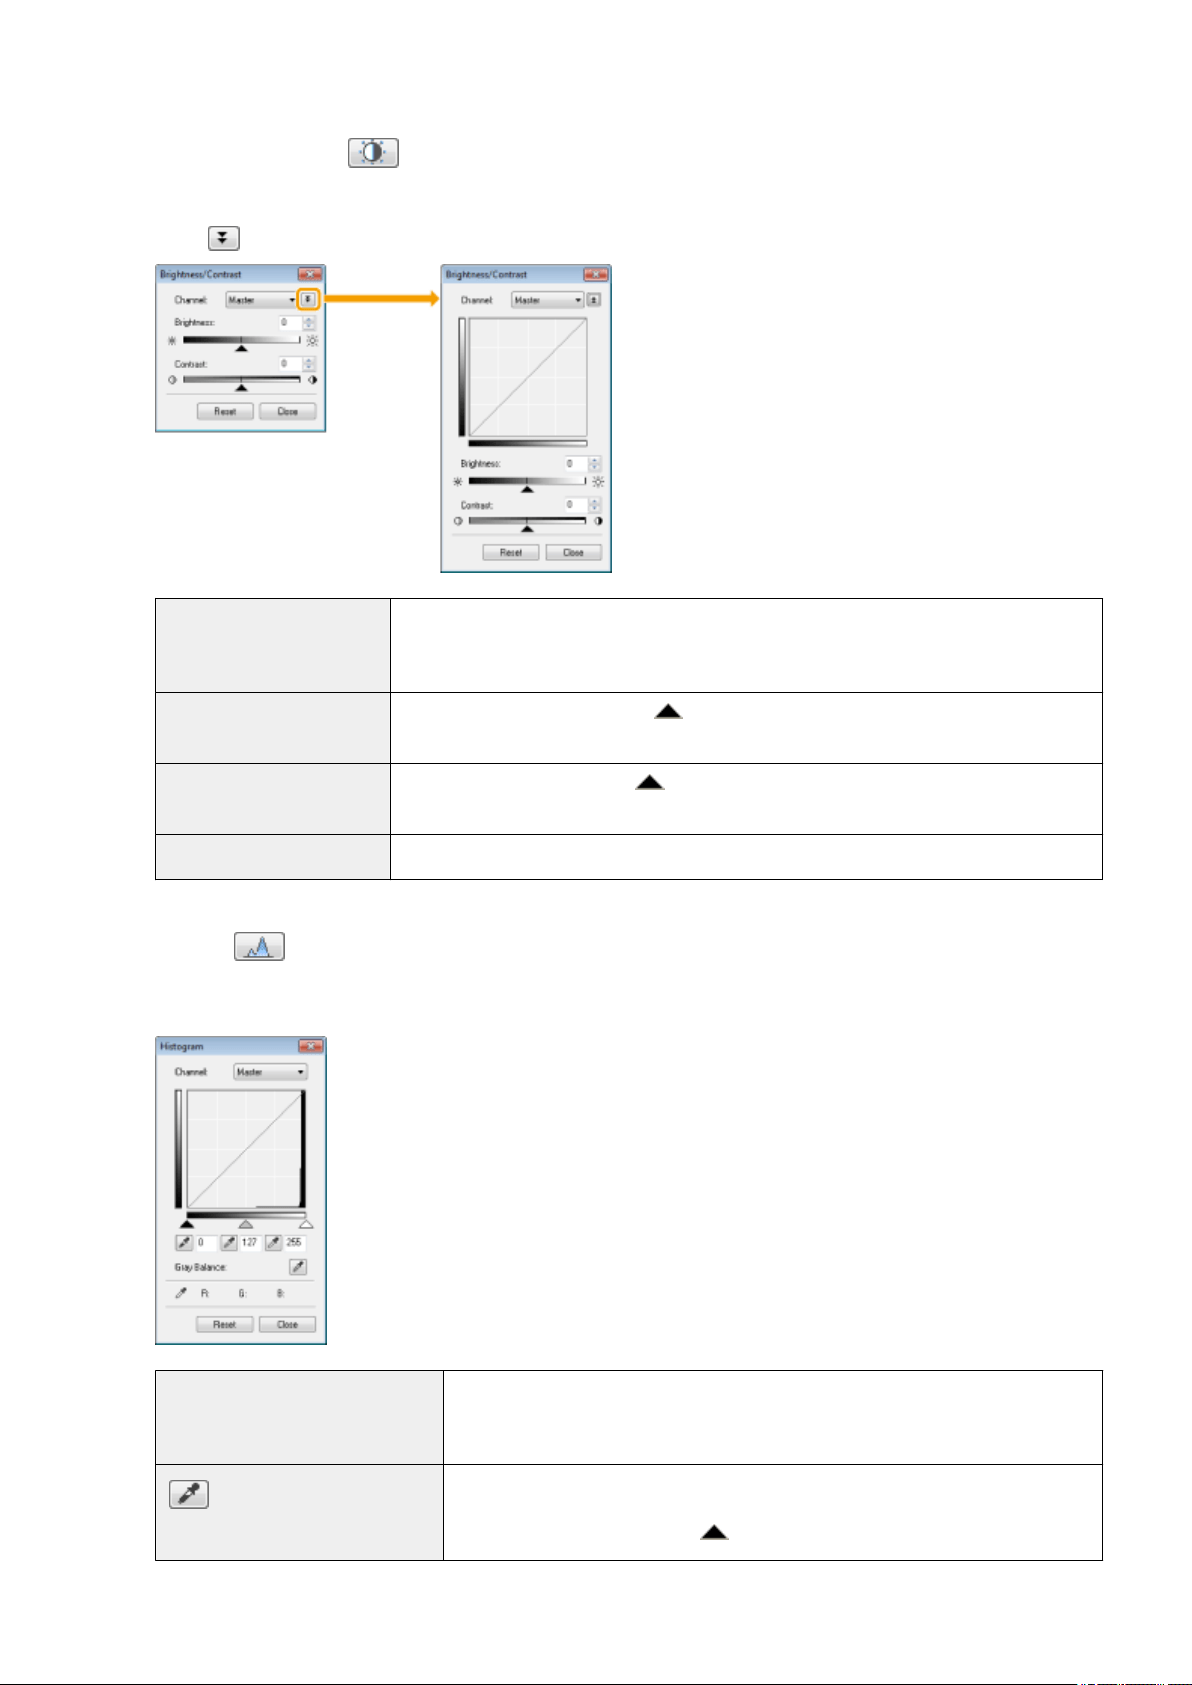
Brightness/Contrast
You can adjust the brightness and contrast level in this dialog box.
Click [ ] to adjust the brightness and contrast using the curve on the graph.
[Channel]
Select [Red], [Green], or [Blue] to adjust each color, or select [Master] to adjust all three
colors when [Color] or [Color (Documents)] is selected for [Color Mode].
Adjust gr
ay when [Grayscale] is selected for [Color Mode].
[Brightness]
Adjust the brightness by moving [
] on the slider or manually entering values from -127
up to 127.
[Contrast]
Adjust the contrast by moving [ ] on the slider or manually entering values from -127 up
to 127.
[Reset] Restore all current settings to default settings.
Histogram
You can visually conrm which parts of the image ar
e darker or lighter. You can eliminate the darkest and
lightest parts to increase the halftone tonal range.
[Channel]
Select [Red], [Green], or [Blue] to adjust each color, or select [Master] to adjust all
thr
ee colors when [Color] or [Color (Documents)] is selected for [Color Mode].
Adjust gray when [Grayscale] is selected for [Color Mode].
[
] (Black-point eyedropper
tool)
Click to move the tool to the part of the image (or the selected scan area) in the
pr
eview area that you want to be the darkest part. You can also manually enter a
value from 0 up to 245 or move [
] on the slider.
Scan
142
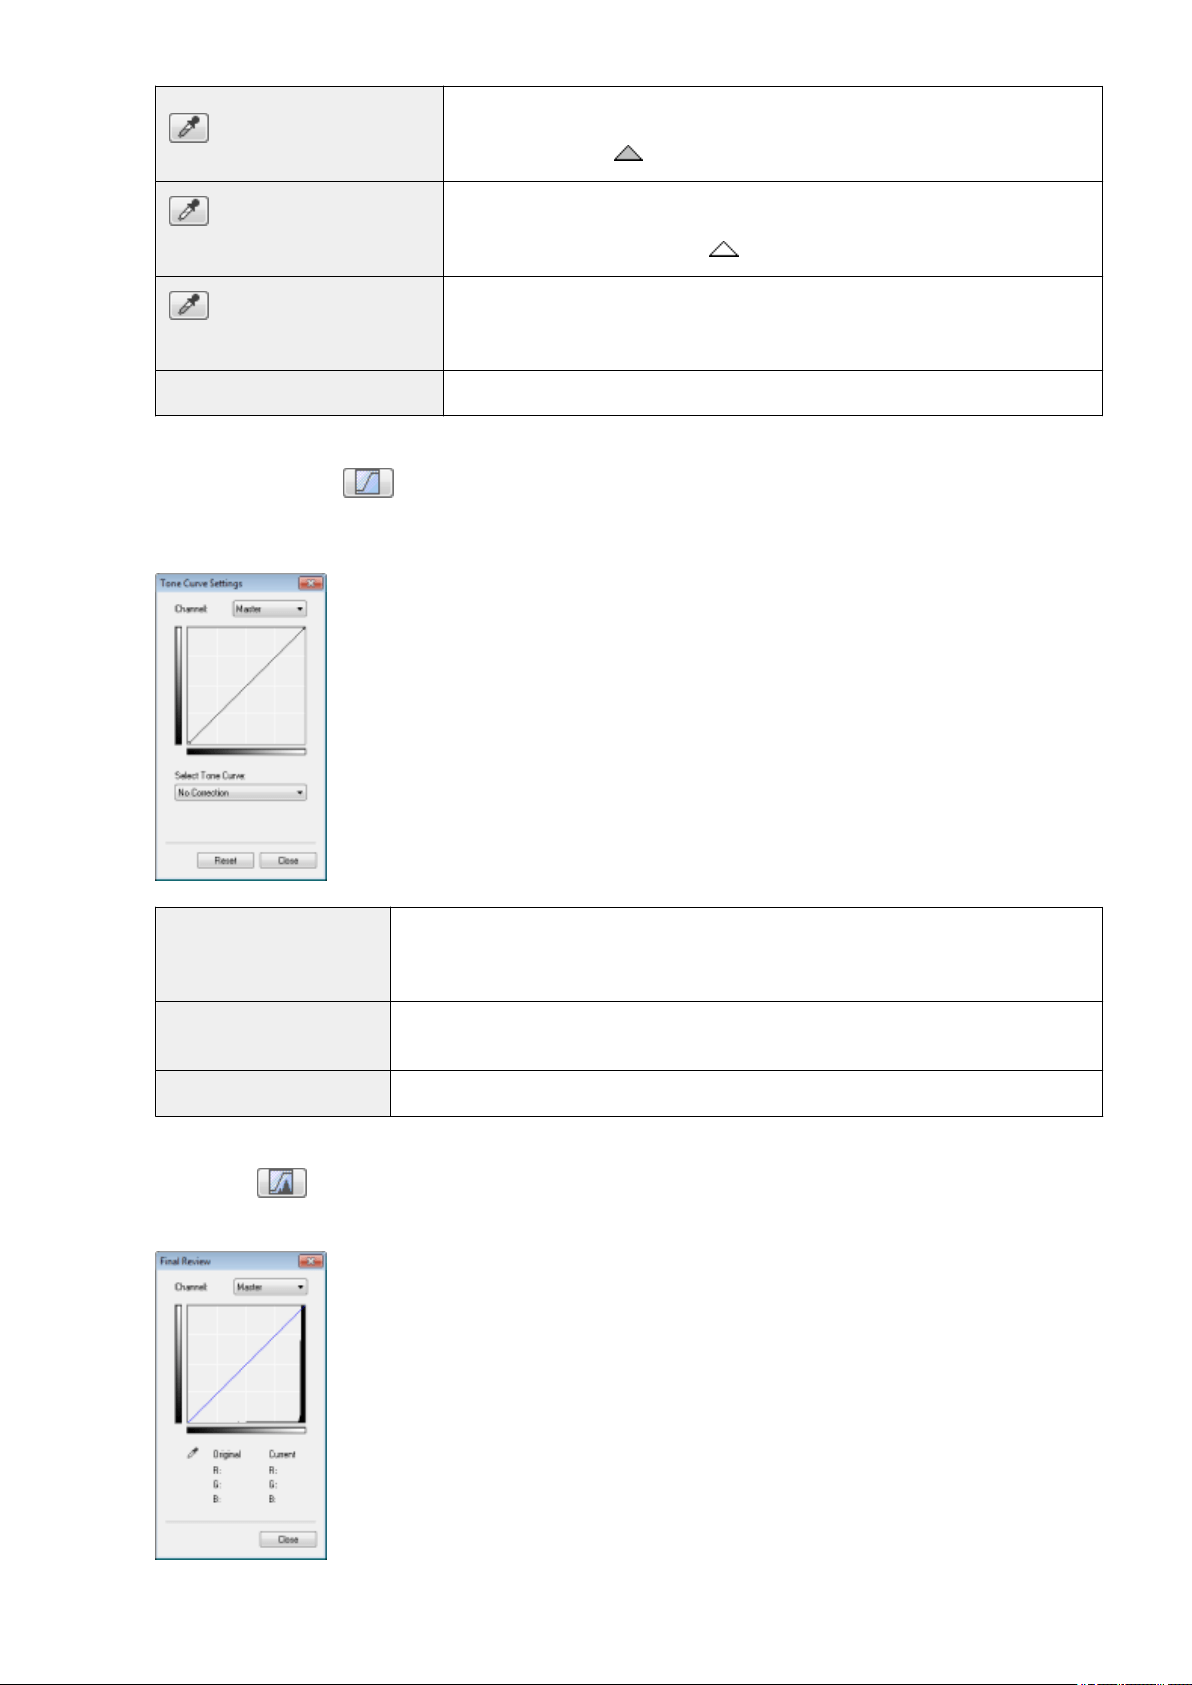
[ ] (Mid-point eyedropper tool)
Click to move the tool to the part of the image (or the selected scan area) in the
pr
eview area that you want to be halftone. You can also manually enter a value from
5 up to 250 or move [
] on the slider.
[
] (White-point eyedropper
tool)
Click to move the tool to the part of the image (or the selected scan area) in the
pr
eview area that you want to be the lightest part. You can also manually enter a
value from 10 up to 255 or move [
] on the slider.
[ ] (Gray Balance eyedropper
tool)
For color images, click to move the tool to the part of the image (or the selected scan
ar
ea) in the preview area that you want to adjust gray balance. Grays in the scanned
image become halftone, while other original colors are faithfully reproduced.
[Reset] Restore all current settings to default settings.
Tone Curve Settings
You can adjust the brightness of a specic part of the image b
y selecting your choice of tone curve in this dialog
box.
[Channel]
Select [Red], [Green], or [Blue] to adjust each color, or select [Master] to adjust all three
colors when [Color] or [Color (Documents)] is selected for [Color Mode].
Adjust gray when [Grayscale] is selected for [Color Mode].
[Select Tone Curve]
Select the tone curve type from [No Correction], [Over Exposure], [Under Exposure], [High
Contrast], and [Invert the Negative/Positive Image].
[Reset] Restore all current settings to default settings.
Final Review
You can conrm all the specied color settings in this dialog bo
x.
Scan
143
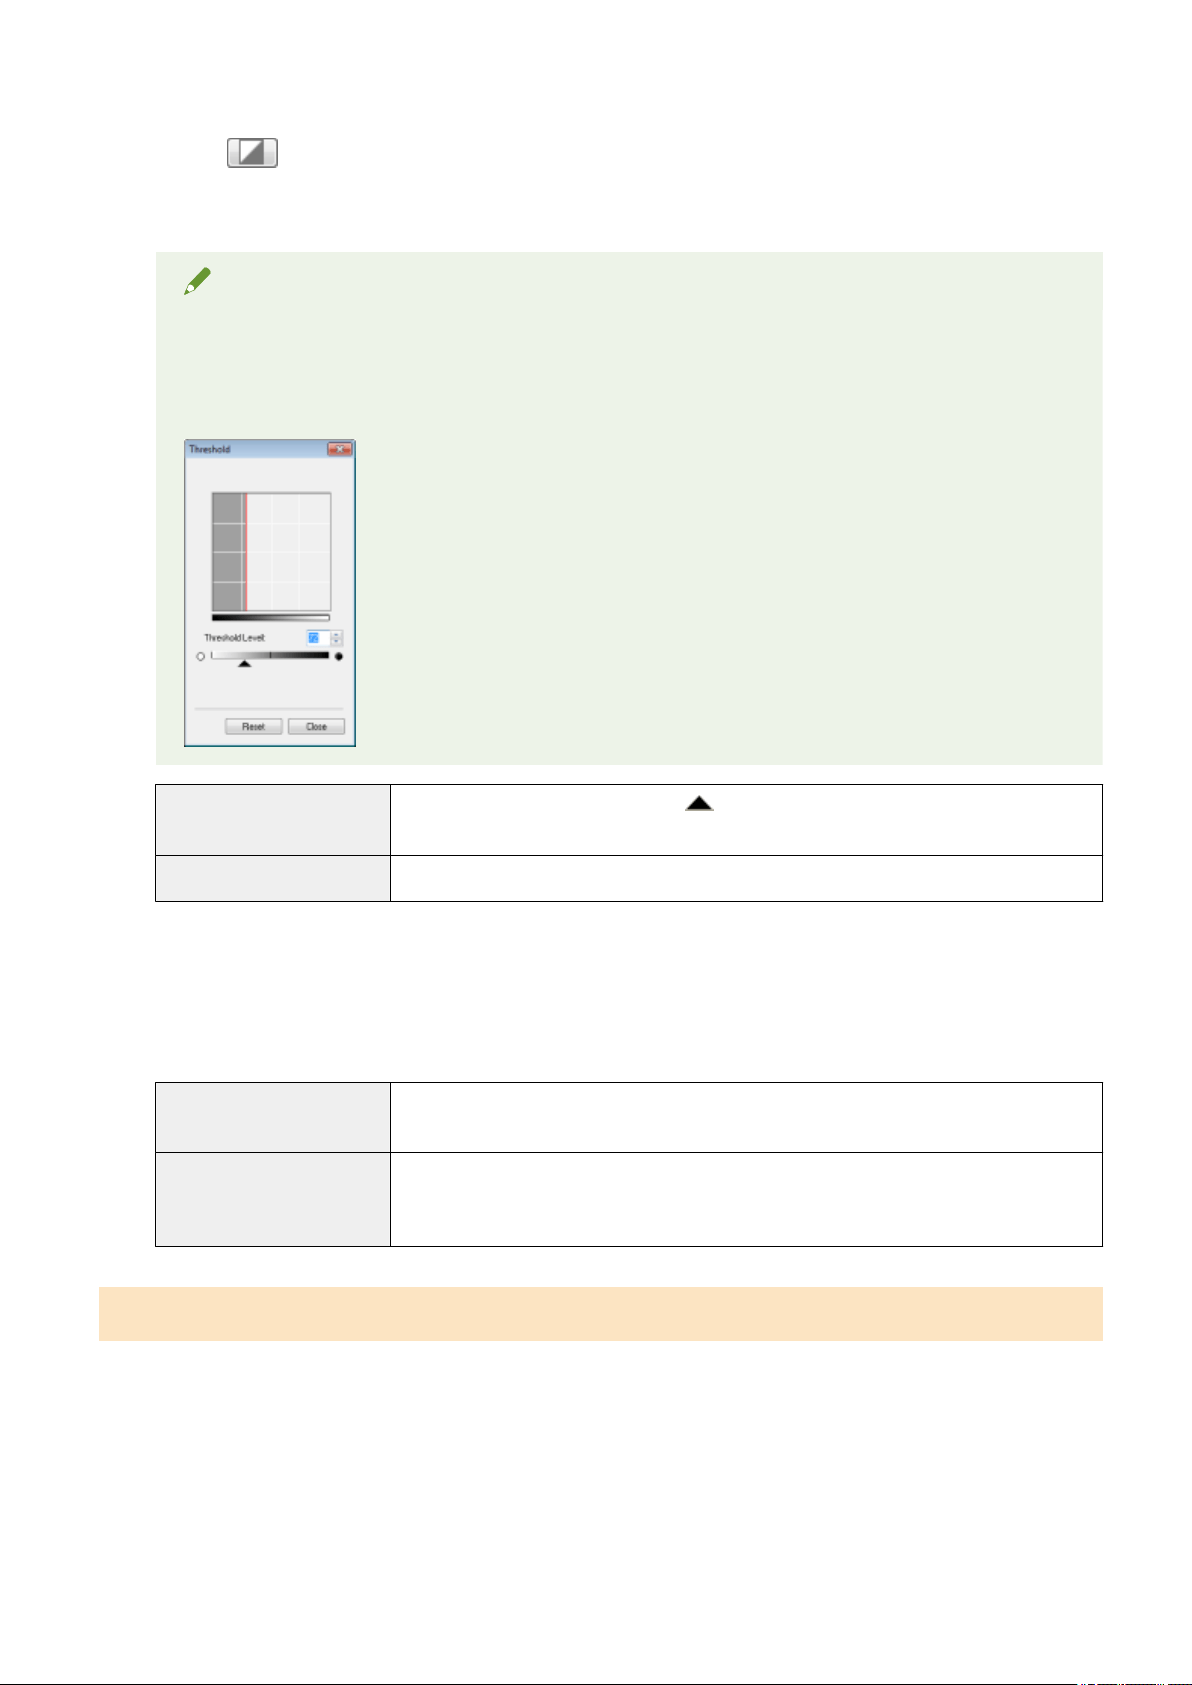
Threshold
You can adjust the threshold setting. By adjusting the threshold, you can sharpen text within the document and
r
educe print-through that often happens to newspapers.
NOTE
Threshold
The brightness of color and gr
ay images can be specied as a value from 0 up to 255, while the
brightness of black and white images is expressed in black and white including all shades between black
and white. A threshold is the boundary to dene whether images are black or white.
[Threshold Level]
Adjust the threshold level by moving [
] on the slider or manually entering a value from 0
up to 255.
[Reset] Restore all current settings to default settings.
Tone curve/threshold drop-down list
Y
ou can save the color settings specied for scan areas. If there are no specic scan areas, the settings specied
for the entire image displayed in the preview area are saved. You can also recall the saved settings to apply to
the selected scan area.
[Custom]
You can custom-dene each setting. The settings can be modied after these settings wer
e
applied to the image.
[Add/Delete]
Display the [Add/Delete Threshold Settings] dialog box when [Black and White] is selected
for [Color Mode] in the [Add/Delete Tone Curve Settings] dialog box. You can register the
current settings set for the image in the preview area under a specied name.
Preferences
The [Preferences] dialog box appears when [Preferences] is clicked in the [Advanced Mode] tab. You can change
the scan and preview settings within this dialog box.
Scan
144
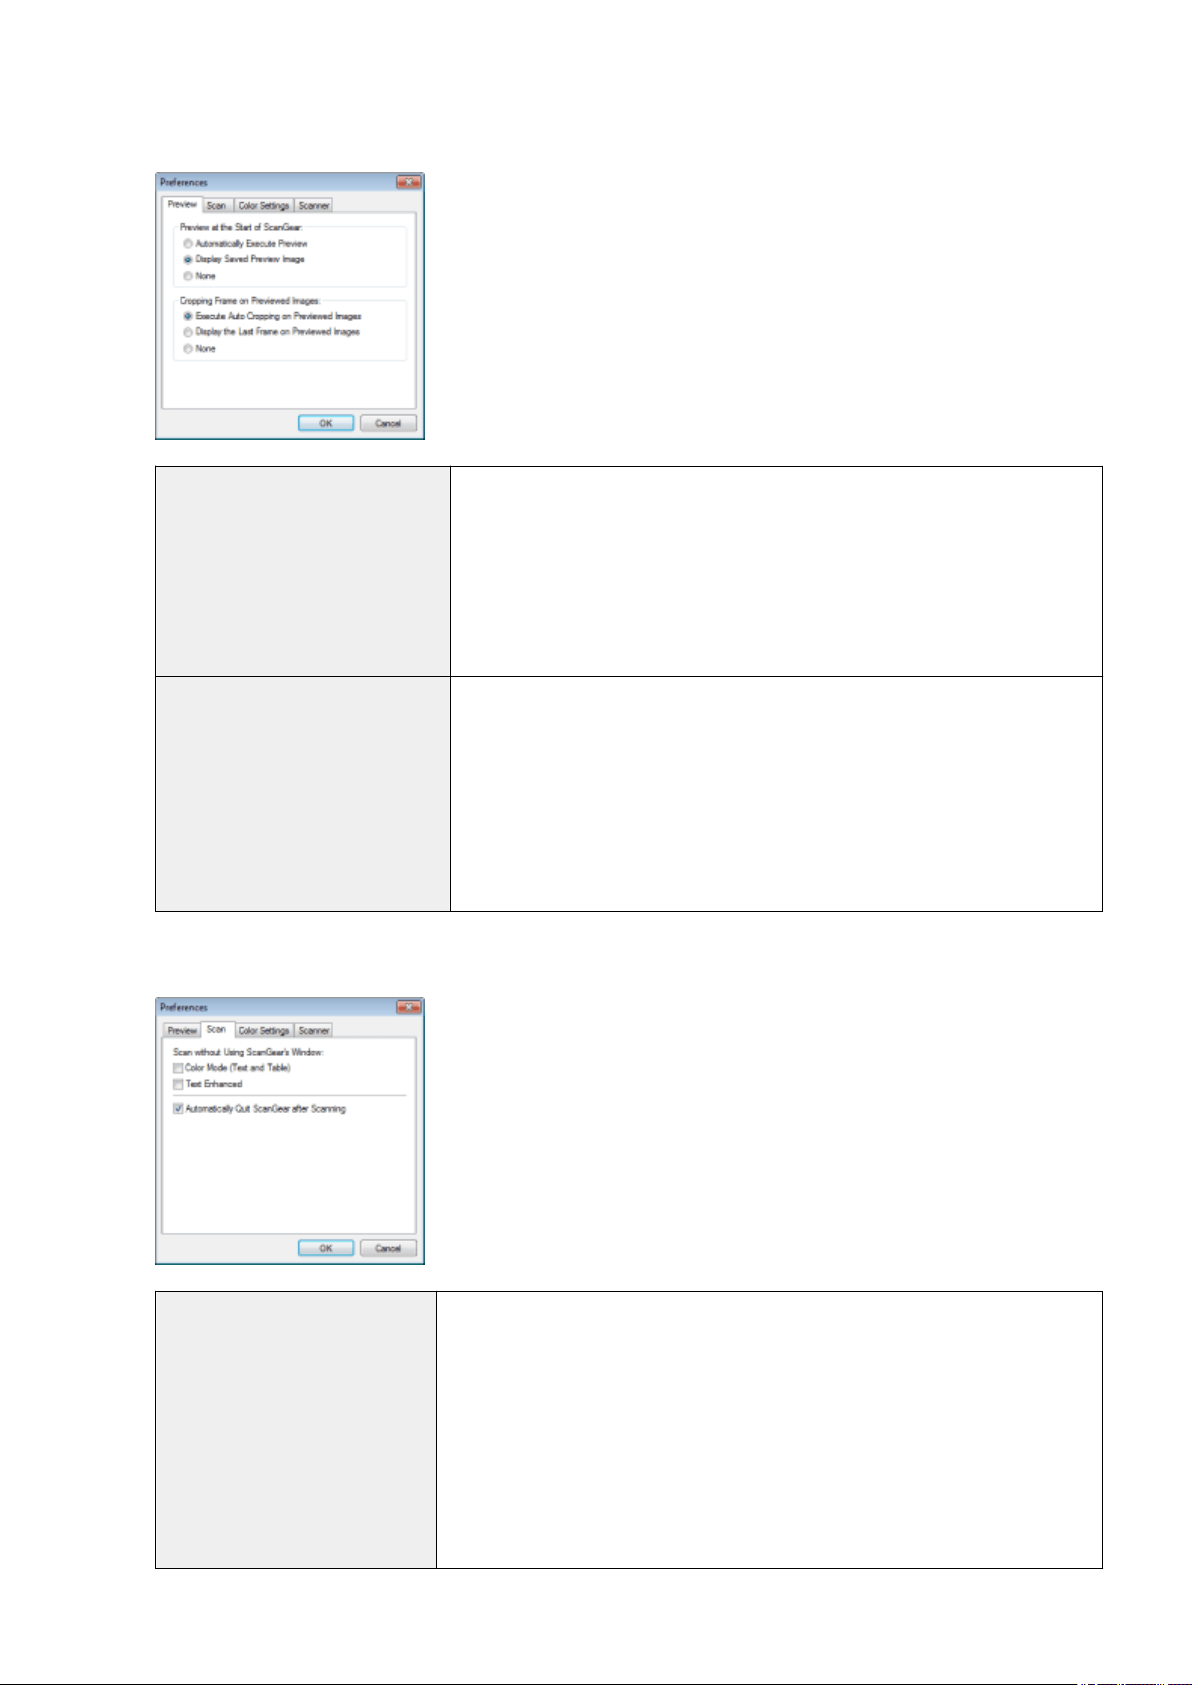
[Preview] tab
[Preview at the Start of ScanGear]
Select the preview mode when you start the ScanGear MF.
● [Automatically Ex
ecute Preview]
The preview starts automatically when the ScanGear MF is started.
● [Display Saved Preview Image]
Display the last previewed image.
● [None]
No preview image is displayed.
[Cropping Frame on Previewed
Images]
Specify how you want the scan area displayed within the image displayed in the
preview area.
● [Execute Auto Cropping on Previewed Images]
The scan area is automatically selected and scaled to t to the document size.
● [Display the Last Frame on Previewed Images]
Display the scan area last dened.
● [None]
No frame is displayed.
[Scan] tab
[Scan without Using ScanGear's
Windo
w]
Documents are scanned using application-dened settings when scanning using
applications such as OCR software that performs scans without opening the ScanGear
MF main window. To perform a scan in a specic color mode instead of using the
application-dened settings, specify this option.
● [Color Mode (Text and Table)]
The document is scanned in [Color (Documents)] mode. Application-dened
settings are disregarded.
● [Text Enhanced]
The document is scanned in [Text Enhanced] mode. Application-dened settings
are disregarded.
Scan
145
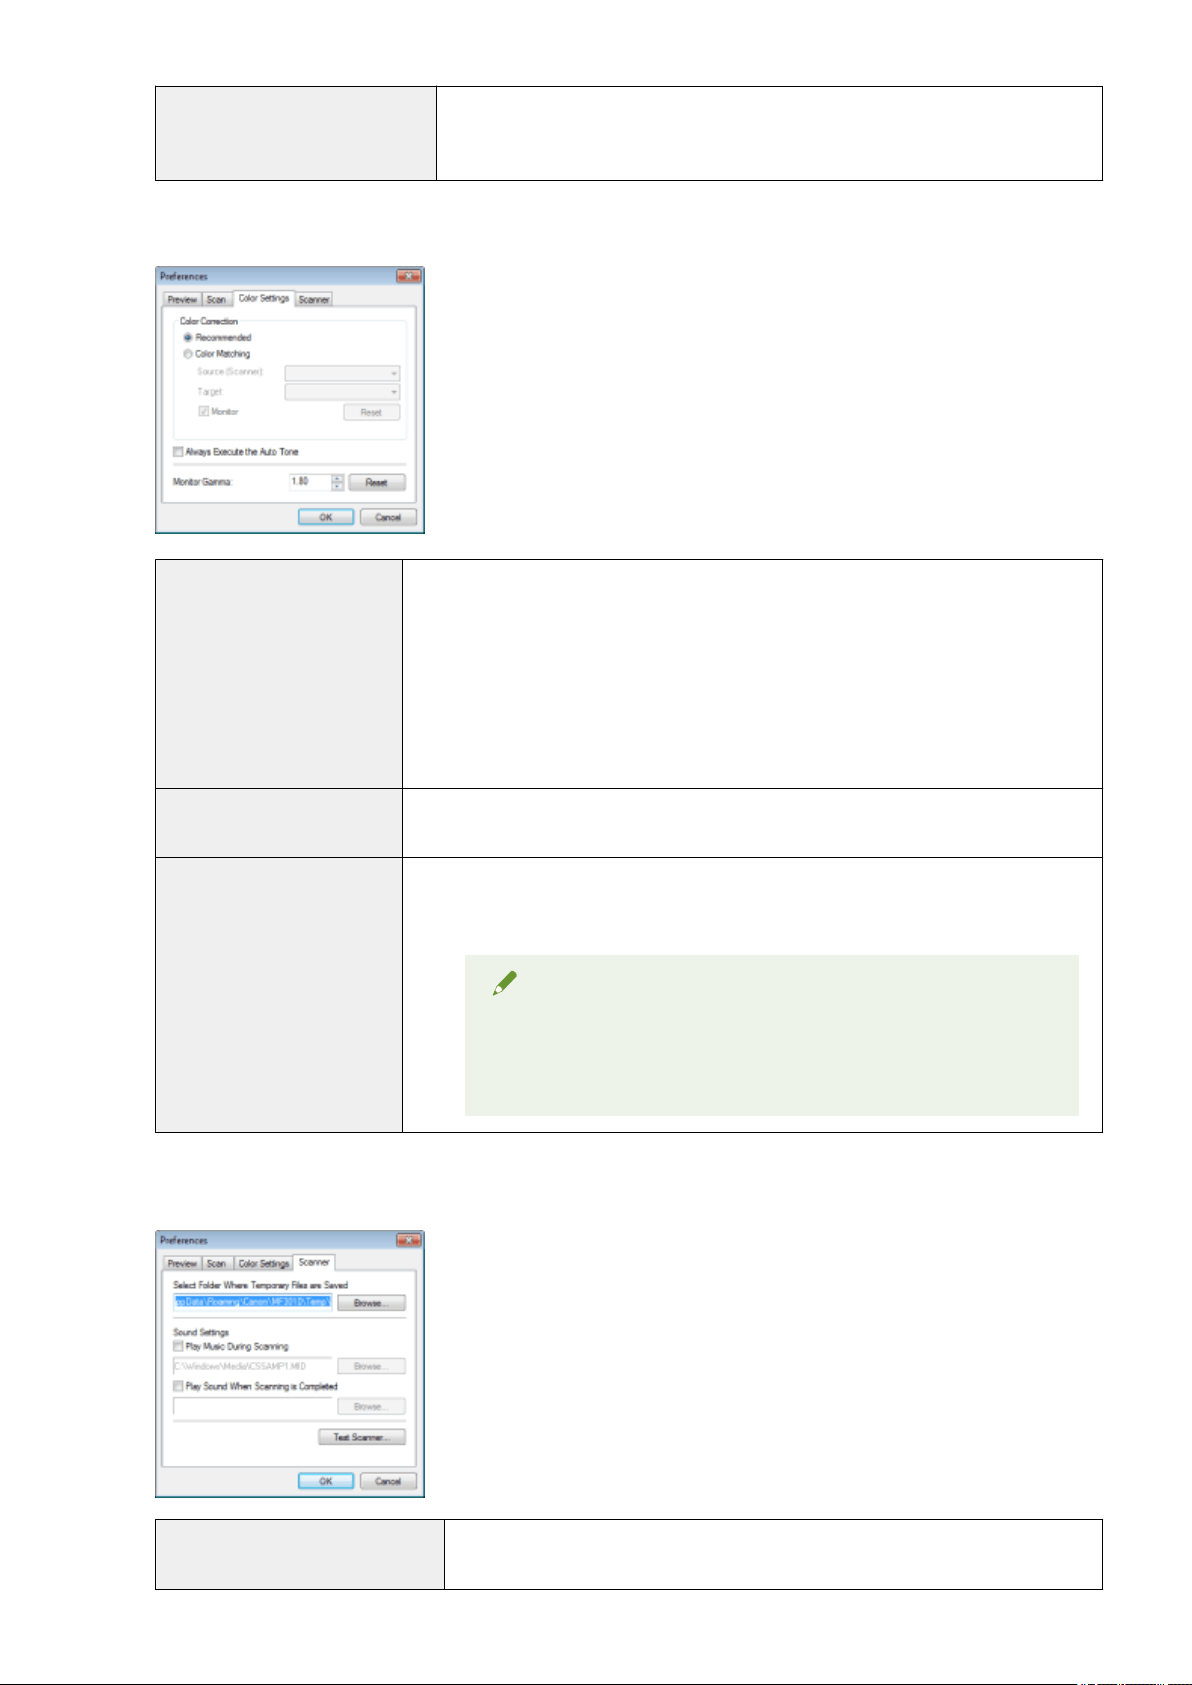
[Automatically Quit ScanGear after
Scanning]
When this setting is selected, the [ScanGear MF] dialog box closes automatically when
scanning is complete. Depending on the application in use, the ScanGear MF closes
automatically when scanning is complete, irr
espective of application-dened settings.
[Color Settings] tab
[Color Correction]
Select the color correction type.
● [Recommended]
Repr
oduce vividly the colors of a document displayed on the screen.
● [Color Matching]
Automatically match the colors of the image to those of the scanner, monitor, and color
printer. When this option is selected, the color command buttons in the [Advanced
Mode] tab are disabled. This setting is selectable only when [Color] or [Color
(Documents)] is selected for [Color Mode].
[Always Execute the Auto Tone]
Always correct the colors of the image automatically. This setting is selectable only when
[Color], [Color (Documents)] or [Grayscale] is selected for [Color Mode].
[Monitor Gamma]
Adjust the gamma. You can specify the gamma value from 0.10 up to 10.00 for the monitor
which displays the scanned image. This setting is not reected to the scan result when
[Black and White] is selected for [Color Mode].
NOTE
When [Color Matching] is selected for [Color
Correction]
The value specied in the prole is applied to scanning results.
[Scanner] tab
[Select Folder Where Temporary
Files are Saved]
Specify the folder where scanned images are temporarily saved. Click [Browse] to
specify the folder.
Scan
146

[Sound Settings]
Set the scanner to play music during scanning or when scanning is complete.
● [Play Music During Scanning]
Music is played during scanning. Click [Br
owse] and specify the sound le.
● [Play Sound When Scanning is Completed]
Music is played when scanning is completed. Click [Browse] and specify the sound
le.
The following le formats are supported:
● MIDI les (*.mid, *.rmi, *.midi)
● Audio les (*.wav, *.aif, *.aiff)
● MP3 le (*.mp3)
[Test Scanner]
You can check to see if the scanner is functioning properly. The [Scanner Diagnostics]
dialog box appears when this button is clicked. Click [Start].
Scan
147

Dening a Scan Ar
ea (Cropping Frame)
85RS-03C
Y
ou can select or deselect scan frames (cropping areas) for images displayed in the preview area.
Selecting the cr
opping area automatically(P. 148)
Dening a cr
opping frame(P. 148)
Dening multiple cr
opping frames(P. 148)
Deleting cr
opping frames(P. 149)
Selecting the cropping area automatically
1
Display the preview.
2
Click [
] (Auto Crop) on the toolbar.
Every time this button is clicked, the selected cropping frame becomes smaller.
Dening a cr
opping frame
1
Display the image in the preview area.
2
Click [
] (Crop) on the toolbar.
3
Click on the preview image and drag around the contours/border of the area you want
to select.
● T
o adjust the selected area
Drag around the contours/border of the area or manually enter the width and height for [Input Settings] in
the [Advanced Mode] tab.
● To move the scan area
Click the inside rim of the scan area and drag it.
NOTE
To maintain height-width proportions of the original image
Click [
] in [Input Settings].
When scanning from the feeder
The curr
ent cropping frame is deleted when new one is dened.
Dening multiple cr
opping frames
You can dene multiple cropping frames.
Scan
148

1
Display the image in the preview area.
2
Click [
] (Crop) on the toolbar.
3
Click on the preview image and drag around the contours/border of the area you want
to select.
4
Click the outer rim of the cropping frame already dened and dr
ag the frame to add.
NOTE
The number of cropping frames that can be specied
Up to 10 cr
opping frames can be specied.
5
Adjust the cropping frames as needed.
Click to select the cropping frames you want to adjust.
Deleting cropping frames
T
o delete a cropping frame, click the outer rim of the cropping frame already dened and drag the frame to
add.
● Press [Delete] on the keyboard.
● Click [
] (Remove Cropping Frame) on the toolbar.
● Right-click on the cr
opping frame and select [Delete].
● Hold down [Ctrl] on the keyboard, right-click the outer rim of the cropping frame, and select [Delete].
Scan
149

Setting Resolution
85RS-03E
A scanned image is a gr
oup of dots which contain color and brightness information. The density of these dots is
called the "resolution". The "dpi (dots per inch)" means the maximum dots a printer can print per inch. Set the
resolution by specifying the following options.
☞ MF Toolbox -> [Image Quality]
☞ ScanGearMF -> the advanced mode tab -> [Output Resolution]
To display the scanned image on a monitor
Images are scanned at a resolution of 75 dpi, which is a typical monitor resolution.
To print from the printer
Scan the document at the printer's resolution.
IMPORTANT
To print the scanned image by scaling (enlarging/reducing)
If you print the scanned image b
y doubling its current size, for example, the actual resolution decreases
by half. To maintain sucient print quality, you need to double the resolution, and vice versa.
Resolution and data size
If the r
esolution is doubled, the image size becomes four times larger. If the data size becomes too large,
it may take considerably longer to process the image, consequently causing an insucient memory error
as well as other unexpected errors. To prevent this from happening, specify the minimum allowable
resolution based on your purpose of the scan.
NOTE
When printing the scanned image from a color printer
As a color printer uses se
veral different color inks to reproduce colors, the resolution can be decreased
by half.
About the scanning resolution
The maximum resolution is as following.
● Optical resolution: 600 dpi
● Software interpolated resolution: 9600 dpi
Scan
150

Troubleshooting
Troubleshooting .............................................................................................................................................
152
Clearing Jams ..................................................................................................................................................... 153
Removing Jammed Paper ............................................................................................................................. 155
Troubleshooting ................................................................................................................................................ 160
Paper Feeding Problems .............................................................................................................................. 162
Cannot Print, or the Images on Printouts are Spotted or Distorted .............................................................. 163
Copying Problems ........................................................................................................................................ 164
The Copy Output is Hardly Readable and Copied Poorly ........................................................................ 165
Printing Problems ......................................................................................................................................... 166
Cannot Print Documents from a Computer ........................................................................................... 167
Scanning Problems ....................................................................................................................................... 168
Cannot Scan a Document ...................................................................................................................... 170
Installation and Uninstallation Problems ...................................................................................................... 172
Miscellaneous Problems ............................................................................................................................... 173
Printing Results are Not Good .......................................................................................................................... 174
Paper Curls ................................................................................................................................................... 175
Paper Creases ............................................................................................................................................... 176
Printing is Uneven ........................................................................................................................................ 177
White Specks or Spots Appear on the Printout ............................................................................................. 178
The Toner does Not Flow Well into the Paper ............................................................................................... 179
Vertical Streaks Appear on the Output ......................................................................................................... 180
Toner Smudges and Spatters Appear around Text and Images .................................................................... 181
The Printout is Too Dark ............................................................................................................................... 182
Printed Bar Codes Cannot be Scanned ......................................................................................................... 183
Images may be partially cut off on the output .............................................................................................. 184
Uninstalling the Software ................................................................................................................................. 185
When a Service Error Has Occurred ................................................................................................................. 188
When a Problem cannot be Resolved ............................................................................................................... 189
Troubleshooting
151

Troubleshooting
85RS-03F
This chapter describes ho
w to handle paper jams and printout problems.
Clearing jams See " Clearing Jams
(P. 153) ."
When a problem has occurred (Read this section before requesting
service.)
See " Troubleshooting(P. 160) ."
When print quality is not good See " Printing Results are Not Good(P. 174) ."
When you want to uninstall the software See " Uninstalling the Software(P. 185) ."
When the problem cannot be resolved after referring to the
appropriate trouble shooting section
See " When a Problem cannot be Resolved(P. 189) ."
Troubleshooting
152
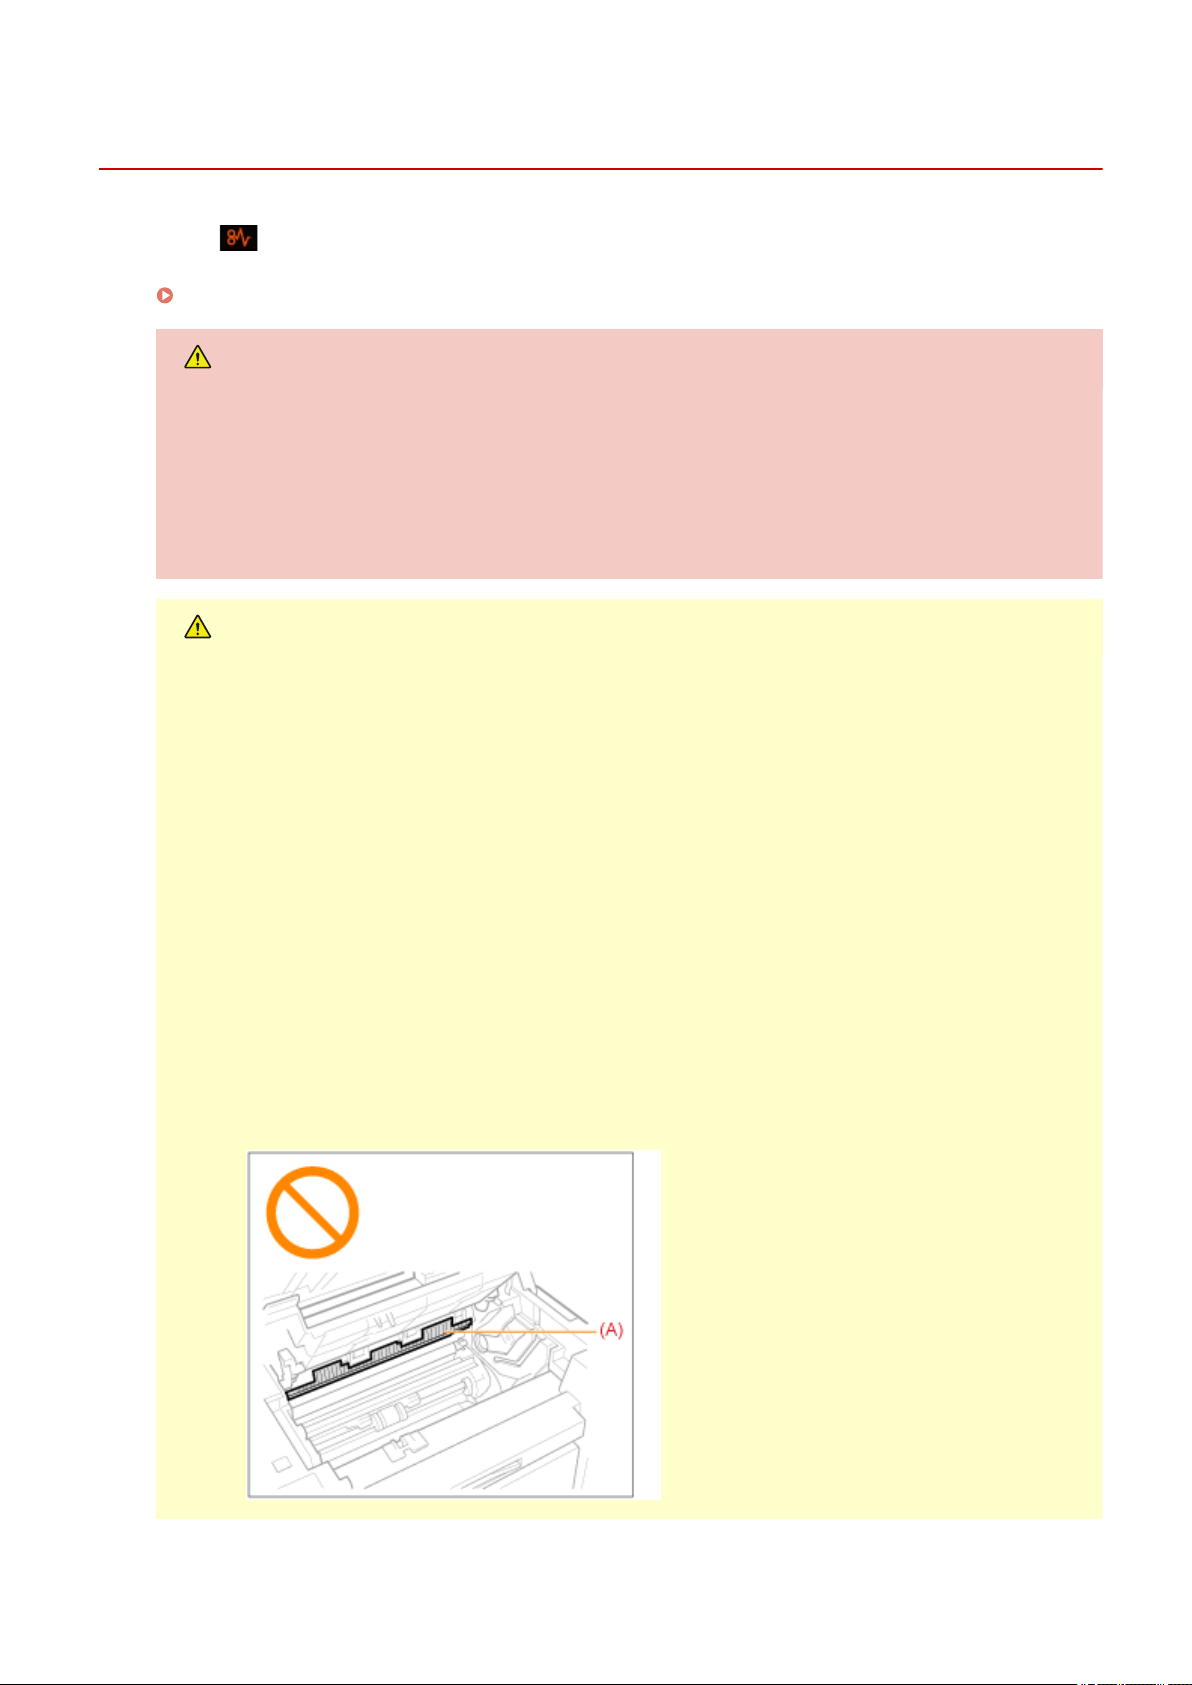
Clearing Jams
85RS-03H
If the [ ] indicator is blinking, a paper jam occurs inside the printer. Follow the procedures in this section
to r
emove the jammed paper.
" Remo
ving Jammed Paper(P. 155) "
WARNING
When removing the jammed paper
Use caution to avoid cutting your hands.
When removing jammed paper or when inspecting the inside of the machine
Do not allo
w necklaces, bracelets, or other metal objects to touch the inside of the machine, as this may
result in burns or electrical shock.
CAUTION
If loose toner comes into contact with your skin or clothing
W
ash with cold water only. Avoid warm water, as this will set the toner and cause it to stain your skin or
clothing.
When removing the jammed paper
● Remo
ve the paper carefully so that no paper fragments remain inside the machine. Also, do not put
your hands in areas other than those described in the procedure. Doing so may result in injury or
burns.
● Do not forcibly remove the jammed paper from the machine. Forcibly removing the paper may result
in personal injury or damage parts of the machine.
- If you cannot remove the paper, contact your local authorized Canon dealer.
● When all paper jams have been cleared, immediately remove your hands from the machine so that
your clothing and hands do not get caught in the rollers.
Do not touch the xing unit (A).
Touching the xing unit (A) may cause burns as it becomes very hot during use.
Troubleshooting
153

IMPORTANT
Cautions when clearing paper jams
● When clearing paper jams, do not turn the po
wer OFF. Data being printed is erased when you turn the
power OFF.
● When the paper gets torn, be sure to remove it so that no pieces remain.
If the jammed paper is torn
Remove all torn pieces of paper to avoid further jams.
If paper jams occur repeatedly
Check the follo
wing.
● Fan the paper stack and tap the edge on a at surface to align the paper before loading it into the
machine.
● Make sure that the paper you are using meets the requirements for use.
" Supported Paper T
ypes(P. 70) "
● Make sure that you have removed all scraps of paper from the inside of the machine.
Do not touch the transfer roller (A).
Touching the transfer roller (A) may damage the machine.
NOTE
Do not force the jammed paper out of the machine.
Contact your local authorized Canon dealer or the Canon help line for assistance, if needed.
Troubleshooting
154
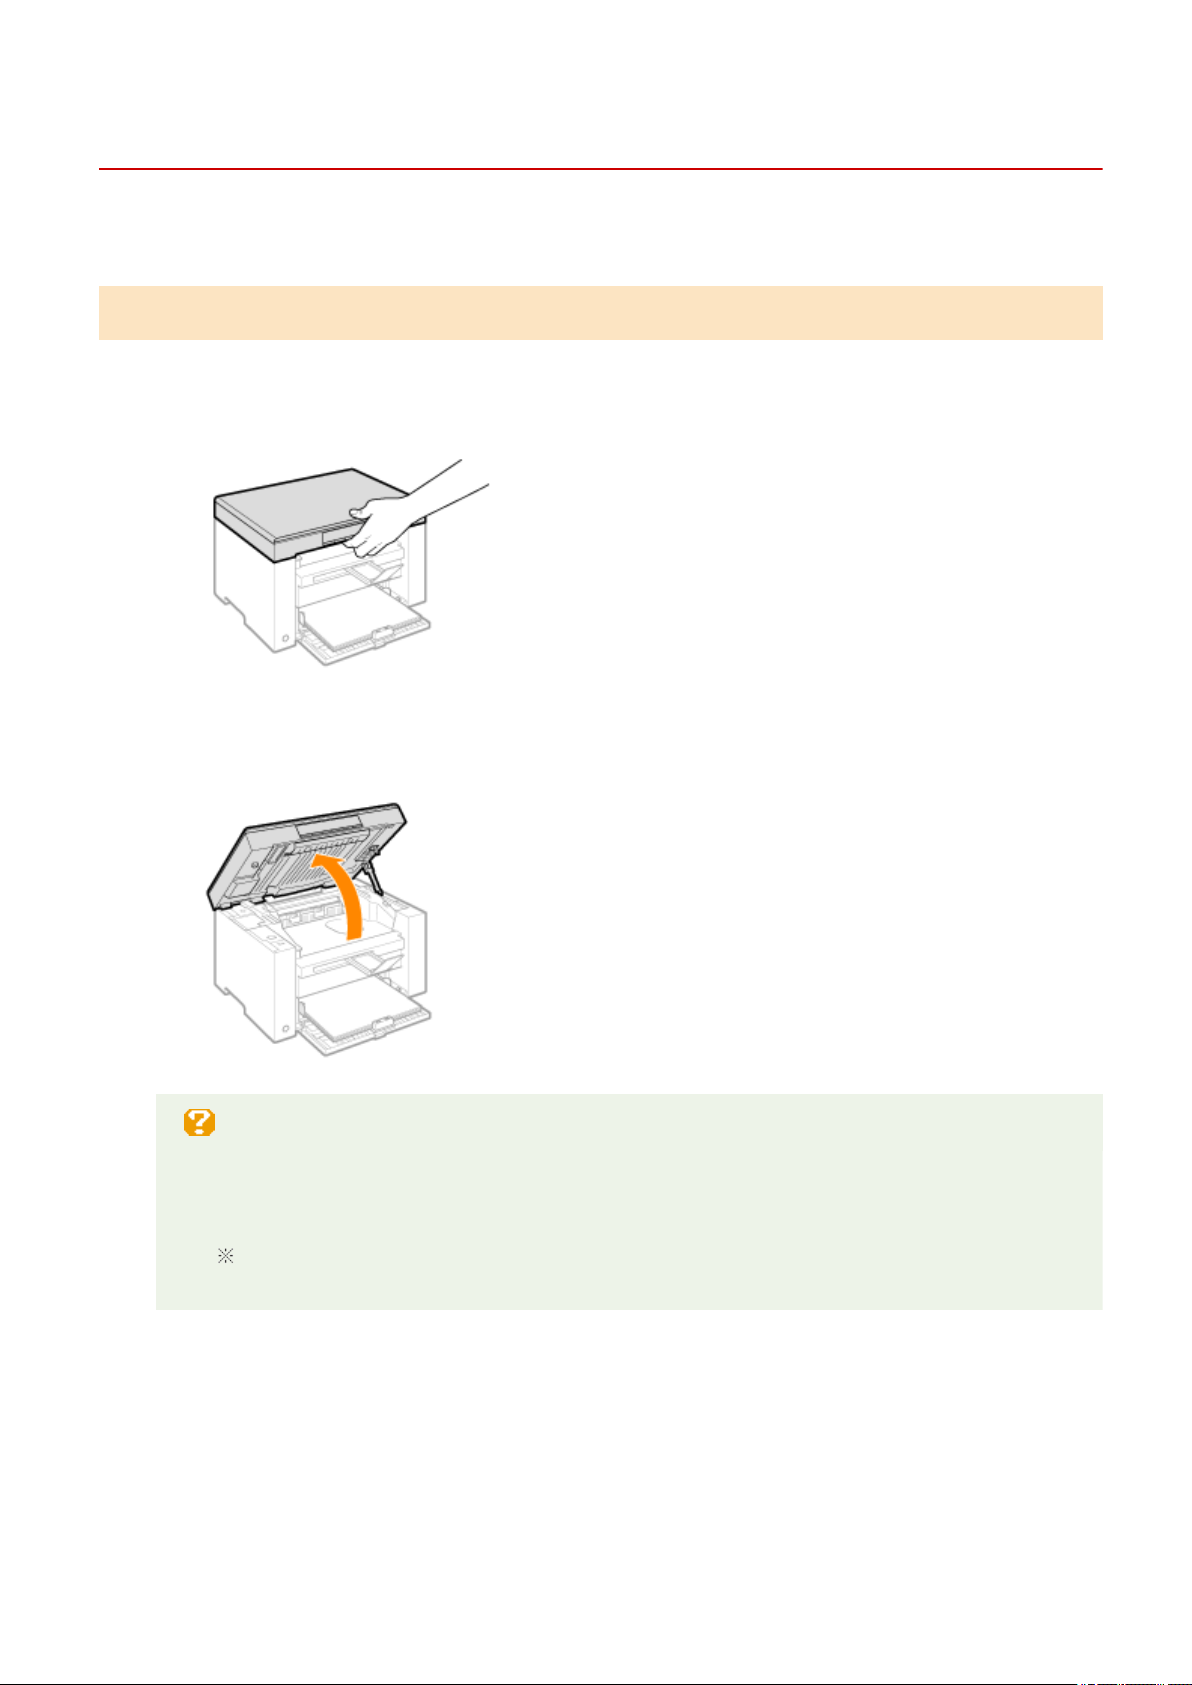
Removing Jammed Paper
85RS-03J
Follo
w onscreen instructions to remove jammed paper.
Inside the printer
1
Hold the operation panel.
2
Lift the scanning platform.
When you cannot lift the scanning platform
Make sure that the platen glass is completely closed.
Do not try to for
cefully lift the scanning platform, as this may damage the machine.
The platen glass may not be completely closed when a thick document such as books is placed
inside. In such case, r
emove it from the platen glass.
3
Hold the grip on the left front side of the toner cover.
Troubleshooting
155
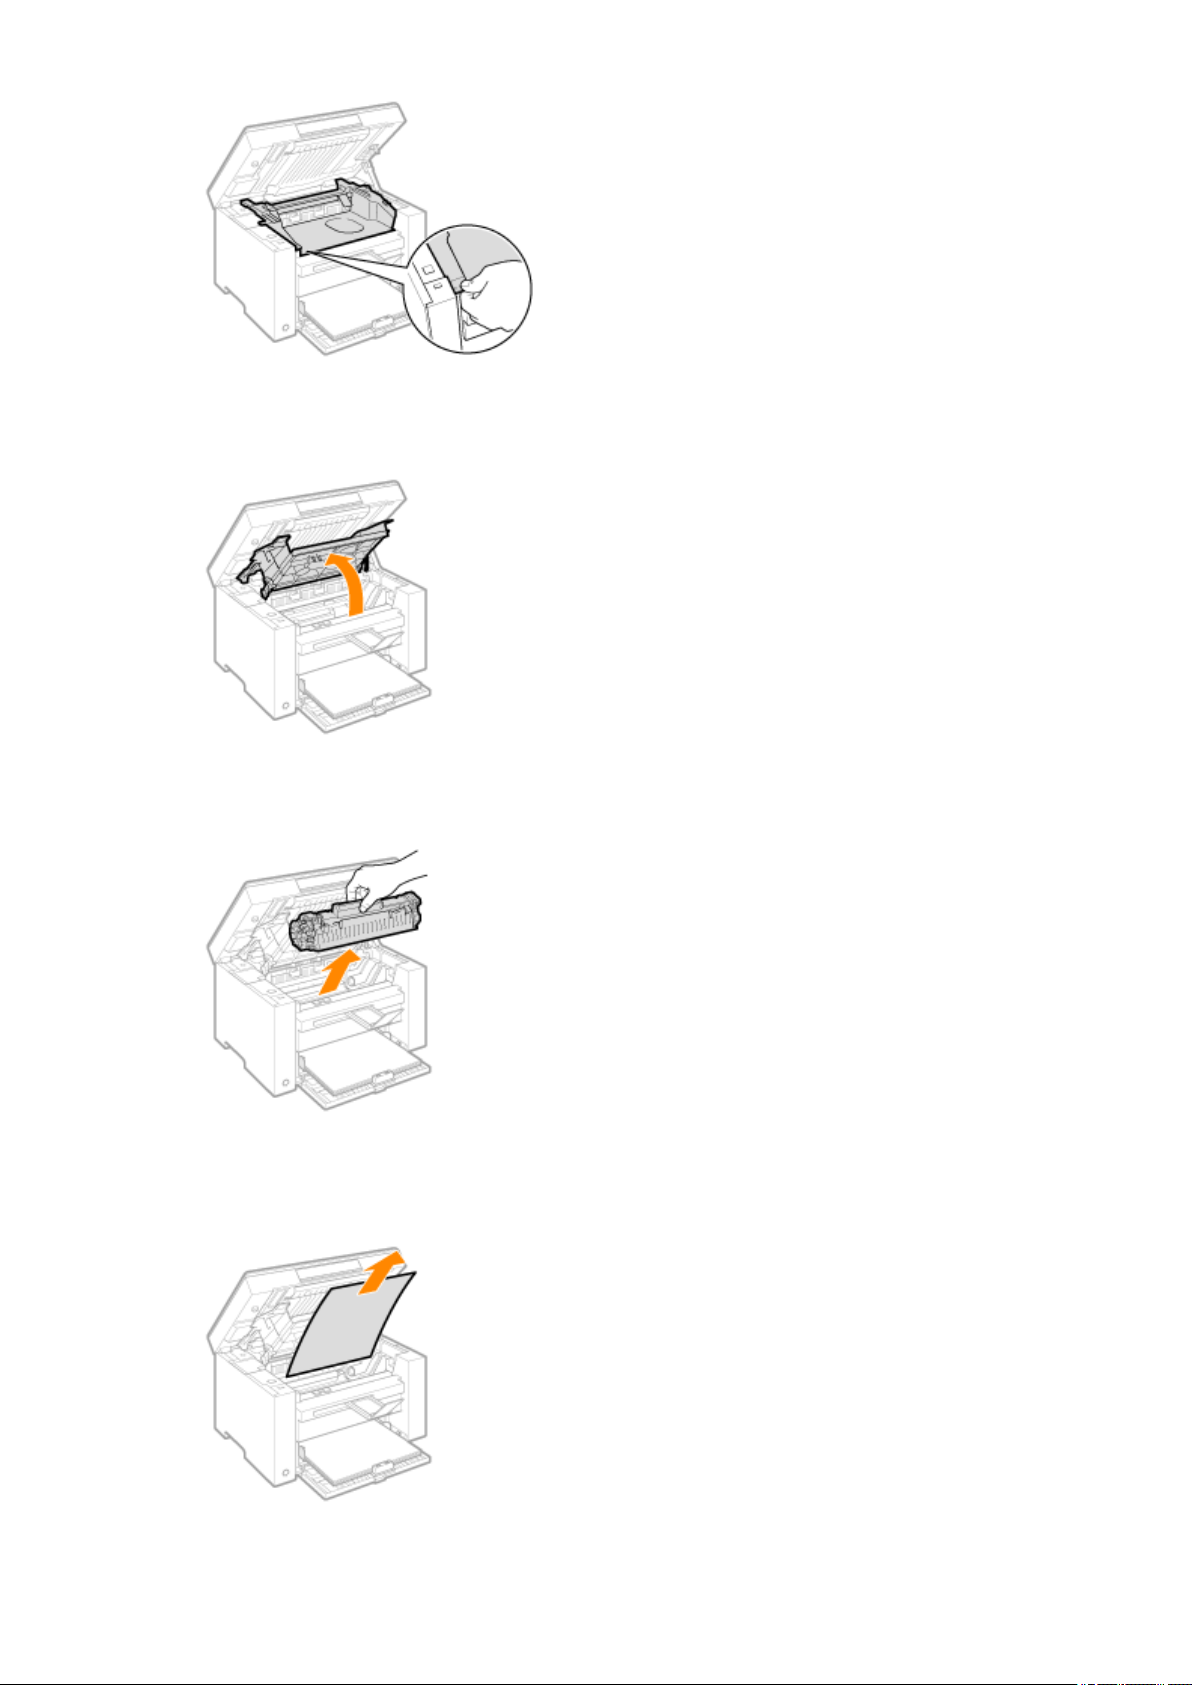
4
Open the toner cover.
5
Remove the toner cartridge.
6
Remove the jammed paper by pulling it out gently.
Troubleshooting
156
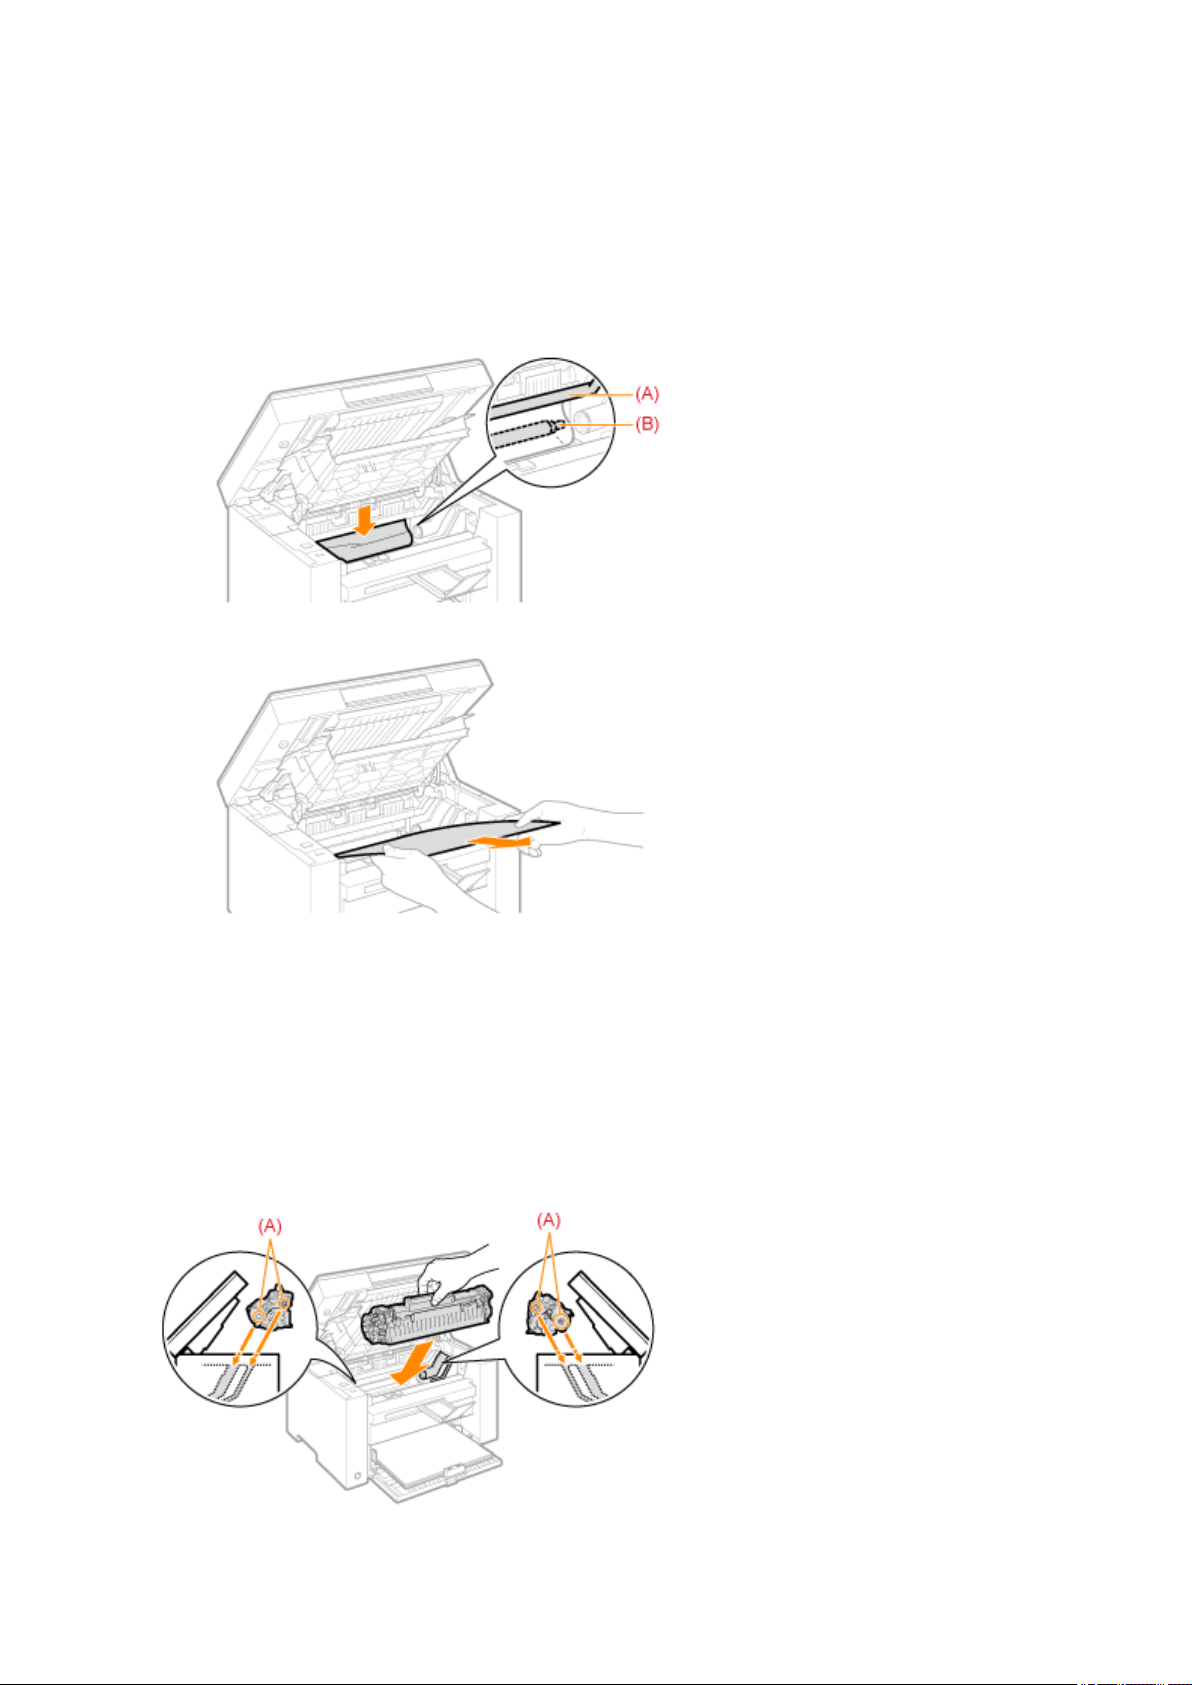
When the leading edge of the jammed paper is not visible
Do not pull out the paper for
cibly and proceed to Step 7(P. 157) .
7
Remove the jammed paper by pulling it out gently.
(1) Gently pull any jammed paper downward from the space between the xing unit (A) and r
oller (B) until
the leading edge emerges from the machine.
(2) When the leading edge emerges, hold both sides of the jammed paper and carefully pull it out.
8
Reload paper into the paper cassette.
9
Insert the toner cartridge.
Fit the protrusions (A) on both sides of the toner cartridge into the guides located on both sides of the machine
and slide the toner cartridge into the machine until the toner cartridge comes to r
est and is held against the
back of the machine.
Troubleshooting
157
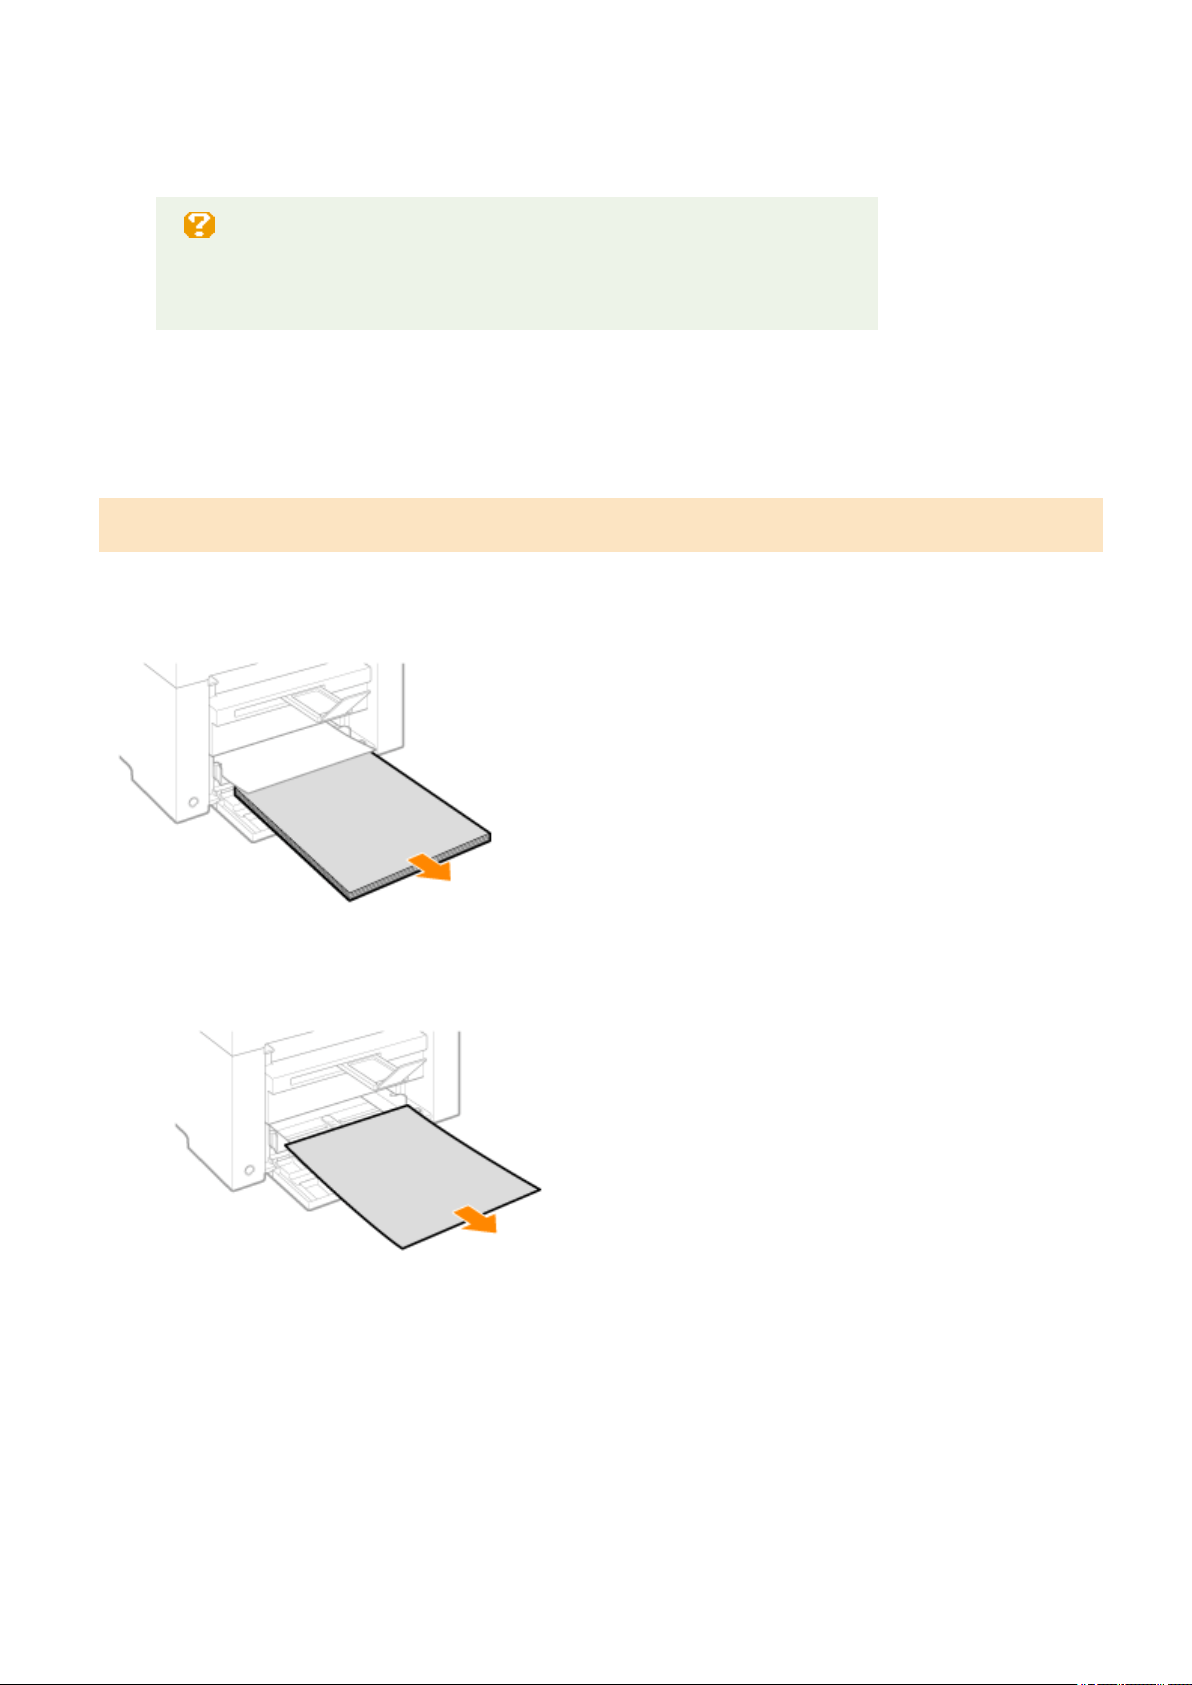
10
Close the toner cover.
When you cannot close the toner cover
Make sure that the toner cartridge is properly set inside the machine.
Do not try to for
cefully close the toner cover, as this may damage the machine.
11
Lower the scanning platform.
The machine is ready to print.
Paper cassette
1
Remove the paper loaded in the paper cassette.
2
Remove the jammed paper by pulling it out gently.
3
Load paper in the paper cassette.
Troubleshooting
158

Troubleshooting
159

Troubleshooting
85RS-03K
If a pr
oblem occurs while the machine is in use, try the actions suggested in this section before contacting
technical support.
Check the following rst.
Is the po
wer switched ON?(P. 160)
Has the po
wer switch been just turned ON?(P. 160)
Is the machine in the sleep mode?(P
. 160)
Ar
e the [Paper Jam] or [Paper] Indicators blinking?(P. 160)
Is anything other than "1" displayed?
(P. 161)
Do an "E" and a subsequent thr
ee-digit number repeatedly appear on the display?(P. 161)
Is the power switched ON?
Make sure that the power cord is securely plugged into the machine and into the wall outlet.
See the Starter Guide.
Make sure that electricity is supplied from the power cord.
Use another po
wer cord or check to see if the cord is broken using a voltmeter.
Turn OFF and ON the power switch.
See the Starter Guide.
If this works, proceed to " Has the po
wer switch been just turned ON?(P. 160) "
Has the power switch been just turned ON?
Wait a few seconds until the machine starts and warms up.
If this works, proceed to " Is the machine in the sleep mode?(P
. 160) "
Is the machine in the sleep mode?
Press any key on the operation panel to return from the sleep mode.
If this works, proceed to " Ar
e the [Paper Jam] or [Paper] Indicators blinking?(P. 160) "
Are the [Paper Jam] or [Paper] Indicators blinking?
Make sure that paper is loaded properly in the paper cassette.
" Loading Paper(P
. 46) "
Check to see if there is a jam somewhere inside the machine.
Troubleshooting
160

" Clearing Jams(P
. 153) "
If this works, proceed to " Is anything other than "1" displayed?
(P. 161) "
Is anything other than "1" displayed?
See the following section and check the display contents and the actions.
" Oper
ation Panel and Display(P. 25) "
Do an "E" and a subsequent three-digit number repeatedly appear on the
display
?
Some sort of error has occurred in the printer.
T
urn OFF the power switch, wait at least 10 seconds, and then turn it ON again. If the problem is not
solved, write down the three-digit number that is displayed, turn OFF the main power switch, disconnect
the power cord, and contact the Canon help line.
If you continue to experience problems after trying the actions suggested in this section, see the following
sections to solve the pr
oblems.
" Paper Feeding Pr
oblems(P. 162) "
" Cop
ying Problems(P. 164) "
" Printing Pr
oblems(P. 166) "
" Scanning Pr
oblems(P. 168) "
" Installation and Uninstallation Pr
oblems(P. 172) "
" Miscellaneous Pr
oblems(P. 173) "
Troubleshooting
161

Paper Feeding Problems
85RS-03L
Paper is not fed at all, or mor
e than one sheet is fed simultaneously (multi-feeds).(P. 162)
Paper jams occur r
epeatedly.(P. 162)
Paper is not fed at all, or more than one sheet is fed simultaneously (multi-
feeds).
Make sure that the paper is properly loaded.
" Loading Paper(P
. 46) "
Make sure that the number of sheets or the paper type loaded in the paper cassette meets the paper
specications.
" Supported Paper T
ypes(P. 70) "
Make sure to load the same size and type of paper into the paper cassette.
Paper jams occur repeatedly.
Make sure that the paper is properly loaded.
" Loading Paper(P
. 46) "
Make sure that the number of sheets or the paper type loaded in the paper cassette meets the paper
specications.
" Supported Paper Types(P. 70) "
Make sure that the scanning platform is fully closed.
Troubleshooting
162
Cannot Print, or the Images on Printouts are Spotted or
Distorted
85RS-03R
Is the appropriate paper type
loaded in the machine?
NO Load the type of paper that meets
the paper specications.
" Supported Paper T
ypes(P. 70) "
Change the settings for paper type.
" Setting a Paper T
ype(P. 54) "
YES
Have you removed the sealing
tape fr
om the toner cartridge?
NO Remove the sealing tape from the
toner cartridge.
" Attention (Replacing the
T
oner Cartridge)(P. 210) "
YES
Is the toner cartridge installed
pr
operly?
NO Install the toner cartridge properly.
" Replacing the T
oner
Cartridge(P. 206) "
YES
Is there sucient toner in the
toner cartridge?
NO To view the onscreen instructions,
see the follo
wing.
" Replacing T
oner
Cartridges(P. 202) "
See the MF Driver Installation
Guide in " Manuals and Their
Contents
(P. 223) ".
Troubleshooting
163

Copying Problems
85RS-03S
See the follo
wing sections.
The cop
y output is hardly readable and copied poorly.(P. 164)
The cop
y output is askew.(P. 164)
The copy output is hardly readable and copied poorly.
● The copy output is too light or has uneven density.
● Vertical white streaks appear on the copy output.
● The copy output has spots and is dirty.
● The copy output is askew.
● Toner does not x onto paper well.
See the following section.
" The Cop
y Output is Hardly Readable and Copied Poorly(P. 165) "
The copy output is askew.
Make sure that the number of sheets or the paper type loaded in the paper cassette meets the paper
specications.
" Supported Paper T
ypes(P. 70) "
Adjust the paper guides to the paper width without space. If the problem persists, load paper with the
other side face up, or in an opposite orientation.
" Loading Paper(P
. 46) "
Make sure that the output tray is not full.
Troubleshooting
164
The Copy Output is Hardly Readable and Copied Poorly
85RS-03U
Is the output tray slot blocked?
YES Remove all the obstructions.
NO
Is the document or paper
loaded pr
operly?
NO ● Load the document pr
operly.
" Placing Documents
(P. 43) "
● Load the paper properly.
" Loading Paper(P
. 46) "
YES
Is the appropriate paper
loaded into the machine?
NO Load the type of paper that meets
the paper specications.
" Supported Paper T
ypes(P. 70) "
YES
Have you removed the sealing
tape fr
om the toner cartridge?
NO Remove the sealing tape from the
toner cartridge.
" Attention (Replacing the
T
oner Cartridge)(P. 210) "
YES
Is the toner cartridge installed
pr
operly?
NO Install the toner cartridge properly.
" Replacing the T
oner
Cartridge(P. 206) "
YES
Is there sucient toner in the
toner cartridge?
NO To view the onscreen instructions,
see the follo
wing.
" Replacing T
oner
Cartridges(P. 202) "
YES
Have you cleaned the scanning
components or xing unit?
NO Clean the scanning components or
xing unit.
" Cleaning the Machine
(P. 193) "
YES
Are you copying on the correct?
YES Make sure to select the appropriate
side of paper to cop
y your
document on, as the side to be
placed face up in the paper source
varies depending on the paper type
that you are using. If the copy result
is not satisfactory, try to copy your
document on the other side.
Troubleshooting
165

Printing Problems
85RS-03W
See the follo
wing sections.
The printout is har
dly readable and printed poorly.(P. 166)
The printout is printed ask
ew.(P. 166)
Cannot print documents fr
om a computer.(P. 166)
The printout is hardly readable and printed poorly.
● The printout is too light or has uneven density.
● Vertical white streaks appear on the printout.
● The printout has spots and is dirty.
● The printout is askew.
● The toner does not ow well into the paper.
See the following section:
" The Cop
y Output is Hardly Readable and Copied Poorly(P. 165) "
The printout is printed askew.
Make sure that the number of sheets or the paper type loaded in the paper cassette meets the paper
specications.
Supported Paper T
ypes(P. 70)
Adjust the paper guides to the paper width without space. If the problem persists, load paper with the
other side face up, or in an opposite orientation.
Loading Paper
(P. 46)
Make sure that the output tray is not full.
Cannot print documents from a computer.
See the following section:
" Cannot Print Documents fr
om a Computer(P. 167) "
Troubleshooting
166
Cannot Print Documents from a Computer
85RS-03X
Are there any jobs remaining in
the print queue?
YES When a print job remains in the
print queue without being
pr
ocessed due to an unexpected
interruption, the machine may not
respond. Delete the job and try to
print it again. To delete print jobs
from your computer, follow the
steps in the procedure below:
(1) Open the printer folder.
" Basic Windo
ws
Operations(P. 224) "
(2) Double-click the machine icon.
(3) The list of print jobs is displayed.
● To delete all the print jobs
Click [Printer] -> [Cancel All
Documents].
● To delete a specic print job
Right-click the print job and click
[Cancel].
If this does not work, delete the
print job(s)manually from the
machine.
NO
Are the printer driver
settings(paper size and output
size) corr
ect?
NO Congure the printer driver
settings.
" Conguring the Default Print
Settings(P
. 101) "
YES
Is the USB cable properly
connected?
NO Reconnect the USB cable and check
the connection status. If necessary
,
try a different USB cable.
YES
Does the USB port of your
computer pr
operly work?
NO Restart your computer and the
machine and connect the machine
to a differ
ent USB port on your
computer.
YES
Is the printer driver properly
installed on your computer?
NO Uninstall the printer driver and
install it again.
" Uninstalling the
Softwar
e(P. 185) "
See the MF Driver Installation
Guide in " Manuals and Their
Contents
(P. 223) ".
Troubleshooting
167

Scanning Problems
85RS-03Y
See the follo
wing sections.
Cannot scan a document.
(P. 168)
Cannot scan multiple documents to cr
eate a combined multi-page PDF le.(P. 168)
During scanning, a computer connected to the machine fr
eezes or is disconnected.(P. 168)
In the e
vent that applications installed from the User Software CD-ROM that comes with the machine
are not properly registered in the MF Toolbox.(P. 169)
A differ
ent application opens when you want to scan a document.(P. 169)
Scanned images ar
e spotted or distorted.(P. 169)
A scanned image is displayed lar
ger (or smaller) than its actual size on the computer screen.(P. 169)
Cannot scan highlighting marks.
(P. 169)
Cannot scan a document.
Refer to the following section:
" Cannot Scan a Document
(P. 170) "
Cannot scan multiple documents to create a combined multi-page PDF le.
Start ScanGear MF, access the Preferences dialog box, and clear the check box next to [Automatically Quit
ScanGear after Scanning] befor
e you perform a scan. When this check box is selected, you can only
perform a scan from the platen glass.
During scanning, a computer connected to the machine freezes or is
disconnected.
Quit all running applications to increase the memory usage.
Make sure that the machine has sucient fr
ee hard disk space when scanning documents at a high
resolution. To scan an A4-sized document at a resolution of 600 dpi in full color, for example, a minimum
of 300 MB of free space is required.
If an error occurs while scanning a specic image for Photoshop, access the [Edit] menu, select
[Pr
eferences], and click [Memory & Image Cache]. Set [Memory Usage] somewhere between 50 and 60
%.
The scanner driver may not be installed properly. Uninstall the software and install it again.
" Uninstalling the Softwar
e(P. 185) "
See the MF Driver Installation Guide in " Manuals and Their Contents
(P. 223) ".
Troubleshooting
168

In the event that applications installed from the User Software CD-ROM that
comes with the machine are not properly registered in the MF Toolbox.
Applications are automatically registered to the MF Toolbox once they have been installed. They are not,
ho
wever, if installed while the MF Toolbox is open. To access these applications from the toolbox, you
need to manually register them to the toolbox.
" Using the MF T
oolbox(P. 124) "
A different application opens when you want to scan a document.
Register the appropriate application in the MF Toolbox.
" Using the MF T
oolbox(P. 124) "
Scanned images are spotted or distorted.
Clean the platen glass and feeder's scanning area.
Scanned images cannot be displayed correctly if displayed smaller than the actual size, depending on the
application. Scale the images to 100 %.
Set the display colors to "High Color (16-bit or 24-bit)" or higher in [Display Properties].
A scanned image is displayed larger (or smaller) than its actual size on the
computer screen.
Try one of the following to set the appropriate resolution.
● Enlar
ge or reduce the image size in the application that you are using. In an application such as MS
Paint or Imaging, an image may be displayed larger than its actual size and cannot be scaled down.
● To solve this problem, scan the image again at a different resolution. If scanned at a higher resolution,
the image is displayed larger than its actual size, and vice versa.
" Setting Resolution
(P. 150) "
Cannot scan highlighting marks.
Start the ScanGear MF, access [Advanced Mode], and set [Color Correction] to [Color Matching].
" Using Advanced Mode
(P. 136) "
Troubleshooting
169
Cannot Scan a Document
85RS-040
Is your computer working
pr
operly?
NO Restart your computer.
YES
Has the MF Toolbox been
installed?
NO Install it.
See the MF Driver Installation
Guide in " Manuals and Their
Contents
(P. 223) ".
YES
Is your USB hub or repeater
working pr
operly?
NO Connect the USB cable directly to a
computer and scan your document
to see if it works pr
operly. If the
scan completes successfully, make
sure that your USB hub or repeater
works properly.
YES
Are you using a USB 2.0-
compatible USB hub?
YES Follow the steps in the procedure
belo
w:
● Connect a USB cable directly to
the computer.
● If your computer has two or
more USB ports, connect the
machine to another USB port.
NO
After installing the software
that comes with this machine,
did you install a TW
AIN-
compatible application?
YES There is a possibility that TWAIN
may have been r
eplaced by a wrong
one. If this happens, you are unable
to perform a scan. To solve the
problem, uninstall the software and
install it again.
" Uninstalling the
Softwar
e(P. 185) "
See the MF Driver Installation
Guide in " Manuals and Their
Contents
(P. 223) ".
NO
Is the machine recognized in
[Scanners and Camer
as] in
Windows?
NO Make sure the machine is
r
ecognized.
(1) Open the [Scanners and
Cameras] folder or [Scanners and
Cameras Properties] folder.
" Basic Windo
ws
Operations(P. 224) "
Troubleshooting
170


Installation and Uninstallation Problems
85RS-041
See the follo
wing sections.
Cannot install the softwar
e.(P. 172)
The [Canon] folder r
emains in the Start menu after the software has been uninstalled.(P. 172)
Cannot use the softwar
e after upgrading the operating system.(P. 172)
Cannot install the software.
Follow the onscreen instructions to install the software. If an error occurs during the installation,
uninstall the softwar
e, restart your computer, and install it again.
" Uninstalling the Softwar
e(P. 185) "
See the MF Driver Installation Guide in " Manuals and Their Contents
(P. 223) ".
Quit all running applications and install the software again.
The [Canon] folder remains in the Start menu after the software has been
uninstalled.
Uninstall the MF Toolbox rst befor
e uninstalling the MF drivers. If you uninstall the MF drivers rst, the
[Canon] folder may remain after the MF Toolbox has been uninstalled.
Follow the steps in the procedure below to remove the folder:
● For Windows 7
Delete the [Canon] folder in [All Programs] under the [Start] menu.
Cannot use the software after upgrading the operating system.
Uninstall the software for this machine before upgrading the operating system on your computer. Once
the upgr
ade has been complete, reinstall the software.
" Uninstalling the Softwar
e(P. 185) "
See the MF Driver Installation Guide in " Manuals and Their Contents
(P. 223) ".
Troubleshooting
172

Miscellaneous Problems
85RS-042
See the follo
wing sections.
Steam is emitted fr
om the machine's output area.(P. 173)
W
ater droplets form on the back side of the operation panel and in the output area.(P. 173)
The settings that you specied ar
e not enabled or saved.(P. 173)
Steam is emitted from the machine's output area.
Use only in the machine. Moisture evaporates from damp paper due to the heat generated inside the
xing unit (it is most lik
ely to occur at low room temperatures). This is not a malfunction, but you can
prevent this by using a stack of new unopened paper.
Should you smell something burning, immediately turn OFF the machine, unplug the power plug from
the AC power outlet, and contact your local authorized Canon dealer or the Canon help line. Continued
use may lead to a re or electrical shock.
Water droplets form on the back side of the operation panel and in the
output ar
ea.
Use only in the machine. Moisture evaporates from damp paper due to the heat generated inside the
xing unit (it is most lik
ely to occur at low room temperatures). This is not a malfunction, but you can
prevent this by using a stack of new unopened paper.
Should you smell something burning, immediately turn off the machine, unplug the power plug from the
AC power outlet, and contact your local authorized Canon dealer or the Canon help line. Continued use
may lead to a re or electrical shock.
The settings that you specied ar
e not enabled or saved.
If the machine is turned OFF immediately after changes have been made to the settings from the
oper
ation panel, the changes may not be saved on the machine.
Wait for approximately ve seconds after changes have been made to the settings and turn OFF the
machine.
Troubleshooting
173

Printing Results are Not Good
85RS-043
Paper curls or creases.
" Paper Curls(P
. 175) "
" Paper Cr
eases(P. 176) "
Unevenness or smudge marks appears.
" Printing is Une
ven(P. 177) "
" White Specks or Spots Appear on the
Printout
(P. 178) "
" The T
oner does Not Flow Well into the
Paper(P. 179) "
" V
ertical Streaks Appear on the Output(P. 180) "
" T
oner Smudges and Spatters Appear around
Text and Images(P. 181) "
" The Printout is T
oo Dark(P. 182) "
Others
" Printed Bar Codes Cannot be Scanned(P
. 183) "
" Images may be partially cut off on the
output
(P. 184) "
NOTE
To contact your local authorized Canon dealer
When a pr
oblem occurs that is not suggested in the User's Guide, or a problem persists if you follow the
instructions, or you cannot determine the nature of the problem, contact your local authorized Canon
dealer.
Troubleshooting
174
Paper Curls
85RS-044
Try one of the following to solve the problem.
<Cause 1> Damp paper is used.
Solution 1 Replace the paper stack with new unopened one.
" Supported Paper T
ypes(P. 70) "
Solution 2 Follow the steps in the procedure below when plain paper (60 to 90 g/m² (16 to 24 lb Bond)) is loaded.
1. Access the [Page Setup] tab.
2. Set [Paper Type] to [Plain Paper L].
Solution 3 Change the <Special Mode d> setting from the operation panel.
" Special Mode
(P. 213) "
<Cause 2> The paper type loaded is not appropriate.
Solution Make sure that the number of sheets or the paper type loaded in the paper cassette meets the paper
specications.
" Supported Paper T
ypes(P. 70) "
Troubleshooting
175
Paper Creases
85RS-045
Try one of the following to solve the problem.
<Cause 1> The paper stack is not loaded corr
ectly.
Solution Load the paper stack is not loaded correctly.
" Loading Paper(P
. 46) "
<Cause 2> Damp paper is used.
Solution Replace the paper stack with new unopened one.
" Supported Paper T
ypes(P. 70) "
<Cause 3> The paper type loaded is not appropriate.
Solution Make sure that the number of sheets or the paper type loaded in the paper cassette meets the paper
specications.
" Supported Paper T
ypes(P. 70) "
<Cause 4> There is a foreign object inside the machine.
Solution Remove the foreign object from the machine.
<Cause 5> Paper creases due to the paper type used or usage conditions of the
machine.
Solution Change the <Special Mode d> setting from the operation panel.
" Special Mode
(P. 213) "
Troubleshooting
176
Printing is Uneven
85RS-046
Try one of the following to solve the problem.
<Cause 1> Paper is too moist or T
oo dry.
Solution Replace the paper stack with new unopened one.
" Supported Paper T
ypes(P. 70) "
<Cause 2> Toner is nearly empty.
Solution To view the onscreen instructions, see the following.
" Replacing the T
oner Cartridge(P. 206) "
<Cause 3> The drum in the toner cartridge is deteriorated.
Solution Replace the toner cartridge with new one.
" Replacing the T
oner Cartridge(P. 206) "
Troubleshooting
177
White Specks or Spots Appear on the Printout
85RS-047
Try one of the following to solve the problem.
<Cause 1> The paper type loaded is not appr
opriate.
Solution Make sure that the number of sheets or the paper type loaded in the paper cassette meets the paper
specications.
" Supported Paper T
ypes(P. 70) "
<Cause 2> Damp paper is used.
Solution Replace the paper stack with new unopened one.
" Supported Paper T
ypes(P. 70) "
<Cause 3> The drum in the toner cartridge is deteriorated.
Solution Replace the toner cartridge with new one.
" Replacing the T
oner Cartridge(P. 206) "
<Cause 4> White specks or spots appear around text and images when a high-
contr
ast document is printed.
Solution Change the [Special Print Mode] setting to [Special Settings 2] in the printer driver.
" Special Mode(P. 213) "
The density becomes lower with [Special Settings 2] than with [Off] or [Special Settings 1].
Additionally, text and lines may be reproduced less clearly.
Troubleshooting
178
The Toner does Not Flow Well into the Paper
85RS-048
Try one of the following to solve the problem.
<Cause 1> The paper type setting specied is not appr
opriate.
Solution Select the appropriate paper type setting.
" Setting a Paper T
ype(P. 54) "
<Cause 2> The paper type loaded is not appropriate.
Solution Make sure that the number of sheets or the paper type loaded in the paper cassette meets the paper
specications.
" Supported Paper T
ypes(P. 70) "
Troubleshooting
179
Vertical Streaks Appear on the Output
85RS-049
Try one of the following to solve the problem.
<Cause 1> Due to the paper type or usage conditions, vertical str
eaks appear on the
output.
Solution 1 Replace the paper stack with new unopened one.
" Supported Paper T
ypes(P. 70) "
Solution 2
To copy or print
Change the <Special Mode b> setting fr
om the operation panel.
" Special Mode
(P. 213) "
To print from a computer
Change the [Special Print Adjustment] setting in the print driver.
" Special Mode
(P. 213) "
<Cause 2> The toner cartridge was replaced recently, or the machine has not printed
anything for an e
xtended period of time.
Solution Change the <Special Mode c> setting from the operation panel.
" Special Mode
(P. 213) "
Troubleshooting
180
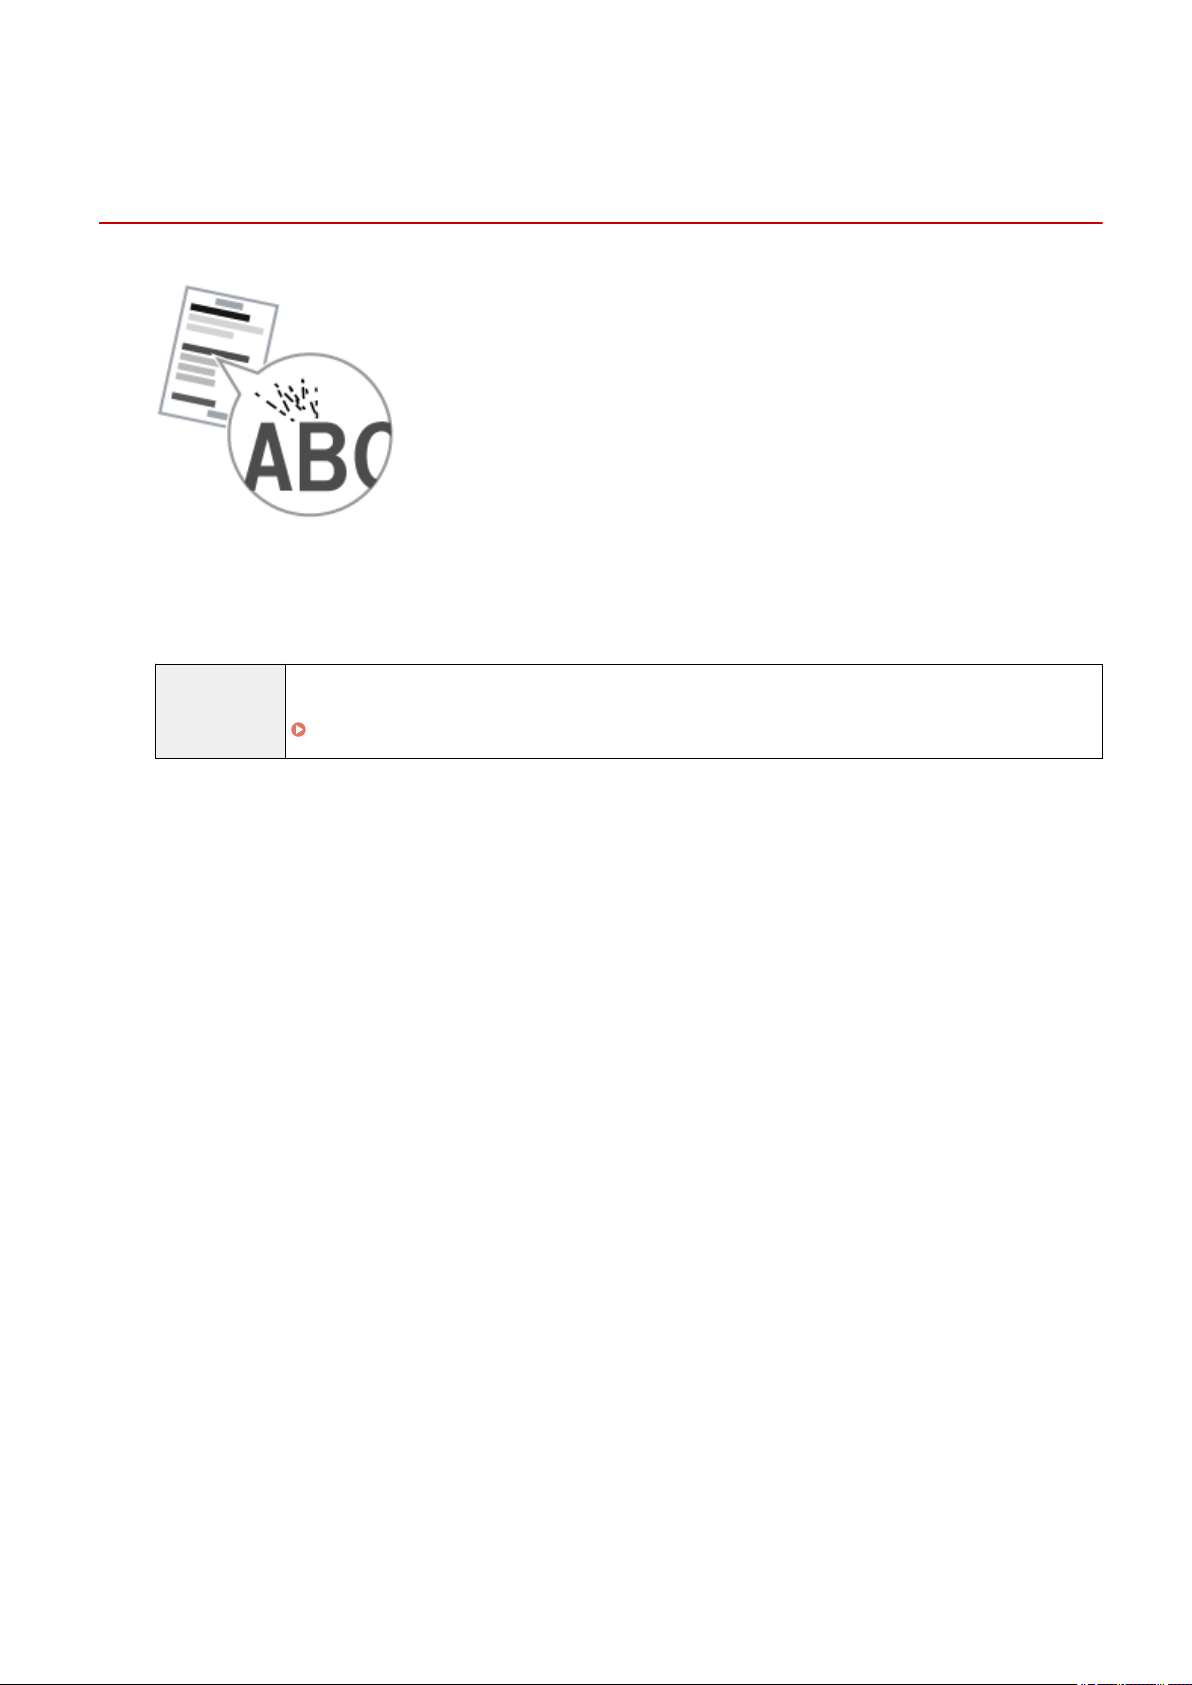
Toner Smudges and Spatters Appear around Text and
Images
85RS-04A
Try one of the following to solve the problem.
<Cause 1> The paper type loaded is not appr
opriate.
Solution Make sure that the number of sheets or the paper type loaded in the paper cassette meets the paper
specications.
" Supported Paper T
ypes(P. 70) "
Troubleshooting
181
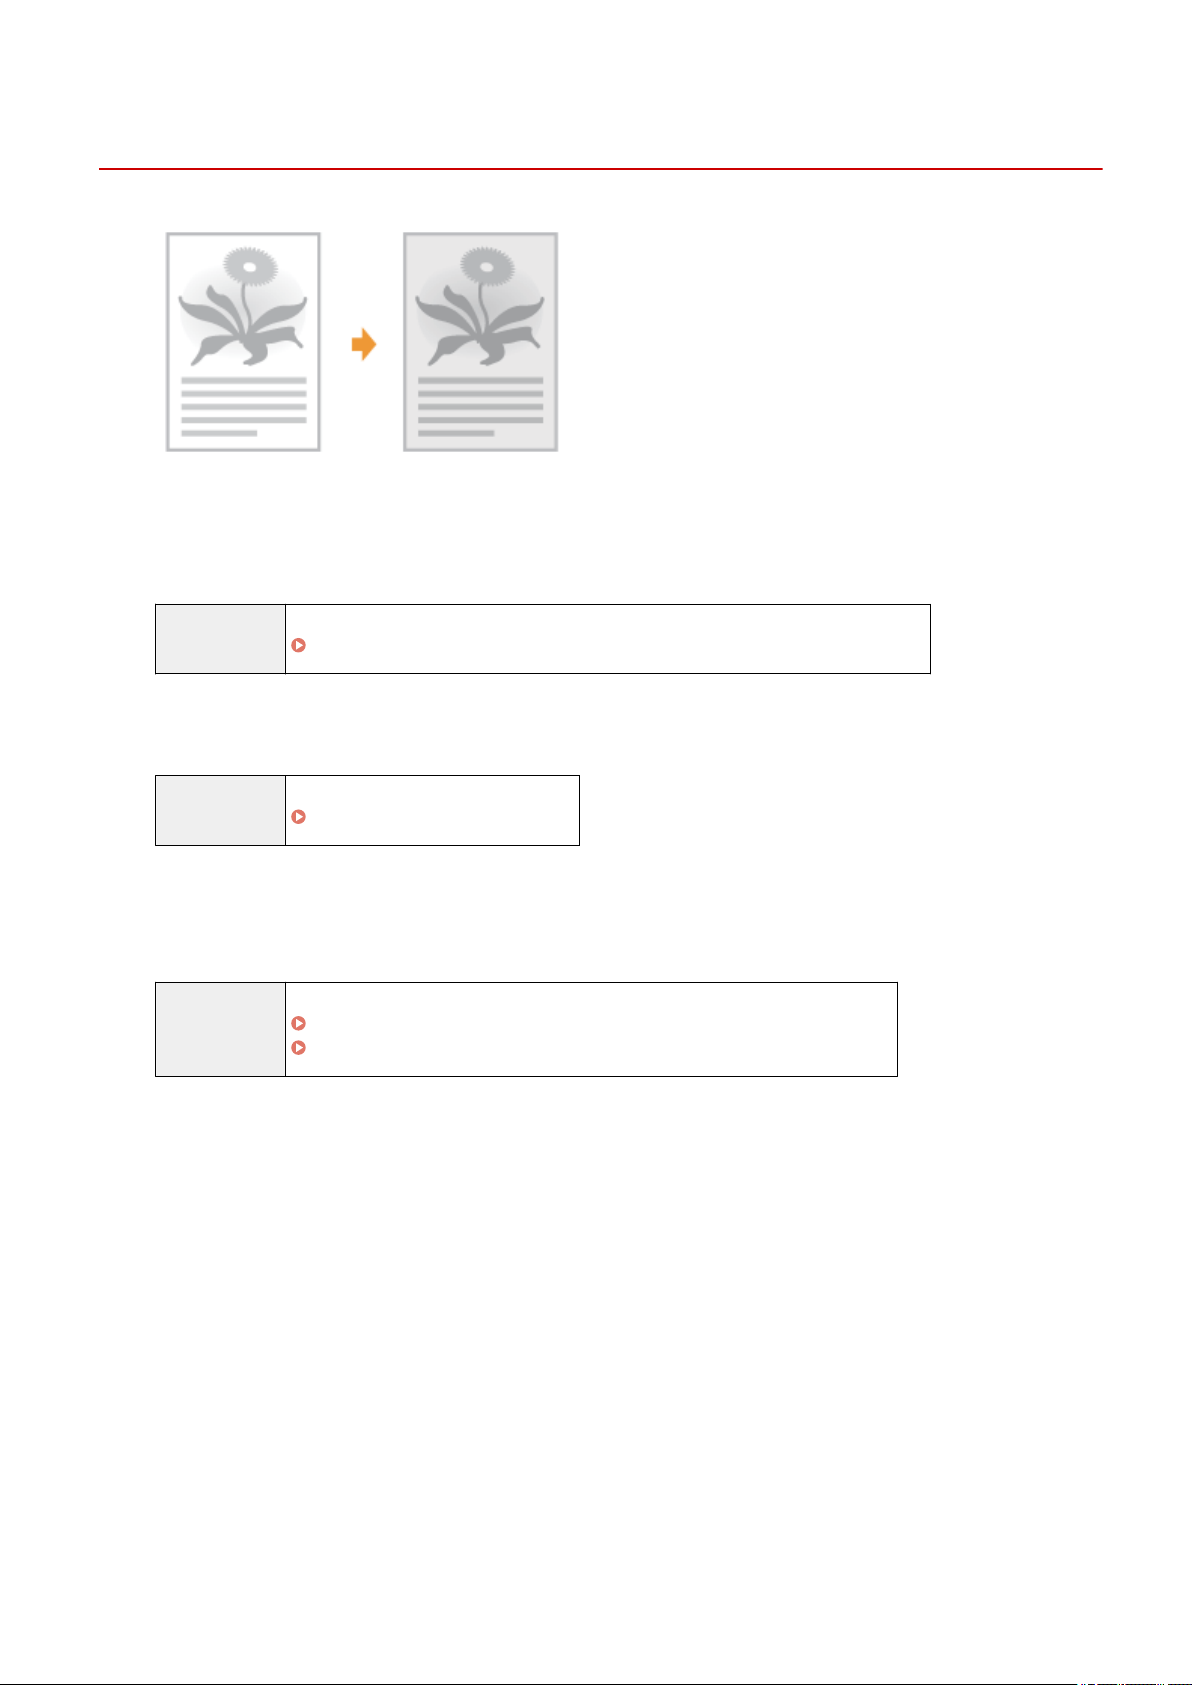
The Printout is Too Dark
85RS-04C
Try one of the following to solve the problem.
<Cause 1> The cop
y density setting specied is not appropriate.
Solution Adjust the <Density> or <Correct Density> to a lower level from the operation panel.
" Adjusting the Density
(P. 79) "
<Cause 2> The machine is exposed to direct sunlight or strong light
Solution Relocate the machine.
" Relocating the Machine
(P. 216) "
<Cause 3> The size of the paper loaded in the paper cassette does not match the
documents.
Solution Perform cleaning the xing unit in <Special Mode C> using the oper
ation panel.
" Special Mode
(P. 213) "
" Cleaning the Fixing Unit
(P. 198) "
Troubleshooting
182
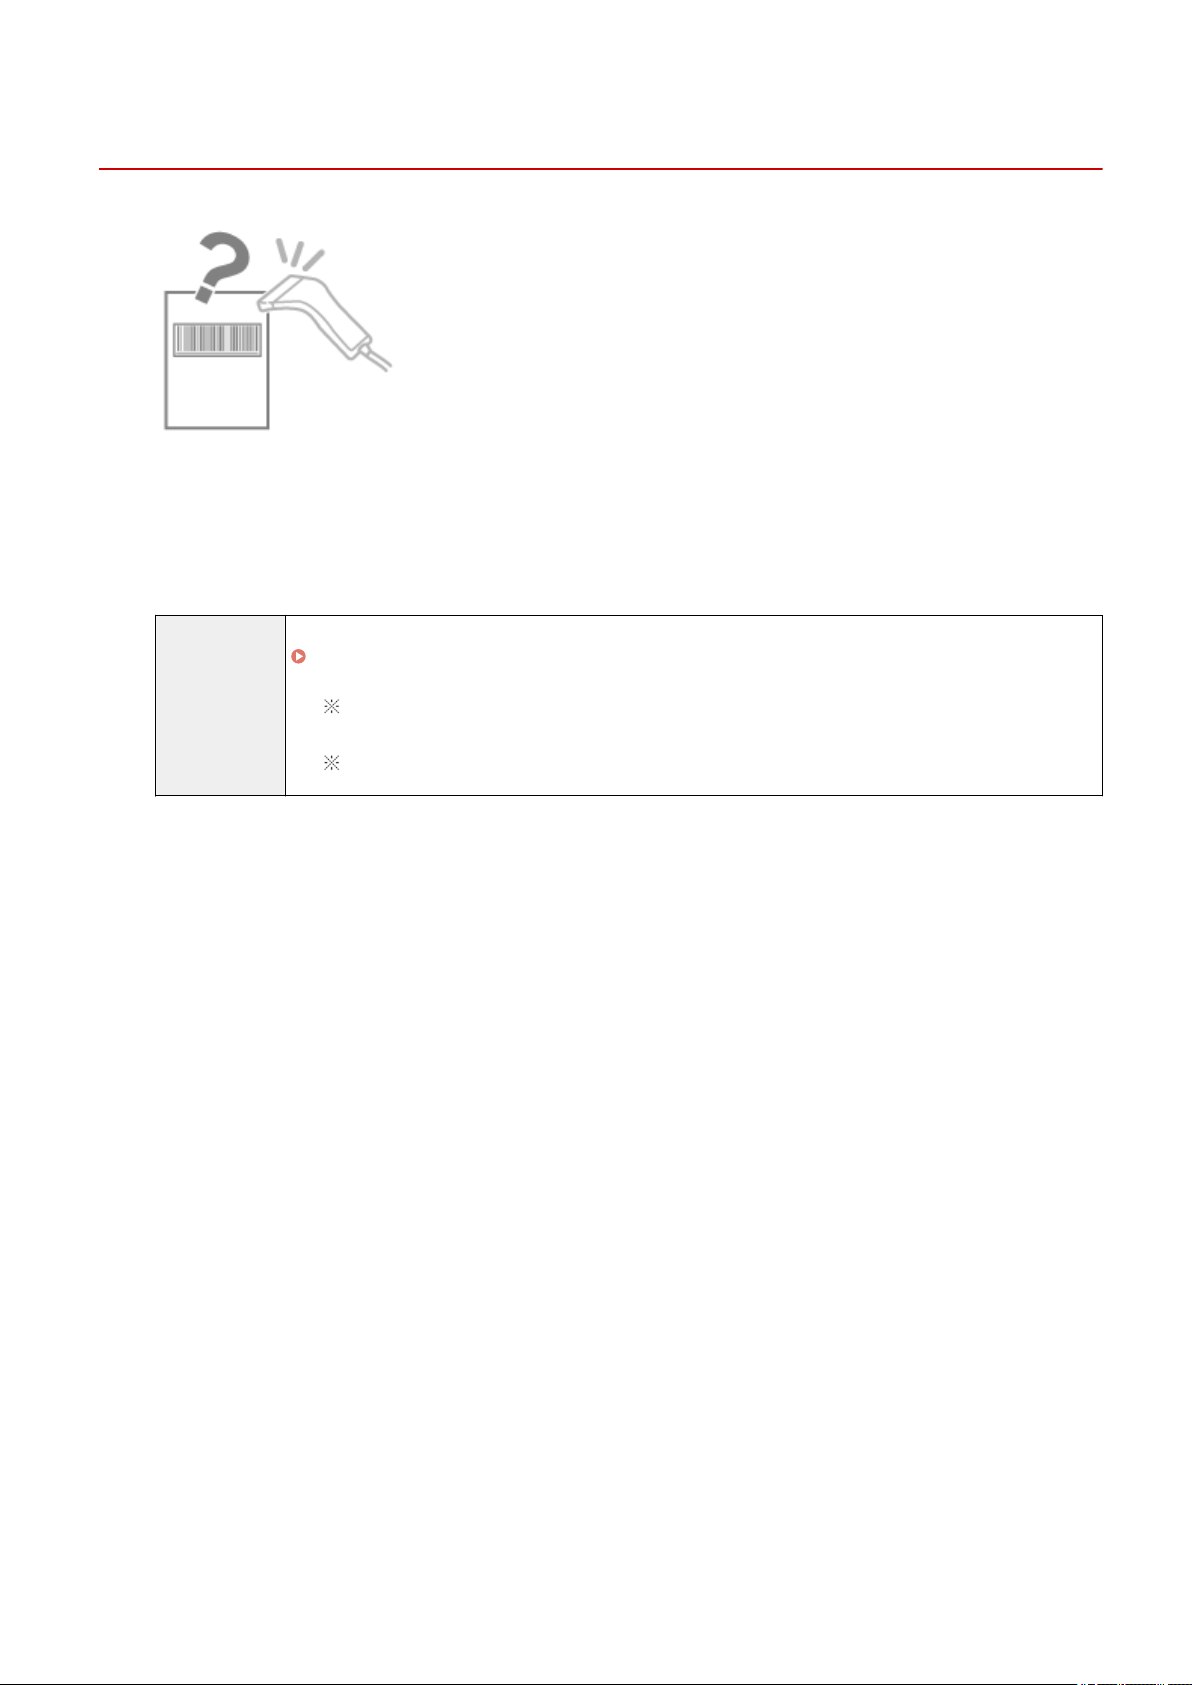
Printed Bar Codes Cannot be Scanned
85RS-04E
Try one of the following to solve the problem.
<Cause> A bar code cannot be scanned corr
ectly when printing it using the default
print settings.
Solution Change the [Special Print Mode] setting to [Special Settings 1] in the print driver.
" Special Mode
(P. 213) "
The density becomes lower with [Special Settings 1] than with [Off]. Additionally, text and lines
may be r
eproduced less clearly.
If [Special Settings 1] is specied, the print speed slo
ws down slower than default settings.
Troubleshooting
183
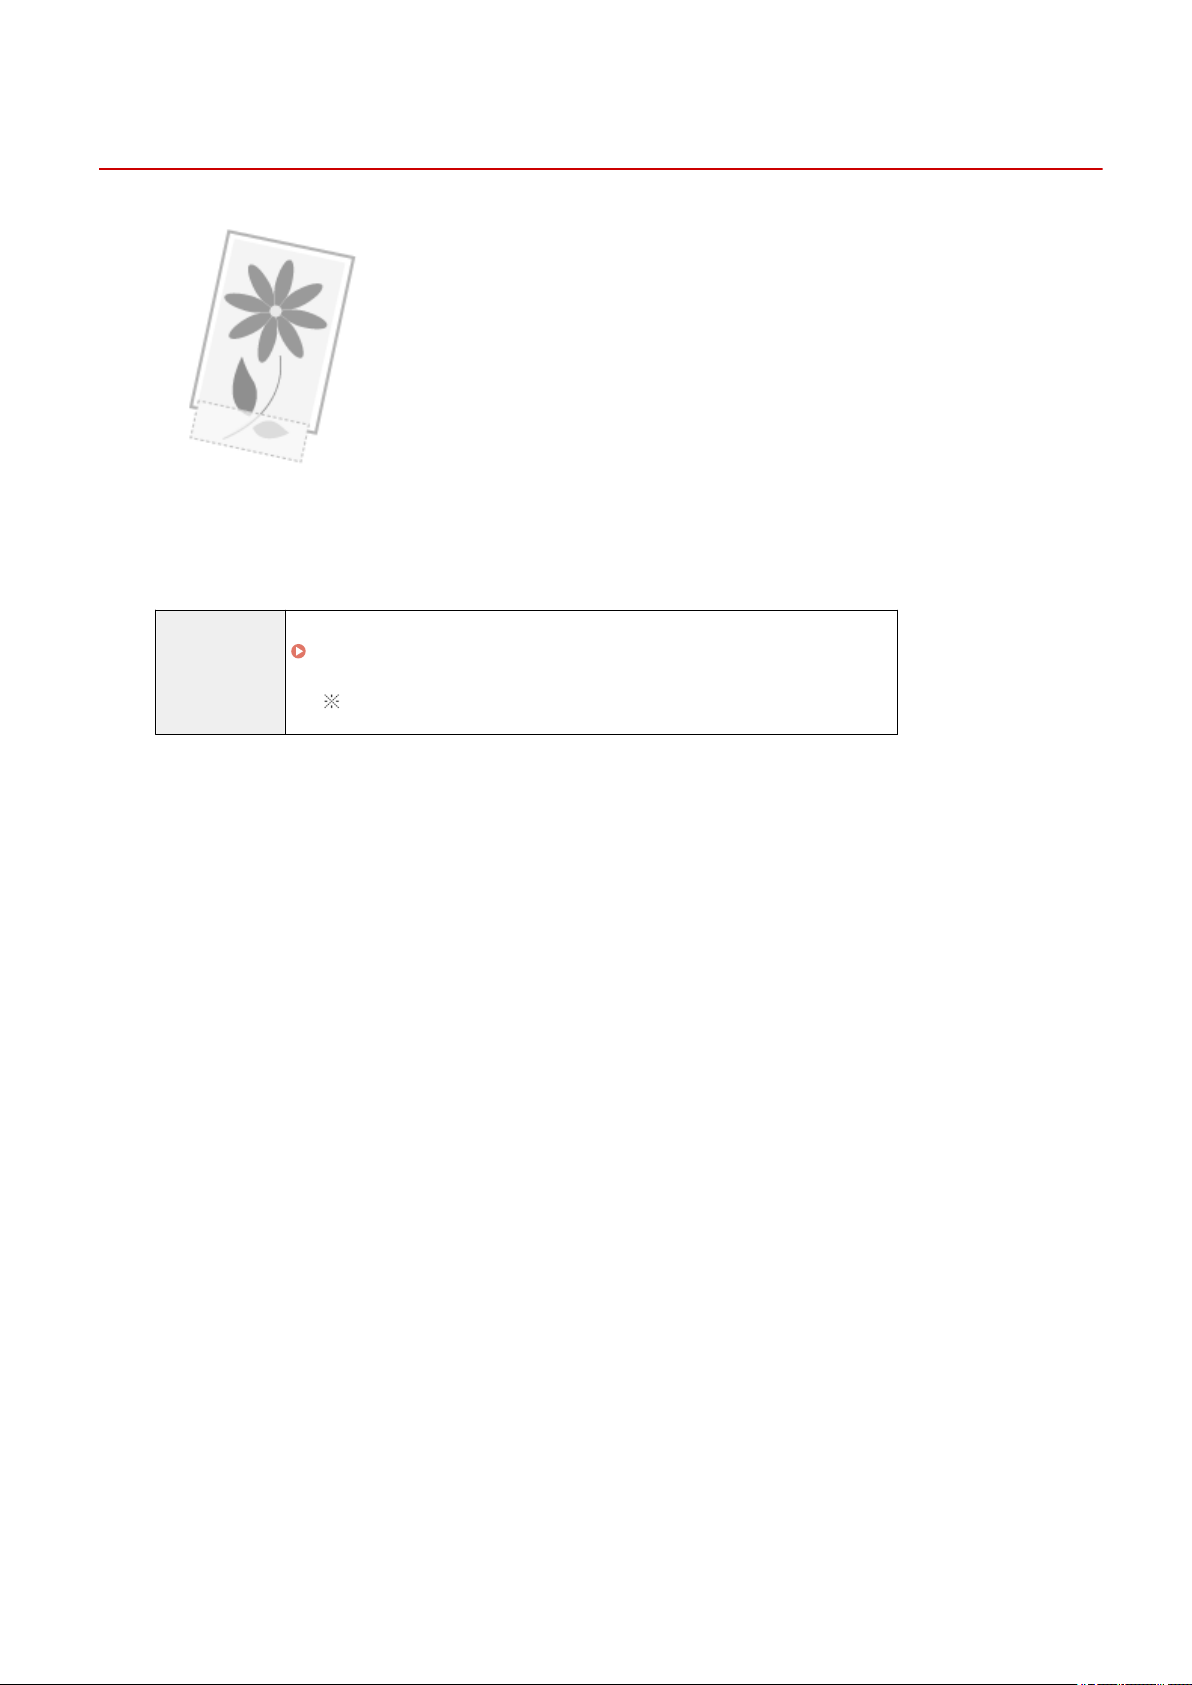
Images may be partially cut off on the output
85RS-04F
Try one of the following to solve the problem.
<Cause> The print speed is prioritized, and [Output Adjustment Mode] is set to [Off].
Solution Change the settings for [Output Adjustment Mode] to [On] in the printer driver.
" Vie
wing the Online Help(P. 103) "
Changing to [On] slows down the print speed.
Troubleshooting
184

Uninstalling the Software
85RS-04H
Follo
w the steps in the procedure below to uninstall the printer driver, scanner driver, MF Toolbox , or Product
Extended Survey Program if you do not need them installed on your computer.
IMPORTANT
Be aware of the following before uninstalling the software.
● Log on to your computer with administr
ator privileges.
● Have the installation software ready in case you want to re-install the drivers).
● Quit all running applications on your computer.
To uninstall the printer/scanner driver
1
Open [Programs and Features].
For Windows 7
1. From the [Start] menu, select [Control Panel].
2. Click [Uninstall a Program] or double-click [Programs and Features].
For Windows 8
Right-click the lo
wer-left corner of the screen and select [Programs and Features].
For Windows 10
1. From the [Start] menu, select [Windows System], and click [Control Panel].
2. Click [Programs] and click [Programs and Features].
2
Select [Canon MF3010], and then click [Uninstall/Change].
3
Click [Delete].
4
Click [Yes] to conrm the uninstallation.
Troubleshooting
185

5
Click [Exit] (or [Restart]).
To uninstall the MF Toolbox
1
Open [Programs and Features].
For Windows 7
1. From the [Start] menu, select [Control Panel].
2. Click [Uninstall a Program] or double-click [Programs and Features].
For Windows 8
Right-click the lo
wer-left corner of the screen and select [Programs and Features].
For Windows 10
1. From the [Start] menu, select [Windows System], and click [Control Panel].
2. Click [Programs] and click [Programs and Features].
2
Select [Canon MF Toolbox 4.9], and then click [Uninstall].
3
Click [Remove].
Troubleshooting
186

4
Click [Exit].
To uninstall the Product Extended Survey Program
1
Open [Programs and Features].
For Windows 7
1. From the [Start] menu, select [Control Panel].
2. Click [Uninstall a program] or double-click [Programs and Features].
For Windows 8
Right-click the lo
wer-left corner of the screen and select [Programs and Features].
For Windows 10
1. From the [Start] menu, select [Windows System], and click [Control Panel].
2. Click [Programs] and click [Programs and Features].
2
Select [Canon Laser Printer/Scanner/Fax Extended Survey Program], and then click
[Uninstall].
3
Follow the on-screen instructions.
Troubleshooting
187

When a Service Error Has Occurred
85RS-04J
The service err
or has occurred when the error number appears on the display and [
] indicator and
[ ] indicator light up.
NOTE
Error numbers
The err
or number appears on the display and switches in order of "E" → "x" → "x" → "x" ("xxx" represents
a three-digit number).
Troubleshooting
188
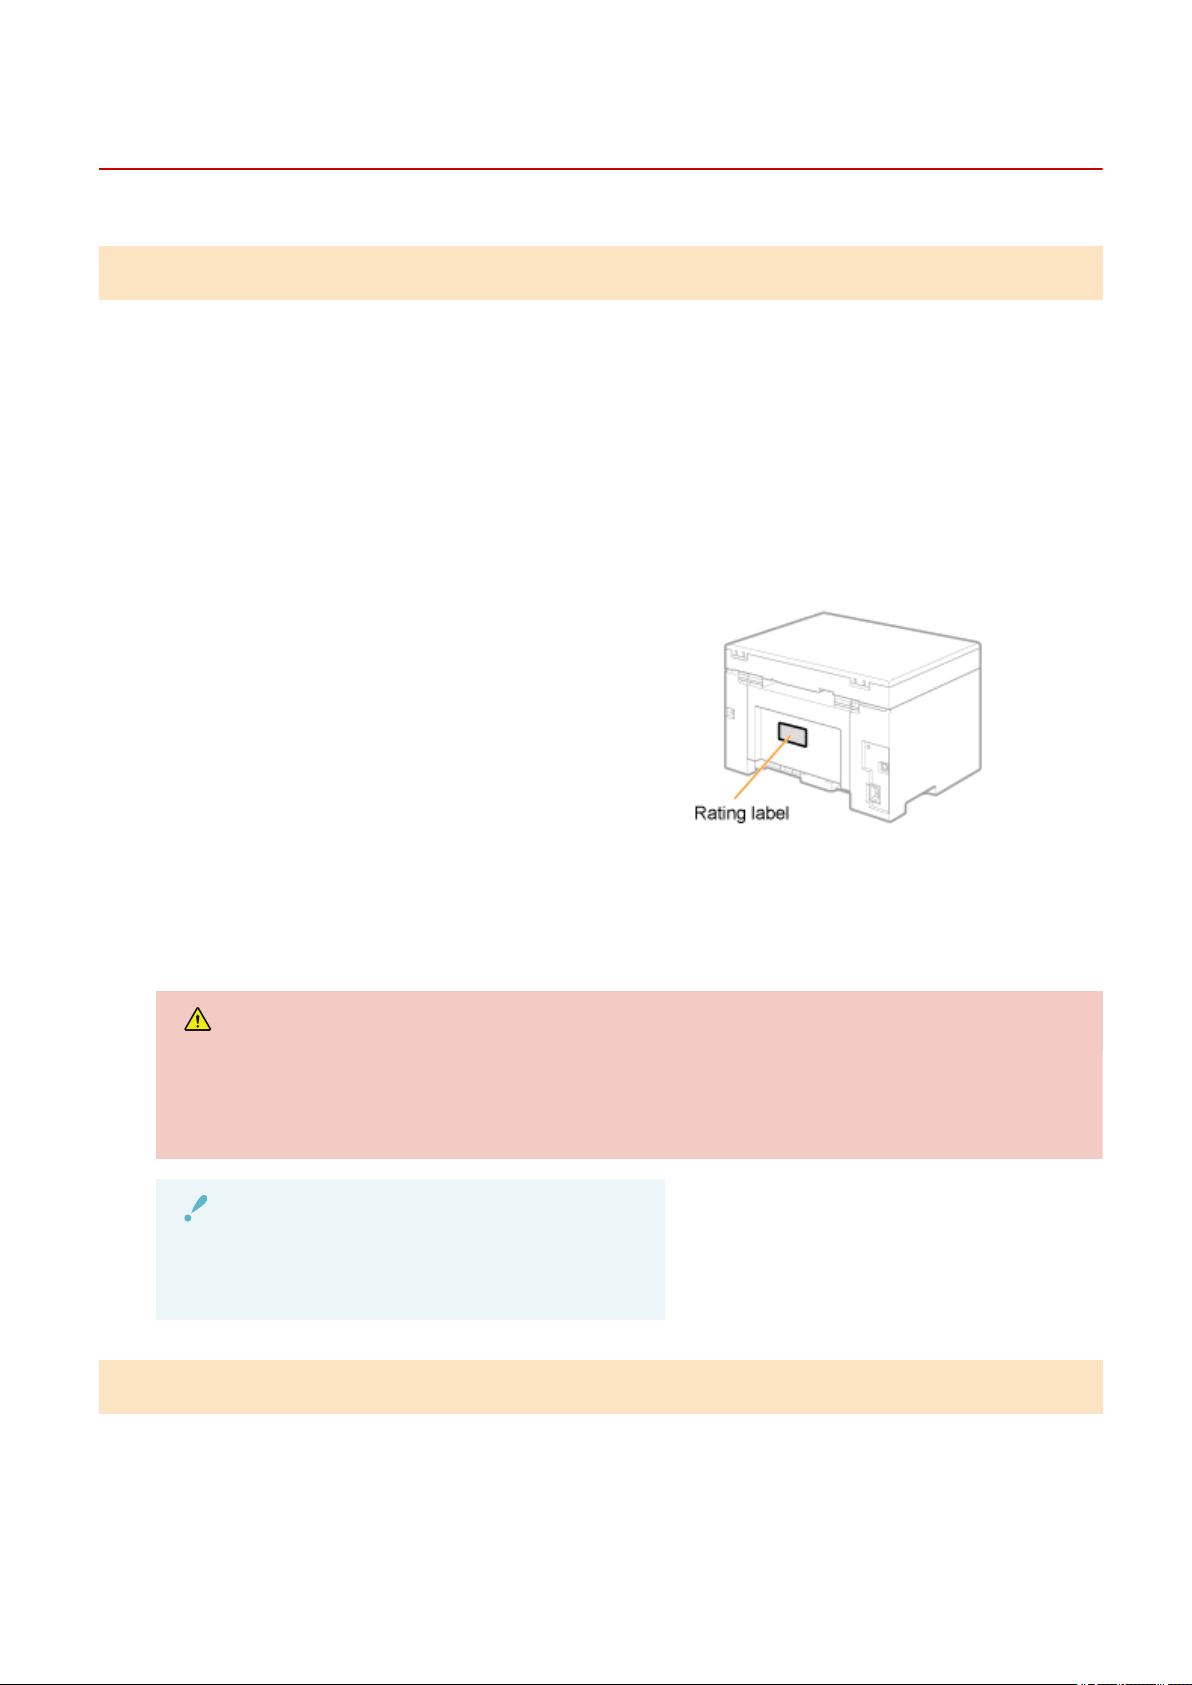
When a Problem cannot be Resolved
85RS-04K
Customer Support (U.S.A.)
If you cannot solve a problem by referring to the information in this chapter, for the fastest resolution, please
refer to available support materials (including the Knowledgebase FAQs and How to Video material) for your
product at www.usa.canon.com.
Please have the following information ready when contacting the Canon Customer
Care Center:
● Product name (imageCLASS MF3010 / MF3010VP)
● Serial number (a character string of three letters and a 5-digit number; located on the rating label on the rear
side of the machine)
● Place of pur
chase
● Nature of the problem
● Steps you have taken to solve the problem and the results
WARNING
If the machine makes strange noises or emits smoke or an odd odor
Turn OFF the power switch immediately, disconnect the power cord, and contact the Canon Customer
Care Center. Do not attempt to disassemble or repair the machine yourself.
IMPORTANT
If you attempt to x the machine yourself
It may void the limited warr
anty.
Customer Support (Canada)
If you cannot solve a problem by referring to the information in this chapter, for the fastest resolution, please
refer to available support materials (including the Knowledgebase FAQs and How to Video material) for your
product at www.canon.ca/support.
Troubleshooting
189
Please have the following information ready when contacting the Canon Customer
Car
e Center:
● Product name (imageCLASS MF3010 / MF3010VP)
● Serial number (a character string of three letters and a 5-digit number; located on the rating label on the rear
side of the machine)
● Place of pur
chase
● Nature of the problem
● Steps you have taken to solve the problem and the results
WARNING
If the machine makes strange noises or emits smoke or an odd odor
Turn OFF the power switch immediately, disconnect the power cord, and contact the Canon Customer
Care Center. Do not attempt to disassemble or repair the machine yourself.
IMPORTANT
If you attempt to x the machine yourself
It may void the limited warr
anty.
Troubleshooting
190

Maintenance
Maintenance .....................................................................................................................................................
192
Cleaning the Machine ....................................................................................................................................... 193
Cleaning the Exterior .................................................................................................................................... 194
Cleaning the Inside of the Machine .............................................................................................................. 195
Cleaning the Fixing Unit ............................................................................................................................... 198
Cleaning the Platen Glass ............................................................................................................................. 199
Attention (Cleaning the Machine) .......................................................................................................... 200
Replacing Toner Cartridges .............................................................................................................................. 202
Before Replacing the Toner Cartridge .......................................................................................................... 203
Replacing the Toner Cartridge ...................................................................................................................... 206
Attention (Replacing the Toner Cartridge) ............................................................................................. 210
Special Mode ...................................................................................................................................................... 213
Relocating the Machine .................................................................................................................................... 216
Attention (Relocating the Machine) .............................................................................................................. 219
Maintenance
191

Maintenance
85RS-04L
This chapter describes ho
w to clean the machine, replace toner cartridges, make adjustments, and transport
the machine.
Cleaning the machine
● When the machine is dirty
See " Cleaning the Exterior
(P. 194) ."
● When the inside of the machine is dirty
See " Cleaning the Inside of the Machine(P. 195) ."
● When black streaks appear on the output
See " Cleaning the Fixing Unit(P. 198) ."
● When the platen glass is dirty
See " Cleaning the Platen Glass(P. 199) ."
Replacing the toner cartridge See " Replacing Toner Cartridges(P. 202) ."
Adjusting the Machine See " Special Mode(P. 213) ."
Relocating the machine See " Relocating the Machine(P. 216) ."
Maintenance
192

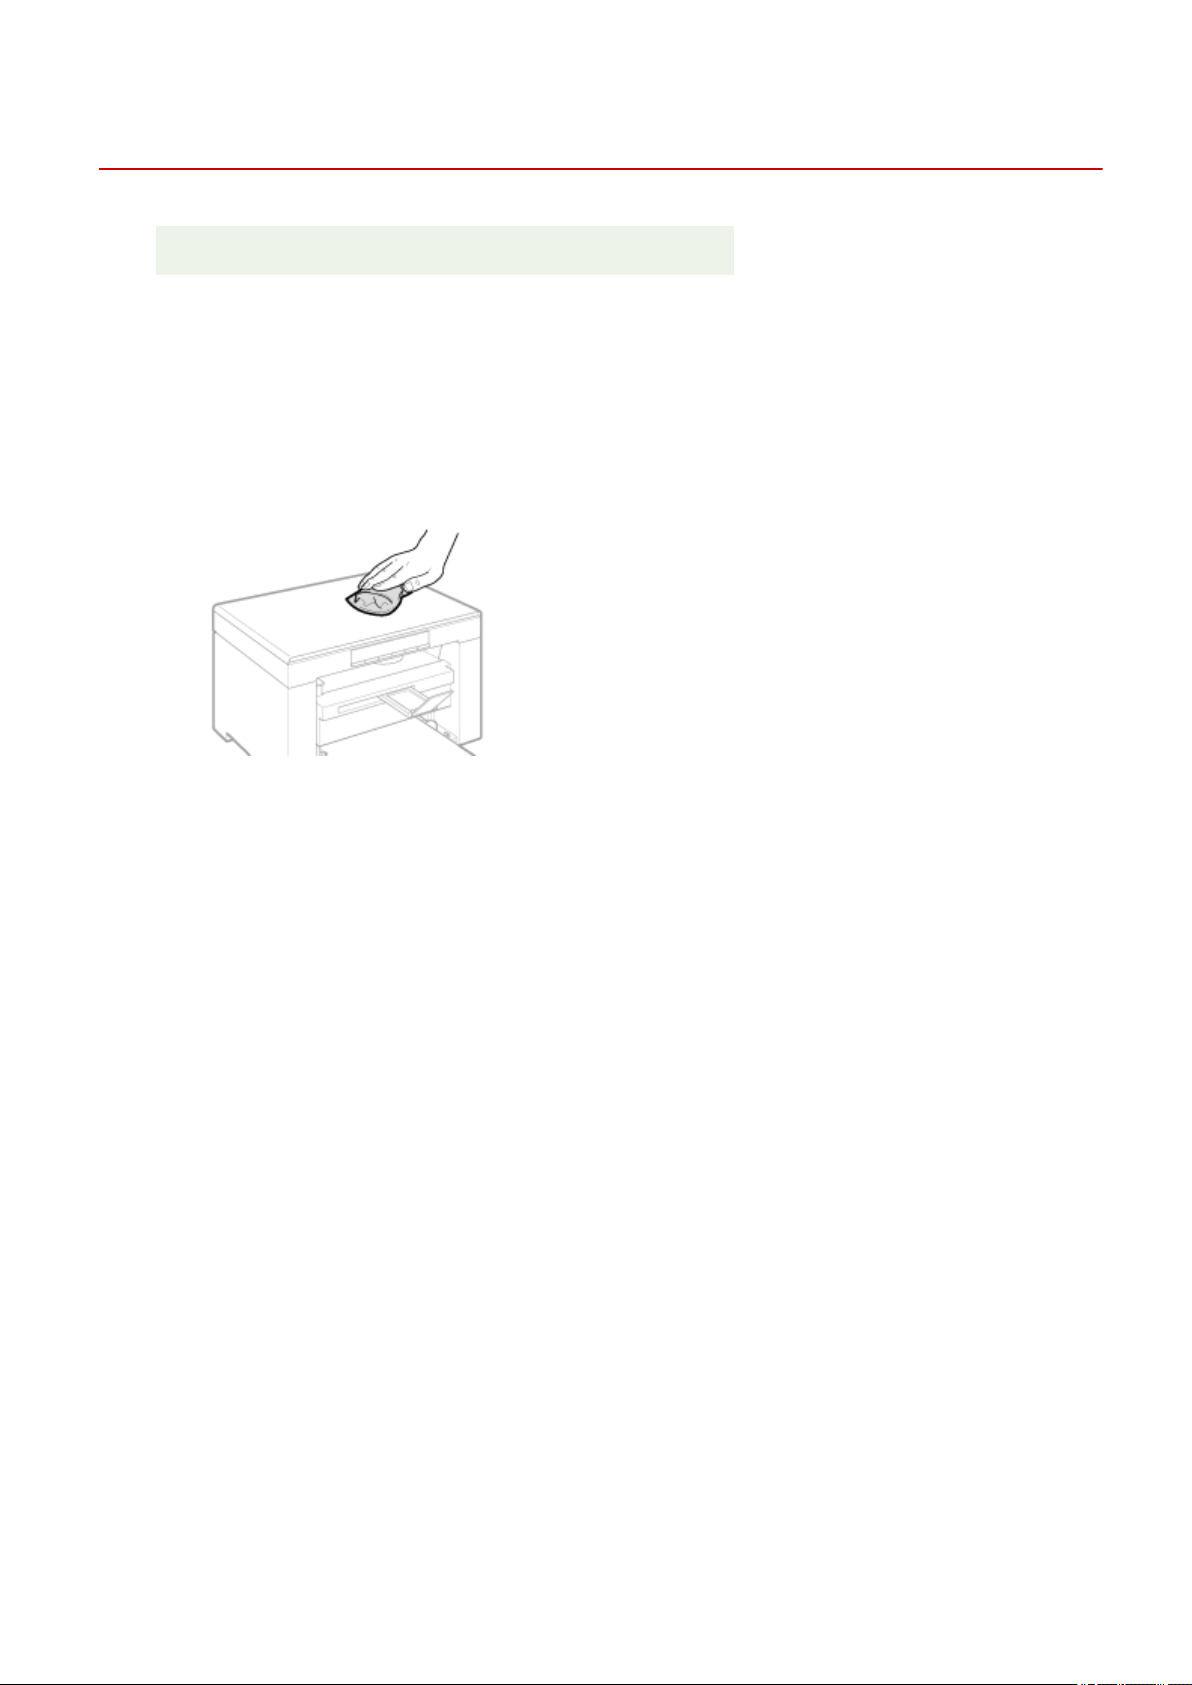
Cleaning the Exterior
85RS-04S
See " Attention (Cleaning the Machine)
(P. 200) " in advance.
Clean the exterior of the machine and ventilation slots.
1
Turn OFF the power switch and disconnect the power cord.
2
Clean the exterior of the machine with a soft, well wrung out cloth dampened with
water or a mild deter
gent diluted with water.
3
Wait for the machine to dry completely before reconnecting the power cord and turn
ON the po
wer.
Maintenance
194
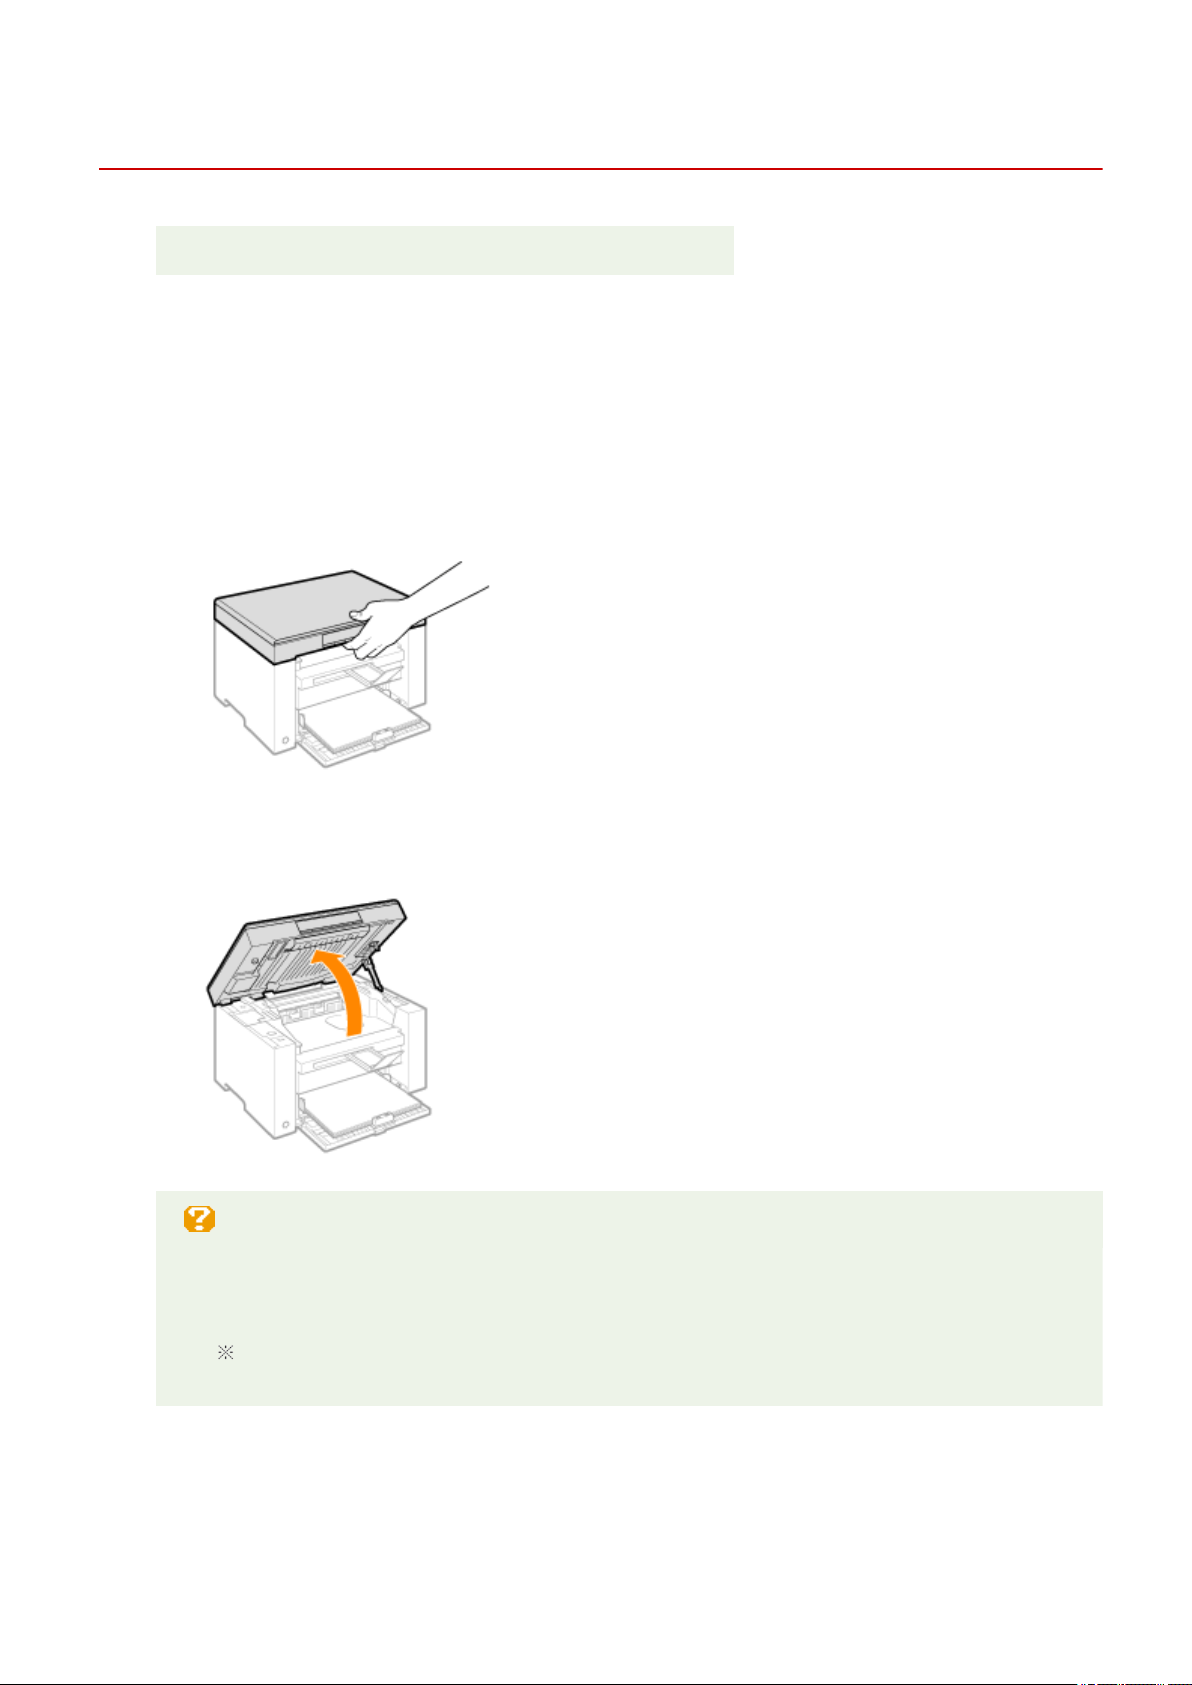
Cleaning the Inside of the Machine
85RS-04U
See " Attention (Cleaning the Machine)
(P. 200) " in advance.
Clean the machine's print area at regular intervals so that toner powder, as well as paper dust and other debris,
do not accumulate inside the machine.
1
Turn OFF the power switch and disconnect the power cord.
2
Hold the operation panel.
3
Lift the scanning platform.
When you cannot lift the scanning platform
Make sure that the platen glass is completely closed.
Do not try to for
cefully lift the scanning platform, as this may damage the machine.
The platen glass may not be completely closed when a thick document such as books is placed
inside. In such case, r
emove it from the platen glass.
4
Hold the grip on the left front side of the toner cover.
Maintenance
195

5
Open the toner cover.
6
Remove the toner cartridge.
7
Remove toner powder, as well as paper dust and other debris from the inside of the
machine, using a clean, soft, dry
, and lint-free cloth.
8
Insert the toner cartridge.
Fit the protrusions (A) on both sides of the toner cartridge into the guides located on both sides of the machine
and slide the toner cartridge into the machine until the toner cartridge comes to r
est and is held against the
back of the machine.
Maintenance
196

9
Close the toner cover.
When you cannot close the toner cover
Make sure that the toner cartridge is properly set inside the machine.
Do not try to forcefully close the toner cover, as this may damage the machine.
10
Lower the scanning platform.
11
Connect the power cord and turn ON the power switch.
Maintenance
197
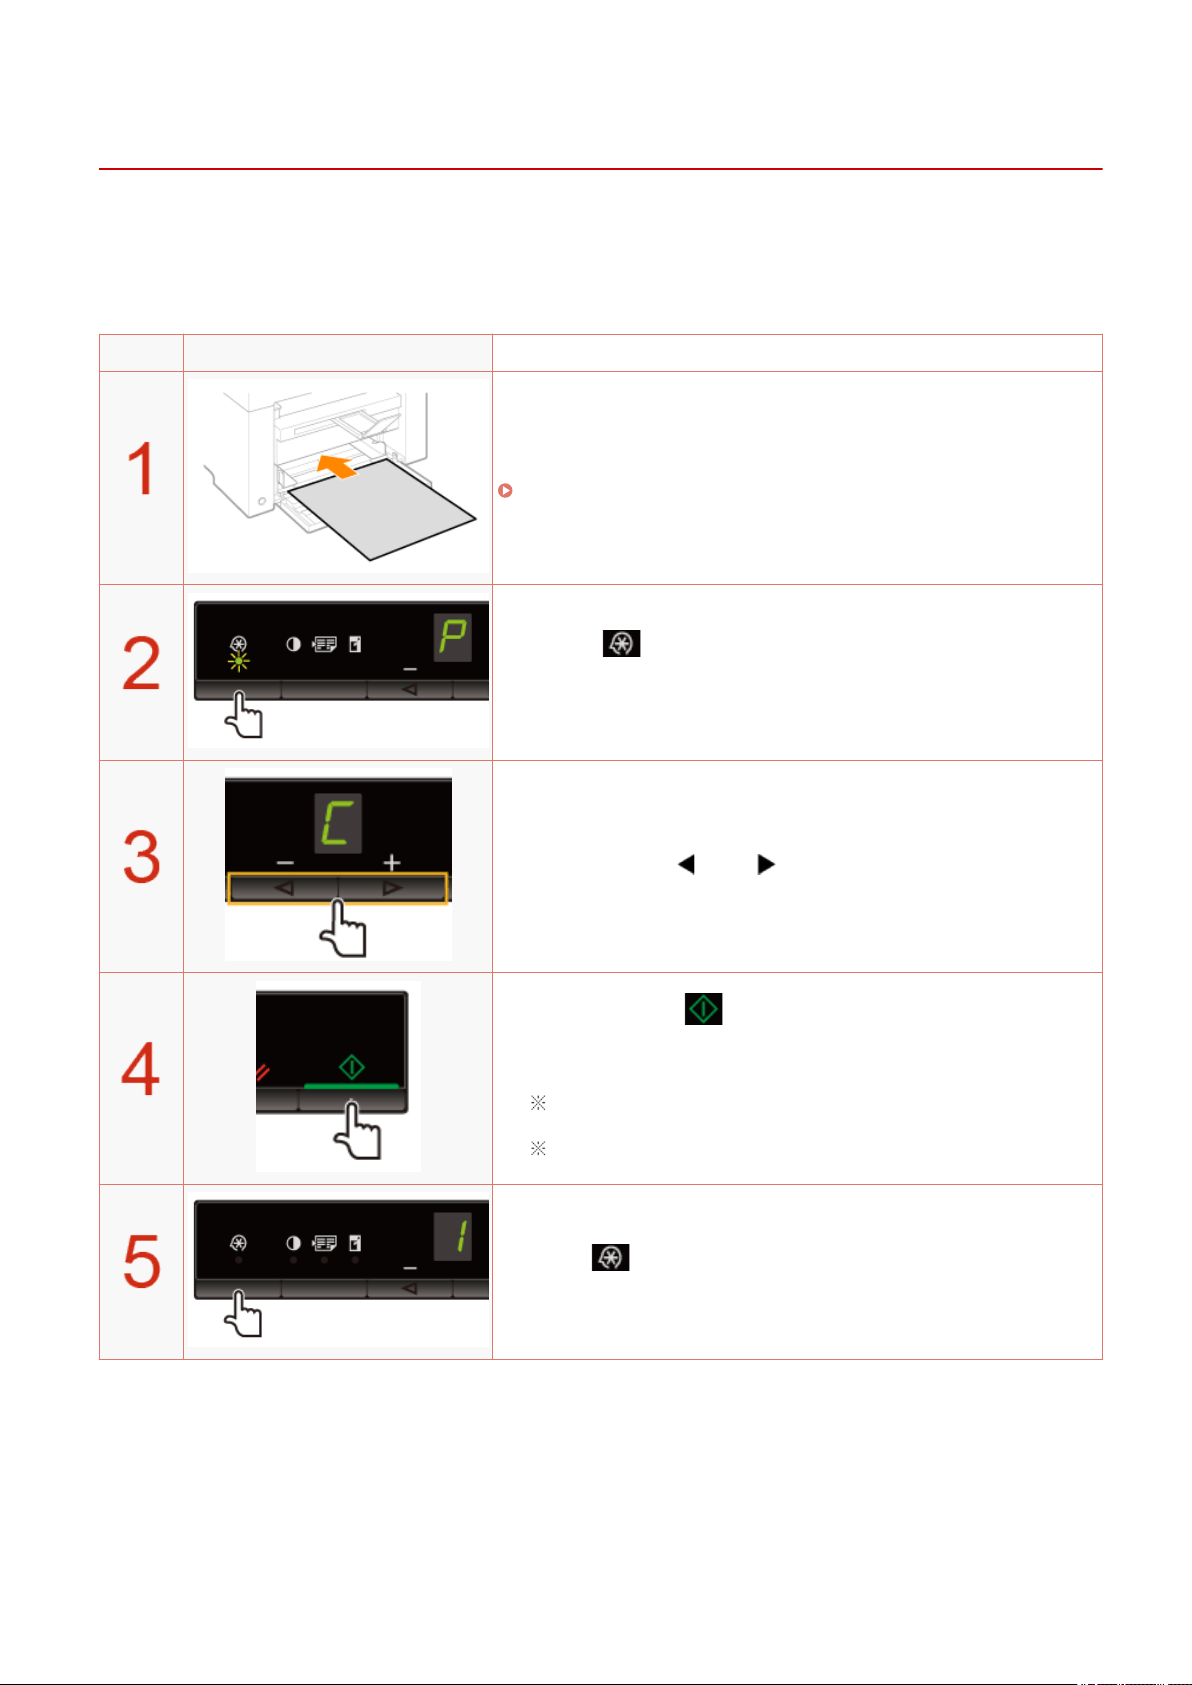
Cleaning the Fixing Unit
85RS-04W
The xing unit may be dirty under the follo
wing conditions. Clean the xing unit.
● When black streaks appear on the output
● When replacing the toner cartridge
Operating results Operating results
Load A4 or Letter size plain paper.
" In the Paper Cassette(P. 47) "
Press [ ] (Menu setting key), and then start the menu
oper
ation.
When the menu is operating, the menu indicator blinks.
Press [ ] or [ ] until "C" is displayed.
When [ ] is pressed, cleaning starts.
It tak
es approximately 140 seconds.
We recommend that plain paper be loaded when cleaning the xing
unit.
You cannot perform cleaning when jobs are stored in the memory.
Press [ ] (Menu setting key) to exit the menu operation.
The menu indicator turns off.
Maintenance
198

Cleaning the Platen Glass
85RS-04X
See " Attention (Cleaning the Machine)
(P. 200) " in advance.
Follow the steps in the procedure below to clean the platen glass and the under surface of the platen glass
co
ver.
1
Turn OFF the power switch and disconnect the power cord.
2
Open the platen glass.
3
Clean the platen glass and the under surface of the platen glass cover.
(1) Clean the areas with a cloth dampened with water.
(2) Wipe the areas with a soft, dry cloth.
4
Close the platen glass.
5
Connect the power cord and turn ON the power switch.
Maintenance
199
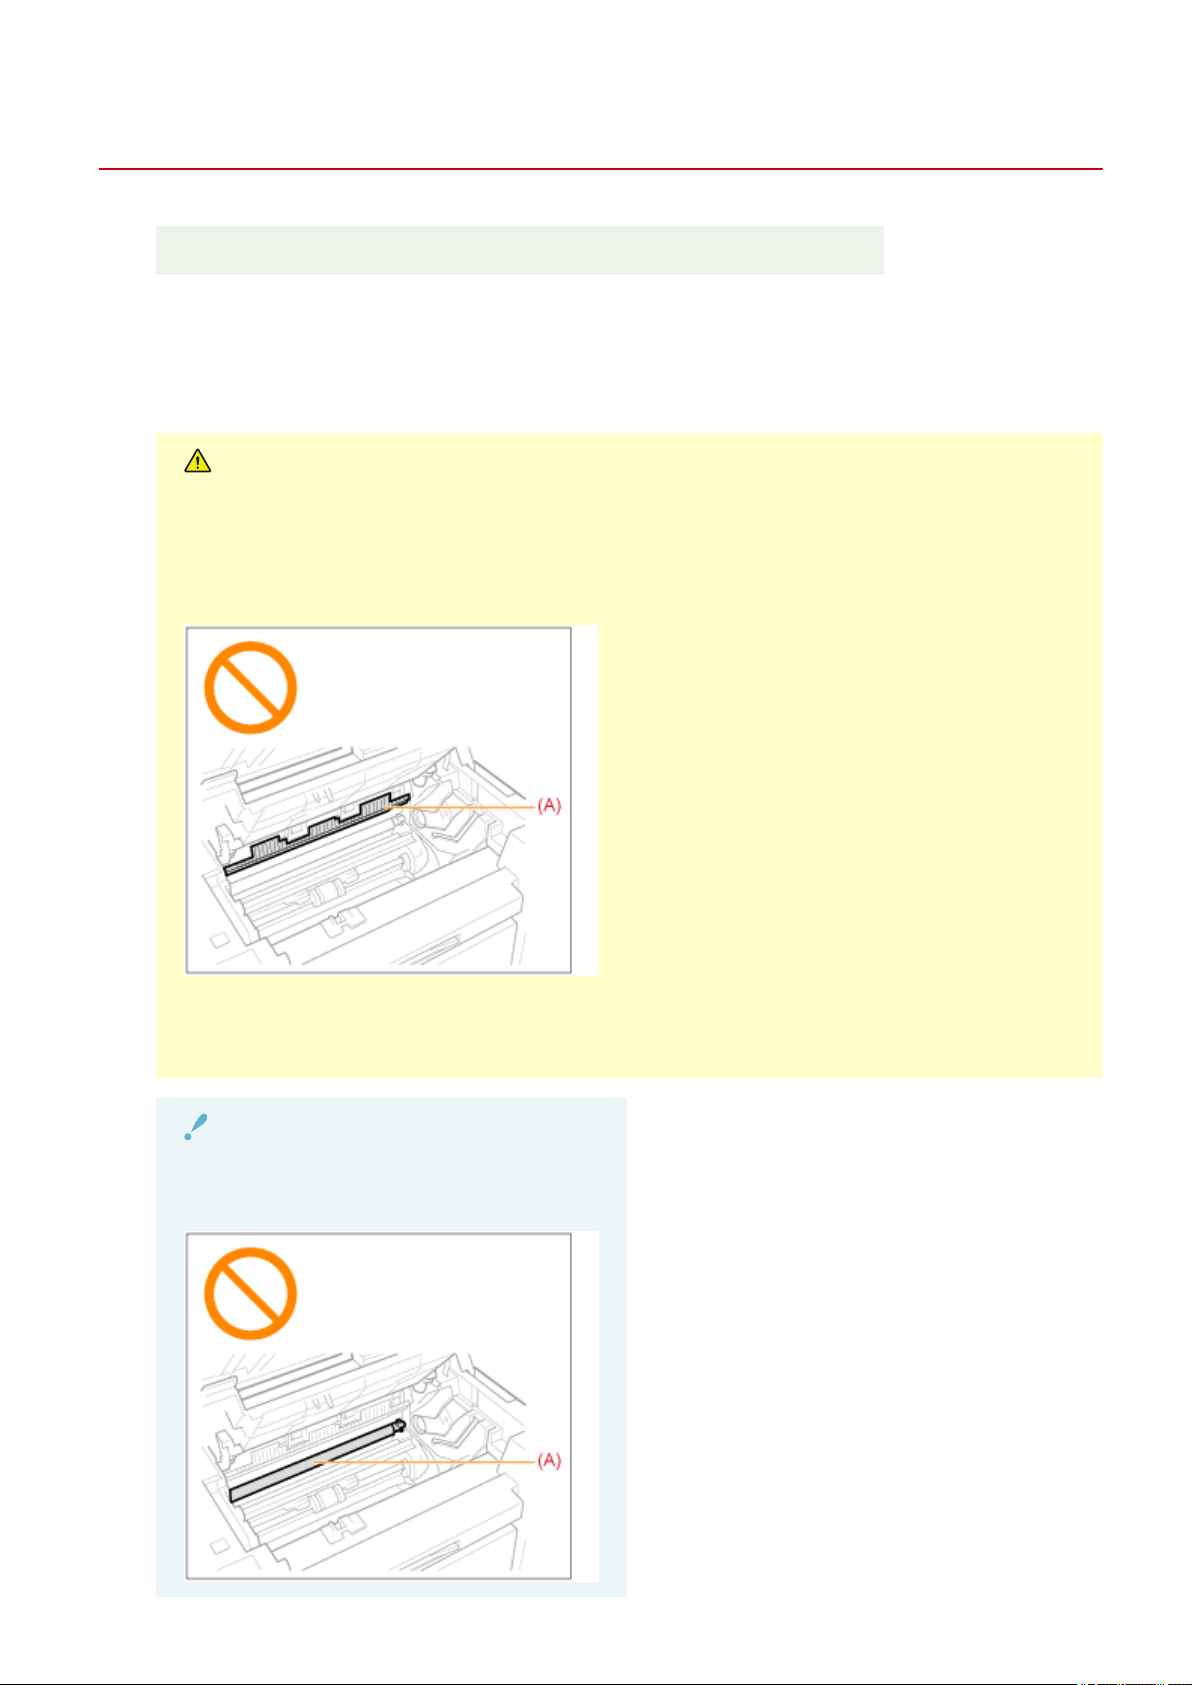
Attention (Cleaning the Machine)
85RS-04Y
See " Maintenance and Inspections
(P. 10) " in "Important Safety Instructions".
Before cleaning the machine, note the following.
● Use a soft cloth to avoid scr
atching the components.
● Do not clean the machine components with tissue paper, paper towels, or similar materials. These materials
tend to stick to the components or generate static charges.
CAUTION
Precautions to take when closing the platen glass
Be car
eful not to get your ngers caught.
Do not touch the xing unit (A).
Touching the xing unit (A) may cause burns as it becomes very hot while the machine is in operation.
Precautions to take when you get toner onto your hands or into clothing
If toner comes in contact with your hands or clothing, wash them immediately in cold water. Do not use
warm water, as it will set the toner and mak
e it dicult to remove the toner stains.
IMPORTANT
Do not touch the transfer roller (A).
The act may damage the machine.
Maintenance
200

NOTE
When a job is waiting to be printed
The job is deleted when you turn OFF the po
wer switch.
Maintenance
201
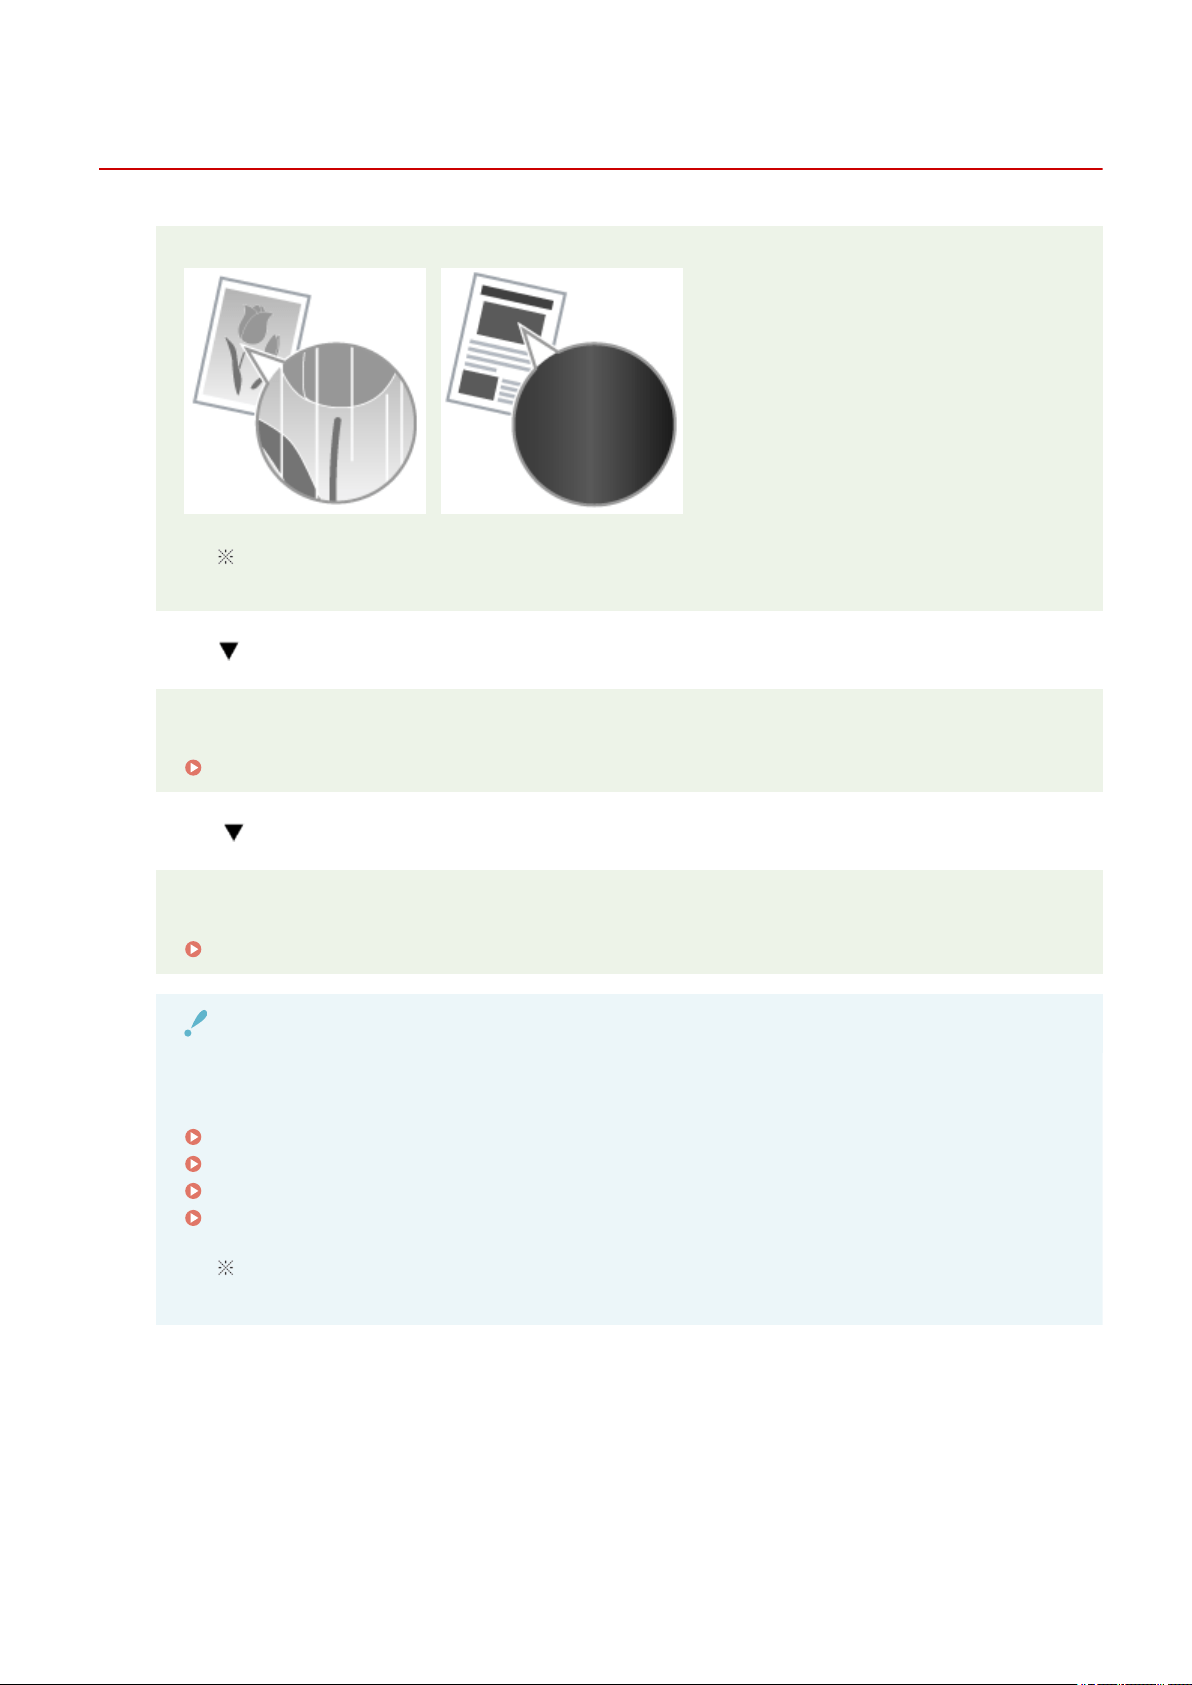
Replacing Toner Cartridges
85RS-050
When the toner nearly runs out, white streaks appear on the output, or the output is partially faded.
No message appears on the screen, if the toner nearly runs out. Replace the toner cartridge when
white str
eaks appear on the output, or the output is partially faded.
When this problem occurs
Follow the steps in the procedure below before replacing the toner cartridge. The machine continues
printing until the toner runs out completely.
" Before Replacing the Toner Cartridge(P. 203) "
When the print quality is still unacceptable
If the problem persists after you have followed the steps in the procedure below, replace the toner
cartridge.
" Replacing the T
oner Cartridge(P. 206) "
IMPORTANT
About toner cartridges
For mor
e information on toner cartridges, see the following sections.
" About the Supplied T
oner Cartridge(P. 37) "
" About Replacement T
oner Cartridges(P. 38) "
" Handling T
oner Cartridges(P. 39) "
" Pur
chasing Consumables(P. 42) "
The average yield of replacement toner cartridges varies from that of the supplied toner
cartridge.
Maintenance
202

Before Replacing the Toner Cartridge
85RS-051
See " Attention (Replacing the T
oner Cartridge)(P. 210) " in advance.
When the toner nearly runs out, follow the steps in the procedure below before replacing the toner cartridge.
The machine continues printing until the toner runs out completely
.
1
Hold the operation panel.
2
Lift the scanning platform.
When you cannot lift the scanning platform
Make sure that the platen glass is completely closed.
Do not try to for
cefully lift the scanning platform, as this may damage the machine.
The platen glass may not be completely closed when a thick document such as books is placed
inside. In such case, r
emove it from the platen glass.
3
Hold the grip on the left front side of the toner cover.
Maintenance
203
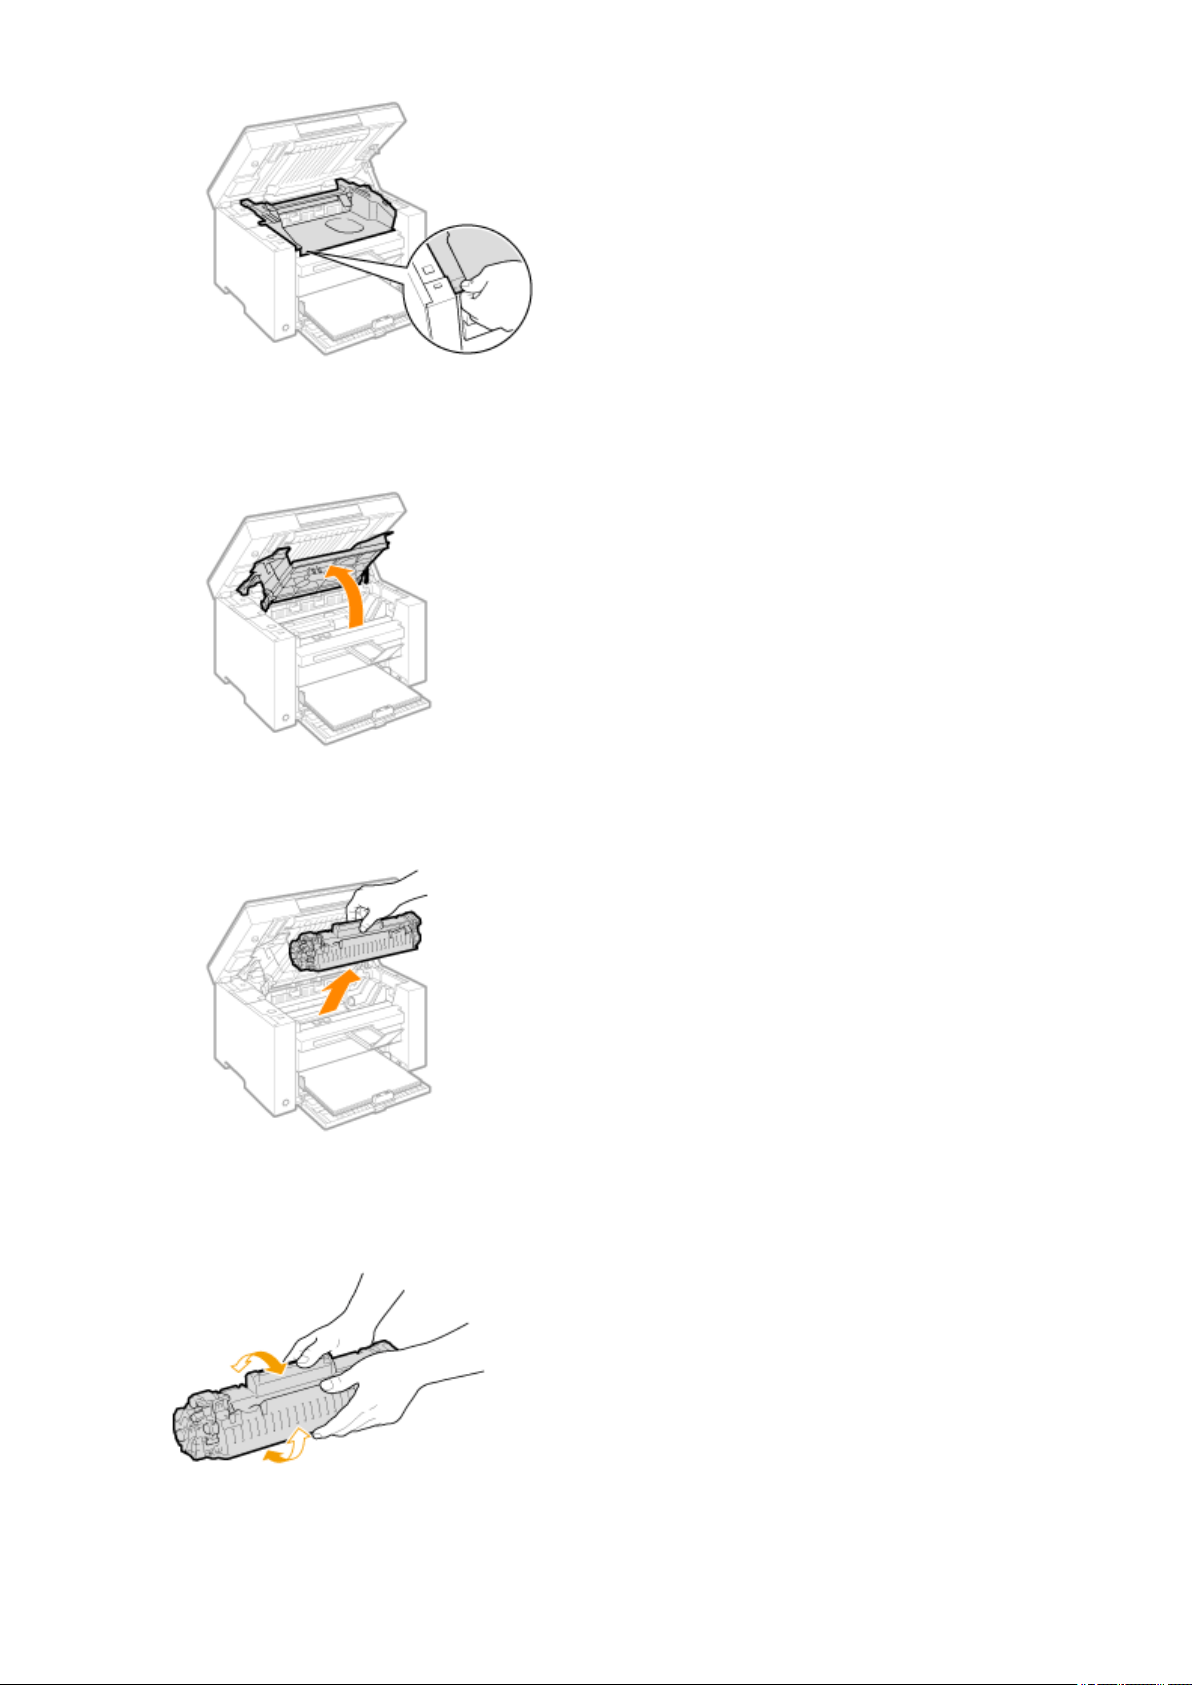
4
Open the toner cover.
5
Remove the toner cartridge.
6
Gently shake the toner cartridge ve or six times to e
venly distribute the toner inside
the cartridge.
7
Insert the toner cartridge.
Maintenance
204

Fit the protrusions (A) on both sides of the toner cartridge into the guides located on both sides of the machine
and slide the toner cartridge into the machine until the toner cartridge comes to r
est and is held against the
back of the machine.
8
Close the toner cover.
When you cannot close the toner cover
Make sure that the toner cartridge is properly set in the machine.
Do not try to forcefully close the toner cover, as this may damage the machine.
9
Lower the scanning platform.
Maintenance
205
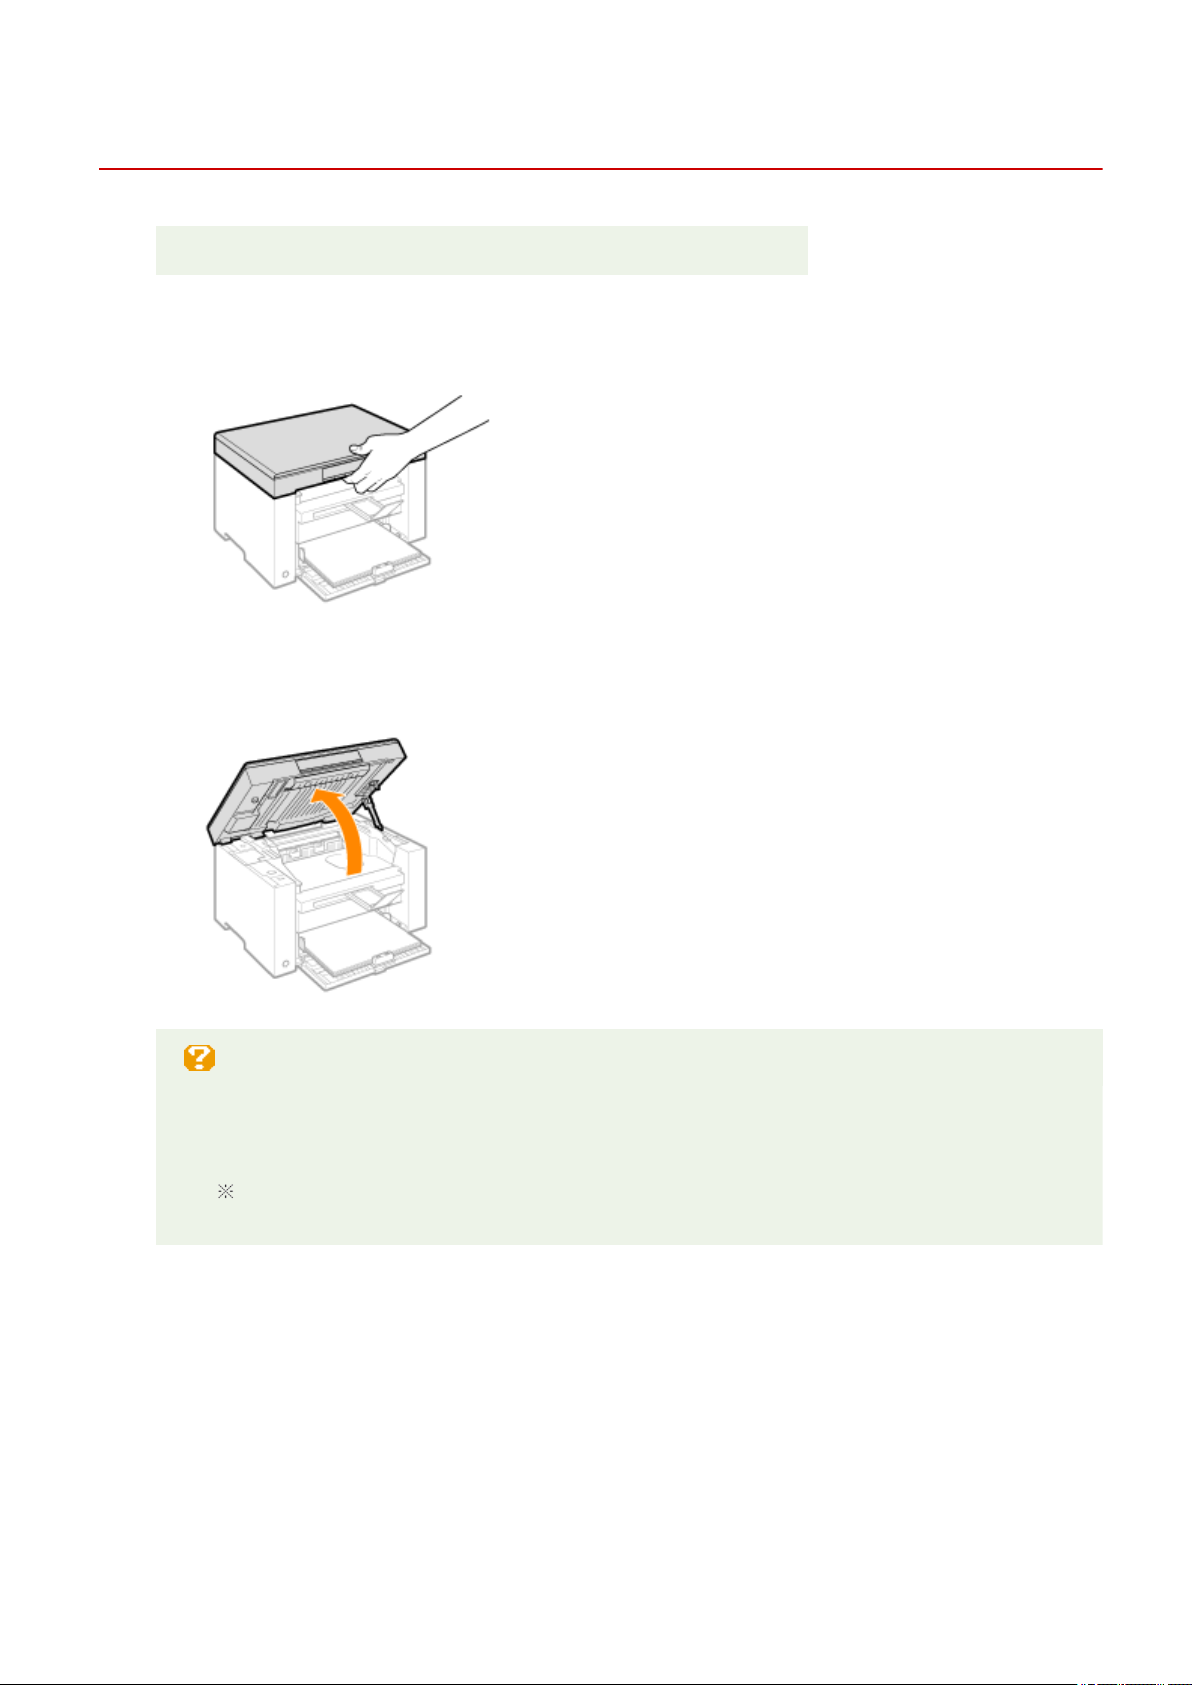
Replacing the Toner Cartridge
85RS-052
See " Attention (Replacing the T
oner Cartridge)(P. 210) " in advance.
1
Hold the operation panel.
2
Lift the scanning platform.
When you cannot lift the scanning platform
Make sure that the platen glass is completely closed.
Do not try to for
cefully lift the scanning platform, as this may damage the machine.
The platen glass may not be completely closed when a thick document such as books is placed
inside. In such case, r
emove it from the platen glass.
3
Hold the grip on the left front side of the toner cover.
Maintenance
206
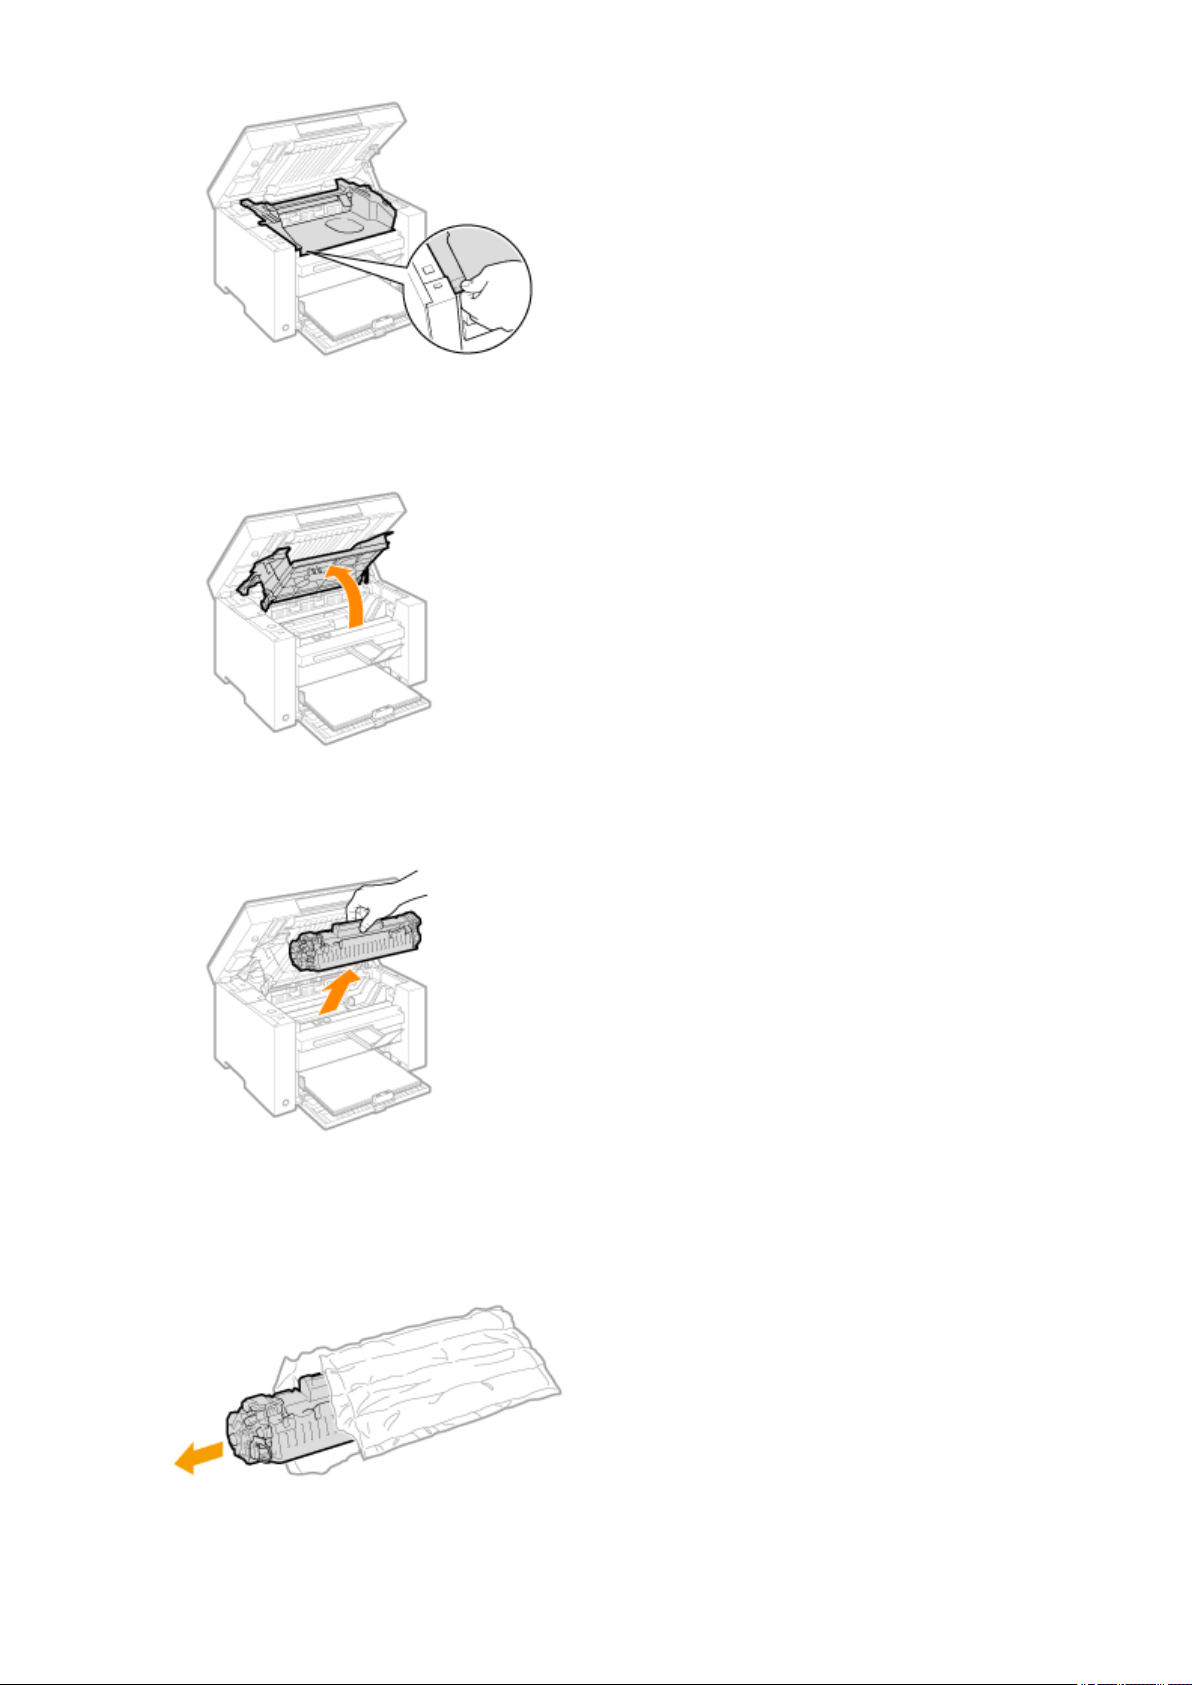
4
Open the toner cover.
5
Remove the toner cartridge.
6
Take out the new toner cartridge from the protective bag.
Tear the notch with both hands to open the protective bag.
Maintenance
207
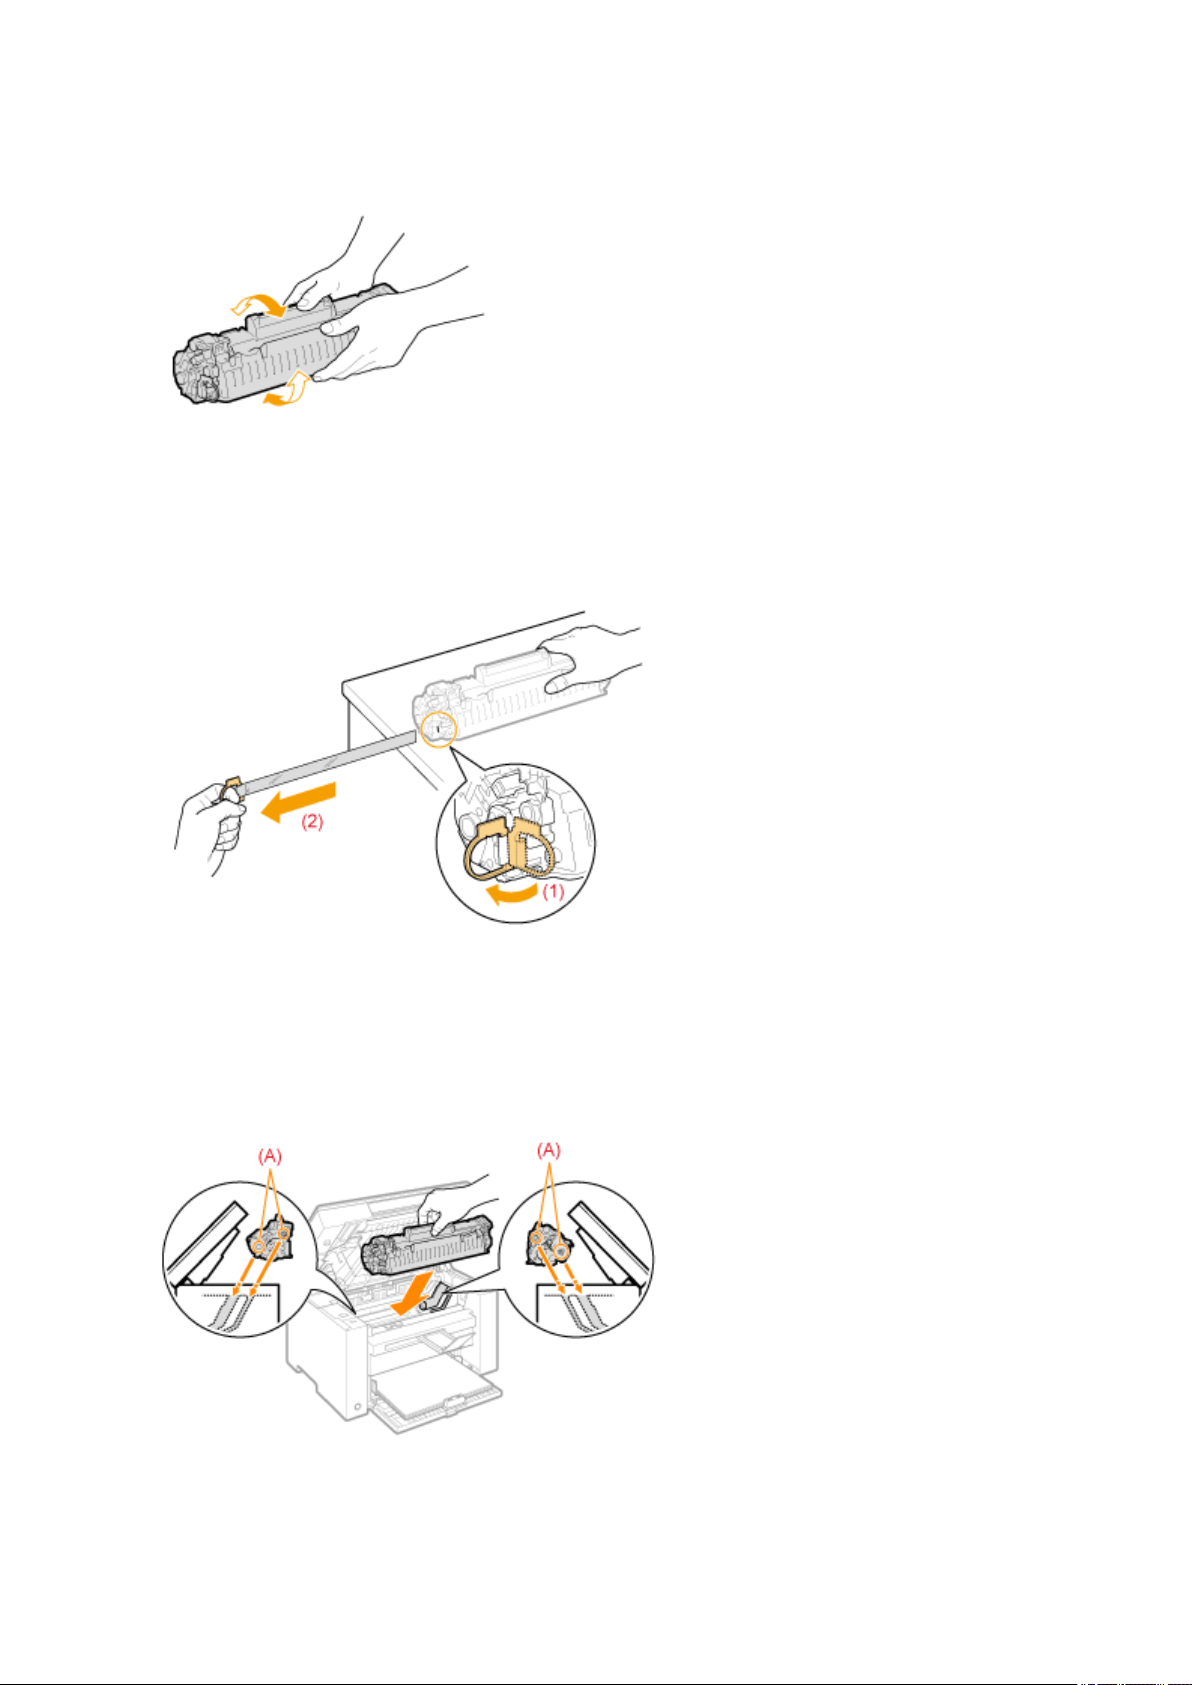
7
Gently shake the toner cartridge ve or six times to e
venly distribute the toner inside
the cartridge.
8
Place the toner cartridge on a at surface, lift the tab, and gently pull the sealing tape
completely out.
The full length of the sealing tape is approximately 50 cm (20").
9
Insert the toner cartridge.
Fit the protrusions (A) on both sides of the toner cartridge into the guides located on both sides of the machine
and slide the toner cartridge into the machine until the toner cartridge comes to r
est and is held against the
back of the machine.
10
Close the toner cover.
Maintenance
208

When you cannot close the toner co
ver
Make sure that the toner cartridge is properly set in the machine.
Do not try to forcefully close the toner cover, as this may damage the machine.
11
Lower the scanning platform.
Maintenance
209

Attention (Replacing the Toner Cartridge)
85RS-053
See " Maintenance and Inspections
(P. 10) " in "Important Safety Instructions".
WARNING
Do not dispose of a used toner cartridge in an open ame.
This may ignite the toner r
emaining inside the cartridge, resulting in burns or re.
When cleaning up spilled or scattered toner
If you accidentally spill or scatter toner, carefully gather the toner particles together or wipe them up
with a soft, damp cloth in a way that prevents inhalation.
Never use a vacuum cleaner that does not have safeguards against dust explosions to clean up spilled
toner. Doing so may cause a malfunction in the vacuum cleaner, or result in a dust explosion due to
static discharge.
CAUTION
Precautions to take when you get toner onto your hands or into clothing
If toner comes in contact with your hands or clothing, wash them immediately in cold water. Do not use
warm water, as it will set the toner and mak
e it dicult to remove the toner stains.
Do not allow the toner to scatter.
Do not pull out the sealing tape for
cefully or stop pulling the tape halfway, as this may cause toner to
spill out. If toner gets into your eyes or mouth, ush them immediately with cold water and consult a
physician.
Use caution when lowering the scanning platform
Keep your ngers clear of the scanning platform to avoid injury
.
IMPORTANT
About replacement toner cartridges
For optimum print quality
, using Canon genuine toner cartridges is recommended.
Model Name Supported Canon Genuine Toner Cartridge
MF3010 / MF3010VP Canon Cartridge 125
Be careful of counterfeit toner cartridges.
Please be awar
e that there are counterfeit Canon toner cartridges in the marketplace.
Use of counterfeit toner cartridge may result in poor print quality or machine performance.
Canon is not responsible for any malfunction, accident or damage caused by the use of counterfeit toner
cartridge.
For more information, see http://www.canon.com/counterfeit.
Shake the toner cartridge before replacement.
If the toner is not distributed e
venly inside the cartridge, this may cause poor print quality.
Maintenance
210
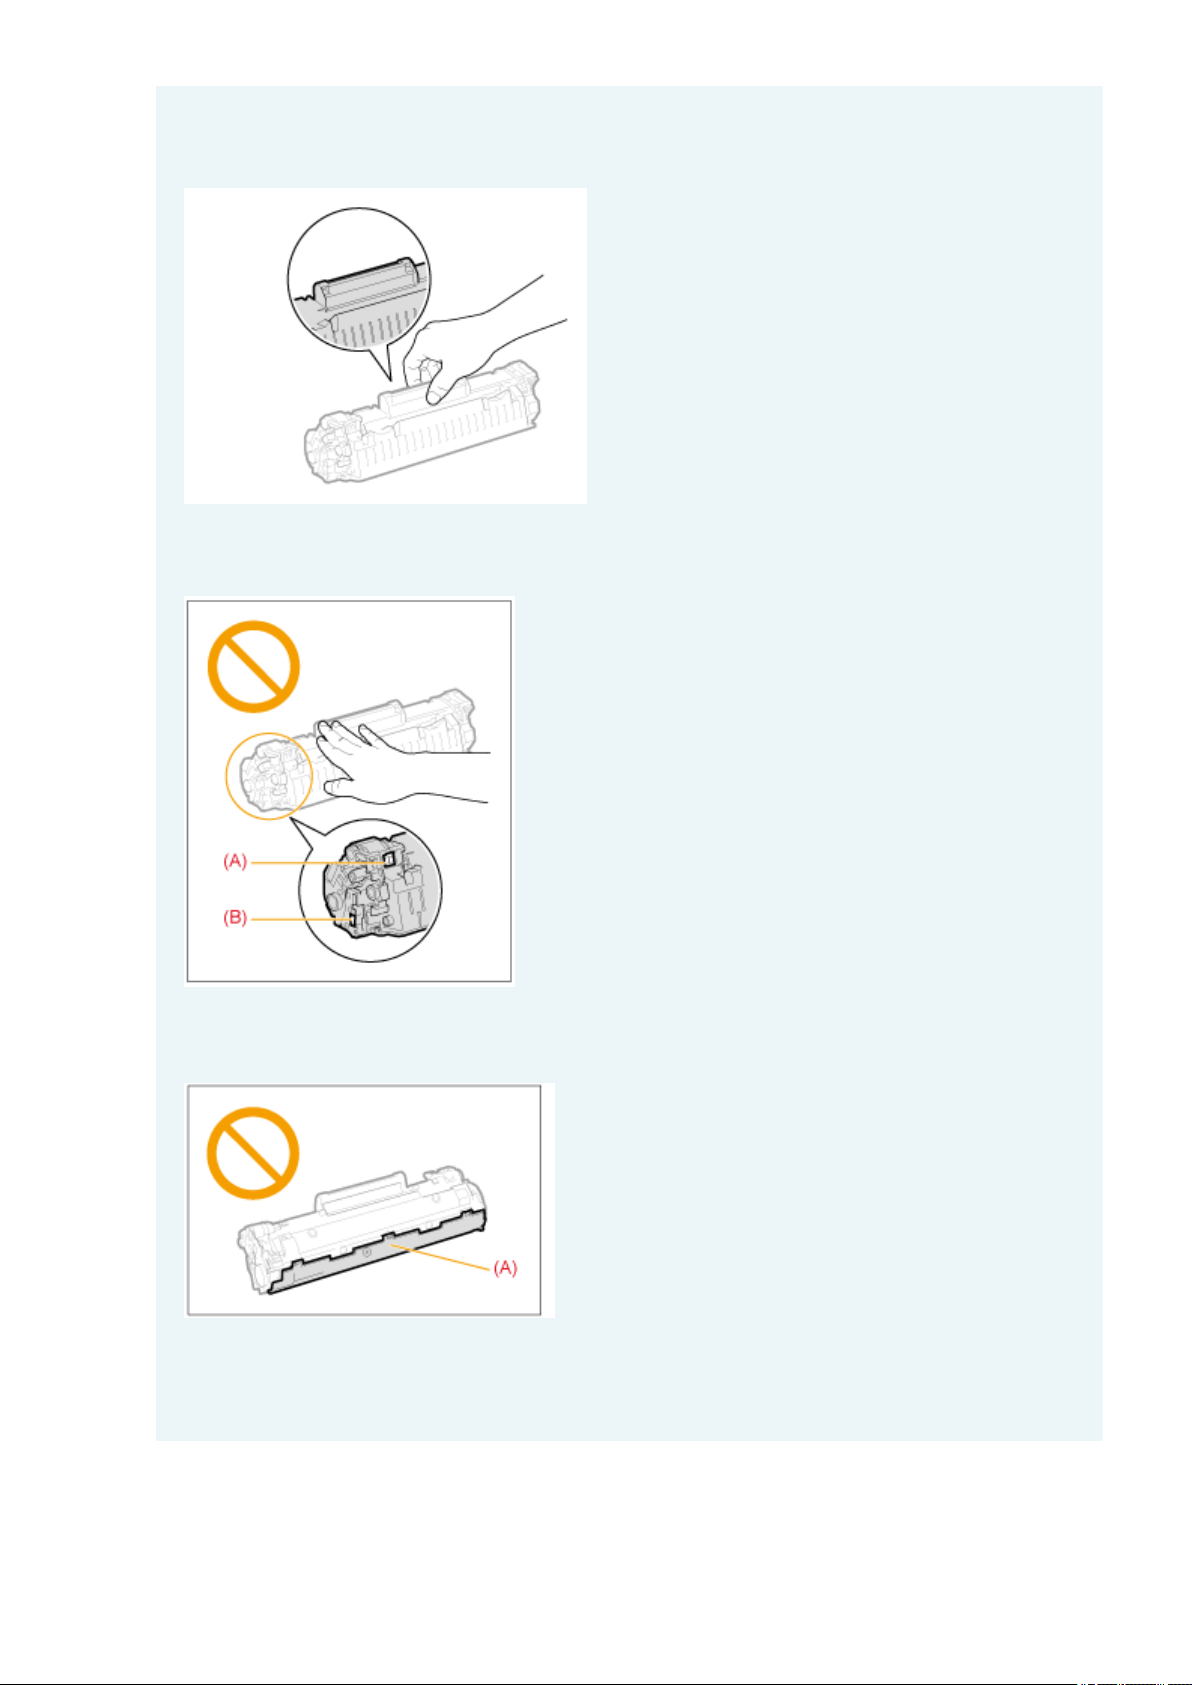
Hold the toner cartridges properly.
When handling the toner cartridge, hold it pr
operly, as shown in the illustration below. Do not stand it
vertically or hold it upside down.
Do not touch the toner cartridge memory (A) or the electrical contacts (B).
This may result in damage to the cartridge.
Do not open the drum protective shutter (A).
Print quality may deterior
ate if you touch or damage the drum inside the drum protective shutter (A). Do
not touch or open the drum protective shutter (A).
When pulling out the sealing tape
● Do not pull the sealing tape at an angle or side
ways. If the tape breaks, the tape may not be pulled out
completely.
Maintenance
211
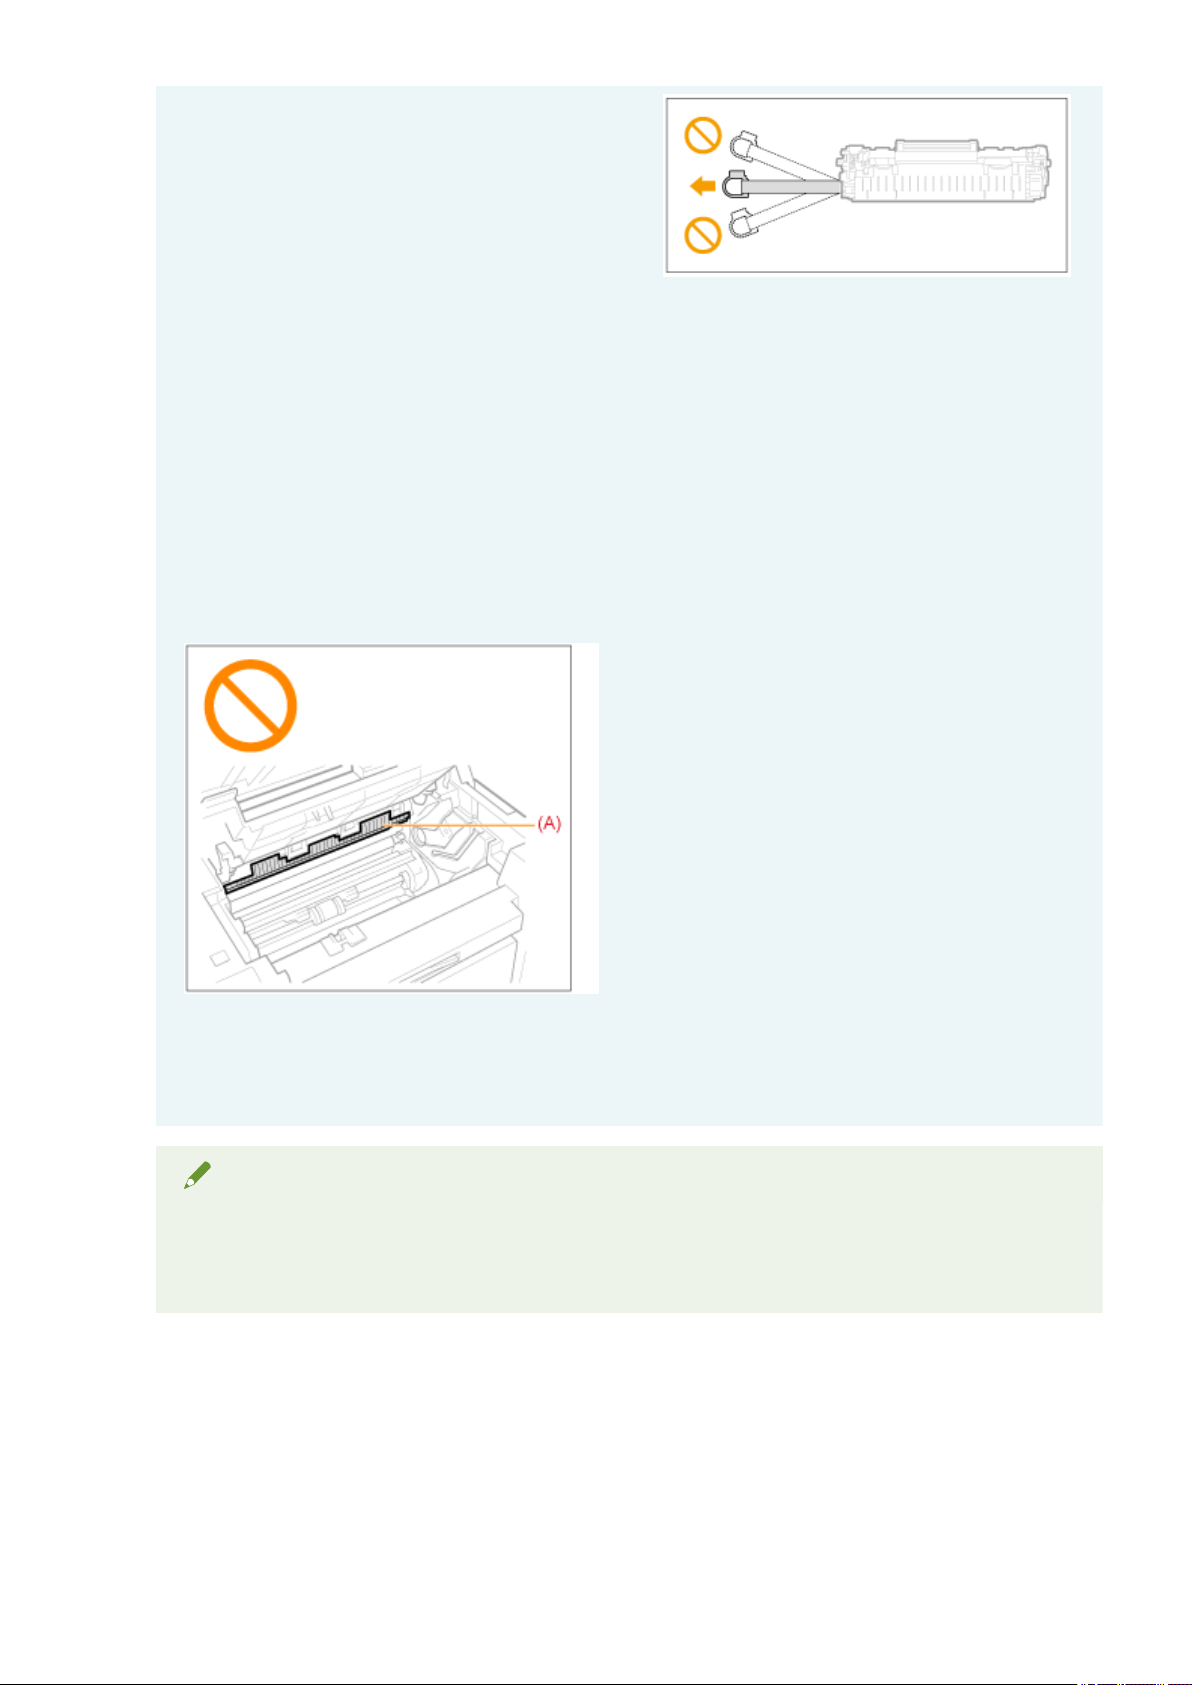
● If the sealing tape is still hanging outside the toner cartridge, pull it out completely.
● If the tape remains inside the toner cartridge, this may cause poor print quality.
When disposing of the removed sealing tape
Dispose of the packing materials in accor
dance with local regulations.
Keep the protective bag.
Keep the pr
otective bag for storing the toner cartridge. You will need it when you remove the toner
cartridge for machine maintenance or other purposes.
Do not touch the high-voltage contacts (A).
This may r
esult in damage to the machine.
Do not leave the toner cover open for an extended period of time when the toner
cartridge is installed.
This may r
esult in print quality deterioration.
NOTE
About the packing materials
The packing materials ar
e subject to change in form or placement, or may be added or removed without
notice.
Maintenance
212
Special Mode
85RS-060
Use the Special Mode settings to x print quality pr
oblems.
Read the following carefully before changing the settings.
IMPORTANT
Use default settings in normal operation
Change the settings only when the pr
oblems noted below occur.
Settings That Can Be Specied Fr
om the Operation Panel
Settings
Default settings are highlighted in bold.
Special mode Options Details
Special Mode b
0 Off
Due to the paper type or usage conditions, vertical streaks appear on the output.
When this occurs, change this setting.
The effect becomes gr
eater as the number goes up.
<Off> -> <Mode 1> -> <Mode 2> -> <Mode 3> -> <Mode 4>
(low) (high)
Streaks can be minimized by changing the paper type or usage
conditions, without needing to change the setting.
The more effective the setting, the lower the density becomes.
Additionally
, the outline of text and images may be reproduced less
clearly, and images may appear slightly jagged.
1
Mode
1
2
Mode
2
3
Mode
3
4
Mode
4
Special Mode c
0 Off Vertical streaks appear on the output after the toner cartridge was replaced
r
ecently, or the machine has not printed anything for an extended period of time.
When this occurs, change this setting.
The effect becomes greater as the number goes up.
<Off> -> <Mode 1> -> <Mode 2> -> <Mode 3>
(low) (high)
Streaks can be minimized by changing the paper type or usage
conditions, without needing to change the setting.
The more effective the setting becomes, the slower the print speed.
1
Mode
1
2
Mode
2
3
Mode
3
Special Mode d
0 Off Due to the paper type or usage conditions, paper curls or creases. When this
occurs, change this setting.
The effect becomes gr
eater as the number goes up.
<Off> -> <Mode 1> -> <Mode 2>
(low) (high)
Paper curls and creases can be minimized by changing the paper type
and usage conditions, without needing to change the setting.
This setting can be selected when
1
Mode
1
2
Mode
2
Maintenance
213
Special mode Options Details
● Paper T
ype is set to Plain paper, Plain paper L, Heavy paper 1, Rough
paper, Label, or Envelope.
The more effective the setting becomes, the slower the print speed.
Special Mode h
0 Off Due to the paper type (for example, heavy paper) or usage conditions (for
e
xample, dry conditions), toner smudges and spatters appear on the output.
When this occurs, set this setting to <On>.
The print quality may become lower when this setting is enabled,
depending on the paper type used (for e
xample, thin paper) or usage
conditions (humid conditions).
1 On
Special Mode C C
Perform cleaning when black streaks appear on the output or toner cartridges
are replaced.
Set the setting for this item to <"C">.
" Cleaning the Fixing Unit
(P. 198) "
Settings That Can Be Specied In the Printer Driver
Settings
Default settings are highlighted in bold.
Special mode
Setting
options
Details
Special Print Adjustment
Off, Mode
1, Mode 2,
Mode 3,
Mode 4
Due to the paper type or usage conditions, vertical streaks appear on the
output. When this occurs, change this setting.
The effect becomes gr
eater as the number goes up.
[Off] -> [Mode 1] -> [Mode 2] -> [Mode 3] -> [Mode 4]
(low) (high)
Streaks can be minimized by changing the paper type or usage
conditions, without needing to change the setting.
The more effective the setting, the lower the density becomes.
Additionally
, the outline of text and images may be reproduced less
clearly, and images may appear slightly jagged.
Special Print Mode
Off, Special
Settings 1,
Special
Settings 2
[Off]
The special print mode is disabled and has no effect.
[Special Settings 1]
If a printed barcode is hardly readable when using the default print settings,
set this setting to [Special Settings 1].
The density becomes lower with [Special Settings 1] than with [Off].
Additionally
, text and lines may be reproduced less clearly.
If [Special Settings 1] is specied, the print speed slo
ws down slower
than default settings.
[Special Settings 2]
If white specks or spots appear around text and images when a high-contrast
document is printed, set this setting to [Special Settings 2].
Maintenance
214
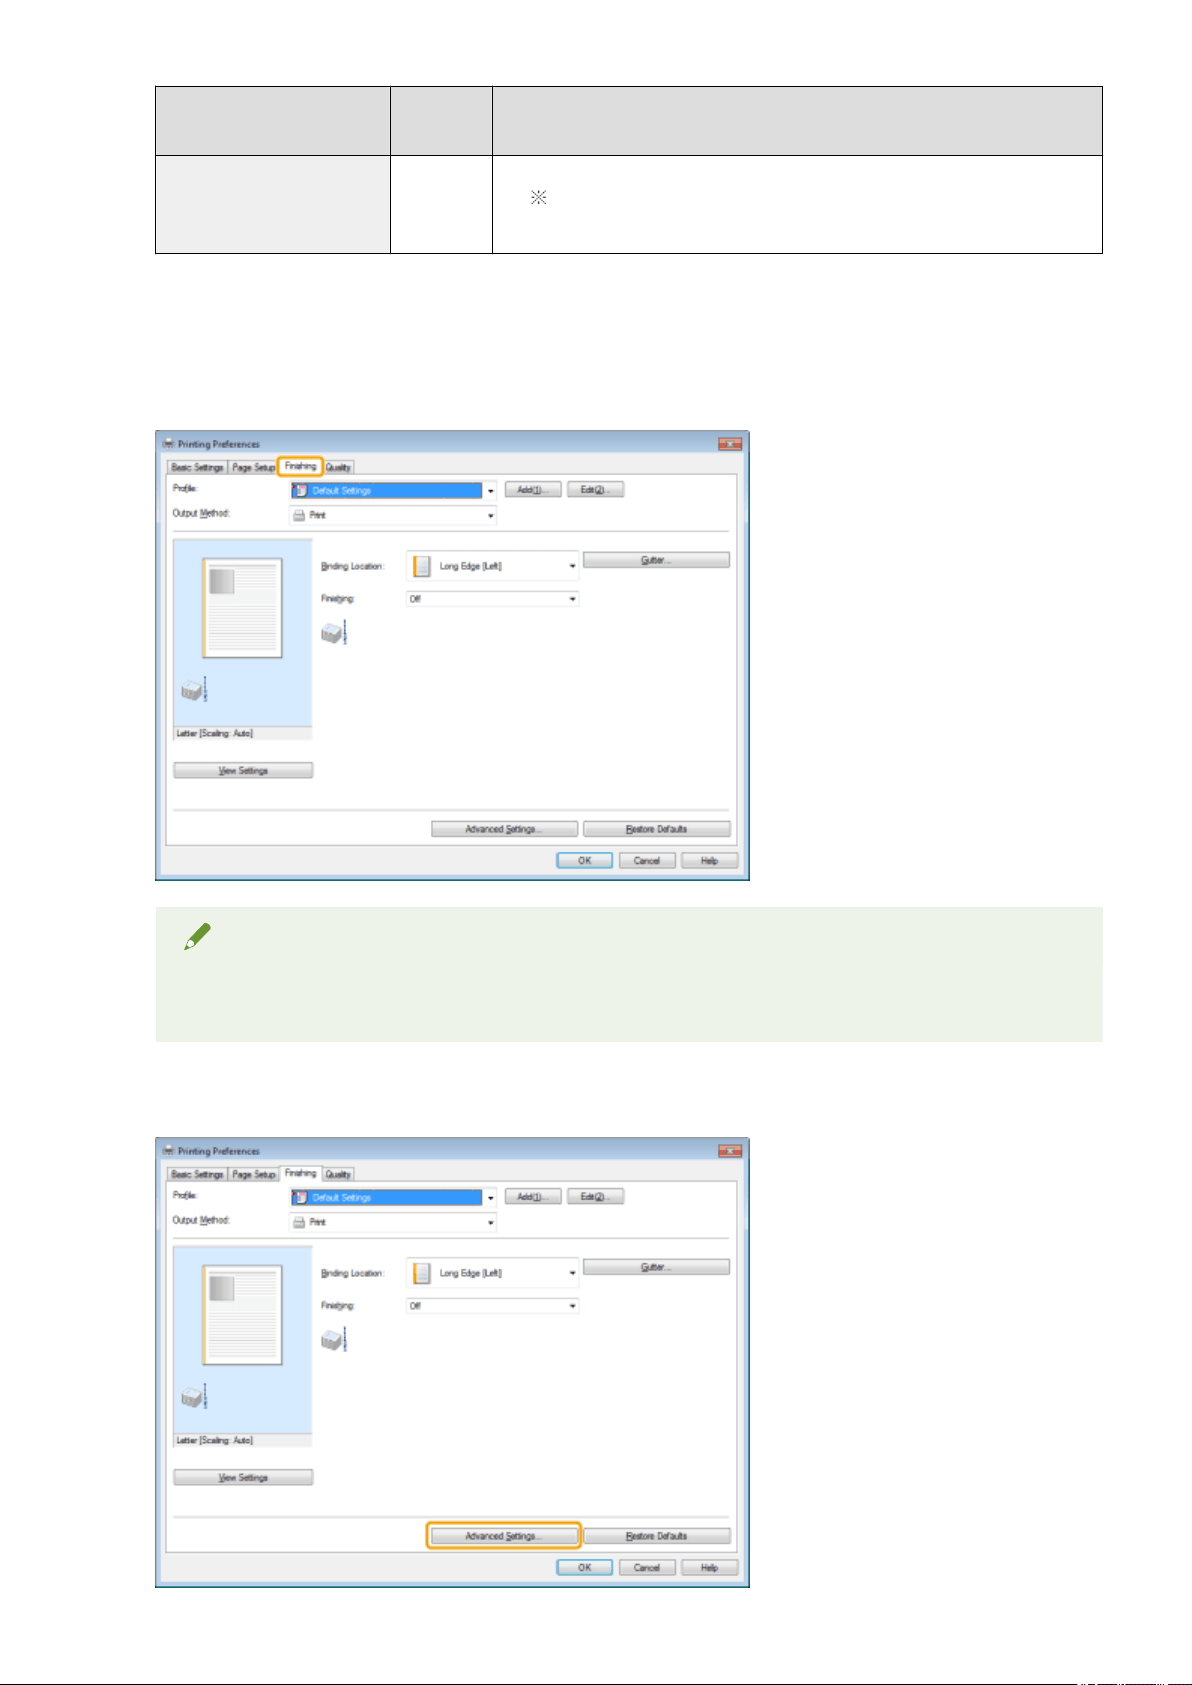
Special mode
Setting
options
Details
The density becomes lower with [Special Settings 2] than with [Off] or
[Special Settings 1]. Additionally
, text and lines may be reproduced less
clearly.
Specifying Special Mode Settings In the Printer Driver
1
Click the [Finishing] tab.
NOTE
For the instructions on how to access the printer driver screen, see " Printing
(P. 98) " and " Conguring
the Default Print Settings(P. 101) ."
2
Click [Advanced Settings].
Maintenance
215
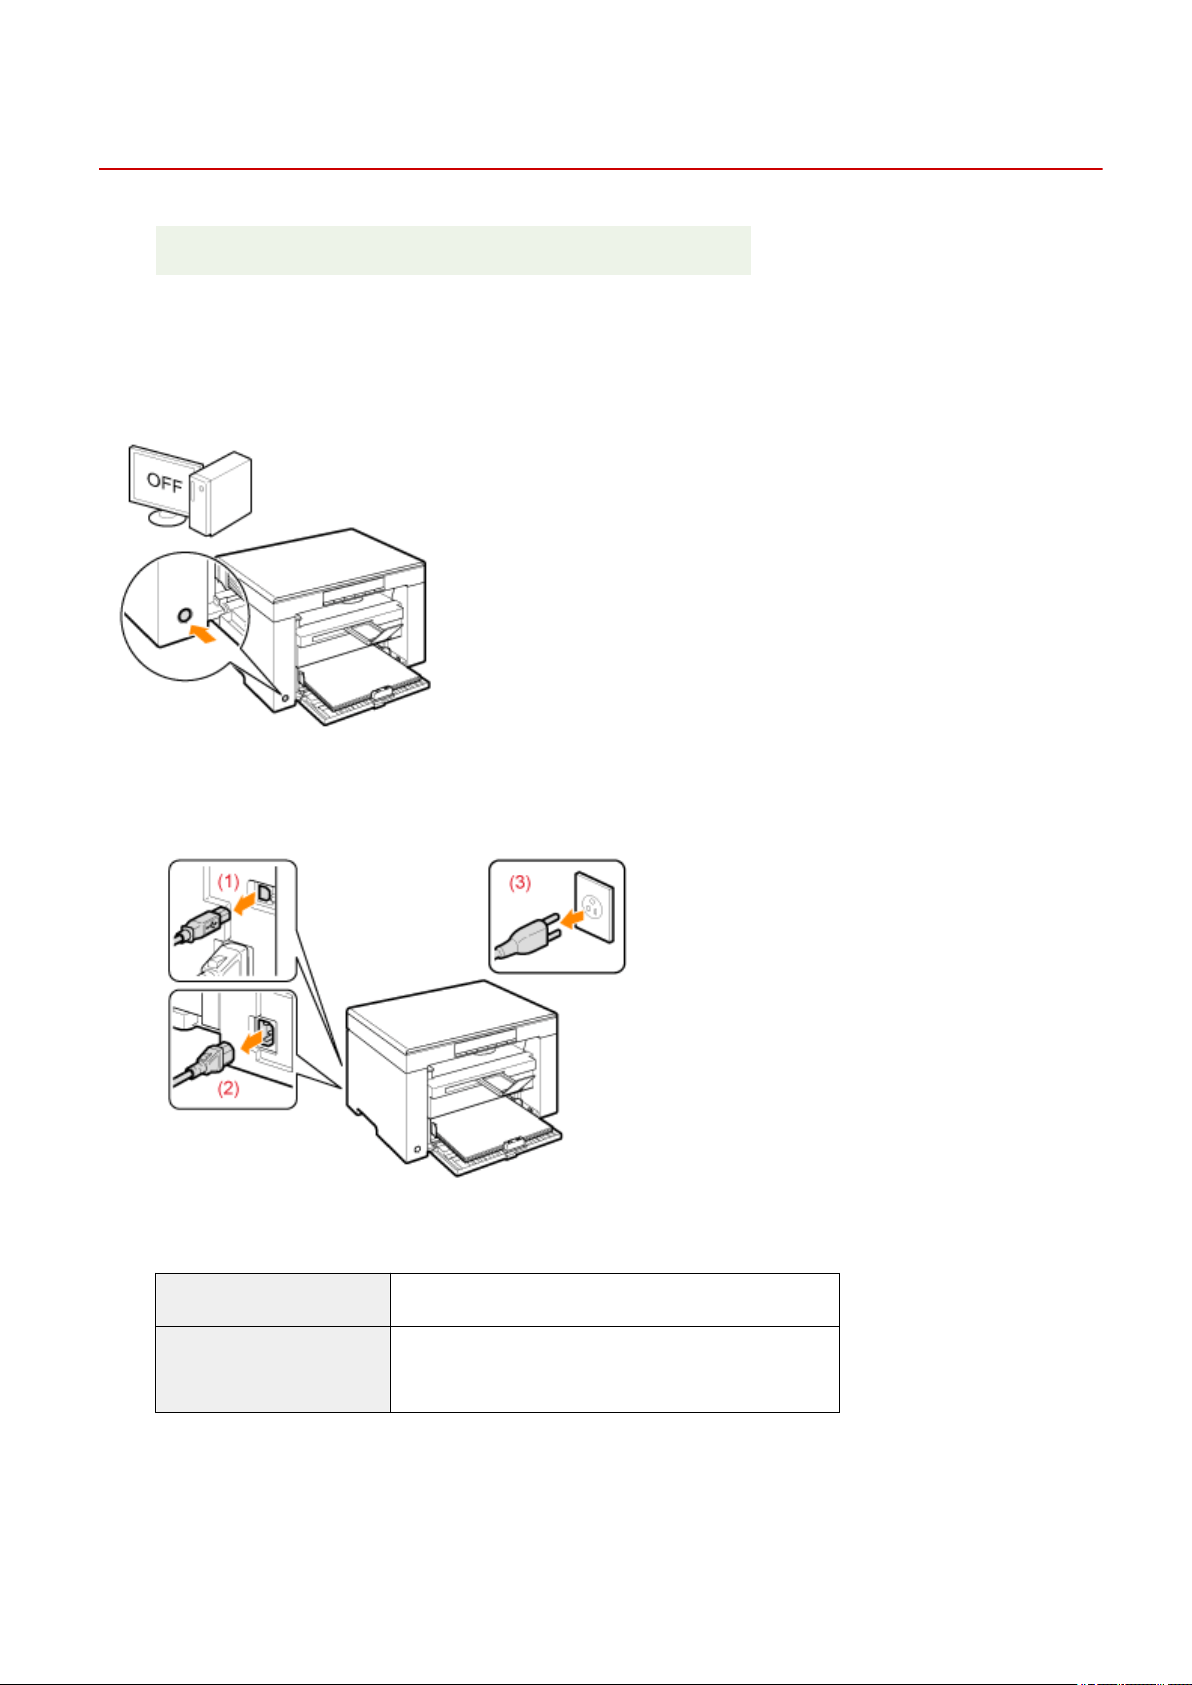
Relocating the Machine
85RS-055
See " Attention (Relocating the Machine)
(P. 219) " in advance.
Follow the steps in the procedure below to relocate the machine somewhere else for maintenance and other
purposes.
1
Turn OFF the machine and all the computers connected to the machine.
2
Disconnect all cables and the power cord from the machine.
How to remove the cables and power cord
USB cable (1) Remove it from the machine.
Power cord
(2) Unplug the power plug from the AC power outlet.
(3) Remove it from the machine.
3
Fold the paper stopper and push the output tray extension into the machine.
Maintenance
216
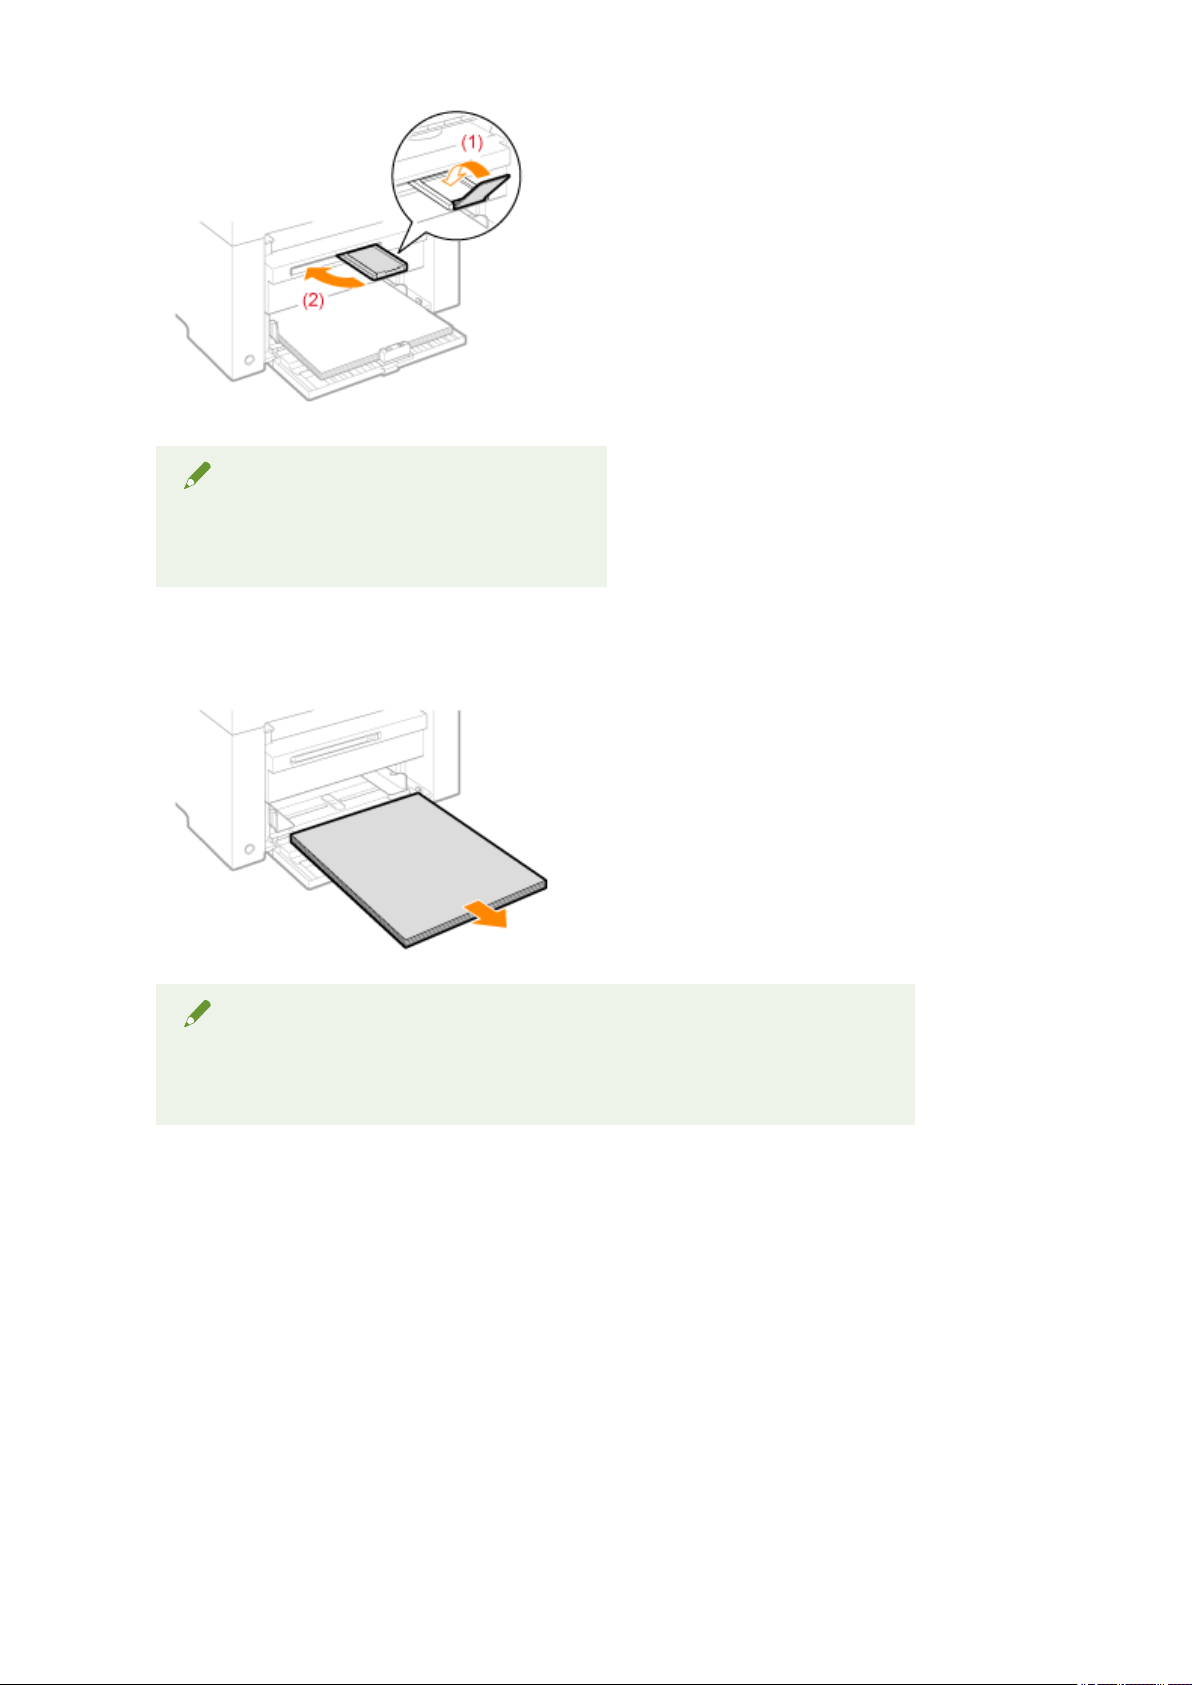
NOTE
When paper is left in the output tray
Remo
ve the paper from the output tray.
4
Remove the paper stack from the paper cassette.
NOTE
When the front paper guide is pulled out from the paper cassette
Push the guide into the paper cassette.
5
Lower the dust cover.
6
Close the paper cassette.
Maintenance
217
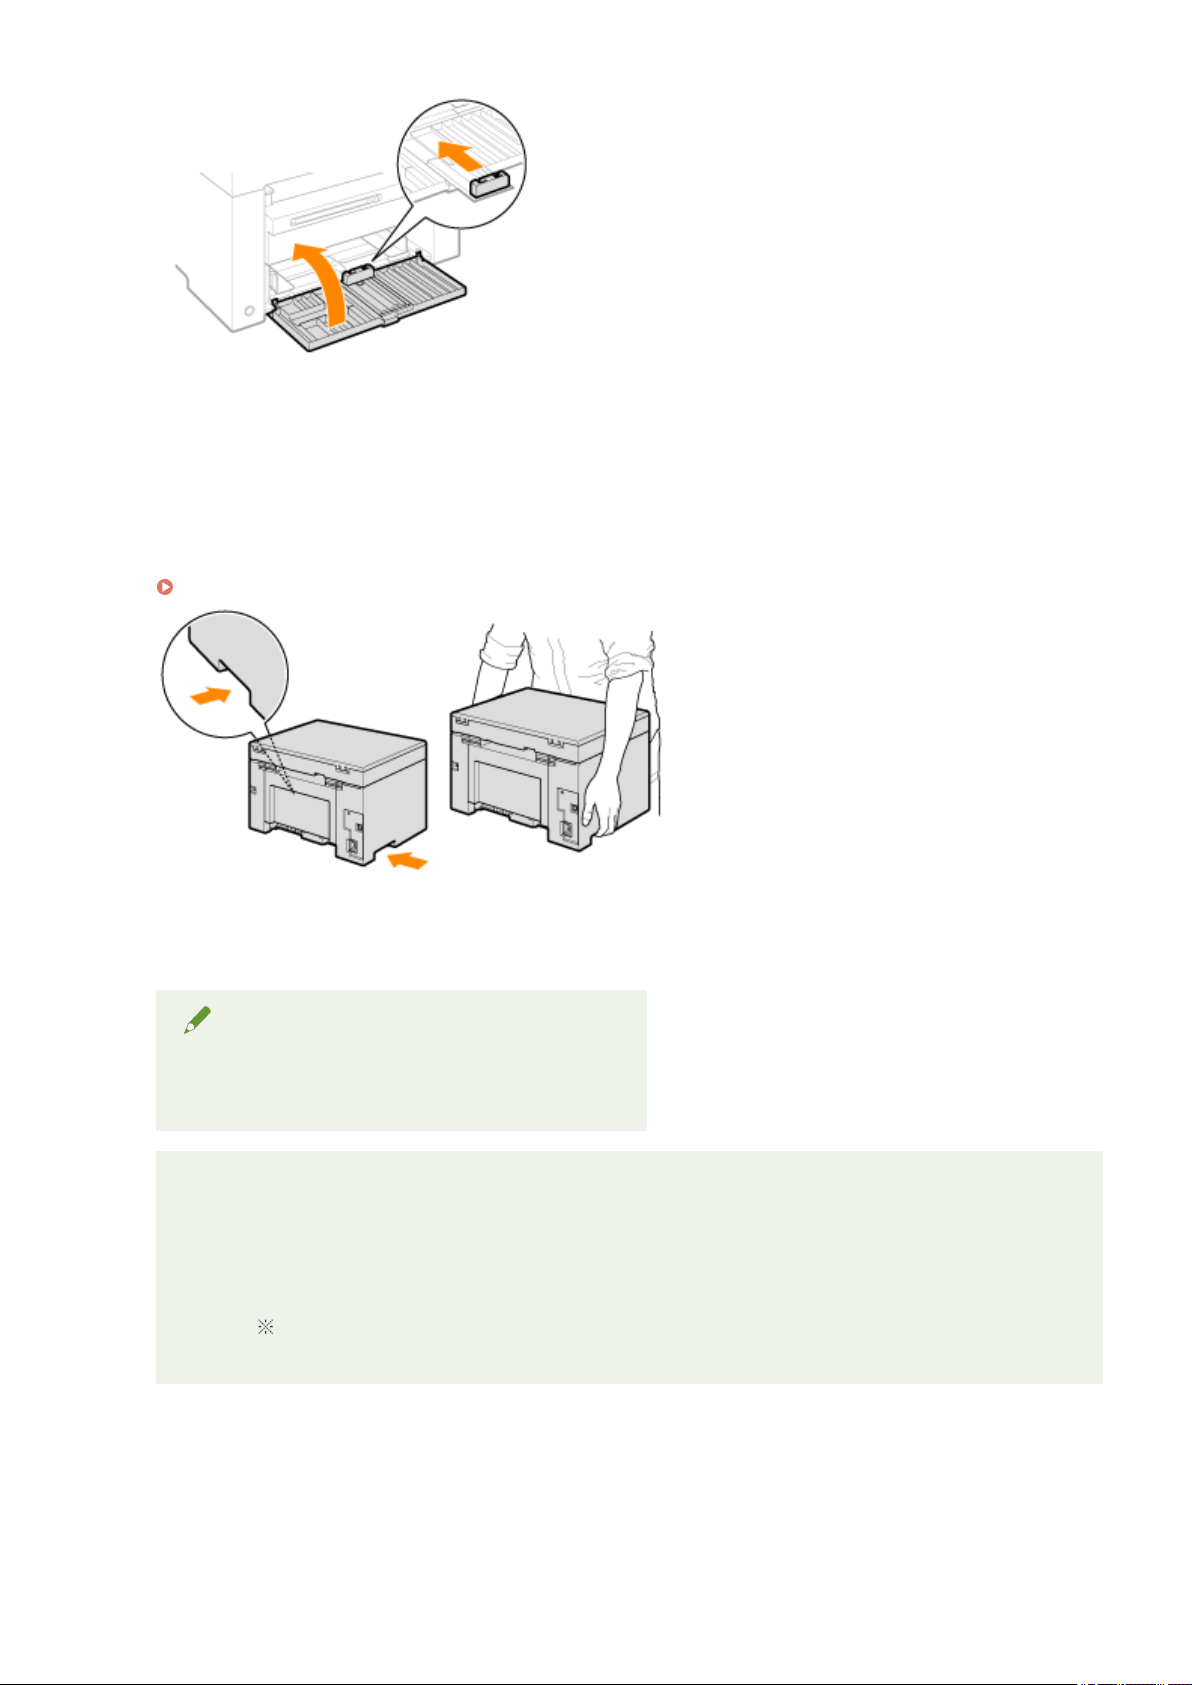
7
Relocate the machine.
Make sure that all the covers and trays are closed and hold the lift handles with the front side of the machine
facing you.
Check the weight of the machine befor
e lifting, carrying, and relocating it.
" Machine Specications(P
. 62) "
8
Carefully set the machine down at the new installation site.
NOTE
When reinstalling the machine
See the Starter Guide that comes with the machine.
When relocating the machine to a far-off place
T
o prevent damage to the machine when relocating the machine to a far-off place, note the following.
● Remove the toner cartridge.
● Securely pack the machine in its original box with the original packing materials.
When the original box and packing materials cannot be found, nd an appr
opriate box and
packing materials to pack the machine and the parts properly.
Maintenance
218

Attention (Relocating the Machine)
85RS-056
WARNING
When relocating the machine
Be sur
e to turn OFF the power switch on the machine and your computer, and unplug the power plug
and interface cables.
Failure to do so can damage the cables or cords, resulting in a re or electrical shock.
CAUTION
Set the machine down slowly and carefully.
Be car
eful not to hurt your hands or ngers.
IMPORTANT
Do not carry the machine with the covers or trays open.
Mak
e sure that the scanning platform and paper cassette are closed before lifting, carrying, and
relocating the machine.
Maintenance
219

Appendix
Appendix .............................................................................................................................................................
221
Third Party Software ......................................................................................................................................... 222
Manuals and Their Contents ............................................................................................................................. 223
Basic Windows Operations ............................................................................................................................... 224
Disclaimers ........................................................................................................................................................ 227
Copyright ........................................................................................................................................................... 228
Trademarks ........................................................................................................................................................ 229
Appendix
220


Third Party Software
85RS-06A
For information r
elated to third-party software, click the following icon(s).
Third-Party Services
Third-party Software Included in this Manual
Appendix
222

Manuals and Their Contents
85RS-061
The manuals listed belo
w are included with the machine. Refer to them as necessary.
Starter Guide
Read this manual rst. This manual describes the installation of the machine, the
settings, and a caution. Be sur
e to read this manual before using the machine.
MF Driver Installation Guide
This manual describes how to install the MF drivers, MF Toolbox, and the supplied
softwar
e.
Quick Reference Guide
This manual describes the basic use of the machine. Place this guide near the printer
for effective usage.
" Using the Quick Refer
ence Guide(P. 27) "
User's Guide (This Manual)
This manual describes all the functions of the machine. You can browse information by
category or enter a k
eyword to search for pages on a specic topic.
" Using User
's Guide(P. 231) "
V_211026
Appendix
223

Basic Windows Operations
85RS-058
Ho
w to Open the Printer Folder(P. 224)
Ho
w to Display the [Scanners and Cameras] Screen(P. 224)
Ho
w to Display [Windows Fax & Scan] Screen(P. 225)
Ho
w to Display the Top Screen of CD-ROM(P. 225)
Ho
w to Check the Windows Process Version (P. 225)
How to Open the Printer Folder
Windows 7
From the [Start] menu, select [Devices and Printers].
Windows 8
Right-click the lower-left corner of the screen, select [Control Panel], and then click [View devices and printers].
Windows 10
1. From the [Start] menu, select [Windows System], and click [Control Panel].
2. Click [Hardware and Sound] and click [Devices and Printers].
How to Display the [Scanners and Cameras] Screen
Windows 7
1. Enter "scanner" in [Search programs and les] under the [Start] menu.
2. Click [View scanners and cameras].
Windows 8
1. Right-click the lower-left corner of the screen and click [Control Panel].
2. Enter "scanner" in [Search Control Panel] on the upper-right corner of the window.
3. Click [View scanners and cameras].
Windows 10
1. From the [Start] menu, select [Windows System], and click [Control Panel].
2. Enter "scanner" in [Search Control Panel] on the upper-right corner of the window.
3. Click [View scanners and cameras].
Appendix
224

How to Display [Windows Fax & Scan] Screen
Windows 7
From the [Start] menu, select [All Programs] -> [Windows Fax and Scan].
Windows 8
1. Right-click the lower-left corner of the screen and select [Search].
2. Enter "scan" and click [Windows Fax & Scan].
Windows 10
1. Enter "scan" in the search box.
2. Click [Windows Fax and Scan] displayed as the search result.
How to Display the Top Screen of CD-ROM
If you cannot display the top screen when setting CD-ROM, perform the following operations.
The CD-ROM drive name is indicated as "D:" in this manual. The CD-ROM drive name may differ depending
on the computer you ar
e using.
Windows 7
1. Enter "D:\Minst.exe" in [Search programs and les] (or [Start Search]) under the [Start] menu.
2. Press the [ENTER] key on the keyboard.
Windows 8
1. Right-click the lower-left corner of the screen and select [Run].
2. Enter "D:\MInst.exe", and then click [OK].
Windows 10
1. Enter "D:\MInst.exe" in the search box.
2. Click [D:\MInst.exe] displayed as the search result.
How to Check the Windows Process Version
1
Open [Control Panel].
Appendix
225
Windows 7
Select [Contr
ol Panel] from [Start] menu.
Windows 8
Right-click the lower-left corner of the screen and select [Control Panel].
Windows 10
Proceed to step 2.
2
Display [System].
Windows 7, 8
Click [System and Maintenance] or [System and Security] -> [System].
Windo
ws 10
1. Select [
] (Settings) from the [Start] menu.
2. Click [System] and select [About].
3
Check the process version.
For 32-bit versions
[32-bit Oper
ating System] is displayed.
For 64-bit versions
[64-bit Operating System] is displayed.
Appendix
226

Disclaimers
85RS-059
● The information in this document is subject to change without notice.
● CANON INC. MAKES NO W
ARRANTY OF ANY KIND WITH REGARD TO THIS MATERIAL, EITHER EXPRESS OR
IMPLIED, EXCEPT AS PROVIDED HEREIN, INCLUDING WITHOUT LIMITATION, THEREOF, WARRANTIES AS TO
MARKETABILITY, MERCHANTABILITY, FITNESS FOR A PARTICULAR PURPOSE OF USE, OR NON-INFRINGEMENT.
CANON INC. SHALL NOT BE LIABLE FOR ANY DIRECT, INCIDENTAL, OR CONSEQUENTIAL DAMAGES OF ANY
NATURE, OR LOSSES OR EXPENSES RESULTING FROM THE USE OF THIS MATERIAL.
● If you are unable to view the manual in PDF format, download Adobe Acrobat Reader from the Adobe
Systems website (https://get.adobe.com/reader/).
Appendix
227

Copyright
85RS-05A
Cop
yright CANON INC. 2022
No part of this publication may be reproduced, transmitted, transcribed, stored in a retrieval system, or
translated into any language or computer language in any form or by any means, electronic, mechanical,
magnetic, optical, chemical, manual, or otherwise, without the prior written permission of Canon Inc.
Appendix
228

Trademarks
85RS-05C
Canon, the Canon logo, and imageCLASS ar
e registered trademarks of Canon Inc. in the United States and may
also be trademarks or registered trademarks in other countries.
Adobe, Acrobat and Reader are registered trademarks of Adobe Systems Incorporated in the United States
and/or other countries.
Apple, Mac, macOS and OS X are trademarks of Apple Inc.
All other trademarks are the property of their respective owners.
All other product and brand names are registered trademarks, trademarks or service marks of their respective
owners.
Appendix
229

Using User's Guide
Using User's Guide ........................................................................................................................................
231
Screen Layout of the User's Guide ................................................................................................................... 232
Top Page ...................................................................................................................................................... 233
Topic Page .................................................................................................................................................... 235
Search Method ............................................................................................................................................. 236
Viewing the User's Guide .................................................................................................................................. 237
Using User's Guide
230

Using User's Guide
85RS-069
The User
's Guide is a manual that can be viewed on your computer or mobile device and it describes all of the
functions of the machine. You can search from your intended use or enter a keyword to quickly nd the page
you are looking for. The section describes the screen layout of the User's Guide and how to read the Guide. You
can specify how the appearance of the User's Guide looks.
Screen Layout of User's Guide
This section describes the screens conguring the User
's Guide and how to use the on-screen buttons.
Scr
een Layout of the User's Guide(P. 232)
Viewing User's Guide
This section describes the meaning of the marks used in the User's Guide, how the keys on the operation panel
and the buttons on the computer display ar
e represented, and other matters that help you understand the
information contained in the User's Guide.
Vie
wing the User's Guide(P. 237)
Specifying How the Appearance of the User's Guide Looks
You can change the character size used in the User's Guide, and switch the screen layout to t to the de
vice you
use to view the User's Guide.
How to Find the Topic You Are Looking for
Sear
ch the contents
You can nd the page you are looking for by selecting the topic from the "Contents" on the left side of
the screen.
Search by keyword
Perform a search by entering a keyword, such as "envelope" or "toner cartridge," and the pages
containing the keyword are displayed. You can nd the page you are looking for from those results. You
can also enter phrases such as "adjusting the density." The keyword search also supports the AND
Boolean to search for multiple keywords. For the organization of the search screen and how to operate
the search screen, see Search Method(P. 236) .
Using User's Guide
231

Screen Layout of the User's Guide
85RS-068
This section describes the scr
een layout of the User's Guide.
The page displayed right after the User's Guide starts is called "Top Page" and the manual description is called
"Topic Page" in this section.
The search panel is used to make search through the User's Guide.
The screen layout is different for each page, so click the following links to see the instruction.
Top Page(P. 233)
Topic Page(P. 235)
Search Method(P. 236)
Using User's Guide
232

Top Page
85RS-063
Appears when the User
's Guide starts.
(1) Table of Contents
Chapter titles ar
e displayed.
(2)
/
Click to display all items, including those nested underneath other items. Click to return to the
original list.
(3)
/
Click to switch between the table of contents and the search display.
(4)
Click to specify settings such as text size, layout, and display method for the User's Guide.
(5)
Click to display information on how to view the User's Guide, how to perform a search, and other
information.
(6)
/
Click to display the previous or following topic.
(7) [First of all...]
Using User's Guide
233

Provide a link to the selected content, to describe the safety instructions, features of the machine, and
ho
w to congure and use the machine eciently (for example, loading paper and using the sleep mode.)
(8) [Select from functions]
Provide a link to the selected content, to let you to learn how to use the functions of the machine.
(9) [Troubleshooting and Maintenance]
Provide a link to the selected content, to describe how to troubleshoot problems and maintain the
machine.
(10) [Others]
The Quick Reference Guide offers handy instructions to operate the machine.
(11) [Disclaimers]
The disclaimers are displayed.
Using User's Guide
234
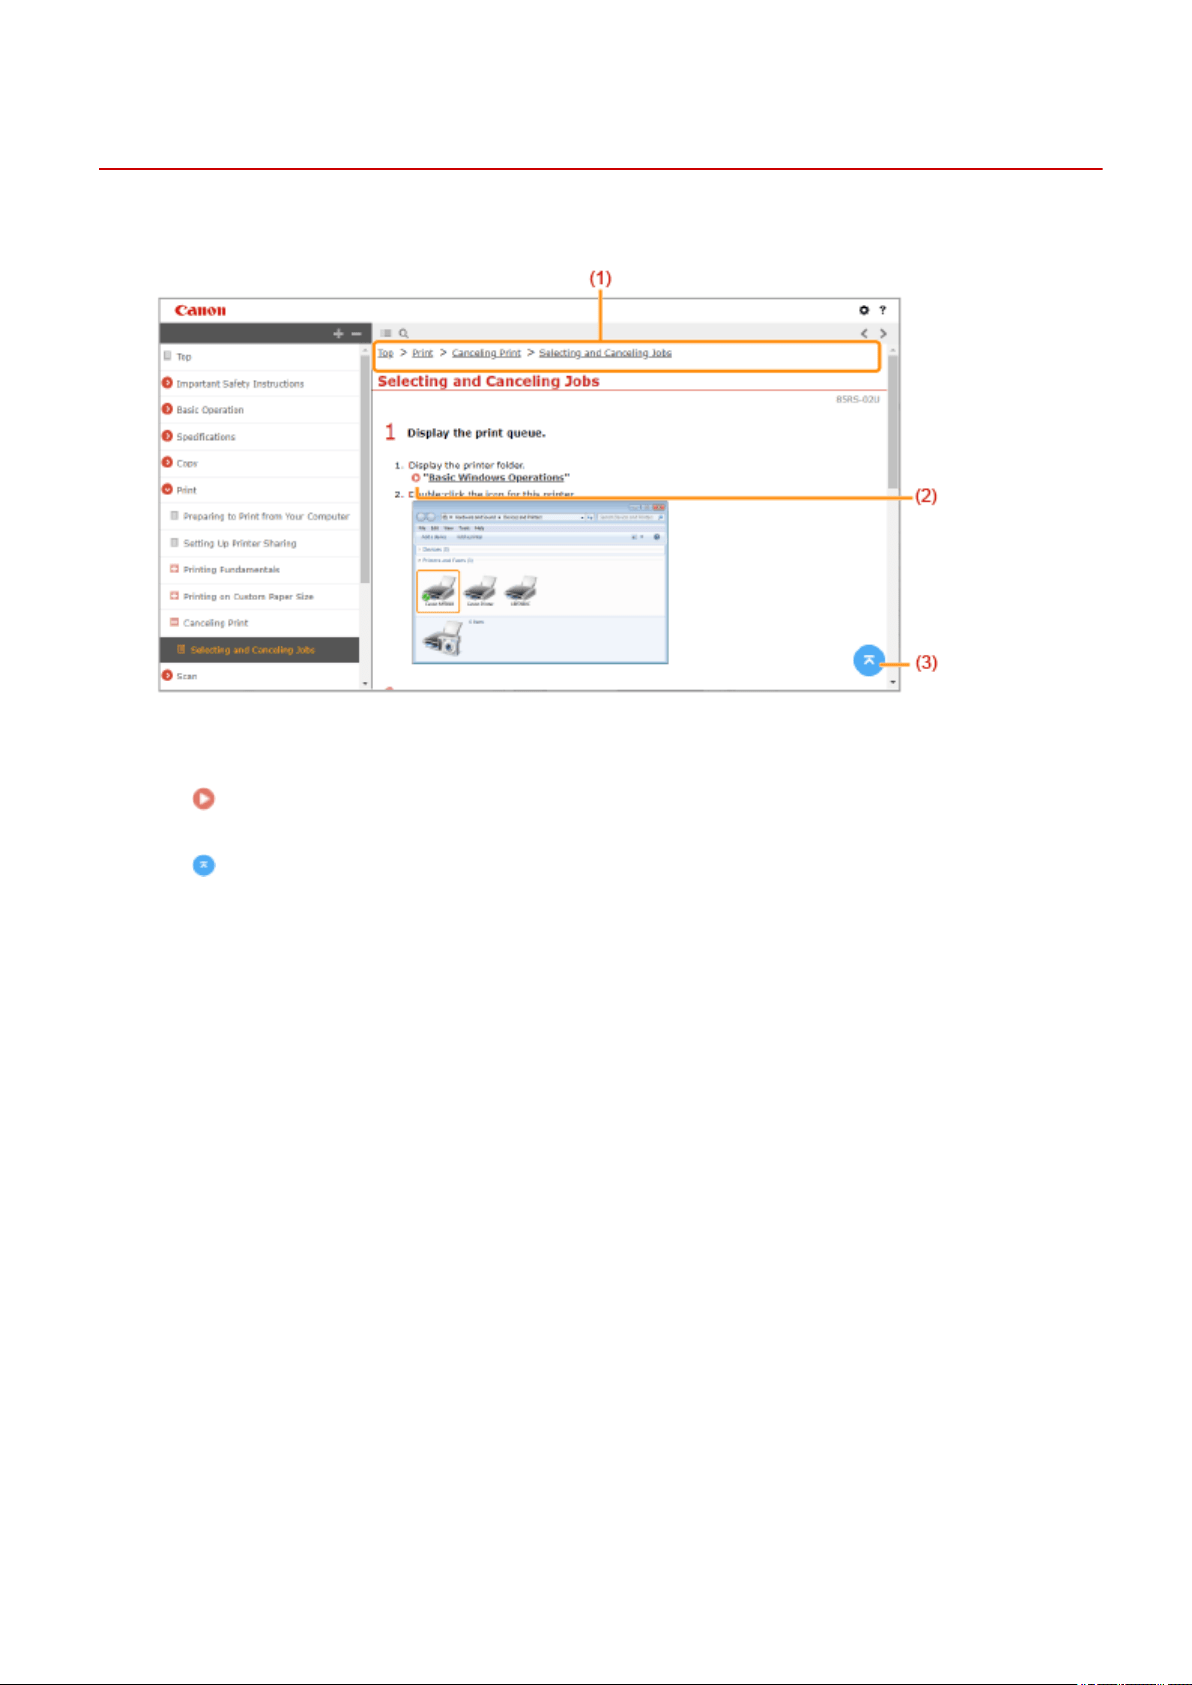
Topic Page
85RS-064
Contains information about ho
w to congure and use the machine.
(1) Navigation
See what chapter topic you ar
e currently viewing.
(2)
Click to go to the corresponding page. To return to the previous page, click "Back" on your Web browser.
(3)
Click to return to the page top.
Using User's Guide
235
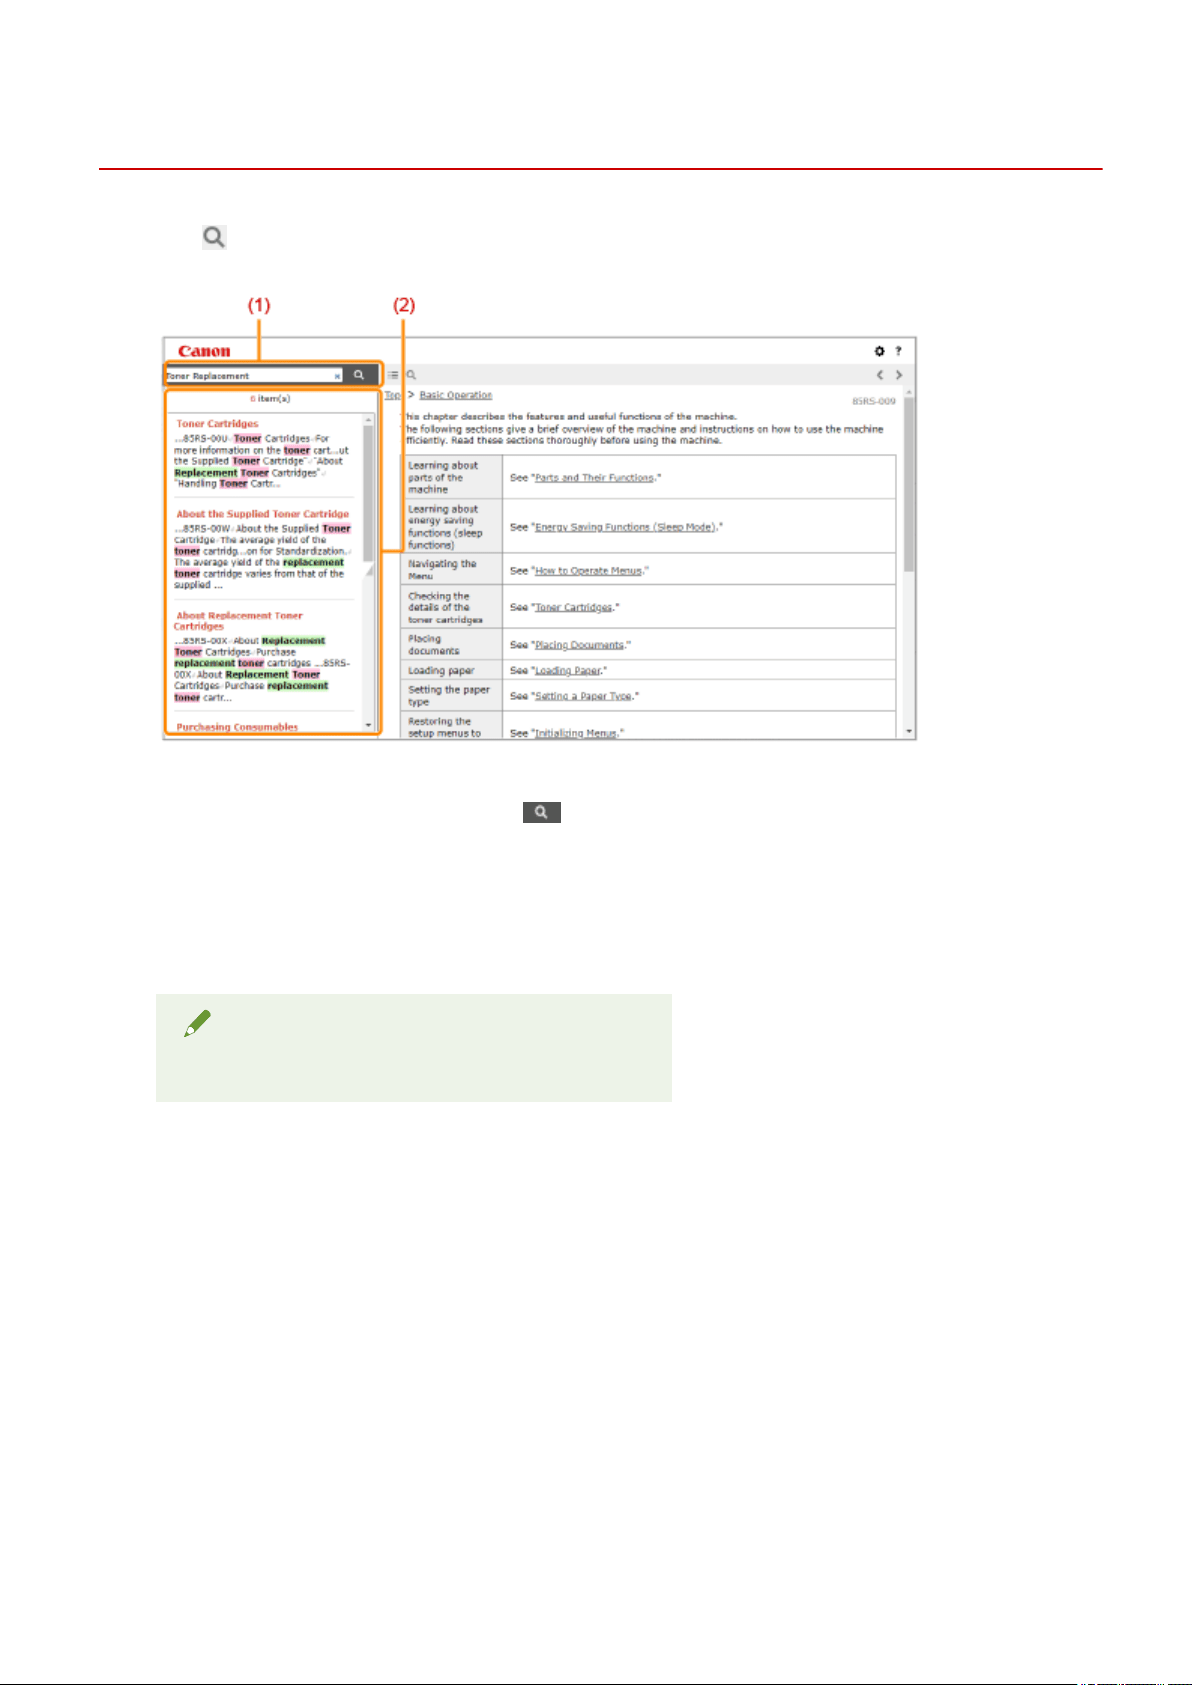
Search Method
85RS-065
Click to display the search screen. Contains a text box to perform a search by keyword and nd the page
you ar
e looking for.
(1) [Enter keyword(s) here]
Enter a k
eyword or keywords and click
to display the search results. Search for pages containing all
k
eywords by spacing keywords apart. Search for only pages with exact matches by enclosing keyword
phrases in double quotation marks.
(2) Search result
Displays the sear
ch results of the pages that contain the specied keywords. From the results, locate the
page you are looking for and click the topic title of the page.
NOTE
● Specied keywords appear in bold in search results.
Using User's Guide
236

Viewing the User's Guide
85RS-066
Symbols Used in the User's Guide
The following are descriptions of warnings and cautions used in the User's Guide to explain handling
restrictions, precautions, and instructions that should be observed for your safety.
WARNING
Indicates a warning concerning operations that may lead to death or injury to persons if not performed
corr
ectly. To use the machine safely, always pay attention to these warnings.
CAUTION
Indicates a caution concerning operations that may lead to injury to persons if not performed correctly.
T
o use the machine safely, always pay attention to these cautions.
IMPORTANT
Indicates operational requirements and restrictions. Be sure to read these items carefully to operate the
machine corr
ectly, and avoid damage to the machine or property.
NOTE
Indicates a clarication of an oper
ation, or contains additional explanations for a procedure. Reading
these notes is highly recommended.
Indicates an operation that must not be performed. Read these items carefully, and make sure not to
perform the described oper
ations.
Keys and Buttons Used in This Manual
The follo
wing are examples of how operation panel keys and on-screen buttons are depicted in the User's
Guide.
Type Depiction in the User's Guide Example
Operation Panel keys [Ke
y icon]
[
]
Buttons on computer operation screen and so on [Button name and so on] [Preferences]
Screenshots Used in the User's Guide
The contents of the scr
eenshots used in the User's Guide are the default settings.
Using User's Guide
237

Depending on the system congur
ation, the contents of the screenshots may partly differ.
The functions of the printer driver may be changed due to upgrade.
Using User's Guide
238

This Font Software is licensed under the SIL Open Font License,
V
ersion 1.1.
This license is copied below, and is also available with a FAQ at:
http://scripts.sil.org/OFL
-----------------------------------------------------------
SIL OPEN FONT LICENSE Version 1.1 - 26 February 2007
-----------------------------------------------------------
PREAMBLE
The goals of the Open Font License (OFL) are to stimulate worldwide
development of collaborative font projects, to support the font
creation efforts of academic and linguistic communities, and to
provide a free and open framework in which fonts may be shared and
improved in partnership with others.
The OFL allows the licensed fonts to be used, studied, modied and
redistributed freely as long as they are not sold by themselves. The
fonts, including any derivative works, can be bundled, embedded,
redistributed and/or sold with any software provided that any reserved
names are not used by derivative works. The fonts and derivatives,
however, cannot be released under any other type of license. The
requirement for fonts to remain under this license does not apply to
any document created using the fonts or their derivatives.
DEFINITIONS
"Font Software" refers to the set of les released by the Copyright
Holder(s) under this license and clearly marked as such. This may
include source les, build scripts and documentation.
"Reserved Font Name" refers to any names specied as such after the
copyright statement(s).
"Original Version" refers to the collection of Font Software
components as distributed by the Copyright Holder(s).
"Modied Version" refers to any derivative made by adding to,
deleting, or substituting -- in part or in whole -- any of the
components of the Original Version, by changing formats or by porting
the Font Software to a new environment.
"Author" refers to any designer, engineer, programmer, technical
writer or other person who contributed to the Font Software.
PERMISSION & CONDITIONS
Permission is hereby granted, free of charge, to any person obtaining
a copy of the Font Software, to use, study, copy, merge, embed,
modify, redistribute, and sell modied and unmodied copies of the
Font Software, subject to the following conditions:
SIL OPEN FONT LICENSE
239

1) Neither the Font Software nor any of its individual components, in
Original or Modied V
ersions, may be sold by itself.
2) Original or Modied Versions of the Font Software may be bundled,
redistributed and/or sold with any software, provided that each copy
contains the above copyright notice and this license. These can be
included either as stand-alone text les, human-readable headers or
in the appropriate machine-readable metadata elds within text or
binary les as long as those elds can be easily viewed by the user.
3) No Modied Version of the Font Software may use the Reserved Font
Name(s) unless explicit written permission is granted by the
corresponding Copyright Holder. This restriction only applies to the
primary font name as presented to the users.
4) The name(s) of the Copyright Holder(s) or the Author(s) of the Font
Software shall not be used to promote, endorse or advertise any
Modied Version, except to acknowledge the contribution(s) of the
Copyright Holder(s) and the Author(s) or with their explicit written
permission.
5) The Font Software, modied or unmodied, in part or in whole,
must be distributed entirely under this license, and must not be
distributed under any other license. The requirement for fonts to
remain under this license does not apply to any document created using
the Font Software.
TERMINATION
This license becomes null and void if any of the above conditions are
not met.
DISCLAIMER
THE FONT SOFTWARE IS PROVIDED "AS IS", WITHOUT WARRANTY OF ANY KIND,
EXPRESS OR IMPLIED, INCLUDING BUT NOT LIMITED TO ANY WARRANTIES OF
MERCHANTABILITY, FITNESS FOR A PARTICULAR PURPOSE AND NONINFRINGEMENT
OF COPYRIGHT, PATENT, TRADEMARK, OR OTHER RIGHT. IN NO EVENT SHALL THE
COPYRIGHT HOLDER BE LIABLE FOR ANY CLAIM, DAMAGES OR OTHER LIABILITY,
INCLUDING ANY GENERAL, SPECIAL, INDIRECT, INCIDENTAL, OR CONSEQUENTIAL
DAMAGES, WHETHER IN AN ACTION OF CONTRACT, TORT OR OTHERWISE, ARISING
FROM, OUT OF THE USE OR INABILITY TO USE THE FONT SOFTWARE OR FROM
OTHER DEALINGS IN THE FONT SOFTWARE.
SIL OPEN FONT LICENSE
240

Third Party Software
This Canon product (the “PRODUCT”) includes third-party software modules. Use and distribution of these
software modules (the “SOFTWARE”) are subject to the conditions below.
(1) You agree that you will comply with any applicable export control laws, restrictions or regulations of the
countries involved in the event that this product including the SOFTWARE is shipped, transferred or
exported into any country.
(2) Rights holders of the SOFTWARE retain in all respects the title, ownership and intellectual property rights
in and to the SOFTWARE. Except as expressly provided herein, no license or right, expressed or implied,
is hereby conveyed or granted by rights holders of the SOFTWARE to you for any intellectual property of
rights holders of the SOFTWARE.
(3) You may use the SOFTWARE solely for use with the PRODUCT.
(4) You may not assign, sublicense, market, distribute, or transfer the SOFTWARE to any third party without
prior written consent of rights holders of the SOFTWARE.
(5) Notwithstanding the foregoing, you may transfer the SOFTWARE only when (a) you assign to a
transferee all of your rights to the PRODUCT and all rights and obligations under the conditions governing
the SOFTWARE and PRODUCT and (b) such transferee agrees in writing to be bound by all these
conditions.
(6) You may not decrypt, decompile, reverse engineer, disassemble or otherwise reduce the code of the
SOFTWARE to human readable form.
(7) You may not modify, adapt, translate, rent, lease or loan the SOFTWARE or create derivative works
based on the SOFTWARE.
(8) You are not entitled to remove or make separate copies of the SOFTWARE from the PRODUCT.
(9) The human-readable portion (the source code) of the SOFTWARE is not licensed to you.

ACCEPTANCE
THE TERMS OF THIS THIRD PARTY SOFTWARE STATED HERE OR IN RELATED WARRANTY
PROVISIONS SHALL BE DEEMED ACCEPTED UPON YOUR USE OF THE PRODUCT FOR ONE OR
MORE OF ITS NORMAL PURPOSES, IF THERE HAS BEEN NO OTHER PRIOR EXPRESS ACCEPTANCE.
THE TERMS OF THIS THIRD PARTY SOFTWARE GOVERN THE THIRD PARTY SOFTWARE AS
DELIVERED WITH THE PRODUCT AND ALL UPDATED VERSIONS OF THE THIRD PARTY SOFTWARE
PROVIDED UNDER MAINTENANCE AGREEMENTS OR OTHER SERVICE ARRANGEMENTS FOR THE
PRODUCT WITH CANON USA OR CANON CANADA OR THEIR RESPECTIVE AUTHORIZED SERVICE
ORGANIZATIONS.
