CSC900 StairClimber
OWNER’S MANUAL


2
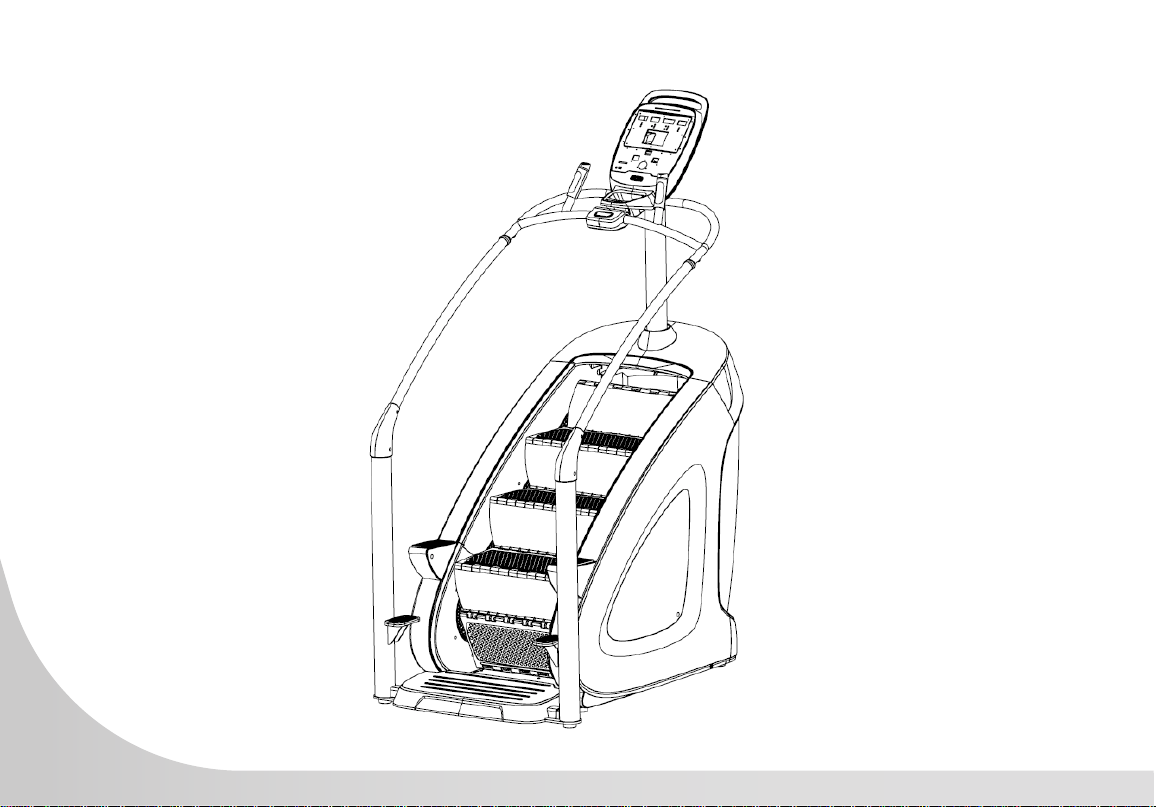
Congratulations on your new StairClimber and welcome to the Spirit Fitness family!
Thank you for your purchase of this quality StairClimber from Spirit Fitness. Your new StairClimber
was manufactured by one of the leading tness manufacturers in the world and is backed by one
of the most comprehensive warranties available. Through your dealer, Spirit Fitness will do all we
can to make your ownership experience as pleasant as possible for many years to come. If not
purchased direct from Spirit Fitness, the local dealership where you purchased this StairClimber is your
administrator for all Spirit Fitness warranty and service needs. Their responsibility is to provide you
with the technical knowledge and service personnel to make your experience more informed and any
difculties easier to remedy.
Please take a moment at this time to record the name of the dealer, their telephone number, and the
date of purchase below to make any future, needed contact easy. We appreciate your support and we
will always remember that you are the reason that we are in business.
Yours in Health,
Spirit Fitness
NAME OF DEALER _____________________________________
DEALER PHONE # _____________________________________
PURCHASE DATE _____________________________________

3
IMPORTANT SAFETY
INSTRUCTIONS
WARNING
• Always unplug the machine from the electrical outlet
before cleaning or servicing.
• This machine is not intended to be serviced by the
end user, refer servicing to qualied personnel only.
• This product will be wired for either 120 VAC
nominal power input OR 230 VAC nominal input.
It is factory-equipped with a specic electric cord
and plug to permit connection to the proper electric
circuit. Make sure that the product is connected to a
dedicated power line having an outlet with the same
conguration as that of the plug.
• Improper connection of the equipment-grounding
conductor can result in a risk of electric shock. Check
with a qualied electrician or serviceman if you are in
doubt as to whether the product is properly grounded.
Do not modify the plug provided with the product.
NO adapter should be used with this product.
• If the product must be reconnected for use on a
different type of electric circuit, the reconnection
should be made by qualied service personnel in
order to avoid a hazard.
• Maximum User Weight: 400 lbs / 180 kg.
• This appliance is not intended for use by persons with
reduced physical, sensory or mental capabilities, or
lack of experience and knowledge, unless they have
been given supervision or instruction concerning use
of the appliance by a person responsible for their
safety.
• Keep children under the age of 13 away from
this machine.
SAVE THESE INSTRUCTIONS - THINK SAFETY!
IMPORTANT ELECTRICAL
INSTRUCTIONS
WARNING
• This equipment is designed for use in a commercial
gymnasium or health club. To ensure the proper
use of the equipment in a safe manner, all users
of the equipment should read this manual before
using the machine. This machine should be made
a part of your club training program in order that
the equipment is used by your members in a safe

4
buttons on the console. If you experience difculties
during the workout, pushing the STOP button will
bring the machine to a stop.
• Do not exceed the maximum allowable weight limit
of 400 lbs. / 180 kg.
• Use care when getting on or off the machine.
Always use the handrails. Do not step off of the
machine while it is moving. Press the STOP button
and wait for the machine to come to a complete
stop before dismounting.
• Do not overexert yourself during exercise. Stop
exercising if you feel pain or tightness in your chest,
become short of breath or feel faint. If you feel
pain or experience any abnormal symptoms, stop
exercising and consult your health care provider.
• Wear proper exercise clothing and athletic shoes
during a workout. Avoid wearing loose clothing.
Tie back long hair and keep towels away from the
moving parts. Face forward at all times and never
attempt to turn around while the machine is moving.
• Do not operate the machine if the motor shroud is
removed or if the power cord is damaged in any
manner.
• Keep all air openings free from dirt or any material
that would block the ow of air to the motor.
• The safety and integrity of this machine can only
be maintained when the equipment is regularly
examined for damage and wear and repaired. It is
manner as intended. In addition to instructing the
club members in the proper use of the equipment,
the club member should obtain a complete physical
examination form their health care provider before
beginning any exercise program.
• This machine is not intended to be used by children.
It is not intended to be used by persons with reduced
physical, sensory, or mental capabilities or lack of
experience and knowledge, unless given instruction
and under the personal supervision concerning use
of the machine by a person responsible for their
safety. Do not leave children unsupervised around
the machine.
• Assemble and operate the machine on a solid level
surface. Position the machine with a minimum of 20
inches (0.5 meters) of clearance on each side to
allow for ease of mounting and dismounting. Allow
for 48 inches (1.25 meters) of clearance behind the
machine. These dimensions are the recommended
minimum distances. The actual area for access and
passage is the responsibility of the facility and should
take into account this training envelope and any
other national or local codes or regulations.
• Keep power cord away from heated surfaces.
Unplug power cord when the machine is unattended
and before performing any preventative maintenance
such as cleaning or replacing a worn part.
• Familiarize yourself with the location of the STOP

5
the sole responsibility of the owner of this equipment
to ensure that regular maintenance is performed.
Worn or damaged parts must be replaced
immediately, or the equipment removed from service
until the repair is made.
• NEVER expose this StairClimber to rain or
moisture. This product is NOT designed
for use outdoors, near a pool or spa, or in
any other high humidity environment. The
operating temperature specication is 40 to
120 degrees Fahrenheit, and humidity is 95%
non-condensing (no water drops forming on
surfaces).
IMPORTANT
OPERATION
INSTRUCTIONS
• NEVER operate this StairClimber without reading
and completely understanding the results of any
operational change you request from the computer
console.
• Understand that changes in resistance do not occur
immediately. Set your desired resistance level on the
computer console and release the adjustment button.
The computer will obey the command gradually.
• Use caution while participating in other activities
while stepping on the rotating staircase; such as
watching television, reading, etc. These distractions
may cause you to lose balance which
may result in serious injury.
• Do not use excessive pressure on console control
buttons. They are precision set to function properly
with little nger pressure.
WARNING
This product can expose you to chemicals including
Toluene and Acrylamide which are known to the
State of California to cause Cancer and birth
defects or other reproductive harm. For more
information, go to www.P65Warnings.ca.gov
RECORD YOUR SERIAL NUMBER
Please record the serial number of this tness
product in the space provided below. The serial
number is located on the front of the StairClimber.

6
SERIAL NUMBER:
REGISTER YOUR PURCHASE
The self-addressed product registration card must be completed in full and returned to Spirit Fitness. You can
also go to www.spirittness.com/warranty under the Support tab to register online.

7
CSC900 PRE-ASSEMBLY
TOOLS INCLUDED:
5mm Allen Wrench
6mm Allen Wrench
PARTS INCLUDED:
1 Main Frame
1 Console
1 Console Mast
1 Column Group
1 Decorative Ring
1 Handlebar Group
2 Side Handlebars
2 Decorative Rings
1 Handlebar
Reinforcement
1 Hardware Kit
2 Handlebar Covers
UNPACKING
1. Read all instructions before assembling.
2. Assemble and operate the StairClimber on a hard, level surface in the area
intended for use.
3. Attach all fasteners and partially tighten them. Do not fully tighten fasteners until
assemble of all components is complete.
4. Do not attempt to move the unit by yourself. Have at least one other person help
and use safe lifting techniques.
5. Do not grasp on any plastic parts of the unit while lifting and moving. The plastic
components are non-structural covers and not capable of supporting the weight of
the unit.
6. Locate the hardware package. The hardware is labeled with its specication
as a description. Each of the assembly steps reference the descriptions to avoid
confusion during assembly.
8
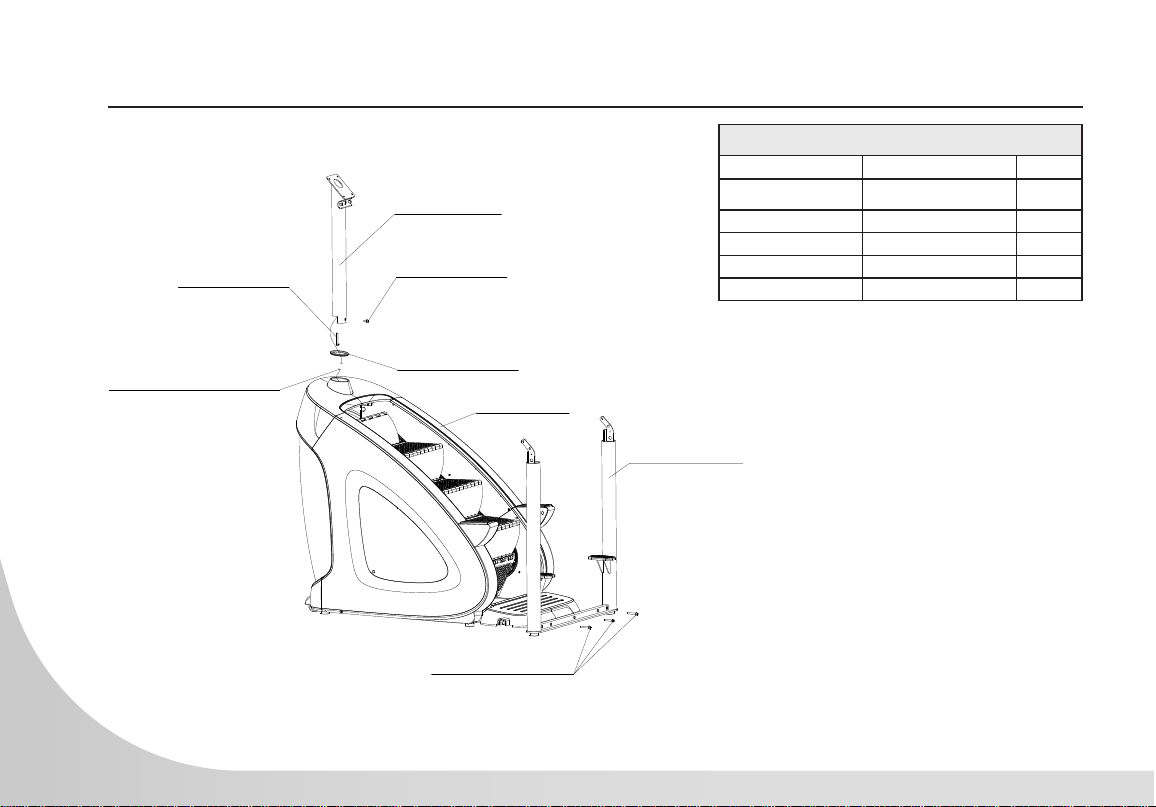
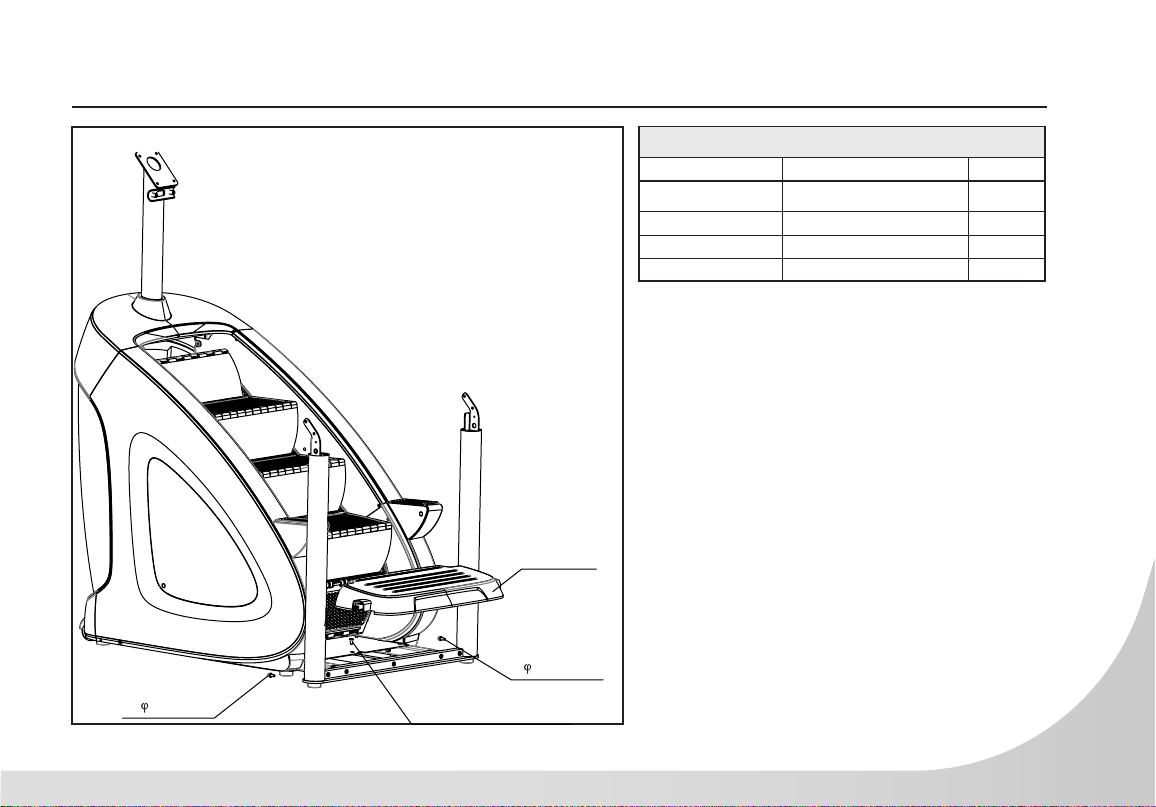
CSC900 STEP ONE
Hardware for Step 1
TYPE DESCRIPTION QTY
CONSOLE MAST 1
BOLT
M8 X 20L
1
BOLT
M6 X 65L
1
BOLT
M8 X 55L
3
WASHER
Ø8
5
1. Insert Console Mast wire through
Decorative Ring then around to
insert through rear of tube. Connect
the Communication Wires between
the Main Frame and Console Mast.
2. Attach the Decorative Ring to
Console Mast using the Bolt M8*20
(1pc), M8*65 (1pc) and ø8 at
washer (2pc).
3. Attach the Column Group to the
lower Main Frame, using the
M8*55 Bolts (3pcs) and the ø8 at
washer (3pcs).
φ8 flat washer
φ8 flat washer
φ8 flat washer
M8*20 bolt
Column group
M8*65 bolt
Console mast
Communication wires
Decorative ring
Main Frame
Using bolt M8*55
9
CSC900 STEP TWO
Hardware for Step 2
TYPE DESCRIPTION QTY
STEP BASE 1
BOLT
M8 X 20L
2
BOLT
M8 X 30L
1
WASHER
ø8
2
1. Attach the Step Base to the lower Main
Frame using the M8*20 Bolts (2pcs), ø8 Flat
Washers (2pcs) and M8*30 Bolt (1pc).
M8*20 Bolt
8 Flat Washer
M8*20 Bolt
8 Flat Washer
M8*30 Bolt
Step Base
10
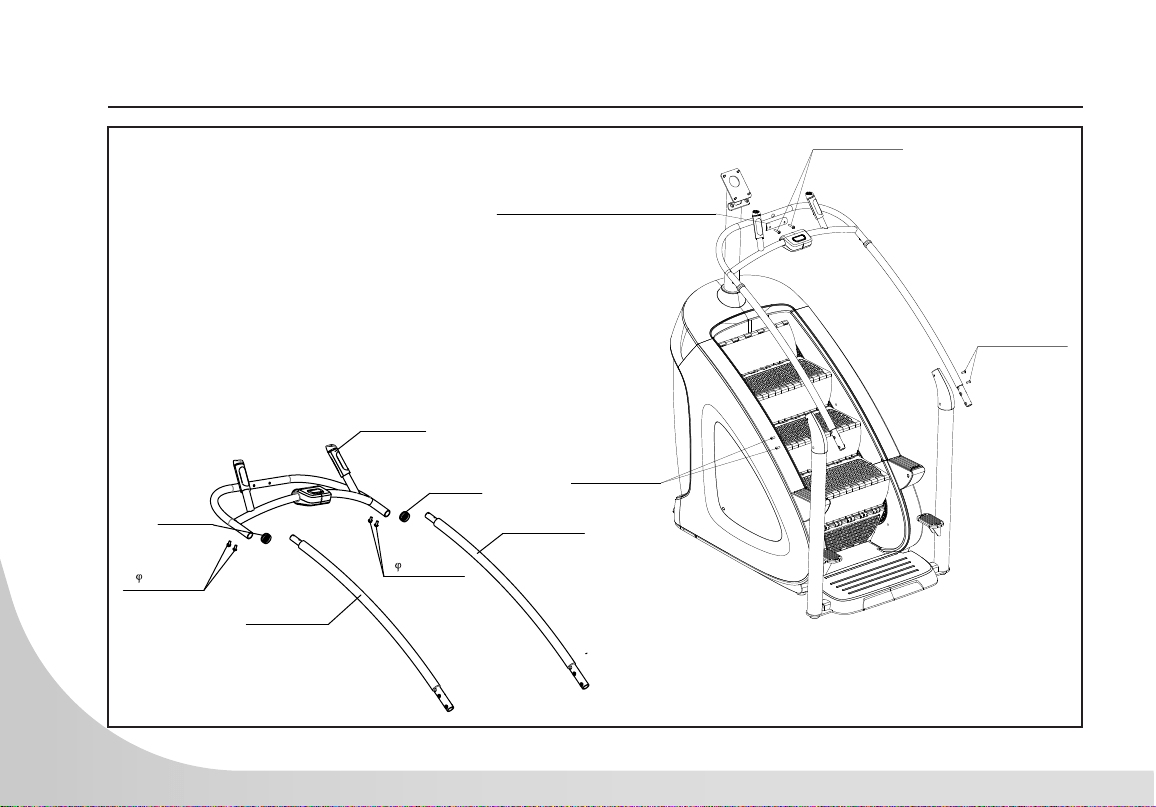
CSC900 STEP THREE
Handlebar Group
Decorative Ring
Decorative Ring
Side Handlebar
Side Handlebar
M8*20 Bolt
8 Flat Washer
M8*20 Bolt
8 Flat Washer
Handleber Reinforcement
M8*20 bolt
φ8 flat
M8*40 bolt
M8*20 bolt

11
CSC900 STEP THREE - CONTINUED
Hardware for Step 3
TYPE DESCRIPTION QTY
SIDE HANDLEBARS 2
HANDLEBAR GROUP 1
DECORATIVE RINGS 2
REINFORCEMENT PLATE 1
BOLT
M8 X 20L
6
BOLT
M8 X 40L
2
WASHER
ø8
6
1. Connect wires with same terminal.
2. Attach Side Handlebars to the Handlebar Group and
with the Decorative Rings using M8*20 Blots (4pcs),
ø8 Flat Washers (4pcs).
3. Attach Handlebar Group to Console Mast with the
Reinforcement Plate using M8*40 Bolts (2pcs), ø8
Flat Washers (2pcs).
4. Attach Handlebars to the Column Groups using
M8*20 Bolts (2pcs).
12
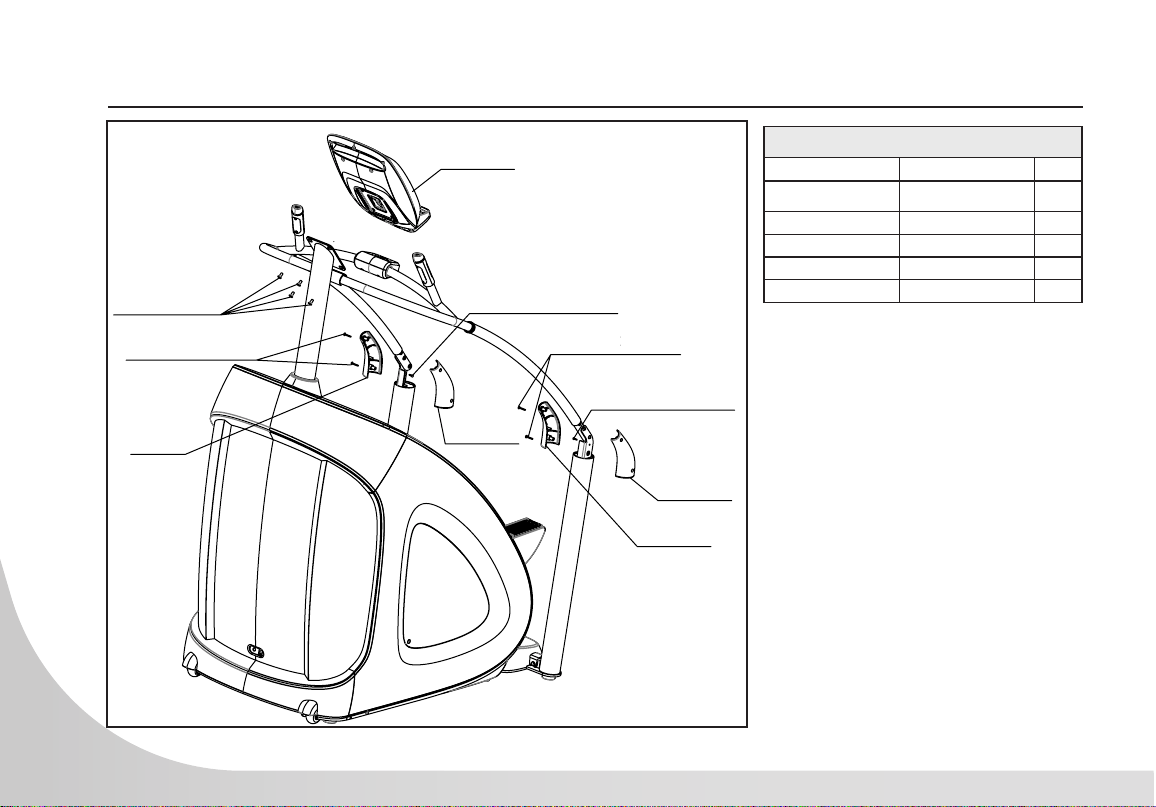
CSC900 STEP FOUR
Hardware For Step 4
TYPE DESCRIPTION QTY
CONSOLE 1
HANDRAIL COVERS
SETS
2
BOLT
M8 X 20L
4
SCREW
M4 X 30L
4
SCREW
ST4.2 X 15L
2
1. Connect Console using M8*20L
Bolts (4pcs).
2. Secure Handlebars on each side
using ST4.2*15L Screws (2pcs).
3. Attach the Handrail Covers on
each side using M4*30L Screws
(4pcs).
Console
M8*20 Bolts
M4*25 Screws
Handrail
Covers
Handrail
Covers
Handrail
Covers
Handrail
Covers
ST4.2*16 Screw
ST4.2*16 Screw
M4*25 Screw
ST4.2*15 Screw
ST4.2*15 Screw
30
30

13
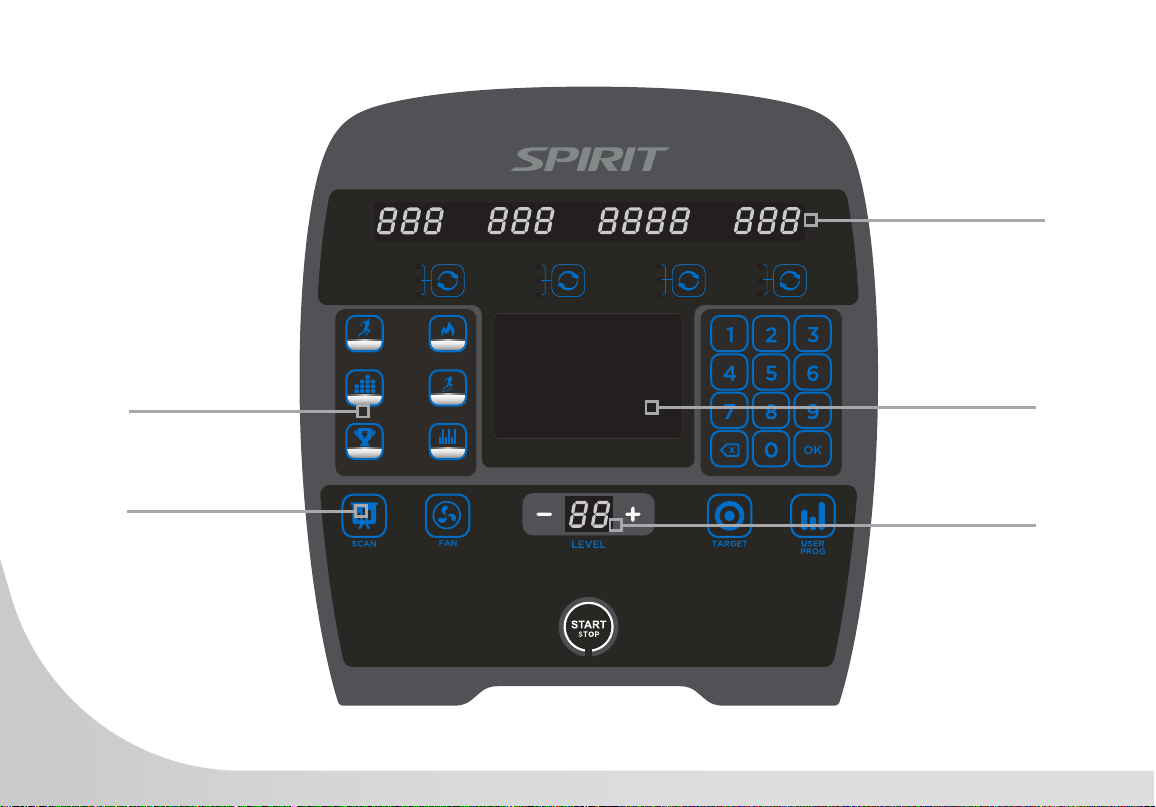
CSC900 CONSOLE OPERATION
14
CHALLENGE
TRAINING
FITNESS
TESTS
VERTICAL
CALORIES TIME EL APSED STEPS/MIN
STEPS
FLOORS
TIME REMAINING
TOTAL PROG TIME
CAL/MIN
WATTS
HEART RATE
METS
INTERVAL
ROLLING
HILLS
FAT
BURNING
CAUTION
To avoid injury, use extreme caution when
stepping onto or off of this unit. Read and
understand the Instruction Manual before
using this machine.
Pour éviter tout accident, veuillez faire
preuve d’une prudence extrême lorsque
vous montez ou descendez de l’appareil.
Lire le manuel d’instructions avant
utilisation.
WARNING
To reduce the risk of personal injury,
keep children under the age of 13 away
from machine.
Pour réduire les risque de blessures,
gardez les enfants âgés de moins de 13
ans loin de l’appareil.
Premium, ultra-bright
Blue LED display
Large LED Matrix
window to track
workout progress
Program Direct Keys
Resistance level
display window
Workout Results Key

15
BASIC INFORMATION
The Dot Matrix, or Prole Window, will display the workout Prole. The Message window displays
pertinent exercise data. There are four windows to display a large variety of pertinent data during the
workout. A Vertical window measures vertical height climbed along with Heart Rate and METS. Calories
window measuring overall calories burned along with Calories/minute and WATTS. A Time Elapsed
window along with Time Remaining and Total Program Time. Also, a Steps/minute window along with
total Steps and Floors climbed.
Heart Rate number display. The StairClimber has capabilities for both a Bluetooth sensor for telemetric
heart rate and contact heart rate. If wearing a Bluetooth enabled heart rate chest strap, the console will
automatically detect the closest sensor and display heart rate in the upper left side window. For contact
heart rate simply grasping the hand pulse sensors will calculate and display the heart rate (this may take
a few seconds). Press the scroll button until Heart Rate is displayed. The Heart Rate window will display
your heart rate, or Pulse, in beats per minute.
The console has a START/STOP button with a PAUSE feature. Once the StairClimber has started rotating
the staircase, the PAUSE function can be activated.
Pressing the START/STOP button once will slow and PAUSE the staircase from rotating and lock it in
place. The time period for the pause function is 30 seconds. If the START/STOP button is pressed once
during this time period then the staircase will unlock and begin slowly rotating again at resistance level
one. The user will be required to increase their resistance back to the previous level of exercise. If the
START/STOP button is not pressed within the 30 seconds, the program will automatically end and the
console resets.
Pressing the START/STOP button twice will slow and stop the staircase from rotating and end the
program, resetting the console.

16
ENTERING A PROGRAM & CHANGING SETTINGS
A safety tether cord is provided with this unit. It is a simple switch design that should always be used.
It is for your safety should you fall from the StairClimber when the Steps Per Minute (SPM) exceeds
your capability. Pulling this safety tether cord and activating the switch will stop the stairs movement.
To Use:
• Fasten the plastic clip onto your clothing securely to assure good holding power. NOTE: the
switch has a strong enough power to minimize accidental, unexpected stopping. The clip should
be attached securely to make certain it does not come off. Be familiar with its function and
limitations. The StairClimber will stop, depending on the level within one to two steps anytime the
switch is activated.
• If for any reason you feel unstable on the rotating staircase, immediately press the START/STOP
button or pull on the safety switch to stop the staircase and step off onto the side support steps
FAN
An adjustable vent, two-speed fan is integrated into the console to help keep you
cool during the workout. The fan is Off by default.
Press the fan button once to turn the fan on, on High. Press the fan button a second
time to switch to Low. Pressing the fan button a third time will shut the fan off.
17
DISPLAY
CHALLENGE
TRAINING
FITNESS
TESTS
VERTICAL
CALORIES TIME ELAPSED STEPS/MIN
STEPS
FLOORS
TIME REMAINING
TOTAL PROG TIME
CAL/MIN
WATTS
HEART RATE
METS
INTERVAL
ROLLING
HILLS
FAT
BURNING
CAUTION
To avoid injury, use extreme caution when
stepping onto or off of this unit. Read and
understand the Instruction Manual before
using this machine.
Pour éviter tout accident, veuillez faire
preuve d’une prudence extrême lorsque
vous montez ou descendez de l’appareil.
Lire le manuel d’instructions avant
utilisation.
WARNING
To reduce the risk of personal injury,
keep children under the age of 13 away
from machine.
Pour réduire les risque de blessures,
gardez les enfants âgés de moins de 13
ans loin de l’appareil.
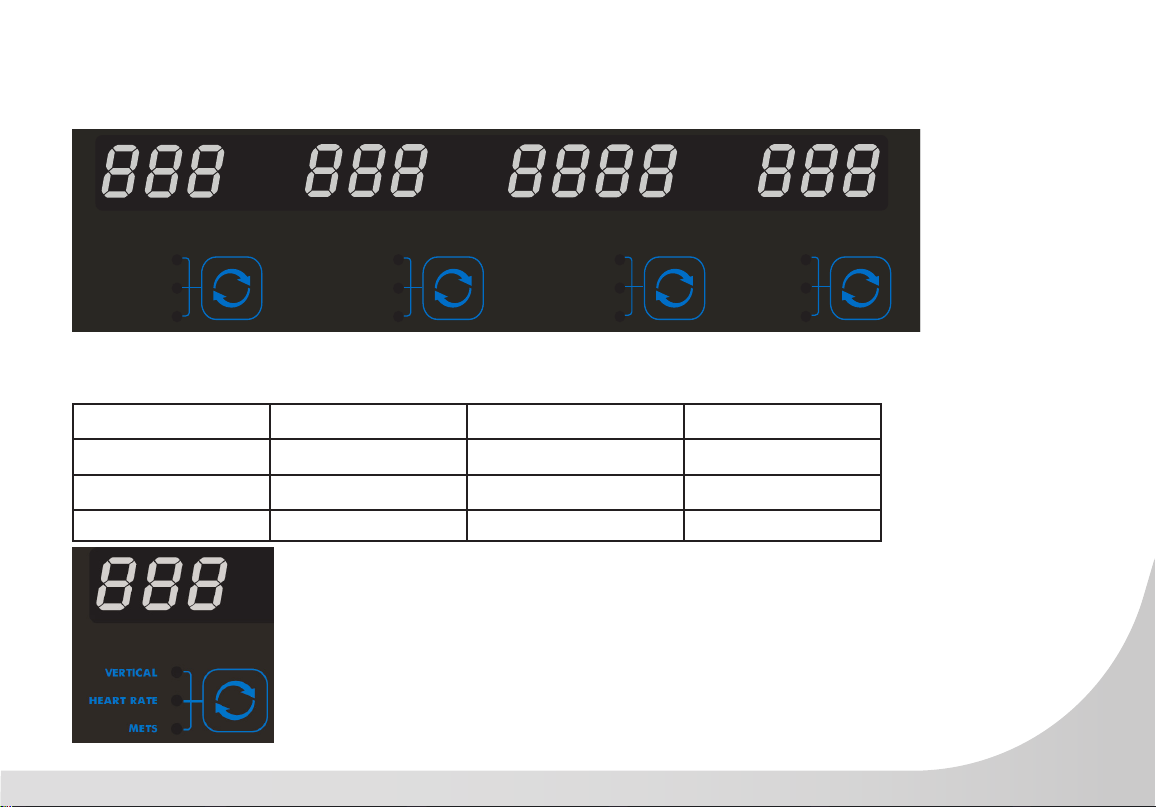
The console display is separated into 4 separate display windows with twelve total data points. Using
the button below each window changes the display data point as shown.
WINDOW ONE WINDOW TWO WINDOW THREE WINDOW FOUR
VERTICAL DISTANCE CALORIES TIME ELAPSED STEPS PER MINUTES
HEART RATE CALORIES / MINUTE TIME REMAINING STEPS
METS WATTS TOTAL PROGRAM TIME FLOORS
Vertical distance counts up from 0 to 999 feet or meters then rolls over
to 1 to represent 1,000. A light in the decimal space for each increment
of 1,000 will also illuminate and changes position with each distance of
1,000 reached.
Changing from imperial to meters is accomplished by pressing 1,2,3,OK.

18
NUMBER KEYPAD
When you are in the data set-up mode setting new data such as age,
weight etc., you can use these buttons to enter the numbers quickly
QUICK START
This is the quickest way to start a workout. Press the Start button to begin.
This will initiate the Quick Start mode. In Quick Start the Time will count
up from zero, all workout data will start to accrue, and the workload may
be adjusted manually by pressing the level Up + and Down - buttons. The
dot matrix display will show just the bottom row lit. As you increase the
workload more rows will light indicating a harder workout. The StairClimber
will get harder as the stairs begin to rotate more easily as the rows increase,
thus increasing your steps per minute. The dot matrix has 24 columns of
lights and each column represents 1 minute. At the end of the 24th column
(or 24 minutes of work) the display will wrap around and start at the rst
column again.
There are 20 levels of resistance available for plenty of variety. The rst
levels are very easy workloads, and the changes between levels are set
to a good progression for de-conditioned users. As the levels increase, the
braking of the rotating stairs decreases, causing the user to step a faster
rate, steps per minute (spm). The highest levels, levels 15-20 are extremely challenging. These levels
should not be used by deconditioned users as there is greater risk of falling off machine when the user
cannot keep up with the rate of rotation of the stairs. These levels are extremely hard and are good for
short interval peaks and elite athletic training.

19
PROGRAMMING THE CONSOLE
Each of the programs can be customized with your personal information and changed to suit your needs.
Some of the information asked for is necessary to ensure the readouts are correct. You will be asked for
your Age and Weight. Entering your Weight aides in calculating a more correct Calorie reading. Although
we cannot provide an exact calorie count we do want to be as close as possible.
CALORIE NOTE: Calorie readings on every piece of exercise equipment, whether it is in a gym or at
home, are not accurate and tend to vary widely. They are meant only as a guide to monitor your progress
from workout to workout. The only way to measure your calorie burn accurately is in a clinical setting
connected to a host of machines. This is because every person is different and burns calories at a different
rate. Some good news is that you will continue to burn calories at an accelerated rate for at least an hour
after you have nished exercising!
20
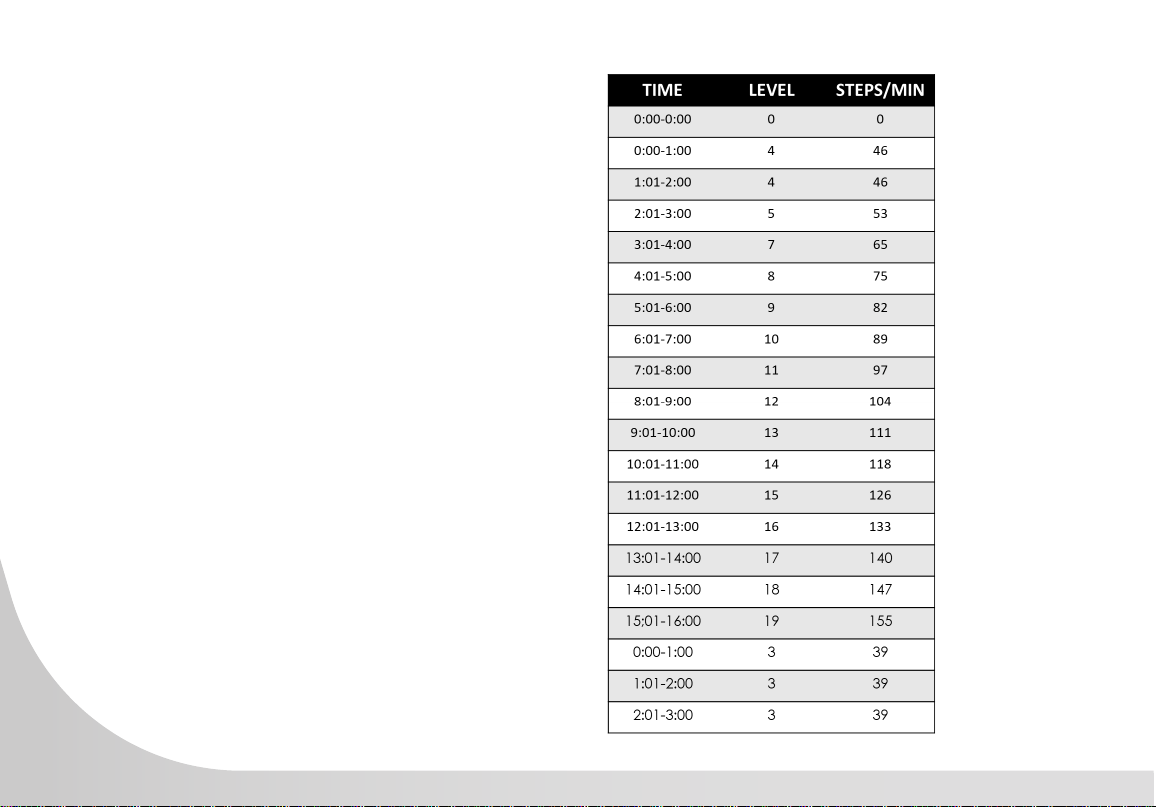
FITNESS TESTS
WFI StairClimber Protocol
The WFI StairClimber Protocol was adopted as a VO2 submaximal eld test for
re service personnel. The test is a series of one minute intervals with increasing
workloads. The goal is for the participants heart rate to achieve a Target Heart
Rate and exceed it for 15 seconds.
1. Press the FITNESS TESTS button.
2. Console displays: WFI. Press OK.
3. Enter Your Age displays on the screen. The default age of 35
will blink repeatedly. Use the Level + or – keys or the numerical
Keypad to adjust age. Press OK.
4. Enter Your Weight displays on the screen. The default weight of
65 kg (145 lb) will blink repeatedly. Use the Level + or – keys
or the numerical Key-pad to adjust weight. Press OK.
5. Enter Your Height displays on the screen. The default height is
175 cm (70 in). Use the Level + or – keys or the numerical Key-pad
to adjust height. Press OK.
6. Press START to begin the WFI Fitness Test. The test begins when
the StairClimber unlocks and begins to rotate.
7. The Level + or - keys are not operational during the test.
8. Pressing the START/STOP button will terminate the test immediately.

21
FITNESS TESTS
WFI StairClimber Protocol
22
FITNESS TESTS
WFI StairClimber Protocol
• Target Heart Rate (THR)
• THR = [208-(0.7*age)]*85
• Submax StairClimber Test VO2 Estimation
• VO2 Max (ml/kg/min) = 57.774 +
(1.757 * TT) – (0.904 X BMI)
• Stair Climber Time (TT) (Time in minutes
and seconds converted to Decimal
(example 5.87))
• Body Mass Index (BMI)
• Body Mass Index BMI)
• BMI = Weight (kg) / Height (m)2 z
or
• BMI = 703 x Weight (lbs) / Height
(inches)2
23
FITNESS TESTS
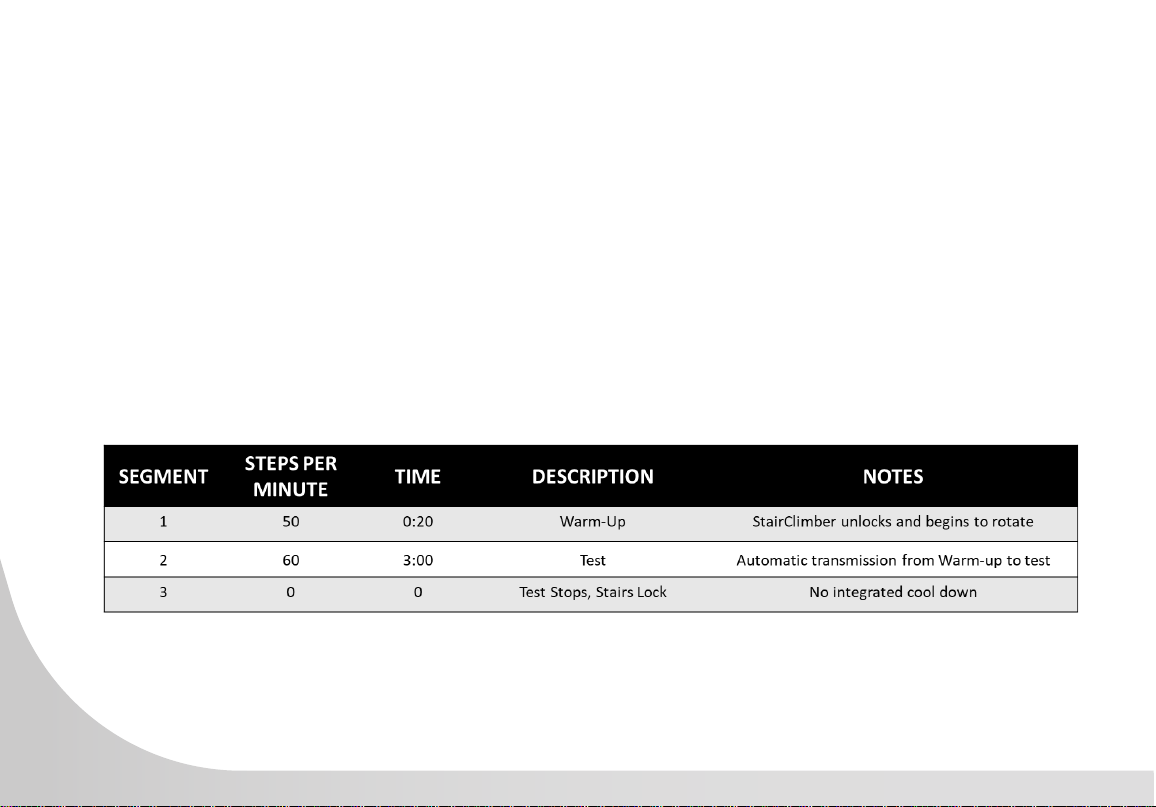
CPAT StairClimber Protocol
The StairClimber test was designed to simulate the critical tasks of climbing stairs
in full protective clothing while carrying re ghting equipment. This test challenges
candidate’s aerobic capacity, lower body muscular endurance, and ability to
balance. The goal of the test is to complete a xed time warm-up at 50 steps per
minute, followed immediately by a 3-minute segment at 60 steps per minute. The
test ends after the 3-minute segment. This is a PASS/FAIL test which does not measure heart rate or
determine submaximal VO2 level.
1. Press the FITNESS TESTS button.
2. Console displays: WFI. Press START/STOP button again for
CAPT. Press OK.
3. Press START to begin the CPAT Fitness Test. The test begins when
the StairClimber unlocks and begins to rotate.
4. The Level + or - keys are not operational during the test.
5. Pressing the START/STOP button will terminate the test
immediately.
24
FITNESS TESTS
CPAT StairClimber Protocol
• The CPAT StairClimber Protocol is a 3 minute test to simulate a re ghter walking up stairs
carrying a high-rise pack or a hose bundle.
• The test has only 2 segments and begins when the StairClimber unlocks and begins to rotate.
• Warm-Up - 20 seconds at 50 steps per minute
• Test - 3 minutes at 60 steps per minute
25
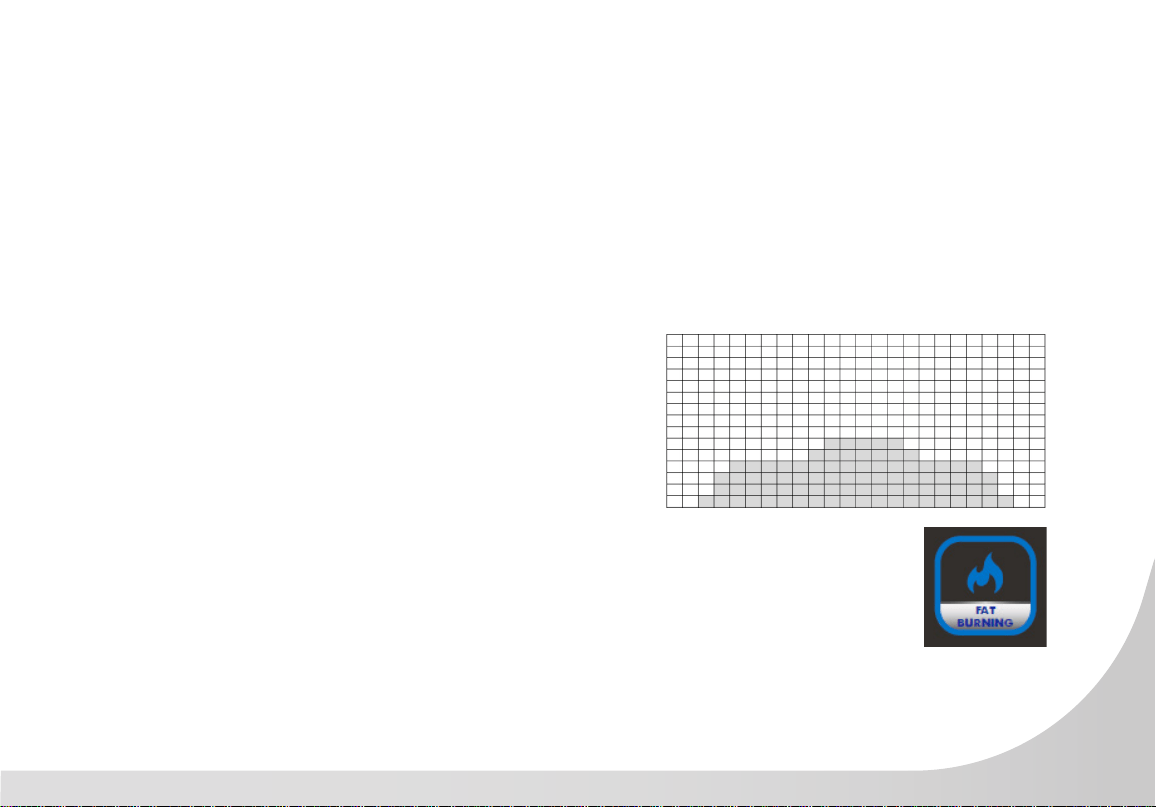
FAT BURNING
The FAT BURINING Program keeps the user as ta
low to moderate intensity for a prolonged workout.
The focus is on aerobic endurance.
1. Press the FAT BURNING button.
2. Console displays: Start Or Press OK To Set Up.
Press OK.
3. Enter Your Age displays on the screen. The
default age of 35 will blink repeatedly. Use the
Level + or – keys or the numerical Keypad to
adjust age. Press OK.
4. Enter Your Weight displays on the screen. The
default weight is 65 kg (145 lbs) will blink
repeatedly.
5. Use the Level + or – keys or the numerical Key-
pad to adjust weight. Press OK.
6. Enter Time displays on the screen. The default
time of 30 minutes will blink repeatedly. The
Minimum time is 5 minutes and the maximum
time is 99 minutes. Use the Level + or – keys or
the numerical Keypad to adjust time. Press OK.
7. Press START to begin.
8. Console counts down from 3 seconds then the
stairs unlock, and program begins. Program
prole displays on the dot matrix display.
9. Resistance level begins at 23 steps per minute
(SPM).
10. Adjust the programs resistance using either the
Level + or – keys or the Numerical Keypad
or the Resistance + or – buttons at the contact
heart rate handle ends.
26
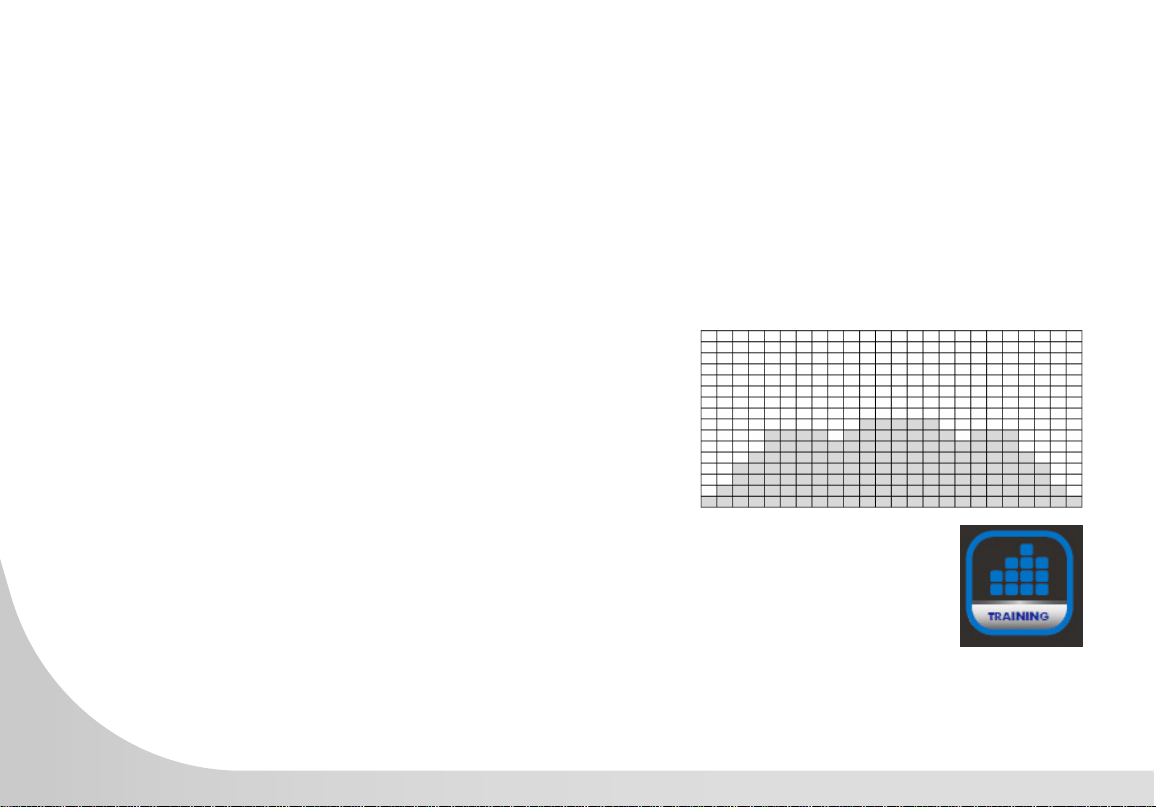
TRAINING
The TRAINING Program allows the user to grad-
ually ramp-up their intensity until reaching a level
for steady state exercise. The focus is on aerobic
endurance.
1. Press the TRAINING button.
2. Console displays: Start Or Press OK To Set Up.
Press OK.
3. Enter Your Age displays on the screen. The
default age of 35 will blink repeatedly. Use the
Level + or – keys or the numerical Keypad to
adjust age. Press OK.
4. Enter Your Weight displays on the screen. The
default weight is 65 kg (145 lbs) will blink
repeatedly.
5. Use the Level + or – keys or the numerical Key-
pad to adjust weight. Press OK.
6. Enter Time displays on the screen. The default
time of 30 minutes will blink repeatedly. The
Minimum time is 5 minutes and the maximum
time is 99 minutes. Use the Level + or – keys or
the numerical Keypad to adjust time. Press OK.
7. Press START to begin.
8. Console counts down from 3 seconds then the
stairs unlock, and program begins. Program
prole displays on the dot matrix display.
9. Resistance level begins at 23 steps per minute
(SPM).
10. Adjust the programs resistance using either the
Level + or – keys or the Numerical Keypad
or the Resistance + or – buttons at the contact
heart rate handle ends.

27
ROLLING HILLS
The ROLLING HILLS Program is a traditional pro-
gram giving the user segments of medium and
medium-high intervals. This program trains aerobic
capacity.
1. Press the ROLLING HILLS button.
2. Console displays: Start Or Press OK To Set Up.
Press OK.
3. Enter Your Age displays on the screen. The
default age of 35 will blink repeatedly. Use the
Level + or – keys or the numerical Keypad to
adjust age. Press OK.
4. Enter Your Weight displays on the screen. The
default weight is 65 kg (145 lbs) will blink
repeatedly.
5. Use the Level + or – keys or the numerical Key-
pad to adjust weight. Press OK.
6. Enter Time displays on the screen. The default
time of 30 minutes will blink repeatedly. The
Minimum time is 5 minutes and the maximum
time is 99 minutes. Use the Level + or – keys or
the numerical Keypad to adjust time. Press OK.
7. Press START to begin.
8. Console counts down from 3 seconds then the
stairs unlock, and program begins. Program
prole displays on the dot matrix display.
9. Resistance level begins at 23 steps per minute
(SPM).
10. Adjust the programs resistance using either the
Level + or – keys or the Numerical Keypad
or the Resistance + or – buttons at the contact
heart rate handle ends.
28
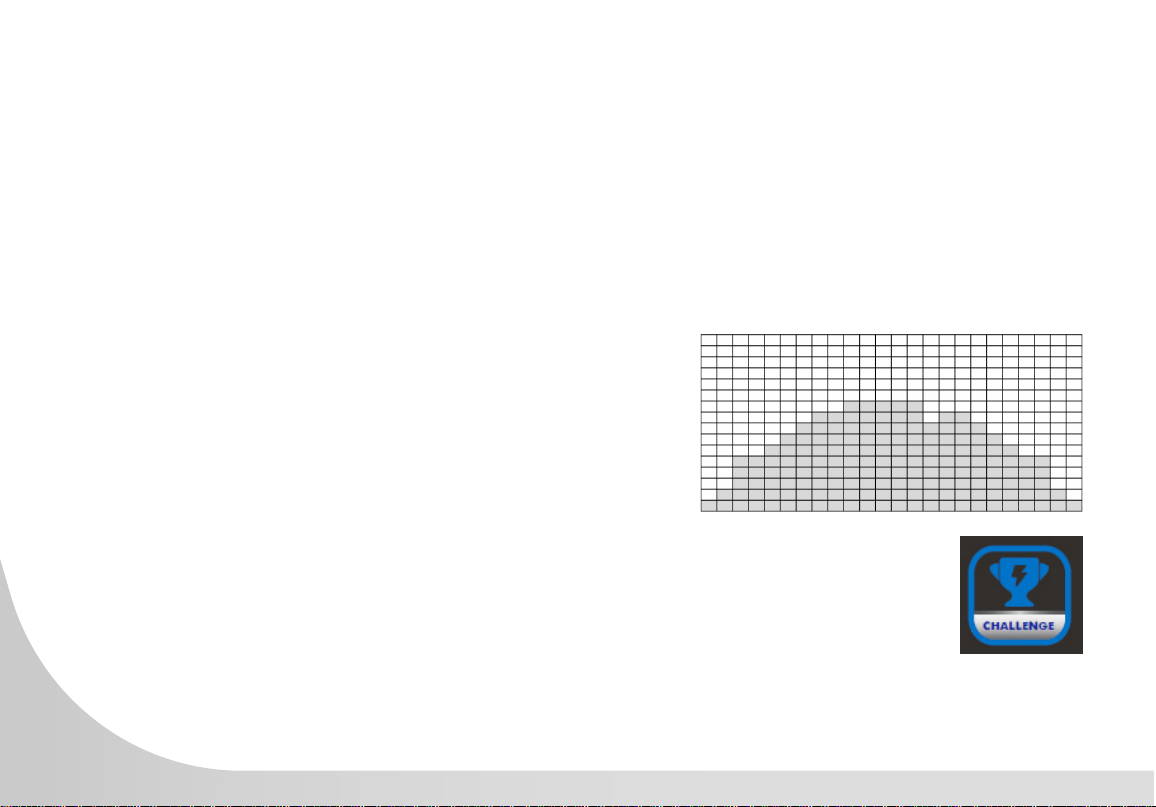
CHALLENGE
The CHALLENGE Program gives the user a
prolonged gradual warm-up, followed by sustained
training at a higher intensity. This program
introduces anaerobic traiining within an aerobic
workout.
1. Press the CHALLENGE button.
2. Console displays: Start Or Press OK To Set Up.
Press OK.
3. Enter Your Age displays on the screen. The
default age of 35 will blink repeatedly. Use the
Level + or – keys or the numerical Keypad to
adjust age. Press OK.
4. Enter Your Weight displays on the screen. The
default weight is 65 kg (145 lbs) will blink
repeatedly.
5. Use the Level + or – keys or the numerical
Keypad to adjust weight. Press OK.
6. Enter Time displays on the screen. The default
time of 30 minutes will blink repeatedly. The
Minimum time is 5 minutes and the maximum
time is 99 minutes. Use the Level + or – keys or
the numerical Keypad to adjust time. Press OK.
7. Press START to begin.
8. Console counts down from 3 seconds then the
stairs unlock, and program begins. Program
prole displays on the dot matrix display.
9. Resistance level begins at 23 steps per minute
(SPM).
10. Adjust the programs resistance using either the
Level + or – keys or the Numerical Keypad
or the Resistance + or – buttons at the contact
heart rate handle ends.
29
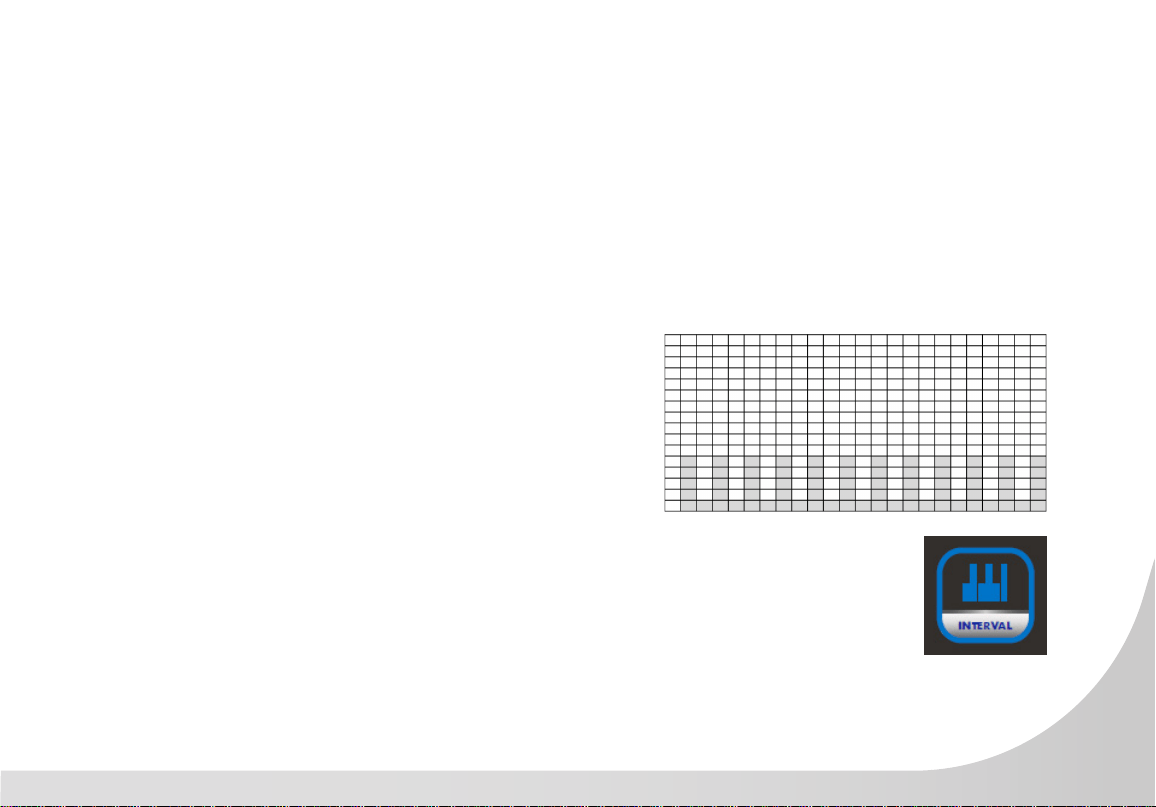
INTERVAL
The INTERVAL Program alternates high intensity
anaerobic sprints with low intensity segments for
recovery. This program trains anaerobic capacity.
1. Press the INTERVAL button.
2. Console displays: Start Or Press OK To Set Up.
Press OK.
3. Enter Your Age displays on the screen. The
default age of 35 will blink repeatedly. Use the
Level + or – keys or the numerical Keypad to
adjust age. Press OK.
4. Enter Your Weight displays on the screen. The
default weight is 65 kg (145 lbs) will blink
repeatedly.
5. Use the Level + or – keys or the numerical
Keypad to adjust weight. Press OK.
6. Enter Time displays on the screen. The default
time of 30 minutes will blink repeatedly. The
Minimum time is 5 minutes and the maximum
time is 99 minutes. Use the Level + or – keys or
the numerical Keypad to adjust time. Press OK.
7. Press START to begin.
8. Console counts down from 3 seconds then the
stairs unlock, and program begins. Program
prole displays on the dot matrix display.
9. Resistance level begins at 23 steps per minute
(SPM).
10. Adjust the programs resistance using either the
Level + or – keys or the Numerical Keypad
or the Resistance + or – buttons at the contact
heart rate handle ends.
30
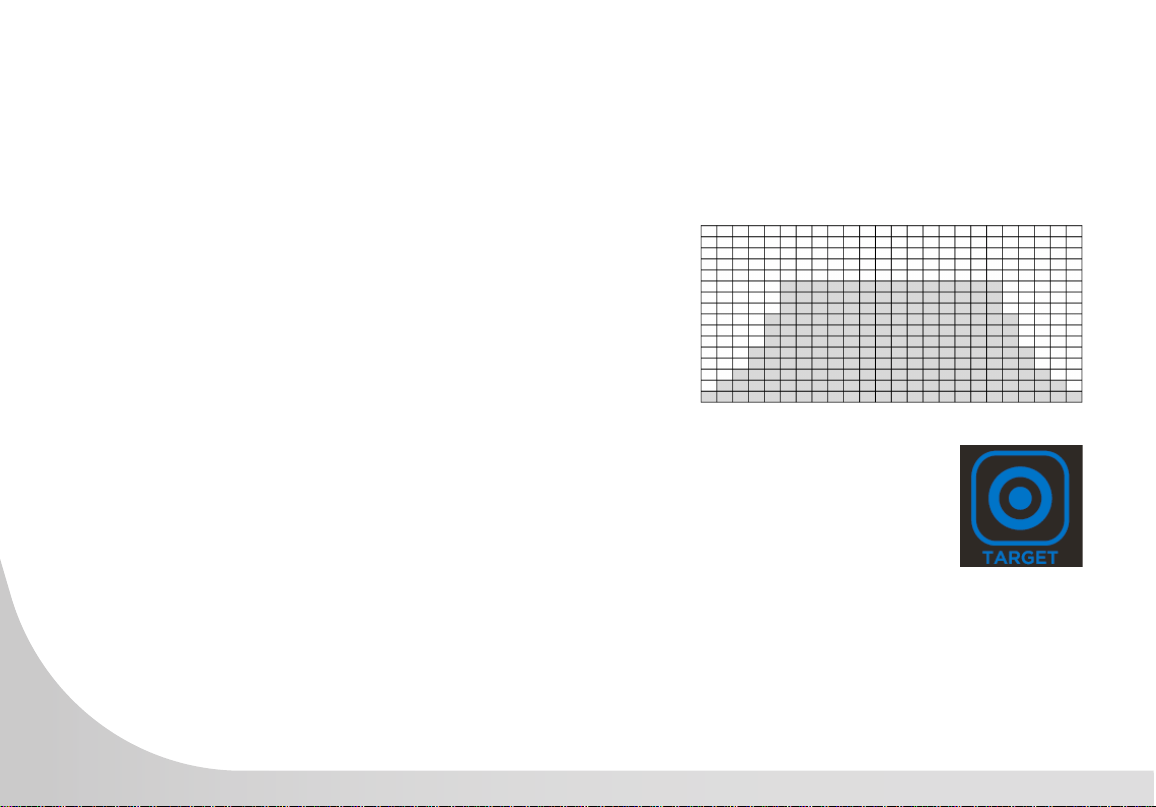
TARGET TRAINING
The TARGET TRAINING Program allows the user to
choose their own workout goal: Time, Vertical Dis-
tance, or Calories. The Program counts down from
the time goal or tracks up for both vertical distance
or calories.
1. Press the TARGET button.
2. 30:00 minutes continually blinks in display
window indicating Total Program Time.
3. Console scrolls: Set Time Or Enter The Next
Target. Press OK if done, or
4. Press TARGET button again for next target.
5. 50 continually blinks in display window
indicating Vertical Distance Goal.
6. Console scrolls: Set Distance Or Enter Next
Target. Press OK if done, or
7. Press Target button again for next target.
8. 50 continually blinks in display window
indicating Calories goal.
9. Console scrolls: Set Calories Or Enter.
10. Use the numerical keypad or Level + or – keys
to adjust target goals:
Minutes 5 to 99
Calories 10 to 990
Vertical 10 to 990
31
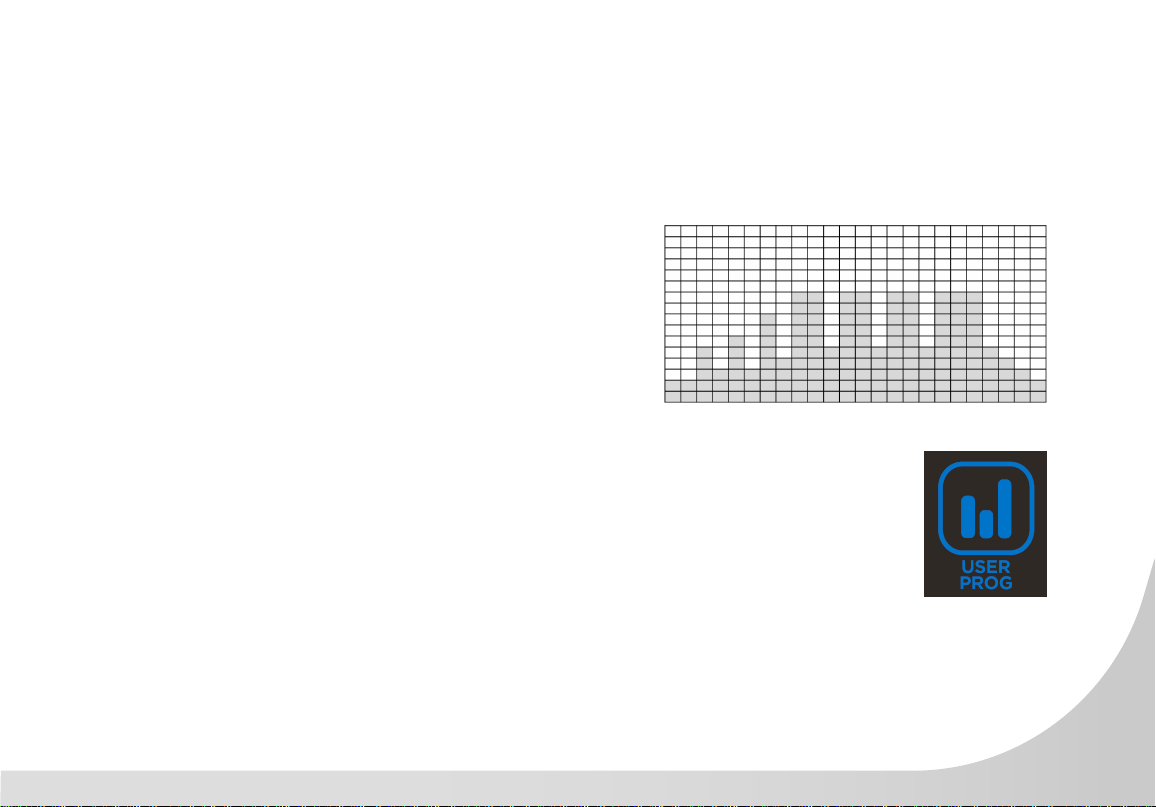
USER PROGRAM
The USER Program allows the user to create their
own unique program design, customizing all 24
segments of the dot matrix display.
1. Press the USER PROGRAM button.
2. 30:00 minutes continually blinks in display
window indicating Total Program Time.
3. Console scrolls: User Program. Press OK.
4. Console scrolls: Set Level The OK For Each
Segment.
5. Set Time then OK.
6. Press Start to begin.

32
PAUSING OR ENDING A PROGRAM
1. The console has a START/STOP button with a PAUSE feature. Once
theStairClimber has started rotating the staircase, the PAUSE function can
be activated.
2. Pressing the START/STOP button once will slow and PAUSE the staircase
from rotating and lock it in place. The time period for the pause function
is 30 seconds. If the START/STOP button is pressed once during this time
period then the staircase will unlock and begin slowly rotating again at resistance
level one. The user will be required to increase their resistance back to the
previous level of exercise. If the START/STOP button is not pressed within the 30
seconds, the program will automatically end and the console resets.
3. When the Start button and the contact heart rate handlebar ends are green,
this indicates that the machine is in motion. When the machine is stopped, the
red light will ash then quickly revert to blue. If the emergency stop has been
activated, then red light will always be on until deactivated. When the program restarts, the color
will revert to blue, or if the program is ended the color will change to blue indicating that the
machine is ready.
4. Once a program has stopped, pressing the RESULTS button will scroll Workout Results on the
display.
5. Workout totals for: Vertical, Total Calories, Time Elapsed, and Steps display.NOTE: Pressing the
RESULTS button twice will erase the workout results and revert to start screen.
6. During Workout Results, console allows scrolling between Vertical, Heart Rate, METS and
Calories, Calories Per Minute, Watts.

33
GENERAL MAINTENANCE
Wipe down all areas in the sweat path with a damp cloth after each workout. If a squeak, thump, clicking
or rough feeling develops the main cause is most likely the following reason:
The hardware was not sufciently tightened during assembly. All bolts that were installed during assembly
need to be tightened as much as possible. It may be necessary to use a larger wrench than the one
provided if you cannot tighten the bolts sufciently.
With durable, high performance components, this equipment is designed for heavy usage with minimal
maintenance required. To keep it in top condition, perform regular daily, weekly and monthly preventive
maintenance routines outlined below.
The safety and integrity of this machine can only be maintained when the equipment is regularly examined
for damage and wear and repaired. It is the sole responsibility of the owner of this equipment to ensure that
regular maintenance is performed. Worn or damaged parts must be replaced immediately, or the equipment
removed from service until the repair is made.
SANITIZING YOUR SPIRIT FITNESS EQUIPMENT
• Unupholstered high-contact surfaces (hard plastics) can be sanitized using a 75% isopropyl alcohol solution and a
clean, dry cloth.Spray surfaces to be sanitized, and use the dry cloth to wipe clean. Allow surfaces to dry before
using.
• For upholstered or soft-plastic surfaces, use a conditioner after sanitizing.Be sure to follow the instructions provided
by the conditioner manufacturer to ensure proper use of the conditioner.
• Alternatively, you can make your own spray by mixing the proper ratio of isopropyl alcohol and distilled water to
reach a 75% solution.
• For more details on sanitization, or to learn how to make your own spray solution, please visit https://support.
spirittness.com/hc/en-us/articles/4406787148564 .

34
STAIRCLIMBER WARRANTY EFFECTIVE NOVEMBER 19, 2021
Spirit Fitness warrants this StairClimber for a period of time listed below from the date of sale, as determined
by sale receipt, or in the absence of a sales receipt eighteen (18) months from the original factory shipping
date. Spirit Fitness’ responsibilities include providing new or remanufactured parts, at Spirit Fitness’ option, and
technical support to our independent dealers and servicing organizations. In the absence of a dealer or service
organization, these warranties will be administered by Spirit Fitness directly. The warranty period applies to the
following components:
NORMAL RESPONSIBILITIES OF THE FACILITY
The facility is responsible for the items listed below:
1. The warranty registration card must be completed and returned to the address listed on the card within 10 days
of
the original purchase, or completed online to validate the manufacturer’s limited warranty.
2. Proper use of the tness equipment in accordance with the instructions provided in this manual
3. Proper installation in accordance with instructions provided with the tness equipment and with all local electric
codes.
4. Expenses for making the tness equipment accessible for servicing, including any item that was not part of the
tness equipment at the time it was shipped from the factory.
5. Damages to the tness equipment nish during shipping, installation or following installation.
6. Routine maintenance of this unit as specied in this manual.
WARRANTY
Commercial
FRAME
Lifetime
GENERATOR BRAKE
5 Years
PARTS
3 Year
LABOR
3 Years
*Prisons and correctional facilities are excluded from warranty coverage.

35
EXCLUSIONS
This warranty does not cover the following:
1. CONSEQUENTIAL, COLLATERAL, OR INCIDENTAL DAMAGES SUCH AS PROPERTY DAMAGE AND
INCIDENTAL EXPENSES RESULTING FROM ANY BREACH OF THIS WRITTEN OR ANY IMPLIED WARRANTY.
NOTE: Some states do not allow the exclusion or limitation of incidental or consequential damages, so this
limitation or exclusion may not apply to you.
2. Service call reimbursement to the facility. Service call reimbursement to the dealer that does not involve malfunction
or defects in workmanship or material, for units that are beyond the warranty period, for units that are beyond the
service call reimbursement period, for tness equipment not requiring component replacement, or tness equipment
not in non-dues paying facility or household use.
3. Damages caused by services performed by persons other than authorized Spirit Fitness service companies; use of
parts other than original Spirit Fitness parts; or external causes such as corrosion, discoloration of paint or plastic,
alterations, modications, abuse, misuse, accident, improper maintenance, inadequate power supply, or acts of
God.
4. Products with original serial numbers that have been removed or altered.
5. Products that have been: sold, transferred, bartered, or given to a third party.
6. Products that do not have a warranty registration card on le at Spirit Fitness. Spirit Fitness reserves the right to
request proof of purchase if no warranty record exists for the product.
7. THIS WARRANTY IS EXPRESSLY IN LIEU OF ALL OTHER WARRANTIES EXPRESSED OR IMPLIED, INCLUDING
THE WARRANTIES OF MERCHANTABILITY AND/OR FITNESS FOR A PARTICULAR PURPOSE.
8. Product used in prisons and correctional facilities
Warranties outside of the United States may vary. Please contact your local dealer for details.

36
SERVICE
Keep your bill of sale. Twelve (12) months from the date on the bill of sale or eighteen (18) months from the
date of factory shipping as determined by the serial number establishes the labor warranty period should
service be required. If service is performed, it is in your best interest to obtain and keep all receipts. This
written warranty gives you specic legal rights. You may also have other rights that vary from state to state.
Service under this warranty must be obtained by following these steps, in order:
1. Contact your selling authorized Spirit Fitness dealer. OR
2. Contact your local authorized Spirit Fitness service organization.
3. If there is a question as to where to obtain service, contact our service department at (870) 935-1107.
4. Spirit Fitness’ obligation under this warranty is limited to repairing or replacing, at Spirit Fitness’ option, the product
through one of our authorized service centers. All repairs must be preauthorized by Spirit Fitness.
5. The owner is responsible for adequate packaging upon return to Spirit Fitness. Spirit Fitness is not responsible for
damages in shipping. Make all freight damage claims with the appropriate freight carrier. DO NOT SHIP ANY
UNIT TO OUR FACTORY WITHOUT A RETURN AUTHORIZATION NUMBER. All units arriving without a return
authorization number will be refused.
6. For any further information, or to contact our service department by mail, send your correspondence to:
SPIRIT FITNESS, INC.
P.O. Box 2037
Jonesboro, AR 72402-2037
Product features or specications as described or illustrated are subject to change without notice. All warranties are made by Spirit Manufacturing,
Inc.
This warranty applies only in the 48 contiguous United States. NOTE: This does not apply to Alaska or Hawaii.

37
NOTES

800.258.4555
spiritservice@spirittness.com
www.spirittness.com
Spirit Fitness
3000 Nestle Road
Jonesboro, AR 72401
CSC900 Owners Manual
© 2021 All Rights Reserved
Revision: 11.19.2021
