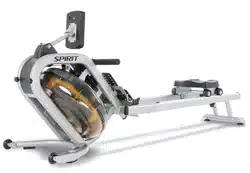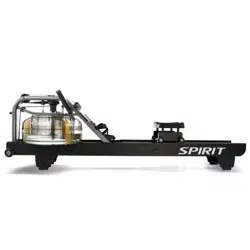
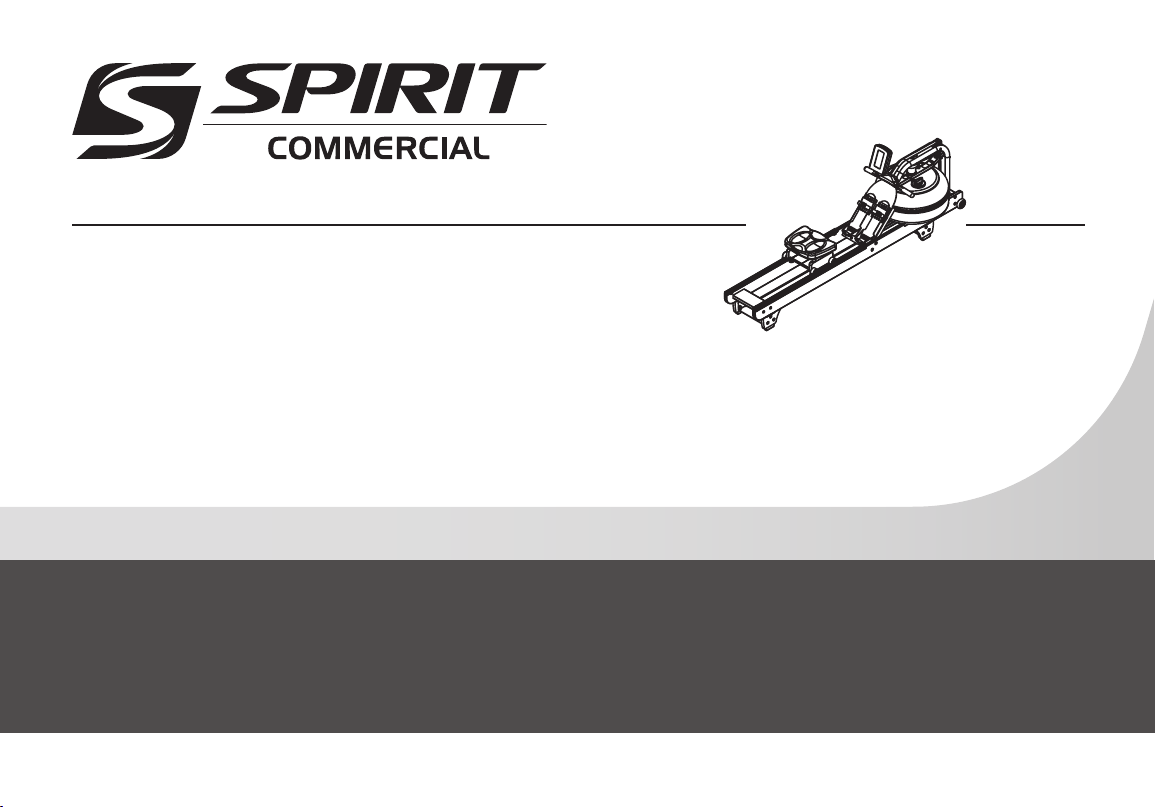
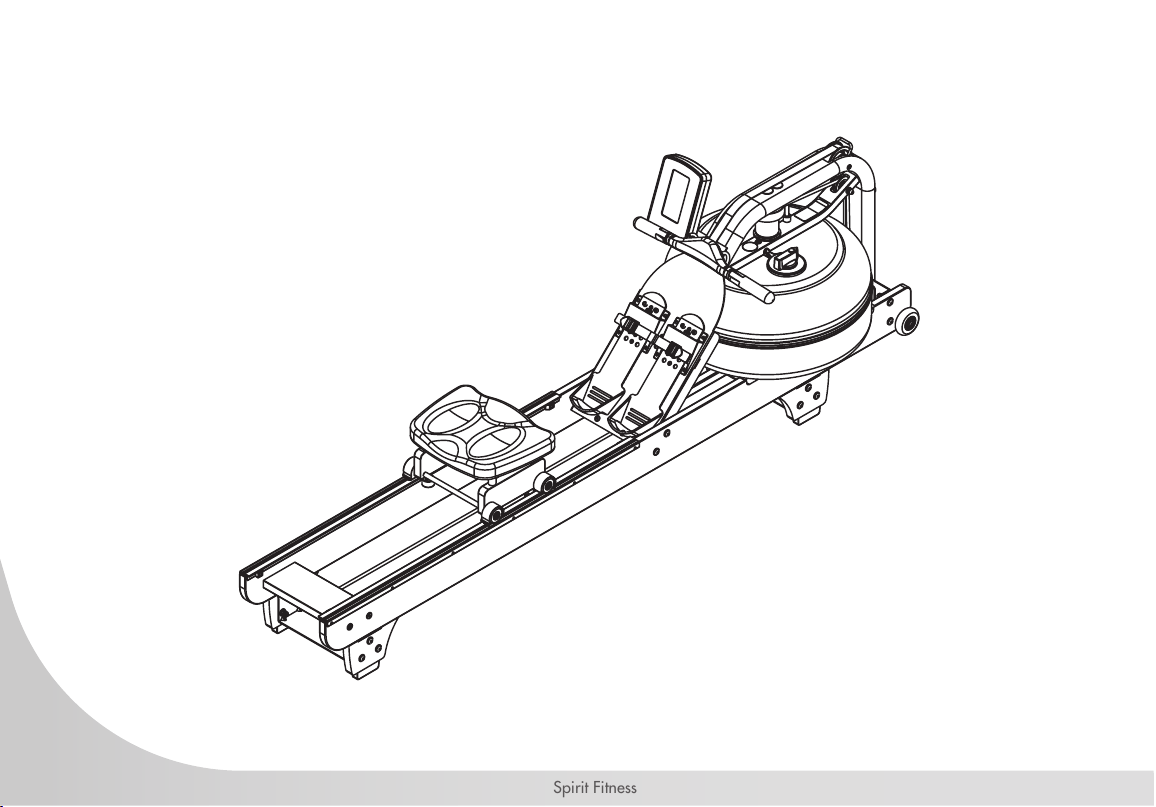
CRW900 Water Rower
OWNER’S MANUAL
Spirit Fitness

3
www.spirittness.com
TABLE OF CONTENTS
5 IMPORTANT SAFETY INSTRUCTIONS
15 WARNING LABELS AND COMMUNICATION STICKERS
1 6 SAFEGUARDS
18 REGISTER YOUR PURCHASE
19 CRW900 ASSEMBLY INSTRUCTIONS
32 OPERATION INSTRUCTIONS
33 TANK FILLING & WATER TREATMENT PROCEDURES
35 ROWER BELT INSTRUCTIONS
39 ROWING FORM
40 CONSOLE OPERATION
50 ENGINEERING MODE
51 GENERAL MAINTENANCE
53 TROUBLESHOOTING
55 EXPLODED VIEWS
61 MANUFACTURER’S LIMITED WARRANTY
Thank you for purchasing our product, please save these instructions. Please do not perform or attempt
any customizing, adjustments, repair or maintenance that is not described in this manual.
4
Spirit Fitness
Congratulations on your new CRW900 Water Rower and welcome to the Spirit Fitness family!
Thank you for your purchase of this quality CRW900 Water Rower from Spirit Fitness. Your new CRW900
was manufactured by one of the leading tness manufacturers in the world and is backed by one of the most
comprehensive warranties available. Through your dealer, Spirit Fitness will do all we can to make your
ownership experience as pleasant as possible for many years to come. If not purchased direct from Spirit Fitness,
the local dealership where you purchased this rower is your administrator for all Spirit Fitness warranty and
service needs. Their responsibility is to provide you with the technical knowledge and service personnel to make
your experience more informed and any difculties easier to remedy.
Please take a moment at this time to record the name of the dealer, their telephone number, and the date of
purchase below to make any future, needed contact easy. We appreciate your support and we will always
remember that you are the reason that we are in business.
Yours in Health,
Spirit Fitness
NAME OF DEALER _____________________________________
DEALER PHONE # _____________________________________
PURCHASE DATE _____________________________________

5
www.spirittness.com
IMPORTANT SAFETY
INSTRUCTIONS
WARNING
This chapter includes precautions and tness
safeguards for the installation and use of the Water
Rower manufactured by SPIRIT FITNESS. Please read
this chapter carefully before installing or using your
equipment. Safety instructions are provided in the
following languages (in the order shown):
• English, Dutch, French, German, Italian, Portuguese,
Spanish, Swedish, Chinese, Japanese
USER SAFETY PRECAUTIONS
These safety notes are directed to you as the owner
of the Water Rower manufactured by Spirit Fitness.
Please train all your users and tness staff to follow
these safety instructions.
DO:
• Do encourage each of your users to discuss their
health program or tness regimen with a healthcare
professional.
• Do stop operating your rower if you feel dizzy or faint.
• Do perform regular preventative maintenance.
• Do exercise slowly until you reach a level of comfort.
DO NOT:
• Do not let unsupervised children operate the rower.
• Do not use without proper athletic shoes.
• Do not use in rainy weather outdoors, or in an enclosed
pool environment.
• Do not drop or insert any object, hands, or feet into any
opening or within the area operation of the product.
• Do not attempt to remove any shrouds or modify the
rower.
WARNING:
• Your Water Rower manufactured by Spirit Fitness is
designed for exercise in a commercial or consumer
environment.
• Please check with your physician prior to beginning any
exercise program.
• Do not push yourself to excess. Stop if you are feeling
faint, dizzy, or exhausted. Use common sense when
rowing.
• Read the owner’s manual in its entirety before operating
the rower.
• Failure to obey this warning can result in injury or death.
SPIRIT FITNESS
®
and the Spirit Fitness logo are
registered trademarks of Dyaco International.

6
Spirit Fitness
VOORZORGSMAATREGELEN
Deze veiligheidsaantekeningen zijn aan u gericht
als eigenaar van de Rower manufactured by Spirit
Fitness. Gelieve uw gebruikers en uw per-soneel
voor conditietraining volledig bekend te maken met
deze veiligheidsinstructies. Doe het volgende:
• Moedig elk van uw gebruikers aan hun
gezondheidspro-gramma of conditietherapie met een
professioneel uit de gezondheidszorg te bespreken.
• Stop het gebruik van uw rower als u zich duizelig of
een auwte voelt.
• Voer regelmatig preventief onderhoud uit.
• Oefen langzaam totdat u een comfortniveau heeft
bereikt.
• Gebruik de rower alleen voor zijn bedoelde gebruik,
zoals in deze handleiding staat beschreven.
Doe het volgende NIET:
• Laat kinderen zonder toezicht de rower niet
bedienen.
• Niet zonder gymschoenen gebruiken.
• Niet buiten bij regenachtig weer gebruiken, of in
dichte ruimte met een zwembad.
• Laat geen enkel voorwerp in de rower vallen en steek
uw handen of voeten in geen enkele opening van of
onder uw rower.
• Probeer geen omhulsels te verwijderen of uw rower te
wijzigen.
WAARSCHUWING:
• Uw Water Rower manufactured by Spirit Fitness
is ontworpen voor aërobische oefeningen in een
commerciële of gebruiker-somgeving.
• Zie uw arts vóór het beginnen van een
oefenprogramma.
• Dwing uzelf niet tot buitensporige oefeningen. Stop als
u zich duizelig, uitgeput of een auwte voelt.
• Lees de gebruikershandleiding helemaal en
aandachtig door alvorens uw rower te bedienen.
• Nalaten deze waarschuwing op te volgen kan letsel
of overlijden tot gevolg hebben.

7
www.spirittness.com
PRÉCAUTIONS
Ces consignes de sécurités s’adressent aux
propriétaires du Water Rower manufactured by
Spirit Fitness. Veuillez instruire tous vos utilisateurs et
instructeurs à suivre ces consignes. À FAIRE:
• Encouragez tous les utilisateurs à consulter un médecin
au sujet de leur programme de tness ou régime
d’exercice.
• Cessez d’utiliser le rower en cas d’étourdissement ou de
faiblesse.
• Exécutez régulièrement la maintenance préventive.
• Commencez l’exercice lentement jusqu’à ce que vous
atteignez un niveau confortable.
• Utilisez le rower uniquement de la manière prévue, telle
que décrite dans ce manuel.
À ÉVITER:
• Ne laissez pas des enfants utiliser le rower sans
sur-veillance.
• Ne l’utilisez pas sans porter de chaussures d’athlétisme.
• Ne l’utilisez pas en extérieur lors de temps pluvieux, ni
en intérieur dans une salle de piscine.
• Évitez de laisser tomber tout objet ou d’introduire les
mains ou pieds dans toute ouverture ou en-dessous du
rower.
• Ne tentez pas de retirer tout carter de protection ni de
modier le rower.
AVERTISSEMENT:
• Le Water Rower manufactured by Spirit Fitness
est conçu pour l’exercice aérobique dans un
environnement commercial ou privé.
• Veuillez consulter un médecin avant de commencer
tout programme d’exercice.
• Ne vous poussez pas au-delà de vos limites.
Arrêtez-vous si vous vous sentez faible, étourdi ou
épuisé Faites preuve de bon sens lorsque vous vous
entraînez.
• Lisez le guide de l’utilisateur en entier avant d’utiliser
le rower.
• Le non-respect de ces avertissements peut se traduire
par des blessures, voire la mort.

8
Spirit Fitness
VORSICHTSMASSNAHMEN
Die folgenden Vorsichtsmaßnahmen richten sich an
Sie als Besitzer des Water Rower manufactured by
Spirit Fitness. Bitte schulen Sie alle Ihre. Benutzer
und Ihr Fitness-Personal in der Beachtung dieser
Sicherheitsvorschrifte. GEBOTE:
• Legen Sie jedem Ihrer Benutzer nahe, sein
Gesundheits- oder Fitnessprogramm mit einem medi-
zinischen Fachmann zu besprechen.
• Beenden Sie den Betrieb Ihres rower, wenn Sie sich
schwindelig oder schwach fühlen.
• Führen Sie regelmäßige vorbeugende
Wartungsmaßnahmen durch.
• Trainieren Sie langsam, bis Sie eine gewisse
Komfortzone erreichen.
• Verwenden Sie den rower nur zum vorgesehenen, in
dieser Anleitung beschriebenen Zweck.
VERBOTE:
• Lassen Sie den rower nicht von unbeaufsichtigten
Kindern in Betrieb nehmen.
• Benutzen Sie das Gerät nicht ohne Sportschuhe.
• Benutzen Sie das Gerät bei regnerischen
Witterungsbedingungen nicht im Freien und nicht In
einer geschlossenen Schwimmbadumgebung.
• Lassen Sie keine Gegenstände in irgendwelche
Öffnun- gen oder unter den rower fallen und halten Sie
Hände und Füße von diesen Bereichen fern.
• Unternehmen Sie keinen Versuch, irgendwelche
Abdeckungen zu entfernen oder den rower zu modi-
zieren
ACHTUNG:
• Der Water Rower manufactured by Spirit Fitness ist
für aerobische Übungen in einer kommerziellen oder
Verbraucherumgebung vorgesehen.
• Bitte holen Sie vor Aufnahme eines jeden
Trainingsprogramms den Rat Ihres Arztes ein.
• Trainieren Sie nicht übertrieben hart. Hören Sie auf,
wenn Sie ein Schwäche-, Schwindel- oder
• Erschöpfungsgefühl verspüren. Lassen Sie sich beim
Schritttraining von Ihrer Vernunft leiten. Lesen Sie vor
Inbetriebnahme Ihres rower die Bedienungsanleitung
vollständig durch.
• Ein Missachten dieses Achtungshinweises kann
Verletzungen oder den Tod zur Folge haben.

9
www.spirittness.com
PRECAUZIONI
Queste note precauzionali sono dirette a voi, come
proprietario dello Water Rower manufactured by
Spirit Fitness. Siete pregati di istruire i vostri uten-
ti e il vostro personale all’osservanza di queste
precauzioni. DA FARE:
• Incoraggiate i vostri utenti a discutere il loro
programma di salute o di tness con uno specialista
dell’healthcare.
• Interrompete l’uso dello rower se avete giramenti di
testa o se vi sentite mancare.
• Eseguite periodicamente servizi di manutenzione.
• Utilizzate lo rower soltanto per l’uso è a cui è destina-
to, come descritto nel manuale.
DA NON FARE:
• Non consentite a bambini di usare lo rower senza la
supervisione di un adulto.
• Non utilizzate lo rower senza scarpe atletiche.
• Non utilizzate lo rower all’esterno in condizioni
piovose o in un ambiente con piscina interna.
• Non lasciate cadere oggetti sullo rower e non inserite
oggetti, mani o piedi in qualsiasi apertura esterna o
sotto lo rower.
• Non cercate di rimuovere le coperture o di
modicare lo rower.
AVVERTENZE:
• Lo Water Rower manufactured by Spirit Fitness è stato
realizzato per esercizi di aerobica in un ambiente
pubblico o privato adeguato.
• Prima di iniziare un programma di esercizio sico,
consultate il vostro medico.
• Non eccedete i vostri limiti. Fermatevi se vi
sentite mancare, se avete giramenti di testa o se
vi sentiteesausti. Usate buon senso nell’utilizzo
dell’attrezzatura.
• Leggete il Manuale dell’utente interamente prima di
utilizzare lo rower.
• La mancata osservanza di queste avvertenze può
comportare lesioni gravi o morte.

10
Spirit Fitness
PRECAUÇÕES
Estas notas de segurança destinam-se a você,
proprietário do Water Rower manufactured by
Spirit Fitness. Treine todos os usuários e o pessoal
da academia para que sigam estas instruções de
segurança. O QUE FAZER:
• Incentive todos os usuários a discutirem seu programa
de saúde ou sistema de condicionamento físico com
um prossional da área de saúde.
• Pare o funcionamento do rower se sentir tontura ou
ertigem.
• Efetue a manutenção preventiva regular.
• Faça exercícios lentamente até atingir um grau de
con-forto.
• Use o rower apenas de acordo com a nalidade
para que se destina, conforme descrito neste manual.
O QUE NÃO FAZER:
• Não deixe crianças sem supervisão operarem o
rower.
• Não use sem os sapatos esportivos apropriados.
• Não utilize em ambientes externos quando o tempo
estiver chuvoso, nem em um ambiente fechado de
pisci-na interna.
• Não deixe cair nem insira nenhum objeto, mãos ou
pés em qualquer abertura ou sob o rower. Não tente
remover nenhum degrau nem modicar seu rower.
ADVERTÊNCIA:
• Seu Water Rower manufactured by Spirit Fitness foi
projetado para exercícios aeróbicos em um ambiente
comercial ou próprio do consumidor.
• Consulte seu médico antes de começar qualquer
programa de exercícios.
• Não se esforce demais. Pare se sentir tontura,
vertigem ou exaustão. Tenha bom senso ao fazer o
exercício. Leia todo o Manual do Proprietário antes
de operar o seu rower.
• Deixar de observar esta advertência pode resultar em
ferimentos ou morte.

11
www.spirittness.com
PRECAUCIONES
Estas notas de seguridad están dirigidas a usted
como el dueño de Water Rower manufactured by
Spirit Fitness. Por favor instruya a todos sus usuar-
ios y personal de entrenamiento para que sigan
estas instrucciones de seguridad. LO QUE SE DEBE
HACER:
• Dígale a cada uno de sus usuarios que discuta su
programa de salud o régimen de ejercicio con un
profe-sional de la salud.
• Deje de operar su rower si se siente mareado o como
que va a desmayarse.
• Lleve a cabo mantenimiento preventivo a intervalos
reg-ulares.
• Haga ejercicio lentamente hasta que alcance un nivel
en el que se sienta cómodo.
• Utilice el rower solamente para lo que fue diseñado,
como se describe en este manual.
LO QUE NO SE DEBE HACER:
• No permita que los niños operen su rower sin
super-visión.
• No lo use sin zapatos atléticos.
• No lo utilice afuera en la lluvia ni en un ambiente
cerra- do donde haya una piscina.
• No lo deje caer ni inserte objetos. manos o pies en
ninguna apertura de su rower ni debajo de él.
• No intente quitar ninguna cubierta o recubrimiento ni
modicar su rower.
ADVERTENCIA:
• Su Water Rower manufactured by Spirit Fitness está
diseñado para el ejercicio aerobic en un ambiente
commercial o de consume.
• Por favor consulte con su médico antes de iniciar
cualquier programma de ejercicio.
• No haga un esfuerzo excesivo. Deténgase si se siento
mareado, exhaust o como si fuera a desmayarse. Use
su sentido común al hacer ejercico.
• Lea completamente el Manual del dueño antes de
operar su rower.
• El no cumplir con esta advertenicia puedo resultar en
una lesión o en la muerte.

12
Spirit Fitness
FÖRSIKTIGHETSÅTGÄRDER
Dessa säkerhetsanmärkningar är riktade till dig i
egenskap av ägare av Roddmaskin manufactured
by Spirit Fitness. Var god utbilda alla användare
och all personal att följa dessa säkerhetsanvisningar.
MAN SKA:
• Uppmuntra alla användare att konsultera sitt hälso-
progam eller sin träningsregim med en läkare.
• Sluta använda Roddmaskin om man känner sig yr
eller svim- färdig.
• Utföra regelbundet underhåll i förebyggande syfte.
• Motionera långsamt tills man når en komfortnivå.
• Endast använda Roddmaskin för dess avsedda
användning, enligt beskrivning i denna handbok.
MAN SKA INTE:
• Låta barn använda Roddmaskin utan uppsikt.
• Använda Roddmaskin utan sportskor.
• Använda Roddmaskin utomhus i fuktigt väder eller i ett
innes- lutet bassängområde.
• Tappa in eller föra in något föremål, händer eller
fötter i någon öppning, eller under Roddmaskin.
• Försöka att avlägsna några skyddskåpor eller att
modi- era Roddmaskin.
VARNINGAR:
• Din Roddmaskin manufactured by Spirit Fitness är
avsedd för aerobisk träning i kommersiella eller
konsumentinriktade miljöer.
• Konsultera din läkare innan du inleder något
träningsprogram.
• Driv inte dig själv för hårt. Sluta om du känner dig yr,
svimfärdig eller utmattad. Använd Roddmaskin med
sunt förnuft. Läs igenom hela handboken innan du
använder Roddmaskin.
• Underlåtelse att iaktta dessa varningar kan medföra
skada eller dödsfall.

13
www.spirittness.com
注意事項注意事項
下述安全說明適用於您所擁有的由SPIRIT
FITNESS製造之水阻式划船機。請培訓所有使用
者與健身人員遵守下述安全說明。
遵守事項:
• 鼓勵您的每個使用者在使用此水阻式划船機前,與
專業的醫療保健專業人員討論他們的健康計劃或健
身方案。
• 如果您感到頭暈或虛弱,請停止使用此水阻式划船
機。
• 請定期進行預防性維護。
• 請緩慢且循序漸進使用此水阻式划船機,直至達到
舒適程度。
禁止事項:
• 請勿讓無人監管的兒童操作此水阻式划船機。
• 請勿在沒有穿著合適的運動鞋的狀況下使用此水阻
式划船機。
• 請勿在戶外陰雨天氣或封閉的泳池環境中使用此水
阻式划船機。
• 請勿讓任何物體、手或腳掉入或插入任何開口或水
阻式划船機運動範圍內。
• 請勿嘗試拆除任何零件或修改此產品。
警告:
• 您所擁有的由Spirit Fitness製造之水阻式划船機,
專為商業或消費環境中的運動而設計。
• 在開始任何鍛煉計劃之前,請諮詢您的醫生。
• 請勿讓自己運動過量。 如果你感到昏厥,頭暈或疲
憊,請停止使用。 使用此水阻式划船機時要運用一
般常識。
• 在使用此水阻式划船機之前,請完整閱讀使用者手
冊。
• 不遵守上述警告可能導致人身傷害或死亡。

14
Spirit Fitness
注意事項注意事項
これらの安全に関する注意事項は、SPIRIT
FITNESS社が製造したROWERのオーナーとして
お客様に向け示されています。これらの安全に
関する指示や注意事項に従うように、すべての
ユーザーやフィットネススタッフをトレーニン
グしてください。
。 DO(行ってください):
• 各ユーザーが各自の健康プログラムやフィットネ
スプログラムについて、必ず医療従事者や専門家
と相談する事を強く奨励します。
• 使用前、使用中にめまいや気分が悪いと感じた場
合は、直ちにバイクの使用をやめてエクササイズ
を中止してください。
• エクササイズバイクの定期的な予防メンテナンス
を行ってください。
• 行っているエクササイズが快適に感じるまではゆ
っくりと運動してください。
DO NOT(行わないでください):
• 監督なしでの子供の自転車使用を禁止してくださ
い。
• 適切な運動靴なしで使用しないでください。
• 雨天時の屋外や屋内プールでの使用は避けてくだ
さい。
• フライホイールの開口部やその付近に物、手、
足、指等を落としたり、入れたり、触れたりしな
いようにしてください。
• カバーや覆いを取り外したり、このエクササイズ
バイクを改造しないでください。
警告:
• このRowerはSpirit Fitness社によって製造され
た、業務使用目的または個人使用目的の有酸素運
動用に設計されたエクササイズバイクです。
• エクササイズプログラムを始める前に必ず医師に
ユーザー自身の健康状態を相談してください。
• 自分自身のレベルを超えた過度なエクササイズは
避けてください。わずかでも、体調不良やめまい
を感じたり、疲労を感じた場合は直ちにエクササ
イズを中止して、使用を止めてください。エクサ
サイズバイクの使用には適切な常識を適用する事
をお勧めいたします。
• エクササイズバイクを使用する前に、取扱説明書
すべてを読み理解してください。
• この警告に従わない場合は、重篤な事故、怪我や
死亡に繋がる可能性があります。
15
www.spirittness.com
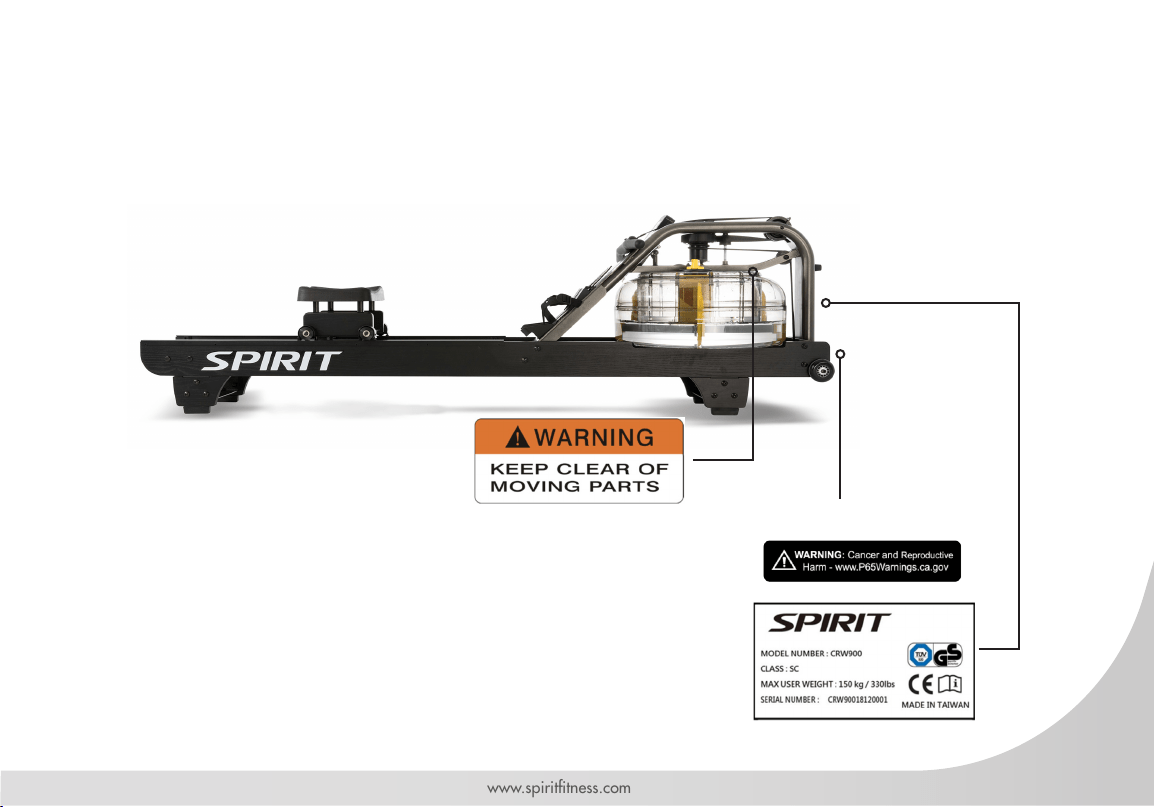
WARNING LABELS AND COMMUNICATION STICKERS
The following pages show examples of Spirit
®
Fitness warning labels and communication stickers placed
on the equipment as part of the manufacturing process. It is critical that owners maintain the integrity
and placement of these stickers. If you nd any stickers missing or damaged contact your local dealer or
distributor for a replacement. NOTE: STICKERS AND LABELS ARE NOT SHOWN TO SCALE.
CALIFORNIA PROP 65 WARNING DECAL
(For US model only)
EXERCISE WARNING STICKER
SERIAL NUMBER DECAL

16
Spirit Fitness
SAFEGUARDS
The following tness safeguards and operating
precautions are directed to purchasers and users of
the Water Rower. Club Managers should ensure that
members and tness staff are trained to follow these
same instructions. Failure to follow these safeguards
may result in injury or serious health risk.
• Do not use any equipment in any way other than
designed or intended by the manufacturer. It is
imperative that equipment is used properly to avoid
injury.
• Injuries may result if exercising improperly or
excessively. It is recommended that all individuals
consult a physician prior to commencing an exercise
program.
• If at any time during exercise you feel faint, dizzy or
experience pain, stop exercising and consult your
physician.
• Keep body parts (hands, feet, hair, etc.), clothing and
jewelry away from moving parts to avoid injury.
• Follow instructions provided in this manual for correct
foot position and basic rowing techniques.
• The maximum weight for individuals riding the rower
should not exceed 450 lbs (204 kilograms).
• Do not use or permit use of any equipment that is
damaged and/or has worn or broken parts. For all
equipment use only replacement parts supplied by
Spirit Fitness.
• Cables and belts pose an extreme liability if used
when frayed. Always replace any cable or belt at rst
sign of wear (consult Spirit Fitness if uncertain).
• Preventative maintenance is the key to smooth
operating equipment as well as to keep your liability
to a minimum. Equipment needs to be inspected at
regular intervals.
• Ensure that any person(s) making adjustments or
performing maintenance or repair of any kind is
qualied to do so.
• Do not attempt to use or repair any accessory
approved for use with the Spirit Fitness Equipment
which appears to be damaged or worn.
• Check all belts, pulleys and bungee cords regularly
for signs of wear, and replace if needed.
• Check regularly and follow all instructions for
maintenance as specied in this manual.
• Replace immediately any defective parts and do not
operate unit until all repairs are complete.
• Keep children away from the equipment. Parents
or others supervising children must provide close
supervision of children if the equipment is used in the
presence of children.
17
www.spirittness.com
• Do not allow users to wear loose tting clothing
or jewelry while using equipment. It is also
recommended to have users’ secure long hair back
and up to avoid contact with moving parts.
• All bystanders must stay clear of all users, moving
parts and attached accessories and components
while machine is in operation.
• We recommend an area no less than 2ft kept clear
around the rower for easier access and safety.
WARNING
This product can expose you to chemicals including
Toluene and Acrylamide which are known to the State
of California to cause Cancer and birth defects or other
reproductive harm. For more information, go to www.
P65Warnings.ca.gov
WARNING
Do not insert ngers into tank.
WARNING
After rowing exercise, please allow the unit to sit for 5
minutes before standing it up for storage.
WARNING
Do not ll past the calibration mark as indicated on the
tank level sticker or water spillage can occur.
WARNING
Never operate this rower without feet properly secured
in foot straps, or without the sliding portion of the slider
footplate locked into position.
Note: Rower is not suitable for therapeutic purposes.

18
Spirit Fitness
RECORD YOUR SERIAL NUMBER
Please record the serial number of this tness product in the space provided below (serial number is located
on the center oor tube behind the crank).
Serial Number:
REGISTER YOUR PURCHASE
The self-addressed product registration card must be completed in full and returned to Spirit Fitness. You can
also go to https://www.spirittness.com/commercialwarrantyregistration.html under the "Support" tab to
register online.

19
www.spirittness.com
CRW900 PRE-ASSEMBLY
Use the following procedures to unpack and assemble your water rower manufactured by Spirit Fitness:
1. Position the shipping carton so the heavy end is located at the bottom.
2. Cut the straps then lift the box over the unit and unpack. Remove foam inserts and all parts from the shipping
carton, then use the parts list to verify that all parts are included in your shipment.
3. Locate the hardware package. The hardware is separated into steps. Remove the tools rst. Remove the hardware
for each step as needed to avoid confusion. As you read through the assembly instructions, any number that is in
brackets [#] refers to the item number from the corresponding assembling drawing.
NOTE: All tools required to assemble the rower are included within the packaging.
NOTE: If you are missing any of the parts listed above, inspect the packing material and the box for items that may
have been overlooked.
If parts are missing, or if you have any operational questions, please call your local Spirit Fitness’s service department
or the distributor whom sold you the product. Please see the back of the manual for a listing of international corporate
ofces and locate the ofce nearest you. Have your serial number ready.
CAUTION: Damage to the rower during assembly is not covered as part of the limited Spirit Fitness warranty. Take
care not to drop or lean the rower on its side. Carefully stand the rower up in the normal upright position on a stable
surface so it will not tip over during assembly.
Protect the environment by not disposing of this product with household waste. Check your local authority or approved
waste center for recycling advice and facilities.
20
Spirit Fitness
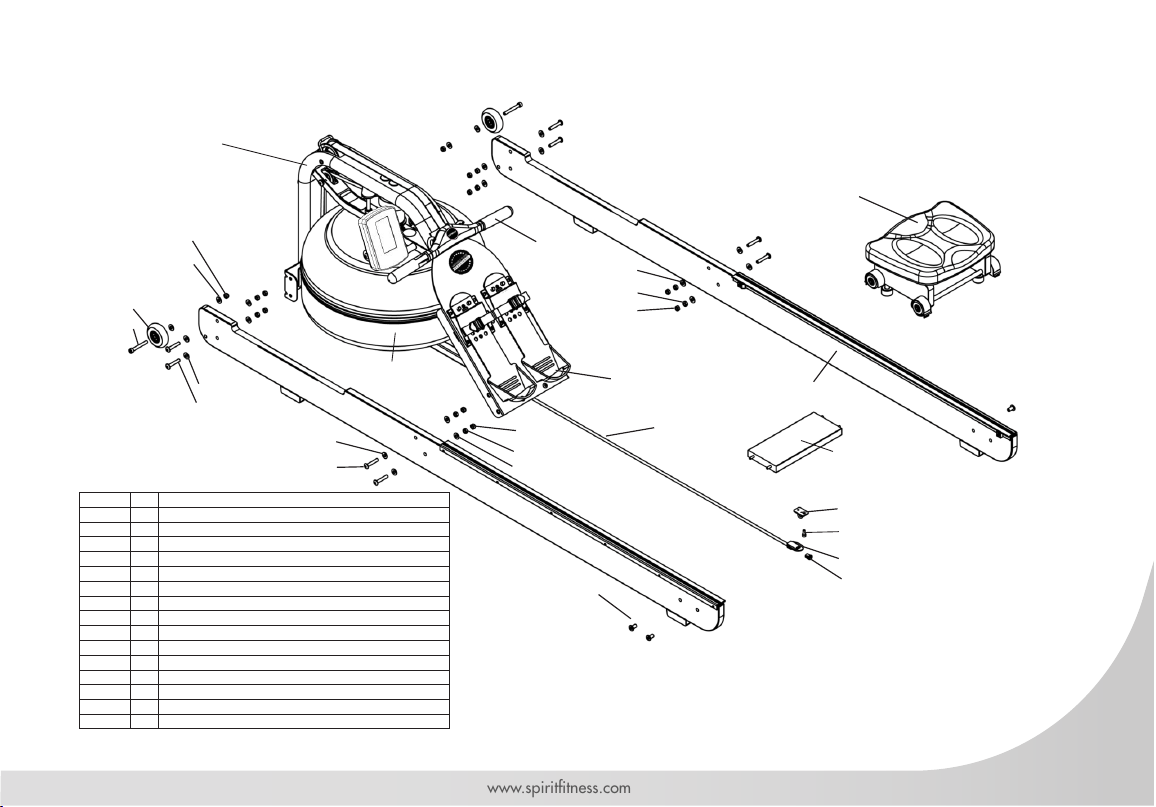
CRW900 BOX 1 & 2 CONTENTS
Item Qt. DESCRIPTION
1 1 MAINFRAME
2 2 LEFT/RIGHT SIDE RAIL
3 1 ROWER SEAT
4 1 REAR BRACE
5 1 BUNGEE HOOK MOUNT
6 2 TRANSPORT WHEEL ASSEMBLY
7 40 M8 WASHER
8 20 M8 STANDARD NUT
9 20 M8 NYLOC NUT
10 4 M6 X 15MM BOLT
11 20 M8 X 45MM BOLT
12 1 5MM ALLEN KEY
13 1 6MM ALLEN KEY
14 1 13MM WRENCH
15 4 AA BATTERY
16 1 WATER TREATMENT TABLETS
17 1 SIPHON
18 1 TOUCH UP PAINT
33 4 M8 X 160 BOLTS
1 2
3
7 98 10 11
12 1413 15 16 17 18
4 5 6
33
21
www.spirittness.com
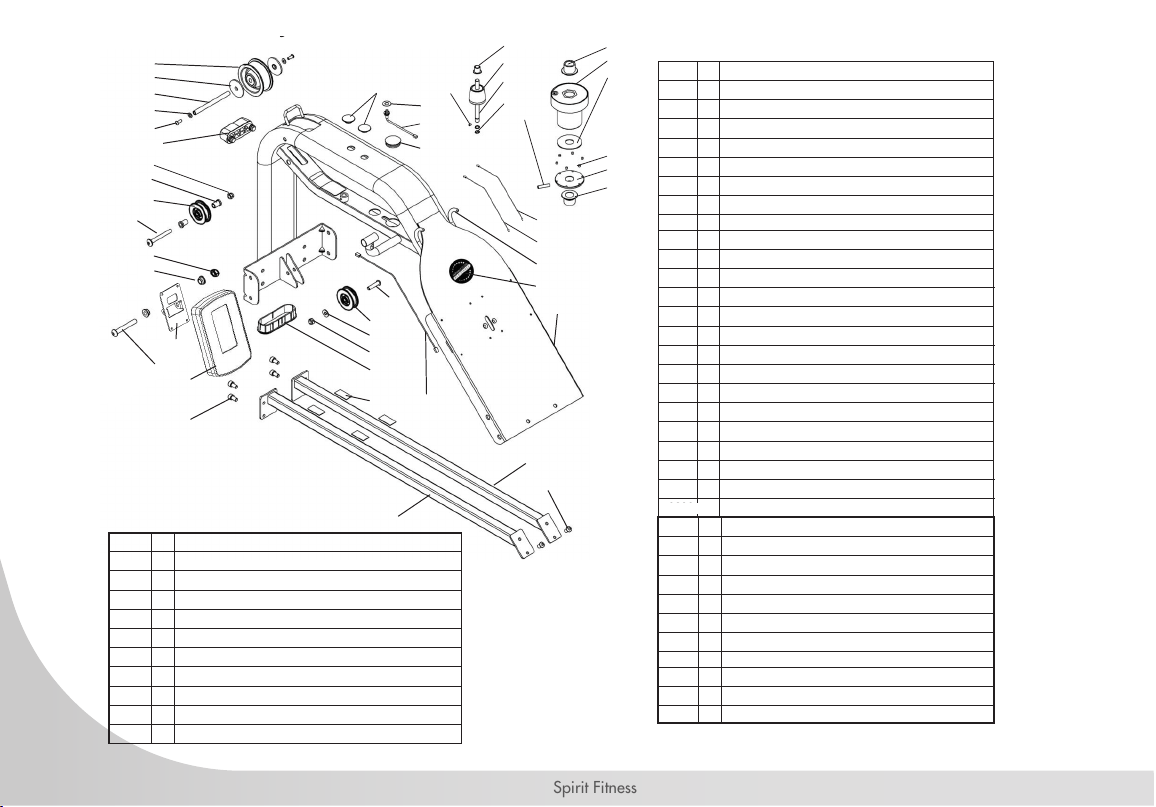
CRW900 PARTS
Item Qt. DESCRIPTION
19 1 BUNGEE SHOCK CORD [Pre-installed on Mainframe]
20 4 SEAT SPACERS
21 1 FOOTBOARD [Pre-installed on Mainframe]
22 2 FRONT AND REAR SUPPORT BRACKETS
23 4 ELEVATED LEGS
24 8 M6 X 20MM BOLT
29 1 HEART RATE RECEIVER
30 3 CABLE TIES
31 3 CABLE TIE MOUNT
32 1 ADJUSTMENT KNOB
19
20
21
22
23 24
29 30 31 32
22
Spirit Fitness
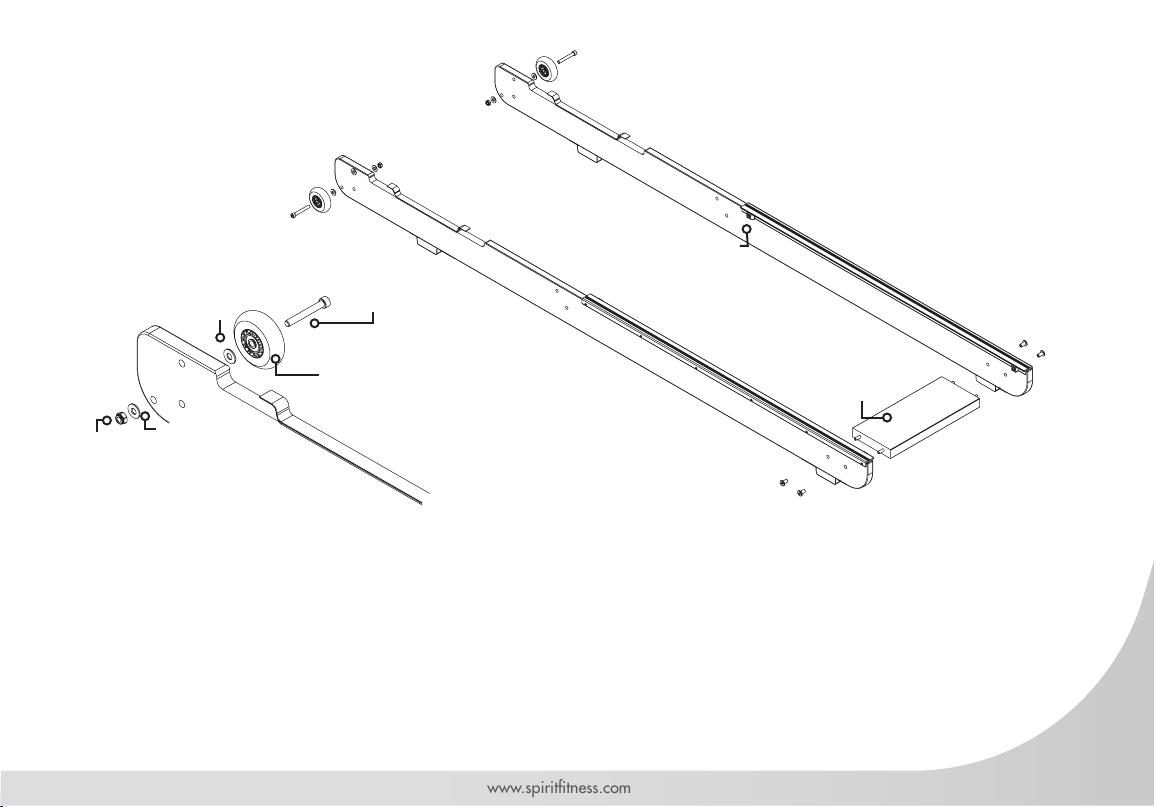
CRW900 1 - REAR BRACE, TRANSPORT WHEEL
REQUIRED PARTS
SIDE RAIL LEFT / RIGHT [2]
REAR BRACE [4]
BUNGEE HOOK MOUNT [5]
TRANSPORT WHEEL ASSEMBLY [6]
4 X M6 X 15MM BOLTS [10]
1. Start with the Rear Brace [4] and on the underside you will nd a pre-installed bolt, remove the bolt. From the
hardware kit, take the Bungee Hook Mount [5] and install it onto the Rear Brace [4] as shown. Please note the
orientation of the Rear Brace [4] and Bungee Hook Mount [5] must be correct in order to hold the end of the
Bungee Shock Cord [19] as depicted by the arrow in the illustration, which points toward the front of rower.
2. Rotate the Rear Brace [4] to correct orientation before assembling onto Side Rails [2].
Rear Brace (Under-
side)
Towards the Rower
Bungee
Hook
Mount
Pre-Installed Bolt
23
www.spirittness.com
1. Next, connect the Left/Right Side Rails [2] using 4pcs M6x15mm Bolts [10] and Rear Brace [4]. DO NOT
TIGHTEN. Note: The "Bump Stops" should be facing towards each other for proper assembly.
2. Once the Rear Brace [4] and Side Rails [2] are assembled, mount the Transport Wheel Assembly [6] onto the Left/
Right Side Rails [2] using the M8 x 60mm bolt [pre-installed], M8 washers [pre-installed], Nylon nut [pre-installed],
& Transport Wheel.
Note: Place one M8 Washer [pre-installed] on the outside and one M8 Washer [pre-installed] on the inside of the rail when
mounting the Transport Wheel [6].
3. The Transport Wheels [6] must be mounted on the outside of Side Rails [2] as shown. Do not over tighten the
transport wheel axle as it may inhibit Transport Wheel [6] rotation.
M8 x 60mm Bolt
Rear Brace
Bump
Stops
M6 x 15mm Bolts
Bungee Hook
Mount towards
the oor
Transport Wheel
M8
Washer
M8 Washer
M8 Nylon
Nut
24
Spirit Fitness
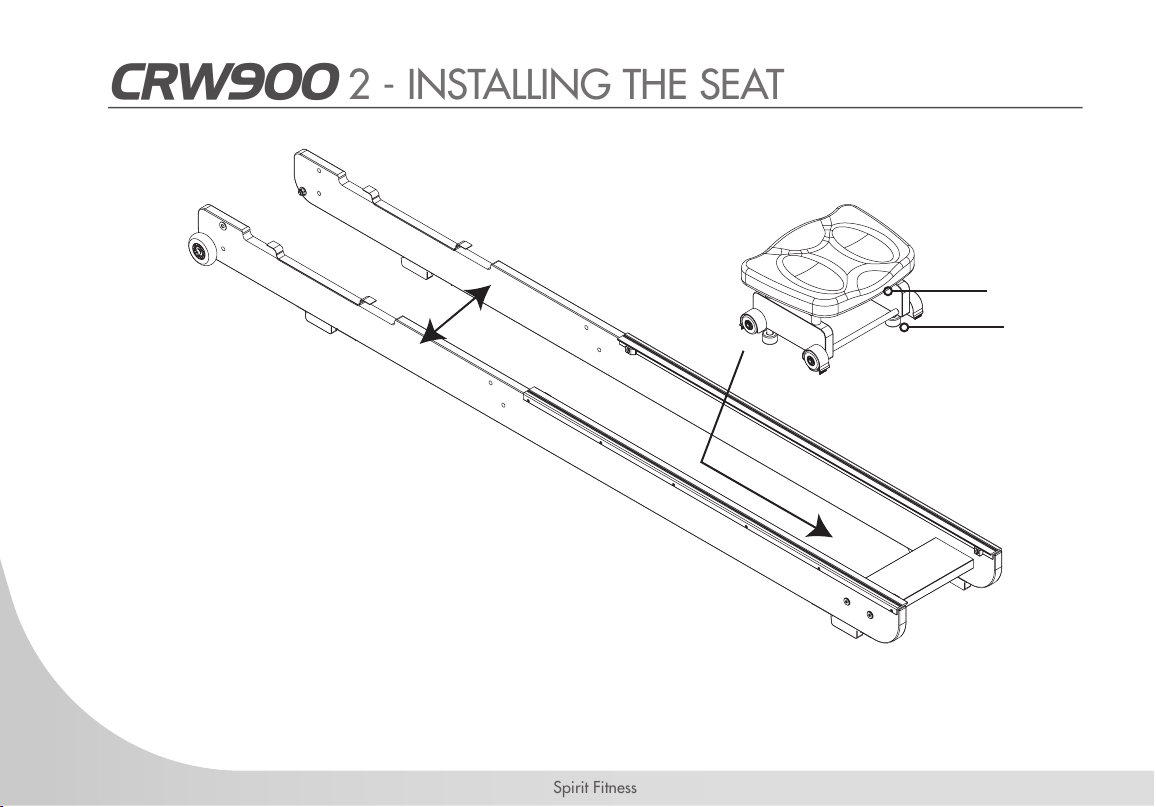
CRW900 2 - INSTALLING THE SEAT
1. To install the Rower Seat [3], spread the Left/Right Side Rails [2] slightly and drop the Rower Seat [3] into the
track. Make sure to t the lower seat guides into the track. It will be sitting somewhat loosely on the track until the
Mainframe [1] is installed. Note: Seat indentation must face rearward as noted in the illustration above.
Seat Indentation Side
Lower Seat Guides
25
www.spirittness.com
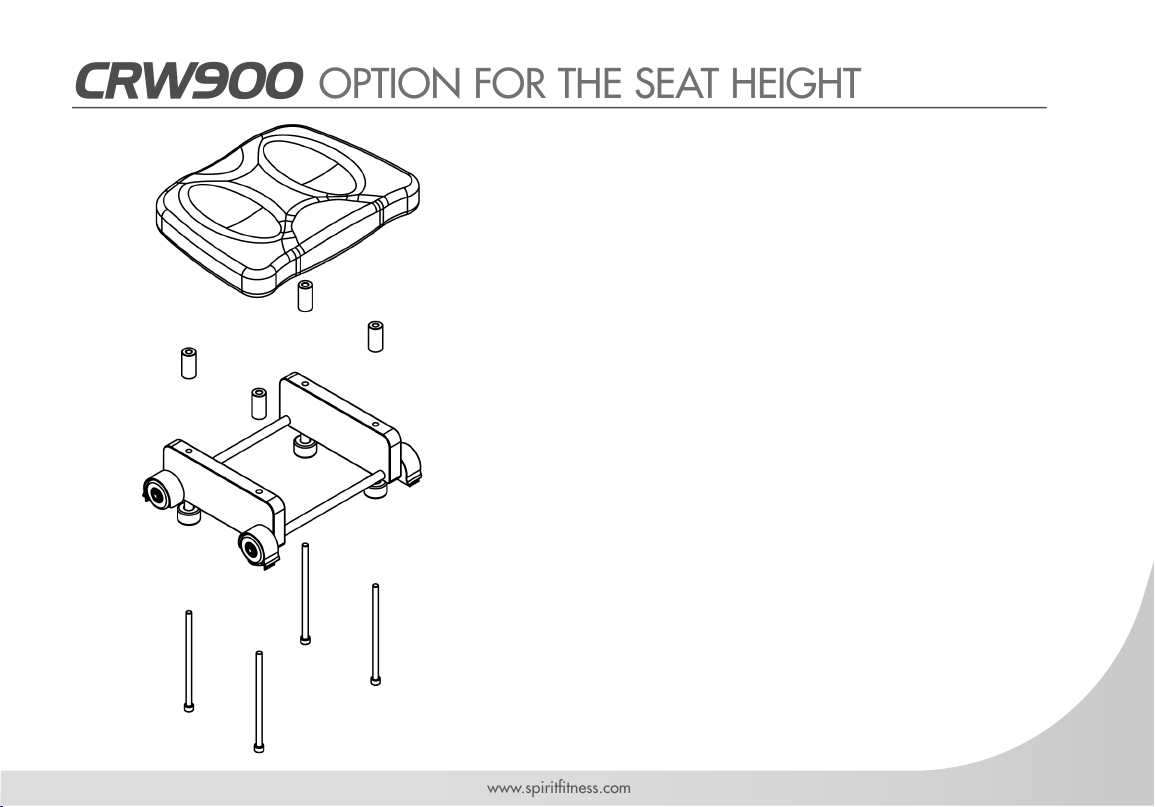
CRW900 OPTION FOR THE SEAT HEIGHT
The Rower Seat [3] comes fully assembled, however the
cushioned seat can be mounted at various heights for
added comfort and usability. The use of Spacers [20] is
optional.
To mount the seat in a higher position,remove the
pre-installed 4pcs of M8 x 130mm screws and the
cushioned rower seat. Place the Spacers [20] in between
the cushioned rower seat and the seat frame before using
4pcs of M8 x 160mm screws [33] to secure everything
in place.
Keep the 4pcs M8 X 130mm screws removed from
the seat if you ever want to return the seat to its original
(lower) position in future.
M8 x 130mm Screws
[Pre-installed]
M8 x 160mm Screws
[33]
Spacers [20, Optional]

26
Spirit Fitness
CRW900 3 - MAINFRAME
1. Install the Mainframe [1] onto the Side Rail Assembly [2] . You will need 8pcs M8x45mm Bolts [11], 16pcs M8
Washers [7], 8pcs M8 Standard Nuts [8] and 8pcs M8 Nylon Nuts [9].
2. Secure the front most lower bracket rst, then the footboard brackets but DO NOT TIGHTEN. You may nd that the
footboard bracket bolts can be difcult to access. Simply align and loosely thread lower bolts and nuts during this
step. (Once the rower is standing in the vertical position in Step Four, these bolts can be tightened.)
Note: Clean wheels & tracks weekly with a soft dry cloth in order to decrease the rate of wear on both wheels and track.
M8 x 45mm Bolt
Footboard
Footboard brackets
Front Lower Brackets
M8 Washer
M8 Washer
M8 Standard Nut
M8 Nylon Nut
REQUIRED PARTS
MAINFRAME [1]
SIDE RAILS ASSEMBLY [2]
16X M8 WASHERS [7]
8X M8 STANDARD NUTS [8]
8X NYLON NUTS [9]
8X M8 X 45MM BOLTS [11]
27
www.spirittness.com
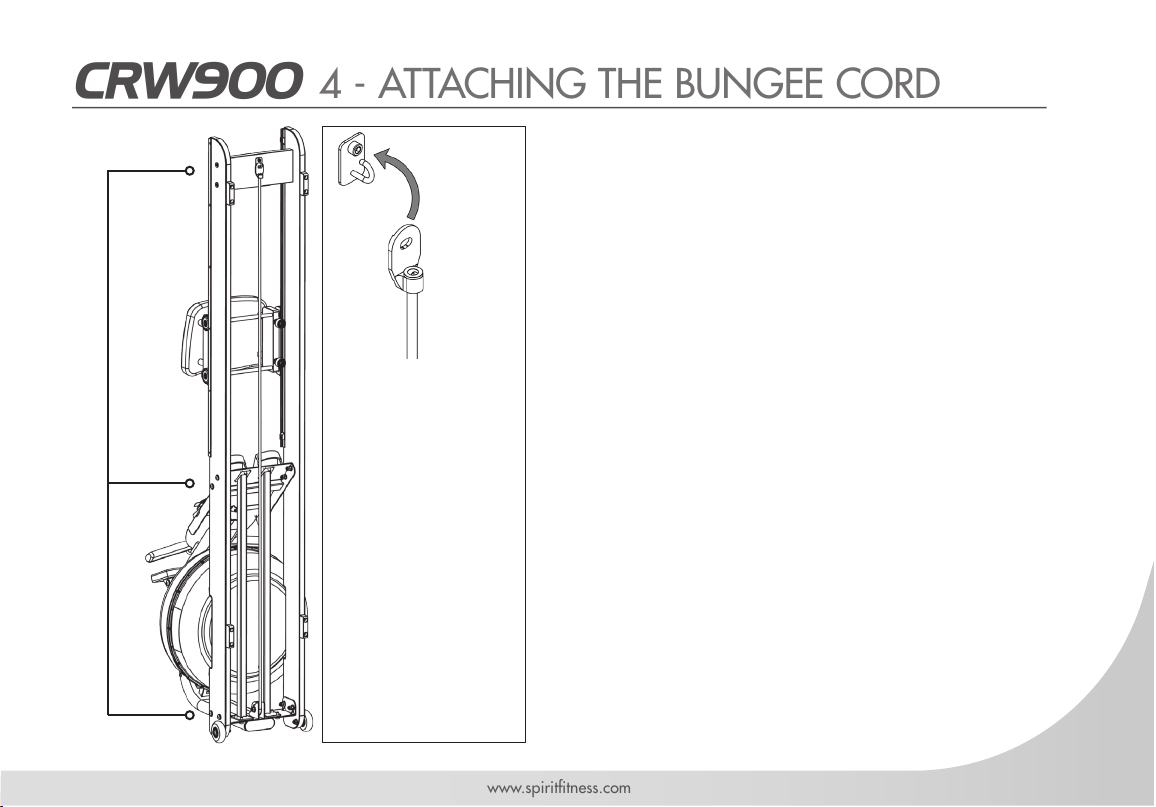
1. Once the Bungee Shock Cord [19] is attached to the
Rear Brace [4], tighten the bolts holding the Footboard
[21], the Mainframe [1] to side rail bolts as they are
easier to access from the vertical position.
2. Lower the rower back to the horizontal position and test
for proper bungee recoil.
3. Check seat rollers/runners for dirt or debris before sitting
on the rower seat. Small objects captured between
the seat rollers and runners can damage the wheels or
running surface. Check runners for debris prior to each
use and clean regularly.
Note: The rower frame bolts require periodic checking for
tightness. Do this at the end of the rst month of use and again
every 12 months
4. The rower frame can be polished with any high grade
furniture polish to further highlight the rich luster of the
wood nish.
5. Install supplied 2 AA batteries [15] and check computer
function. Further details regarding console operation can
be found in the "Computer" section of this manual on
page 45.
6. Choose a at, level surface on which to use your rower,
to avoid rocking and potential premature wear.
• Pull bungee shock
cord and hook
bungee end onto
the Bungee Hook
Mount [5] as
shown.
CAUTION
• Do not cut bungee
tie wrap before
bungee shock cord
is attached to rear
of rower as shown
here.
CRW900 4 - ATTACHING THE BUNGEE CORD
Tighten frame
bolts securely
once rower is
standing.
28
Spirit Fitness
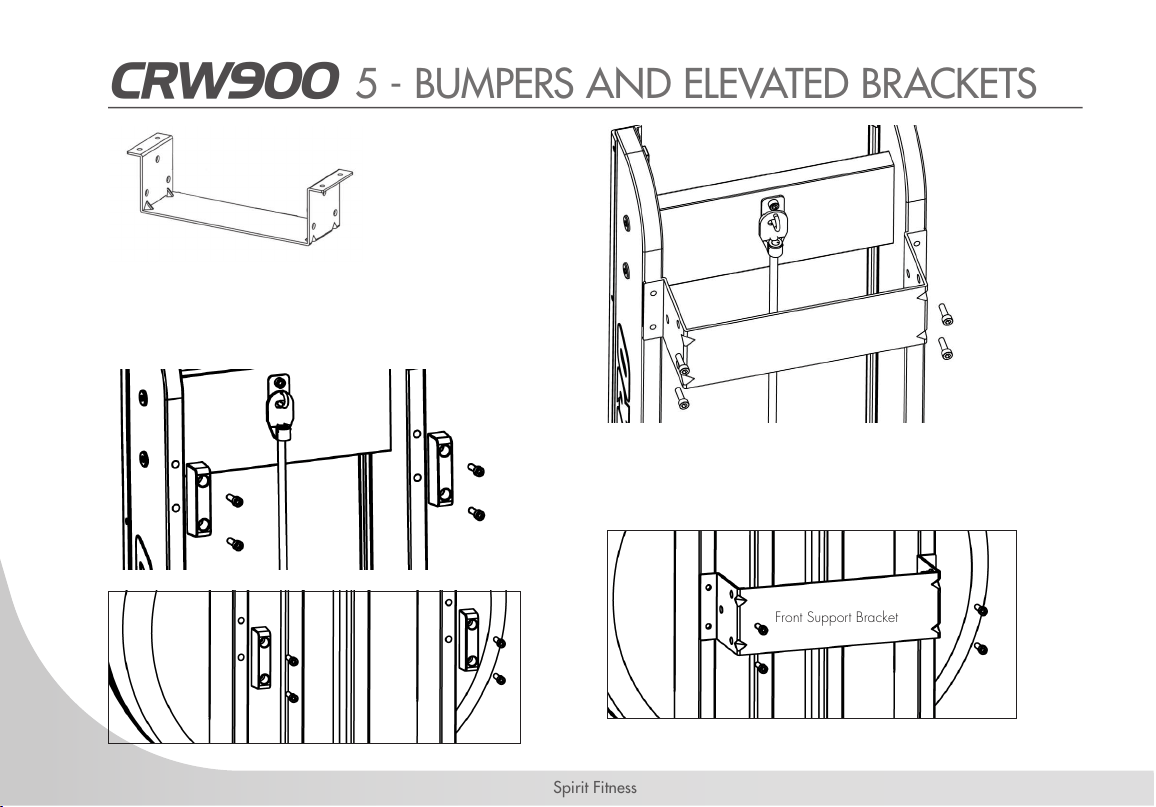
CRW900 5 - BUMPERS AND ELEVATED BRACKETS
1. Stand the Rower Vertically
2. Remove the M6x20mm Bolts [pre-installed] and the
front and the rear bumpers from Left and Right Rail
[2].
1. Mount the Front and Rear Support Bracket [22] as
pictured. Insert and secure with the 4pcs M6x20mm
Bolt [24] on each.
M6 x 20mm Bolt
Rear Support Bracket
Front and Rear Support
Brackets [22] - 2pcs
Front Support Bracket
M6 x 20mm Bolt
Side Rail Bumper
Bolt
29
www.spirittness.com
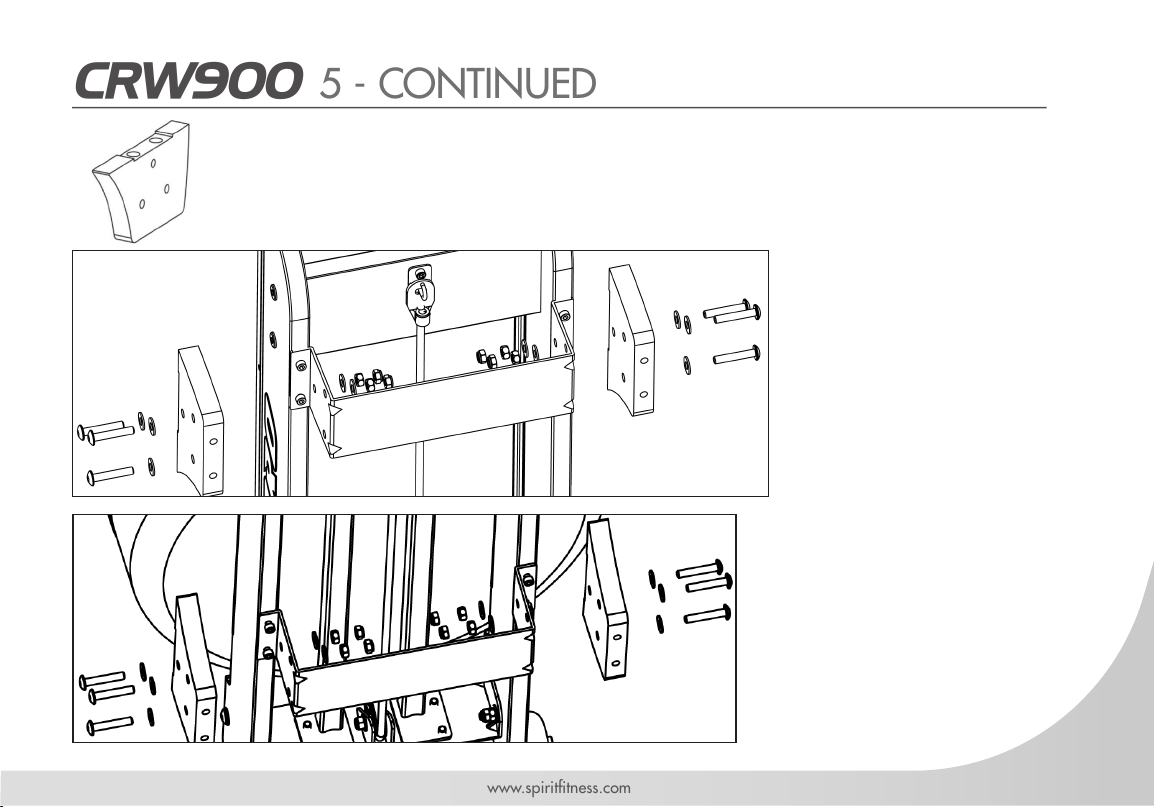
CRW900 5 - CONTINUED
1. Mount the Elevated
Leg [23] as pictured.
Align the Elevated Legs
[23] with the bolt holes
and secure them all
with 12pcs M8x45mm
Bolt [11], 24pcs M8
Washer [7], 12pcs M8
Nut [8 and 12pcs M8
Nylon Nut [9].
CAUTION: The arched
sides of the legs should
face the middle of the
rower as shown.
2. Reinstall the bumpers
to the bottom of the
Elevated Legs [23] with
the previously installed
M6 x 20mm Bolts (as
shown on page 28).
Elevated Leg
Elevated Leg
Rear Support Bracket
Front Support Bracket
Elevated Leg [23] - 4pcs
30
Spirit Fitness
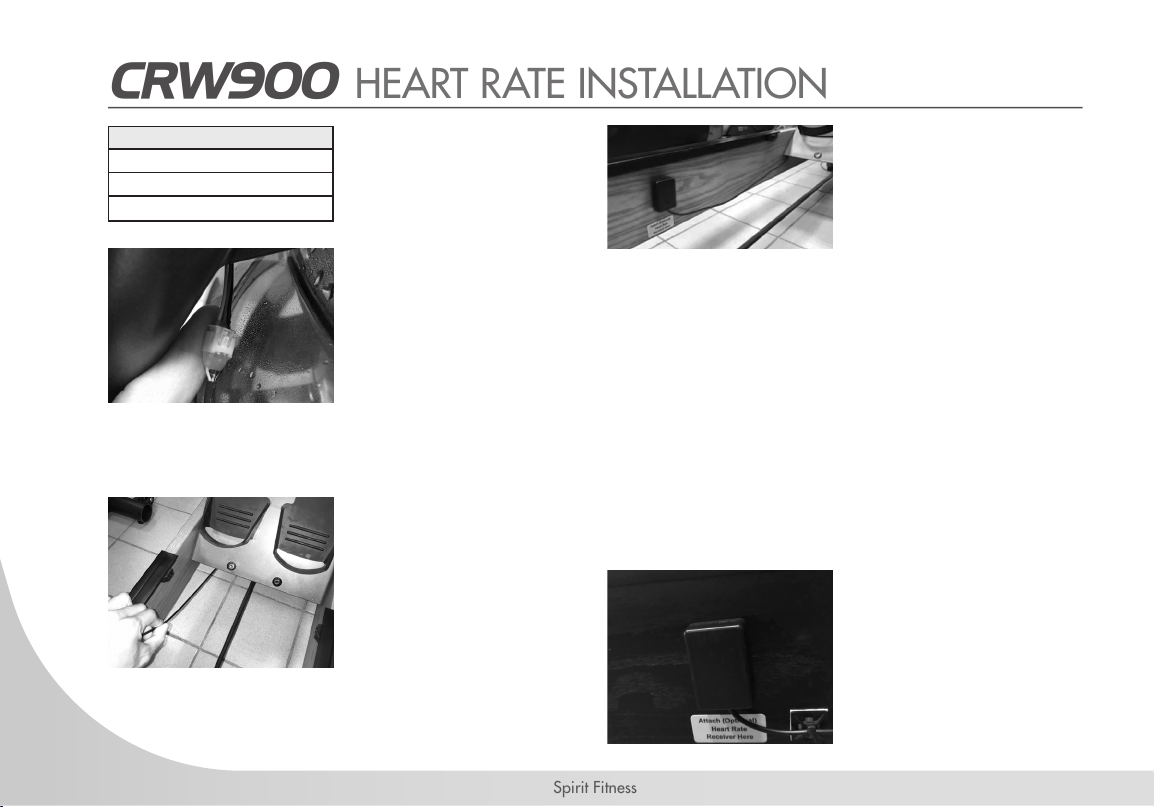
CRW900 HEART RATE INSTALLATION
REQUIRED PARTS
HEART RATE RECEIVER [29]
3PCS CABLE TIES [30]
3PCS CABLE TIE MOUNTS [31]
1. After conrming all
parts are present. Find
the ying lead cable
on the Mainframe
[1] of the rower just
behind the upper
Footboard [21] and
attach the harness.
2. Run the wire under the
Footboard [21] to the
side rail.
3. Paste the Heart Rate
Receiver [29] to the
location as indication
label using double-
sided tape, and
please be aware
on the direction,
keeping the wire in the
downside.
Note: Don’t afx
permanently until signal
in this location is tested.
Mount the Receiver low
enough to avoid the
lower Seat Rollers.
4. Use the Cable Tie
Mounts [31] to secure
the wiring out of the
way of any moving
parts. Trim excess.
31
www.spirittness.com
• You will have an excess of wire which you can tuck out of the way behind the metal frame bracket.
• Maintaining a consistent signal on a rower can be a challenge due to the varying distances experienced during
the rowing stroke between the receiver/transmitter.
• If you are experiencing difculty, make sure the batteries on your chest belt or other device are fresh, and that the
frequency of your transmitter is 5.3 KHz.
• Environmental conditions, as well as proximity to other machines can also interfere with a clean signal. Feel free
to experiment moving the heart rate receiver into different positions for best performance.
CRW900 HEART RATE INSTALLATION

32
Spirit Fitness
OPERATION INSTRUCTIONS
The CRW900 Rower's water tank offers a true multi-level experience. Water is moved between the "storage" and
"active" chambers of the tank. Your new rower can adapt at the turn of a dial to the resistance preferred by each user
in the home environment.
GETTING STARTED
To achieve minimum resistance, select "MIN" on the tank adjuster. It takes 10 strokes to ll the central "storage" tank,
leaving a minimal amount of water in the outer "active" tank. This process is always required if minimum resistance
is desired. Rowing at a steady pace (20 to 25 strokes per minute [SPM]) and putting effort into the stroke, ensuring
that good form is maintained. You can make adjustments to the resistance level while you row. Your rower will adapt
almost instantly to increases in resistance but will take up to 10 strokes to reduce the effort required, as the central
"storage" tank lls up.
DEVELOPING YOUR ROUTINE
Once you have found a level that gives you the desired challenge, changes can be made to SPM and to stroke
intensity to further vary your workout intensity. Interval training is used by most rowers, where a period of low intensity
is combined with short intervals of high intensity. Your SPIRIT Rower allows for changes 'on the y', to achieve multi-
level resistance proles during a single workout.
33
www.spirittness.com
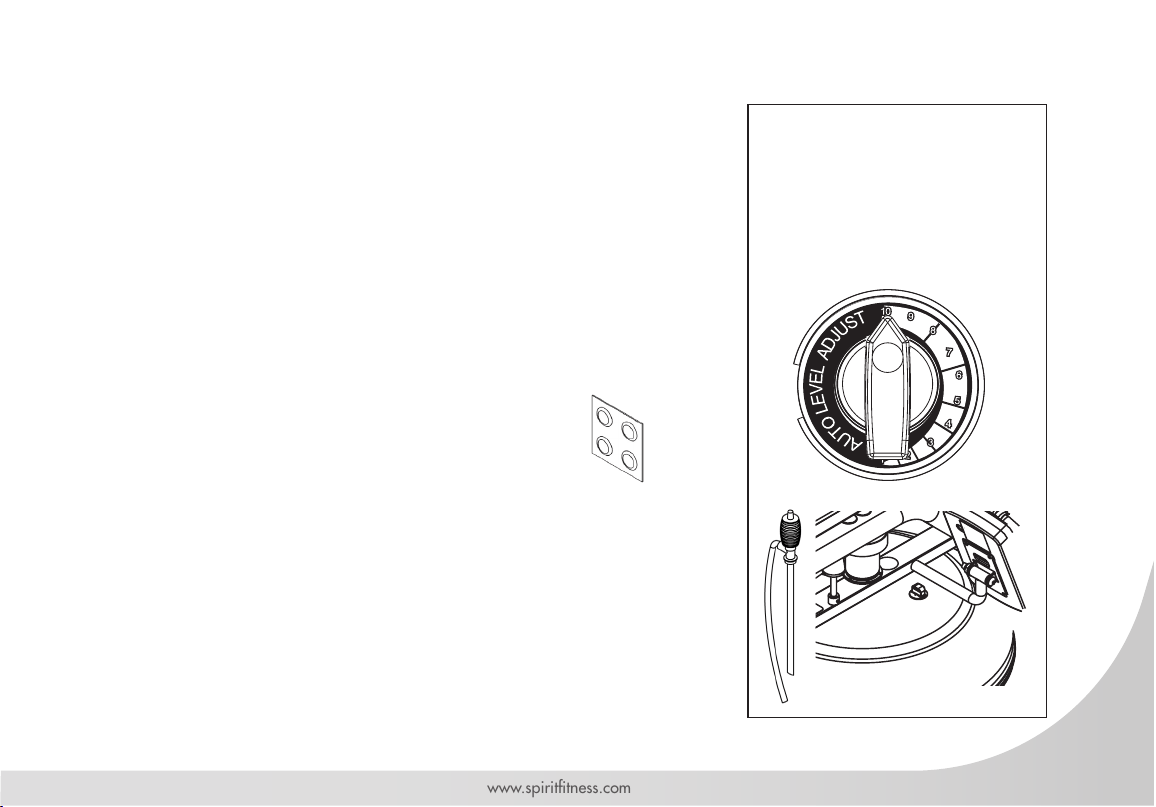
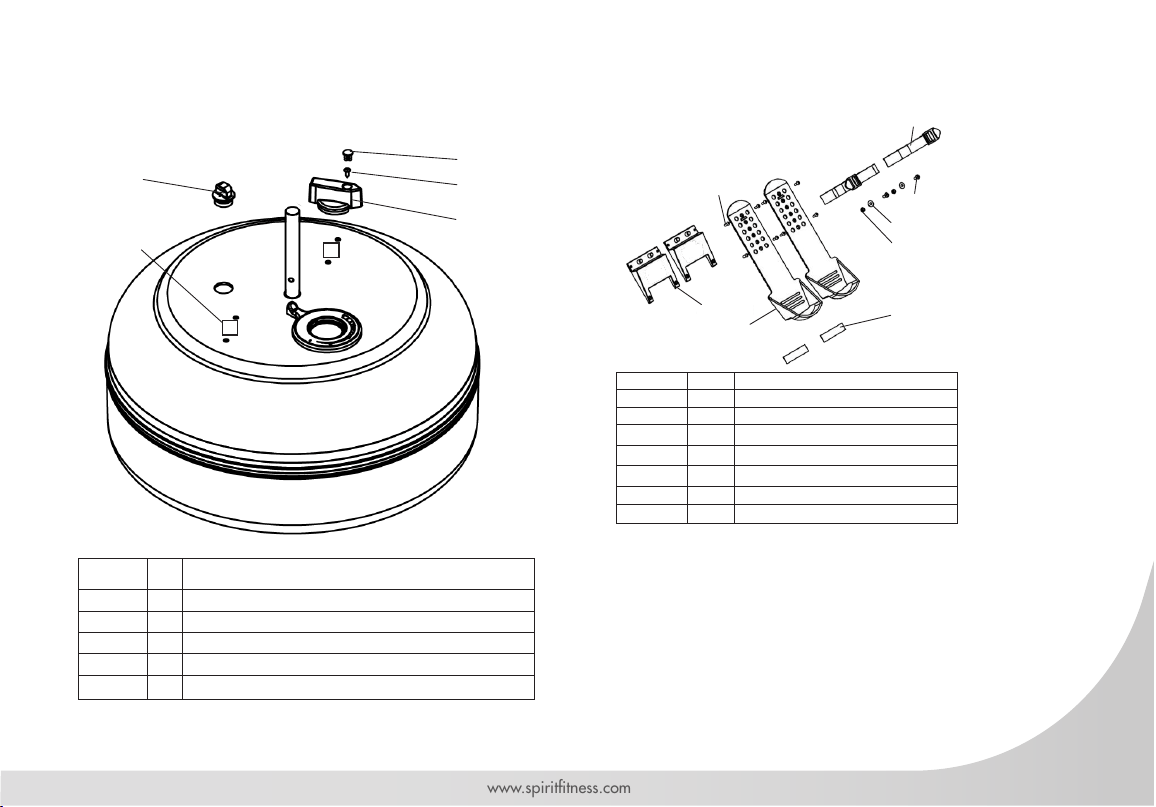
TANK FILLING & WATER TREATMENT PROCEDURES
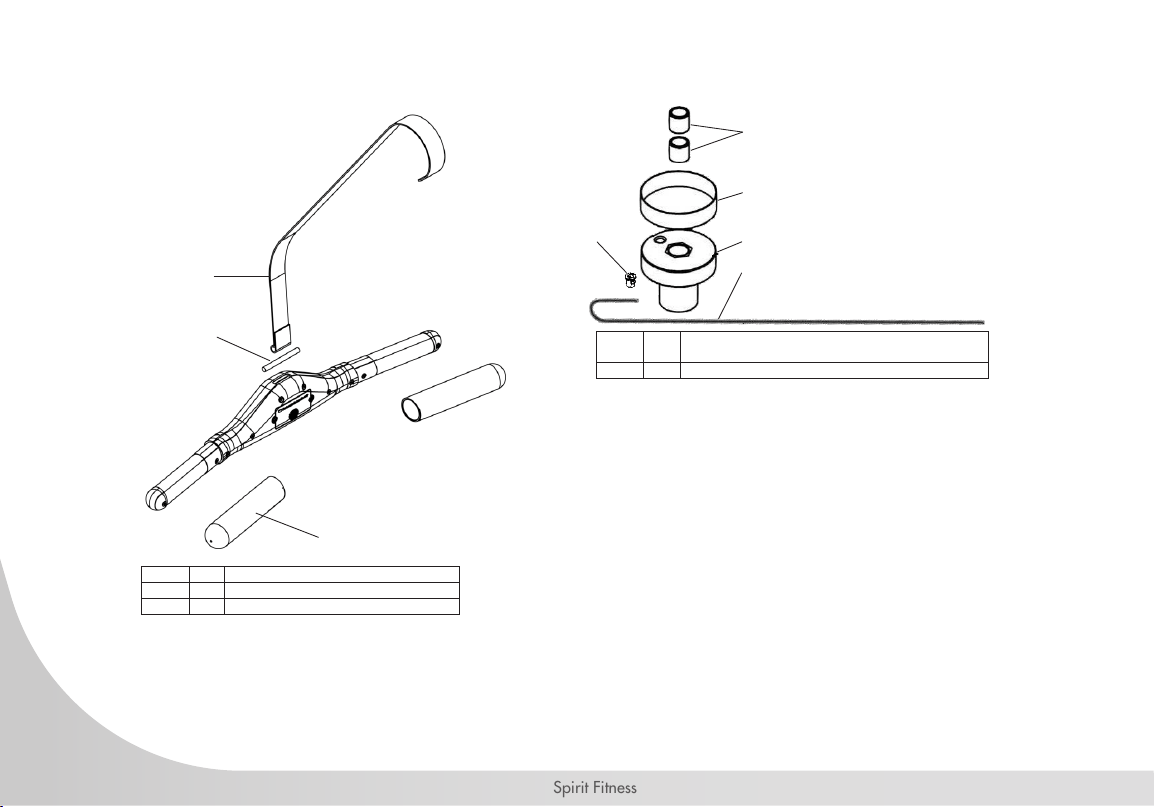
1. Remove rubber ll plug from the top of the tank.
2. Place a large bucket of water next to the rower. Position the Siphon [17]
with rigid hose in the bucket, and exible hose in the tank.
Note: Make sure small breather valve on siphon is closed before lling.
3. Set Adjustment Knob [32] to "10". Squeeze siphon to begin lling. Do not
overll tank.
4. When full, open the valve on the top of the siphon to allow excess water
to escape.
5. Once lling is completed follow the water treatment schedule below, then
replace the tank plug.
INITIAL WATER TREATMENT
Add 1 x Water Treatment Tablet [16] per full tank.
DO NOT, UNDER ANY CIRCUMSTANCE, USE A WATER
TREATMENT TABLET OTHER THAN THOSE SUPPLIED WITH YOUR UNIT.
Your unit purchase includes 4 Water Treatment Tablets [16], which is sufcient
for several years of use. To purchase additional chlorine tabs, please consult
your nearest regional dealer/distributor.
1 : This setting keeps a portion of
the water in reserve creating light
resistance.
10 : This setting allows the
maximum amount of water to reach
the ywheel for.
• Resistance adjuster
must be set to "10"
to allow for accurate
lling capacity.
• Do not overll the tank
beyond the maximum
indicated level of 20
liters. Refer to the tank
level decal on the tank.
• In areas where tap
water quality is
known to be poor,
we recommend to
use distilled water.
Tank Plug
Siphon
Water
Treatment
Tablets
34
Spirit Fitness
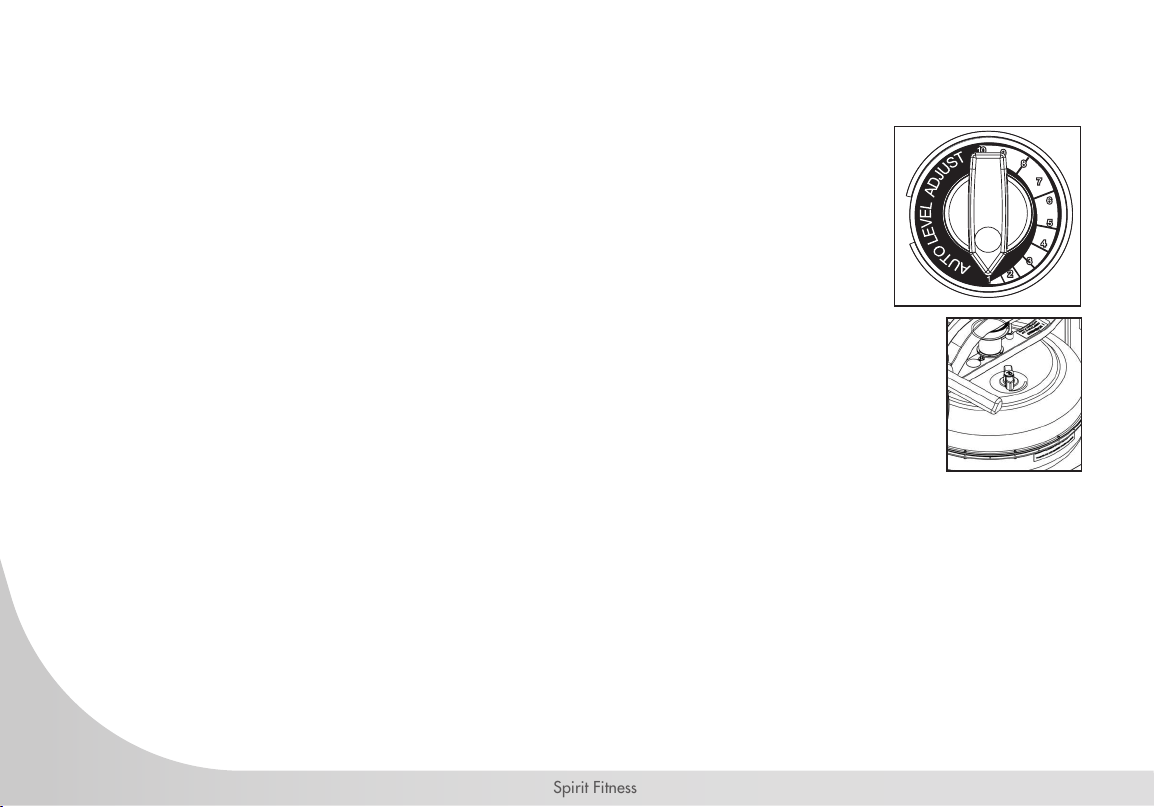
1. Set Adjuster Knob [32] to “1”.
2. Row at least ten strokes to ll the storage reservoir as completely as possible. Remove the
tank plug.
3. Insert rigid end of siphon into the tank, and exible hose into a large bucket.
4. Drain tank using the siphon and then rell following directions for tank lling as described
in the "Tank Filling" section of this manual (pg 33).
Note: Approximately 40% of tank water will remain. It is not possible to completely drain the tank
without disassembly.
5. Follow the Resistance Level Display guide in the Console set up page (pg 53) for level
calibration.
• The valve on top of the siphon must be closed to allow proper drainage.
• Water treatment will preclude the need to change tank water if the treatment schedule is
maintained. Additional Water Treatment Tablets [32] are required only when discoloration appears in the water.
REMOVING / CHANGING TANK WATER
LONG TERM WATER TREATMENT & BASIC OPERATION
Do not use any water treatment other than the tablets supplied with this unit. For replacement tablets, contact your local
SPIRIT distributor. Water treatment schedules for your water rower will vary according to the uid tanks exposure to
sunlight, but expect 8-12 months near a bright, sunlit window and 2 years or more for a darker location. At the point
of nding the water slightly cloudy, add a Water Treatment Tablet [32 ].
CAUTION: It is strongly recommended that a drop cloth be used under the uid tank whenever the tank plug is opened for water
treatment.
35
www.spirittness.com
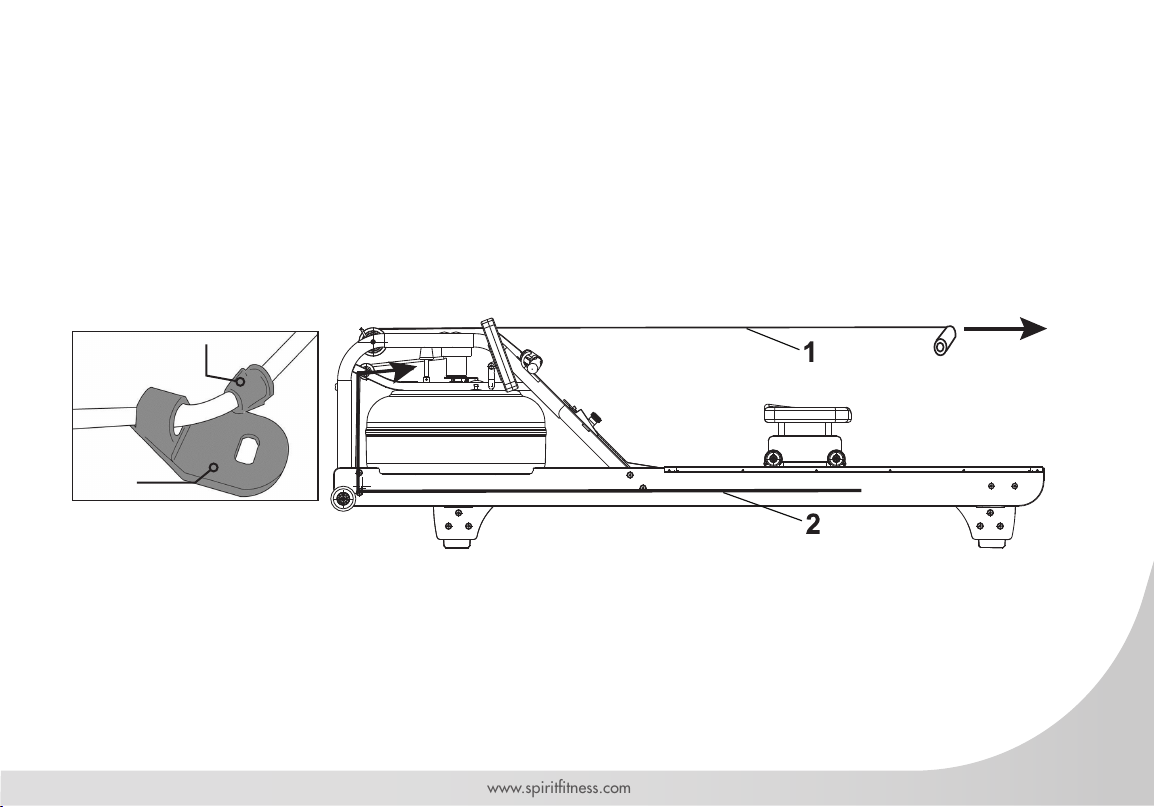
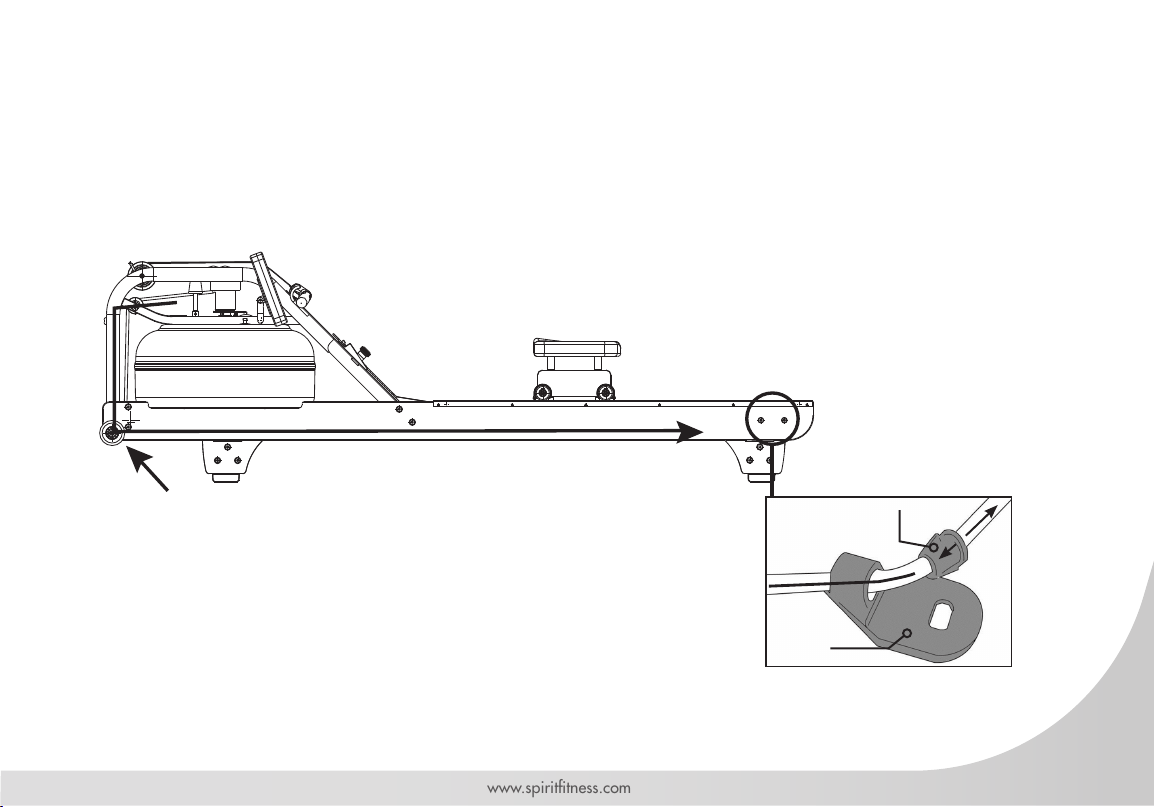
DETACHING THE ROWER BELT
1. To detach belt, simply pull beyond the range of the normal rowing stroke until the belt detaches from the belt bungee
pulley.
Note: You’ll hear the Velcro separating just before the belt detaches.
2. Unhook the Bungee Shock Cord [19] from the Rear Brace [4]. Then, push out the inner clip from the bungee
hook. Pull the bungee through the inner clip until free. This will allow for the Bungee Shock Cord [19] to be threaded
completely out of the Main Frame [1] and up to the belt bungee pulley where it will be re-attached once the rower belt
is in the proper position.
Inner Clip
Bungee
Hook
36
Spirit Fitness
Velcro Facing Upwards
Idle Wheel
Rower Handle
Belt/Bungee Pulley
Bungee Pulley
Bungee Shock Cord
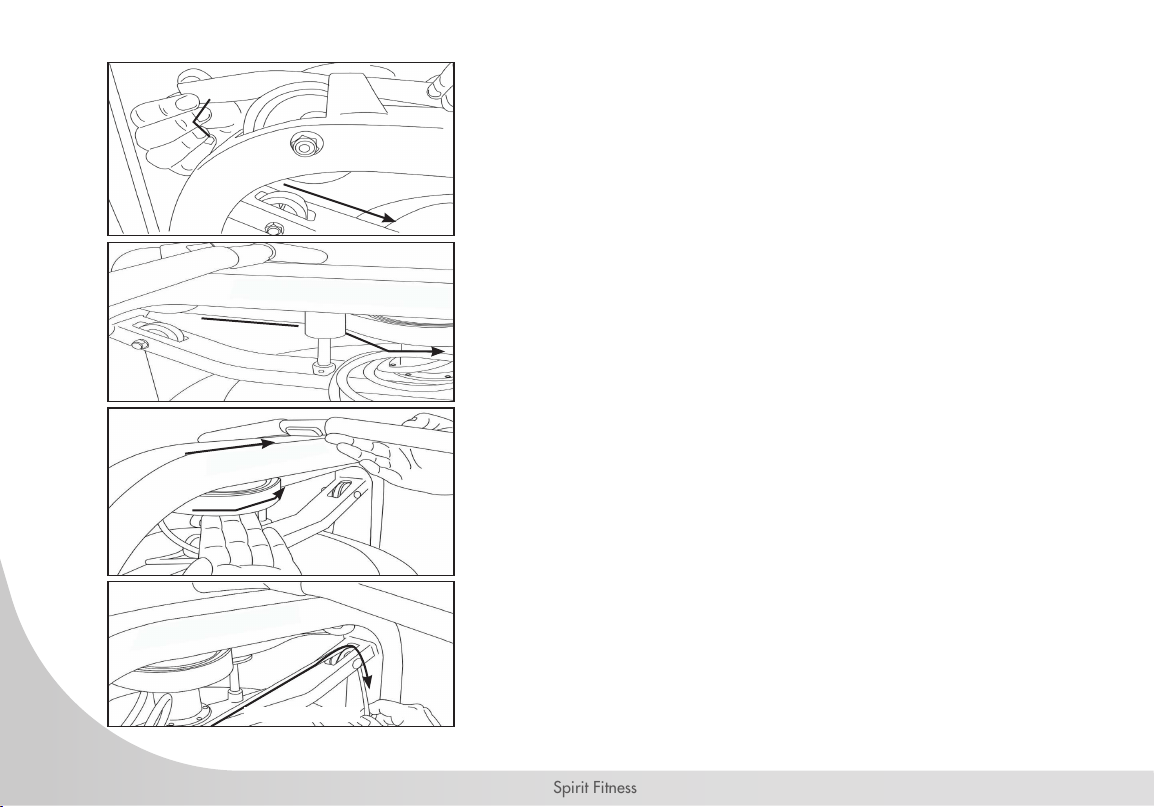
REATTACHING THE ROWER BELT
STEP 1
Begin reattaching the rower belt by threading around the rower belt
pulley with the Velcro side facing upward as illustrated.
STEP 2
Next, thread the belt around the idle wheel as shown.
Once around the idle wheel, attach the rower belt to the
belt/bungee pulley. There is an obvious “lip” at the attachment point.
STEP 3
Wind the rower belt onto the belt/bungee pulley until the rower handle
is as it’s furthest forward position.
STEP 4
Re-thread the Bungee Shock Cord [19] (on opposite side of the idle
wheel) back through the bungee pulleys and tie off at the attachment
point.
37
www.spirittness.com
REATTACHING THE ROWER BELT - CONTINUED
STEP 5
Recoil tension will decrease over time as the Bungee Shock Cord [19] stretches. To increase recoil tension, simply
push the inner clip out of the bungee hook from behind, pull the required amount of bungee through the inner clip and
replace the inner clip into the bungee hook as shown below.
Hint: Before reattaching the inner clip/ bungee hook,
tie a slip knot under slight tension at the lower bungee pulley.
This will keep the bungee under tension while reassembling the bungee hook.
Inner Clip
Bungee
Hook
38
Spirit Fitness
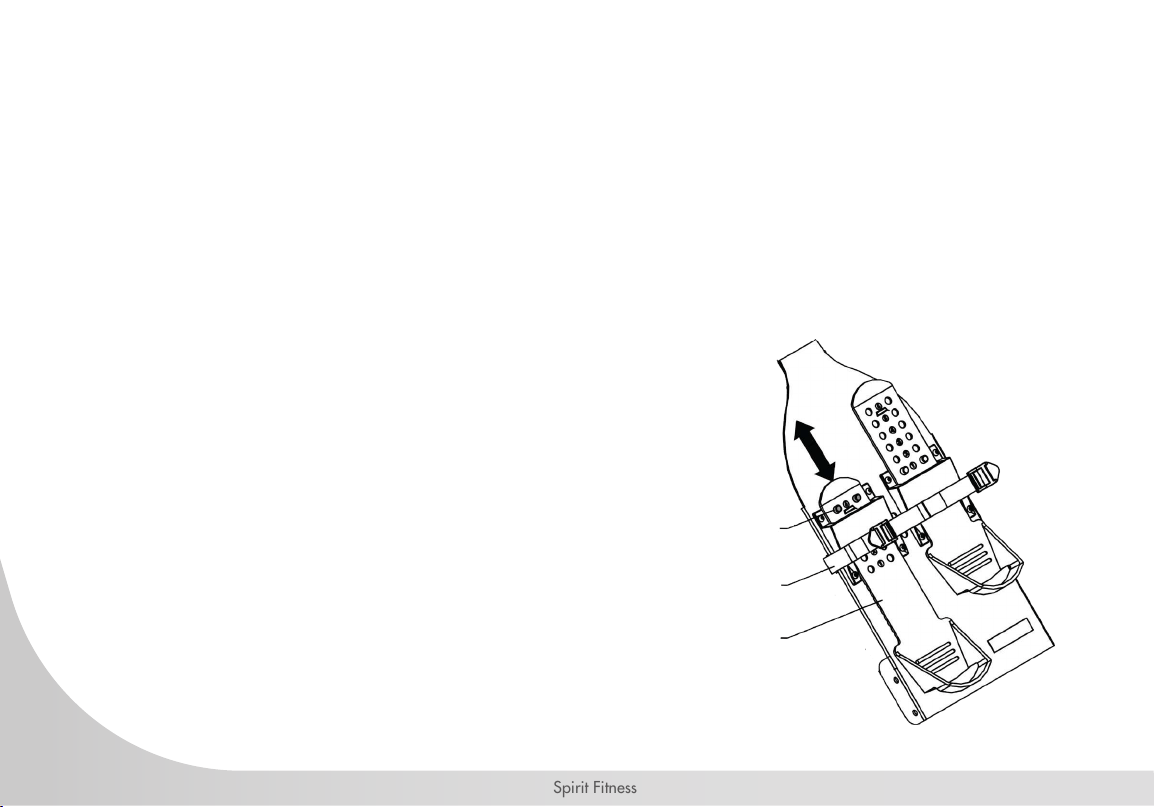
ADJUSTING FOOTPLATES
The footplate slider accommodates most foot sizes, and is designed to keep your feet securely in place as you row.
The feet should be positioned so that the foot strap covers the section of the foot that naturally bends as you row.
TO ADJUST: Lift the top of the footplate from the mounting peg and slide vertically between settings 1- 6 to suit your
foot length. Secure by hooking the footplate back on to the mounting peg and pushing down rmly to lock it into
position. Place feet on the foot plates and tighten the foot straps to ensure your feet sit rmly against the heel captures.
Note: The heel capture should bend to allow your foot to pivot naturally as you row.
WARNING
Never operate this rower without feet properly secured
in foot straps, or without the sliding portion of the slider
footplate locked into position!
Mounting Pegs
Foot Strap
Slide
39
www.spirittness.com
P.33
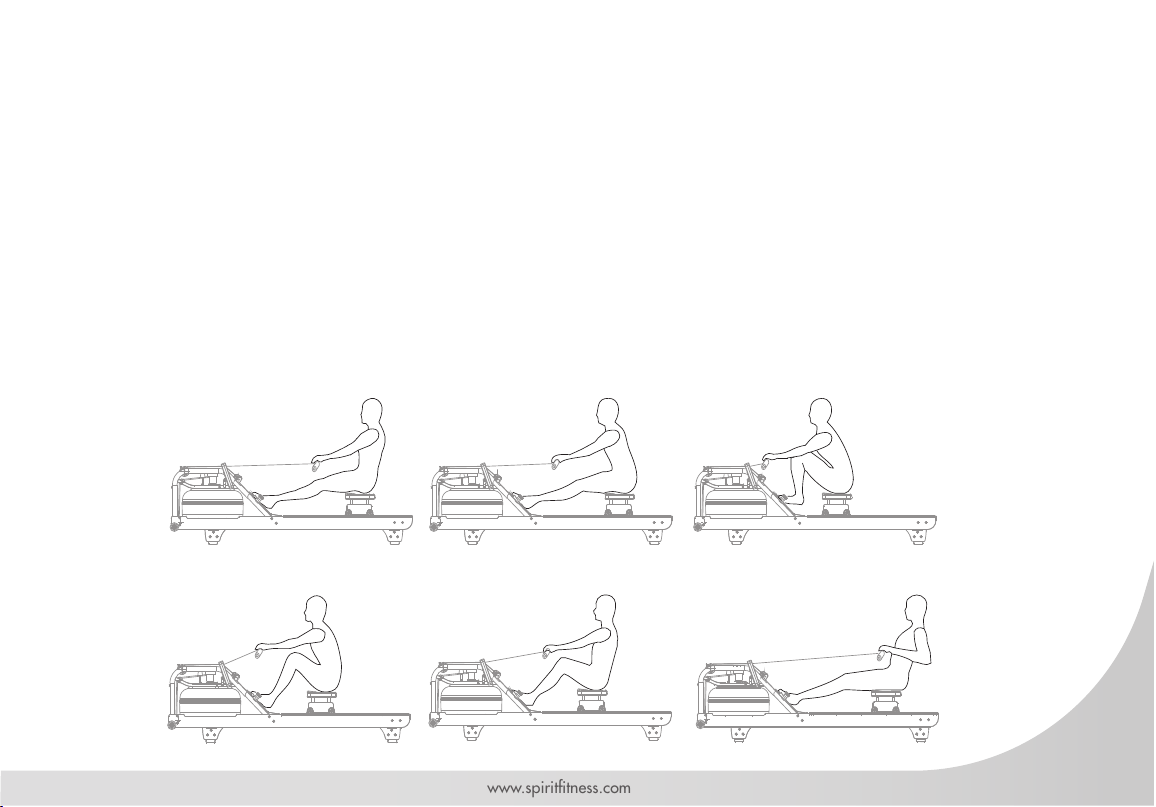
ROWING FORM
1. Sit with straight legs and back, leaning forward slightly at the hips with arms out straight, hands level with the lower ribs.
Pull back.
2. Legs and back straight, leaning slightly forward from the hips, arms out in front. Lean and slide forward. Note: Hands
should now be around your knees, keeping legs straight.
3. Legs come forward, aiming to get the shins vertical. Back is still straight, and posture leaning slightly forward with arms
still out front. Now drive hard, this is the CATCH.
4. Knees partially straightened so seat is now at mid-point of travel, back and arms still straight. Maintain the stroke.
5. Knees are nearly straight and back is still straight but now leaning slightly back from the hips. Arms straight. Now
squeeze through.
6. Legs now fully extended. Back straight and leaning slightly back, now pull with the arms so they are close to the chest,
forearms horizontal and elbows close in to the rib cage. This is the FINISH.

40
Spirit Fitness
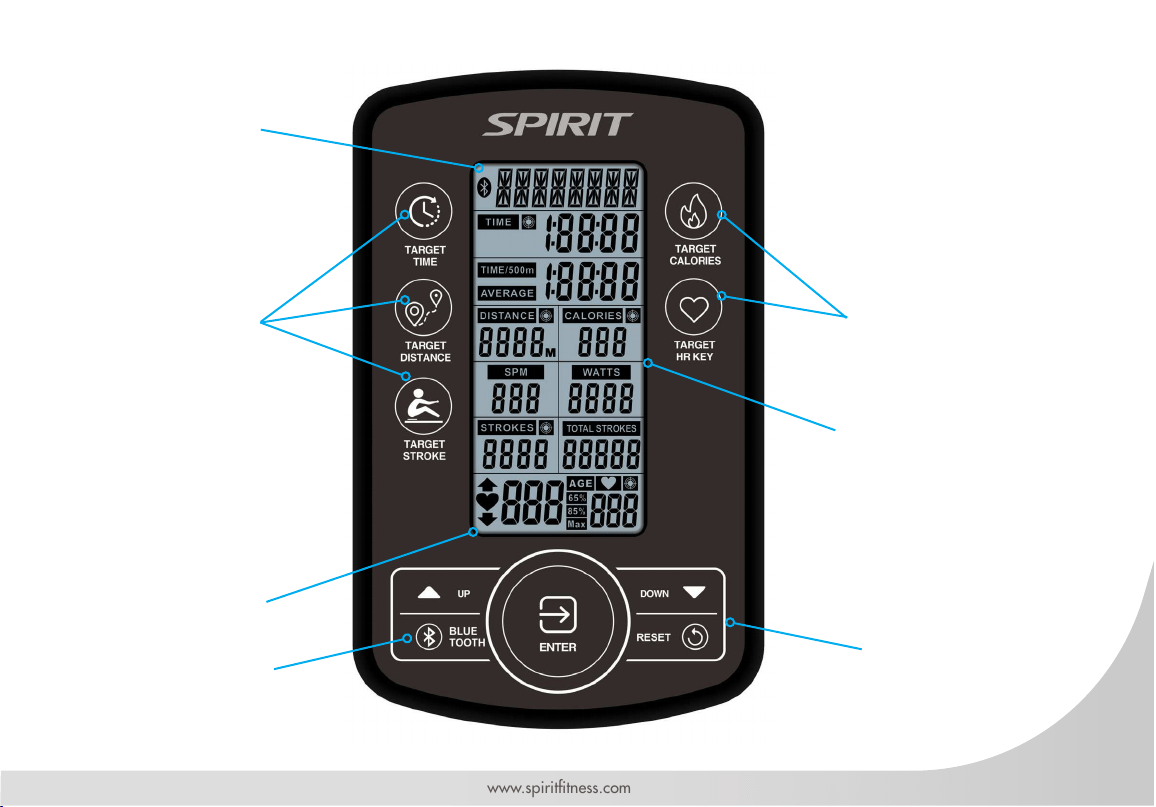
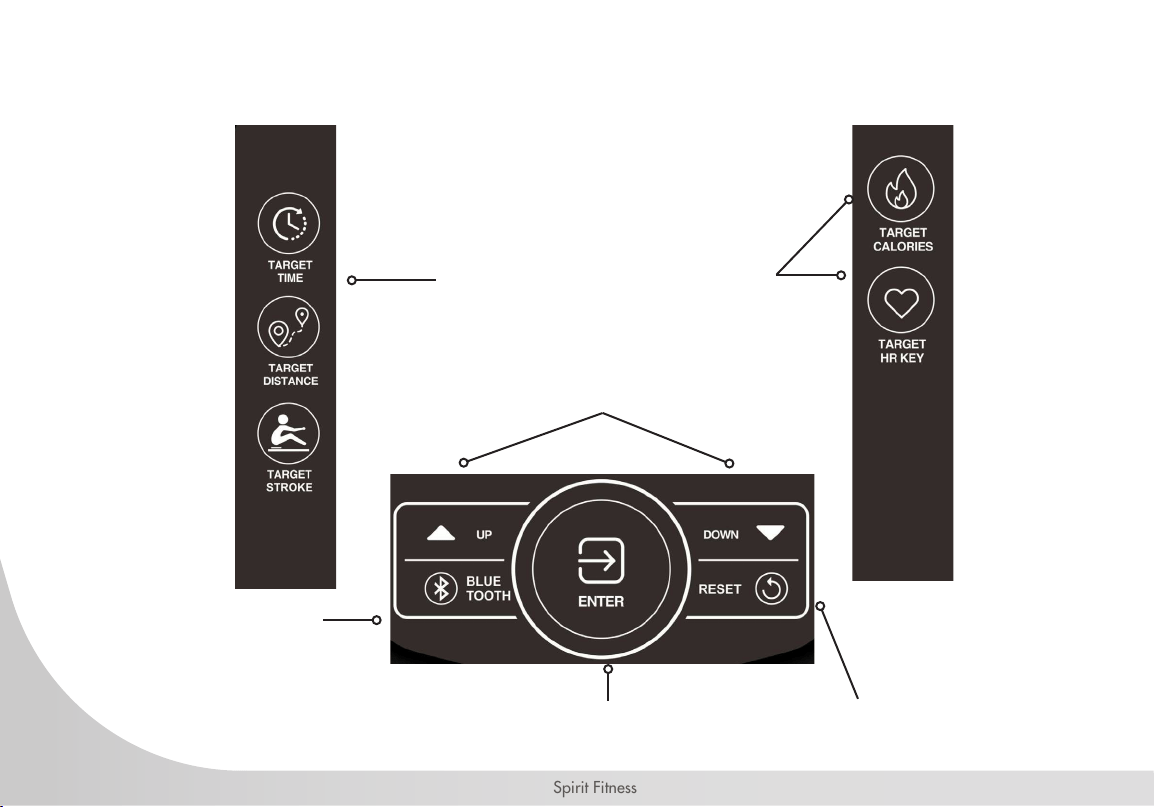
CRW900 CONSOLE OPERATION
41
www.spirittness.com
INTERVAL DISPLAY PANEL
QUICK MODE BUTTONS
HEART RATE DISPLAY
PANEL
QUICK MODE BUTTONS
TIME, DISTANCE,
CALORIES, WATTS, SPEED,
RPM DISPLAY PANEL
BLUETOOTH BUTTON
CONTROL KEYPAD
42
Spirit Fitness
CONSOLE BUTTONS
The Quick Mode buttons will go into
the associated mode immediately
The Enter button is used to conrm a value
as making adjustments to a mode
The ▲/▼ Arrow buttons allow the user to
increase or decrease console values
Use the Bluetooth button
to upload the workout
summary to the App. Work
only in Stop Mode.
Use the Reset button to
clear a value, to pause
your workout, end your
workout. Hold for 3
seconds for a Total Reset
of all values (except Total
Strokes).

43
www.spirittness.com
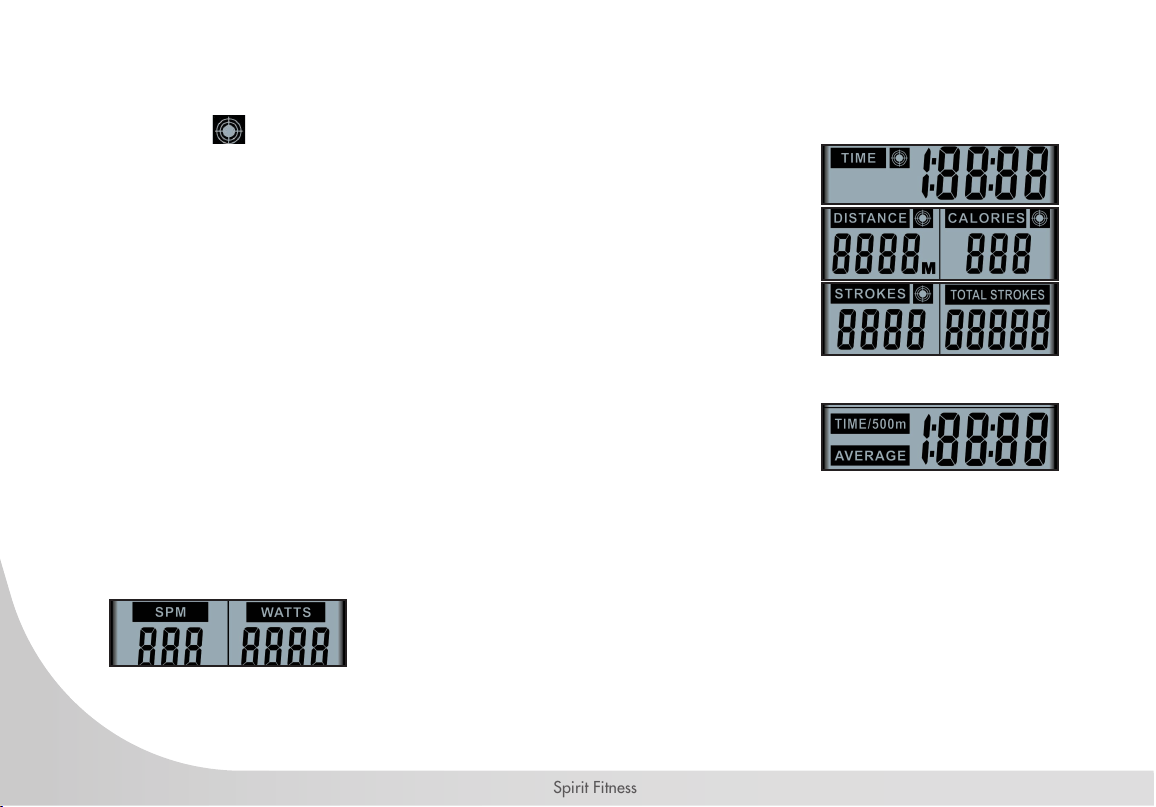
CONSOLE DISPLAY
Bluetooth Symbol - Displays
when BLUETOOTH key is
pressed
When "TARGET DISTANCE" is
selected, distance selected will be
displayed here. Overall distance will
be displayed during workout.
SPM: Strokes Per Minute
When "TARGET STROKE" is selected,
stroke selection will be displayed here.
Overall stroke count will be displayed
here during exercise."
Heart Rate Value will be
displayed here.
Resistance value displays here based on current water
level
When "TARGET TIME" is selected, time selection will
be displayed here. Total elapsed time or time count
down will be displayed during exercise."
Displays the time needed to row 500 meters
according to current speed and average speed.
When "TARGET CALORIES" is selected, calorie
selection will be displayed here. Workout data for
target calories will be displayed here during exercise.
Displays the power consumption during
training.
Displays total accumulative stroke count.
When "TARGET HR' is selected, heart
rate value (65%, 85%, and MAX) will be
displayed here during exercise.
44
Spirit Fitness
TARGET TIME, DISTANCE, CALORIES MODE
The target panels will show Time, Distance, Calories and Strokes depending on operating mode. When
the target symbol is displayed, it means that target mode is operating in that particular value.
The TIME will alternate showing the remaining or elapsed time.
The DISTANCE will count or countdown in meters.
The CALORIES will count or countdown the number of calories burned during
workout.
The STROKES will count or countdown the number of strokes during workout.
The TOTAL STROKES show the total number of strokes during workout.
TIME - 500M / AVERAGE DISPLAY
The TIME/500m is time per 500 meters.
The AVERAGE is average time of several TIME/500m work out.
SPM / WATTS DISPLAY
SPM and Watts will be displayed during all modes. SPM refers to Strokes per Minute. The WATTS will
show the amount of work produced in a particular time during workout.
45
www.spirittness.com
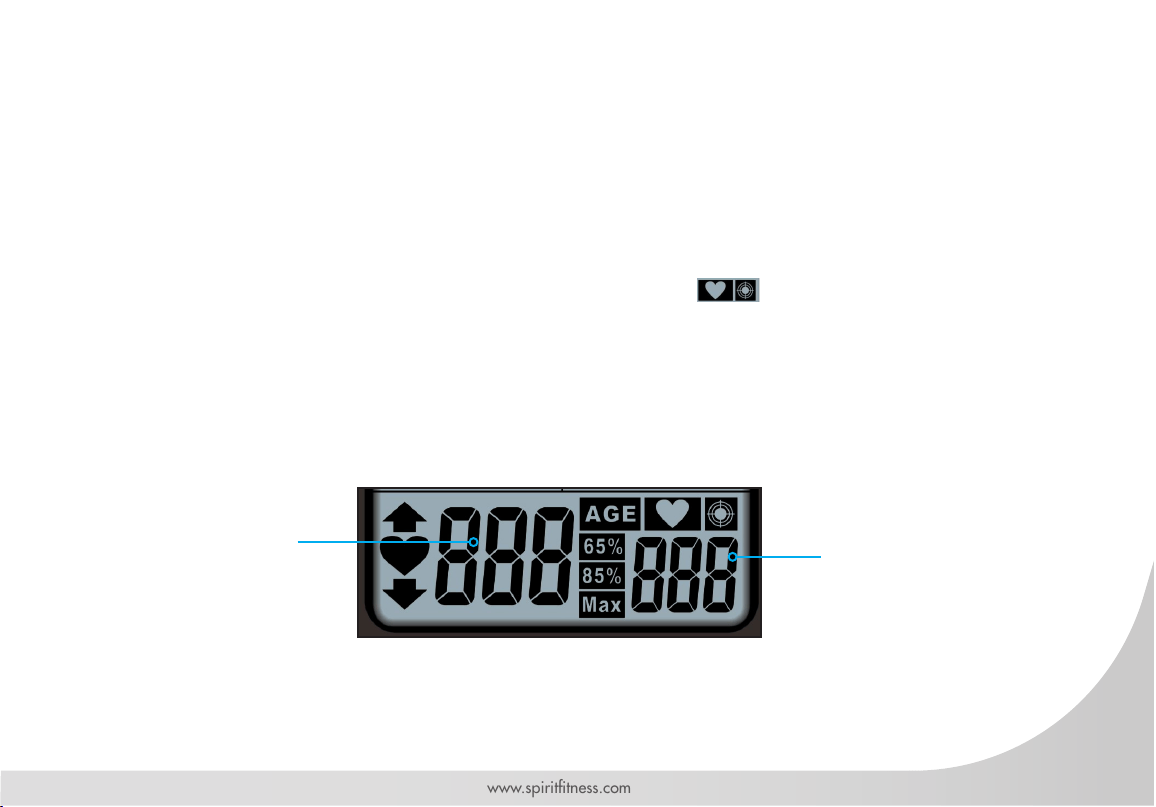
HEART RATE DISPLAY
This panel will show every user’s heart rate information. When console detects a signal from a wireless
monitor, the BPM (beats-per-minute) will show in the large three-digit eld and the heart icon will ash.
However, if no signal is detected signal, three dashes "- - -" will display to indicate no heart rate detected.
While in TARGET HEART RATE mode, the console helps the user maintain in a BPM range to build cardio-
vascular endurance. The target value range will post next to the 65%, 85% and Max HR banners. The q
or p symbol will ash to indicate that an increase or decrease of workout speed is needed to reach the
desired range. When the user’s heart rate is in the target range, the icons will light.
To detect heart rate, the heart rate receiver must be installed and a heart rate chest strap (not included) must
be used.
Target heart rate
value displays
here
Current heart rate
displays here when
heart rate monitor
(not included) is in
use.

46
Spirit Fitness
CONSOLE SETUP
BATTERY INSTALLATION
The console operates on 4 AA batteries. The battery compartment is on the back side of the console. Please dispose of
batteries properly after use.
CONSOLE MODES
SLEEP MODE
After 60 seconds of inactivity, the console will switch into the power-saving "Sleep Mode". The display will switch off.
Rotating the pedals or pressing any button on the console will launch the "Ready Mode".
READY MODE
The "Ready Mode" informs the user that the console is powered on and ready to enter into any mode. After a period
of 60 seconds of inactivity the console will switch into the "Sleep Mode".
PAUSE MODE
The console will automatically enter "Pause Mode" if there is no input. TIME, DISTANCE, CALORIES, STROKE, and
TOTAL STROKES will continue to be displayed in "Pause Mode". The 7-segment display shows LEVEL. TIME/500m
and TIME/500m AVERAGE will be shown alternately. After the 30-second period, the buzzer will buzz for 2 seconds
to go into "Stop Mode". In "Pause Mode", user can press the RESET button to go into the STOP screen.

47
www.spirittness.com
STOP MODE
Press the RESET button to go into the "Stop Mode" while in the "Pause Mode", or if there is no input via the console
for 30 seconds the console will automatically enter "Stop Mode". In "Stop Mode", the 7-segment display will show
“STOP”, TIME will show total time, DISTANCE will show total distance, CALORIES will show total calories burned,
STROKES will show the number of strokes for the workout, TOTAL STROKES will show the total number of strokes,
TIME/500m and TIME/500m AVERAGE will be shown alternately for one minute. If the heart rate monitor has been
used, the "Stop Mode" will show heart rates at 85%, at 65%, and the max heart rate for 5 seconds each, alternately.
If no heart rate monitor has been used, then no values will be displayed.
WORKOUT SUMMARY
The console provides a brief workout summary after completed the workout.
Data displayed includes: Total Time, Total Distance and Total Watts.
RESET PROCESS
To reset all saved settings, press and hold RESET button for 3 seconds.

48
Spirit Fitness
CONSOLE PROGRAMS
QUICK START
As strokes are detected, the console will immediately launch QUICK START. TIME, DISTANCE, CALORIES,
SPM, WATTS, STROKES, TOTAL STROKES will begin counting. TIME/500m and TIME/500m AVERAGE
will be alternately displayed every 5 seconds. The 7-segment display will show level according to VR
adjustments. When there's heart rate input, the icon will stay lit, and the ♥ icon will ash. Current
heart rates will be shown. In the absence of heart rate input, three dashes “- - -” will be shown continuously.
TARGET TIME, DISTANCE, CALORIES, AND STROKES PROGRAMS
Target Time, Target Distance, Target Calories, and Target Strokes program allow the target goal of each
value to be customized.
Launch: Press the desired TARGET button (TIME, DISTANCE, CALORIES, STROKES).
Setup: When operating a target program (after the console has been reset), user will enter the target value.
Adjust the value by pressing ▲ or ▼ buttons, then pressing the ENTER button to conrm the setting. If no
value has been entered, the console will use the last setting as the target value on each mode.
Start: Each mode display eld will light up and begin to readout data as follows:
For the TARGET TIME program, the time target will begin to count down.
For the TARGET DISTANCE program, the distance will begin to calculating.
For the TARGET CALORIES program, the calories will begin calculating.
For the TARGET STROKES program, the strokes will begin calculating.
End: The mode will end when the target is achieved. Pressing the RESET button at any time will also end
the target program. The workout summary will be shown after the target program has ended, or the RESET
button has been pressed.

49
www.spirittness.com
TARGET HEART RATE PROGRAMS
The Target Heart Rate program allows the maximum beats per minute (BPM) target to be customized to
maximize cardiovascular training. The Heart Rate program calculates the maximum heart rate value based
on the user's age to optimize the training target between 65% and 85% of the calculated or theoretical
maximum heart rate.
Launch: Press the Target Heart Rate button.
Setup: When operating a target program (after the console has been reset), the user enters their age. Adjust
the value by pressing ▲ or ▼ buttons, then pressing the ENTER button to conrm.
Start: The display eld will light up and begin to display heart rate and progress toward cardiovascular
goal. When the user's heart rate is lower than 65% of the calculated maximum HR range, the 65% display
will ash indicating minimum goal has not yet been achieved. When the users heart rate is over 85% of the
calculated of maximum HR range, the 85% display will ash indicating heart rate is over the maximum goal
End: The target program will end when the user stops pedaling. Pressing the RESET button at any time will
also end the target program. The workout summary will be shown after the "Target Program" has ended, or
the RESET button has been pressed.
BLUETOOTH
The Bluetooth function will only connect when the console is in the "Stop Mode". When the console is in
"Stop Mode", press the BLUETOOTH button. The Bluetooth symbol will ash on the display. Connect to
the console through the Bluetooth function on your device. After a device has been paired, the workout
summary will upload to the SPIRIT Fit App (requires download via app store).

50
Spirit Fitness
ENGINEERING MODE
Press Reset and Enter buttons for 2 seconds to enter Engineering Mode. The console will also beep for 1 second.
DISTANCE banner will blink rst. Press ▲ or ▼ button to select setting section. (Sound → ODO → Sound)
While in Engineering Mode if there is no activity for 30 seconds, the console will switch STANDBY Mode. Pressing the
Reset button will exit the Engineering Mode. The console settings and ODO will not be reset using the "RESET Mode",
however, removing the batteries will return the console to original factory settings and the ODO value will be zero.
AUDIO ON/OFF
• Under Engineering Mode of the Audio ON/OFF setting. The SOUND sign will blink. Press Enter to get into.
• After pressing Enter, the console will display “ON” or ”OFF”
• If the audio is on, the “ON” sign will blink.
• If the audio is off, the “OFF” sign will blink.
• Press Enter to conrm and the console will return to Engineering Mode.
• While in this setting if there is no activity for 30 seconds or pressing Reset, the console will switch STANDBY Mode.
ODO
The “ODO” feature displays the total time usage for your machine as H : M : S (hours, minutes, and seconds). Once the
time odometer reaches the 2-hour mark, the odometer will begin to display the time in 1-hour increments. For example,
“3H” would indicate 3 hours of total usage.
• When cycling through options in “Engineering Mode”, press enter when “ODO” is blinking on the display.
• When the total exercise time exceeds 1:59:59, the LCD will display the numerical hour number next to an “H” (hours).
• To exit, press the q or p button to switch between other Engineering modes.
• While in this setting if there is no activity for 30 seconds, the console will enter STANDBY Mode. Pressing the Reset
button twice will exit the Engineering Mode.

51
www.spirittness.com
GENERAL MAINTENANCE
A regular preventative maintenance schedule with your tness equipment ensures that products are working
at an optimal condition without affecting the your exercise experience. To assist in the maintenance
regimen, it is recommended to break service into daily, weekly, & monthly activities.
Details on each activity can be found in the "Maintenance" section of this document (see pages 33 -38).
All preventive maintenance activities must be performed on a regular basis. Performing routine preventive
maintenance actions can aid in providing safe, trouble-free operation of all SPIRIT equipment. SPIRIT is
not responsible for performing regular inspection and maintenance for your machines. Be sure to train all
necessary personnel In equipment inspection and maintenance actions, in addition to proper accident
reporting and record keeping.
Item Time Frame Instructions Notes
Seat and Seat Rails Weekly Wipe down seat rails with lint free cloth
Frame Weekly Wipe down frame with lint free cloth
Tank and Water
Treatment
12m to 2years
Follow instructions as specied in the Water
Treatment Procedure section of the manual [pg 33]
Bungee Cord
Check every hundred hours for
correct tension and for signs of
wear.
The bungee cord should last for many years. If a
bungee cord change is required, please contact your
local service representative for further details.
Rowing Belt
Check every hundred hours for
correct tension and for signs of
wear.
The rowing belt should provide many years of trouble
free use. If a rowing belt change is required, please
contact your local service representative for further
details.

52
Spirit Fitness
SANITIZING YOUR SPIRIT FITNESS EQUIPMENT
• Unupholstered high-contact surfaces (hard plastics) can be sanitized using a 75% isopropyl alcohol
solution and a clean, dry cloth.Spray surfaces to be sanitized, and use the dry cloth to wipe clean.
Allow surfaces to dry before using.
• For upholstered or soft-plastic surfaces, use a conditioner after sanitizing.Be sure to follow the
instructions provided by the conditioner manufacturer to ensure proper use of the conditioner.
• Alternatively, you can make your own spray by mixing the proper ratio of isopropyl alcohol and
distilled water to reach a 75% solution.
• For more details on sanitization, or to learn how to make your own spray solution, please visit https://
support.spirittness.com/hc/en-us/articles/4406787148564 .

53
www.spirittness.com
TROUBLESHOOTING
Issue Possible Cause Instructions
Water changes
color or becomes
cloudy
Rower is in direct sunlight or has not
had water treatment
Local tap water is of poor quality
Change rower location to reduce direct exposure to sunlight. Add
water treatment or change tank water as directed in the Water
Treatment Section [pg 33] of this manual. Consider using distilled
water to rell tank.
Rower belt slipping
off belt/ bungee
pulley
Bungee not under enough tension
Recoil not strong enough
Tighten bungee cord following the instructions in Reattaching the
Rower Belt [pg 36] section of this manual.
Inconsistent
readings on the
console for
500meter split time
and SPM (strokes
per minute)
Sensor gap issue
Faulty sensor
Sensor has moved out of position
Wiring harness issue
Use the back cover of the computer as a
“gap tool” to check the gap between sensor head and magnetic ring,
or see if the sensor head has moved out of position.
Please contact your nearest SPIRIT customer service center for details.
The console does
not illuminate after
battery installation
Batteries installed incorrectly or
need replacing
Check to see if the batteries are installed in the correct position.
Reinstall or replace as needed. If the LCD screen fails to illuminate, try
rotating the batteries slightly in the computer. If this fails, contact your
local service center.
The console screen
illuminates, but
does not register
when rowing
Loose or failed connection
Sensor gap too wide
Check that the computer lead is connected properly. If it is connected
then contact your local service center. Check sensor gap.
• Please contact your nearest SPIRIT customer service if any assistance is required.
54
Spirit Fitness
TROUBLESHOOTING CONTINUED
Issue Possible Cause Instructions
Trouble with
resistance
VR Setting
1. Hold down ENTER+UP+DOWN buttons for 2 seconds. After entering VR
settings mode, the buzzer will buzz for 1 second.
2. The 7-segment display will show “VR”. The time window will show “L”.
3. Adjust VR for the rst increment, then press the ENTER KEY to conrm.
4. The time window will show “H”. Adjust VR for the highest increment, then
press ENTER button to conrm.
5. After setting the highest and lowest VR, the console then completes the VR
settings and enters standby mode.
6. Congured VR range will automatically be divided into 10 even increments.
• Please contact your nearest SPIRIT customer service if any assistance is required.
55
www.spirittness.com
62811 8 Dome Head Bolt M8x45 - B
62812 1 Hex Head Bolt M6x15 - B
62819 2 Hex Head Bolt M8x60 - B
62822 8 Nut M8 - B
65820 1
Bungee Hook Mount
65921 20 Washer M8.5x19x1.6t - B
65923 1 Bungee Hook
65931 10 Nyloc Nut M8 - B
66066 4 Shoulder Screw M6x15 - B
66070 2 Transport Wheel
66557 1 Rear Board 268x115x23 - Black
66924 1 Bungee Rope 8mm x 2230 & Inner Clip #65922
A385 1 Seat Assembly Complete - Black
A386 1 Plastic Handle Complete
A387 1 Side Rail Complete Assembly L/R - Black
A1078 1 10 Level Tank Complete Assembly
66066
UpperMain
Frame Assembly
A1078
A387
A385
A386
62822
65931
66070
62819
65921
62811
66924
65820
65923
66557
62812
65921
65931
Footplate Assembly
65931
65921
62811
65921
62822
65921
65922
EXPLODED VIEWS
Assembly Overview
56
Spirit Fitness
Main Frame Assembly
60150
60123
60145
11072
61066
A159
60124
65125
65960
10052
60125
60126
62807
65153
90322
63820
90104
62810
65988
65921
65931
10090
66014
60230
60108
61228
65988
90141
65918
60114
60120
65142
60129
60113
61010
10095
10150
10185
10178
11070
60148
65910
10114
24005
65154
13124
90140
PN Qty Description
10052 1 Grub Screws M4x6 - B
610
10090 1 End Cap 118x40mm
610
10095 2 Dome Head Bolt M6x10 - B
612
10114 2 Computer Mount Plastic Bushing 20x16x13x10
628
10150 2 Washer M6x13x1t - B
628
10178 2 Plastic Spacer D46x4T for Belt Pulley
638
10185 1 Axle Shaft 10mm for Belt Pulley
651
11070 1 Sensor Connecting Cable 300mm
651
11072 1 Sensor 100mm
651
13124 1 Level Wiring 300mm
651
24005 1 Washer M11x22x1t SUS
659
60108 2 Bungee Pulley Spacer 8mm
659
60113 1 Main Shaft Oil Bushing - Lower 38x20x22
659
60114 1 Magnet Ring & 6 x Magnet #60124
659
60120 1 Roll Pin M6x30
659
60123 1 Idle Shaft Upper Frame Mount 10mm
659
60125 1 Idler Pulley Shaft 10x107mm
660
60126 2 C Clip 10mm
901
60129 1 Nut Dome Head M8 - B
901
60145 1 Frame Plug 38.1mm
901
60148 1 Heart Rate Lead- 400mm
903
60150 1 Main Shaft Nylon Bushing - Upper
A
60230 1 Rubber Bumper
61010 4 Tank Bonding Strip 3M-VHB 20x40x1mm
61066 1 Plastic Washer M5920.1x2T
61228 1 Dome Head Bolt M8x65 - B
62807 2 Dome Head Bolt M8x15 - B
62810 1 Dome Head Bolt M8x35 - B
63820 1 Round Decal - VFR
65125 2 Rubber End Cap - Main Frame
65142 4 Hex Head Bolt M8x15 - B
65153 1 Tank Strut Bracket - APPRO - Left
65154 1 Tank Strut Bracket - APPRO - Right
65910 1 Nyloc Nut M10 - B
65918 1 Dome Head Bolt M10x60 - B
65921 1 Washer M8.5x19x1.6t - B
65931 1 Nyloc Nut M8 - B
65960 1 Idle Wheel & Bearing 6000ZZ x 2 #60112
65988 2 Bungee Pulley & Bearing & Spacer x2
66014 1 Belt Pulley with 6000zz Bearings Complete
90104 2 Rubber Hook Cover 8mm x 50mm
90140 1 CY Console Support
90141 1 CY Console
90322 1 Upper Frame - SPIRIT
A159 1 Belt/ Bungee Pulley Complete with Bungee Assembly
Main Frame Assembly
61130
61130
57
www.spirittness.com
Sliding Footplate Assembly
10100
10220
65935
65693
10176
62064
62063
65997
10100 2 Washer M6x16x1 - B
10176 2
Foot Strap & Buckle
10220 2
Counter Sunk Bolt M6x20 - B
62063 2 Footplate Slider with Velcro #65997
62064 2 Footplate Slider Base 120x111x22.8
65693 8 Dome Head Bolt M5x15 - B
65935 2 Nylock Nut M6 - B
65997 2 Velcro For Sliding Footplate
FDF PN Qty Description
12188 1 Dome Head Bolt M4x15 SUS
61001 2 Tank Bonding Strip 3M-VHB 40x40x1mm
63144 1 Tank Plug for HS Tank
67988 1 Knob Cap
69986 1 Adjuster Knob
A1078 - 10 Level Tank Complete Assembly
69986
63144
12188
67988
61001
Not Sold Separately
58
Spirit Fitness
A159 Belt Bungee Pulley Complete
Bearings
Velcro
Bungee Pulley
60900 1
Belt Bungee Pulley Complete & Velcro & One
Way Bearings #90136
66924 1 Bungee 8mm x 2230 & Inner Clip #65922
66924
65922
64503
64503 1 Belt Bush
64504 1 Belt
64516 2 Handle Grip
A386 Plastic Handle Complete
64504
64516
59
www.spirittness.com
7
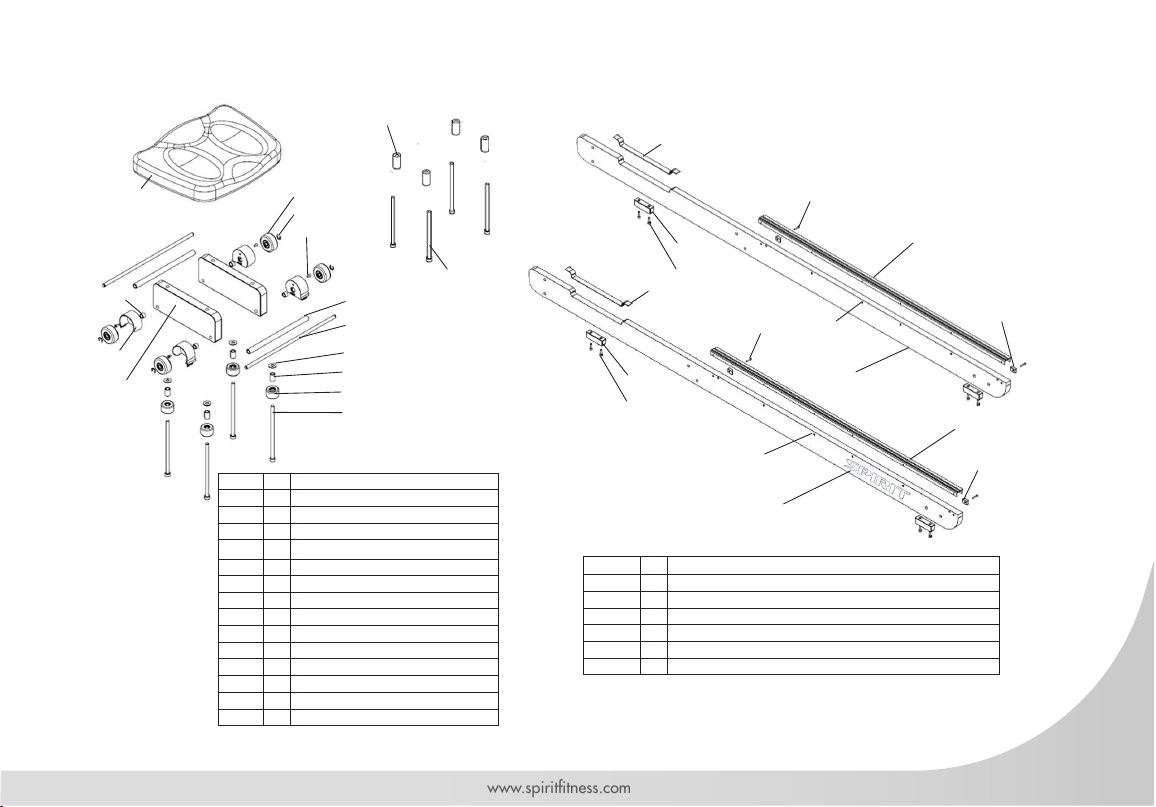
62818 4
Hex Head Bolt M8x160 - B
65702 4
Seat Wheel
65921 4 Washer 8.5x19x1.6t - B
66047 2 Brush Cover - Left & Right
66049 4 Counter Sunk Bolt 5/32
66058 1 Seat LS-E28 for Wooden Rail
66059 4 Spacer 12.7x8x8.5
66061 4 Spacer 20x8x38
66062 2 Spacer 12x8x209
66063 2 Axle Shaft 8mm
66064 4 D7 Eclip
66065 4 Spacer 12.7x8x19.5
66323 4 Seat Wheel 98A
66360 2 Seat Frame - Black
70191 4 Hex Head Bolt M8x130 - B
A385 Seat Assembly Complete
66058
66323
66064
66360
66059
66065
65702
70191
65921
A387 Side Rail Assembly L/R
62814 4
Hex Head Bolt M4x20 - B
62815 8
Hex Head Bolt M6x20 - B
64753 2 Side Rail Black with Decal #64754
66039 4 Side Rail Bumper
66055 2 Velcro for Side Rail 20x345
66056 4 Bump Stop - Square 23x15x6.5
66254 1 Seat Runner L/R with Dome Head Screw #66074
62815
66074
66039
66254
62814
66055
64753
66056
62815
66074
66039
66254
62814
66055
64753
66056
Right
Left
66049
66062
66063
66047
66061
62818
Seat Runner LR w/ Dome Head Screw #66074
60
Spirit Fitness
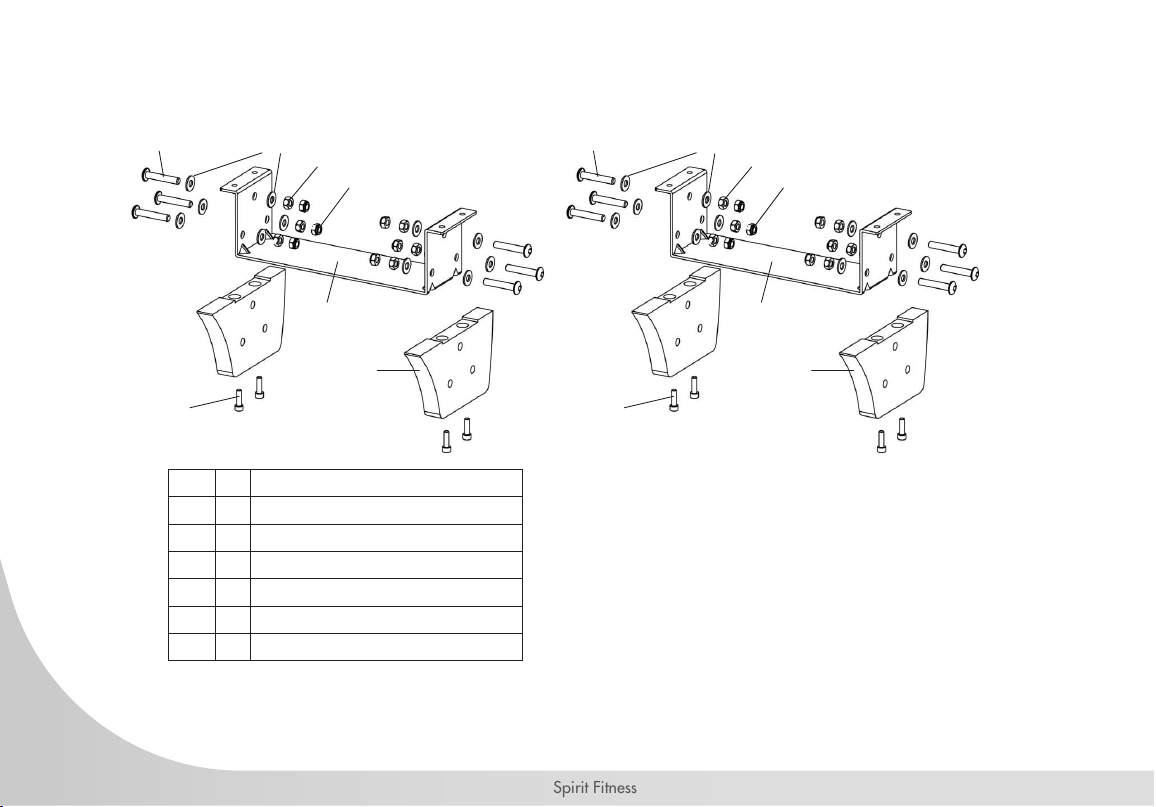
62811 12 Dome Head Bolt M8x45 - B
62815 8 Hex Head Bolt M6x20 - B
62822 12 Nut M8 - B
65921 24 Washer M8.5x19x1.6t - B
65931 12 Nyloc Nut M8 - B
66450 2 U Bracket
66452 4 Elevate Leg with Bushing
62811
65921
65931
62815
62822
66450
66452
EVK - Elevate Kit Assembly
62811
65921
65931
62815
62822
66450
66452

61
www.spirittness.com
CRW900 WATER ROWER WARRANTY EFFECTIVE OCTOBER 22, 2021
Spirit Fitness warrants all its tness rower parts for a period of time listed below from the date of retail sale, as
determined by sale receipt, or in the absence of a sales receipt eighteen (18) months from the original factory
shipping date. Spirit Fitness’ responsibilities include providing new or remanufactured parts, at Spirit Fitness’
option, and technical support to our independent dealers and servicing organizations. In the absence of a
dealer or service organization, these warranties will be administered by Spirit Fitness directly to a consumer.
The warranty period applies to the components as follows:
NORMAL RESPONSIBILITIES OF THE CONSUMER
The consumer is responsible for the items listed below:
• Proper use of the tness equipment in accordance with the instructions provided in this manual.
• Proper installation in accordance with instructions provided with the tness equipment and with all local electric codes.
• Proper connection to a grounded power supply of sufcient voltage, replacement of blown fuses, repair of loose
connections or defects in house or facility wiring.
• Expenses for making the tness equipment accessible for servicing, including any item that was not part of the tness
equipment at the time it was shipped from the factory.
• Damages to the tness equipment nish during shipping, installation or following installation.
• Routine maintenance of this unit as specied in this manual.
Warranty
Commercial
Residential
Frame
10 Years
Lifetime
Par ts
2 Years
5 Years
Tank & Seals
3 Years
5 Years
Labor
1 Year
2 Years
Wearable Parts
1 Year
5 Years
*Prisons and correctional facilities are excluded from warranty coverage.

62
Spirit Fitness
EXCLUSIONS
This warranty does not cover the following:
1. CONSEQUENTIAL, COLLATERAL, OR INCIDENTAL DAMAGES SUCH AS PROPERTY DAMAGE AND
INCIDENTAL EXPENSES RESULTING FROM ANY BREACH OF THIS WRITTEN OR ANY IMPLIED WARRANTY.
Note: Some states do not allow the exclusion or limitation of incidental or consequential damages, so this
limitation or exclusion may not apply to you.
2. Service call reimbursement to the consumer. Service call reimbursement to the dealer that does not involve
malfunction or defects in workmanship or material, for units that are beyond the warranty period, for units that are
beyond the service call reimbursement period, or for tness equipment not requiring component replacement.
3. Damages caused by services performed by persons other than authorized Spirit Fitness service companies; use of
parts other than original Spirit Fitness parts; or external causes such as corrosion, discoloration of paint or plastic,
alterations, modications, abuse, misuse, accident, improper maintenance, inadequate power supply, or acts of
God.
4. Products with original serial numbers that have been removed or altered.
5. Products that have been: sold, transferred, bartered, or given to a third party.
6. Spirit Fitness reserves the right to request proof of purchase if no warranty record exists for the product.
7. THIS WARRANTY IS EXPRESSLY IN LIEU OF ALL OTHER WARRANTIES EXPRESSED OR IMPLIED, INCLUDING
THE WARRANTIES OF MERCHANTABILITY AND/OR FITNESS FOR A PARTICULAR PURPOSE.
8. Product used in prisons and correctional facilities
CUSTOMER SUPPORT
If any items need replacement contact the Spirit Fitness Customer Support Department at (870) 935-1107
(Local) or (800) 258-8511. For international customers, please contact your local distributer.

63
www.spirittness.com
SERVICE
• Keep your bill of sale. Twelve (12) months from the date on the bill of sale or eighteen (18) months from the date of
factory shipping as determined by the serial number establishes the labor warranty period should service be required.
If service is performed, it is in your best interest to obtain and keep all receipts. This written warranty gives you specic
legal rights. You may also have other rights that vary from state to state within the United States. Service under this
warranty must be obtained by following these steps, in order:
• Contact your selling authorized Spirit Fitness dealer. OR
• Contact your local authorized Spirit Fitness service organization.
• If there is a question as to where to obtain service, contact our service department at (870) 935-1107. For
international customers, please contact your local distributer.
• Spirit Fitness’ obligation under this warranty is limited to repairing or replacing, at Spirit Fitness’ option, the product
through one of our authorized service centers. All repairs must be preauthorized by Spirit Fitness. If the product is
shipped to a service center freight charges to and from the service center will be the customer’s responsibility. For
replacement parts shipped while the product is under warranty, the customer will be responsible for shipping and
handling charges. For in-home service, the customer will be responsible for a trip charge. There will be an additional
trip charge if the customer is located over 100 miles from the nearest service center.
• The owner is responsible for adequate packaging upon return to Spirit Fitness. Spirit Fitness is not responsible for
damages in shipping. Make all freight damage claims with the appropriate freight carrier. DO NOT SHIP ANY UNIT
TO OUR FACTORY WITHOUT A RETURN AUTHORIZATION NUMBER. All units arriving without a return authorization
number will be refused.
• For any further information, or to contact our service department by mail, send your correspondence to:
Spirit Fitness
P.O. Box 2037
Jonesboro, AR 72402-2037
Product features or specications as described or illustrated are subject to change without notice. All warranties are made by Spirit Manufacturing, Inc.
This warranty applies only in the 48 contiguous United States. NOTE: This does not apply to Alaska or Hawaii.

64
Spirit Fitness
MANUFACTURER
Dyaco Commercial & Medical
North America
18303 Bothell Everett Hwy.
Suite 210
Bothell, WA 98012
TEL: +1-425-659-2401 (Local)
TOLL-FREE: +1-866-463-2662
EMAIL: Questions@spirittness.com
INTERNATIONAL OFFICES
Taipei HQ Ofce
12F, No.111, SongJiang
Rd. Taipei City, Taiwan, 10486
TEL: +886-2-2515-2288
FAX: +886-2-2515-9963
EMAIL: [email protected]
Dyaco Japan
Ryogoku ST Bldg. 7F 2-17-17
Ryogoku Sumida Tokyo 130-0026, Japan
TEL: +81 3-5669-0405
FAX: +81 3-5669-0406
EMAIL: [email protected]
Dyaco Shanghai
Room 210, No.350
Hengren Road
Yangpu District
Shanghai, China 200438
TEL: 86-21-65068300
FAX: 86-21-65068150
Dyaco UK Ltd
Fairbourne Drive
Atterbury
Milton Keynes
MK10 9RG UK
TEL: +44-0-800 029 3865
EMAIL: [email protected]
Dyaco Germany
Technologiepark Bergisch-Gladbach
Haus 56
Friedrich-Ebert-Straße 75
51429 Bergisch Gladbach
TEL: +49-0-2204 844 340
FAX: + 49-0-2204 844 333
EMAIL: [email protected]
Dyaco Canada
5955 Don Murie Street
Niagara Falls, ON
L2G 0A9
Canada
TEL: +1 888-707-1880
FAX: +1 905-353-8968
EMAIL: [email protected]

65
www.spirittness.com
NOTES

66
Spirit Fitness
NOTES

67
www.spirittness.com

800.258.4555
Questions@spirittness.com
www.spirititness.com
Spirit Fitness
3000 Nestle Road
Jonesboro, AR 72401
CRW900 Owners Manual
© 2019 All Rights Reserved
Revision 4: 10.11.2019