
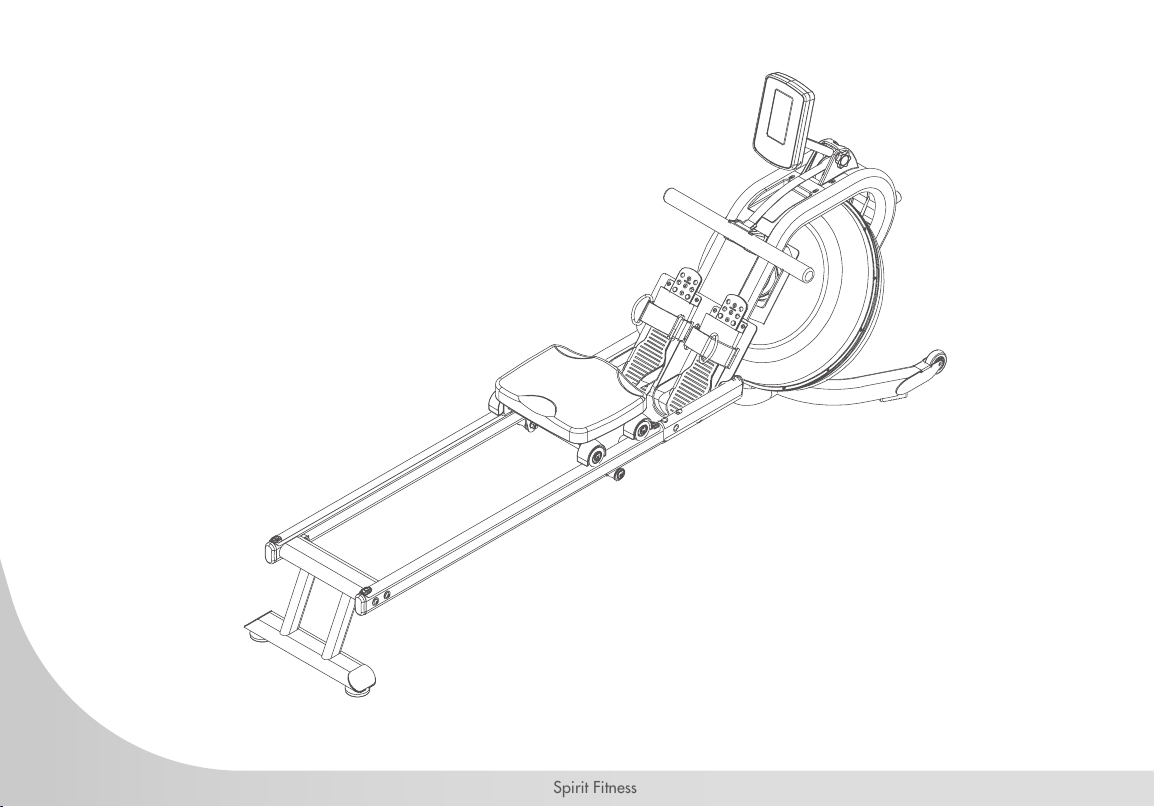
CRW800H2O Water Rower
OWNER’S MANUAL
Spirit Fitness

3
www.spirittness.com
TABLE OF CONTENTS
5 IMPORTANT SAFETY INSTRUCTIONS
6 WARNING LABELS AND COMMUNICATION STICKERS
7 SAFEGUARDS
9 REGISTER YOUR PURCHASE
10 CRW800H2O ASSEMBLY INSTRUCTIONS
17 TANK FILLING & WATER TREATMENT PROCEDURES
20 CONSOLE OPERATION
30 ENGINEERING MODE
31 GENERAL MAINTENANCE
32 TROUBLESHOOTING
34 MANUFACTURER’S LIMITED WARRANTY
Thank you for purchasing our product, please save these instructions. Please do not perform or attempt
any customizing, adjustments, repair or maintenance that is not described in this manual.

4
Spirit Fitness
Congratulations on your new CRW800H2O Water Rower and welcome to the Spirit Fitness family!
Thank you for your purchase of this quality CRW800H2O Water Rower from Spirit Fitness. Your new
CRW800H2O was manufactured by one of the leading tness manufacturers in the world and is backed by one
of the most comprehensive warranties available. Through your dealer, Spirit Fitness will do all we can to make
your ownership experience as pleasant as possible for many years to come. If not purchased direct from Spirit
Fitness, the local dealership where you purchased this rower is your administrator for all Spirit Fitness warranty
and service needs. Their responsibility is to provide you with the technical knowledge and service personnel to
make your experience more informed and any difculties easier to remedy.
Please take a moment at this time to record the name of the dealer, their telephone number, and the date of
purchase below to make any future, needed contact easy. We appreciate your support and we will always
remember that you are the reason that we are in business.
Yours in Health,
Spirit Fitness
NAME OF DEALER _____________________________________
DEALER PHONE # _____________________________________
PURCHASE DATE _____________________________________

5
www.spirittness.com
IMPORTANT SAFETY
INSTRUCTIONS
WARNING
This chapter includes precautions and tness
safeguards for the installation and use of the Water
Rower manufactured by SPIRIT FITNESS. Please read
this chapter carefully before installing or using your
equipment.
USER SAFETY PRECAUTIONS
These safety notes are directed to you as the owner
of the Water Rower manufactured by Spirit Fitness.
Please train all your users and tness staff to follow
these safety instructions.
DO:
• Do encourage each of your users to discuss their
health program or tness regimen with a healthcare
professional.
• Do stop operating your rower if you feel dizzy or faint.
• Do perform regular preventative maintenance.
• Do exercise slowly until you reach a level of comfort.
DO NOT:
• Do not let unsupervised children operate the rower.
• Do not use without proper athletic shoes.
• Do not use in rainy weather outdoors, or in an enclosed
pool environment.
• Do not drop or insert any object, hands, or feet into any
opening or within the area operation of the product.
• Do not attempt to remove any shrouds or modify the
rower.
WARNING:
• Your Water Rower manufactured by Spirit Fitness is
designed for exercise in a commercial or consumer
environment.
• Please check with your physician prior to beginning any
exercise program.
• Do not push yourself to excess. Stop if you are feeling
faint, dizzy, or exhausted. Use common sense when
rowing.
• Read the owner’s manual in its entirety before operating
the rower.
• Failure to obey this warning can result in injury or death.
SPIRIT FITNESS
®
and the Spirit Fitness logo are
registered trademarks of Dyaco International.
6
Spirit Fitness
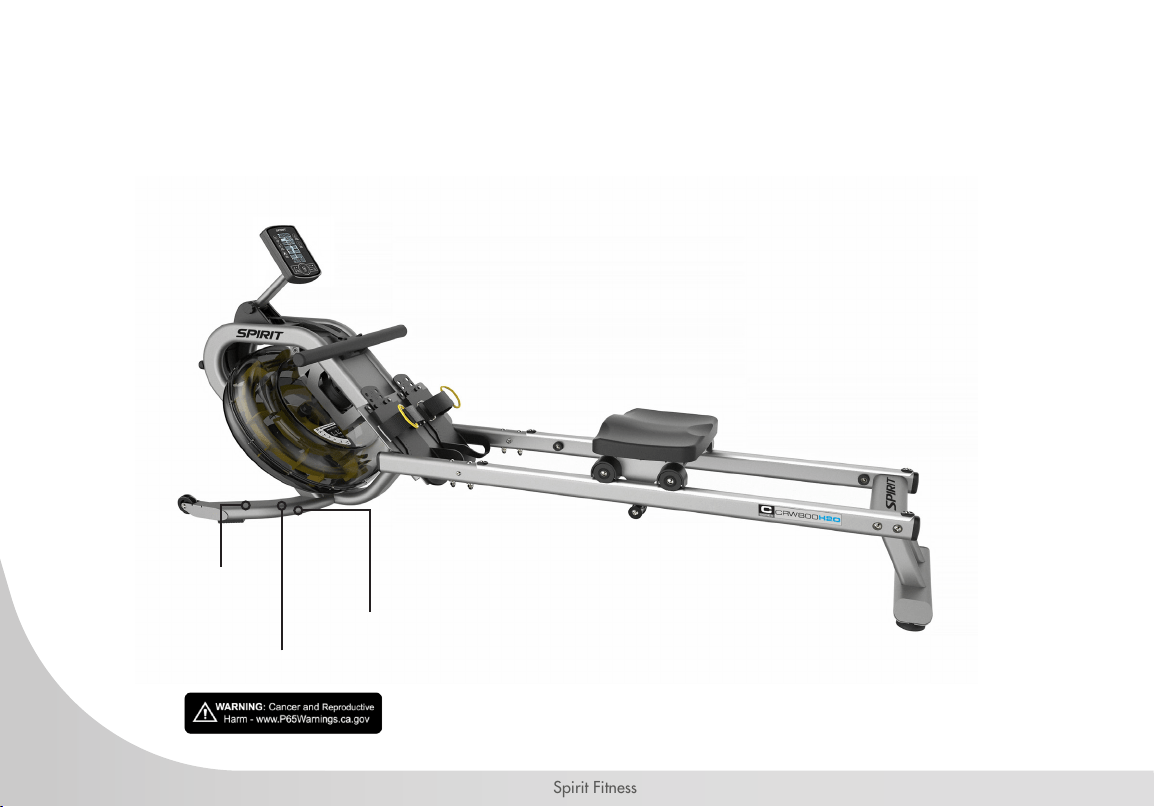
WARNING LABELS AND COMMUNICATION STICKERS
The image below shows an example of Spirit
®
Fitness warning labels and communication stickers placed
on the equipment as part of the manufacturing process. It is critical that owners maintain the integrity
and placement of these stickers. If you nd any stickers missing or damaged contact your local dealer or
distributor for a replacement. NOTE: STICKERS AND LABELS ARE NOT SHOWN TO SCALE.
CALIFORNIA PROP 65 WARNING DECAL
(For US model only)
MADE IN CHINA STICKER
SERIAL NUMBER STICKER

7
www.spirittness.com
SAFEGUARDS
The following tness safeguards and operating
precautions are directed to purchasers and users of
the Water Rower. Club Managers should ensure that
members and tness staff are trained to follow these
same instructions. Failure to follow these safeguards
may result in injury or serious health risk.
• Do not use any equipment in any way other than
designed or intended by the manufacturer. It is
imperative that equipment is used properly to avoid
injury.
• Injuries may result if exercising improperly or
excessively. It is recommended that all individuals
consult a physician prior to commencing an exercise
program.
• If at any time during exercise you feel faint, dizzy or
experience pain, stop exercising and consult your
physician.
• Keep body parts (hands, feet, hair, etc.), clothing and
jewelry away from moving parts to avoid injury.
• Follow instructions provided in this manual for correct
foot position and basic rowing techniques.
• The maximum weight for individuals riding the rower
should not exceed 350 lbs.
• Do not use or permit use of any equipment that is
damaged and/or has worn or broken parts. For all
equipment use only replacement parts supplied by
Spirit Fitness.
• Cables and belts pose an extreme liability if used
when frayed. Always replace any cable or belt at rst
sign of wear (consult Spirit Fitness if uncertain).
• Preventative maintenance is the key to smooth
operating equipment as well as to keep your liability
to a minimum. Equipment needs to be inspected at
regular intervals.
• Ensure that any person(s) making adjustments or
performing maintenance or repair of any kind is
qualied to do so.
• Do not attempt to use or repair any accessory
approved for use with the Spirit Fitness Equipment
which appears to be damaged or worn.
• Check all belts, pulleys and bungee cords regularly
for signs of wear, and replace if needed.
• Check regularly and follow all instructions for
maintenance as specied in this manual.
• Replace immediately any defective parts and do not
operate unit until all repairs are complete.
• Keep children away from the equipment. Parents
or others supervising children must provide close
supervision of children if the equipment is used in the
presence of children.
8
Spirit Fitness
• Do not allow users to wear loose tting clothing
or jewelry while using equipment. It is also
recommended to have users’ secure long hair back
and up to avoid contact with moving parts.
• All bystanders must stay clear of all users, moving
parts and attached accessories and components
while machine is in operation.
• We recommend an area no less than 2ft kept clear
around the rower for easier access and safety.
WARNING
This product can expose you to chemicals including
Toluene and Acrylamide which are known to the State
of California to cause Cancer and birth defects or other
reproductive harm. For more information, go to www.
P65Warnings.ca.gov
WARNING
Do not insert ngers into tank.
WARNING
After rowing exercise, please allow the unit to sit for 5
minutes before standing it up for storage.
WARNING
Do not ll past the calibration mark as indicated on the
tank level sticker or water spillage can occur.
WARNING
Never operate this rower without feet properly secured
in foot straps, or without the sliding portion of the slider
footplate locked into position.
Note: Rower is not suitable for therapeutic purposes.

9
www.spirittness.com
RECORD YOUR SERIAL NUMBER
Please record the serial number of this tness product in the space provided below (serial number is located
on the center oor tube behind the crank).
Serial Number:
REGISTER YOUR PURCHASE
The self-addressed product registration card must be completed in full and returned to Spirit Fitness. You can
also go to https://www.spirittness.com/commercialwarrantyregistration.html under the "Support" tab to
register online.
10
Spirit Fitness
CRW800H2O PRE-ASSEMBLY
Use the following procedures to unpack and assemble your water rower manufactured by Spirit Fitness:
1. Position the shipping carton so the heavy end is located at the bottom.
2. Cut the straps then lift the box over the unit and unpack. Remove foam inserts and all parts from the shipping
carton, then use the parts list to verify that all parts are included in your shipment.
3. Locate the hardware package. The hardware is separated into steps. Remove the tools rst. Remove the hardware
for each step as needed to avoid confusion. As you read through the assembly instructions, any number that is in
brackets [#] refers to the item number from the corresponding assembling drawing.
NOTE: All tools required to assemble the rower are included within the packaging.
NOTE: If you are missing any of the parts listed above, inspect the packing material and the box for items that may
have been overlooked.
If parts are missing, or if you have any operational questions, please call your local Spirit Fitness’s service department
or the distributor whom sold you the product. Please see the back of the manual for a listing of international corporate
ofces and locate the ofce nearest you. Have your serial number ready.
CAUTION: Damage to the rower during assembly is not covered as part of the limited Spirit Fitness warranty. Take
care not to drop or lean the rower on its side. Carefully stand the rower up in the normal upright position on a stable
surface so it will not tip over during assembly.
Protect the environment by not disposing of this product with household waste. Check your local authority or approved
waste center for recycling advice and facilities.

11
www.spirittness.com
CRW800H2O ASSEMBLY PARTS CHECKLIST
NO.1
NO.38
NO.2
NO.3R L
NO.52
NO.53
NO.54
Part No Description Q’ty
1 Main Frame 1
2 Rear Stabilizer 1
3R/3L Slide Rail 1/1
38 Seat Assembly 1
54 Computer Assembly 1
52 Funnel 1
53 Pumping Siphon 1
Water-Purication
Tablet
1
User Manual 1
Hardware Parts 1
AA Batteries 4
Note: Above parts are all needed to assemble this machine.
Before you start to assemble, please check the hardware packing
to make sure they are included.
12
Spirit Fitness
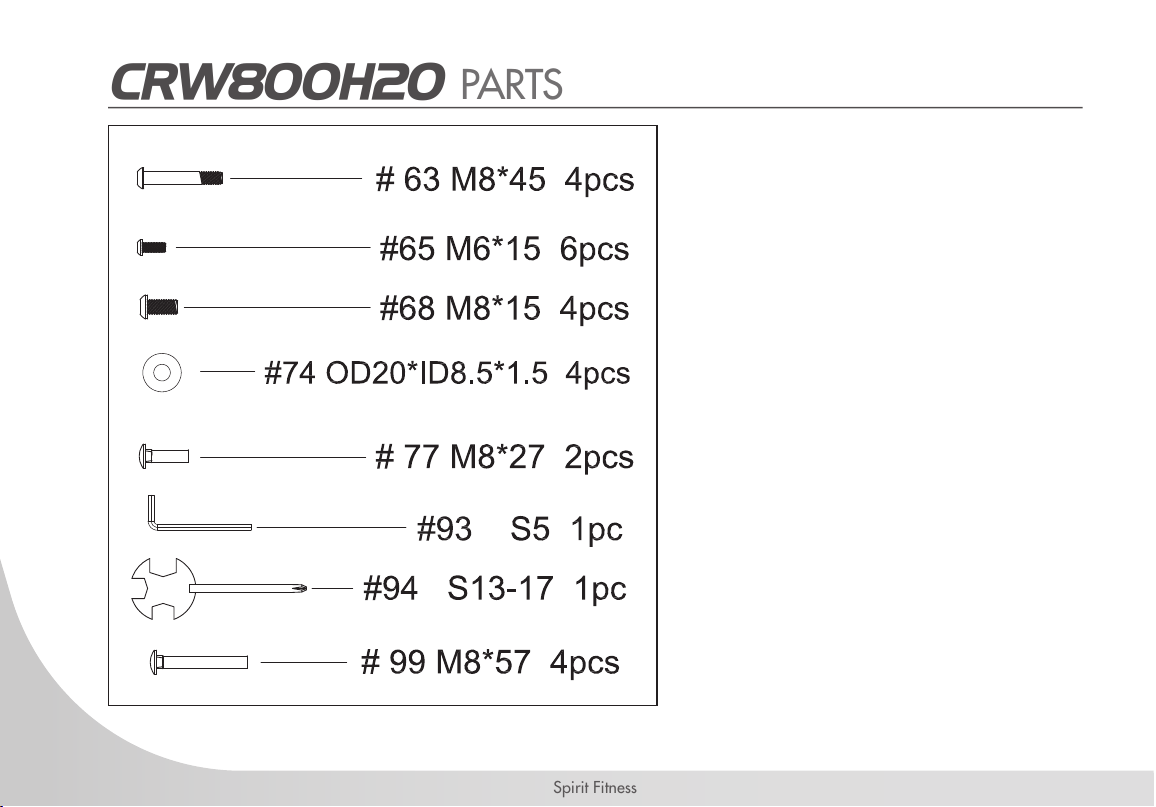
CRW800H2O PARTS
13
www.spirittness.com
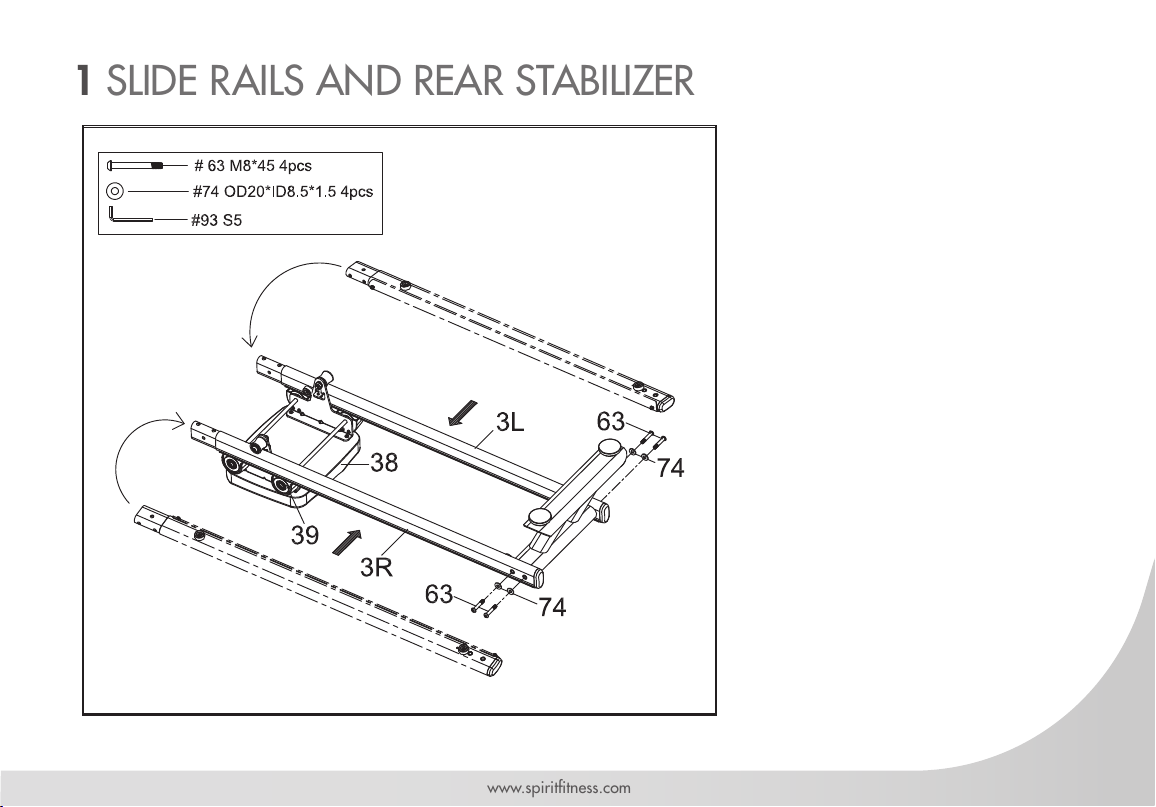
1. Turn over the Slide Rail (No.
3) as above. Attach the Seat’s
Rollers (No. 39) to the Slide
Rail making sure the plate
touches the rollers. To secure
the Slide Rails between the
Rollers, you’ll need to insert
it at an angle and rotate as
shown in the diagram to the
left.
2. Secure the Rear Stabilizer
(No. 2) to the Slide Rails (No.
3) using 2 Screws (No. 63)
and 2 Washers (No. 74) on
both sides.
1 SLIDE RAILS AND REAR STABILIZER
14
Spirit Fitness
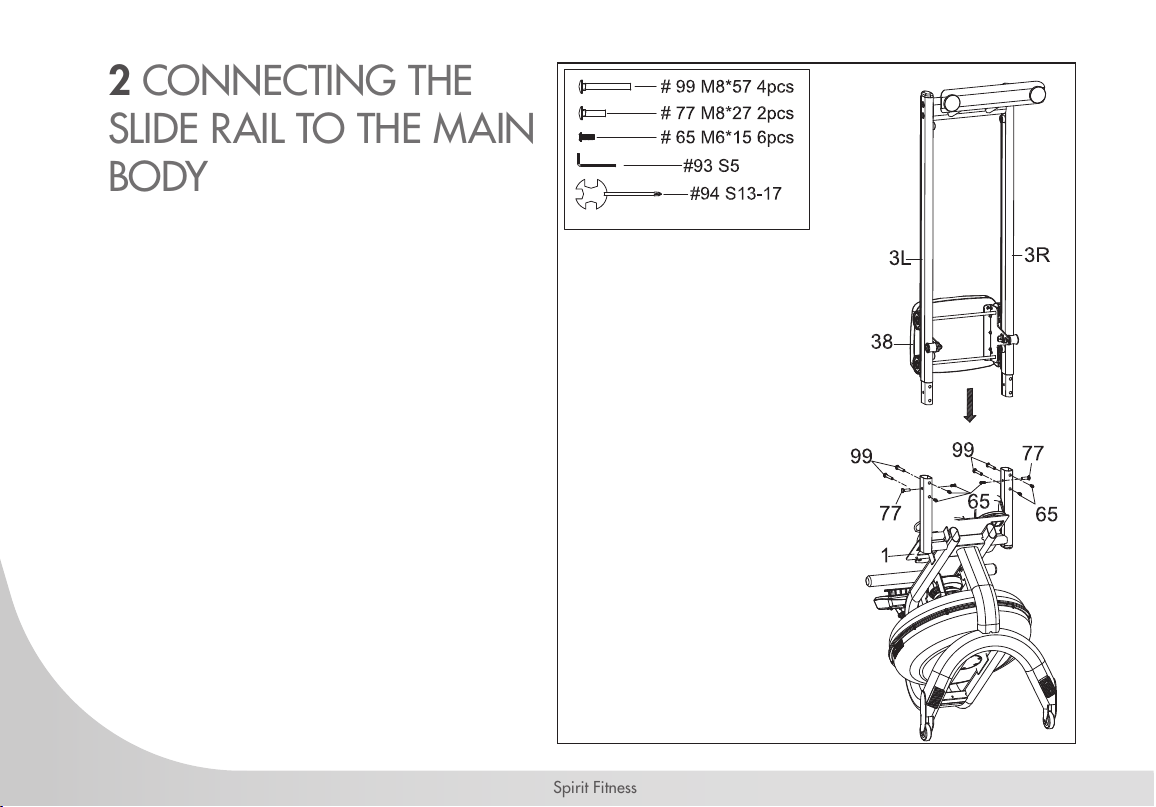
1. This step can be made easier with the use
of another person to assist you. Be careful
of the sliding Seat (No. 38) as it will move
when placed upright.
2. Set the Main Frame (No. 1) in an upright
position and connect the Slide Rails (No.3)
using 4 Long Bolts (No. 99), 2 Small Bolts
(No. 77), and 6 Screws (No. 65).
3. Use the Allen Wrench (No. 93) and Wrench
(No. 94) to secure.
2 CONNECTING THE
SLIDE RAIL TO THE MAIN
BODY
15
www.spirittness.com
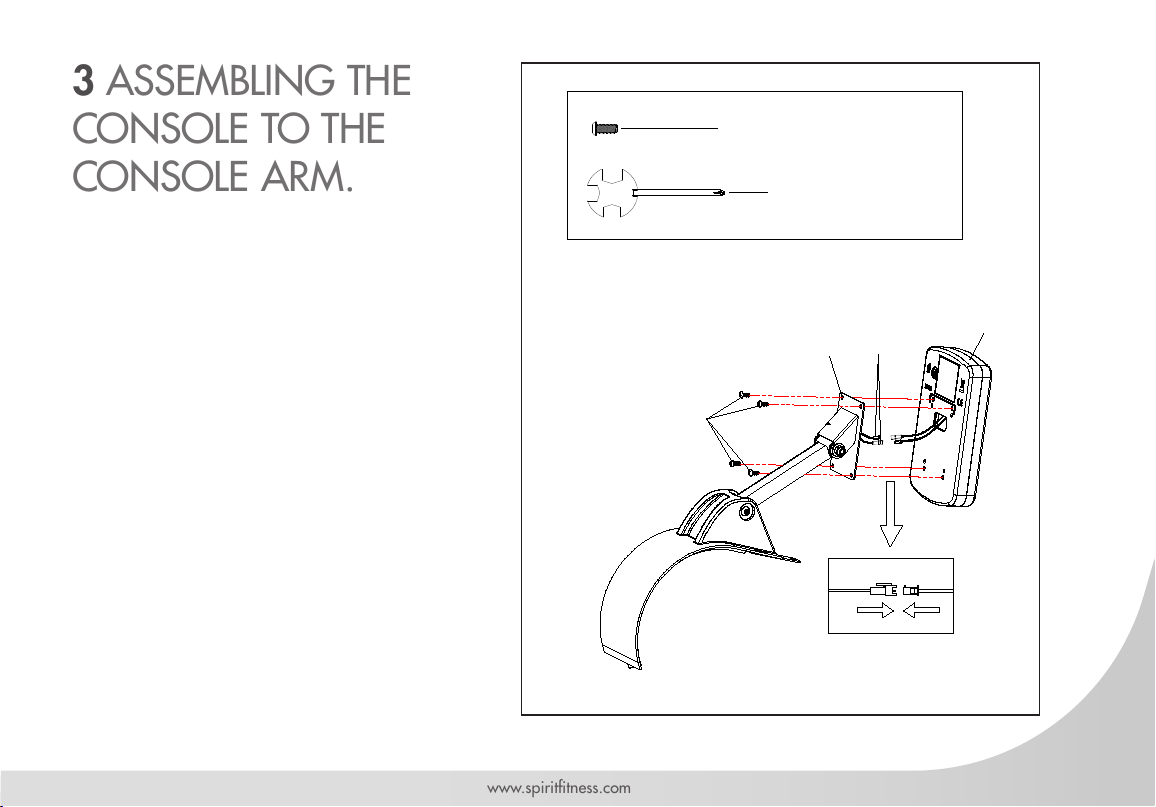
67
11
54
#94 S13-17
# 67 M5*15 4pcs
96
Step 3.1
Attach the Connection wire (#96) to the console (#54).
Attach the console (#54) to Support Plate (#11), Tighten with 4
Screws (#67) which are pre-assembled on the back of computer.
1. Connect the Console Wires (No. 96)
together.
2. Remove the 4 Screws (No. 67) from the
back of the Console (No. 54). Align the
holes on the Console (No. 54) with the
holes on the Support Plate (No. 11) then
secure with the screws.
3 ASSEMBLING THE
CONSOLE TO THE
CONSOLE ARM.

16
Spirit Fitness
1. Place the 4 AA batteries into
the Console (No. 54).
2. Turn the Main Frame (No.
1) upright. Connect the
Sensor Wire (No. 56) to the
Connection Wire (No. 96).
Be careful not to pinch the
wires. Feed any extra length
of wire to lay in the Main
Frame.
3. Plug the Decorative Cover
(No. 26) into the Main Frame
(No. 1).
4. Secure the Console (No. 54)
to the Main Frame using 4
Small Screws (No. 68).
#68 M8*15 4pcs
#93 S5
68
68
26F
1
96
56
4 ATTACHING THE CONSOLE
#68 M8*15 4pcs
#93 S5
68
68
26F
1
96
56

17
www.spirittness.com
How to Fill and Empty the Tank
1. Remove the Fill Plug (No. 50) from the Upper Tank (No. 24).
2. To ll tank with water, refer to Fig. A. Insert the Funnel (No. 52) into the
tank, then use a cup or the Siphon Pump (No. 53) and a bucket to ll
the tank. Use the water level gauge on the side of the tank to measure
desired water level in the tank.
3. To empty the tank, refer to Fig. B. Place a bucket next to the rower, and
use the Siphon Pump (No 53) to pump out the water from the tank into
the bucket.
4. Insert the Fill Plug (No. 50) into the Upper Tank (No. 24). Wipe excess
water off of the frame.
NOTE:
• Fill the tank only with tap water. Add 1 water-purication tablet (1 packet
is included.). Never use pool chlorine or chlorine bleach. This will
damage the tank and void the warranty.
50
53
52
24
Fig. A
Fig. B
Water level label
50
24
50
53
52
24
Fig. A
Fig. B
Water level label
50
24
• Add a water purication tablet every 6 months or as needed. If water remains
cloudy, replace the water in the tank.
• Water from the tank is not suitable for consumption. Dispose the water after
pumping it out from the tank.
WATER LEVEL
• See Fig. A. The water level gauge is on the side of the tank. The maximum ll level is 6. Never ll it over this
limit. Filling the tank over this limit will void the warranty.
• The resistance depends on the water level in the tank. Water level 1 is the lowest resistance. Level 6 is the
highest resistance.
18
Spirit Fitness
Adjustment Guides
折叠步骤图
38
3
2
38
3
2
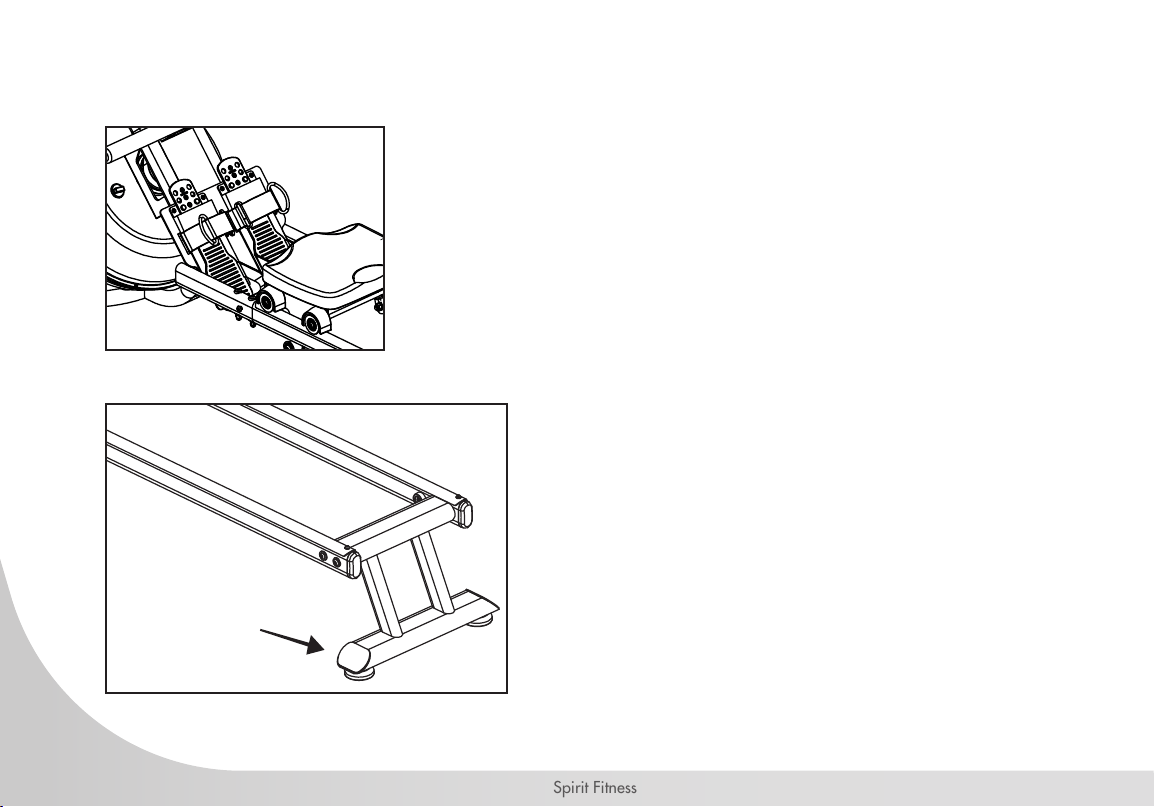
The pedal strap is adjustable and can be personalized to t the user’s foot
size.
To adjust the pedal strap, remove the hook and loop end of the strap from
the mesh side by pulling it upward and over to the side.
Once removed, you may increase the opening of the pedal strap by pulling
the mesh end up and to the side.
To tighten, pull the hook and loop end of the pedal strap upward then over
and down to secure it to the mesh side of the strap.
Adjusting the Balance
Adjust the rear feet if the machine is out of balance.
CAUTION!
Moving parts, such as the seat, can crush
and cut your ngers. Keep hands clear of the
Slide Rail during use.

19
www.spirittness.com
Storage
折叠步骤图
38
3
2
38
3
2
CAUTION!
Move the Seat (No. 38) to front of Slide Rail (No. 3)
rst or it will glide down when raising the rower up!
CAUTION!
Move with caution when you raise
the rower up, as your head may
touch the Rear Stabilizer (No. 2).
CAUTION!
When not in use, you can save space
by storing the rower vertically. Lift by
the Rear Stabilizer (No. 2) to raise the
rower to vertical position.
If not using the rower for more than a
month, empty the tank before storing.
To move the machine,
lift up the rear stabilizer
until the transportation
wheels on the front
stand touch the ground.
With the wheels on
the ground, you can
transport the rower to
the desired location
with ease.

20
Spirit Fitness
CRW800H2O CONSOLE OPERATION
21
www.spirittness.com
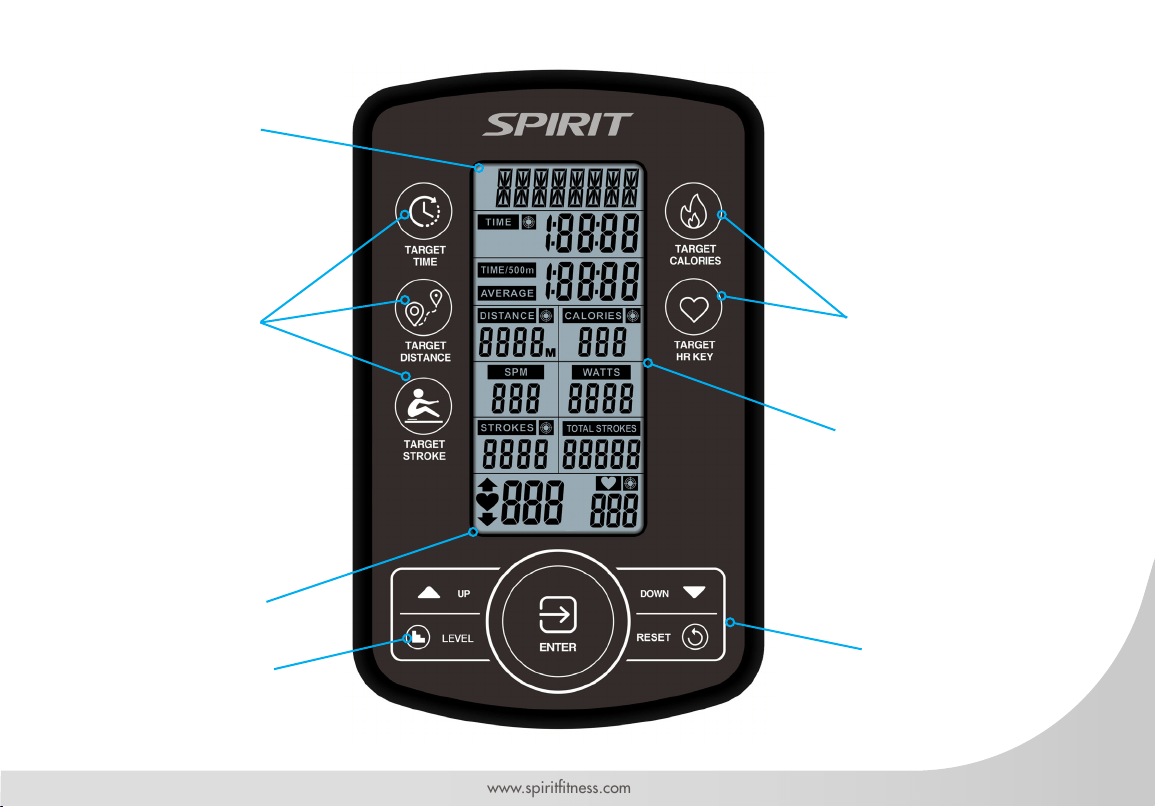
INTERVAL DISPLAY
PANEL
QUICK MODE
BUTTONS
HEART RATE DISPLAY
PANEL
QUICK MODE
BUTTONS
TIME, DISTANCE,
CALORIES, WATTS,
SPEED, RPM DISPLAY
PANEL
WATER LEVEL
BUTTON
CONTROL KEYPAD
22
Spirit Fitness
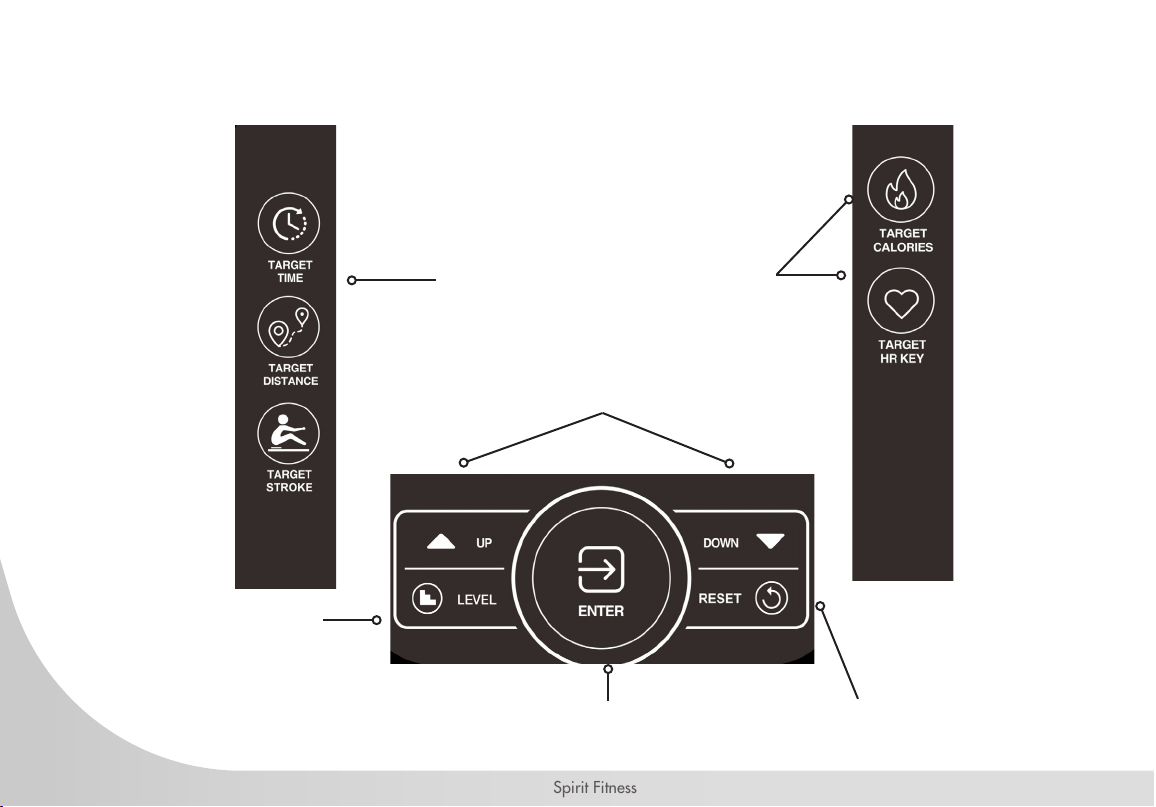
CONSOLE BUTTONS
The Quick Mode buttons will go into
the associated mode immediately
The Enter button is used to conrm a value
as making adjustments to a mode
The ▲/▼ Arrow buttons allow the user to
increase or decrease console values
Use the Level button to
communicate the water
level in the tank to the
console.
Use the Reset button to
clear a value, to pause
your workout, end your
workout. Hold for 2
seconds for a Total Reset
of all values (except Total
Strokes).

23
www.spirittness.com
CONSOLE DISPLAY
When "TARGET DISTANCE" is
selected, distance selected will be
displayed here. Overall distance will
be displayed during workout.
SPM: Strokes Per Minute
When "TARGET STROKE" is selected,
stroke selection will be displayed here.
Overall stroke count will be displayed
here during exercise."
Heart Rate Value will be
displayed here.
Resistance value displayed here.
When "TARGET TIME" is selected, time selection will
be displayed here. Total elapsed time or time count
down will be displayed during exercise."
Displays the time needed to row 500 meters
according to current speed and average speed.
When "TARGET CALORIES" is selected, calorie
selection will be displayed here. Workout data for
target calories will be displayed here during exercise.
Displays the power consumption during
training.
Displays total accumulative stroke count.
When "TARGET HR' is selected, heart
rate value will be displayed here during
exercise.
24
Spirit Fitness
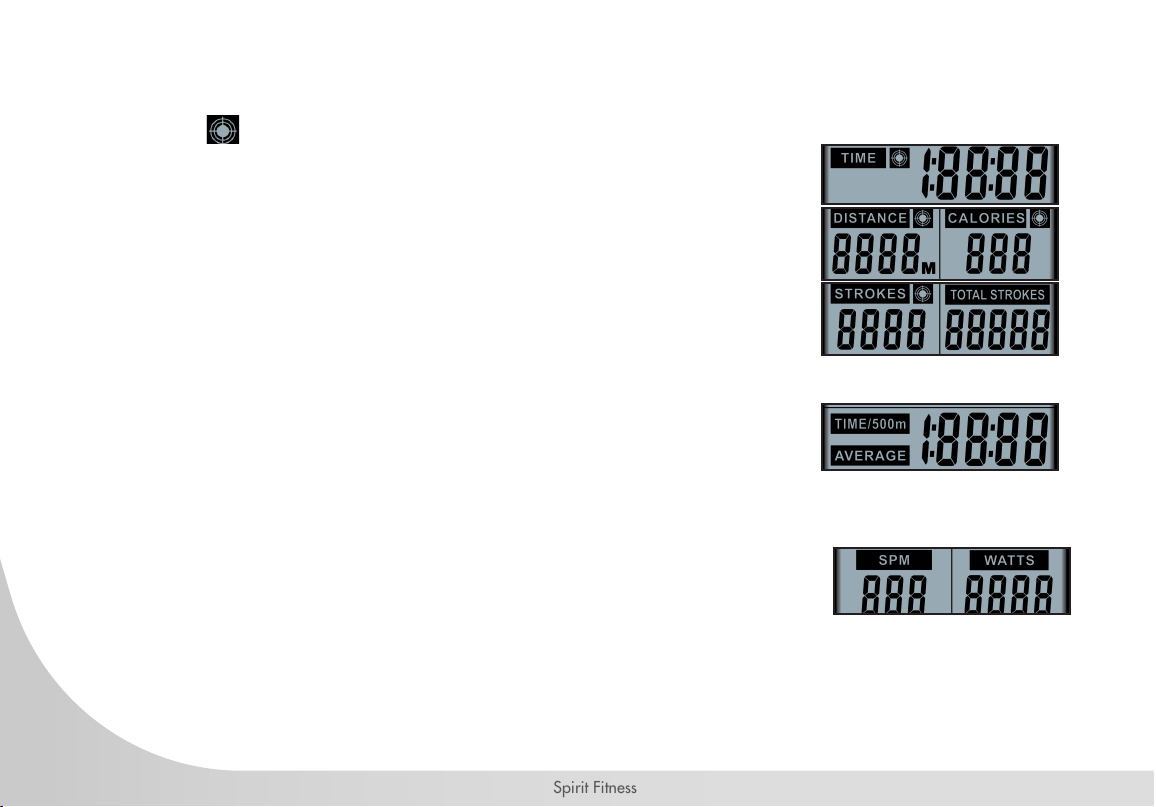
TARGET TIME, DISTANCE, CALORIES MODE
The target panels will show Time, Distance, Calories and Strokes depending on operating mode. When
the target symbol is displayed, it means that target mode is operating in that particular value.
The TIME will alternate showing the remaining or elapsed time.
The DISTANCE will count or countdown in meters.
The CALORIES will count or countdown the number of calories burned during
workout.
The STROKES will count or countdown the number of strokes during workout.
The TOTAL STROKES show the total number of strokes during workout.
TIME - 500M / AVERAGE DISPLAY
The TIME/500m is time per 500 meters.
The AVERAGE is average time of several TIME/500m work out.
SPM / WATTS DISPLAY
SPM and Watts will be displayed during all modes.
SPM refers to Strokes per Minute.
The WATTS will show the amount of work produced in a particular time during workout.
25
www.spirittness.com
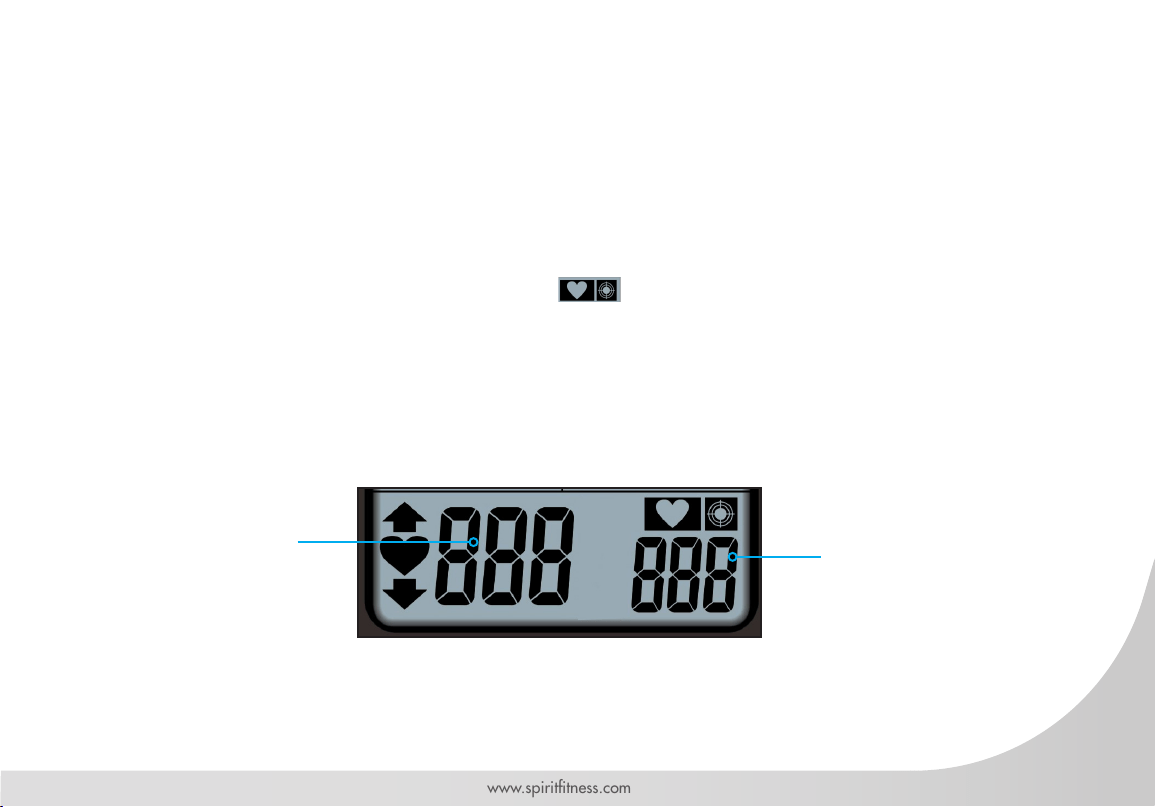
HEART RATE DISPLAY
This panel will show every user’s heart rate information. When console detects a signal from a wireless
monitor, the BPM (beats-per-minute) will show in the large three-digit eld and the heart icon will ash.
However, if no signal is detected signal, three dashes "- - -" will display to indicate no heart rate detected.
While in TARGET HEART RATE mode, the console helps the user maintain in a BPM range to build cardio-
vascular endurance. The target value range will vary by 10% from the default data. The q or p symbol
will ash to indicate that an increase or decrease of workout speed is needed to reach the desired range.
When the user’s heart rate is in the target range, the icons will light.
To detect heart rate, the heart rate receiver must be installed and a heart rate chest strap (not included) must
be used.
Target heart rate
value displays
here
Current heart rate
displays here when
heart rate monitor
(not included) is in
use.

26
Spirit Fitness
CONSOLE SETUP
BATTERY INSTALLATION
The console operates on 4 AA batteries. The battery compartment is on the back side of the console. Please dispose of
batteries properly after use.
WATER LEVEL BUTTON
Once you ll the tank to your desired resistance between 1 and 6 you can use the LEVEL Button to communicate the
resistance level to the console. Use the arrow keys to adjust from L1 to L6, pressing ENTER to conrm the desired level.
The default Level is L1.
CONSOLE MODES
SLEEP MODE
After 60 seconds of inactivity, the console will switch into the power-saving "Sleep Mode". The display will switch off.
Pulling the handlebar or pressing any button on the console will launch the "Ready Mode".
READY MODE
The "Ready Mode" informs the user that the console is powered on and ready to enter into any mode. After a period
of 60 seconds of inactivity the console will switch into the "Sleep Mode".
STOP MODE
Press the RESET button to go into the "Stop Mode", or if there is no input via the console for 4 minutes the console
will automatically enter "Stop Mode". In "Stop Mode", the 7-segment display will show “STOP”, TIME will show total
time, DISTANCE will show total distance, CALORIES will show total calories burned, STROKES will show the number
of strokes for the workout, TOTAL STROKES will show the total number of strokes, TIME/500m and TIME/500m

27
www.spirittness.com
AVERAGE will be shown alternately for one minute. If heart rates is input, the "Stop Mode" will show current heart
rate. If no heart rate monitor has been used, then no values will be displayed.
WORKOUT SUMMARY
The console provides a brief workout summary after completed the workout.
Data displayed includes: Total Time, Total Distance and Total Watts.
RESET PROCESS
To reset all saved settings, press and hold RESET button for 2 seconds.
28
Spirit Fitness
CONSOLE PROGRAMS
QUICK START
As strokes are detected, the console will immediately launch QUICK START. TIME, DISTANCE, CALORIES,
SPM, WATTS, STROKES, TOTAL STROKES will begin counting. TIME/500m and TIME/500m AVERAGE
will be alternately displayed every 5 seconds. The 7-segment display will show level according to VR
adjustments. When there's heart rate input, the icon will stay lit, and the ♥ icon will ash. Current
heart rates will be shown. In the absence of heart rate input, three dashes “- - -” will be shown continuously.
TARGET TIME, DISTANCE, CALORIES, AND STROKES PROGRAMS
Target Time, Target Distance, Target Calories, and Target Strokes program allow the target goal of each
value to be customized.
Launch: Press the desired TARGET button (TIME, DISTANCE, CALORIES, STROKES).
Setup: When operating a target program (after the console has been reset), user will enter the target value.
Adjust the value by pressing ▲ or ▼ buttons, then pressing the ENTER button to conrm the setting. If no
value has been entered, the console will not count down.
Start: Each mode display eld will light up and begin to readout data as follows:
For the TARGET TIME program, the time target will begin to count down.
For the TARGET DISTANCE program, the distance will begin to calculating.
For the TARGET CALORIES program, the calories will begin calculating.
For the TARGET STROKES program, the strokes will begin calculating.
End: The mode will end when the target is achieved. Pressing the RESET button at any time will also end
the target program. The workout summary will be shown after the target program has ended, or the RESET
button has been pressed.

29
www.spirittness.com
TARGET HEART RATE PROGRAMS
The Target Heart Rate program allows the maximum beats per minute (BPM) target to be customized to
maximize cardiovascular training.
Launch: Press the Target Heart Rate button.
Setup: When operating a target program, the user enters the desired target heart rate (the default is 100).
Adjust the value by pressing ▲ or ▼ buttons, then pressing the ENTER button to conrm.
Start: The display eld will light up and begin to display heart rate and progress toward cardiovascular
goal. When the user's heart rate is lower than <10% of the calculated maximum HR range, the ▲ on screen
will ash indicating minimum goal has not yet been achieved.
When the user's heart rate is >10% than the target HR, the ▼ on screen will ash to indicate heart rate is
over the maximum goal.
When the user's heart rate falls with the 10% of the target HR, the target number will not display.
End: The target program will end when the user stops rowing. Pressing the RESET button at any time will
also end the target program. The workout summary will be shown after the "Target Program" has ended, or
the RESET button has been pressed.

30
Spirit Fitness
ENGINEERING MODE
Press Reset and Enter buttons for 2 seconds to enter Engineering Mode. The console will also beep for 1 second.
DISTANCE banner will blink rst. Press ▲ or ▼ button to select setting section. (Sound → ODO → Sound)
While in Engineering Mode if there is no activity for 30 seconds, the console will switch STANDBY Mode. Pressing the
Reset button will exit the Engineering Mode. The console settings and ODO will not be reset using the "RESET Mode",
however, removing the batteries will return the console to original factory settings and the ODO value will be zero.
AUDIO ON/OFF
• Under Engineering Mode of the Audio ON/OFF setting. The SOUND sign will blink. Press Enter to get into.
• After pressing Enter, the console will display “ON” or ”OFF”
• If the audio is on, the “ON” sign will blink.
• If the audio is off, the “OFF” sign will blink.
• Press Enter to conrm and the console will return to Engineering Mode.
• While in this setting if there is no activity for 30 seconds or pressing Reset, the console will switch STANDBY Mode.
ODO
The “ODO” feature displays the total time usage for your machine as H : M : S (hours, minutes, and seconds). Once the
time odometer reaches the 2-hour mark, the odometer will begin to display the time in 1-hour increments. For example,
“3H” would indicate 3 hours of total usage.
• When cycling through options in “Engineering Mode”, press enter when “ODO” is blinking on the display.
• When the total exercise time exceeds 1:59:59, the LCD will display the numerical hour number next to an “H” (hours).
• To exit, press the q or p button to switch between other Engineering modes.
• While in this setting if there is no activity for 30 seconds, the console will enter STANDBY Mode. Pressing the Reset
button twice will exit the Engineering Mode.

31
www.spirittness.com
GENERAL MAINTENANCE
A regular preventative maintenance schedule with your tness equipment ensures that products are working
at an optimal condition without affecting the your exercise experience. To assist in the maintenance
regimen, it is recommended to break service into daily, weekly, & monthly activities.
All preventive maintenance activities must be performed on a regular basis. Performing routine preventive
maintenance actions can aid in providing safe, trouble-free operation of all SPIRIT equipment. SPIRIT is
not responsible for performing regular inspection and maintenance for your machines. Be sure to train all
necessary personnel In equipment inspection and maintenance actions, in addition to proper accident
reporting and record keeping.
Item Time Frame Instructions Notes
Seat and Seat Rails Weekly Wipe down seat rails with lint free cloth
Frame Weekly Wipe down frame with lint free cloth
Tank and Water
Treatment
12m to 2years
Follow instructions as specied on page 25 of the
manual.
Rowing Belt
Check every hundred hours for
correct tension and for signs of
wear.
The rowing belt should provide many years of trouble
free use. If a rowing belt change is required, please
contact your local service representative for further
details.

32
Spirit Fitness
TROUBLESHOOTING
Issue Possible Cause Instructions
Water changes
color or becomes
cloudy
Rower is in direct sunlight or has not
had water treatment
Local tap water is of poor quality
Change rower location to reduce direct exposure to sunlight. Add
water treatment or change tank water as directed on page 25 of this
manual. Consider using distilled water to rell tank.
Inconsistent
readings on the
console for
500meter split time
and SPM (strokes
per minute)
Sensor gap issue
Faulty sensor
Sensor has moved out of position
Wiring harness issue
Use the back cover of the computer as a
“gap tool” to check the gap between sensor head and magnetic ring,
or see if the sensor head has moved out of position.
Please contact your nearest SPIRIT customer service center for details.
The console does
not illuminate after
battery installation
Batteries installed incorrectly or
need replacing
Check to see if the batteries are installed in the correct position.
Reinstall or replace as needed. If the LCD screen fails to illuminate, try
rotating the batteries slightly in the computer. If this fails, contact your
local service center.
The console screen
illuminates, but
does not register
when rowing
Loose or failed connection
Sensor gap too wide
Check that the computer lead is connected properly. If it is connected
then contact your local service center. Check sensor gap.
• Please contact your nearest SPIRIT customer service if any assistance is required.

33
www.spirittness.com
TROUBLESHOOTING CONTINUED
Issue Possible Cause Instructions
Trouble with
resistance
VR Setting
1. Hold down ENTER+UP+DOWN buttons for 2 seconds. After entering VR
settings mode, the buzzer will buzz for 1 second.
2. The 7-segment display will show “VR”. The time window will show “L”.
3. Adjust VR for the rst increment, then press the ENTER KEY to conrm.
4. The time window will show “H”. Adjust VR for the highest increment, then
press ENTER button to conrm.
5. After setting the highest and lowest VR, the console then completes the VR
settings and enters standby mode.
6. Congured VR range will automatically be divided into 10 even increments.
• Please contact your nearest SPIRIT customer service if any assistance is required.

34
Spirit Fitness
CRW800H2O WATER ROWER WARRANTY
EFFECTIVE SEPTEMBER 27, 2019
Spirit Fitness warrants all its tness rower parts for a period of time listed below from the date of retail sale,
as determined by sale receipt, or in the absence of a sales receipt eighteen (18) months from the original
factory shipping date. Spirit Fitness’ responsibilities include providing new or remanufactured parts, at
Spirit Fitness’ option, and technical support to our independent dealers and servicing organizations. In the
absence of a dealer or service organization, these warranties will be administered by Spirit Fitness directly
to a consumer. The warranty period applies to the components as follows:
NORMAL RESPONSIBILITIES OF THE CONSUMER
The consumer is responsible for the items listed below:
• Proper use of the tness equipment in accordance with the instructions provided in this manual.
• Proper installation in accordance with instructions provided with the tness equipment and with all local electric
codes.
• Proper connection to a grounded power supply of sufcient voltage, replacement of blown fuses, repair of loose
connections or defects in house or facility wiring.
• Expenses for making the tness equipment accessible for servicing, including any item that was not part of the
tness equipment at the time it was shipped from the factory.
• Damages to the tness equipment nish during shipping, installation or following installation.
• Routine maintenance of this unit as specied in this manual.
Warranty
Residential
Commercial (5 hours or less in a non dues paying facility.)
Frame
Lifetime
Lifetime
Parts
10 Years
5 Years
Labor
2 Years
2 Years

35
www.spirittness.com
EXCLUSIONS
This warranty does not cover the following:
1. CONSEQUENTIAL, COLLATERAL, OR INCIDENTAL DAMAGES SUCH AS PROPERTY DAMAGE AND
INCIDENTAL EXPENSES RESULTING FROM ANY BREACH OF THIS WRITTEN OR ANY IMPLIED WARRANTY.
Note: Some states do not allow the exclusion or limitation of incidental or consequential damages, so this
limitation or exclusion may not apply to you.
2. Service call reimbursement to the consumer. Service call reimbursement to the dealer that does not involve
malfunction or defects in workmanship or material, for units that are beyond the warranty period, for units that are
beyond the service call reimbursement period, or for tness equipment not requiring component replacement.
3. Damages caused by services performed by persons other than authorized Spirit Fitness service companies; use of
parts other than original Spirit Fitness parts; or external causes such as corrosion, discoloration of paint or plastic,
alterations, modications, abuse, misuse, accident, improper maintenance, inadequate power supply, or acts of
God.
4. Products with original serial numbers that have been removed or altered.
5. Products that have been: sold, transferred, bartered, or given to a third party.
6. Spirit Fitness reserves the right to request proof of purchase if no warranty record exists for the product.
7. THIS WARRANTY IS EXPRESSLY IN LIEU OF ALL OTHER WARRANTIES EXPRESSED OR IMPLIED, INCLUDING
THE WARRANTIES OF MERCHANTABILITY AND/OR FITNESS FOR A PARTICULAR PURPOSE.
8. Product used in prisons and correctional facilities
CUSTOMER SUPPORT
If any items need replacement contact the Spirit Fitness Customer Support Department at (870) 935-1107
(Local) or (800) 258-8511. For international customers, please contact your local distributer.

36
Spirit Fitness
SERVICE
• Keep your bill of sale. Twelve (12) months from the date on the bill of sale or eighteen (18) months from the date of
factory shipping as determined by the serial number establishes the labor warranty period should service be required.
If service is performed, it is in your best interest to obtain and keep all receipts. This written warranty gives you specic
legal rights. You may also have other rights that vary from state to state within the United States. Service under this
warranty must be obtained by following these steps, in order:
• Contact your selling authorized Spirit Fitness dealer. OR
• Contact your local authorized Spirit Fitness service organization.
• If there is a question as to where to obtain service, contact our service department at (870) 935-1107. For
international customers, please contact your local distributer.
• Spirit Fitness’ obligation under this warranty is limited to repairing or replacing, at Spirit Fitness’ option, the product
through one of our authorized service centers. All repairs must be preauthorized by Spirit Fitness. If the product is
shipped to a service center freight charges to and from the service center will be the customer’s responsibility. For
replacement parts shipped while the product is under warranty, the customer will be responsible for shipping and
handling charges. For in-home service, the customer will be responsible for a trip charge. There will be an additional
trip charge if the customer is located over 100 miles from the nearest service center.
• The owner is responsible for adequate packaging upon return to Spirit Fitness. Spirit Fitness is not responsible for
damages in shipping. Make all freight damage claims with the appropriate freight carrier. DO NOT SHIP ANY UNIT
TO OUR FACTORY WITHOUT A RETURN AUTHORIZATION NUMBER. All units arriving without a return authorization
number will be refused.
• For any further information, or to contact our service department by mail, send your correspondence to:
Spirit Fitness
P.O. Box 2037
Jonesboro, AR 72402-2037
Product features or specications as described or illustrated are subject to change without notice. All warranties are made by Spirit Manufacturing, Inc.
This warranty applies only in the 48 contiguous United States. NOTE: This does not apply to Alaska or Hawaii.

37
www.spirittness.com
MANUFACTURER
Dyaco Commercial & Medical
North America
18303 Bothell Everett Hwy.
Suite 210
Bothell, WA 98012
TEL: +1-425-659-2401 (Local)
TOLL-FREE: +1-866-463-2662
EMAIL: Questions@spirittness.com
INTERNATIONAL OFFICES
Taipei HQ Ofce
12F, No.111, SongJiang
Rd. Taipei City, Taiwan, 10486
TEL: +886-2-2515-2288
FAX: +886-2-2515-9963
EMAIL: [email protected]
Dyaco Japan
Ryogoku ST Bldg. 7F 2-17-17
Ryogoku Sumida Tokyo 130-0026, Japan
TEL: +81 3-5669-0405
FAX: +81 3-5669-0406
EMAIL: [email protected]
Dyaco Shanghai
Room 210, No.350
Hengren Road
Yangpu District
Shanghai, China 200438
TEL: 86-21-65068300
FAX: 86-21-65068150
Dyaco UK Ltd
Fairbourne Drive
Atterbury
Milton Keynes
MK10 9RG UK
TEL: +44-0-800 029 3865
EMAIL: [email protected]
Dyaco Germany
Technologiepark Bergisch-Gladbach
Haus 56
Friedrich-Ebert-Straße 75
51429 Bergisch Gladbach
TEL: +49-0-2204 844 340
FAX: + 49-0-2204 844 333
EMAIL: [email protected]
Dyaco Canada
5955 Don Murie Street
Niagara Falls, ON
L2G 0A9
Canada
TEL: +1 888-707-1880
FAX: +1 905-353-8968
EMAIL: [email protected]

38
Spirit Fitness
NOTES

39
www.spirittness.com

800.258.4555
Questions@spirittness.com
www.spirititness.com
Spirit Fitness
3000 Nestle Road
Jonesboro, AR 72401
CRW800H2O Owners Manual
© 2019 All Rights Reserved
Revision 3: 09.27.2019