
Outdoor HDTV
Antenna Amplifier
User’s Manual
Questions? Contact our U.S.-based Consumer Care at
1-800-654-8483 between 7AM–8PM CST.

2
Thank you for your purchase of this HDTV antenna amplifier.
Before installation, please read this manual carefully and
keep this manual for further information.
IMPORTANT SAFETY INSTRUCTIONS
• WARNING: RISK OF FIRE AND SHOCK
• Use power inserter and power supply in dry location.
These are for INDOOR use only.
Feature
This HDTV antenna amplifier is specifically designed for digital
TV broadcast reception.
It increases signal strength and helps overcome cable and
splitter loss. This amplifier can be mast-mounted or
wall-mounted outdoors or used indoors.
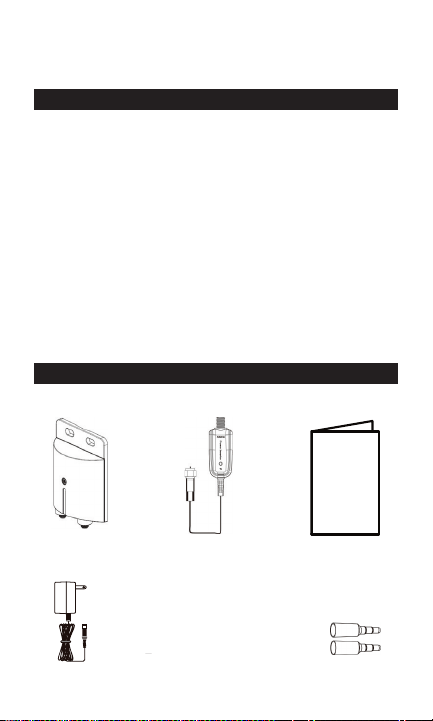
PACKAGE CONTENTS
Verify contents before installation
HDTV antenna
amplifier main unit
Power Inserter User’s manual
Power supply
Mast Mount Hardware
Zip tie x4
1
HDTV Antenna Amplifier
MODEL: 42179
Thank you for your purchase of this HDTV Antenna Amplifier. Before your installation,
please read this manual carefully and keep this manual for further information.
IMPORTANT SAFTEY INSTRUCTIONS
WARNING: RISK OF FIRE AND SHOCK
USE power inserter and power supply in dry location.
These are for INDOOR use only.
Feature:
This HDTV Antenna Amplifier is specially designed for digital TV broadcast reception.
It increases signal strength and helps overcome cable and splitter loss. This amplifier can
be mast-mounted or wall-mounted outdoors or used indoors.
PACKAGE CONTENT
Please check the contents before your installation.
Rubber boot x 2
Zip tie x 4
4.Mast Mount Hardware
1.HDTV Antenna Amplifier
main unit
2.Power Supply 3.Power Inserter
5.Instruction
Manual
Rubber boot x2
3
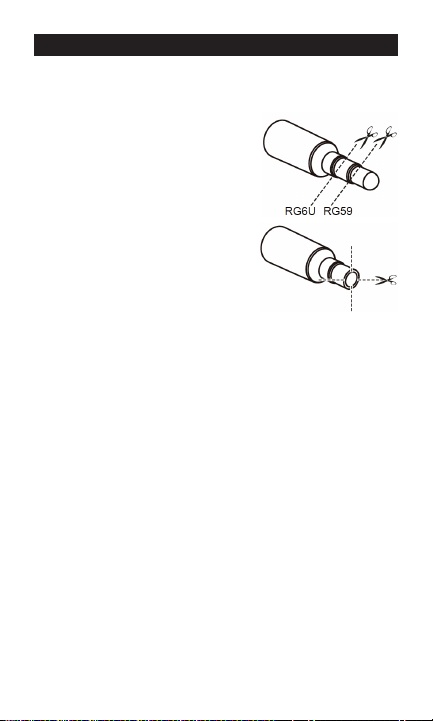
INSTALLATION
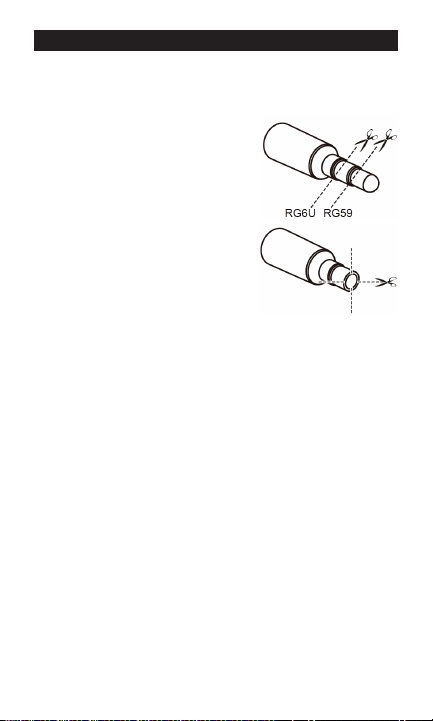
To protect the amplifier from water, be sure to use the rubber
boots provided.
If you assemble your own cables:
1. Cut the rubber boot as pictured.
2. Pull the cable through the
rubber boot.
3. Attach the coax connector.
If you use pre-built cables
(connectors pre-attached):
1. Cut the rubber boot as pictured.
2. Make 4 slits in the
vertical direction.
3. Pull the cable (with connector)
through the rubber boot. When
connecting to the amplifier, use a
small zip tie to secure the rubber
boot to the cable.
Outdoor amplifier installation
1. Connect a coax cable from your antenna to the ANTENNA
on the amplifier. Be sure to use a rubber boot, and for best
results, keep the cable between the antenna and amplifier
as short as possible.
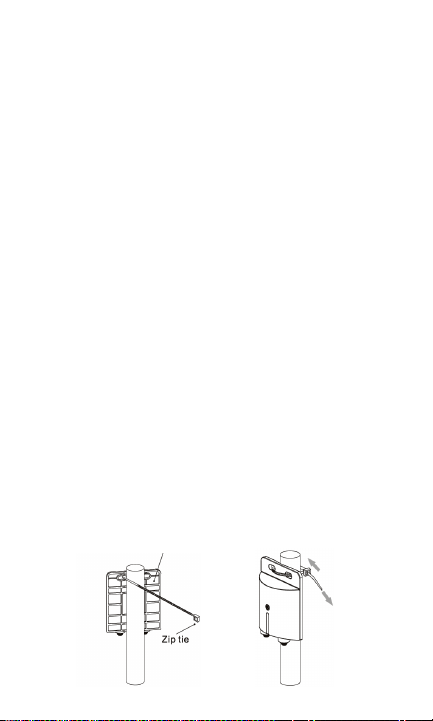
2. Mount the amplifier in your desired location.
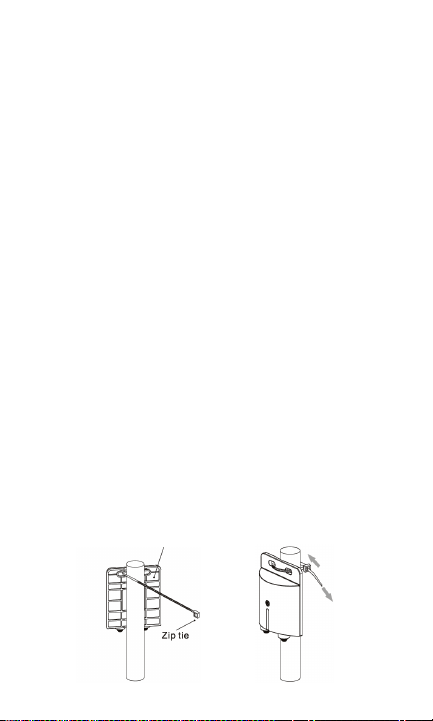
• Mast mount: Use a large zip tie to secure
amplifier to mast.
See picture on the following page.
• Wall mount: Use the slotted holes at the top of
the amplifier to attach to wall.
4
3. Connect a coax cable from the TV/POWER on the amplifier
to a grounding block (not included) per the National Electric
Code. Make sure the grounding block is properly grounded.
Refer to your antenna’s instruction manual for details. Be
sure to use a rubber boot when connecting the coax cable
to the amplifier. For mast mount, use a large zip tie to
secure the cable to mast. Place the zip tie as close as pos-
sible to the amplifier
4. Connect a coax cable from the grounding block to the input
of the power inserter.
Note: Leave enough slack in the coax cable to create a drip
loop so moisture cannot enter the house. Also seal the coax
cable entry point into your house with exterior caulk.
5. Connect the coax cable pre-attached to the power inserter
to the HDTV.
6. Connect the power supply plug to the power inserter.
7. Plug the power supply into an AC wall outlet. The lighted red
LED confirms power is correctly applied.
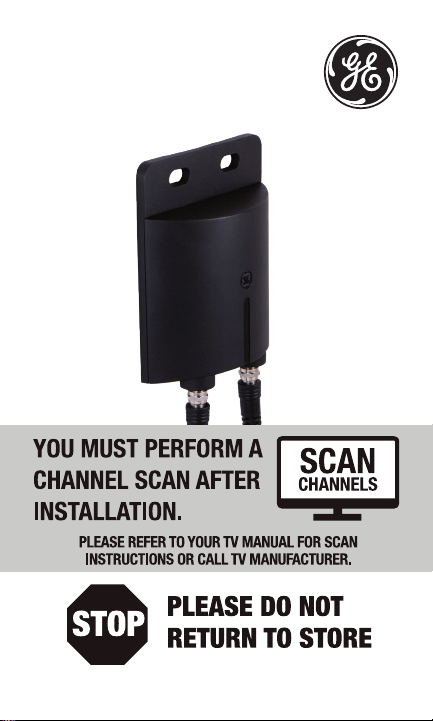
8. SCAN FOR CHANNELS ON YOUR HDTV. This step is very
important. Your HDTV will NOT receive signals from your
antenna without completing this step. See your TV’s menu
for this process. You can also refer to the TV instruction
manual for detail instructions.
Note: It is important to repeat this process and re-scan for
channels anytime you move or reposition your antenna.
STEP 1
Insert Zip tie into
top holes
STEP 2
Tighten zip tie
Outdoor antenna amplifier

Indoor amplifier installation
1. Connect a coax cable from your antenna to the ANTENNA
on the amplifier. For best results, keep the cable between
the antenna and amplifier as short as possible.
2. Place the amplifier in your desired location. Use the slotted
holes at the top of the amplifier to attach to wall.
3. Connect a coax cable from the TV/POWER on the amplifier
to the input of the power inserter.
4. Connect the coax cable pre-attached to the power inserter
to the HDTV.
5. Connect the power supply plug to the power inserter.
6. Plug the power supply into an AC wall outlet. The lighted red
LED confirms that power is correctly applied.
7. SCAN FOR CHANNELS ON YOUR HDTV.
This step is very important. Your HDTV will NOT receive
signals from your antenna without completing this step.
See your TV’s menu for this process. You can also refer to
the TV instruction manual for detail instructions.
Note: It is important to repeat this process and re-scan for
channels anytime you move or reposition your antenna.
Questions? Contact us at 1-800-654-8483 between
7:00AM—8:00PM CST.

42179 V1
1/17/2019
MADE IN CHINA
GE is a trademark of General Electric Company and is
under license by Jasco Products Company LLC, 10 E.
Memorial Rd., Oklahoma City, OK 73114.
This Jasco product comes with a limited-lifetime
warranty.Visit www.byjasco.com for warranty details.
Questions? Contact our U.S.-based Consumer Care at
1-800-654-8483 between 7AM–8PM CST.
7
Amplificador de
antena HDTV
para exteriores
Manual
del usuario
8
Gracias por adquirir este amplificador de antena HDTV. Antes
de instalarlo, lea este manual cuidadosamente y guárdelo
para obtener más información.
INSTRUCCIONES DE SEGURIDAD IMPORTANTES
• ADVERTENCIA: RIESGO DE INCENDIO Y
DESCARGA ELÉCTRICA
• Use el inyector de corriente y la fuente de alimentación en
un lugar seco. Estos son solo para uso en INTERIORES.
Características
Este amplificador de antena HDTV está diseñado específica-
mente para recibir transmisión digital de televisión.
Aumenta la intensidad de la señal y ayuda a compensar la
pérdida causada por cables y bifurcadores. Este amplificador
puede montarse en mástil o
en pared, tanto en exteriores como en interiores
CONTENIDO DEL PAQUETE
Verifique el contenido antes de la instalación
Unidad principal
del amplificador de
antena HDTV
Inyector de
corriente
Manual
del usuario
Alimentación
eléctrica
Accesorios para el
montaje en mástil
Precintos (4)
1
HDTV Antenna Amplifier
MODEL: 42179
Thank you for your purchase of this HDTV Antenna Amplifier. Before your installation,
please read this manual carefully and keep this manual for further information.
IMPORTANT SAFTEY INSTRUCTIONS
WARNING: RISK OF FIRE AND SHOCK
USE power inserter and power supply in dry location.
These are for INDOOR use only.
Feature:
This HDTV Antenna Amplifier is specially designed for digital TV broadcast reception.
It increases signal strength and helps overcome cable and splitter loss. This amplifier can
be mast-mounted or wall-mounted outdoors or used indoors.
PACKAGE CONTENT
Please check the contents before your installation.
Rubber boot x 2
Zip tie x 4
4.Mast Mount Hardware
1.HDTV Antenna Amplifier
main unit
2.Power Supply 3.Power Inserter
5.Instruction
Manual
Manga de goma (2)
9
INSTALACIÓN
Para proteger el amplificador del agua, asegúrese de usar las
mangas de goma suministradas.
Si ensambla sus propios cables:
1. Corte la manga de goma como
se muestra en la imagen.
2. Pase el cable por la manga de
goma y tire de él.
3. Coloque el conector coaxial.
Si usa cables preconstruidos
(conectores prefijados):
1. Corte la manga de goma como
se muestra en la imagen.
2. Corte cuatro ranuras en direc-
ción horizontal/vertical.
3. Pase el cable (con conector) por
la manga de goma y tire de él.
Cuando lo conecte con el ampli-
ficador, use un precinto pequeño para sujetar la manga de
goma al cable.
Instalación del amplificador en exteriores
1. Conecte un cable coaxial de la antena a la entrada del
amplificador correspondiente (ANTENNA). Asegúrese de
usar una manga de goma y, para obtener los mejores
resultados, coloque un cable lo más corto posible entre la
antena y el amplificador.
2. Monte el amplificador en la ubicación deseada.
• Montaje en mástil: use un precinto grande
para sujetar el amplificador al mástil. Consulte
la imagen de la página siguiente.
• Montaje en pared: use los orificios ranurados
de la parte superior del amplificador para
sujetarlo a la pared.
10
3. Conecte un cable coaxial de la salida de tele-
visión/encendido (TV/POWER) del amplificador
a un bloque de conexión a tierra (no incluido)
según lo establecido en el Código de Normas
de Electricidad. Asegúrese de que el bloque de
conexión a tierra esté debidamente conectado
a tierra. Consulte el manual de instrucciones de
la antena para obtener más detalles.
4. Connect a coax cable from the grounding block
to the input of the power inserter.
Nota: el cable coaxial debe tener holgura suficiente para
formar un lazo de goteo a fin de que la humedad no entre en
la casa. También deberá sellar la entrada del cable coaxial
en su casa con masilla para exteriores.
5. Conecte el cable coaxial (prefijado) al inyector de corriente
y al televisor HDTV.
6. Conecte el enchufe de la fuente de alimentación al inyector
de corriente.
7. Enchufe la fuente de alimentación a un tomacorriente de
CA. Se encenderá una luz LED roja para indicar que la cor-
riente se suministra correctamente.
8. EXPLORE LOS CANALES EN SU TELEVISOR HDTV. Este paso
es muy importante. Su televisor HDTV NO recibirá señales
de la antena si no se completa este paso. Consulte su
menú de TV para este proceso. También puede consultar
el manual de instrucciones de su televisor para obtener
instrucciones detalladas.
PASO 2
Ajuste el precinto
PASO 1
Inserte el precinto en los
orificios superiores
Amplificador
de antena de
exteriores

Instalación del amplificador en interiores
1. Conecte un cable coaxial de la antena a la entrada del
amplificador correspondiente (ANTENNA). Para obtener los
mejores resultados, coloque un cable lo más corto posible
entre la antena y el amplificador.
2. Coloque el amplificador en la ubicación deseada. Use los
orificios ranurados de la parte superior del amplificador
para sujetarlo a la pared.
3. Conecte un cable coaxial de la salida de TV/encendido (TV/
POWER) del amplificador a la entrada del inyector
de corriente.
4. Conecte el cable coaxial (prefijado) al inyector de corriente
y al televisor HDTV.
5. Conecte el enchufe de la fuente de alimentación al inyector
de corriente.
6. Enchufe la fuente de alimentación a un tomacorriente de
CA. Se encenderá una luz LED roja para indicar que la cor-
riente se suministra correctamente.
7. EXPLORE LOS CANALES EN SU TELEVISOR HDTV.
Este paso es muy importante. Su televisor HDTV NO recibirá
señales de la antena si no se completa este paso. Consulte
su menú de TV para este proceso. También puede consul-
tar el manual de instrucciones de su televisor para obtener
instrucciones detalladas.
Nota: es importante repetir este proceso y volver a explorar
los canales cada vez que traslade o cambie de posición
la antena.
¿Tiene preguntas? Comuníquese con nuestro Centro de
atención al cliente con sede en EE. UU. al 1-800-654-8483 de
7:00 a. m. a 8:00 p. m. CST (hora central estándar).
Nota: es importante repetir este proceso y volver a explorar los cana-
les cada vez que traslade o cambie de posición la antena.

12
HECHO EN CHINA
GE es una marca comercial de General Electric Company
con licencia otorgada a Jasco Products Company LLC,
10 E. Memorial Rd., Oklahoma City, OK 73114.
Este producto de Jasco tiene una garantía de por vida
limitada. Visite www.byjasco.com para conocer los
detalles de la garantía.
¿Preguntas? Comuníquese al 1-800-654-8483 entre las
7:00 a. m. y las 8:00 p. m. CST (hora central estándar).
