Loading ...
Loading ...
Loading ...
MAINTENANCE[(ONT'D) TO ADJUST SPEEDSELECTOR CABLE
TO ADJUST DRIVE CONTROL CABLE
NOTE: THE DRIVE CONTROL CABLESHOULD BE
CHECKED OFTEN TO BESURE THAT GEAR CASE
SHIFTER IS FULLY ENGAGED OR WHENEVER
SERVICE HAS BEEN PERFORMED ON THE GEAR
CASE OR DRIVE CONTROL COMPONENTS.
1. To adjust, remove the drive cover by removing
four (4) screws. Keep for re-use (See Fig. 21).
2_ Loosen screws holding cable clamp "A" & "B"
(See Figs. 22 and 23).
3. Loosen both jam nuts "C" & "D" at the cable
- clamp on the gear case adjusting bracket (See
Fig. 22_). .
4. Unhook clutch spring from shifter arm (See
Fig.
5. Hold, clip, or tape down the drive control bar
and engage the drive control (See Fig. 16).
6. Move the shifter arm to drive position. To be
sure the jaw clutch isfully engaged, rotate the
front wheels.
7. Hold shifter arm in fully engaged position by
gripping and pulling threaded sleeve with
pliers as shown in Fig. 22. DO NOT pull on
control cable.
8. Tighten jam nut "C" up to bracket until cable is
snug.
9. Tighten cable clamp screw "B" (See Fig. 22).
10. Tighten jam nut "D" up to bracket (See
Fig. 22).
1I. Tighten screw "A" (See Fig. 23,).
12. Put clutchspring back in place on shifter arm,
removed in step 5 above.
73. With drive control in engaged position, push
mower back and forth to be sure gear case is
fully engaged.
NOTE: Be sure to disengage drive control before
starting engine.
14. Put drive cover back in place, removed in step
I above.
GEAR CASE
7. THE GEAR CASE AND AREA AROUND ALL THE
DRIVE SHOULD BE KEPT CLEAN AND FREE OF
TRASH BUILD-UP.
2. To check gear case area:
a. Remove the drive cover by removing the
four (4) screws (See Fig. 21). Keep for re-
use.
b. Clean trash from around gear case.
c. Put drive cover back, removed in (a)
above.
NOTE: The gear case is filled to proper level at the
factory. The only time the lubricant needs atten-
tion is if service has been performed on the gear
case.
The gear case must be filled with grease after gear
case has been serviced. Use only multi-purpose
automotive grease. Do not substitute.
CAUTION: DISCONNECT SPARKPLUG WIRE FROM
SPARK PLUG. PLACE WIRE WHERE IT CANNOT
CONTACT SPARKPLUG.
1. While cranking engine with engine control
move speed selector lever to (3) high position
(See Fig. 17).
NOTE: DISCONNECT THE ENGINE CONNECTOR
FROM THE BATTERYTO PREVENT ACCIDENTAL
STARTING.
2. Remove the drive cover by removing (4) screws
(See Fig. 21).
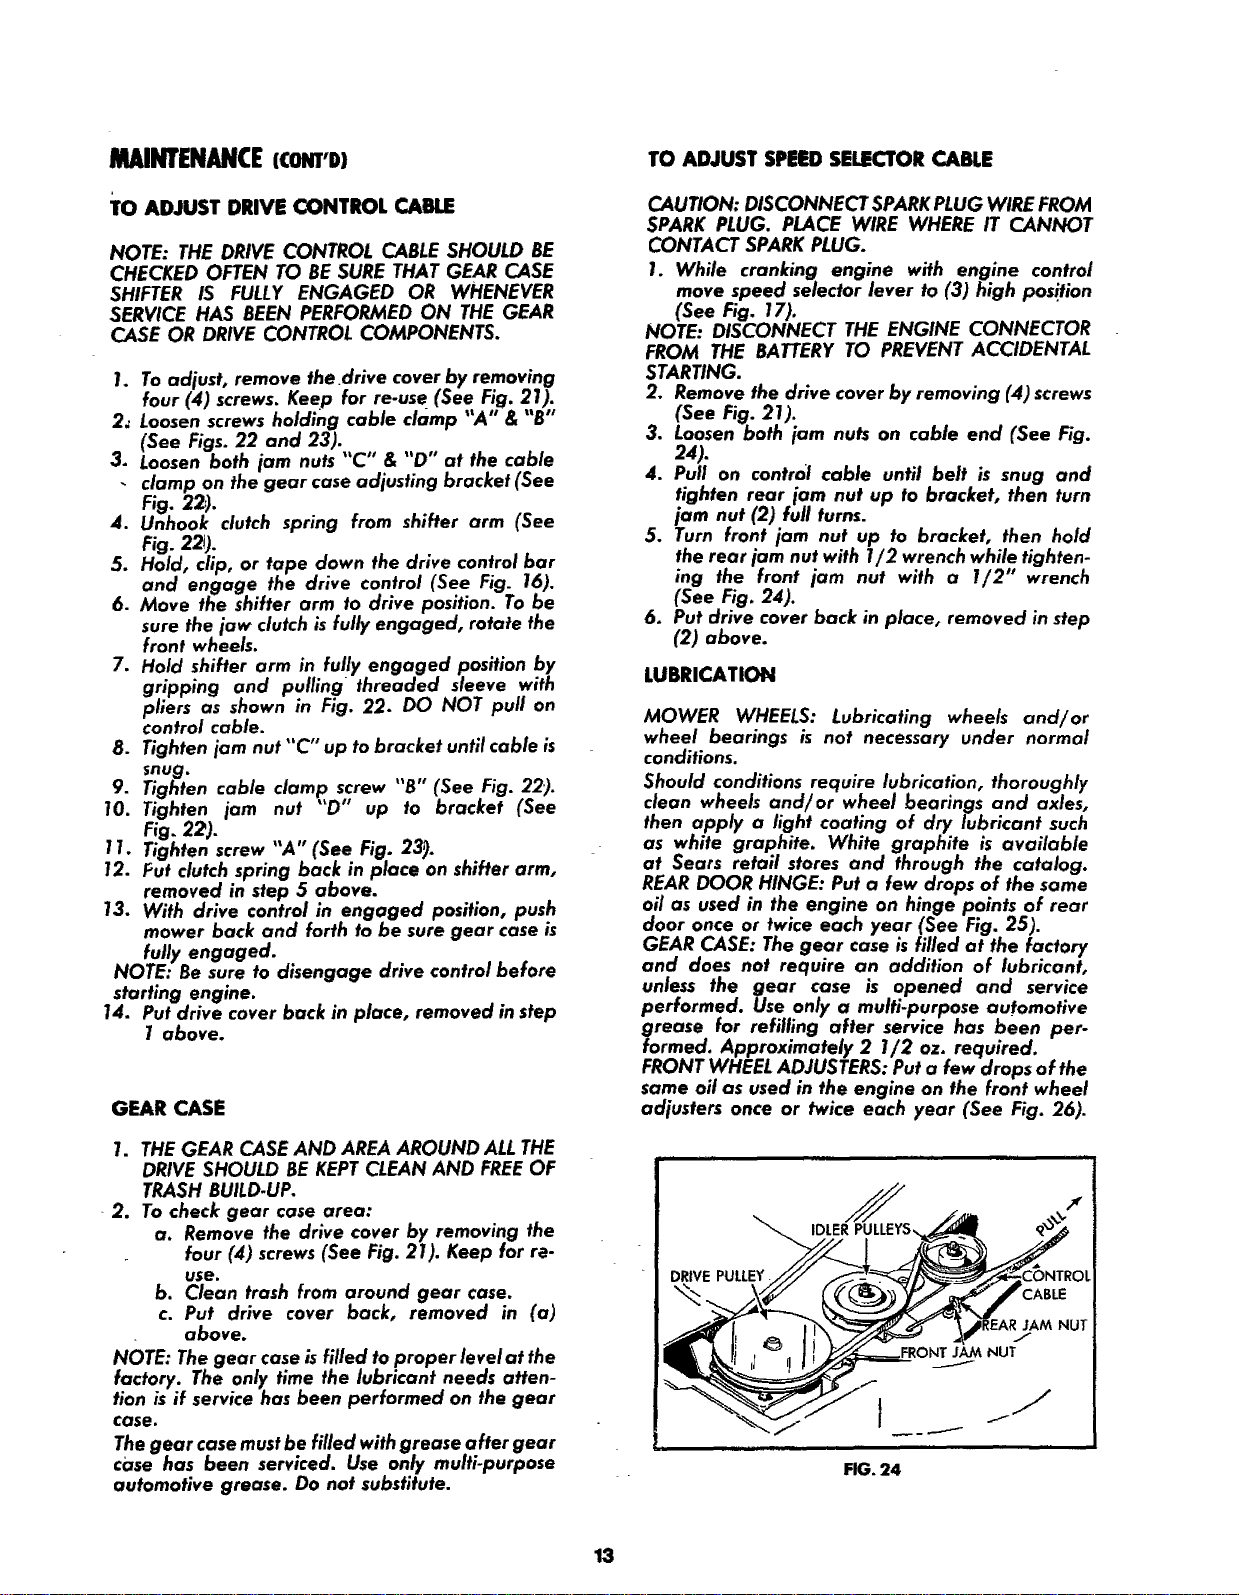
3. Loosenboth jam nuts on cable end (See Fig.
24).
4. Pull on control cable until belt is snug and
tighten rear jam nut up to bracket, then turn
jam nut (2) full turns.
5. Turn front jam nut up to bracket, then hold
the rear jam nut with 1/2 wrench while tighten-
ing the front jam nut with a I/2" wrench
(See Fig. 24).
6. Put drive cover back in place, removed in step
(2) above.
LUBRICATION
MOWER WHEELS: Lubricating wheels and/or
wheel bearings is not necessary under normal
conditions.
Should conditions require lubrication, thoroughly
clean wheels and/or wheel bearings and axles,
then apply a light coating of dry lubricant such
as white graphite. White graphite is available
at Sears retail stores and through the catalog.
REARDOOR HINGE: Put a few drops of the same
oil as used in the engine on hinge points of rear
door once or twice each year (See Fig. 25).
GEAR CASE: The gear case isfilled at the factory
and does not require an addition of lubricant,
unless the gear case is opened and service
performed. Use only a multi-purpose automotive
grease for refilling after service has been per-
formed. Approximately 2 1/2 oz. required.
FRONT WHEELADJUSTERS:Puta few drops of the
same oil as used in the engine on the front wheel
adjusters once or twice each year (See Fig. 26).
DRIVE PULLEY
JAM NUT
/
JAM NUT
FIG. 24
13
Loading ...
Loading ...
Loading ...