Loading ...
Loading ...
Loading ...
The connection cord is not included. Purchase a commercially
available cord as shown below.
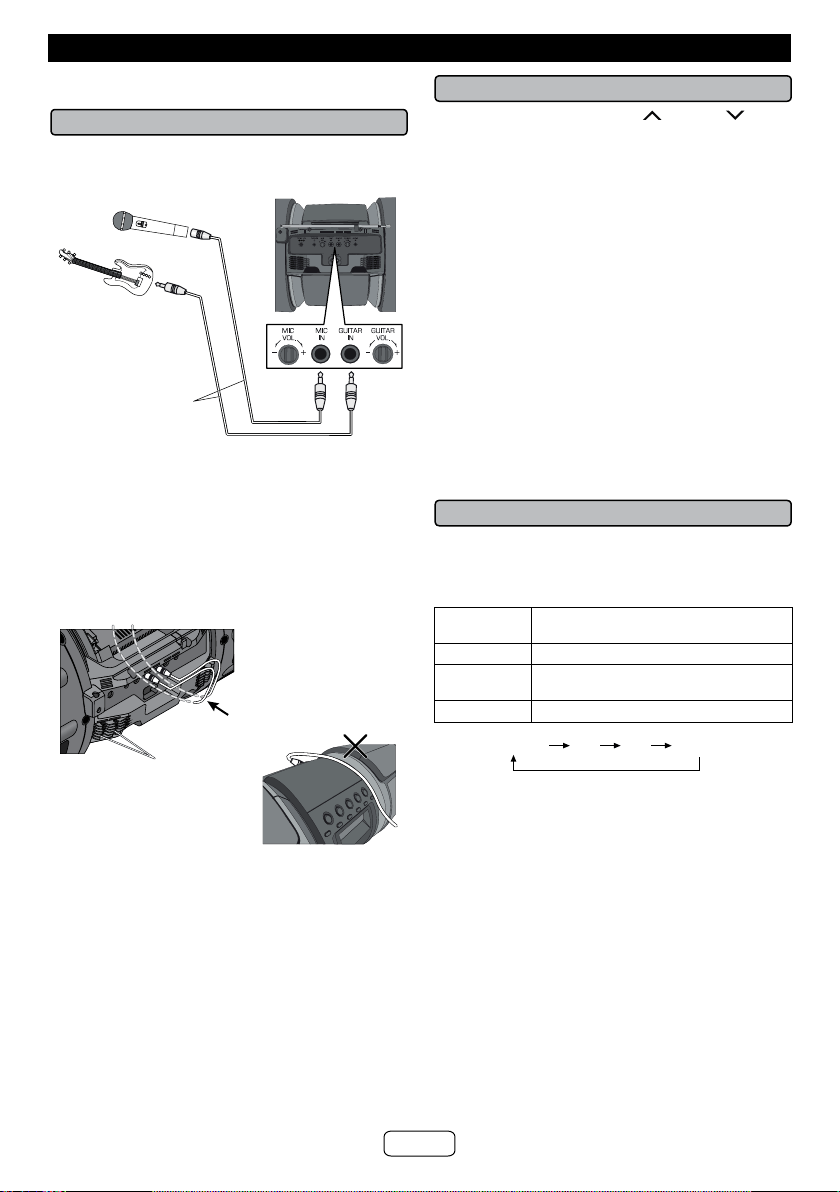
■ Connecting a guitar / microphone
Caution:
Be careful not to connect a bass guitar as it might damage this
unit.
Microphone or guitar
(not supplied)
Ø 1/4” (6.3 mm)
monaural cable
(not supplied)
1 Set the guitar/microphone volume (GAIN) knob to the minimum
level.
2 Connect a guitar/microphone to the correct input jack.
Use a microphone with a 1/4” (6.3 mm) diameter plug.
Use a standard plug adaptor when using a microphone with
a 1/8” (3.5 mm) diameter plug.
3 Arrange the guitar/microphone cables into the grooves of the
cable holder on the left or the right side of the unit.
Then, thread the cable through the bottom of the unit.
Do not let the cables to be on top of the unit when using
guitar/microphone as it may cause the unit to roll over
causing damage and injury.
Thread the cables under the unit
Cable holder
4 Connect the cables to a guitar/microphone.
5 Select a source.
To mix a guitar or microphone sound with a source sound,
select the playback source (Bluetooth/USB/Audio In/Tuner).
To play a guitar or using the microphone only, select ’AUDIO
IN’ function. Make sure there is no playback from Audio In
connection.
6 Adjust the volume (GAIN) knob on the connected equipment.
To enjoy a guitar distortion effect, turn the guitar volume
(GAIN) knob to almost maximum level.
Caution:
When not using the guitar/microphone, remove it from the
input jack.
Before disconnecting the guitar/microphone, set the guitar/
microphone volume (GAIN) knob to the minimum level.
■ Echo control (Karaoke)
Toggle the echo level with ECHO or ECHO button.
ECHO OFF ...... ECHO 08
Notes:
● The sound is produced in 2-channel stereo automatically
while playing karaoke.
● When you sing too loud through the microphone, your
voice may be distorted depending on the devices
connected. If this happens, lower the microphone
volume.
● If an extremely sensitive microphone is used, howling
may be generated.
● Unidirectional microphone is more appropriate for vocal
use.
● When you connect or disconnect a microphone, the
sound is muted for few seconds.
● Karaoke is not supported at Tuner function.
If squealing occurs:
● Reduce the microphone volume.
● Change the direction of the microphone.
● Reduce the volume of the main unit.
● Move the microphone away from the speakers.
■ To change the audio mode
Press the AUDIO button on the remote control until the
desired audio mode is displayed.
Each time the AUDIO button is pressed, the mode will
change as follows:
STEREO Sounds on the left and right channels are
played.
L+L Sounds on the left channel only are played.
R+R Sounds on the right channel only are
played.
V CANCEL
Vocal is canceled.
STEREO
V CANCEL
L+L R+R
Notes:
● The default audio mode setting is “STEREO”.
● When playing a sound on which a vocal and music
have been separately recorded, select the audio mode
as desired.
● Use sources recorded in stereo. The function will not
work with mono sources.
● With some sources the original vocals may still be
heard.
Notes on sound multiplexed:
● Sound multiplexed sources are sources on which the
main vocal and the BGM (Background music) have
been recorded on one of the two channels and only the
BGM on the other.
● The function will not work properly with sources which
do not belong to this group.
● Music on which vocal has been recorded on the left
channel and music on the right may not play properly.
Connecting other equipment
E-19
Loading ...
Loading ...
Loading ...