User Manual
NGTeco Time Clock – D1, D2, W1 and W2 series
Date: March 2021
Doc Version: 3.0
English
Thank you for choosing our product. Please read the instructions carefully
before operation. Follow these instructions to ensure that the product is
functioning properly. The images shown in this manual are for illustrative
purposes only.
For further details, please visit our Company’s website
www.ngteco.com.

D and W Series NGTeco Time Clock User Manual
Page | 2 Copyright©2021 NGTeco. All rights reserved.
About the Manual
This manual introduces the operations and usage of the NGTeco Time Clock.
All figures displayed are for illustration purposes only. Figures in this manual may not be exactly
consistent with the actual products.
D and W Series NGTeco Time Clock User Manual
Page | 3 Copyright©2021 NGTeco. All rights reserved.
Document Conventions
Conventions used in this manual are listed below:
GUI Conventions
For Software
Convention
Description
Bold font
Used to identify software interface names e.g. OK, Confirm, Cancel
>
Multi-level menus are separated by these brackets. For example, File >
Create > Folder.
For Device
Convention
Description
< >
Button or key names for devices. For example, press <OK>
[ ]
Window names, menu items, data table and field names are inside square
brackets. For example, pop up the [New User] window
/
Multi-level menus are separated by forward slashes. For example,
[File/Create/Folder].
Symbols
Convention Description
This implies about the notice or pays attention to, in the manual
The general information which helps in performing the operations
faster
The information which is significant
Care taken to avoid danger or mistakes
The statement or event that warns of something or that serves as a
cautionary example.

D and W Series NGTeco Time Clock User Manual
Page | 4 Copyright©2021 NGTeco. All rights reserved.
Table of Contents
1 OVERVIEW.................................................................................................................... 11
2 OPERATIONAL PROCEDURE ........................................................................................ 11
2.1 FINGER ENROLLMENT ................................................................................................... 11
2.1.1 FINGER SELECTION FOR ENROLLMENT .......................................................................................... 11
2.1.2 ENROLLMENT OPERATION ............................................................................................................ 12
2.1.3 QUALITY IMPROVEMENT OF FINGERPRINT READS ......................................................................... 12
2.2 VERIFICATION MODES ................................................................................................... 13
2.2.1 FINGERPRINT ................................................................................................................................ 13
2.2.2 PASSWORD ................................................................................................................................... 16
2.2.3 ATTENDANCE STATUS .................................................................................................................. 17
2.3 T9 MODE .......................................................................................................................... 18
3 PRIVILEGES .................................................................................................................. 19
3.1 ADMINISTRATOR ............................................................................................................ 19
3.2 USERS ............................................................................................................................... 21
3.2.1 HOW TO RESET ADMIN PRIVILEGES .............................................................................................. 21
4 MAIN MENU ................................................................................................................. 23
5 USER MANAGEMENT ................................................................................................... 24
5.1 NEW USER REGISTRATION ............................................................................................ 24
5.2 USER DATA MANAGEMENT .......................................................................................... 28
5.2.1 EDIT USER DETAILS ...................................................................................................................... 29
5.2.2 ENROLL THE FINGERPRINT ............................................................................................................ 30
5.2.3 DELETE USER................................................................................................................................ 30

D and W Series NGTeco Time Clock User Manual
Page | 5 Copyright©2021 NGTeco. All rights reserved.
5.3 HOW TO TRANSFER USER DATA .................................................................................. 30
5.3.1 UPLOAD USER DATA FROM USB DRIVE TO CLOCK ..................................................................... 31
5.3.2 DOWNLOAD USER DATA FROM CLOCK TO USB DRIVE ............................................................... 34
6 PAY PERIOD ................................................................................................................. 36
6.1 WEEKLY PAY PERIOD ..................................................................................................... 36
6.2 BI-WEEKLY PAY PERIOD ................................................................................................ 37
6.3 SEMI-MONTHLY PAY PERIOD ....................................................................................... 38
6.4 MONTHLY PAY PERIOD ................................................................................................. 39
7 ATTENDANCE MANAGEMENT ..................................................................................... 40
7.1 ATTENDANCE RULES ..................................................................................................... 40
7.2 ATTENDANCE TRACKING .............................................................................................. 42
7.2.1 EVERY DAY’S ATTENDANCE .......................................................................................................... 42
7.2.2 ATTENDANCE OF INDIVIDUAL USERS ............................................................................................ 44
7.2.3 ADD MISSING ATTENDANCE PUNCH ............................................................................................ 47
8 TIME-ATTENDANCE REPORTS ..................................................................................... 48
8.1 REPORT PARAMETERS ................................................................................................... 49
8.2 DOWNLOAD REPORTS .................................................................................................. 49
9 COMMUNICATION PARAMETERS ............................................................................... 52
9.1 MANUAL WI-FI CONFIGURATION ................................................................................ 52
9.1.1 CONNECTION TO AN EXISTING WI-FI ........................................................................................... 52
9.1.2 NEW WI-FI CONNECTION ............................................................................................................ 53
9.1.3 ENABLE/DISABLE DHCP ............................................................................................................. 54
9.2 WI-FI CONFIGURATION THROUGH USB ...................................................................... 55
9.3 APP CONNECTION .......................................................................................................... 57

D and W Series NGTeco Time Clock User Manual
Page | 6 Copyright©2021 NGTeco. All rights reserved.
10 DATA MANAGEMENT .................................................................................................. 59
10.1 ATTENDANCE LOG MANAGEMENT ............................................................................. 59
10.1.1 DOWNLOAD ATTENDANCE LOGS ................................................................................................. 59
10.1.2 DELETE ATTENDANCE LOGS ......................................................................................................... 60
10.2 CLOCK RESET .................................................................................................................. 61
10.3 DELETE ALL DATA .......................................................................................................... 63
10.4 FIRMWARE UPDATE ....................................................................................................... 64
11 SYSTEM SETTINGS ....................................................................................................... 65
11.1 CLOCK DATE AND TIME................................................................................................. 65
11.2 CLOCK INFORMATION ................................................................................................... 66
12 TROUBLESHOOTING .................................................................................................... 68
13 CONTACT US ................................................................................................................ 68

D and W Series NGTeco Time Clock User Manual
Page | 7 Copyright©2021 NGTeco. All rights reserved.
Table of Figures
FIGURE 2-1: FINGERPRINT REGISTRATION ................................................................................. 12
FIGURE 2-2: SUCCESSFUL BIOMETRIC VERIFICATION .............................................................. 13
FIGURE 2-3: FAILED BIOMETRIC VERIFICATION ......................................................................... 14
FIGURE 2-4: 1:1 VERIFICATION SCREEN ...................................................................................... 14
FIGURE 2-5: SUCCESSFUL BIOMETRIC VERIFICATION .............................................................. 15
FIGURE 2-6: FAILED BIOMETRIC VERIFICATION ......................................................................... 15
FIGURE 2-7: FAILED 1:1 VERIFICATION........................................................................................ 16
FIGURE 2-8: SUCCESSFUL PASSWORD VERIFICATION.............................................................. 16
FIGURE 2-9: FAILED PASSWORD VERIFICATION ........................................................................ 17
FIGURE 2-10: HOME SCREEN ......................................................................................................... 17
FIGURE 2-11: CHANGED ATTENDANCE STATUS ........................................................................ 18
FIGURE 2-12: ADD USER DETAILS ................................................................................................ 18
FIGURE 2-13: SPECIAL CHARACTERS ........................................................................................... 19
FIGURE 3-1: LOCKED SCREEN FOR ADMIN VERIFICATION ....................................................... 20
FIGURE 3-2: ADMIN VERIFICATION .............................................................................................. 20
FIGURE 3-3: FAILED ADMIN VERIFICATION ................................................................................ 21
FIGURE 3-4: CLEAR PERMISSION .................................................................................................. 21
FIGURE 3-5: CONFIRMATION SCREEN ......................................................................................... 22
FIGURE 3-6: SUCCESS MESSAGE AFTER CLEARING PERMISSION ........................................... 22
FIGURE 4-1: MAIN MENU ............................................................................................................... 23
FIGURE 5-1: USER LIST ................................................................................................................... 24
FIGURE 5-2: ADD A NEW USER ..................................................................................................... 25
FIGURE 5-3: USER DETAILS ............................................................................................................ 25
FIGURE 5-4: FINGERPRINT ENROLLMENT ................................................................................... 26
FIGURE 5-5: SUCCESSFUL ENROLLMENT .................................................................................... 26
FIGURE 5-6: ALERT TO OVERWRITE FINGERPRINTS .................................................................. 27
FIGURE 5-7: ENROLL PASSWORD ................................................................................................. 27
FIGURE 5-8: CHANGE PASSWORD................................................................................................ 28

D and W Series NGTeco Time Clock User Manual
Page | 8 Copyright©2021 NGTeco. All rights reserved.
FIGURE 5-9: USER LIST MENU ....................................................................................................... 28
FIGURE 5-10: USER LIST ................................................................................................................. 29
FIGURE 5-11: EDIT USER DETAILS ................................................................................................ 29
FIGURE 5-12: ALERT TO DELETE USER ......................................................................................... 30
FIGURE 5-13: UPLOAD USER DATA .............................................................................................. 31
FIGURE 5-14: DOWNLOAD TEMPLATE ........................................................................................ 31
FIGURE 5-15: SUCCESS MESSAGE AFTER DOWNLOADING TEMPLATE .................................. 32
FIGURE 5-16: TEMPLATE FILE - 1 .................................................................................................. 32
FIGURE 5-17: TEMPLATE FILE -2 ................................................................................................... 33
FIGURE 5-18: EDIT USER DETAILS ................................................................................................ 33
FIGURE 5-19: UPLOAD TEMPLATE ............................................................................................... 34
FIGURE 5-20: SUCCESS MESSAGE AFTER UPLOADING THE TEMPLATE ................................. 34
FIGURE 5-21: DOWNLOAD USER DATA -1 .................................................................................. 35
FIGURE 5-22: DOWNLOAD USER DATA - 2 ................................................................................. 35
FIGURE 5-23: SUCCESS MESSAGE AFTER DOWNLOADING USER DATA ................................ 35
FIGURE 5-24: DOWNLOADED FILE ............................................................................................... 36
FIGURE 6-1: WEEKLY PAY PERIOD ............................................................................................... 37
FIGURE 6-2: BI-WEEKLY PAY PERIOD ........................................................................................... 38
FIGURE 6-3: SEMI-MONTHLY PAY PERIOD ................................................................................. 39
FIGURE 6-4: MONTHLY PAY PERIOD ............................................................................................ 39
FIGURE 7-1: ATTENDANCE RULE .................................................................................................. 40
FIGURE 7-2: TODAY'S ATTENDANCE ........................................................................................... 42
FIGURE 7-3: ATTENDANCE DETAILS ............................................................................................ 43
FIGURE 7-4: TIME DATA ................................................................................................................. 43
FIGURE 7-5: ATTENDANCE OF A USER ........................................................................................ 44
FIGURE 7-6: ATTENDANCE IN A DAY ........................................................................................... 44
FIGURE 7-7: ATTENDANCE HISTORY ........................................................................................... 45
FIGURE 7-8: SELECTING A USER ................................................................................................... 45
FIGURE 7-9: USERS LIST ................................................................................................................. 46
FIGURE 7-10: SELECTED USERS TO VIEW ATTENDANCE .......................................................... 46

D and W Series NGTeco Time Clock User Manual
Page | 9 Copyright©2021 NGTeco. All rights reserved.
FIGURE 7-11: ATTENDANCE DETAILS OF THE SELECTED USERS............................................. 47
FIGURE 7-12: ADD MISSING PUNCHES ........................................................................................ 47
FIGURE 7-13: MISSING PUNCH DETAILS ..................................................................................... 48
FIGURE 8-1: TIME REPORT ............................................................................................................. 49
FIGURE 8-2: SUCCESS MESSAGE AFTER GENERATING TIME REPORT .................................... 50
FIGURE 8-3: DOWNLOADED ATTENDANCE REPORT ................................................................ 50
FIGURE 8-4: DETAILED ATTENDANCE REPORT .......................................................................... 51
FIGURE 9-1: MANUAL WI-FI CONNECTION ................................................................................. 52
FIGURE 9-2: AVAILABLE WI-FI NETWORKS ................................................................................. 52
FIGURE 9-3: WI-FI CONNECTION INTERFACE ............................................................................. 53
FIGURE 9-4: CONNECTED WI-FI .................................................................................................... 53
FIGURE 9-5: SSID AND PASSWORD .............................................................................................. 54
FIGURE 9-6: DHCP INTERFACE ...................................................................................................... 54
FIGURE 9-7 DHCP CONNECTIVITY ................................................................................................ 55
FIGURE 9-8: WI-FI SETUP BY USB.................................................................................................. 55
FIGURE 9-9: WI-FI SETUP TEMPLATE DOWNLOAD .................................................................... 56
FIGURE 9-10: SUCCESS MESSAGE AFTER DOWNLOAD ............................................................ 56
FIGURE 9-11: DOWNLOADED TEMPLATE ................................................................................... 56
FIGURE 9-12: CONNECTIVITY INTERFACE ................................................................................... 57
FIGURE 9-13: APP CONNECTION .................................................................................................. 58
FIGURE 9-14: APP OPERATION ..................................................................................................... 58
FIGURE 10-1: DATA MANAGEMENT ............................................................................................. 59
FIGURE 10-2: DOWNLOAD ATTENDANCE LOG .......................................................................... 59
FIGURE 10-3: SUCCESS MESSAGE AFTER DOWNLOADING ATTENDANCE LOGS ................. 60
FIGURE 10-4: DOWNLOADED ATTENDANCE LOGS ................................................................... 60
FIGURE 10-5: DELETE ATTENDANCE LOGS ................................................................................. 61
FIGURE 10-6: CONFIRMATION TO DELETE ATTENDANCE LOGS ............................................. 61
FIGURE 10-7: SUCCESS MESSAGE AFTER DELETING ATTENDANCE LOGS ............................ 61
FIGURE 10-8: CLOCK RESET ........................................................................................................... 62
FIGURE 10-9: CONFIRMATION TO RESET THE CLOCK ............................................................... 62

D and W Series NGTeco Time Clock User Manual
Page | 10 Copyright©2021 NGTeco. All rights reserved.
FIGURE 10-10: SUCCESS MESSAGE AFTER RESET ...................................................................... 62
FIGURE 10-11: DELETE ALL DATA ................................................................................................ 63
FIGURE 10-12: CONFIRMATION TO DELETE ALL DATA ............................................................ 63
FIGURE 10-13: SUCCESS MESSAGE AFTER DELETING ALL DATA ............................................ 63
FIGURE 10-14: UPDATE FIRMWARE ............................................................................................. 64
FIGURE 10-15: CONFIRMATION TO UPDATE FIRMWARE ......................................................... 64
FIGURE 10-16: SUCCESS MESSAGE AFTER UPDATING FIRMWARE......................................... 64
FIGURE 11-1: DATE AND TIME SETTINGS -1 ............................................................................... 65
FIGURE 11-2: DATE AND TIME SETTINGS -2 ............................................................................... 65
FIGURE 11-3: SYSTEM INFORMATION -1 ..................................................................................... 66
FIGURE 11-4: SYSTEM INFORMATION - 2 .................................................................................... 67
FIGURE 13-1: SYSTEM HELP .......................................................................................................... 68
FIGURE 13-2: SUPPORT SCREEN ................................................................................................... 69

D and W Series NGTeco Time Clock User Manual
Page | 11 Copyright©2021 NGTeco. All rights reserved.
1 Overview
This document outlines the menu operations of the NGTeco D and W Series Time Clock.
The NGTeco Time Clock provides convenience for users and minimizes the requirement of the
computer skills of users. The clock allows the setting of attendance rules, managing user
information, managing user privileges, setting pay periods, generating timecard reports and
attendance logs, etc.
Key Features
• Easy to monitor and straight-forward services.
• Reduces management cost for attendance related procedures.
• Goes a long way in simplifying the payroll process.
• Advanced attendance analytics.
• Granular visibility into attendance patterns.
• Greatly reduces month-end hassles and compliance challenges.
2 Operational Procedure
Note: Press and Hold M/OK for 3 seconds to open the menu.
2.1 Finger Enrollment
Finger Enrollment procedure includes capturing a user’s fingerprint and saving it as a template
to the corresponding User ID. To enhance the fingerprint authentication rate, make sure you
enroll the finger in a proper manner.
2.1.1 Finger Selection for Enrollment
• It is recommended to use the index finger or middle finger to enroll your fingerprint.
• If the fingerprints on your selected hand are worn or damaged, try using the other hand.
• If the fingers are small, try enrolling the thumb finger.
D and W Series NGTeco Time Clock User Manual
Page | 12 Copyright©2021 NGTeco. All rights reserved.
2.1.2 Enrollment Operation
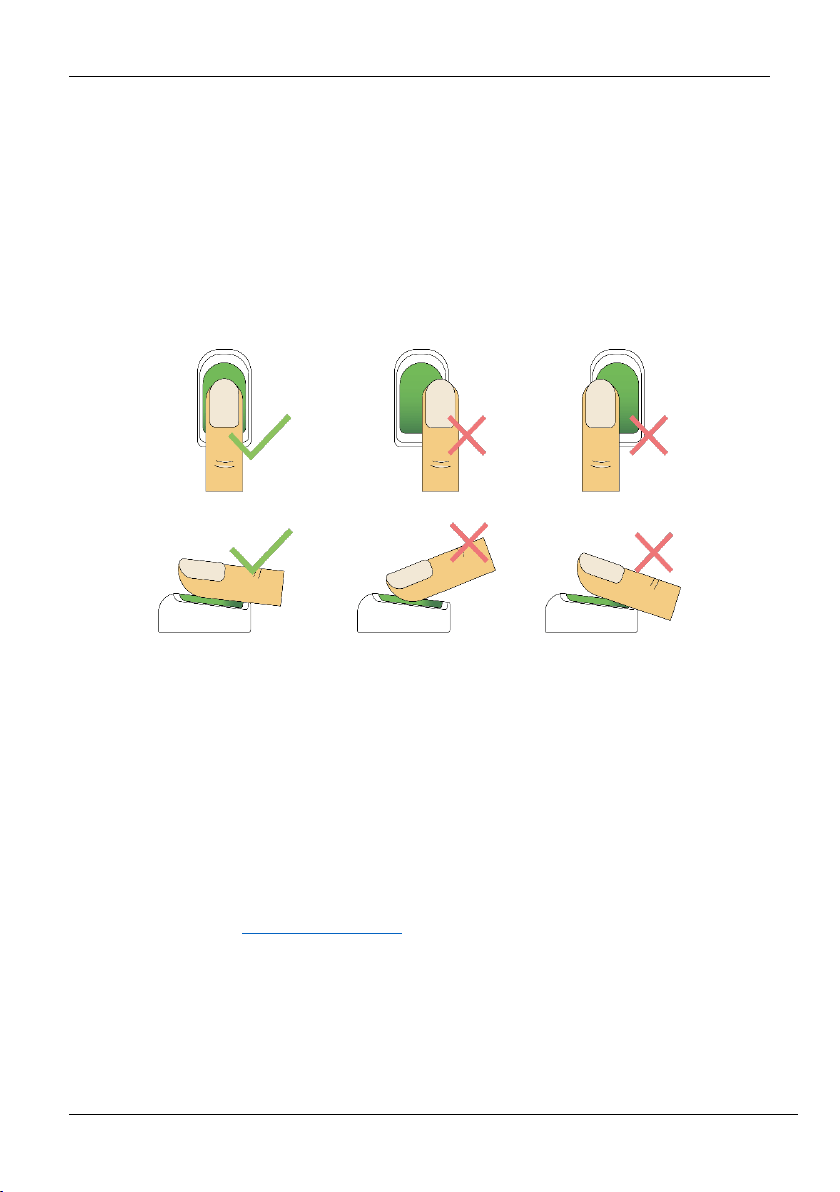
• Place the finger flat and centered on the sensor surface.
• The score for each enrollment will be displayed. Make sure the score is high enough to
ensure proper enrollment and authentication.
• Place the finger consecutively until the success message appears. An illustration is given
below:
Figure 2-1: Fingerprint Registration
2.1.3 Quality Improvement of Fingerprint Reads
• Place the finger firmly on the sensor surface.
• Always use clean fingers for enrollment.
• Do not slide the finger while enrolling it.
• Avoid angled or tilted finger positions for enrollment.
For further details, refer fingerprint enrollment
.
D and W Series NGTeco Time Clock User Manual
Page | 13 Copyright©2021 NGTeco. All rights reserved.
2.2 Verification Modes
In the NGTeco Time Clock, there are two verification modes, namely:
• Fingerprint verification
• Password verification
These verification modes can be used for check-in and check-out punches and access to the
Admin menu.
2.2.1 Fingerprint
The fingerprint verification can be done in two ways:
1: N Verification: The clock compares the current fingerprint collected by the fingerprint
sensor with all the fingerprints on the clock. Press your finger properly on the fingerprint sensor.
If the fingerprint matches with the saved template, the verification is successful.
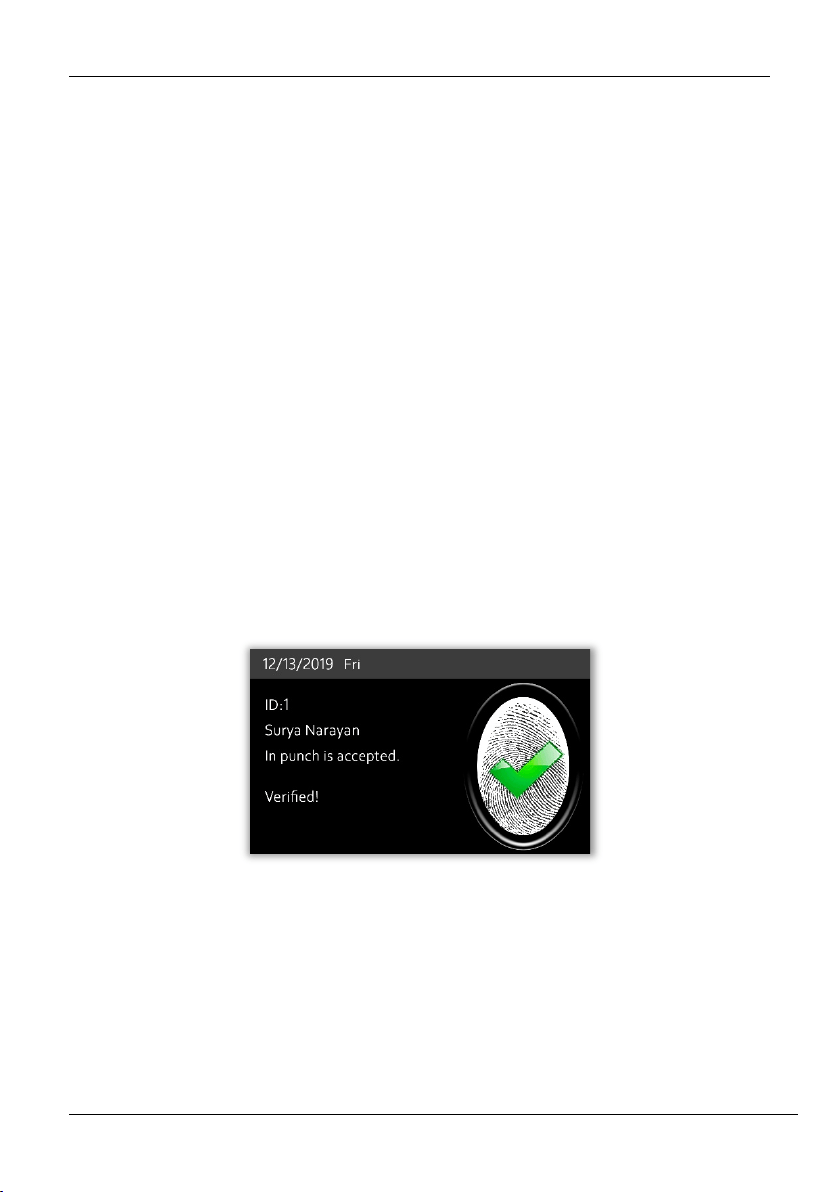
If the verification is successful, the success message will be displayed as shown below:
Figure 2-2: Successful Biometric Verification
D and W Series NGTeco Time Clock User Manual
Page | 14 Copyright©2021 NGTeco. All rights reserved.
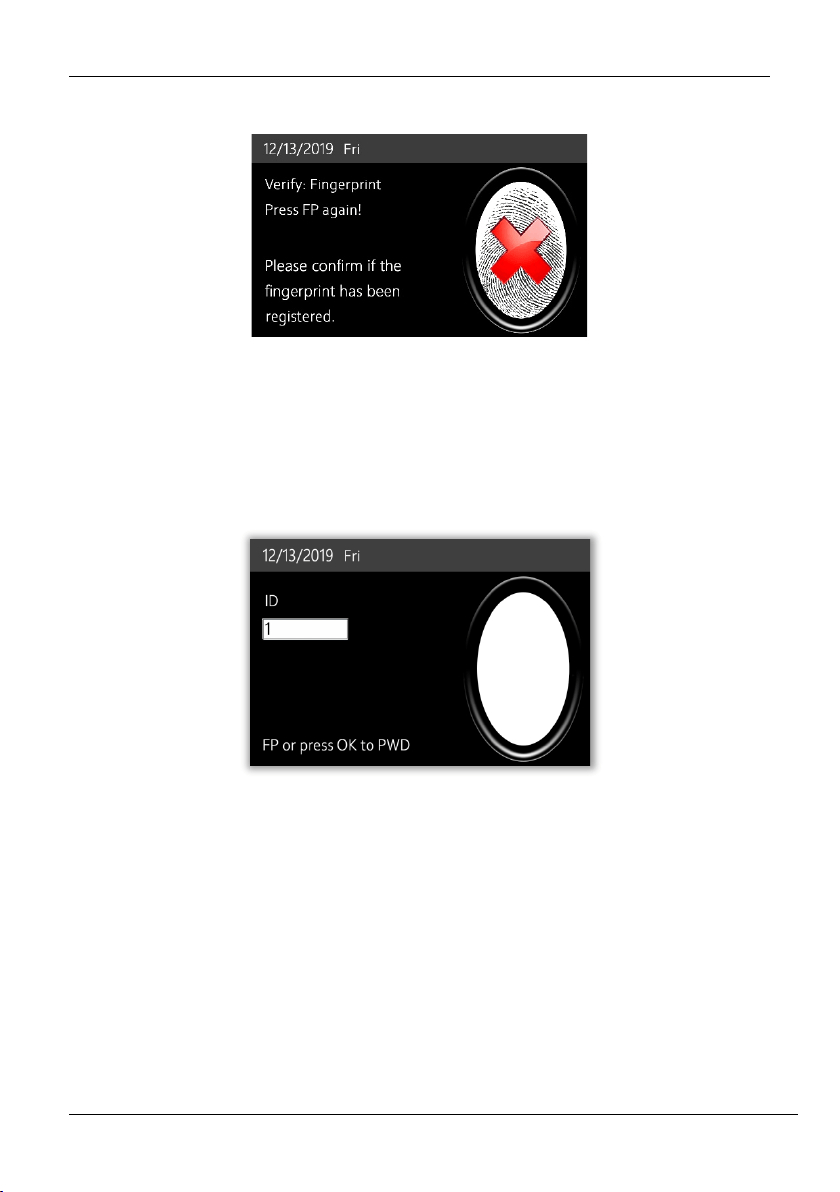
If the verification failed, the message will be displayed as shown below:
Figure 2-3: Failed Biometric Verification
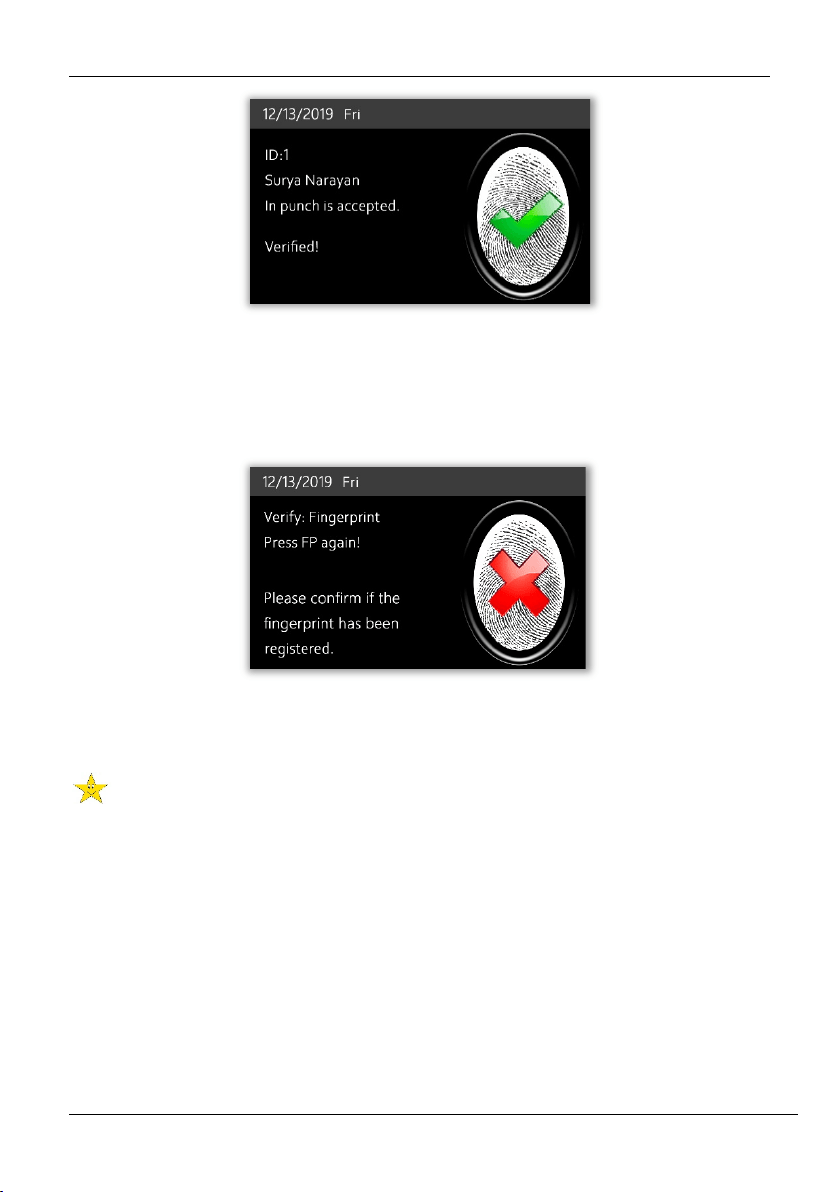
1:1 Verification: The clock compares the current fingerprint collected by the fingerprint
sensor with the fingerprint template saved for the corresponding User ID. Enter your User ID
through the keypad and press your finger.
Figure 2-4: 1:1 Verification Screen
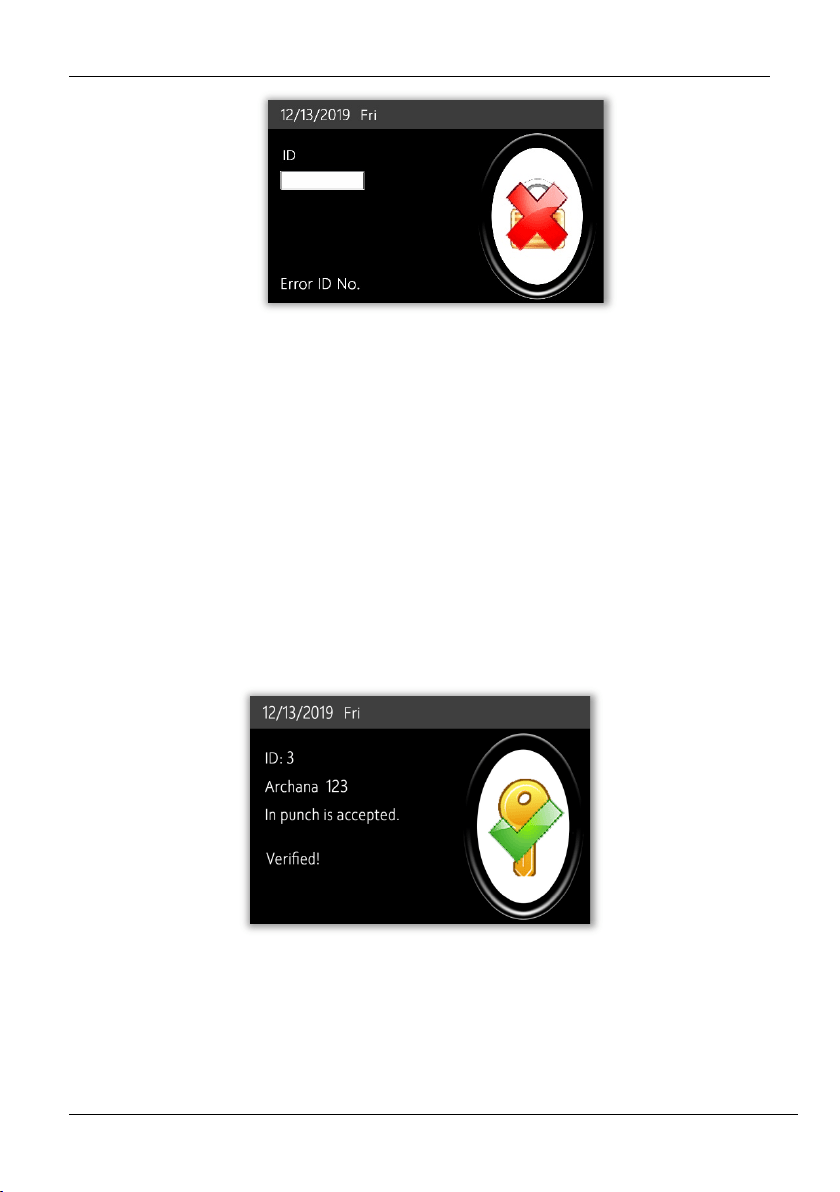
If the fingerprint matches the saved template, the verification is successful, and the success
message will be displayed as shown below:
D and W Series NGTeco Time Clock User Manual
Page | 15 Copyright©2021 NGTeco. All rights reserved.
Figure 2-5: Successful Biometric Verification
If the verification failed, the message will be displayed as shown below:
Figure 2-6: Failed Biometric Verification
If the clock displays " Error ID No”, then the User ID is not yet created.
D and W Series NGTeco Time Clock User Manual
Page | 16 Copyright©2021 NGTeco. All rights reserved.
Figure 2-7: Failed 1:1 Verification
If the clock instructs “Please try again”, then press your finger again. You can try 2 more times.
If the verification fails after trying for 2 more times, then the clock returns to the home screen.
2.2.2 Password
In the Password verification mode, the clock compares the entered password with the
registered password corresponding to the User ID. If both the passwords match, then the
verification is successful.
If the verification is successful, the success message will be displayed as shown below:
Figure 2-8: Successful Password Verification
D and W Series NGTeco Time Clock User Manual
Page | 17 Copyright©2021 NGTeco. All rights reserved.
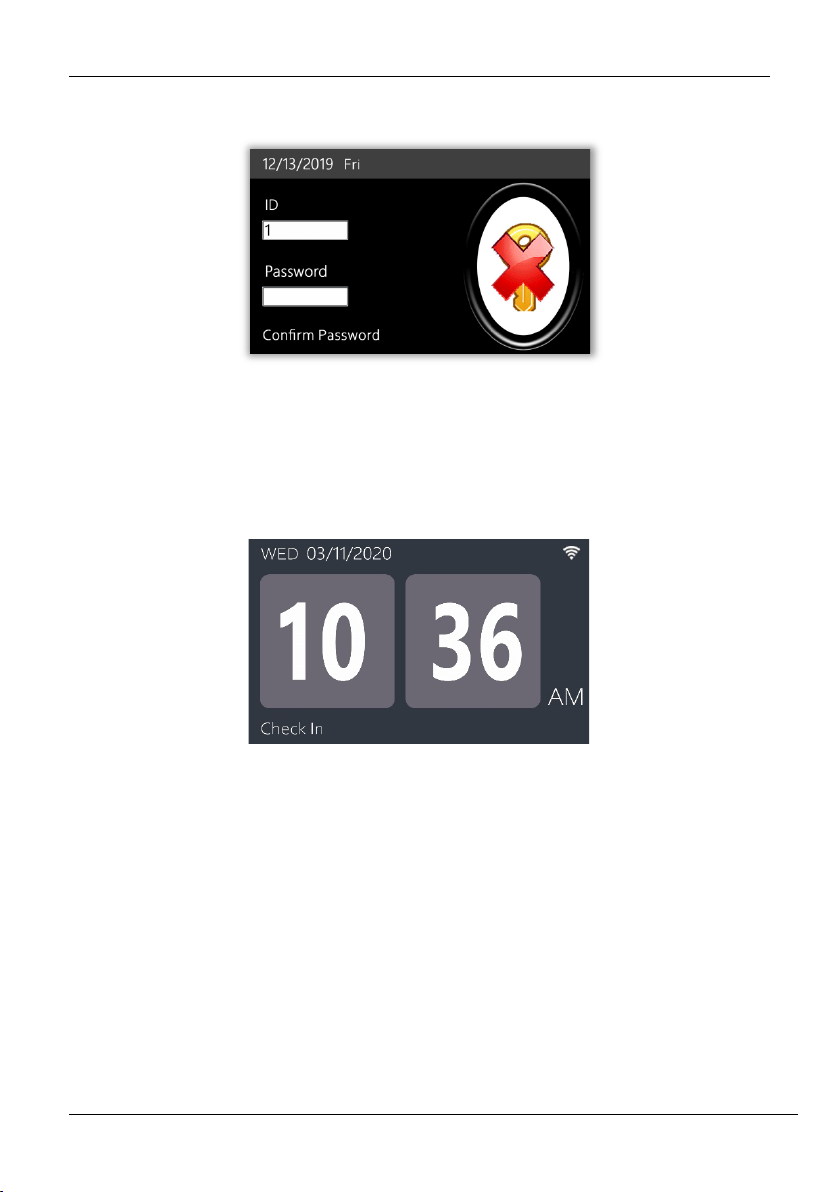
If the verification failed, the message will be displayed as shown below:
Figure 2-9: Failed Password Verification
2.2.3 Attendance Status
The clock’s home screen displays the current attendance status:
Figure 2-10: Home screen
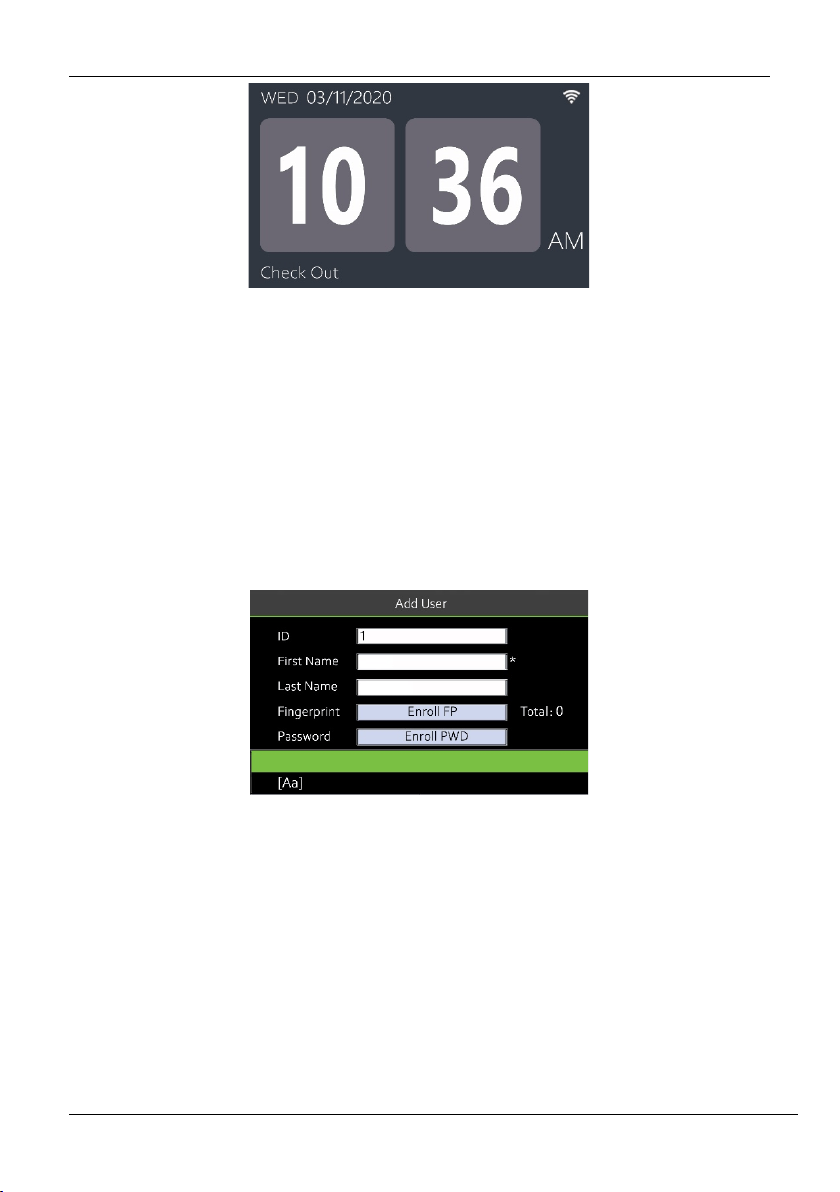
If you want to change the attendance status, press IN or OUT key as required.
The attendance status changes as shown below:
D and W Series NGTeco Time Clock User Manual
Page | 18 Copyright©2021 NGTeco. All rights reserved.
Figure 2-11: Changed Attendance Status
2.3 T9 Mode
The T9 mode allows you to enter the Uppercase, Lowercase, and Special characters in the text
input fields. You can enter the alphabets and special characters by pressing one keystroke per
letter.
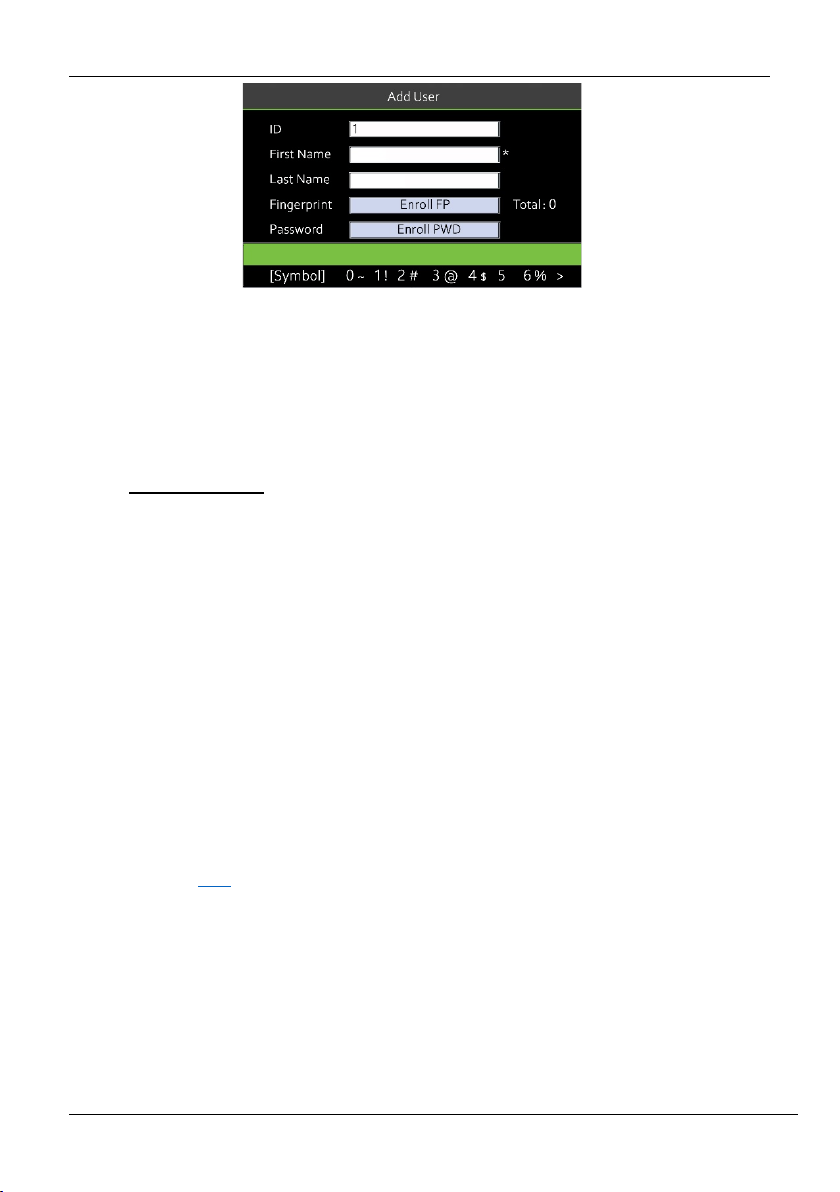
• Navigate to the required text field and press <M/OK>.
Figure 2-12: Add User Details
• Each key on the keypad has a few letters printed above them. For example, pressing 3
can enter D, E, and F. To enter “F”, press 3 thrice. This is accomplished by comparing the
number of keystrokes with the internal syntactical dictionary to determine the letter.
• Press <
> to switch between Uppercase, Lowercase, and Special characters.
D and W Series NGTeco Time Clock User Manual
Page | 19 Copyright©2021 NGTeco. All rights reserved.
Figure 2-13: Special Characters
• To add the special character, press the corresponding key once. For example, to enter
“@” press 3 once.
3 Privileges
The user privileges are classified as:
• Administrator
• Users
3.1 Administrator
The Administrator privilege protects the clock against unwanted damage to important
configurations and unwanted changes. The Administrator has the privilege to operate all the
menus in addition to fingerprint/password-based attendance maintenance. The Admin can
make changes to the configuration, add and modify user details, and query on attendance
records. Click here
to view the detailed menu operations.
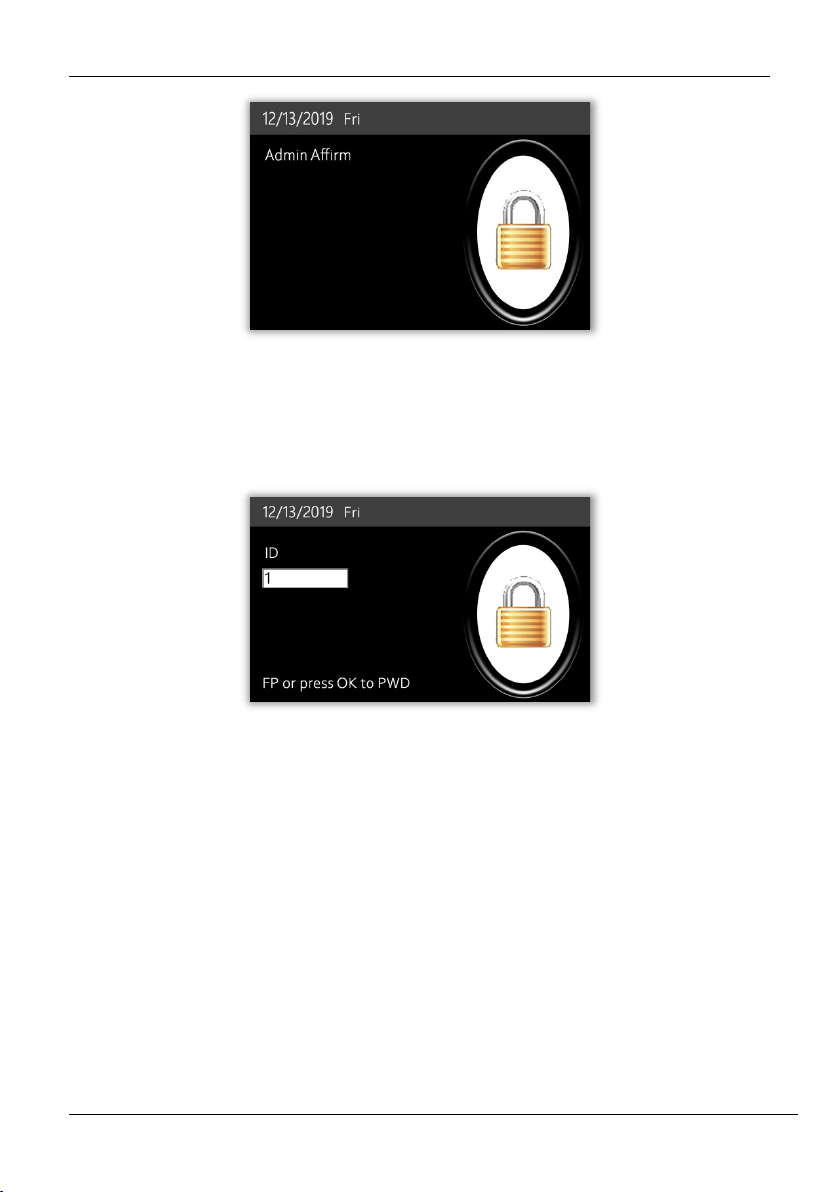
Initially, the Admin must press and hold the <M/OK> key for 5 seconds. Then the Admin
verification screen appears as shown below:
D and W Series NGTeco Time Clock User Manual
Page | 20 Copyright©2021 NGTeco. All rights reserved.
Figure 3-1: Locked screen for Admin Verification
The Admin must verify the fingerprint or press <M/OK> to verify the password.
Figure 3-2: Admin Verification
D and W Series NGTeco Time Clock User Manual
Page | 21 Copyright©2021 NGTeco. All rights reserved.
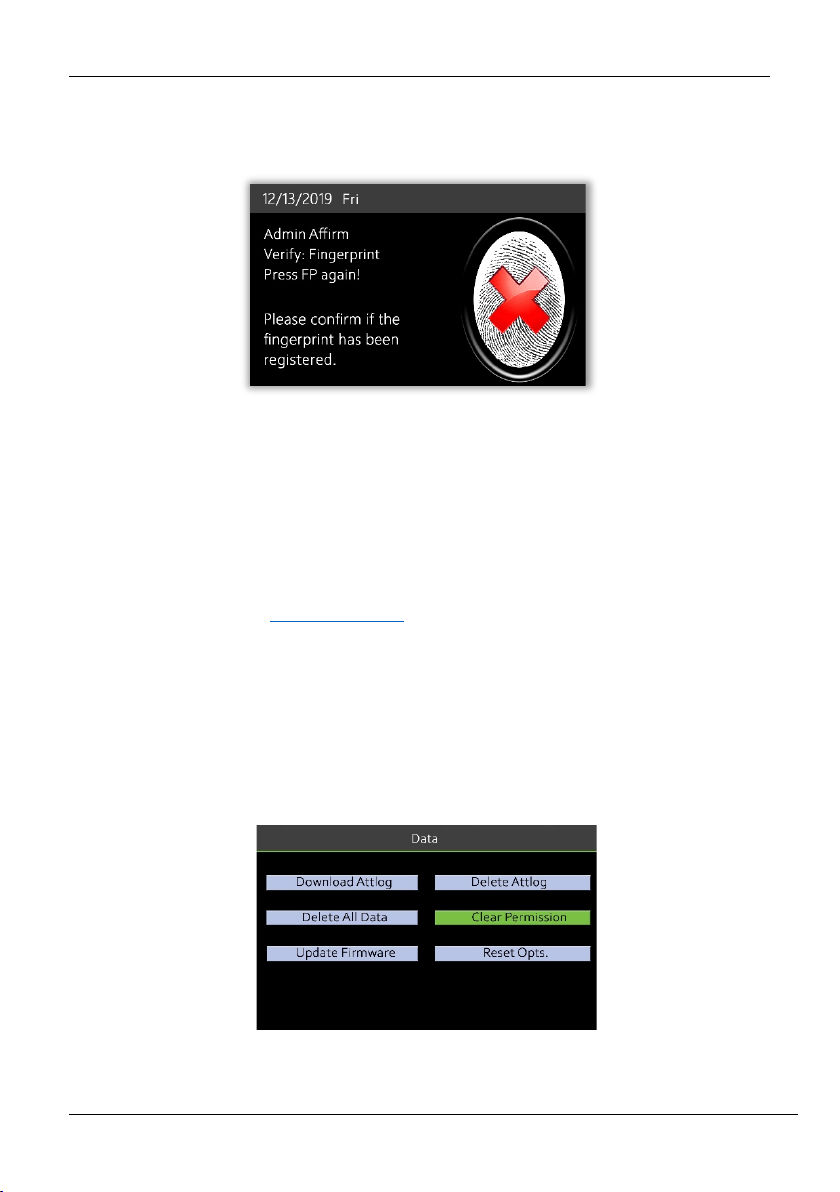
If a person other than Admin tries to open the menu with his own credentials, an error will be
displayed as shown below:
Figure 3-3: Failed Admin Verification
3.2 Users
Users can make attendance punch through fingerprint/password verification methods.
For further details, refer Verification modes
.
3.2.1 How to Reset Admin Privileges
You can reset the Admin privileges, and this can be done at a single instance instead of doing
one by one. The procedure is given below:
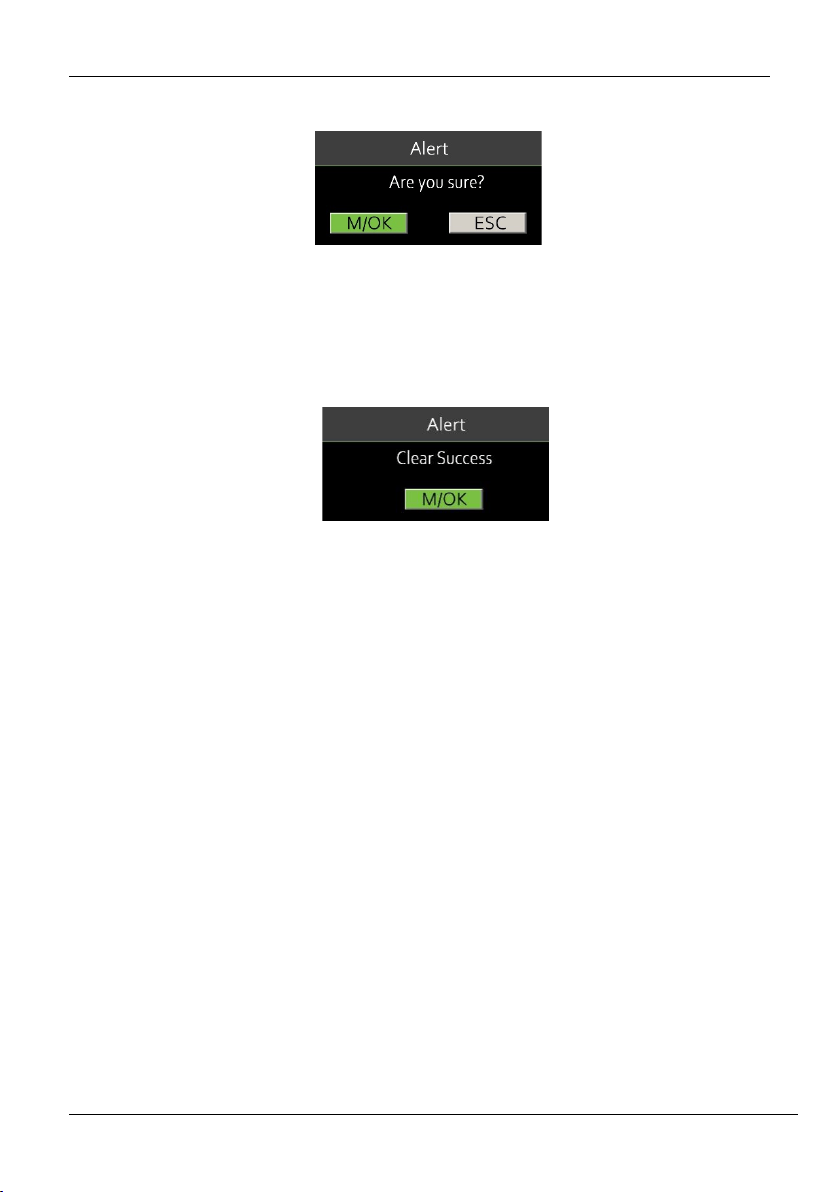
• Go to [Data] then [Clear Permission].
Figure 3-4: Clear Permission
D and W Series NGTeco Time Clock User Manual
Page | 22 Copyright©2021 NGTeco. All rights reserved.
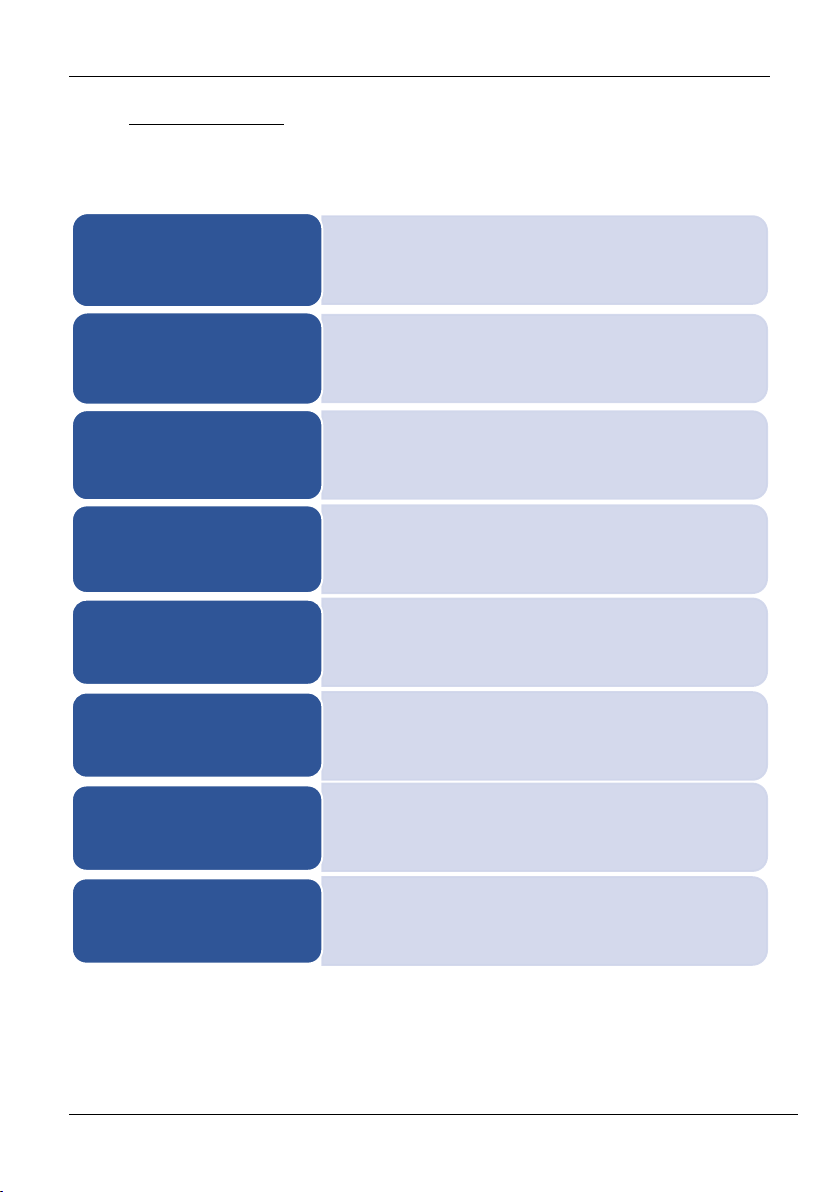
• An alert will be displayed as shown below:
Figure 3-5: Confirmation screen
• Press <M/OK> if you want to reset the Admin Privileges.
• After deleting the permissions, a success message will be displayed as shown below:
Figure 3-6: Success message after clearing permission
D and W Series NGTeco Time Clock User Manual
Page | 23 Copyright©2021 NGTeco. All rights reserved.
4 Main Menu
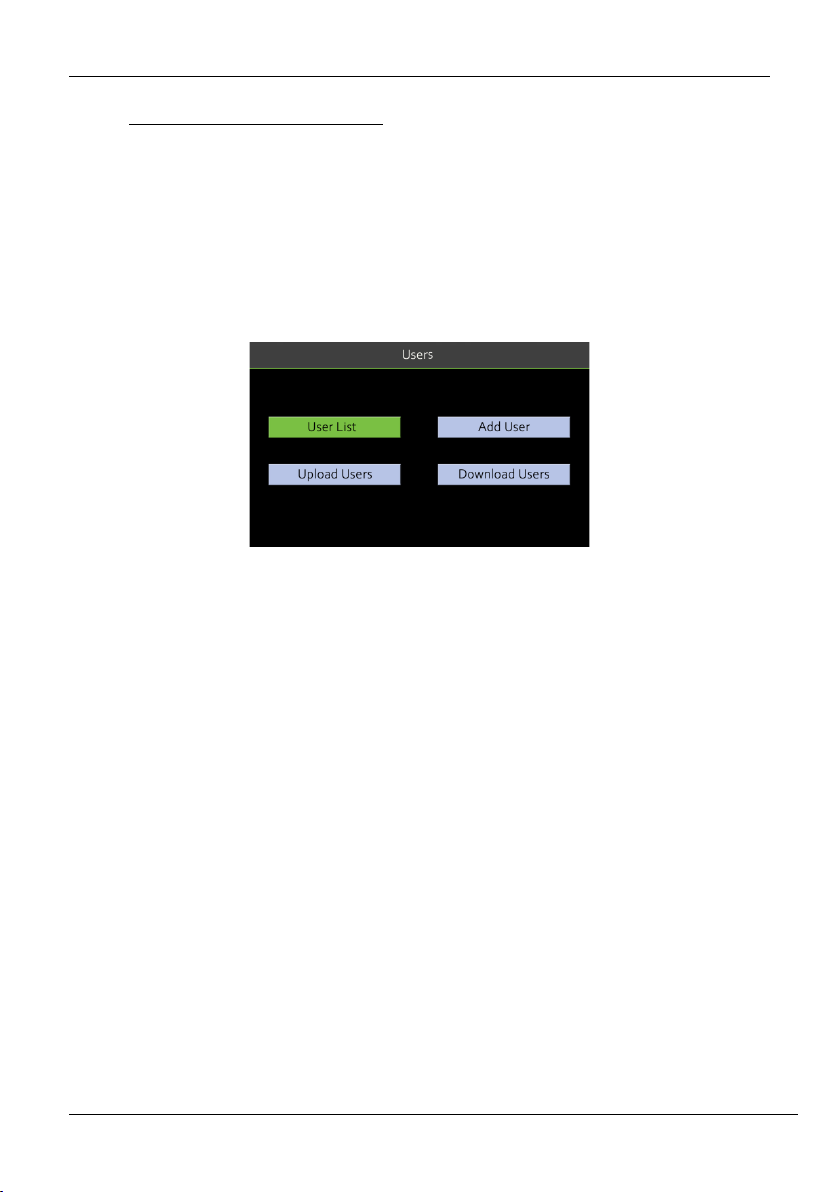
The Time Clock comprises the following menu.
Figure 4-1: Main Menu
• Manages User Data
• Upload/Download User Data
Users
• Setting Payment Cycle Period such as Weekly, Bi-
weekly, Monthly or Semi-monthly
Pay Period
• Viewing Attendance Details
• Adding Manual logs
• Viewing Attendance of individual employees
Time Data
• Selecting Payment cycle to calculate Attendance
• Downloading Attendance Reports for further
processing
Time Report
• Configuring Wi-Fi Manually or by USB Drive
• Mobile App Connection
Communication
• Setting Maximum Work Hours
• Setting Day Cutoff Time
• Setting Duplicate Punch Interval
Rule
• Downloading/Deleting Attendance logs
• Updating Firmware
• Resetting Device/Clearing all data
• Clearing Admin Permissions
Data
• Setting Date and Time
• Viewing Device Information
System
D and W Series NGTeco Time Clock User Manual
Page | 24 Copyright©2021 NGTeco. All rights reserved.
5 User Management
The Users menu frames a role-based access control and the tasks they can perform in the time
clock. The Administrator(s) can grant and revoke roles and permissions at the clock level. To
change the permission of a user, the administrator(s) updates the role. It allows the
Administrator(s) to add new users, edit the details of an existing user, uploading/downloading
the user details from/to a USB drive.
Figure 5-1: User List
5.1 New User Registration
New users in an organization can be added to the time clock by an Administrator. It includes
simple steps that can be performed without much effort. The steps to add a new user are
given below:
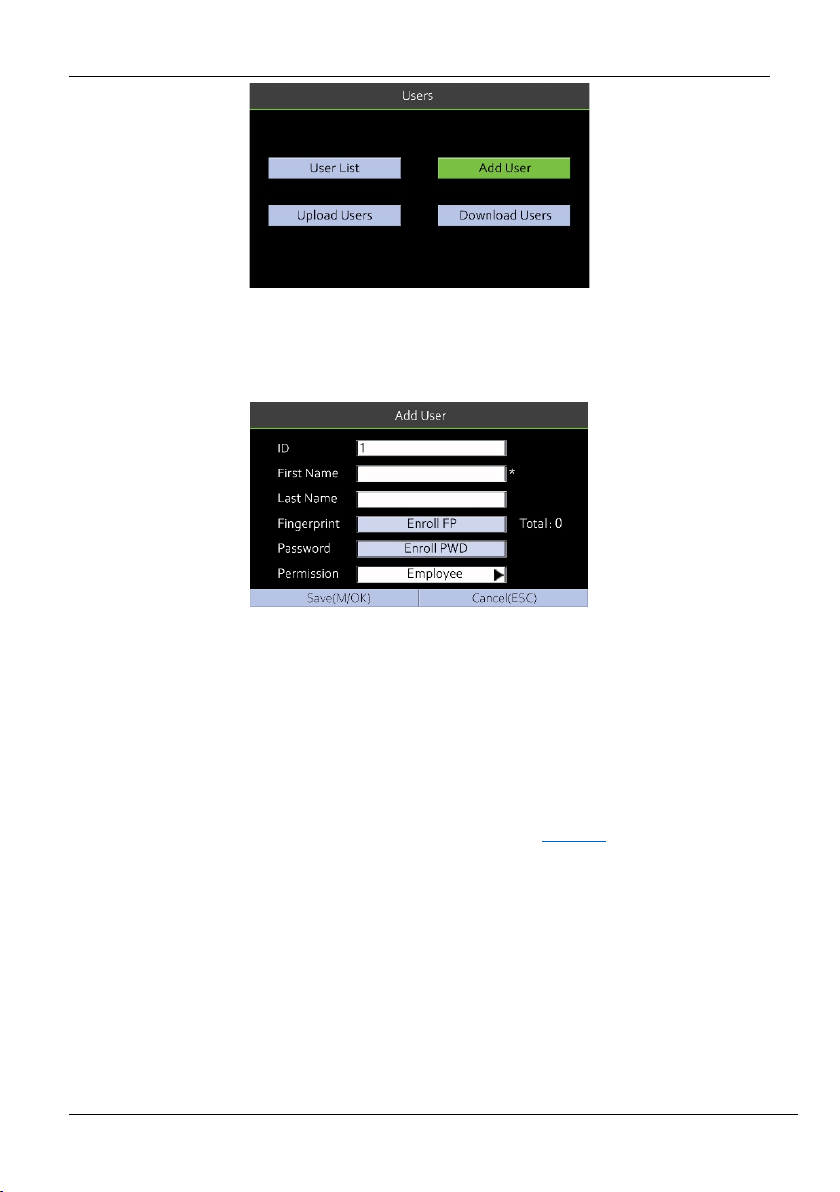
1. Go to [Users] and navigate to [Add User] by pressing the respective navigation key. The
Interface to add a new user will be displayed as shown below:
D and W Series NGTeco Time Clock User Manual
Page | 25 Copyright©2021 NGTeco. All rights reserved.
Figure 5-2: Add a New user
2. Enter the following details:
Figure 5-3: User Details
• ID: The User ID will be auto-generated beginning from 1. If you want to change the
User ID generated by the clock, delete the displayed ID by pressing <
/
> and
enter the new User ID.
• First Name: Enter the First Name of the user.
• Last Name: Enter the Last Name of the user. Refer T9 mode
for further details.
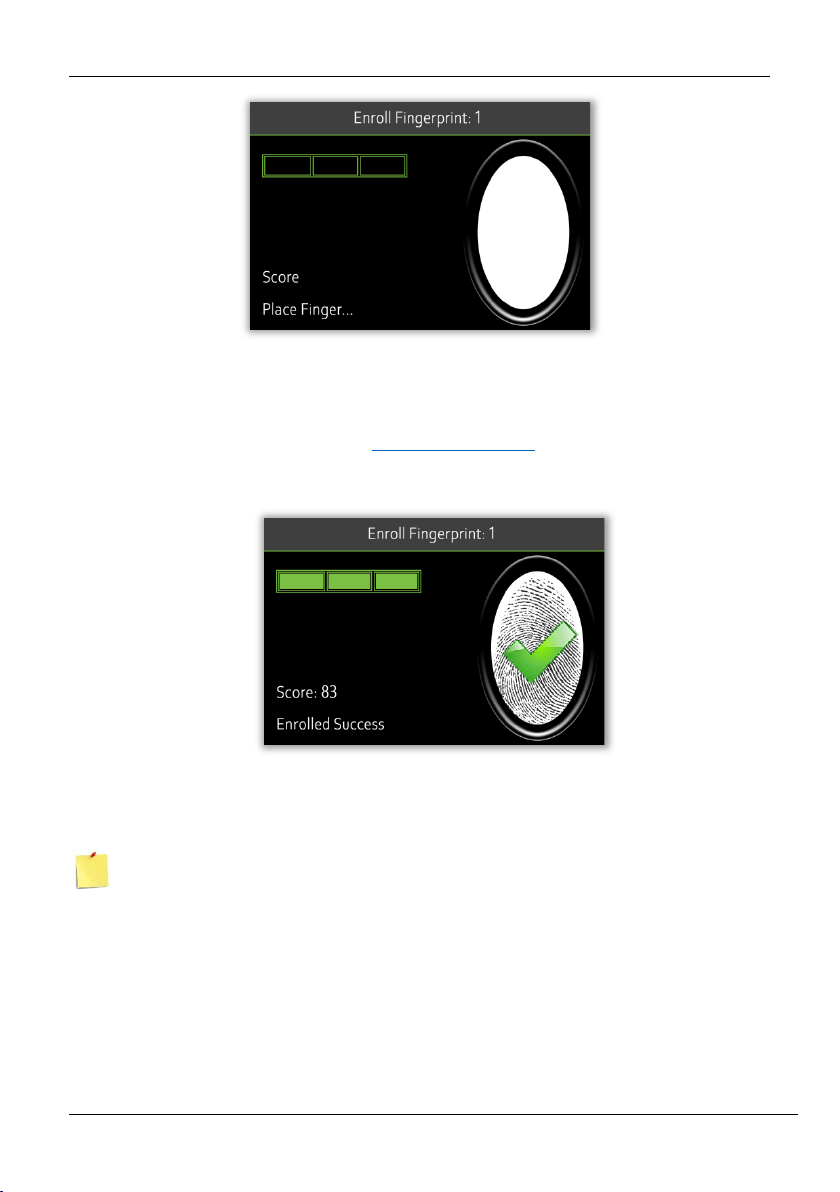
• Fingerprint: To enroll the fingerprint, press <M/OK>. The interface to enroll the
fingerprint will be displayed as shown below:
D and W Series NGTeco Time Clock User Manual
Page | 26 Copyright©2021 NGTeco. All rights reserved.
Figure 5-4: Fingerprint Enrollment
• To view more details, refer Fingerprint Enrollment
.
• After successful enrollment, the success message will be displayed as shown below:
Figure 5-5: Successful Enrollment
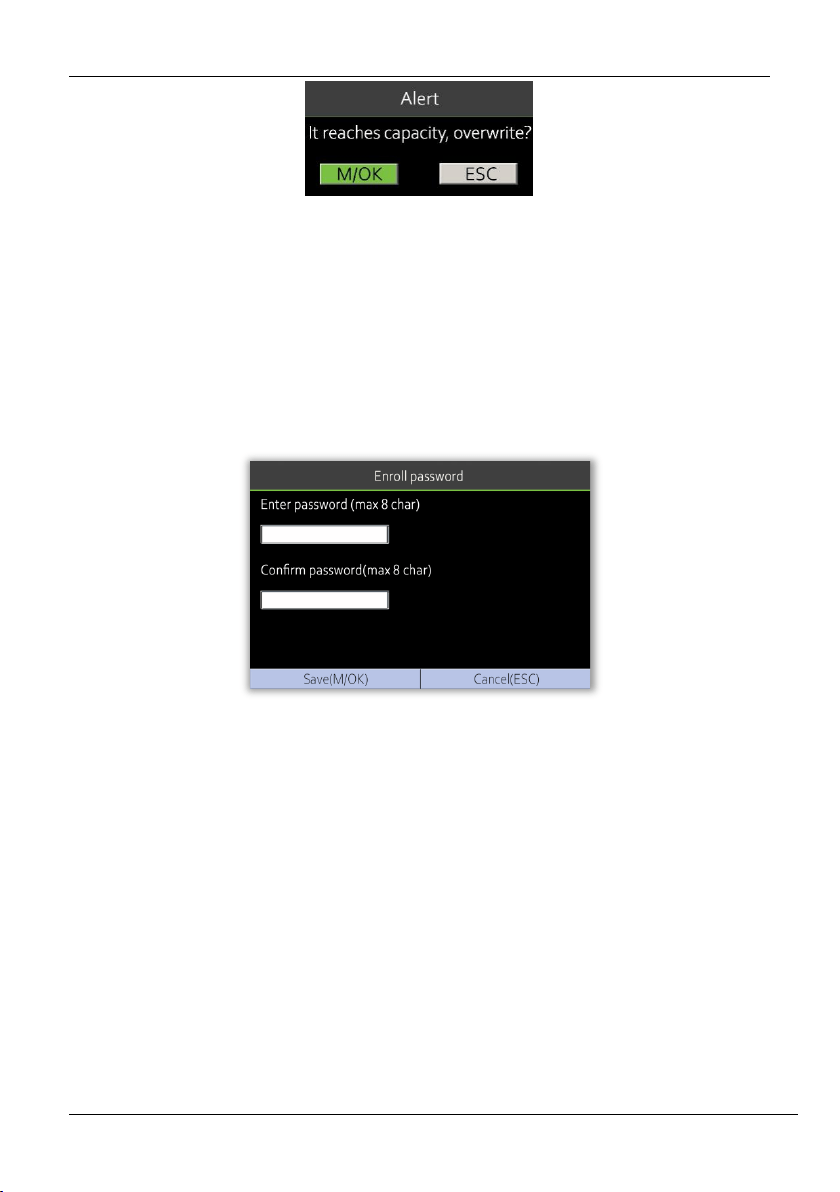
You can register a maximum of three fingerprints. If you try to register more than 3
fingerprints, the clock raises an alert message as shown below:
D and W Series NGTeco Time Clock User Manual
Page | 27 Copyright©2021 NGTeco. All rights reserved.
Figure 5-6: Alert to overwrite Fingerprints
If you press <M/OK>, then all the registered fingerprints will be deleted, and you can restart
the enrollment process.
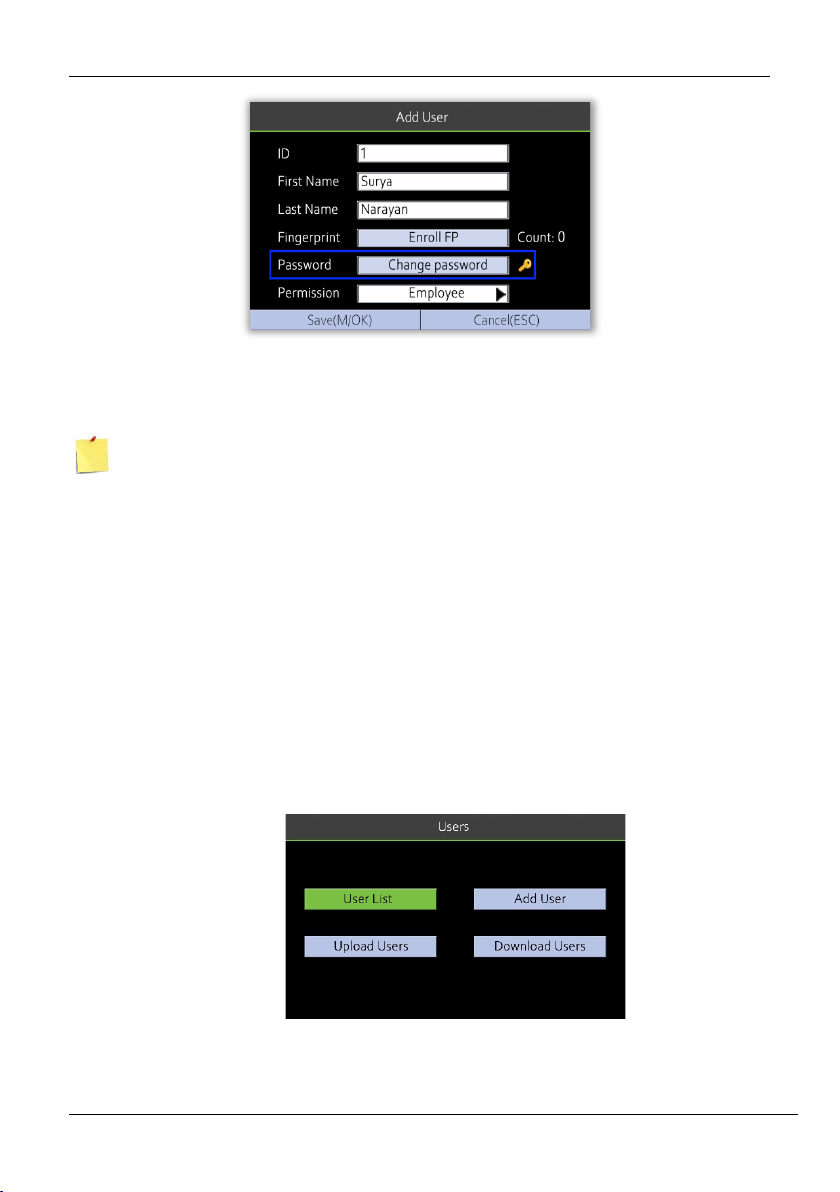
• Password: To register a password, press the <M/OK> key. The interface to register the
password will be displayed as shown below:
Figure 5-7: Enroll Password
Enter the password and confirm the same.
Then press <M/OK> to save the password.
The indication of the registered password will be displayed as shown below:
D and W Series NGTeco Time Clock User Manual
Page | 28 Copyright©2021 NGTeco. All rights reserved.
Figure 5-8: Change Password
The entered password must be a maximum of 8 characters.
• Permission: Set the Permission level of the user as Users/Administrator. Press the <>
or <> key to switch between Users and Administrator options.
3. Navigate to [Save] and press <M/OK> to save the user details.
5.2 User Data Management
The Administrator can also modify the existing user data. The steps to edit the user data are
given below:
1. Go to [Users] and navigate to [User List].
Figure 5-9: User List menu
D and W Series NGTeco Time Clock User Manual
Page | 29 Copyright©2021 NGTeco. All rights reserved.
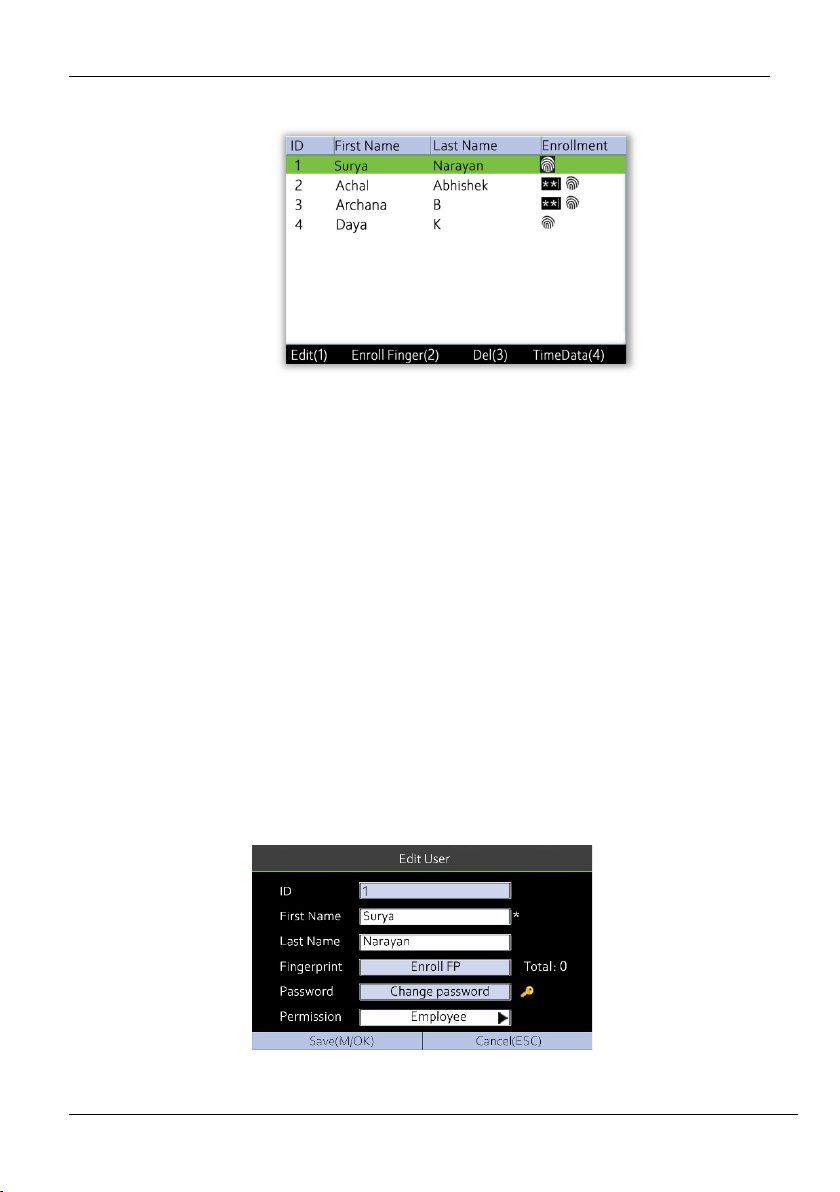
2. The user's list will be displayed as shown below:
Figure 5-10: User List
3. Navigate to the respective user by pressing the corresponding navigation keys.
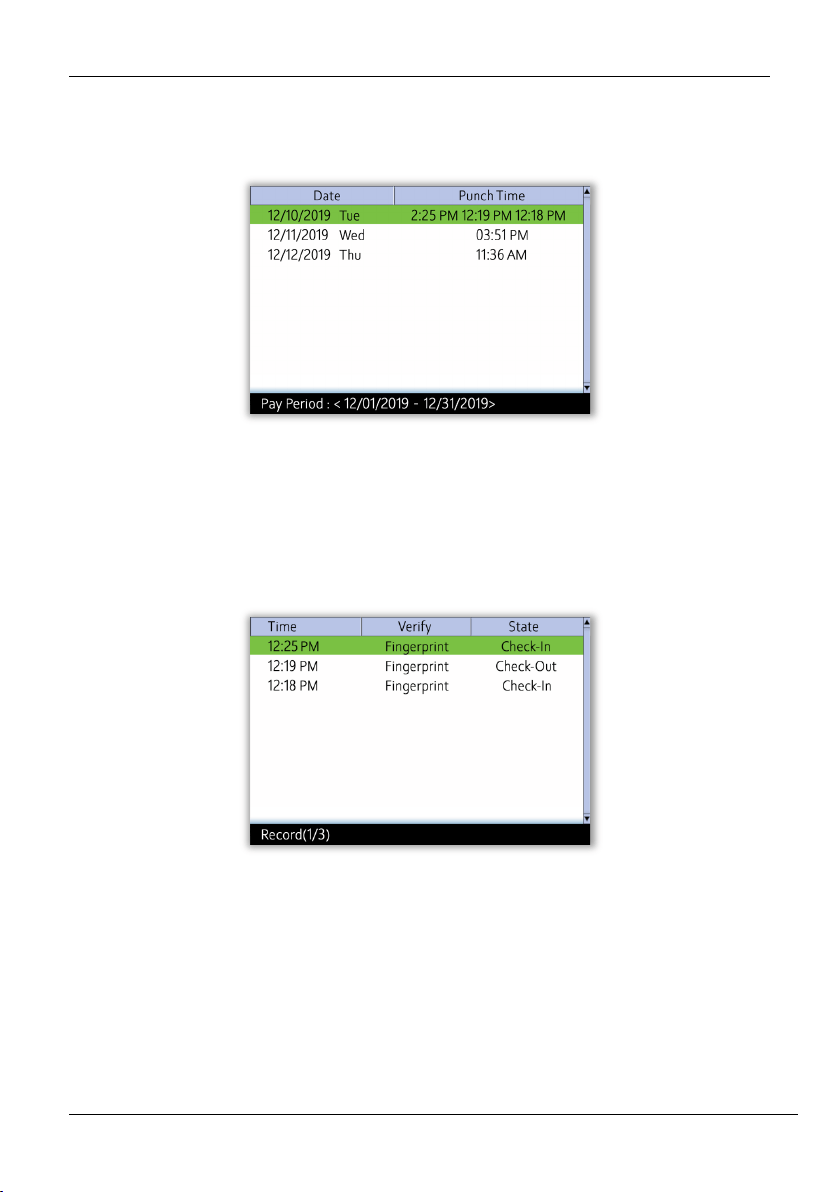
4. The shortcut keys to manage the data are:
<1> - Edit the user details
<2> - Enroll the fingerprint
<3> - Delete the user
<4> - View the time and attendance details of the respective users.
5.2.1 Edit User Details
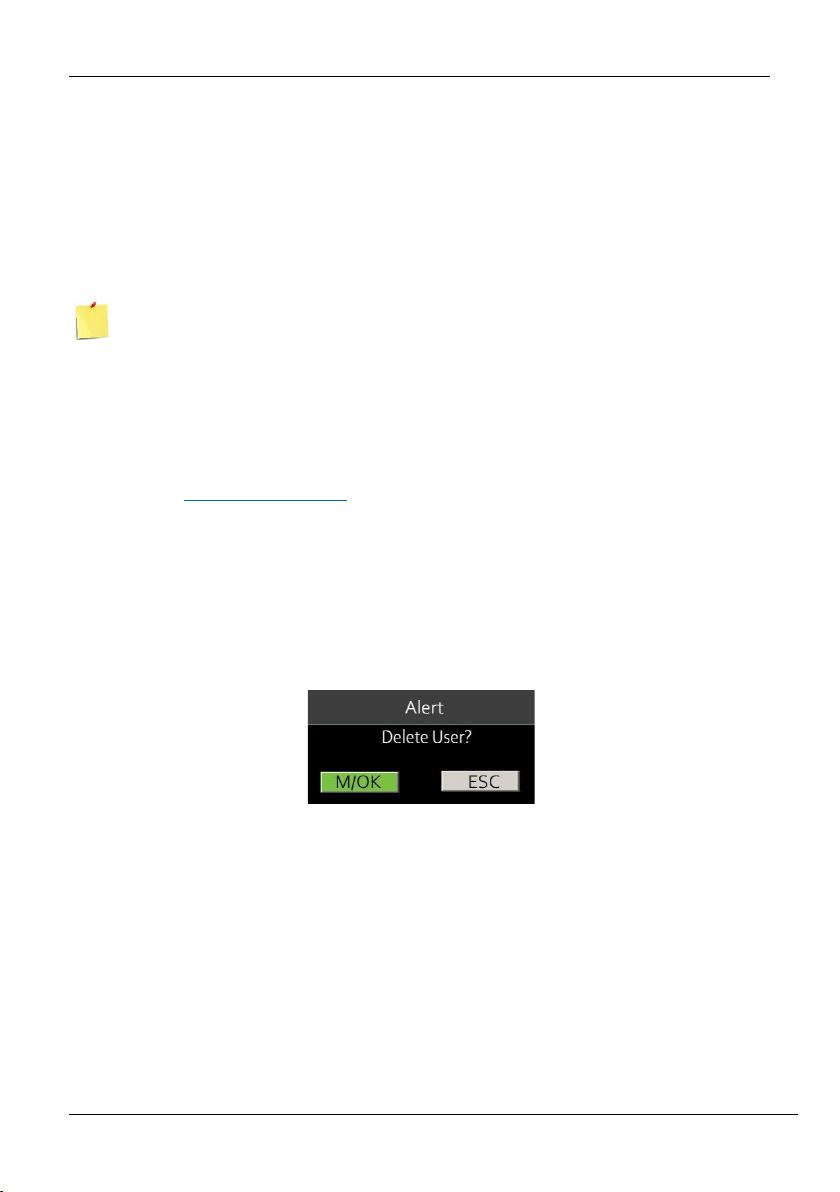
• Press <1> to edit the user details. The interface to edit the user details will be displayed
as shown below:
Figure 5-11: Edit user details
D and W Series NGTeco Time Clock User Manual
Page | 30 Copyright©2021 NGTeco. All rights reserved.
• Navigate to the corresponding field and make necessary changes. To add another
fingerprint, navigate to Fingerprint and press <M/OK>. Enroll the fingerprint. Similarly,
navigate to Password and press <M/OK>. Enter the New Password and confirm the
same.
• You can also change the permission of the user by pressing the <
> or <
> key.
• Finally, navigate to [Save] and press <M/OK>.
You cannot edit the ID of the user.
5.2.2 Enroll the Fingerprint
• If you prefer to enroll the fingerprint of the user, navigate to the corresponding user and
press <2>.
• Refer Fingerprint Enrollment to proceed further.
5.2.3 Delete User
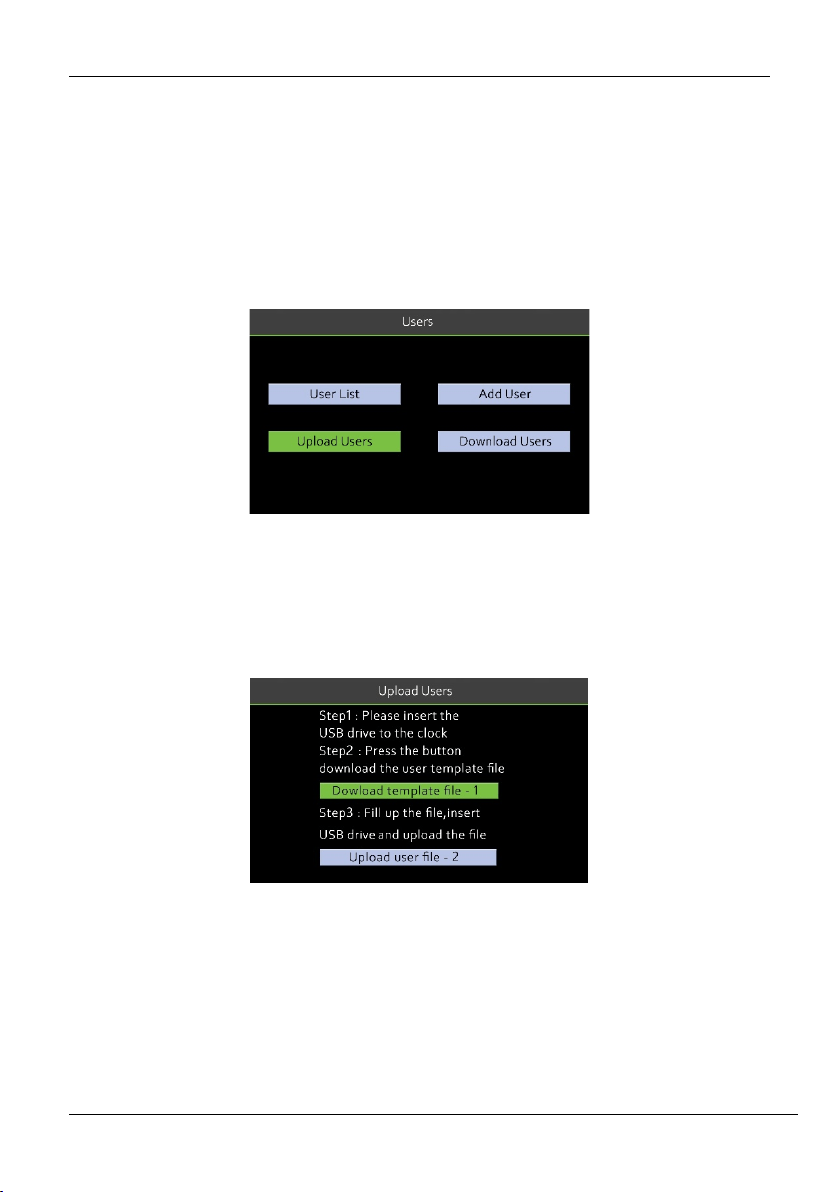
• If you require to delete a user permanently, navigate to the corresponding user and
press <3>.
• An alert will be displayed as shown below:
Figure 5-12: Alert to delete user
• Press <M/OK> to delete the User.
5.3 How to Transfer User Data
The user data can be transferred in two ways:
• From Clock to the USB drive
• From USB drive to clock
D and W Series NGTeco Time Clock User Manual
Page | 31 Copyright©2021 NGTeco. All rights reserved.
5.3.1 Upload User Data from USB Drive to Clock
To add a large number of user data, you can directly upload it from a USB drive. The clock
facilitates you to add bulk user data without any complexity in a short duration of time. The
procedure to upload the user data is given below.
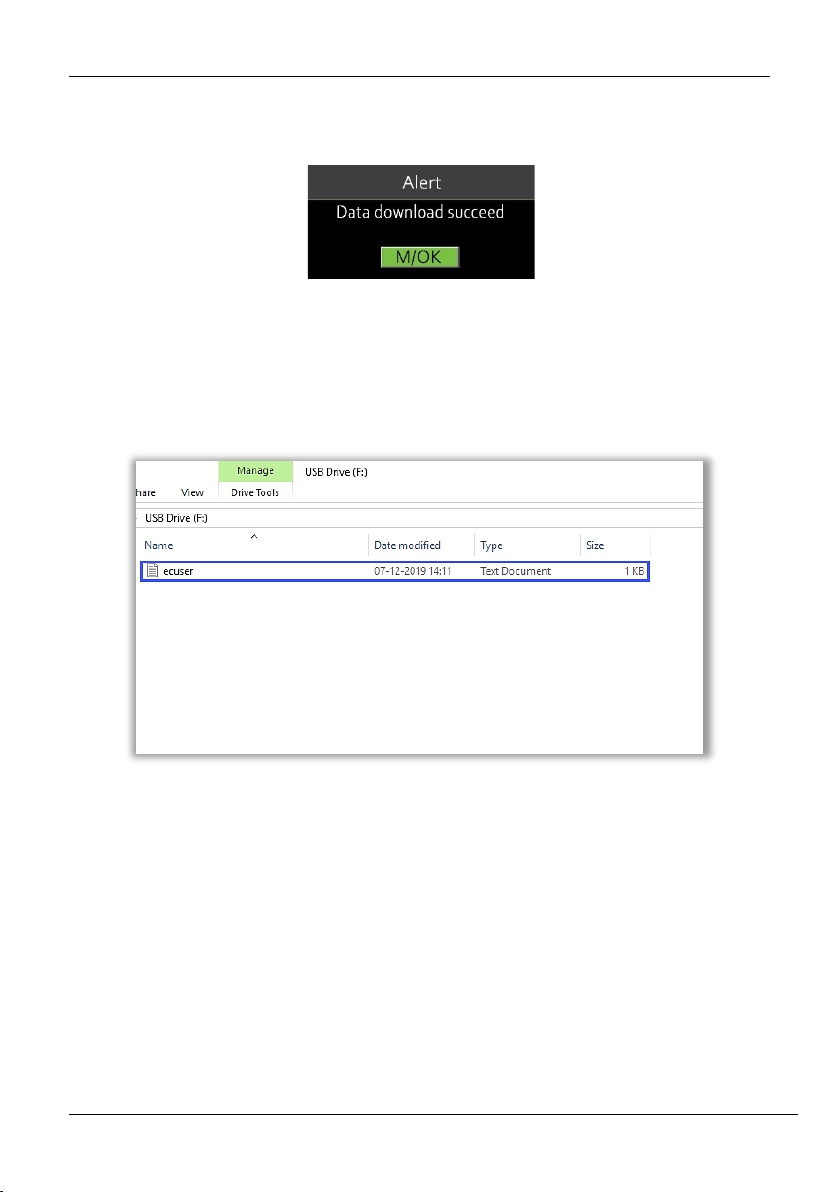
• Go to [Users] and navigate to [Upload Users].
Figure 5-13: Upload User Data
• Insert the USB drive into the USB slot.
• Navigate to [Download Template File-1] and press <M/OK>.
Figure 5-14: Download Template
D and W Series NGTeco Time Clock User Manual
Page | 32 Copyright©2021 NGTeco. All rights reserved.
• The template will be downloaded to the USB drive with the file name ecuser.txt and
the success message will be displayed as shown below:
Figure 5-15: Success message after downloading template
• Insert the USB drive to your PC to edit the template file.
• The template file will be displayed as shown below:
Figure 5-16: Template file - 1
D and W Series NGTeco Time Clock User Manual
Page | 33 Copyright©2021 NGTeco. All rights reserved.
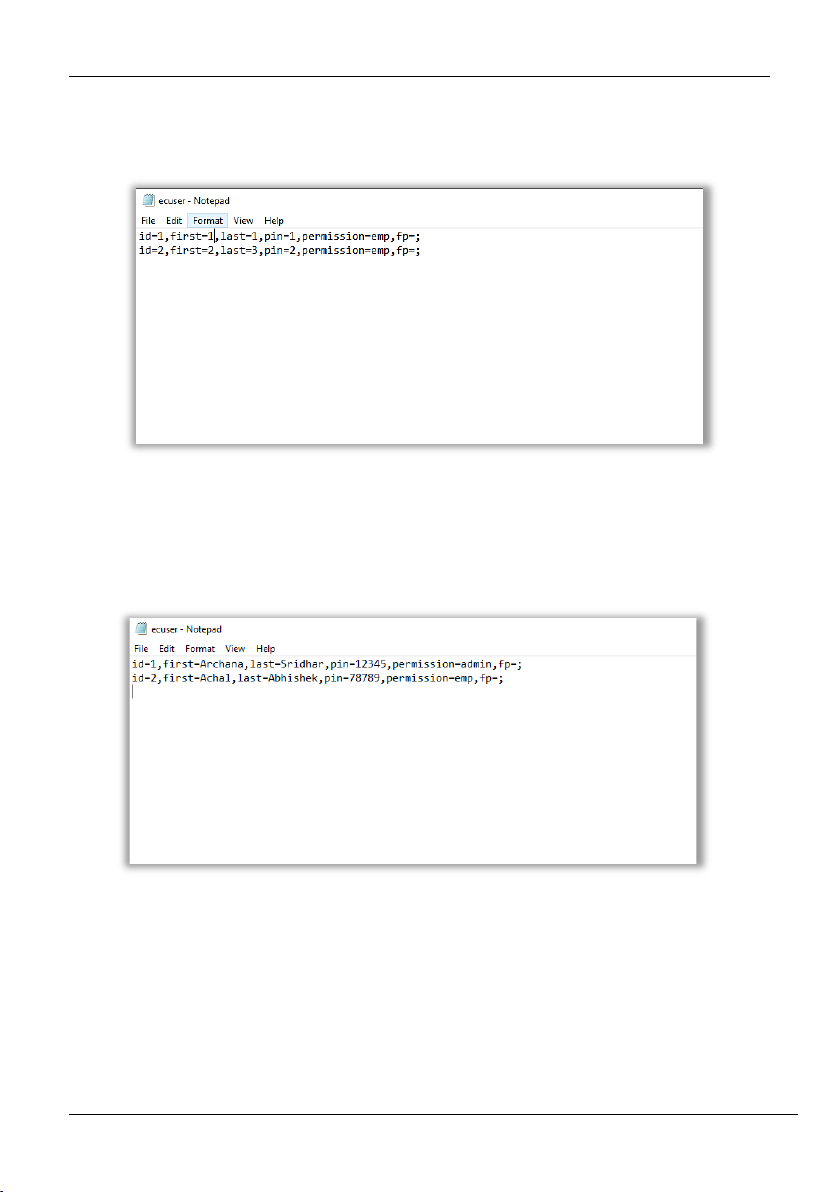
• Double-click to open the template file. The template file details will be displayed as
shown below:
Figure 5-17: Template file -2
• Edit the ID, First Name, Last Name, Password, and permission. An example is shown
below:
Figure 5-18: Edit user details
• Save the template and insert the USB drive into the clock again.
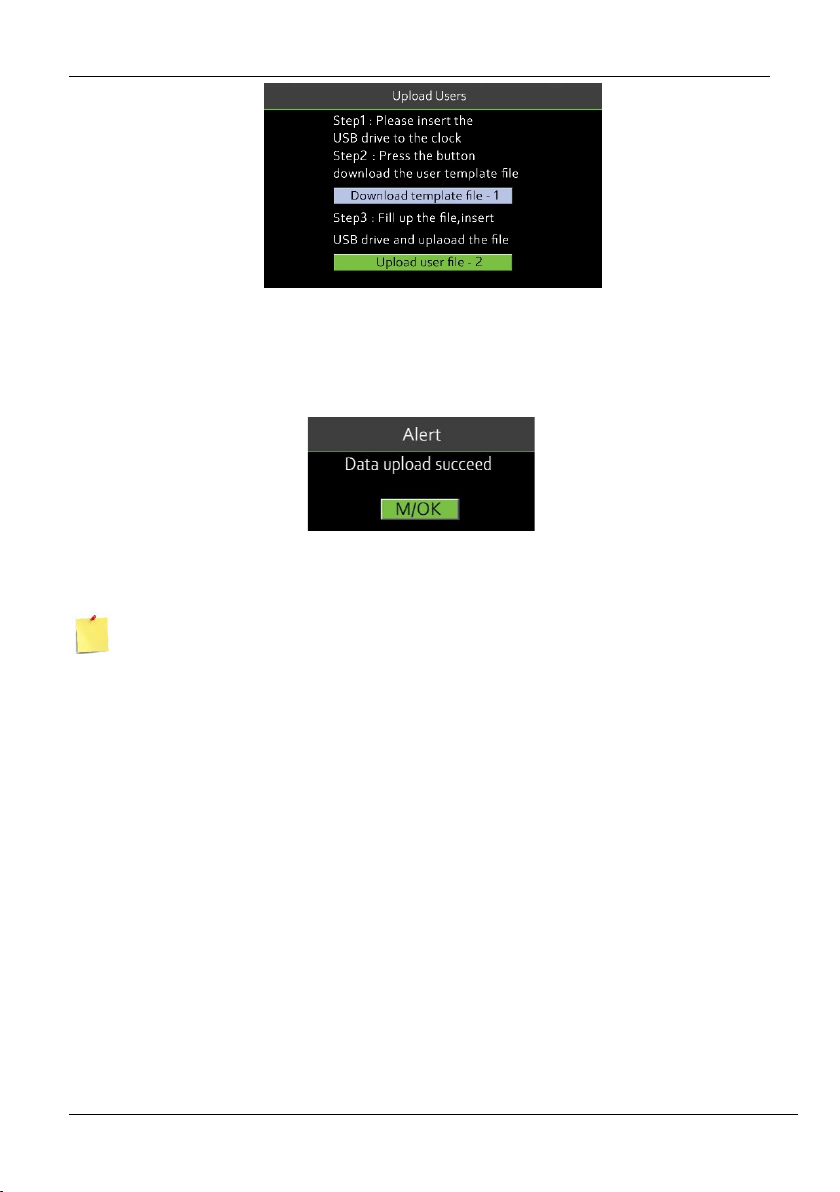
• Go to [Users] and navigate to [Upload Users].
• Navigate to [Upload User File -2] and press <M/OK>.
D and W Series NGTeco Time Clock User Manual
Page | 34 Copyright©2021 NGTeco. All rights reserved.
Figure 5-19: Upload template
• After uploading, the success message will be displayed as shown below:
Figure 5-20: Success message after uploading the template
If any existing User ID is the same as the uploaded User ID, then the existing user details will
be replaced by the newly uploaded user details.
5.3.2 Download User Data from Clock to USB Drive
If you need to download all the user details, perform the following steps:
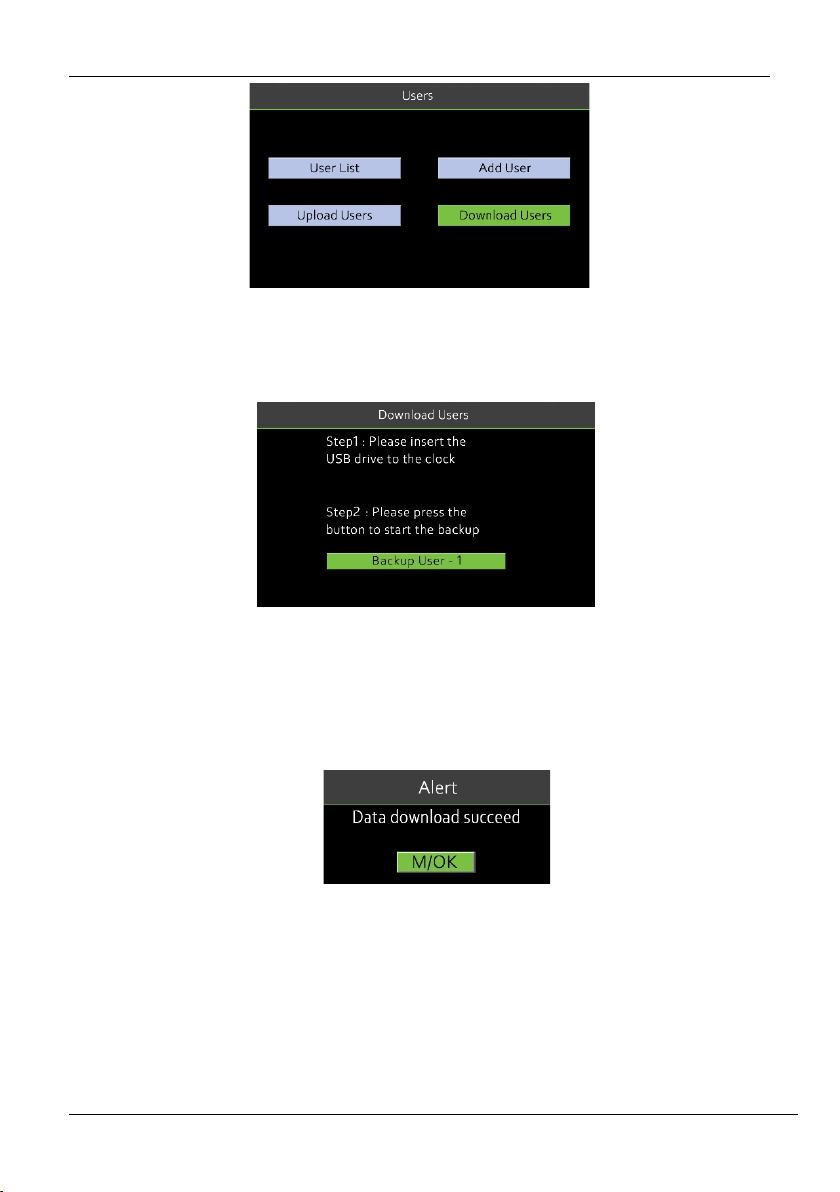
• Go to [Users] and navigate to [Download Users].
D and W Series NGTeco Time Clock User Manual
Page | 35 Copyright©2021 NGTeco. All rights reserved.
Figure 5-21: Download user data -1
• Insert a USB Drive into the clock.
Figure 5-22: Download user data - 2
• Navigate to [Backup User -1] and press <M/OK>.
• The success message after downloading the user data will be displayed as shown below:
Figure 5-23: Success message after downloading user data
• Insert the USB drive to your PC and the file will be downloaded in the name of
“ecuser.txt”.
D and W Series NGTeco Time Clock User Manual
Page | 36 Copyright©2021 NGTeco. All rights reserved.
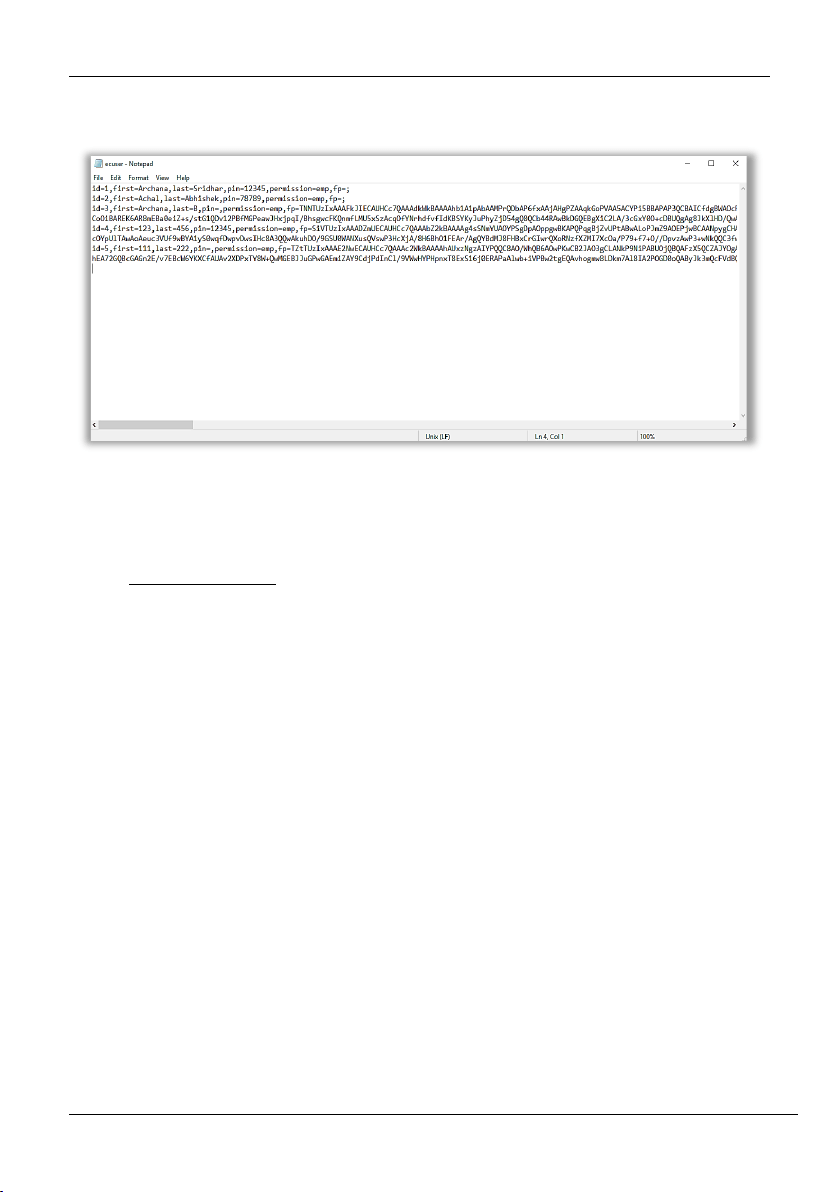
• The downloaded file will be displayed as shown below:
Figure 5-24: Downloaded file
6 Pay Period
A pay period is a length of time over which the user’s attendance time is recorded and paid. It
is a recurring time schedule that determines how often the users will be paid. The pay period
ensures that the users will be paid regularly for their work. It also simplifies the reporting
requirements for employer liabilities.
The types of pay periods adopted in this time clock are:
• Weekly Pay Period
• Bi-weekly Pay Period
• Semi-monthly Pay Period
• Monthly Pay Period
6.1 Weekly Pay Period
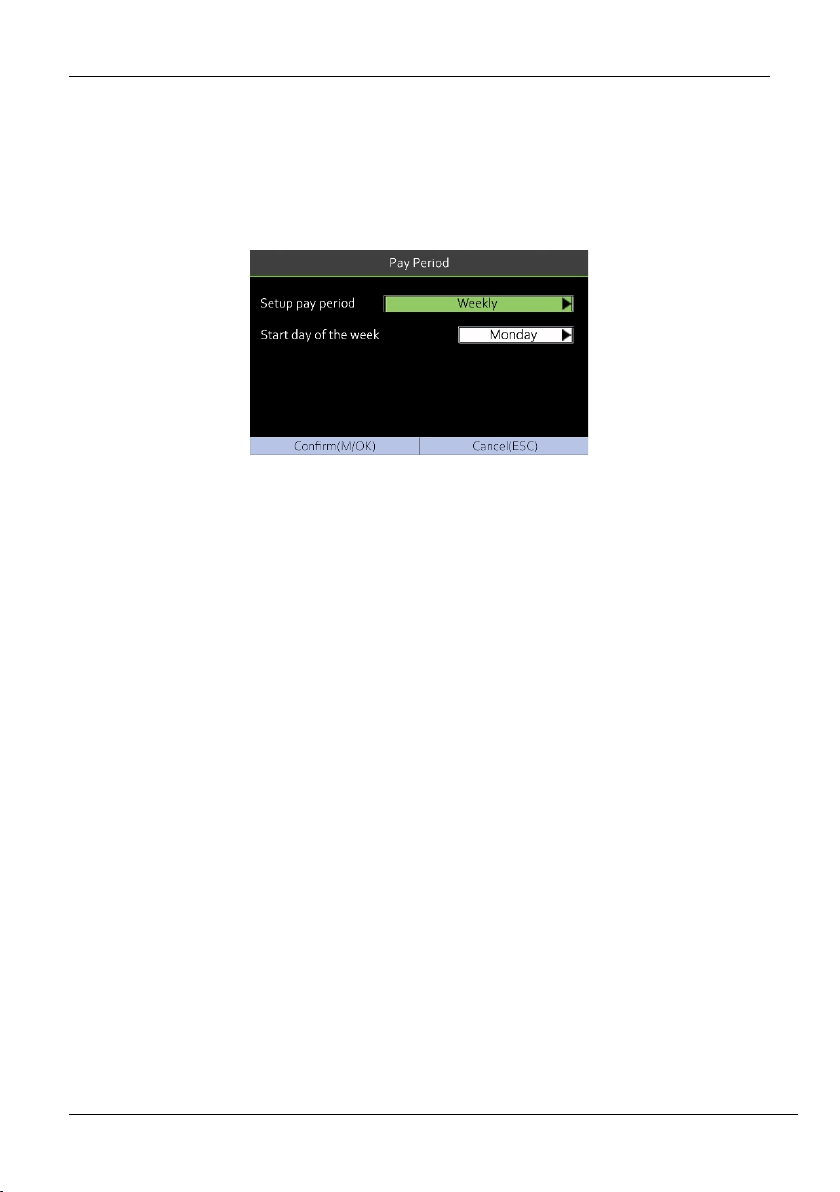
A weekly pay period consists of 52 pay periods in a year, one week of each. The payroll is
scheduled to run on the same day every week.
D and W Series NGTeco Time Clock User Manual
Page | 37 Copyright©2021 NGTeco. All rights reserved.
Perform the following steps to set the Weekly Pay Period:
1. Go to [Pay Period].
2. Press <
> to view the available pay period options.
3. Select [Weekly Pay Period].
Figure 6-1: Weekly Pay period
4. Then press <
> to navigate and set the starting day of the week.
5. Then navigate to [Confirm] and press <M/OK>.
6.2 Bi-weekly Pay Period
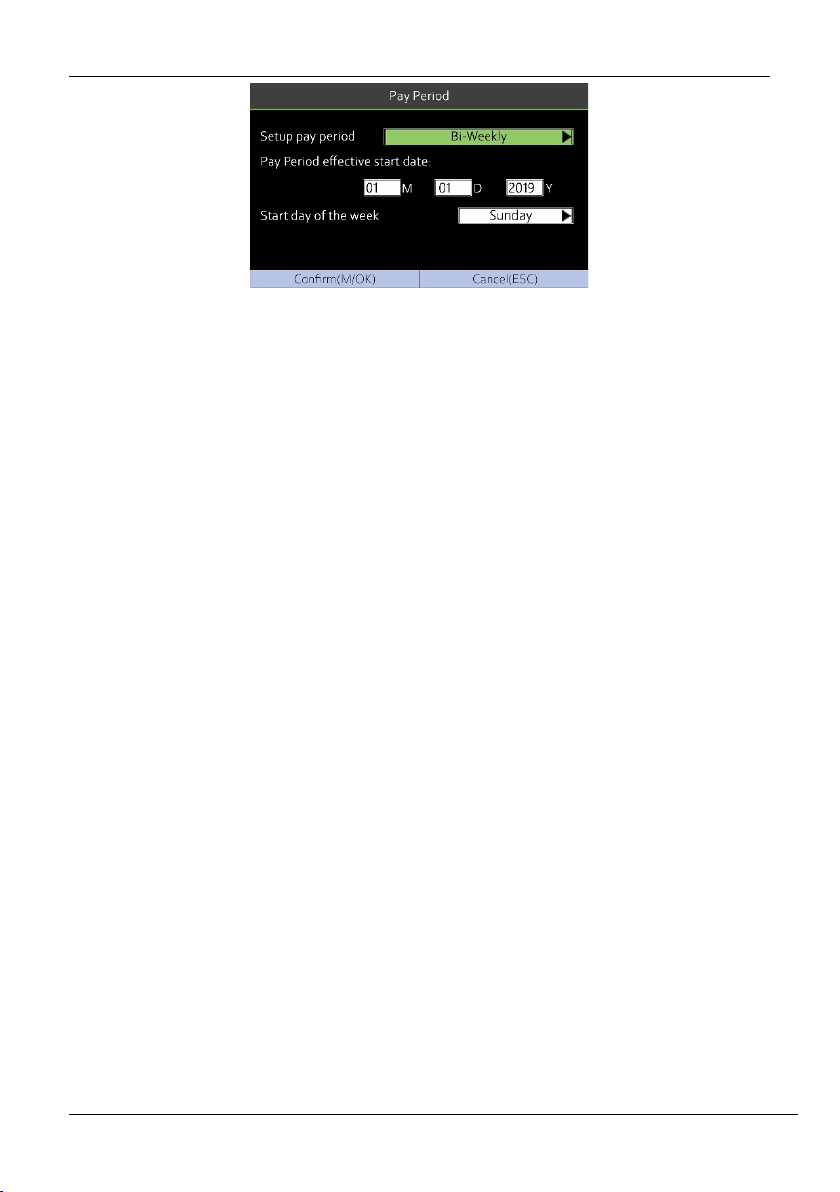
A bi-weekly pay period consists of 26 pay periods in a year (2 weeks or 14 days). Like the weekly
pay period, a bi-weekly pay period also starts on the known day of a week.
Perform the following steps to set the Bi-Weekly Pay Period:
1. Go to [Pay Period].
2. Press <
> to view the available pay period options.
3. Select [Bi-Weekly Pay Period].
D and W Series NGTeco Time Clock User Manual
Page | 38 Copyright©2021 NGTeco. All rights reserved.
Figure 6-2: Bi-Weekly Pay period
4. Then press <
> to navigate and set the effective starting date of the pay period.
5. Press <> to select the start day of the week.
6. Then navigate to [Confirm] and press <M/OK>.
6.3 Semi-monthly Pay Period
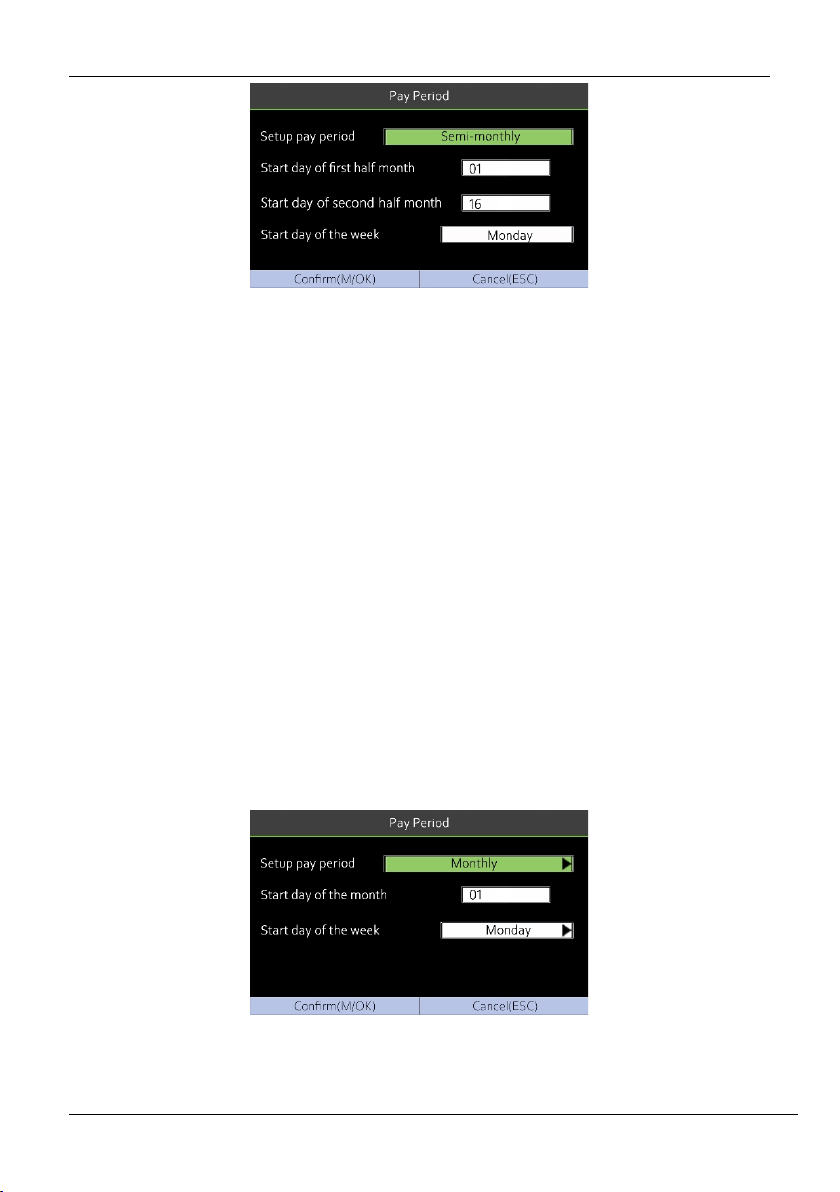
A semi-monthly pay period consists of 24 pay periods in a year. Each month will have exactly
2 pay periods. By default, the first pay period runs from the 1
st
-15
th
date of the month and the
second pay period runs from 16
th
to the last date of the month. (Note: The start day of Semi-
month may vary for each company)
Perform the following steps to set the Semi-Monthly Pay Period:
1. Go to [Pay Period].
2. Press <
> to view the available pay period options.
3. Select [Semi-Monthly Pay Period].
D and W Series NGTeco Time Clock User Manual
Page | 39 Copyright©2021 NGTeco. All rights reserved.
Figure 6-3: Semi-monthly Pay period
4. Then, press <
> to navigate and set the start day of the first and second half of the
month.
5. Then, press <
> to navigate and set the start day of the week.
6. Navigate to [Confirm] and press <M/OK>.
6.4 Monthly Pay Period
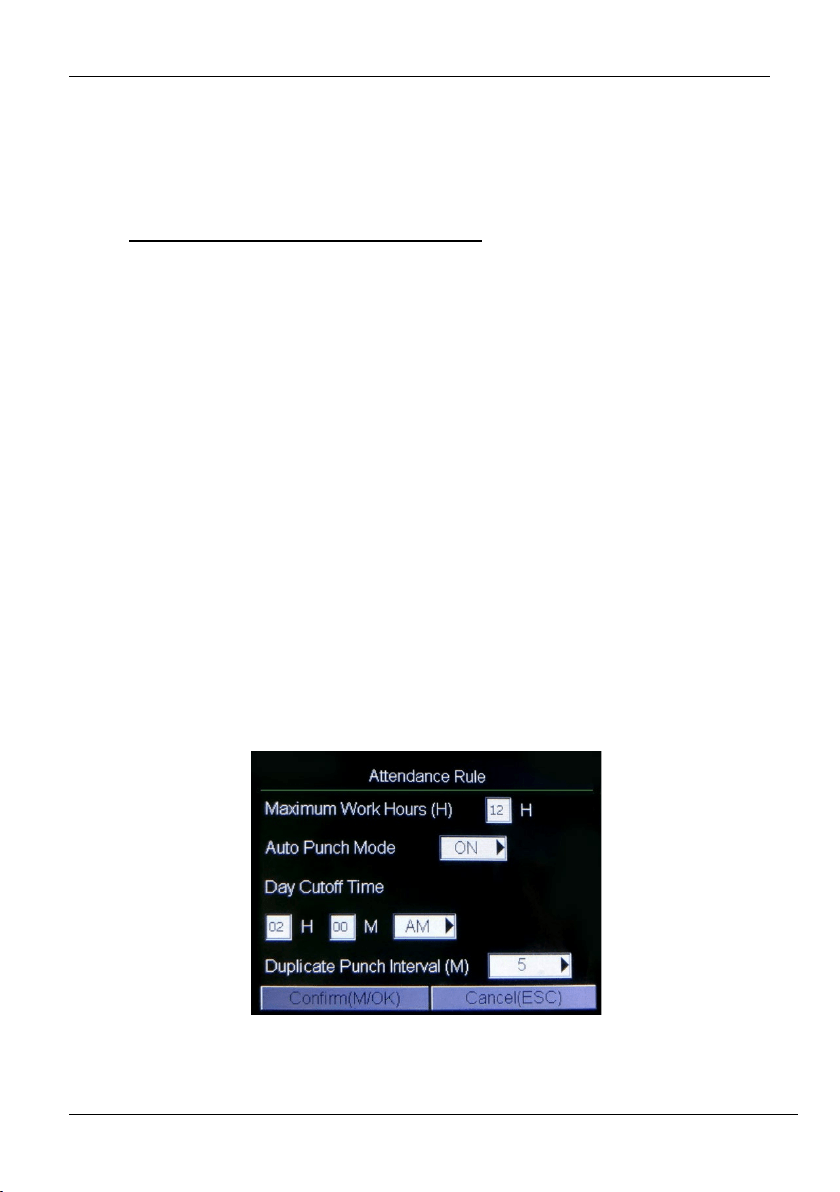
The payroll runs on the same date of every month.
Perform the following steps to set the Monthly Pay Period:
1. Go to [Pay Period].
2. Press <
> to view the available pay period options.
3. Select [Monthly Pay Period].
Figure 6-4: Monthly Pay period
D and W Series NGTeco Time Clock User Manual
Page | 40 Copyright©2021 NGTeco. All rights reserved.
4. Then, press <> to navigate and set the start day of the month.
5. Then, press <
> to navigate and set the start day of the week.
6. Navigate to [Confirm] and press <M/OK>.
7 Attendance Management
The NGTeco Time Clock automates and provides a simple way to record the attendance of
users with Fingerprint/Password verification. It also assists the employer to track the user’s
attendance analytics such as work hours, absenteeism, missing attendance punches, etc. This
automated clock greatly reduces the computational errors and transcriptional errors thus
facilitating hassle-free attendance calculation
.
7.1 Attendance Rules
Attendance Rules are a predefined set of specifications framed to maintain clear and
consistent attendance management of the users.
The procedure to set the attendance rules is given below:
1. Go to [Rule].
2. The interface to set the attendance rules will be displayed as shown below:
Figure 7-1: Attendance Rule

D and W Series NGTeco Time Clock User Manual
Page | 41 Copyright©2021 NGTeco. All rights reserved.
3. Enter the following details:
Maximum Work Hours: Set the maximum number of working hours in a day. When the time
difference between two attendance punches (check-in and check-out) exceeds this maximum
work hour, then the attendance will be calculated separately for that day. Then you can
identify that there are missing attendance punches between the actual punches made by the
users. The default value is 12 hours.
Auto Punch Mode: When this feature is enabled, the punch state will not be displayed on the
home screen and the punch state will be updated automatically based on the previous punch
state of the user. For example, if the user’s first punch state is Check-in, then the next punch
state is Check-out. This feature is enabled by default.
Note: When the time exceeds the Day Cutoff Time, the punch state will be reset to Check-in.
If the Auto Punch Mode is turned off, the user needs to select the punch state manually and
the punch state will be displayed on the home screen. Press the ☉/< button to change the
punch state to IN, and the <M/OK> button to change the punch state to OUT. The punch state
is Check-in by default and if the user presses the <M/OK> button the state will change to
Check-out for five seconds. Then, the state will be auto-changed to Check-in.
Day Cutoff Time: Set the time on which the day is changed to the next day on the clock.
Example: Consider the day change time is set to 2:00 AM. If the users start to work before 2:00
AM, then the total worked hours until check-out will be added to the previous day. If the users
start to work after 2:00 AM, then the total worked hours until check-out will be added to the
next day.
Duplicate Punch Interval: The Duplicate Punch interval defines the time duration in which
the clock considers only the first attendance punch, even if you make many attendance
punches within the defined period. The unit is minutes.
D and W Series NGTeco Time Clock User Manual
Page | 42 Copyright©2021 NGTeco. All rights reserved.
Example: Assume that the duplicate punch period is 5 minutes. If you make several check-in
attendance punches within 5 minutes, the clock considers only the first punch time and
ignores the rest of the attendance punches.
4. Navigate to [Confirm] and press <M/OK>.
7.2 Attendance Tracking
You can track and monitor the user’s attendance to ensure productivity and workflow during
working hours.
7.2.1 Every Day’s Attendance
The clock is equipped with a provision to view the daily attendance of users. The steps to view
the daily attendance is given below:
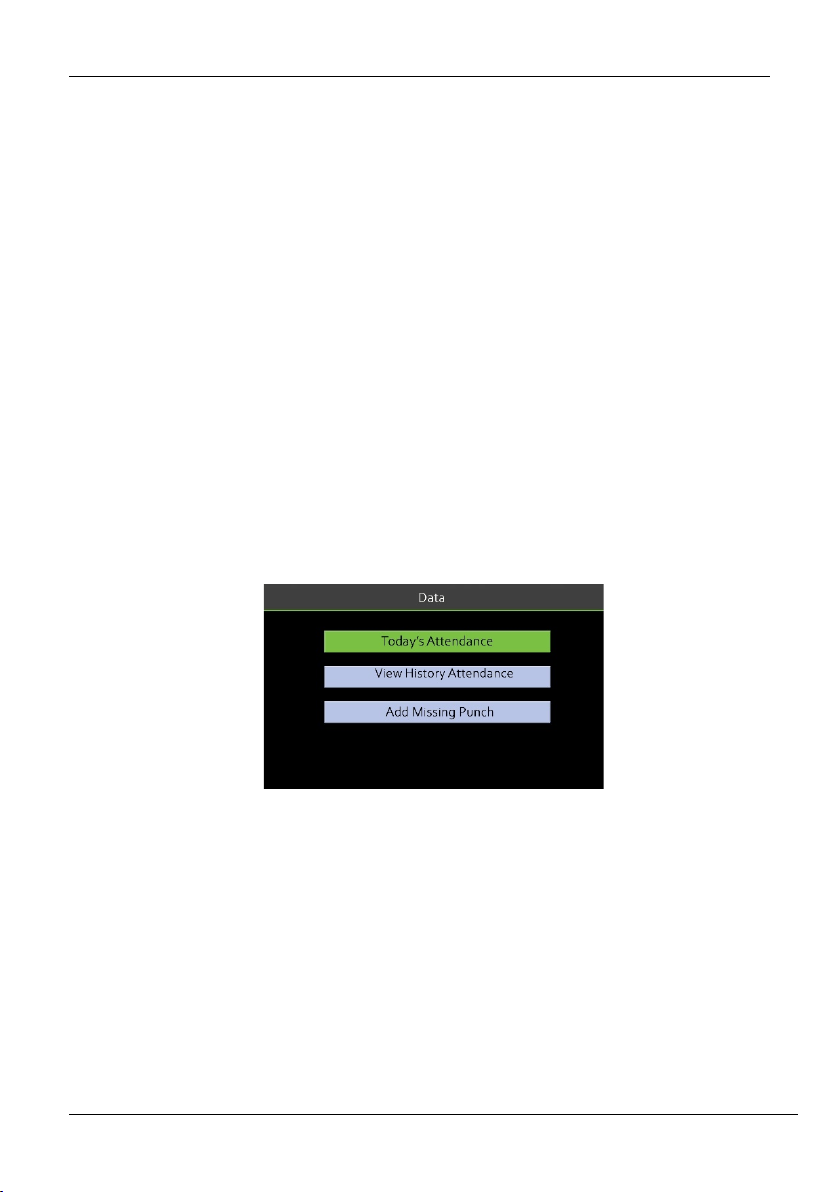
1. Go to [Time Data] and then [Today’s Attendance].
Figure 7-2: Today's Attendance
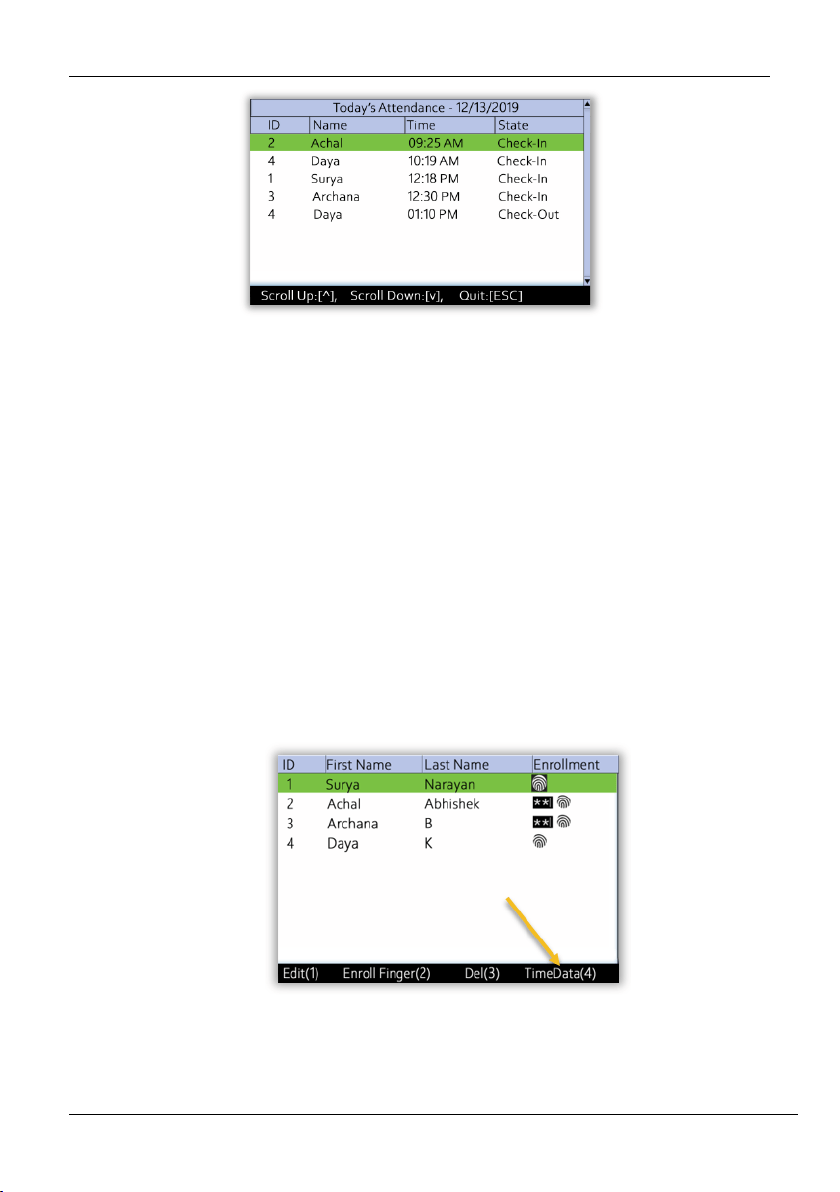
2. The attendance details of the day will be displayed as shown below:
D and W Series NGTeco Time Clock User Manual
Page | 43 Copyright©2021 NGTeco. All rights reserved.
Figure 7-3: Attendance Details
3. The columns are described as follows:
• ID: Displays the User ID of the users.
• Name: Displays the Name of the users.
• Time: Displays the time when the attendance punch is made.
• State: Displays the state of the attendance punch(check-in/check-out)
You can also check the Users Attendance through the [Users] menu. Go to [Users] and
perform the steps as below:
• If you need to view the attendance details of the particular users, navigate to the
corresponding user and press <4>.
Figure 7-4: Time Data
D and W Series NGTeco Time Clock User Manual
Page | 44 Copyright©2021 NGTeco. All rights reserved.
• The attendance record of the users for that specific pay period will be displayed as
shown below:
Figure 7-5: Attendance of a user
• Navigate to the required date and press <M/OK>. The attendance status will be
displayed as shown below:
Figure 7-6: Attendance in a Day
7.2.2 Attendance of Individual Users
The clock has a provision to track the attendance of individual users to ensure all users are
fulfilling their obligations. It also helps the Management to identify the potential attendance
issues. The steps to track the attendance of individual users are given below:
D and W Series NGTeco Time Clock User Manual
Page | 45 Copyright©2021 NGTeco. All rights reserved.
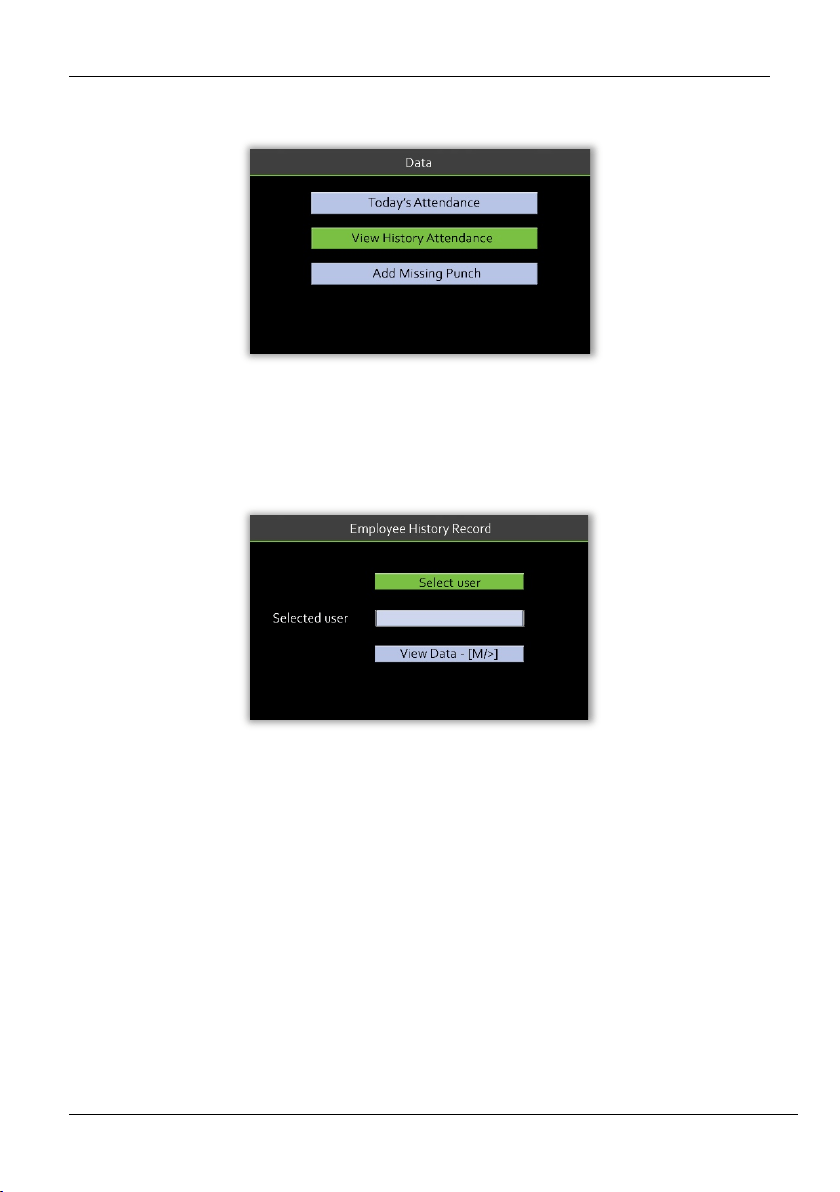
1. Go to [Time Data] and then [View History Attendance].
Figure 7-7: Attendance History
2. The interface to select users will be displayed as shown below:
Figure 7-8: Selecting a User
3. To select a user, select [Select user] and press <M/OK>.
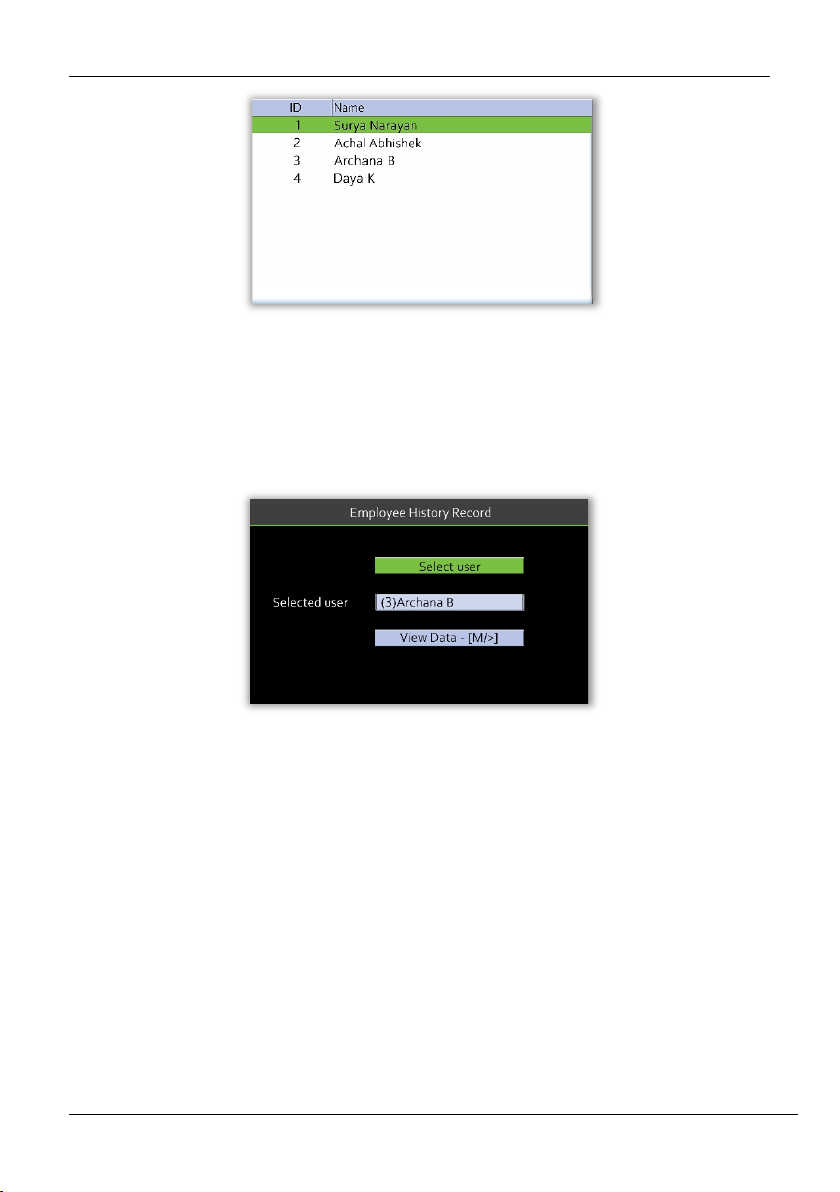
4. The list of users will be displayed as shown below:
D and W Series NGTeco Time Clock User Manual
Page | 46 Copyright©2021 NGTeco. All rights reserved.
Figure 7-9: Users List
5. Navigate to the required users and press <M/OK>.
6. The selected users will be displayed as shown below:
Figure 7-10: Selected users to view Attendance
7. Navigate to [View Data] and press <M/OK>.
8. The attendance of the selected users will be displayed as shown below:
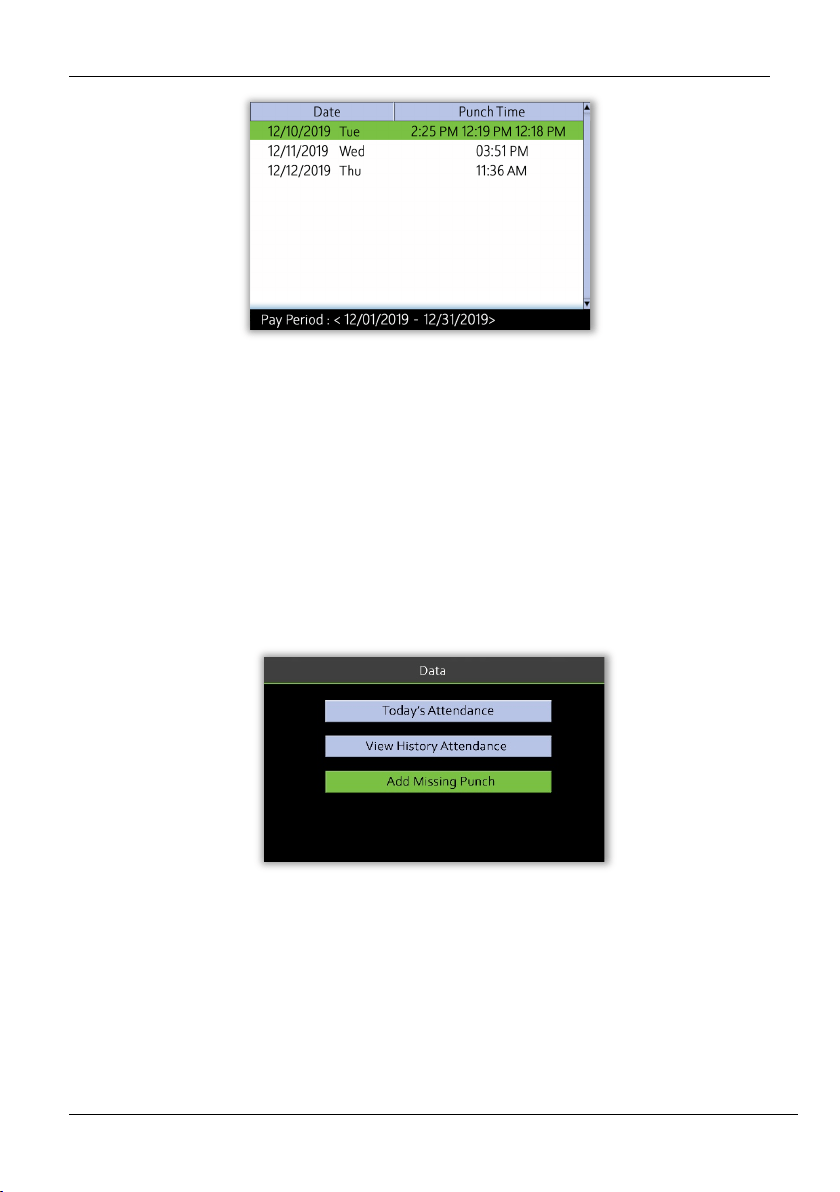
D and W Series NGTeco Time Clock User Manual
Page | 47 Copyright©2021 NGTeco. All rights reserved.
Figure 7-11: Attendance Details of the selected users
7.2.3 Add Missing Attendance Punch
Note: Press the OUT button before punching out to avoid missing punch out on that day.
When a user forgets to punch for check-in/check-out, the attendance details can be logged in
manually. The steps to add manual logs is given below:
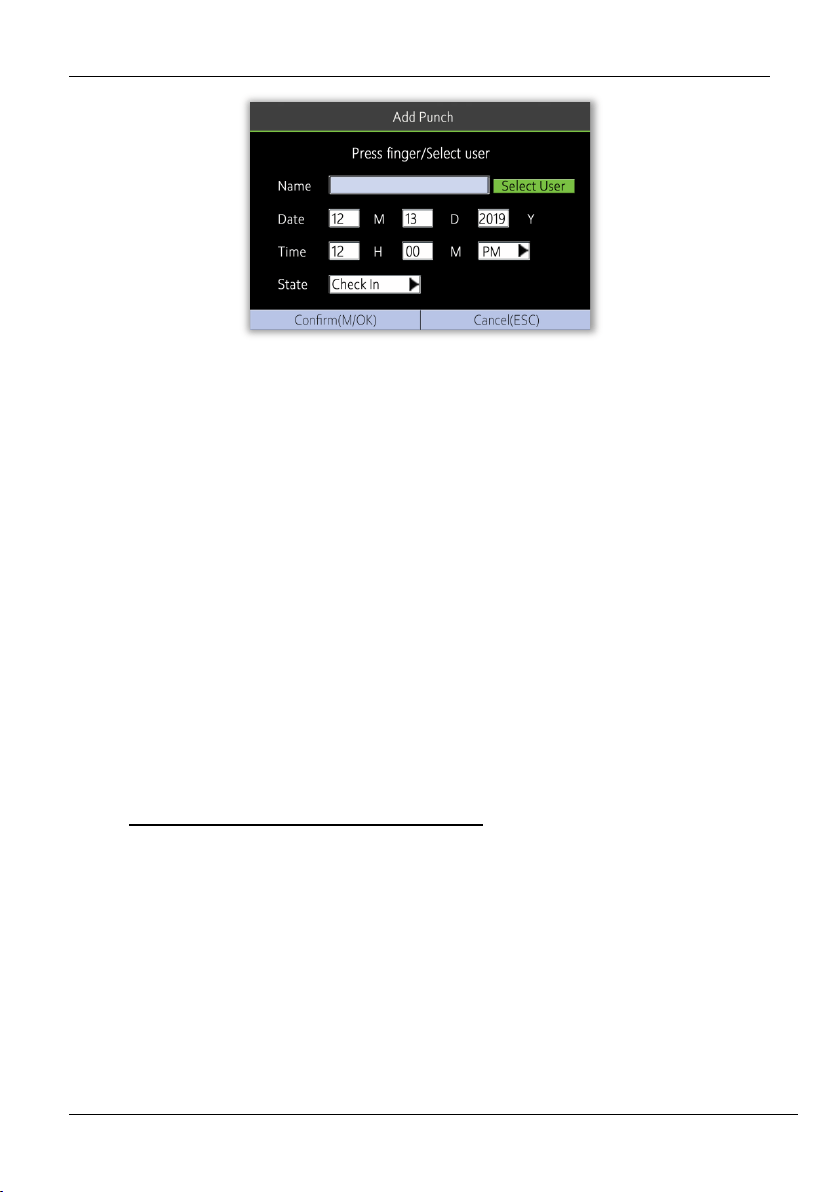
1. Go to [Time Data] and then [Add Missing Punch].
Figure 7-12: Add missing punches
2. The interface to add the missing punches will be displayed as shown below:
D and W Series NGTeco Time Clock User Manual
Page | 48 Copyright©2021 NGTeco. All rights reserved.
Figure 7-13: Missing Punch details
3. Initially, you must select the users to whom you must add the missing punches. This can
be done in two ways:
• Navigate to [Select User] and press <M/OK>. (or)
• Press the fingerprint of the respective users.
4. Date: Enter the date on which you must add the missing attendance punch by
navigating to Month, Date, and Year text boxes by pressing <>key.
5. Time: Enter the Time by navigating to Hour and Minute text boxes by pressing <>
key. If the time format is 12-hours, then select [AM/PM] by pressing <
> key.
6. Select the attendance state as Check-in/Check-out by pressing <
> key.
7. Navigate to [Confirm] and press <M/OK>.
8 Time-Attendance Reports
You can generate statistical reports that display the attendance details of the users in the
specified pay period. The difficulty of maintaining the user’s time and attendance is lessened
with this simple reporting system. The data generated from these attendance reports assist
with efficient management of user's resources and report accuracy.
D and W Series NGTeco Time Clock User Manual
Page | 49 Copyright©2021 NGTeco. All rights reserved.
8.1 Report Parameters
The procedure to set the report parameters is given below:
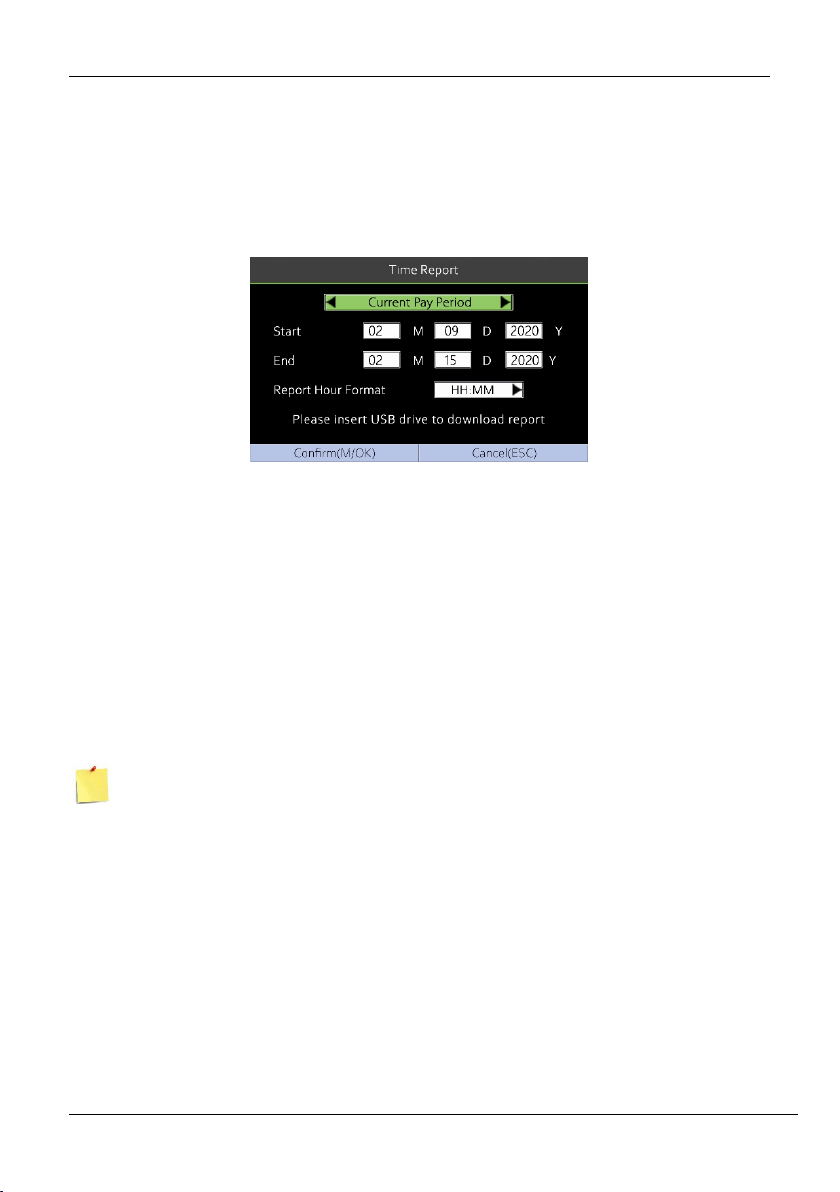
• Go to [Time Report]. The interface to generate reports will be displayed as shown below:
Figure 8-1: Time Report
• The available pay period options are the Current Pay period and Custom Pay period.
You can also select the date range of the pay period which is currently being used. In the
Custom Pay period, you can define the date range within 31 days.
• Select the required pay period by pressing <
> or <
> key.
• Then navigate to [Start] and enter the Month, Date, and Year by pressing <> key.
• Similarly, navigate to [End] and enter the Month, Date, and Year by pressing <
> key.
The Start and End dates are predefined based on the selected pay periods except for the
Custom Pay period.
• Navigate to [Report Hour Format] and set the unit to calculate the time. It can be HH:
MM/Decimal.
8.2 Download Reports
• Insert a USB drive to download the report.
• Navigate to [Confirm] and press <M/OK>.
D and W Series NGTeco Time Clock User Manual
Page | 50 Copyright©2021 NGTeco. All rights reserved.
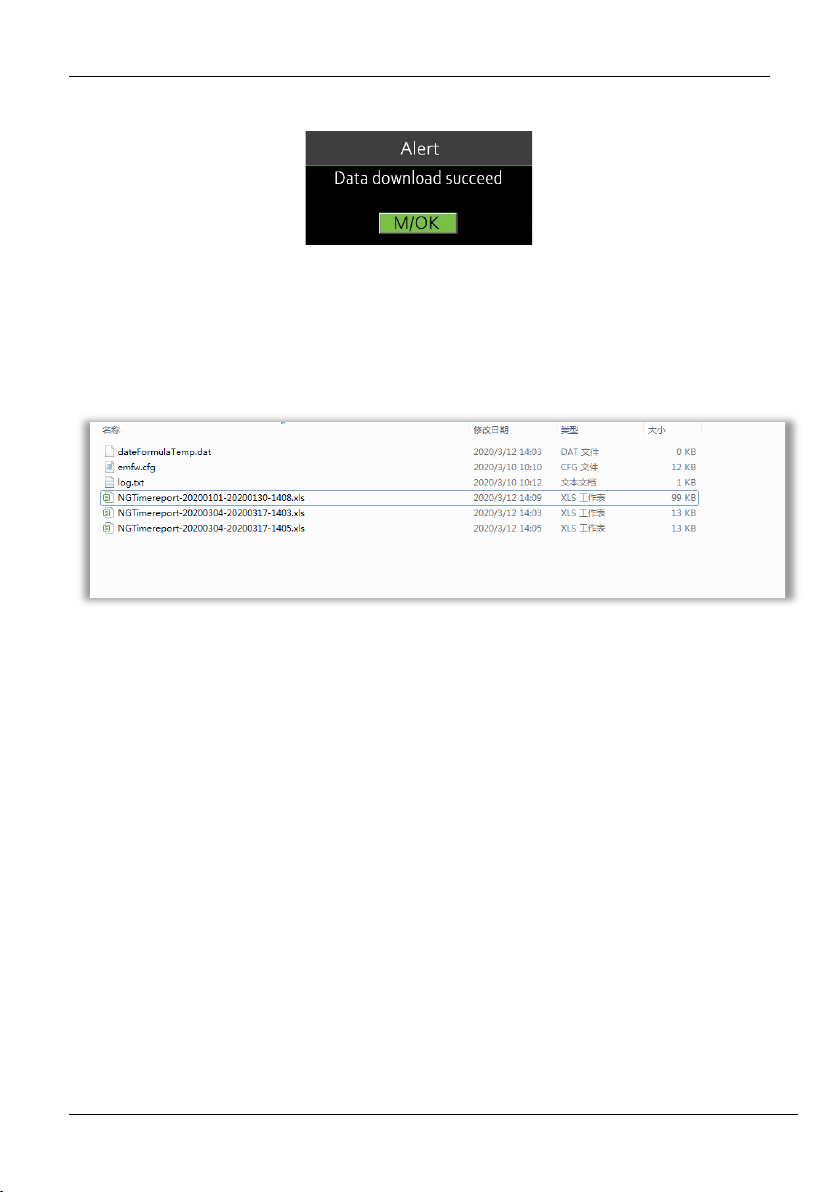
• After downloading the report, the success message will be displayed as shown below:
Figure 8-2: Success Message after generating time report
• Now insert the USB drive into your PC to view the reports.
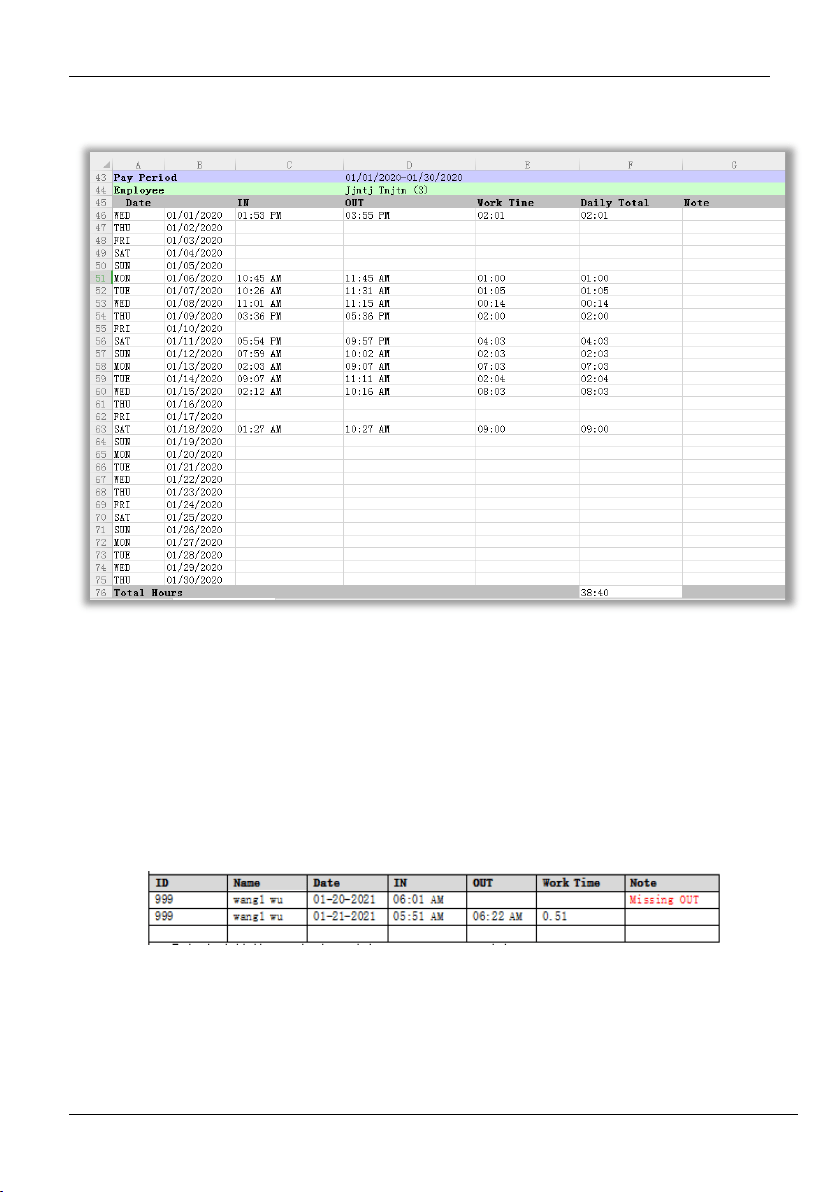
• The report will be downloaded by the name of date and time as shown below:
Figure 8-3: Downloaded Attendance Report
D and W Series NGTeco Time Clock User Manual
Page | 51 Copyright©2021 NGTeco. All rights reserved.
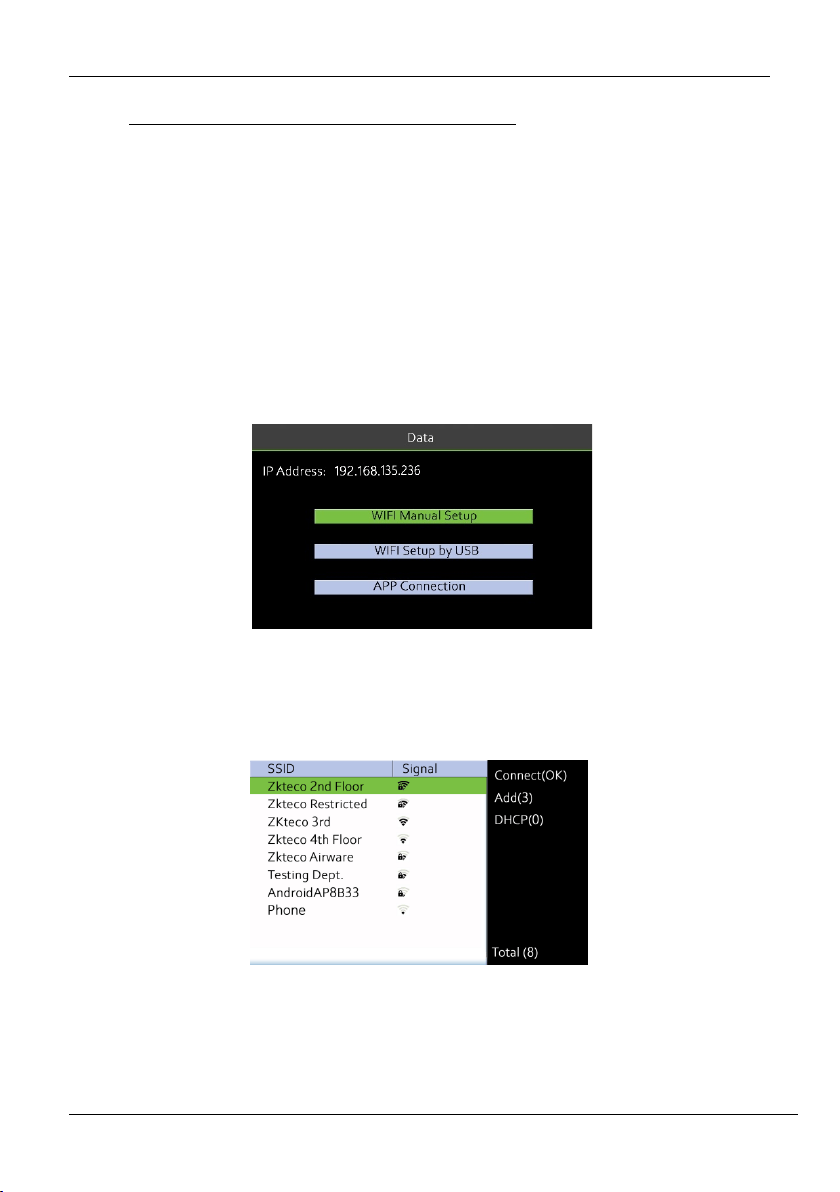
• The report will be displayed as shown below:
Figure 8-4: Detailed Attendance Report
• The report consists of the specific Pay period, Name of the employee, Date-wise check-
in and check-out time, actual work time, and total worked time.
• The report uses the nearest rule calculation. For example, if the punch states are IN, IN,
and OUT for the same user, the device will match the second IN and OUT and the report
displays Missing OUT for the first IN.
• If the time interval between the IN and OUT states is more than the maximum work
hours, then the report will show Missing IN and Missing OUT.
D and W Series NGTeco Time Clock User Manual
Page | 52 Copyright©2021 NGTeco. All rights reserved.
9 Communication Parameters
You can set the communication parameters to connect the clock with Wi-Fi.
9.1 Manual Wi-Fi Configuration
9.1.1 Connection to an Existing Wi-Fi
The steps to connect to Wi-Fi is given below:
1. Go to [Comm.] then [Wi-Fi manual setup].
Figure 9-1: Manual Wi-Fi connection
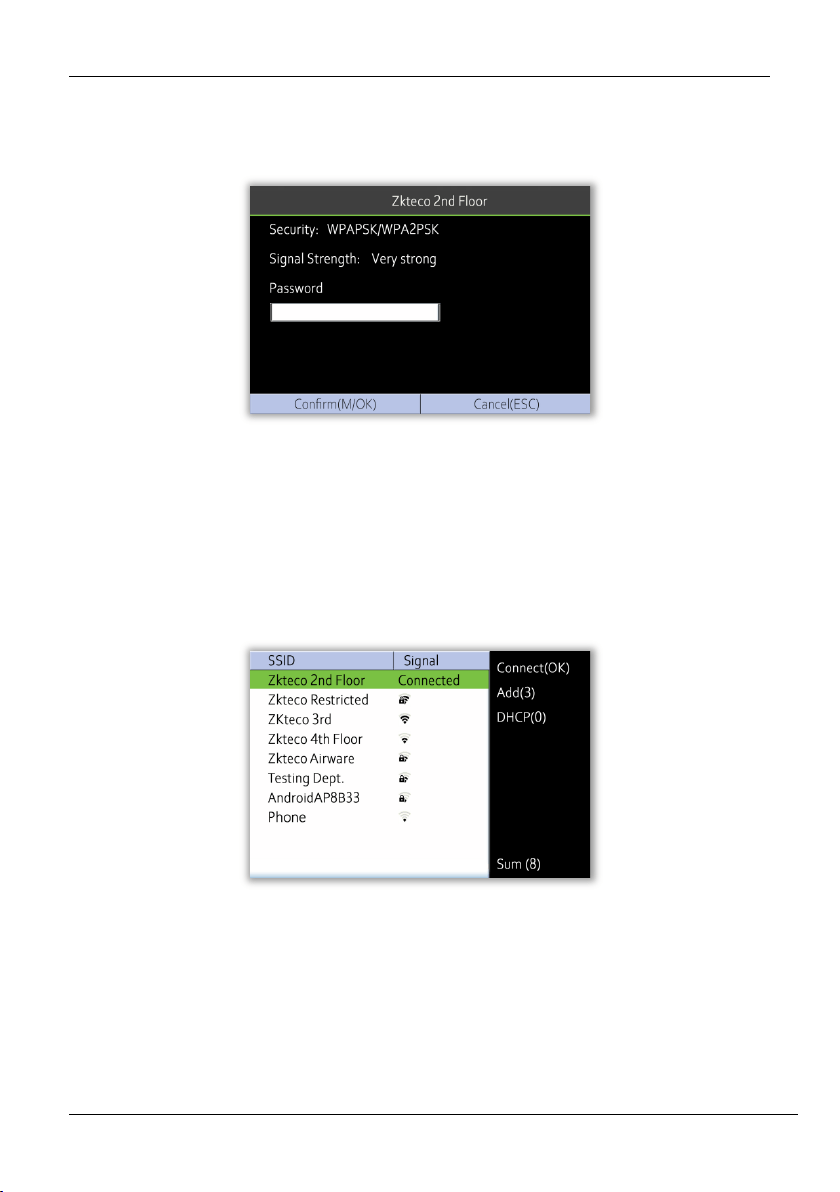
2. The list of available Wi-Fi connections will be displayed as shown below:
Figure 9-2: Available Wi-Fi networks
3. Navigate to the required Wi-Fi connection and press <M/OK>.
D and W Series NGTeco Time Clock User Manual
Page | 53 Copyright©2021 NGTeco. All rights reserved.
4. The interface to connect Wi-Fi will be displayed as shown below. If the signal strength is
weak, the device may fail to connect.
Figure 9-3: Wi-Fi Connection interface
5. Navigate to [Password] and enter the password to connect.
6. Then navigate to [Confirm] and press <M/OK>.
7. Once connected, the connectivity status will be displayed as shown below:
Figure 9-4: Connected Wi-Fi
9.1.2 New Wi-Fi Connection
To add a new Wi-Fi connection, perform the following steps:
1. Go to [Comm.] then [Wi-Fi Manual Setup].
D and W Series NGTeco Time Clock User Manual
Page | 54 Copyright©2021 NGTeco. All rights reserved.
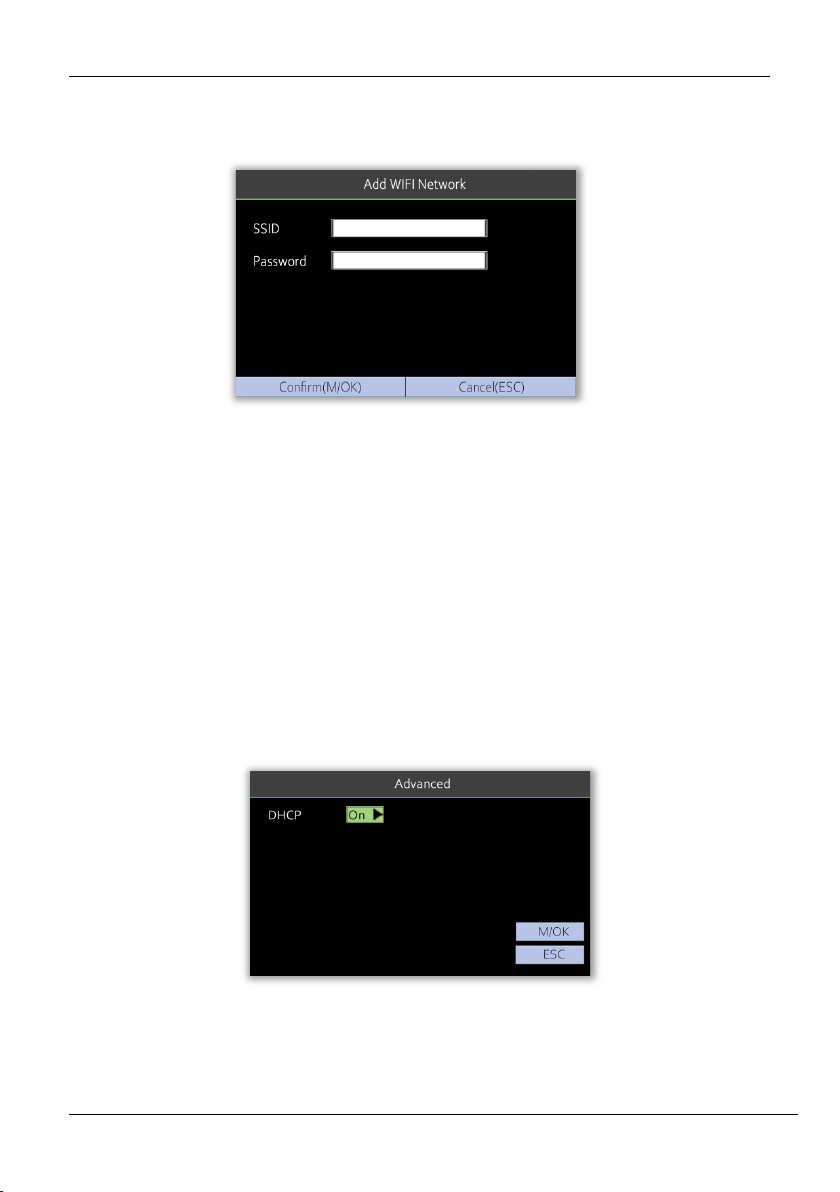
2. Press <3> to add a new connection. The interface to add a new connection will be
displayed as shown below:
Figure 9-5: SSID and Password
3. Enter the [SSID] and [Password].
4. Navigate to [Confirm] and press <M/OK>.
9.1.3 Enable/Disable DHCP
To enable/disable DHCP, perform the following steps:
1. Go to [Comm.] then [Wi-Fi Setting].
2. Press <0> to view the DHCP settings.
3. By default, DHCP will be on.
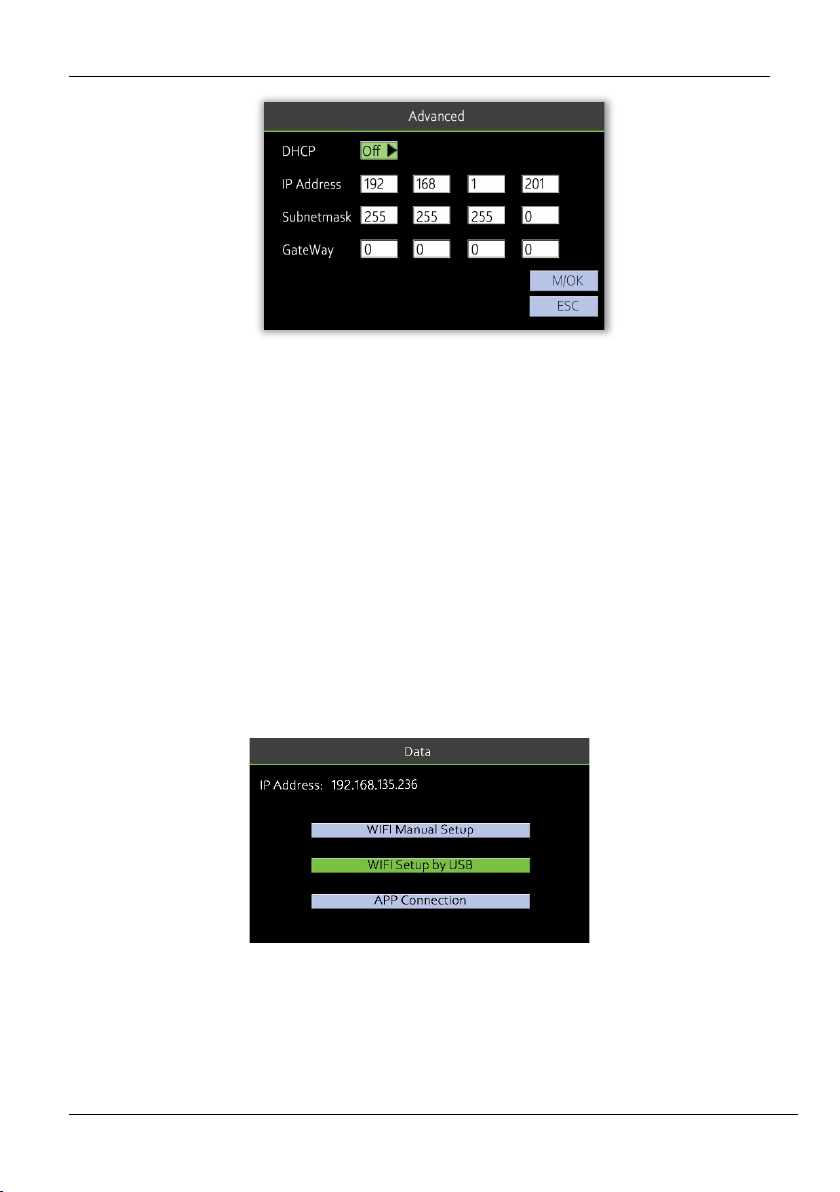
Figure 9-6: DHCP Interface
4. If you disable DHCP, you must manually set the IP Address, Subnet mask, and Gateway
by pressing <>. The interface is shown below:
D and W Series NGTeco Time Clock User Manual
Page | 55 Copyright©2021 NGTeco. All rights reserved.
Figure 9-7 DHCP Connectivity
5. Then navigate to <M/OK>.and press <M/OK>.
9.2 Wi-Fi Configuration through USB
You can also configure Wi-Fi through the Wi-Fi configuration template uploaded from a USB
disk.
To configure Wi-Fi through a USB disk, perform the following steps:
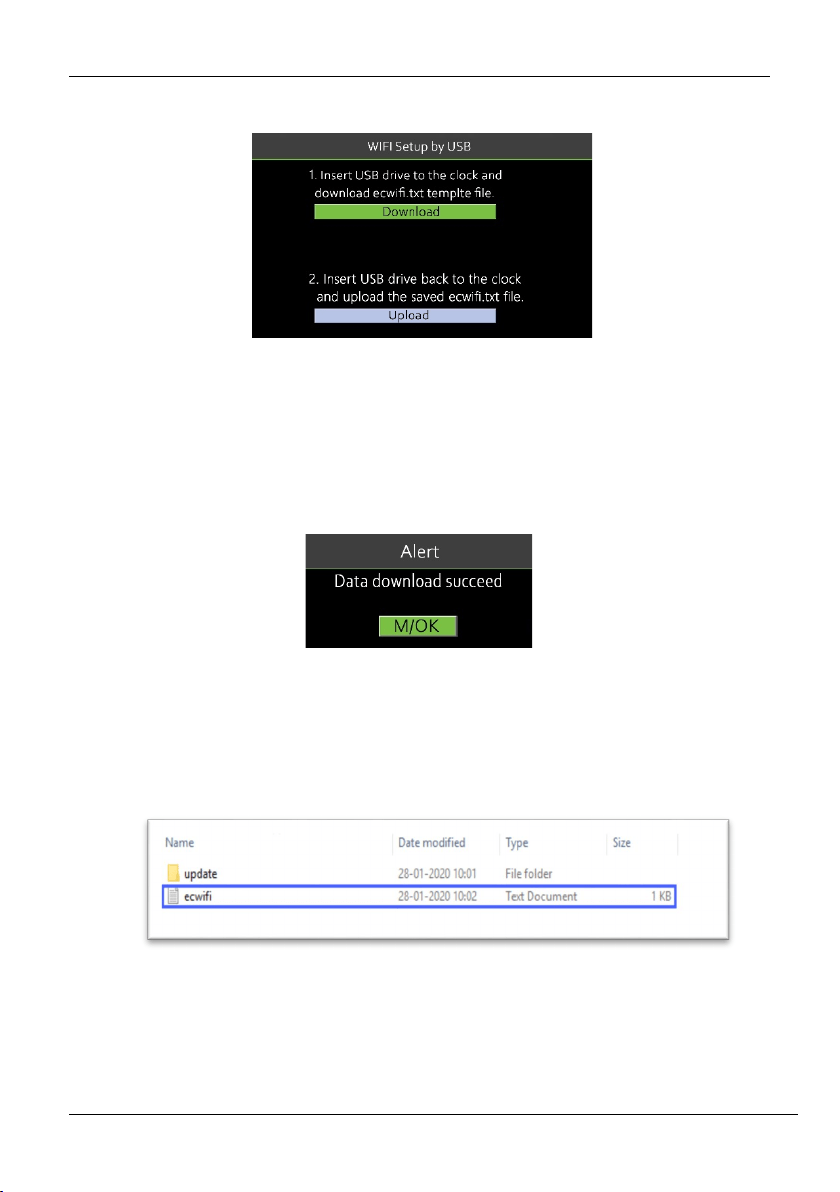
1. Go to [Comm.] then [Wi-Fi Setup by USB].
Figure 9-8: Wi-Fi setup by USB
D and W Series NGTeco Time Clock User Manual
Page | 56 Copyright©2021 NGTeco. All rights reserved.
2. The interface to download the template will be displayed as shown below:
Figure 9-9: Wi-Fi setup template Download
3. Insert a USB drive into the clock.
4. Navigate to [Download] and press <M/OK>.
5. After downloading the template, a success message will be displayed as shown below:
Figure 9-10: Success message after download
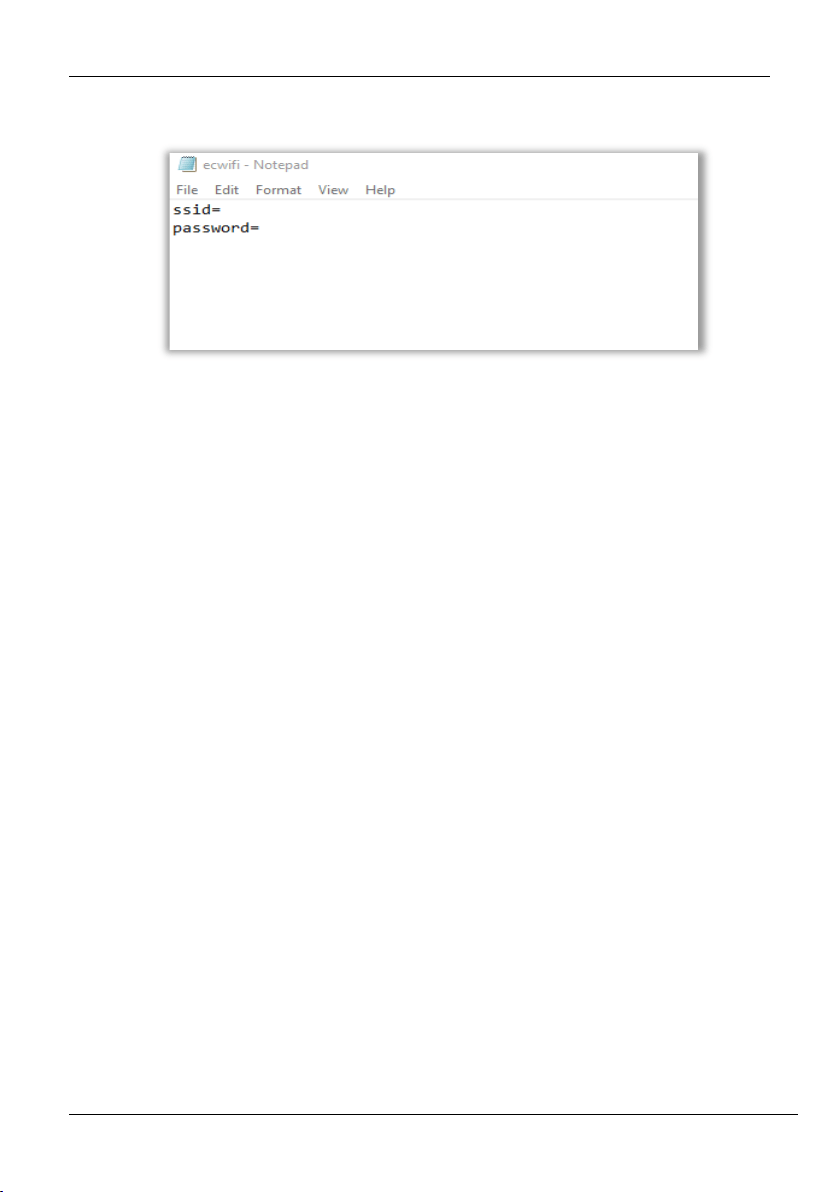
6. Now, insert the USB drive into your PC. The Wi-Fi configuration file will be downloaded
as shown below:
Figure 9-11: Downloaded template
D and W Series NGTeco Time Clock User Manual
Page | 57 Copyright©2021 NGTeco. All rights reserved.
7. Modify the template file by entering the SSID and Password.
Figure 9-12: Connectivity Interface
8. Save the file and again insert the USB drive to the clock.
9. Go to [Comm.] then [Configure Wi-Fi through USB].
10. Then select [Upload].
11. The clock will be connected to the configured Wi-Fi with the uploaded SSID and
Password.
9.3 App Connection
The App Connection interface allows you to connect the “NGTeco Time” mobile app with the
time clock. Once connected, you can perform user management, report management, etc. on
the mobile app.
• Connect the mobile and time clock to the same Wi-Fi network.
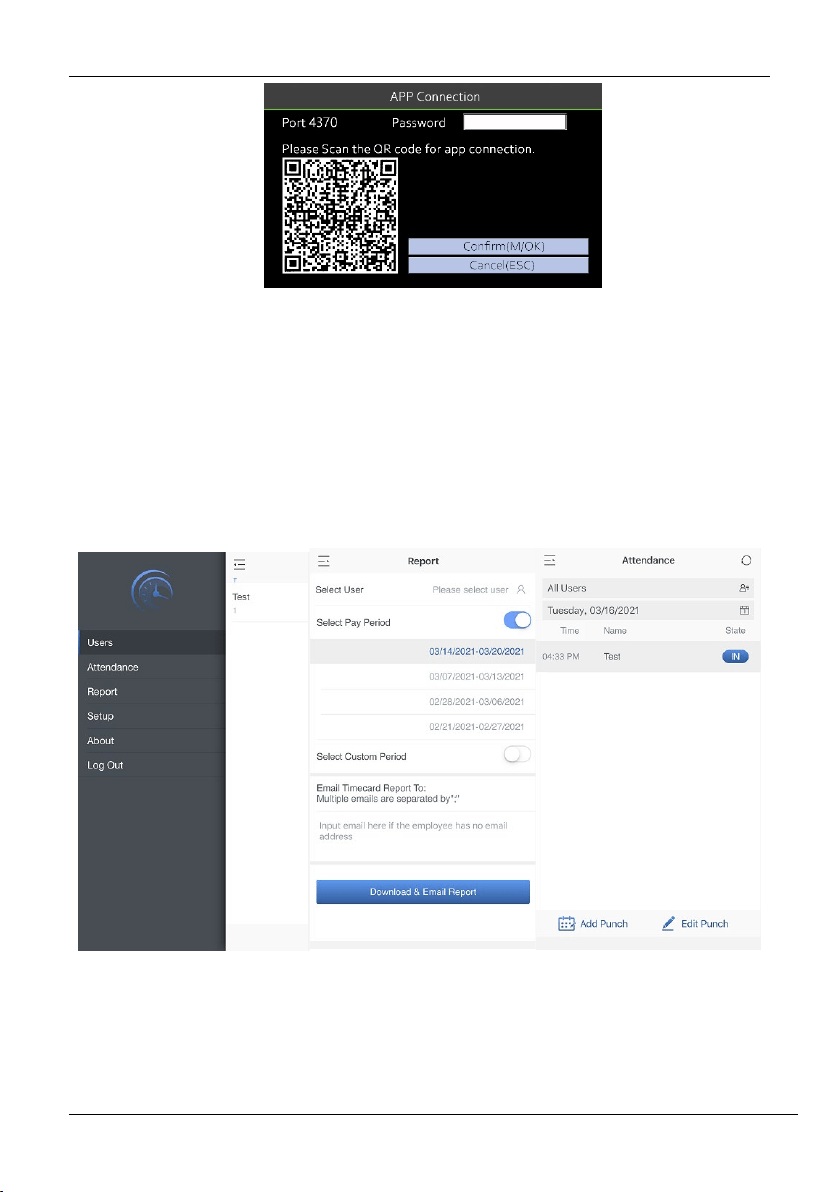
• Go to [Comm.] and then [App Connection] to view the QR code.
• Enter the Pass Code and Save.
• Scan the QR code through the mobile App to get connected.
• After a successful connection, you can set the clock parameters from your mobile.
D and W Series NGTeco Time Clock User Manual
Page | 58 Copyright©2021 NGTeco. All rights reserved.
Figure 9-13: App Connection
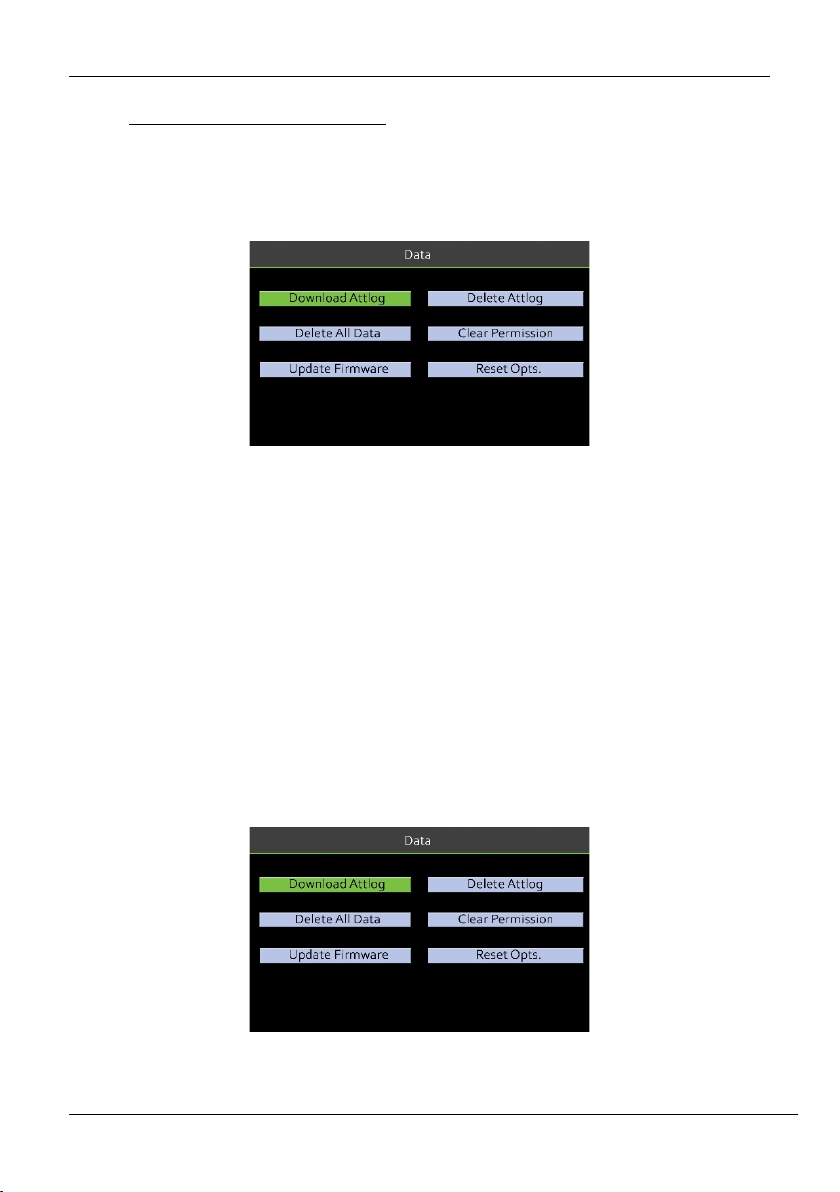
• When the APP is connected to the device successfully, the user can download the report
from the mobile in the Report page of the APP. The menu functions of the APP are
shown in the left-side image below, and report is shown in the middle image. The user
can also edit or add the punch record in the Attendance page of the APP which is shown
in the right-side image.
Figure 9-14: App Operation
D and W Series NGTeco Time Clock User Manual
Page | 59 Copyright©2021 NGTeco. All rights reserved.
10 Data Management
Data Management is an administrative process that includes acquiring, validating, and
processing the required data to ensure the smooth functioning of the time-attendance clock.
Figure 10-1: Data Management
10.1 Attendance Log Management
Attendance logs are usually updated in the attendance software for further processing.
10.1.1 Download Attendance Logs
Perform the following steps to download the attendance logs:
1. Insert the USB drive into the clock.
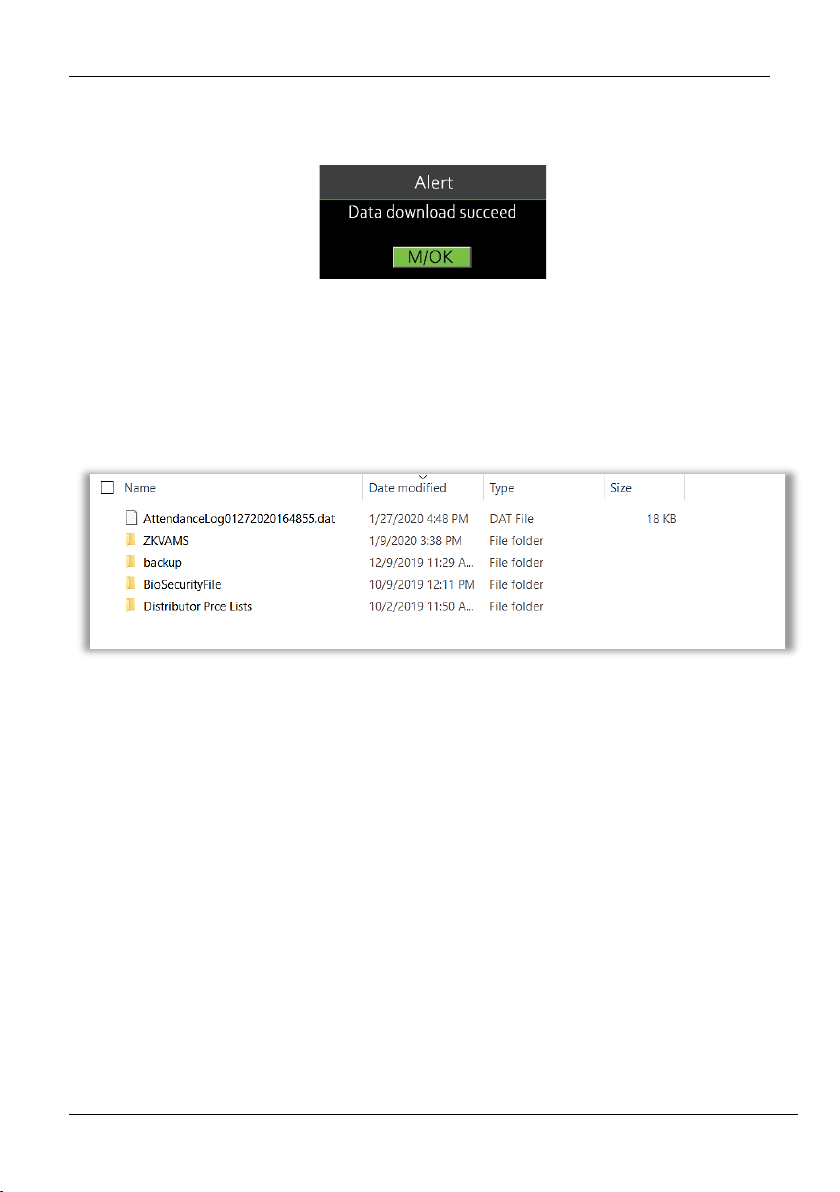
2. Go to [Data] and then [Download Attlog].
Figure 10-2: Download Attendance Log
D and W Series NGTeco Time Clock User Manual
Page | 60 Copyright©2021 NGTeco. All rights reserved.
3. After downloading the attendance logs, a success message will be displayed as shown
below:
Figure 10-3: Success message after downloading Attendance logs
4. Now, insert the USB drive to your PC and upload the logs to the attendance software.
5. The downloaded file on the USB drive will be named AttendanceLogxxxx.dat as
below. You can open it with a text editor to view the attendance data.
Figure 10-4: Downloaded Attendance logs
10.1.2 Delete Attendance Logs
Perform the following steps to delete the attendance logs:
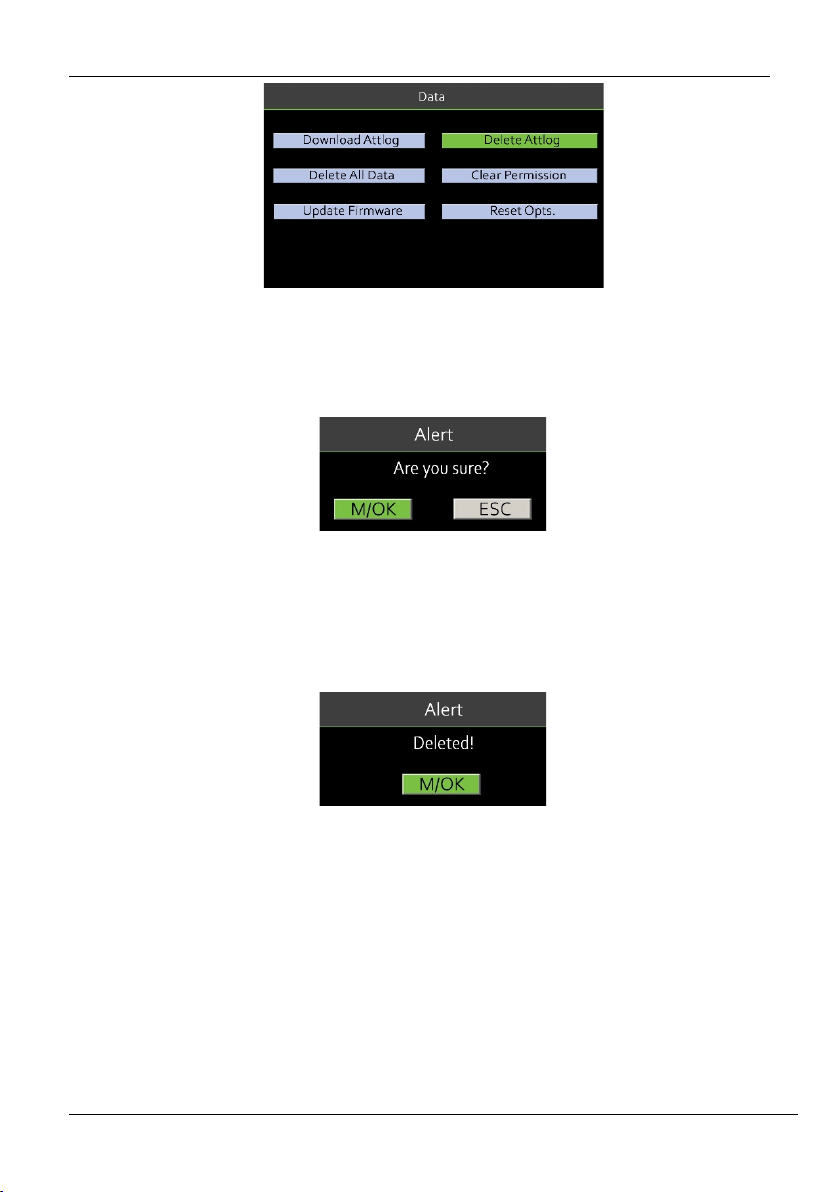
1. Go to [Data] then [Delete Attlog].
D and W Series NGTeco Time Clock User Manual
Page | 61 Copyright©2021 NGTeco. All rights reserved.
Figure 10-5: Delete Attendance logs
2. An alert will be displayed as shown below:
Figure 10-6: Confirmation to delete Attendance logs
3. Press <M/OK> to delete all the attendance logs.
4. After deleting the attendance logs, a success message will be displayed as shown below:
Figure 10-7: Success message after deleting Attendance logs
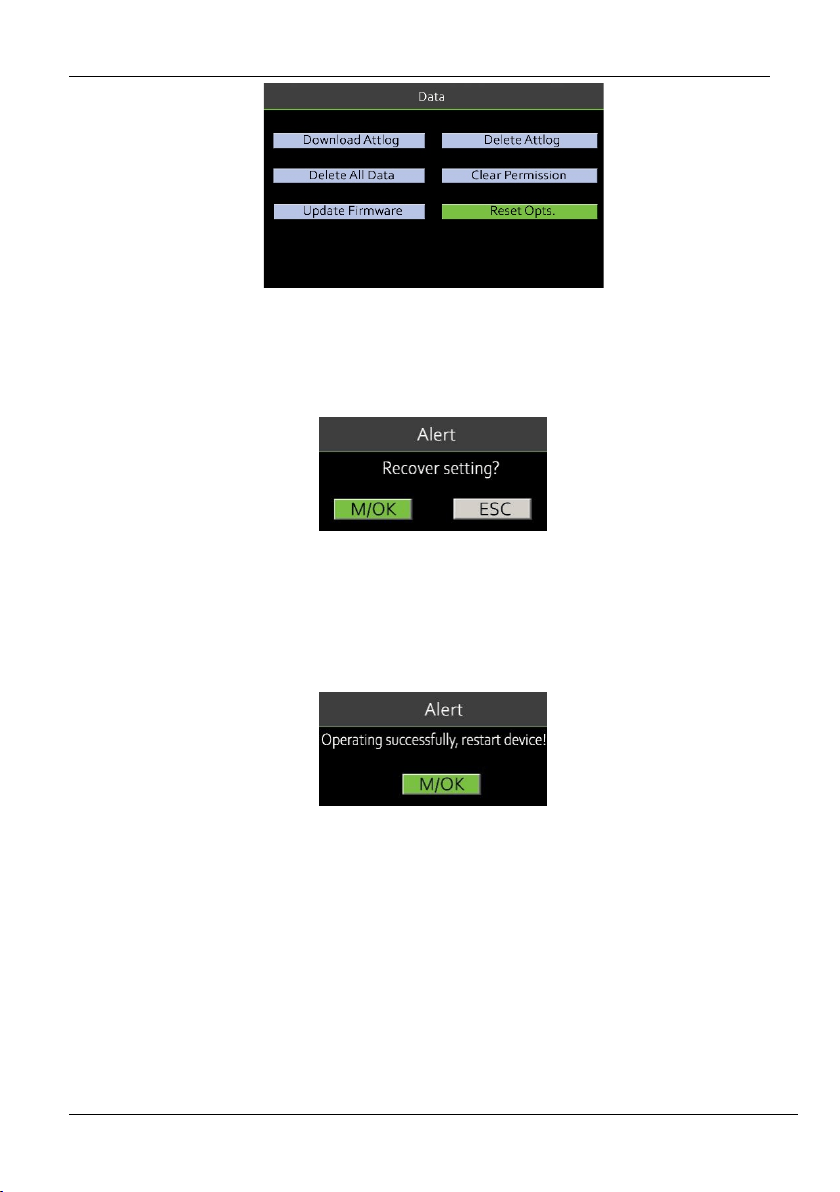
10.2 Clock Reset
If you want to reset the clock to its initial working state, perform the following steps:
1. Go to [Data] then [Reset Opts.].
D and W Series NGTeco Time Clock User Manual
Page | 62 Copyright©2021 NGTeco. All rights reserved.
Figure 10-8: Clock Reset
2. An alert will be displayed as shown below:
Figure 10-9: Confirmation to Reset the clock
3. Press <M/OK> to delete all the data.
4. After resetting the clock, a success message will be displayed as shown below:
Figure 10-10: Success message after reset
D and W Series NGTeco Time Clock User Manual
Page | 63 Copyright©2021 NGTeco. All rights reserved.
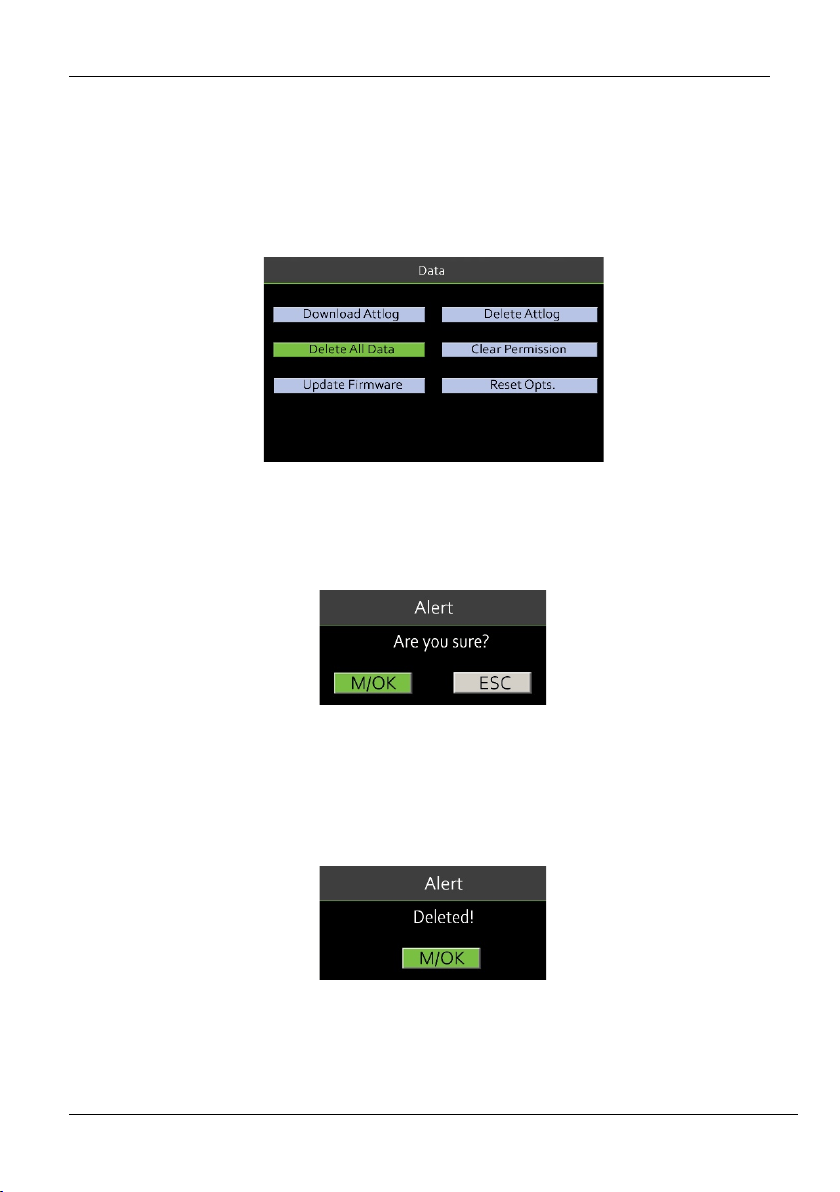
10.3 Delete all Data
Perform the following steps to delete all the data:
1. Go to [Data] then [Delete All Data].
Figure 10-11: Delete all Data
2. An alert will be displayed as shown below:
Figure 10-12: Confirmation to delete all data
3. Press <M/OK> to delete all the data.
4. After deleting the data, a success message will be displayed as shown below:
Figure 10-13: Success message after deleting all data
D and W Series NGTeco Time Clock User Manual
Page | 64 Copyright©2021 NGTeco. All rights reserved.
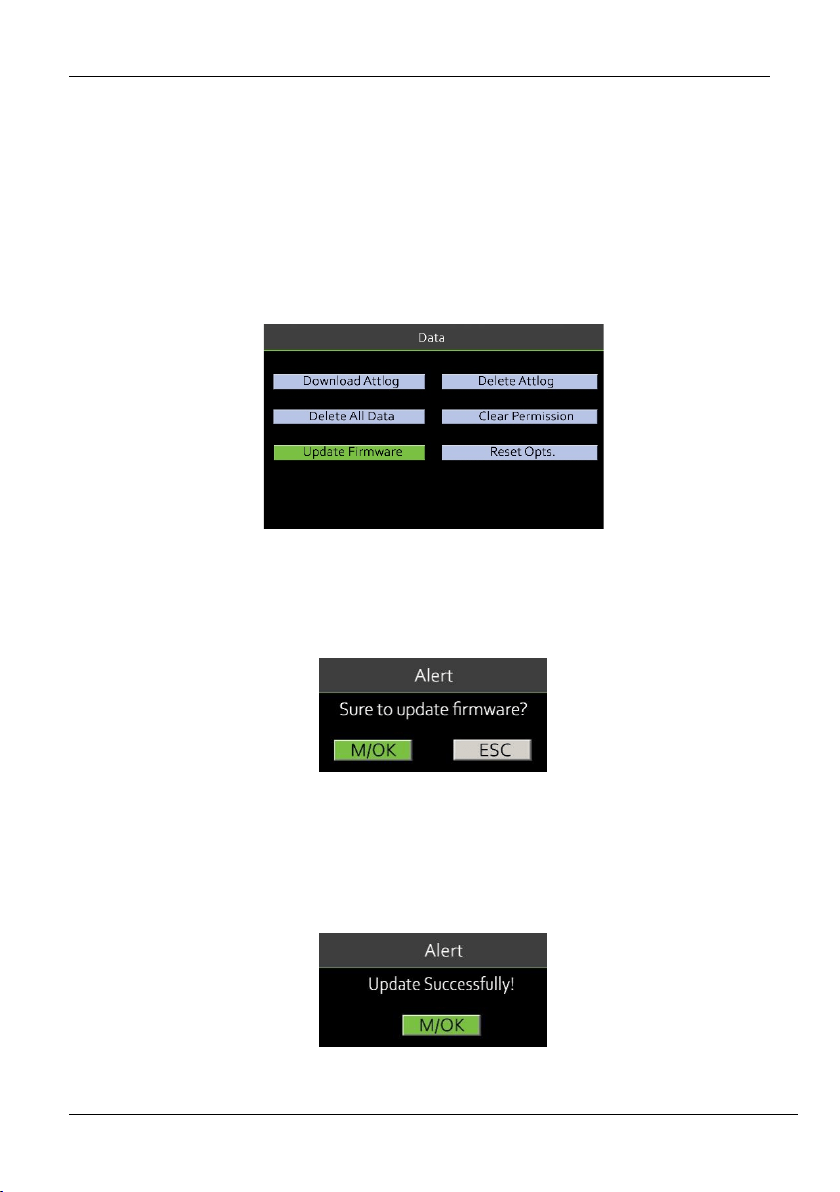
10.4 Firmware Update
You can contact the distributor to update the Firmware. Perform the following steps to
update the firmware:
1. Insert the USB drive which contains the Firmware files.
2. Go to [Data] and then [Update Firmware].
Figure 10-14: Update Firmware
3. An alert will be displayed as shown below:
Figure 10-15: Confirmation to update Firmware
4. Press <M/OK> to update the firmware.
5. After updating the firmware, a success message will be displayed as shown below:
Figure 10-16: Success message after updating Firmware
D and W Series NGTeco Time Clock User Manual
Page | 65 Copyright©2021 NGTeco. All rights reserved.
Make sure that the Firmware files are kept inside a single folder with folder name “update”
11 System Settings
11.1 Clock Date and Time
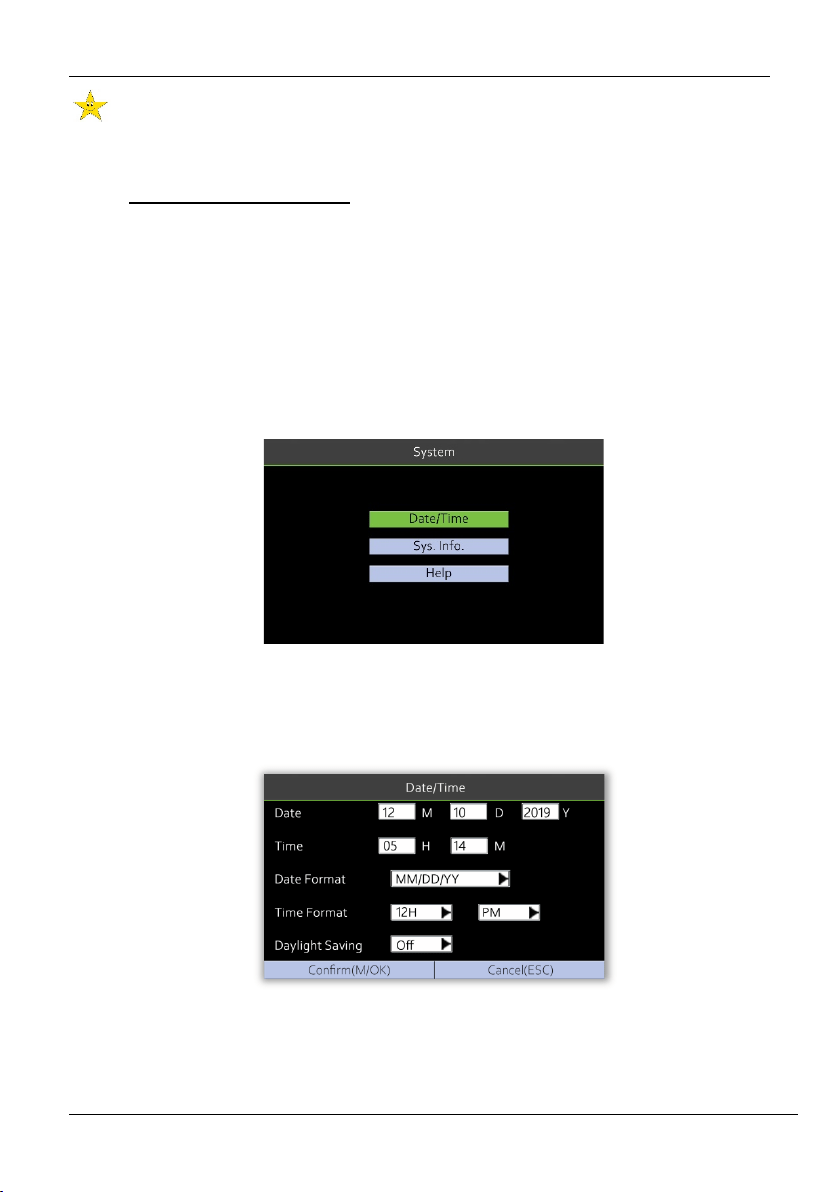
It is necessary to calibrate the date and time of the clock before usage to ensure accurate
attendance time. The procedure to set the date and time is given below:
• Go to [System] and press <M/OK>.
Figure 11-1: Date and Time Settings -1
• Then go to [Date and Time] and press <M/OK>. The interface appears as shown below:
Figure 11-2: Date and Time Settings -2
D and W Series NGTeco Time Clock User Manual
Page | 66 Copyright©2021 NGTeco. All rights reserved.
The following are the required parameters to set the date and time.
Date: Set the Date by navigating to Month, Date, and Year text boxes by pressing <
> key.
Time: Set the Time by navigating to Hours and Minutes text boxes by pressing <
> key.
Date Format: Set the Date Format from the available options using <
> or <
> key.
Time Format: Set the Time Format from the available options using <
> or <
> key.
If the Time Format is set to 12-hours, then set AM/PM using <
> or <
> key.
Daylight Saving: Enable or Disable the Daylight Saving using <
> or <
> key.
After setting the parameters press <M/OK> to save the date and time.
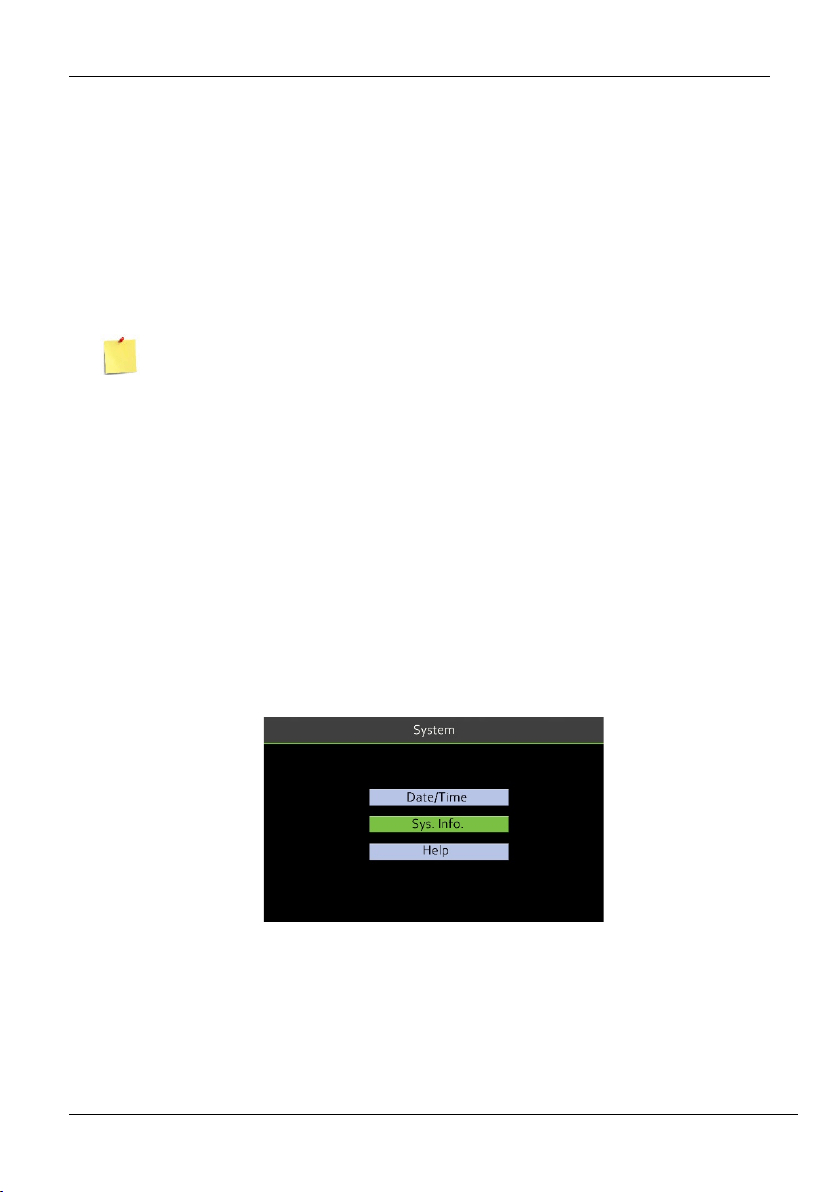
11.2 Clock Information
You can view the clock-related details to ensure the existing parameters of the clock.
• Go to [System] and press <M/OK>.
• Then navigate to [System Info] and press <M/OK>.
Figure 11-3: System Information -1
D and W Series NGTeco Time Clock User Manual
Page | 67 Copyright©2021 NGTeco. All rights reserved.
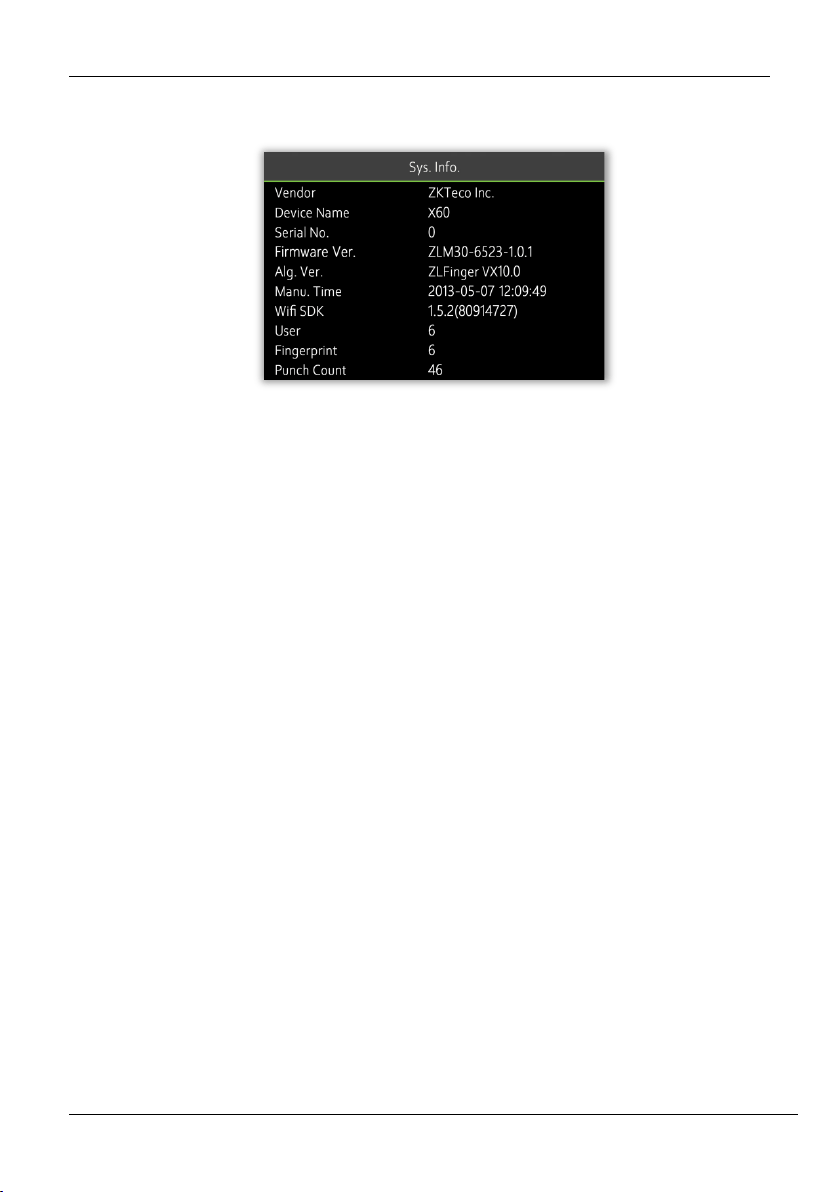
• The Clock Information will be displayed as shown below:
Figure 11-4: System Information - 2
The following details will be displayed:
• Vendor Name: The Manufacturer of the Clock.
• Clock Name: The model name of the clock.
• Serial Number: The unique number provided to the clock.
• Firmware ver.: It shows the core board name and version inside the clock.
• Algorithm Version Number: It represents the Fingerprint Algorithm Version.
• Wi-Fi SDK number
• Manufactured Time
• Number of enrolled users
• Number of registered fingerprints
• Number of attendance punches made
D and W Series NGTeco Time Clock User Manual
Page | 68 Copyright©2021 NGTeco. All rights reserved.
12 Troubleshooting
Category Issue Quick fix
Power
The clock does not operate
after the power is supplied
• Check the Power Cable for any damages.
PIN I lost my PIN
• Contact the Administrator to change the PIN
• If you have lost the Admin PIN, contact the
supplier
Fingerprint
The enrolled fingerprint
could not be authenticated
• Place the finger in a proper position.
• Make sure your finger is free from cuts and
stains. If the registered finger has such flaws,
enroll another finger
Admin I lost my Admin credentials
• Contact another Admin to reset your
credentials
• Contact the supplier for further proceedings
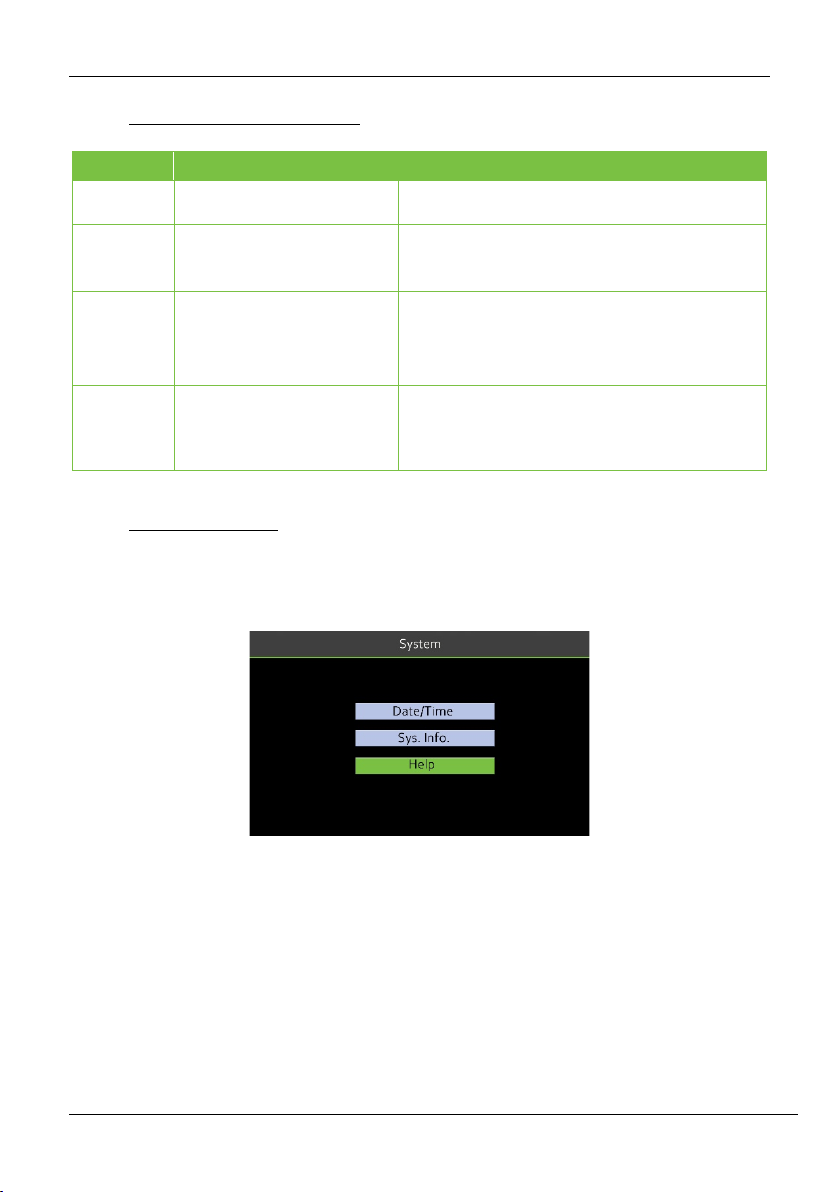
13 Contact Us
You can contact us for any queries related to the working of the attendance clock. Go to
[System] and then [Help].
Figure 13-1: System Help
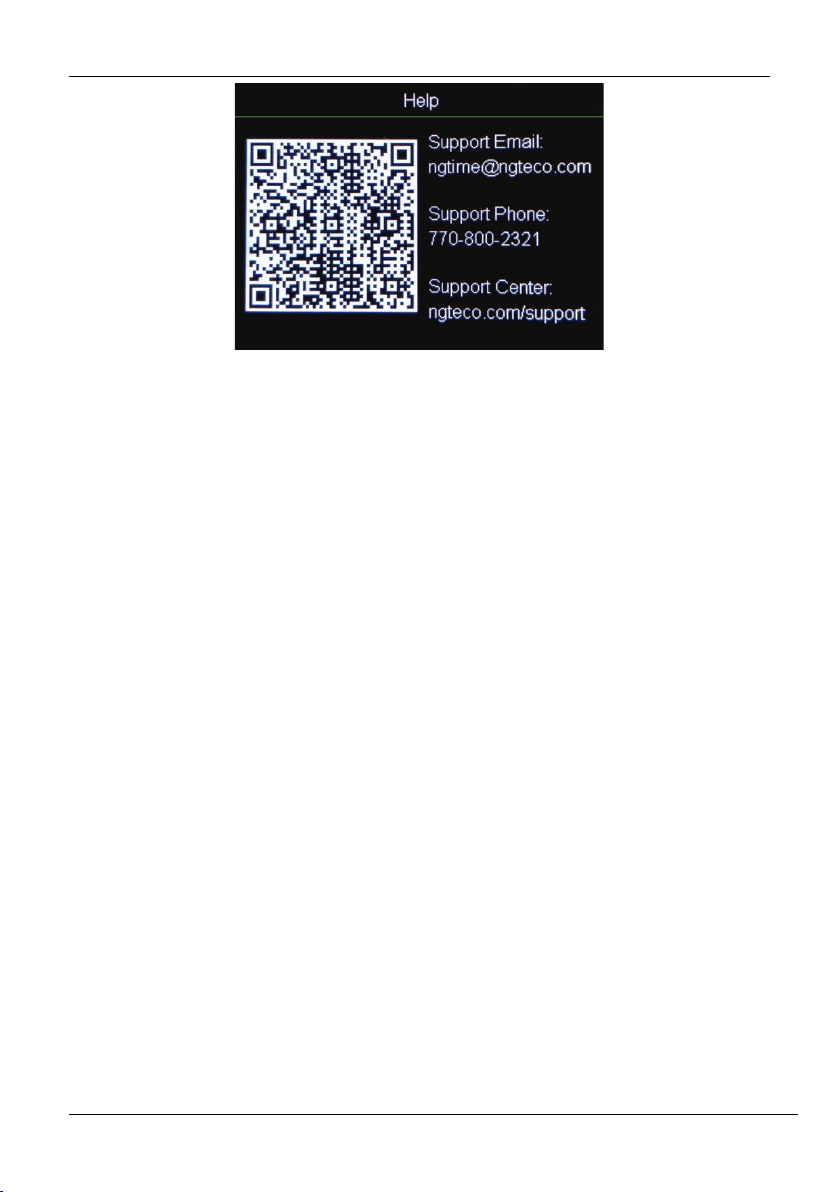
Scan the generated QR code to connect to the support website.
D and W Series NGTeco Time Clock User Manual
Page | 69 Copyright©2021 NGTeco. All rights reserved.
Figure 13-2: Support Screen

Page | 70 Copyright©2021 NGTeco. All rights reserved.
NGTeco
Website: www.ngteco.com
Email: ngtime@ngteco.com
Phone: (770) 800-2321
Support: https://cutt.ly/ngteco
Copyright © 2021 NGTeco. All rights reserved.