Loading ...
Loading ...
Loading ...
© 2021 United States Stove Company
7
INSTALLATION
PELLET VENT TYPE
A certied 3-inch or 4-inch type “PL” pellet vent exhaust
system must be used for installation and attached to the
pipe connector provided on the back of the stove (use a
3-inch to 4-inch adapter for 4-inch pipe). Connection at back
of stove must be sealed using Hi-Temp RTV. Use 4-inch
vent if the vent height is over 12-feet or if the installation is
over 2,500 feet above sea level. We recommend the use of
Simpson Dura-Vent® or Metal-Fab® pipe (if you use other
pipe, consult your local building codes and/or building
inspectors). Do not use Type-B Gas Vent pipe or galvanized
pipe with this unit. The pellet vent pipe is designed to
disassemble for cleaning and should be checked several
times during the burning season. Pellet vent pipe is not
furnished with the unit and must be purchased separately.
PELLET VENT INSTALLATION
The installation must include a clean-out tee to enable
collection of y ash and to permit periodic cleaning of the
exhaust system. 90-degree elbows accumulate y ash
and soot thereby reducing exhaust ow and performance
of the stove. Each elbow or tee reduces draft potential by
30% to 50%. All joints in the vent system must be fastened
by at least 3 screws, and all joints must be sealed with Hi-
Temp RTV silicone sealant to be airtight. The area where
the vent pipe penetrates to the exterior of the home must
be sealed with silicone or other means to maintain the
vapor barrier between the exterior and the interior of the
home. Vent surfaces can get hot enough to cause burns if
touched by children. Noncombustible shielding or guards
may be required.
PELLET VENT TERMINATION
Do not terminate the vent in an enclosed or semi-enclosed
area, such as; carport, garage, attic, crawl space, under a
sun deck or porch, narrow walkway, or any other location
that can build up a concentration of fumes. Termination in
one of these areas can also lead to unpredictable pressure
situations with the appliance, and could result in improper
performance and/or malfunction. The termination
must exhaust above the outside air inlet elevation. The
termination must not be located where it will become
plugged by snow or other materials. Do not terminate the
venting into an existing steel or masonry chimney.
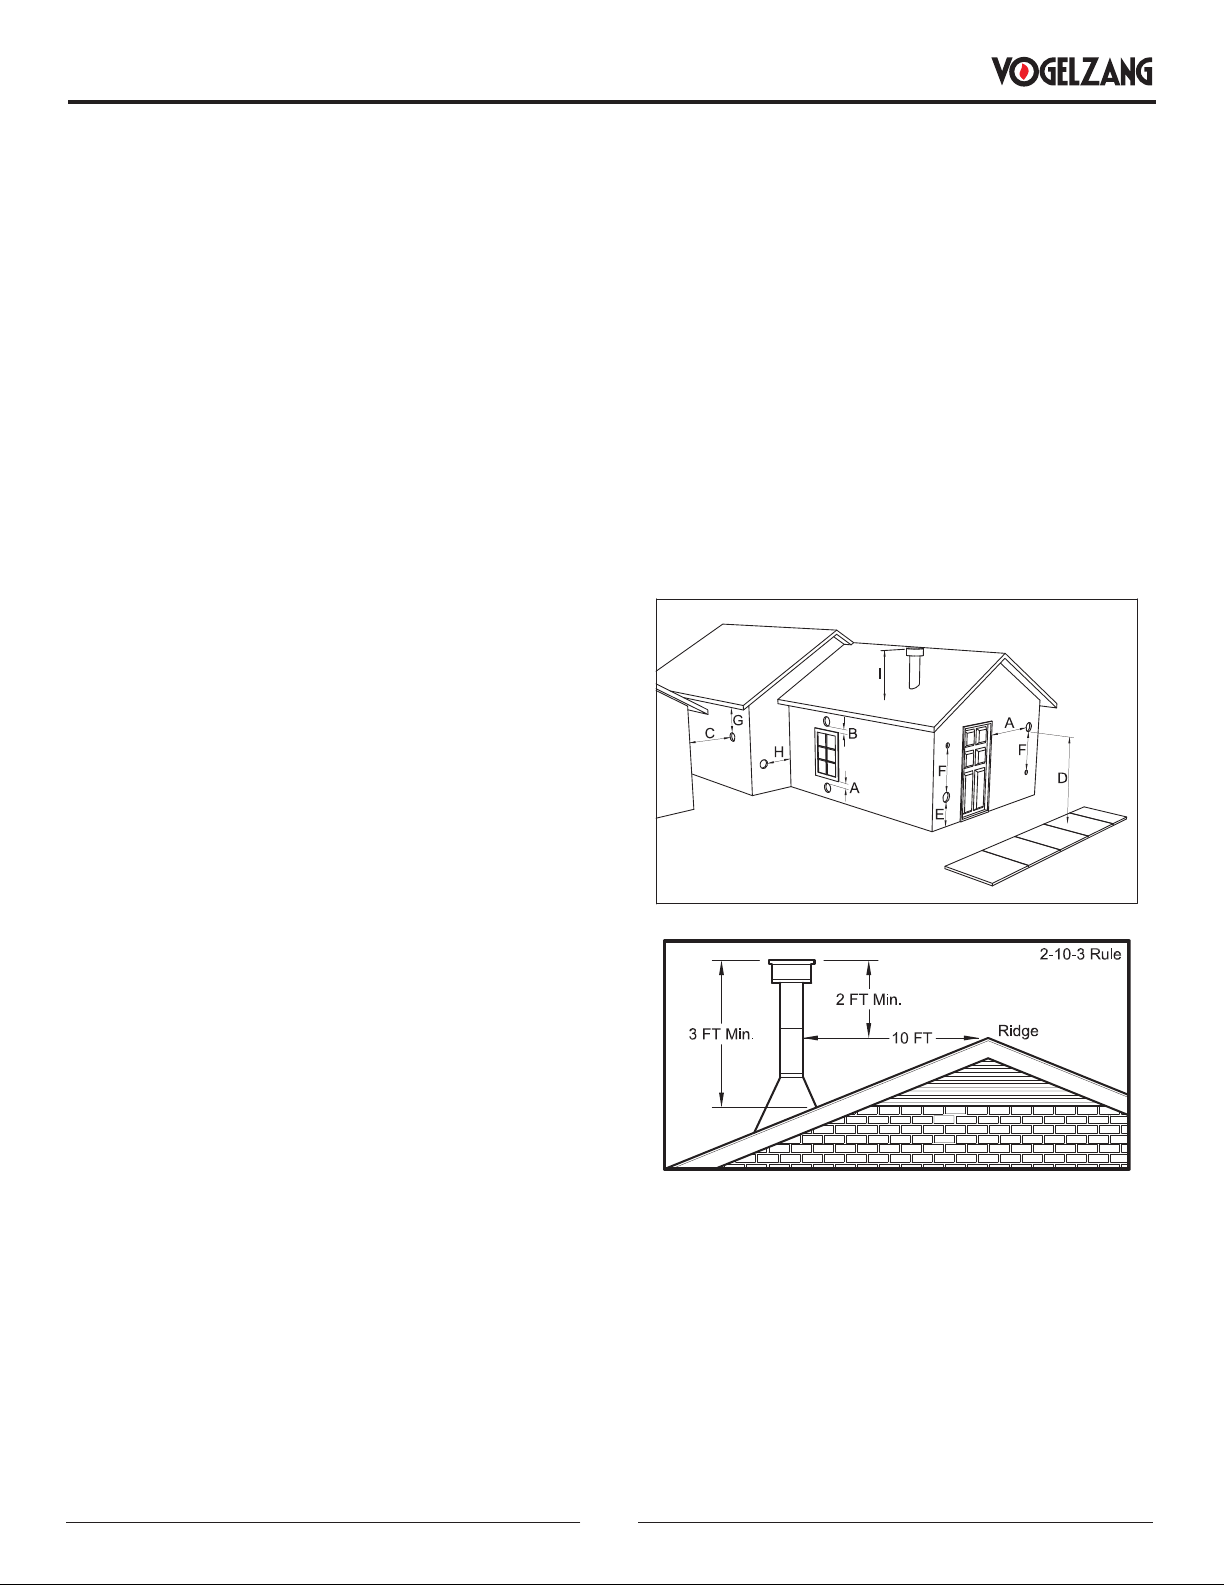
VENT TERMINATION CLEARANCES
A. Minimum 4-foot (1.22m) clearance below or beside
any door or window that opens.
B. Minimum 1-foot (0.3m) clearance above any door or
window that opens.
C. Minimum 3-foot (0.91m) clearance from any adjacent
building.
D. Minimum 7-foot (2.13m) clearance from any grade
when adjacent to public walkways.
E. Minimum 2-foot (0.61m) clearance above any grass,
plants, or other combustible materials.
F. Minimum 3-foot (0.91m) clearance from an forced air
intake of any appliance.
G. Minimum 2-foot (0.61m) clearance below eves or
overhang.
H. Minimum 1-foot (0.3m) clearance horizontally from
combustible wall.
I. Must be a minimum of 3 foot (0.91m) above the roof
and 2 foot (0.61m) above the highest point or the roof
within 10 feet (3.05m).
THROUGH THE WALL INSTALLATION
(RECOMMENDED INSTALLATION)
Canadian installations must conform to CAN/CSA-B365.
To vent the unit through the wall, connect the pipe adapter
to the exhaust motor adapter. If the exhaust adapter
is at least 18” (457 mm) above ground level, a straight
section of pellet vent pipe can be used through the wall.
Your heater dealer should be able to provide you with a
kit that will handle most of this installation, which will
include a wall thimble that will allow the proper clearance
Loading ...
Loading ...
Loading ...