Loading ...
Loading ...
Loading ...
WARNING: Do not permit fingers to touch the termi-
nals of plug when installing or removing from outlet.
Plug must be plugged into matching outlet that is
properly installed and grounded in accordance with
all local codes and ordinances. Do not modify plug
provided. If it will not fit in outlet, have proper outlet
installed by a qualified electrician.
Inspect tool cords periodically, and if damaged, have
repaired by a Sears or other qualified service dealer.
Green (or green and yellow) conductor in cord is the
grounding wire. If repair or replacement of the elec-
tric cord or plug is necessary, do not connect the
green (or green and yellow) wire to a live terminal.
Where a 2-prong wall receptacle is encountered, it
must be replaced with a properly grounded 3-prong
receptacle installed in accordance with National Electric
Code and local codes and ordinances.
WARNING: This work should be performed by a quali-
fied electrician.
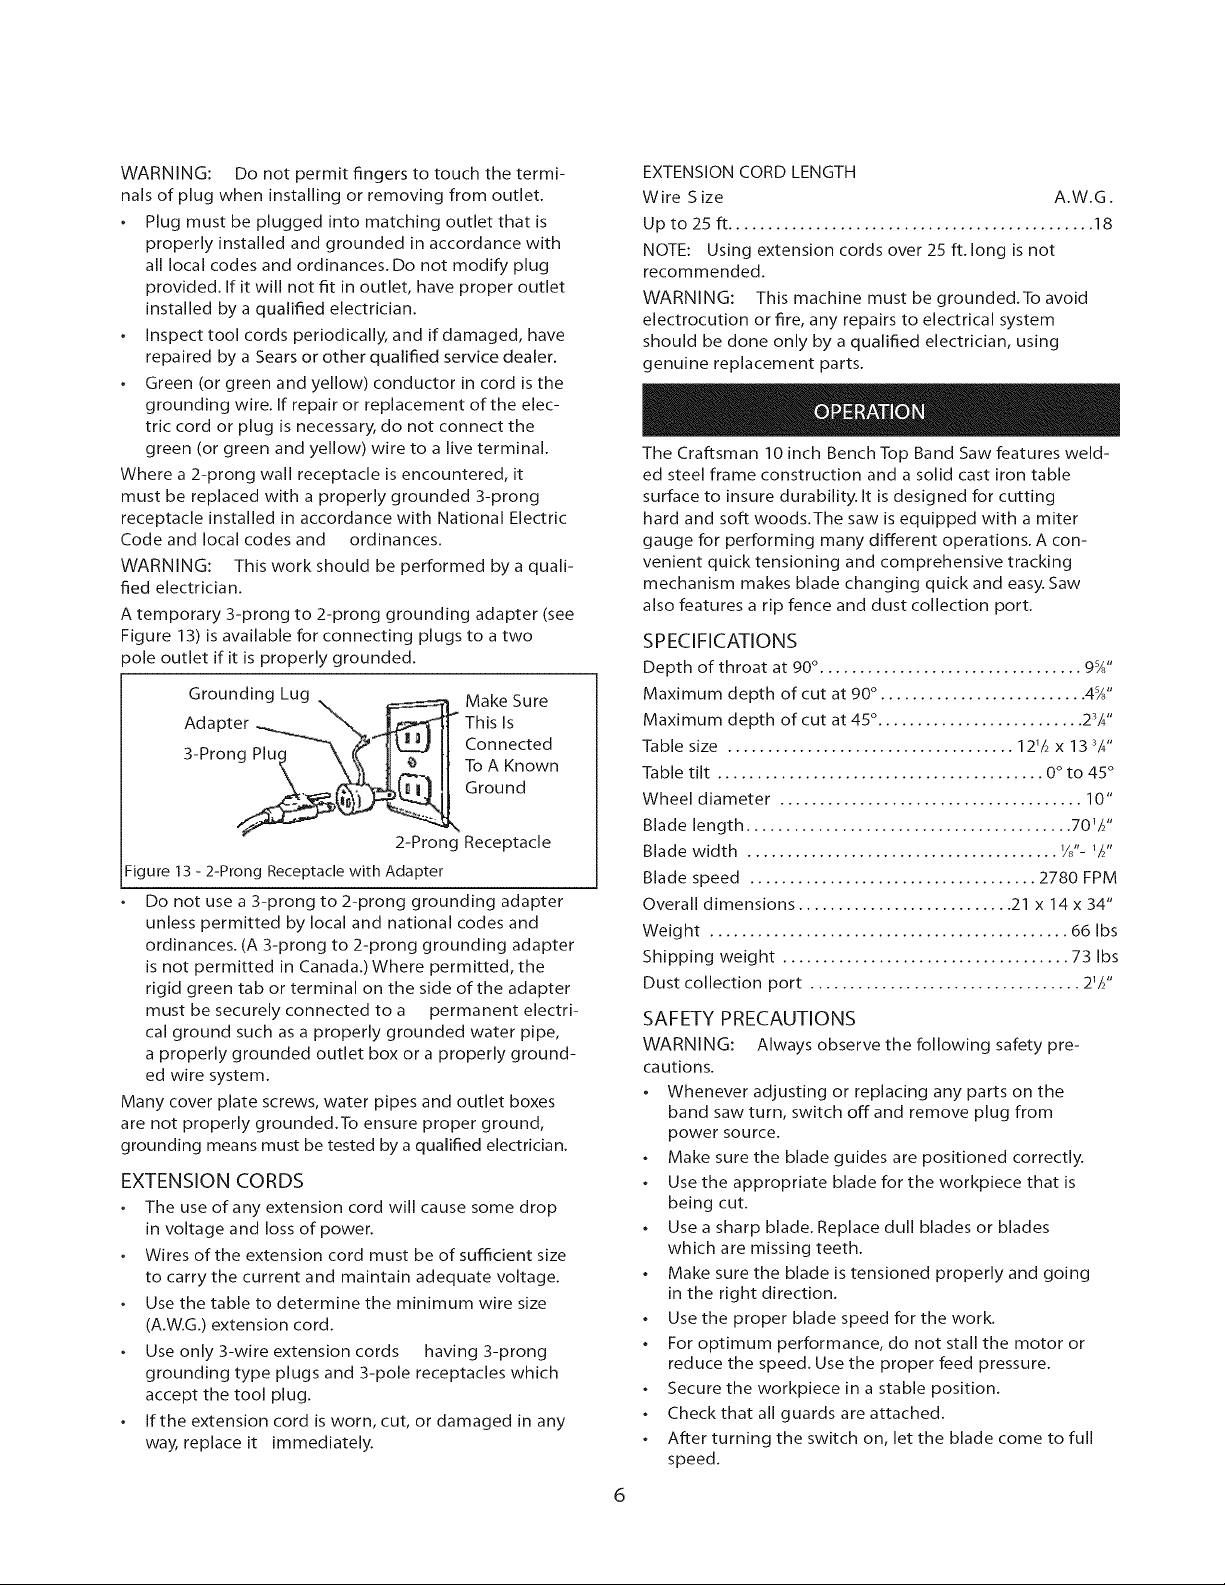
A temporary 3-prong to 2-prong grounding adapter (see
Figure 13) is available for connecting plugs to a two
3ole outlet if it is properly grounded.
Grounding Lug Make Sure
Adapte_ This Is
3-Prong Connected
To A Known
Ground
2-Prong Receptacle
Figure 13 - 2-Prong Receptacle with Adapter
Do not use a 3-prong to 2-prong grounding adapter
unless permitted by local and national codes and
ordinances. (A 3-prong to 2-prong grounding adapter
is not permitted in Canada.) Where permitted, the
rigid green tab or terminal on the side of the adapter
must be securely connected to a permanent electri-
cal ground such as a properly grounded water pipe,
a properly grounded outlet box or a properly ground-
ed wire system.
Many cover plate screws, water pipes and outlet boxes
are not properly grounded.To ensure proper ground,
grounding means must be tested by a qualified electrician.
EXTENSION CORDS
The use of any extension cord will cause some drop
in voltage and loss of power.
Wires of the extension cord must be of sufficient size
to carry the current and maintain adequate voltage.
Use the table to determine the minimum wire size
(A.W.G.) extension cord.
Use only 3-wire extension cords having 3-prong
grounding type plugs and 3-pole receptacles which
accept the tool plug.
If the extension cord is worn, cut, or damaged in any
way, replace it immediately.
6
EXTENSION CORD LENGTH
Wire Size A.W.G.
Up to 25 ft .............................................. 18
NOTE: Using extension cords over 25 ft. long is not
recommended.
WARNING: This machine must be grounded.To avoid
electrocution or fire, any repairs to electrical system
should be done only by a qualified electrician, using
genuine replacement parts.
The Craftsman 10 inch Bench Top Band Saw features weld-
ed steel frame construction and a solid cast iron table
surface to insure durability. It is designed for cutting
hard and soft woods.The saw is equipped with a miter
gauge for performing many different operations. A con-
venient quick tensioning and comprehensive tracking
mechanism makes blade changing quick and easy. Saw
also features a rip fence and dust collection port.
SPECIFICATIONS
Depth of throat at 90 °. ................................ 9_"
Maximum depth of cut at 90 ° . ......................... 4_"
Maximum depth of cut at 45 °. ......................... 23A"
Table size .................................... 121/2 x 13 34"
Table tilt ......................................... 0 ° to 45 °
Wheel diameter ...................................... 10"
Blade length ......................................... 70V/'
Blade width ....................................... W'- V/'
Blade speed .................................... 2780 FPM
Overall dimensions ........................... 21 x 14 x 34"
Weight ............................................. 66 Ibs
Shipping weight .................................... 73 Ibs
Dust collection port .................................. 2'//'
SAFETY PRECAUTIONS
WARNING: Always observe the following safety pre-
cautions.
Whenever adjusting or replacing any parts on the
band saw turn, switch off and remove plug from
power source.
Make sure the blade guides are positioned correctly.
Use the appropriate blade for the workpiece that is
being cut.
Use a sharp blade. Replace dull blades or blades
which are missing teeth.
Make sure the blade is tensioned properly and going
in the right direction.
Use the proper blade speed for the work.
For optimum performance, do not stall the motor or
reduce the speed. Use the proper feed pressure.
Secure the workpiece in a stable position.
Check that all guards are attached.
After turning the switch on, let the blade come to full
speed.
Loading ...
Loading ...
Loading ...