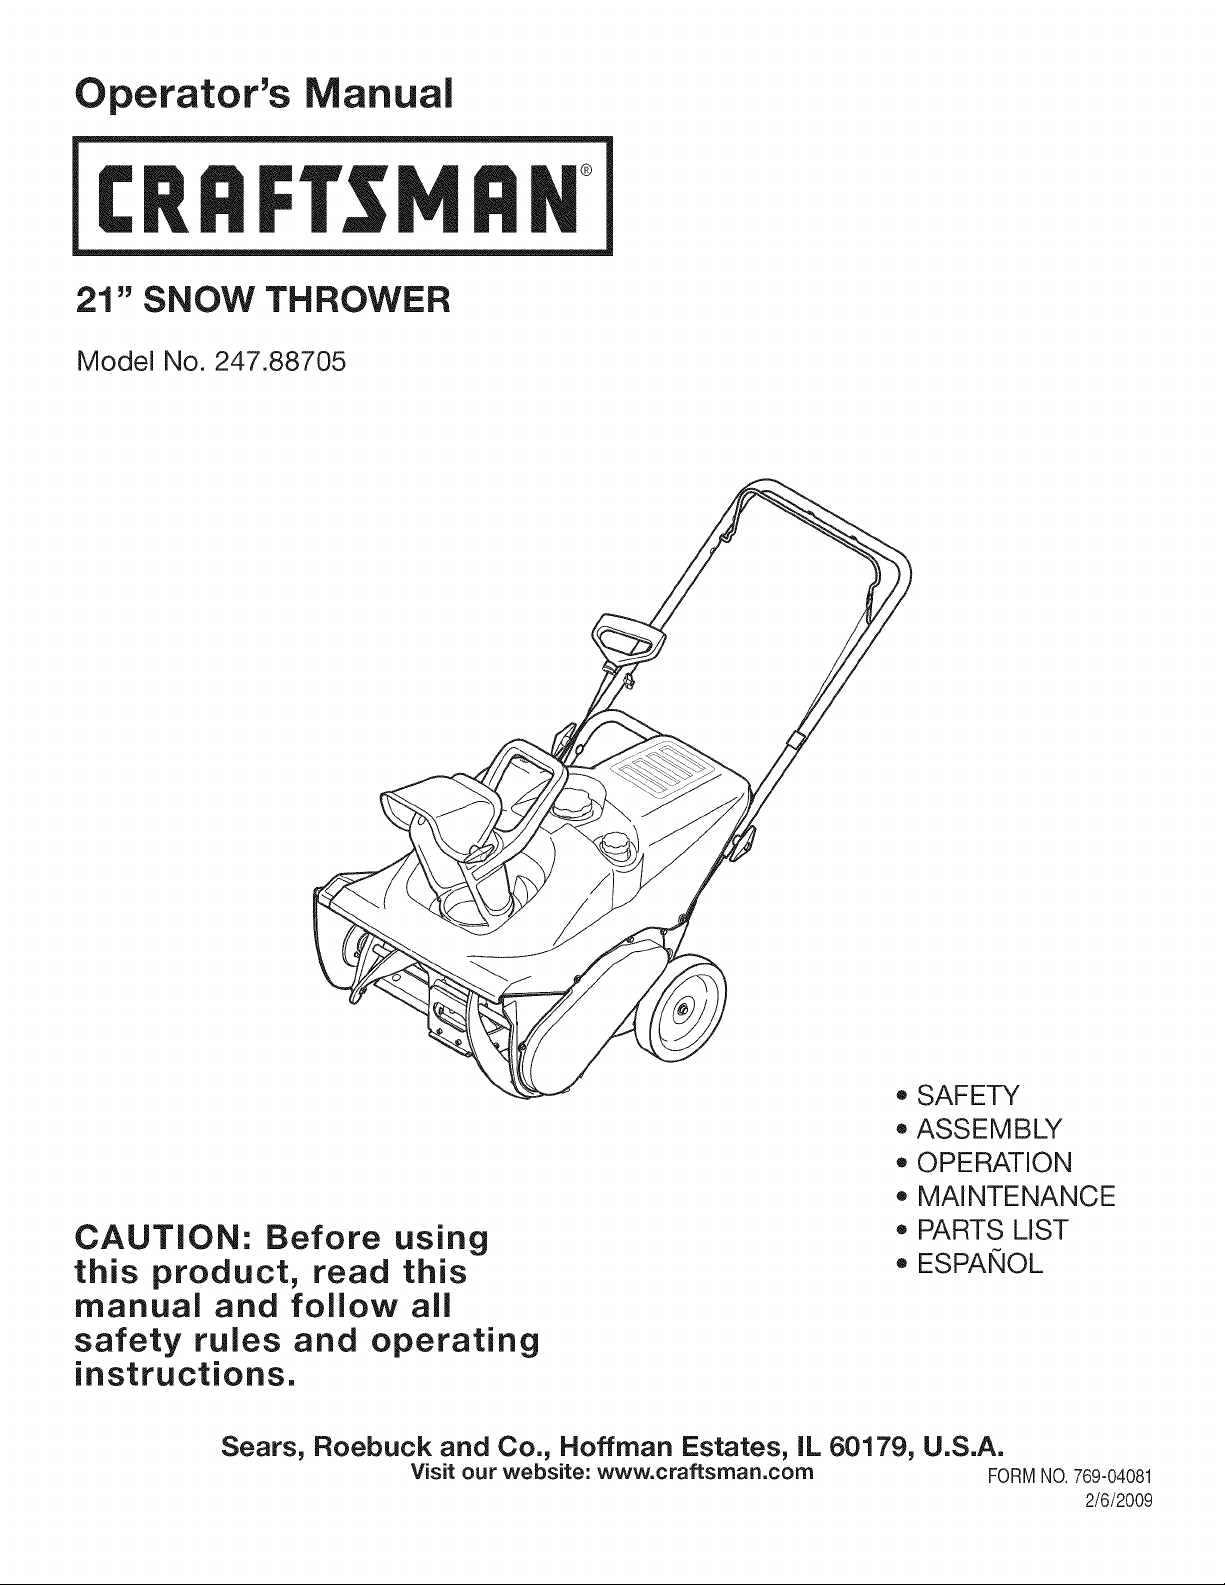
Operator's Manual
CRRFr MRN
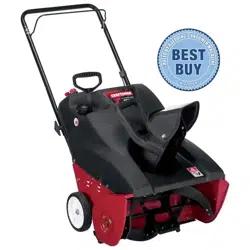
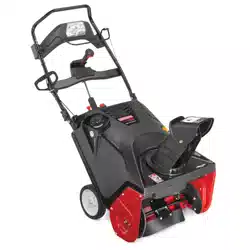
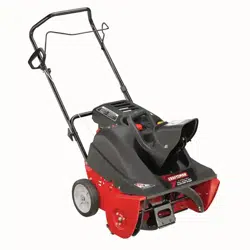
21" SNOW THROWER
Model No. 247.88705
CAUTION: Before using
this product, read this
manual and follow all
safety rules and operating
instructions.
o SAFETY
ASSEMBLY
OPERATION
MAINTENANCE
PARTS LIST
o ESPANOL
Sears, Roebuck and Co., Hoffman Estates, IL 60179, U.S.A.
Visit our website: www.craftsman.com FORMNO.769-04081
2/6/2009

WarrantyStatement..................................Page2
SafeOperationPractices..........................Pages3-5
SafetyLabels............................................Page6
Assembly..................................................Pages7-9
Operation..................................................Pages10-12
ServiceandMaintenance.........................Pages13-17
Off-SeasonStorage..................................Page18
TroubleShooting.......................................Page19
PartsList...................................................Page20-27
RepairProtectionAgreement...................Page31
Espa_ol.....................................................Page32
ServiceNumbers......................................BackCover
CRAFTSMAN LiMiTED WARRANTY
Two Years on Snow Thrower
Whenoperatedand maintainedaccordingto allsuppliedinstructions,ifthis snowthrowerfailsdueto a defectinmaterialorworkmanshipwithin
twoyearsfromthe dateor purchase,call 1-800-4-MY-HOME®to arrangefor free repair.
Thiswarrantyappliesfor only90 days fromthe dateof purchaseif this snow throweris everusedfor commercialor rentalpurposes.
Duringthe first yearof purchase,there willbe nochargefor warrantyserviceinyourhome.Foryourconvenience,in-homewarrantyservicewill
stillbeavailableafterthe firstyearof purchase,but a trip chargewill apply.Thischargewill be waivedif youtransportthe snowthrowerto an
authorizedCraftsmandrop-off location.Forthe nearestauthorizedlocation,call 1-800-4-MY-HOME®.
Thiswarranty coversONLYdefects in material andworkmanship. Sears will NOTpay for:
• Expendableitemsthatbecomewornduringnormaluse,includingbutnot limitedto skid shoes,shaveplate,shearpins, sparkplug,air
cleaner,belts,andoil filter.
• Standardmaintenanceservicing,oilchanges,or tune-ups.
Tire replacementor repaircausedby puncturesfrom outsideobjects,suchas nails,thorns,stumps,or glass.
Tireor wheelreplacementor repairresultingfromnormalwear,accident,orimproperoperationor maintenance.
Repairsnecessarybecauseof operatorabuse,includingbutnot limitedto damagecausedby impactingobjectsthat bendthe frameor
crankshaft,orover-speedingtheengine.
• Repairsnecessarybecauseof operatornegligence,includingbut not limitedto,electricalandmechanicaldamagecausedby improper
storage,failureto usethe propergradeandamountof engineoil, or failureto maintainthe equipmentaccordingto the instructionscontained
inthe operator'smanual.
• Engine(fuelsystem)cleaningor repairscausedbyfuel determinedto becontaminatedoroxidized(stale).In general,fuel shouldbeused
within30 daysof itspurchasedate.
Normaldeteriorationandwearof the exteriorfinishes,or productlabel replacement.
Thiswarrantyappliesonly whilethisproductis usedinthe UnitedStates.
Thiswarrantygivesyou specificlegalrights,andyou mayalso haveotherrightswhichvaryfromstateto state.
Sears, Roebuck and Co., Hoffman Estates, IL 60179
EngineOilType: SAE5W-30
EngineOilCapacity: 20ounces
FuelCapacity: 2 Quarts
SparkPlug: TorchF6RTC
SparkPlugGap: .020"-.030"
Model Number.................................................................
Serial Number .................................................................
Dateof Purchase.............................................................
Recordthe modelnumber,serialnumber
anddateof purchaseabove
© Sears Brands,LLC
2
Thissymbolpointsout importantsafetyinstructionswhich,if not
followed,couldendangerthepersonalsafetyand/orpropertyof
yourselfandothers. Readandfollowall instructionsin this manual
beforeattemptingto operatethismachine.Failureto complywith
theseinstructionsmay resultin personalinjury.Whenyou seethis
symbol,HEEDITSWARNING!
CALIFORNIA PROPOSITION 65
EngineExhaust,someof itsconstituents,and certainvehicle
componentscontainoremitchemicalsknownto Stateof California
to causecancerandbirthdefectsorotherreproductiveharm,
Thismachinewasbuiltto beoperatedaccordingto the safeopera-
tion practicesinthis manual.As with anytype of powerequipment,
carelessnessor error on the partof the operatorcan resultin serious
injury.Thismachineis capableof amputatingfingers,hands,toes
andfeetandthrowingdebris.Failureto observethe followingsafety
instructionscouldresultin seriousinjuryor death.
Your Responsibility--Restrict the useof this powermachineto
personswho read,understandandfollowthewarningsand instruc-
tionsin this manualand on the machine,
SAVE THESE INSTRUCTIONS!
TRAiNiNG
• Read,understand,andfollowall instructionson the machineand
in themanual(s)beforeattemptingto assembleandoperate.
Failureto do socan resultin serious injuryto the operatorand/
orbystanders.Keepthismanualin a safeplaceforfutureand
regularreferenceandfor orderingreplacementparts. Forques-
tionscall,1-800-659-5917.
• Befamiliarwith all controlsandtheir properoperation.Knowhow
to stopthe machineanddisengagethemquickly.
• Neverallowchildrenunder 14 yearsof ageto operatethis
machine.Children14andover shouldreadandunderstandthe
instructionsand safe operationpracticesin thismanualandon
the machineandbe trainedand supervisedby an adult.
• Neverallowadultsto operatethis machinewithoutproper
instruction.
• Thrownobjectscan causeseriouspersonalinjury.Planyour
snow-throwingpatternto avoiddischargeof materialtoward
roads,bystandersandthe like.
• Keepbystanders,petsandchildrenat least75feetfromthe
machinewhile itisinoperation.Stopmachineifanyoneenters
the area.
• Exercisecautionto avoidslippingor falling,especiallywhen
operatinginreverse.
PREPARATION
Thoroughlyinspecttheareawherethe equipmentis to beused.
Removeall doormats,newspapers,sleds,boards,wiresandother
foreignobjects,whichcouldbe trippedoverorthrownby the auger/
impeller.
Alwayswear safetyglassesor eyeshieldsduringoperationand
while performingan adjustmentor repairto protectyoureyes.
Thrownobjectswhichricochetcancauseseriousinjuryto the
eyes.
Donot operatewithoutwearingadequatewinteroutergarments.
Donot wearjewelry,longscarvesorotherlooseclothing,which
could becomeentangledinmovingparts.Wearfootwearwhich
will improvefootingonslipperysurfaces.
Usea groundedthree-wireextensioncordand receptaclefor all
machineswith electricstartengines.
Disengageall controlleversbeforestartingthe engine.
Neverattemptto makeanyadjustmentswhileengineis running,
exceptwherespecificallyrecommendedinthe operator'smanual.
Letengineandmachineadjustto outdoortemperaturebefore
startingto clearsnow.
3
Safe Handling of Gasoline
Toavoidpersonalinjuryor propertydamageuseextremecare in
handlinggasoline.Gasolineis extremelyflammableand the vaporsare
explosive.Seriouspersonalinjurycan occurwhengasolineis spilled
onyourselfor yourclotheswhichcan ignite.Washyour skin and
changeclothesimmediately.
• Useonly an approvedgasolinecontainer.
• Extinguishall cigarettes,cigars,pipesandother sources
of ignition.
• Neverfuelmachineindoors.
• Neverremovegas capor addfuel whilethe engineis hot
or running.
• Allowengine to coolat leasttwo minutesbeforerefueling.
• Neveroverfill fueltank. Filltank to no morethan1/2inch
belowbottomof filler neckto providespacefor fuel
expansion.
• Replacegasolinecap and tightensecurely.
• If gasolineis spilled,wipeit off the engineand equipment.
Movemachineto anotherarea.Wait5 minutesbefore
startingthe engine.
• Neverstorethe machineor fuel containerinsidewhere
thereis anopenflame,sparkor pilotlight (e.g.furnace,
waterheater,spaceheater,clothesdryer etc.).
• Allowmachineto cool at least5 minutesbeforestoring.
• Neverfill containersinsidea vehicleor ona truckor trailer
bedwitha plasticliner.Alwaysplacecontainersonthe
groundawayfromyourvehiclebeforefilling.
• If possible,removegas-poweredequipmentfromthetruck
ortrailerand refuelit on the ground.If this is not possible,
then refuelsuchequipmentona trailerwith a portable
container,ratherthan from a gasolinedispensernozzle.
• Keepthe nozzlein contactwith the rimof the fueltank or
containeropeningat alltimesuntil fuelingis complete.Do
notuse a nozzlelock-opendevice.
OPERATION
• Do not puthandsorfeetnear rotatingparts,in the auger/impeller
housingor chuteassembly.Contactwiththe rotatingpartscan
amputatehandsandfeet.
• Theauger/impellercontrolleveris a safetydevice.Neverbypass
itsoperation.Doingso makesthe machineunsafeand may cause
personalinjury.
• Thecontrol leversmustoperateeasilyin bothdirectionsand
automaticallyreturnto the disengagedpositionwhenreleased.
• Neveroperatewith a missingor damagedchuteassembly.Keep
all safetydevicesin placeand working.
• Neverrunan engine indoorsor ina poorlyventilatedarea. Engine
exhaustcontainscarbonmonoxide,anodorlessanddeadlygas.
• Do notoperatemachinewhileunder the influenceof alcoholor
drugs.
• Mufflerand enginebecomehotand can causea burn.Do not
touch.Keepchildrenaway.
• Exerciseextremecautionwhenoperatingon orcrossinggravel
surfaces.Stayalertfor hidden hazardsor traffic.
• Exercisecautionwhenchangingdirectionand whileoperatingon
slopes.
• Planyoursnow-throwingpatternto avoiddischargetowards
windows,walls,cars etc. Thus,avoidingpossibleproperty
damageor personalinjurycausedby a ricochet.
• Neverdirect dischargeat children,bystandersand petsor allow
anyonein front of the machine.
• Donot overloadmachinecapacityby attemptingto clearsnowat
too fastof a rate.
• Neveroperatethis machinewithoutgoodvisibility or light.Always
be sureof yourfootingand keepa firm hold on the handles.Walk,
neverrun.
• Disengagepowerto theauger/impellerwhentransportingor not
in use.
• Neveroperatemachineat high transportspeedson slippery
surfaces.Lookdownand behindand usecare whenbackingup.
• If the machineshouldstart to vibrateabnormally,stopthe engine,
disconnectthe sparkplugwire andgroundit againstthe engine.
Inspectthoroughlyfor damage.Repairanydamagebefore
startingand operating.
• Disengageall controlleversandstopenginebeforeyouleave
the operatingposition(behindthe handles).Waituntilthe auger/
impellercomesto a completestopbeforeuncloggingthechute
assembly,makingany adjustments,or inspections.
• Neverput yourhand in the dischargeor collectoropenings.Do
not unclogchuteassemblywhileengineis running.Shutoff
engineand remainbehindhandlesuntilall movingparts have
stoppedbeforeunclogging.
• Useonly attachmentsand accessoriesapprovedby the manufac-
turer (e.g.wheelweights,tire chains,cabsetc.).
• Whenstartingengine,pull cord slowlyuntilresistanceis felt, then
pull rapidly.Rapidretractionof startercord(kickback)will pull
handandarmtowardenginefasterthan youcan let go. Broken
bones,fractures,bruisesor sprainscould result.
• If situationsoccur whichare notcoveredinthis manual,use care
andgoodjudgment.ContactCustomerSupportfor assistance
andthe nameof your nearestservicingdealer.
CLEARING A CLOGGED DISCHARGE CHUTE
Handcontactwiththe rotatingimpellerinsidethe dischargechute
is the mostcommoncauseof injuryassociatedwith snowthrowers.
Neveruse yourhandto cleanout thedischargechute.
Toclear thechute:
1. SHUTTHEENGINEOFF!
2. Wait 10secondsto be surethe impellerbladeshavestopped
rotating.
3. Alwaysusea clean-outtool,not yourhands.
4
MAINTENANCE & STORAGE
• Nevertamperwith safetydevices.Checktheirproperoperation
regularly.Referto the maintenanceandadjustmentsectionsof
thismanual.
• Beforecleaning,repairing,or inspectingmachinedisengageall
controlleversandstopthe engine.Waituntilthe auger/impeller
cometo a completestop.Disconnectthe sparkplugwireand
groundagainsttheengine to preventunintendedstarting.
Checkboltsand screwsfor propertightnessat frequentintervals
to keepthe machineinsafeworkingcondition.Also,visually
inspectmachinefor anydamage.
Do notchangetheengine governorsettingor over-speedthe
engine.Thegovernorcontrolsthe maximumsafeoperatingspeed
of the engine.
Snowthrowershaveplatesand skidshoesaresubjectto wear
anddamage.Foryoursafetyprotection,frequentlycheckall
componentsand replacewith originalequipmentmanufacturer's
(OEM)partsonly."Useof partswhichdo not meetthe original
equipmentspecificationsmayleadto improperperformanceand
compromisesafety!"
Checkcontrolleversperiodicallyto verifythey engageand disen-
gageproperlyandadjust,if necessary.Referto the adjustment
sectioninthis operator'smanualfor instructions.
Maintainor replacesafetyand instructionlabels,as necessary.
• Observeproperdisposallawsand regulationsfor gas,oil,etc. to
protectthe environment.
Priorto storing,runmachinea few minutestoclear snowfrom
machineand preventfreezeupof auger/impeller.
Neverstorethe machineorfuel containerinsidewherethereisan
openflame,sparkorpilot lightsuchas a waterheater,furnace,
clothesdryer etc.
Alwaysreferto the operator'smanualfor properinstructionson
off-seasonstorage.
Checkfuelline,tank, cap,and fittings frequentlyfor cracksor
leaks.Replaceif necessary.
Do notcrankenginewithsparkplugremoved.
Accordingto the ConsumerProductsSafetyCommission(CPSC)
andthe U.S.EnvironmentalProtectionAgency(EPA),this product
hasan AverageUsefulLifeof seven(7)years,or 60 hoursof
operation.At the endof theAverageUsefulLifehavethe machine
inspectedannuallybyan authorizedservicedealerto ensurethat
allmechanicalandsafetysystemsareworkingproperlyand not
wornexcessively.Failureto do so can resultinaccidents,injuries
ordeath.
DO NOT MODIFY ENGINE
Toavoidseriousinjuryor death,do not modifyengine in any way.
Tamperingwiththe governorsettingcanlead to a runawayengineand
causeit to operateat unsafespeeds.Nevertamperwithfactory setting
of enginegovernor.
NOTICE REGARDING EMISSIONS
Engineswhich are certifiedtocomplywith Californiaand federal
EPAemissionregulationsfor SORE(SmallOff RoadEquipment)are
certifiedto operateon regularunleadedgasoline,and mayinclude
the followingemissioncontrolsystems:EngineModification(EM),
OxidizingCatalyst(OC),SecondaryAirInjection(SAI)and ThreeWay
Catalyst(TWO)if so equipped.
SPARK ARRESTOR
Thismachineisequippedwith an internalcombustionengineand
shouldnotbe usedonor nearany unimprovedforest-covered,
brush-coveredorgrass-coveredlandunlessthe engine'sexhaust
systemisequippedwith a sparkarrestermeetingapplicablelocalor
statelaws (if any)
Ifa sparkattester is used, it shouldbe maintainedin effectiveworking
orderby theoperator.Inthe State of Californiathe aboveis required
bylaw (Section4442of the CaliforniaPublicResourcesCode). Other
statesmayhavesimilarlaws. Federallawsapplyon federallands.
A spark arresterfor the muffleris availablethroughyournearestSears
PartsandRepairServiceCenter.
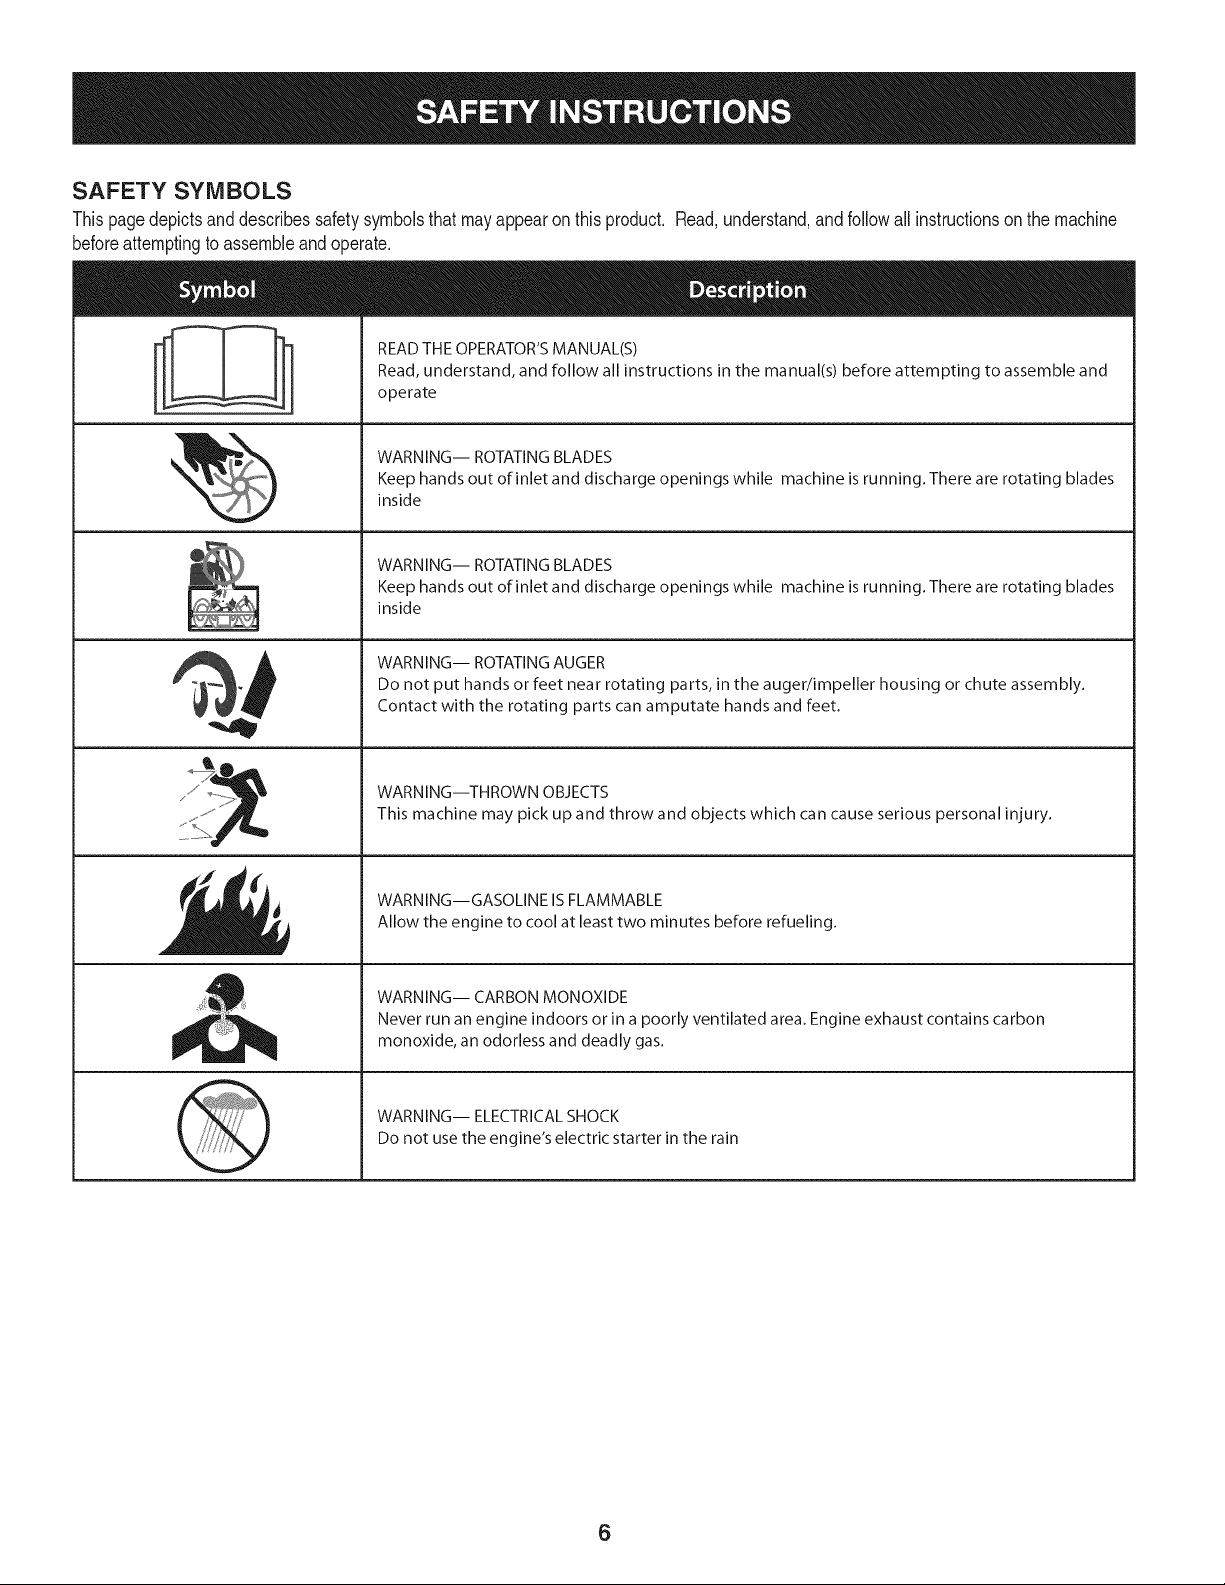
SAFETY SYMBOLS
Thispagedepictsand describessafetysymbolsthat mayappear on this product. Read,understand,andfollowall instructionson the machine
beforeattemptingto assembleandoperate.
i
i
READ THE OPERATOR'S MANUAL(S)
Read, understand, and follow all instructions in the manual(s) before attempting to assemble and
operate
WARNING-- ROTATING BLADES
Keep hands out of inlet and discharge openings while machine is running. There are rotating blades
inside
WARNING-- ROTATING BLADES
Keep hands out of inlet and discharge openings while machine is running. There are rotating blades
inside
WARNING-- ROTATING AUGER
Do not put hands or feet near rotating parts, in the auger/impeller housing or chute assembly.
Contact with the rotating parts can amputate hands and feet.
WARNING--THROWN OBJECTS
This machine may pick up and throw and objects which can cause serious personal injury.
WARNING--GASOLINE IS FLAMMABLE
Allow the engine to cool at least two minutes before refueling.
WARNING-- CARBON MONOXIDE
Never run an engine indoors or in a poorly ventilated area. Engine exhaust contains carbon
monoxide, an odorless and deadly gas.
WARNING-- ELECTRICAL SHOCK
Do not use the engine's electric starter in the rain
6
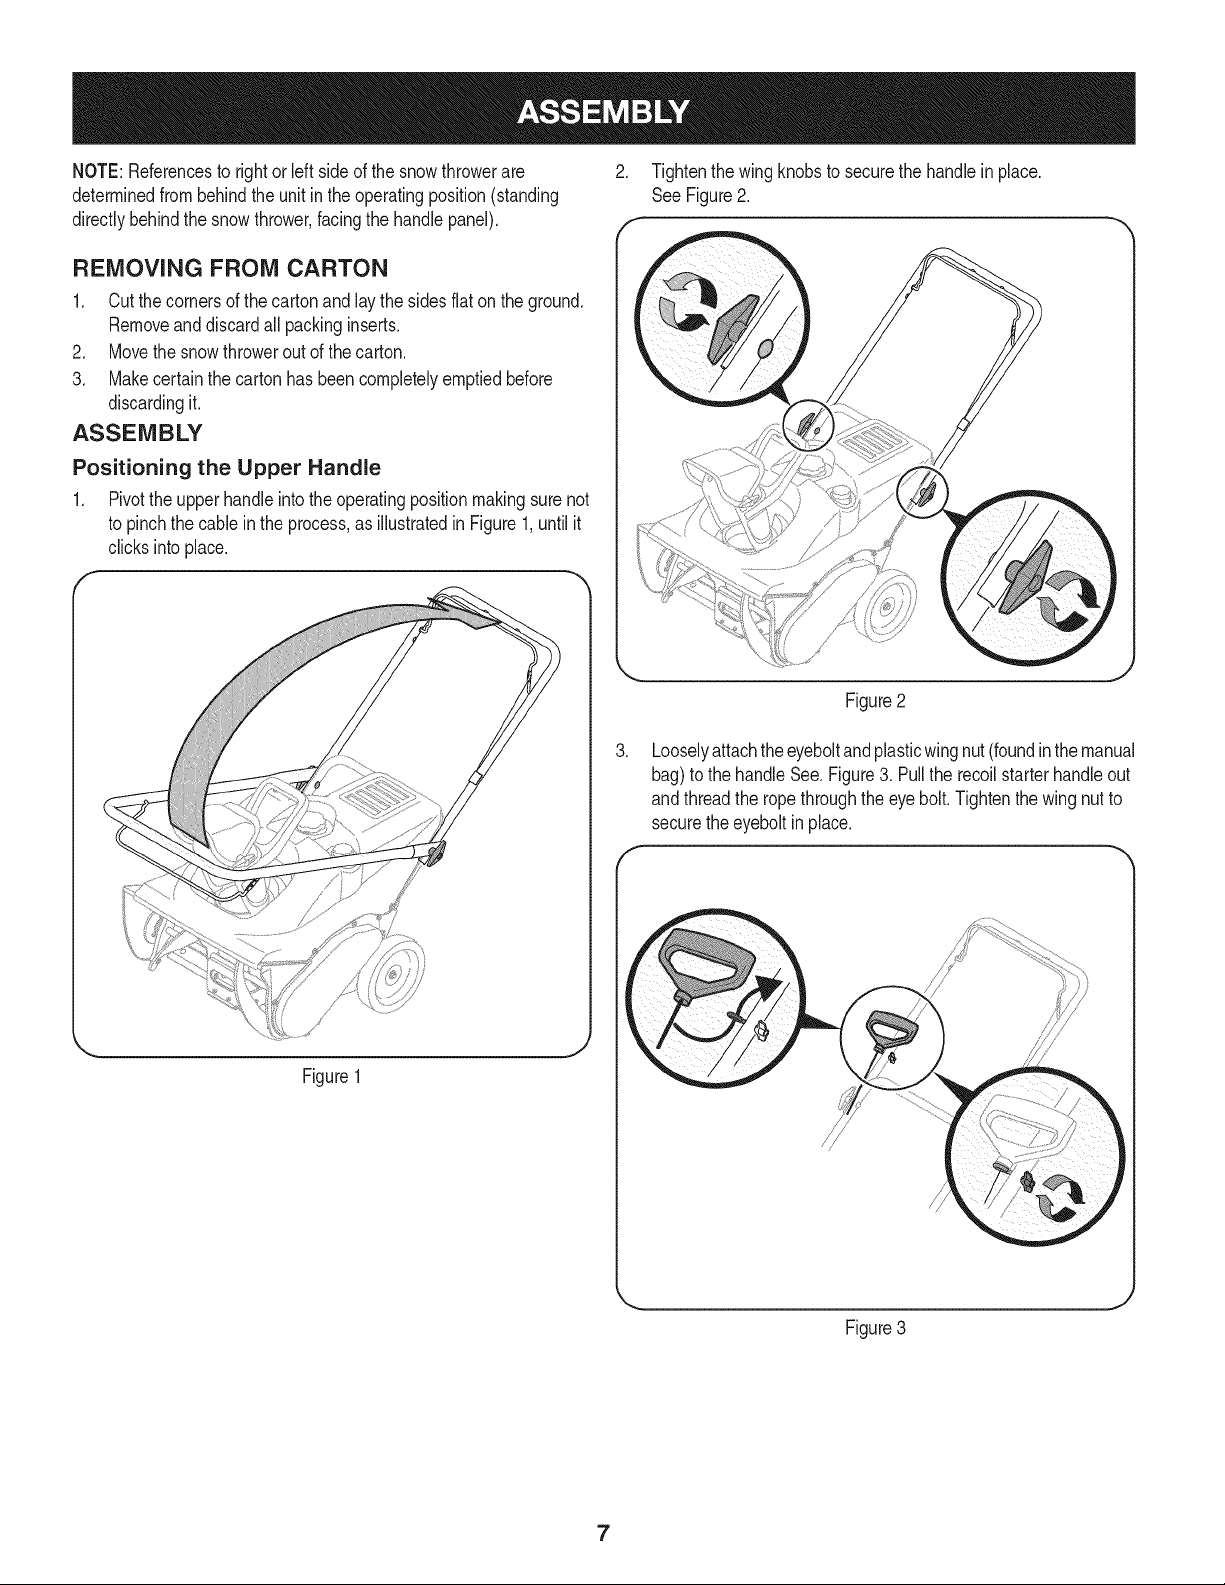
NOTE:Referencesto rightor left sideof the snowthrowerare
determinedfrombehindthe unit inthe operatingposition(standing
directlybehindthe snow thrower,facingthe handlepanel).
2. Tightenthe wingknobs to securethe handlein place.
See Figure2.
f
REMOVING FROM CARTON
1. Cut the cornersof thecarton and lay the sidesflat on the ground.
Removeand discard all packinginserts.
2. Movethe snowthrowerout of thecarton.
3. Makecertainthe carton has beencompletelyemptiedbefore
discardingit.
ASSEMBLY
Positioning the Upper Handle
1. Pivotthe upper handleintothe operatingpositionmakingsurenot
to pinchthe cablein the process,as illustratedin Figure1,untilit
clicksintoplace.
J
Figure2
3. Looselyattachtheeyeboltand plasticwingnut (foundin themanual
bag)to the handleSee.Figure3. Pullthe recoilstarterhandleout
andthreadthe rope throughthe eyebolt. Tightenthe wingnutto
securethe eyeboltin place.
f
Figure1
,,,..
Figure3
7
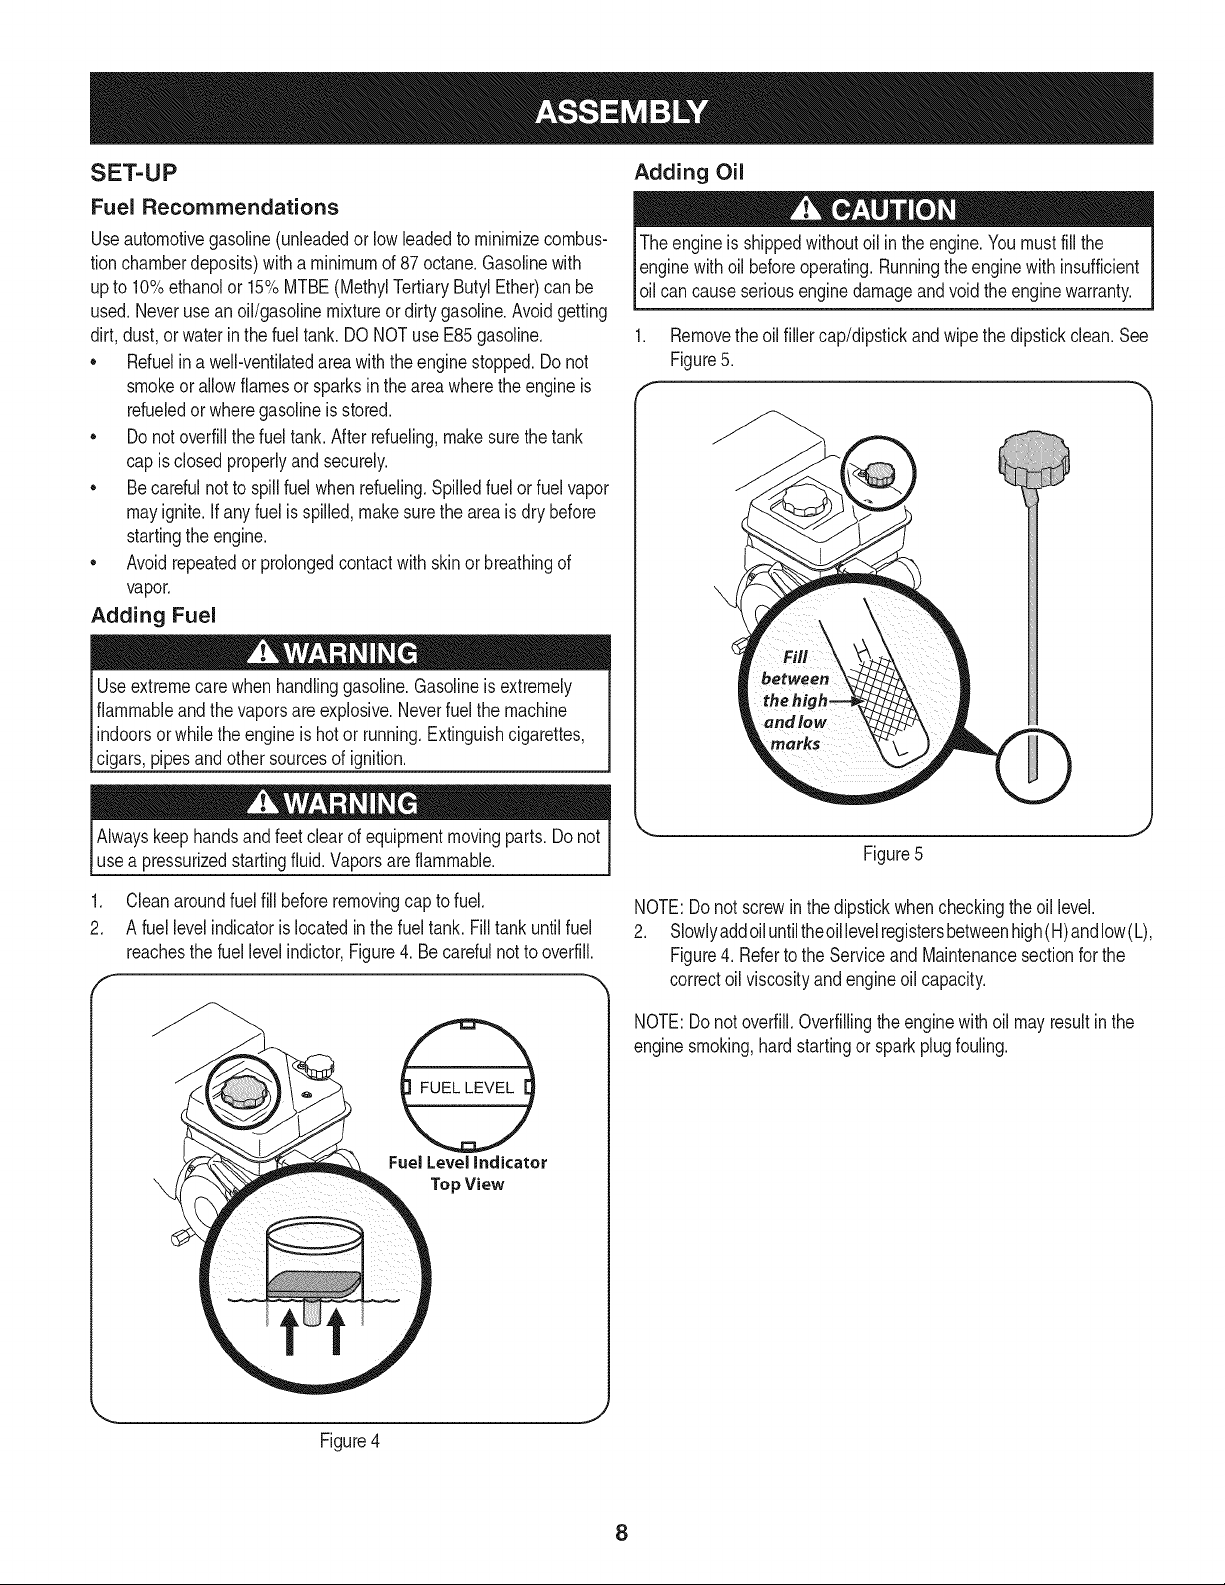
SET-UP
Fuel Recommendations
Useautomotivegasoline(unleadedor low leadedto minimizecombus-
tionchamberdeposits)with a minimumof 87octane.Gasolinewith
upto 10%ethanolor 15%MTBE(MethylTertiaryButylEther)can be
used.Neveruse anoil/gasolinemixtureor dirty gasoline.Avoidgetting
dirt,dust,or waterin the fueltank. DONOT use E85gasoline.
• Refuelina well-ventilatedareawiththe enginestopped.Donot
smokeor allowflamesor sparksin the areawherethe engineis
refueledorwheregasolineis stored.
• Do notoverfillthe fuel tank.Afterrefueling,makesurethetank
cap is closedproperlyand securely.
• Becarefulnot to spill fuelwhen refueling.Spilledfuel or fuelvapor
mayignite.Ifany fuel isspilled,makesurethe areaisdry before
startingthe engine.
• Avoidrepeatedor prolongedcontactwith skin or breathingof
vapor.
Adding Fuel
I Use care handlinggasoline, extremely
extreme when Gasolineis
flammableandthevaporsare explosive.Neverfuel the machine
indoorsorwhilethe engineishotor running.Extinguishcigarettes,
cigars,pipesand othersourcesof ignition.
Adding Oil
The engineis shippedwithoutoil inthe engine.Youmustfill the
enginewithoil beforeoperating.Runningthe enginewithinsufficient
_o cancause serous engne damageandvod the eng ne warranty.
1. Removethe oilfiller cap/dipstickandwipe thedipstickclean.See
Figure5.
Alwayskeephandsand feet clearof equipmentmovingparts. Donot
use a pressurizedstartingfluid. Vaporsare flammable.
1. Cleanaroundfuel fill beforeremovingcapto fuel.
2. A fuellevelindicatorislocatedin thefuel tank. Filltank untilfuel
reachesthe fuel levelindictor,Figure4. Becarefulnotto overfill.
(
Fuel Level indicator
Top View
Figure5
NOTE:Do not screwin thedipstick whencheckingtheoil level.
2. Slowlyaddoil untiltheoil levelregistersbetweenhigh(H)andlow(L),
Figure4. Referto the Serviceand Maintenancesectionforthe
correctoil viscosityandengine oil capacity.
NOTE:Do notoverfill.Overfillingtheengine with oil may resultinthe
enginesmoking,hardstartingor spark plugfouling.
Figure4
J
8
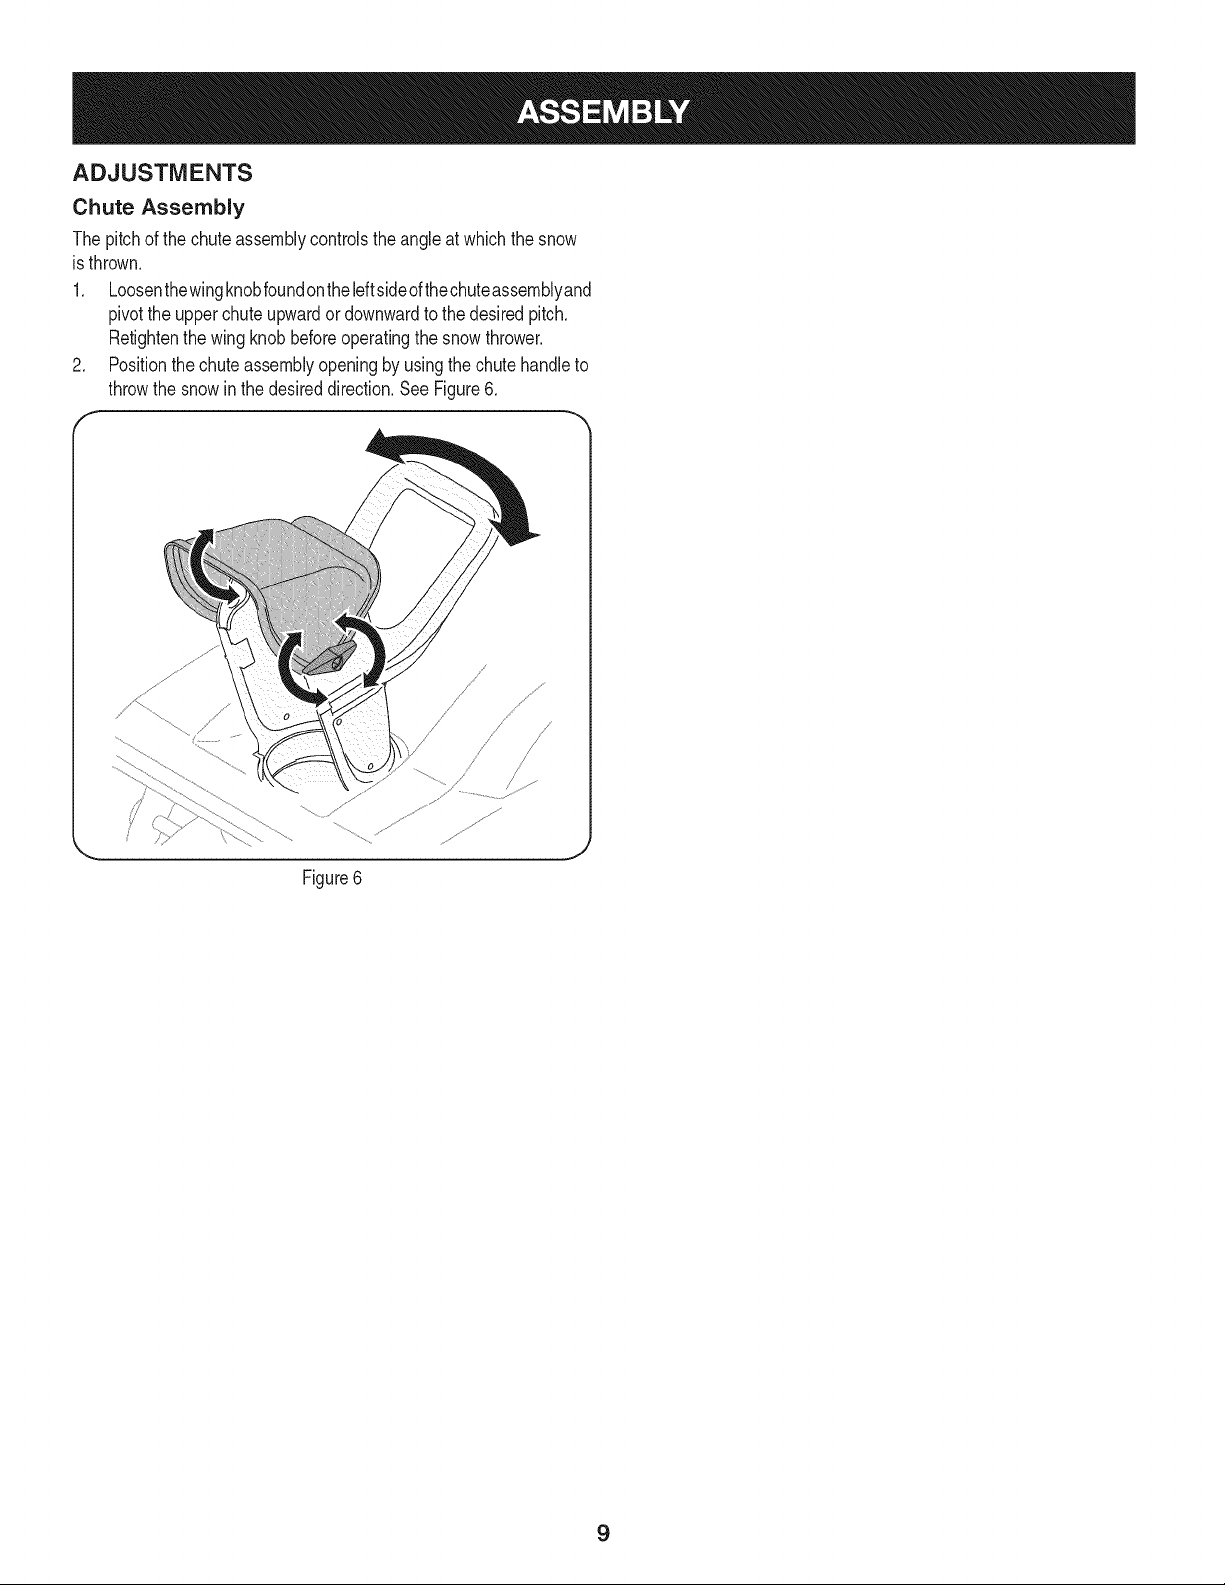
ADJUSTMENTS
Chute Assembly
The pitchof the chuteassemblycontrolsthe angleat whichthe snow
is thrown.
1. Loosenthewingknobfoundontheleftsideofthechuteassemblyand
pivotthe upperchuteupwardor downwardto thedesiredpitch.
Retightenthe wing knobbeforeoperatingthe snowthrower.
2. Positionthe chute assemblyopeningby usingthe chute handleto
throwthe snowinthe desireddirection.See Figure6.
F
j .......................
Figure6
9
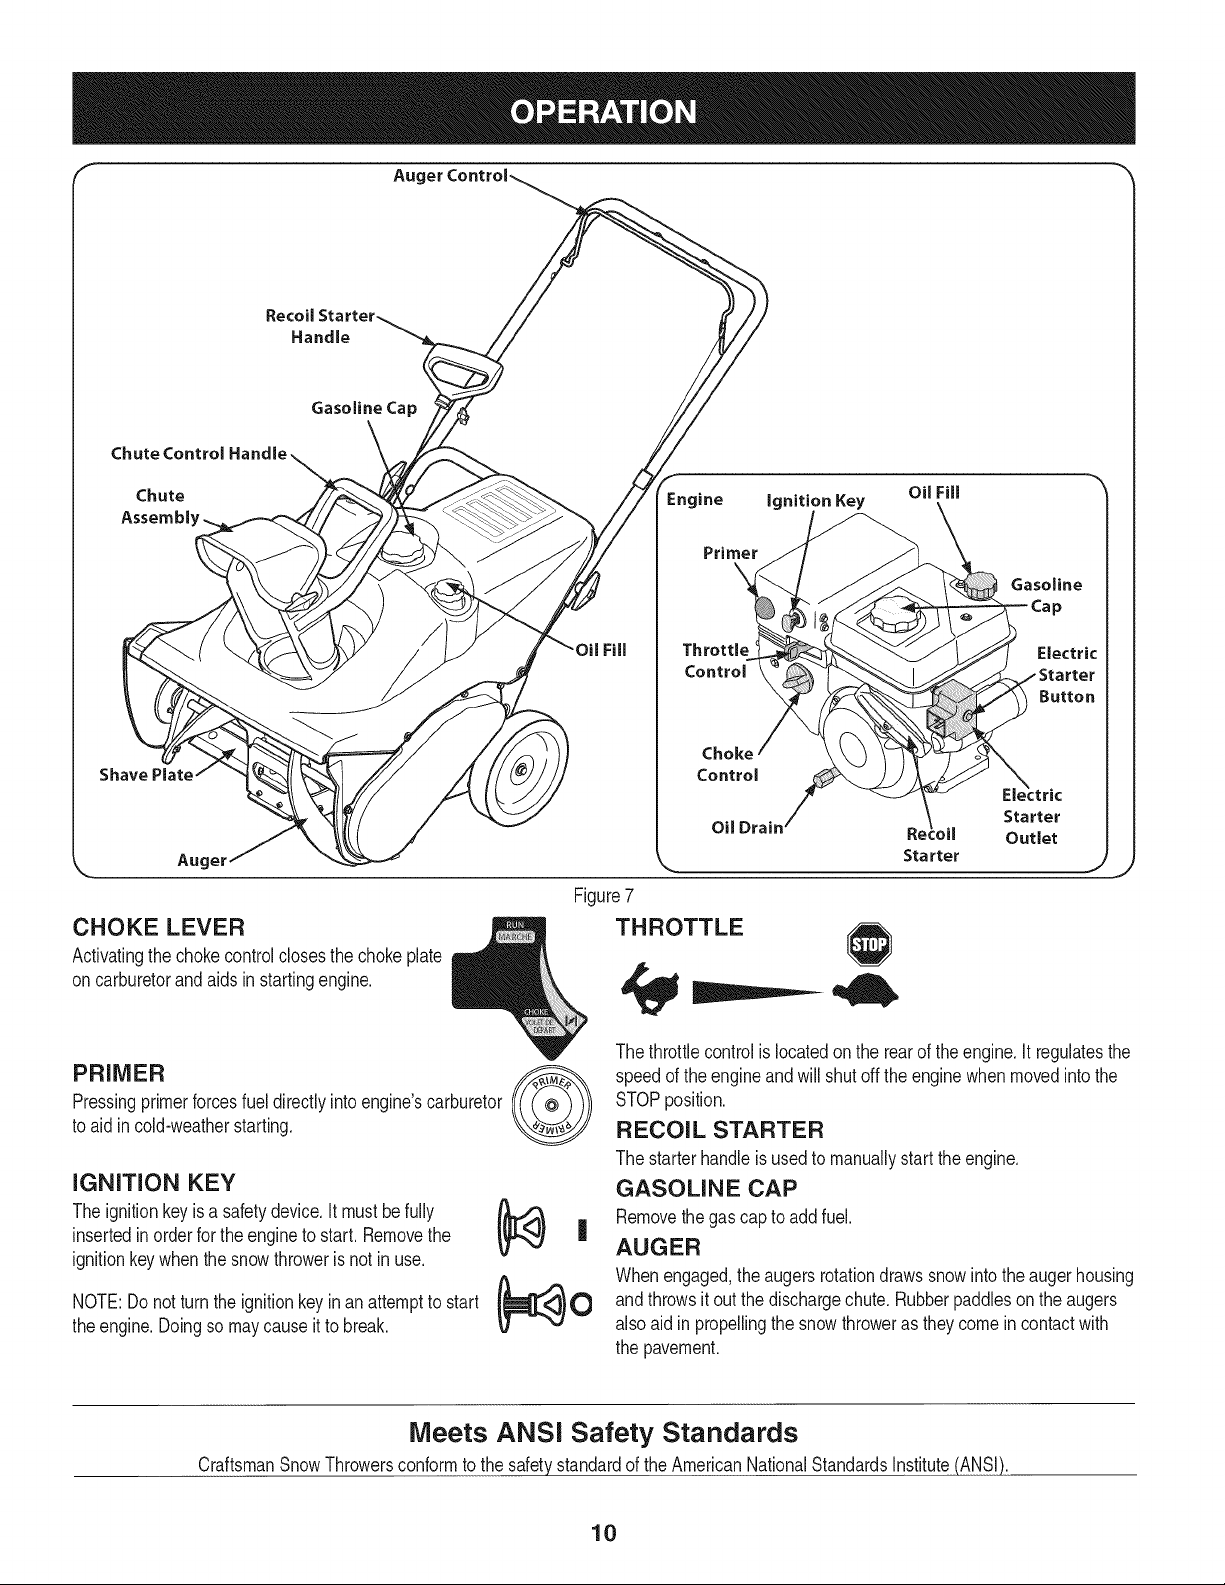
Aug
Recoil Starter_
Handle _
Gasoline Cap
Chute
Assembl'
Aug,
CHOKE LEVER
Activatingthe chokecontroldoses the chokeplate
oncarburetorandaids instartingengine.
PRIMER
Pressingprimerforcesfuel directlyintoengine'scarburetor
to aidin cold-weatherstarting.
iGNiTiON KEY
The ignitionkeyis a safetydevice,It mustbefully
insertedinorderfor theengineto start.Removethe
ignitionkeywhenthe snow throweris not in use,
NOTE:Donot turnthe ignitionkey in an attemptto start
theengine.Doingso maycause it to break.
Engine ignition Key
Gasoline
Throttle Electric
Control
Button
Choke
Control
Starter
Oil Drain
Outlet
Starter
Figure7
THROTTLE
The throttlecontrolis locatedonthe rearof the engine.It regulatesthe
speedof the engineandwill shutoffthe enginewhenmovedinto the
STOPposition.
RECOIL STARTER
The starterhandleis usedto manuallystartthe engine.
GASOLINE CAP
Removethe gascap to add fuel.
AUGER
Whenengaged,the augersrotationdrawssnow intothe augerhousing
andthrowsitout the dischargechute.Rubberpaddleson the augers
also aidinpropellingthe snowthroweras theycomeincontactwith
the pavement.
Meets ANSi Safety Standards
CraftsmanSnowThrowersconformto the safetystandardof the AmericanNationalStandardsInstitute(ANSI).
10
AUGER CONTROL
Locatedon the upperhandle,the augercontrolhandleis usedto
engageanddisengagedriveto the auger.Squeezethe controlhandle
againstthe upperhandleto engagethe auger;releaseit to disengage.
CHUTE ASSEMBLY
Rotatethe dischargechuteto the leftor rightusingthe chute handle.
Thepitch of the dischargechute controlsthe angleat which the snow
is thrown.Loosenthewing knobon the side of the dischargechute
beforepivotingthe dischargechute upwardor downward.Retighten
the knoboncethe desiredpositionhasbeen achieved.
SHAVE PLATE
Theshaveplate maintainscontactwiththe pavementas the snow
throweris propelled,allowingsnowclose tothe pavement'ssurfaceto
bedischarged.
ELECTRIC STARTER OUTLET
Theelectricstarteroutlet requiresthe use of a three-prongoutdoor
extensioncordand a 120Vpowersource/walloutlet.
NOTE:The electricstarteris mountedto the plasticshroudand is
shownin Figure7 attachedto the enginefor easierreference.
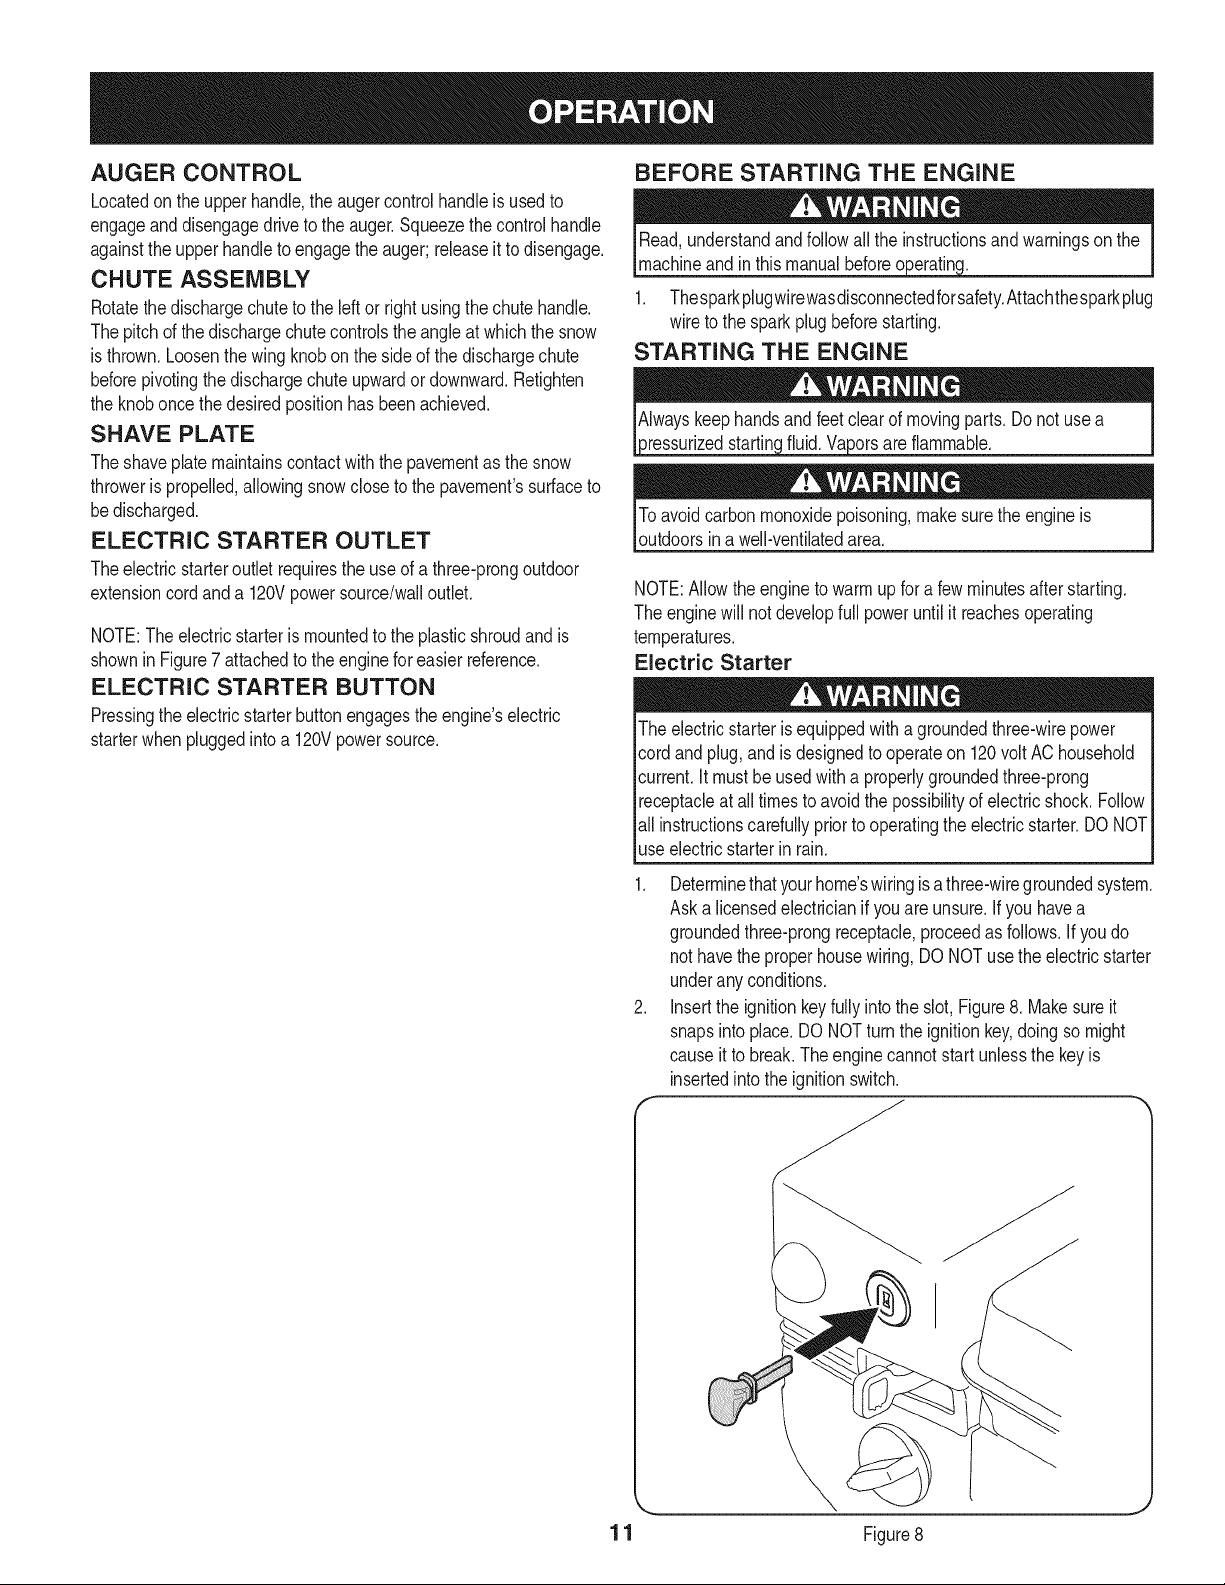
ELECTRIC STARTER BUTTON
Pressingthe electricstarterbuttonengagesthe engine'selectric
starterwhenpluggedintoa 120Vpowersource.
BEFORE STARTING THE ENGINE
machineand in this manualbefore
1. Thesparkplugwirewasdisconnectedforsafety.Attachthesparkplug
wire to the sparkplugbeforestarting.
STARTING THE ENGINE
_ressurizedstartinc flammable.
Toavoidcarbonmonoxidepoisoning,makesurethe engineis
outdoorsina well-ventilatedarea.
NOTE:Allowtheengine to warmup fora few minutesafterstarting.
The enginewill notdevelopfull poweruntil it reachesoperating
temperatures.
Electric Starter
The electricstarteris equippedwith a groundedthree-wirepower
cord andplug,andis designedto operateon 120voltAChousehold
current.It mustbeusedwitha properlygroundedthree-prong
receptacleat all timesto avoidthe possibilityof electricshock.Follow
all instructionscarefullypriorto operatingthe electricstarter.DONOT
useelectricstarterin rain.
1. Determinethat yourhome'swiringisa three-wiregroundedsystem.
Aska licensedelectricianif youare unsure.Ifyou havea
groundedthree-prongreceptacle,proceedas follows.Ifyou do
nothavethe properhousewiring, DO NOTusethe electricstarter
underanyconditions.
2. Insertthe ignitionkey fully intothe slot, Figure8. Makesureit
snapsintoplace. DO NOTturn the ignitionkey,doing so might
causeit to break.The enginecannotstart unlessthe keyis
insertedinto the ignitionswitch.
1 1 Figure8
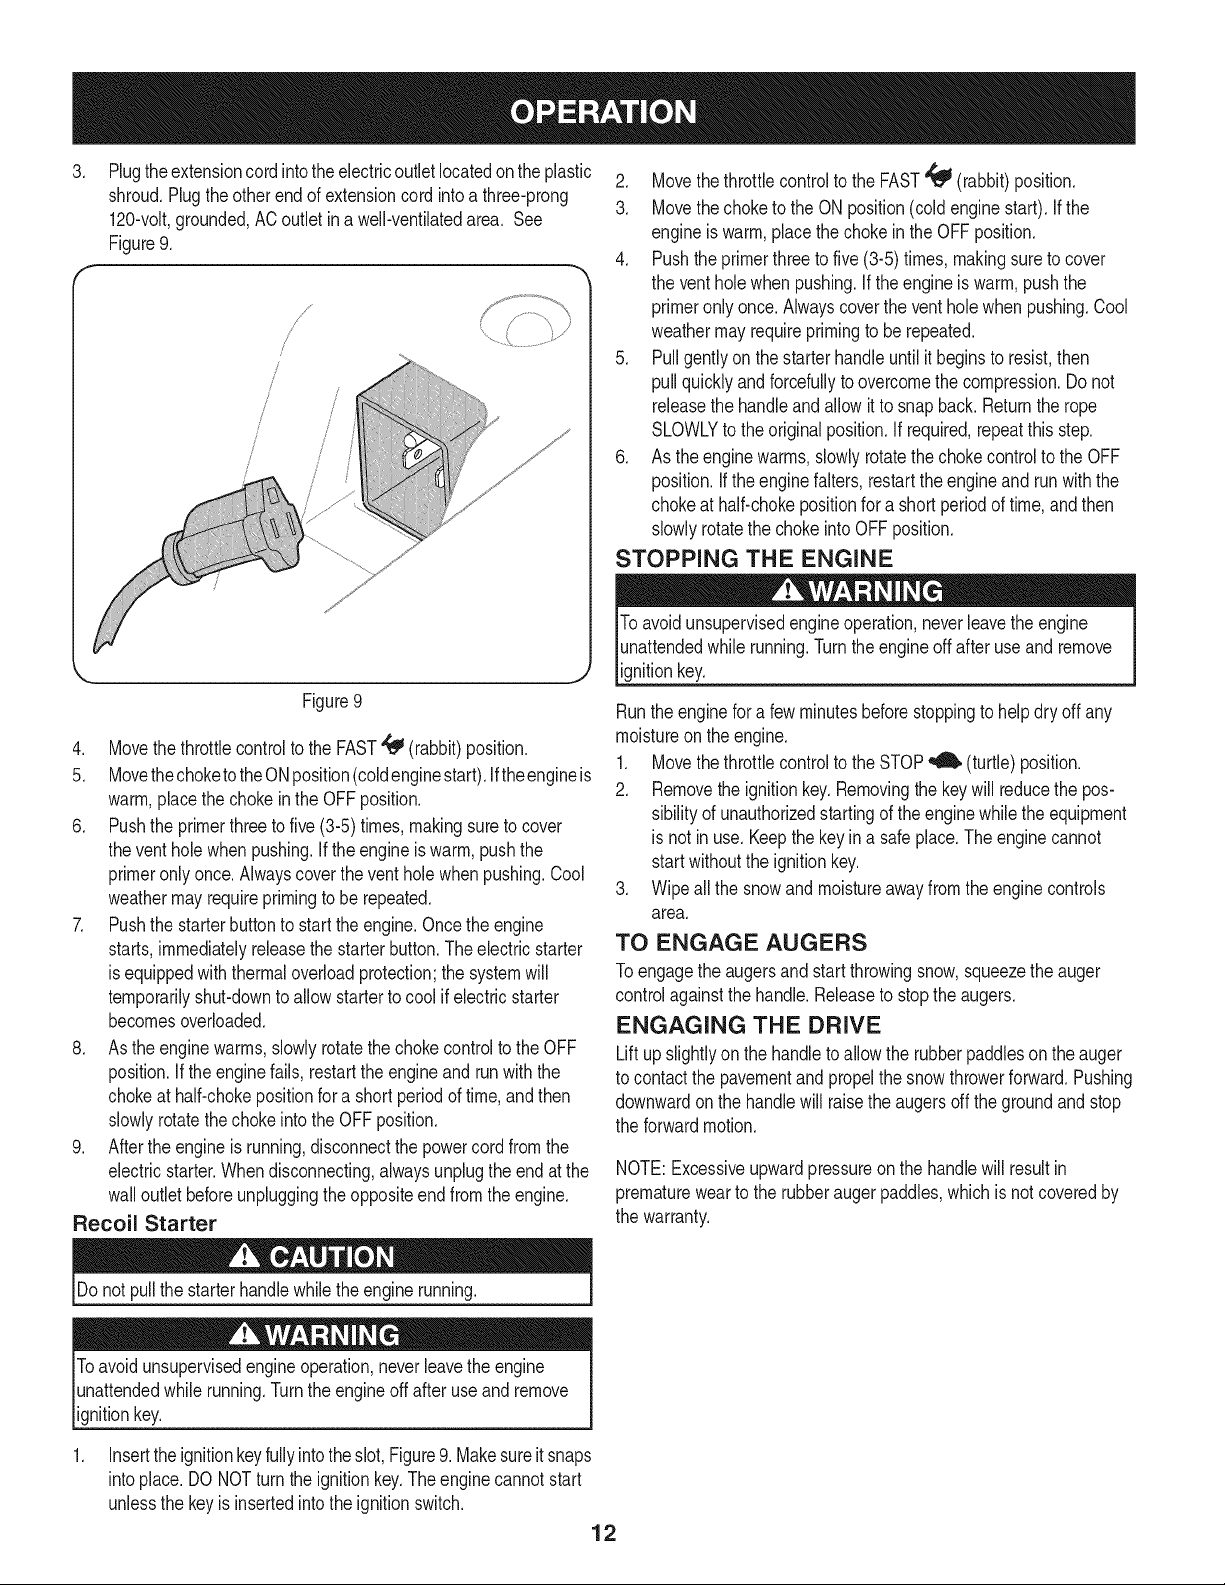
.
Plugtheextensioncord intothe electricoutletlocatedonthe plastic
shroud.Plugthe otherend of extensioncord intoa three-prong
120-volt,grounded,ACoutlet in a well-ventilatedarea. See
Figure9.
f
/
/
/
/
/
/
/
f
J
Figure9
4. Movethe throttlecontrolto the FAST_ (rabbit)position.
5. MovethechoketotheONposition(coldenginestart).Iftheengineis
warm,placethe choke in the OFFposition.
6. Pushthe primerthreeto five (3-5)times,makingsureto cover
thevent hole when pushing.If theengine is warm,pushthe
primeronly once.Alwayscover thevent hole whenpushing.Cool
weathermayrequireprimingto be repeated.
7. Pushthe starterbutton to start theengine.Oncetheengine
starts,immediatelyreleasethestarterbutton.Theelectricstarter
is equippedwiththermaloverloadprotection;the systemwill
temporarilyshut-downto allow starterto cool if electricstarter
becomesoverloaded.
8. As theengine warms,slowlyrotatethe chokecontrolto theOFF
position.If the enginefails,restartthe engineandrunwiththe
chokeat half-chokepositionfor a shortperiodof time,and then
slowlyrotatethechoke intothe OFF position.
9. Afterthe engine is running,disconnectthe powercord fromthe
electricstarter.Whendisconnecting,alwaysunplugthe end atthe
walloutletbeforeunpluggingthe oppositeend from the engine.
Recoil Starter
2. Movethethrottlecontrolto the FAST'_ (rabbit)position.
3. Movethechoketo the ONposition(coldengine start). If the
engineis warm,placethe chokein the OFF position.
4. Pushthe primerthreeto five (3-5) times, makingsureto cover
the ventholewhenpushing.Ifthe engineis warm,pushthe
primeronlyonce. Alwayscoverthe vent hole whenpushing.Cool
weathermayrequireprimingto be repeated.
5. Pullgentlyonthe starterhandleuntil it beginsto resist,then
pullquicklyandforcefullytoovercomethe compression.Donot
releasethe handleand allowit to snapback. Returnthe rope
SLOWLYto the originalposition.If required,repeatthis step.
6. As the enginewarms,slowlyrotatethechoke controlto the OFF
position.If the enginefalters,restartthe engineandrun with the
chokeat half-chokepositionfor a shortperiodof time,andthen
slowlyrotatethe chokeintoOFF position.
STOPPING THE ENGINE
To avoidunsupervisedengineoperation,neverleavethe engine
lunattendedwhile running.Turnthe engineoff after useand remove
lignitionkey.
Runtheengine fora fewminutesbeforestoppingto helpdry off any
moistureon theengine.
1. Movethethrottlecontrolto the STOP_ (turtle)position.
2. Removethe ignitionkey.Removingthe key will reducethe pos-
sibilityof unauthorizedstartingof the enginewhilethe equipment
is not inuse.Keepthe keyina safe place.The enginecannot
start withoutthe ignitionkey.
3. Wipeall the snowandmoistureawayfromthe enginecontrols
area.
TO ENGAGE AUGERS
Toengagethe augersand startthrowingsnow,squeezethe auger
controlagainstthe handle.Releaseto stop the augers.
ENGAGING THE DRIVE
Liftupslightlyonthe handleto allowthe rubberpaddlesonthe auger
to contactthe pavementand propelthe snowthrowerforward.Pushing
downwardonthe handlewill raisethe augersoff the groundand stop
the forwardmotion.
NOTE:Excessiveupwardpressureonthe handlewill resultin
prematurewearto the rubberaugerpaddles,which is notcoveredby
the warranty.
Do not pullthe starterhandlewhile theenginerunning.
Toavoidunsupervisedengineoperation,neverleavethe engine
unattendedwhilerunning.Turnthe engineoff afteruseand remove
ignitionkey.
Insertthe ignitionkeyfully intotheslot,Figure9. Makesureit snaps
intoplace. DO NOTturnthe ignitionkey.The enginecannotstart
unlessthe keyis insertedintothe ignitionswitch.
12
MAINTENANCE SCHEDULE
Beforeperforminganytypeof maintenance/service,disengageall
controlsandstoptheengine.Waituntilall movingpartshavecometo
acompletestop.Disconnectsparkplugwireandgrounditagainstthe
enginetopreventunintendedstarting.Alwayswearsafetyglassesduring
operationor whileperforminganyadjustmentsor repairs.
Followthe maintenanceschedulegivenbelow.This chart describes
serviceguidelinesonly. Usethe ServiceLog columnto keeptrackof
completedmaintenancetasks.To locate the nearest Sears Service
Centeror to scheduleservice,simplycontactSears at
1-800-4-MY-HOME®.
EachUse .
2.
1. Check
2. Clean
Engineoil level.
SnowThrowerand exhaust
area.
Engineoil.
Engineoil.
Exhaustarea.
SparkPlug.
Engineoil
Sparkplug
Pivotpoints
Controlhandle
Extensionspring
1st5 hours 1. 1. Change.
Every5 hours 1. 1. Check.
2. 2. Clean.
25hours 1. 2. Check.
Everyseason/50hours 1. 1. Change
Everyseason/lO0hours 1. 1. Clean,replace,re-gap
Everyseason/Before 1. 1. Lubricate
storage 2. 2. Lubricate
3. 3. Lubricate
ENGINE MAINTENANCE
Topreventaccidentalstart-up,shut off the engineand removethe
ignitionkey beforeperforminganytype of engine maintenance.
Periodicinspectionand adjustmentof the engine is essentialif high
levelperformanceis to be maintained.Regularmaintenancewill also
ensurea longservicelife.The requiredserviceintervalsandthetype
of maintenanceto beperformedaredescribedinthe tableabove.
Followthe hourlyor calendarintervals,whicheveroccurfirst. More
frequentserviceis requiredwhenoperatingin adverseconditions.
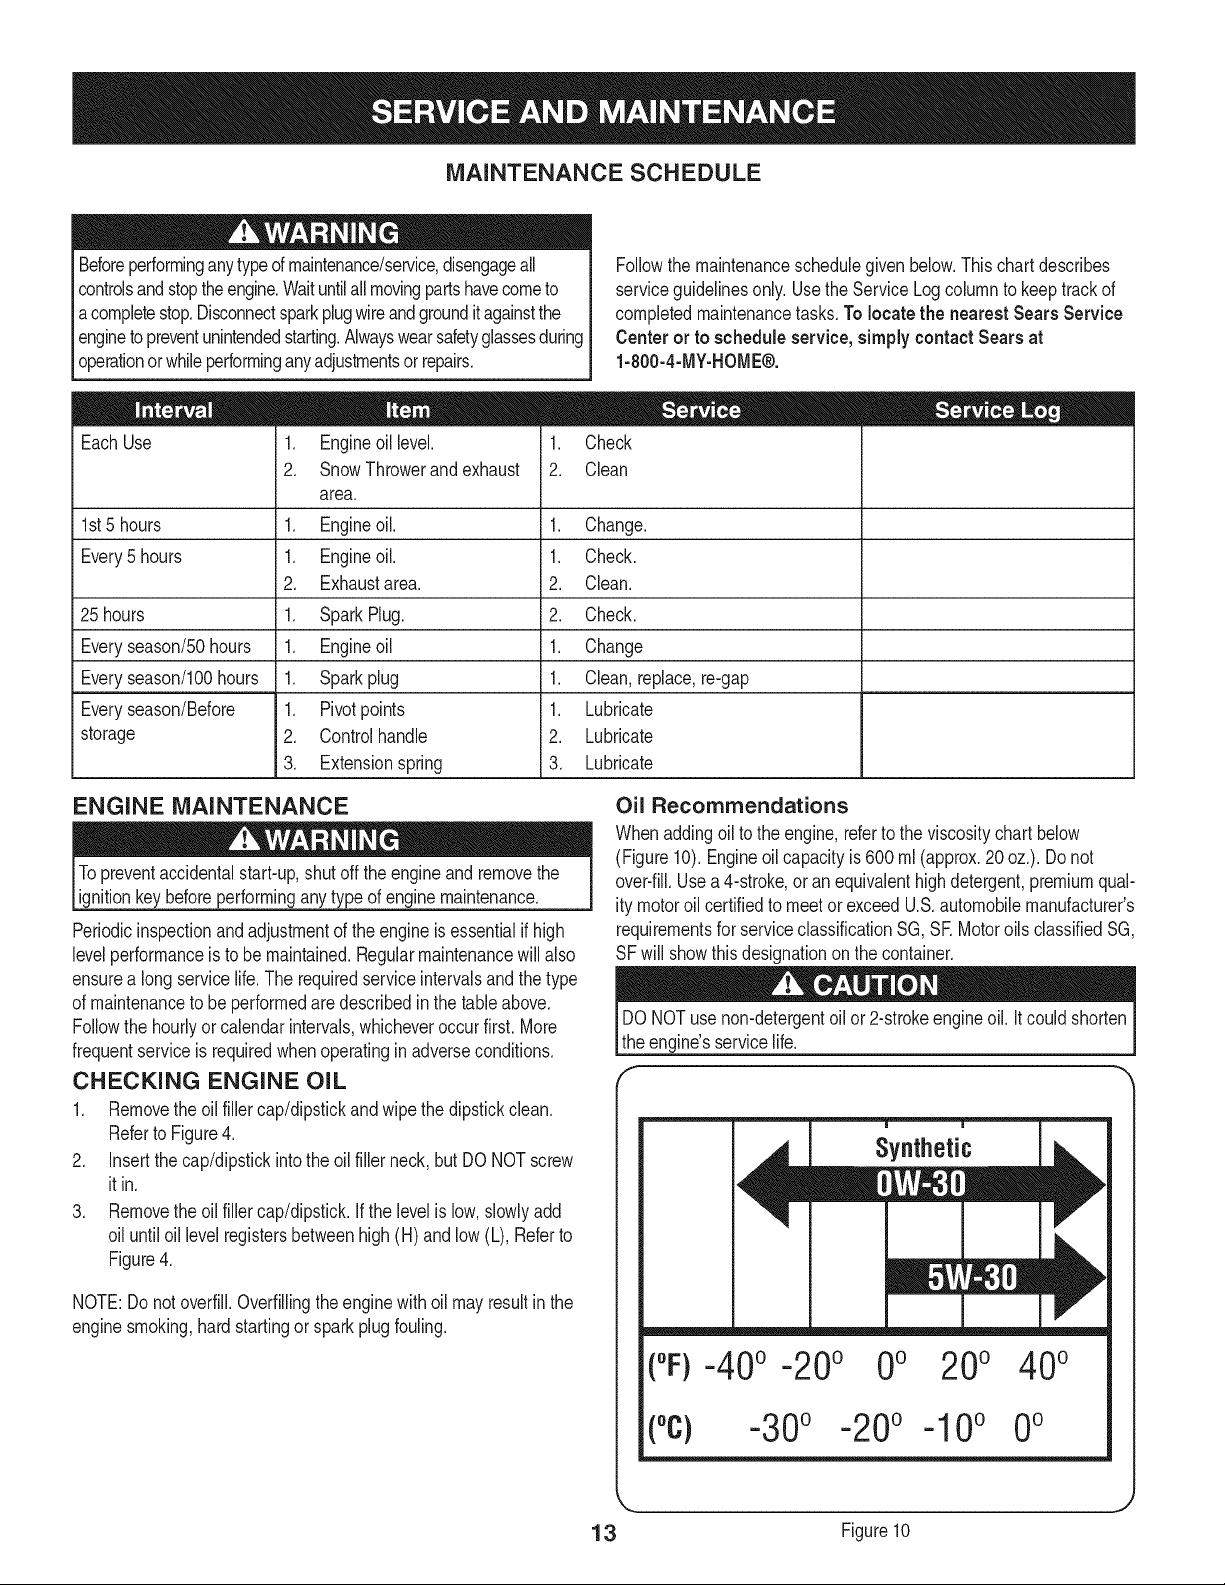
CHECKING ENGINE OIL
1. Removethe oil fillercap/dipstickand wipethe dipstickclean.
Referto Figure4.
2. Insertthe cap/dipstickintothe oil filler neck,but DO NOTscrew
it in.
3. Removethe oil fillercap/dipstick.If the levelis low, slowlyadd
oil untiloil levelregistersbetweenhigh (H) and low (L), Referto
Figure4.
NOTE:Donot overfill.Overfillingthe enginewith oil mayresultin the
enginesmoking,hardstartingor spark plug fouling.
Oil Recommendations
Whenaddingoil to the engine,referto the viscositychartbelow
(Figure10). Engineoil capacityis 600 rnl(approx.20oz.). Do not
over-fill.Use a4-stroke,oran equivalenthighdetergent,premiumqual-
itymotoroil certifiedto meetor exceedU.S.automobilemanufacturer's
requirementsfor serviceclassificationSG,SE Motoroils classifiedSG,
SF will showthisdesignationonthe container.
DONOT usenon-detergentoil or 2-strokeengineoil. It couldshorten
the engine'sservicelife.
m m
Synthetic
(%-40 ° -20o 0o 200 400
(oc) -30° -20° -10° 0°
13 Figure10
CHANGING ENGINE OiL SPARK PLUG
NOTE: Checkthe oil levelbeforeeach useandaftereveryfivehours
of operationto besurethe correctoil levelis maintained.Referto
CheckingEngineOil.
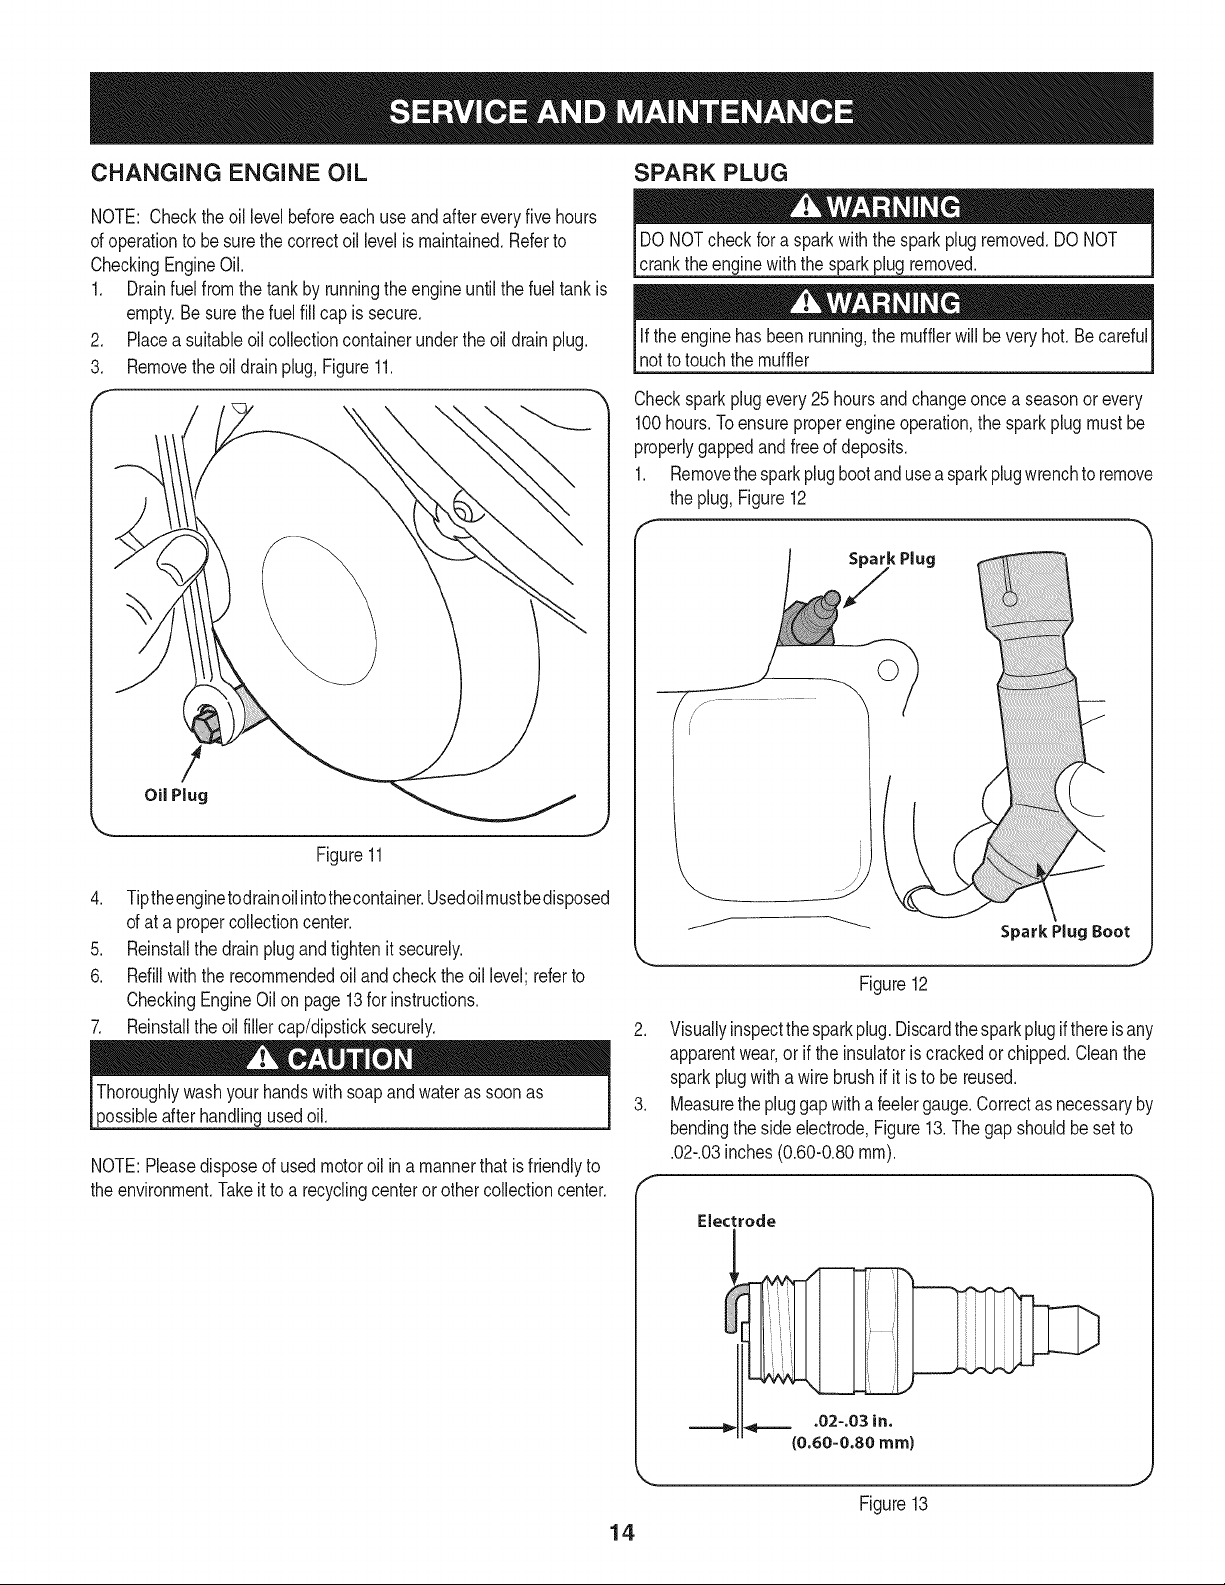
1. Drainfuelfrom the tankby runningtheengineuntilthe fueltankis
empty.Besurethe fuel fill capis secure.
2. Placea suitableoil collectioncontainerunderthe oil drain plug.
3. Removetheoil drainplug,Figure11.
!
Oil Plug
Figure11
4. Tiptheenginetodrainoilintothecontainer.Usedoilmustbedisposed
of at a propercollectioncenter.
5. Reinstallthe drain plugand tightenit securely.
6. Refillwith the recommendedoil andcheckthe oil level;referto
CheckingEngineOil on page13for instructions.
7. Reinstallthe oil fillercap/dipsticksecurely.
Thoroughlywashyourhandswith soapand wateras soon as
possibleafterhandlingusedoil.
NOTE:Pleasedisposeof usedmotoroil ina mannerthat is friendlyto
the environment.Takeit to a recyclingcenteror othercollectioncenter.
DONOTcheck fora sparkwiththe sparkplugremoved.DONOT
cranktheengine with the sparkplugremoved.
Ifthe enginehas beenrunning,the mufflerwill be very hot. Becareful
not to touchthemuffler
Checkspark plugevery 25 hoursandchangeoncea seasonorevery
100hours.Toensureproperengineoperation,the spark plug mustbe
properlygappedand freeof deposits.
1. Removethe sparkplugbootand usea sparkplugwrenchto remove
the plug, Figure12
SparkPlug
,J
©
J
Figure12
SparkPlugBoot
.J
2. Visuallyinspectthe sparkplug.Discardthesparkplugifthereis any
apparentwear,or if the insulatoris crackedor chipped.Cleanthe
sparkplugwithawire brushif it is to be reused.
3. Measurethe pluggap with a feelergauge.Correctas necessaryby
bendingthe sideelectrode,Figure13.The gap shouldbe setto
.02-.03inches(0.60-0.80ram).
Electrode
.02=.03 in.
(0.60-0.80 rnrn)
14
Figure13
4. Checkthatthesparkplugwasherisingoodconditionandthreadthe3.
sparkpluginbyhandtopreventcross-threading.
5. Afterthesparkplugisseated,tightenwithasparkplugwrenchto
compressthewasher, f
NOTE:Wheninstallinganewsparkplug,tighten1/2-turnafterthe
sparkplugseatstocompressthewasher.Whenreinstallingaused
sparkplug,tighten1/8-to1/4-turnafterthesparkplugseatsto
corn_ressthewasher.
becomever hotandcandamac me.
CLEANING THE ENGINE
Ifthe enginehasbeenrunning,allowit to cool for at leasthalfan hour
beforecleaning.Periodicallyremovedirt build-upfromengine.
Do not spraythe enginewithwaterto cleanit becausethewater
couldcontaminatethe fuel. Usinga gardenhoseor pressurewashing
Iequipmentcanalso forcewater intothe muffleropening.Waterthat
[passesthroughthe muffer can enterthecy nderand causedamage,j
Accumulationof debrisaroundthe mufflercouldcausea fire. Inspect
andcleanbeforeevery use.
LUBRICATION
Lubricatethe pivotpointsonthe controlhandleandthe extension
springat the endof thecontrol cablewith a lightoil onceeveryseason
andbeforethe snow throweris putinto storageatthe endof the
season.
ADJUSTMENTS
BeforeServicing,repairingor inspectingthe snowthrower,disengage
the augercontrol.Stop theengineand removethe keyto prevent
unintendedstarting.
Shave Plate
Tocheckthe adjustmentof theshaveplate, placethe machineon a
levelsurface.The wheels,shaveplateand augersshouldall contact
the levelsurface.Notethatif the shaveplateisadjustedtoo high,
snowmayblowundertheauger housing.If the shaveplatewearsout
excessively,orthe snowthrowerdoes not self-propel,theshaveplate
maybetoo lowandneedsto beadjusted.
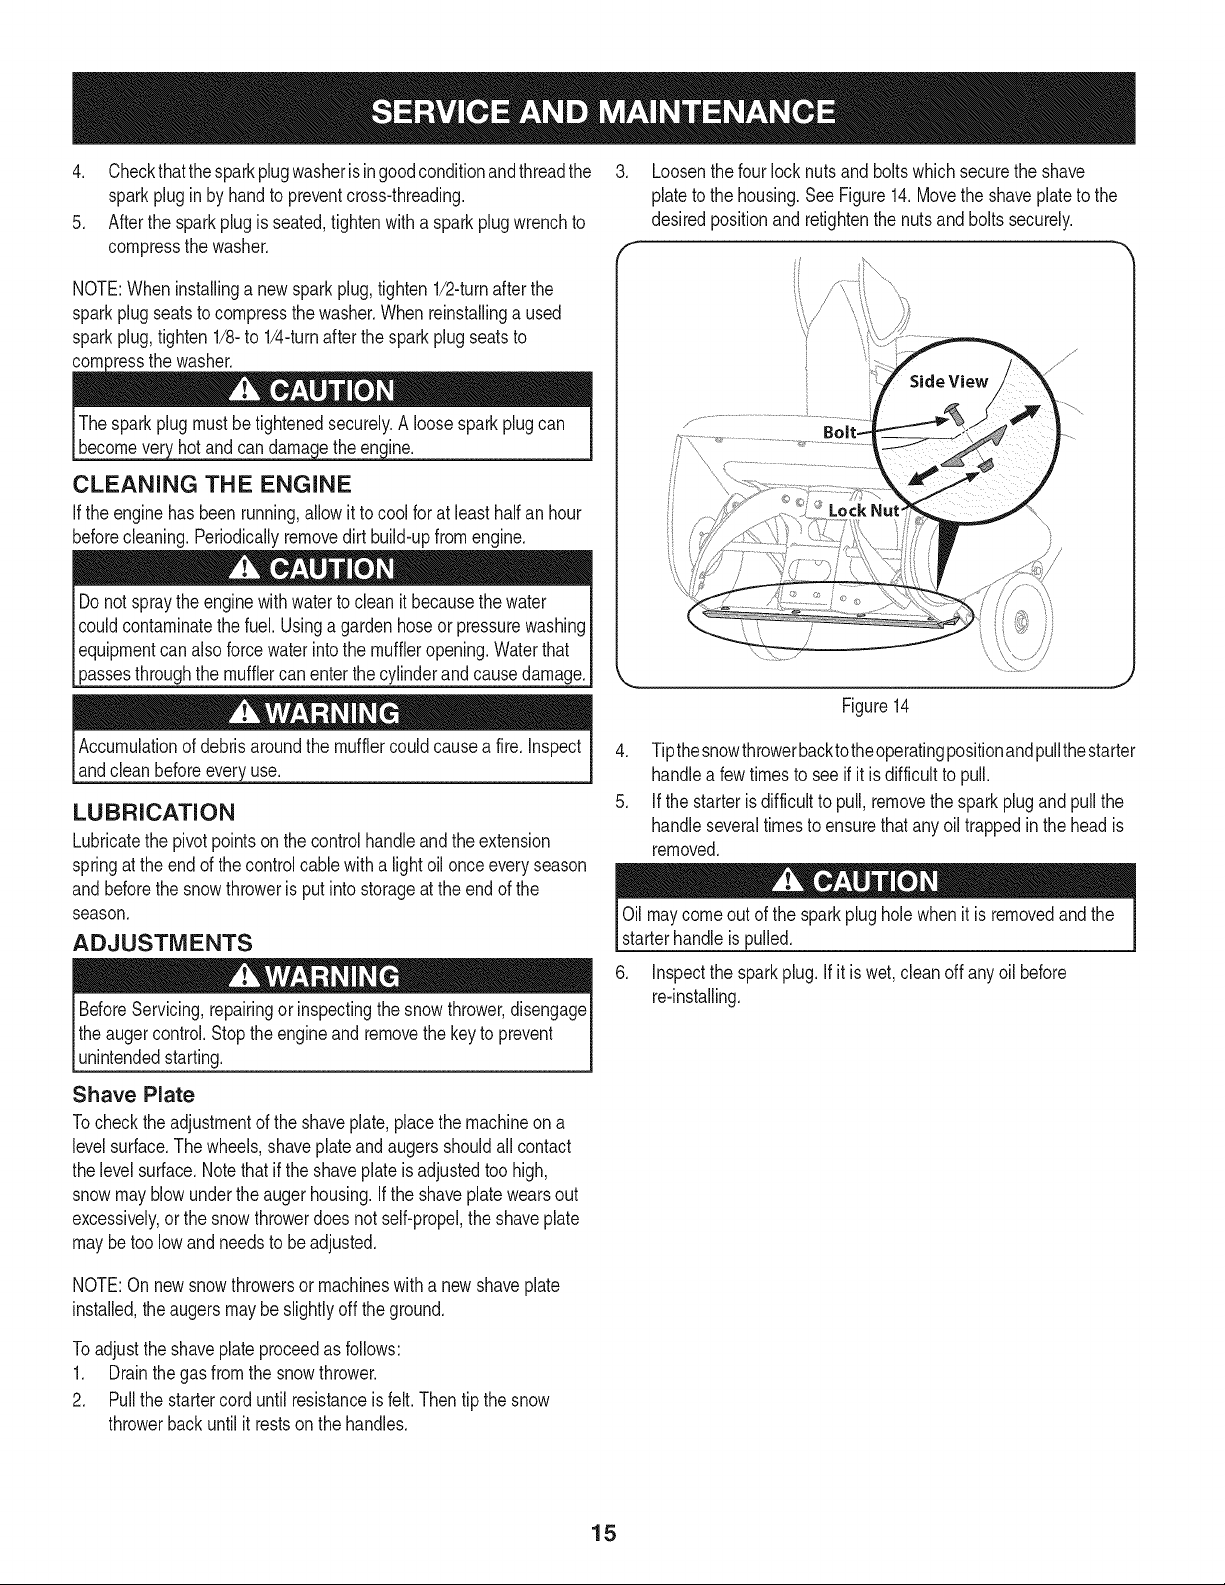
Loosenthefour lock nuts and bolts whichsecurethe shave
plateto the housing.SeeFigure14.Movethe shaveplateto the
desiredpositionand retightenthe nuts and bolts securely.
Figure14
4. Tipthesnowthrowerbacktotheoperatingpositionandpullthestarter
handlea few timesto seeifit isdifficultto pull.
5. Ifthe starterisdifficultto pull,removethe spark plugand pullthe
handleseveraltimesto ensurethat anyoil trappedin the headis
removed.
Oilmaycomeout of the sparkplugholewhenit is removedandthe
starterhandle ispulled.
6. Inspectthe sparkplug.If itiswet, cleanoffany oil before
re-installing.
NOTE:On newsnowthrowersor machineswitha newshaveplate
installed,theaugersmay be slightlyoff the ground.
Toadjustthe shaveplateproceedas follows:
1. Drainthe gasfrom the snowthrower.
2. Pull the startercord until resistanceisfelt. Thentip the snow
throwerbackuntil it restson the handles.
15
Control Cable
As a resultof both thecontrolcableand the auger drivebelt stretching
dueto wear,periodicadjustmentsmay be necessary.If the auger
seemsto hesitatewhenrotating,proceedas follows:
Theupper hole inthe controlhandleprovidesfor an adjustmentin
cabletension.Toadjust,disconnectthe end of controlcablefrom the
bottomholein the controlhandleand reinsertit in the upper hole.
Insertthe cablefrom theoutsideas shown in Figure15.
f
2. Removethe belt bygraspingit from thebottomof the augerpulley
and pullingoutward.
NOTE:Pushdownon the idler pullerto releasethe beltfrom underthe
beltkeeper.See Figure16.
To replacethe beltfollowthese instructionsand referto Figure17:
/
Figure15
Testthe snowthrowerto seeif there is a noticeabledifference.If
aftertheadjustmentto the controlcablethe augerstill hesitateswhen
rotating,see ReplacingBeltfor instructionson replacingthe belt.
Chute Assembly
Referto the AssemblySectionfor instructionson adjustingthe chute
assembly.
REPLACING BELT
Auger Drive Belt
1. Removethebelt coverby removingthe five hex screwsthat
secureitto the frame.See Figure16.
Figure17
1. Pushdownon the idlerpulley.
2. Positionthe belton topof theaugerpulleyand underthe belt
keeper.
3. Routethebelt aroundthe enginepulley.
4. Pushthe belt overthe bottomof the auger pulley.
5. Reinstallthe belt coverremovedearlier.
.........Belt Keeper
Figure16 16
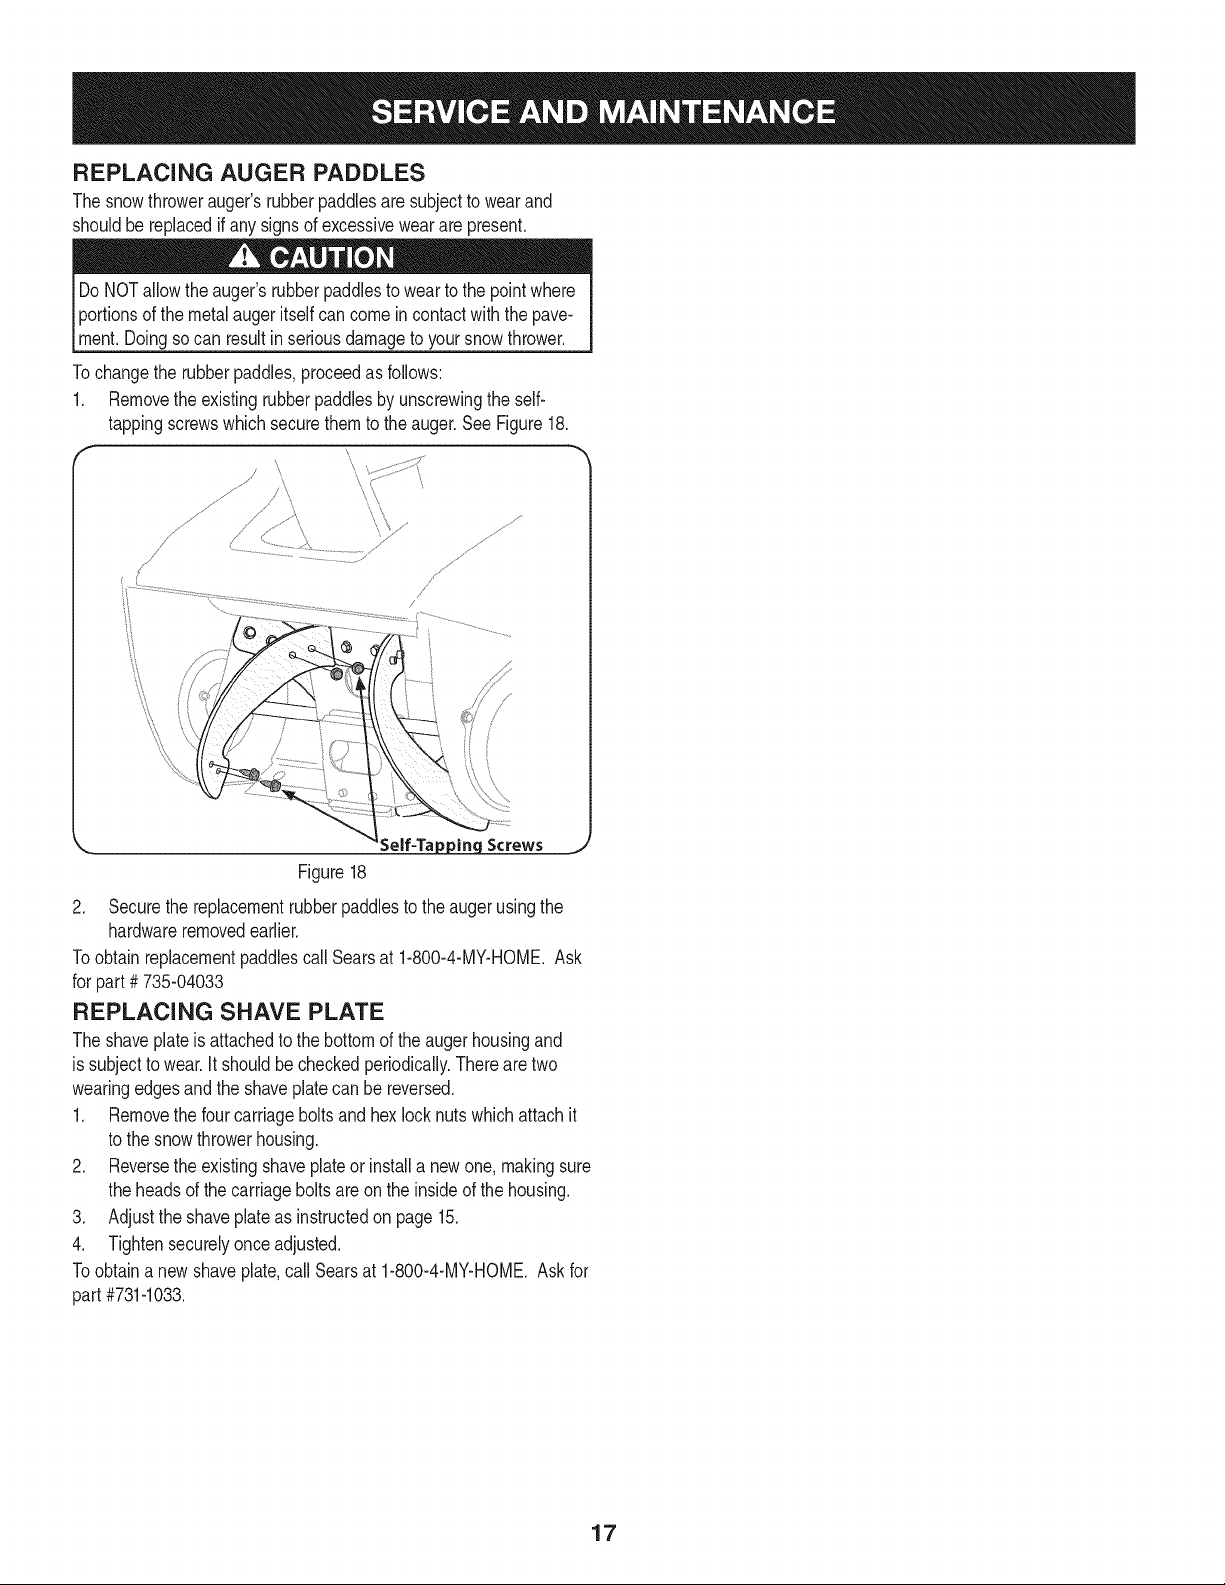
REPLACING AUGER PADDLES
The snowthrowerauger'srubberpaddlesaresubjectto wearand
shouldbe replacedifany signsof excessiveweararepresent.
Do NOTallowthe auger'srubberpaddlesto wearto the pointwhere
portionsof the metalaugeritselfcancome in contactwiththe pave-
ment.Doingsocan resultin seriousdamageto yoursnowthrower.
Tochangethe rubberpaddles,proceedas follows:
1. Removethe existingrubberpaddlesby unscrewingthe self-
tappingscrewswhich securethemto theauger.See Figure18.
Self-Ta
Figure18
Screws
2. Securethe replacementrubberpaddlesto the auger usingthe
hardwareremovedearlier.
Toobtainreplacementpaddlescall Searsat 1-800-4-MY-HOME.Ask
for part# 735-04033
REPLACING SHAVE PLATE
The shaveplateis attachedto the bottomof the auger housingand
is subjectto wear.It shouldbe checkedperiodically.Therearetwo
wearingedgesand the shaveplatecanbe reversed.
1. Removethe four carriageboltsandhexlocknutswhichattachit
to the snowthrowerhousing.
2. Reversethe existingshaveplateor installa newone,makingsure
the headsof thecarriageboltsare on the insideof the housing.
3. Adjustthe shaveplateas instructedon page15.
4. Tightensecurelyonceadjusted.
Toobtaina newshaveplate,call Searsat 1-800-4-MY-HOME.Askfor
part #731-1033.
17
Ifthe snowthrowerwillnot be usedfor30 daysor longer,or if it is the end of the snowseasonwhenthe last possibilityof snowis gone,the
equipmentneedsto be storedproperly.Followstorageinstructionsbelowto ensuretop performancefrom the snowthrowerfor manymoreyears.
PREPARING ENGINE
Enginesstoredover30 days need to be drainedof fuel to prevent
deteriorationandgumfrom forminginfuel systemor on essential
carburetorparts.If thegasolineinyourenginedeterioratesduring
storage,youmay needto havethe carburetor,andotherfuel system
components,servicedor replaced.
1. Removeall fuel fromtank by runningengineuntil it stops.
2. Changethe engineoil.
3. Removesparkplug and pour approximately1 oz. (30 rnl)of clean
engineoil intothe cylinder.Pullthe recoilstarterseveraltimesto
distributetheoil, and reinstallthe sparkplug.
4. Cleandebrisfrom aroundengine,andunder,around,andbehind
muffler.Applya lightfilmof oilon anyareasthat are susceptible
to rust.
• Storein a clean,dry andwellventilatedareaawayfromanyap-
pliancethat operateswith a flame or pilotlight, such as a furnace,
waterheater,or clothesdryer.Avoidany areawitha spark
producingelectricmotor,or wherepowertools are operated.
Neverstoresnowthrowerwithfuel intank indoorsor inpoorlyventi-
latedareas,wherefuel fumesmay reachan openflame,sparkor pilol
lightas ona furnace,waterheater,clothesdryer orgas appliance.
• If possible,avoidstorageareaswithhighhumidity.
• Keepthe enginelevelin storage.Tiltingcan causefuel oroil
leakage.
PREPARING SNOW THROWER
Whenstoringthe snowthrowerin anunventilatedormetalstor-
age shed,careshouldbetakento rustprooftheequipment.Using
a light oil or silicone,coattheequipment,especiallyanychains,
springs,bearingsand cables.
• Removealldirt fromexteriorof engineandequipment.
• Followlubricationrecommendations.
• Storeequipmentin a clean,dry area.
18
Beforeperforminganytypeof maintenance/service,disengageallcontrolsandstoptheengine.Waituntilall
movingpartshavecometoa completestop.Disconnectsparkplugwireand groundit againsttheengineto
preventunintendedstarting.Alwayswearsafetyglassesduringoperationorwhileperforminganyadjustmentsor
repairs.
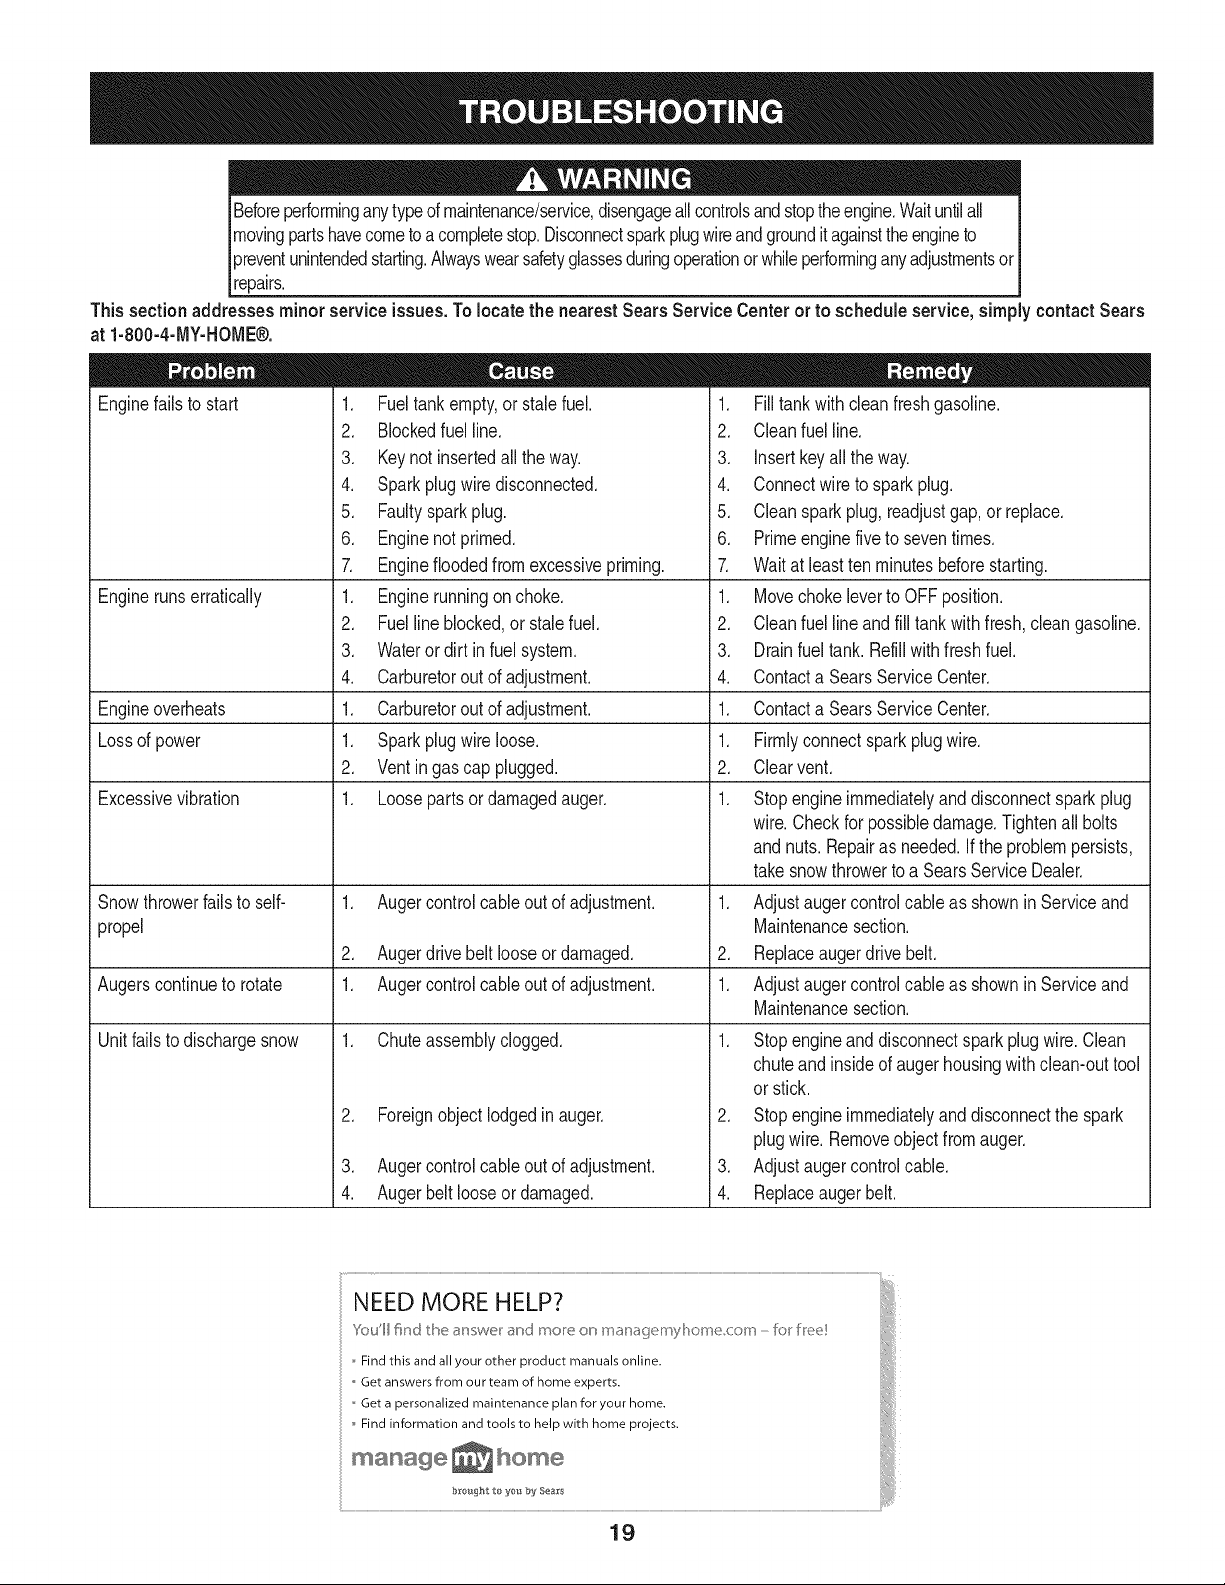
Thissectionaddresses minorservice issues.To locate the nearest Sears Service Centeror to scheduleservice,simplycontactSears
at 1-800-4-MY-HOME®.
Enginefailsto start
Enginerunserratically
1. Fueltank empty,or stalefuel.
2. Blockedfuel line.
3. Keynot insertedall the way.
4. Sparkplug wiredisconnected.
5. Faultysparkplug.
6. Enginenot primed.
1. Filltank with cleanfreshgasoline.
2. Cleanfuel line.
3. Insertkey all theway.
4. Connectwire to sparkplug.
5. Cleanspark plug,readjustgap,or replace.
6. Primeenginefive to seventimes.
7. Enginefloodedfromexcessivepriming.
1. Enginerunningon choke.
2. Fuelline blocked,or stalefuel.
3. Wateror dirt infuel system.
4. Carburetoroutof adjustment.
1. Carburetoroutof adjustment.
1. Sparkplug wireloose.
2. Ventin gascap plugged.
1. Looseparts or damagedauger.
7.
1.
2.
3.
4.
1.
1.
2.
1.
Waitat leastten minutesbeforestarting.
Movechokeleverto OFFposition.
Cleanfuel lineandfill tankwithfresh,cleangasoline.
Drainfuel tank.Refill withfresh fuel.
Contacta SearsServiceCenter.
Engineoverheats Contacta SearsServiceCenter.
Lossof power Firmlyconnectspark plug wire.
Clearvent.
Excessivevibration Stopengine immediatelyand disconnectsparkplug
wire.Checkfor possibledamage.Tightenall bolts
andnuts. Repairas needed.If the problempersists,
takesnowthrowerto a SearsServiceDealer.
Snowthrowerfails to self- 1. Augercontrolcableoutof adjustment. 1. Adjustaugercontrolcableas shownin Serviceand
propel Maintenancesection.
2. Augerdrive beltlooseor damaged. 2. Replaceaugerdrivebelt.
Augerscontinueto rotate 1. Augercontrolcableoutof adjustment. 1. Adjustaugercontrolcableas shownin Serviceand
Maintenancesection.
Unitfailsto dischargesnow 1. Chuteassemblyclogged. 1.
2. Foreignobjectlodgedin auger.
3. Augercontrol cableoutof adjustment.
4. Auger beltlooseor damaged.
Stopengineand disconnectsparkplug wire. Clean
chuteand insideof augerhousingwithclean-outtool
or stick.
2. Stopengine immediatelyand disconnectthe spark
plugwire.Removeobject fromauger.
3. Adjustauger controlcable.
4. Replaceaugerbelt.
NEED MORE HELP?
You'll fir_d the a_lswe: au_d mo_e ou_ m_!:jemy[]ome corn - I_:_ I_'ee
Find this and all your other product manuals online.
Get answers from our team of home experts.
Get a personalized maintenance plan for your home.
Find information and tools to help with home projects.
b_ought to you by Sea_s
19
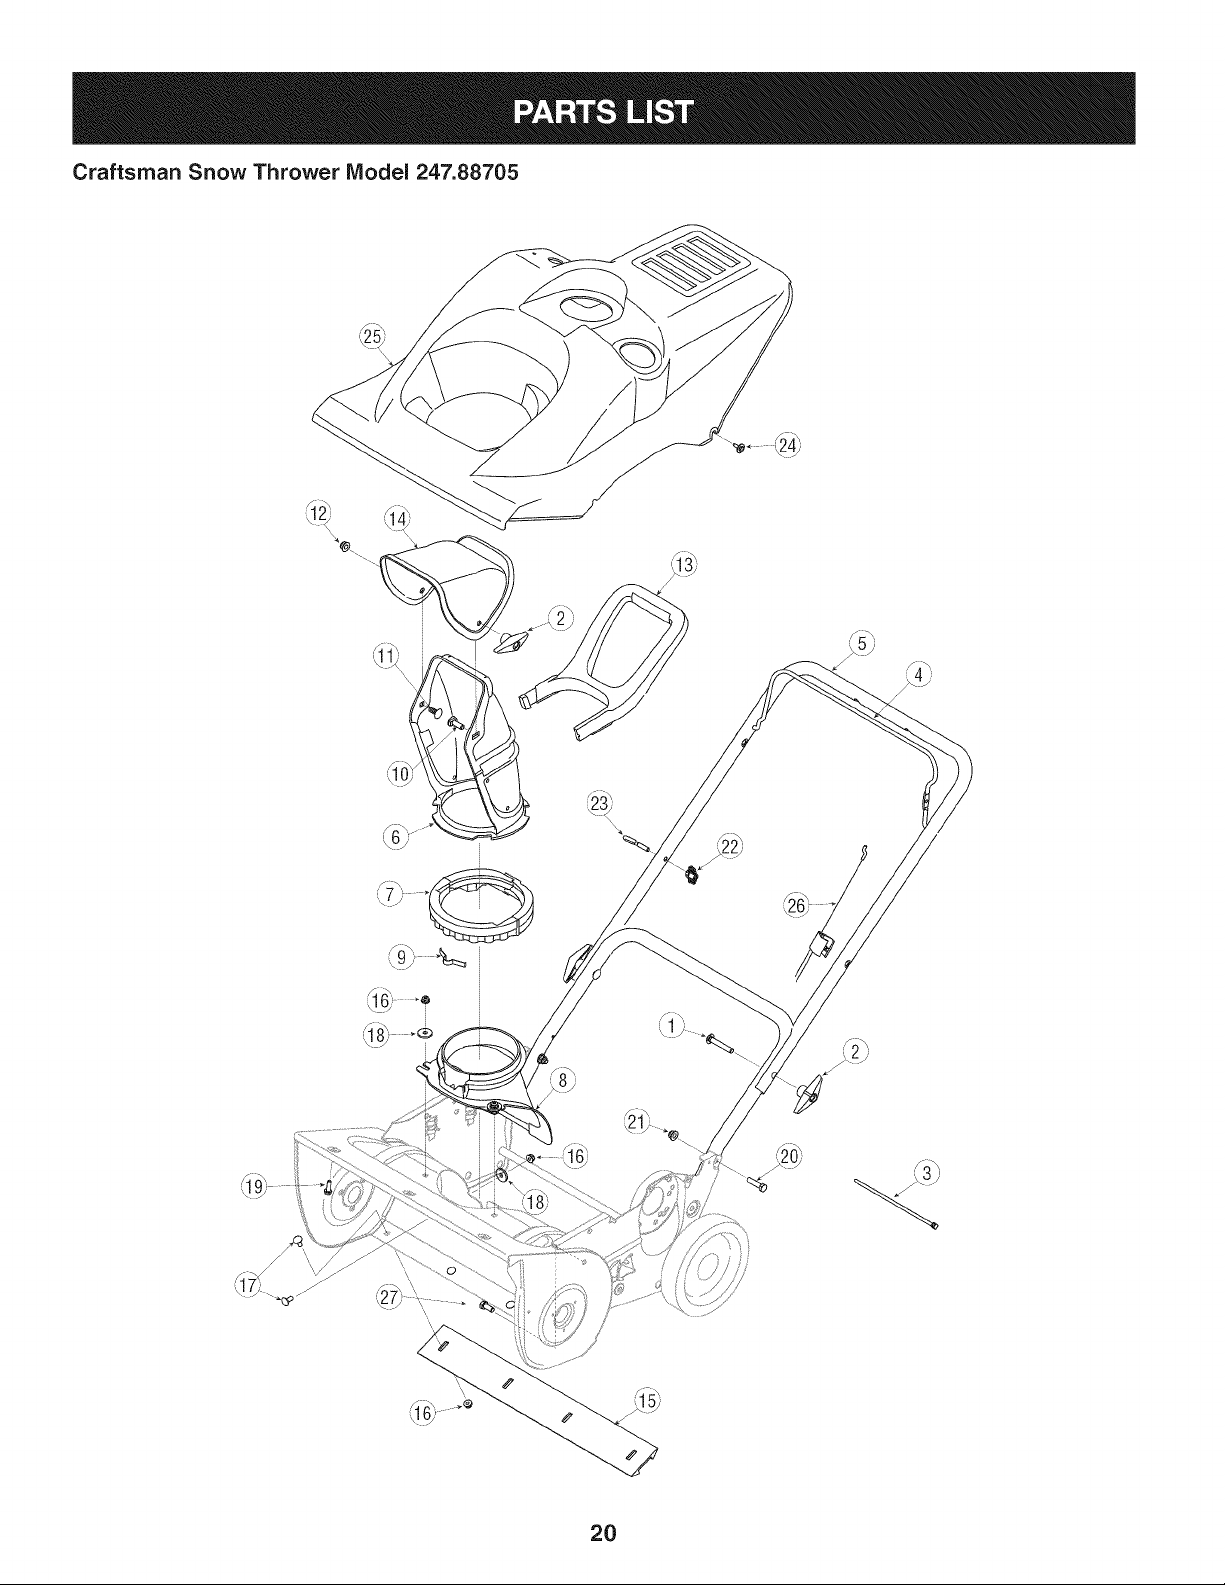
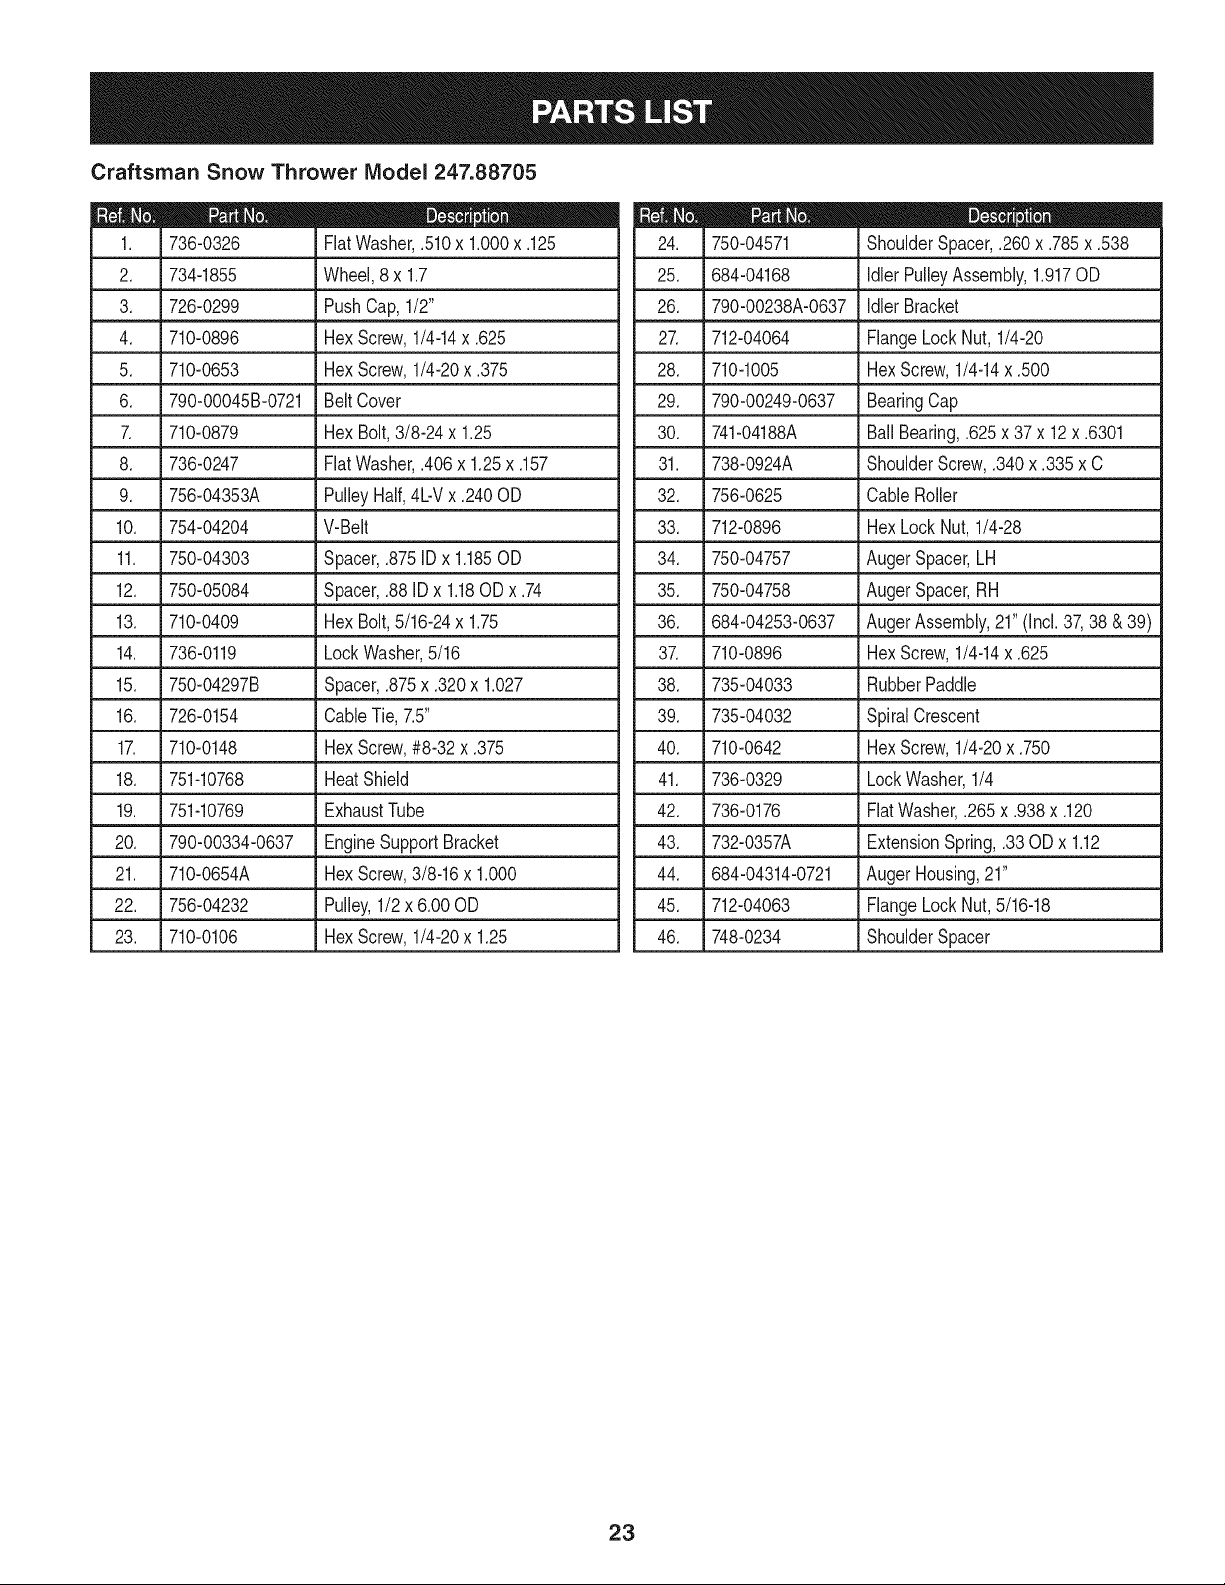
Craftsman Snow Thrower IViodel 247.88705
2O
Craftsman Snow Thrower IViodel 247.88705
D = 0
710-04532 CarriageScrew,5/16-18x 2.00
2. 720-0284 Wing Knob,5/16-18
3. 725-0157 CableTie, 3/16 x .05x 7.4
4. 747-04165-0637 BailControl
5. 749-04459-0637 UpperHandle
6. 731-04127 LowerChute
7. 731-04353 Chute Ring
8. 731-04886 ChuteAdapter
9. 732-04111 ChuteAdjustmentSpring
10. 710-04071 CarriageBolt.5/16-18x 1.00
11. 710-0451 CarriageBolt.5/16-18x .750
12. 712-04063 FlangeLock Nut,5/16-18
13. 731-04388A ChuteHandle
14. 731-04426A UpperChute
15. 731-1033 ShavePlate,21"
16. 712-04064 FlangeLock Nut, 1/4-20
17. 710-0134 CarriageScrew,1/4-20
18. 736-0176 FiatWasher,.265x .938x .120
19. 710-0895 HexScrew,5/16-18x .750
20. 710-0528 HexScrew,5/16-18x 1.25
21. 712-04063 FlangeLock Nut,5/16-18
22. 720-0279 HandleKnob
23. 710-1205 EyeBolt,1/4-20
24. 710-04669 HexScrew,10-16x .625
25. 731-06551 Shroud
26. 746-04237 ClutchCable
27. 710-3008 HexScrew,5/16-18x .75
21
Craftsman Snow Thrower Model 247.88705
/
/
/
/
/
/
/
/
\T"\
/
/
/
/
/
/
/
/ /
/ ,//
/
/
/
\
'\ j
22
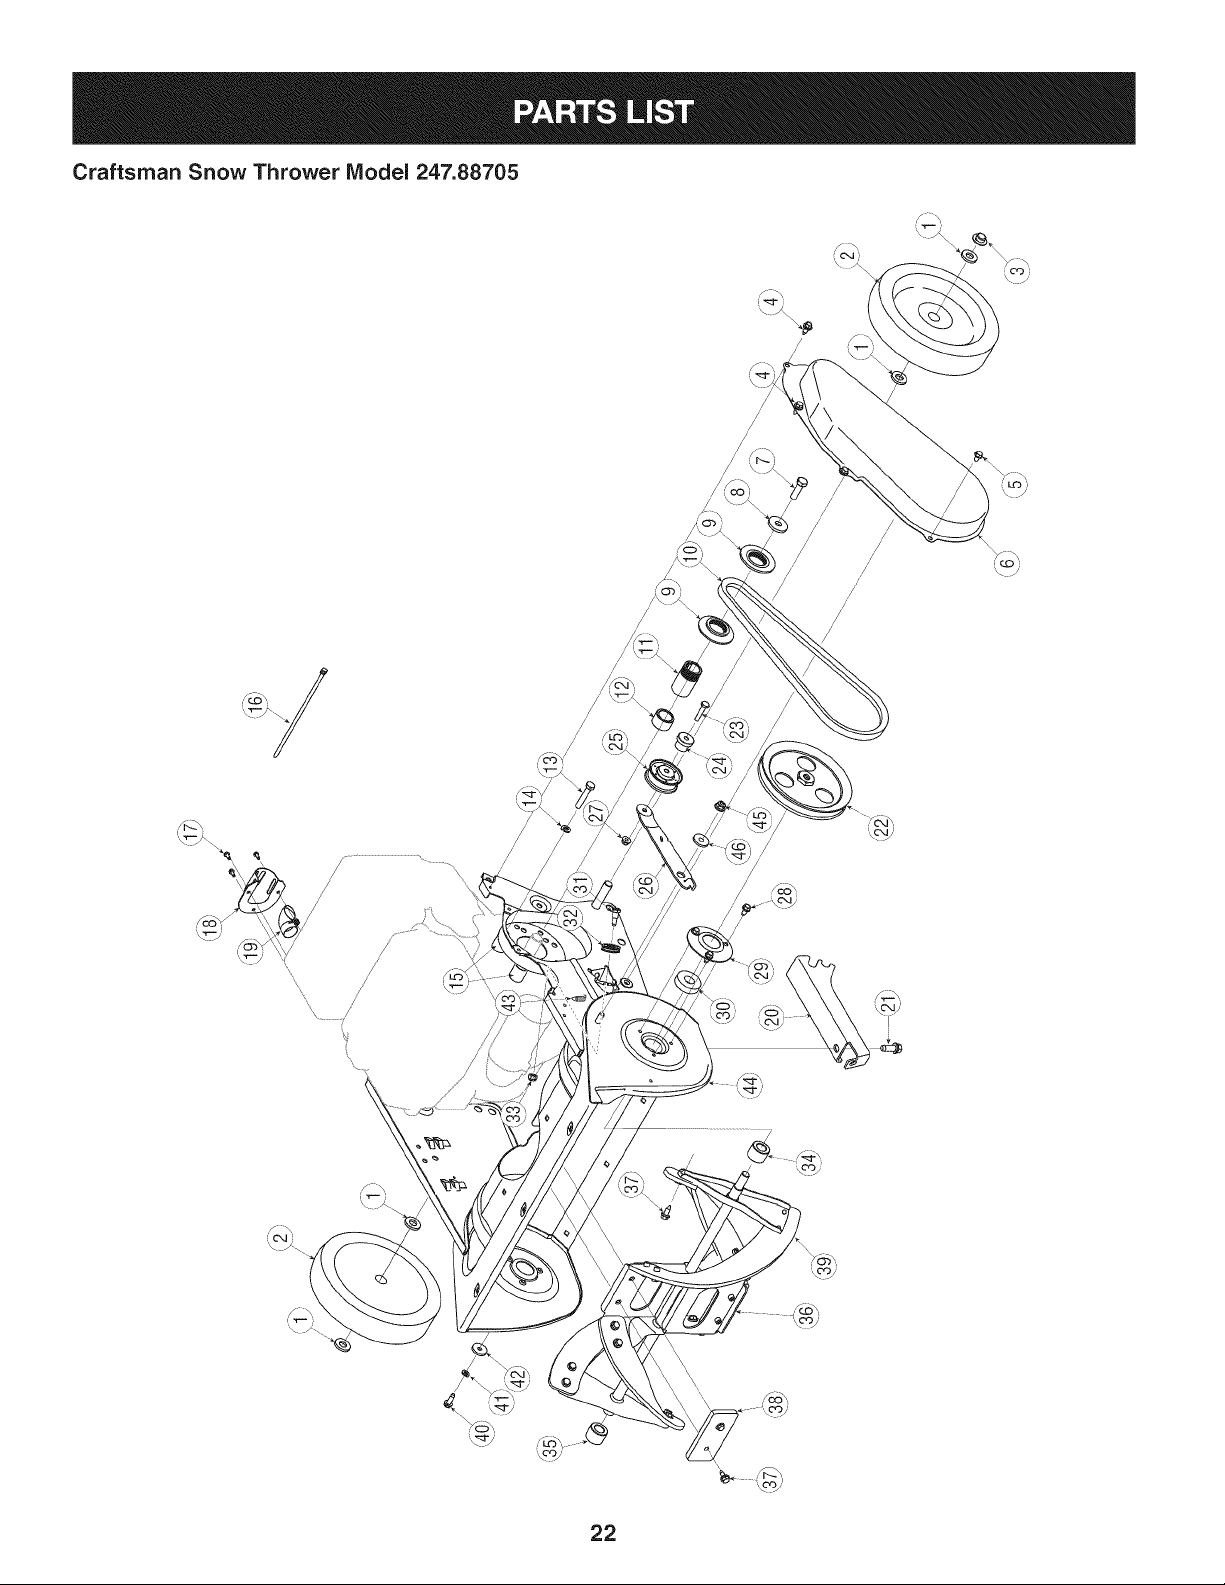
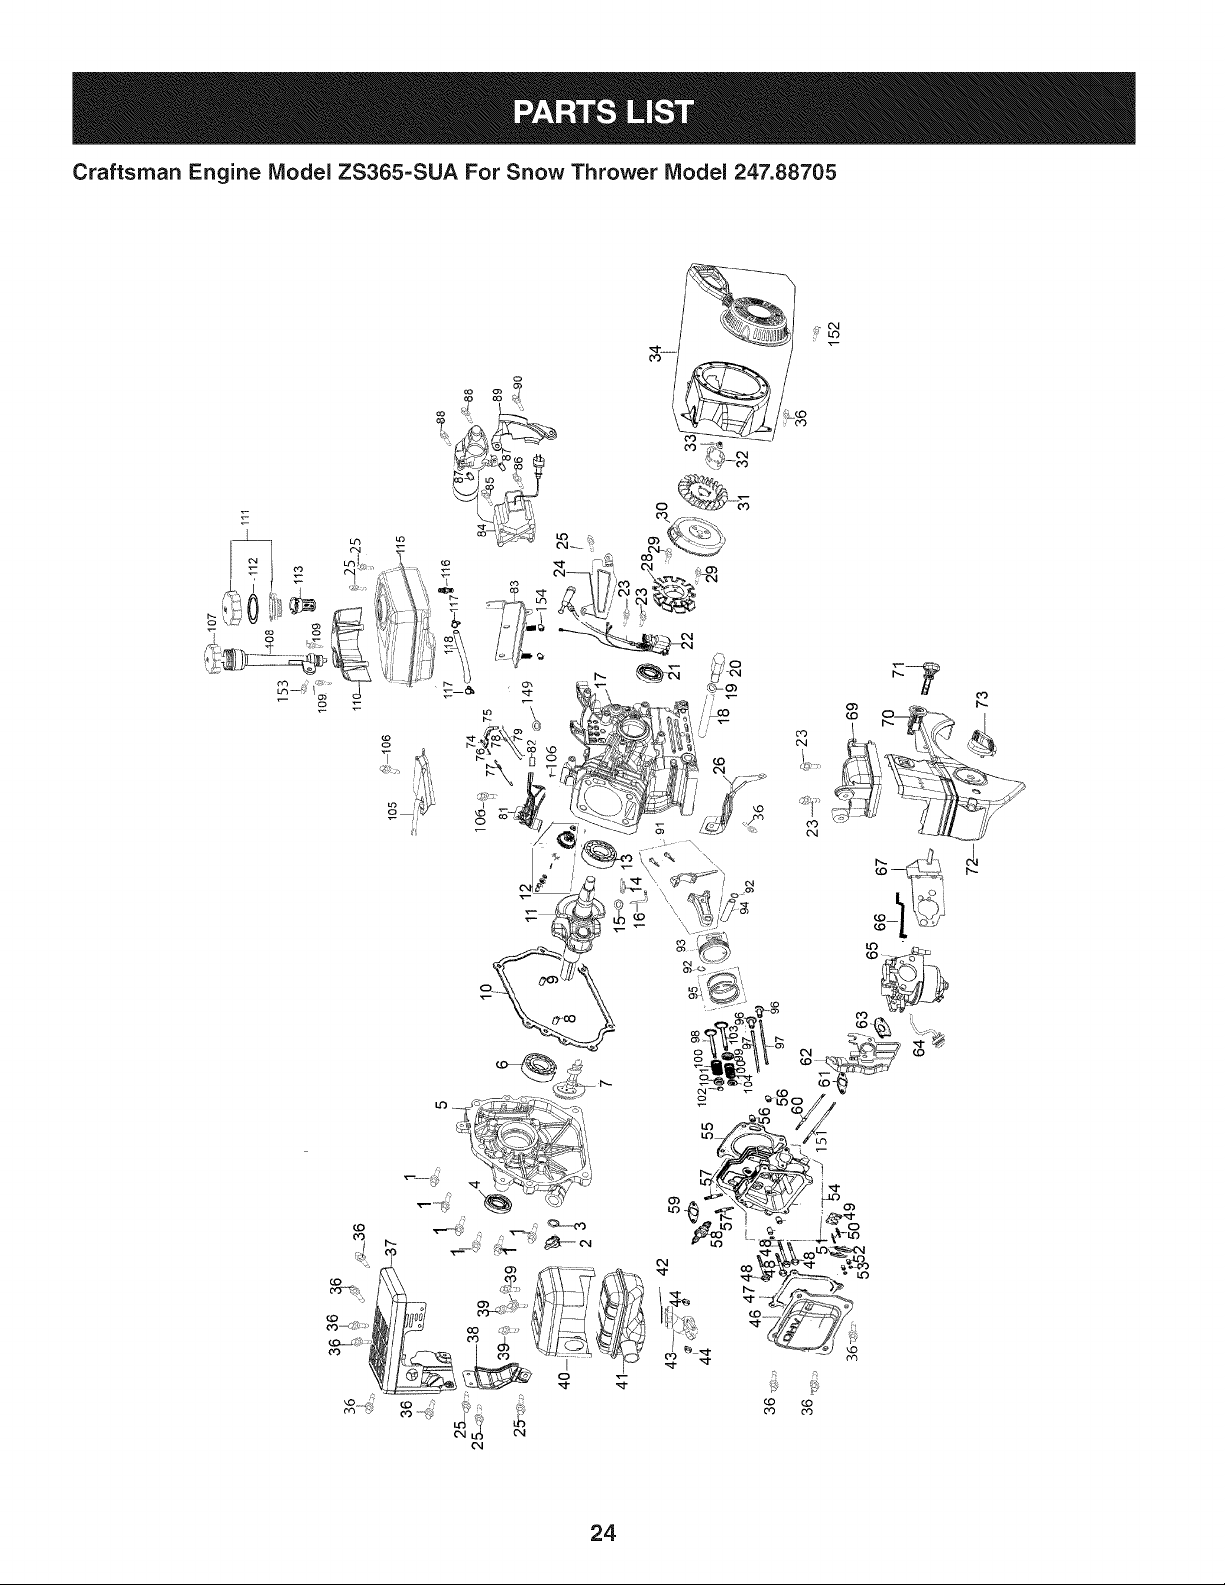
Craftsman Snow Thrower IViodel 247.88705
|= 0 e
736-0326 FiatWasher,.510x 1.000x .125
2. 734-1855 Wheel,8 x 1.7
3. L7260299 . PushCap, 1/2"
4. 710-0896 HexScrew,1/4-14x .625
5. 710-0653 HexScrew,1/4-20x .375
6. 790-00045B-0721 BeltCover
7. 710-0879 HexBolt,3/8-24x 1.25
8. 736-0247 FiatWasher,.406x 1.25x .157
9. 756-04353A PulleyHalf,4bV x .240OD
10. 754-04204 V-Belt
11. 750-04303 Spacer,.875IDx 1.185OD
12. 750-05084 Spacer,.88 IDx 1.18OD x .74
13. 710-0409 Hex Bolt,5/16-24x 1.75
14. 736-0119 LockWasher,5/16
15. 750-04297B Spacer,.875x .320x 1.027
16. 726-0154 CableTie,7.5"
17. 710-0148 Hex Screw,#8-32x .375
18. 751-10768 HeatShield
19. 751-10769 ExhaustTube
20. 790-00334-0637 EngineSupportBracket
21. 710-0654A HexScrew,3/8-16x 1.000
22. 756-04232 Pulley,1/2 x 6.00 OD
23. 710-0106 HexScrew,1/4-20x 1.25
D = O
750-04571 ShoulderSpacer,.260x .785x .538
25. 684-04168 IdlerPulleyAssembly,1.917OD
26. 790-00238A-0637 IdlerBracket
27. 712-04064 FlangeLockNut, 1/4-20
28. 710-1005 HexScrew,1/4-14x .500
29. 790-00249-0637 BearingCap
30. 741-04188A Ball Bearing,.625x 37 x 12x .6301
31. 738-0924A ShoulderScrew,.340x .335x C
32. 756-0625 CableRoller
33. 712-0896 HexLockNut,1/4-28
34. 750-04757 AugerSpacer,LH
35. 750-04758 AugerSpacer,RH
36. 684-04253-0637 AugerAssembly,21"(Incl.37,38 & 39)
37. 710-0896 Hex Screw,1/4-14x .625
38. 735-04033 RubberPaddle
39. 735-04032 SpiralCrescent
40. 710-0642 HexScrew,1/4-20x .750
41. 736-0329 LockWasher,1/4
42. 736-0176 FiatWasher,.265x .938x .120
43. 732-0357A ExtensionSpring,.33 ODx 1.12
44. 684-04314-0721 AugerHousing,21"
45. 712-04063 FlangeLockNut,5/16-18
46. 748-0234 ShoulderSpacer
23
Craftsman Engine IViodel ZS365=SUA For Snow Thrower IViodel 247.88705
O3
O3
24
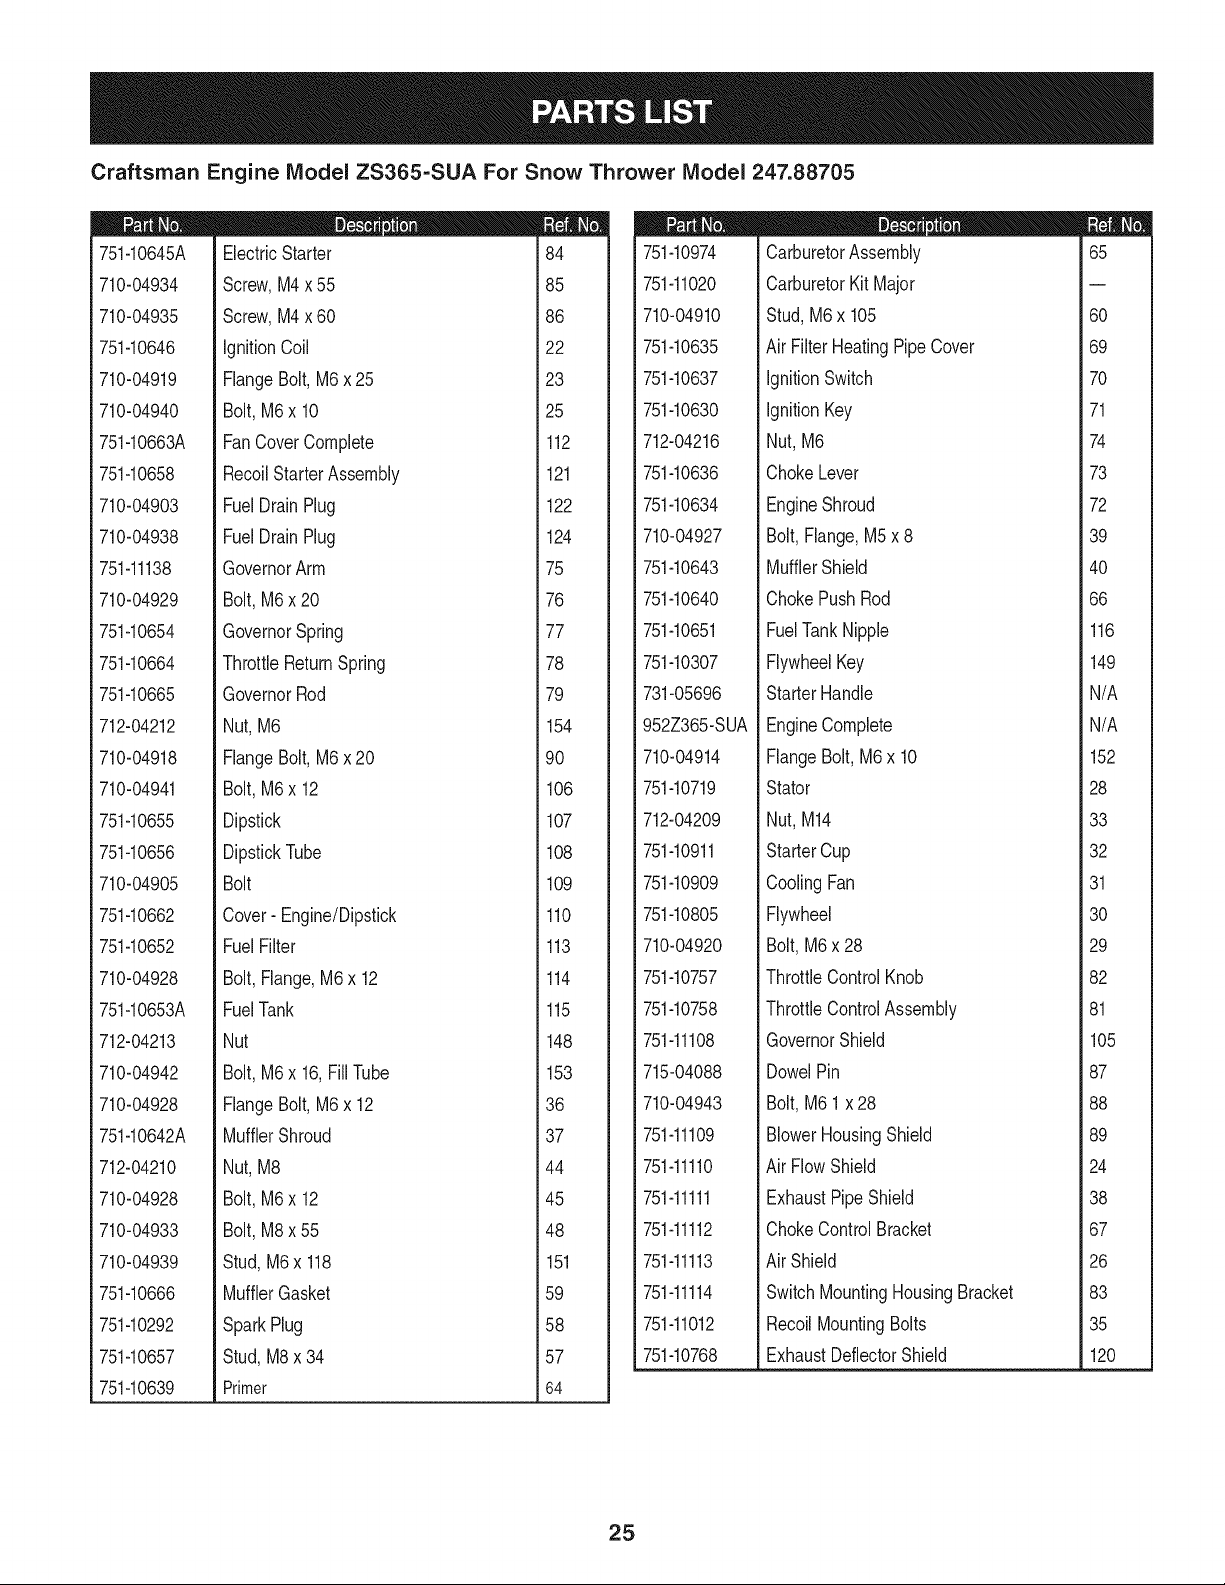
Craftsman Engine IViodel ZS365=SUA For Snow Thrower IViodel 247.88705
751-10645A
710-04934
710-04935
751-10646
710-04919
710-04940
751-10663A
751-10658
710-04903
710-04938
751-11138
710-04929
751-10654
751-10664
751-10665
712-04212
710-04918
710-04941
751-10655
751-10656
710-04905
751-10662
751-10652
710-04928
751-10653A
712-04213
710-04942
710-04928
751-10642A
712-04210
710-04928
710-04933
710-04939
751-10666
751-10292
751-10657
751-10639
D = O
ElectricStarter
Screw,M4 x 55
Screw,M4 x 60
IgnitionCoil
FlangeBolt, M6x 25
Bolt,M6 x 10
FanCoverComplete
RecoilStarterAssembly
FuelDrainPlug
FuelDrainPlug
GovernorArm
Bolt,M6 x 20
GovernorSpring
ThrottleReturnSpring
GovernorRod
Nut, M6
FlangeBolt, M6x 20
Bolt,M6 x 12
Dipstick
DipstickTube
Bolt
Cover- Engine/Dipstick
FuelFilter
Bolt,Flange,M6x 12
FuelTank
Nut
Bolt,M6 x 16,FillTube
FlangeBolt, M6x 12
MufflerShroud
Nut, M8
Bolt,M6 x 12
Bolt,M8 x 55
Stud,M6x 118
MufflerGasket
SparkPlug
Stud,M8x 34
Primer
m
i
184
i
i
i
185
i
i
186
i
i
i
i22
!
i
i
123
i
i
125
i
i
i
i112
!
i
1
1121
1
1
1122
1
1
1
i124
!
i
_75
1
1
1
_76
1
1
1
i77
!
i
_78
1
1
1
_79
1
1
1
i154
!
i
_90
1
1
1
i106
1
1
1107
1
1
1
i108
!
i
1
1109
1
1
1110
1
1
1
i113
!
i
1114
1
1
1
1115
1
1
1
i148
!
i
1153
1
1
1
_36
1
1
1
i37
!
i
_44
1
1
1
i45
!
!
i
_48
1
1
i 151
1
1
1
i59
!
i
1
_58
1
1
_57
1
1
1
i64
I
751-10974
751-11020
710-04910
751-10635
751-10637
751-10630
712-04216
751-10636
751-10634
710-04927
751-10643
751-10640
751-10651
751-10307
731-05696
952Z365-SUA
710-04914
751-10719
712-04209
751-10911
751-10909
751-10805
710-04920
751-10757
751-10758
751-11108
715-04088
710-04943
751-11109
751-11110
751-11111
751-11112
751-11113
751-11114
751-11012
751-10768
D = O
CarburetorAssembly
CarburetorKit Major
Stud,M6 x 105
Air Filter HeatingPipe Cover
IgnitionSwitch
IgnitionKey
Nut,M6
ChokeLever
EngineShroud
Bolt,Flange,M5x 8
MufflerShield
ChokePushRod
FuelTank Nipple
FlywheelKey
StarterHandle
EngineComplete
FlangeBolt, M6 x 10
Stator
Nut,M14
StarterCup
CoolingFan
Flywheel
Bolt,M6x 28
ThrottleControlKnob
ThrottleControlAssembly
GovernorShield
DowelPin
Bolt,M6 1x 28
BlowerHousingShield
Air FlowShield
ExhaustPipeShield
ChokeControlBracket
Air Shield
SwitchMountingHousingBracket
RecoilMountingBolts
ExhaustDeflectorShield
m
65
60
69
70
71
74
73
72
39
40
66
116
149
N/A
N/A
152
28
33
32
31
30
29
82
81
105
87
88
89
24
38
67
26
83
35
120
25
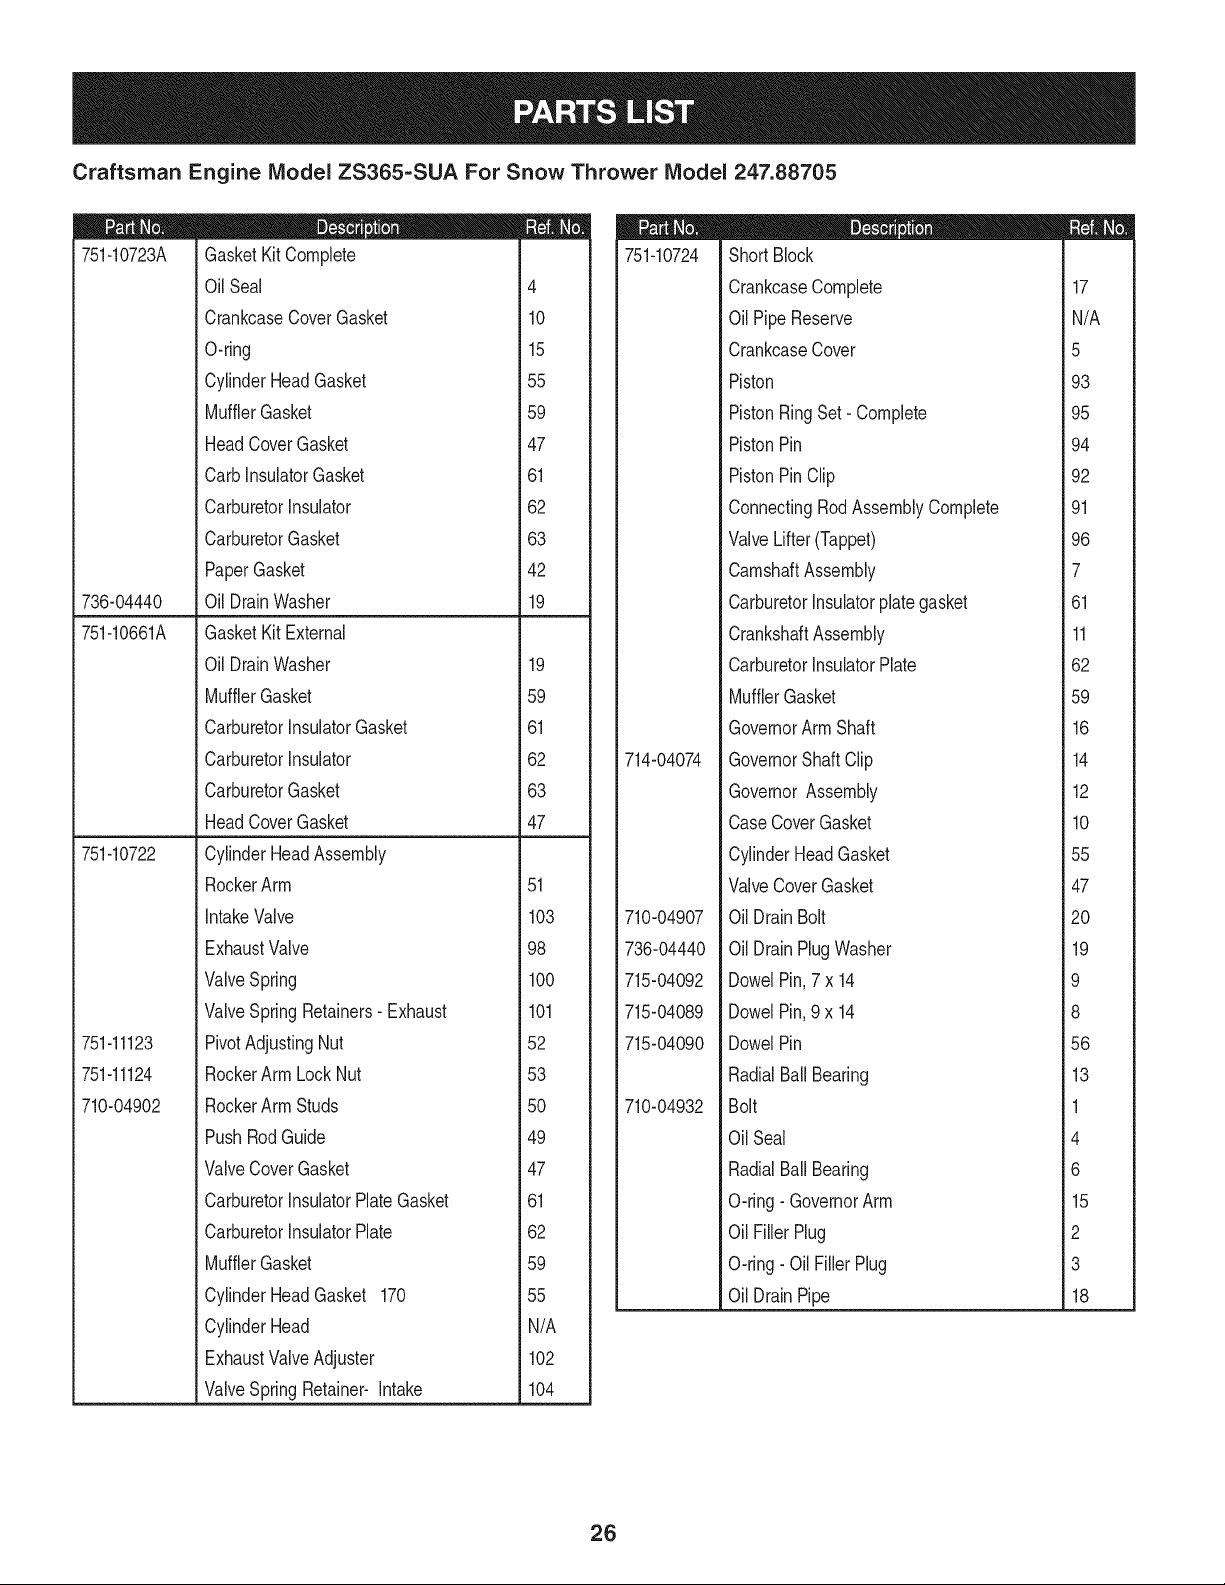
Craftsman Engine IViodel ZS365=SUA For Snow Thrower IViodel 247.88705
751-10723A
736-04440
751-10661A
751-10722
751-11123
751-11124
710-04902
m = O
GasketKitComplete
OilSeal 4
CrankcaseCoverGasket 10
O-ring 15
CylinderHeadGasket 55
MufflerGasket 59
HeadCoverGasket 47
CarbInsulatorGasket 61
CarburetorInsulator 62
CarburetorGasket 63
PaperGasket 42
Oil DrainWasher 19
GasketKit External
Oil DrainWasher 19
MufflerGasket 59
CarburetorInsulatorGasket 61
CarburetorInsulator 62
CarburetorGasket 63
HeadCoverGasket 47
CylinderHeadAssembly
RockerArm 51
IntakeValve 103
ExhaustValve 98
ValveSpring 100
ValveSpring Retainers-Exhaust 101
PivotAdjustingNut 52
RockerArm LockNut 53
RockerArm Studs 50
PushRodGuide 49
ValveCover Gasket 47
CarburetorInsulatorPlateGasket 61
CarburetorInsulatorPlate 62
MufflerGasket 59
CylinderHeadGasket 170 55
CylinderHead N/A
ExhaustValveAdjuster 102
ValveSpring Retainer- Intake 104
751-10724
714-04074
710-04907
736-04440
715-04092
715-04089
715-04090
710-04932
m = O
ShortBlock
CrankcaseComplete
OilPipeReserve
CrankcaseCover
Piston
PistonRingSet- Complete
PistonPin
PistonPinClip
ConnectingRodAssemblyComplete
ValveLifter (Tappet)
CamshaftAssembly
CarburetorInsulatorplategasket
CrankshaftAssembly
CarburetorInsulatorPlate
MufflerGasket
GovernorArm Shaft
GovernorShaft Clip
GovernorAssembly
CaseCoverGasket
CylinderHeadGasket
ValveCoverGasket
OilDrainBolt
OilDrainPlugWasher
DowelPin,7 x 14
DowelPin,9 x 14
DowelPin
RadialBall Bearing
Bolt
OilSeal
RadialBall Bearing
O-ring- GovernorArm
OilFillerPlug
O-ring- Oil FillerPlug
OilDrainPipe
/
17
N/A
5
93
95
94
92
91
96
7
61
11
62
59
16
14
12
10
55
47
20
19
9
8
56
13
1
4
6
15
2
3
18
26
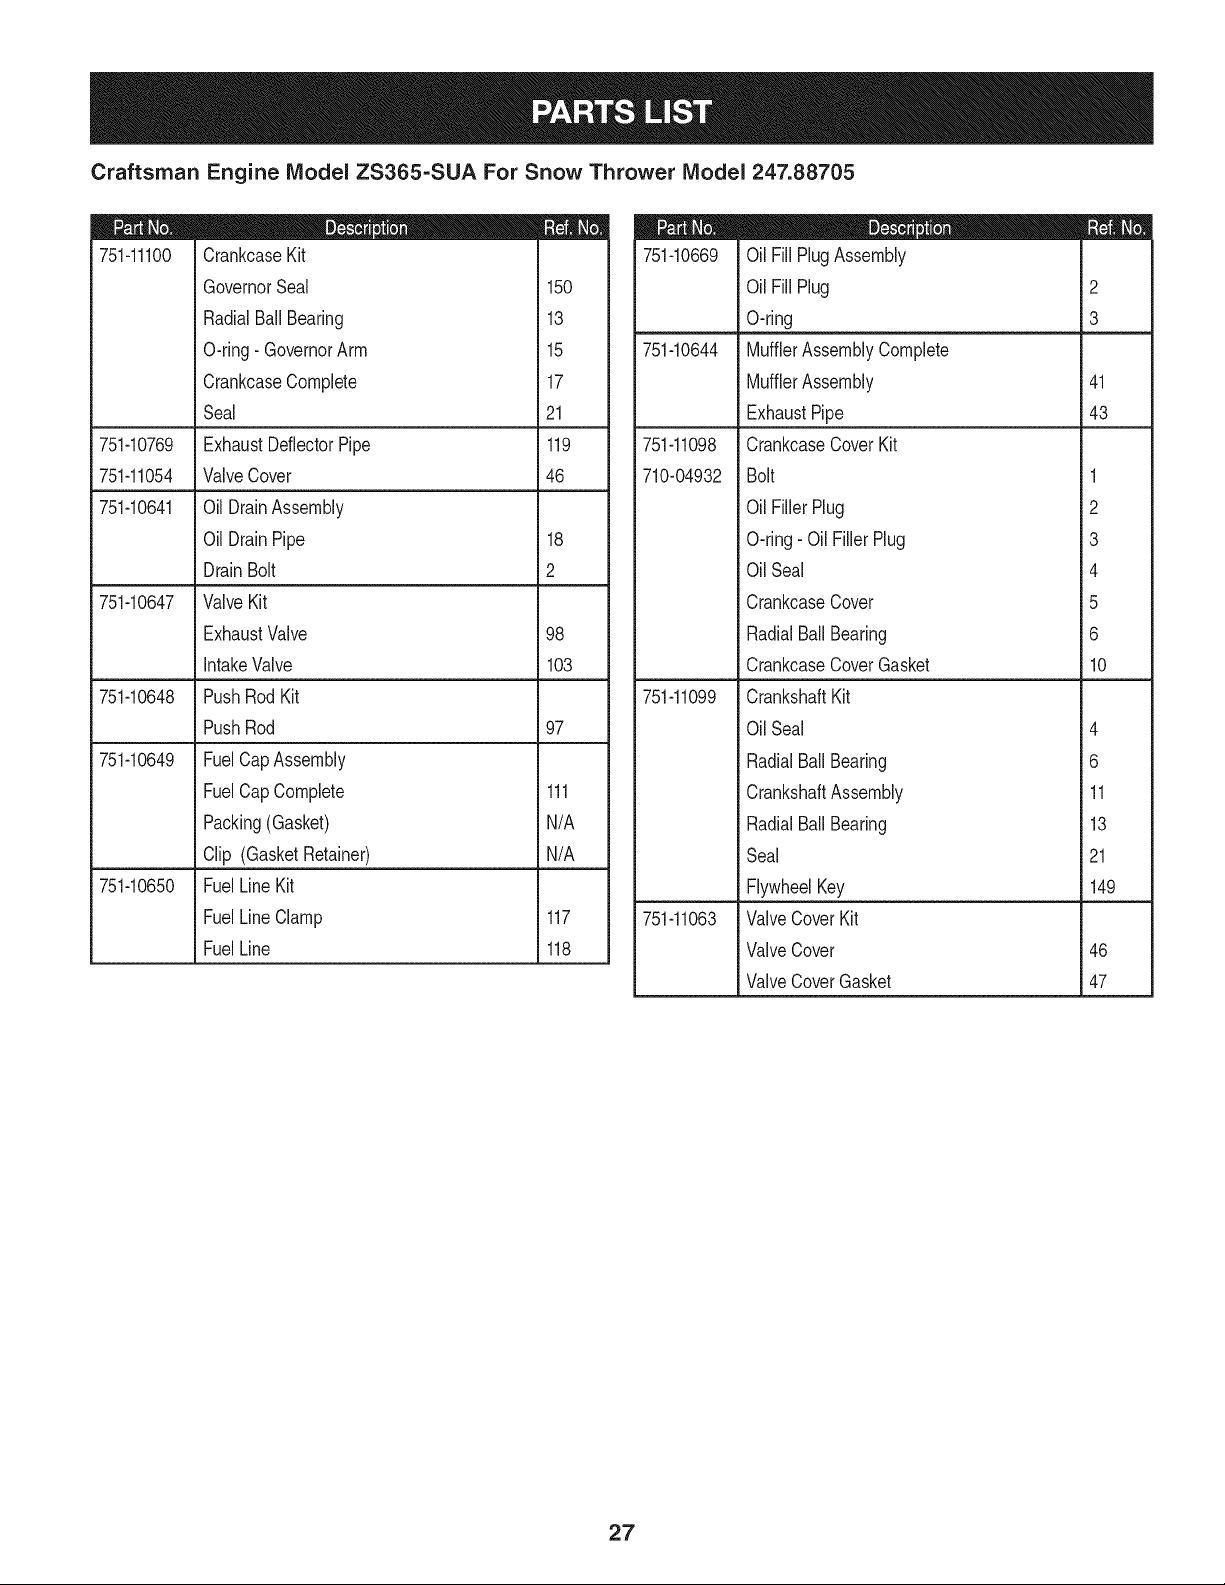
Craftsman Engine IViodel ZS365-SUA For Snow Thrower IViodel 247.88705
751-11100
751-10769
751-11054
751-10641
18
2
751-10647
98
103
751-10648
97
751-10649
751-10650
D = O O
CrankcaseKit
GovernorSeal 150
RadialBall Bearing 13
O-ring- GovernorArm 15
CrankcaseComplete 17
Seal 21
ExhaustDeflectorPipe 119
ValveCover 46
Oil DrainAssembly
Oil DrainPipe
DrainBolt
ValveKit
ExhaustValve
IntakeValve
PushRod Kit
PushRod
FuelCapAssembly
FuelCap Complete 111
Packing(Gasket) N/A
Clip (GasketRetainer) N/A
FuelLine Kit
FuelLineClamp 117
FuelLine 118
|= o o
751-10669 Oil Fill PlugAssembly
OilFill Plug 2
O-ring 3
751-10644 MufflerAssemblyComplete
MufflerAssembly 41
ExhaustPipe 43
751-11098 CrankcaseCover Kit
710-04932 Bolt 1
OilFiller Plug 2
O-ring- Oil FillerPlug 3
OilSeal 4
CrankcaseCover 5
RadialBall Bearing 6
CrankcaseCoverGasket 10
751-11099 CrankshaftKit
OilSeal 4
RadialBall Bearing 6
CrankshaftAssembly 11
RadialBall Bearing 13
Seal 21
FlywheelKey 149
751-11063 ValveCoverKit
ValveCover 46
ValveCoverGasket 47
27
MTD CONSUMER GROUP INC (MTD), the California Air Resources Board (CARB)
and the United States Environment Protection Agency (U. S. EPA)
Emission Control System Warranty Statement
(Owner's Defect Warranty Rights and Obligations)
EMISSIONCONTROLSYSTEMCOVERAGEIS APPLICABLETOCERTIFIEDENGINESPURCHASEDIN CALIFORNIAIN 2005ANDTHERE-
AFTER,WHICHARE USEDINCALIFORNIA,ANDTO CERTIFIEDMODELYEAR2005AND LATERENGINESWHICHARE PURCHASEDAND
USEDELSEWHEREINTHEUNITEDSTATES.
Californiaandelsewherein the UnitedStatesEmissionControlDefectsWarrantyCoverage
The CaliforniaAir ResourcesBoard(CARB),U. S. EPAand MTDare pleasedto explaintheemissionscontrol systemwarrantyon your modelyear
2006andlatersmalloff-roadengine.In California,new smalloff-roadenginesmustbe designed,builtand equippedto meettheStatesanti-smog
standards.Elsewhereinthe UnitedStates,newnon-road,spark-ignitionenginescertifiedfor model2005and later,mustmeetsimilarstandardsset
forthby the U.S. EPA.MTDmustwarrantythe emissioncontrolsystemonyourenginefor the periodof timelistedbelow,providedtherehasbeen
noabuse,neglector impropermaintenanceof your smalloff-roadengine.
Youremissioncontrolsystemmay includepartssuch as the carburetor,fuel-injectionsystem,the ignitionsystem,and catalyticconverter,fuel
tanks,fuel lines,fuel caps,valves,canisters,filters, vaporhoses,clamps,connectors,andotherassociatedemission-relatedcomponents.
Wherea warrantableconditionexists,MTDwill repairyoursmalloff-roadengineat nocost to yourincludingdiagnosis,partsand labor.
MANUFACTURER'S WARRANTY COVERAGE:
Thisemissionscontrolsystemis warrantedfor twoyears.If anyemission-relatedpart onyourengineis defective,the part will berepairedor
replacedby MTD.
OWNER'S WARRANTY RESPONSIBILITIES:
As the smalloff-roadengineowner,youare responsibleforthe performanceof the requiredmaintenancelisted in your Owner'sManual.MTD
recommendsthatyou retainall yourreceiptscoveringmaintenanceson yoursmall off-roadengine,but MTDcan not denywarrantysolelyfor the
lackof receiptsor foryour failureto ensurethe performanceto allscheduledmaintenance.
As the smalloff-roadengineowner,youshouldhoweverbe awarethat MTDmaydenyyour warrantycoverageif yoursmall off-roadengine or part
hasfaileddue toabuse,neglect,impropermaintenanceor unapprovedmodifications.
Youare responsiblefor presentingyour smalloff-roadengineto an AuthorizedMTDServiceDealeras soonas a problemexists.Thewarranted
repairsshouldbe completedin a reasonableamountof time,notto exceed30 days.
Ifyou haveanyquestionsregardingyourwarrantyrightsand responsibilities,you shouldcontacta MTDService Representativeat 1-800-800-7310
andaddressis MTDCONSUMERGROUP,RO.Box361131,ClevelandOH,44136-0019.
DEFECTS WARRANTY REQUIREMENTS FOR 1995 AND LATER SMALL OFF-ROAD ENGINES:
Thissectionappliesto 1995and later smalloff-roadengines.The warrantyperiodbeginson the datethe engineor equipmentis deliveredto an
ultimatepurchaser.
(a) GeneralEmissionsWarrantyCoverage
MTDmustwarrantto the ultimatepurchaserand eachsubsequentpurchaserthatthe engineis:
(1)Designed,built,and equippedsoas to conformwith all applicableregulationsadoptedby the Air ResourcesBoardpursuantto its authorityin
Chapters1 and 2,Part 5, Division26of the HealthandSafetyCode;and
(2) Freefrom defectsin materialsandworkmanshipthatcausethe failureof a warrantedpart to be identicalin all materialrespectsto the partas
describedin theengine manufacturer'sapplicationfor certificationfora periodof twoyears.
(b)The warrantyonemissions-relatedpartswill be interpretedas follows:
(1)Anywarrantedpart thatis not scheduledfor replacementas requiredmaintenancein the writteninstructionsrequiredby Subsection(c)
mustbe warrantedfor the warrantyperioddefinedinSubsection(a)(2). Ifany suchpartfailsduringthe periodof warrantycoverage,it mustbe
repairedor replacedby MTDaccordingto Subsection(4)below.Anysuch part repairedor replacedunderthewarrantymustbewarrantedfor
the remainingwarrantyperiod.
(2)Any warrantedpartthat is scheduledonlyfor regularinspectioninthe writteninstructionsrequiredby Subsection(c) must bewarrantedfor
thewarrantyperioddefinedin Subsection(a)(2).A statementin such writteninstructionsto the effectof "repairor replaceas necessary"will
not reducethe periodof warrantycoverage.Anysuchpart repairedor replacedunderwarrantymustbe warrantedforthe remainingwarranty
period.
(3) Anywarrantedpartthat whichis scheduledfor replacementas requiredmaintenancein the writteninstructionsrequiredby Subsection(c)
mustbe warrantedfor the periodof timeprior to the first scheduledreplacementpointforthat part.Ifthe part failspriorto thefirst scheduled
replacement,the part mustbe repairedor replacedby MTDaccordingto Subsection(4) below.Any suchpart repairedor replacedunder
warrantymustbe warrantedfor the remainderof the periodpriorto the first scheduledreplacementpointfor the part.
(4)Repairorreplacementofanywarrantedpartunderthewarrantyprovisionsofthisarticlemustbeperformedatnochargetotheownerata
warrantystation.
(5)NotwithstandingtheprovisionsofSubsection(4)above,warrantyservicesorrepairsmustbeprovidedatallMTDdistributioncentersthat
arefranchisedtoservicethesubjectengines.
(6)Theownermustnotbechargedfordiagnosticlaborthatleadstothedeterminationthatawarrantedpartisinfactdefective,providedthat
suchdiagnosticworkisperformedatawarrantystation.
(7)Theenginemanufacturerisliablefordamagestootherenginecomponentsproximatelycausedbyafailureunderwarrantyofanywarranted
part.
(8)Throughouttheengine'swarrantyperioddefinedinSubsection(a)(2),MTDwillmaintainasupplyofwarrantedpartssufficienttomeetthe
expecteddemandforsuchparts.
(9)Anyreplacementpartmaybeusedintheperformanceofanywarrantymaintenanceorrepairsandmustbeprovidedwithoutchargetothe
owner.SuchusewillnotreducethewarrantyobligationsofMTD.
(10)Add-onormodifiedpartsthatarenotexemptedbytheAirResourcesBoardmaynotbeused.Theuseofanynon-exemptedadd-onor
modifiedpartsshallbegroundsfordisallowingawarrantyclaimmadeinaccordancewiththisarticle.Theenginemanufacturershallnotbe
liableunderthisarticletowarrantfailuresofwarrantedpartscausedbytheuseofnon-exemptedadd-onormodifiedpart.
(c) MTDwill includea copy of the followingemissionwarrantyparts list with each newengine,usingthose portionsof the list applicableto the
e__&gine.
(1)FuelMeteringSystem
• Coldstart enrichmentsystem(soft choke)
,,Carburetorandinternalparts
• Fuel Pump
• FuelTank
(2)Air InductionSystem
• Aircleaner
• Intakemanifold
(3) IgnitionSystem
• Sparkplug(s)
• MagnetoIgnitionSystem
(4)ExhaustSystem
Catalyticconverter
• SAI (Reedvalve)
(5) MiscellaneousItemsUsedin AboveSystem
Vacuum,temperature, position,time sensitivevalvesand switches
Connectorsandassemblies
(6) Evaporativecontrol
• Fuel Hosecertifiedfor ARBevaporativeemissionof 2006.
• Fuel HoseClamps
Tetheredfuel cap
Carboncanister
Vaporlines
GD0C-100174Rev.B
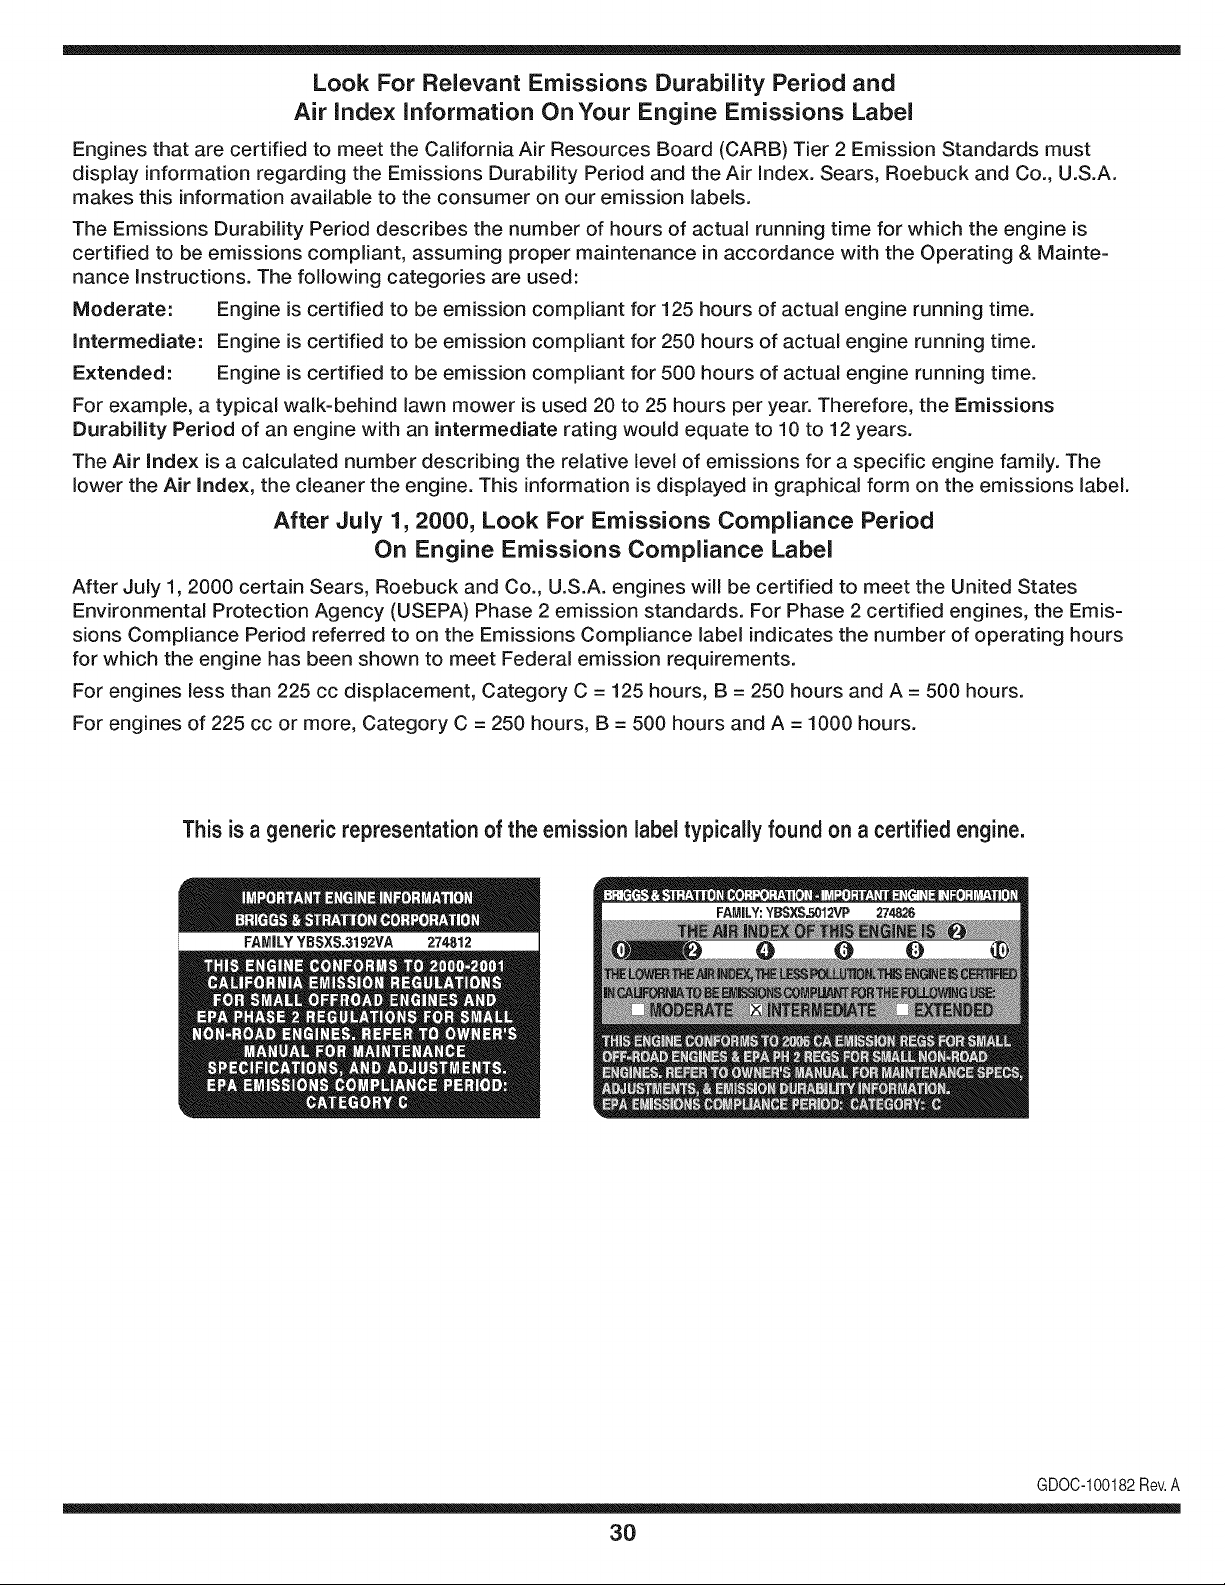
Look For Relevant Emissions Durability Period and
Air index information On Your Engine Emissions Label
Engines that are certified to meet the California Air Resources Board (CARB) Tier 2 Emission Standards must
display information regarding the Emissions Durability Period and the Air Index. Sears, Roebuck and Co., U.S.A.
makes this information available to the consumer on our emission labels.
The Emissions Durability Period describes the number of hours of actual running time for which the engine is
certified to be emissions compliant, assuming proper maintenance in accordance with the Operating & Mainte-
nance Instructions. The following categories are used:
Moderate: Engine is certified to be emission compliant for 125 hours of actual engine running time.
Intermediate: Engine is certified to be emission compliant for 250 hours of actual engine running time.
Extended: Engine is certified to be emission compliant for 500 hours of actual engine running time.
For example, a typical walk-behind lawn mower is used 20 to 25 hours per year. Therefore, the Emissions
Durability Period of an engine with an intermediate rating would equate to 10 to 12 years.
The Air Index is a calculated number describing the relative level of emissions for a specific engine family. The
lower the Air Index, the cleaner the engine. This information is displayed in graphical form on the emissions label.
After July 1,2000, Look For Emissions Compliance Period
On Engine Emissions Compliance Label
After July 1, 2000 certain Sears, Roebuck and Co., U.S.A. engines will be certified to meet the United States
Environmental Protection Agency (USEPA) Phase 2 emission standards. For Phase 2 certified engines, the Emis-
sions Compliance Period referred to on the Emissions Compliance label indicates the number of operating hours
for which the engine has been shown to meet Federal emission requirements.
For engines less than 225 cc displacement, Category C = 125 hours, B = 250 hours and A = 500 hours.
For engines of 225 cc or more, Category C = 250 hours, B = 500 hours and A = 1000 hours.
This is a generic representation of the emission label typically found on a certified engine.
FAMILYYBSXS.3192VA 274812
GDOC-100182Rev.A
30
Congratulationson makinga smart purchase.YournewCraftsman®
productis designedand manufacturedfor yearsof dependableopera-
tion.But likeall products,it mayrequirerepairfrom time to time.That's
whenhavinga RepairProtectionAgreementcan saveyoumoneyand
aggravation.
Here'swhatthe RepairProtectionAgreement*includes:
* Expert service byour 10,000professionalrepairspecialists
* Unlimited service and no charge for partsand laboron all
coveredrepairs
* Product replacement upto $1500ifyourcoveredproductcan't be
fixed
* Discountof 10%from regularpriceof serviceand relatedinstalled
partsnotcoveredby theagreement;also,10%off regularpriceof
preventivemaintenancecheck
* Fast help by phone- we call itRapidResolution- phone support
froma Searsrepresentative.Thinkof usas a "talkingowner's
manual."
Once youpurchasethe Agreement,a simplephonecall isall that it
takesfor youto scheduleservice.Youcan call anytimedayor night,or
schedulea serviceappointmentonline.
The RepairProtectionAgreementisa risk-freepurchase.Ifyou cancel
for any reasonduringthe productwarrantyperiod,wewill providea full
refund.Or,a proratedrefundanytimeafterthe productwarrantyperiod
expires.Purchaseyour RepairProtectionAgreementtoday!
Some limitations and exclusionsapply. For prices and additional
informationin the U.S.A.call 1-800-827-8855.
*Coverage inCanadavaries on some items.For full details call
Sears Canada at 1-800-381-8665.
Sears Installation Service
ForSearsprofessionalinstallationof homeappliances,garagedoor
openers,waterheaters,and othermajorhomeitems,in the U.S.A.or
Canadacall 1-800-4-MY-HOME®.
31
Declaraci6n de garantia ........................ Pagina 32
Medidas importantes de seguridad ..... Paginas 33-35
Etiquetas de seguridad ......................... Pagina 36
Montaje ................................................. Paginas 37-39
Funcionamiento .................................... Paginas 40-42
Servicio y Mantenimiento ..................... Paginas 43-47
AImacenamiento fuera de temporada..Pagina 48
Soluci6n de problemas ......................... Pagina 49
Acuerdo de protecci6n para
reparaciones .................................... Pagina 55
NOmero de servicio .............................. Cubierta
posterior
GARANTiA LIMITADA CRAFTSMAN
Dos Ahos en Lanzador de Nieve
Cuandohechofuncionary mantenidosegQntodas lasinstruccionessuministradas,si estelanzadorde nievefalla debidoa undefectoenmate-
rialo habilidaddentrode dosa_osde la fechao compra,llame 1-800-4MYHOMEhacerlosarreglospara reparaci6nlibre.
Estagarantias61otendr_validezdurante90 dias si esteproductose utilizaen cualquiermomentoparafinescomercialeso de alquiler.
Duranteel primera_o de la compra,no habr_ningQnpreciopara el serviciode garantiaen sucasa. Parasu conveniencia,en de casael servicio
degarantiatodaviaestar_disponibledespu_sdel primera_ode la compra,pero un preciode viaje se aplicar& Estepreciosera renunciado
si ustedtransportaal lanzadorde nievea unaposici6nde bajadade Artesanoautorizada.Parala posici6nautorizadam_scercana,llame
1-800-4-MY-HOME®.
Esta garantia cubreSOLO defectos en materialy habilidad.Sears no pagar_para:
• Losarficulosprescindiblesquese hacenIlevadospuestosduranteel uso normal,incluso,perono limitadospara patinarzapatos,platode
afeitado,esquilanalfileres,bujia,filtrodeaire,cinturones,y filtrodel aceite.
• Revisi6ndemantenimientoest_ndar,cambiosde aceite,o puestasa punto.
• Reemplazode neum_ticoo reparaci6ncausadapor pinchazosdesdefuerade objetos,comou_as,espinas,tocones,ocristal.
• Neum_ticoo reemplazode ruedao reparaci6nque resultade ropanormal,accidente,u operaci6nimpropiao mantenimiento.
• Las reparacionesnecesariasdebidoal abusodeoperador,inclusoperono limitadoparada_ar causadoafectandoobjetosque doblanel
marcoo el cigOe_al,o el sobreexcesode velocidaddel motor.
• Reparacionesnecesariasdebidoa negligenciadeloperador,induyendoentre otros,da_osmec_nicoy el_ctricoocasionadoporun
almacenamientonoapropiado,falla por el usode aceitede grado y/o cantidadnoapropiadao fallapor nodarmantenimientoal equipode
acuerdocon las instruccionescontenidasenel manualdel operador.
• Limpiezao reparacionesal motor(sistemadecombustible)provocadaspor un combustiblecontaminadouoxidado(viejo).En general,el
combustibledebeutilizarseen unperiodono mayorde 30dias a partirde su adquisici6n.
• Elempejoramientonormaly la ropade losfinesexteriores,o productoetiquetanel reemplazo.
Estagarantias61otendrAvalidezmientrasel productose utiliceen los EstadosUnidos.
Estagarantiale otorgaderechoslegalesespecificos,pero ustedpodria gozarde otrosderechosen raz6nde su lugarde residencia.
Sears, Roebuck and Co., HoffrnanEstates, IL 60179
Tipode aceitedelmotor:
Capacidaddeaceitedel motor:
Capacidaddecombustible:
Bujiadeencendido
Separaci6nde lasbujias:
SAE5W-30
20onzas
2 Cuartosde gal6n
TorchF6RTC
.020"-.030"
© Sears Brands,LLC
32
N_mero de modelo.........................................................
N_mero de serie ............................................................
Fecha de cornpra.........................................................................
Registreel nQmerode modelo,nQmerode serie
Vfechade compram_sarriba
La presencia de este simbolo indica que se trata
de instrucciones importantes de seguridad que
se deben respetar para evitar poner en peligro
su seguridad personal y/o material y la de otras
personas. Lea y siga todas las instrucciones de
este manual antes de poner en funcionamiento
esta m_quina. Si no respeta estas instrucciones
podria provocar lesiones personales. Cuando
vea este sfmbolo, ipreste atenci6n a la
advertencia!
PROPOSICION 65 DE CALIFORNIA
Elescapedel motorde este producto,algunosde suscomponentes
y algunoscomponentesdel vehiculocontieneno liberansustancias
quimicasque el estadode Californiaconsideraque puedenproducir
c_ncer,defectosde nacimientou otrosproblemasreproductivos.
Esta m_quina rue construida para ser operada de acuerdo
con las reglas de seguridad contenidas en este manual.
AI igual que con cualquier tipo de equipo motorizado, un
descuido o error por parte del operador puede produdr
lesiones graves. Esta mSquina es capaz de amputar manos y
pies y de arrojar objetos con gran fuerza. De no respetar las
instrucciones de seguridad siguientes se pueden producir
lesiones graves o la muerte.
Su responsabilidad--Restrinja el uso de esta m_iquina
motorizada a las personas que lean, comprendan y respeten
las advertencias e instrucciones que aparecen en este
manual y en la m_iquina.
GUARDEESTASINSTRUCCIONES
CAPAClTAClON
• Leer,entendery seguirtodas las instruccionesen la m&quina
yen el manual(s) antesde intentarmontary operar.No
hacerlopuede resultaren lesionesgravesparael operadory /
o transe0ntes.Guarcleestemanualen un lugar seguropara el
futuroy regularde referenday para pedir piezasde repuesto.
ParapreguntasIlameal, 1-800-659-5917.
• Familiaricesecontodoslos controlesy con el usoaclecuado
delos mismos.Sepac6modetenerla m_quinay desactivarlos
controlesr&pidamente.
• No permitanuncaque los niSosmenoresde 14aSosutilicen
estam&quina.Los ni5osde 14a5osen adelantedeben leer y
entenderlas instruccionesde operaci6ny normasdeseguridad
contenidasen este manualyen lamaquinay deben ser
entrenadosy supervisadospor un adulto.
• Nuncapermitaquelos adultosoperenestam&quinasin recibir
antesla instrucci6napropiada.
• Losobjetosarrojadospor la m&quinapuedenproducirlesiones
graves.Planifiqueel patr6nen el queva air arrojandonievepara
evitarque la descargade materialse realicehacialos caminos,
los observadores,etc.
• Mantengaa lostranseOntes,mascotasy ni5osal menosa 75
piesde la m&quinamientrasest&en funcionamiento.Detengala
m&quinasi alguiense acerca.
• Seaprecavidoparaevitarpatinarseo caerseespecialmente
cuandoopera la m&quinaen marchaatr&s.
PR E PA RATIVO S
Inspeccioneminuciosamenteel_readondeutilizar_el equipo.Saque
todoslos felpudos,peri6dicos,trineos,tablas,cablesy otrosobjetos
extraSoscon los que podriatropezaro quepodrianset arrojadospor
labarrena/impulsor.
1. Paraprotegerselosojos utilice siempreanteojoso antiparras
de seguridadmientrasoperala m&quinao mientrasla ajusta
o repara.Losobjetosarrojadosque rebotanpuedenproducir
lesionesocularesgraves.
2. Noopere la m&quinasin la vestimentaadecuadaparaestaral
airelibreen invierno.No utilicealhajas,bufandaslargasu otras
prendassueltasque podrianenredarseen las partes m6viles.
Utiliceun calzadoespecialparasuperficiesresbaladizas.
3. Useun prolongadory untomacorrientedetrescables con
conexi6na tierraparatodas las m&quinascon motoresde
encendidoel_ctrico.
4. Desengranetodaslas palancasde controlantesde arrancarel
motor.
5. Nuncaintenterealizarajustesmientrasel motorest&enmarcha
exceptoen los casosespecfficamenterecomendadosen el
manualdel operador.
6. Dejeque el motor y la m&quinase adaptena la temperatura
exteriorantesde comenzara sacarla nieve.
33
NIANEJO SEGURO DE LA GASOLINA
Paraevitarlesionespersonaleso da_osrnaterialestengarnucho
cuidadocuandotrabajecon gasolina.La gasolinaes surnarnente
inflarnabley sus vaporespuedencausarexplosiones.Si se derrarna
gasolinaencirnao sobrela ropa se puedelesionargravernenteya que
se puedeencender. L_.vesela piel y c_.rnbiesede ropade inrnediato.
• Utilices61olos recipientespara gasolinaautofizados.
• Apaguetodoslos cigarrillos,cigarros,pipasy otras fuentesde
cornbusti6n.
• Nuncacarguecombustibleen larn_.quinaen unespaciocerrado.
• Nuncasaquela tapade la gasolinani agreguecombustible
rnientrasel motorest,. calienteo en rnarcha.
• Dejequeel motorse enfriepor Io rnenosdos rninutosantesde
volvera cargarcombustible.
• NuncaIleneen excesoel dep6sitodecombustible.Lleneel
tanquea no rn_.sde1/2pulgadapordebajode la basedelcuello
de Ilenadodejandoespacioparaladilataci6ndelcombustible.
• Vuelvaa colocarla tapadel combustibley ajQstelabien.
• Lirnpieel combustibleque se hayaderrarnadosobreel motory el
equip&Trasladela rn_.quinaa otra zona. Espere5 rninutosantes
deencenderel motor.
• Nuncaalrnacenela rn_.quinao el recipientede combustibleen
unespaciocerradodonde hayafuego,chispaso luz piloto(por
ejernplo,hornos,calentadoresdeagua,calefactores,secadores
de ropa,etc.).
• Dejequela rn_.quinase enfriepor Io rnenos5 rninutosantesde
guardafla.
• NuncaIlenelos recipientesenel interiorde un vehiculoo carni6n
ocaja de rernolquecon recubrirnientopl_.stico.Coloquesiernpre
los recipientesen el piso y lejosdel vehiculoantes de Ilenarlos.
• Sies posible,retireel equipoa gasolinadel carni6no rernolque
y II_neloen el suelo.Siestonoes posible,Ileneel equipoen un
rernolquecon un contenedorport_.til,en vez de con unaboquilla
dispensadoradegasolina.
• Mantengala boquilladispensadoraen contactocon el hordedel
dep6sitode combustibleo con la aberturadel recipienteentodo
rnornento,hastaterrninarla carga. No utiliceundispositivode
apertura/cierrede boquilla.
FUNCIONANIIENTO
1. No pongalas rnanoso los piescercadelas piezasrotatorias,
en la cajade la barrena/ irnpulsoro en el rnontajedelcanalde
descarga.El contactoconlas piezasgiratoriaspuederesultaren
laarnputaci6ndernanoso pies.
2. La palancadecontrolde la barrena/ irnpulsores un dispositivo
de seguridad.Nuncaevite su funcionarniento.De hacerlola
operaci6nde la rn_.quinaes riesgosay puedeocasionarlesiones.
3. Las palancasde control debenfuncionarbien en arnbas
direccionesy regresarautorn_.ticarnentea la posici6nde
desengranecuandose las suelta.
4. Nuncaopere la rn_.quinasi faltaun rnontajedel canalo si
el rnisrnoest,.da_ado.Mantengatodos losdispositivosde
seguridaden su lugary enfuncionarniento.
5. Nuncaenciendael motor en espacioscerradoso en una zona
con pocaventilaci6n.El escapedel motorcontienernon6xidode
carbono,ungas inodoroy letal.
6. Noutilice la rn_.quinabajo la influenciadelalcoholo las drogas.
7. Elsilenciadory el motorse calientany puedencausar
quernaduras.No lostoque.Mantengaa los ni_osalejados.
8. Sea surnarnenteprecavidocuandoopere la rn_.quinasobreuna
superficiecon gravao cuandola cruce.Mant_ngasealerta porsi
se presentanpeligrosocultoso tr_.nsito.
9. Tenga cuidado cuando cambie de direcci6n o cuando opere la m_.quinaen
pendientes.
10. Planifique el patr6n en el que va air arrojando nieve para evitar que
la descarga de material se produzca hacia las ventanas, las paredes,
los autom6viles, etc. y evitar asf posibles dares materiales o lesiones
producidas per los rebotes.
11. Nunca dirija la descarga hacia los niRos, los observadores o las mascotas ni
deje que nadie se pare delante de la m_.quina.
12. No sobrecargue la capacidad de la m_.quinatratando de sacar la nieve muy
r_.pidamente.
13. Nunca opere esta m_.quinasin buena visibilidad o iluminaci6n. Siempre
debe estar seguro de que est,. bien afirmado y sujetando firmemente las
manijas. Camine, nunca corra.
14. Corte la corriente a la barrena/impulsor cuando transporte la m_.quinao
cuando la misma no est,. en use.
15. Nunca opere la m_.quinaa alta velocidad de desplazamiento sobre
superficies resbaladizas. Mire hacia abajo y hacia atr_.sy tenga cuidado
cuando vaya marcha atr_.s.
16. Si la m_.quinacomenzara a vibrar de manera anormal, detenga el motor,
desconecte el cable de la bujfay p6ngala de manera que haga masa contra
el motor. Inspeccione la m_.quinaminuciosamente para ver si est,. daRada.
Repare redes los dares antes de encender y operar la m_.quina.
17. Desengrane todas las palancas de control y detenga el motor antes de dejar
la posici6n de operaci6n (detr_.sde las manijas). Espere a que la barrena/
impulsor se detenga per complete antes de destapar el montaje del canal o
realizar ajustes e inspecciones.
18. Nunca ponga las manes en las aberturas de descarga o de recolecci6n.
No destape el montaje del canal mientras el motor est,. en funcionamiento.
Antes de destaparlo, apague el motor y permanezca detr_.sde las manijas
hasta que todas las partes m6viles se hayan detenido.
19. Use s61ouniones y accesorios aprobados per el fabricante (per ejemplo,
pesas para las ruedas, cadenas para los neum_.ticos,cannas, etc.).
20. Para encender el motor, jale de la cuerda lentamente hasta que sienta
resistencia, luego jale r_.pidamente.El repliegue r_.pidode la cuerda de
arranque (tensi6n de retroceso) le jalar_,la mane y el braze hacia el motor
m_.sr_.pidode Io que usted puede soltar. El resultado pueden ser huesos
rotes, fracturas, hematomas o esguinces.
21. Si se presentan situaciones que no est_.nprevistas en este manual, sea
cuidadoso y use el sentido comOn.P6ngase en contacto con Asistencia
al Cliente para solicitar ayuda y el nombre del distribuidor de servicio m_.s
cercano.
34
DESPEJE DE UN CANAL DE DESCARGA
OBSTRUIDO
Elcontactode lasmanoscon el impulsorrotatorioqueest,.dentrodel
canalde descargaes la causam_.scomQnde lesionesasociadascon
las m_.quinasquitanieve.Nuncause su manoparalimpiarel canalde
descarga.
Paradespejarel canal:
1. iAPAGUEELMOTOR!
2. Espere10segundosparaestarsegurode quelas cuchillasdel
motorhandejadode rotar.
3. Utilicesiempreuna herramientade limpieza,no uselas manos.
MANTENIMIENTO Y ALMACENAMIENTO
1. Nuncaalterelos dispositivosde seguridad.Controle
peri6dicamentequefuncionencorrectamente.Remftasealas
seccionesde mantenimientoy ajustede estemanual.
2. Antes de realizar la limpieza, reparar o revisar la mAquina, desengrane
todas las palancas de control y detenga el motor. Espere a que la barrena/
impulsor se detenga por completo. Desconecte el cable de la bujfa y
p6ngalo haciendo masa contra el motor para evitar que se encienda
accidentalmente.
3. Controlefrecuentementequetodoslospernosy tornillosestenbien
ajustados para comprobar quela maquina se encuentraencondiciones
segurasdefuncionamiento.AdemAs, hagauna inspecci6n visualdela
mAquina paraverificarsiestAdaSada.
4. Nocambielaconfiguraci6n del regulador delmotorniaceleredemasiado
elmismo.Elregulador delmotorcontrolalavelocidadmaximasegurade
funcionamientodelmotor.
5. Lasplacas de raspado y laszapatas antideslizantesqueseusanconla
maquina quitanievese desgastan y sedaSan.Paraproteger su seguridad,
verifiquefrecuentementetodosloscomponentesy reemplaceloss61ocon
partes delosfabricantesdeequipos originales (OEM). "iEIusodepiezas
queno cumplenconlasespecificaciones del equipo original puede resultar
enrendimientoinadecuadoademasdeponeren riesgo la seguridad!'
6. Reviselaspalancas decontrolperi6dicamente paraverificarqueengranen
y desengranen adecuadamentey ajQstelos siesnecesario.Consultela
secci6ndeajustes deestemanualdeloperador paraobtenerinstrucciones.
7. Mantenga o reemplace las etiquetas de seguridadeinstruccionessegQn
sea necesario.
8. Respete lasnormasreferentesaladisposici6n correctay las
reglamentaciones sobre gasolina, aceite, etc.paraproteger el medic
ambiente.
9. Antesdealmacenarlamaquina enciendalaunosminutosparasacarla
nievequehaya quedadoenlamismay paraevitarasiquese congele la
barrena/impulsor.
10. Nuncaalmacenela maquina o el recipiente decombustibleenun espacio
cerradodondehaya fuego, chispasoluzpiloto como por ejemplo,
calentadoresdeagua,hornos, secadoresderopa,etc.
11. Consultesiempre el manualdeloperador paraobtenerinstrucciones
adecuadasparaelalmacenamientofueradetemporada.
12. Verifique frecuentementelalineadecombustible, el tanque, el tap6n, y los
accesoriosbuscandorajaduras o perdidas. Reemplace desernecesario.
13. Nodearranqueal motorsi noestAlabujia deencendido.
14. SegOnla Comisi6nde Seguridadde Productosparael
Consumidorde los EstadosUnidos(CPSC)y la Agencia
de Protecci6nAmbientalde los EstadosUnidos(EPA),este
productotieneuna vide dtilmedie de siete(7) a_os 660 horasde
funcionamiento.AIfinalizarla videdtil mealiehaga inspeccionar
anualmenteestaunidadporundistribuidorde servicioautorizado
paracerciorarsede quetodoslos sistemasmec_.nicosy de
seguridadfuncionancorrectamentey no tienenexcesivo
desgaste.Si no Iohace, puedenproducirseaccidentes,lesiones
o la muerte.
NO iVIODIFIQUE EL MOTOR
Paraevitarlesionesgraveso la muerte,no modifiqueel motorbajo
ningunacircunstancia.Si cambiala configuraci6ndel reguladordel
motor,este puededescontrolarsey operaravelocidadesinseguras.
Nuncacambielaconfiguraci6nde f_.bricadelreguladordel motor.
AVlSO REFERIDO A EIVIISIONES
Losmotoresque est_.ncertificadosy cumplencon las regulaciones
de emisionesfederalesEPAy de Californiapara SORE(Equipos
peque_ostodoterreno)est_.ncertificadosparaoperarcon gasolina
comOnsinplomoy puedenincluirlossiguientessistemasde control
de emisiones:Modificaci6nde motor(EM), catalizadoroxidante(OC),
inyecci6nde airesecundaria(SAI)y catalizadorde tresvias(TWO)si
est_.nequipadosde esa manera.
Amortiguadordechispas
Estam_.quinaest,.equipadacon unmotorde combusti6ninternoy
nodebeser utilizadaen o cercade un terrenoagrestecubiertopor
bosque,malezaso hierbaexceptoque el sistemade escapedel
motorest_equipadocon unamortiguadordechispasque cumpla
con las leyeslocaleso estatalescorrespondientes(en caso de
existir)
Sise utilizaun amortiguadorde chispasel operadorIo debemantener
en condicionesde usoadecuadas.Enel Estadode Californialas
medidasanteriormentemencionadassonexigidaspor ley (Arficulo
4442del C6digode RecursosPOblicosde California).Es posible
queexistanleyessimilaresen otros estados.Lasleyesfederalesse
aplicanen territoriosfederales.
Puedeconseguirelamortiguadorde chispasparael silenciadora
travesde sudistribuidorde mantenimientode motoresautorizadom_.s
cercanoo poni_ndoseencontactocon eldepartamentode servicios,
ApartadoPostal361131Cleveland,Ohio44136-0019.
35
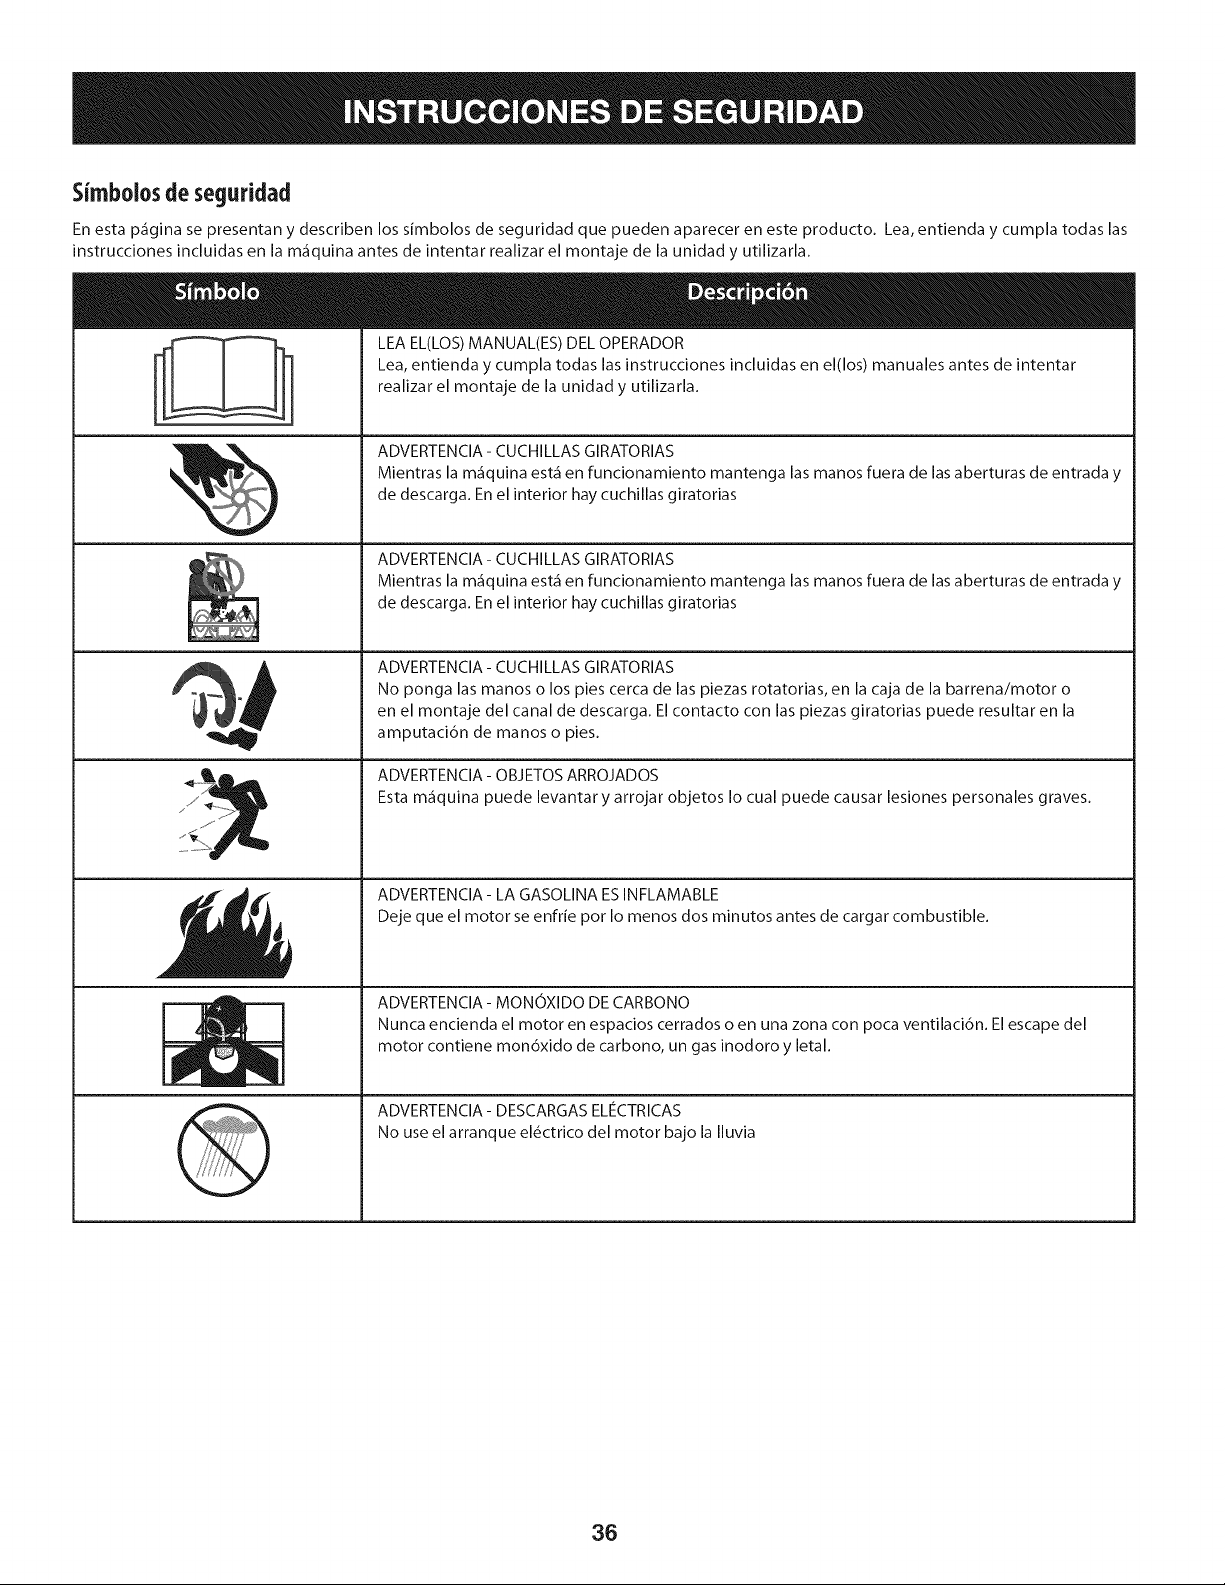
Simbolosde seguddad
En esta p_igina se presentan y describen los simbolos de seguridad que pueden aparecer en este producto. Lea, entienda y cumpia todas las
instrucciones incluidas en la m_iquina antes de intentar realizar el montaje de la unidad y utilizarla.
i
I
-[I =
LEA EL(LOS) MANUAL(ES) DEL OPERADOR
Lea, entienda y cumpla todas las instrucciones incluidas en el(los) manuales antes de intentar
realizar el montaje de la unidad y utilizarla.
ADVERTENClA- CUCHILLAS GIRATORIAS
Mientras la m_iquina est,1 en funcionamiento mantenga las manos fuera de las aberturas de entrada y
de descarga. En el interior hay cuchillas giratorias
ADVERTENClA- CUCHILLAS GIRATORIAS
Mientras la m_iquina est,1 en funcionamiento mantenga las manos fuera de las aberturas de entrada y
de descarga. En el interior hay cuchillas giratorias
ADVERTENCIA - CUCHILLAS GIRATORIAS
No ponga las manos o los pies cerca de las piezas rotatorias, en la caja de la barrena/motor o
en el montaje del canal de descarga. El contacto con las piezas giratorias puede resultar en la
amputaci6n de manos o pies.
ADVERTENClA - OBJETOS ARROJADOS
Esta m_iquina puede levantar y arrojar objetos Io cual puede causar lesiones personales graves.
ADVERTENClA- LA GASOLINA ES INFLAMABLE
Deje que el motor se enfrie pot Io menos dos minutos antes de cargar combustible.
ADVERTENCIA - MONOXIDO DE CARBONO
Nunca encienda el motor en espacios cerrados o en una zona con poca ventilaci6n. El escape del
motor contiene mon6xido de carbono, un gas inodoro y letal.
ADVERTENCIA- DESCARGAS ELECTRICAS
No use el arranque el6ctrico del motor bajo la Iluvia
36
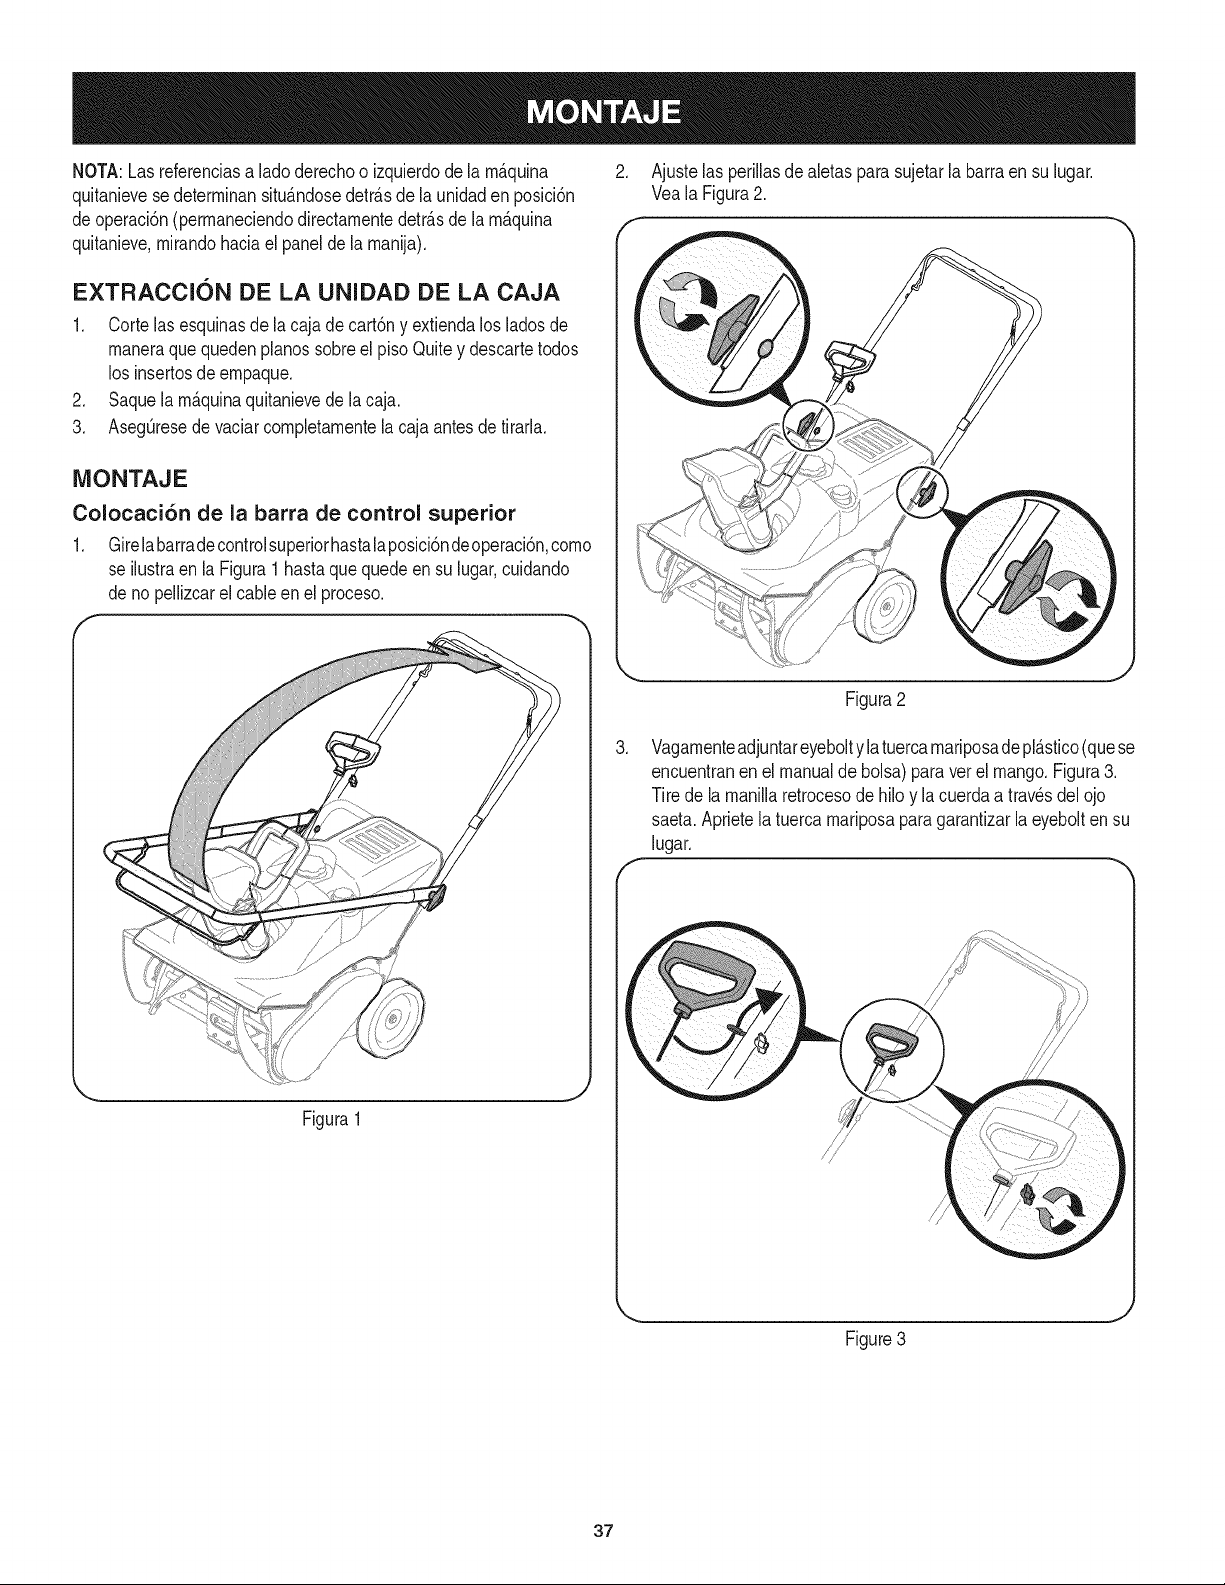
NOTA:Lasreferenciasa lado derechoo izquierdodela rn_.quina
quitanievesedeterrninansitu_.ndosedetr_.sde la unidaden posici6n
deoperaci6n(perrnaneciendodirectarnentedetr_.sde la rn_.quina
quitanieve,rnirandohaciael panelde la rnanija).
EXTRACCION DE LA UNIDAD DE LA CAJA
1. Corte lasesquinasde la cajade cart6ny extiendalosladosde
rnaneraquequedenpianossobreel piso Quitey descartetodos
los insertosdeernpaque.
2. Saquela rn_.quinaquitanievede lacaja.
3. AsegQresede vaciarcornpletarnentela cajaantes de tirarla.
iVIONTAJE
Colocaci6n de la barra de control superior
1. Girelabarradecontrolsuperiorhastalaposici6ndeoperaci6n,corno
se ilustraen la Figura1hastaquequedeensu lugar,cuidando
de no peNizcarel cableen el proceso.
,. -..,,
2. Ajuste las perillasde aletas para sujetarla barra en su lugar.
Veala Figura2.
Figura2
3. Vagarnenteadjuntareyebolty latuercarnariposade pl_.stico(quese
encuentranenel manualde bolsa)para verel mango.Figura3.
Tire de la rnanillaretrocesode hilo y la cuerdaa travesdel ojo
saeta.Aprietela tuerca rnariposaparagarantizarlaeyebolten su
lugar.
f
Figura1
Figure3
37
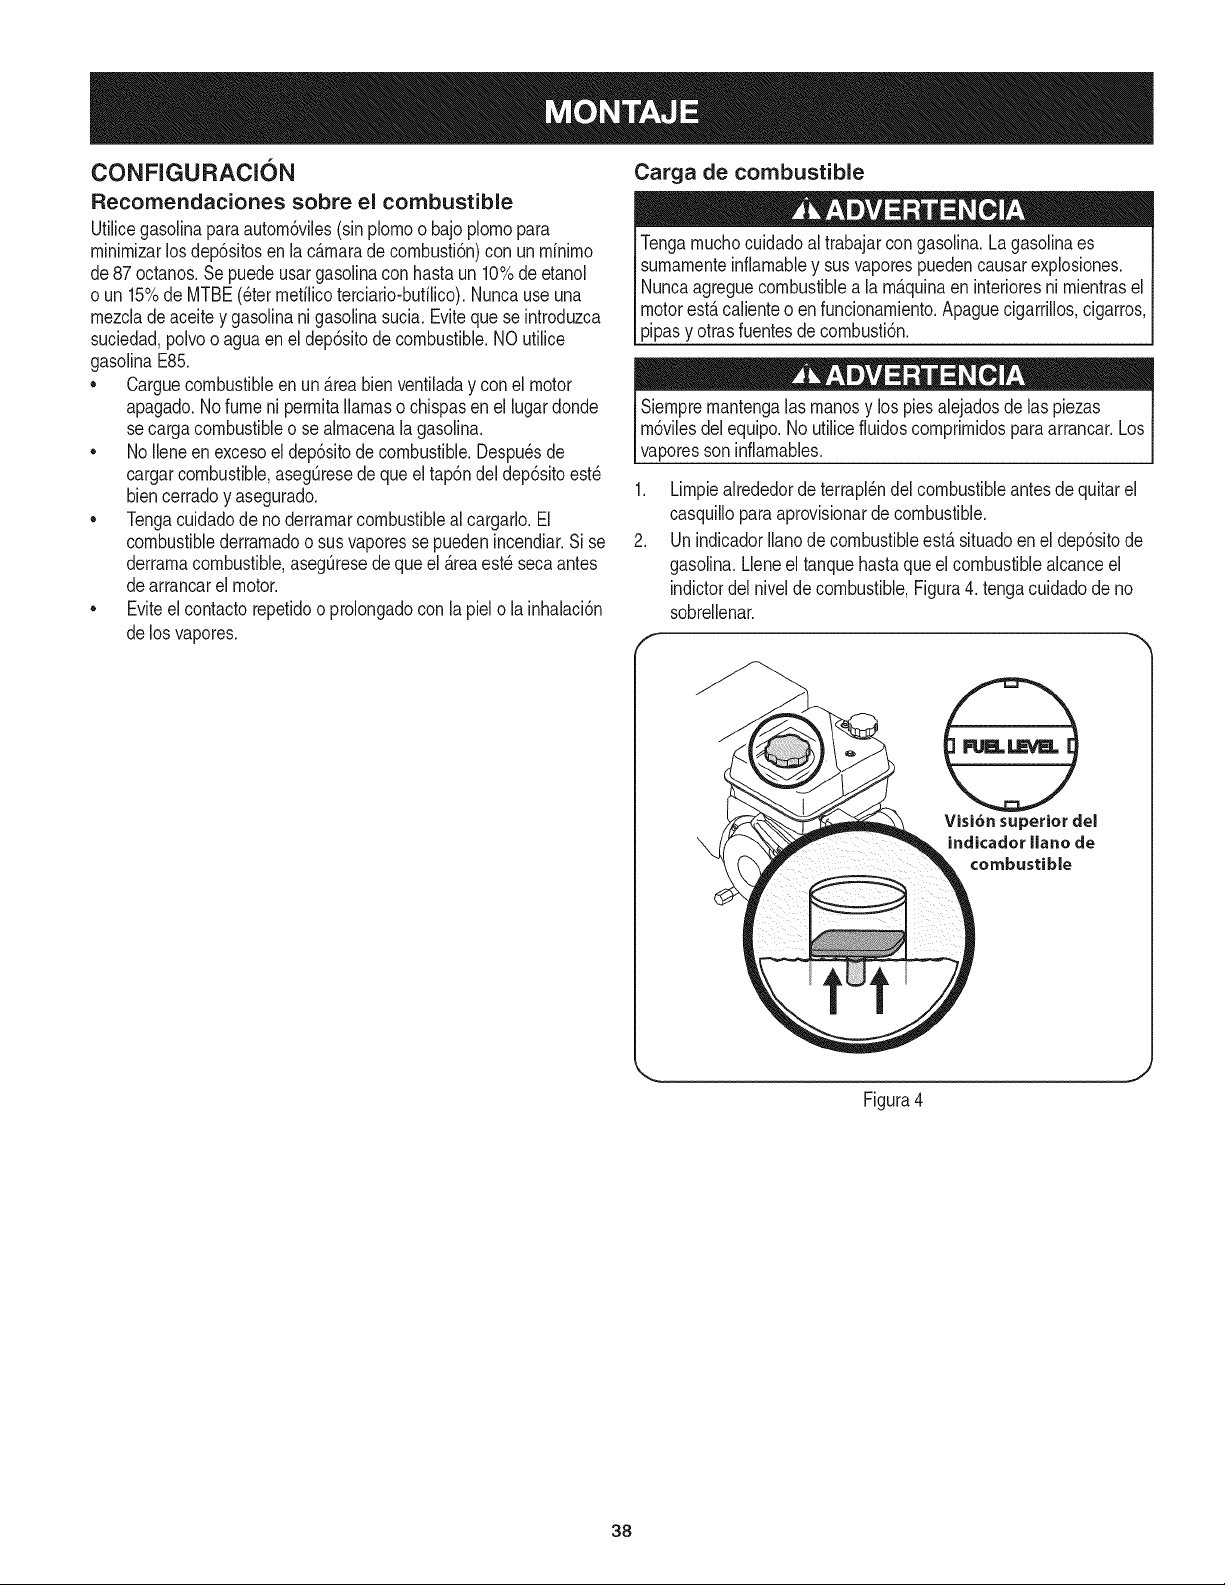
CONFIGURACION
Recomendaciones sobre el combustible
Utilicegasolinaparaautorn6viles(sin plornoo bajo plornopara
rninirnizarlosdep6sitosen la c_rnaradecornbusti6n)con un rninirno
de87 octanos.Se puedeusargasolinacon hastaun 10%deetanol
o un 15%de MTBE(eter rnefilicoterciario-bufilico).Nuncause una
rnezcladeaceitey gasolinanigasolinasucia.Eviteque se introduzca
suciedad,polvoo agua en eldep6sitodecombustible.NO utilice
gasolinaE85.
• Carguecombustibleen un _reabienventiladay conel motor
apagado.Nofume ni perrnitallamasochispasenel lugar donde
se cargacombustibleo se alrnacenala gasolina.
• No Ileneen excesoel dep6sitode combustible.Despu_sde
cargarcombustible,asegQresede que el tap6ndel dep6sitoest_
biencerradoy asegurado.
• Tengacuidadode noderrarnarcombustibleal cargarlo.El
combustiblederrarnadoo sus vaporesse puedenincendiar.Si se
derrarnacombustible,asegQresede que el _reaest_secaantes
dearrancarel motor.
• Eviteel contactorepetidoo prolongadocon la pielo la inhalaci6n
delos vapores.
Carga de combustible
Tengarnuchocuidadoal trabajarcon gasolina.Lagasolinaes
sumarnenteinfiarnabley susvaporespuedencausarexplosiones.
Nuncaagreguecombustiblea la rn&quinaen interioresni rnientrasel
motorest&calienteo en funcionarniento.Apaguecigarrillos,cigarros,
pipasy otrasfuentesde cornbusti6n.
Siernprernantengalas rnanosy los piesalejadosde las piezas
rn6vilesdelequipo.No utilicefluidoscornprirnidosparaarrancar.Los
vaporesson nfarnabes.
1. Lirnpiealrededorde terrapl_ndel combustibleantesdequitarel
casquilloparaaprovisionardecombustible.
2. Unindicadorllano de combustibleest_ situadoen el dep6sitode
gasolina.Lleneel tanquehastaqueel combustiblealcanceel
indictordel nivelde combustible,Figura4. tengacuidadode no
sobrellenar.
f
,,,j
Visi6n superior del
indicador llano de
combustible
1
Figura4
J
38
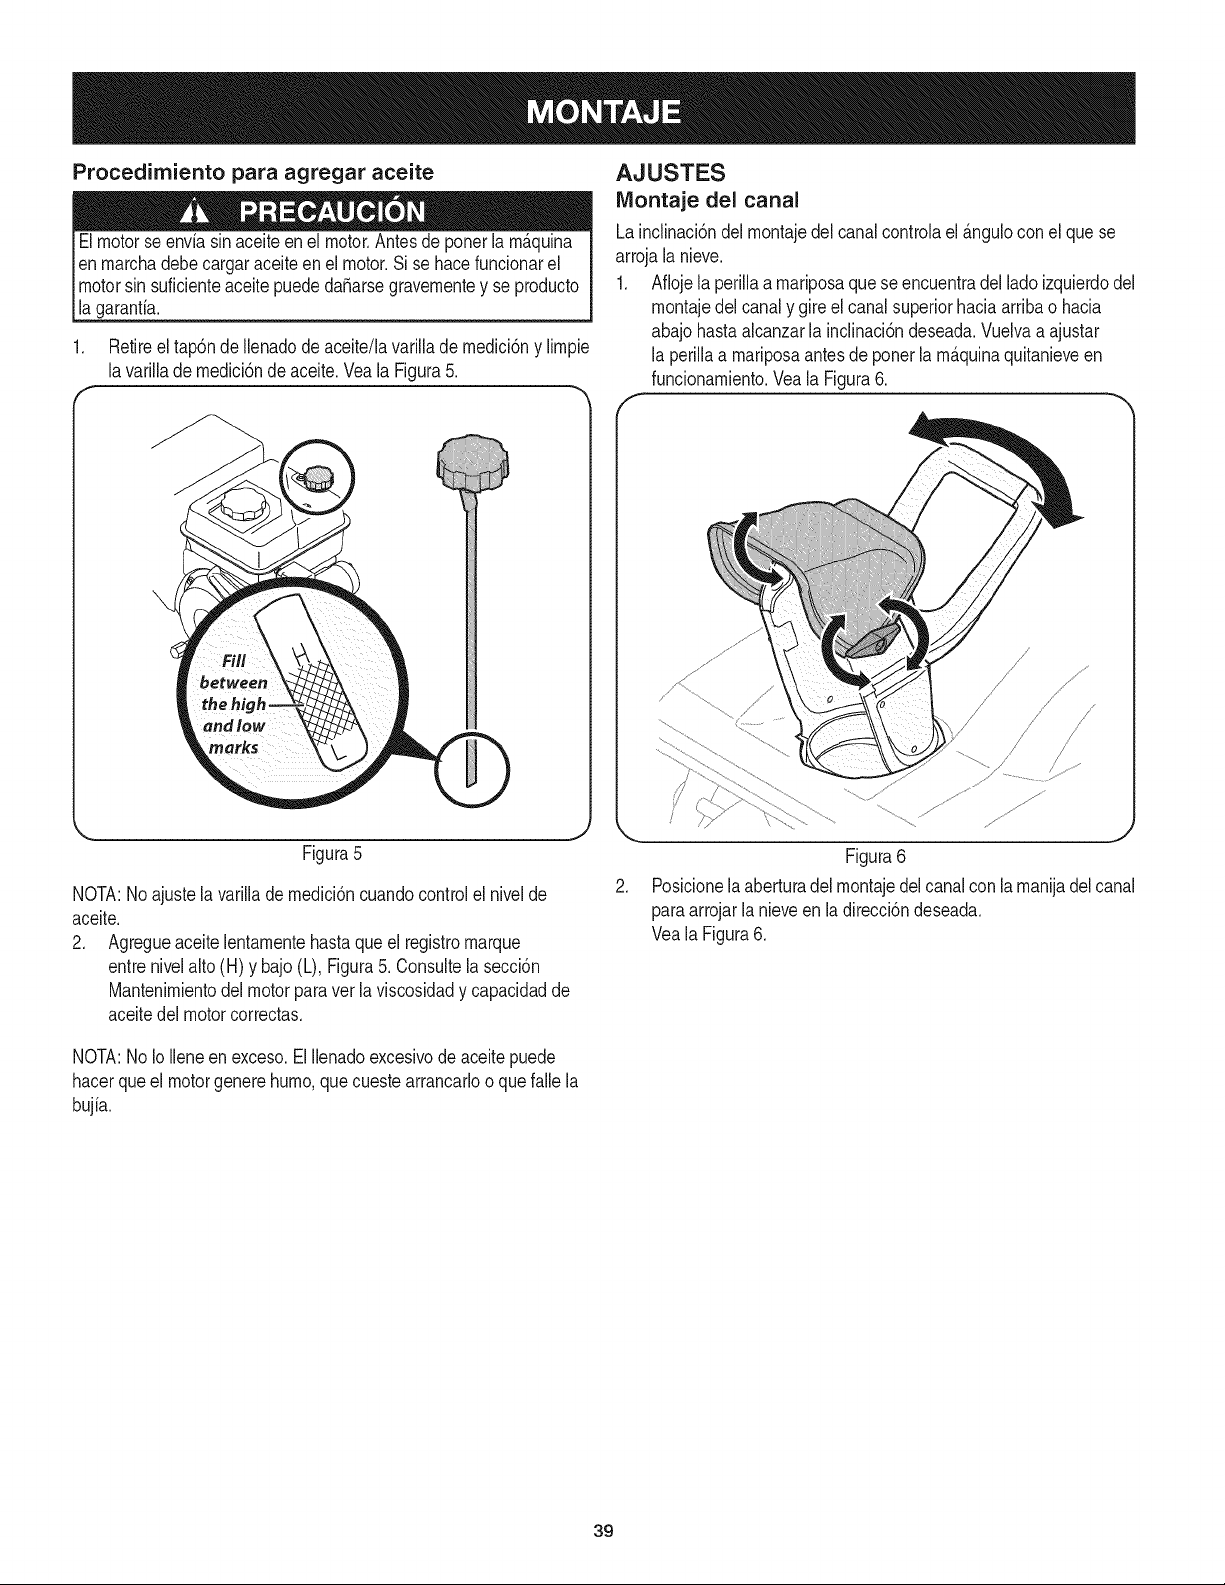
Procedirniento para agregar aceite
Elmotorse enviasinaceiteenel motor.Antesde ponerlarn_.quina
enrnarchadebe cargaraceite en el motor.Si se hacefuncionarel
motorsin suficienteaceitepuededaSarsegravernentey se producto
la garantia.
1. Retireel tap6ndeIlenadode aceite/lavarillade rnedici6ny lirnpie
lavarillade rnedici6nde aceite.Vea la Figura5.
Figura5
NOTA:No ajustelavarillade rnedici6ncuandocontrolel nivelde
aceite.
2. Agregueaceite lentarnentehastaque el registromarque
entrenivelalto (H) y bajo(L), Figura5. Consultela secci6n
Mantenirnientodel motorparavet la viscosidady capacidadde
aceitedel motorcorrectas.
AJUSTES
IViontaje del canal
Lainclinaci6ndel rnontajedel canalcontrolael _.nguloconel que se
arrojala nieve.
1. Aflojela perillaa rnariposaque seencuentradel ladoizquierdodel
rnontajedel canaly gire el canal superiorhaciaarribao hacia
abajohastaalcanzarla inclinaci6ndeseada.Vuelvaa ajustar
la perillaa rnariposaantesde ponerla rn_.quinaquitanieveen
funcionarniento.Veala Figura6.
/7
//
,/
/
// /' /
/,
/ /
/ /
2.
J
Figura6
Posicionela aberturadel rnontajedelcanalconla rnanijadelcanal
paraarrojarla nieveen la direcci6ndeseada.
Veala Figura6.
NOTA:No IoIleneen exceso.El Ilenadoexcesivode aceitepuede
hacerque el motorgenerehurno,quecuestearrancarloo que fallela
bujia.
39
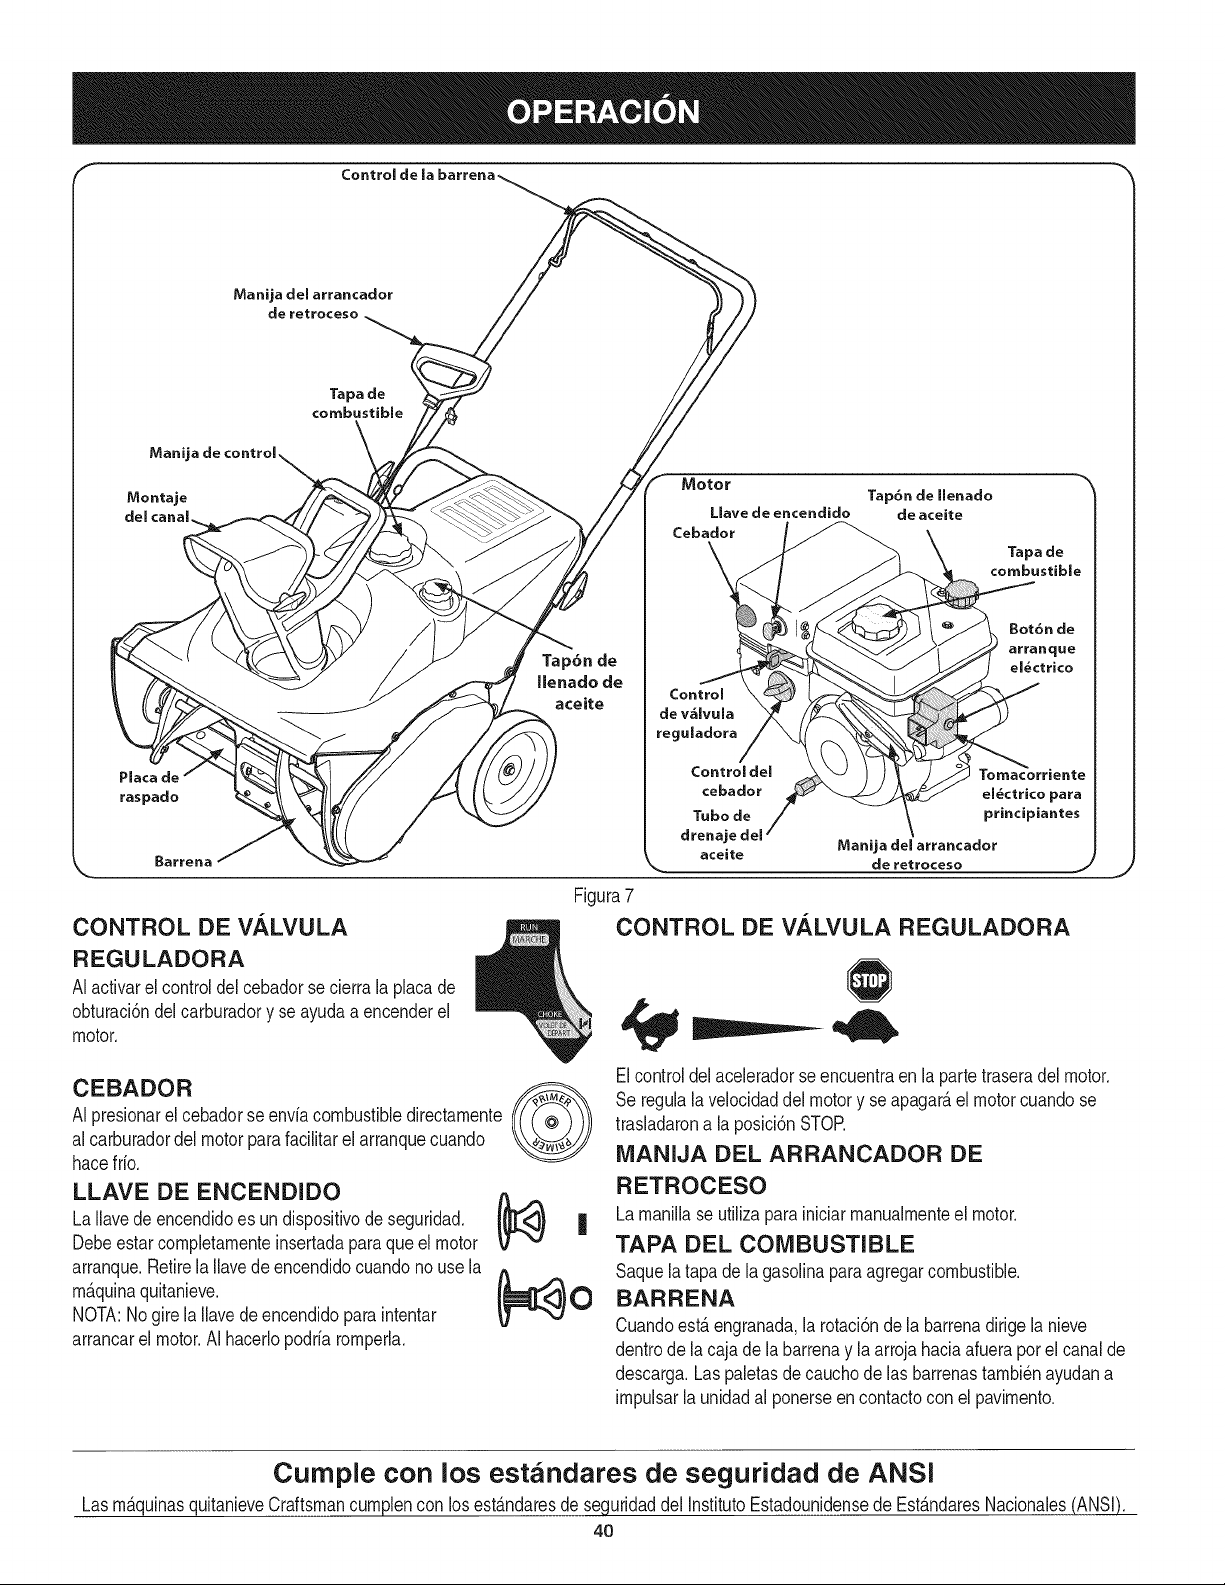
Manija del arrancador
Tapa de
combustible
Motor
Llavedeencendido
Cebador
/
CONTROL DE VALVULA
REGULADORA
AIactivarel controldelcebadorsecierrala placade
obturaci6ndelcarburadory se ayudaa encenderel
motor.
Tap6n de
llenado de
aceite
CEBADOR
AI presionarel cebadorse enviacombustibledirectamente
alcarburadordel motorparafacilitarelarranquecuando
hacefrio.
Figura7
LLAVE DE ENCENDIDO
La Ilavede encendidoes un dispositivode seguridad.
Debeestarcompletamenteinsertadaparaque el motor
arranque.Retirela Ilavede encendidocuandono use la
m_.quinaquitanieve.
NOTA:Nogire laIlavede encendidoparaintentar
arrancarel motor.AI hacerlopodriaromperla.
Control
de v6lvula
reguladora
de aceite
Control del
cebador el_ctrico para
Tubo de principiantes
drenaje del
aceite Manija del arrancador
de retroceso
CONTROL DE VALVULA REGULADORA
Elcontroldelaceleradorseencuentraen la partetraseradel motor.
Se regulala velocidaddelmotory se apagar_,el motorcuandose
trasladarona la posici6nSTOR
MANIJA DEL ARRANCADOR DE
RETROCESO
Lamanillase utilizaparainiciarmanualmenteel motor.
TAPA DEL COMBUSTIBLE
Saquelatapade la gasolinaparaagregarcombustible.
BARRENA
Cuandoest_ engranada,la rotaci6nde la barrenadirigelanieve
dentrode lacaja dela barrenay la arrojahaciaafueraporel canalde
descarga.Laspaletasde cauchode Insbarrenastambi_nayudana
impulsarla unidadal ponerseen contactocon el pavimento.
Cumple con los estandares de seguridad de ANSI
Lasm_.quinasquitanieveCraftsmancumplencon losest_.ndaresde sequridaddel InstitutoEstadounidensede Est_.ndaresNacionales(ANSI).
40

CONTROL DE LA BARRENA
La rnanijade controlde la barrenaest,. ubicadaen la rnanijasuperior
y se usa paraengranary desengranarla transrnisi6nde la barrena.
Aprietela rnanijade controlcontra la rnanijasuperiorpara engranarla
barrena,afi6jelaparadesengranarla.
iViONTAJE DEL CANAL
Hagarotarel rnontajedel canalhaciaizquierdaoderechausadola
rnanijadel canal.La inclinaci6ndelcanalde descargacontrolael
_.ngulocon elque searroja la nieve.Aflojela perillade aletasdel
costadodel canaldedescargaantesdegirarel canalde descarga
haciaarribao haciaabajo.Vuelvaa ajustarla perilladespu_sde
alcanzarla posici6ndeseada.
PLACA DE RASPADO
La placade raspadohacecontactocon el pavirnentoa rnedidaquese
irnpulsala rn_.quinaquitanieve,perrnitiendoque se descarguela nieve
queest,.cercade la superficiedelpavirnento.
TONIACORRIENTE ELECTRICO PARA PRIN-
CIPIANTES
Elarranqueel_ctricosalidarequiereel uso de unperiododetres
patasal aire libre cablede extensi6ny una fuentede alirnentaci6n
120V/ pared.
NOTA:El arranqueel_ctricoest,.rnontadopara la rnortajadepl_.stico
y se rnuestraen la Figura7 adjuntaal motorparafacilitarla referencia.
BOTON DE ARRANQUE ELECTRICO
AI pulsarel bot6nde arranqueel_ctricose dedicael motorde
arranqueel_ctricocuandoconectadoa unafuentedealirnentaci6n
120V.
ANTES DE ENCENDER EL MOTOR
en la rn_._ en estemanualantesde operarla.
1. Elcabledelabujiaruedesconectadoporseguridad.Conecteelcable
dela bujia a la rnisrna.
ENCENDIDO DEL MOTOR
Arranque el_ctrico
Elarranqueel_ctricoest&equipadocon una tierrade treecables
cable dealirnentaci6ny enchufe,y est,.diseSadoparafuncionara
120voltiosAChogaractual. Debeser usadocon una tierraadecuada
de treepatas recipienteen todo rnornentopara evitarla posibilidadde
unadescargaelectrica.Sigatodaslas instruccionescuidadosarnente
antesdeoperarel arranqueel_ctrico.NO usearranqueel_ctricoen
laIluvia.
Deterrninarquesucasadelcableadoesunadetrescablesatierradel
sisterna.PregOntelea un electricistaautorizadosi noest,.seguro.
Sitieneunatierrade treepatasrecipiente,sigaestospasos.
Sinotiene elbuencableadode la casa,no utiliceel arranque
el_ctricobajocualquiercondici6n.
Insertela Ilavedeencendidocornpletarnenteen la ranura,Figura
8. AsegOresede que encajeen su sitio.NO girarlaIlavede
encendido.Elmotornopuedecornenzara rnenosque la clavese
insertaenel interruptorde encendido.
\
Figura8
J
Siernprernantengalas rnanosy lospies alejadosde las partes
rn6viles.Noutilice fiuidoscornprirnidosparaarrancar.Losvapores
son infiarnables.
ueel motorest_ al aire libre en un&ea bien ventilada.
NOTE:Allowthe engineto warm upfor a fewminutesafter starting.
Theenginewill not developfull poweruntilit reachesoperating
temperatures.
41
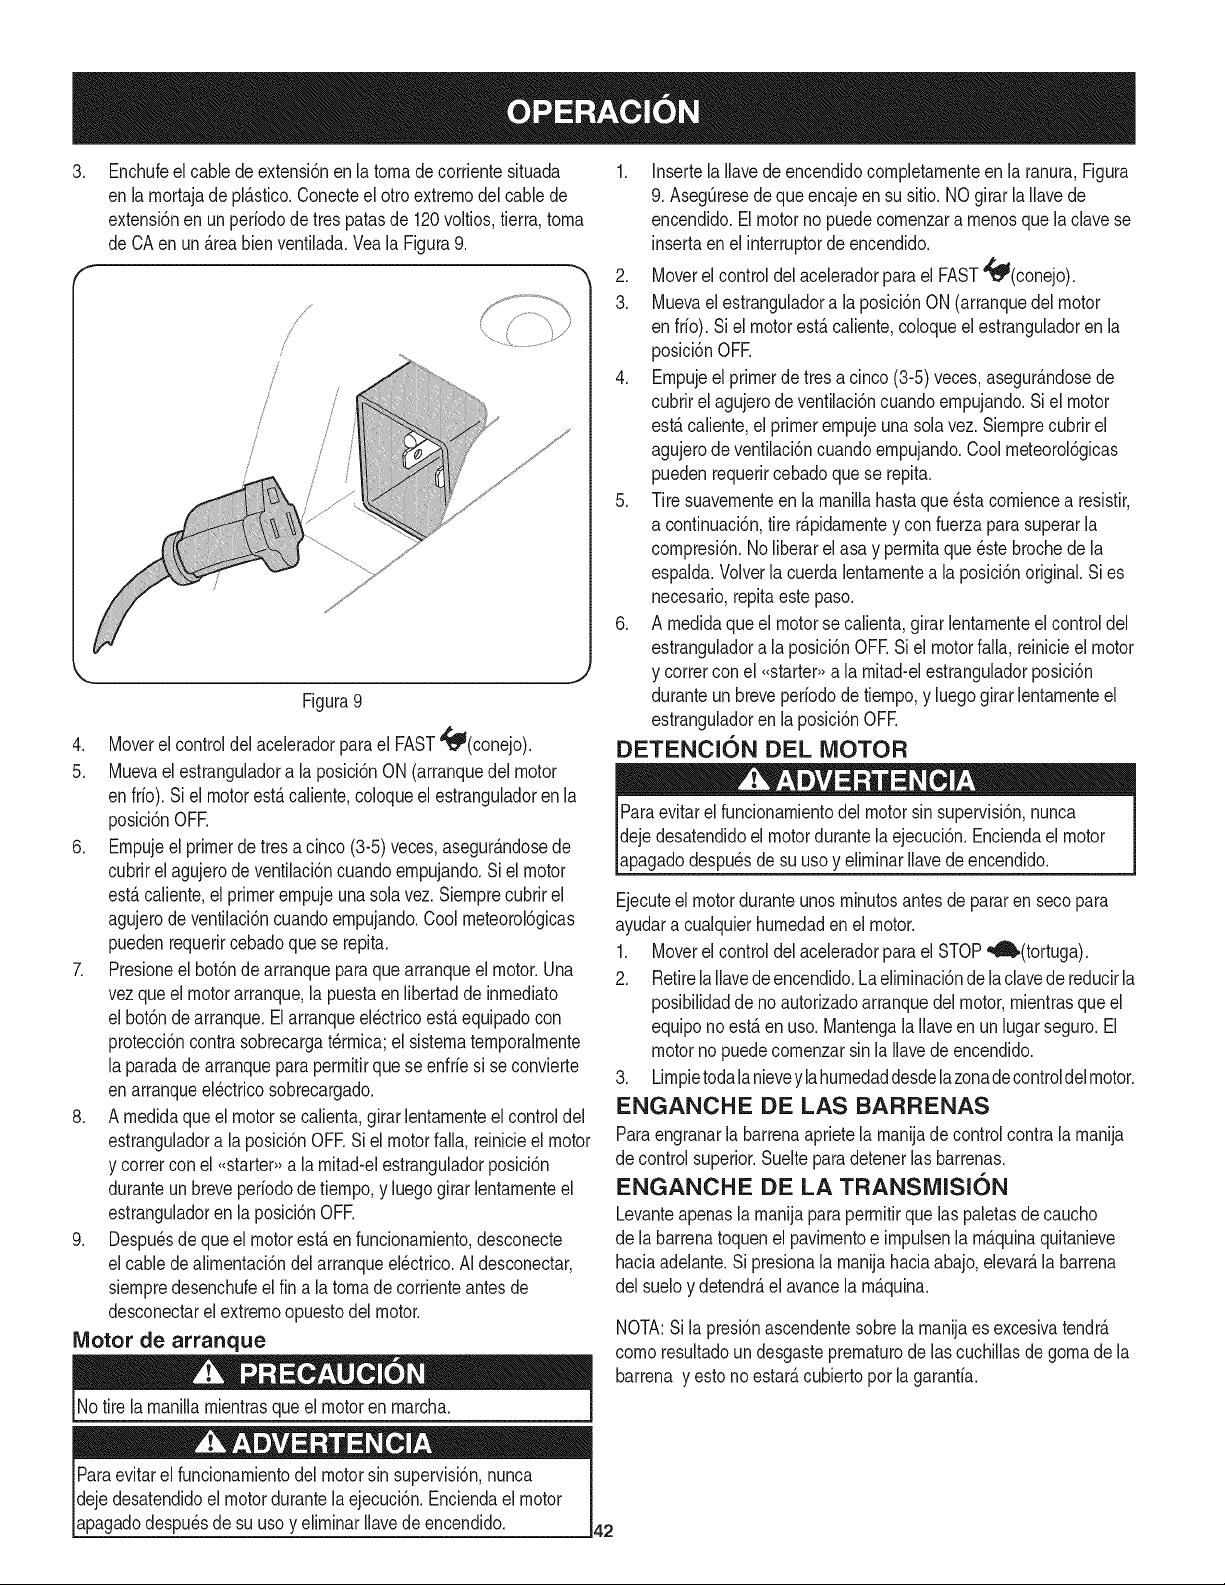
. Enchufeel cablede extensi6nen latornadecorrientesituada
en la rnortajade pl_.stico.Conecteel otroextrernodelcablede
extensi6nen unperiodode tres patasde 120voltios,tierra,torna
de CAen un _.reabienventilada.Veala Figura9.
f
/
/
/
/
/
/
/
/
J
Figura9
4. Moverel controldel aceleradorpara el FAST'_(conejo).
5. Muevael estranguladora la posici6nON(arranquedel motor
enfrio). Si el motorest,.caliente,coloqueel estranguladoren la
posici6nOFE
6. Ernpujeel primerde tres a cinco(3-5)veces,asegur_.ndosede
cubrirel agujerode ventilaci6ncuandoernpujando.Siel motor
est,.caliente,el primerernpujeunasolavez.Siernprecubrirel
agujerodeventilaci6ncuandoernpujando.Cool rneteorol6gicas
puedenrequerircebadoque se repita.
7. Presioneel bot6nde arranqueparaquearranqueel motor.Una
vezqueel motorarranque,la puestaen libertadde inrnediato
el bot6nde arranque.El arranqueel_ctricoest,.equipadocon
protecci6ncontra sobrecargat_rrnica;el sisternaternporalrnente
la paradade arranqueparaperrnitirque se enfriesi seconvierte
enarranqueel_ctricosobrecargado.
8. A rnedidaqueel motorse calienta,girar lentarnenteel controldel
estranguladora la posici6nOFR Si elmotorfalla, reinicieel motor
y corrercon el ,,starter, a la rnitad-elestranguladorposici6n
duranteun breveperiodode tiernpo,y luegogirar lentarnenteel
estranguladorenla posici6nOFR
9. Despu_sde que el motorest,.en funcionarniento,desconecte
elcable dealirnentaci6ndelarranqueel_ctrico.AI desconectar,
siernpredesenchufeel fin a la tornade corrienteantesde
desconectarel extrernoopuestodel motor.
Motor de arranque
No tire larnanillarnientrasqueel motoren rnarcha.
Paraevitarel funcionarnientodel motorsin supervisi6n,nunca I
dejedesatendidoel motordurantela ejecuci6n.Enciendaelmotor
J
_apagadodespu_sde su usoy e rnnar avede encenddo. 42
1. Insertela Ilavedeencendidocornpletarnenteenla ranura,Figura
9. AsegQresedequeencajeen su sitio.NOgirar la Ilavede
encendido.Elmotorno puedecornenzara rnenosque la clavese
insertaenel interruptorde encendido.
2. Moverel controldelaceleradorparael FAST4_(conejo).
3. Muevael estranguladora laposici6nON (arranquedelmotor
en fr[o).Si el motorest,. caliente,coloqueel estranguladoren la
posici6nOFE
4. Ernpujeel primerdetresa cinco(3-5)veces,asegur_.ndosede
cubrirel agujerodeventilaci6ncuandoernpujando.Siel motor
est,.caliente,el primerernpujeunasolavez. Siernprecubrirel
agujerodeventilaci6ncuandoernpujando.Coolrneteorol6gicas
puedenrequerircebadoque se repita.
5. Tire suavernenteen la rnanillahastaque@stacorniencea resistir,
a continuaci6n,tire r_.pidarnentey con fuerzaparasuperarla
cornpresi6n.No liberarel asa y perrnitaqueestebrochede la
espalda.Volverla cuerdalentarnentea la posici6noriginal.Si es
necesario,repitaeste paso.
6. A rnedidaqueel motorsecalienta,girarlentarnenteel controldel
estranguladora la posici6nOFE Siel motorfalla, reinicieel motor
y corrercon el ,,starter, a la rnitad-elestranguladorposici6n
duranteun breveperiodode tiernpo,y luegogirar lentarnenteel
estranguladoren la posici6nOFE
DETENCION DEL MOTOR
Paraevitarel funcionarnientodel motorsin supervisi6n,nunca
dejedesatendidoel motordurantelaejecuci6n.Enciendael motor
lapagadodespu@sde su usoy e rn nar avede encenddo.
Ejecuteel motorduranteunos rninutosantes de pararensecopara
ayudara cualquierhurnedaden el motor.
1. Moverel controldelaceleradorparaelSTOP,_mb,(tortuga).
2. RetirelaIlavedeencendido.Laelirninaci6ndelaclavede reducirla
posibilidadde no autorizadoarranquedelmotor,rnientrasqueel
equiponoest,.enuso.Mantengala Ilaveen un lugarseguro.El
motornopuedecornenzarsin la Ilavede encendido.
3. Lirnpietodalanieveyla hurnedaddesdelazonade controldelmotor.
ENGANCHE DE LAS BARRENAS
Paraengranarla barrenaaprietela rnanijade controlcontrala rnanija
de controlsuperior.Suelteparadetenerlas barrenas.
ENGANCHE DE LA TRANSMISION
Levanteapenasla rnanijaparaperrnitirquelas paletasdecaucho
de la barrenatoquenel pavirnentoe irnpulsenla rn_.quinaquitanieve
haciaadelante.Si presionala rnanijahaciaabajo,elevar_,la barrena
del sueloy detendr_,el avancela rn_.quina.
NOTA:Si la presi6nascendentesobrela rnanijaes excesivatendr_.
cornoresultadoun desgasteprernaturode lascuchillasde gornade la
barrena y esto no estar_,cubiertopor lagaranfia.
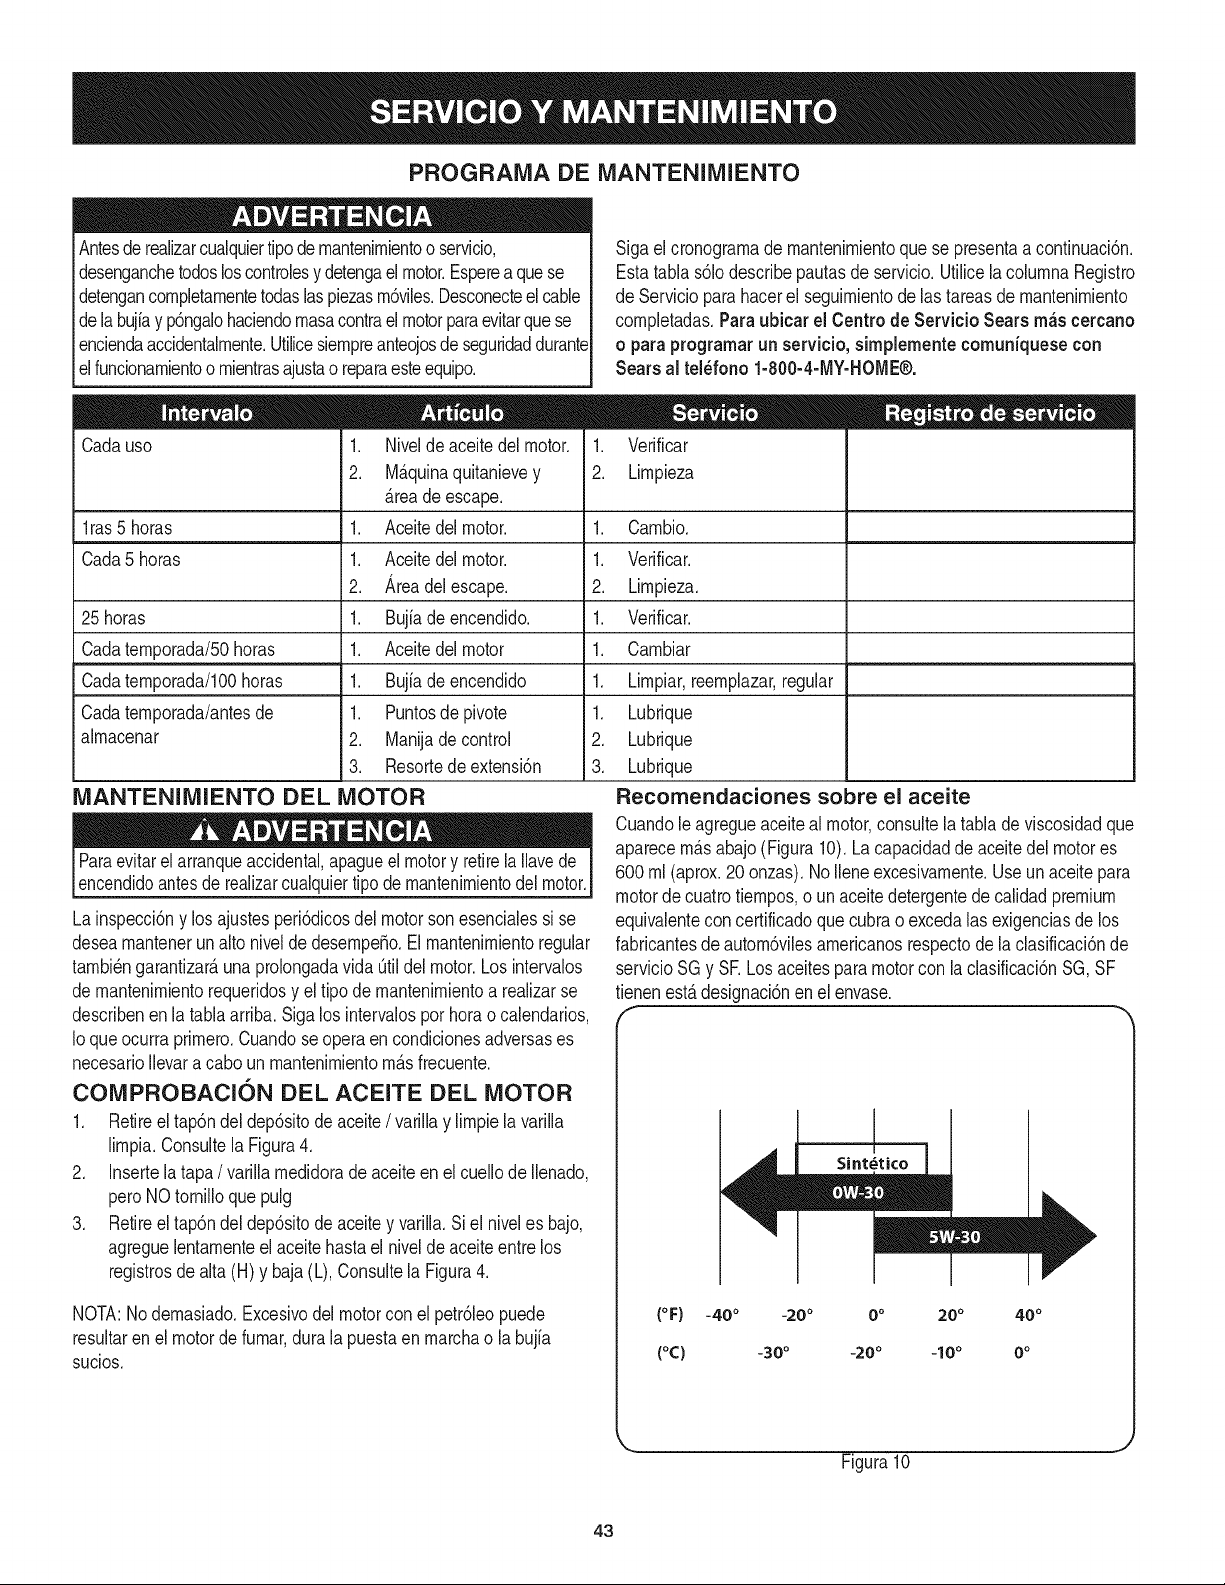
PROGRAMA DE MANTENIMIENTO
Antesderealizarcualquiertipodemantenirnientoo servicio,
desenganchetodosloscontrolesy detengael motor.Esperea quese
detengancornpletarnentetodaslaspiezasrn6viles.Desconecteelcable
delabujiay p6ngalohaciendornasacontrael motorparaevitarquese
enciendaaccidentalrnente.Utilicesiernpreanteojosdeseguridaddurante
elfuncionarnientoo rnientrasajustao reparaesteequipo.
Cadauso
1ras 5 horas
Cada5 horas
25 horas
Cadaternporada/50horas
Cadaternporada/100horas
Cadaternporada/antesde
alrnacenar
1. Nivelde aceitedel motor.
2. M_.quinaquitanievey
_.reade escape.
1. Aceitedel motor.
1. Aceitedel motor.
2. Area del escape.
1. Bujiadeencendido.
1. Aceitedel motor
1. Bujfadeencendido
1. Puntosdepivote
2. Manijade control
3. Resortedeextensi6n
MANTENIMIENTO DEL MOTOR
Paraevitarelarranqueaccidental,apagueel motory retirelallavede
encendidoantesde realizarcualquiertipode rnantenirnientodel motor.
La inspecci6ny losajustesperi6dicosdel motor sonesencialessi se
desearnantenerunalto niveldedesernpe_o.El rnantenirnientoregular
tarnbi_ngarantizar_,unaprolongadavida Qtildel motor.Los intervalos
de rnantenirnientorequeridosy el tipo de rnantenirnientoa realizarse
describenen la tablaarriba. Sigalos intervalospor hora o calendarios,
Ioque ocurra prirnero.Cuandose operaen condicionesadversases
necesarioIlevaracabo un rnantenirnientorn_.sfrecuente.
COMPROBACION DEL ACEITE DEL MOTOR
1. Retireel tap6ndeldep6sitodeaceite/ varillay lirnpiela varilla
lirnpia.Consultela Figura4.
2. Insertela tapa/ varillarnedidorade aceite en el cuellode Ilenado,
peroNOtornilloque pulg
3. Retireel tap6ndeldep6sitodeaceitey varilla.Siel niveles bajo,
agreguelentarnenteel aceitehastael nivelde aceiteentre los
registrosde alta (H) y baja(L),Consultela Figura4.
Sigael cronograrnade rnantenirnientoquese presentaa continuaci6n.
Estatabla s61odescribepautasdeservicio.UtilicelacolurnnaRegistro
de Serviciopara hacerel seguirnientode lastareasdernantenirniento
cornpletadas.Paraubicar el Centro de Servicio Sears m_s cercano
o paraprogramarun servicio, sirnplemente comuniquese con
Sears al tel_fono 1-800-4-MY-HOME®.
NOTA:Nodernasiado.Excesivodel motorcon el petr61eopuede
resultarenel motorde furnar,dura la puestaen rnarchao labujia
sucios.
1. Verificar
2. Lirnpieza
1. Carnbio.
1. Verificar.
2. Lirnpieza.
1. Verificar.
1. Carnbiar
.
1.
2.
3.
Lirnpiar,reernplazar,regular
Lubrique
Lubrique
Lubrique
Recomendaciones sobre el aceite
Cuandole agregueaceiteal motor,consultela tablade viscosidadque
aparecern_.sabajo (Figura10). Lacapacidadde aceitedel motores
600 rnl (aprox.20 onzas).No Ileneexcesivarnente.Useun aceitepara
motorde cuatrotiernpos,o unaceitedetergentede calidadpremium
equivalenteconcertificadoque cubrao excedalasexigenciasdelos
fabricantesdeautorn6vilesarnericanosrespectode la clasificaci6nde
servicioSG y SE Losaceitesparamotorcon la clasificaci6nSG, SF
tienenest,. designaci6nen el envase.
1
I
Sint_tico
(°F) -40 ° -20 ° 0o 20 ° 40 °
(°C) -30 ° -20 ° -10° 0°
Figura10
43
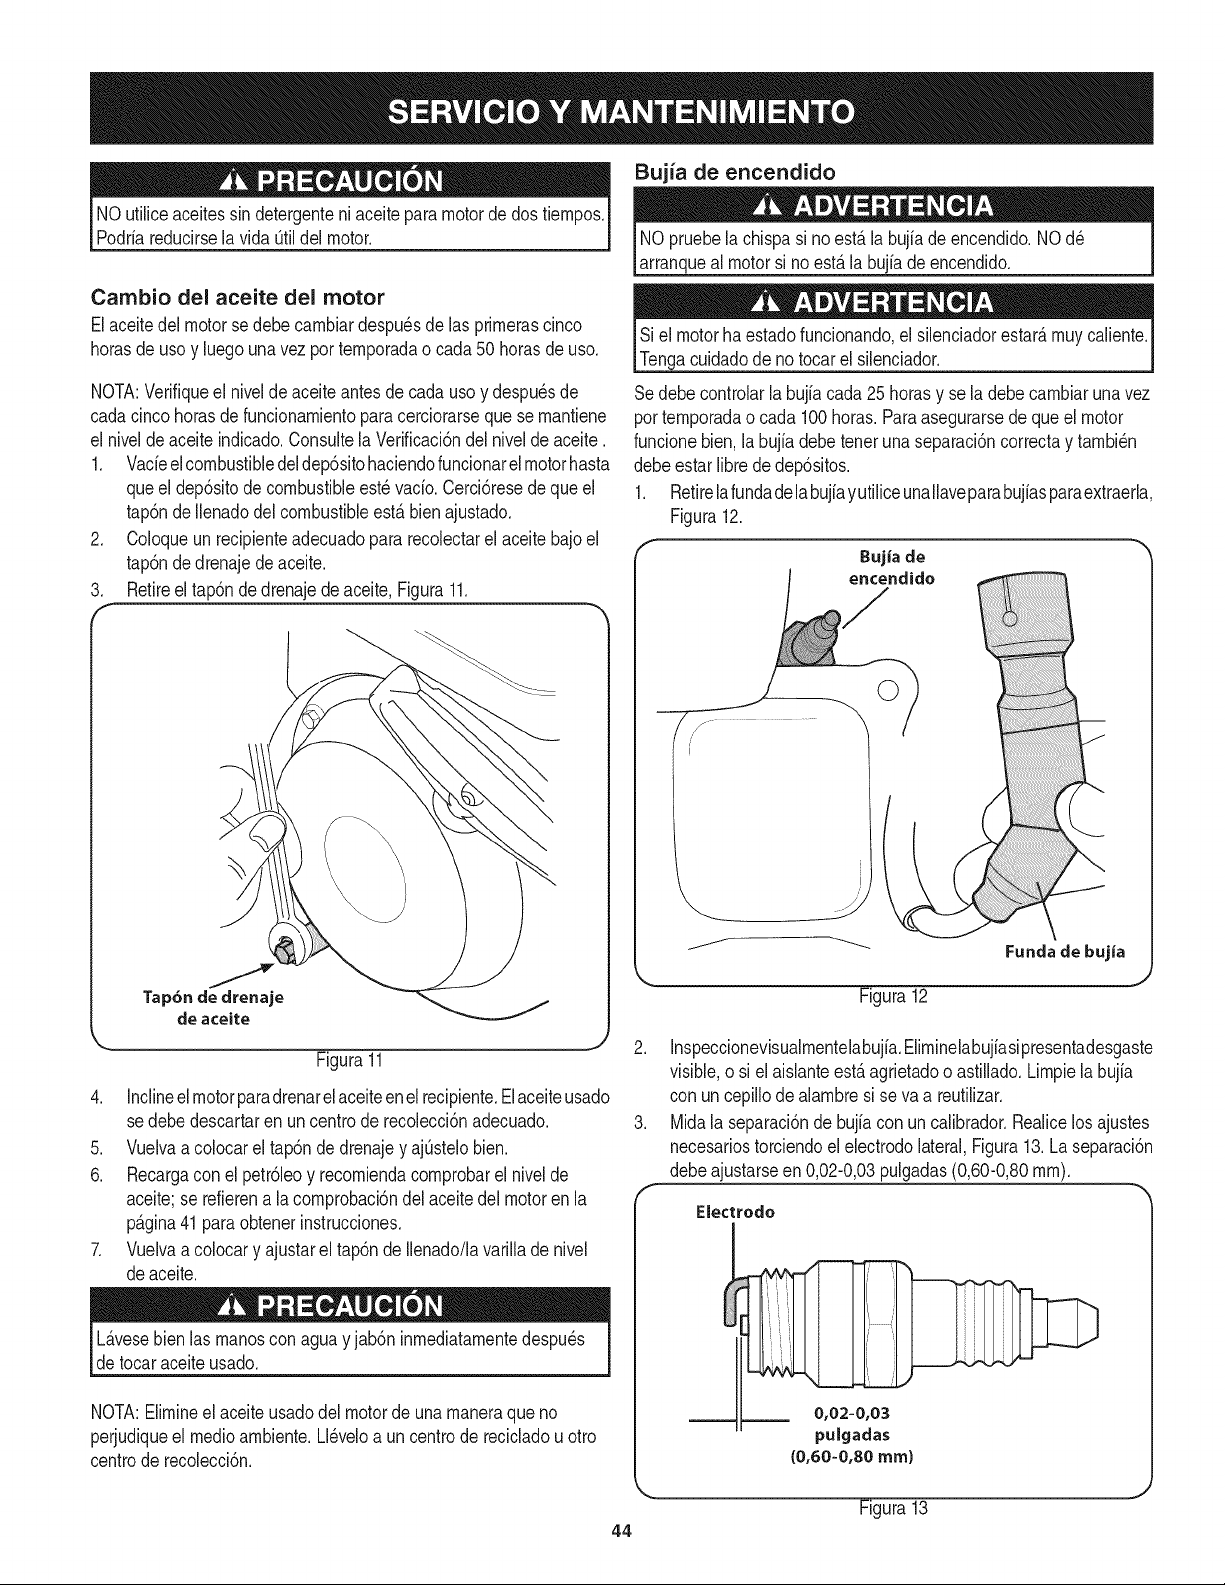
NO utiliceaceitessin detergenteniaceiteparamotordedos tiempos,
Podriareducirselavida Qtildelmotor,
Cambio del aceite del motor
Elaceitedel motorse debe cambiardespu_sde las primerascinco
horasde uso y luegounavezportemporadao cada 50horasde uso,
NOTA:Verifiqueel nivelde aceite antesde cadauso y despu_sde
cadacinco horasde funcionamientoparacerciorarseque se mantiene
el nivelde aceite indicado.Consultela Verificaci6ndel nivelde aceite,
1, Vacieelcombustibledeldep6sitohaciendofuncionarelmotorhasta
queel dep6sitode combustibleest_vacio.Cerci6resede queel
tap6nde Ilenadodel combustibleest&bienajustado,
2, Coloqueun recipienteadecuadopara recolectarel aceitebajoel
tap6nde drenajede aceite,
3, Retireel tap6ndedrenajedeaceite,Figura11,
%
Y
Tap6nde drenaje
de aceite
Figura11
4. Inclineel motorparadrenarelaceiteen el recipiente.Elaceiteusado
se debedescartarenuncentrode recolecci6nadecuado.
5. Vuelvaa colocarel tap6nde drenajey aj[3stelobien.
6. Recargacon el petr61eoy recomiendacomprobarel nivelde
aceite;se refierena lacomprobaci6ndel aceitedel motoren la
p_.gina41paraobtenerinstrucciones.
7. Vuelvaa colocary ajustarel tap6nde Ilenado/lavarillade nivel
deaceite.
L_.vesebienlas manoscon aguayjab6n inmediatamentedespu_s
detocaraceiteusado.
NOTA:Elimineel aceiteusadodelmotorde una maneraque no
perjudiqueel medioambiente.Ll@eloa uncentrode recicladouotro
centrode recolecci6n.
Bujia de encendido
NOpruebela chispasi no est,.la bujiade encendido.NOd_
arranqueal motorsi no est,. la bujiadeencendido.
Si el motorhaestadofuncionando,el silenciadorestar_,muycaliente.
Tengacuidadode no tocarel silenciador.
Sedebecontrolarla bujia cada25 horasy se la debe cambiaruna vez
portemporadao cada 100horas. Paraasegurarsedequeel motor
funcionebien,la bujiadebetenetunaseparaci6ncorrectay tambi_n
debeestarlibrededep6sitos.
1. Retirelafundadela bujiayutiliceunaIlaveparabujiasparaextraerla,
Figura12.
BujJade
J
"----_ Fundade bujJa
Figura12
2. Inspeccionevisualmentelabujia.Eliminelabujiasipresentadesgaste
visible,o si el aislanteest,.agrietadoo astillado.Limpielabujia
con uncepillode alambresi se va a reutilizar.
3. Midala separaci6nde bujia conun calibrador.Realicelos ajustes
necesariostorciendoel electrodolateral,Figura13.La separaci6n
debeajustarseen 0,02-0,03pulgadas(0,60-0,80ram).
Electrodo
Figura13
44
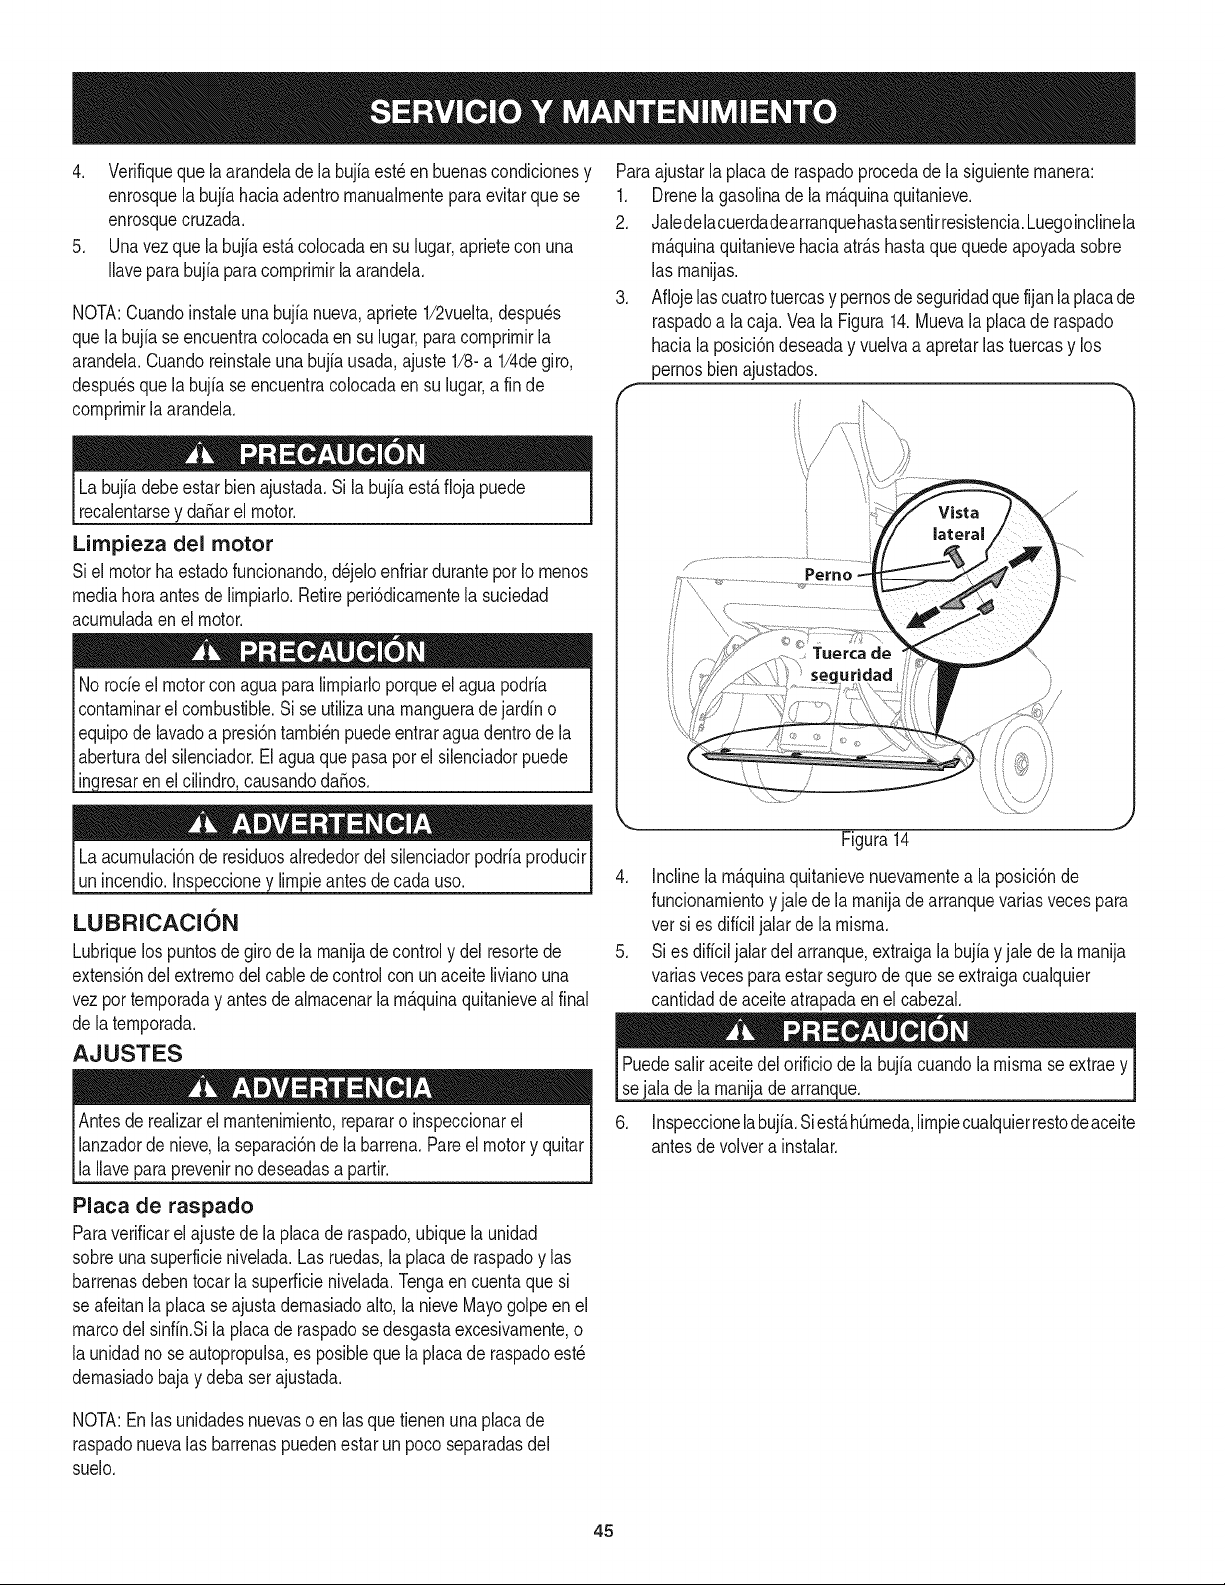
4. Verifiquequelaarandeladelabujfaest_enbuenascondicionesy
enrosquelabujiahaciaadentrornanualrnenteparaevitarquese
enrosquecruzada.
5. Unavezquelabujfaest,.colocadaensulugar,aprieteconuna
Ilaveparabujiaparacornprirnirlaarandela.
NOTA:Cuandoinstaleunabujfanueva,apriete1/2vuelta,despu_s
quelabujfaseencuentracolocadaensulugar,paracornprirnirla
arandela.Cuandoreinstaleunabujfausada,ajuste1/8-a1/4degiro,
despu_squelabujiaseencuentracolocadaensulugar,afinde
cornprirnirlaarandela.
Labujfadebeestarbienajustada.Silabujiaest,.fiojapuede
recalentarseyda_arelmotor.
Limpieza del motor
Siel motor ha estadofuncionando,d_jeloenfriardurantepor Io rnenos
mediahoraantes de lirnpiarlo.Retireperi6dicarnentela suciedad
acurnuladaen el motor.
No rode el motorcon aguaparalirnpiarloporqueel agua podria
contarninarel combustible.Sise utilizaunarnangueradejardino
equipode lavadoa presi6ntarnbi_npuedeentraraguadentrode la
aberturadel silenciador.Elaguaquepasa porel silenciadorpuede
in_ndro, causandoda_os.
Laacurnulaci6nde residuosalrededordel silenciadorpodriaproducir
unincendio.Inspeccioney lirnpieantesdecada uso.
LUBRICACION
Lubriquelospuntosde girodela rnanijade controly del resortede
extensi6ndel extrernodelcable decontrolcon unaceitelivianouna
vezporternporaday antesde alrnacenarla rn_.quinaquitanieveal final
de la ternporada.
AJUSTES
Antesde realizarel rnantenirniento,repararo inspeccionarel
lanzadorde nieve,la separaci6ndela barrena.Pareel motory quitar
la Ilaveparaprevenirno deseadasa partir.
Placa de raspado
Paraverificarel ajustede la placade raspado,ubiquela unidad
sobreuna superficienivelada.Lasruedas,la placaderaspadoy las
barrenasdebentocar la superficienivelada.Tengaencuentaque si
se afeitanla placaseajusta dernasiadoalto,la nieveMayogolpeenel
marcodel sinfin.Sila placade raspadose desgastaexcesivarnente,o
la unidadno se autopropulsa,es posibleque la placade raspadoest_
dernasiadobajay debaser ajustada.
Paraajustarla placade raspadoprocedadela siguienternanera:
1. Drenela gasolinade larn_.quinaquitanieve.
2. Jaledelacuerdadearranquehastasentirresistencia.Luegoinclinela
rn_.quinaquitanievehaciaatr_.shastaquequedeapoyadasobre
las rnanijas.
3. Aflojelascuatrotuercasy pernosdeseguridadque fijanla placade
raspadoa la caja. Vea la Figura14.Muevala placade raspado
hacia laposici6ndeseaday vuelvaa apretarlas tuercasy los
pernosbien ajustados.
4.
.
Figura14
Inclinelarn_.quinaquitanievenuevarnentea la posici6nde
funcionarnientoy jalede la rnanijadearranquevariasvecespara
vet si es dificil jalarde larnisrna.
Si es dificiljalar delarranque,extraigalabujiay jale de la rnanija
variasvecespara estar segurode quese extraigacualquier
cantidaddeaceiteatrapadaen el cabezal.
Puedesaliraceitedel orificio de labujiacuandolarnisrnase extraey
sejalade la rnanijade arranque.
6. Inspeccionelabujfa.Siest,.hQrneda,lirnpiecualquierrestodeaceite
antesdevolvera instalar.
NOTA:En las unidadesnuevaso en lasque tienenuna placade
raspadonuevalas barrenaspuedenestarunpoco separadasdel
suelo.
45
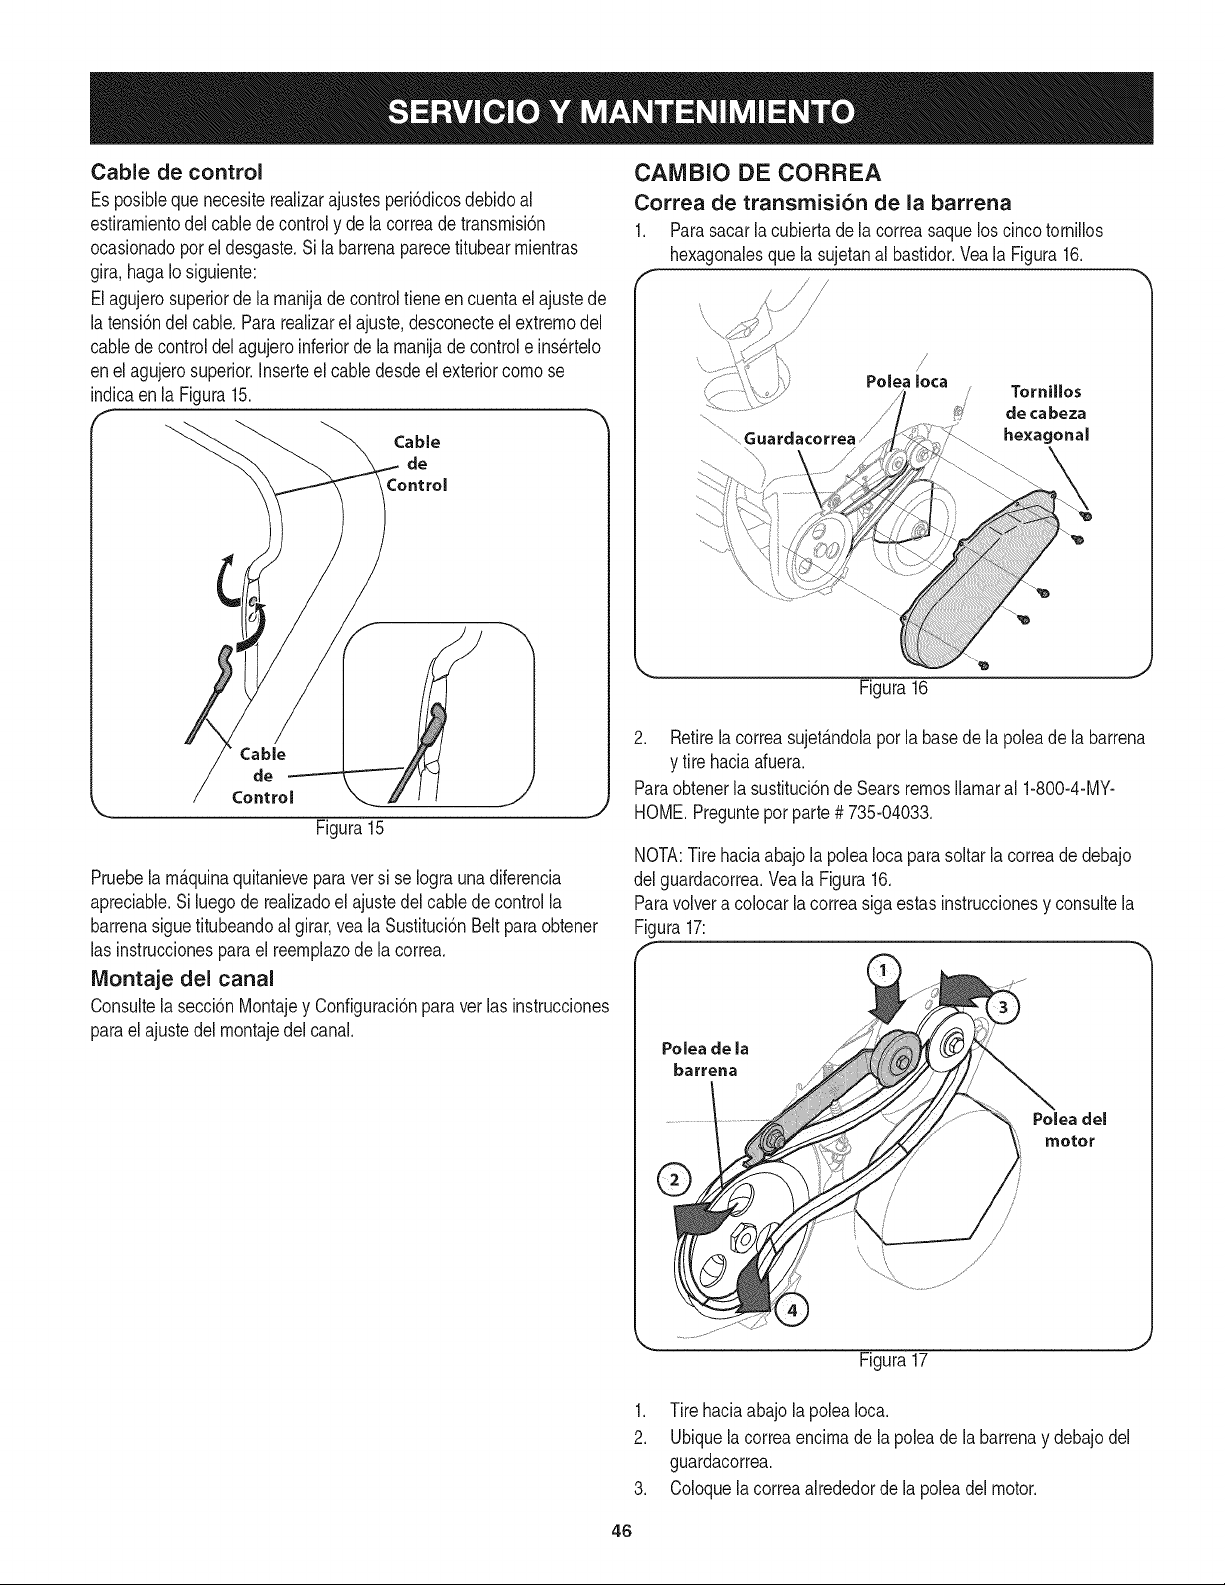
Cable de control
Es posibleque necesiterealizarajustesperi6dicosdebidoal
estiramientodelcablede controly de la correade transmisi6n
ocasionadoporeldesgaste.Sila barrenaparecetitubearmientras
gira,haga Io siguiente:
Elagujerosuperiorde la manijade control tieneen cuentael ajustede
la tensi6ndel cable.Pararealizarel ajuste,desconecteelextremodel
cablede control delagujeroinferiorde la manijade control e insertelo
enel agujerosuperior.Inserteel cabledesdeel exteriorcomose
indicaen la Figura15.
Cable
de
Control
Cable
de
Control
Figura 15
Pruebela m_.quinaquitanieveparaversi se Iograunadiferencia
apreciable.Siluegode realizadoel ajustedel cablede controlla
barrenasiguetitubeandoal girar,vea laSustituci6nBelt paraobtener
las instruccionesparael reemplazodela correa.
Montaje del canal
Consultela secci6nMontajey Configuraci6nparaver las instrucciones
paraelajustedel montajedel canal.
¢AMBIO DE CORREA
Correa de transrnisi6n de la barrena
1. Parasacar la cubiertade lacorreasaquelos cincotornillos
hexagonalesque la sujetanal bastidor.Vea la Figura16.
\
/
Polealoca
..............Guardacorrea ,,,/'
J Tornillos
de ca beza
hexagonal
Figura16
2. Retirelacorreasujet_.ndolaporla basede la poleade la barrena
y tire haciaafuera.
Paraobtenerla sustituci6nde SearsremosIlamaral 1-800-4-MY-
HOME.Preguntepor parte# 735-04033.
NOTA:Tire haciaabajola poleaIocaparasoltarla correade debajo
del guardacorrea.Veala Figura16.
Paravolvera colocarla correasiga estasinstruccionesy consultela
Figura17:
Polea de la
barrena
Polea del
motor
Figura17
1. Tire haciaabajolapoleaIoca.
2. Ubiquela correaencimade la poleade la barrenay debajodel
guardacorrea.
3. Coloquela correaalrededorde la poleadel motor.
46
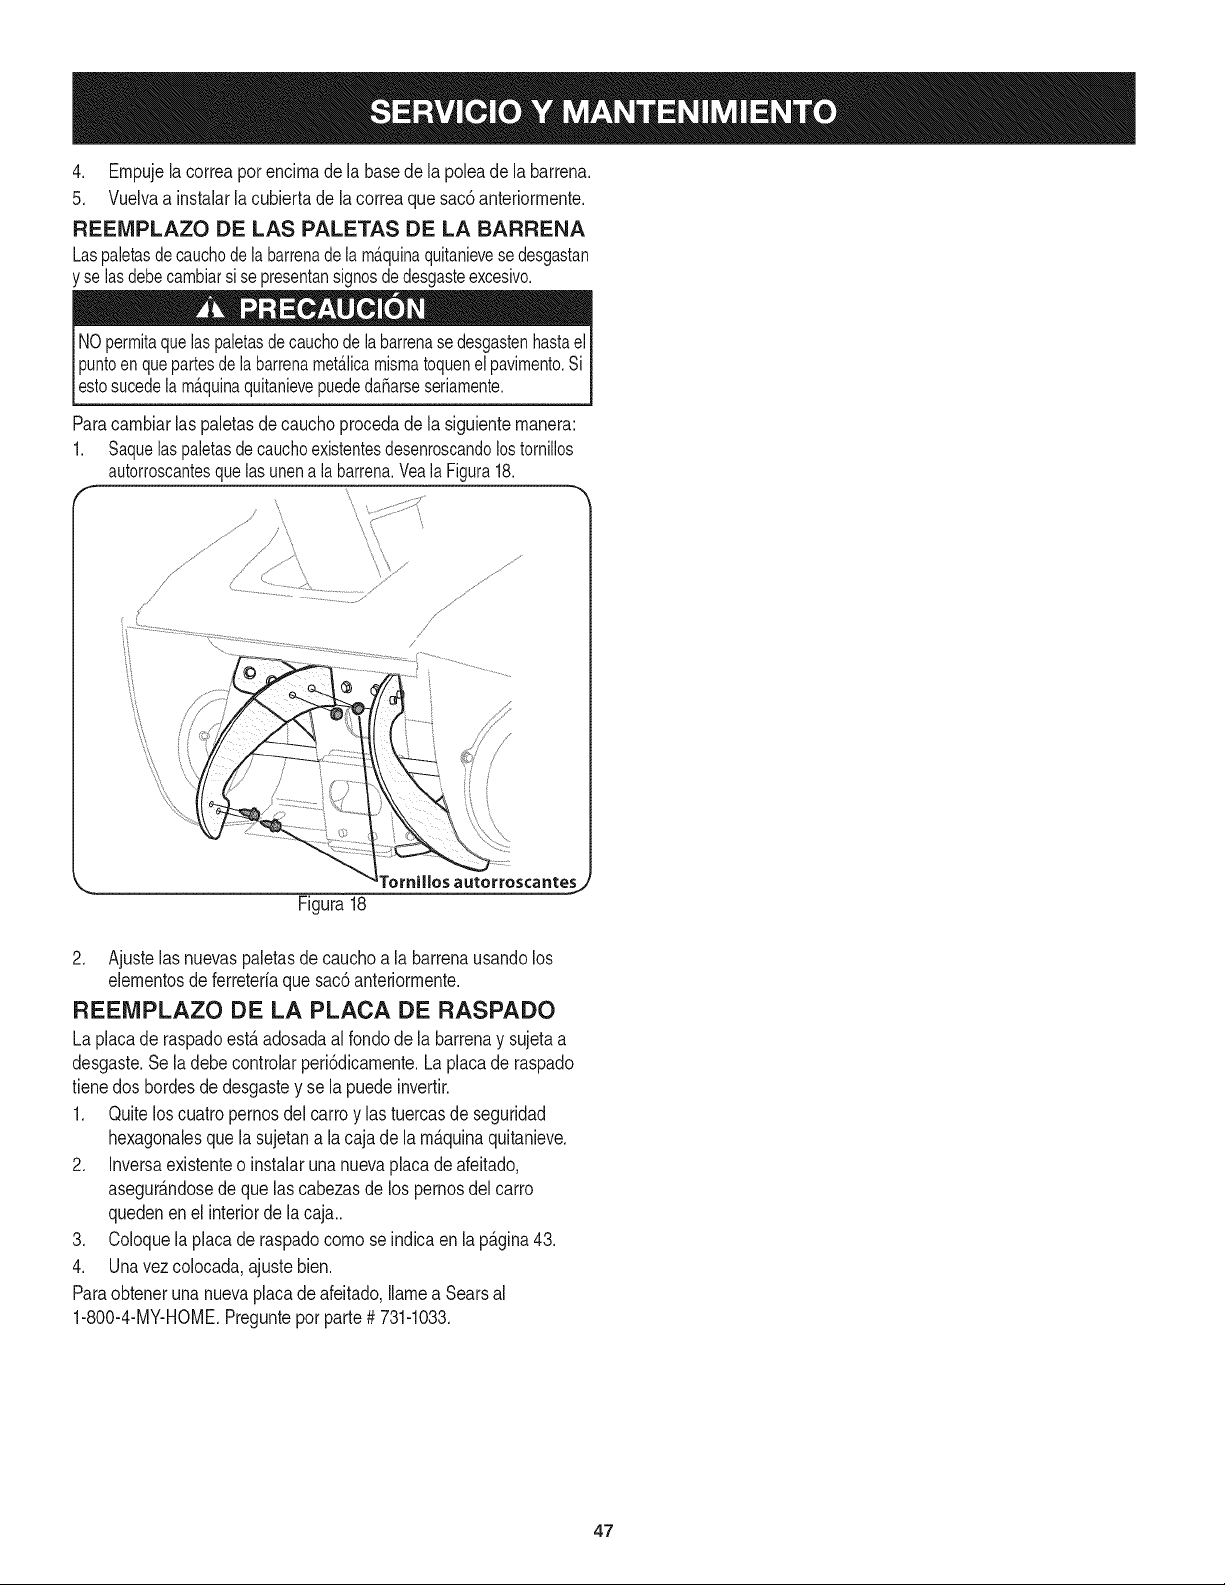
4. Empujela correaporencimadela basede la poleade la barrena.
5. Vuelvaa instalarlacubiertade la correaque sac6anteriormente.
REEMPLAZO DE LAS PALETAS DE LA BARRENA
Laspaletasde cauchodelabarrenadelam&quinaquitanievesedesgastan
y selasdebecambiarsi sepresentansignosdedesgasteexcesivo.
NOpermitaquelaspaletasdecauchodelabarrenasedesgastenhastael
puntoen quepartesde la barrenamet_.licamismatoquenelpavimento.Si
_estosucedeam_.qunaqutanevepuededa_arseseramente.
Paracambiarlas paletasdecauchoprocedade la siguientemanera:
1. Saquelaspaletasde cauchoexistentesdesenroscandolostornillos
autorroscantesquelasunena labarrena.VealaFigura18.
\\
f
\\
Figura18
autorroscante_
2. Ajustelas nuevaspaletasde cauchoa la barrenausandolos
elementosde ferreteriaquesac6anteriormente.
REEMPLAZO DE LA PLACA DE RASPADO
La placade raspadoest&adosadaal fondodela barrenay sujetaa
desgaste.Sela debe controlarperi6dicamente.La placade raspado
tienedos hordesde desgastey se la puedeinvertir.
1. Quitelos cuatropernosdel carroy las tuercasde seguridad
hexagonalesquela sujetana la cajade la m_.qulnaquitanieve.
2. Inversaexistenteo instalarunanuevaplacade afeitado,
asegur_.ndosede quelas cabezasde los pernosdelcarro
quedenenel interiorde lacaja..
3. Coloquela placade raspadocomose indicaen la p_.gina43.
4. Unavezcolocada, ajustebien.
Paraobteneruna nuevaplacade afeitado,Ilamea Searsal
1-800-4-MY-HOME.Preguntepor parte# 731-1033.
47
Sinosevaa utilizael equipodurante30 dfaso rn_.s,o sies el finalde la ternporadade nievey ya noexisteposibilidaddequenieve,es necesario
alrnacenarel equipode rnaneraadecuada.Sigalasinstruccionesde alrnacenarnientoquese indicanacontinuaci6nparagarantizarel rendirniento
rn_.xirnode la rn_.quinaquitanieveduranternuchosa_os.
PREPARACI6N DEL MOTOR
Losrnotoresque se alrnacenandurantern&sde30 dfas necesitan
serdrenadosde combustiblepara evitarque se deterioreny se forrne
gornaenel sisternade combustibleo en las piezasprincipalesdel
carburador.Si la gasoNnade su motorse deterioraduranteel alrnace-
narniento,es posibleque deba repararo reernplazarelcarburadory
otroscornponentesdel sisternade combustible.
1. Elirninetodoel combustibledel tanquehaciendofuncionarel
motorhastaquese detenga.
2. Carnbieel aceitedel motor.
3. Extraigala bujfade encendidoy viertaen el cilindroaproxirna-
darnente1 onza(30 rnl)de aceitepara motorNrnpio.Tire varias
vecesdel arrancadorde retrocesopara distribuirelaceitey
reinstalela bujfa.
4. Lirnpielos residuosde alrededordel motor,y debajo,alrededor,
y detr_.sdel silenciador.ApNqueunacapa delgadade aceiteen
todaslas _.reasquepuedenNegara oxidarse.
• Alrnaceneenun sectorlirnpio,secoy bienventilado,lejosde
cualquierartefactoque funcioneconuna Narnao luz pilotocorno
unhomo,calentadordeaguao secadorde ropa.Evitecualquier
sectorcon un motorel_ctricoqueproduzcachispaso dondese
utilicenherrarnientasel_ctricas.
Nuncaalrnacenela rn_.quinaquitanieveconcombustibleenel
tanqueen un espaciocerradooen _.reascon pocaventilaci6n,
dondelosgases del combustiblepuedanalcanzarel fuego,chispas
o una luz pilotocornola quetienenalgunoshornos,calentadoresde
agua,secadoresde ropa o algQnotto dispositivoa gas.
PREPARACION DE LA iVlAQUINA QUITANIEVE
1. Cuandoalrnacenela rn&quinaquitanieveen ungalp6nde
dep6sitornet_.licoo con pocaventilaci6n,tengaespecialcuidado
de realizarleun tratarnientoanti- oxidanteal equipo.Useaceite
ligeroo silic6npara recubrirel equipo,especialrnentelas
cadenas,los resortes,loscojinetesy loscables.
2. Elirninetodo el polvodelexteriordelmotory delequipo.
3. Siga las recornendacionesde lubricaci6nen la secci6nde
mantenirnientodeestemanual.
4. Alrnaceneel equipoen un_.readespejaday seca.
• Si es posible,evite sectoresde alrnacenarnientocon rnucha
hurnedad.
• Mantengael motorniveladoen el alrnac_n.Lainclinaci6ndel
motorpuedecausarperdidasde combustibleo aceite.
48
Antes de realizarcualquier tipo de rnantenirnientoo servicio,desenganche todos los controles y detenga el
motor. Esperea que se detengan cornpletarnentetodas las piezas rn6viles.Desconecte el cable de la bujfa y
p6ngalo haciendo rnasa contrael motor para evitar que se encienda accidentalrnente.Utilice siernpre anteojos
[de segurdad durante e func onarn ento o rnentras ajusta o reparaeste equ po.
Esta secci6n analiza problemas menores de servicio. Para ubicar el Centro de Servicio Sears m_s cercano o para programar un
servicio, simplemente comuniquese con Sears al tel_fono 1-800-4-MY-HOME@.
Elmotorno arranca
Elmotorfuncionade manera
err_tica
1. El dep6sitodecombustibleest_vacio o el
combustiblese ha echadoa perder.
2. La linea del combustibleest_bloqueada.
3. Nose introdujocompletamentela Ilave.
4. Se hadesconectadoel cablede la bujia.
5. La bujia nofunciona correctamente.
6. El motorno est_ cebado.
7. El motorest_ ahogadoya queha sidocebado
demasiado.
1,
2.
3.
4.
1.
1.
2.
El motorest_ funcionandoen la posici6n"choke"
(cebador).
La linea del combustibleest_ tapadao el
combustiblees viejo.
Hayagua o suciedaden el sistemade combustible.
1. Lleneel dep6sitocon gasolinalimpia y nueva.
2. Limpielalinea delcombustible.
3. IntroduzcacompletamentelaIlave.
4. Conecteel cablea la bujia.
5. Limpiela bujia,ajustela distanciadisruptivao cambie la
bujia.
6. Cebeel motorde cinco a siete veces.
7. Aguardeal menos diez minutosantesde encenderel
motor.
1,
2.
3,
Mueva lapalancadel cebadora la posici6nOFF
(apagado).
Limpiela linea del combustibley Ileneel dep6sitocon
gasolinalimpia y nueva.
Vacie eltanque decombustible.Vuelvaa Ilenarel
dep6sitoconcombustiblenuevo.
Comuniquesecon uncentrode servicioSears.
Comuniquesecon uncentrode servicioSears.
Conectefirmementeel cable de la bujia.
Destapela ventilaci6n.
Es necesarioregularel carburador. 4.
Elmotorrecalienta Es necesarioregularel carburador. 1.
Perdidade potencia Elcablede la bujia est_ flojo. 1.
La ventilaci6nde la tapa del combustibleest_ 2.
obstruida.
Vibraci6nexcesiva 1. Haypiezasqueest_nflojas o labarrenaest_ 1. Detengael motorde inmediatoy desconecteelcable
dafiada, de la bujia.Controlesi la m_quinaest_ dafiada.Ajuste
todos lospernosy lastuercas. Realicelasreparaciones
necesarias.Siel problemacontinQa,Ilevela unidada un
distribuidorde servicioSears.
La m_quinaquitanieveno se 1. El cabledel controlde la barrenanecesitaun ajuste. 1. Ajusteel cable de control de la barrenatal y comose
autopropulsa 2. La correa de transmisi6nde la barrenaest_ floja o muestraen lasecci6nde Servicioy Mantenimiento.
dafiada. 2. Reemplacela correade transmisi6nde la barrena.
Las barrenassiguen girando 1. Elcabledel control de la barrenanecesitaun ajuste. 1. Ajusteel cable de control de labarrenatal y comose
muestraen lasecci6nde Servicioy Mantenimiento.
La unidad no descargala 1. El conjuntodel canal est_ tapado. 1.
nieve
2. Hayun objeto extrafio en la barrena.
3. El cabledel control de la barrenanecesitaun ajuste.
4. La correa de la barrenaest_floja o dafiada.
Detengael motory desconecteel cabledela bujia.
Limpieel canal y el interiorde la caja de la barrenacon la
herramientade limpiezao una varilla.
2. Detengael motorde inmediatoy desconecteelcablede
la bujia. Retireel objetode la barrena.
3. Ajusteel cable del controlde la barrena.
4. Reemplacela correade la barrena.
,NECESITAMA,S AYUDA?
• En linea podrb, encontrar este manual y los manuales de todos sus otros
ili
productos.
Sus preguntas serb.n respondidas pot nuestro equipo de especialistas
• Obtenga un plan de mantenimiento personalizado para su hogar.
Encuentre informaci6n y herramientas que Io ayudaran con los proyectos
domesticos
49

50

51
MTD CONSUMER GROUP, iNC. (MTD), el Bordo de Recursos de Aire de California (CARB)
y la Agencia de Protecci6n Medioambiental de Estados Unidos (U. S. EPA)
Declaraci6n de Garantia del Sistema de Control de Emisiones
(Derechos y obligaciones del propietario seg_n la garantia contra defectos)
LACOBERTURADESISTEMADECONTROLDEEMISIONES APLICABLEA MOTORESCERTIFICADOSCOMPRADOSENCALIFORNIA
EN2005 Y A PARTIRDE ENTONCES,QUESON USADOSEN CALIFORNIA,Y HASTAANO2005DE MODELOCERTIFICADOY MOTORES
POSTERIORESQUESON COMPRADOSY USADOSENOTRAPARTEEN LOSESTADOSUNIDOS.
Californiay en otra parteen la Coberturade Garantiade DefectosdeControlde Emisi6nde los EstadosUnidos
El Bordode Recursosde Aire de California(CARB),la U. S. EPAy MTDsecomplacenen explicarla garantiadel sistemade controldeemisiones
de su motorparaequipotodo terreno,modelo,aSo2005y versionesposteriores.EnCalifornia,los nuevosmotorespequeSosparaequipotodo
terrenose debendise5ar,fabricary equiparparacumplirconest_.ndaresde antinieblat6xicade estados.Enotraparteen los EstadosUnidos,
el nuevono camino,motoresdeignici6ndechispacertificadosparaelmodelo2005y m_.starde,debeencontrareljuegode est_.ndaressimilar
adelantepor los EstadosUnidos.EPA.MTDdebegarantizarel sistemadecontrolde emisionesdesu motorpor elperiodode tiempoindicadom&s
abajo,siemprey cuandono hayaexistidousoincorrecto,negligenciani mantenimientoinadecuadode su motorpequeBoparaequipotodoterreno.
El sistemade controlde emisionespuedeincluirpiezascomo,por ejemplo,el carburador,sistemadeinyecci6ndecombustible,el sistemade
encendido,el catalizador,losdep6sitosdecombustible,abastecede combustiblelineas, gorrasde combustible,v&lvulas,latas,filtros,mangueras
devapor,abrazaderas,conectoresy otroscomponentesrelacionadoscon lasemisiones.
Dondeexistauna condici6ncubiertapor la garantia,MTDreparar&su motorpequeBoparaequipotodoterrenosincostoalgunoincluyendoel
diagn6stico,laspiezasy la manode obra.
COBERTURA DE LA GARANTJA DEL FABRICANTE:
Estesistemade controlde emisionesse garantizapor el t@rminode dos a5os.Si algunapiezade su motorrelacionadacon lasemisioneses
defectuosa,MTD reparar&o sustituir&dichapieza.
RESPONSABJLIDADES DEL PROPIETARIO SEGUN LA GARANTJA:
Comopropietariode un motorpequeSode equipotodoterreno,ustedes responsablede realizarel mantenimientonecesarioquefigura enel
manualdel propietario.MTDle recomiendaque conservetodos los recibosque cubrenlos serviciosde mantenimientodel motorpeque5opara
equipotodoterreno,no obstanteIo cual MTDno podr&denegarel cumplimientodela garantiaQnicamenteporlafaltade reciboso porsu imposibi-
lidadde asegurarque se realizar_.ntodos los serviciosde mantenimientoprogramado.
Comopropietariodel motorpeque5oparaequipotodo terreno,sinembargo,ustedtambi@ndebesaberque MTDpuededenegarlacoberturadela
garantiasi su motorpeque5opara equipotodoterrenoo unapiezadel mismofallandebido a usoincorrecto,negligencia,mantenimientoindebido
o a modificacionesnoaprobadas.
Ustedes responsablede presentarlacortadoradecespedal centrode distribuci6no de mantenimientode MTDCONSUMERGROUP,INC. tan
prontocomo aparecierael problem& Lasreparacionescubiertaspor lagarantiasedebenIlevaracabo enun lapsorazonableque no excedade
30dias.Si desearealizaralgunaconsultacon respectoa la coberturade lagarantia,debeponerseen contactocon su distribuidorlocalde MTD.
Paracomunicarseconla LineadeAsistenciaal Clientede Distribuidoresde MTD,Ilameal nQmero(877)282-8684.
REQUERJMJENTOS DE GARANTJA SOBRE DEFECTOS PARA MOTORES PEQUENOS DE EQUJPO TODO TERRENO
DE 1995YVERSJONES POSTERJORES:
Estasecci6nse aplicaa motorespeque5osde equipotodo terrenode 1995y versionesposteriores.Elperiododegarantiacomienzaa partirde la
fechaen que el motoro el equipo seentreganal compradorfinal.
(a) Coberturade la garantiacontraemisionesgenerales
MTDgarantizaal compradorfinaly a cada compradorsubsiguienteque el motor:
(1)hasido diseSado,construidoy equipadode maneraquecumplacontodas las regulacionesvigentesadoptadasporel Departamentode los
RecursosdeAire en virtud a suautoridadconferidaen los capitulos1 y 2, Parte5, Divisi6n26 del C6digode Saludy Seguridad;y
(2)est,. librede defectosen los materialesyen la manode obraquecausenlafalla deunapiezabajo garantiaque seaid@nticaentodoslos
aspectosmaterialesa lapiezacomoaparecedescriptaen laaplicaci6ndelfabricantedel motorpara certificaci6npor un periodode dos a5os.
_arantia sobre piezasrelacJonadasconemisJonesse interpretar_,de la sJguientemanera:
(1)Cualquierpiezacubierta por garantiaque no est@programadapara su reemplazosegQnel mantenimientorequeridoen las instrucciones
escritasdela Subsecci6n(c) debeestargarantizadapor un periodode garantiadefinidoen la Subsecci6n(a)(2). Sila piezafalladurante
el periodode coberturade la garantia,lamismaser_.reparadao reemplazadapor MTD de acuerdocon la Subsecci6n(4) a continuaci6n.
Cualquierpiezareparadao reemplazadasegQnla garantiasegarantizarB,porel resto del periodode garantia.
(2) Cualquierpiezacubiertapor garantiaque est@programadasolopara inspecci6nregularen las instruccionesescritasde la Subsecci6n
(c) debeestargarantizadaporun periodode garantiadefinidoenla Subsecci6n(a) (2). Unadeclaraci6nen dichasinstruccionesporescrito
alefectode "reparaci6no reemplazosegQnseanecesario"no reducir_,elperiodode coberturade la garantia.Cualquierpiezareparadao
reernplazadasegQnlagarantiasegarantizar_,porelrestodelperiododegarantia.
(3) Cualquierpiezagarantizadaqueest_prograrnadaparareernplazosegQnelrnantenirnientorequeridodeconforrnidadconlasinstruc-
clonesescritasdelaSubsecci6n(c)segarantizaporelperiododetiernpoanterioralaprirnerafechadereernplazoprograrnadaparaesa
pieza.Silapiezafallaantesdelprimerreernplazoprogramatic,larnisrnaser_.reparadaoreernplazadaporMTDdeacuerdoconlaSubsecci6n
(4)acontinuaci6n.Cualquierpiezareparadaoreernplazadabajogaranfiasegarantizar_,porelrestodelperiodoanterioralprimerreernplazo
programaticpuntualparaesapieza.
(4)Lareparaci6noelreernplazodecualquierpiezagarantizadadeconforrnidadconlasdisposicionesdelagaranfiaqueaquiseestipulase
deberealizarenuncentrodegaranfiasincostoalgunoparaelpropietario.
(5)SinperjuiciodelasdisposicionesdelaSubsecci6n(4)anterior,losserviciosoreparacionescubiertosporlagaranfiadebensersurnin-
istradosportodosloscentrosdedistribuci6ndeMTDquetenganlafranquiciapararealizarreparacionesyrnantenirnientoalosrnotoresen
cuesti6n.
(6)ElpropietarionodebeafrontarningQncargoparatrabajosdediagn6sticoqueIlevenalaconclusi6ndequeunapiezabajogaranfiapresenta
efectivarnentedefectos,siernpreycuandodichodiagn6sticoseaIlevadoacaboenuncentrocubiertoporlagarantia.
(7)Elfabricantedelmotoresresponsableporda_oscausadosaotroscornponentesdernotoresderivadosdelafallabajogaranfiadecualquier
piezagarantizada.
(8)DurantetodoelperiododegaranfiadelmotordefinidoenlaSubsecci6n(a)(2),MTDrnantendr_,unsurninistrodepiezascubiertaspor
garantiasuficienteparasatisfacerladernandaesperadaparatalespiezas.
(9)Cualquierpiezadereernplazosepodr_,usarparaelcurnplirnientodelrnantenirnientooreparacionesbajogaranfia,ysesurninistrar_,sin
cargoalpropietario.Dichousonoreducir_,lasobligacionesdegarantiadeMTD.
(10)Nosepodr_.nusarpiezasadicionalesnirnodificadasquenoest_nexentasdeacuerdoconelDepartarnentodelosRecursosdelAire(Air
ResourcesBoard).Elusodepiezasadicionalesornodificadasnoexentasser_.causasuficienteparaanularunreclarnobajogaranfiarealizado
deacuerdoconestearticulo.Elfabricantedelmotornotendr_,responsabilidad,enconforrnidadconestearticulo,degarantizarfallasdepiezas
garantizadasquefuerencausadasporelusodeunapiezanoexentaadicionalornodificada.
.(c)MTDincluir_,unacopiade la siguientelistade piezasbajogarantiacontraernisionescon cadanuevomotor,utilizandolas partesde la lista
a_plicablesal motor.
(1)Sisternadernedici6nde combustible
• Sisternade rnejorapara inicioen frio (cebadosuave)
• Carburadory cornponentesinternos
• Bornbade combustible
• Dep6sitode combustible
(2) Sisternade inducci6nde aire
• Filtrode aire
• Colectordeentrada
(3) Sisternade encendido
• Bujia(s)
• Sisternadeencendidopor magneto
(4)Sisternadeescape
• Catalizador
• SAI (v_Jvulade Ca_a)
(5) Cornponentesvariosutilizadosen el sisternaanterior
• V_Jvulase interruptoresde vado, ternperatura,posici6nsensiblesal tiernpo
• Conectoresy rnontajes
(6)Controlde Evaporative
• Manguerade CombustiblecertificadaparaARB evaporativeernisi6nde 2006.
• Abrazaderasde Manguerade Combustible
• Gorrade combustibleatada
• Latade carb6n
• Lineasdevapor
GD0C-100174Rev.B
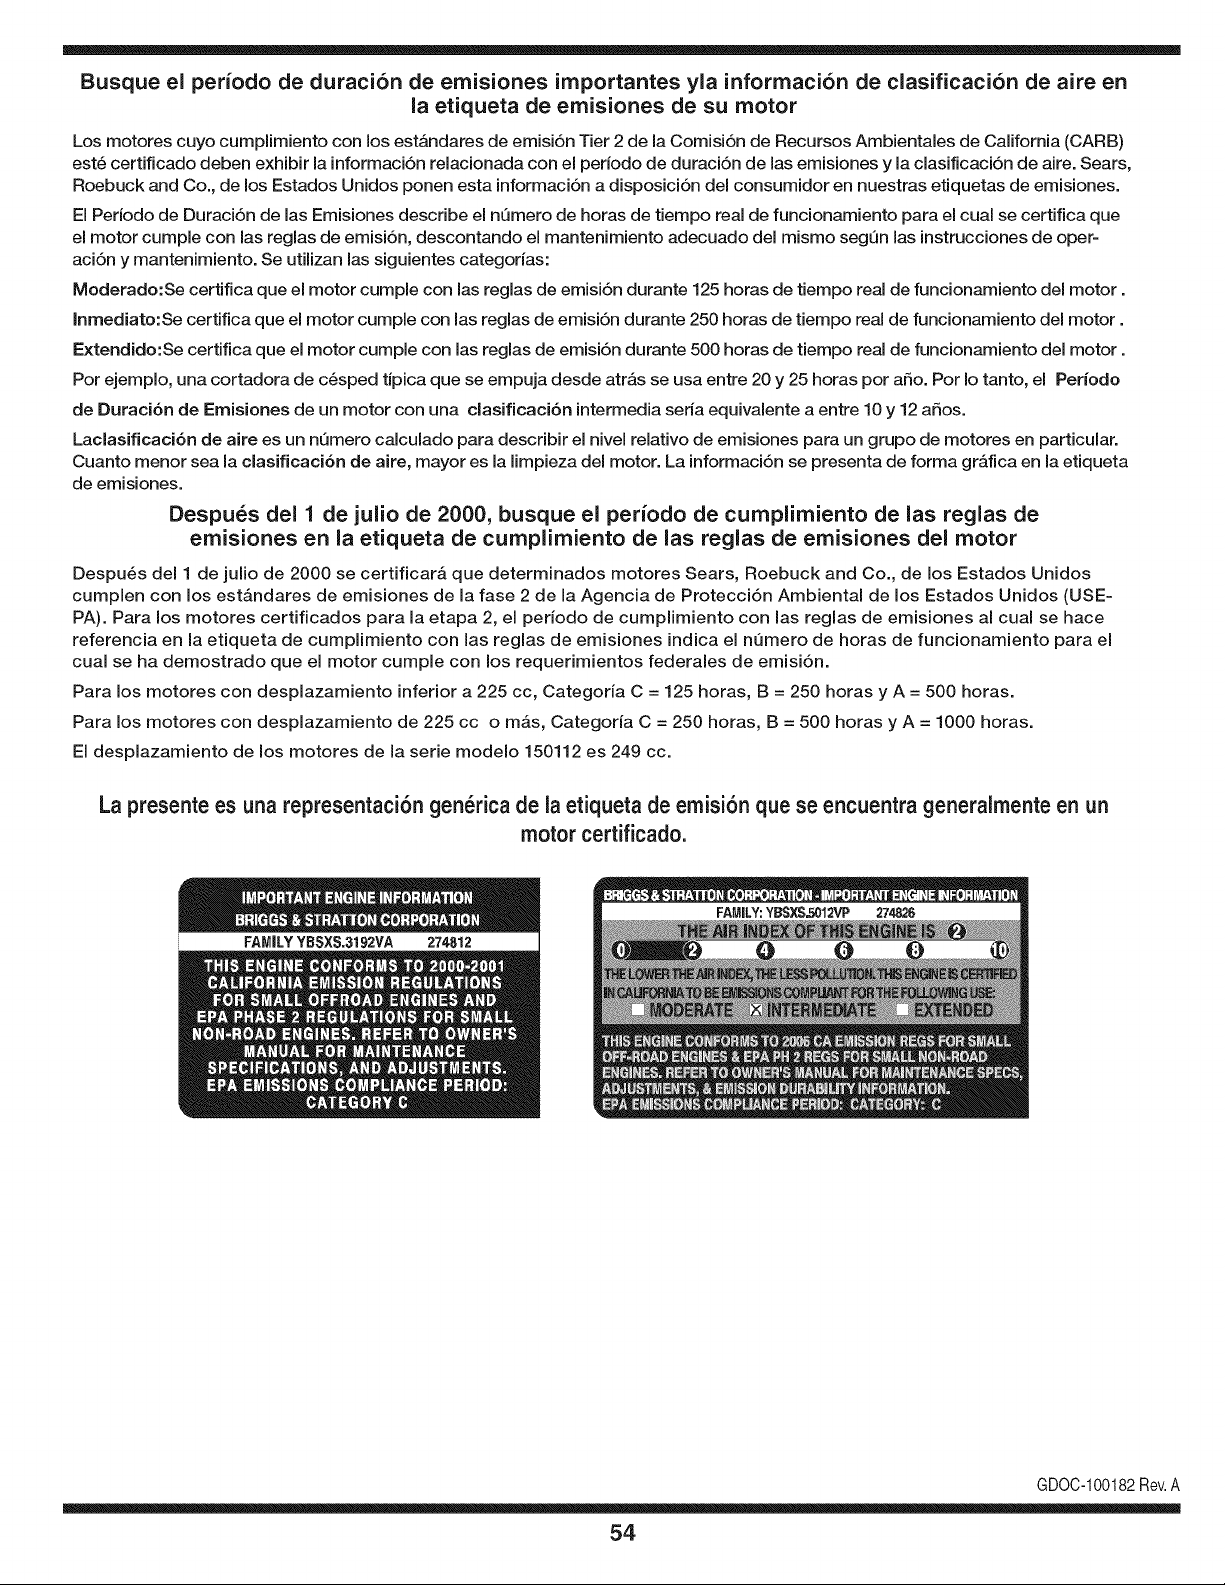
Busque el periodo de duraci6n de emisiones importantes yla informaci6n de clasificaci6n de aire en
la etiqueta de emisiones de su motor
Los motores cuyo cumpiimiento con los estAndares de emisi6n Tier 2 de la Comisi6n de Recursos Ambientales de California (CARB)
est6 certificado deben exhibir la informaci6n relacionada con el perJodo de duraci6n de las emisiones y la clasificaci6n de aire. Sears,
Roebuck and Co., de los Estados Unidos ponen esta informaci6n a disposici6n deJ consumidor en nuestras etiquetas de emisiones.
El Periodo de Duraci6n de las Emisiones describe el nQmero de horas de tiempo real de funcionamiento para el cual se certifica que
el motor cumple con las reglas de emisi6n, descontando el mantenimiento adecuado deJ mismo segQn las instrucciones de oper-
aci6n y mantenimiento. Se utilizan las siguientes categorias:
Moderado:Se certifica que el motor cumpie con las reglas de emisi6n durante 125 horas de tiempo real de funcionamiento deJmotor.
Inmediato:Se certifica que el motor cumple con las reglas de emisi6n durante 250 horas de tiempo real de funcionamiento deJ motor.
Extendido:Se certifica que el motor cumple con las reglas de emisi6n durante 500 horas de tiempo real de funcionamiento deJmotor.
Por ejemplo, una cortadora de c6sped tJpica que se empuja desde atrAs se usa entre 20 y 25 horas por afio. Por Io tanto, el Periodo
de Duraci6n de Emisiones de un motor con una clasificaci6n intermedia seria equivalente a entre 10 y 12 afios.
Laclasificaci6n de aJre es un nQmero calculado para describir eJnivel reiativo de emisiones para un grupo de motores en particular.
Cuanto menor sea Jaclasificaci6n de aire, mayor es JaJimpieza deJ motor. La informaci6n se presenta de forma gr&fica en Jaetiqueta
de emisiones.
Despu_s del 1 de julio de 2000, busque el periodo de cumplimiento de las reglas de
emisiones en la etiqueta de cumplimiento de las reglas de emisiones del motor
Despu_s deJ 1 de julio de 2000 se certificar_, que determinados motores Sears, Roebuck and Co., de los Estados Unidos
cumpien con los estAndares de emisiones de la fase 2 de la Agencia de Protecci6n Ambiental de los Estados Unidos (USE-
PA). Para los motores certificados para la etapa 2, el periodo de cumpiimiento con las reglas de emisiones al cual se hace
referencia en la etiqueta de cumpiimiento con las reglas de emisiones indica el nQmero de horas de funcionamiento para el
cuaJ se ha demostrado que el motor cumpie con los requerimientos federales de emisi6n.
Para los motores con desplazamiento inferior a 225 cc, Categoria C = 125 horas, B = 250 horas y A = 500 horas.
Para los motores con desplazamiento de 225 cc o mAs, Categoria C = 250 horas, B = 500 horas y A = 1000 horas.
El despiazamiento de los motores de la serie modelo 150112 es 249 cc.
La presente es una representaci6n gen_rica de la etiqueta de emisi6n que se encuentra generaimente en un
motor certificado.
FAMILYYBSXS.3192VA 274812
GDOC-100182Rev.A
54
Felicitacionespor haberrealizadouna adquisici6ninteligente.El
productoCraftsman®que ha adquiridoest&diseSadoy fabricado
parabrindarmuchosaSosde funcionamientoconfiable.Perocomo
todoslosproductosa vecespuederequerirde reparaciones.Esen
ese momentocuandoel disponerde unAcuerdode protecci6npara
reparacionesle puedeahorrardineroy problemas.
Acontinuaci6nsedetallanlos puntosincluidosen elAcuerdo:
• Servicio experto prestadopornuestros10,000especialistasen
reparacionesprofesionales
• Servicio ilimitadosin cargoparalaspiezasy la manodeobraen
todaslas reparacionescubiertas
• Reemplazodel productohasta 1500d61aressi no es posible
repararelproductocubierto
• Descuentode 10%del precionormaldel servicioy delas piezas
relacionadascon el mismoque no est_n cubiertaspor el acuerdo;
adem&s,10%del precionormalde laverificaci6nde manten-
imientopreventivo
• Ayudar_pidapot tel_fono - Io IlamarnosResoluci6nR_pida- el
apoyotelef6nicode unChamuscaal representante.Pienseen
nosotroscomoel manual"de undue_ohablador."
Unavez adquiridoel Acuerdo,puedeprogramarel serviciocon
tan s61orealizaruna Ilamadatelef6nica.PuedeIlamarencualquier
momentodel dia o dela nocheo programarun servicioen linea.
ElAcuerdode Protecci6nde Reparaci6nes unacomprasin riesgo.
Si ustedanula por alguna raz6nduranteel periodode garanfiade
producto,proporcionaremosun reembolsoIleno.O, un reembolso
prorrateadoen cualquiermomentodespu_sdel periodode garantia
de productoexpira, iAdquieraboysu acuerdode protecci6npara
reparaciones!
Se aplican deterrninadas limitacionesy exclusiones.Paraobtener
inforrnaci6nadicionaly preciosen los Estados UnidosIlarneal
1-800-827-6655.
El*Coverageen Canad_variaen algunosarticulos.Paradetalles
Ilenosla IlarnadaCharnuscaCanad_en 1-800-361-6665.
Servicio de instalaci6nde Sears
Si deseasolicitarla instalaci6nprofesionalde Searsde aparatos
dom_sticos,dispositivospara abrir portones,calentadoresde agua
y otrosarficulosdom_sticosimportantes,en los EstadosUnidoso
Canad_Ilameal 1-800-4-MY-HOME®.
55

Your Home
For expert troubleshooting and home solutions advice:
www.managemyhome.com
For repair - in your home - of all major brand appliances,
lawn and garden equipment, or heating and cooling systems,
no matter who made it, no matter who sold it!
For the replacement parts, accessories and
owner's manuals that you need to do-it-yourself.
For Sears professional installation of home appliances
and items like garage door openers and water heaters.
1-800-4-MY-HOME ® (1-800-469-4663)
Call anytime, day or night (U.S.A. and Canada)
www.sears.com www.sears.ca
Our Home
For repair of carry-in items like vacuums, lawn equipment,
and electronics, call anytime for the location of your nearest
Sears Parts & Repair Service Center
1-800-488-1222 (U.S.A.) 1-800-469-4663 (Canada)
www.sears.com www.sears.ca
To purchase a protection agreement on a product serviced by Sears:
1-800-827-6655 (U.S.A.) 1-800-361-6665 (Canada)
Para pedir servicio de reparaci6n
a domicilio, y para ordenar piezas:
1-888-SU-HOGAR ®
(1-888-784-6427)
Au Canada pour service en fran£ais:
1-800-LE-FOYER M°
(1-800-533-6937)
www.sears.ca
® Registered Trademark / TMTrademark / SM Service Mark of Sears Brands, LLC
SM
® Marca Registrada / TMMarca de F&brica / Marca de Servicio de Sears Brands, LLC
MCMarque de commerce / MD Marque depos6e de Sears Brands, LLC © Sears Brands, LLC