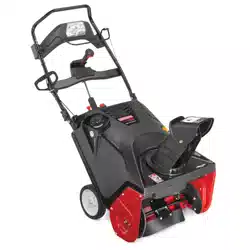
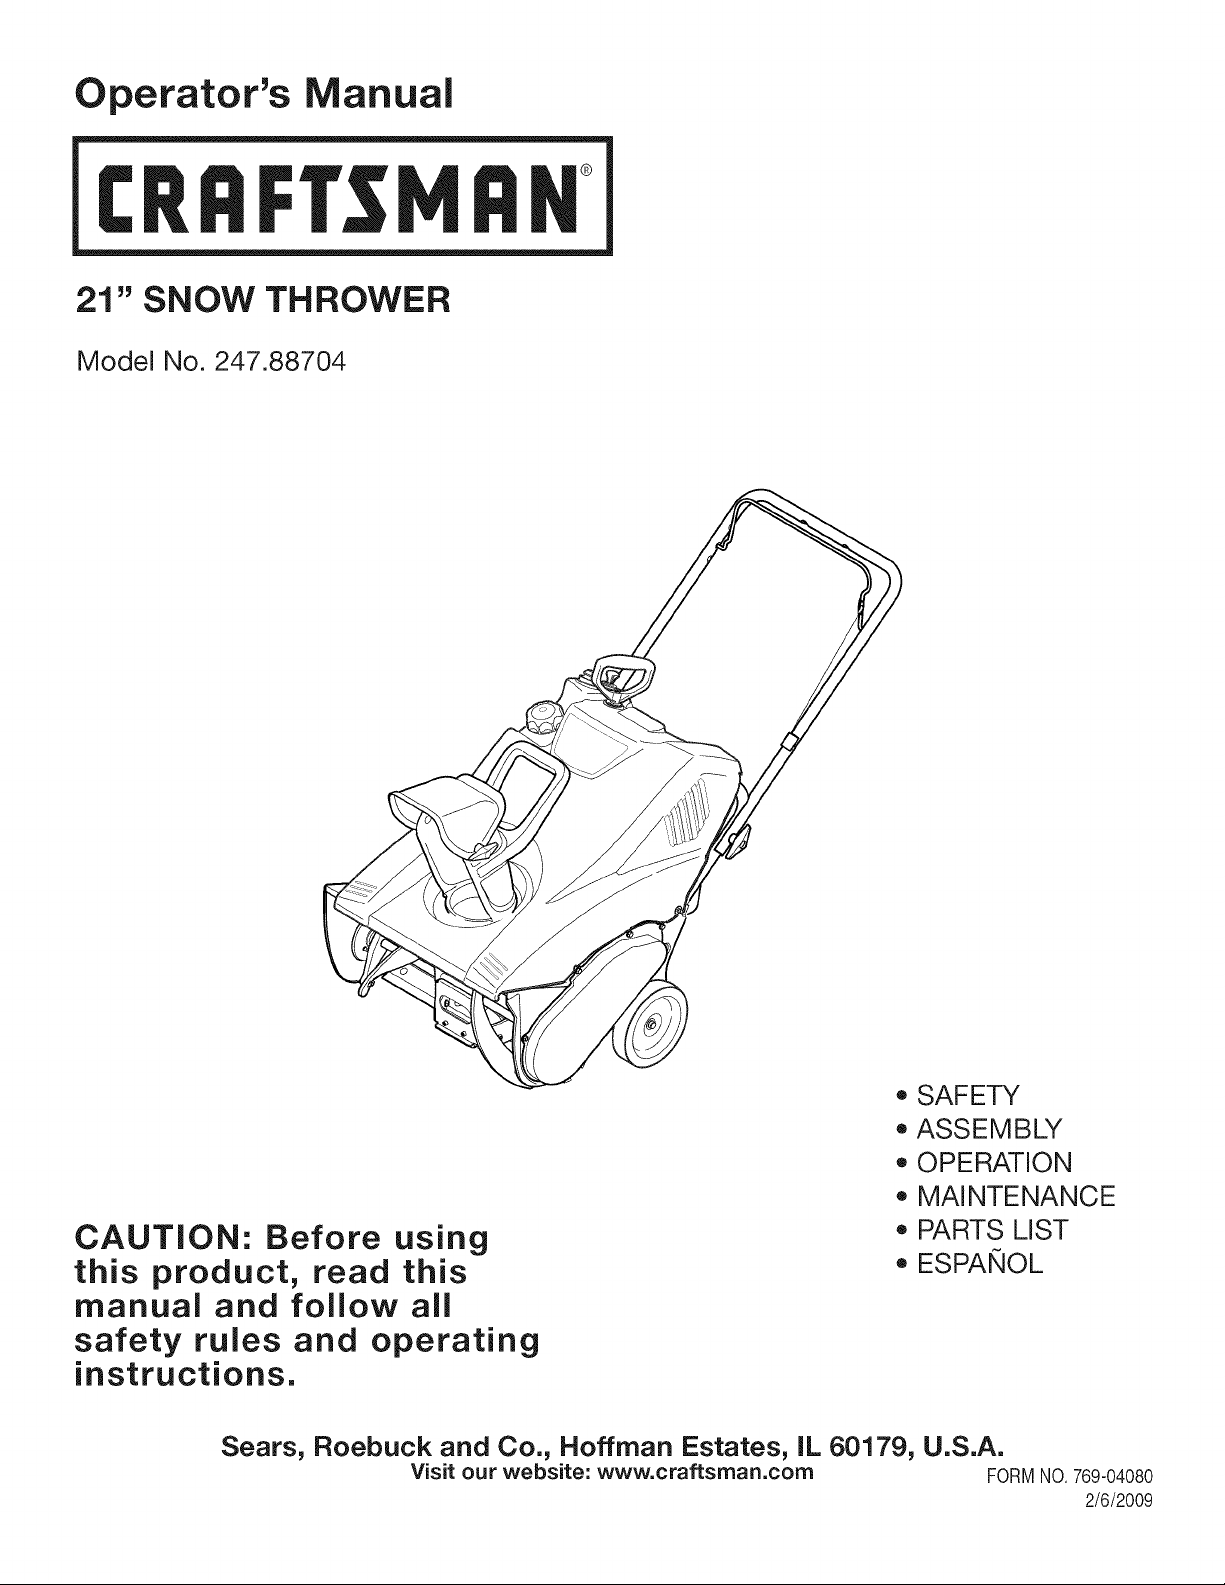
Operator's Manual
CRRFr MRN
21" SNOW THROWER
Model No. 247.88704
CAUTION: Before using
this product, read this
manual and follow all
safety rules and operating
instructions.
o SAFETY
ASSEMBLY
OPERATION
MAINTENANCE
PARTS LIST
o ESPANOL
Sears, Roebuck and Co., Hoffman Estates, IL 60179, U.S.A.
Visit our website: www.craftsman.com FORMNO.769-04080
2/6/2009
WarrantyStatement..................................Page2
SafeOperationPractices..........................Pages3-5
SafetyLabels............................................Page6
Assembly..................................................Pages7-8
Operation..................................................Pages10-12
ServiceandMaintenance.........................Pages13-17
Off-SeasonStorage..................................Page18
TroubleShooting.......................................Page19
PartsList...................................................Page20-27
RepairProtectionAgreement...................Page31
Espa_ol.....................................................Page32
ServiceNumbers......................................BackCover
CRAFTSMAN LiMiTED WARRANTY
Two Years on Snow Thrower
Whenoperatedand maintainedaccordingto allsuppliedinstructions,ifthis snowthrowerfailsdueto a defectinmaterialorworkmanshipwithin
twoyearsfromthe dateor purchase,call 1-800-4-MY-HOME®to arrangefor free repair.
Thiswarrantyappliesfor only90 days fromthe dateof purchaseif this snow throweris everusedfor commercialor rentalpurposes.
Duringthe first yearof purchase,there willbe nochargefor warrantyserviceinyourhome.Foryourconvenience,in-homewarrantyservicewill
stillbeavailableafterthe firstyearof purchase,but a trip chargewill apply.Thischargewill be waivedif youtransportthe snowthrowerto an
authorizedCraftsmandrop-off location.Forthe nearestauthorizedlocation,call 1-800-4-MY-HOME®.
Thiswarranty coversONLYdefects in material andworkmanship. Sears will NOTpay for:
• Expendableitemsthatbecomewornduringnormaluse,includingbutnot limitedto skid shoes,shaveplate,shearpins, sparkplug,air
cleaner,belts,andoil filter.
• Standardmaintenanceservicing,oilchanges,or tune-ups.
Tire replacementor repaircausedby puncturesfrom outsideobjects,suchas nails,thorns,stumps,or glass.
Tireor wheelreplacementor repairresultingfromnormalwear,accident,orimproperoperationor maintenance.
Repairsnecessarybecauseof operatorabuse,includingbutnot limitedto damagecausedby impactingobjectsthat bendthe frameor
crankshaft,orover-speedingtheengine.
• Repairsnecessarybecauseof operatornegligence,includingbut not limitedto,electricalandmechanicaldamagecausedby improper
storage,failureto usethe propergradeandamountof engineoil, or failureto maintainthe equipmentaccordingto the instructionscontained
inthe operator'smanual.
• Engine(fuelsystem)cleaningor repairscausedbyfuel determinedto becontaminatedoroxidized(stale).In general,fuel shouldbeused
within30 daysof itspurchasedate.
Normaldeteriorationandwearof the exteriorfinishes,or productlabel replacement.
Thiswarrantyappliesonly whilethisproductis usedinthe UnitedStates.
Thiswarrantygivesyou specificlegalrights,andyou mayalso haveotherrightswhichvaryfromstateto state.
Sears, Roebuck and Co., Hoffman Estates, IL 60179
EngineOilType: SAE5W-30
EngineOilCapacity: 20ounces
FuelCapacity: 2 Quarts
SparkPlug: TorchF6RTC
SparkPlugGap: .020"-.030"
Model Number.................................................................
Serial Number .................................................................
Dateof Purchase.............................................................
Recordthe modelnumber,serialnumber
anddateof purchaseabove
© Sears Brands,LLC
2

Thissymbolpointsout importantsafetyinstructionswhich,if not
followed,couldendangerthepersonalsafetyand/orpropertyof
yourselfandothers. Readandfollowall instructionsin this manual
beforeattemptingto operatethismachine.Failureto complywith
theseinstructionsmay resultin personalinjury.Whenyou seethis
symbol,HEEDITSWARNING!
CALIFORNIA PROPOSITION 65
EngineExhaust,someof itsconstituents,andcertainvehicle
componentscontainoremitchemicalsknownto Stateof California
to causecancerandbirthdefectsorotherreproductiveharm,
Thismachinewasbuiltto beoperatedaccordingto the safeopera-
tion practicesinthis manual.As with anytype of powerequipment,
carelessnessor error on the partof the operatorcan resultin serious
injury.Thismachineis capableof amputatingfingers,hands,toes
andfeetandthrowingdebris.Failureto observethe followingsafety
instructionscouldresultin seriousinjuryor death.
Your Responsibility--Restrict the useof this powermachineto
personswho read,understandandfollowthewarningsand instruc-
tionsin this manualand on the machine,
SAVE THESE INSTRUCTIONS!
TRAiNiNG
• Read,understand,andfollowall instructionson the machineand
in themanual(s)beforeattemptingto assembleand operate.
Failureto do socan resultin serious injuryto the operatorand/
orbystanders.Keepthismanualin a safeplaceforfutureand
regularreferenceandfor orderingreplacementparts. Forques-
tionscall,1-800-659-5917.
• Befamiliarwithall controlsand their properoperation.Knowhow
to stopthe machineanddisengagethemquickly.
• Neverallowchildrenunder 14 yearsof age to operatethis
machine.Children14andover shouldreadand understandthe
instructionsand safe operationpracticesin thismanualand on
the machineandbe trainedandsupervisedby anadult.
• Neverallowadultsto operatethis machinewithoutproper
instruction.
• Thrownobjectscan causeseriouspersonalinjury.Planyour
snow-throwingpatternto avoiddischargeof materialtoward
roads,bystandersandthe like.
• Keepbystanders,petsandchildrenat least75feetfrom the
machinewhile itisinoperation.Stopmachineifanyoneenters
the area.
• Exercisecautionto avoidslippingor falling,especiallywhen
operatinginreverse.
PREPARATION
Thoroughlyinspecttheareawherethe equipmentis to be used.
Removeall doormats,newspapers,sleds,boards,wiresandother
foreignobjects,whichcouldbe trippedoveror thrownby the auger/
impeller.
Alwayswear safetyglassesor eyeshieldsduringoperationand
while performingan adjustmentor repairto protectyoureyes.
Thrownobjectswhichricochetcancause seriousinjuryto the
eyes.
Donot operatewithoutwearingadequatewinteroutergarments.
Donot wearjewelry,longscarvesorotherlooseclothing,which
could becomeentangledinmovingparts.Wearfootwearwhich
will improvefootingonslipperysurfaces.
Usea groundedthree-wireextensioncordand receptaclefor all
machineswith electricstartengines.
Disengageall controlleversbeforestartingthe engine.
Neverattemptto makeanyadjustmentswhileengineis running,
exceptwherespecificallyrecommendedinthe operator'smanual.
Letengineandmachineadjustto outdoortemperaturebefore
startingto clearsnow.
3
Safe Handling of Gasoline
Toavoidpersonalinjuryor propertydamageuseextremecare in
handlinggasoline.Gasolineis extremelyflammableand the vaporsare
explosive.Seriouspersonalinjurycan occurwhengasolineis spilled
onyourselfor yourclotheswhichcan ignite.Washyour skinand
changeclothesimmediately.
• Useonly an approvedgasolinecontainer.
• Extinguishall cigarettes,cigars,pipesandother sources
of ignition.
• Neverfuelmachineindoors.
• Neverremovegas capor addfuel whilethe engineis hot
or running.
• Allowengine to coolat leasttwo minutesbeforerefueling.
• Neveroverfill fueltank. Filltank to no morethan1/2inch
belowbottomof filler neckto providespacefor fuel
expansion.
• Replacegasolinecap and tightensecurely.
• If gasolineis spilled,wipeit off the engineand equipment.
Movemachineto anotherarea.Wait5 minutesbefore
startingthe engine.
• Neverstorethe machineor fuel containerinsidewhere
thereis anopenflame,sparkor pilotlight (e.g.furnace,
waterheater,spaceheater,clothesdryer etc.).
• Allowmachineto cool at least5 minutesbeforestoring.
• Neverfill containersinsidea vehicleor ona truckor trailer
bedwith a plasticliner.Alwaysplacecontainersonthe
groundawayfromyourvehiclebeforefilling.
• If possible,removegas-poweredequipmentfromthetruck
ortrailerand refuelit on the ground.If this is not possible,
then refuelsuchequipmenton a trailerwitha portable
container,ratherthan from a gasolinedispensernozzle.
• Keepthe nozzlein contactwith the rimof the fueltank or
containeropeningat alltimesuntil fuelingis complete.Do
notuse a nozzlelock-opendevice.
OPERATION
• Do not puthandsorfeetnear rotatingparts,in the auger/impeller
housingor chuteassembly.Contactwiththe rotatingpartscan
amputatehandsandfeet.
• Theauger/impellercontrolleveris a safetydevice.Neverbypass
itsoperation.Doingso makesthe machineunsafeandmay cause
personalinjury.
• Thecontrol leversmustoperateeasilyin bothdirectionsand
automaticallyreturnto the disengagedpositionwhenreleased.
• Neveroperatewith a missingor damagedchuteassembly.Keep
all safetydevicesin placeandworking.
• Neverrunanengine indoorsor ina poorlyventilatedarea. Engine
exhaustcontainscarbonmonoxide,an odorlessanddeadlygas.
• Do notoperatemachinewhileunderthe influenceof alcoholor
drugs.
• Mufflerand engine becomehotand can causea burn.Do not
touch.Keepchildrenaway.
• Exerciseextremecautionwhenoperatingon or crossinggravel
surfaces.Stayalertfor hidden hazardsor traffic.
• Exercisecautionwhenchangingdirectionandwhileoperatingon
slopes.
• Planyoursnow-throwingpatternto avoiddischargetowards
windows,walls,carsetc. Thus,avoidingpossibleproperty
damageor personalinjurycausedby a ricochet.
• Neverdirect dischargeat children,bystandersand petsor allow
anyoneinfront of the machine.
• Donot overloadmachinecapacityby attemptingto clearsnowat
too fastof a rate.
• Neveroperatethis machinewithoutgoodvisibilityor light. Always
be sureof yourfootingand keepa firm hold on the handles.Walk,
neverrun.
• Disengagepowerto theauger/impellerwhentransportingor not
in use.
• Neveroperatemachineat high transportspeedson slippery
surfaces.Lookdownand behindand usecare whenbackingup.
• If the machineshouldstart to vibrateabnormally,stop the engine,
disconnectthe sparkplugwire andgroundit againstthe engine.
Inspectthoroughlyfor damage.Repairanydamagebefore
startingandoperating.
• Disengageall controlleversandstopenginebeforeyouleave
the operatingposition(behindthe handles).Waituntilthe auger/
impellercomesto a completestop beforeuncloggingthechute
assembly,makingany adjustments,or inspections.
• Neverput yourhand in the dischargeor collectoropenings.Do
not unclogchuteassemblywhileengineis running.Shutoff
engineand remainbehindhandlesuntilall movingpartshave
stoppedbeforeunclogging.
• Useonly attachmentsand accessoriesapprovedby the manufac-
turer (e.g.wheelweights,tire chains,cabsetc.).
• Whenstartingengine,pull cord slowlyuntilresistanceis felt, then
pull rapidly.Rapidretractionof startercord(kickback)will pull
handand armtowardenginefasterthan youcan let go. Broken
bones,fractures,bruisesor sprainscould result.
• If situationsoccur whichare notcoveredinthis manual,use care
andgood judgment.ContactCustomerSupportfor assistance
andthe nameof your nearestservicingdealer.
CLEARING A CLOGGED DISCHARGE CHUTE
Handcontactwiththe rotatingimpellerinsidethe dischargechute
is the mostcommoncauseof injuryassociatedwithsnowthrowers.
Neveruse yourhandto cleanout thedischargechute.
Toclear thechute:
1. SHUTTHEENGINEOFF!
2. Wait 10secondsto be surethe impellerbladeshavestopped
rotating.
3. Alwaysusea clean-outtool,not yourhands.
4
MAINTENANCE & STORAGE
• Nevertamperwith safetydevices.Checktheirproperoperation
regularly.Referto the maintenanceandadjustmentsectionsof
thismanual.
• Beforecleaning,repairing,or inspectingmachinedisengageall
controlleversandstop the engine.Wait untilthe auger/impeller
cometo a completestop.Disconnectthe sparkplugwireand
groundagainsttheengineto preventunintendedstarting.
Checkboltsand screwsfor propertightnessat frequentintervals
to keepthe machineinsafeworkingcondition.Also,visually
inspectmachinefor anydamage.
Do notchangetheenginegovernorsettingor over-speedthe
engine.Thegovernorcontrolsthe maximumsafeoperatingspeed
of the engine.
Snowthrowershaveplatesand skid shoesare subjectto wear
anddamage.Foryoursafetyprotection,frequentlycheckall
componentsand replacewith originalequipmentmanufacturer's
(OEM)partsonly."Useof partswhichdo not meetthe original
equipmentspecificationsmayleadto improperperformanceand
compromisesafety!"
Checkcontrolleversperiodicallyto verifytheyengageand disen-
gageproperlyand adjust,if necessary.Referto the adjustment
sectioninthisoperator'smanualfor instructions.
Maintainor replacesafetyand instructionlabels,as necessary.
• Observeproperdisposallawsand regulationsfor gas,oil,etc. to
protectthe environment.
Priorto storing,runmachinea few minutestoclear snowfrom
machineand preventfreezeup of auger/impeller.
Neverstorethe machineorfuel containerinsidewherethereisan
openflame,spark or pilot lightsuch as a waterheater,furnace,
clothesdryer etc.
Alwaysreferto the operator'smanualfor properinstructionson
off-seasonstorage.
Checkfuelline,tank, cap,andfittings frequentlyfor cracksor
leaks.Replaceif necessary.
Do notcrankenginewithspark plug removed.
Accordingto the ConsumerProductsSafetyCommission(CPSC)
andthe U.S.EnvironmentalProtectionAgency(EPA),thisproduct
hasan AverageUsefulLifeof seven(7) years,or 60 hoursof
operation.At the endof theAverageUsefulLifehavethe machine
inspectedannuallybyan authorizedservicedealerto ensurethat
allmechanicalandsafetysystemsare workingproperlyand not
wornexcessively.Failureto do so can resultin accidents,injuries
ordeath.
DO NOT MODIFY ENGINE
Toavoidseriousinjuryor death,do not modifyenginein any way.
Tamperingwiththe governorsettingcanleadto a runawayengineand
causeit to operateat unsafespeeds.Nevertamperwithfactory setting
of enginegovernor.
NOTICE REGARDING EMISSIONS
Engineswhich are certifiedtocomplywith Californiaand federal
EPAemissionregulationsfor SORE(SmallOff RoadEquipment)are
certifiedto operateon regularunleadedgasoline,and mayinclude
the followingemissioncontrolsystems:EngineModification(EM),
OxidizingCatalyst(OC),SecondaryAir Injection(SAI)and ThreeWay
Catalyst(TWO)if so equipped.
SPARK ARRESTOR
Thismachineisequippedwithan internalcombustionengineand
shouldnotbe usedon or nearany unimprovedforest-covered,
brush-coveredorgrass-coveredlandunlessthe engine'sexhaust
systemisequippedwitha sparkarrestermeetingapplicablelocalor
statelaws(if any)
Ifa sparkattesteris used,it shouldbemaintainedin effectiveworking
orderby theoperator.Inthe Stateof Californiathe aboveis required
bylaw (Section4442of the CaliforniaPublicResourcesCode). Other
statesmayhavesimilarlaws. Federallawsapplyonfederallands.
A spark arresterfor the muffleris availablethroughyournearestSears
PartsandRepairServiceCenter.
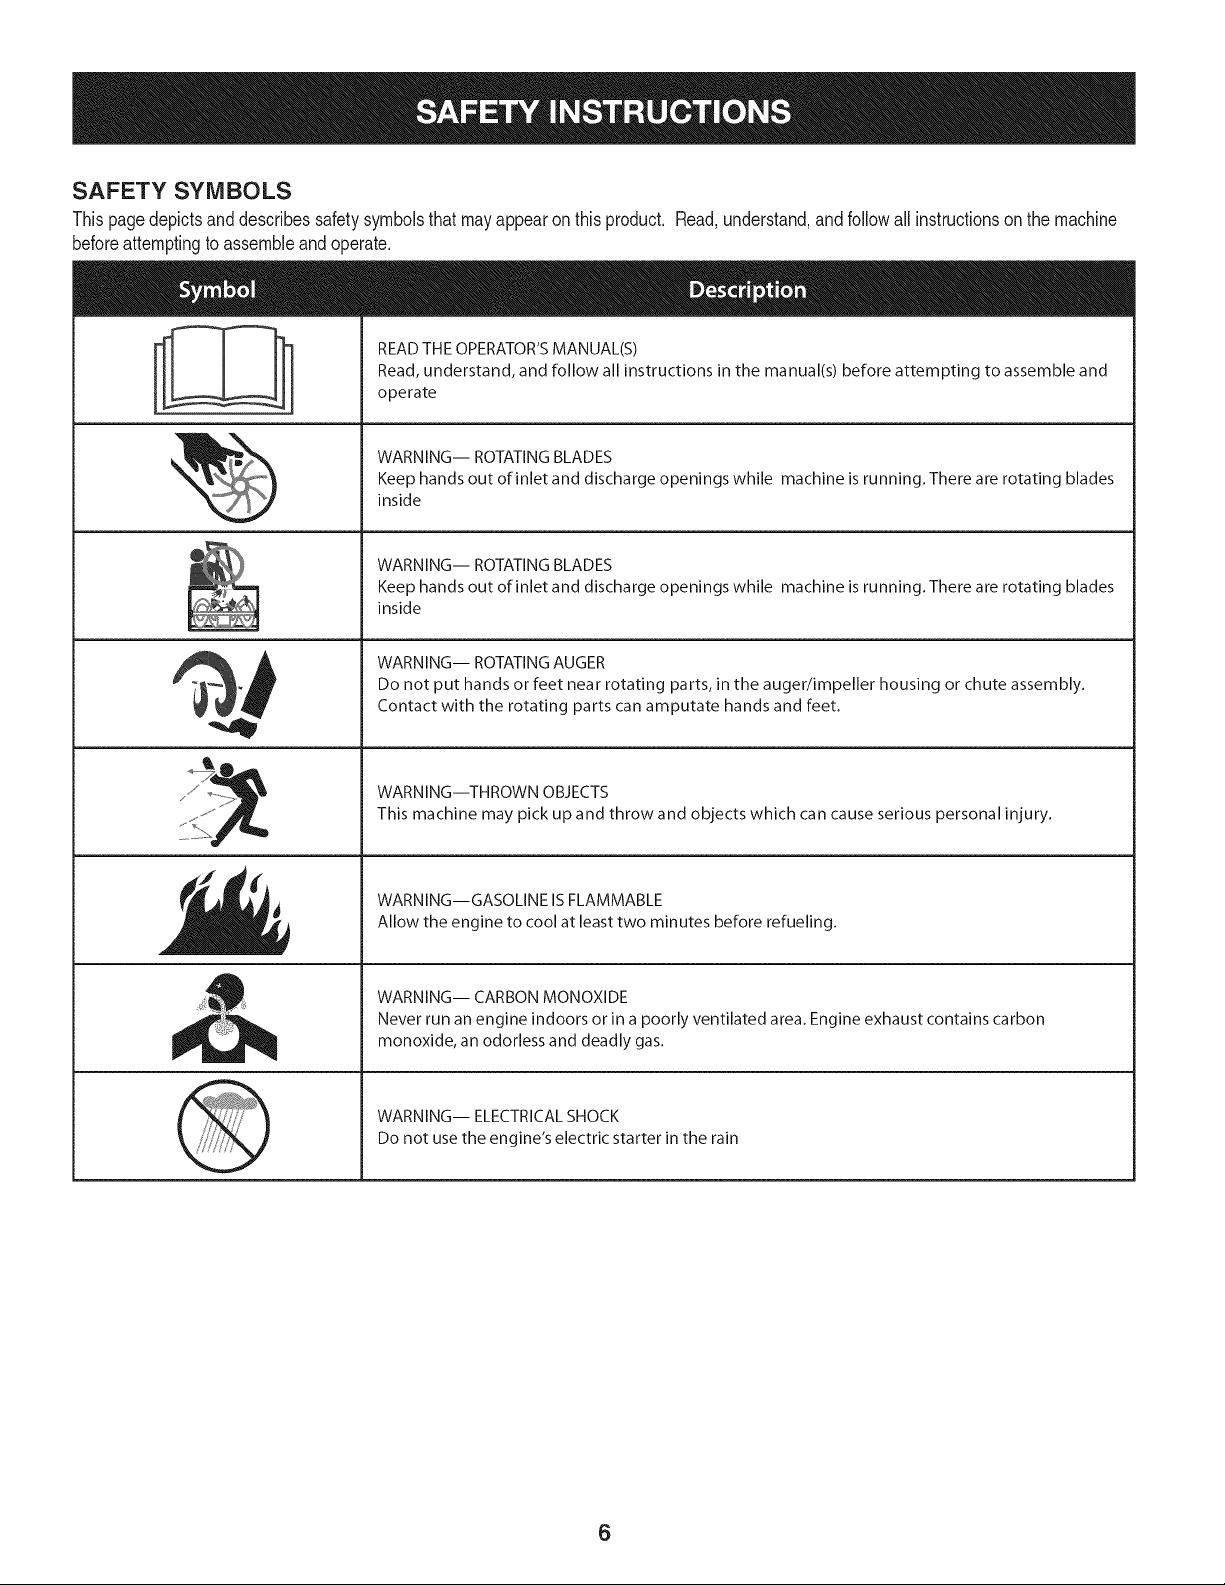
SAFETY SYMBOLS
Thispagedepictsanddescribessafetysymbolsthat mayappear on this product. Read,understand,andfollowall instructionson the machine
beforeattemptingto assembleandoperate.
i
i
READ THE OPERATOR'S MANUAL(S)
Read, understand, and follow all instructions in the manual(s) before attempting to assemble and
operate
WARNING-- ROTATING BLADES
Keep hands out of inlet and discharge openings while machine is running. There are rotating blades
inside
WARNING-- ROTATING BLADES
Keep hands out of inlet and discharge openings while machine is running. There are rotating blades
inside
WARNING-- ROTATING AUGER
Do not put hands or feet near rotating parts, in the auger/impeller housing or chute assembly.
Contact with the rotating parts can amputate hands and feet.
WARNING--THROWN OBJECTS
This machine may pick up and throw and objects which can cause serious personal injury.
WARNING--GASOLINE IS FLAMMABLE
Allow the engine to cool at least two minutes before refueling.
WARNING-- CARBON MONOXIDE
Never run an engine indoors or in a poorly ventilated area. Engine exhaust contains carbon
monoxide, an odorless and deadly gas.
WARNING-- ELECTRICAL SHOCK
Do not use the engine's electric starter in the rain
6
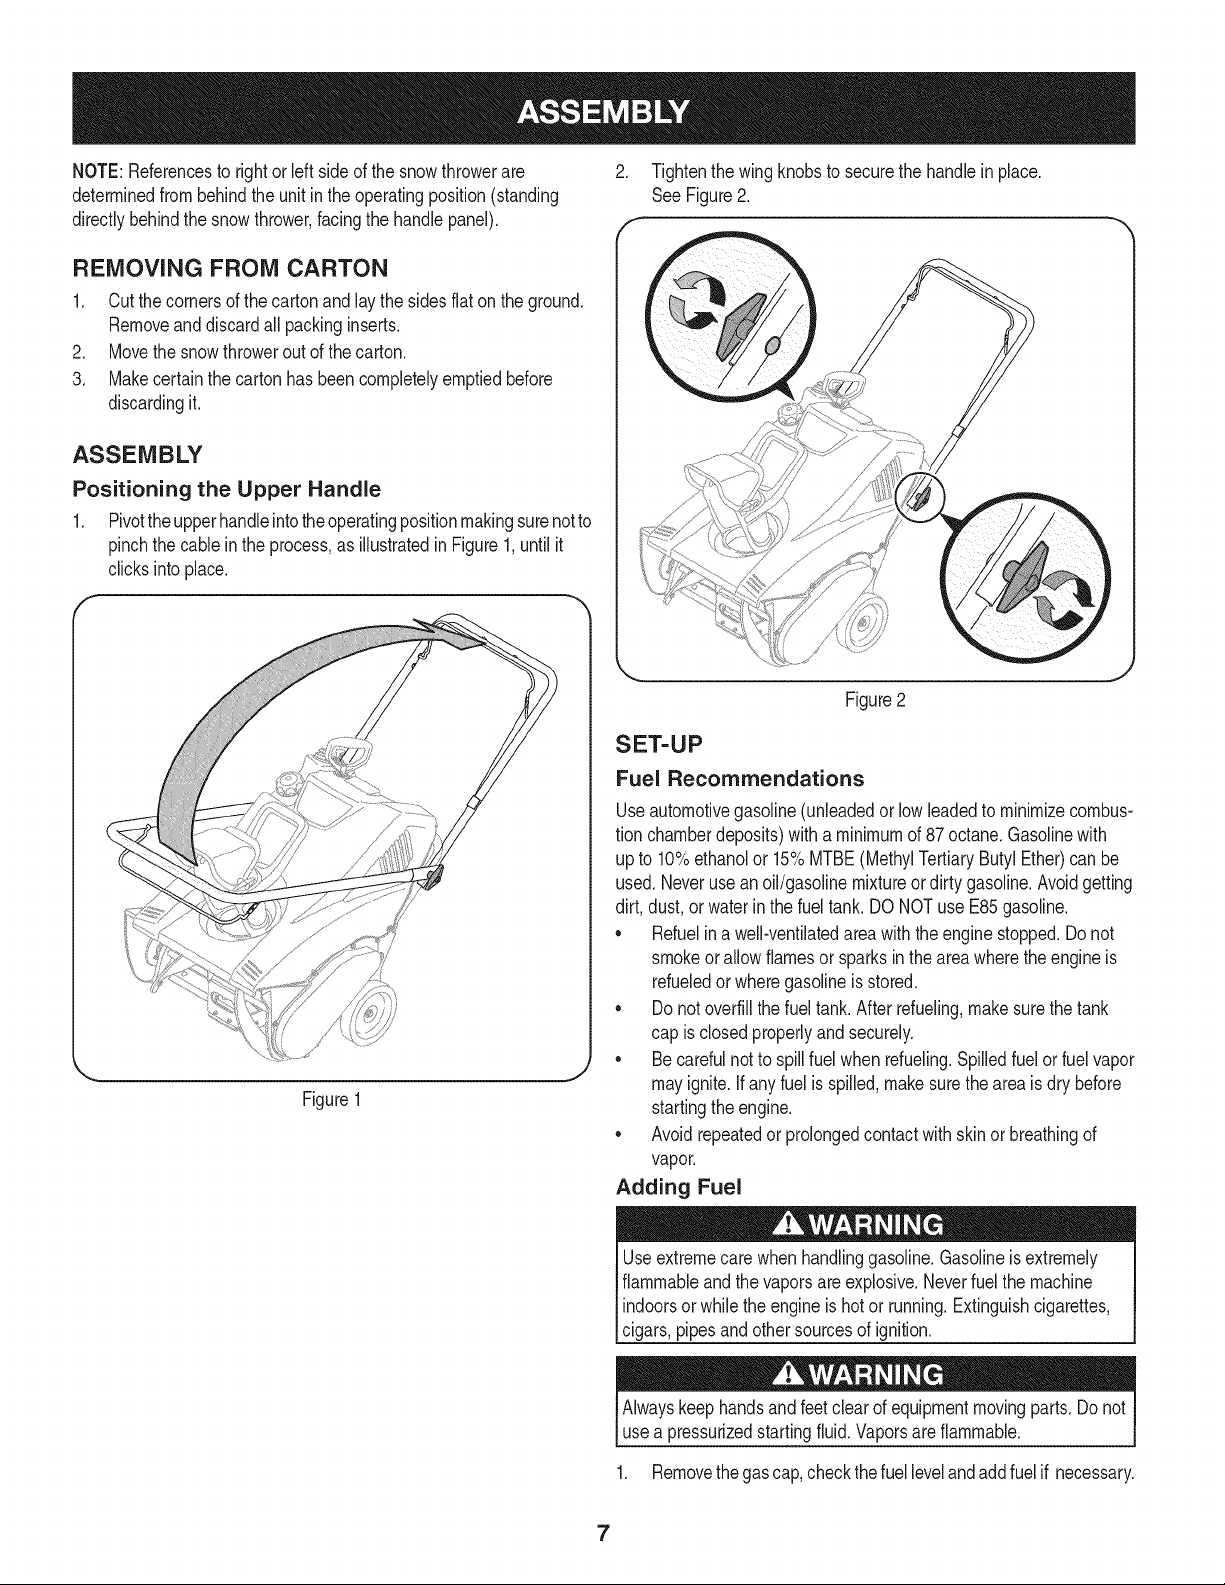
NOTE:Referencesto rightorleft sideof the snowthrowerare
determinedfrombehindthe unit inthe operatingposition(standing
directlybehindthe snowthrower,facingthe handlepanel).
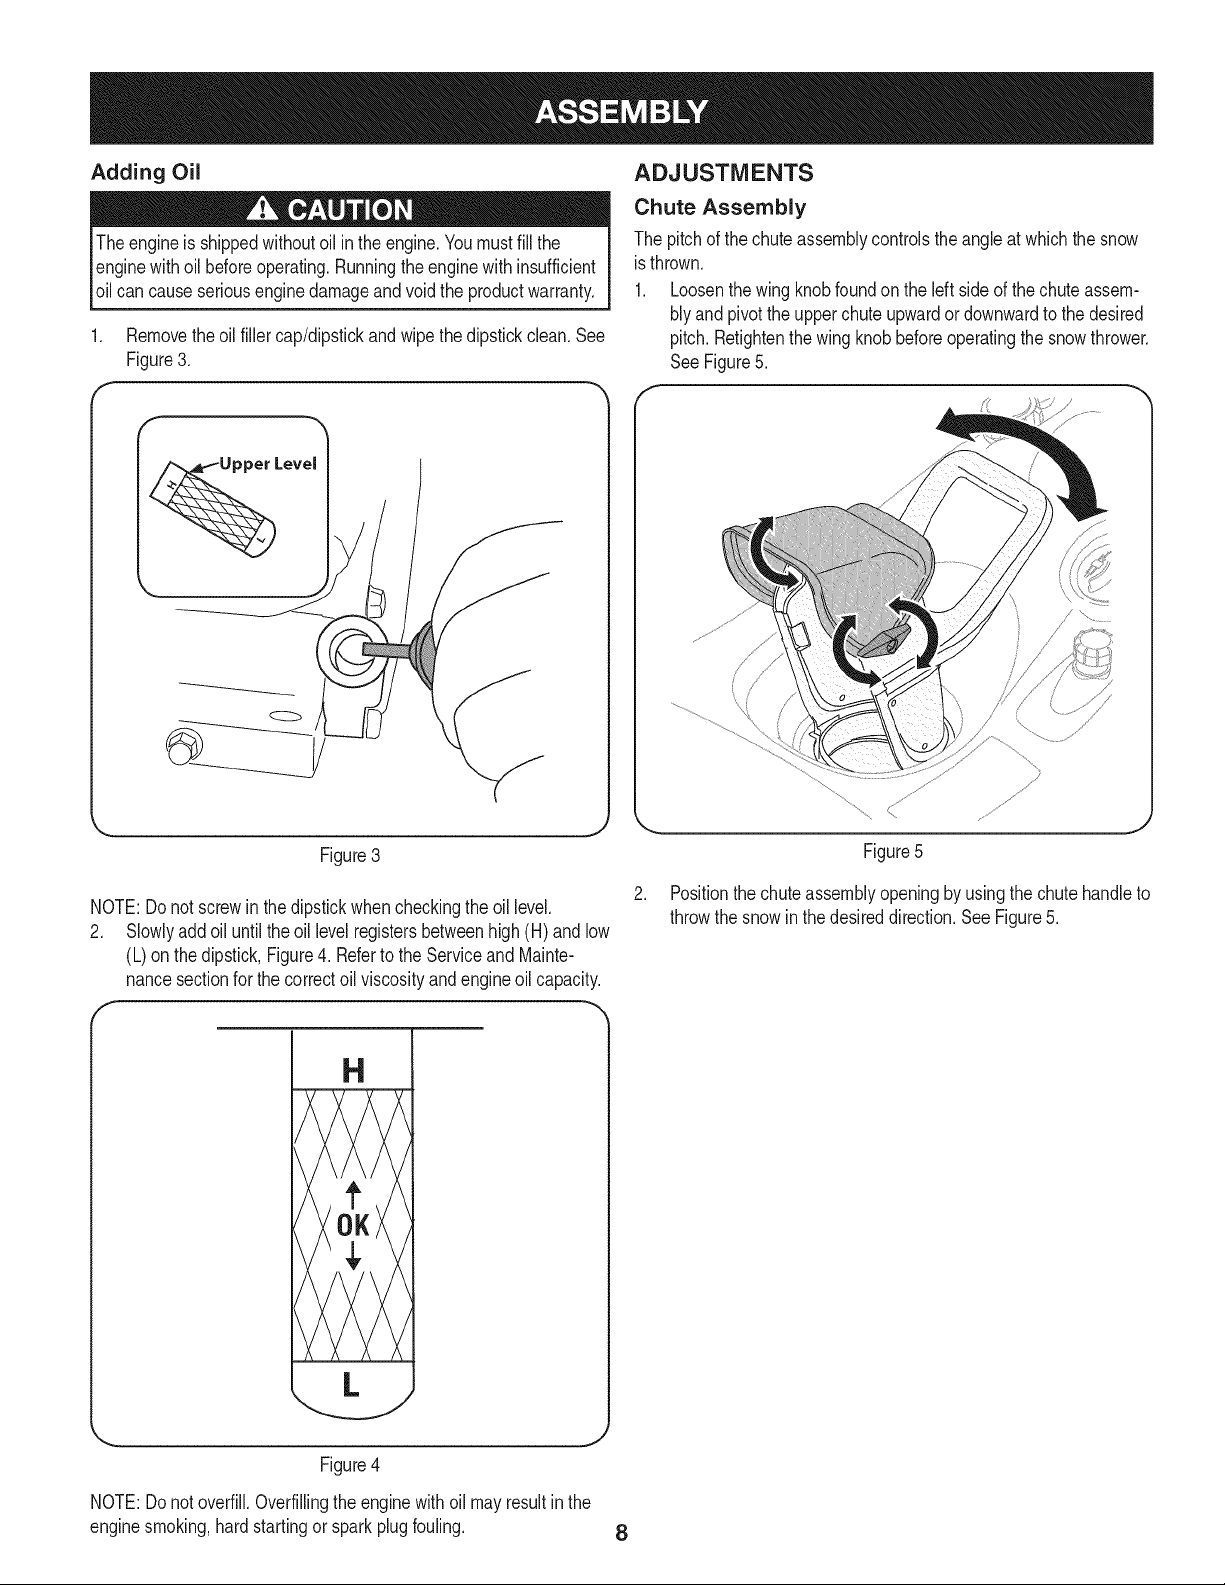
2. Tightenthe wingknobs to securethe handlein place.
See Figure2.
f,
REMOVING FROM CARTON
1. Cut the cornersof thecarton and lay the sidesflat on the ground.
Removeand discard all packinginserts.
2. Movethe snowthrowerout of thecarton.
3. Makecertainthe carton has beencompletelyemptiedbefore
discardingit.
ASSEMBLY
Positioning the Upper Handle
1. Pivotthe upperhandleintotheoperatingpositionmakingsurenotto
pinchthe cableinthe process,as illustratedin Figure1,untilit
clicksintoplace.
Figure1
J
J
Figure2
SETUP
Fuel Recommendations
Useautomotivegasoline(unleadedor lowleadedto minimizecombus-
tion chamberdeposits)witha minimumof 87 octane.Gasolinewith
up to 10%ethanolor 15%MTBE(MethylTertiaryButylEther)can be
used.Neverusean oil/gasolinemixtureordirty gasoline.Avoidgetting
dirt, dust,or waterinthe fuel tank.DO NOTuse E85gasoline.
• Refuelin a well-ventilatedareawiththe enginestopped.Do not
smokeorallowflamesor sparksin the areawherethe engineis
refueledor wheregasolineis stored.
• Donot overfillthe fueltank.After refueling,makesurethe tank
cap is closedproperlyandsecurely.
• Be carefulnotto spillfuel whenrefueling.Spilledfuel or fuel vapor
mayignite.If any fuelis spilled,makesurethe areais dry before
startingthe engine.
• Avoidrepeatedor prolongedcontact with skinor breathingof
vapor.
Adding Fuel
Useextremecarewhenhandlinggasoline.Gasolineis extremely
flammableand the vaporsare explosive.Neverfuelthe machine
indoorsor whilethe engineis hot or running.Extinguishcigarettes,
cigars,pipesandothersourcesof ignition.
Alwayskeephandsandfeetclear of equipmentmovingparts.Do not
usea pressurizedstartingfluid.Vaporsareflammable.
1. Removethe gascap,checkthe fuelleveland addfuel if necessary.
7
Adding Oil
Theengineis shippedwithoutoil in theengine.Youmustfill the
enginewithoil beforeoperating.Runningthe enginewith insufficient
oilcan causeseriousenginedamageandvoid the productwarranty.
1. Removetheoil fillercap/dipstickandwipethe dipstickclean.See
Figure3.
Level
ADJUSTMENTS
Chute Assembly
The pitchof thechuteassemblycontrolstheangleat whichthe snow
isthrown.
1. Loosenthewing knobfoundon the left sideof the chuteassem-
blyandpivot the upperchuteupwardor downwardto the desired
pitch.Retightenthe wingknobbeforeoperatingthesnow thrower.
SeeFigure5.
f --,,
Figure3
NOTE:Donot screwinthe dipstickwhencheckingthe oil level.
2. Slowlyadd oil untilthe oillevel registersbetweenhigh (H) and low
(L)on thedipstick,Figure4. Referto the Serviceand Mainte-
nancesectionfor the correctoil viscosityand engineoil capacity.
Figure5
Positionthe chuteassemblyopeningby usingthe chutehandleto
throwthe snowinthedesireddirection.See Figure5.
,. j
Figure4
NOTE:Donot overfill.Overfillingthe enginewithoil may resultinthe
enginesmoking,hardstartingor sparkplug fouling.
8

This page left intentionallyblank.
9
RecoiJ Starter
er ControJ
Chute Assernbl,
Gas Ca
HandJe
Shave Plate
Auger
f
Exhaust
Chok
Oil Fill Cap.._._
w/Dipstick
Oil Drain/
SparkPlug/ "_
Boot
_\/\_l//_ Recoil
J; %/'Starter
Hand_
Figure10
Nowthat youhavesetupyour snowthrower,it's importantto become
acquaintedwith its controlsand features.Referto Figure10.
CHOKE LEVER
Activatingthe chokecontrolclosesthe chokeplateoncarburetorand
aids instartingengine.
PRIMER
Pressingprimerforcesfuel directlyintoengine'scarburetor
to aidin cold-weatherstarting.
IGNITION KEY
The ignitionkeyis a safetydevice.It mustbefully
insertedinorder for theengineto start.Removethe
ignitionkeywhenthe snowthroweris not in use.
NOTE:Donot turnthe ignitionkeyinan attemptto start
theengine.Doingso maycauseit to break.
RECOIL STARTER
The starterhandleis usedto start the engine.
GASOLINE CAP
Removethe gascap to add fuel.
AUGER
Whenengaged,the augersrotationdrawssnowintothe augerhousing
andthrowsit out the dischargechute.Rubberpaddleson the augers
also aidin propellingthe snowthroweras they comein contactwith
the pavement.
AUGER CONTROL
Locatedonthe upper handle,the augercontrolhandle is usedto
engageanddisengagedriveto the auger.Squeezethecontrol handle
againstthe upperhandleto engagethe auger; releaseit to disengage.
Meets ANSI Safety Standards
CraftsmanSnowThrowersconformto the safetystandardof the AmericanNationalStandardsInstitute(ANSi).
10
CHUTE ASSEMBLY
Rotatethe dischargechuteto the left or rightusingthe chutehandle.
Thepitchof the dischargechutecontrolsthe angleat which the snow
is thrown.Loosenthewing knobonthe side of the dischargechute
beforepivotingthe dischargechuteupwardor downward.Retighten
the knoboncethe desiredpositionhasbeenachieved.
SHAVE PLATE
Theshaveplate maintainscontactwith the pavementas the snow
throweris propelled,allowingsnowclose tothe pavement'ssurfaceto
bedischarged.
BEFORE STARTING THE ENGINE
machineandin thismanualbeforeo
1. Thespark plug wirewas disconnectedfor safety.Attachthe spark
plugwireto the sparkplugbeforestarting.
STARTING THE ENGINE
)ressurizedstartin{ flammable.
5. Ifthe engineis warm,pushthe primerbuttononlyonce.
NOTE:Alwayscoverthe venthole in the primerbuttonwhenpushing.
Additionalprimingmaybe necessaryfor thefirst start if the tempera-
ture is below 15° R
6. Graspthe starterhandleandpull the rope out slowly,until it pulls
slightlyharder.Letthe roperewindslowly.
7. Pullthe starterhandlerapidly.Do notallowthe handleto snap
back.Allowit to rewindslowlywhilekeepinga firm hold on the
handle.
8. As the enginewarmsup and beginsto operateevenly,slidethe
chokeleverslowlyto the 1/2chokeposition.Whentheengine
| a
beginsto runsmoothly,movethechoketo the OFF_ _position.
Ifthe enginefails, returnto FULLI_1 choke,then slowlymoveto
t
÷
II
1/2chokethenthe OFF_ _position.
STOPPING THE ENGINE
1. Runthe enginefor a fewminutesbeforestoppingto helpdry off
any moistureonthe engine.
2. To stopthe engine removethe ignitionkey and store it in a safe
place.
3. Wipeall the snowandmoistureawayfromthe enginecontrols
area.
To avoidcarbonmonoxidepoisoning,makesuretheengine is
outdoorsina well-ventilatedarea.
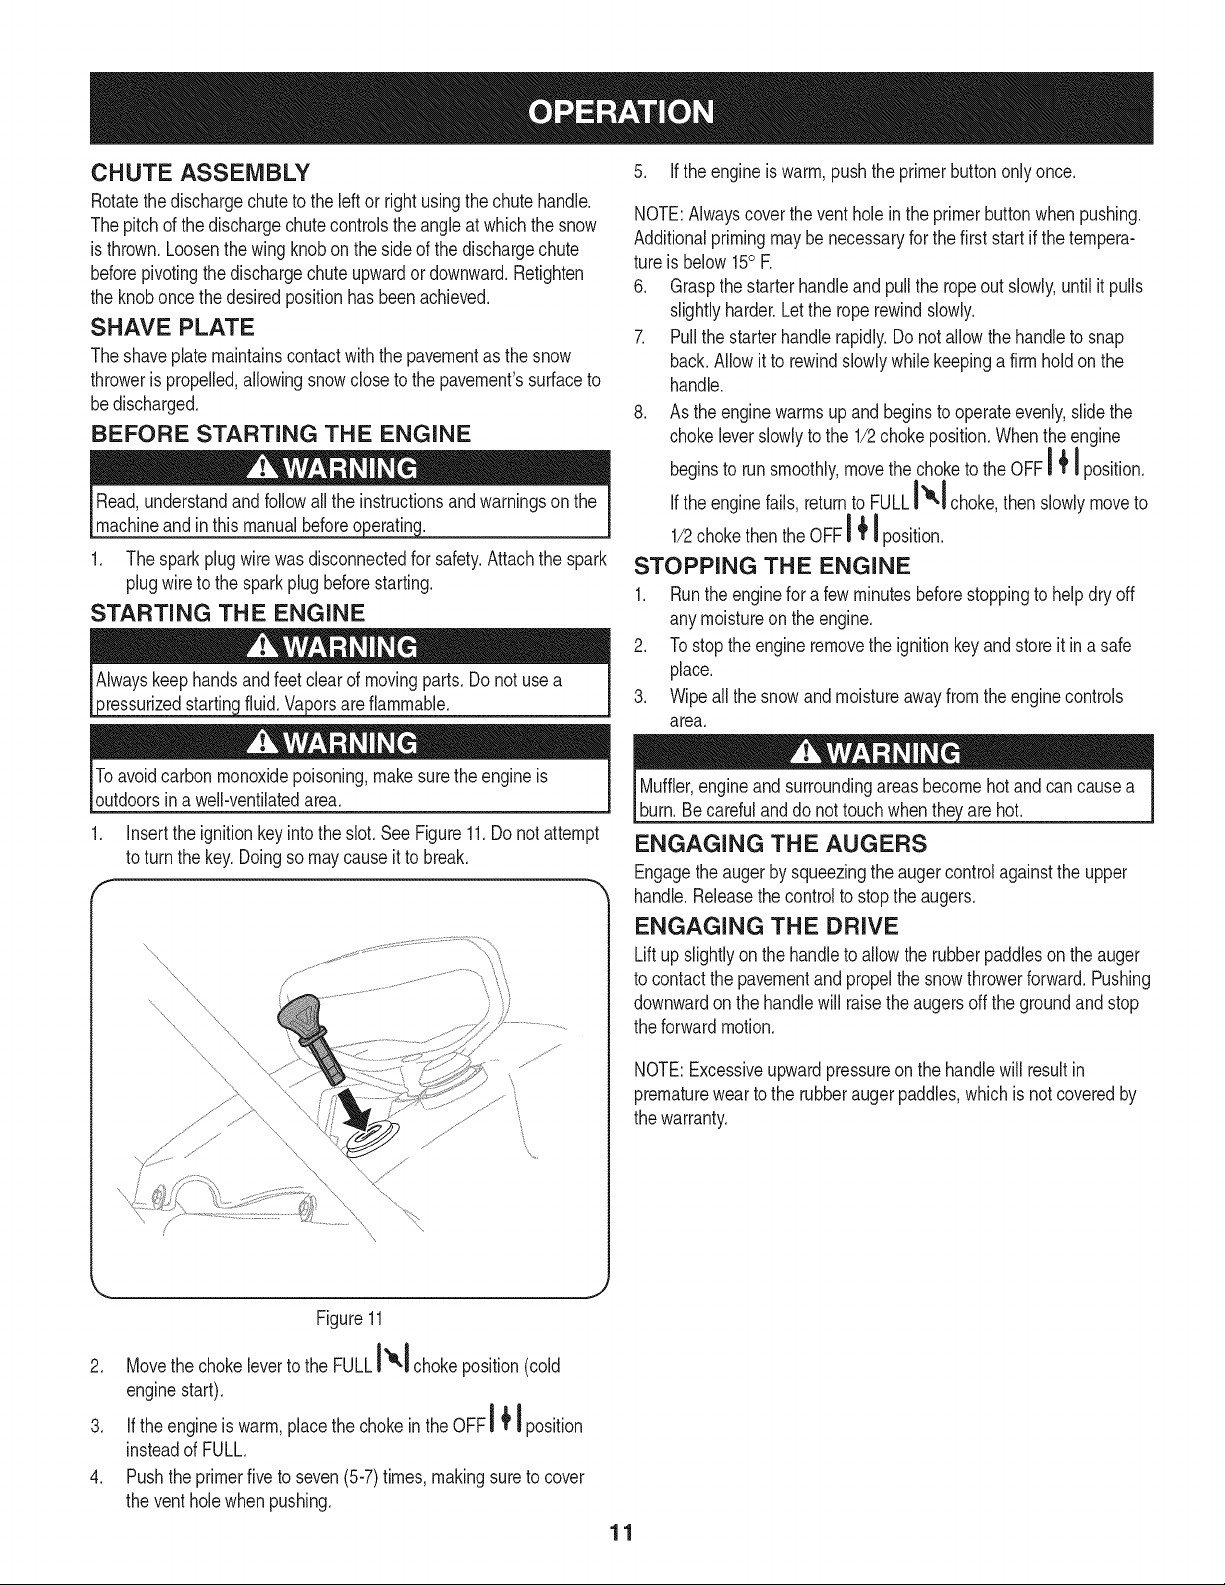
1. Insertthe ignitionkeyinto the slot.See Figure11.Do notattempt
to turnthe key.Doingso maycauseit to break.
r
,%
Muffler,engineandsurroundingareasbecomehotandcan causea
burn. Becarefulanddo not touchwhenthe,/are hot.
ENGAGING THE AUGERS
Engagethe augerby squeezingtheaugercontrolagainstthe upper
handle.Releasethe controlto stopthe augers.
ENGAGING THE DRIVE
Liftup slightlyonthe handleto allowthe rubberpaddlesonthe auger
to contactthe pavementand propelthe snowthrowerforward.Pushing
downwardonthe handlewill raisethe augersoff the groundand stop
the forwardmotion.
NOTE:Excessiveupwardpressureon the handlewill resultin
prematurewearto the rubberaugerpaddles,whichis not coveredby
the warranty.
Figure11
2. Movethe chokeleverto the FULLI_1 chokeposition(cold
enginestart).
I II
3. If theengineis warm,placethe chokeinthe OFFi I position
insteadof FULL.
4. Pushthe primerfive to seven(5-7)times, makingsureto cover
the ventholewhenpushing.
11
Thispageleftintentionallyblank.
12
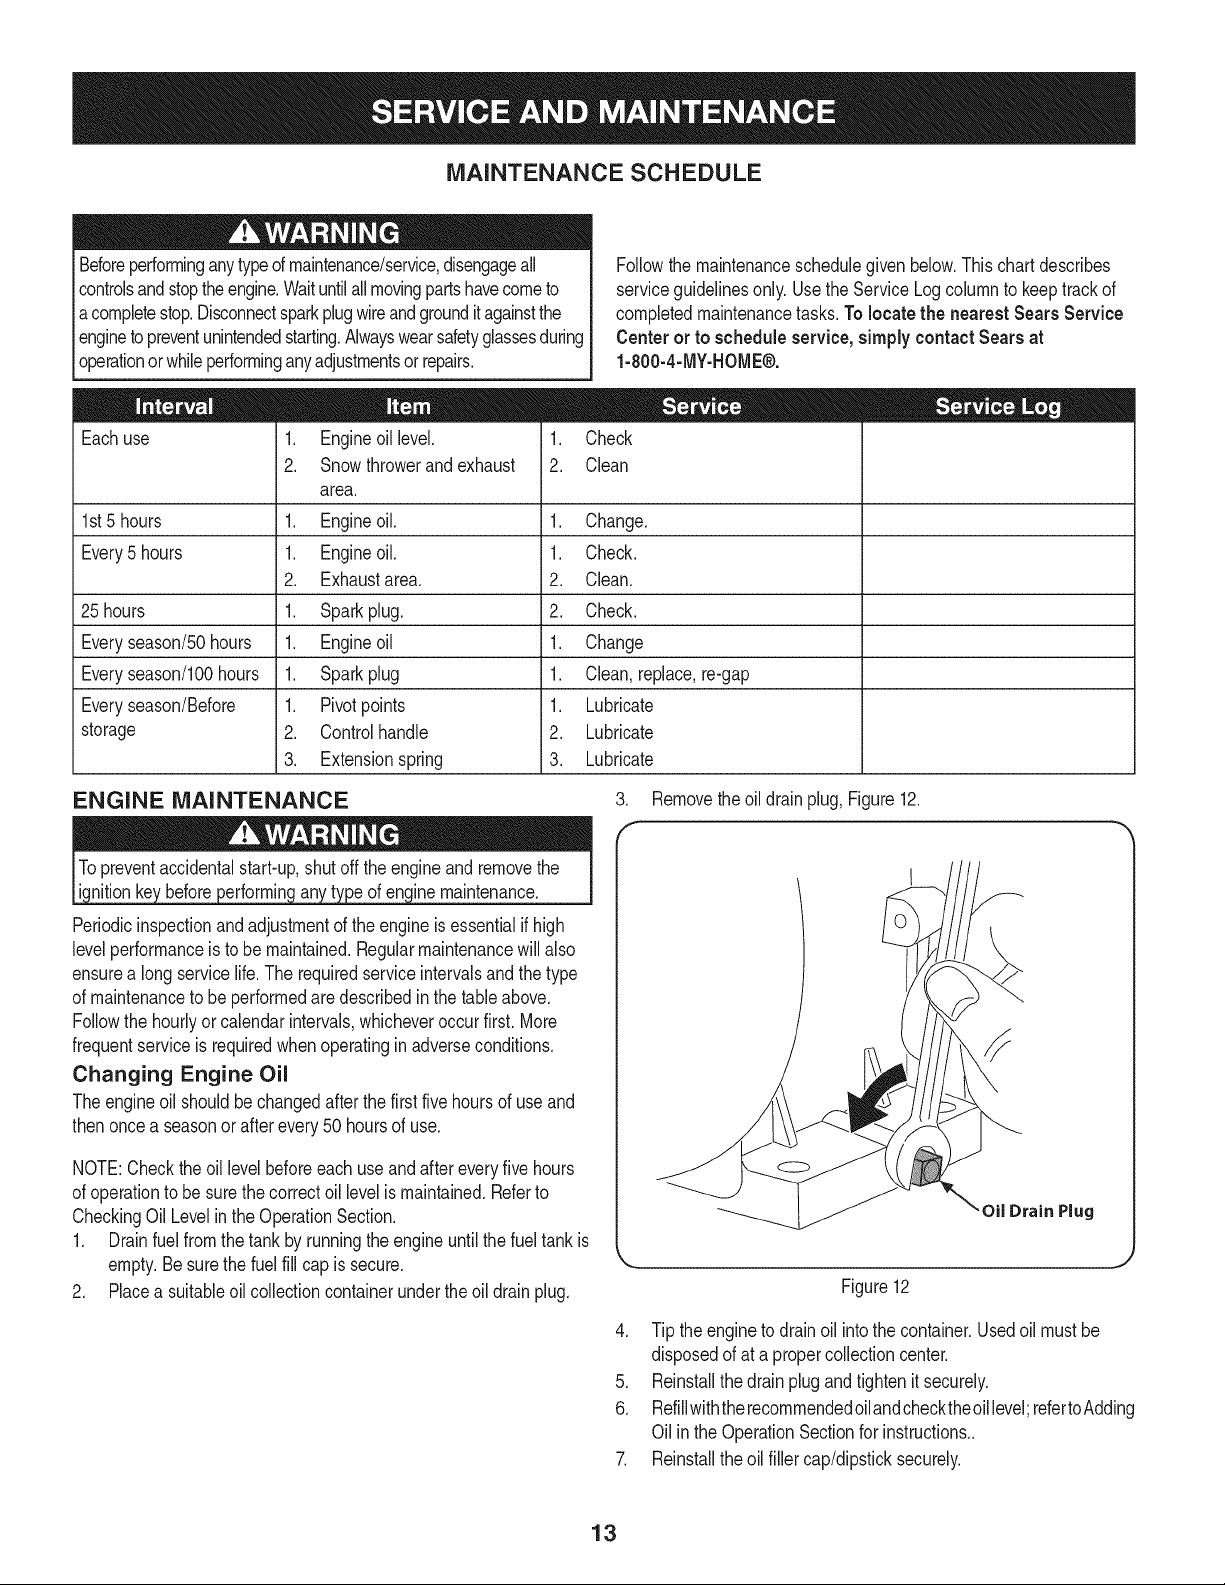
MAINTENANCE SCHEDULE
Beforeperforminganytypeofmaintenance/service,disengageall
controlsandstoptheengine.Waituntilallmovingpartshavecometo
acompletestop.Disconnectsparkplugwireandgrounditagainstthe
enginetopreventunintendedstarting.Alwayswearsafetyglassesduring
operationorwhileperforminganyadjustmentsor repairs.
Eachuse 1. Engineoil level.
2. Snowthrowerand exhaust
Followthe maintenanceschedulegiven below.Thischartdescribes
serviceguidelinesonly.Usethe ServiceLog columnto keeptrackof
completedmaintenancetasks.To locate the nearest Sears Service
Centeror to scheduleservice,simplycontactSearsat
1-800-4-MY-HOME@.
= =
1. Check
2. Clean
area.
1st5 hours 1. Engineoil. 1. Change.
Every5hours 1. Engineoil. 1. Check.
2. Exhaustarea. 2. Clean.
25 hours 1. Sparkplug. 2. Check.
Everyseason/50hours 1. Engineoil 1. Change
Everyseason/lO0hours 1. Sparkplug 1. Clean,replace,re-gap
Everyseason/Before 1. Pivotpoints 1. Lubricate
storage 2. Controlhandle 2. Lubricate
3. Extensionspring 3. Lubricate
ENGINE MAINTENANCE
ine maintenance.
Periodicinspectionandadjustmentof the engine isessentialifhigh
levelperformanceisto be maintained.Regularmaintenancewill also
ensurea long servicelife. The requiredserviceintervalsand thetype
of maintenanceto beperformedaredescribedinthe tableabove.
Followthe hourlyor calendarintervals,whicheveroccurfirst. More
frequentserviceis requiredwhenoperatinginadverseconditions.
Changing Engine Oil
Theengineoil shouldbe changedafter the firstfive hoursof useand
thenoncea seasonor afterevery 50 hoursof use.
NOTE:Checkthe oil levelbeforeeachuse and afterevery five hours
of operationto besurethe correctoil levelismaintained.Referto
CheckingOilLevelinthe OperationSection.
1. Drainfuelfrom the tank by runningtheengine untilthe fueltank is
empty.Besurethe fuel fill cap issecure.
2. Placea suitableoil collectioncontainerunder theoil drainplug.
.
f
Removethe oil drain plug, Figure12.
Figure12
4. Tip the engineto drain oil into the container.Usedoil mustbe
disposedof at a propercollectioncenter.
5. Reinstallthe drain plug andtightenitsecurely.
6. Refillwiththerecommendedoilandchecktheoillevel;refertoAdding
Oil inthe OperationSectionfor instructions..
7. Reinstallthe oil fillercap/dipsticksecurely.
13
Thoroughlywashyourhandswithsoapand wateras soon as
possibleafterhandlingusedoil.
NOTE:Pleasedisposeof usedmotoroil in a mannerthat is friendlyto
the environment.Takeit to a recyclingcenteror othercollectioncenter.
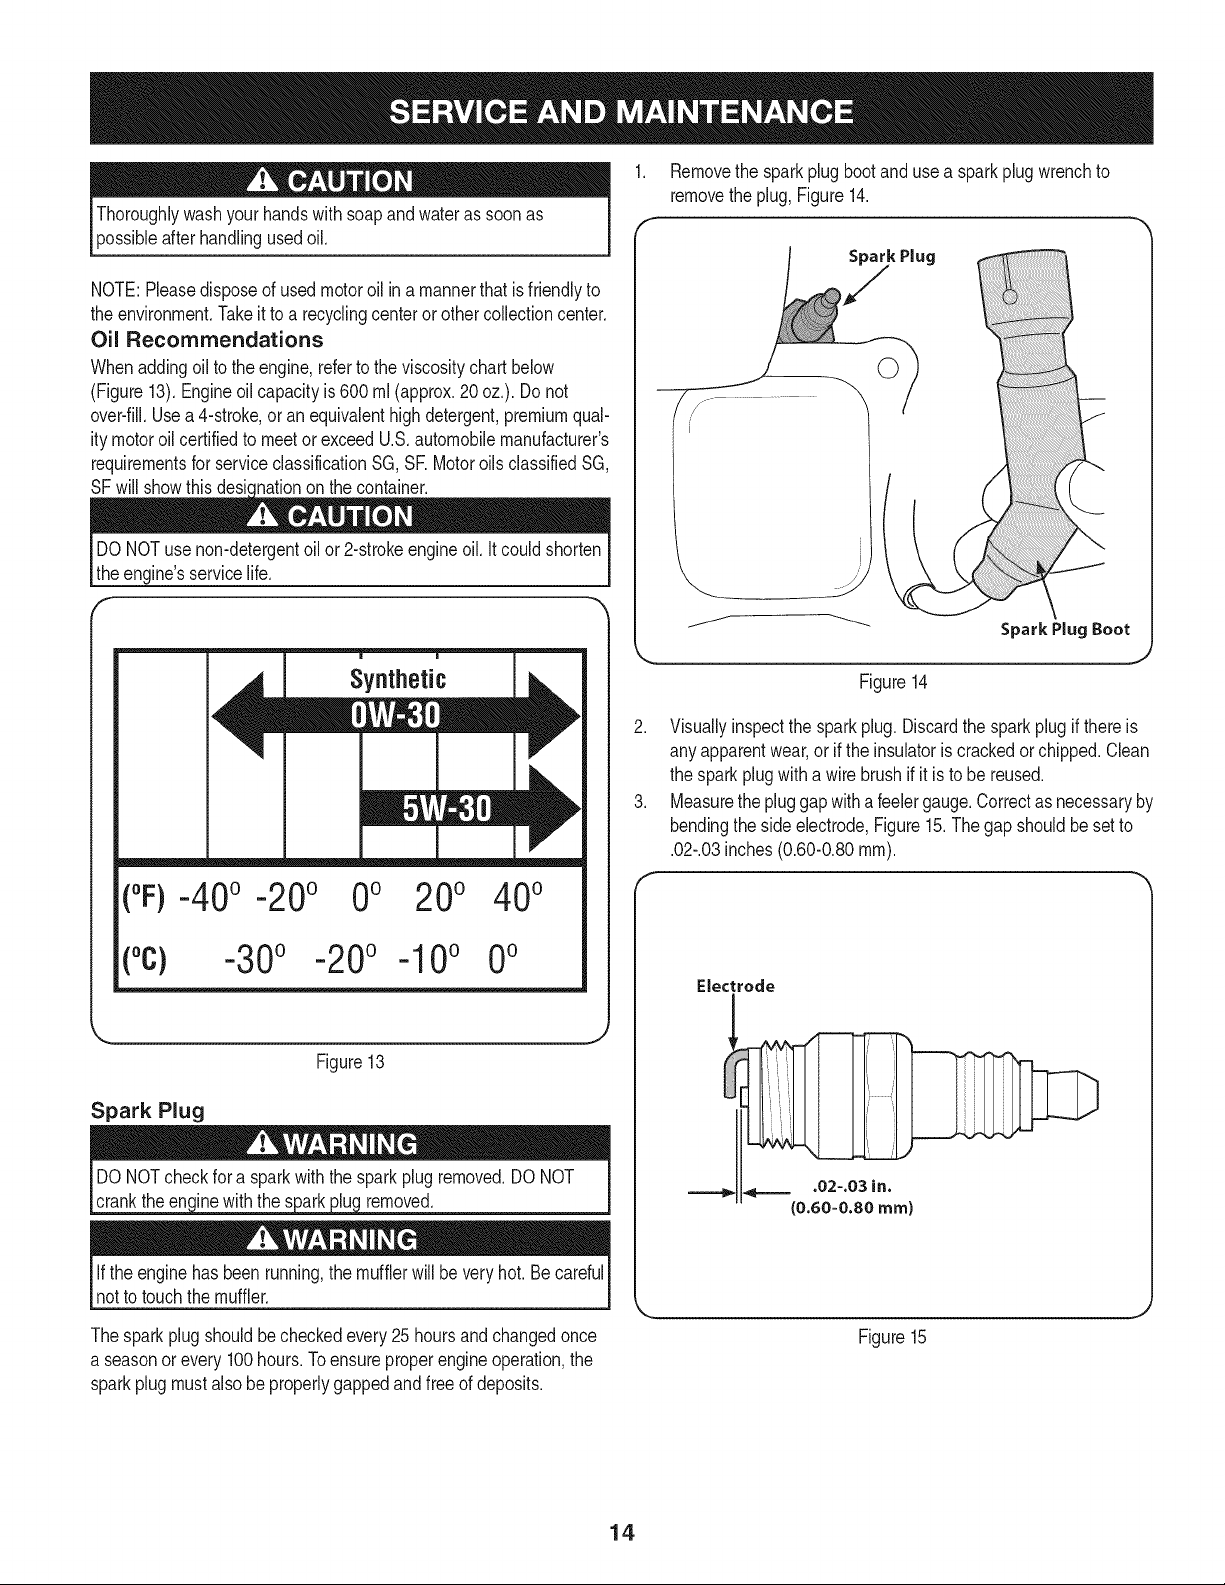
Oil Recommendations
Whenaddingoilto the engine,refertothe viscositychartbelow
(Figure13).Engineoilcapacity is600 rnl(approx.20 oz.). Donot
over-fill.Usea 4-stroke,or anequivalenthighdetergent,premiumqual-
ity motoroil certifiedto meetor exceedU.S.automobilemanufacturer's
requirementsfor serviceclassificationSG,SR Motoroils classifiedSG,
SF will showthisdesicnationonthe container.
DO NOTuse non-detergentoil or 2-strokeengineoil. Itcouldshorten
theengine'sservicelife.
f,
m m
Synthetic
(%-40 o -20o 0o 200 400
(oc) -30° -20° -10° 0°
Figure13
Spark Plug
crankthe en(inewith the sark__ removed.
Ifthe enginehasbeen running,the mufflerwill be veryhot. Be careful
notto touchthe muffler.
Thesparkplug shouldbe checkedevery25 hoursandchangedonce
a seasonor every100hours.Toensureproperengine operation,the
sparkplugmustalso beproperlygappedand free of deposits.
Removethe sparkplug bootand usea spark plugwrenchto
removethe plug,Figure14.
©
Spark Plug Boot
Figure14
Visuallyinspectthe sparkplug. Discardthe sparkplug if thereis
any apparentwear,or if the insulatoris crackedorchipped.Clean
the sparkplugwitha wire brushif it is to be reused.
Measurethe pluggapwithafeelergauge.Correctas necessaryby
bendingthe sideelectrode,Figure15.Thegap shouldbe setto
.02-.03inches(0.60-0.80ram).
Electrode
_==== .02=.03in.
(0.60=0.80ram)
Figure15
14
4. Checkthatthesparkplugwasherisin goodconditionandthreadthe
sparkplugin by handto preventcross-threading.
5. Afterthe sparkplug is seated,tightenwith a sparkplugwrenchto
compressthe washer.
NOTE:Wheninstallinga newsparkplug,tighten1/2-turnafterthe
sparkplugseatsto compressthe washer.Whenreinstallinga used
sparkplug,tighten 1/8-to 1/4-turnafter the sparkplug seatsto
corn_ressthe washer.
becomever hotand can damac me.
Cleaning the Engine
Ifthe enginehasbeen running,allowit to cool for at least halfan hour
beforecleaning.Periodicallyremovedirt build-upfromengine.
Do not spraythe enginewithwaterto cleanit becausethewater
couldcontaminatethe fuel.Usinga gardenhoseor pressurewashing
Iequipmentcanalso forcewaterintothe muffleropening.Waterthat
[passesthroughthe muffer can enterthecy nderandcausedamage,j
Accumulationof debrisaroundthe mufflercouldcausea fire. Inspect
andcleanbeforeevery use.
LUBRICATION
Lubricatethe pivotpointson the controlhandleand the extension
springat the endof thecontrolcablewitha lightoil onceeveryseason
andbeforethe snow throweris putinto storageatthe end of the
season.
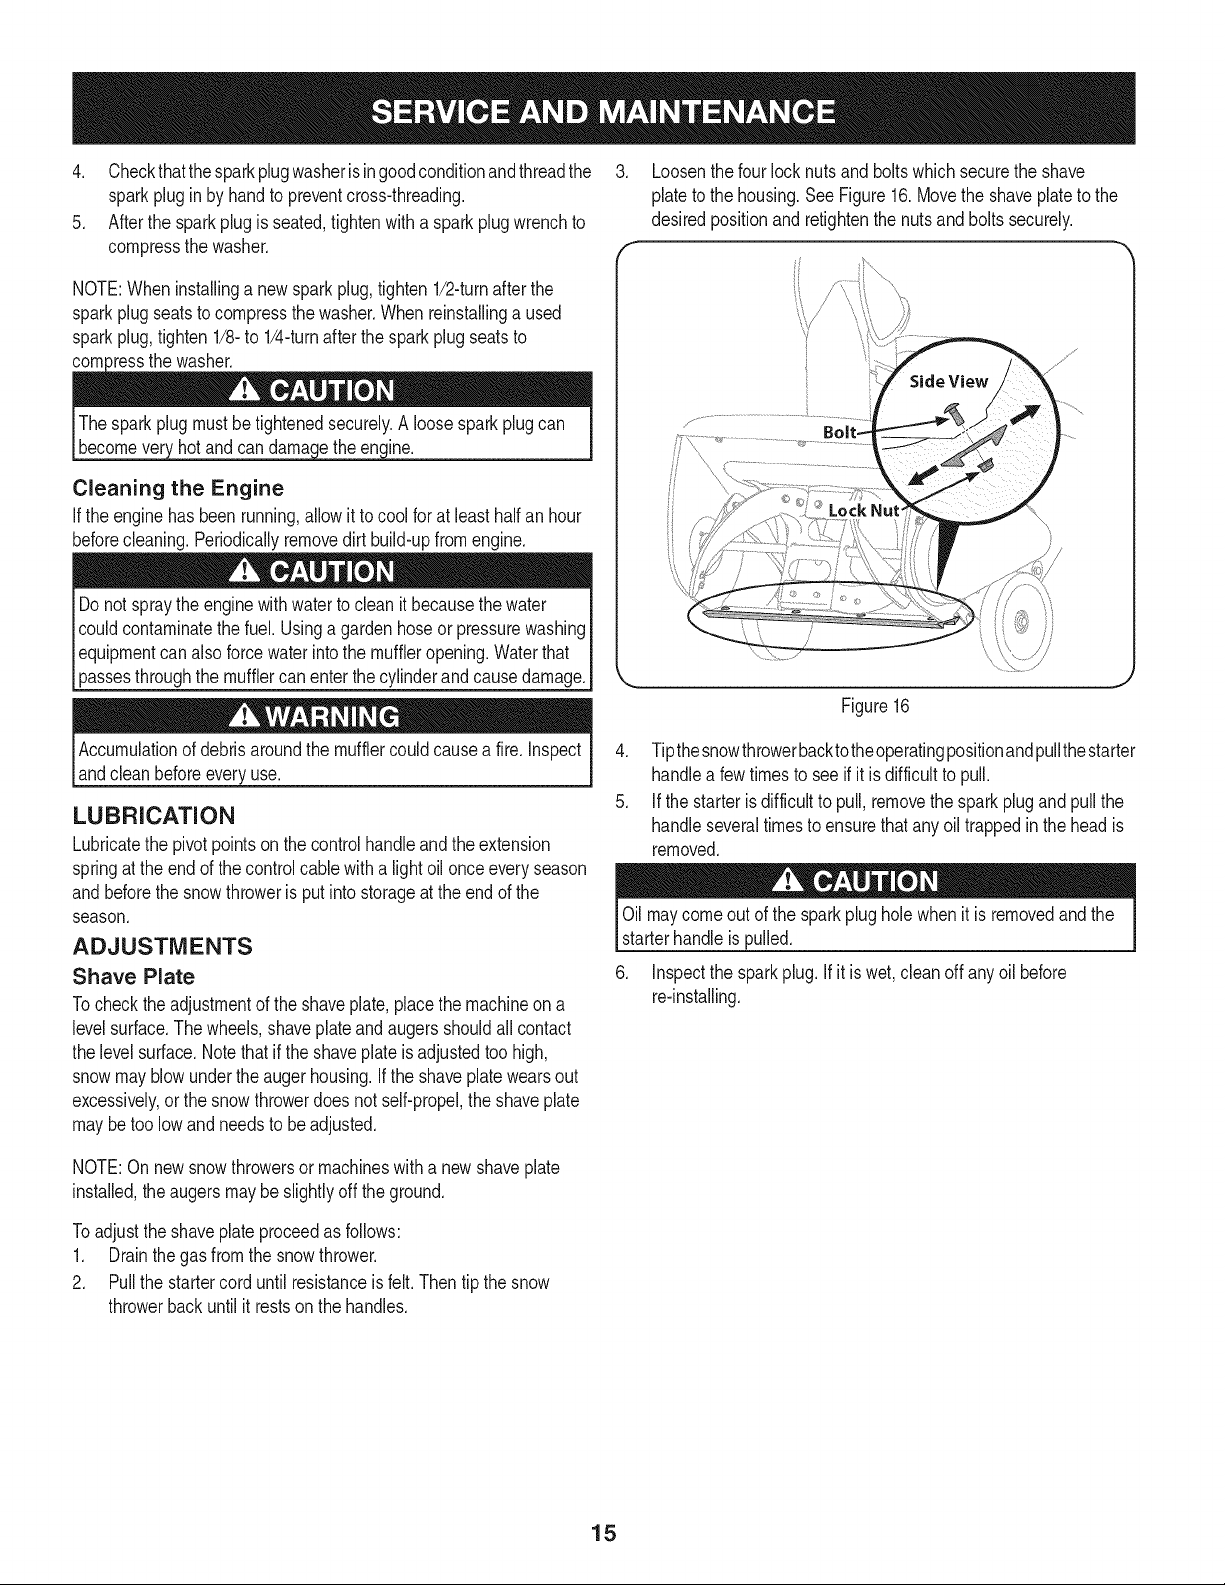
ADJUSTMENTS
Shave Plate
Tocheckthe adjustmentof theshaveplate,placethe machineon a
levelsurface.The wheels,shaveplateandaugersshouldall contact
the levelsurface.Notethatif the shaveplateis adjustedtoo high,
snowmayblowundertheauger housing.If the shaveplatewearsout
excessively,orthe snowthrowerdoes not self-propel,theshaveplate
maybetoo lowandneedsto be adjusted.
. Loosenthefour locknuts and bolts whichsecurethe shave
plateto the housing.SeeFigure16.Movethe shaveplateto the
desiredpositionandretightenthe nuts and bolts securely.
Figure16
4. Tipthesnowthrowerbacktotheoperatingpositionandpullthestarter
handlea few timesto seeif it is difficultto pull.
5. Ifthe starteris difficultto pull,removethe spark plugand pullthe
handleseveraltimesto ensurethat anyoil trappedin the headis
removed.
Oilmaycomeout of the sparkplugholewhenit is removedandthe
starterhandleis pulled.
6. Inspectthe sparkplug.If itiswet, cleanoffany oil before
re-installing.
NOTE:On newsnowthrowersor machineswith a newshaveplate
installed,theaugersmaybe slightlyoff the ground.
Toadjustthe shaveplateproceedas follows:
1. Drainthe gasfrom the snowthrower.
2. Pull the startercord until resistanceisfelt. Thentip the snow
throwerbackuntil it restson the handles.
15
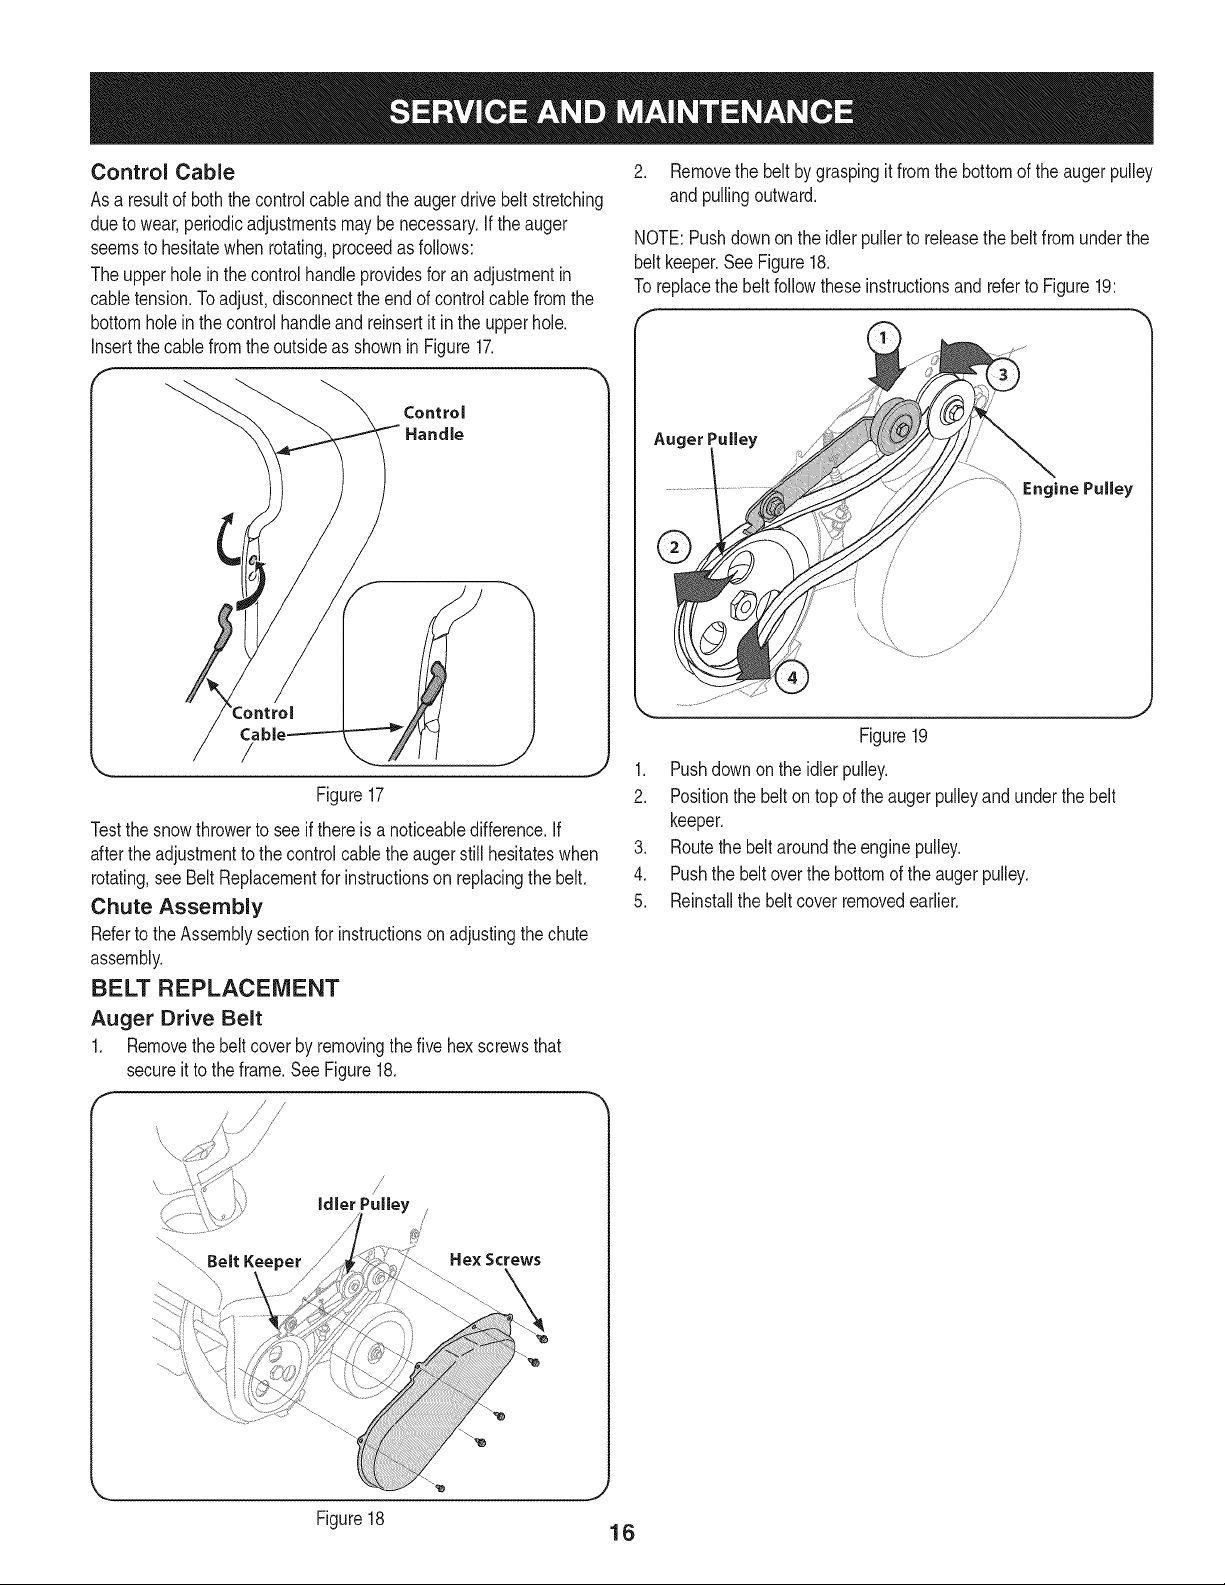
Control Cable
As a resultof both thecontrolcableand the auger drivebelt stretching
dueto wear,periodicadjustmentsmaybenecessary.Ifthe auger
seemsto hesitatewhenrotating,proceedas follows:
Theupperhole in the controlhandle providesfor an adjustmentin
cabletension.Toadjust,disconnectthe endof controlcablefrom the
bottomholein the controlhandleand reinsertit inthe upper hole.
Insertthe cablefromtheoutsideas shownin Figure17.
Control
Handle
/
J
Figure17
Testthe snowthrowerto seeif there is a noticeabledifference.If
aftertheadjustmentto the controlcablethe augerstill hesitateswhen
rotating,see BeltReplacementfor instructionson replacingthebelt.
Chute Assembly
Referto the Assemblysectionfor instructionson adjustingthechute
assembly.
BELT REPLACEMENT
Auger Drive Belt
1. Removethebelt coverby removingthe fivehex screwsthat
secureit to the frame.SeeFigure18.
2. Removethe belt bygraspingit from thebottomof the augerpulley
and pullingoutward.
NOTE:Pushdownonthe idler pullerto releasethe beltfrom underthe
beltkeeper.SeeFigure18.
To replacethe beltfollowtheseinstructionsand referto Figure19:
/
/
/
Figure19
1. Pushdownon the idlerpulley.
2. Positionthe belton topof theaugerpulleyand underthe belt
keeper.
3. Routethebelt aroundthe enginepulley.
4. Pushthe belt overthe bottomof the augerpulley.
5. Reinstallthe belt coverremovedearlier.
................Belt Keeper
Figure18
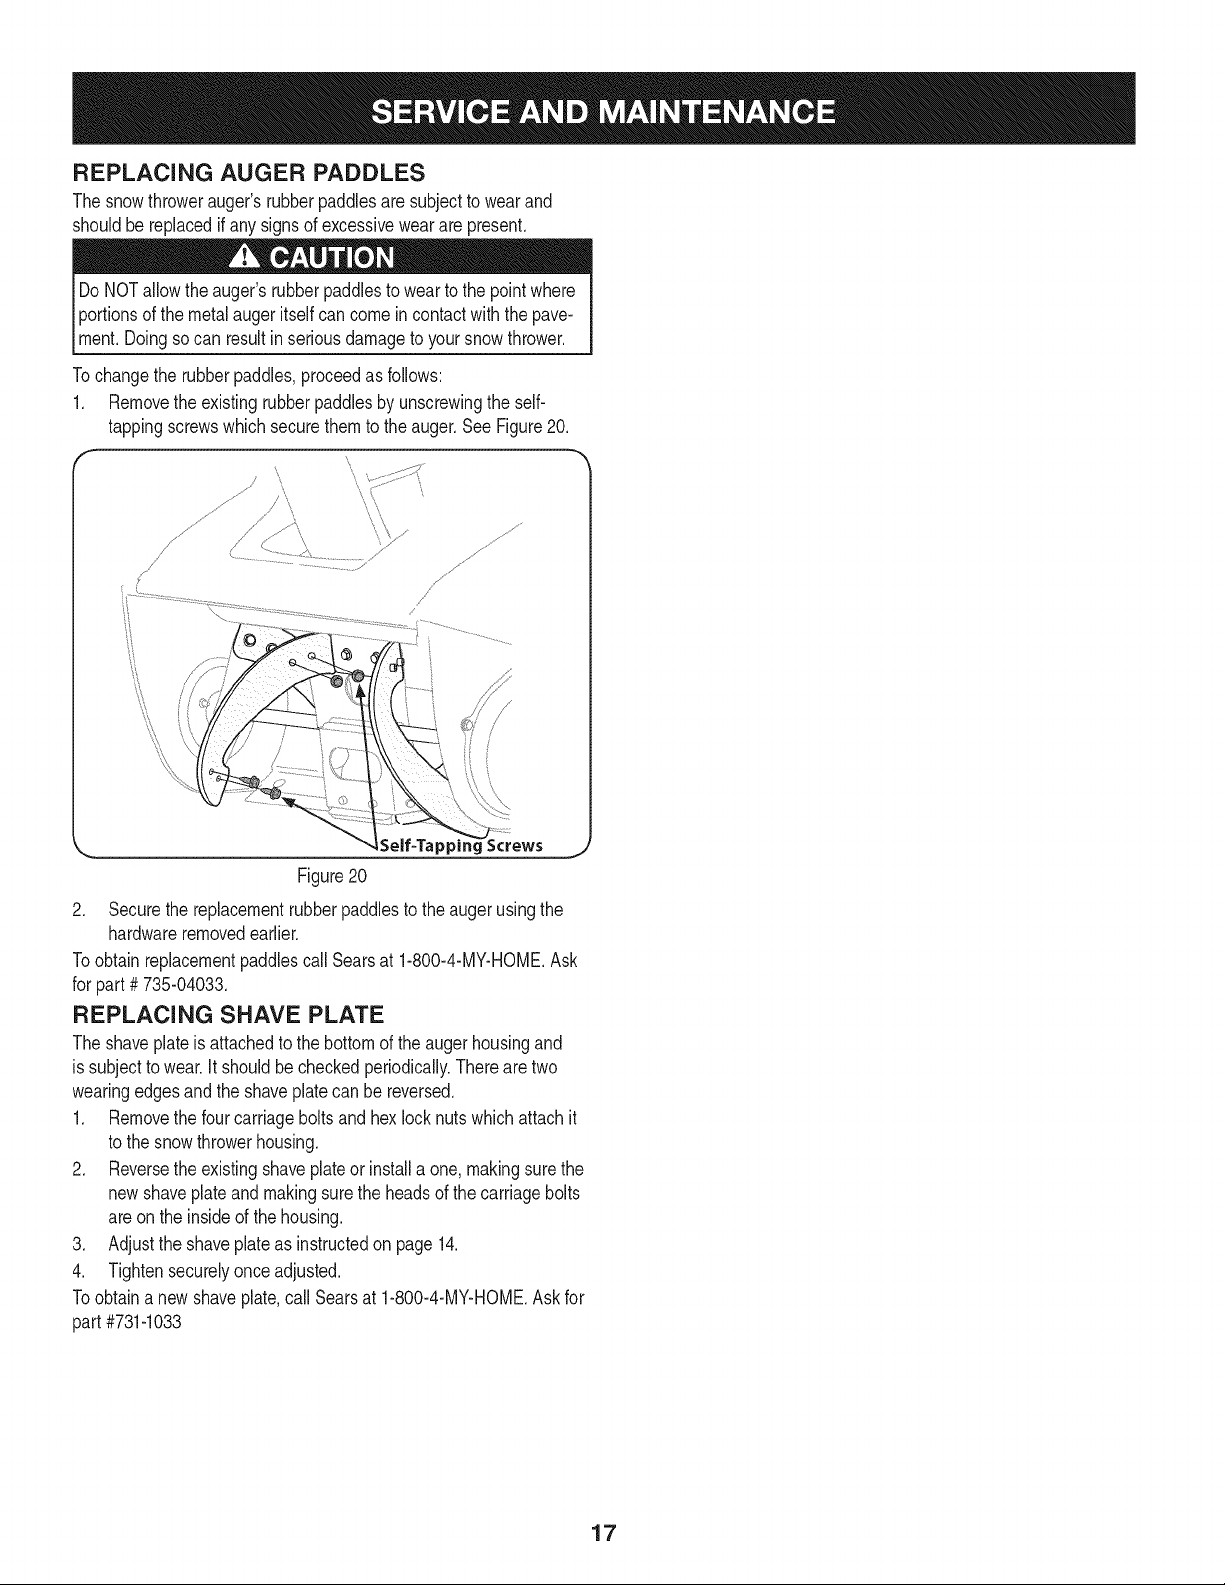
REPLACING AUGER PADDLES
The snowthrowerauger'srubberpaddlesaresubjectto wearand
shouldbereplacedifany signsof excessiveweararepresent.
Do NOTallowthe auger'srubberpaddlesto wearto the pointwhere
Iportionsof the metalaugeritselfcancomein contactwith the pave-
lment. Doingsocan resultin seriousdamageto yoursnowthrower.
Tochangethe rubberpaddles,proceedas follows:
1. Removethe existingrubberpaddlesby unscrewingthe self-
tappingscrewswhichsecurethemto theauger.See Figure20.
/
......." / +,
............i/." k _\I.........
f
Self-Tappir ..,,
Figure20
2. Securethe replacementrubberpaddlesto the augerusingthe
hardwareremovedearlier.
Toobtainreplacementpaddlescall Searsat 1-800-4-MY-HOME.Ask
for part# 735-04033.
REPLACING SHAVE PLATE
The shaveplateis attachedto the bottomof the augerhousingand
issubjectto wear.It shouldbe checkedperiodically.Therearetwo
wearingedgesandthe shaveplatecanbe reversed.
1. Removethe four carriageboltsandhexlock nuts which attachit
to the snowthrowerhousing.
2. Reversethe existingshaveplateor install a one,makingsurethe
newshaveplateand makingsurethe headsof the carriagebolts
areon the insideof the housing.
3. Adjustthe shaveplateas instructedon page14.
4. Tightensecurelyonceadjusted.
Toobtaina newshaveplate,call Searsat 1-800-4-MY-HOME.Askfor
part #731-1033
17
Ifthe snowthrowerwillnot be usedfor30 daysor longer,or if it is the endof the snowseasonwhenthe last possibilityof snowis gone,the
equipmentneedsto bestoredproperly.Followstorageinstructionsbelowto ensuretop performancefrom the snowthrowerfor manymoreyears.
PREPARING ENGINE
Enginesstoredover30days need to be drainedof fuel to prevent
deteriorationandgumfrom formingin fuel systemor onessential
carburetorparts.If thegasolinein yourenginedeterioratesduring
storage,youmayneedto havethe carburetor,andotherfuel system
components,servicedor replaced.
1. Removeall fuel fromtank by runningengineuntil it stops.
2. Changethe engineoil.
3. Removesparkplug and pour approximately1 oz. (30 rnl)of clean
engineoil intothe cylinder.Pullthe recoilstarterseveraltimesto
distributetheoil, and reinstallthe spark plug.
4. Cleandebrisfrom aroundengine,and under,around,andbehind
muffler.Applya lightfilmof oilon anyareasthat are susceptible
to rust.
• Storein a clean,dry andwellventilatedarea awayfrom anyap-
pliancethatoperateswith a flame or pilotlight,suchas a furnace,
waterheater,or clothesdryer.Avoidany areawith a spark
producingelectricmotor,or wherepowertoolsare operated.
Neverstoresnowthrowerwith fuel in tank indoorsor in poorlyventi-
latedareas,wherefuel fumesmayreachan openflame,sparkor pilol
lightas ona furnace,water heater,clothesdryer or gas appliance.
• If possible,avoidstorageareaswith high humidity.
• Keepthe enginelevelin storage.Tiltingcan causefuel oroil
leakage.
PREPARING SNOW THROWER
Whenstoringthe snowthrowerin an unventilatedormetal stor-
age shed,careshouldbe taken to rustprooftheequipment.Using
a light oil or silicone,coattheequipment,especiallyanychains,
springs,bearingsandcables.
• Removealldirt fromexteriorof engineandequipment.
• Followlubricationrecommendations.
• Storeequipmentin a clean,dry area.
18
Beforeperforminganytypeof maintenance/service,disengageallcontrolsandstoptheengine.Waituntilall
movingpartshavecometo acompletestop.Disconnectsparkplugwireandgrounditagainsttheengineto
Ipreventunintendedstarting.Alwayswearsafetyglassesduringoperationorwhileperforminganyadjustmentsor
[repairs.
Thissectionaddresses minorserviceissues.To locate the nearest Sears Service Centeror to scheduleservice,simplycontactSears
at 1-800-4-MY-HOME®.
Enginefailsto start
Enginerunserratically
1. Fueltank empty,or stalefuel.
2. Blockedfuel line.
3. Keynot insertedallthe way.
4. Sparkplug wiredisconnected.
5. Faultysparkplug.
6. Enginenot primed.
1. Filltank with cleanfreshgasoline.
2. Cleanfuel line.
3. Insertkeyall theway.
4. Connectwire to sparkplug.
5. Cleanspark plug,readjustgap,or replace.
6. Primeenginefiveto seventimes.
7. Enginefloodedfromexcessivepriming.
1. Enginerunningon choke.
2. Fuelline blocked,or stalefuel.
3. Wateror dirt infuel system.
4. Carburetoroutof adjustment.
1. Carburetoroutof adjustment.
1. Sparkplugwireloose.
2. Ventin gascap plugged.
1. Looseparts or damagedauger.
7.
1.
2.
3.
4.
1.
1.
2.
1.
Waitat leastten minutesbeforestarting.
Movechokeleverto OFFposition.
Cleanfuel lineandfill tankwithfresh,cleangasoline.
Drainfuel tank.Refillwithfreshfuel.
Contacta SearsServiceCenter.
Engineoverheats Contacta SearsServiceCenter.
Lossof power Firmlyconnectsparkplug wire.
Clearvent.
Excessivevibration Stopengineimmediatelyand disconnectspark plug
wire.Checkfor possibledamage.Tightenall bolts
andnuts. Repairas needed.If problempersists,take
snowthrowerto a SearsService Dealer.
Snowthrowerfailsto self- 1. Augercontrolcableoutof adjustment. 1. Adjustaugercontrolcableas shownin Serviceand
propel Maintenancesection.
2. Augerdrive beltlooseor damaged. 2. Replaceaugerdrivebelt.
Augerscontinueto rotate 1. Augercontrolcableoutof adjustment. 1. Adjustaugercontrolcableas shownin Serviceand
Maintenancesection.
Unitfailsto dischargesnow 1. Chuteassemblyclogged. 1.
2. Foreignobjectlodgedin auger.
3. Augercontrol cableoutof adjustment.
4. Auger beltlooseor damaged.
Stopengineanddisconnectsparkplug wire. Clean
chuteand insideof augerhousingwith clean-outtool
or stick.
2. Stopengine immediatelyand disconnectthe spark
plugwire. Removeobjectfromauger.
3. Adjustauger controlcable.
4. Replaceaugerbelt.
NEED MORE HELP?
You'H f_nd the answer 4_nd mov'e or_ managemyBome corn - Io_ Iree
Find this and all your other product manuals online.
Get answers from our team of home experts.
Get a personalized maintenance plan for your home.
Find information and tools to help with home projects.
b_ou@/d: t:o ye_ by gears
19
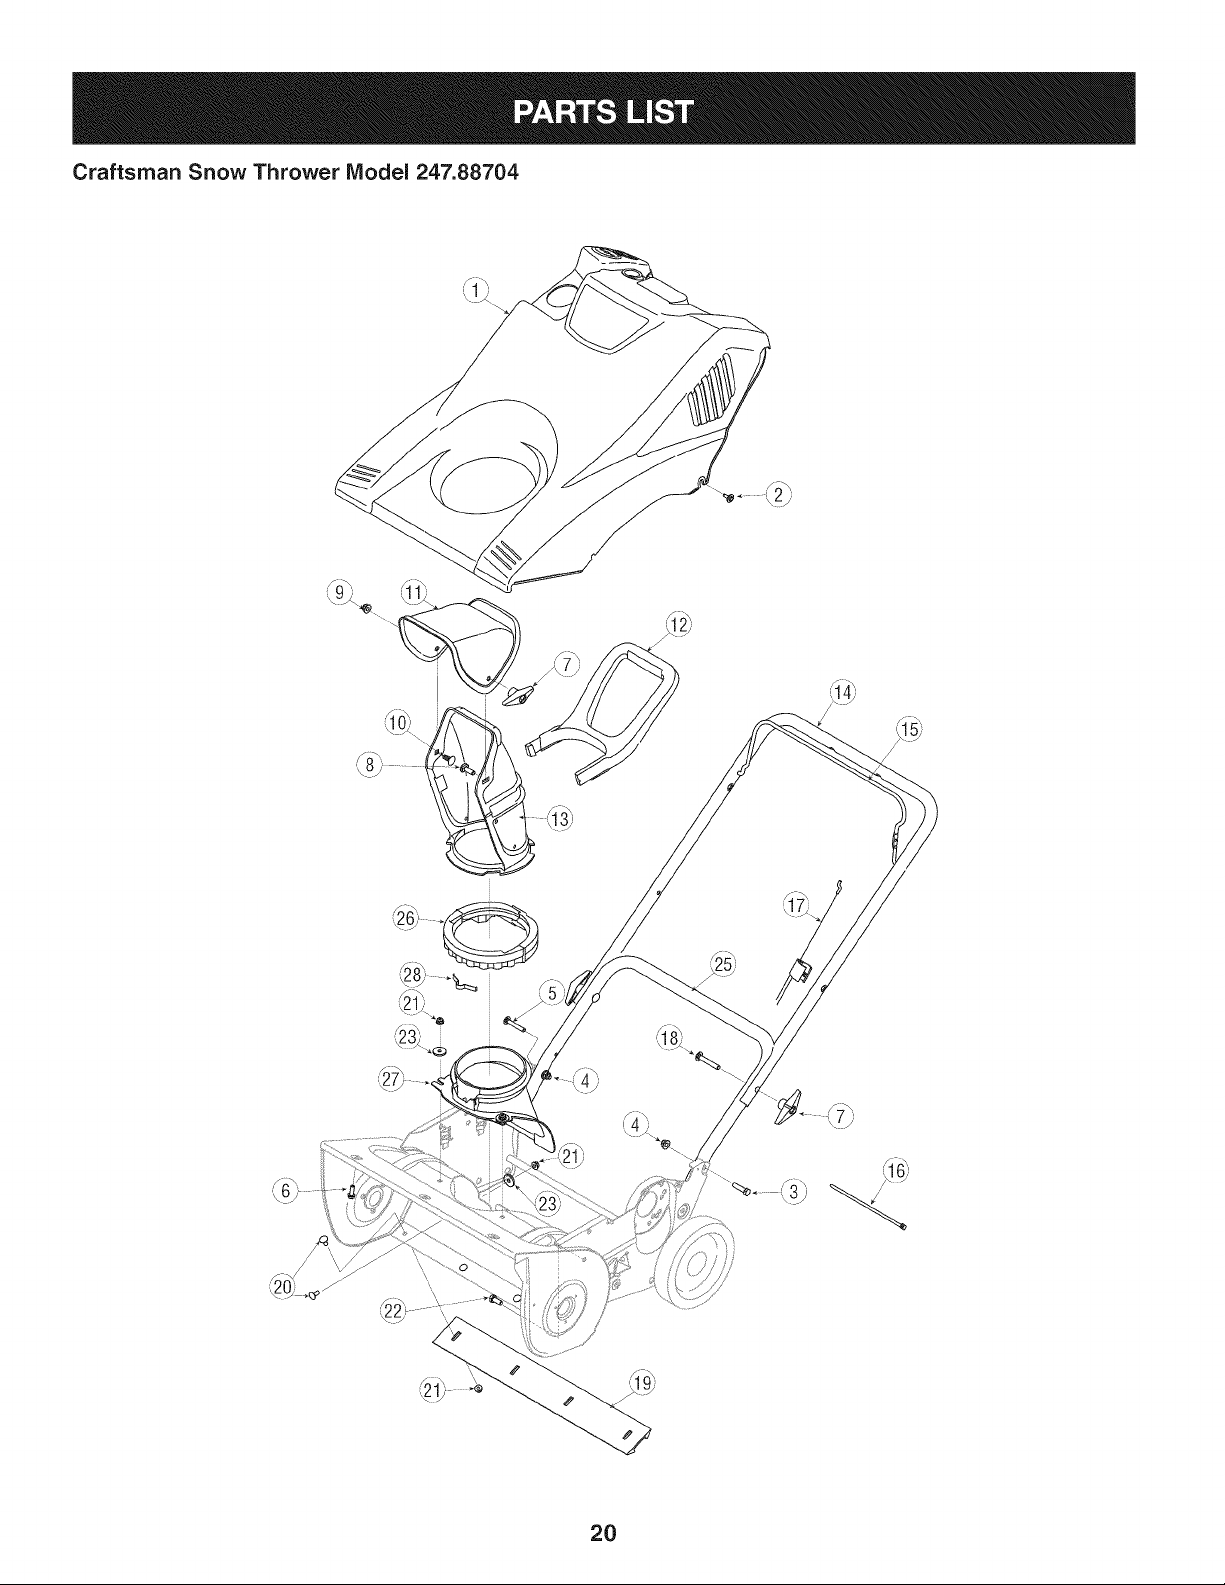
Craftsman Snow Thrower Model 247.88704
\
\
/
/
2O
Craftsman Snow Thrower IViodel 247.88704
684-04236A
2. 710-04669
3. 710-1090
4. 712-04063
5. 710-1882
6. 984-04127
m = O O
Shroud
HexScrew,10-16x .625
HexFlangeScrew,5/16-18x 1.25
FlangeLockNut,5/16-18
HexFlangeScrew,5/16-18x 1.50
HexScrew,1/4-15x .750
7. 720-0284 Wing Nut,5/16-18
8. 710-04071 CarriageBolt,5/16-18x 1.00
9. 712-04063 FlangeLockNut,5/16-18
10. 710-0451 CarriageBolt,5/16-18x .750
11. 731-04426A UpperChute
12. 731-04388A ChuteHandle
13. 684-04127 LowerChute
14. 749-04459-0637 UpperHandle
15. 747-04165-0637 BailControl
16. 725-0157 CableTie,3/16x .05 x 7.4
17. 746-04237 ClutchCable
18. 710-04532 CarriageBolt,5/16-18x 2.00
19. 731-1033 ShavePlate,21"
20. 710-0134 CarriageScrew,1/4-20x .62
21. 712-04064 FlangeLockNut, 1/4-20
22. 710-3008 HexScrew,5/16-18x .75
23. 736-0176 FlatWasher,.265x .938x .120
24. 750-04297B Spacer,.875x .320x 1.027
25. 749-04114-0637 LowerHandle
26. 731-04353 LowerChuteRing
27. 731-04886 ChuteAdapter
28. 732-04111 ChuteAdjustmentSpring
21
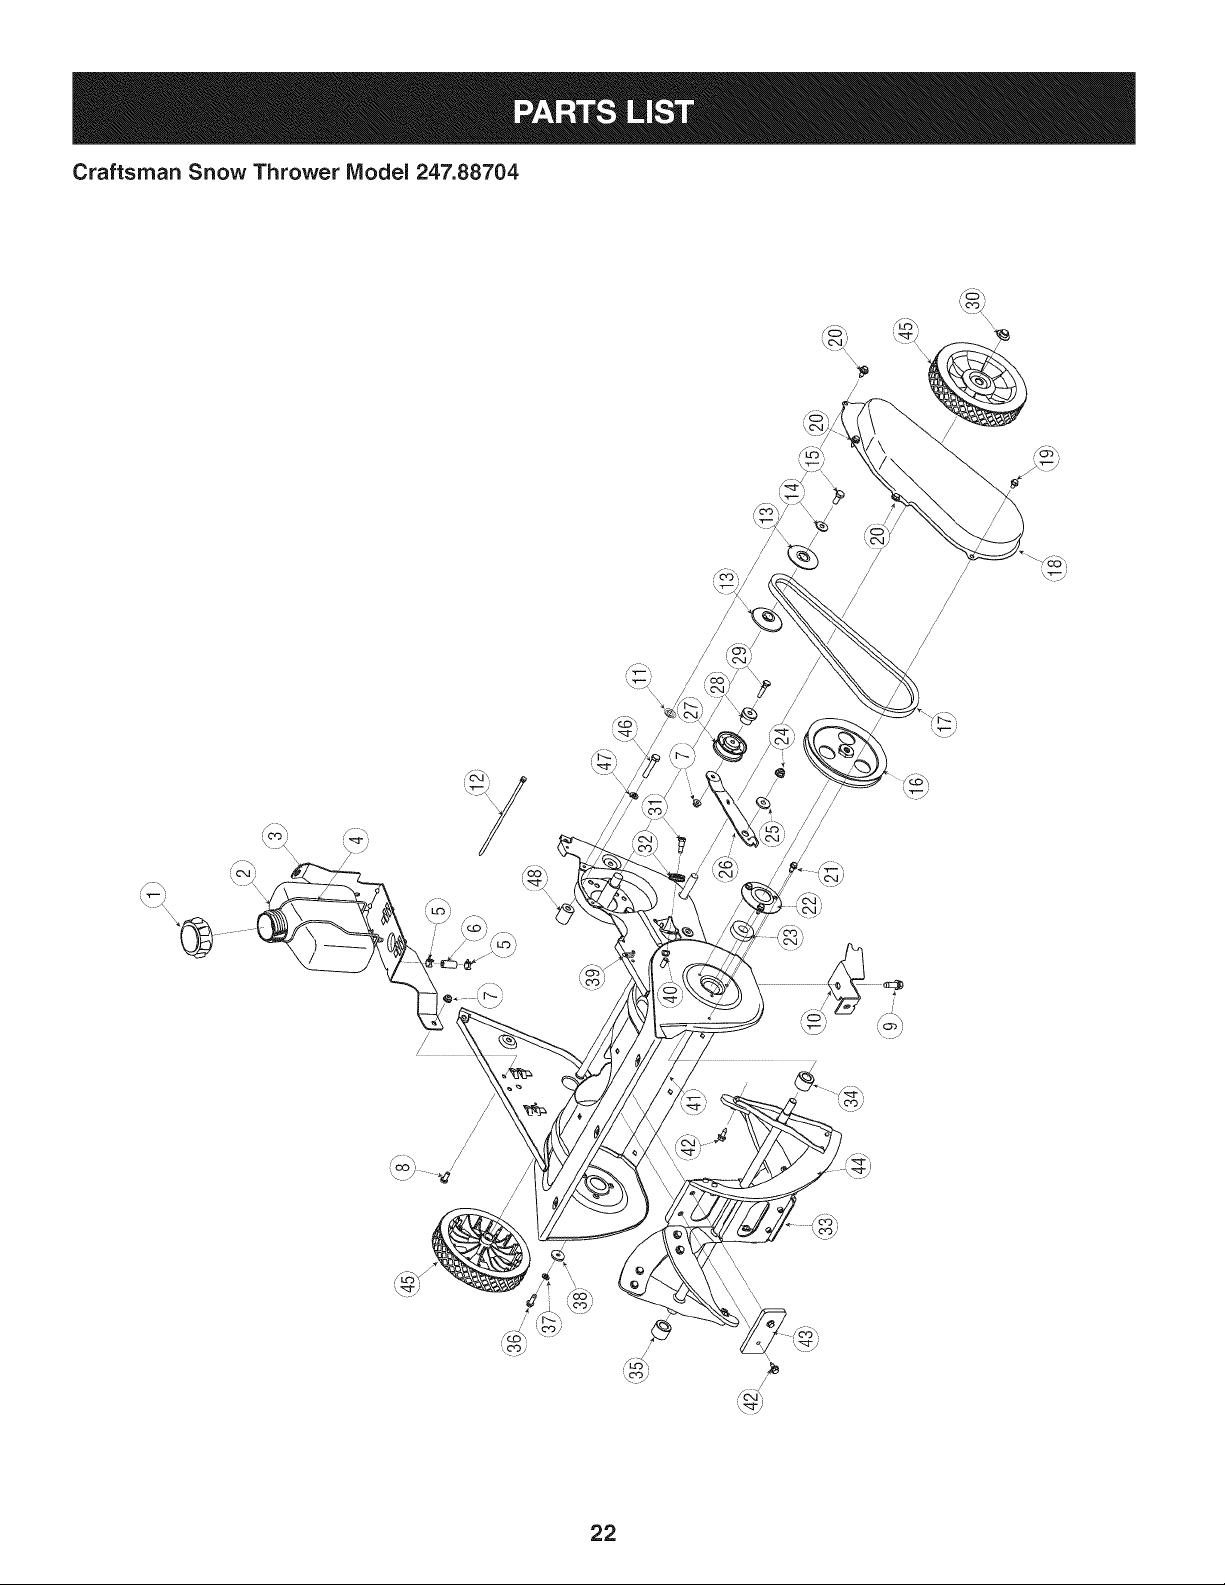
Craftsman Snow Thrower Model 247.88704
/
/
/
\
/
22
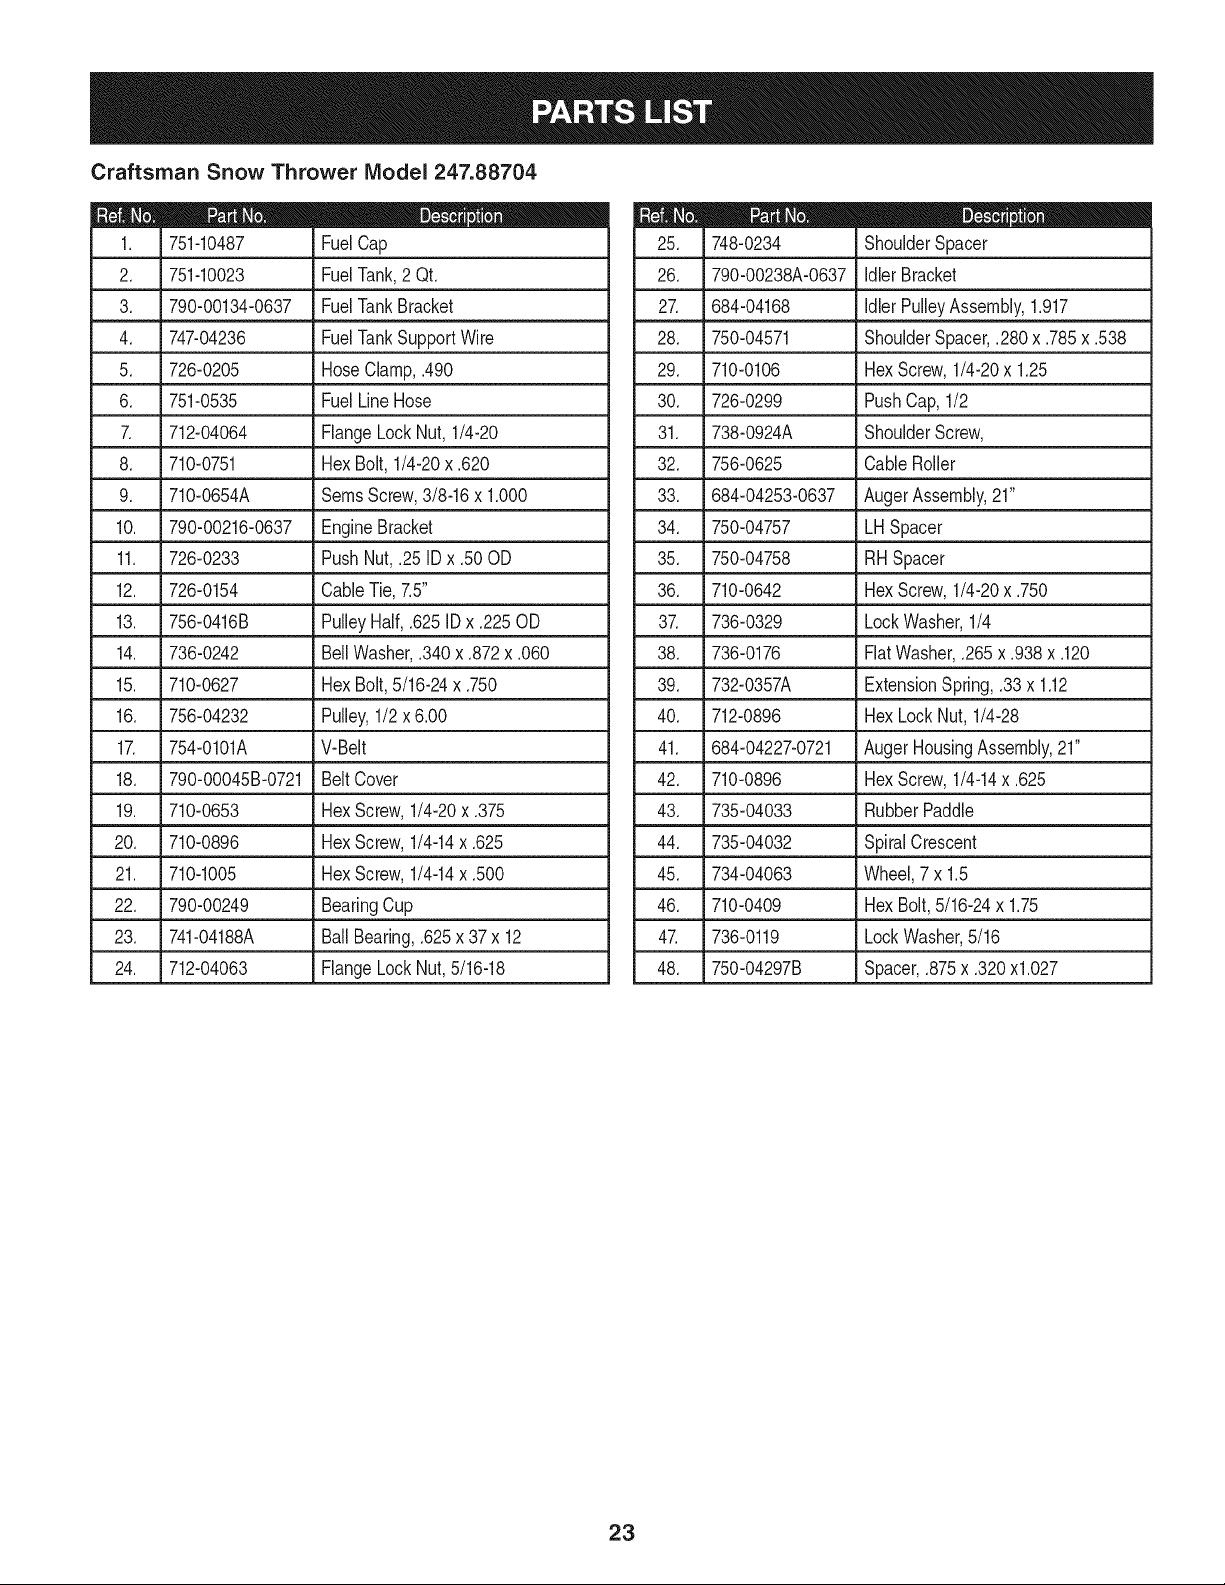
Craftsman Snow Thrower Model 247.88704
|- o o
FuelCap
FuelTank,2 Qt.
FuelTankBracket
L
751-10487
2. 751-10023
3. 790-00134-0637
4. 747-04236 FuelTankSupportWire
5. 726-0205 HoseClamp,.490
6. 751-0535 FuelLineHose
7. 712-04064 FlangeLockNut, 1/4-20
8. 710-0751 HexBolt, 1/4-20x .620
9. 710-0654A SemsScrew,3/8-16x 1.000
10. 790-00216-0637 EngineBracket
11. J 726-0233 . PushNut,.25 IDx .50OD
12. 726-0154 CableTie,7.5"
13. 756-0416B PulleyHalf,.625IDx .225 OD
14. 736-0242 BellWasher,.340x .872x .060
15. 710-0627 HexBolt,5/16-24x .750
16. 756-04232 Pulley,1/2 x 6.00
17. 754-0101A V-Belt
18. 790-00045B-0721 BeltCover
19. 710-0653 HexScrew,1/4-20x .375
20. 710-0896 HexScrew,1/4-14x .625
21. 710-1005 HexScrew,1/4-14x .500
22. 790-00249 BearingCup
23. 741-04188A BallBearing,.625x 37 x 12
24. 712-04063 FlangeLockNut,5/16-18
D = O O
748-0234 ShoulderSpacer
26. 790-00238A-0637 idler Bracket
27. 684-04168 idlerPulleyAssembly,1.917
28. 750-04571 ShoulderSpacer,.280x .785x .538
29. 710-0106 HexScrew,1/4-20x 1.25
30. 726-0299 PushCap,1/2
31. 738-0924A ShoulderScrew,
32. 756-0625 CableRoller
33. 684-04253-0637 AugerAssembly,21"
34. 750-04757 LHSpacer
35. 750-04758 RH Spacer
36. 710-0642 HexScrew,1/4-20x .750
37. 736-0329 LockWasher,1/4
38. 736-0176 FlatWasher,.265x .938x .120
39. 732-0357A ExtensionSpring,.33x 1.12
40. 712-0896 HexLockNut, 1/4-28
41. 684-04227-0721 AugerHousingAssembly,21"
42. 710-0896 HexScrew,1/4-14x .625
43. 735-04033 RubberPaddle
44. 735-04032 SpiralCrescent
45. 734-04063 Wheel,7 x 1.5
46. 710-0409 HexBolt,5/16-24x 1.75
47. 736-0119 LockWasher,5/16
48. 750-04297B Spacer,.875x .320xl.027
23
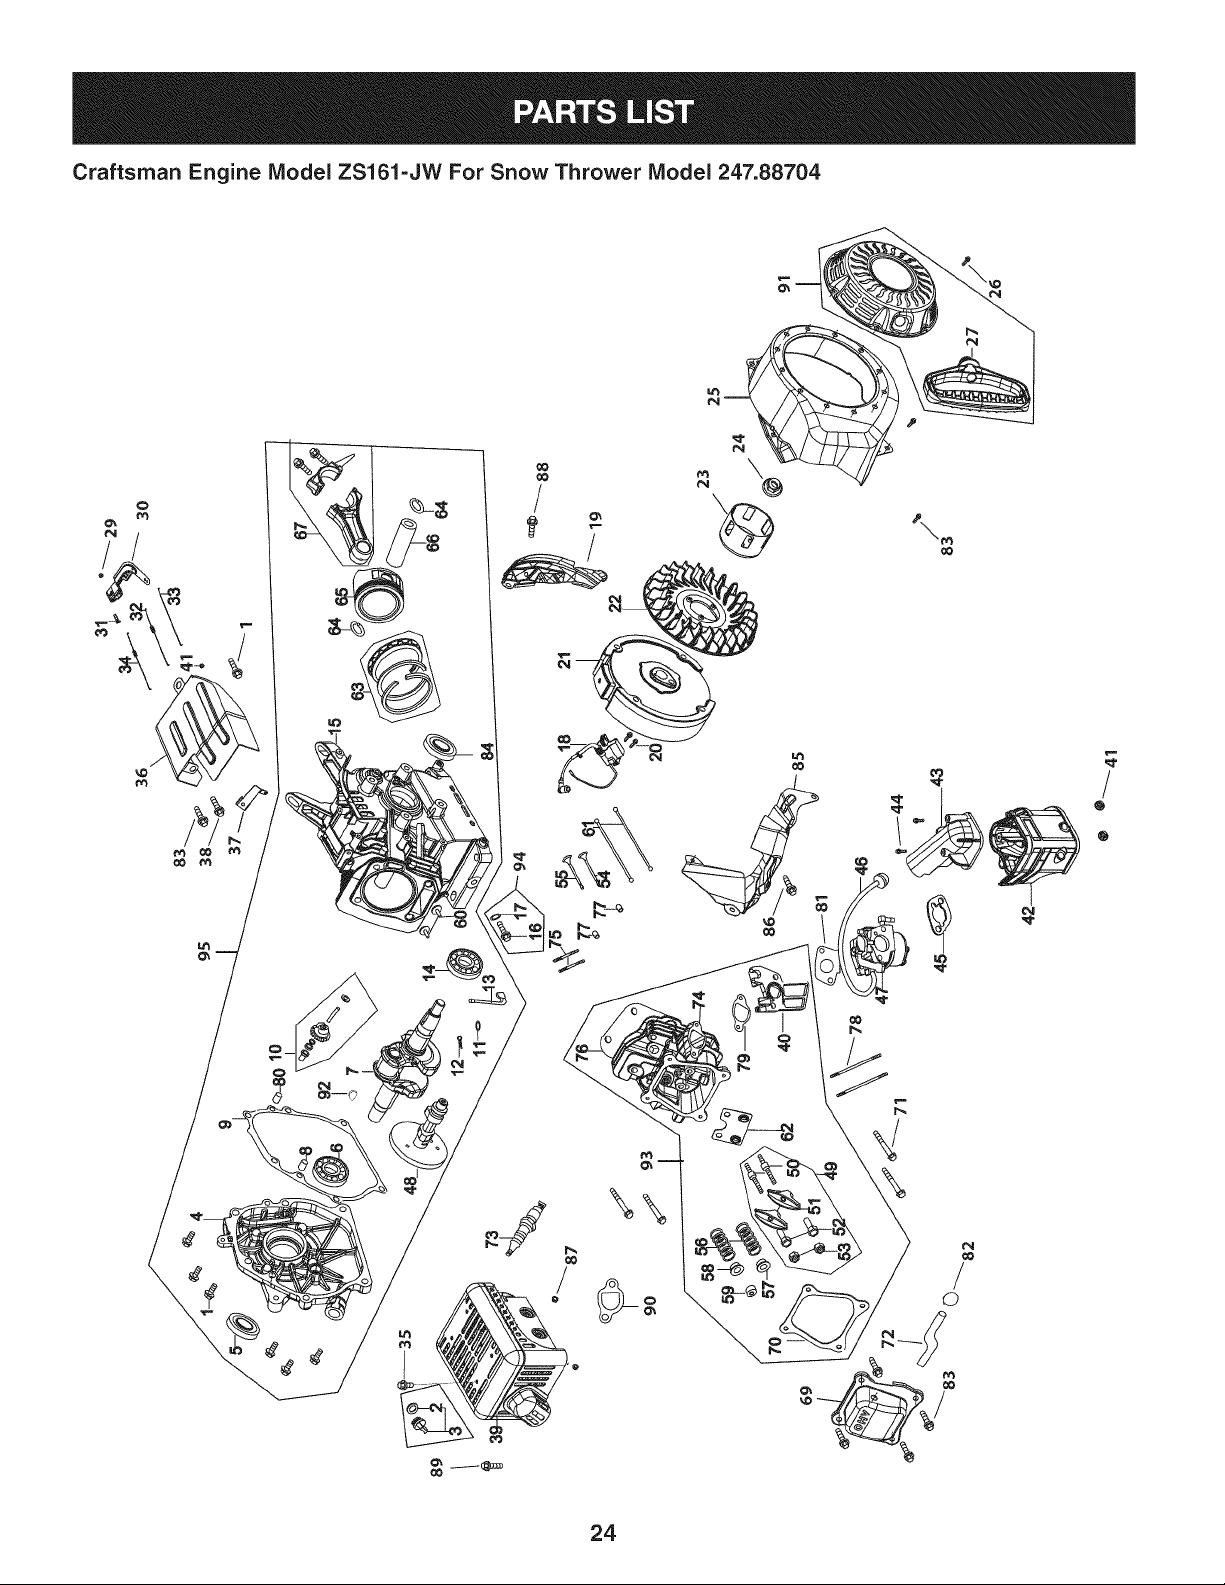
Craftsman Engine IViodel ZS161=JW For Snow Thrower IViodel 247.88704
_t3
\\
O3
O0
/
©
/
Q
0
24
Craftsman Engine IViodel ZS161=JW For Snow Thrower IViodel 247.88704
00 ,,
751-10950
714-04074
710-04906
736-0440
715-04092
715-04089
710-04920
Short BlockAssembly
CrankcaseComplete
CrankcaseCover
Piston
PistonRing Set- OIL
PistonPin
PistonPinClip
ConnectingRodComplete
ValveLifter
CamshaftAssembly
CarburetorInsulatorPlateGasket
CrankshaftAssembly
CarburetorInsulatorPlate
MufflerGasket
GovernorArmShaft
GovernorShaftClip
Governor Assembly
CaseCoverGasket
CylinderHeadGasket(graphite)
HeatPipeIntakeGasket
HeadCoverGasket
Oil DrainPlug
Oil DrainPlugWasher
DowelPin
DowelPin
Bearing
Bearing
Bolt
Oil Seal
Oil Seal
O-RingDipstick
O-RingGov.Shaft
95
15
4
65
63
66
64
67
6O
48
79
7
4O
9O
13
12
10
9
76
45
7O
16
17
8
80
6
14
1
5
84
2
11
751-10370
710-04906
736-0440
751-11096
751-10307
751-10949
710-04902
751-11123
751-11124
751-10951
736-0440
OilDrain PlugandWasherAssembly 94
OilDrain Plug 16
OilDrain PlugWasher 17
CrankshaftKit
Bearing 6
CrankshaftAssembly 7
Bearing 14
FlywheelKey 92
CylinderHeadAssembly 93
HeadCoverGasket 70
RockerArm &Bolt Assembly(Incl.50-53) 49
PivotBolt 50
RockerArm 51
ValveAdjustingNut 52
PivotLockingNut 53
ValveSpring 56
IntakeValveSpringSeat 57
ExhaustValveSpringSeat 58
ExhaustValveAdjuster 59
PushRodGuidePlate 62
CarburetorInsulator 40
CarburetorInsulatorGasket 79
CylinderHead- Complete 74
CylinderHeadGasket 76
GasketKit- Complete
O-Ring 2
CrankcaseCoverGasket 9
O-Ring,5.2 x 1.9 11
OilSeal,22x 35 x 7 84
Washer,10x 16x 1.5 17
CylinderHeadGasket 76
MufflerGasket 90
25
Craftsman Engine IViodel ZS161=JW For Snow Thrower IViodel 247.88704
751-10952
736-0440
751-10097
952Z161-
JW
751-11095
710-04920
D = O
HeadCoverGasket 70
CarburetorInsulatorGasket 79
Packing 81
CarburetorGasket 45
GasketKit- External
O-Ring 2
Washer,10x 16x 1.5 17
MufflerGasket 90
HeadCoverGasket 70
CarburetorInsulatorGasket 79
CarburetorGasket 45
CrankcaseKit
Bearing 14
CrankcaseComplete 15
Oil Seal 84
EngineComplete N/A
CrankcaseCoverKit
Bolt 1
DipstickAssembly 2, 3
CrankcaseCover 4
Oil Seal 5
Bearing 6
CaseCoverGasket 9
751-10292
751-10953
751-10954
712-04210
710-04918
710-04920
751-10955
731-05696
751-10657
751-10307
710-04919
751-10908
751-10910
751-10956
751-10948
751-10961
751-10962
751-10912
751-10913
751-10957
751-10958
751-10959
710-04928
710-04927
D = W
SparkPlug
GovernorReturnSpring
ThrottleReturnSpring
Nut,M8
Bolt,Flange,M6x 20
Bolt
RecoilStarterAssembly
RecoilStarterHandle
MufflerStudAssembly
FlywheelKey
Bolt,Flange,M6x 25
Flywheel
CoolingFan
CarburetorAssembly
CarburetorKit- Major
IntakeHeaterBox
IntakeHeaterBox Base
ValveKit
PushRodKit
DipstickAssembly
IgnitionCoil
MufflerGasket
Bolt,M6x 12
FlangeBolt,M5 x 8
m
73
34
32
87
88
1
91
27
75
92
2O
21
22
47
43
42
54, 55
61
2,3
18
90
86
89
26
Craftsman Engine IViodel ZS161=JW For Snow Thrower IViodel 247.88704
712-04212
710-04913
751-10639
731-05632
751-11107
712-04211
710-04914
751-11106
710-04908
751-11104
710-04921
751-10901
751-11102
710-04944
751-11103
751-11054
751-10911
712-04209
710-04922
731-07059
715-04090
710-04909
726-04101
710-04916
751-11105
751-11063
D = O O
Nut,M6 41
Bolt,M4 x 45 44
Primer 46
IgnitionKey
FanCover 25
Nut,Flange,M6 29
Bolt,Flange,M6x 10 26
GovernorArmBracket 30
Bolt,M6 x 21,GovernorArm 31
GovernorSpringBracket 37
Bolt,Flange,M8x 14 38
MufflerAssembly 39
OilAlert SidePlate 19
FlangeBolt 35
CoverShield 36
ValveCover 69
StarterCup 23
Nut,M14 24
Bolt,M8 x 50 71
BreatherHose 72
DowelPin 77
Bolt,Stud, M6x 113 78
BreatherHoseClamp 82
Bolt,M6 x 14 83
SidePlate 85
ValveCoverKit
ValveCover 69
ValveCoverGasket 70
27
MTD CONSUMER GROUP INC (MTD), the California Air Resources Board (CARB)
and the United States Environment Protection Agency (U. S. EPA)
Emission Control System Warranty Statement
(Owner's Defect Warranty Rights and Obligations)
EMISSIONCONTROLSYSTEMCOVERAGEIS APPLICABLETOCERTIFIEDENGINESPURCHASEDIN CALIFORNIAIN 2005ANDTHERE-
AFTER,WHICHARE USEDINCALIFORNIA,ANDTO CERTIFIEDMODELYEAR2005ANDLATERENGINESWHICHARE PURCHASEDAND
USEDELSEWHEREINTHEUNITEDSTATES.
Californiaandelsewherein the UnitedStatesEmissionControlDefectsWarrantyCoverage
The CaliforniaAir ResourcesBoard(CARB),U. S. EPAand MTDare pleasedto explaintheemissionscontrol systemwarrantyon your modelyear
2006and latersmalloff-roadengine.In California,new smalloff-roadenginesmustbe designed,builtand equippedto meettheStatesanti-smog
standards.Elsewhereinthe UnitedStates,newnon-road,spark-ignitionenginescertifiedfor model2005and later,mustmeetsimilarstandardsset
forthby the U.S. EPA.MTDmustwarrantythe emissioncontrolsystemon yourenginefor the periodof time listed below,providedtherehasbeen
noabuse,neglector impropermaintenanceof your smalloff-roadengine.
Youremissioncontrolsystemmayincludepartssuch as the carburetor,fuel-injectionsystem,the ignitionsystem,and catalyticconverter,fuel
tanks,fuel lines,fuel caps,valves,canisters,filters,vaporhoses,clamps,connectors,andotherassociatedemission-relatedcomponents.
Wherea warrantableconditionexists,MTDwill repairyoursmall off-roadengineat no cost to yourincludingdiagnosis,partsand labor.
MANUFACTURER'S WARRANTY COVERAGE:
Thisemissionscontrolsystemis warrantedfor twoyears.If anyemission-relatedpart on yourengine is defective,the part will berepairedor
replacedby MTD.
OWNER'S WARRANTY RESPONSIBILITIES:
As the smalloff-roadengineowner,youare responsibleforthe performanceof the requiredmaintenancelisted in your Owner'sManual.MTD
recommendsthatyou retainall yourreceiptscoveringmaintenanceson yoursmalloff-roadengine,but MTDcan not denywarrantysolelyfor the
lackof receiptsor foryour failureto ensurethe performanceto allscheduledmaintenance.
As the smalloff-roadengineowner,youshouldhoweverbeawarethat MTDmaydenyyour warrantycoverageif yoursmalloff-roadengine or part
hasfaileddue toabuse, neglect,impropermaintenanceor unapprovedmodifications.
Youare responsiblefor presentingyour smalloff-roadengineto an AuthorizedMTDServiceDealeras soonas a problemexists.Thewarranted
repairsshouldbe completedina reasonableamountof time,notto exceed30 days.
Ifyou haveanyquestionsregardingyourwarrantyrightsand responsibilities,you shouldcontacta MTDService Representativeat 1-800-800-7310
andaddressis MTDCONSUMERGROUP,RO. Box361131,ClevelandOH,44136-0019.
DEFECTS WARRANTY REQUIREMENTS FOR 1995 AND LATER SMALL OFF-ROAD ENGINES:
Thissectionappliesto 1995andlater smalloff-roadengines.The warrantyperiodbeginson the datethe engineor equipmentis deliveredto an
ultimatepurchaser.
(a) GeneralEmissionsWarrantyCoverage
MTDmustwarrantto the ultimatepurchaserandeachsubsequentpurchaserthat the engineis:
(1)Designed,built,andequippedsoas to conformwith all applicableregulationsadoptedby the Air ResourcesBoardpursuantto itsauthorityin
Chapters1and 2,Part 5, Division26 of the Healthand SafetyCode;and
(2) Freefrom defectsin materialsandworkmanshipthatcausethe failureof a warrantedpart to beidenticalin all materialrespectsto the partas
describedin theengine manufacturer'sapplicationfor certificationfora periodof twoyears.
(b)The warrantyonemissions-relatedpartswill be interpretedas follows:
(1)Anywarrantedpart thatis not scheduledfor replacementas requiredmaintenanceinthe writteninstructionsrequiredby Subsection(c)
mustbewarrantedfor the warrantyperioddefinedinSubsection(a)(2). If any such partfails duringthe periodof warrantycoverage,it mustbe
repairedor replacedby MTDaccordingto Subsection(4)below.Anysuch part repairedor replacedunderthewarrantymustbewarrantedfor
the remainingwarrantyperiod.
(2)Any warrantedpartthat is scheduledonlyfor regularinspectionin the writteninstructionsrequiredby Subsection(c) must bewarrantedfor
thewarrantyperioddefinedin Subsection(a)(2).A statementinsuch writteninstructionsto the effectof "repairor replaceas necessary"will
not reducethe periodof warrantycoverage.Anysuchpart repairedor replacedunderwarrantymustbe warrantedforthe remainingwarranty
period.
(3) Anywarrantedpartthat whichis scheduledfor replacementas requiredmaintenancein the writteninstructionsrequiredby Subsection(c)
mustbewarrantedfor the periodof timepriorto the first scheduledreplacementpointforthat part.Ifthe part failspriorto thefirst scheduled
replacement,the part mustbe repairedor replacedby MTDaccordingto Subsection(4) below.Any such part repairedor replacedunder
warrantymustbewarrantedfor the remainderof the periodpriorto the first scheduledreplacementpointfor the part.
(4)Repairorreplacementofanywarrantedpartunderthewarrantyprovisionsofthisarticlemustbeperformedatnochargetotheownerata
warrantystation.
(5)NotwithstandingtheprovisionsofSubsection(4)above,warrantyservicesorrepairsmustbeprovidedatallMTDdistributioncentersthat
arefranchisedtoservicethesubjectengines.
(6)Theownermustnotbechargedfordiagnosticlaborthatleadstothedeterminationthatawarrantedpartisinfactdefective,providedthat
suchdiagnosticworkisperformedatawarrantystation.
(7)Theenginemanufacturerisliablefordamagestootherenginecomponentsproximatelycausedbyafailureunderwarrantyofanywarranted
part.
(8)Throughouttheengine'swarrantyperioddefinedinSubsection(a)(2),MTDwillmaintainasupplyofwarrantedpartssufficienttomeetthe
expecteddemandforsuchparts.
(9)Anyreplacementpartmaybeusedintheperformanceofanywarrantymaintenanceorrepairsandmustbeprovidedwithoutchargetothe
owner.SuchusewillnotreducethewarrantyobligationsofMTD.
(10)Add-onormodifiedpartsthatarenotexemptedbytheAirResourcesBoardmaynotbeused.Theuseofanynon-exemptedadd-onor
modifiedpartsshallbegroundsfordisallowingawarrantyclaimmadeinaccordancewiththisarticle.Theenginemanufacturershallnotbe
liableunderthisarticletowarrantfailuresofwarrantedpartscausedbytheuseofnon-exemptedadd-onormodifiedpart.
(c) MTDwill includea copy of the followingemissionwarrantyparts list with each newengine,usingthose portionsof the list applicableto the
e__&gine.
(1)FuelMeteringSystem
• Coldstart enrichmentsystem(soft choke)
,,Carburetorandinternalparts
• Fuel Pump
• FuelTank
(2)Air InductionSystem
• Aircleaner
• Intakemanifold
(3) IgnitionSystem
• Sparkplug(s)
• MagnetoIgnitionSystem
(4)ExhaustSystem
Catalyticconverter
• SAI (Reedvalve)
(5) MiscellaneousItemsUsedin AboveSystem
Vacuum,temperature, position,time sensitivevalvesand switches
Connectorsandassemblies
(6) Evaporativecontrol
• Fuel Hosecertifiedfor ARBevaporativeemissionof 2006.
• Fuel HoseClamps
Tetheredfuel cap
Carboncanister
Vaporlines
GD0C-100174Rev.B
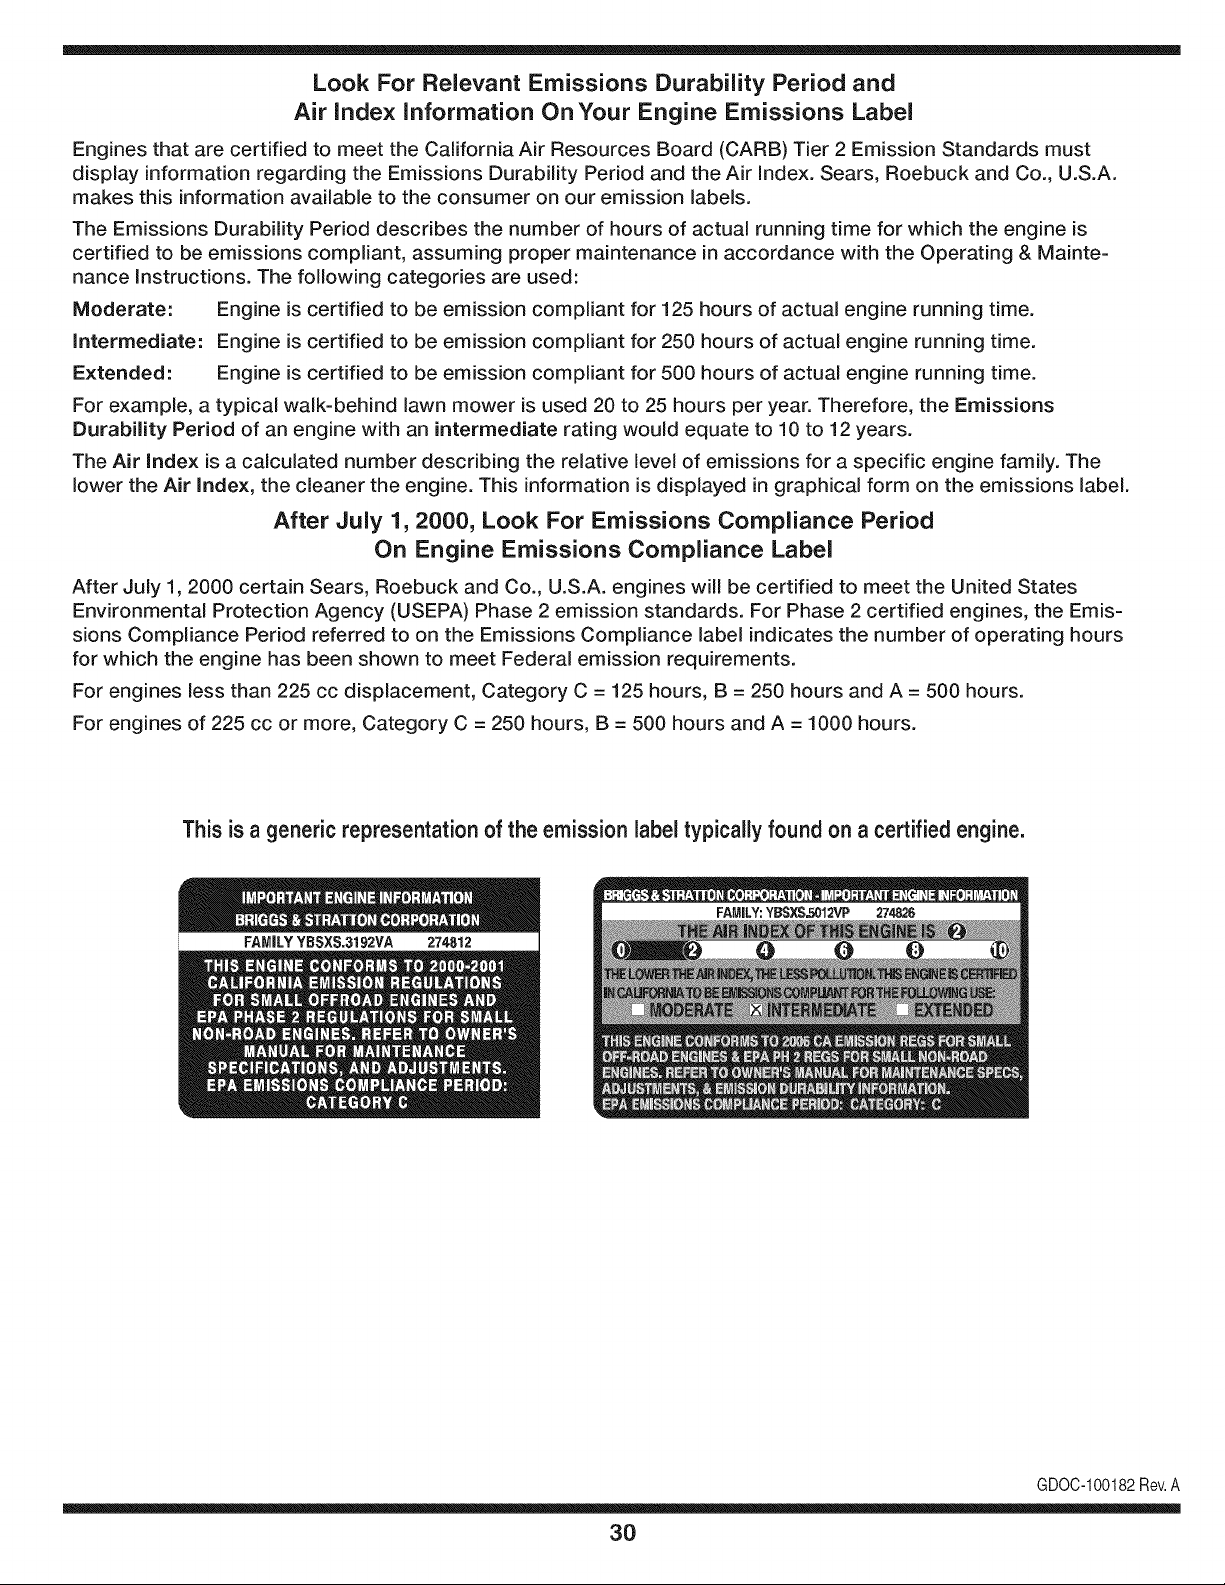
Look For Relevant Emissions Durability Period and
Air index information On Your Engine Emissions Label
Engines that are certified to meet the California Air Resources Board (CARB) Tier 2 Emission Standards must
display information regarding the Emissions Durability Period and the Air Index. Sears, Roebuck and Co., U.S.A.
makes this information available to the consumer on our emission labels.
The Emissions Durability Period describes the number of hours of actual running time for which the engine is
certified to be emissions compliant, assuming proper maintenance in accordance with the Operating & Mainte-
nance Instructions. The following categories are used:
Moderate: Engine is certified to be emission compliant for 125 hours of actual engine running time.
Intermediate: Engine is certified to be emission compliant for 250 hours of actual engine running time.
Extended: Engine is certified to be emission compliant for 500 hours of actual engine running time.
For example, a typical walk-behind lawn mower is used 20 to 25 hours per year. Therefore, the Emissions
Durability Period of an engine with an intermediate rating would equate to 10 to 12 years.
The Air Index is a calculated number describing the relative level of emissions for a specific engine family. The
lower the Air Index, the cleaner the engine. This information is displayed in graphical form on the emissions label.
After July 1,2000, Look For Emissions Compliance Period
On Engine Emissions Compliance Label
After July 1, 2000 certain Sears, Roebuck and Co., U.S.A. engines will be certified to meet the United States
Environmental Protection Agency (USEPA) Phase 2 emission standards. For Phase 2 certified engines, the Emis-
sions Compliance Period referred to on the Emissions Compliance label indicates the number of operating hours
for which the engine has been shown to meet Federal emission requirements.
For engines less than 225 cc displacement, Category C = 125 hours, B = 250 hours and A = 500 hours.
For engines of 225 cc or more, Category C = 250 hours, B = 500 hours and A = 1000 hours.
This is a generic representation of the emission label typically found on a certified engine.
FAMILYYBSXS.3192VA 274812
GDOC-100182Rev.A
30
Congratulationson makinga smartpurchase.YournewCraftsman@
productis designedandmanufacturedfor yearsof dependableopera-
tion.But likeall products,it mayrequirerepairfromtimeto time.That's
whenhavinga RepairProtectionAgreementcansave youmoneyand
aggravation.
Here'swhatthe RepairProtectionAgreement*includes:
* Expert service byour 10,000professionalrepairspecialists
o Unlimitedserviceand no chargefor partsand laboron all
coveredrepairs
o Product replacementupto $1500if yourcoveredproductcan't be
fixed
• Discountof 10%from regularprice of serviceand relatedinstalled
partsnotcoveredby theagreement;also, 10%off regularpriceof
preventivemaintenancecheck
• Fast help by phone- we call it RapidResolution- phone support
froma Searsrepresentative.Thinkof usas a "talkingowner's
manual."
Onceyou purchasethe Agreement,a simplephonecall is all that it
takesfor youto scheduleservice.Youcan call anytimedayor night,or
schedulea serviceappointmentonline.
The RepairProtectionAgreementis a risk-freepurchase.If youcancel
for any reasonduringthe productwarrantyperiod,wewill provideafull
refund.Or,a proratedrefundanytimeafterthe productwarrantyperiod
expires.Purchaseyour RepairProtectionAgreementtoday!
Somelimitationsand exclusionsapply. For pricesand additional
informationin the U.S.A. call 1-800-827-6655.
*Coverage inCanadavaries on some items.Forfull details call
Sears Canadaat 1-800-361-6665.
Sears Installation Service
ForSearsprofessionalinstallationof homeappliances,garagedoor
openers,waterheaters,andothermajorhomeitems,in the U.S.A.or
Canadacall 1-800-4-MY-HOME®.
31
Declaraci6n de garantia ........................ Pagina 32
Medidas importantes de seguridad ..... Paginas 33-35
Etiquetas de seguridad ......................... Pagina 36
Montaje ................................................. Paginas 37-39
Funcionamiento .................................... Paginas 40-42
Servicio y Mantenimiento ..................... Paginas 43-47
AImacenamiento fuera de temporada..Pagina 48
Soluci6n de problemas ......................... Pagina 49
Acuerdo de protecci6n para
reparaciones .................................... Pagina 53
NOmero de servicio .............................. Cubierta
posterior
GARANTiA LIMITADA CRAFTSMAN
Dos Ahos en Lanzador de Nieve
Cuandohechofuncionary mantenidosegQntodaslasinstruccionessuministradas,si estelanzadorde nievefalla debidoa undefectoenmate-
rialo habilidaddentrode dosa_osde la fechao compra,llame 1-800-4MYHOMEhacerlosarreglosparareparaci6nlibre.
Estagarantias61otendr_validezdurante90 dias si este productose utilizaen cualquiermomentopara fines comercialeso de alquiler.
Duranteel primera_o de la compra,no habr_ningQnpreciopara el serviciode garantiaen sucasa. Parasu conveniencia,ende casa el servicio
degarantiatodaviaestar_disponibledespu_sdel primera_ode la compra,pero un preciode viaje se aplicar& Estepreciosera renunciado
si ustedtransportaal lanzadorde nievea una posici6nde bajadade Artesanoautorizada.Parala posici6nautorizadam_scercana,llame
1-800-4-MY-HOME®.
Esta garantia cubreSOLO defectos en material y habilidad.Sears no pagar_para:
• Losarticulosprescindiblesque se hacenIlevadospuestosduranteel uso normal,incluso,perono limitadosparapatinarzapatos,platode
afeitado,esquilanalfileres,bujia,filtro de aire,cinturones,y filtro del aceite.
• Revisi6ndemantenimientoest_ndar,cambiosde aceite,o puestasa punto.
• Reemplazode neum_ticoo reparaci6ncausadapor pinchazosdesdefuerade objetos,como u_as,espinas,tocones,ocristal.
• Neum_ticoo reemplazode ruedao reparaci6nque resultade ropanormal,accidente,u operaci6nimpropiao mantenimiento.
• Las reparacionesnecesariasdebidoal abusodeoperador,inclusoperono limitadoparada_arcausadoafectandoobjetosque doblanel
marcoo el cigOe_al,o el sobreexcesode velocidaddel motor.
• Reparacionesnecesariasdebidoa negligenciadeloperador,induyendoentre otros,da_osmec_nicoy el_ctricoocasionadopor un
almacenamientonoapropiado,falla porel usode aceitedegradoy/o cantidadno apropiadao fallapor no dar mantenimientoal equipode
acuerdocon las instruccionescontenidasenel manualdeloperador.
• Limpiezao reparacionesal motor(sistemadecombustible)provocadaspor un combustiblecontaminadouoxidado(viejo).En general,el
combustibledebeutilizarseen unperiodono mayorde 30dias a partirde su adquisici6n.
• Elempejoramientonormaly la ropade losfinesexteriores,o productoetiquetanel reemplazo.
Estagarantias61otendrAvalidezmientrasel productose utiliceen los EstadosUnidos.
Estagarantialeotorgaderechoslegalesespecificos,pero ustedpodria gozarde otrosderechosen raz6nde su lugarde residencia.
Sears, Roebuck and Co., HoffmanEstates, IL 60179
Tipode aceitedel motor:
Capacidaddeaceitedel motor:
Capacidaddecombustible:
Bujiade encendido
Separaci6nde lasbujias:
SAE5W-30
20onzas
2 Cuartosde gal6n
TorchF6RTC
.020"-.030"
N_mero de modelo.........................................................
N_mero de serie ............................................................
Fecha de compra.........................................................................
Registreel nQmerode modelo,nQmerode serie
Vfechade compram_sarriba
© Sears Brands,LLC
32
Lapresenciadeestesimboloindicaquesetrata
deinstruccionesimportantesdeseguridadque
sedebenrespetarparaevitarponerenpeligro
suseguridadpersonaly/omaterialy ladeotras
personas.Leaysigatodaslasinstruccionesde
estemanualantesdeponerenfuncionamiento
estam_quina.Sinorespetaestasinstrucciones
podriaprovocarlesionespersonales.Cuando
veaestesfmbolo,ipresteatenci6nala
advertencia!
PROPOSICION 65 DE CALIFORNIA
Elescapedel motorde este producto,algunosde suscomponentes
y algunoscomponentesdel vehiculocontieneno liberansustancias
quimicasqueel estado de Californiaconsideraque puedenproducir
c_ncer,defectosde nacimientouotros problemasreproductivos.
Esta m_quina rue construida para ser operada de acuerdo
con las reglas de seguridad contenidas en este manual.
AI igual que con cualquier tipo de equipo motorizado, un
descuido o error por parte del operador puede produdr
lesiones graves. Esta mSquina es capaz de amputar manos y
pies y de arrojar objetos con gran fuerza. De no respetar las
instrucciones de seguridad siguientes se pueden producir
lesiones graves o la muerte.
Su responsabilidad--Restrinja el uso de esta m_iquina
motorizada alas personas que lean, comprendan y respeten
las advertencias e instrucciones que aparecen en este
manual yen la m_iquina.
GUARDEESTASINSTRUCCIONES
CAPAClTAClON
• Leer,entendery seguirtodaslas instruccionesen la m&quina
yen el manual(s) antesde intentarmontary operar.No
hacerlopuederesultaren lesionesgravesparael operadory /
o transe0ntes.Guarcleestemanualen un lugar seguropara el
futuroy regularde referenday para pedir piezasde repuesto.
ParapreguntasIlameal, 1-800-659-5917.
• Familiaricesecontodoslos controlesy con el usoaclecuado
delos mismos.Sepac6modetenerla m_quinay desactivarlos
controlesr&pidamente.
• No permitanuncaque los niSosmenoresde 14aSosutilicen
estam&quina.Los ni5osde 14a5osen adelantedebenleery
entenderlas instruccionesde operaci6ny normasdeseguridad
contenidasen este manualy en la maquinay deben ser
entrenadosy supervisadospor un adulto.
• Nuncapermitaquelos adultosoperenestam&quinasin recibir
antesla instrucci6napropiada.
• Losobjetosarrojadosporla m&quinapuedenproducirlesiones
graves.Planifiqueel patr6nenel queva air arrojandonievepara
evitarque la descargade materialse realicehacialos caminos,
los observadores,etc.
• Mantengaa lostranseOntes,mascotasy ni5osal menosa 75
piesde la m&quinamientrasest&en funcionamiento.Detengala
m&quinasi alguiense acerca.
• Seaprecavidoparaevitarpatinarseo caerseespecialmente
cuandooperala m&quinaen marchaatr&s.
PR E PA RATIVO S
Inspeccioneminuciosamenteel_readondeutilizar_el equipo.Saque
todoslos felpudos,peri6dicos,trineos,tablas,cablesy otrosobjetos
extraSoscon los que podriatropezaro quepodrianset arrojadospor
labarrena/impulsor.
1. Paraprotegerselosojos utilice siempreanteojoso antiparras
de seguridadmientrasoperala m&quinao mientrasla ajusta
o repara.Losobjetosarrojadosquerebotanpuedenproducir
lesionesocularesgraves.
2. Nooperela m&quinasin la vestimentaadecuadaparaestaral
airelibreen invierno.No utilicealhajas,bufandaslargasu otras
prendassueltasquepodrianenredarseen las partes m6viles.
Utiliceun calzadoespecialpara superficiesresbaladizas.
3. Useun prolongadory untomacorrientedetrescablescon
conexi6na tierraparatodas las m&quinascon motoresde
encendidoel_ctrico.
4. Desengranetodaslas palancasde controlantesde arrancarel
motor.
5. Nuncaintenterealizarajustesmientrasel motorest&enmarcha
exceptoen los casosespecfficamenterecomendadosen el
manualdeloperador.
6. Dejequeel motor y la m&quinase adaptena latemperatura
exteriorantesde comenzara sacarla nieve.
33
NIANEJO SEGURO DE LA GASOLINA
Paraevitarlesionespersonaleso da_osrnaterialestengarnucho
cuidadocuandotrabajecon gasolina.Lagasolinaes surnarnente
inflarnabley sus vaporespuedencausarexplosiones.Si se derrarna
gasolinaencirnao sobrela ropase puedelesionargravernenteya que
se puedeencender. L_.vesela piel y c_.rnbiesede ropade inrnediato.
• Utilices61olos recipientesparagasolinaautofizados.
• Apaguetodoslos cigarrillos,cigarros,pipasy otrasfuentesde
cornbusti6n.
• Nuncacarguecombustibleen la rn_.quinaen un espaciocerrado.
• Nuncasaquela tapade lagasolinaniagreguecombustible
rnientrasel motorest,. calienteo en rnarcha.
• Dejequeel motorse enfriepor Io rnenosdos rninutosantesde
volvera cargarcombustible.
• NuncaIleneenexcesoel dep6sitode combustible.Lleneel
tanquea no rn_.sde1/2pulgadapor debajode la basedel cuello
de Ilenadodejandoespacioparala dilataci6ndel combustible.
• Vuelvaa colocarla tapadelcombustibley ajQstelabien.
• Lirnpieel combustibleque se hayaderrarnadosobreel motory el
equip&Trasladela rn_.quinaa otra zona.Espere5 rninutosantes
deencenderel motor.
• Nuncaalrnacenela rn_.quinao el recipientede combustibleen
unespaciocerradodonde hayafuego,chispaso luz piloto(por
ejernplo,hornos,calentadoresdeagua,calefactores,secadores
de ropa,etc.).
• Dejequela rn_.quinase enfrieporIo rnenos5 rninutosantesde
guardafla.
• NuncaIlenelos recipientesen el interiordeunvehiculoo carni6n
ocaja de rernolquecon recubrirnientopl_.stico.Coloquesiernpre
los recipientesen el piso y lejosdel vehiculoantes de Ilenarlos.
• Sies posible,retireel equipoa gasolinadelcarni6no rernolque
y II_neloen el suelo.Siestonoes posible,Ileneel equipoen un
rernolquecon un contenedorport_.til,en vez de con unaboquilla
dispensadoradegasolina.
• Mantengala boquilladispensadoraen contactocon el hordedel
dep6sitode combustibleo con la aberturadel recipienteentodo
rnornento,hastaterrninarlacarga. No utiliceun dispositivode
apertura/cierrede boquilla.
FUNCIONANIIENTO
1. No pongalas rnanoso los piescercadelas piezasrotatorias,
en la cajade la barrena/ irnpulsoro en el rnontajedelcanalde
descarga.Elcontactoconlas piezasgiratoriaspuederesultaren
laarnputaci6ndernanoso pies.
2. La palancadecontrolde la barrena/ irnpulsores un dispositivo
de seguridad.Nuncaevite su funcionarniento.De hacerlola
operaci6nde la rn_.quinaes riesgosay puedeocasionarlesiones.
3. Las palancasde control debenfuncionarbienen arnbas
direccionesy regresarautorn_.ticarnentea la posici6nde
desengranecuandose las suelta.
4. Nuncaopere la rn_.quinasi faltaun rnontajedel canalo si
el rnisrnoest,.da_ado.Mantengatodoslosdispositivosde
seguridaden su lugaryen funcionarniento.
5. Nuncaenciendaelmotor en espacioscerradoso en una zona
con pocaventilaci6n.Elescapedel motorcontienernon6xidode
carbono,ungas inodoroy letal.
6. Noutilicela rn_.quinabajo la influenciadelalcoholo las drogas.
7. Elsilenciadory el motorse calientany puedencausar
quernaduras.No lostoque.Mantengaa los ni_osalejados.
8. Sea surnarnenteprecavidocuandooperelarn_.quinasobreuna
superficiecon gravaocuandola cruce.Mant_ngasealerta porsi
se presentanpeligrosocultoso tr_.nsito.
9. Tenga cuidado cuando cambie de direcci6n o cuando opere la m_.quinaen
pendientes.
10. Planifique el patr6n en el que va air arrojando nieve para evitar que
la descarga de material se produzca hacia las ventanas, las paredes,
los autom6viles, etc. y evitar asf posibles dares materiales o lesiones
producidas per los rebotes.
11. Nunca dirija la descarga hacia los niRos, los observadores o las mascotas ni
deje que nadie se pare delante de la m_.quina.
12. No sobrecargue la capacidad de la m_.quinatratando de sacar la nieve muy
r_.pidamente.
13. Nunca opere esta m_.quinasin buena visibilidad o iluminaci6n. Siempre
debe estar seguro de que est,. bien afirmado y sujetando firmemente las
manijas. Camine, nunca corra.
14. Corte la corriente a la barrena/impulsor cuando transporte la m_.quinao
cuando la misma no est,. en use.
15. Nunca opere la m_.quinaa alta velocidad de desplazamiento sobre
superficies resbaladizas. Mire hacia abajo y hacia atr_.sy tenga cuidado
cuando vaya marcha atr_.s.
16. Si la m_.quinacomenzara a vibrar de manera anormal, detenga el motor,
desconecte el cable de la bujfa y p6ngala de manera que haga masa contra
el motor. Inspeccione la m_.quinaminuciosamente para ver si est,. daRada.
Repare redes los dares antes de encender y operar la m_.quina.
17. Desengrane todas las palancas de control y detenga el motor antes de dejar
la posici6n de operaci6n (detr_.sde las manijas). Espere a que la barrena/
impulsor se detenga per complete antes de destapar el montaje del canal o
realizar ajustes e inspecciones.
18. Nunca ponga las manes en las aberturas de descarga o de recolecci6n.
No destape el montaje del canal mientras el motor est,. en funcionamiento.
Antes de destaparlo, apague el motor y permanezca detr_.sde las manijas
hasta que todas las partes m6viles se hayan detenido.
19. Use s61ouniones y accesorios aprobados per el fabricante (per ejemplo,
pesas para las ruedas, cadenas para los neum_.ticos,cannas, etc.).
20. Para encender el motor, jale de la cuerda lentamente hasta que sienta
resistencia, luego jale r_.pidamente.El repliegue r_.pidode la cuerda de
arranque (tensi6n de retroceso) le jalar_,la mane y el braze hacia el motor
m_.sr_.pidode Io que usted puede soltar. El resultado pueden ser huesos
rotes, fracturas, hematomas o esguinces.
21. Si se presentan situaciones que no est_.nprevistas en este manual, sea
cuidadoso y use el sentido comOn.P6ngase en contacto con Asistencia
al Cliente para solicitar ayuda y el nombre del distribuidor de servicio m_.s
cercano.
34
DESPEJE DE UN CANAL DE DESCARGA
OBSTRUIDO
Elcontactode lasmanoscon el impulsorrotatorioqueest,. dentrodel
canaldedescargaes la causa m_.scomQnde lesionesasociadascon
las m_.quinasquitanieve.Nuncause su manoparalimpiarelcanalde
descarga.
Paradespejarel canal:
1. iAPAGUEELMOTOR!
2. Espere10segundosparaestar segurode quelas cuchillasdel
motorhandejadode rotar.
3. Utilicesiempreuna herramientade limpieza,no uselas manos.
MANTENIMIENTO Y ALMACENAMIENTO
1. Nuncaalterelos dispositivosde seguridad.Controle
peri6dicamentequefuncionencorrectamente.Remftasea las
seccionesde mantenimientoy ajustede estemanual.
2. Antes de realizar la limpieza, reparar o revisar la mAquina, desengrane
todas las palancas de control y detenga el motor. Espere a que la barrena/
impulsor se detenga por completo. Desconecte el cable de la bujfa y
p6ngalo haciendo masa contra el motor para evitar que se encienda
accidentalmente.
3. Controlefrecuentementequetodoslospernosy tornillosestenbien
ajustados para comprobar quela maquina se encuentraencondiciones
segurasdefuncionamiento.AdemAs, hagauna inspecci6n visualdela
mAquina paraverificarsiestAdaSada.
4. Nocambielaconfiguraci6n del regulador delmotorniaceleredemasiado
elmismo.Elregulador delmotorcontrolalavelocidadmaximasegurade
funcionamientodelmotor.
5. Lasplacas de raspado y laszapatas antideslizantesqueseusanconla
maquina quitanievese desgastan y sedaSan.Paraproteger su seguridad,
verifiquefrecuentementetodosloscomponentesy reemplaceloss61ocon
partes delosfabricantesdeequipos originales (OEM). "iEIusodepiezas
queno cumplenconlasespecificaciones del equipo original puede resultar
enrendimientoinadecuadoademasdeponeren riesgo la seguridad!'
6. Reviselaspalancas decontrolperi6dicamente paraverificarqueengranen
y desengranen adecuadamentey ajQstelos siesnecesario.Consultela
secci6ndeajustes deestemanualdeloperador paraobtenerinstrucciones.
7. Mantenga o reemplace las etiquetas de seguridadeinstruccionessegQn
sea necesario.
8. Respete lasnormasreferentesaladisposici6n correctay las
reglamentaciones sobre gasolina, aceite, etc.paraproteger el medic
ambiente.
9. Antesdealmacenarlamaquina enciendalaunosminutosparasacarla
nievequehaya quedadoenlamismay paraevitarasiquese congele la
barrena/impulsor.
10. Nuncaalmacenela maquina o el recipiente decombustibleenun espacio
cerradodondehaya fuego, chispasoluzpiloto como por ejemplo,
calentadoresdeagua,hornos, secadoresderopa,etc.
11. Consultesiempre elmanualdeloperador paraobtenerinstrucciones
adecuadasparaelalmacenamientofueradetemporada.
12. Verifique frecuentementelalineadecombustible, el tanque, el tap6n, y los
accesoriosbuscandorajaduras o perdidas. Reemplace desernecesario.
13. Nodearranqueal motorsi noestAlabujia deencendido.
14. SegOnla Comisi6nde Seguridadde Productosparael
Consumidorde los EstadosUnidos(CPSC)y la Agencia
de Protecci6nAmbientalde los EstadosUnidos(EPA),este
productotieneunavide dtilmedie de siete(7) a_os 660 horasde
funcionamiento.AIfinalizarla videdtil mealiehaga inspeccionar
anualmenteestaunidadpor un distribuidorde servicioautorizado
paracerciorarsede quetodoslos sistemasmec_.nicosy de
seguridadfuncionancorrectamentey no tienenexcesivo
desgaste.Si no Iohace,puedenproducirseaccidentes,lesiones
o la muerte.
NO iVIODIFIQUE EL MOTOR
Paraevitarlesionesgraveso la muerte,no modifiqueel motorbajo
ningunacircunstancia.Si cambiala configuraci6ndel reguladordel
motor,este puededescontrolarsey operaravelocidadesinseguras.
Nuncacambiela configuraci6ndef_.bricadel reguladordel motor.
AVlSO REFERIDO A EIVIISIONES
Losmotoresqueest_.ncertificadosy cumplencon las regulaciones
de emisionesfederalesEPAy de Californiapara SORE(Equipos
peque_ostodoterreno)est_.ncertificadosparaoperarcon gasolina
comOnsinplomoy puedenincluirlossiguientessistemasde control
de emisiones:Modificaci6nde motor(EM), catalizadoroxidante(OC),
inyecci6nde airesecundaria(SAI)y catalizadorde tresvias(TWO)si
est_.nequipadosde esa manera.
Amortiguadordechispas
Estam_.quinaest,. equipadacon un motorde combusti6ninternoy
nodebe ser utilizadaen o cercade unterrenoagrestecubiertopor
bosque,malezaso hierbaexceptoque el sistemade escapedel
motorest_equipadocon un amortiguadorde chispasque cumpla
con las leyeslocaleso estatalescorrespondientes(en caso de
existir)
Sise utilizaun amortiguadorde chispasel operadorIo debemantener
en condicionesde usoadecuadas.Enel Estadode Californialas
medidasanteriormentemencionadassonexigidaspor ley (Arficulo
4442del C6digode RecursosPOblicosde California).Es posible
queexistanleyessimilaresen otros estados.Lasleyesfederalesse
aplicanenterritoriosfederales.
Puedeconseguirelamortiguadorde chispasparael silenciadora
travesde sudistribuidorde mantenimientode motoresautorizadom_.s
cercanoo poni_ndoseencontactocon el departamentode servicios,
ApartadoPostal361131Cleveland,Ohio44136-0019.
35
Simbolosde seguddad
En esta p_igina se presentan y describen los simbolos de seguridad que pueden aparecer en este producto. Lea, entienda y cumpia todas las
instrucciones incluidas en la m_iquina antes de intentar realizar el montaje de la unidad y utilizarla.
i
I
-[I =
LEA EL(LOS) MANUAL(ES) DEL OPERADOR
Lea, entienda y cumpla todas las instrucciones incluidas en el(los) manuales antes de intentar
realizar el montaje de la unidad y utilizarla.
ADVERTENClA- CUCHILLAS GIRATORIAS
Mientras la m_iquina est,1 en funcionamiento mantenga las manos fuera de las aberturas de entrada y
de descarga. En el interior hay cuchillas giratorias
ADVERTENClA- CUCHILLAS GIRATORIAS
Mientras la m_iquina est,1 en funcionamiento mantenga las manos fuera de las aberturas de entrada y
de descarga. En el interior hay cuchillas giratorias
ADVERTENCIA - CUCHILLAS GIRATORIAS
No ponga las manos o los pies cerca de las piezas rotatorias, en la caja de la barrena/motor o
en el montaje del canal de descarga. El contacto con las piezas giratorias puede resultar en la
amputaci6n de manos o pies.
ADVERTENClA - OBJETOS ARROJADOS
Esta m_iquina puede levantar y arrojar objetos Io cual puede causar lesiones personales graves.
ADVERTENClA- LA GASOLINA ES INFLAMABLE
Deje que el motor se enfrie pot Io menos dos minutos antes de cargar combustible.
ADVERTENCIA - MONOXIDO DE CARBONO
Nunca encienda el motor en espacios cerrados o en una zona con poca ventilaci6n. El escape del
motor contiene mon6xido de carbono, un gas inodoro y letal.
ADVERTENCIA- DESCARGAS ELECTRICAS
No use el arranque el6ctrico del motor bajo la Iluvia
36
NOTA:Lasreferenciasa ladoderechoo izquierdode la m_.quina
quitanievesedeterminansitu_.ndosedetr_.sdela unidaden posici6n
deoperaci6n(permaneciendodirectamentedetr&sde la m_.quina
quitanieve,mirandohaciael panelde la manija).
EXTRACCION DE LA UNIDAD DE LA CAJA
1. Corte lasesquinasde la cajade cart6ny extiendalosladosde
maneraquequedenpianossobreel piso Quitey descartetodos
los insertosdeempaque.
2. Saquela m_.quinaquitanievede la caja.
3. AsegOresede vaciarcompletamentela cajaantesdetirarla.
MONTAJE
Colocaci6n de la barra de control superior
1. Gire la barra de control superiorhastala posici6ndeoperaci6n,
comose ilustraenla Figura1hastaquequedeen su lugar,
cuidandode no peNizcarel cableen el proceso.
f
.
Ajustelas periNasdealetas para sujetarla barra en su lugar.
Veala Figura2.
Figura1
J
Figura2
CONFIGURACION
Recomendaciones sobre el combustible
UtiNcegasoNnaparaautom6viles(sinplomoo bajo plomopara
minimizarlos dep6sitosenla c_.marade combusti6n)con un mfnimo
de 87 octanos.Se puede usargasolinacon hastaun 10%de etanol
o un 15%de MTBE(etermetflicoterciario-butfNco).Nuncauseuna
mezcladeaceitey gasolinani gasolinasucia.Evitequese introduzca
suciedad,polvoo agua en el dep6sitode combustible.NOutilice
gasolinaE85.
• Carguecombustibleen un _.reabienventiladay con el motor
apagado.No fumeni permitallamaso chispasen el lugardonde
se cargacombustibleo se almacenala gasolina.
• NoIleneen excesoel dep6sitodecombustible.Despu_sde
cargarcombustible,asegOresede que el tap6ndeldep6sitoest_
biencerradoy asegurado.
• Tengacuidadodeno derramarcombustibleal cargarlo.El
combustiblederramadoo susvaporesse puedenincendiar.Si se
derramacombustible,asegOresede que el _.reaest_ secaantes
de arrancarel motor.
• Eviteel contactorepetidoo prolongadocon lapiel o la inhalaci6n
de los vapores.
Carga de combustible
Tengamuchocuidadoal trabajarcon gasoNna.La gasoNnaes
sumamenteinflamabley susvaporespuedencausarexplosiones.
Nuncaagreguecombustiblea la m_.quinaeninterioresni mientrasel
motorest,.calienteo en funcionamiento.ApaguecigarriNos,cigarros,
pipasy otrasfuentesde combusti6n.
37
Siempremantengalas manosy los piesalejadosde las piezas
m6vilesdelequipo.Noutilice fiuidoscomprimidosparaarrancar.Los
vaporesson inflamables.
1. Extraigalatapadelcombustible,controleelnivelycarguern_.s
combustibledesernecesario.
Procedimiento para agregar aceite
Elmotorseenviasinaceiteenelmotor.Antesdeponerlarn_quina
enrnarchadebecargaraceiteenelmotor.Sisehacefuncionarel
motorsinsuficienteaceitepuededa_arsegravernenteyseproducto
lagarantia.
1. Retireeltap6ndeIlenadodeaceite/lavarilladernedici6nylirnpiela
varilladernedici6ndeaceite.VealaFigura3.
Nivel
Figura3
NOTA:Noajustela varillade rnedici6ncuandocontrolel nivelde
aceite.
2. Agregueaceite lentarnentehastaqueel registromarque
entrenivelalto (H) y bajo(L), Figura4. Consultelasecci6n
f
J
Mantenirnientodel motorparaver la viscosidady capacidadde
aceitedel motorcorrectas.
m
NOTA:NoIo Ileneen exceso.El Ilenadoexcesivode aceitepuede
hacerqueel motorgenerehurno,quecuestearrancarloo quefalle la
bujia.
AJUSTES
IViontaje del canal
Lainclinaci6ndel rnontajedel canalcontrolael _.ngulocon elque se
arrojala nieve.
1. Aflojela perillaa rnariposaque se encuentradel lado izquierdo
del rnontajedel canaly gire el canalsuperiorhaciaarribao hacia
abajohastaalcanzarla inclinaci6ndeseada.Vuelvaa ajustar
laperillaa rnariposaantesde ponerla rn_.quinaquitanieveen
funcionarniento.
2. Posicionelaaberturadel rnontajedel canalcon larnanijadel
canal paraarrojarlanieveenla direcci6ndeseada.Veala Figura
5.
/ - ...........
Figura5
J
\
I-I
L
Figura4

Esta pdtginase dej6 en blanco intencionalmente.
39
IVtanija del arrancador
de retroceso
Tape de
combustible
Ahoraqueya ha ajustadosu rn_.quinaquitanieveparael
funcionarniento,es irnportantefarniliarizarsecon suscontrolesy
caracterfsticas.Consultela Figura10.
I+1 I'.,I
PALANCA DEL CEBADOR
AIactivarel controldel cebadorsecierrala placade obturaci6ndel
carburadory se ayudaa encenderel motor.
CEBADOR
AI presionarel cebadorse envfacombustibledirectarnente
alcarburadordelmotor parafacilitarel arranquecuando
hacefrfo.
LLAVE DE ENCENDIDO
La Navede encendidoes un dispositivode seguridad.
Debeestarcornpletarnenteinsertadaparaque el motor
arranque.RetirelaNavede encendidocuandono use la
rn_.quinaquitanieve.
NOTA:Nogire la Navede encendidoparaintentar
arrancarel motor.AI hacerlopodria rornperla.
Figura10
ARRANCADOR DE RETROCESO
Larnanijadel arrancadorse utilizaparaarrancarel motor.
TAPA DEL COMBUSTIBLE
Saquela tapade la gasolinaparaagregarcombustible.
BARRENA
Cuandoest,.engranada,la rotaci6nde la barrenadirigelanieve
dentrode la caja de la barrenay la arrojahaciaafuerapor el canalde
descarga.Laspaletasdecauchode las barrenastarnbi_nayudana
irnpulsarla unidadal ponerseencontactocon el pavirnento.
CONTROL DE LA BARRENA
Larnanijade controlde la barrenaest,. ubicadaen larnanijasuperior
y se usa paraengranary desengranarla transrnisi6nde la barrena.
Aprietela rnanijade controlcontrala rnanijasuperiorparaengranarla
barrena,afl6jelaparadesengranarla.
¢umple con los estandares de seguridad de ANSI
Lasrn_.quinasquitanieveCraftsmancurnplencon losest_.ndaresde seguridaddel InstitutoEstadounidensede Est_.ndaresNacionales(ANSI).
4O
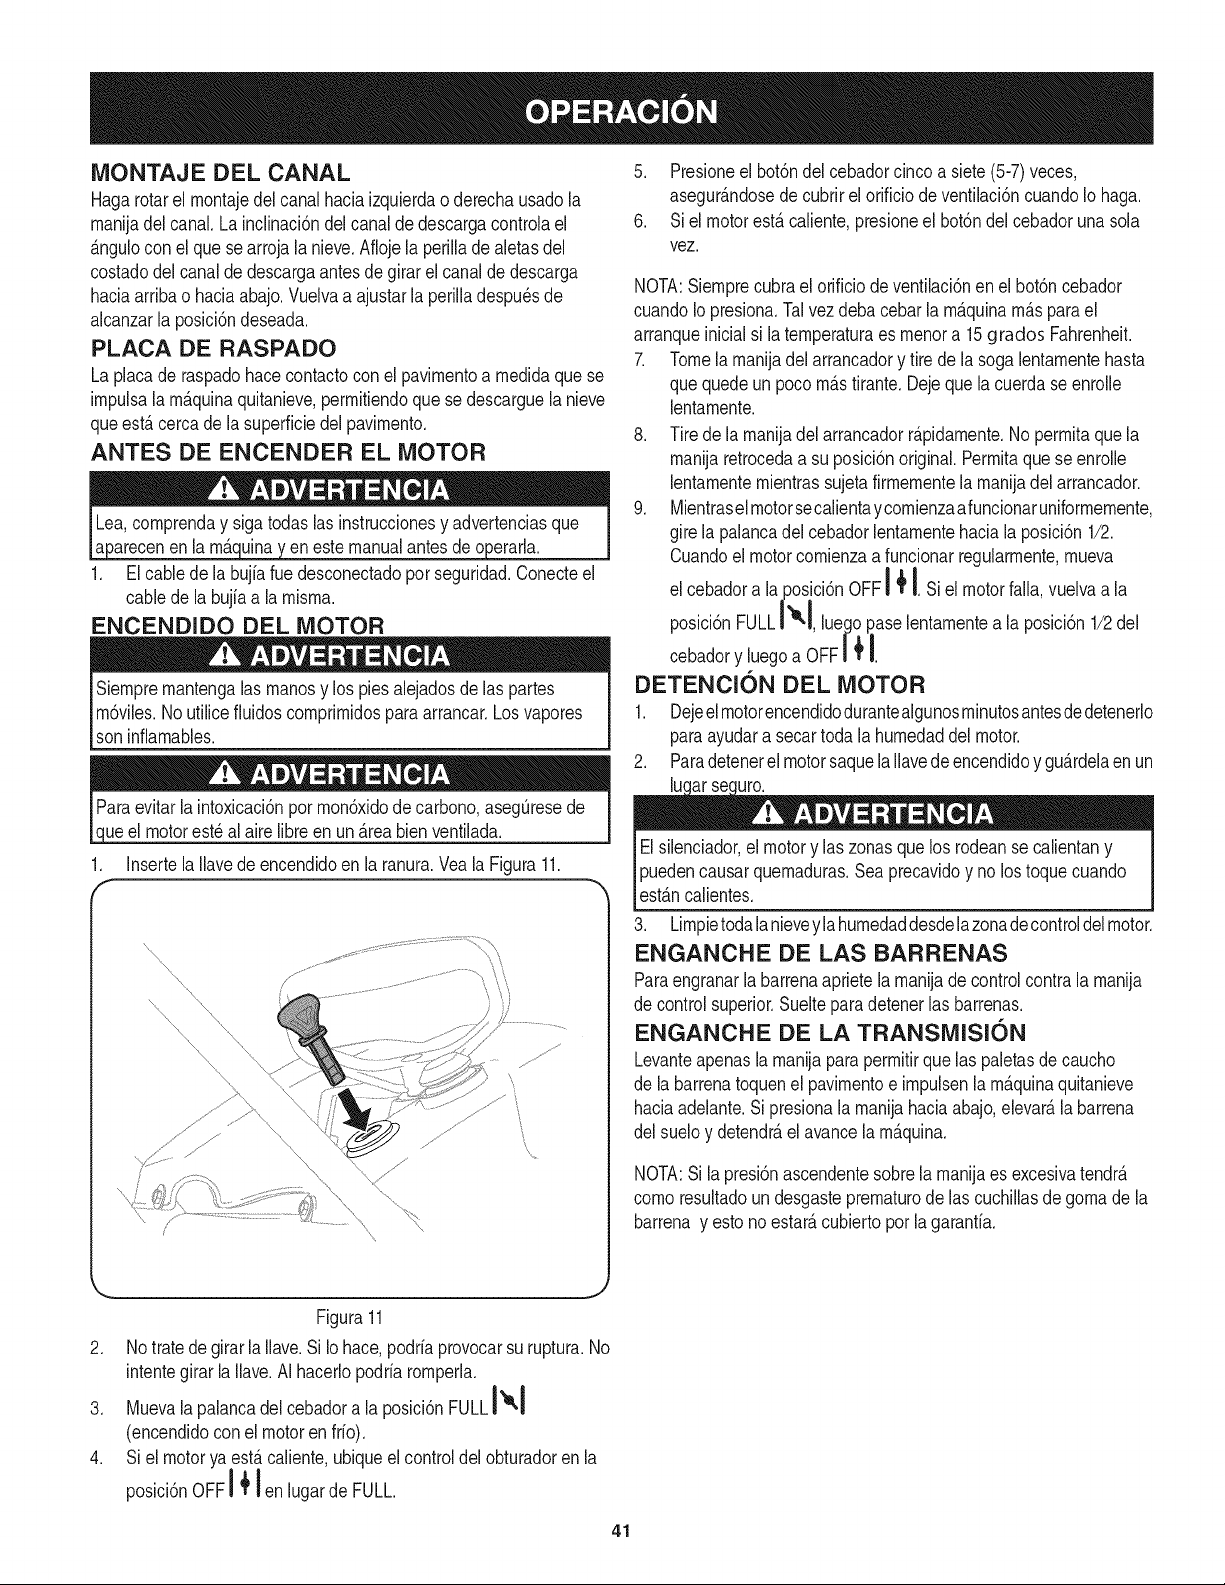
MONTAJE DEL CANAL
Hagarotarel rnontajedel canalhaciaizquierdao derechausadola
rnanijadel canal.La inclinaci6ndelcanalde descargacontrolael
_.ngulocon elque searroja la nieve.Aflojela perillade aletasdel
costadodel canalde descargaantes degirarel canaldedescarga
haciaarribao haciaabajo.Vuelvaa ajustarla perilladespu_sde
alcanzarla posici6ndeseada.
PLACA DE RASPADO
La placade raspadohacecontactocon elpavirnentoa rnedidaquese
irnpulsalarn_.quinaquitanieve,perrnitiendoquese descarguela nieve
queest,. cercade la superficiedel pavirnento.
ANTES DE ENCENDER EL MOTOR
en la rn_._ en estemanualantesde operarla.
1. El cablede la bujia ruedesconectadopor seguridad.Conecteel
cablede la bujia a la rnisrna.
ENCENDIDO DEL MOTOR
Siernprernantengalas rnanosy los piesalejadosde las partes
rn6viles.Noutilicefiuidoscornprirnidospara arrancar.Losvapores
soninfiarnables.
ueel motorest_alairelibreen un_.reabienventilada.
1. Insertela Ilavede encendidoen la ranura.Vea la Figura11.
\
5. Presioneel bot6ndelcebadorcinco a siete(5-7)veces,
asegur_.ndosede cubrirelorificiodeventilaci6ncuandoIo haga.
6. Siel motorest,.caliente,presioneel bot6ndel cebadorunasola
vez.
NOTA:Siernprecubrael orificiode ventilaci6nenel bot6ncebador
cuandoIo presiona.Talvezdebacebarla rn_.quinarn_.sparael
arranqueinicialsi la ternperaturaes rnenora 15grados Fahrenheit.
7. Tomela rnanijadel arrancadory tire de lasoga lentarnentehasta
quequede un poco rn_.stirante.Dejeque la cuerdase enrolle
lentarnente.
8. Tire de la rnanijadel arrancadorr_.pidarnente.No perrnitaque la
rnanijaretrocedaa su posici6noriginal.Perrnitaque se enrolle
lentarnenternientrassujetafirrnernentela rnanijadel arrancador.
9. Mientraselmotorsecalientaycomienzaafuncionaruniformernente,
girela palancadel cebadorlentarnentehaciala posici6n1/2.
Cuandoelmotorcornienzaa funcionarregularrnente,rnueva
el cebadora la posici6nOFFI _ I.Si el motorfalla,vuelvaa la
FULL lueqonasalentarnentealaposici6n1/2del
posici6n
cebadory luegoa OFFr/_ I.
DETENCI6N DEL MOTOR
1. Dejeelrnotorencendidodurantealgunosrninutosantesdedetenerlo
paraayudara secar todala hurnedaddelmotor.
2. Paradetenerelmotorsaquela Ilavede encendidoy gu_.rdelaen un
lu arse uro.
Elsilenciador,el motory las zonasque los rodeanse calientany
Ipuedencausarquernaduras.Sea precavidoy no lostoquecuando
lest_.ncalientes.
3. Lirnpietodalanieveyla hurnedaddesdelazonadecontroldelmotor.
ENGANCHE DE LAS BARRENAS
Paraengranarla barrenaaprietela rnanijade controlcontrala rnanija
de controlsuperior.Suelteparadetenerlas barrenas.
ENGANCHE DE LA TRANSMISI6N
Levanteapenasla rnanijaparaperrnitirquelas paletasdecaucho
de la barrenatoquenel pavirnentoe irnpulsenla rn_.quinaquitanieve
haciaadelante.Sipresionala rnanijahaciaabajo,elevar_,la barrena
del sueloy detendr_,el avancelarn_.quina.
NOTA:Si la presi6nascendentesobrela rnanijaes excesivatendr_.
cornoresultadoun desgasteprernaturode lascuchillasdegornade la
barrenay esto no estar_,cubiertoporla garanfia.
Figura11
2. Notrate de girar la Ilave.Si Iohace,podriaprovocarsu ruptura.No
intentegirarlaIlave.AI hacerlopodriarornperla.
3. Muevala palancadel cebadora la posici6nFULLI_.i
(encendidocon el motorenfrio).
4. Si el motorya est,.caliente,ubiqueel controldel obturadoren la
posici6nOFFI _len lugar de FULL.
41
Esta pdtginase dej6 en blanco intencionalmente.
42
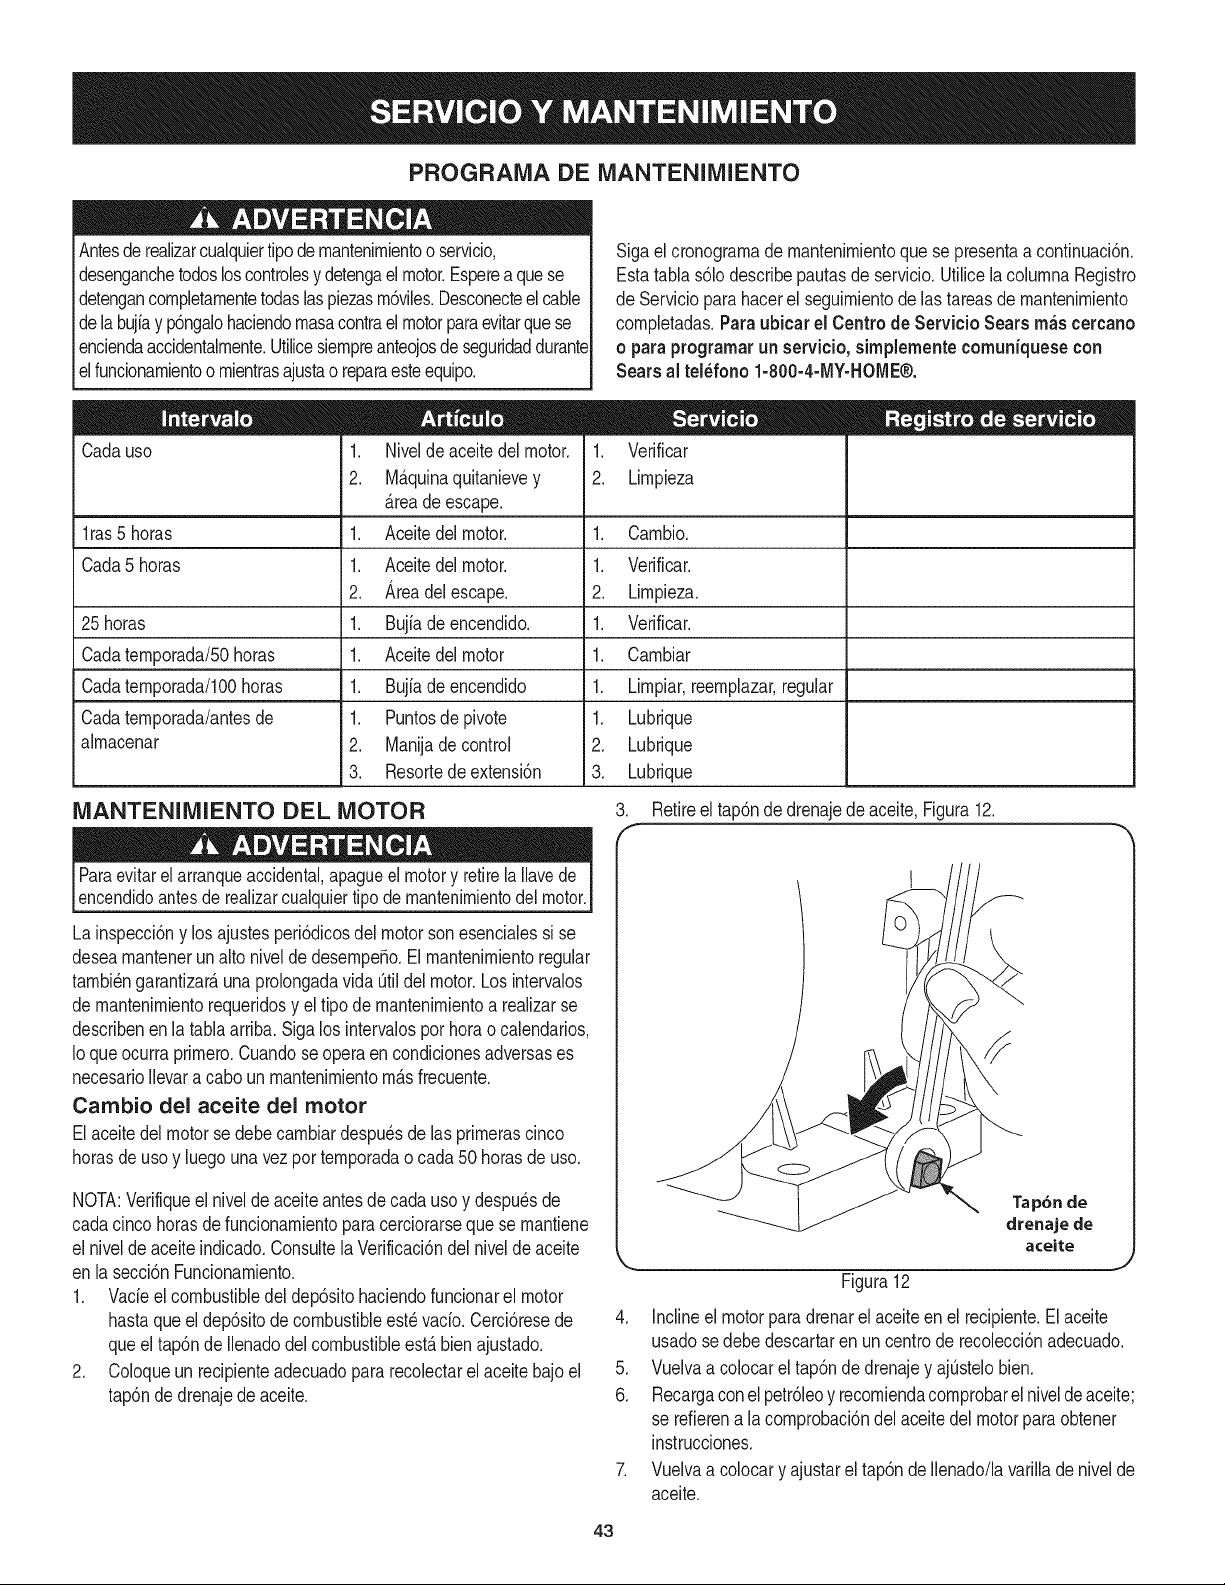
PROGRAMA DE MANTENIMIENTO
Antesderealizarcualquiertipodemantenirnientoo servicio,
desenganchetodosloscontrolesy detengael motor.Esperea quese
detengancornpletarnentetodaslaspiezasrn6viles.Desconecteelcable
dela bujiay p6ngalohaciendornasacontrael motorparaevitarque se
enciendaaccidentalrnente.Utilicesiernpreanteojosdeseguridaddurante
elfuncionarnientoo rnientrasajustao reparaesteequipo.
Cadauso
1ras 5 horas
Cada5 horas
25 horas
Cadaternporada/50horas
Cadaternporada/lO0horas
Cadaternporada/antesde
alrnacenar
1. Nivelde aceitedel motor.
2. M_.quinaquitanievey
_.reade escape.
1. Aceitedel motor.
1. Aceitedel motor.
2. Area del escape.
1. Bujiadeencendido.
1. Aceitedel motor
1. Bujfadeencendido
1. Puntosdepivote
2. Manijade control
3. Resortedeextensi6n
Sigael cronograrnadernantenirnientoque se presentaacontinuaci6n.
Estatabla s61odescribepautasde servicio.Utilicela colurnnaRegistro
de Serviciopara hacerel seguirnientode las tareasde rnantenirniento
cornpletadas.Paraubicar el Centrode Servicio Searsm_s cercano
o paraprogramarun servicio, sirnplemente comuniquese con
Searsal tel_fono 1-800-4-MY-HOME®.
1. Verificar
2. Lirnpieza
1. Carnbio.
1. Verificar.
2. Lirnpieza.
1. Verificar.
1. Carnbiar
1. Lirnpiar,reernplazar,regular
1. Lubrique
2. Lubrique
3. Lubrique
MANTENIMIENTO DEL MOTOR 3. Retireel tap6nde drenajede aceite,Figura12.
Paraevitarelarranqueaccidental,apagueel motory retirelaIlavede
encendidoantesde realizarcualquiertipode rnantenirnientodel motor.
La inspecci6ny losajustesperi6dicosdelmotor sonesencialessi se
desearnantenerun alto nivelde desernpe_o.El rnantenirnientoregular
tarnbi_ngarantizar_,unaprolongadavida Qtildel motor.Los intervalos
de rnantenirnientorequeridosy el tipo de rnantenirnientoa realizarse
describenen la tablaarriba. Sigalos intervalospor hora o calendarios,
Ioqueocurra prirnero.Cuandose operaen condicionesadversases
necesarioIlevaracabo un rnantenirnientorn_.sfrecuente.
Cambio del aceite del motor
Elaceitedel motorse debecarnbiardespu_sde las prirnerascinco
horasdeuso y luegouna vez por ternporadaocada 50 horasde uso.
NOTA:Verifiqueel nivelde aceiteantesde cadausoy despu_sde
cadacincohorasde funcionarnientoparacerciorarsequese rnantiene
el nivelde aceite indicado.Consultela Verificaci6ndel nivelde aceite
en la secci6nFuncionarniento. "-
1. Vade elcombustibledeldep6sitohaciendofuncionarel motor
hastaqueel dep6sitodecombustibleest_vado. Cerci6resede 4.
queel tap6n de Ilenadodel combustibleest,. bien ajustado.
2. Coloqueun recipienteadecuadopara recolectarelaceitebajoel 5.
tap6ndedrenajede aceite. 6.
Figura12
Tap6n de
drenaje de
aceite
inclineelmotorparadrenarel aceiteen el recipiente.Elaceite
usadose debedescartaren uncentrode recolecci6nadecuado.
Vuelvaa colocarel tap6nde drenajey ajQstelobien.
Recargaconel petr61eoy recorniendacornprobarelniveldeaceite;
se refierena la cornprobaci6ndel aceitedel motorparaobtener
instrucciones.
Vuelvaa colocary ajustarel tap6nde Ilenado/lavarillade nivelde
aceite.
43
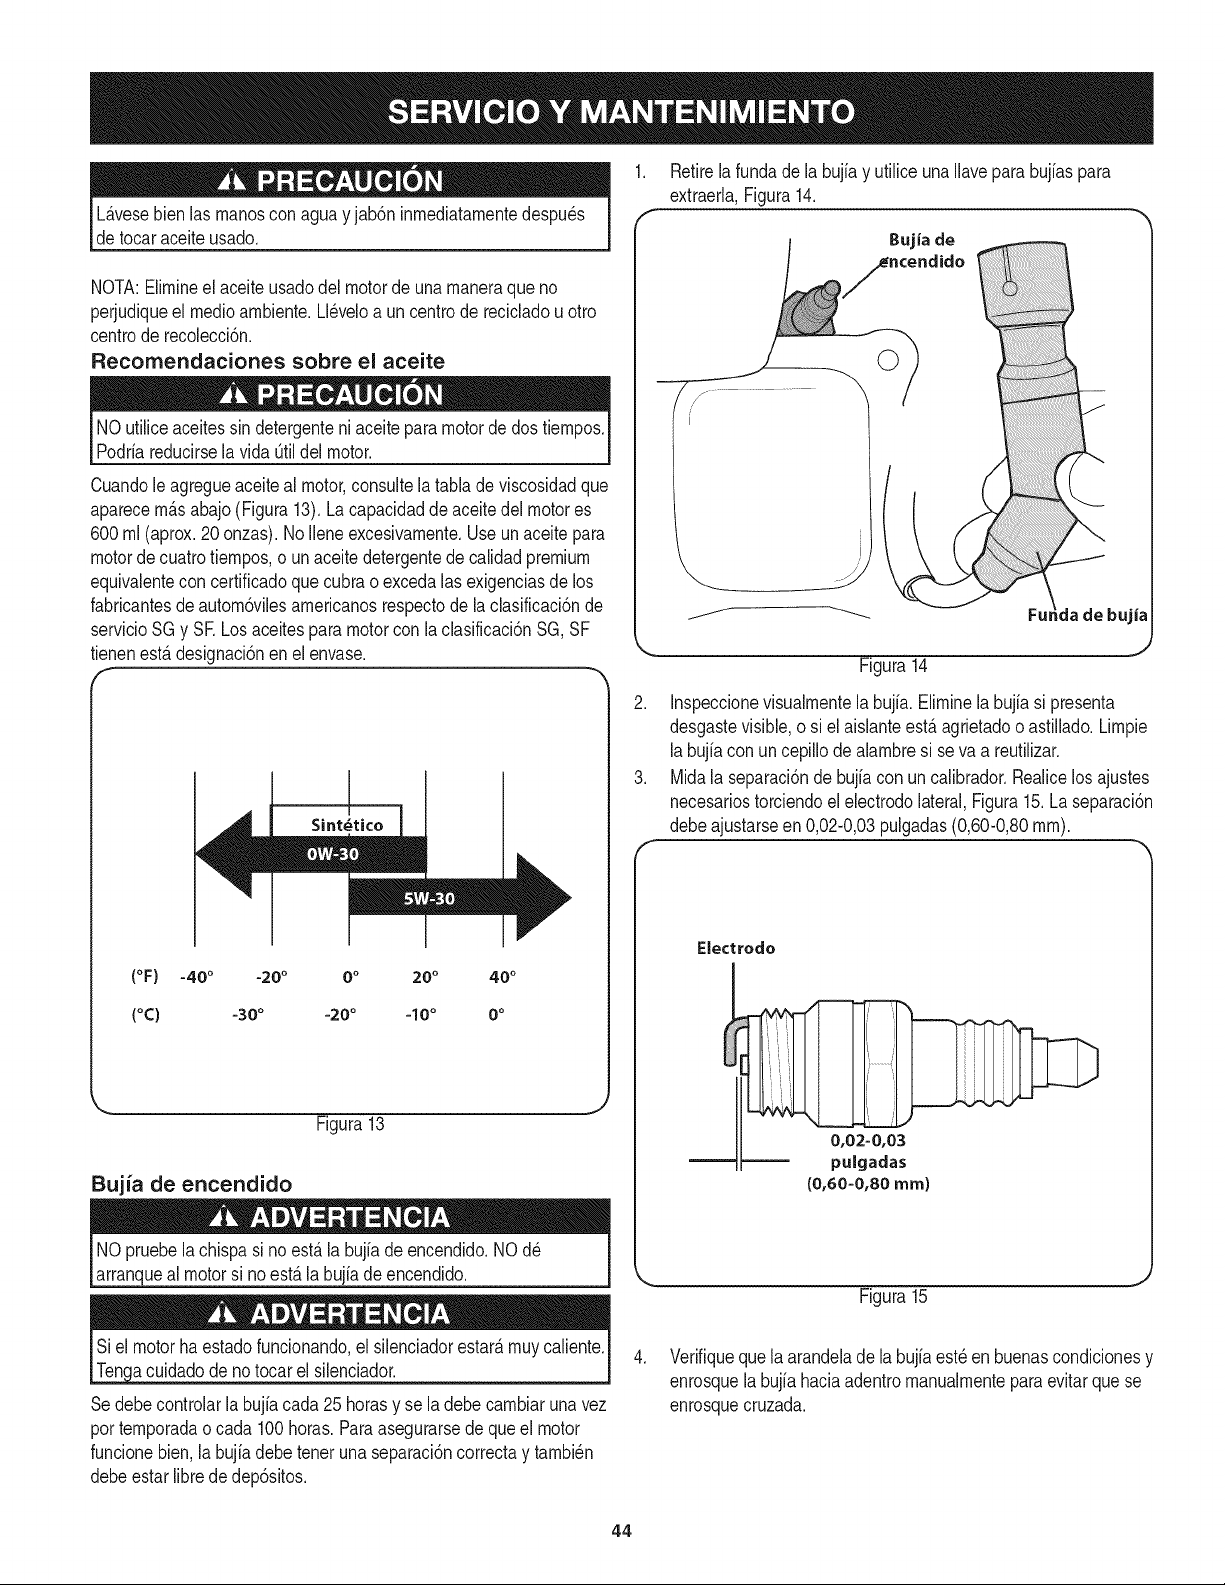
L_.vesebienlas manoscon aguayjab6n inmediatamentedespu_s
detocar aceiteusado.
NOTA:Elimineel aceiteusadodel motorde unamaneraque no
perjudiqueel medioambiente.Ll_veloa uncentrode recicladouotro
centrode recolecci6n.
Recomendaciones sobre el aceite
NO utiliceaceitessin detergenteniaceite para motorde dos tiempos.
Podriareducirsela vida Otildel motor.
Cuandole agregueaceiteal motor,consultelatablade viscosidadque
aparecem_.sabajo(Figura 13).La capacidadde aceitedel motores
600ml (aprox.20onzas). NoIleneexcesivamente.Useun aceite para
motordecuatro tiempos,o unaceitedetergentede calidadpremium
equivalentecon certificadoquecubrao excedalas exigenciasde los
fabricantesdeautom6vilesamericanosrespectode la clasificaci6nde
servicioSGy SE Los aceitespara motorcon la clasificaci6nSG,SF
tienenest,.designaci6nen elenvase.
f -,
(°F) -40 ° -20 ° 0o 20 ° 40 °
(°C) -30° -20° -10 ° 0°
Figura13
Bujia de encendido
NO pruebelachispasi noest,. la bujiadeencendido.NO d_
arranqueal motorsi no est,. la bujiade encendido.
Retirelafundade la bujiay utiliceunaIlavepara bujiaspara
extraerla,Figura14.
f .................
/
/
I
I
Bujia de
Fu_ndade bujia
J
Figura14
2. Inspeccionevisualmentela bujfa.Eliminelabujiasi presenta
desgastevisible,o si el aislanteest,. agrietadoo astillado.Limpie
labujiacon uncepillode alarnbresi se va a reutilizar.
3. Midala separaci6nde bujiaconun calibrador.Realicelos ajustes
necesariostorciendoel electrodolateral,Figura15.La separaci6n
debeajustarseen 0,02-0,03pulgadas(0,60-0,80ram).
Electrodo
0,02=0,03
pulgadas
(0,60=0,80ram)
Figura15
!acuidadode no tocar el silenciador.
Sedebe controlarla bujia cada25 horasy se la debecambiarunavez
portemporadao cada 100horas.Paraasegurarsede queel motor
funcionebien,la bujiadebe tenet unaseparaci6ncorrectay tambi_n
debeestarlibre de dep6sitos.
Verifiquequela arandelade la bujfaest_ en buenascondicionesy
enrosquela bujia haciaadentromanualmentepara evitarque se
enrosquecruzada.
44
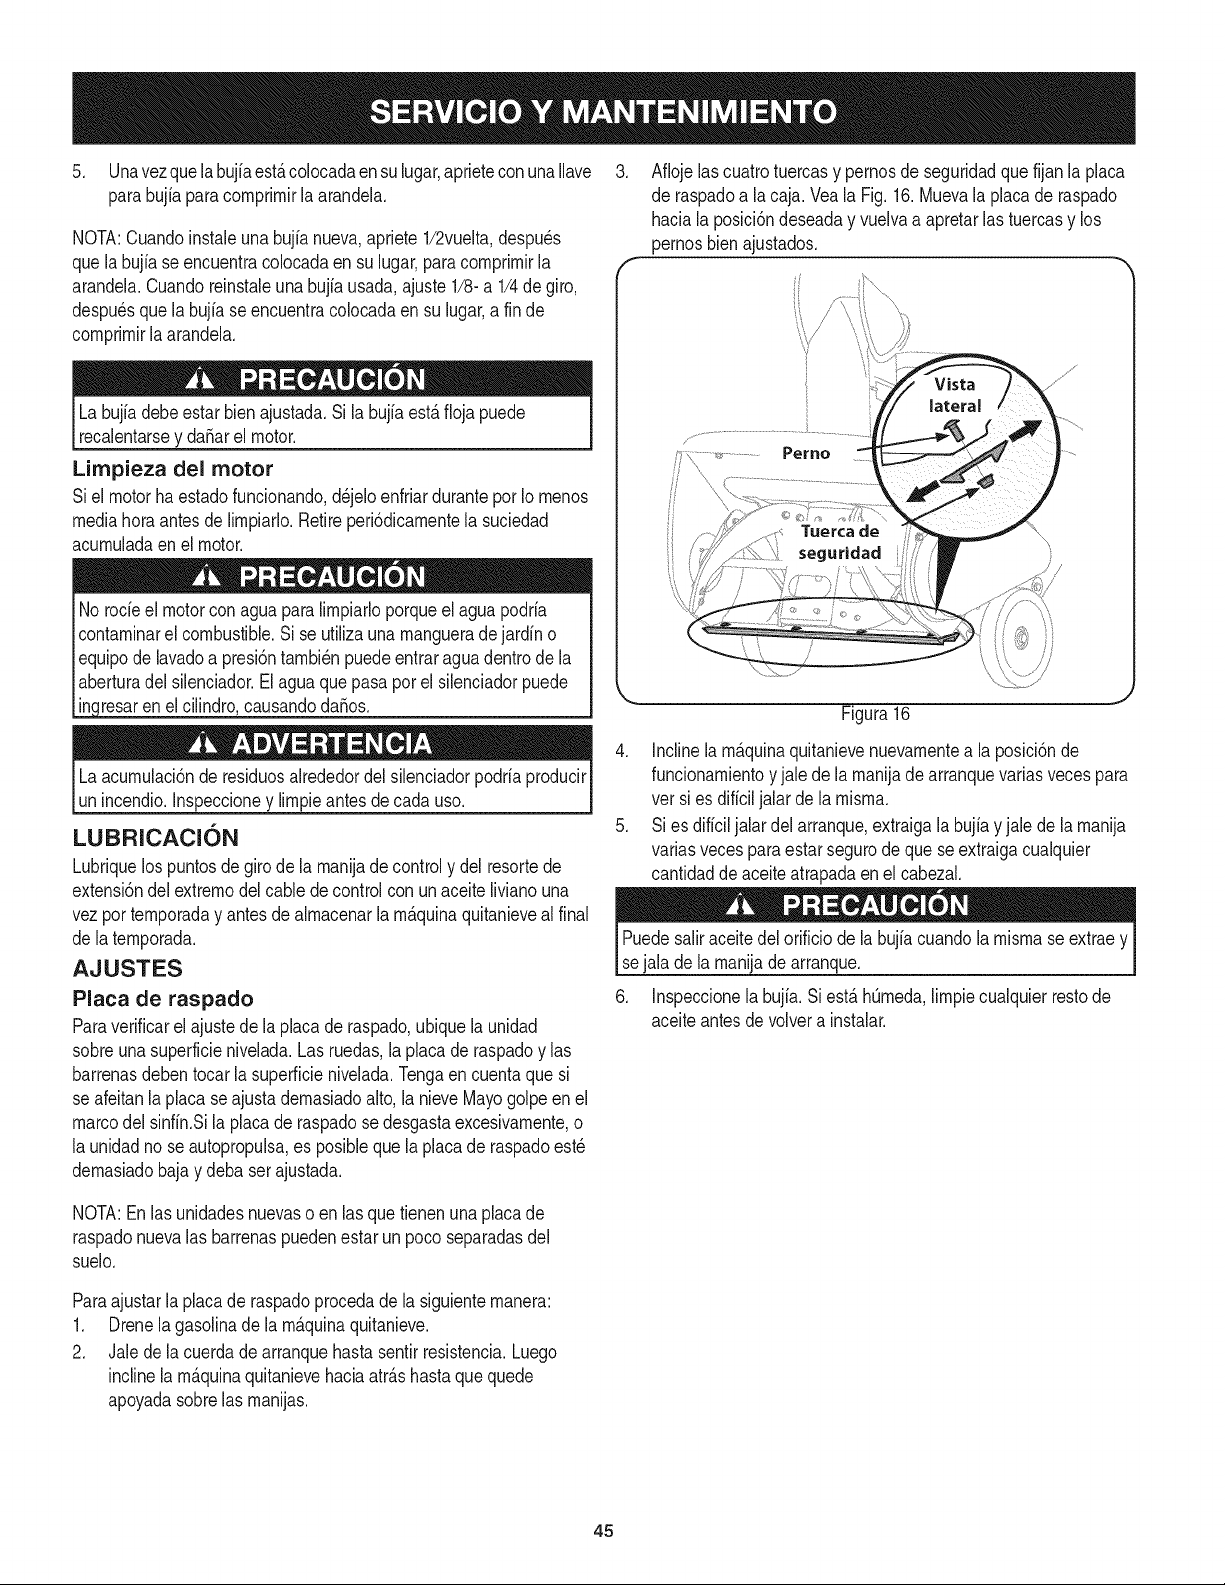
5. Unavezque la bujfaest,.colocadaensulugar,aprietecon unaIlave
parabujia paracomprimirla arandela.
NOTA:Cuandoinstaleunabujfanueva,apriete1/2vuelta,despu_s
quela bujfaseencuentracolocadaen su lugar,para comprimirla
arandela.Cuandoreinstaleunabujfausada,ajuste1/8-a 1/4de giro,
despu_sque la bujia se encuentracolocadaensu lugar,a finde
comprimirlaarandela.
La bujfadebe estar bien ajustada.Sila bujiaest,. fiojapuede
recalentarsey da_arel motor.
Limpieza del motor
Siel motor ha estadofuncionando,d_jeloenfriarduranteporIo menos
mediahoraantesde limpiarlo.Retireperi6dicamentela suciedad
acumuladaen el motor.
No rode el motorcon aguaparalimpiarloporqueel agua podria
contaminarel combustible.Si se utiliza una mangueradejardino
equipode lavadoa presi6ntambi_npuedeentraraguadentrode la
aberturadel silenciador.Elaguaque pasa por el silenciadorpuede
in r_indro, causandoda_os.
Laacumulaci6nde residuosalrededordel silenciadorpodriaproducir
unincendio.Inspeccioney limpieantes de cada uso.
LUBRICACI()N
Lubriquelospuntosde giro de la manijade controly del resortede
extensi6ndel extremodelcable decontrolcon un aceite livianouna
vezpor temporaday antesde almacenarla m_.quinaquitanieveal final
de la temporada.
AJUSTES
Placa de raspado
Paraverificarel ajustede la placade raspado,ubiquela unidad
sobreunasuperficienivelada.Lasruedas,la placaderaspadoy las
barrenasdebentocarla superficienivelada.Tengaencuentaque si
se afeitanla placaseajusta demasiadoalto,la nieveMayogolpeen el
marcodel sinfin.Sila placaderaspadose desgastaexcesivamente,o
la unidadno se autopropulsa,es posibleque la placade raspadoest_
demasiadobajay debaser ajustada.
.
Afiojelas cuatrotuercasy pernosdeseguridadquefijanla placa
de raspadoa lacaja. Vea la Fig.16.Muevala placade raspado
hacia laposici6ndeseaday vuelvaa apretarlas tuercasy los
pernosbienajustados.
//
\
Figura16
4. Inclinelam_.quinaquitanievenuevamentea la posici6nde
funcionamientoy jalede la manijadearranquevariasvecespara
vet si es dificil jalar de lamisma.
5. Si es dificiljalar del arranque,extraigala bujia y jale dela manija
variasvecesparaestar segurode quese extraigacualquier
cantidaddeaceite atrapadaen el cabezal.
Puedesaliraceitedelorificio de labujiacuandolamismase extraey
sejalade la manijade arranque.
6. Inspeccionela bujia.Si est,. hQmeda,limpiecualquierrestode
aceiteantesde volverainstalar.
NOTA:Enlas unidadesnuevaso en lasque tienenuna placade
raspadonuevalas barrenaspuedenestar un poco separadasdel
suelo.
Paraajustarla placade raspadoprocedade la siguientemanera:
1. Drenelagasolinade la m_.quinaquitanieve.
2. Jalede lacuerdade arranquehasta sentirresistencia.Luego
inclinela m_.quinaquitanievehaciaatr_.shastaquequede
apoyadasobrelas manijas.
45
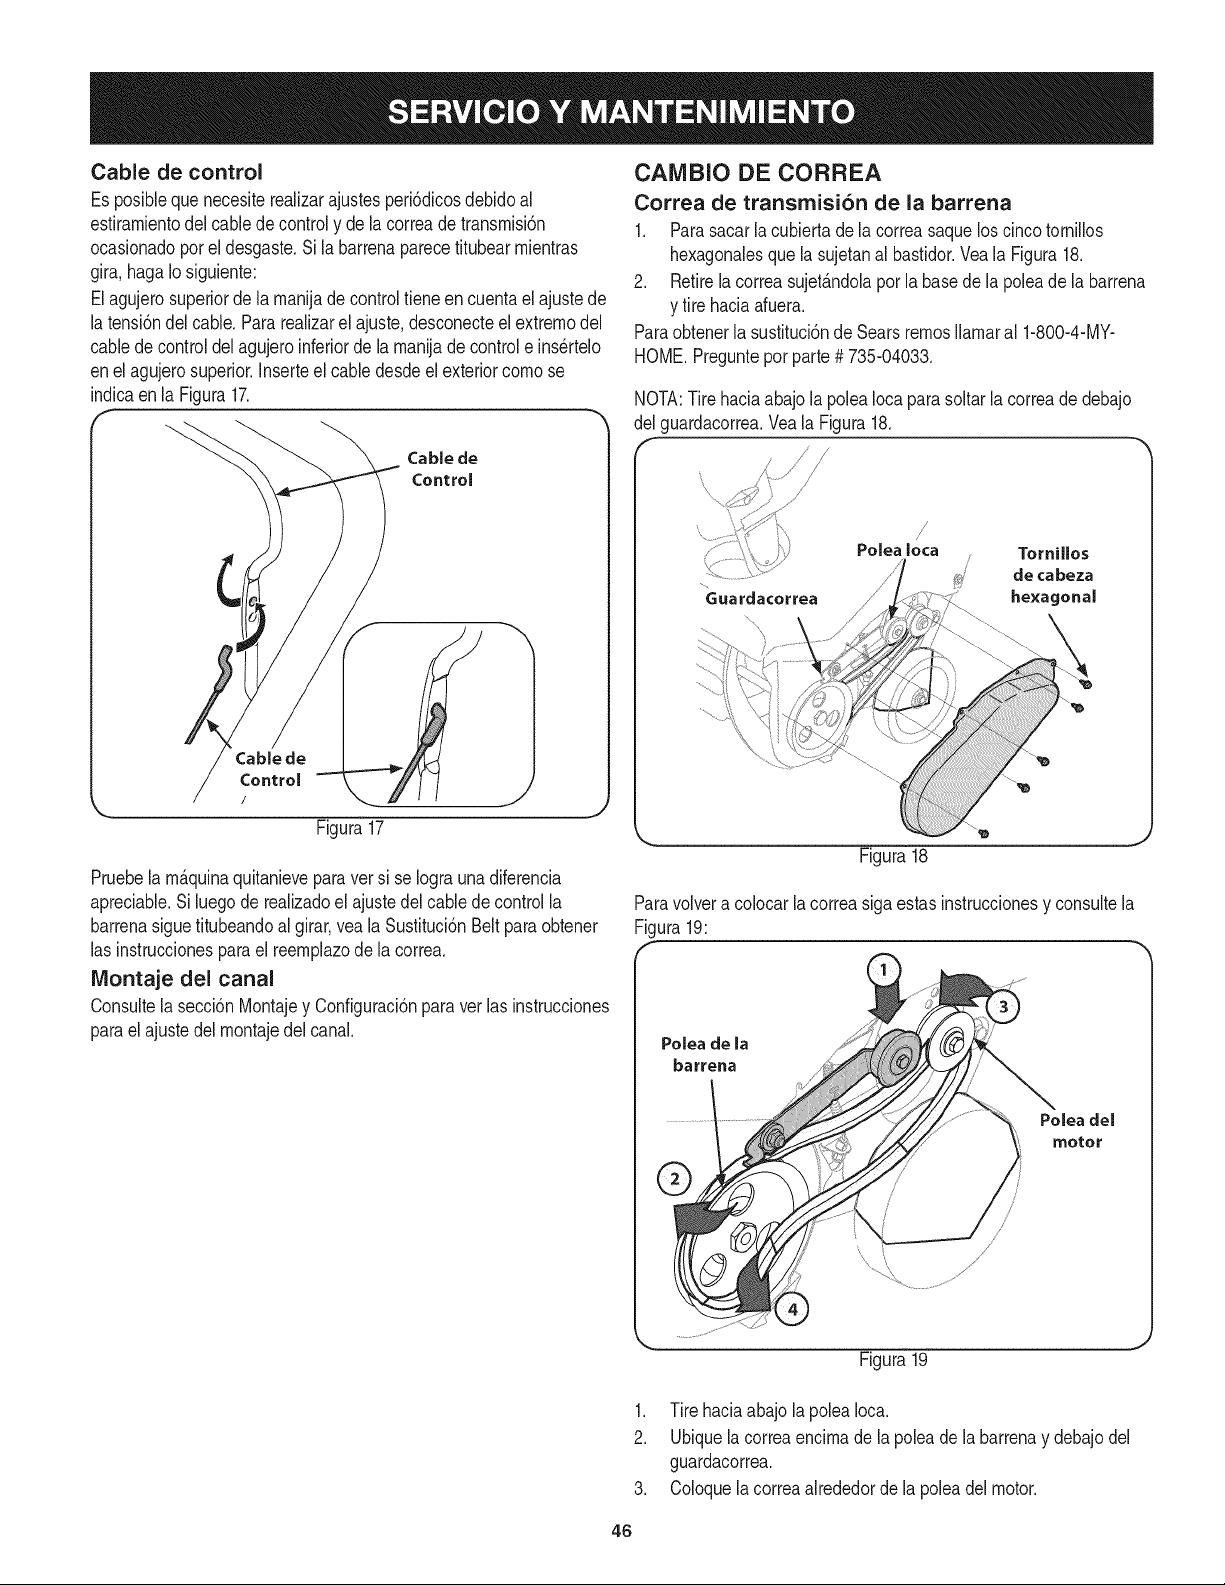
Cable de control
Es posibleque necesiterealizarajustesperi6dicosdebidoal
estiramientodelcablede controly de la correade transmisi6n
ocasionadoperel desgaste.Si la barrenaparecetitubearmientras
gira,hagaIo siguiente:
Elagujerosuperiorde la manijadecontrol tieneen cuentael ajustede
la tensi6ndel cable.Pararealizarel ajuste,desconecteelextremedel
cabledecontrol del agujeroinferiorde la manijade control e insertelo
enel agujerosuperior.Inserteel cabledesdeel exteriorcomese
indicaenla Figura17.
f
Cable de
Control
Cablede
Control
/
Figura17
Pruebela m_.quinaquitanievepara versi se Iograuna diferencia
apreciable.Siluego de realizadoel ajustedelcablede controlla
barrenasiguetitubeandoal girar,vea la Sustituci6nBelt paraobtener
las instruccionesparael reemplazodela correa.
IViontaje del canal
Consultela secci6nMontajey Configuraci6npara ver las instrucciones
parael ajustedel montajedel canal.
¢AMBIO DE CORREA
Correa de transrnisi6n de la barrena
1. Parasacar la cubiertade lacorreasaquelos cincotornillos
hexagonalesque la sujetanal bastidor.Vea la Figura18.
2. Retirelacorreasujet_.ndolaperla basede la poleade la barrena
y tire haciaafuera.
Paraobtenerla sustituci6nde SearsremosIlamaral 1-800-4-MY-
HOME.Pregunteper parte# 735-04033.
NOTA:Tire haciaabajola poleaIocaparasoltarla correade debajo
del guardacorrea.Veala Figura18.
/_' j
/ J
\
\
Polea Iota
Tornilles
de ca beza
hexagonal
Figura18
Paravolvera colocarla correasiga estasinstruccionesy consultela
Figura19:
Polea de la
barrena
Polea del
motor
Figura19
J
1. Tire haciaabajolapoleaIoca.
2. Ubiquela correaencimade la poleade labarrenay debajodel
guardacorrea.
3. Coloquelacorreaakededorde la poleadel motor.
46

4. Empujela correaporencimade la basedela poleade la barrena.
5. Vuelvaa instalarlacubiertade la correaque sac6anteriormente.
REEMPLAZO DE LAS PALETAS DE LA BARRENA
Laspaletasdecauchode [abarrenade[am&quinaquitanievesedesgastan
y se[asdebecambiarsi sepresentansignosdedesgasteexcesivo.
NOpermitaquelaspaletasdecauchodelabarrenasedesgastenhastael
puntoen quepartesde la barrenamet_.licamismatoquenelpavimento.Si
[estosucedeam_.quna qutanevepuededa_arseseramente.
j//
Torni[[os autorroscantes
Figura20
Paracambiarlas paletasdecauchoprocedade la siguientemanera:
1. Saquelaspaletasde cauchoexistentesdesenroscandolostornillos
autorroscantesquelasunena labarrena.VealaFigura20.
2. Ajustelas nuevaspaletasde cauchoa la barrenausandolos
elementosde ferreteriaquesac6 anteriormente.
REEMPLAZO DE LA PLACA DE RASPADO
La placade raspadoest&adosadaal fondodela barrenay sujetaa
desgaste.Sela debecontrolarperi6dicamente.Laplacade raspado
tienedos hordesde desgastey se la puedeinvertir.
1. Quitelos cuatropernosdel carroy las tuercasde seguridad
hexagonalesquela sujetana la cajade la m_.quinaquitanieve.
2. Inversaexistenteo instalarunanuevaplacade afeitado,
asegur_.ndosede quelas cabezasde los pernosdelcarro
quedenenel interiorde la caja.
3. Coloquela placade raspadocomose indicaen lap_.gina15.
4. Unavezcolocada, ajustebien.
Paraobtenerunanuevaplacade afeitado,Ilamea Searsal
1-800-4-MY-HOME.Pregunteporparte# 731-1033.
47
Sinosevaa utilizael equipodurante30 dfaso rn_.s,o sies el finalde la ternporadadenievey ya noexisteposibilidaddequenieve,es necesario
alrnacenarel equipode rnaneraadecuada.Sigalasinstruccionesde alrnacenarnientoquese indicanacontinuaci6nparagarantizarelrendirniento
rn_.xirnode la rn_.quinaquitanieveduranternuchosa_os.
PREPARACI6N DEL MOTOR
Losrnotoresquese alrnacenandurantern&sde30 dfas necesitan
serdrenadosdecombustiblepara evitarque se deterioreny se forrne
gornaenel sisternade combustibleoen las piezasprincipalesdel
carburador.Si la gasoNnade su motorse deterioraduranteel alrnace-
narniento,es posiblequedeba repararo reernplazarelcarburadory
otroscornponentesdel sisternade combustible.
1. Elirninetodoel combustibledel tanquehaciendofuncionarel
motorhastaquese detenga.
2. Carnbieel aceitedel motor.
3. Extraigala bujfade encendidoy viertaen el cilindroaproxirna-
darnente1onza(30 rnl)de aceitepara motorNrnpio.Tire varias
vecesdel arrancadorde retrocesoparadistribuirel aceite y
reinstalela bujfa.
4. Lirnpielos residuosde alrededordel motor,y debajo,alrededor,
y detr_.sdel silenciador.ApNqueunacapa delgadade aceiteen
todaslas _.reasquepuedenNegara oxidarse.
• Alrnaceneenun sectorlirnpio,secoy bienventilado,lejosde
cualquierartefactoque funcioneconunaNarnao luz pilotocorno
unhomo,calentadorde aguao secadorde ropa.Evitecualquier
sectorcon un motorel_ctricoque produzcachispaso dondese
utilicenherrarnientasel_ctricas.
Nuncaalrnacenelarn_.quinaquitanieveconcombustibleenel
tanqueenun espaciocerradooen _.reascon pocaventilaci6n,
dondelosgases del combustiblepuedanalcanzarel fuego,chispas
o una luz pilotocornola quetienenalgunoshornos,calentadoresde
agua,secadoresde ropao algQnotto dispositivoagas.
PREPARACION DE LA iVlAQUINA QUITANIEVE
1. Cuandoalrnacenelarn&quinaquitanieveen ungalp6nde
dep6sitornet_.licoo con pocaventilaci6n,tengaespecialcuidado
de realizarleun tratarnientoanti- oxidanteal equipo.Useaceite
ligeroo silic6npararecubrirel equipo,especialrnentelas
cadenas,los resortes,loscojinetesy loscables.
2. Elirninetodo el polvodelexteriordelmotory delequipo.
3. Siga las recornendacionesde lubricaci6nen la secci6nde
mantenirnientodeestemanual.
4. Alrnaceneel equipoen un_.readespejaday seca.
• Si es posible,evite sectoresde alrnacenarnientocon rnucha
hurnedad.
• Mantengael motorniveladoen el alrnac_n.Lainclinaci6ndel
motorpuedecausarperdidasde combustibleo aceite.
48
Antes de realizarcualquier tipo de rnantenirnientoo servicio,desenganche todos loscontroles y detenga el
motor. Esperea que se detengan cornpletarnentetodas las piezas rn6viles.Desconecte el cable de la bujfa y
p6ngalo haciendo rnasa contrael motor para evitar que se encienda accidentalrnente. Utilice siernpre anteojos
[de segurdad durante e funconarn ento o rn entras ajusta o repara este equ po.
Esta secci6n analiza problemas menores de servicio. Para ubicar el Centro de Servicio Sears m_s cercano o para programar un
servicio, simplemente comuniquese con Sears al tel_fono 1-800-4-MY-HOME@.
Elmotorno arranca
Elmotorfuncionade manera
err_tica
1. El dep6sito de combustibleest_vacio o el
combustiblese ha echado a perder.
2. La linea del combustibleest_bloqueada.
3. Nose introdujocompletamentela Ilave.
4. Se hadesconectadoel cable de la bujia.
5. La bujia nofunciona correctamente.
6. El motornoest_ cebado.
7. El motorest_ ahogadoya queha sidocebado
demasiado.
1. El motorestAfuncionandoen la posici6n"choke"
(cebador).
2. La linea del combustibleest_tapada o el
combustiblees viejo.
3. Hayagua o suciedaden el sistemade combustible.
4. Es necesarioregularel carburador.
1. Lleneel dep6sito con gasolinalimpiay nueva.
2. Limpielalinea delcombustible.
3. IntroduzcacompletamentelaIlave.
4. Conecteel cable a la bujia.
5. Limpiela bujia,ajustela distanciadisruptivao cambie la
bujia.
6. Cebeel motordecinco a siete veces.
7. Aguardeal menos diez minutosantesde encenderel
motor.
1,
2.
3,
Mueva la palanca del cebadora la posici6nOFF
(apagado).
Limpiela linea del combustibley Ileneel dep6sito con
gasolinalimpia y nueva.
Vacie el tanque de combustible.Vuelvaa Ilenarel
dep6sitocon combustiblenuevo.
Comuniquesecon un centrode servicioSears.
Comuniquesecon un centrode servicioSears.
Conectefirmementeel cable de la bujia.
Destapela ventilaci6n.
4,
Elmotorrecalienta 1. Es necesarioregularel carburador. 1.
Perdidade potencia 1. El cable de la bujia est_flojo. 1.
2. La ventilaci6nde la tapa del combustibleest_ 2.
obstruida.
Vibraci6nexcesiva 1. Haypiezas queest_nflojas o labarrenaest_ 1. Detengael motorde inmediatoy desconecteelcable
daSada, de la bujia.Controlesi la m&quinaest_ daSada.Ajuste
todos lospernosy lastuercas. Realicelasreparaciones
necesarias.Siel problemacontinQa,Ilevela unidad a un
distribuidorde servicioSears.
La m&quinaquitanieveno se 1. El cabledel control de la barrenanecesitaun ajuste. 1. Ajusteel cablede controlde la barrenatal y comose
autopropulsa 2. La correa de transmisi6nde la barrenaest_ floja o muestraen lasecci6nde Servicioy Mantenimiento.
daSada. 2. Reemplacela correade transmisi6nde la barrena.
Las barrenassiguen girando 1. Elcable del controlde la barrenanecesitaun ajuste. 1. Ajusteel cable de control de labarrenatal y comose
muestraen lasecci6nde Servicioy Mantenimiento.
La unidad no descargala 1. Elconjuntodel canalest_ tapado. 1.
nieve
2. Hayun objeto extraSoen la barrena.
3. El cable del controlde la barrenanecesitaun ajuste.
4. La correa de la barrenaest&floja o daSada.
Detengael motory desconecteel cablede la bujia.
Limpieel canal y el interiorde la caja de la barrenacon la
herramientade limpiezao una varilla.
2. Detengael motorde inmediatoy desconecteelcable de
la bujia. Retireel objetode la barrena.
3. Ajusteel cabledel controlde la barrena.
4. Reemplacela correade la barrena.
49
MTD CONSUMER GROUP, iNC. (MTD), el Bordo de Recursos de Aire de California (CARB)
y la Agencia de Protecci6n Medioambiental de Estados Unidos (U. S. EPA)
Declaraci6n de Garantia del Sistema de Control de Emisiones
(Derechos y obligaciones del propietario seg_n la garantia contra defectos)
LACOBERTURADESISTEMADECONTROLDEEMISIONESAPLICABLEA MOTORESCERTIFICADOSCOMPRADOSENCALIFORNIA
EN2005Y A PARTIRDE ENTONCES,QUESON USADOSEN CALIFORNIA,Y HASTAANO2005DE MODELOCERTIFICADOY MOTORES
POSTERIORESQUESON COMPRADOSY USADOSENOTRAPARTEEN LOSESTADOSUNIDOS.
Californiayen otra parteen la Coberturade Garantiade Defectosde Controlde Emisi6nde los EstadosUnidos
El Bordode Recursosde Aire de California(CARB),la U. S. EPAy MTDsecomplacenen explicarla garantiadel sistemade controldeemisiones
de su motorparaequipotodo terreno,modelo,aSo2005y versionesposteriores.EnCalifornia,los nuevosmotorespequeSosparaequipotodo
terrenose debendise5ar,fabricary equiparparacumplirconest_.ndaresde antinieblat6xicade estados.En otraparteen los EstadosUnidos,
el nuevono camino,motoresde ignici6nde chispacertificadosparaelmodelo2005y m_.starde,debeencontrarel juego de est_.ndaressimilar
adelanteporlos EstadosUnidos.EPA.MTDdebe garantizarel sistemadecontrolde emisionesde su motorpor elperiodode tiempoindicadom&s
abajo,siemprey cuandono hayaexistidousoincorrecto,negligencianimantenimientoinadecuadode su motorpequeBoparaequipotodoterreno.
El sistemade controlde emisionespuedeincluirpiezascomo,porejemplo,el carburador,sistemadeinyecci6ndecombustible,el sistemade
encendido,el catalizador,losdep6sitosde combustible,abastecedecombustiblelineas, gorrasde combustible,v&lvulas,latas,filtros,mangueras
devapor,abrazaderas,conectoresy otroscomponentesrelacionadoscon lasemisiones.
Dondeexistaunacondici6ncubiertapor la garantia,MTDreparar&su motorpequeBoparaequipotodoterrenosincostoalgunoincluyendoel
diagn6stico,laspiezasy la manode obra.
COBERTURA DE LA GARANTJA DEL FABRICANTE:
Estesistemade controldeemisionesse garantizaporel t@rminodedos a5os.Si algunapiezade su motorrelacionadacon lasemisioneses
defectuosa,MTD reparar&o sustituir&dichapieza.
RESPONSABJLIDADES DEL PROPIETARIO SEGUN LA GARANTJA:
Comopropietariodeun motorpequeSode equipotodoterreno,ustedes responsablede realizarel mantenimientonecesarioquefigura enel
manualdel propietario. MTDle recomiendaqueconservetodoslos recibosque cubrenlos serviciosde mantenimientodel motorpeque5opara
equipotodoterreno,noobstanteIo cual MTDno podr&denegarel cumplimientodela garantiaQnicamenteporlafaltade reciboso porsu imposibi-
lidadde asegurarque se realizar_.ntodos los serviciosde mantenimientoprogramado.
Comopropietariodelmotorpeque5oparaequipotodo terreno,sinembargo,ustedtambi@ndebesaberque MTDpuede denegarlacoberturadela
garantiasi su motorpeque5oparaequipotodoterrenoo unapiezadel mismofallandebido a usoincorrecto,negligencia,mantenimientoindebido
o a modificacionesnoaprobadas.
Ustedes responsablede presentarla cortadorade cespedal centrode distribuci6no de mantenimientode MTDCONSUMERGROUP,INC.tan
prontocomoaparecierael problem& Lasreparacionescubiertaspor lagarantiasedebenIlevaracabo enun lapsorazonableque no excedade
30dias. Si desearealizaralgunaconsultacon respectoa la coberturade la garantia,debe ponerseen contactocon su distribuidorlocalde MTD.
Paracomunicarseconla Linea de Asistenciaal Clientede Distribuidoresde MTD,Ilameal nQmero(877)282-8684.
REQUERJMJENTOS DE GARANTJA SOBRE DEFECTOS PARA MOTORES PEQUENOS DE EQUJPO TODO TERRENO
DE 1995YVERSJONES POSTERJORES:
Estasecci6nse aplicaa motorespeque5osdeequipotodo terrenode 1995y versionesposteriores.El periodode garantiacomienzaa partirde la
fechaen que el motoro el equipo seentreganal compradorfinal.
(a) Coberturade la garantiacontraemisionesgenerales
MTDgarantizaal compradorfinaly a cada compradorsubsiguienteque el motor:
(1)hasido diseSado,construidoy equipadode maneraque cumplacontodas las regulacionesvigentesadoptadasporel Departamentode los
RecursosdeAire envirtuda suautoridadconferidaen los capitulos1y 2, Parte5, Divisi6n26del C6digode Saludy Seguridad;y
(2)est,. librede defectosen los materialesyen la manode obraque causenla falla de una piezabajo garantiaque seaid@nticaen todos los
aspectosmaterialesa lapiezacomoaparecedescriptaen la aplicaci6ndel fabricantedel motorparacertificaci6npor un periodode dos a5os.
_arantia sobre piezasrelacJonadasconemisJonesse interpretar_,de la sJguientemanera:
(1)Cualquierpiezacubierta por garantiaque no est@programadapara su reemplazosegQnel mantenimientorequeridoenlas instrucciones
escritasdela Subsecci6n(c) debeestar garantizadapor unperiodode garantiadefinidoen la Subsecci6n(a)(2). Si la piezafalladurante
el periodode coberturade la garantia,lamismaser_.reparadao reemplazadaporMTD de acuerdocon la Subsecci6n(4) a continuaci6n.
Cualquierpiezareparadao reemplazadasegQnlagarantiasegarantizarB,porel resto del periodode garantia.
(2) Cualquierpiezacubiertaporgarantiaque est@programadasoloparainspecci6nregularen las instruccionesescritasde la Subsecci6n
(c) debeestargarantizadaporun periododegarantiadefinidoenla Subsecci6n(a) (2). Unadeclaraci6nen dichasinstruccionespor escrito
alefectode "reparaci6no reemplazosegQnseanecesario"no reducir_,el periodode coberturade la garantia.Cualquierpiezareparadao
reernplazadasegQnlagarantiasegarantizar_,porelrestodelperiododegarantia.
(3) Cualquierpiezagarantizadaqueest_prograrnadaparareernplazosegQnelrnantenirnientorequeridodeconforrnidadconlasinstruc-
clonesescritasdelaSubsecci6n(c)segarantizaporelperiododetiernpoanterioralaprirnerafechadereernplazoprograrnadaparaesa
pieza.Silapiezafallaantesdelprimerreernplazoprogramatic,larnisrnaser_.reparadaoreernplazadaporMTDdeacuerdoconlaSubsecci6n
(4)acontinuaci6n.Cualquierpiezareparadaoreernplazadabajogaranfiasegarantizar_,porelrestodelperiodoanterioralprimerreernplazo
programaticpuntualparaesapieza.
(4)Lareparaci6noelreernplazodecualquierpiezagarantizadadeconforrnidadconlasdisposicionesdelagaranfiaqueaquiseestipulase
deberealizarenuncentrodegaranfiasincostoalgunoparaelpropietario.
(5)SinperjuiciodelasdisposicionesdelaSubsecci6n(4)anterior,losserviciosoreparacionescubiertosporlagaranfiadebensersurnin-
istradosportodosloscentrosdedistribuci6ndeMTDquetenganlafranquiciapararealizarreparacionesyrnantenirnientoalosrnotoresen
cuesti6n.
(6)ElpropietarionodebeafrontarningQncargoparatrabajosdediagn6sticoqueIlevenalaconclusi6ndequeunapiezabajogaranfiapresenta
efectivarnentedefectos,siernpreycuandodichodiagn6sticoseaIlevadoacaboenuncentrocubiertoporlagarantia.
(7)Elfabricantedelmotoresresponsableporda_oscausadosaotroscornponentesdernotoresderivadosdelafallabajogaranfiadecualquier
piezagarantizada.
(8)DurantetodoelperiododegaranfiadelmotordefinidoenlaSubsecci6n(a)(2),MTDrnantendr_,unsurninistrodepiezascubiertaspor
garantiasuficienteparasatisfacerladernandaesperadaparatalespiezas.
(9)Cualquierpiezadereernplazosepodr_,usarparaelcurnplirnientodelrnantenirnientooreparacionesbajogaranfia,ysesurninistrar_,sin
cargoalpropietario.Dichousonoreducir_,lasobligacionesdegarantiadeMTD.
(10)Nosepodr_.nusarpiezasadicionalesnirnodificadasquenoest_nexentasdeacuerdoconelDepartarnentodelosRecursosdelAire(Air
ResourcesBoard).Elusodepiezasadicionalesornodificadasnoexentasser_.causasuficienteparaanularunreclarnobajogaranfiarealizado
deacuerdoconestearticulo.Elfabricantedelmotornotendr_,responsabilidad,enconforrnidadconestearticulo,degarantizarfallasdepiezas
garantizadasquefuerencausadasporelusodeunapiezanoexentaadicionalornodificada.
.(c)MTDincluir_,unacopiade la siguientelistade piezasbajogarantiacontraernisionescon cadanuevomotor,utilizandolas partesde la lista
a_plicablesal motor.
(1)Sisternadernedici6nde combustible
• Sisternade rnejorapara inicioen frio (cebadosuave)
• Carburadory cornponentesinternos
• Bornbade combustible
• Dep6sitodecombustible
(2) Sisternade inducci6nde aire
• Filtrode aire
• Colectordeentrada
(3) Sisternade encendido
• Bujia(s)
• Sisternadeencendidopor magneto
(4)Sisternadeescape
• Catalizador
• SAI (v_Jvulade Ca_a)
(5) Cornponentesvariosutilizadosen el sisternaanterior
• V_Jvulase interruptoresde vado, ternperatura,posici6nsensiblesal tiernpo
• Conectoresy rnontajes
(6)Controlde Evaporative
• Manguerade CombustiblecertificadaparaARB evaporativeernisi6nde 2006.
• Abrazaderasde Manguerade Combustible
• Gorrade combustibleatada
• Latade carb6n
• Lineasdevapor
GD0C-100174Rev.B
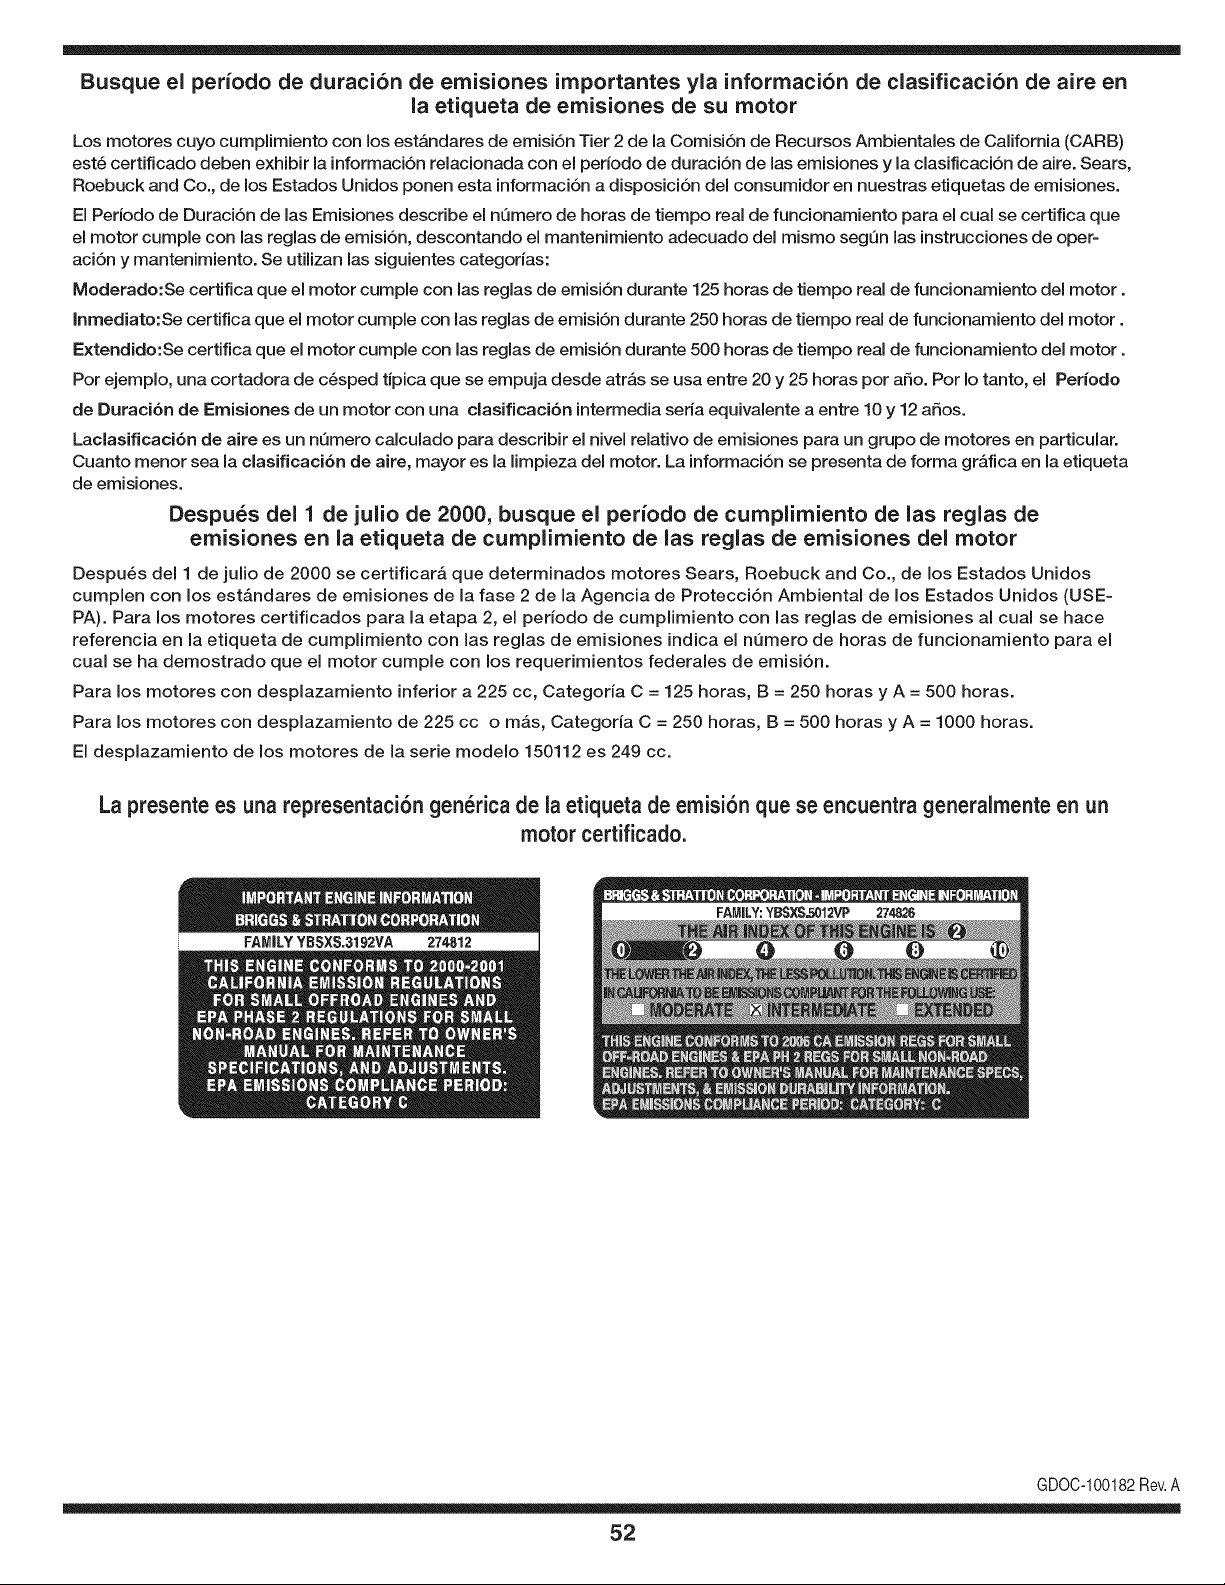
Busque el periodo de duraci6n de emisiones importantes yla informaci6n de clasificaci6n de aire en
la etiqueta de emisiones de su motor
Los motores cuyo cumpiimiento con los estAndares de emisi6n Tier 2 de la Comisi6n de Recursos Ambientales de California (CARB)
est6 certificado deben exhibir la informaci6n relacionada con el perJodo de duraci6n de las emisiones y la clasificaci6n de aire. Sears,
Roebuck and Co., de los Estados Unidos ponen esta informaci6n a disposici6n deJ consumidor en nuestras etiquetas de emisiones.
El Periodo de Duraci6n de las Emisiones describe el nQmero de horas de tiempo real de funcionamiento para el cual se certifica que
el motor cumple con las reglas de emisi6n, descontando el mantenimiento adecuado deJ mismo segQn las instrucciones de oper-
aci6n y mantenimiento. Se utilizan las siguientes categorias:
Moderado:Se certifica que el motor cumpie con las reglas de emisi6n durante 125 horas de tiempo real de funcionamiento deJmotor.
Inmediato:Se certifica que el motor cumple con las reglas de emisi6n durante 250 horas de tiempo real de funcionamiento deJ motor.
Extendido:Se certifica que el motor cumple con las reglas de emisi6n durante 500 horas de tiempo real de funcionamiento deJmotor.
Por ejemplo, una cortadora de c6sped tJpica que se empuja desde atrAs se usa entre 20 y 25 horas por afio. Por Io tanto, el Periodo
de Duraci6n de Emisiones de un motor con una clasificaci6n intermedia seria equivalente a entre 10 y 12 afios.
Laclasificaci6n de aJre es un nQmero calculado para describir eJnivel reiativo de emisiones para un grupo de motores en particular.
Cuanto menor sea Jaclasificaci6n de aire, mayor es JaJimpieza deJ motor. La informaci6n se presenta de forma gr&fica en Jaetiqueta
de emisiones.
Despu_s del 1 de julio de 2000, busque el periodo de cumplimiento de las reglas de
emisiones en la etiqueta de cumplimiento de las reglas de emisiones del motor
Despu_s deJ 1 de julio de 2000 se certificar_, que determinados motores Sears, Roebuck and Co., de los Estados Unidos
cumpien con los estAndares de emisiones de la fase 2 de la Agencia de Protecci6n Ambiental de los Estados Unidos (USE-
PA). Para los motores certificados para la etapa 2, el periodo de cumpiimiento con las reglas de emisiones al cual se hace
referencia en la etiqueta de cumpiimiento con las reglas de emisiones indica el nQmero de horas de funcionamiento para el
cuaJ se ha demostrado que el motor cumpie con los requerimientos federales de emisi6n.
Para los motores con desplazamiento inferior a 225 cc, Categoria C = 125 horas, B = 250 horas y A = 500 horas.
Para los motores con desplazamiento de 225 cc o mAs, Categoria C = 250 horas, B = 500 horas y A = 1000 horas.
El despiazamiento de los motores de la serie modelo 150112 es 249 cc.
La presente es una representaci6n gen_rica de la etiqueta de emisi6n que se encuentra generaimente en un
motor certificado.
FAMILYYBSXS.3192VA 274812
GDOC-100182Rev.A
52

Felicitacionespor haberrealizadouna adquisici6ninteligente.El
productoCraftsman@queha adquiridoest_ dise_adoy fabricado
parabrindarrnuchosa_osde funcionarnientoconfiable.Perocorno
todoslos productosa vecespuederequerirde reparaciones.Esen
esernornentocuandoel disponerde un Acuerdode protecci6npara
reparacionesle puedeahorrardineroy problernas.
A continuaci6nsedetallanlos puntosincluidosenel Acuerdo:
• Servicio experto prestadopor nuestros10,000especialistasen
reparacionesprofesionales
• Servicio ilirnitadosincargoparalaspiezasy la rnanodeobraen
todaslas reparacionescubiertas
• Reernplazodel productohasta1500d61aressi no es posible
repararel productocubierto
• Descuentode 10%del precionormaldel servicioy de las piezas
relacionadascon el rnisrnoqueno est_ncubiertaspor el acuerdo;
adern&s,10%del precionormalde laverificaci6nde rnanten-
irnientopreventivo
• Ayudar_pidapot tel_fono- IoIlarnarnosResoluci6nR_pida- el
apoyotelef6nicode un Charnuscaal representante.Pienseen
nosotroscornoel manual"de undue_ohablador."
Unavezadquiridoel Acuerdo,puedeprograrnarel serviciocon
tan s61orealizaruna Ilarnadatelef6nica.PuedeIlarnarencualquier
mornentodeldia o dela nocheo prograrnarun servicioen linea.
ElAcuerdode Protecci6nde Reparaci6nes una cornprasin riesgo.
Siustedanulapor alguna raz6nduranteel periodode garantiade
producto,proporcionarernosun reernbolsoIleno.O,un reernbolso
prorrateadoencualquiermornentodespu_sdelperiodode garantia
de productoexpira, iAdquieraboysu acuerdode protecci6npara
reparaciones!
Seaplican deterrninadaslirnitaciones y exclusiones.Paraobtener
inforrnaci6nadicional y preciosen los Estados UnidosIlarne al
1-800-827-6655.
El*Coverage en Canad_variaen algunosarticulos. Paradetalles
Ilenosla IlarnadaCharnuscaCanad_en 1-800-361-6665.
Servicio de instalaci6nde Sears
Sideseasolicitarla instalaci6nprofesionalde Searsde aparatos
dorn_sticos,dispositivosparaabrir portones,calentadoresde agua
y otrosarficulosdorn_sticosirnportantes,en los EstadosUnidoso
Canad_Ilarneal 1-800-4-MY-HOME®.
53

54

55

Your Home
For expert troubleshooting and home solutions advice:
www.managemyhome.com
For repair - in your home - of all major brand appliances,
lawn and garden equipment, or heating and cooling systems,
no matter who made it, no matter who sold it!
For the replacement parts, accessories and
owner's manuals that you need to do-it-yourself.
For Sears professional installation of home appliances
and items like garage door openers and water heaters.
1-800-4-MY-HOME ® (1-800-469-4663)
Call anytime, day or night (U.S.A. and Canada)
www.sears.com www.sears.ca
Our Home
For repair of carry-in items like vacuums, lawn equipment,
and electronics, call anytime for the location of your nearest
Sears Parts & Repair Service Center
1-800-488-1222 (U.S.A.) 1-800-469-4663 (Canada)
www.sears.com www.sears.ca
To purchase a protection agreement on a product serviced by Sears:
1-800-827-6655 (U.S.A.) 1-800-361-6665 (Canada)
Para pedir servicio de reparaci6n
a domicilio, y para ordenar piezas:
1-888-SU-HOGAR ®
(1-888-784-6427)
Au Canada pour service en fran£ais:
1-800-LE-FOYER M°
(1-800-533-6937)
www.sears.ca
® Registered Trademark / TMTrademark / SM Service Mark of Sears Brands, LLC
SM
® Marca Registrada / TMMarca de F&brica / Marca de Servicio de Sears Brands, LLC
MCMarque de commerce / MD Marque depos6e de Sears Brands, LLC © Sears Brands, LLC