Loading ...
Loading ...
Loading ...
iii i ., .......
i iiiii i i ii i iii IHII I
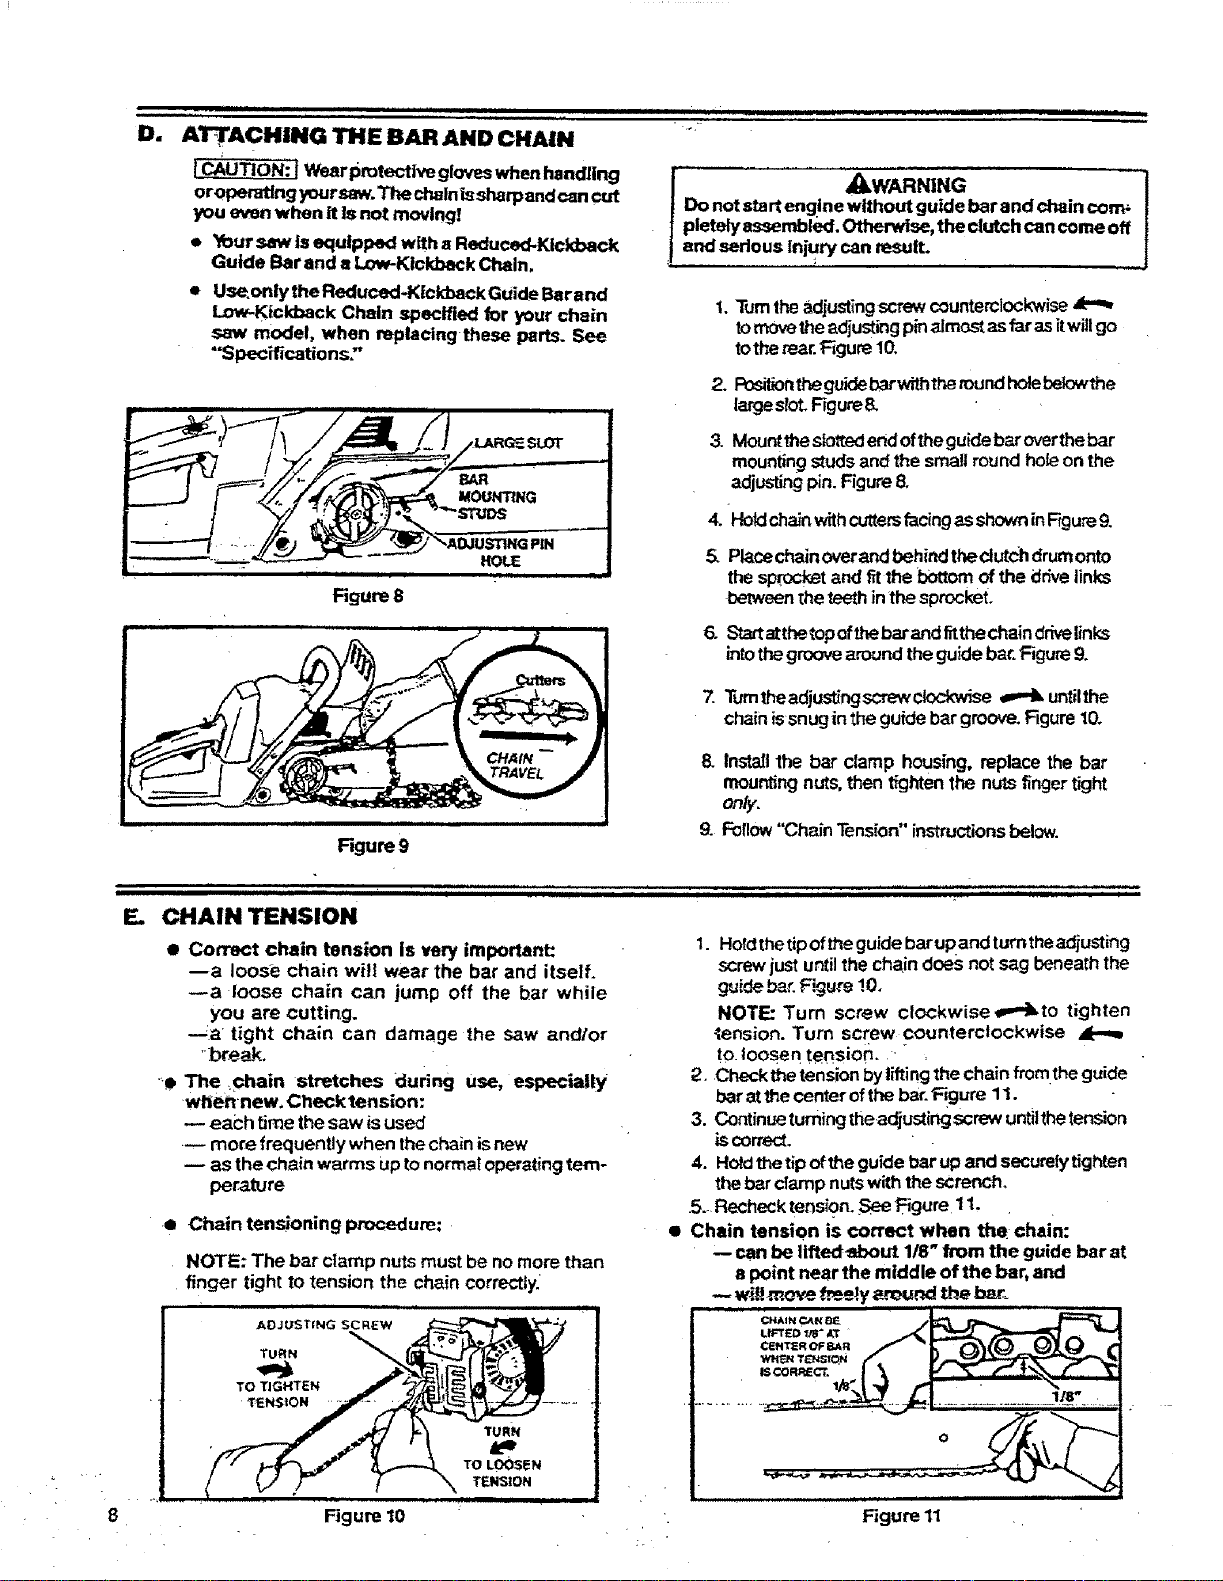
D. ATTACHING THE BAR AND CHAIN
I_TlON'i l Wear protective gloves when handling
oroperattng yoursaw. The chalnissharpandcan cut
you even when it iS not mcMng!
e Your saw is equipped with a Reduced-Kickback
Guide Bar and a Low-Kickback Chain.
• Use.only the Reduced-Kickback Guide Bar and
Low-Kickback Chain specified for your chain
saw model, when replaclngthese parts. See
"'Specifications:'
iiiIIIIIIIHIIIIIIIIII
Figure 8
CHAIN _ _
Figureg
•,WARNING 1
Do not startengine without guide bar and chain corn,
pletely assembled. Otherwise, the clutch can come off
and sedous Injury can IvP_ult.
t. "rumtheadjustingscrew counterclockwise
tomovetheadjusting pinalmostasfarasitwillgo
tothemar._gure 10,
2. F_silionthe guide bar withthe roundhole be_the
large sFot.Figure&
3. Mountthe slettedend ofthe guide bar overthe bar
mounting s_Jdsand the smatl round hole on the
adjusting pin. Figure 8.
4. HoU chainwith cuttersfacingas shown in Figure 9.
5. Piece chain overand behind thedutch drum onto
the sL:_'ocketand fit the bottom of the ddve links
between the teeth in the sprockeL
6. Start atthe topofthe barand fitthe chain drive links
intothe groove around the guide bar. Figure 9.
7. Tumtheadjust_ngscTewclockwise_ untilthe
chainissnucjintheguide bargroove. F_gure10.
8. lnstaJtthe bar clamp housing,replacethe bar
mountingnuts,then _htan the nutsf_ngertight
only,
9. Forlow"Chain Tension" instructions below.
i . iiiiii i i ii ii i i
r. CHAIN TENSION
• Correct chain tension is very important:
--a loose chain will wear the bar and itself.
--a loose chain can jump off the bar while
you are cutting.
_a rtight chain can damage the saw andlor
'break,
_e The _¢hain stretches during use, especially
when new. Check tension:
each timethesaw isused
._ more frequentlywhen thechainisnew
as the chainwarms Uptonormaloperatingtem-
perature
• Chain tensioning procedure:
NOTE: The bar clamp nuts must be no more than
finger tight to tension the chain correctly.
iiiiii ii ii i ii i i i
1. Hotdthetipoft_eguidebarupandtumtheadjusting
screw just until the chain does not sag beneath the
guide ba_ Figure 10.
NOTE: Turn screw clockwise_"ikto tighten
_ension. Turn screw counterclockwise
to. loosen tensior_.
2. Checkthe tension by lifting the chain fromthe guide
bar at the center of the bar. Figure 11.
3. Continue turning theadjusting screw untilthe tension
iscorrect.
4. Hotdtf_etlp of the guide bar up and securely tighten
the barclamp nuts with the scrunch.
5.. Recheck tension. _SeeFigure 11.
• Chain tension is correct when the Ichain:
can be lifted-about 118" from the guide bar at
a point near the middle of the bar, and
w*:t_move _J.y _round the i=_r._
Figure 10 Rgure 11
Loading ...
Loading ...
Loading ...