Loading ...
Loading ...
Loading ...
IMPORTANT OPERATING INSTRUCTIONS -
Check to see that the carton contains the following
items illustrated on pages 4 and 5.
One Chuck Cap - Part Number 660113
One Co!let - Part Number 480
One Chuck Wrench - Part Number 500045
Two Spacers
One Guide Gauge
Three Grinding Stones -
Part Numbers 36581, 82 & 83
Sharpener - Part Number 36578
IMPORTANT: If any of these parts are missing,
please IMMEDIATELY notify the Sears retail or
catalog store from which you purchased the sharp-
ener so corrective action can be taken as quickly as
possible,,
Read this manual carefully, It will help you use your
tool correctly and help you select the correct
accessory for your job
Your Craftsman Saw Chain Sharpener will sharpen
nearly all popular sizes of chain if you follow these
simple instructions
ALWAYS UNPLUG TOOL BEFORE CHANGING
GRINDING STONES OR SERVICING YOUR TOOL.
CHUCK--Consists of a chuck cap and collet. To
loosen, first unplug the sharpener from the power'
supply, then depress the chuck lock pin and rotate
the shaft by hand until the lock pin engages the shaft
preventing further rotation. NOTE: Do not depress
pin while the tool is running. With the lock pin
depressed, use the chuck wrench to loosen thechuck
cap Insert shank of grinding stone into colteL With
the lock pin depressed, tighten the chuck cap with
the wrench until the shank is gripped by the collet.
Avoid excessive tightening of the chuck cap.
CHUCK LOCK PIN -_J"
. I _'_ A'_ CHUCK
CHUCK j___j_-_,.,--_ _"_'_--- CAP
WRENCH / -- _
TO LOOSEN \COLLET
CAUTION--Any servicing of this tool (including
brush replacement) should be performed by an
authorized Sears service representative,
MAINTENANCE--The brushes in this tool are self-
limiting. This means that when the brushes are worn
out, they stop making contact with the commutator
and the toot wilt stop running This is done to
e_iminate the possibility of a piece of the brush
and/or the spring getting loose inside the toot when
the brushes are worn out.
Read before using.Chain Saw Sharpener
Just prior to the tool stopping it wdl start to run
sporadically, it will lose power and it may run at a
reduced speed and make unusual noises
BALANCING GRINDING STONES--It is important
that all grinding stones be in good balance (much
the same as the tires on your automobfle)_ To true
up or balance a grinding stone, slightly loosen chuck
cap and give the grinding stone or cotter a ¼ turn,
Retighten chuck cap and run the tool, You should
be able to tell by the sound and feel if your grinding
stone is running in balance.. Continue adjusting in
this fashion until best balance is achieved.
BEARINGS--Your tool is equipped with oil impreg-
nated sleeve bearings. Under normal use not more
than 2 drops of SAE No 5 or lighter, non-detergent
otl can be added to each oil hole for each 100 hours
of use,
STONE DIAMETER--Do not use grinding stones
other than the 3 listed in the chain identification
chart.
SAFETY--Protect your eyes when grinding with the
tool .... always wear an approved type of safety
glasses.
ADJUSTING SHARPENER
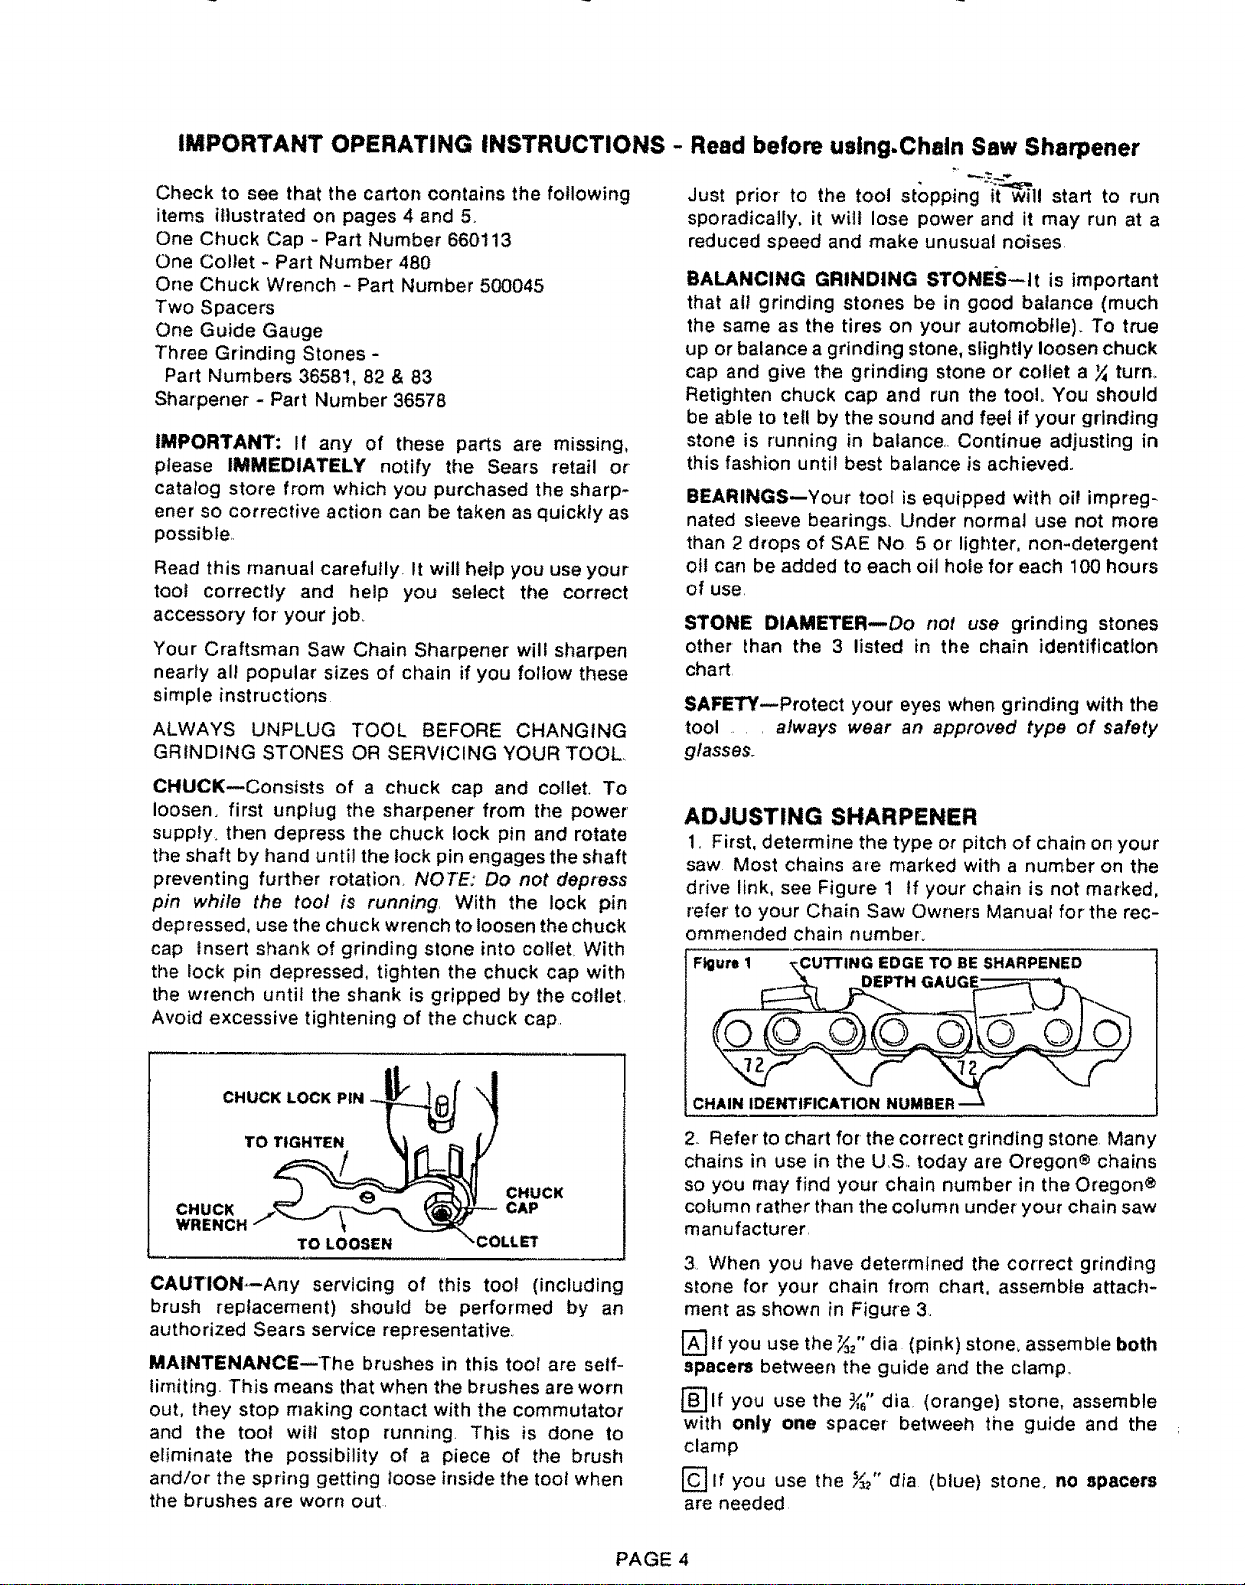
1, First, determine the type or pitch of chain on your
saw Most chains are marked with a number on the
drive link, see Figure 1 tf your chain is not marked,
refer to your Chain Saw Owners Manual for the rec-
ommended chain number.
Figure 1 _\CUTTING EDGE TO BE SHARPENED
© ©
c
2,, Refer to chart for the correct grinding stone Many
chains in use in the US,, today are Oregon® chains
so you may find your chain number in the Oregon®
column rather than the column under your chain saw
manufacturer,
3 When you have determined the correct grinding
stone for your chain from chart, assemble attach-
ment as shown in Figure 3,
If you use the _" dia (pink) stone, assembte both
spacers between the guide and the clamp.
rB]lf you use the ¾_"dia. (orange) stone, assemble
with only one spacer betweeh the guide and the
clamp
[_ If you use the _" alia (blue) stone, no spacers
are needed
PAGE 4
Loading ...
Loading ...
Loading ...