OPERATION
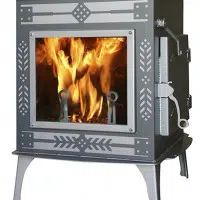
The Survival Hybrid Wood Stove is designed to burn clean at all times. The directions below detail how to maintain peak
efficiency and clean-burning.
Seasoning Your Stove
Seasoning is accomplished through a series of small to moderate wood fires. Don’t place anything on the top surface of
the stove until the paint has finished curing. There are two things you will notice during the first fire:
First, there will be a hot, acrid smell as the stove heats up. This smell is a result of the paint on the stove and pipe
curing. You will want to have your first fire on a day when you can open the windows in the house to provide adequate
ventilation. The odor is non-toxic and will only be present for the first few fires.
Second, there will be some condensation on the glass. This condensation is a result of any moisture being driven out of
the stove and condensing on the inner surface of the glass. It takes a couple of small fires to season the stove and remove
this excess moisture.
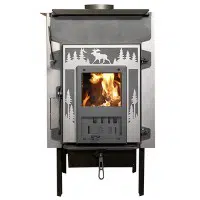
Getting to Know the Survival Stove Controls
Bypass Damper
When the bypass damper is open, smoke
travels directly from the firebox to the chim-
ney. When the bypass damper is closed,
smoke travels through the catalytic combus-
tor. The catalytic combustor burns the smoke
to produce more heat and cleaner exhaust.
Air Control
The air control damper on the load door con-
trols the rate the fuel is burned and the
amount of heat that the stove produces.
Move the air damper all the way to the right to
kindle a fire or maximum heat.
Slide the damper slowly to the left to decrease
the burn rate or heat output. The damper is very
sensitive; moving the damper just a fraction of
an inch will affect the burn rate and heat output.
Door Latch Detent
There is a small notch in the door handle. If
you close the door just to this notch, it will let
air in at the edge of the door. This will provide
a small boost when kindling a fire. Use the
detent to add a little air when starting a wood
fire, or just after reloading.
8
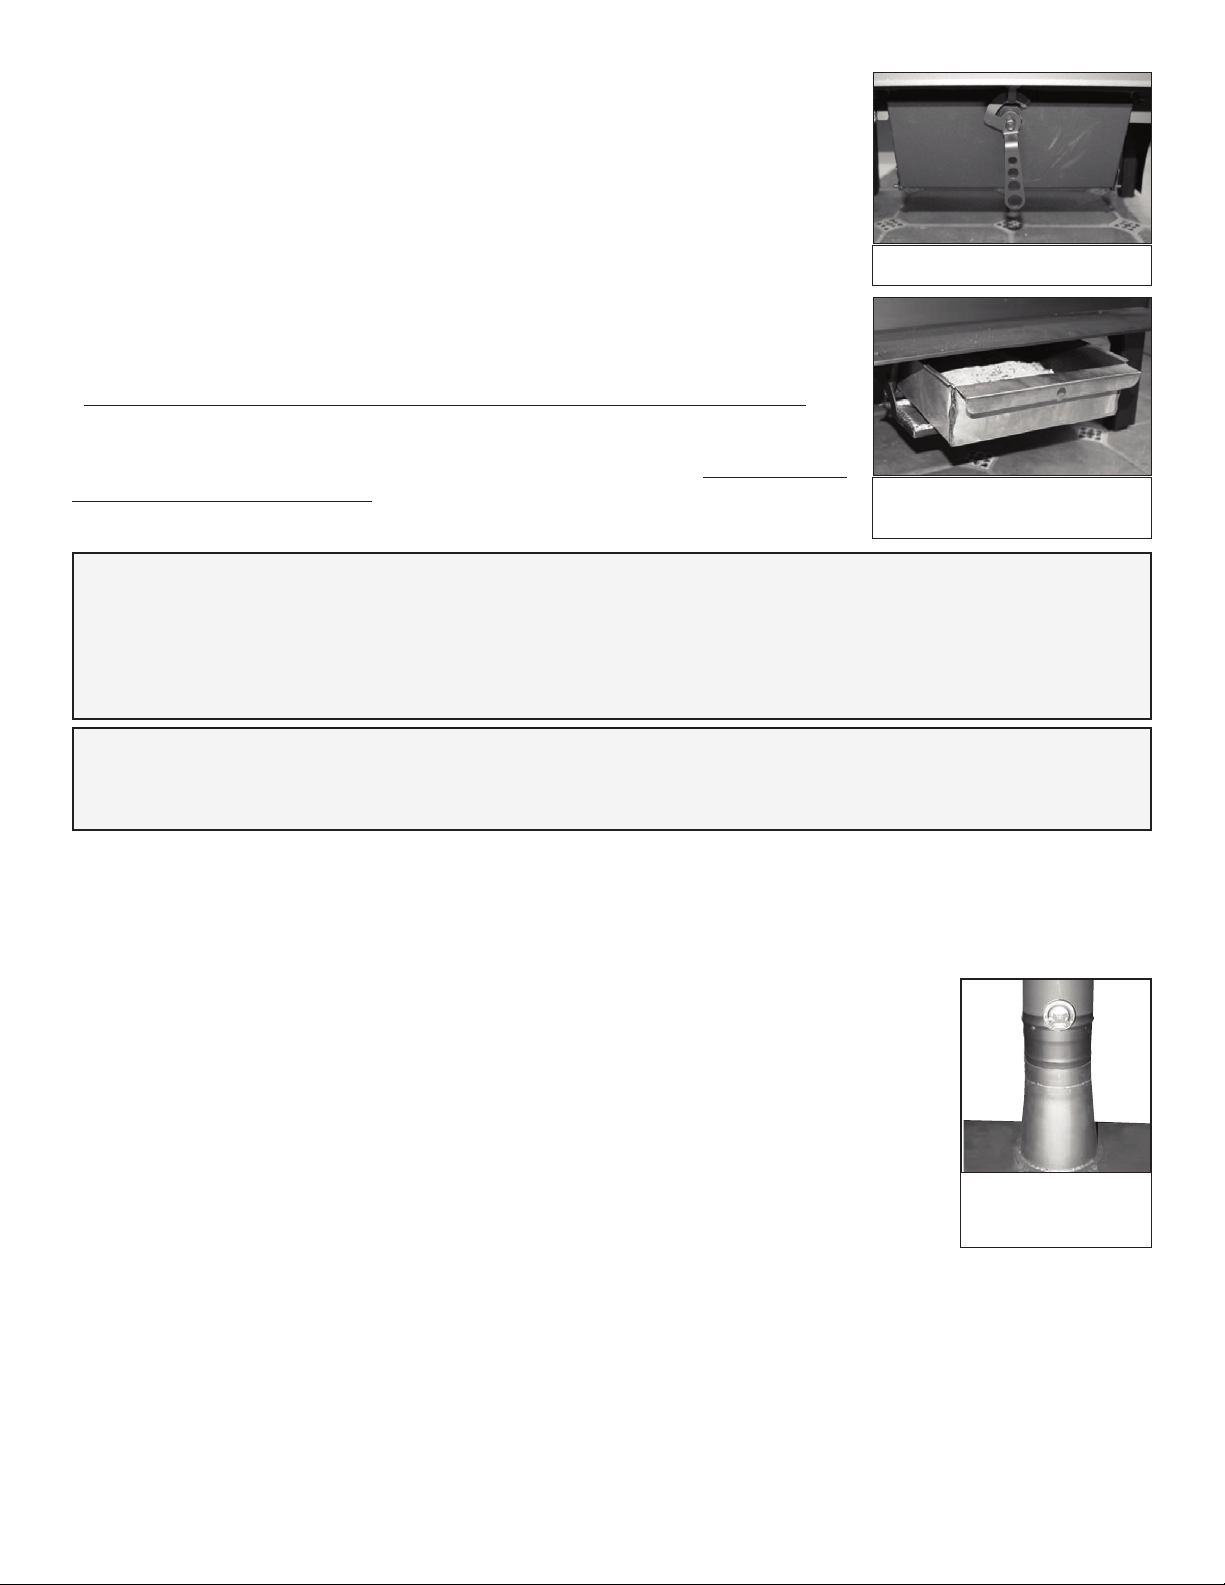
The Bypass Damper Handle must be opened to kindle a fire and to reload the stove. Close
the Bypass Damper Handle when the stove is in operation. The stove will produce more heat
and less smoke with the handle closed.
Bypass Damper Handle
Closed Position
Bypass Damper Handle
Open Position
Push RIGHT To Kindle a Fire, or
High Heat
Push LEFT For Low Fire, or
Long Burn Time
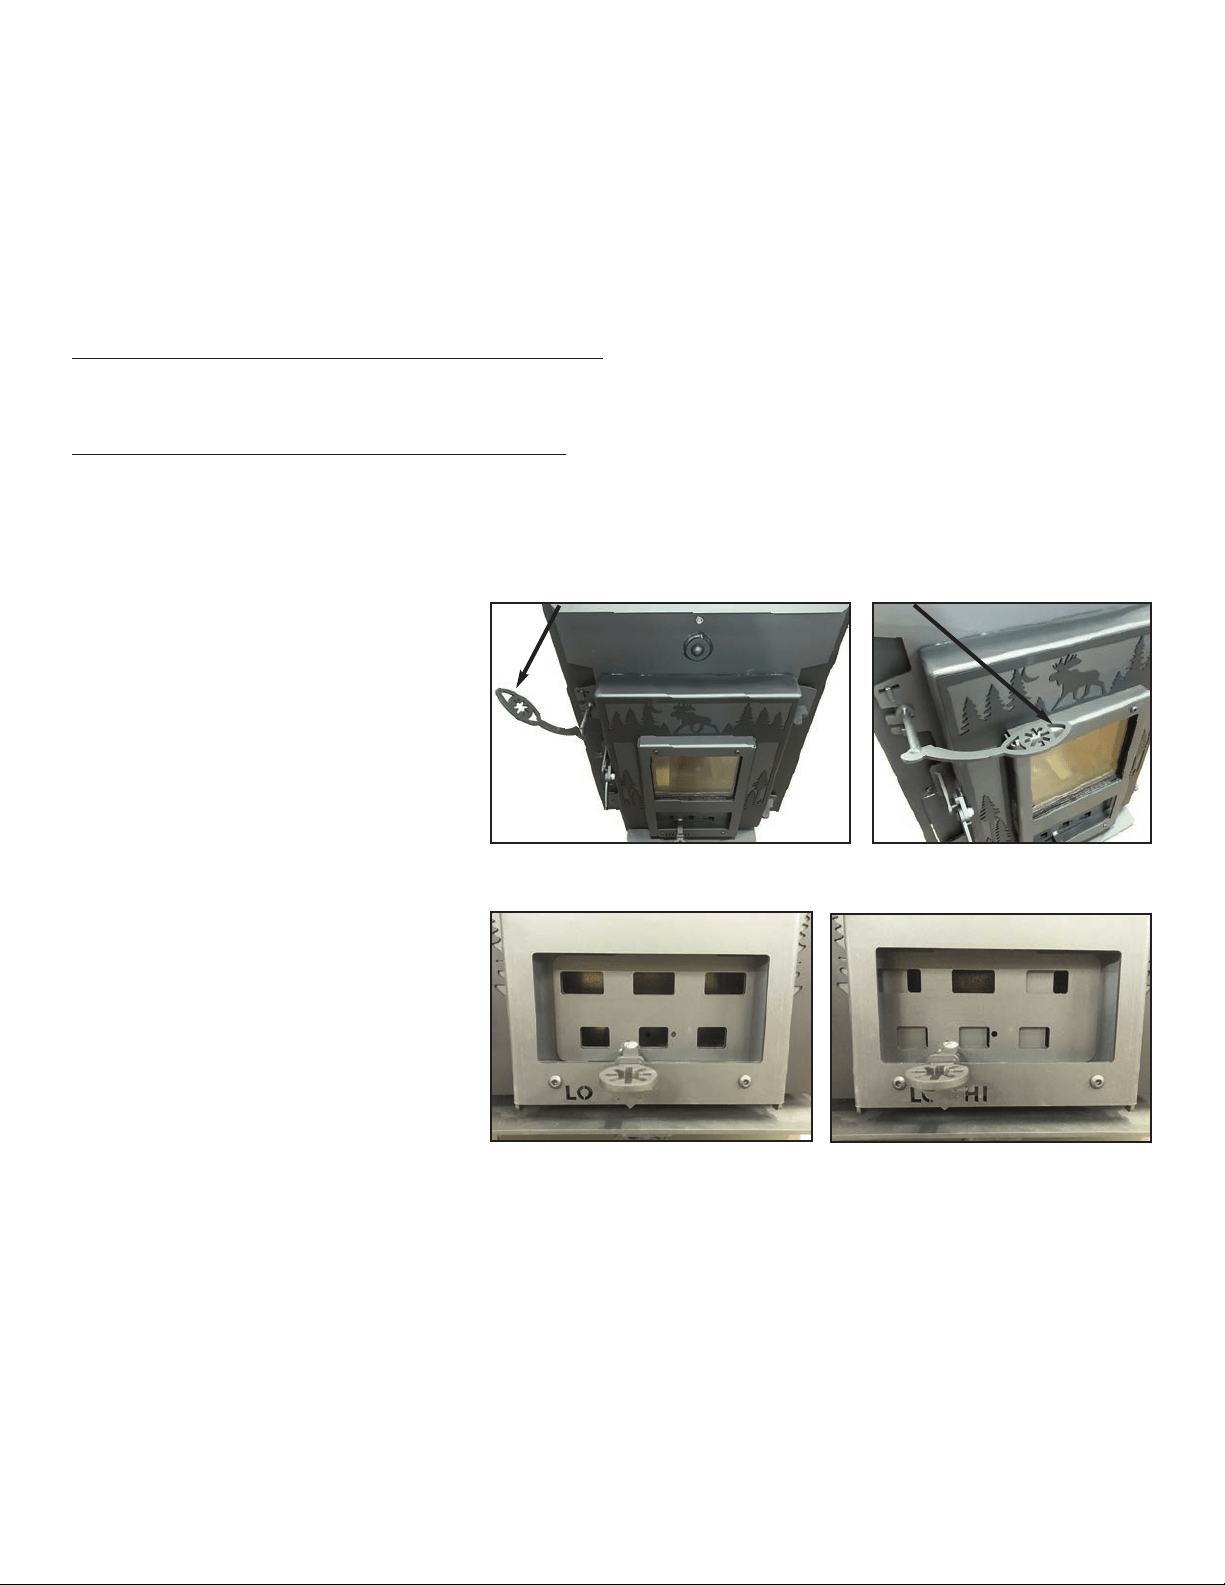
Wood Burning Operation
1) Open the Air Control Damper all the way (Figure 1)
2) Open the Bypass Damper (Figure 2). The Bypass Damper must be open to open the loading door. Keep the Bypass
Damper open to prevent smoke from spilling into the room when kindling the fire.
3) Always confirm there is adequate draft before lighting the fire. Hold a lit match or light a small piece of
newspaper in the top/back of the firebox, where smoke exits. If the flame is drawn out of the firebox, toward the
flue, proceed with lighting the fire. If the flame stands still or is pushed away from the flue exit, you must
establish a good draft before lighting a fire. A hair dryer or heat gun pointed at the flue exit is a good way to
establish draft without creating a lot of smoke. After you think you have draft, retest with a match.
4) Once good draft has been established, build a fire on the floor of the firebox.
DO NOT USE ADDITIONAL GRATES, ANDIRONS OR ANY OTHER METHODS TO SUPPORT THE FUEL
IN THE FIREBOX. Start with crumpled newspaper and dry kindling (Figure 3).
5) Add small splits of firewood once the kindling has ignited to establish a bed of hot coals.
6) Add small to medium splits onto the hot coals (Figure 4).
7) After the single wall pipe temperature reaches 200-250°F, close the Bypass Damper by lowering the handle down to
the closed position (Figure 5). All of the smoke from the firebox will now pass through the catalytic combustor. The
combustor will generate a substantial amount of heat as it “burns” the smoke passing through it.
8) Adjust the Air Control Damper to a lower setting, by sliding the Air Control to the left. The closer the air damper is
to being closed, the longer the wood will burn (Figure 6).
9
Figure 1
Figure 2
Figure 3
Figure 4
Figure 5
Figure 6
CAUTION
NEVER USE GASOLINE, GASOLINE TYPE LANTERN FUEL, KEROSENE, CHARCOAL LIGHTER FLUID OR SIMILAR
LIQUIDS TO START OR “FRESHEN UP” A FIRE IN THIS STOVE. KEEP ALL SUCH LIQUIDS WELL AWAY FROM THE
STOVE WHILE IT IS IN USE.
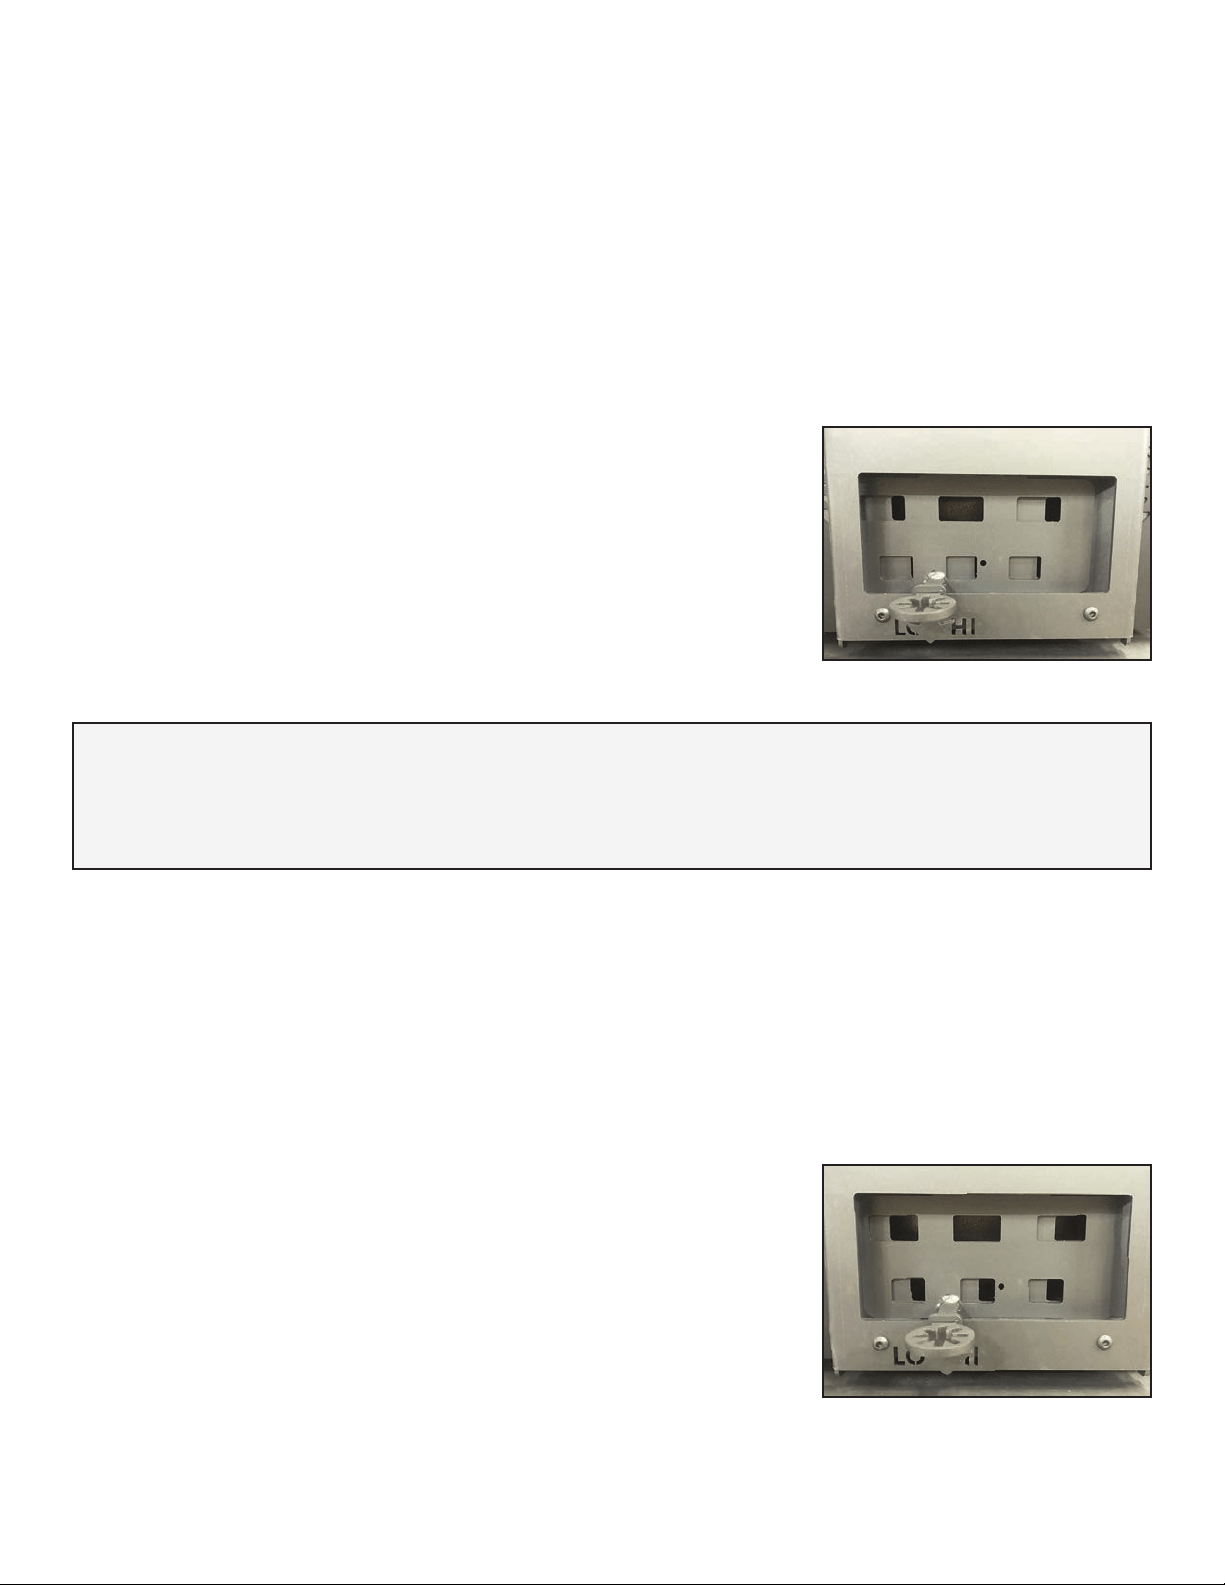
Low & Overnight Burning
These instructions are intended as a guide to operating your wood stove. Your timing and final damper settings will
vary depending on chimney draft, type of wood, moisture content of the wood and size of the splits. The Survival
Hybrid Wood Stove is simply designed and intended to be user friendly, but it will take some practice to understand
how the stove works best for you.
1) Before opening the loading door, open the bypass damper and the air control damper. Wait a minute or so, before
slowly opening the loading door, allowing a strong draft and prevent smoke from spilling into the room.
2) Wearing stove gloves, open the loading door and stir up the hot coals with a poker or rake. If necessary, excess ash
should be removed before reloading the firebox. Rake the hot coals back and forth in the firebox to allow the loose
ash to fall through the center grate into the ash pan. Dispose of the ash properly.
NEVER PUT AN ASH CONTAINER ON A COMBUSTIBLE SURFACE, LIKE A WOOD FLOOR.
3) Place several small splits on top of the hot coals and allow them to ignite.
4) Load the firebox to capacity leaving roughly 2” of space for secondary
combustion (stainless steel, perforated ceiling), with a mix of larger and
smaller split pieces of wood. Close the loading door.
5) Allow the temperature on the surface of single wall pipe or stove top to come
back up to 200°-250°, this may only take 5-15 minutes depending on the
dryness of the wood and draft conditions.
6) Adjust the Air Control Damper to a low setting, moving it to the left.
7) Close the Bypass Damper.
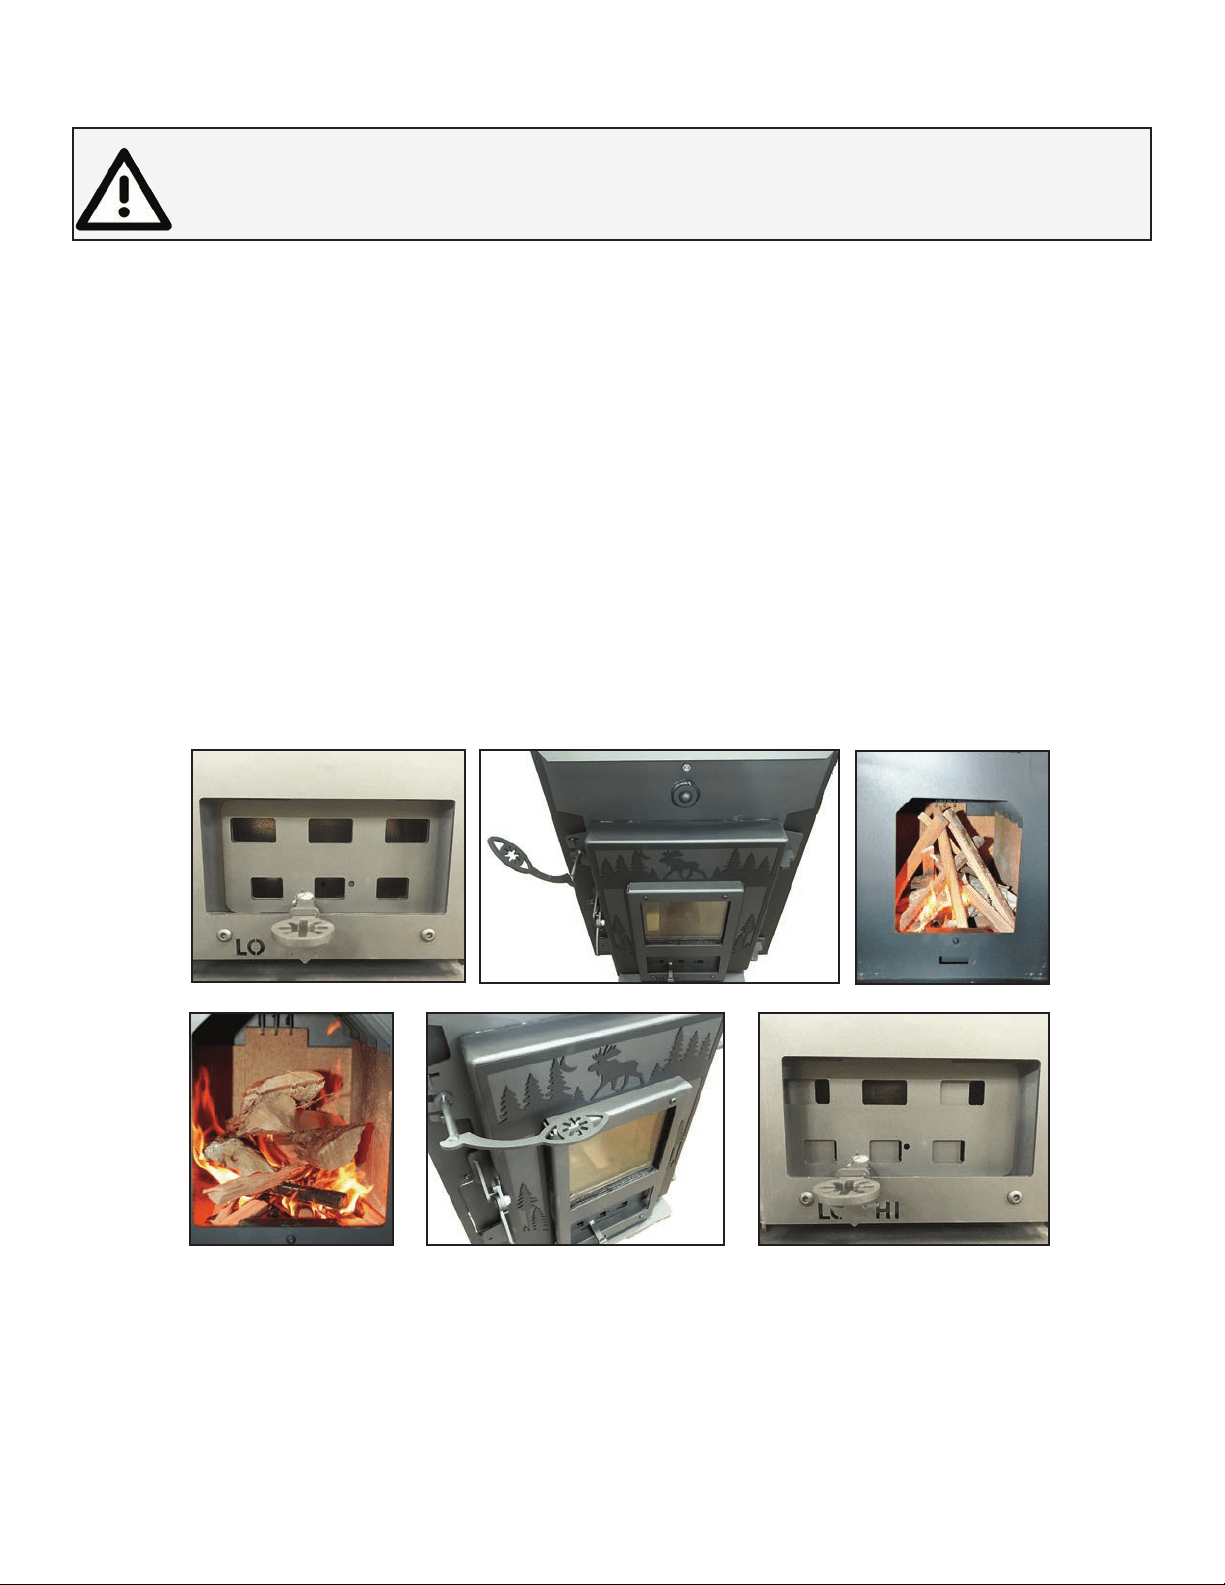
Burning for Higher Heat Output
These instructions are intended as a guide to operating your wood stove. Your timing and final damper settings will
vary depending on chimney draft, type of wood, moisture content of the wood, and size of the splits. The Survival
Hybrid Wood Stove is simply designed and intended to be user friendly, but it will take some practice to understand
how the stove works best for you.
1) Before opening the loading door, open the bypass damper and the air control damper. Wait a minute or so, before
slowly opening the loading door, allowing a strong draft and prevent smoke from spilling into the room.
2) Open the load door and and stir up the coals and remove excess ash as needed.
3) Place several small splits on top of the hot coals and allow them to ignite.
4) Load the firebox to capacity leaving about a 2”space for secondary
combustion (stainless steel, perforated ceiling), with a mix of larger and
smaller splits. Close the loading door.
5) Allow the temperature on the surface of single wall pipe or stove top to come
back up to 200°-250°. Lower the Combustion Air Control down to 1/2 open.
6) Adjust the Air Control Damper to roughly 1/2 open.
7) Close the Bypass Damper by lowering the lever until it stops.
8) You should see the flames from secondary combustion at the top of the firebox becoming more active.
10
DO NOT BURN THE STOVE WITH THE AIR DAMPER FULLY OPEN FOR EXTENDED PERIODS. USE THE FULL
OPEN POSITION TO KINDLE A FIRE, TO RELOAD THE FIREBOX, OR WHEN HIGH HEAT IS NEEED.
NEVER BUILD A ROARING FIRE IN A COLD STOVE. IT TAKES AT LEAST 30 MINUTES TO HEAT THE INNER
FIREBRICK WALLS OF THE SURVIVAL HYBRID. ATTEMPTS TO REACH HIGH TEMPERATURES VERY QUICKLY
COULD RESULT IN DAMAGE TO THE STEEL PARTS.
Air combustion set to 1/2 open
Low combustion air setting
Ash Removal
NEVER BURN THE STOVE WITH THE ASH DOOR OPEN!
If your Survival Hybrid Wood Stove is in continuous operation we recommend that
you check the ash pan every few days, and empty it at least once a week. Before
emptying out the ash pan, make sure that the fire is reduced to hot coals. Open bypass
damper, and open the air control damper. Remember to wear stove gloves - the ash pan
will be hot! Open the ash pan door located below the loading door. Carefully slide the lid
into place on the top of the ash pan and remove the ash pan from the base of the stove.
The lid slides over the long top edges of the ash pan. Close the ash pan door before
emptying the ashes into an appropriate container.
Do not open the ash removal door while the stove is in the middle of a long burn,
because the additional draft created under the fire could cause the stove to burn
excessively hot and the ash pan itself will be very hot, and full of live coals. If you are
burning your stove 24 hours/day, it is often easiest to empty the ashes first thing in the
morning, after an overnight burn.
Magnetic Thermometer
We recommend placing the magnetic thermometer 8”-10”above the flue collar on single wall stove pipe.
If you are reading the single wall stove pipe temperature, the interior flue exhaust temperature is
about twice as hot as the reading on the magnetic thermometer. We recommend engaging your
catalytic combustor once the pipe thermometer reaches 200°-250°F.
Once the temperature on the pipe has reached 200°-250°F and you have engaged the catalytic
combustor, move the magnetic thermometer to the stovetop, right over the catalytic combustor.
Since the exhaust has not been passing through this area, initially the temperature will be low (less
than 200°-250°F). As the catalytic combustor engages, this temperature will rise to the 300-500°F
range, or somewhat higher. This temperature can be high either when there are a lot of small
pieces of wood in the firebox (more surface area), or when there is a smoldering fire and lots of
smoke is passing through the catalyst. You will quickly learn what burning conditions produce
different temperatures. When you see reduced temperatures on this top thermometer, it is almost
always a sign that the catalyst needs to be removed and cleaned.
Overfiring
Burning a stove frequently at excessive temperatures is known as overfiring. When the surface temperature is
consistently over 700º F, the stove has reached 1400º F inside. Operation with temperatures in this range can lead to metal
warping, becoming brittle, and eventually deteriorating completely. It can shorten the useful life of the catalytic
combustor.
11
Place the surface thermome-
ter 8” above t he stove top for
top vent, or on the cover
plate for rear vent.
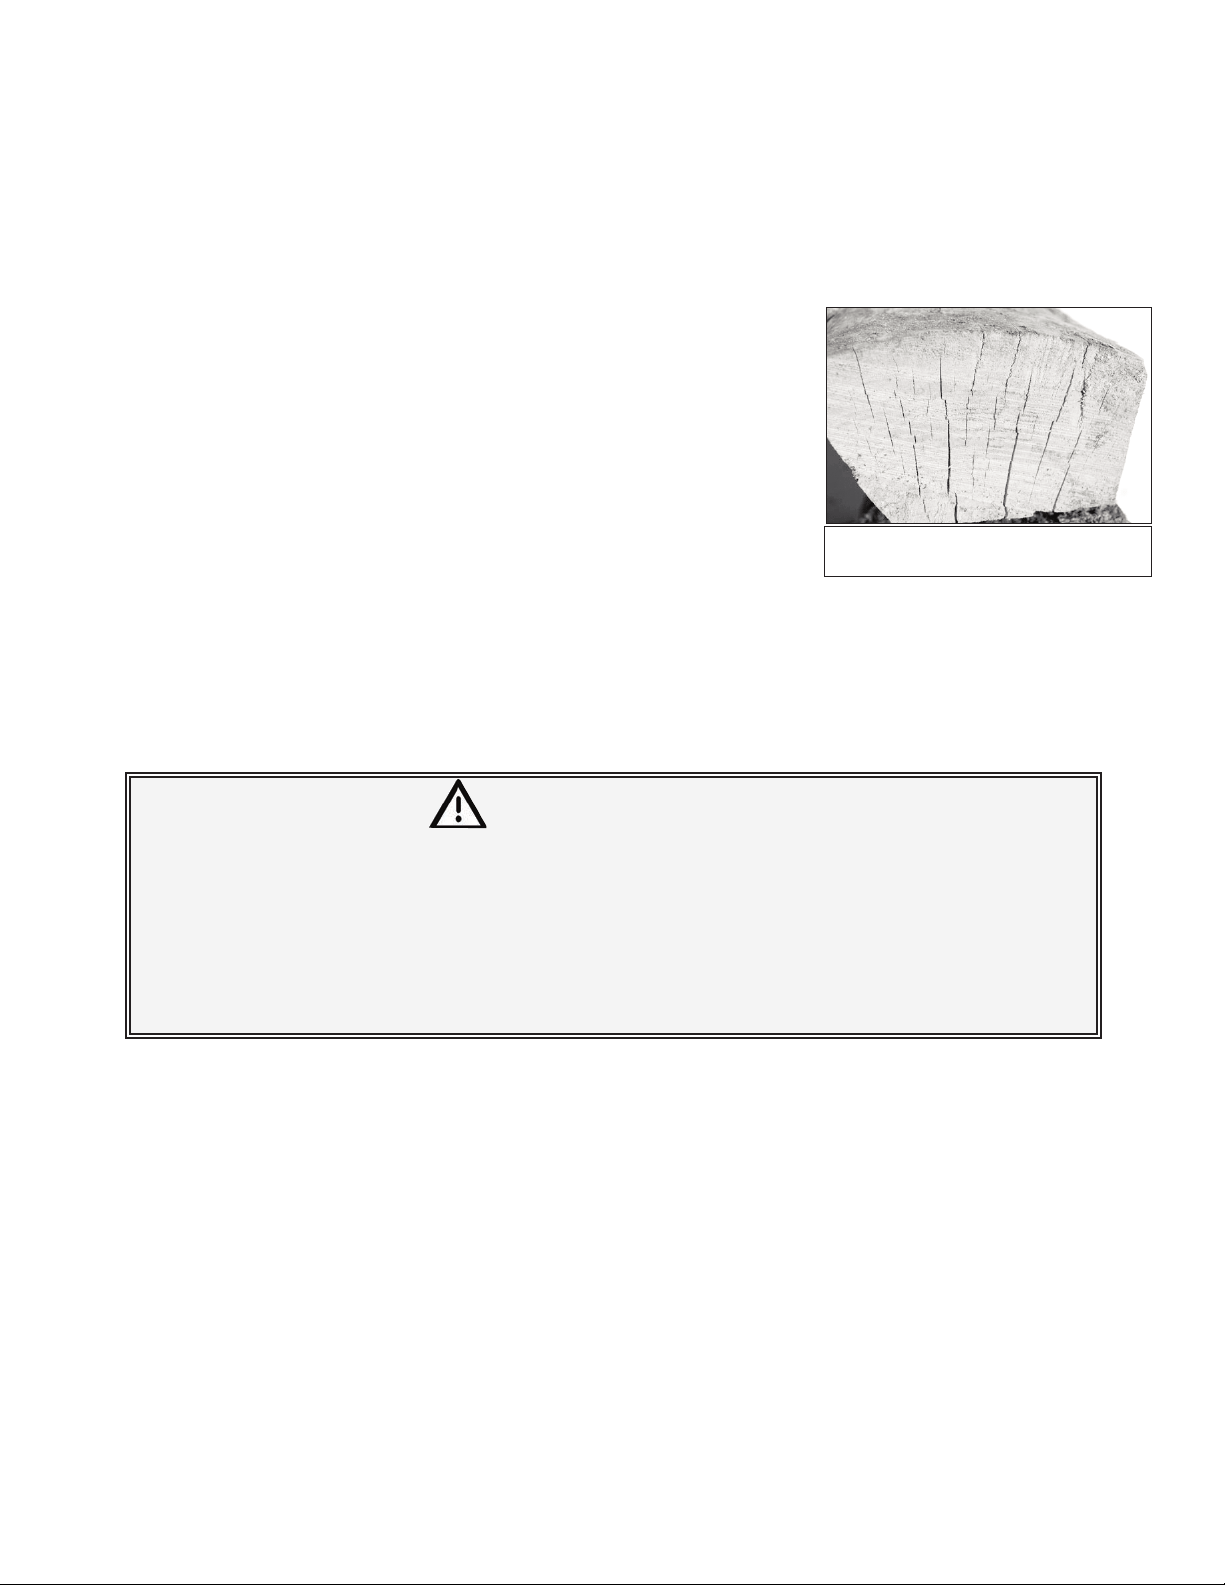
The ash pan door is located below the
front loading door.
The ash pan door drops down and the
ash pan slides out from under the
stove for easy ash removal.
NEVER SHOVEL ASHES INTO A COMBUSTIBLE CONTAINER LIKE A CARDBOARD BOX OR A PLASTIC BUCKET. DO
NOT USE A VACUUM CLEANER TO REMOVE ASHES UNLESS IT IS SPECIFICALLY DESIGNED FOR WOODSTOVE
ASH REMOVAL. NEVER LEAVE A CONTAINER OF HOT ASHES ON A WOOD FLOOR, PORCH, OR ANY
COMBUSTIBLE SURFACE.
ASHES SHOULD BE EMPTIED INTO A METAL CONTAINER WITH A TIGHT FITTING LID. THE CLOSED CONTAINER
OF ASHES SHOULD BE PLACED ON A NONCOMBUSTIBLE FLOOR OR ON THE GROUND, WELL AWAY FROM ALL
COMBUSTIBLE MATERIALS, PENDING FINAL DISPOSAL. IF THE ASHES ARE DISPOSED OF BY BURIAL IN SOIL OR
OTHERWISE LOCALLY DISPERSED, THEY SHOULD BE RETAINED IN THE CLOSED CONTAINER UNTIL ALL
CINDERS HAVE THOROUGHLY COOLED. LIVE CINDERS CAN TAKE 36 HOURS OR LONGER TO COOL.

Avoid overfiring by letting the combustor and secondaries do most of the work in the stove. Your stove is operating at
peak efficiency when the combustor is “engaged”and the secondaries are ignited, with the damper lever set to a low to
moderate setting, and the logs are glowing with secondary flames apparent. You will get the greatest amount of heat per
pound of wood when the stove is operated in this manner.
Daily Use
Your Survival Hybrid stove is well suited for continuous firing on a 24 hour a day basis. It can burn for 6-8 hours on
one load of wood, and will provide steady, even, heat for hours after the fire dies down. You need only disengage the
catalytic combustor when you kindle a fire, or reload the stove. Once the catalyst is ignited, it will continue to function as
long as there is smoke to burn, even when the surface temperature drops below 200°-250°.
Your connector pipe and chimney, or chimney pipe, should be inspected at regular intervals (not less than once every
two months). Examine the connector pipe for creosote, corrosion, loose seams, or excessive soot. Clean and replace as
necessary. The chimney or chimney pipe should be cleaned and checked by a certified specialist once a year. A small
mirror held at the cleanout door of a masonry chimney will be helpful. For a Class A prefabricated metal pipe, some
disassembly is usually required.
The Stove Top
The top lid of the Survival Hybrid makes for a perfect cook surface. The cook surface can be used to make soups,
stews, sauces, and even meals that require higher temperature cooking. The steel cooktop is not designed as a cooking
surface. Food should always be placed in a heavy duty Dutch oven or skillet.
The Fall-Away Tool
The “fall-away tool”, which comes with your stove, can be used to operate the door latch and the bypass lever. Simply
lift the door handle with the “fall-away tool” to safely open/close the loading door. The loading door and the door
handle are very hot, so use the tool provided. The “fall-away tool” conforms to UL requirements and is made so that if
you let go of it, it will “fall-away” from the stove and not become too hot to handle.
Firewood
Your Woodstock Soapstone Survival Hybrid Wood Stove is designed to burn dry, natural cordwood. Higher efficiency
and lower emissions generally result when burning air dried hardwoods, as compared to green, freshly cut hardwoods.
It is perfectly fine to burn soft woods in your stove as long as they are properly dried. Hardwoods are preferable because
they are typically denser than soft woods, giving them a higher fuel value per volume.
The moisture content of some trees may range as high as 50% – i.e., there is as much moisture in the tree as there is
wood. After wood has been cut to length, split and stacked for a year, the moisture content will usually range from 15-
25%. Splitting wood before it is stored will reduce drying time. Properly dried wood will produce more heat, reduce the
likelihood of water vapor condensing in the chimney, forming creosote, and result in less pollution entering the air. It is
safer and more efficient to burn dry hardwood than green or wet wood that smolders.
The advantages of burning dry wood are many. Dry wood is lighter, easier to split, and easier to carry. It is easier to
light, produces more heat, and generates less pollution. If you burn wet wood much of the energy generated by the fire
is used to drive moisture out of the wood, rather than producing heat for you. Dry wood will maintain the highest
combustor temperatures and burn the most efficiently. Creosote is much less likely to form if you burn dry wood.
12
DO NOT OVERFIRE THIS WOOD STOVE!
ATTEMPTS TO ACHIEVE HEAT OUTPUT RATES THAT EXCEED STOVE DESIGN
SPECIFICATIONS CAN RESULT IN PERMANENT DAMAGE TO THE STOVE AND TO
THE CATALYTIC COMBUSTOR.
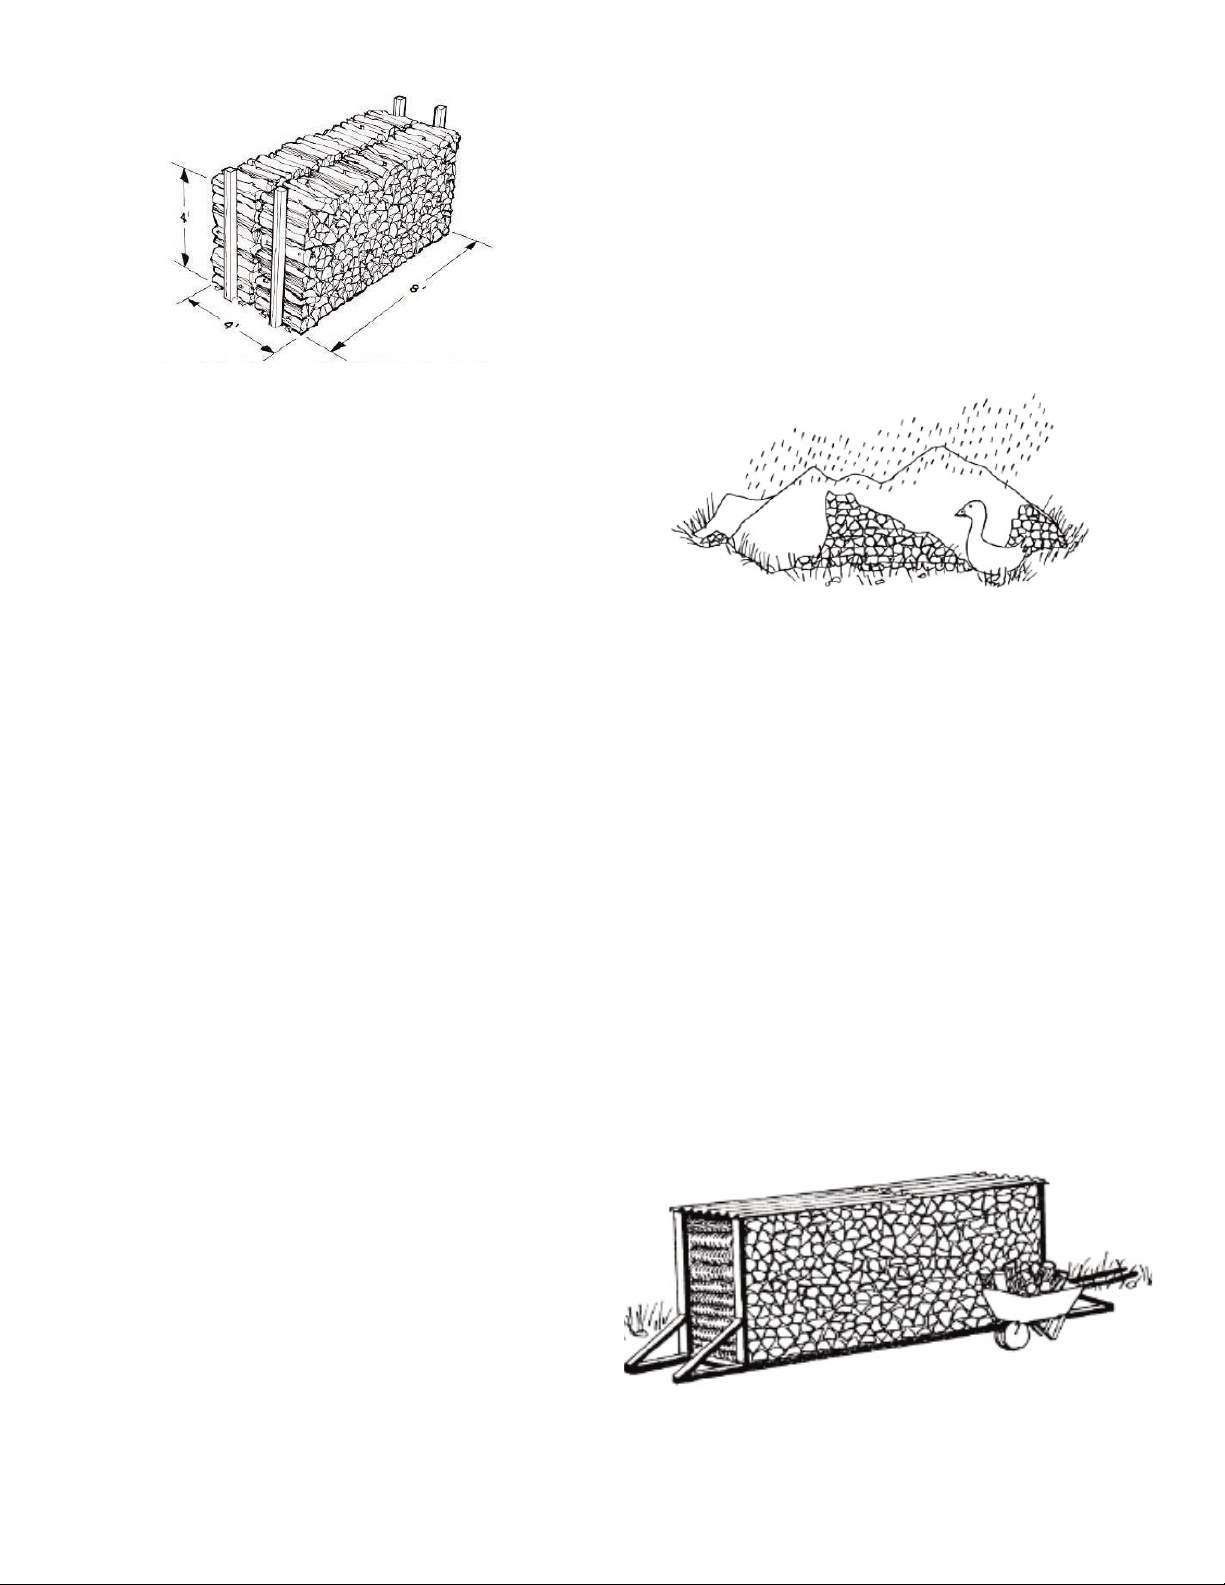
There are several ways to determine if wood is properly dried. Visual “checking” on the end of the wood splits, dry
wood will feel lighter, if you bang two pieces of dry wood together it will sound hollow (wet wood will sound solid &
dull), and no bubbling or sizzling from the wood as it burns. Moisture meters are a great way to determine the
percentage of moisture content in wood. Moisture meters utilize two pin probes that insert into the wood and read the
percentage of moisture. Moisture meters can be purchased online.
Common symptoms of burning wet wood include: Difficulty getting the fire started, smokey fire, dirty glass, creosote
buildup within the stove pipe and/or chimney, low heat output, short burn times, and excessive wood use.
DO NOT BURN pressure treated or painted wood, unseasoned wood, garbage,
solvents, lawn clippings or yard waste, materials containing rubber; including
tires, plastics, petroleum products, paints, paint thinners, asphalt products,
materials containing asbestos, construction debris, railroad ties, manure or animal
remains, salt water driftwood or other salt treated saturated materials, or paper
products, cardboard, plywood, or particle board in your Woodstock Soapstone
Survival Hybrid Wood Stove. The prohibition against burning these materials does
not prohibit the use of fire starters made from paper, cardboard, saw dust, wax and
similar substances for the purpose of starting a fire in the Survival Hybrid.
Burning treated wood, garbage, solvents, colored paper or trash may result in the
release of toxic fumes and may poison or otherwise render the catalytic combustor
ineffective and cause smoke.
Burning cardboard, loose paper, and trash will add significantly to ash and soot buildup, and it will not produce much
heat. Fly ash from improper fuel can also coat or plug the combustor, causing smoke spillage into the room. Under
normal operating conditions, the Woodstock Soapstone Stove is designed to last for generations. It is not, however,
designed for continuous over-firing or the burning of trash.
Dry Firewood will show “checking”
or cracks at the end of the split
DO NOT BURN!
• UNSEASONED WOOD
• TREATED/PAINTED WOOD
• GARBAGE
• CARDBOARD
• SOLVENTS
• COLORED PAPER
• TRASH
• LAWN CLIPPING
• RUBBER PRODUCTS
• PLASTICS
• PETROLEUM PRODUCTS
• PAINT/PAINT THINNER
• MATERIALS CONTAINING ASBESTOS
• DRIFTWOOD
• ASPHALT PRODUCTS
• RAILROAD TIES
• MANURE/ANIMAL REMAINS
• PLYWOOD/PARTICLE BOARD
13

If you did not grow up in a house with a wood burning
stove, you are probably wondering what is involved in
burning wood for heat and enjoyment. Here are some of
the most frequently asked questions about wood.
Q: What is the best wood for a wood burning stove ?
A: On a pound-for-pound basis all wood contains just
about the same amount of energy. However, on a volume
basis there is a great difference in the heat given off by dif-
ferent woods. As a general rule, so-called "hardwoods"are
more dense than "softwoods". They burn longer and give
off more heat than softwoods. The following table should
help you in choosing which woods to burn.
Species Having High Heat Value
(1 cord = 21,000,000 - 24,000,000 BTU = 200-250 gal. of fuel
oil or 250-300 cu. ft. of natural gas)
Species Having Medium Heat Value
(1 cord = 17,000,000 - 20,000,000 BTU = 150-200 gal. of fuel
oil or 200-250 cu. ft. of natural gas)
Species Having Low Heat Value
(1 cord = 12,000,000-17,000,000 BTU = 100-150 gal. of fuel
oil or 200-250 cu. ft. of natural gas)
Q: Where do I get firewood?
A: For many people the most satisfying way is to cut
yourown. Even if you do not own a woodlot, you may find
that someone who does would be happy to have you
improve his woodland by culling out poor quality hard-
woods. In many states you are allowed to cut in state
forests. You can find out by contacting your county forester
or your state's department in charge of parks and forests.
As pointed out elsewhere in this presentation, even if you
have to buy firewood, you can invariably savemoney over
buying other kinds of fuel. You can usually find firewood
vendors listed in local classified pages, online, and on local
list serves. Look for someone who is honest about the
types of wood they offer and how well seasoned it is.
There is nothing wrong with buying green, unseasoned
wood as long as the price reflects the fact that you cannot
use it until you have taken the time to stack it and dry it.
(More about that, below). It is important to understand the
unit of measure most commonly used for wood: the cord.
Q: How much wood is in a cord?
A: Depending on the size of the pieces of wood and the
care with which it is stacked, the actual amount of wood in
a cord will vary considerably. It is legitimate for a cord to
be as much as 1/3 air. However, no matter what length of
firewood you buy, it must stack up to 8' x 4' x 4' to be a
cord. Note: If you buy a cord of 4 foot lengths of wood and
cut it up yourself, the resulting pile will take up less than a
cord because of all the sawdust you create. A cord put into
16-inch or 24-inch lengths will shrink by 14 percent, or 18
cubic feet, in volume. Another measure by which wood is
sold is the run. A run is 1/3 of a cord and measures 8 feet
by 4 feet by 16 inches.
Q: So, what is a "face cord"?
A: Wood is often advertised as so much per "face cord",
you should be very careful about buying wood on this
basis. A"face cord" is a non-standard measurement that
should never be confused with a cord. It measures 8 feet
long by 4 feet high, but is only as deep as one length of
wood. Obviously, it is possible for a face cord to contain
considerably less than one cord of wood. Before buying a
face cord of wood, you ought to use your calculator to fig-
ure how much you are paying on a cord basis; you may be
unpleasantly surprised.
Q: Everyone says you should let your wood dry for a year
before using it. Is it really necessary to burn seasoned
wood?
A: The simple answer is yes. Seasoned wood will burn bet-
ter, provide more heat, and cause fewer problems than
green wood. When first cut, wood is often more than 50%
water by weight. It takes a lot of energy to drive off this
water -- which is what has to happen before the wood can
burn. So green wood is hard to light, doesn't produce
much heat, and smokes a lot. The water in green wood can
also cool the catalytic combustor to the point that it will no
longer function and/or cause smoke to condense on the
inside of your chimney's walls as creosote. What is impor-
tant is the dryness of the wood (optimally 15-25%water
content), not the period of time it has been drying. At one
extreme, some professional firewood suppliers use wood
kilns to dry wood in only a few days. At the other extreme,
unsplit, improperly stacked wood will rot long before it is
ever dry enough to use.
American Beech
Apple
Hickory
Ironwood
Red Oak
Sugar Maple
White Oak
Yellow Birch
Big Leaf Maple
Eastern Larch
Elm
Red Maple
White Ash
White Birch
Aspen
Cottonwood
Hemlock
Red Alder
Redwood
Sitka Spruce
14
Wood Burning Basics
Q: So, how do I tell if my wood is dry enough to use?
A:Partly, being able to tell if wood is dry is a matter of
experience. However, some of the signs you can use to tell
if your wood is dry are:
1) The wood is lighter than green wood. However, be
aware that the density and weight of wood also depends
on the species. White oak is denser and heavier than white
pine. Still, dry white oak is lighter than wet whiteoak. 2)
The bark is loose. As wood dries it tends to lose its bark.
This is not an absolute rule, but when your wood is dry
you should notice a good bit of barkless wood and free
pieces of bark. 3) The color of the wood fades. Different
types of woodare more or less colorful, but for all species,
dry wood is more subdued and faded looking than green
wood. 4) The wood shows radial cracks.As wood dries it
shrinks. As a result, it usually develops cracks, visible at
the ends, which radiate out from the heartwood to the
bark. Since the wood will often start to crack before it is
completely dry, the presence of radial cracks is not a fool-
proof sign that the wood is ready to burn. But, the total
absence of such cracks is a good sign that it is not ready
yet. 5) The wood loses its sappy smell. Dry wood is much
less aromatic than green wood. 6) Dry wood makes a
"crack" when hit. If you hit two pieces of seasoned wood
together, they will make a resonant sound, like a bat hitting
a baseball. Green wood makes more of a "thud".
Q: I have green wood, what do I do now?
A: If you have the time, carefully stack your wood and let
it dry. If you have no other options, try splitting the wood-
into smaller pieces, mixing dry wood or kindling with it,
and letting more air into the stove, so it burns a little hotter.
Q: What is the best way to dry my wood?
A: The best way to dry your wood is to split it and then
stack it so that it is well-ventilated, covered and off the
ground. Storing wood this way for 4-6 months can makea
big difference in the efficiency of your stove. Split wood
has much more surface area than unsplit wood. It also has
surfaces that are not covered with bark. Therefore, it will
dry faster than unsplit wood. The ultimate example of this
is birch wood. Because birch bark is waterproof, unsplit
birch wood will often rot from the inside without ever dry-
ing. Wood not only takes up less space when stacked, but it
allows air to circulate around the wood. Good ventilation is
the most important factor in having dry wood. It helps to
dry the wood by speeding up evaporation. If you have the
space, you might want to employ a trick used by old
timers. They stacked their wood in long thin rows spaced
apart, and at right angles to the prevailing winds to ensure
good ventilation. Covering the wood and keeping it off the
ground are important because these practices keep the
wood away from moisture. Wood acts very much like a
sponge. If it is exposed to rain, snow or moisture in the
ground, it will soak this water right up, putting to naught
all your efforts to dry it out.
With these basics in mind, there are a few simple rules you
will want to follow:
1) Do cover the wood, but do not drape a plastic sheet or
tarp over your wood pile so that it covers the sides of the
pile. This will trap the moisture in the pile and the wood
will not dry. If you can, make a simple wood frame to raise
the plastic cover a few feet above the wood. The ultimate
drying place is an open sided shed. 2) Use 2 x 4's, poles, or
pallets or some other method to keep your wood off the
ground. 3) If you dry your wood inside, allow for adequate
ventilation. Wood stored in a heated space does dry faster.
However, drying wood gives off a lot of water. If you do
not allow for that water to exit to the outside you will
probably raise a bumper-crop of mold and/or mush-
rooms. Another reason to be careful about storing wood
inside is the fact that ants, beetles or other unwanted
guests sometimes ride along on unseasoned wood.
A standard cord measures 128 cubic feet (or 4’x 4’x 8’).
Don’t cover your woodpile with a trap or plastic sheet that goes
all the way to the ground. Moisture will get trapped under the
tarp, and the wood will not dry.
Store your firewood off the ground on 2 x 4’s or 2 x 6’s.Cover it
with plastic or metal roofing. Leave the sides open
15