
Installation Tips
1. Check the camera before the installation
You can connect all the parts (including the extension cables, lenses, GPS, remote control, as
well as your SD card) with the DVR, then connect it to the home power using your phone
charger (5V/1-2A) and the USB cable, to see if the camera works normally.
If yes, then the camera is in good condition.
If no, you can use the exclusion method to find which part has a problem.
Or you can contact us via Amazon message for support.
NOTE: not recommend using the phone quick charger for power supply. Since it may
support 5V/9V, if it output 9V, the camera will be damaged.
2. Some suggestions on SD card
SD card is really important for the recording. Defective or aged card may result in the
recording problem.
Since M1 records 1080P from both channels, it needs the SD card to has enough high
writing speed.
We recommend using the big brand SD card, such as Samsung Endurance Pro card, which is
specially designed for the dashcam.
You can also contact us via Amazon message to get one SD card test tool to check the SD
card condition.
Then, let’s begin the installation!
3. Install the lenses
Please remember to locate the lenses at a place with as little vibration as possible.
* The reason is too much vibration will cause the “Rolling Shutter”, or called “Jelly Effect”,
which will make the video choppy.
4. Route the extension cable
There is no much point need to pay attention to but please keep it away from the hot part
on your motorcycle. And don ’ t sandwich the cable in the crevice to avoid it from being
pinched off.
Also, remember to tighten the screw on the joint to make it tight.
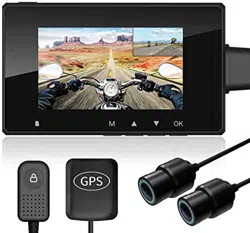
5. How to connect the connectors?
Match the color of the connector. Also match the arrows on the connector.
And the green connector is for the front lens, the black connector is for the rear lens, the
yellow connector is for the remote control.
6. Locate the GPS
Please locate the GPS at an open space on your motorcycle to help it receive the satellite
signal.
* This GPS is different from the phone GPS function since the mobile phone uses both

satellite signals and its communication service to get the location. But the GPS on M1 can
only rely on the satellite signal. So that’s the reason why need it to locate at an open space.
** You need to sync the GPS data at first, then you can view your riding route on the App.
You can find the tutorial for "how to view GPS route" on the Amazon product page, just
below this installation tutorial.
7. Get power supply via the Voltage Converter or the USB cable
Just need to remember that the red cable on the converter should connect to the V+, and
the black cable on the converter should connect to the V-.
And please make sure the motorcycle battery voltage is within 11.7V-30V if you use the
converter for power supply.
The converter has the “low voltage protection” feature which will cut off the power supply if
the voltage is lower than 11.7V, to avoid the motorcycle battery from being exhausted.
If the voltage is higher than 30V, the converter will be damaged.
If you power the camera using the USB power source on your motorcycle, please make sure
the USB power source can output at least 5V/1A. Since some type of USB power can only
output 5V/500mA, which is not enough for the camera.
8. Finally, connect all the wires to the DVR.
Please fix the DVR at a stable place where has enough space for it, to avoid it from been
crashed.
9. Now the installation is finished, just go for a test run!
Please always remember to contact us at any time for any questions via Amazon
message!