Loading ...
Loading ...
Loading ...
Step-by-stepinsta/lation instructions.
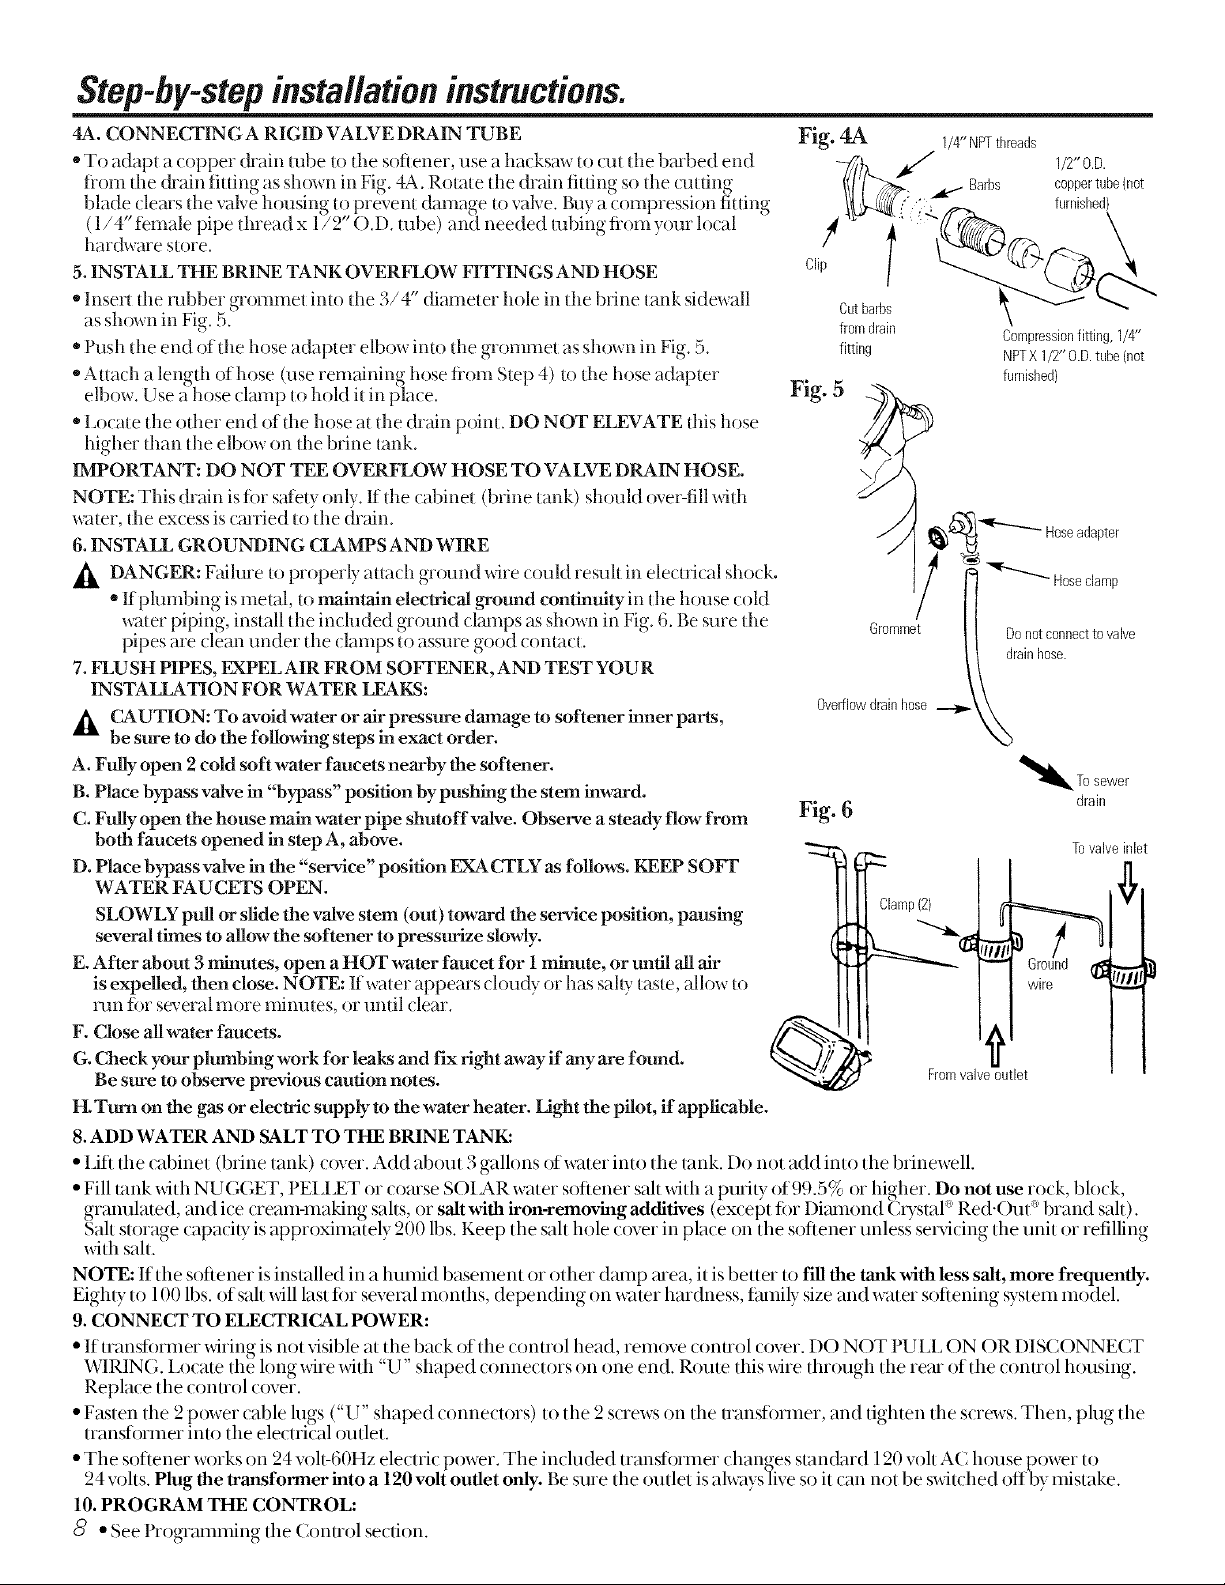
4A. CONNECTING A RIGID VALVE DRAIN TUBE Fig. 4A 1/4"NPTthreads
• To adapt a (ol)per &ain robe u, the s(,Jr/ener, use a ha(ksa,, to (ut dm bmbe den d --7_/h _/" t.__? 1/2" O.D.
from tile drain fitting as shown in Fig. 4.4. Rotate tile drain lifting so tile cutting Barbs coppertube{net
blade,dears, tile.xake housing, ,t°,prevent (kmlage,to vake. Buv..a (ompression, lit ring, j ,. ::' i_ furnished)
(1/4 female pipe dnead x l/2 ().D. robe) and needed robing from your local
fT
hardware store.
5. INSTALL THE BRINE TANK OVERFLOW FITTINGS AND HOSE OH
InseHtherubbe_ gtommetmtoflle3/4 dlametel hole in dm brine tank sidewall eutbarbs
asshown in Fig. 5. from drain Compressionfitting,1/4"
• Push the end of din hose adapter elbow into tile grommet asshown in Fig. 5. fitting NPTX1/2"0.D.tube(not
• Attach alenelh of hose (use rem_fining hose flom Step 4) to tile hose adapter furnished}
elbow. L sea hose clamp to hold U m place. Fig. 5
• Locate tile other end of the hose at tile drain point. DO NOT ELEVATE this hose
higher than the elbow on tile brine tank.
IMPORTANT: DO NOT TEE OVERFLOW HOSE TO VALVE DRAIN HOSE. \ S
NOTE: This drain is fi)r safety only If tile t abinet (brine tank) shoukl over-till with
water, tile ex(ess is (anted to tile drain.
6. INSTALL GROUNDING C_AMPS AND WIRE pter
A DANGER: Failure to properly atta(h ground wire tould resuh in electri(al sho(k.
• _ Hoseclamp
• If plumbing is metal, u) maintain electrical ground continuity in tile house (:okl
water piping, install tile included ground ( kunps as shown in Fig. 6. Be sure tlie Grommet
pipes are (lean llndei tile clamps to assuie good cent}tot. Donotconnecttovalve
drainhose.
7. FLUSH PIPES, EXPEL AIR FROM SOFTENER, AND TEST YOUR
INSTALLATION FOR WATER LEAKS:
Overflowdrainhose
A CAUTION: To avoid water or air pressure damage to softener inner parts,
be sure to do the following steps in exact order.
A. Fully open 2 cold soft water faucets nearby the softener.
To
sewer
B. Place bypass valve in "bypass" position by pushing the stem inward, drain
C. Fully open the house main water pipe shutoff valve. Observe a steady flow from Fig. 6
both faucets opened in step A, above. Tuvalvehdet
D. Place bypass valve in the "service" position EXACTLY as follows. KEEP SOFT
WATER FAUCETS OPEN.
SLOWLY pull or slide the valve stem (out) toward the service position, pausing
several times to allow the softener to pressurize slowly.
E. After about 3 minutes, open a HOT water faucet for 1 minute, or until all air
is expelled, then close. NOTE: If water appears t loudy or has sahy taste, allow to wire
run fiw several more minutes, or until clear.
F. Close allwater faucets.
G. Check your plumbing work for leaks and fix right away if any are found.
Be sure to observe previous caution notes. Fromvalveoutlet
IZLTurn on the gas or electric supply to the water heater. Light the pilot, if applicable.
8. ADD WATER AND SALT TO THE BRINE TANK:
Y
"I Jfl tile (abinet (brine tank) / oxel. Add about 3 galhms of water into tile tank. I)o not add into tile brinewell.
• Fill tank x_ith NUGGET, PEI ] £T or coarse SOLAR water softener sah with a purity of 99.5% or lfigher. Do not use rock, block,
uranulated, and ice cream-making salts, or salt w_th _ron-removmg additwes (except for Ihamond Crystal '_Red.OuP brand sah).
Sah storage capacHv is approxmlatelv 200 lbs. Keep tile sah hole cover m place on the softener unless serxacmg tile unU or rehlhng
with salt.' ....
NOTE: Iftilesoftener isinstalledin a humid basement or oflmr damp mea, itisbetter to fillthe tank with lesssalt,more frequently.
Eightyto I00Ibs.ofsallxfilllastlotseve_vdmonths,dependingon waterhardness,familysizeandwatersofteningsystelnmodel
9.CONNECT TO tLECTRICAL POWER:
• Iftransfi)rmer wiring is not visible at tile back of the control bead, remove control cover. DO NOT PUI]. ON OR DIS(_ONNECT
WIRING. I.ocate the long wire with "U" shaped connectors on one end. Route this wire tlnough the rear of the control housing.
Replace the control covei.
• Fasten the 2 power cable lugs ("U" shaped connectors) to the 2 screws on the transformer, and tighten the screws. Then, plug the
transforlner into the electri{:al outlet.
• Tile softener works on 24 voh:60Hz electric power. Tile included transfi)rmer changes stan(bnd 120 voh A( house power to
24 vohs. Plug the transformer into a 120 volt oudet only. Be sure tile outlet is alwayslive so it can not be switched off by inistake.
10. PROGRAM THE CONTROL:
o° • See Programming tile Control se(tion.
Loading ...
Loading ...
Loading ...