Operating Instructions
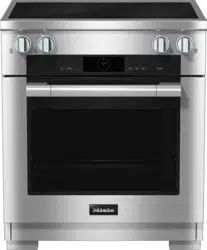
30" Electric Range
To prevent accidents and damage to the range, you must r
ead all
instructions supplied before installing or using the appliance.
en-US M.-Nr. 09 897 980

IMPORTANT SAFETY INSTRUCTIONS
2
WARNING
Children and adults can tip over the range if has not been
sec
ured. This may lead to fatal injuries.
This r
ange must be secured and connected using the anti-tip
device according to the installation instructions.
If
you have moved the range, slide the locking latch onto the anti-
tip device until you feel it lock into place.
Do not use the r
ange if the anti-tip device has not been properly
installed and engaged.
F
ailure to observe the information contained in the installation
instructions can lead to serious or fatal injuries for children and
adults.

Contents
3
IMPORTANT SAFETY INSTRUCTIONS................................................................. 2
IMPORTANT SAFETY INSTRUCTIONS.................................................................
6
Guide to the range ...............................................................................................
20
Cooktop ................................................................................................................. 20
Oven....................................................................................................................... 22
Control panel........................................................................................................
24
Burner control knobs ............................................................................................. 24
Temperature selector ............................................................................................ 25
Operating mode selector ...................................................................................... 25
Clock / Timer.......................................................................................................... 26
Display .............................................................................................................. 26
Symbols in the display...................................................................................... 26
Sensor buttons ................................................................................................. 26
Temperature indicator ..................................................................................
26
Features ................................................................................................................
27
Model numbers ..................................................................................................... 27
Data plate .............................................................................................................. 27
Items included .................................................................................................. 27
Standard and optional accessories ....................................................................... 27
Shelf runners..................................................................................................... 28
Universal tray and Wire oven rack .................................................................... 28
FlexiClips with wire rack .................................................................................. 29
Ceramic and stainless steel cleaner 250 mL .................................................... 32
Cooktop safety features......................................................................................... 33
Overheat protection .......................................................................................... 33
Oven safety features.............................................................................................. 33
System lock for the oven.............................................................................. 33
Cooling fan........................................................................................................ 33
Vented oven door.............................................................................................. 33
Safety Door Lock for Self Clean ....................................................................... 33
PerfectClean treated surfaces ............................................................................... 34
Self Clean ready accessories................................................................................. 34
Before using for the first time............................................................................. 35
Before using for the first time................................................................................. 35
Setting the time of day for the first time ............................................................... 35
Turning on the cooktop for the first time................................................................ 35
Heating the oven.................................................................................................... 35

Contents
4
Operating the cooktop ........................................................................................
37
How the burners work............................................................................................ 37
Cookware............................................................................................................... 37
Energy saving tips ................................................................................................. 38
Burner data ............................................................................................................ 39
Setting range.......................................................................................................... 40
Turning on .............................................................................................................. 41
Turning on the second heating zone................................................................. 41
Turning off .............................................................................................................. 41
Residual heat display........................................................................................ 41
Operating the oven ..............................................................................................
42
Energy saving tips.................................................................................................. 42
Using the oven....................................................................................................... 42
Cooling fan ............................................................................................................ 42
Preheating the oven .............................................................................................. 43
Guide to the modes..............................................................................................
44
Clock / Timer........................................................................................................
45
Turning a cooking program On / Off automatically................................................ 45
Setting the cooking time................................................................................... 45
Setting a cooking time and finish time ............................................................. 46
At the end of the cooking time.......................................................................... 47
Changing the cooking time............................................................................... 47
Deleting a cooking time .................................................................................... 48
Deleting a finish time ........................................................................................ 48
Changing the time of day....................................................................................... 49
Changing factory default settings.......................................................................... 50
System lock .......................................................................................................
53
Timer ...................................................................................................................... 55
Setting the timer ............................................................................................... 55
Bake ......................................................................................................................
57
Roast .....................................................................................................................
59
Slow Roasting ......................................................................................................
61
Broil .......................................................................................................................
63
Defrost ..................................................................................................................
65
Canning.................................................................................................................
66
Dehydrate .............................................................................................................
67

Contents
5
Frozen food...........................................................................................................
68
Cleaning and care................................................................................................
69
Cooktop: Unsuitable cleaning agents.................................................................... 69
Ceramic surface..................................................................................................... 70
Oven: Unsuitable cleaning agents ......................................................................... 71
Tips ........................................................................................................................ 71
Normal soiling ........................................................................................................ 72
Stubborn soiling..................................................................................................... 72
Self Cleaning the oven interior............................................................................... 73
Preparing for the Self Clean program ............................................................... 73
Starting the Self Clean program ....................................................................... 74
At the end of the Self Clean program ............................................................... 75
The Self Clean program is canceled................................................................. 76
Removing the door ................................................................................................ 77
Reinstalling the door .............................................................................................. 78
Removing the shelf runners ................................................................................... 79
Frequently asked questions................................................................................
80
Technical Service .................................................................................................
84

IMPORTANT SAFETY INSTRUCTIONS
6
When using the appliance, follow basic safety precautions, including the
following:
Read all instructions before installation and use of the range to prevent
accidents and machine damage.
This range complies with current safety requirements. However,
impr
oper use of the appliance can result in personal injury or
damage to property.
Please read the installation instructions carefully before installing
and connecting the appliance.
Read the operating instructions before using the range for the first
time. To prevent accidents and damage to the appliance, always
observe both the installation instructions and operating
instructions. Both documents contain important information about
installation, safety, use and maintenance.
Miele cannot be held liable for damage occurring as a result of
non-compliance with the instructions.
Keep these installation instructions and operating instructions in a
safe place and pass them on to any future owner.

IMPORTANT SAFETY INSTRUCTIONS
7
Use
This r
ange is intended for domestic use and use in other similar
environments.
This applianc
e is not intended for outdoor use.
Use the range exclusively under normal domestic conditions:
– Use the oven for baking, roasting, broiling, defrosting, canning
and dr
ying food.
– Use the stovetop to prepare food and keep it warm.
Any other use is not permitted.
Risk of Fire! Do not use this oven to store or dry flammable
materials.
P
ersons who lack physical, sensory or mental abilities, or
experience with the appliance should not use it without supervision
or instruction by a responsible person.

IMPORTANT SAFETY INSTRUCTIONS
8
Children
As w
ith any appliance, close supervision is necessary when used
by children.
Do not lea
ve children unattended: Children should not be alone or
unsupervised in the area where the oven is installed. Do not allow
them to sit or stand on the appliance.
Chil
dren under the age of eight must be kept away from the range
unless constantly supervised.
Chil
dren ages eight and up may only use the range without
supervision if they have been shown how to use it in a safe manner,
and if they are able to recognize and understand the potential risks
of improper use.
Chil
dren must not be allowed to clean or maintain the range
without supervision.
Please super
vise any children in the vicinity of the range and do
not let them play with the appliance.
Risk of burns! The skin of chi
ldren is more sensitive to high
temperatures than that of adults.
– External parts of the oven such as the door glass, vent and
co
ntrol panel become hot. Do not allow children to touch the
oven when it is in operation.
– The burners of the cooktop will become hot during use. Turn pot
and pan handles in
ward, so children cannot pull them down and
be burned. Risk of burns!
Danger of burns.
Chil
dren's skin is more sensitive to high temperatures than that of
adults. The oven becomes hotter during self-cleaning than it does in
normal use. Do not let children touch the oven while the Self Clean
program is running.

IMPORTANT SAFETY INSTRUCTIONS
9
Burn hazar
d from improper use! Do not allow children to operate
the oven.
Dange
r of suffocation! Ensure that any plastic wrappings, bags,
etc. are disposed of safely and kept out of the reach of children.
Burn hazard!
Keep the spaces above and behind the range clear of any items that
could draw the attention of children. Otherwise, they can be tempted
into climbing onto the appliance.
Dange
r of injury. Never allow children to hang or lean on any part
of the appliance.

IMPORTANT SAFETY INSTRUCTIONS
10
Technical safety
Installatio
n, repair and maintenance work should be performed by
a Miele authorized service technician in accordance with national
and local safety regulations and the provided installation
instructions. Contact Miele’s Technical Service Department for
examination, repair or adjustment. Repairs and other work by
unauthorized persons could be dangerous and may void the
warranty.
Do not carry or lift the range by the oven door handle or the
control panel!
Maint
enance by the user: Never repair or replace any part of the
appliance unless the instructions specifically recommend doing so.
Service work may only be performed by a qualified technician.
A d
amaged range can be dangerous. Always check for visible
signs of damage. Never use a damaged appliance.
Reliable and safe operation of the range can only be guaranteed if
it is connected to the public power mains.
The ele
ctrical safety of the range can only be guaranteed when it
is properly grounded. Compliance with this essential safety
requirement is absolutely mandatory. If in any doubt, please have
the building's wiring system inspected by a qualified electrician.
P
roper installation: Make sure that your appliance has been
installed correctly and that it has been grounded by a qualified
technician.
T
o avoid damaging the range, make sure that the connection data
(voltage and frequency) on the data plate correspond to the
building's power supply before connecting the appliance.
When in doubt, consult a qualified electrician.

IMPORTANT SAFETY INSTRUCTIONS
11
During
installation, maintenance and repair work, e.g. if the oven
lighting is broken (see "Frequently asked questions"), the range must
be completely disconnected from the household electricity supply. It
is only completely isolated from the electricity supply when:
– The main circuit breaker has been tripped, or
– The plug fuses have been fully unscrewed (where applicable), or
– The power cable has been unplugged from the wall outlet.
Un
plug the cable by pulling on the plug, not on the cord.
Do not use a power strip or e
xtension cord to connect the range
to electricity. These are a fire hazard and do not guarantee the
required level of appliance safety.
Any contact with live connections or tampering with the electrical
or mecha
nical components of the range will endanger your safety
and may lead to appliance malfunctions.
Do not open the appliance housing under any circumstances.
This applianc
e must not be installed and operated in mobile
installations (e.g. on a ship).
Any r
epairs not performed by a Miele authorized service
technician will void the warranty.
Defective co
mponents should be replaced by Miele original parts
only. Only with these parts can the manufacturer guarantee the
safety of the appliance.
Risk of electri
c shock! If the ceramic surface of the stovetop is
defective or chipped, cracked or broken in any way, immediately
switch the stovetop off and do not continue to use it. Disconnect the
range from the power supply and contact Miele Technical Service.
If
the range is installed behind a cabinet door, do not close the
door while the appliance is in operation. Heat and moisture can build
up behind the closed door and cause damage to the range and to
the surrounding cabinets and flooring. Do not close the door until
the appliance has completely cooled down.

IMPORTANT SAFETY INSTRUCTIONS
12
Do not insta
ll kitchen cabinets above the range, since reaching
over a hot stovetop to access the cabinets can result in burns. If it is
necessary to install cabinets, you can reduce the risk of burns by
installing a range hood that extends at least 4 3/4 in (12 cm) past the
bottom of the cabinets.

IMPORTANT SAFETY INSTRUCTIONS
13
Proper use
T
he oven becomes very hot while in use. Use caution to
ensure that you are not burned on the heating elements or interior
surfaces of the oven. Use pot holders when placing food in the
oven, adjusting the racks, etc. in a hot oven.
C
aution: Heating elements may be hot even though they are not
glowing. Interior surfaces of an oven become hot enough to cause
burns. External parts of the oven such as the door glass, vents, and
the control panel can become hot. During and after use, do not
touch, or let clothing or other flammable materials come into contact
with heating elements or interior surfaces of the oven until they have
had sufficient time to cool.
Do not let foo
d sit in the oven for more than one hour before or
after cooking. Doing so can result in food poisoning or sickness.
Use onl
y dry, heat-resistant potholders. Moist or damp potholders
used on hot surfaces may result in steam burns. Do not let
potholders come in contact with oil or grease. Do not substitute dish
towels or other bulky items for potholders. Do not let potholders
touch hot heating elements.
L
oose fitting or hanging garments present a fire hazard. Wear
proper apparel while operating the appliance.
Do not heat up food in closed containers, as pressure will build up
in the container, causing them to explode.
Do not use the range to boil or heat up cans.
Never pour cold water onto hot surfaces in a hot oven.
The steam created could cause serious burns or scalding and the
sudden change in temperature can damage the enamel in the oven.
T
o prevent burns, always place oven racks at their desired height
while the oven is cool. If the rack must be moved while the oven is
hot, do not let pot holders touch hot heating elements.

IMPORTANT SAFETY INSTRUCTIONS
14
Op
en the door carefully to allow hot air or steam to escape before
placing or removing food.
T
o prevent burns, allow the heating elements to cool before
cleaning by hand.
Do not leave the oven door open unnecessarily as someone may
trip over it or be injured by it.
Never leave
the appliance unattended when cooking with oil or
fat. They can ignite if overheated. Do not use water on grease
fires.Turn off the oven immediately and suffocate the flames by
keeping the oven door closed.
Do not use wat
er on cooktop grease fires. Turn the cooktop off.
Smother or use a dry chemical or foam-type extinguisher on any fire
or flame.
Smother the fir
e or flames, or use a dry chemical extinguishing
agent or foam fire extinguisher.
Never st
ore flammable liquids and materials in, above or under an
oven, or near cooking surfaces.
The hig
h temperatures radiated could cause objects near the
oven to catch fire.
Do not use the oven to heat the room.
Br
oiling food for an excessively long time can cause it to dry out
and may result in the food catching fire.
Do not exceed recommended broiling times.
Some foods dr
y out very quickly and can be ignited by high
broiling temperatures.
Do not use broiling functions for crisping rolls or bread or to dry
flowers or herbs. Instead use the Conv Bake (Convection Bake) or
Surround functions.

IMPORTANT SAFETY INSTRUCTIONS
15
Use cautio
n when using alcohol in your recipes. Alcohol
evaporates at high temperatures but may, in rare circumstances,
combust on the hot heating elements.
Plastic or alu
minum foil cookware melts at high temperatures and
can damage the range or start to burn. Do not use any plastic or
aluminum foil cookware.
Exception: You can use oven-safe plastic cookware in the oven.
Heed the cookware manufacturer's instructions.
When r
esidual heat is used to keep food warm, the high level of
humidity and condensation can cause damage in the oven. The
control panel, countertop or cabinetry may also be damaged.
Do not switch the oven off completely while food is inside it, but
select the lowest possible temperature for the oven mode you are
using. This will ensure the fan will automatically continue to run.
It
is recommended to cover all cooked food that is left in the oven
to be kept warm. This will prevent moisture from condensing on the
interior of the oven.
T
o avoid damage, do not place aluminum foil, pots, pans or
baking sheets directly on the oven floor. This can cause a build up of
heat that will damage the oven floor.
Do not slide pots or pans on the oven
floor. This could scratch
and damage the surface.
The door can
support a maximum weight of 33 lbs (15 kg). Do not
sit on or lean against an open door, and do not place heavy objects
on it. Also make sure that nothing can get trapped between the door
and the oven cavity. The oven could get damaged.
This ove
n must only be used for cooking food. Fumes, vapors or
heat given off by glues, plastics or flammable liquids and materials
could be hazardous. Do not use it as a dryer, kiln, dehumidifier, etc.
Do not cover or block any vent openings.

IMPORTANT SAFETY INSTRUCTIONS
16
Do not let metal objects (aluminum foil, pans) come in contact
with the heating element.
Mak
e certain that the power cords of small appliances do not
come in contact with or get caught in the oven door.
When baking frozen pizzas or pies, place them on the wire rack
lined with parchment paper. Do not use the baking tray or the
roasting pan for frozen foods with a large surface area. The tray or
pan could become warped and difficult to remove from the oven
when hot. Frozen foods like french fries, chicken nuggets, etc. can
be baked on the baking tray.
The flames co
uld set the grease filters of a cooker hood on fire.
Do not flambé under a cooker hood.
Never heat empty cook
ware.
If
the cooktop is covered, there is a risk that the material of the
cover will ignite, explode or melt if the range is still hot or if turned on
inadvertently. Never cover the cooktop with a board, cloth or
protective sheet.
When using
an electrical appliance, e.g. a hand mixer, near the
cooktop, make sure that the power cable does not come into
contact with the hot cooktop. The cable's insulation could become
damaged.
The co
oktop gets hot when in use and remains hot for a while
after being turned off. There is a potential hazard until the residual
heat indicator goes out.
If
the cooktop is turned on or accidentally turned on or if it is still
hot, metal objects on the cooktop can heat up. Other items may
melt or catch fire. Damp lids can become attached to the cooktop
by suction. Do not store items on the cooktop! Always turn the
burners off after use!

IMPORTANT SAFETY INSTRUCTIONS
17
Do not all
ow solid or liquid sugar, or pieces of plastic or aluminum
foil to get onto the burners when they are hot, as they can damage
the ceramic surface when it cools down. If this should occur, turn off
the appliance and scrape off all the sugar, plastic or aluminum
residues while still hot, using a shielded scraper blade. Wear oven
gloves. Allow the burners to cool down and clean them with a
suitable ceramic cleaning agent.
P
ans that boil dry can cause damage to the ceramic glass. Do not
leave the appliance unattended while it is being used.
P
ots and pans with bases with pronounced edges or ridges can
scratch the ceramic burner. Only use pots and pans with smooth
bases.
Lift pans into position on the cooktop. Sliding them into place can
cause scuffs and scratches.
Gr
ains of salt, sugar and sand (e.g. from cleaning vegetables) can
cause scratches if they get under pan bases. Make sure that the
ceramic surface is clean before placing pans on it.
E
ven a light object can cause damage to the ceramic cooktop in
certain circumstances. Do not drop anything on the ceramic surface.
Hot pans on the display can cause damage to the electronics
underneath. Do not place hot pans on the area around the display.
The co
oktop frames or surrounding (in the case of beveled
cooktops) may become hot due to the following factors: operating
time, high output settings, large cookware, and number of burners in
operation.
Cook
ware of aluminum or with an aluminum base can cause
shiny metallic spots. These spots can be removed with ceramic
glass or stainless steel cleaner (see "Cleaning and Care").

IMPORTANT SAFETY INSTRUCTIONS
18
If
residue remains on the cooktop for any length of time, it can
cook into the cooktop and sometimes it is then not possible to
remove it. Remove spills and splatters promptly. Also make sure that
the bottom of any cookware is clean, dry, and free of grease before
placing it on the cooktop.
The co
oktop has burners of different sizes. Use cookware with a
level base that is large enough for the burner. Cookware that is too
small leaves part of the hot burner uncovered, which may cause
burns due to touching or ignite clothing. The use of cookware of the
right size also makes for better use of the heated areas.
Not any coo
kware of glass, glass ceramic, ceramic, clay or other
glass cookware is suitable for use on a burner. It can be damaged
due to sudden temperature change.
W
et sponges or clothes can cause burns due to hot steam if they
are used to wipe spilled food off a hot burner. Some cleansers can
emit hazardous vapors if they are applied to a hot surface. Be
careful when cleaning the cooktop.
Spilled food can cause odors an
d the spraying of grease, which
can ignite on the cooktop. Never leave the cooktop unsupervised at
high power.
If
the handles of a pot or pan extend across an adjacent burner,
this can cause burns, the ignition of flammable materials and the
spilling of food due to inadvertent contact with the cookware. Turn
the pot or pan so that the handles point toward the inside and do
not extend across an adjacent burner.
If
the burner is damaged, cleansers or spilled food can penetrate
the glass surface and cause a short-circuit. Never cook on a
damaged burner. Contact an electrician immediately.

IMPORTANT SAFETY INSTRUCTIONS
19
Cleaning and care
Do not use a st
eam cleaner to clean the range.
The steam may reach electrical components and cause a short
circuit.
Only clean par
ts listed in these Operating and Installation
Instructions.
Scr
atches on the door glass can cause the glass to break.
Do not use abrasive cleaners, hard sponges, brushes or sharp metal
tools to clean the door glass.
The shel
f runners can be removed for cleaning purposes (see
"Cleaning and care"). Ensure they are correctly fitted after cleaning
and never operate the oven without the shelf runners inserted.
Ther
e is a seal around the oven interior which seals the inside of
the door. Take care not to rub, damage or move the gasket.
Do not use ove
n cleaners. Commercial oven cleaners or oven
liners of any kind should not be used in or around any part of the
oven.
Debris shoul
d be removed before running the Self Clean program.
If not removed this debris can smoke causing the self-cleaning
program to turn itself off.
Accessories
Use only ge
nuine original Miele parts. If parts or accessories from
other manufacturers are used, the warranty will become void.
The high temperatures used during self-cleaning will damage
accessories that are not designed for cleaning in the Self Clean
program. Please remove these accessories from the oven before
starting the Self Clean program. This also applies to accessories
purchased separately (see "Cleaning and care").
SAVE THESE INSTRUCTIONS AND REVIEW THEM PERIODICALLY
Guide to the range
20
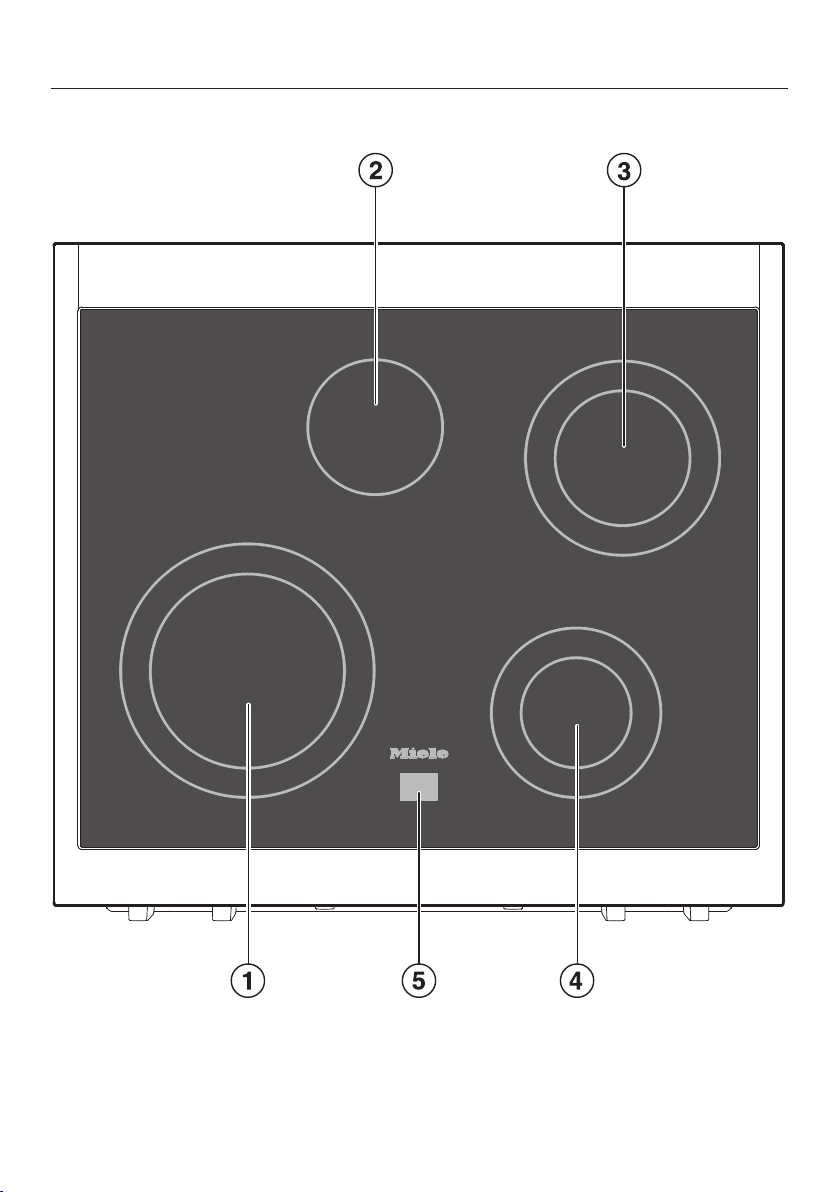
Cooktop

Guide to the range
21
a
Variable burner
8 1/4" - 10 5/8" (21 cm - 27 cm)
b
Standard burner
5 11/16" (14.5 cm)
c
Variable burner
5 11/16" - 8 1/4" (14.5 cm - 21 cm)
d
Variable burner
4 3/4" - 7" (12 cm - 18 cm)
e
Residual heat display
Guide to the range
22
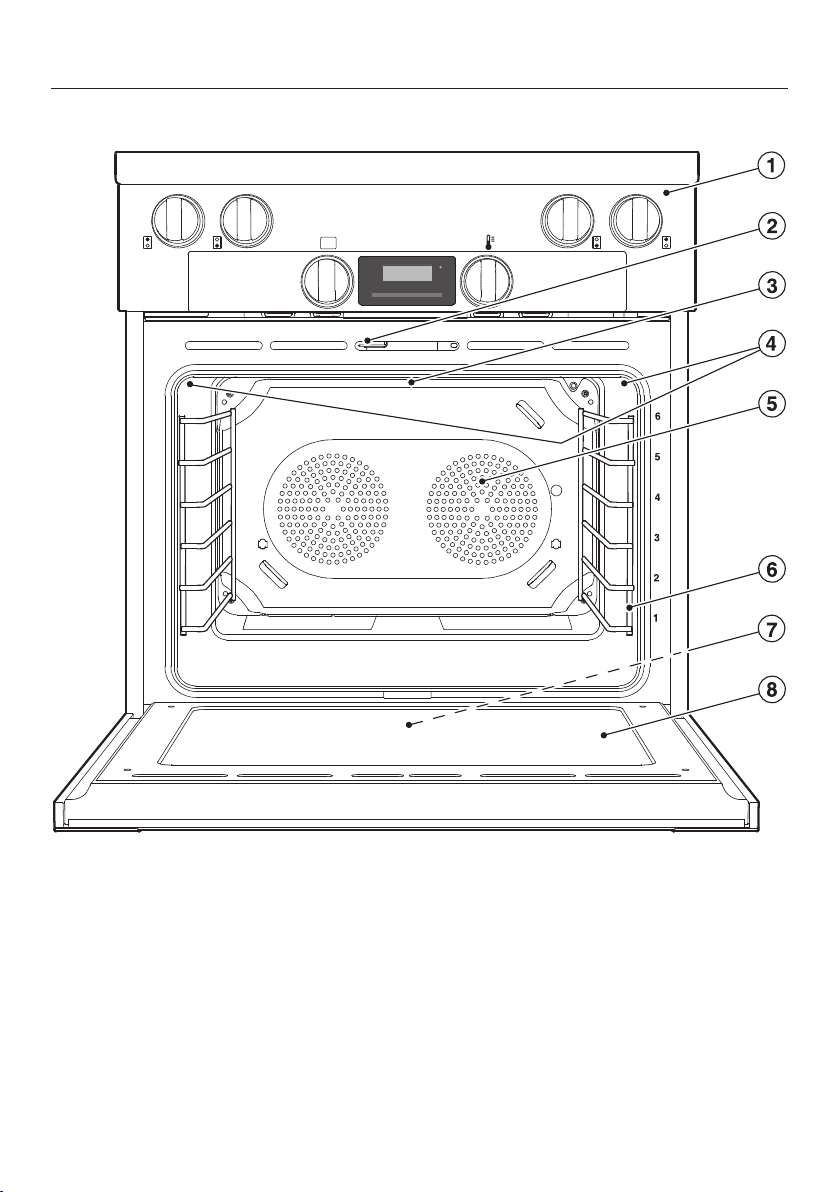
Oven

Guide to the range
23
a
Oven and cooktop controls
b
Door lock with contact switch for Self Clean *
c
Browning/Broiling element
d
Oven interior lighting
e
TwinPower convection fans with heating element
f
Shelf runners with 6 levels
g
Data plate **
h
Door
* This switch ensures that the heating elements and the convection fans turn off
when the door is opened during use.
** The data plate is located behind the base cover.
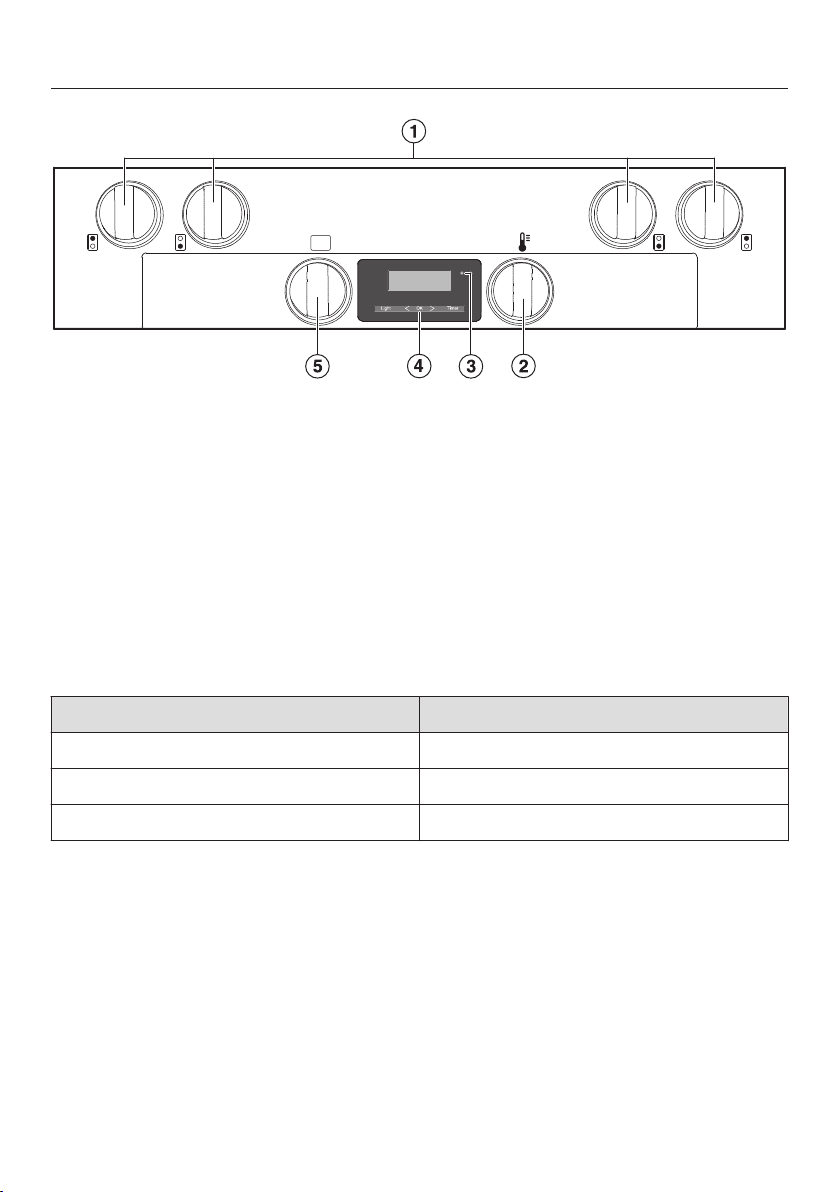
Control panel
24
a
Burner control knobs
b
Temperature selector
c
Optical interface
(for Service technicians only)
d
Display with sensor buttons for the light, timer and confirmation ", OK, "
e
Operating mode selector
Burner control knobs
The range is equipped with various cooking zone functions:
Symbol Description
0 Burner off
1–12 Power levels
Turning on a variable burner

Control panel
25
Temperature selector
The temperature selector is used to
select the t
emperature for a cooking
mode.
It can be turned clockwise until a
r
esistance is felt and then turned back
again.
The temperature settings are marked on
the t
emperature selector.
Operating mode selector
To select an operating mode.
It can be turned clockwise or counter-
clockwise.
The operating modes are printed on the
mode selector.
Operating modes
– Rapid (Rapid PreHeat)
– Bake
– Broil
– Surround
– Clean (Self Clean)
– Conv Broil (Convection Broil)
– Conv Bake (Convection Bake)
Control panel
26
Clock / Timer
The clock/timer is operated via the
Display with the senso
r buttons.
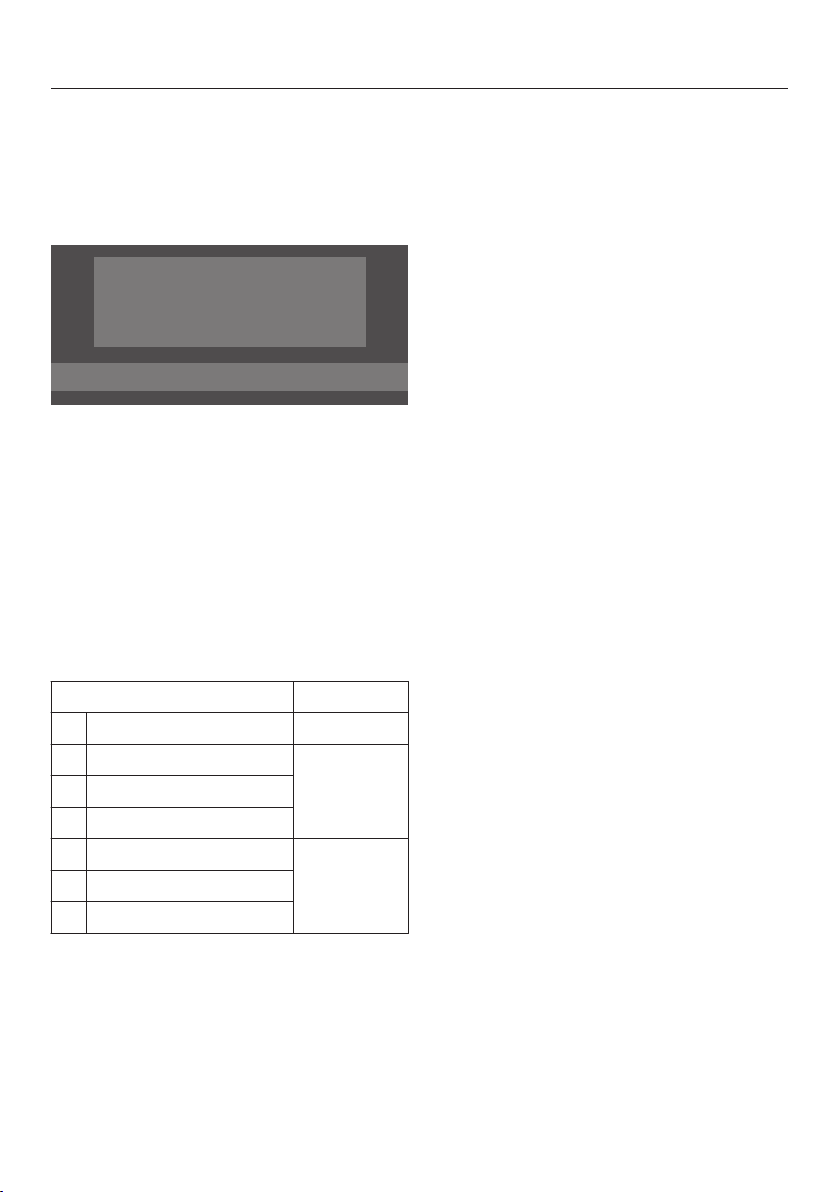
Display
h min
Light OK Timer
The display shows the time of day or
your settings.
See "Clock / Timer" for more
information.
Symbols in the display
Depending on the position of the mode
select
or and/or which button is
pressed, the following symbols will
appear:
Symbol / Mode
Timer Any
Temperature indicator
Operating
mode
Cooking time
Finish time
Settings Off
Time of day
System lock
A mode can only be set or changed if
the mode select
or is in the correct
position.
Sensor buttons
The range has sensor buttons for light,
, OK, , and timer
, which react to the
touch of a finger. Each touch is
confirmed with an audible tone.
The tone can be turned on or off by
selecting the status in the settings
(see "Settings").
Temperature indicator
The temperature indicator light lights
up when the oven is heating.
When the set temperature is reached,
– the oven heating turns off,
– and the temperature indicator light
goes out.
The temperature regulator ensures that
the oven
heating and temperature
indicator light turn back on again when
the oven temperature falls below the
level set.

Features
27
Model numbers
A list of the ovens described in these
oper
ating instructions can be found on
the back page.
Data plate
The data plate is behind the toe-kick.
The t
oe-kick cover is attached to the
base of the range by magnets so it can
be removed and put back again easily.
There you can find the model number,
the serial number and the connection
data (voltage/fr
equency/maximum rated
load) for your range.
Have this information available when
conta
cting Miele Technical Service.
Items included
The range is supplied with:
– installation instructions,
– operating instructions,
– an anti-tip device including screws
for fast
ening the range,
– various accessories.
Standard and optional
accessories
Accessories vary depending on
model.
All ove
ns are supplied with shelf
runners, a universal tray and a wire
rack.
Depending on the model, your range
may also be supplied with other
accessories listed here.
All accessories and cleaning and care
pr
oducts listed in these instructions are
designed to be used with the Miele
range.
These can be ordered via the Miele
websit
e, from Miele (see end of this
booklet for contact details) or from your
Miele dealer.
When ordering, please have ready the
model number of you
r range and of the
desired accessories.
Features
28
Shelf runners
The shelf runners are located on the
right and left-hand sides of the oven
with the leve
ls for inserting accessories.
The shelf level numbers are indicated
on the fr
ont of the oven frame.
Each level consists of a strut on which
you can
place the wire oven rack, for
example.
The runners can be removed for
cleaning purposes. See "Cleaning and
C
are".
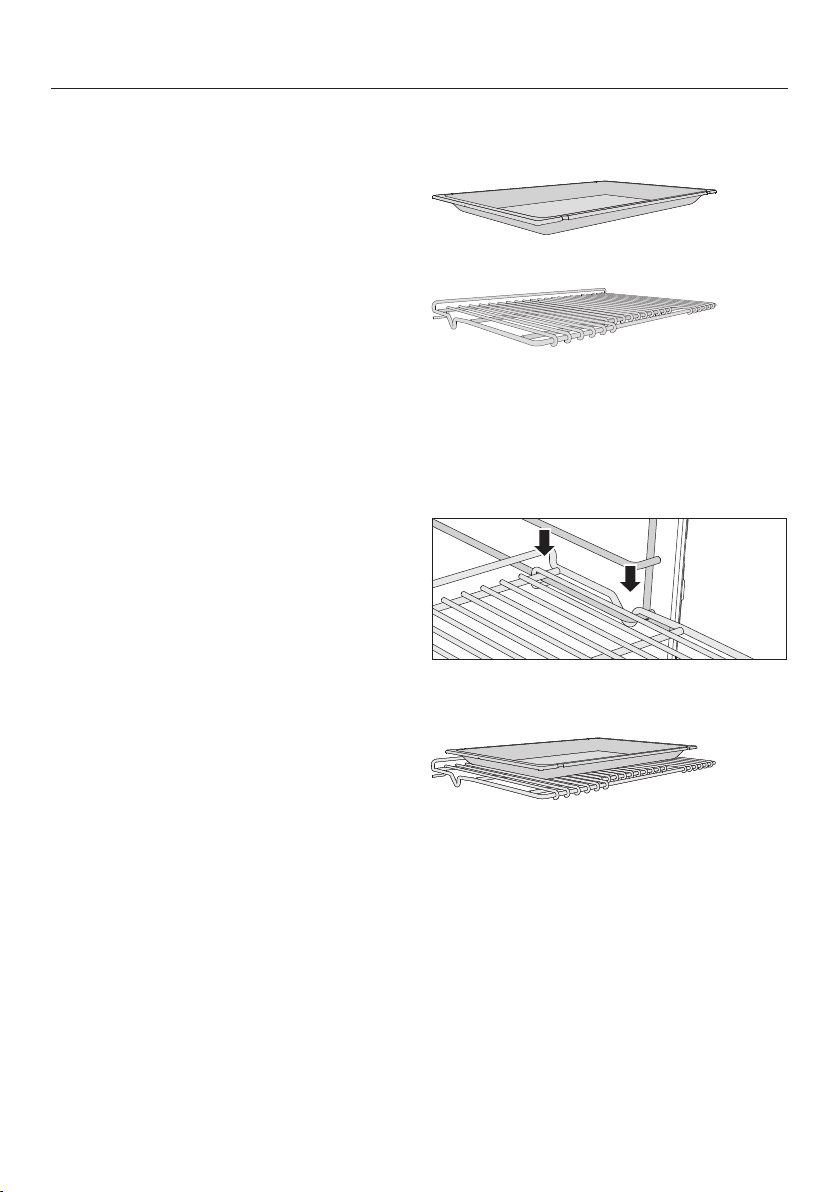
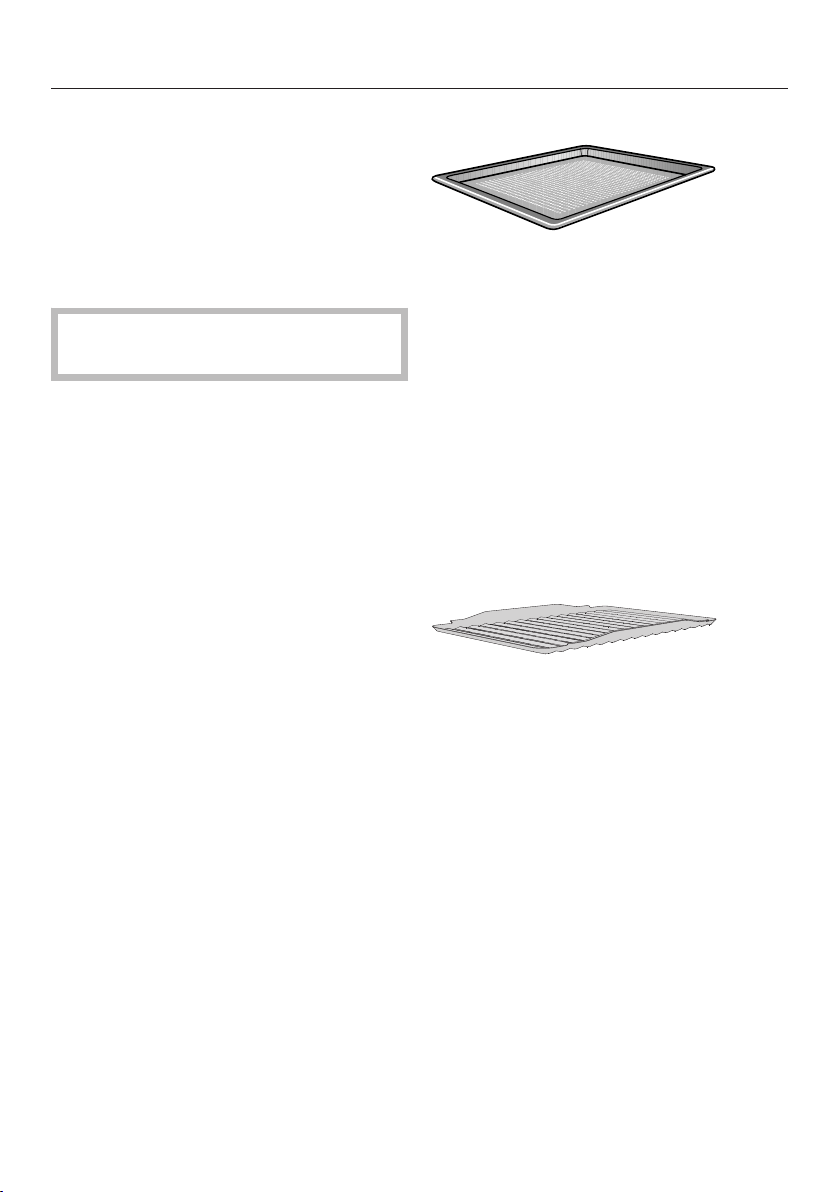
Universal tray and Wire oven rack
Universal tray HUBB30-1
Wire oven rack HBBR30-2
Non-tip safety notches are located on
the shor
ter sides of these
accessories.These prevent the trays
being pulled completely out of the side
runners when you only wish to pull
them out partially.
Always place the wire oven rack on the
runner with the notch facing down.
When using the universal tray, place it
directly on the wire oven rack.
Features
29
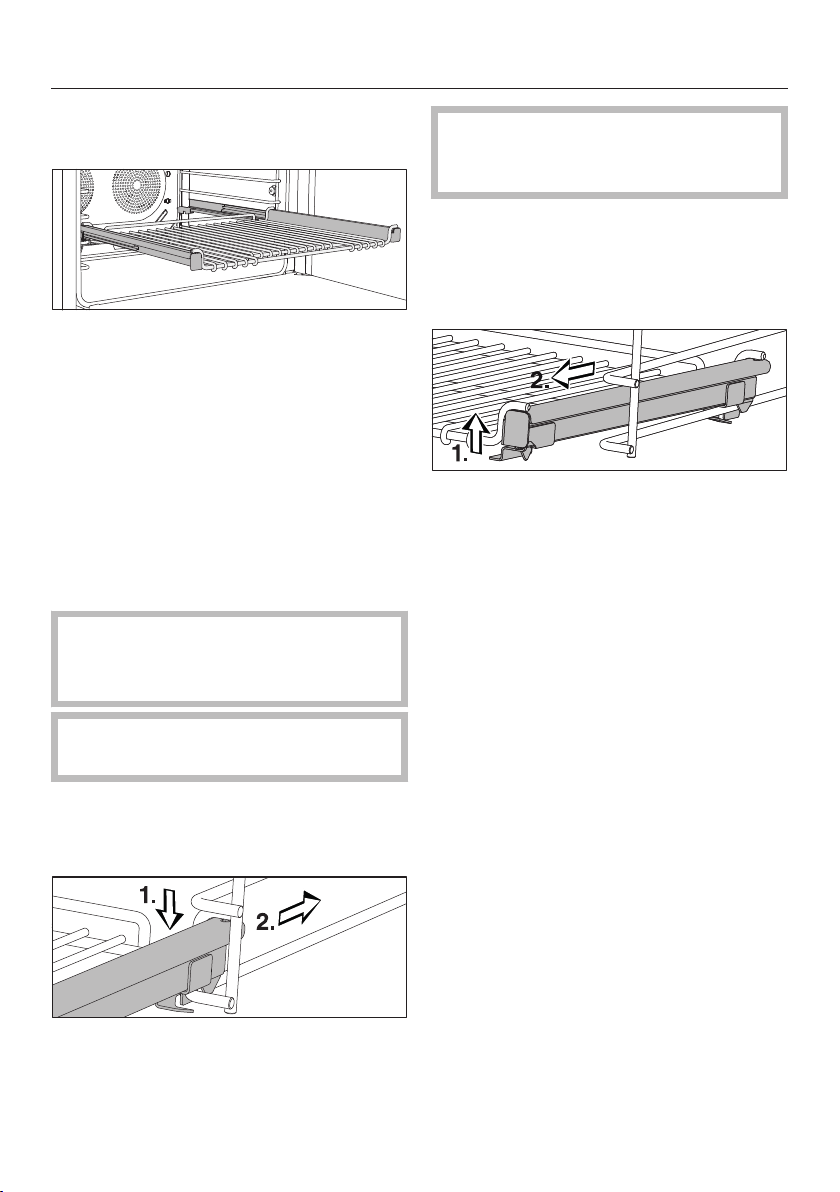
FlexiClips with wire rack
HFCBBR30-2
The FlexiClips with wire rack can be
mou
nted on any shelf level and pulled
completely out of the oven This allows
you to see the food easily.
The FlexiClips with wire rack is pushed
in and
then locked onto a level.
The rack can hold a maximum of 33 lbs
(15 kg).
Installing and removing the FlexiClips
with
wire rack
Danger of burns! Mak
e sure the
heating elements are turned off and
that the oven cavity is cool.
Do not pull the Fl
exiClips apart
during installation or removal.
Ho
ld the FlexiClips with wire rack
with both hands and position it in
front of the desired level.
Inser
t the FlexiClips with wire rack
onto the level (1.) and slide it along
the struts of the level (2.) until it clicks
into place.
If the FlexiClips with wire rack jams
when sliding it onto the level, pull it
out using some force and reinsert.
To removing the FlexiClips with wire
r
ack:
P
ush the FlexiClips with wire rack in
all the way.
Usin
g both hands lift the front of the
FlexiClips with wire rack on both
sides (1.) and pull it out of the level
(2.).
Using the universal tray
When using the universal tray, place
it directly on the FlexiClips with wire
rack.
Features
30
Temperature selector with °C scale
The range is delivered with a
t
emperature selector with °F scale. You
can get the temperature selector with
°C scale as an accessory. Specify the
model of your range when purchasing.
Replacing the temperature selector
Do not oper
ate the range without
an installed temperature selector.
T
urn the temperature selector to 0°.
P
ull the temperature selector off the
range horizontally.
Install the ne
w temperature sensor in
the same position and push it onto
the range.
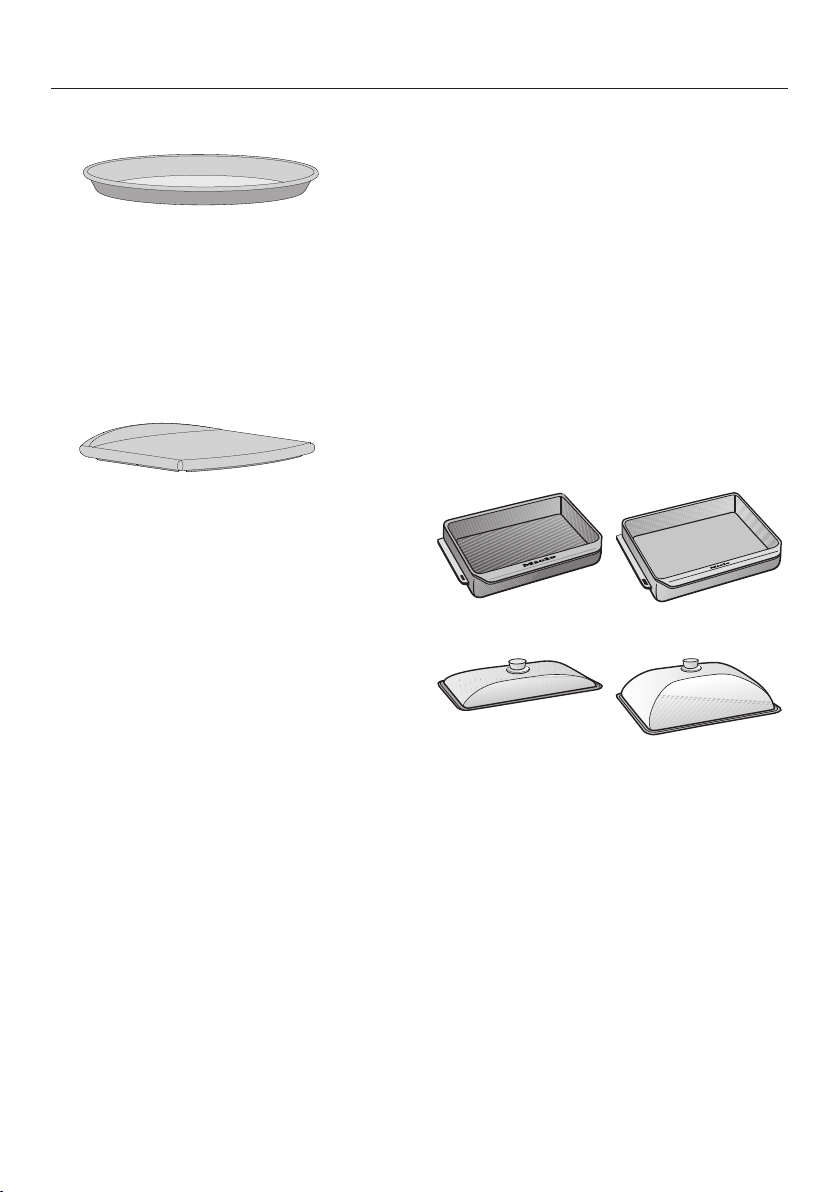
Perforated baking tray HBBL71
The perforated baking tray has been
specially d
eveloped for the preparation
of baked goods.
The tiny perforations assist in browning
the underside of baked goods.
The tray can also be used for
dehydrating or drying food.
The surface has been treated with
P
erfectClean enamel for easy cleaning.
The perforated baking tray can be
placed on t
he rack.
Grilling and Roasting insert
HGBB30-1
The grilling and roasting insert is placed
in the universal
tray.
The drippings from the meat or poultry
are collected under the insert reducing
spattering in the oven. The drippings
can then be used for gravy and sauces.
The surface has been treated with
P
erfectClean enamel for easy cleaning.
Features
31
Round baking form HBF27-1
This circular form is suitable for cooking
fr
esh or frozen pizzas, flat cakes, tarts
and baked goods.
The surface has been treated with
P
erfectClean enamel.
Gourmet Baking Stone HBS60
The baking stone is ideal for baking
dishes
with a crisp bottom such as
pizza and bread.
The baking stone is made from a heat
retaining stone and is glazed. Place the
stone directly on the wire rack.
A wooden peel is supplied with it for
placing food on and off the stone.
Gourmet Casserole Dishes HUB and
Lids HBD
Miele Gourmet Casserole Dishes can
be place
d directly on the wire oven
rack. They have an anti-stick coating.
The oven dishes have depths of 8 1/2"
(22 cm) or 13 3/4" (35 cm). They have
the same width and height.
Matching lids are also available
separ
ately.
Depth: 8 1/2"
(22 cm)
Depth: 13 3/4"
(35 cm)
HUB61-22 HUB61-35
HBD60-22 HBD60-35

Features
32
Opener
The opener allows you to open the
cover of the over light.
Miele Oven Cleaner
Miele oven cleaner is suitable for
r
emoving stubborn soiling. It is not
necessary to preheat the oven before
use.
Ceramic and stainless steel cleaner
250 mL
Removes heavy soiling, lime scale, and
alu
minum residue.

Features
33
Cooktop safety features
Overheat protection
Each burner has overheat protection
(inner t
emperature limiter). It turns the
heating of the cooking off automatically
before it overheats. As soon as the
burner has cooled off, the heating turns
on again.
Overheating can be caused by:
– turning a burner on without putting a
pan on it,
– heating empty cookware,
– a pan with an uneven bottom not
sittin
g evenly on the burner,
– the pan not conducting heat
pr
operly.
You will recognize activation of the
overhe
at protection if the heat keeps
turning on and off at the highest power
setting.
Oven safety features
System lock for the oven
The system lock prevents the oven from
bei
ng used unintentionally (see "System
lock ").
The system lock will remain activated
even aft
er a power failure.
Cooling fan
The cooling fan comes on automatically
when a cooking program is started. The
cooling fan mixes hot air from the oven
cavity with cool room air before venting
it out into the kitchen through vents
located between the appliance door
and the control panel.
The cooling fan will continue to run for
a whil
e after a program is complete to
prevent moisture from building up in the
oven, on the control panel or
surrounding cabinetry.
When the temperature in the oven has
fallen sufficiently, the cooling fan will
tur
n off automatically.
Vented oven door
The oven door is made of glass panes
that have a heat-
reflective coating on
part of their surface.
During operation, air is also circulated
thr
ough the door to keep the outer
panel cool.
The door can be removed and
disassembled for cleaning purposes
(see "Cleanin
g and care").
Safety Door Lock for Self Clean
For safety reasons, the door is locked
as soon
as the Self Clean program is
started. After the self-cleaning program
has finished, the door will remain
locked until the temperature in the oven
has fallen below 535°F (280°C).

Features
34
PerfectClean treated surfaces
The revolutionary PerfectClean enamel
is a smooth
, non-stick surface that
cleans easily with a sponge.
Food and soiling from baking and
r
oasting can be easily removed from
these surfaces.
Do not use ceramic knives as these
will scratch the PerfectClean surface.
Follow the instructions in the "Cleaning
and Care" section of this manual so the
anti-stick and easy cleaning properties
are retained.
The following have all been treated with
P
erfectClean:
– Universal tray
– Grilling and Roasting insert
– Perforated baking tray
– Round baking form
Self Clean ready accessories
The following accessories can be left in
the oven
during the Self Clean program.
– Shelf runners
– Wire oven rack
See "Cleaning and care" for more
information.

Before using for the first time
35
Before using for the first time
The r
ange may only be operated
after it has been installed properly.
Read the operating and installation
in
structions carefully before installing
the range..
Read the operating instructions
car
efully before starting up the
range.
The time of day can only be changed
when the mode selec
tor is set to Off.
Set the time of day
.
Setting the time of day for the
first time
The time of day is shown in 12 hour
clock format.
After connection the oven to the
electrical supply
will appear in the
display and a will flash under :
Use or t
o set the time of day.
Confirm with OK.
The time of day is now saved.
Change the time of day to a 12-hour
format by setting h in the settings
menu (see "Settings").
During a power failure, the time of day
will be saved for app
rox. 200 hours. If
the power returns within this period of
time the current time of day is
displayed again. If the power is out for
an extended period of time the time of
day will need to be reset.
The time is day is turned off by default
(see "Settings - ").
The display will appear dark when the
oven is turned off. The time of day
conti
nues to run unseen in the
background.
Turning on the cooktop for the
first time
Remo
ve any protective foil and
stickers.
Befo
re first use, wipe down the
appliance with a damp cloth and dry
it.
Metal components are protected by a
conditioning agent. Smells and vapor
may occur when the appliance is used
for the first time.
The smell and any vapors do not
indicat
e a faulty connection or a
defective appliance and are not harmful
to your health.
Heating the oven
New ovens may have a slight odor
during their first use. Heating up the
oven for at least an hour with nothing in
it will eli
minate the odor.

Before using for the first time
36
Ensure that the kitchen is well
ventilated while the appliance is
being heated up for the first time.
Close doors to other rooms to
prevent the smell spreading
throughout the house.
Remo
ve any protective wrapping and
sticky labels from the oven.
T
ake all accessories out of the oven
and clean them (see "Cleaning and
care").
Befor
e heating the oven up, wipe the
interior with a damp cloth to remove
any dust or bits of packaging that
may have accumulated in the oven
cavity during storage and unpacking.
Selec
t the operating mode Conv
Bake (Convection Bake)
The oven heating, lighting and cooling
fan will turn on.
Selec
t the maximum temperature
475°F (250°C).
Heat up the oven for at least one
hou
r.
Once the hea
ting up process is
complete, turn the mode selector to
Off and the temperature selector to
0°F.
Danger of burns! Allow the oven
t
o cool before cleaning.
Selec
t "Light" to turn on the oven
light.
Cle
an the oven interior with warm
water and liquid dish soap, applied
with a soft sponge or cloth.
Dr
y all surfaces with a soft cloth.
T
urn the oven lighting off.
Leave the oven door open until the
ove
n interior is completely dry.

Operating the cooktop
37
How the burners work
Each burner has overheat protection,
whi
ch prevents the overheating of the
ceramic top (see "Overheat
protection").
Standard burners have one heating
band, variable burners have two
heating bands.
If a power level is set, the heating turns
on and the heating band is visible
through the ceramic top. The heat
output of the burners depends on the
power level set and is controlled
electronically. This causes the "cycling"
of a burner: the heating is turned on
and off.
Cookware
The most suitable cookware
is metal
pots and pans with thick bottoms that,
when cold, bulge inwards slightly. On
warming, the bottom extends and sits
level on the burner; this conducts the
heat optimally.
cold hot
Glass, ceramic or stoneware is less
suitable.
These materials do not
conduct the heat well.
Not suitable ar
e plastic and aluminum
dishes. These melt at high
temperatures.
Cookware of aluminum or with an
aluminum base can cause shiny
metallic spots. These spots can be
r
emoved with ceramic glass or stainless
steel cleaner (see "Cleaning and Care").
Pots and pans with bases with
pr
onounced edges or ridges can
scratch the ceramic burner. Only use
pots and pans with smooth bases.
Lift pans into position on the cooktop.
Sliding
them into place can cause
scuffs and scratches.
Often the maximum diameter quoted by
manufac
turers refers to the diameter of
the top rim of the pot or pan. The
diameter of the base (generally smaller)
is more important.

Operating the cooktop
38
Energy saving tips
– Ensure that the bottoms of pots or
pans match the siz
e of the burner or
are somewhat larger. This ensures
that heat is not lost unnecessarily.
– Use a lid whenever possible to
mini
mize heat loss.
– For small quantities, select a small
pan. A small pan on a small burner
uses less en
ergy than a large, only
partially filled pan on a large burner.
– Cook with as little water as possible.
– Once food has come to the boil or
the pan is hot for fr
ying, reduce the
heat to a lower power setting.
– When cooking for a long time, turn
the burner off at least 5 or 10 minutes
before the end of the cooking time.
This makes use of the residual heat.

Operating the cooktop
39
Burner data
Burner
Output in Watts at
208 V and 60 Hz
Output in Watts at
240 V and 60 Hz
left front
(variable burner)
8 1/4" / 10 5/8"
(21 cm / 27 cm)
2000 / 2800 2300 / 3100
left rear
(st
andard burner)
5 11/16"
(14.5 cm)
1200 1200
right rear
(variable burner)
5 11/16" / 8 1/4"
(14.5 cm / 21 cm)
700 / 1800 700 / 1800
right front
(variable burner)
4 3/4" / 7"
(12 cm / 18 cm)
1100 / 2400 1100 / 2400
Total: 8200 Total: 8500
Operating the cooktop
40
Setting range
Setting range
Melting butter, chocolate, etc.
Dissolving gelatin
1-2
Thickening sauces containing only egg yolk and butter
W
arming small quantities of liquid
Keeping food warm that sticks easily
Cooking rice
1-3
Warming liquid and semi-solid foods
Thick
ening creams and sauces.
Preparing omelets, lightly fried eggs
Steaming fruit
3–5
Thawing frozen foods
S
teaming vegetables, fish
Cooking pasta, legumes
Swelling grains
4–6
Bringing to a boil and continued cooking of large quantities of
food
7
Gentle braising (without overheating the fat) of fish, cutlets,
sausages, fried eggs, etc.
8–9
Frying pancakes, etc. 9–11
Boiling large quantities of water
Bringing to a boil
11–12
These settings, which refer to approx. 4 servings, should only be taken as a guide. With
deep p
ans, larger quantities or when cooking without a lid, a higher setting is required. For
smaller quantities, select a lower setting.

Operating the cooktop
41
Never heat an empty pot! This
c
an damage the glass ceramic
surface.
Never leave the cooktop unattended
during use!
Hot pans on the display can
c
ause damage to the electronics
underneath.
NEVER place hot pots or pans near
the display
.
The burner control knobs have a
st
op.
Never turn the knob to the right to 0,
past the symbol or the last
nu
mber.
Turning on
P
ress the burner knob and turn it to
the right to the desired setting.
Turning on the second heating zone
Variable burners have a second heating
zone that you can turn on.
You have to overcome slight
r
esistance in order to turn the knob
from 12 to .
P
ress the burner knob in and turn it
clockwise past "12" to the stop, to
.
The second heating zone turns on.
The
n turn the knob to the left to the
desired setting.
Turning off
T
urn the burner knob to the left to 0.
Residual heat display
When after turning on one burner, for
e
xample the left front, a specified
temperature is reached, the associated
residual heat indicator lights up:
A little while after turning off the burner,
the r
esidual heat indicator goes out.
Risk of burns! Do not t
ouch the
burners while the residual heat
indicators are on.

Operating the oven
42
Energy saving tips
– Remove any accessories from the
oven
that you do not require for
cooking.
– Only preheat the oven if the recipe or
coo
king chart advises.
– Try not to open the door when
cooking.
– If a temperature range is given, it is
best t
o select the lower temperature
and check the food after the shortest
cooking time given.
– Use the operating mode Conv Bake
(Conve
ction Bake). You can use
cooking temperatures 10-30° lower
than when using other modes.
– Conv Broil (Convection Broil) can be
used for a wide variety of foods.
L
ower temperatures can be used
than with other broil modes that use
the maximum temperature setting.
Using residual heat
Tip: When co
oking using temperatures
above 285°F (140°C) and cooking
durations longer than 30 minutes, you
can turn the temperature selector to the
0°F position about 5 minutes before the
end of cooking. The heating elements
will turn off and the residual heat in the
oven will be sufficient to finish cooking
the food.
Using the oven
Place the food in the oven.
Usin
g the mode selector, select the
required oven mode.
The oven lighting and the TwinPower
fans will turn on.
Selec
t the temperature using the
temperature selector.
The oven heating will turn on.
After the cooking process:
T
urn the mode selector to Off and the
temperature selector to 0°F.
T
ake the food out of the oven.
Cooling fan
After the cooking process the cooling
fan
will continue to run for a while after
a program is complete to prevent
moisture from building up in the oven,
on the control panel or surrounding
cabinetry.
When the temperature in the oven has
fallen sufficiently the cooling fan will
turn off aut
omatically.

Operating the oven
43
Preheating the oven
The appliance only needs to be
pr
eheated in a few cases.
Most dishes can be placed in a cold
oven. They will then use the heat
pr
oduced during the heating phase.
The oven should be preheated in the
following instances:
Conv Bake (Convection Bake)
– dark bread doughs,
– beef sirloins and tenderloins.
Surround
– cakes and pastries with a short
baking
time (up to 30 minutes),
– delicate mixtures,
– dark bread doughs,
– beef sirloins and tenderloins.
Rapid PreHeat
With Rapid (Rapid PreHeat) the
pr
eheating phase can be shortened.
Do not use Rapid (Rapid PreHeat)
when bakin
g pizzas or delicate
mixtures (e.g. small cakes, pastries).
The tops of these items will brown
t
oo quickly.
Selec
t Rapid (Rapid PreHeat).
Select a temperature.
Set the desir
ed oven function when
the temperature indicator light
goes out for the first time.
Place the food in the oven.

Guide to the modes
44
The oven has a range of modes for
pr
eparing a variety of foods.
Rapid (Rapid PreHeat)
(Browning / Broiling element +
Convection fan with heating element)
This function allows the oven to be
heated to the desired temperature
quickly.
Once the desired temperature has been
reached the oven function must be
selected.
Bake
(Baking element)
This mode uses traditional baking
techniques to perfect pies and biscuits.
Broil
(Browning / Broiling element)
Use this function for broiling or searing
small quantities. Ideal for chops, ribs,
br
owning baked dishes and toasting
bread.
Surround
(Browning / Broiling element + Baking
element)
This premium baking mode uses heat
fr
om the upper and lower elements to
create perfect results on all baking
recipes.
If using an older recipe or cookbook,
set the oven t
emperature 10 ° lower
than that recommended. This won't
change cooking times.
Conv Broil (Convection Broil)
(Browning / Broiling element +
Convection fans)
This allows for a lower temperature to
be used then when using
broil. Ideal for
broiling thicker cuts of meat (e.g.
roulades, chicken). This function
distributes hot air from the browning /
broiling element over the food using the
fan.
Conv Bake (Convection Bake)
(Convection fans with heating element)
Use this mode for baking and roasting
on sever
al levels at the same time. You
can cook at lower temperatures than
with the Surround function because the
fans distribute the heat evenly
throughout the cavity for a consistent
baking temperature.

Clock / Timer
45
Turning a cooking program
On
/ Off automatically
You can set a cooking program to turn
on or off aut
omatically. First the mode
and cooking temperature must be
selected.
The maximum duration that can be set
for a cooki
ng program is 12 hours.
It It is recommended to use the
aut
omatic On/Off feature when
roasting. Do not delay the start of the
program for too long when baking.
Cake mixtures and doughs will dry out,
and the leavening agents will lose their
effectiveness.
Setting the cooking time
Example: Baking a cake for 1 hour 5
min
utes.
Place the food in the oven.
Selec
t the required oven mode and
temperature.
The oven heating, lighting and cooling
fan will turn on.
Select OK.
If necessar
y, move the symbol
with or until it appears under .
Confirm with OK.
h will appear in the display along
with a flashing under .
h
Use or t
o set the cooking time
().
Confirm with OK.
The cooking time is saved and then
coun
ts down in minutes, with the last
minute counting down in seconds.
The symbol indicat
es that a cooking
time has been set.

Clock / Timer
46
Setting a cooking time and finish
time
Example: The time is now 11:15 AM;
you want a dish with a cooking time of
90 minu
tes to be ready by 1:30 PM.
Place the food in the oven.
Selec
t the required oven mode and
temperature.
The oven heating, lighting and cooling
fan will turn on.
Set the cooking time:
Select OK.
If necessar
y, move the symbol
with or until it appears under .
Confirm with OK.
h will appear in the display along
with a flashing under .
Use or t
o set the cooking time
().
Confirm with OK.
The cooking time is saved and then
coun
ts down in minutes:
h
Set the finish time:
Move the symbol with or until
it appears under .
appears:
Confirm with OK.
will appear in the display (current
time of day + cooking time = + ):
Use or t
o set the end of the
cooking time ().
Confirm with OK.
The finish time is now saved:
The oven heating, lighting and cooling
fan will turn off.
As soon as the start time ( - =
) has been reached, the oven
heating, lighting and cooling fan will
turn on.

Clock / Timer
47
At the end of the cooking time
– appears in the display,
– flashes,
– the oven heating and lighting will turn
off,
– the cooling fan will continue to run,
and
– a signal will sound if turned on (see
"Settings - ").
T
urn the mode selector to Off.
T
ake the food out of the oven.
If the dish is not cooked to your liking,
you can
extend the cooking time by
entering a new time.
Changing the cooking time
Select OK.
If necessar
y, move the symbol
with or until it appears under .
The cooking time remaining appears in
the display
.
Confirm with OK.
Change the cooking time with or
.
Confirm with OK.
The changed cooking time is now
saved.

Clock / Timer
48
Deleting a cooking time
Select OK.
If necessar
y, move the symbol
with or until it appears under .
Confirm with OK.
The symbol will flash under .
Use t
o set the cooking time to
.
Confirm with OK.
The cooking time and finish time are
deleted.
Select OK.
The current temperature will appear.
The o
ven heating remains turned on.
If you would like to complete the
coo
king program:
T
urn the mode selector to Off.
T
ake the food out of the oven.
T
urn the oven off.
If you turn the mode selector to 0, the
settings for the cooking time and the
finish
time will be deleted.
Deleting a finish time
Select OK.
If necessar
y, move the symbol
with or until it appears under .
Confirm with OK.
The symbol will flash under .
Use or t
o set the end of the
cooking time to .
Confirm with OK.
The finish time is now deleted.

Clock / Timer
49
Changing the time of day
The time of day can only be changed
when the mode selec
tor is set to Off.
Turn the mode selector to Off.
Select OK.
Move the symbol with or until
it appears under .
Confirm with OK.
The symbol will flash under .
Use or t
o set the time of day.
Confirm with OK.
The time of day is now saved.
During a power failure, the time of day
will be saved for app
rox. 200 hours.
When the power returns within this
period of time the current time is
displayed again.
After an extended power failure, the
time of day will need t
o be reset.

Clock / Timer
50
Changing factory default
settings
The appliance is supplied with a
number of default settings (see the
"Settings over
view" chart).
A setting can be changed by altering its
status.
The settings can only be changed
when the mode selec
tor is on Off.
Select OK.
If necessary, move the symbol
with or until it appears under .
Confirm with OK.
appears:
If you want t
o change another
setting, select the appropriate
number with or .
Confirm with OK.
The setting is selected and the current
status appears, e.g. .
To change the status:
Set the desir
ed status using or .
Confirm with OK.
The status is saved and the setting
appears again.
If you would lik
e to change additional
settings, repeat the process.
If you have completed changing
settings, select .
The settings will remain in memory
even in
the event of a power failure.

Clock / Timer
51
Settings overview
Setting Status
T
ime of day
display
* The time of day display is turned off.
The display is dark when the oven is turned off. The
time o
f day continues to run unseen in the background.
If you have selected status , the oven must be
turned on before it can be used. This also applies for
the Timer and Light.
The oven also switches off automatically if no settings
ar
e selected within a certain period of time (approx. 30
minutes).
The time of day display is turned on
a
nd is visible in the display.
Buzz
er
volume
The buzzer is Off.
t
o
*
The buzzer is On.
The
volume can be changed. The corresponding buzzer
will be heard when a status is selected.
K
eypad tone
The keypad tone is turned off.
* The keypad tone is turned on.
Clock format
The time of day is shown in a 24-hour format.
* The time of day is shown in the 12-hour format.
If you chang
e the clock after 1 pm (13:00) from a 12-
hour clock to a 24-hour clock, you will need to update
the hours for the time of day accordingly.

Clock / Timer
52
Setting Status
Display
brightness
t
o
,
*
Different levels of brightness can be selected for the
disp
lay.
: Minimum brightness
: Maximum brightness
Lighting
* The oven interior lighting is on for 15 seconds and then
turns o
ff automatically.
The oven interior lighting is permanently turned on.
T
emperature
regulation
t
o
The temperature can be modified so that it is slightly
higher or lower than shown.
The higher the level, the higher the cooking
t
emperature.
Demo Mode
* Select and p
ress OK for approx. 4 seconds. When
appears in the display the demo mode is
deactivated.
Select and pr
ess OK for approx. 4 seconds. When
appears in the display the demo mode is active.
The oven can be operated, but the oven heating does
no
t work. For personal use you do not need this setting.
* Factory default

Clock / Timer
53
System lock
The system lock prevents the oven
from being used unintentionally.
The system lock is set of off by default.
This can be changed by setting the
status :
– = Off
–
= On
The status of the system lock can only
be change
d when the mode selector
is in the Off position.
To activate the system lock
Select OK.
Move the symbol with or until
it appears under .
Confirm with OK.
The currently set status
appears
and the symbol flashes under :
Use or to set the status .
Confirm with OK.
The system lock is turned on.
When the appliance is turned on again,
the symbol will appear in the display
t
o remind you that the system lock has
been activated.
The system lock will remain activated
even aft
er a power failure.

Clock / Timer
54
Deactivating the system lock for a
cooking
process
Selec
t an operating mode.
The and symbols will appear
alon
g with the current time of day:
P
ress and hold OK until goes out.
The oven can now be used.
Deactivating the system lock
T
urn the mode selector to Off.
Press and hold OK until goes out.
Select OK.
Move the symbol with or until
it appears under .
Confirm with OK.
The currently set status appears and
the symbol flashes under .
Use or t
o select the status .
Confirm with OK.
The system lock is Off.
The symbol disappears.

Clock / Timer
55
Timer
The timer can be used to time any
activity in the kitchen , e.g. boiling
eggs.
The timer can also be used at the same
time as a coo
king program if a start and
finish time have been set, e.g. a
reminder to stir the dish or add
seasoning.
A maximum time of 99 minutes and 55
secon
ds can be set for the timer.
Setting the timer
Example: Boiling eggs and setting the
timer for 6 minu
tes and 20 seconds.
Selec
t Timer.
will appear in the display with
flashing under :
min
Use or t
o set the timer as
desired.
min
Confirm with OK.
The timer settings are saved and will
count down in seconds:
min
The symbol indica
tes that the timer
has been set.

Clock / Timer
56
At the end of the timer
– flashes,
– the time starts counting upwards,
– a signal will sound if turned on (see
"Settings - ").
Selec
t Timer.
The signal will turn off and the symbols
in the display will go out.
Resetting the timer
Selec
t Timer.
The current timer appears.
Change the time set with or .
Confirm with OK.
The changed time is saved and will
count down in seconds.
Canceling the timer
Selec
t Timer.
Use to reduce the timer to .
Confirm with OK.
The timer has been canceled.

Bake
57
Eating food which has been cooked
correctly is important for good
health.
Only bake cakes, pizza, french fries,
etc. until they are golden brown. Do
not overcook them.
Operating modes
Depending on how you would like the
food pr
epared, you can use Conv Bake
(Convection Bake) or Surround.
Bakeware
The bakeware used depends on the
oven mode chosen and how the food is
pr
epared.
– Conv Bake (Convection Bake):
Baki
ng tray, Universal tray, any heat-
resistant baking dishes
– Surround:
Dark metal, enamel or aluminum
baking
tins with a matte finish, as
well as heat-resistant glass, ceramic
and coated dishes can be used.
Avoid bright, shiny metal tins as they
result in uneven or poor browning,
and in some cases cakes might not
cook properly.
– Always place baking pans on the
wir
e rack.
Position rectangular pans with the
longer side across the width of the
rack. This will allow for optimum heat
distribution and even baking results.
– When baking cakes with fruit
t
oppings or deep cakes, place the
pan in the universal tray to catch any
spillages.
Parchment paper / Greasing the pan
All Miele accessories (baking tray,
unive
rsal tray and round baking form)
are treated with PerfectClean enamel.
Surfaces treated with PerfectClean
enamel generally do not need to be
greased or covered with parchment
paper.
Parchment paper is only needed with:
– anything with a high salt content (e.g.
pr
etzels, bread sticks), because
sodium can damage the
PerfectClean surface;
– meringues or dishes with a high egg-
whit
e content, because they are
more likely to stick,
– frozen food cooked on the wire rack.

Bake
58
Temperature
As a general rule, select the lower
t
emperature given in the chart.
Choosing a baking temperature higher
than tho
se recommended may reduce
the cooking time, but will lead to
uneven browning, and unsatisfactory
cooking results.
Baking duration
Check if the food is cooked at the end
of the shor
test duration quoted. To
check if a cake is ready insert a
wooden skewer or toothpick into the
center, it should come out clean.
Shelf levels
The shelf level that you place the food
on for baking depends on the oven
mode and the number of tr
ays being
used.
– Conv Bak
e (Convection Bake)
1 Tray: level 3
2 Trays: levels 1+3 / 2+4
3 Trays: levels 1+3+5
– Surr
ound
1 Tray: Level 3
Bake moist cakes and muffins on a
maximum of two levels at the same
time.

Roast
59
Always follow USDA guidelines on
food safety
.
Operating modes
Depending on how you would like the
food prepared, you can use Conv Bake
(Convection Bake) or Surround.
Cookware
Any heat-resistant cookware can be
used:
Wire oven rack, grilling and roasting
inser
t (if available) on top of the
universal tray, roasting pans, heat-
resistant glass/earthen/cast iron
cooking and roasting bags.
Temperature
As a general rule, select the lower
t
emperature given in the chart.
If higher temperatures are used, the
meat will brown on the outside, but will
not be properly cooked through.
When cooking with Conv Bake
(Convec
tion Bake), select a temperature
25°F (20°C) lower than when using
Surround.
Select a temperature of approx. 25°F
(10°C) lower than quot
ed in the roasting
chart for meat weighing more than
6.5 lbs (3 kg).The roasting process will
take longer, but the meat will cook
evenly through and the skin or crackling
will not be too thick.
When roasting on the rack, set a
temperature approx. 10° lower than if
using an oven dish.
Shelf levels
In most cases level 3 should be used.
W
ith large items, such as a turkey, use
level 1 or 2.

Roast
60
Tips
– Resting time: At the end of the
pr
ogram, take the roast out of the
oven, cover with aluminum foil and
let stand for about 10 minutes. This
helps retain the juices when the meat
is sliced.
– The larger the cut of meat to be
roasted, the lower the temperature
should be. The roasting process will
take a little longer, but the meat will
be cooked evenly and the outside will
become crisp.
– Use a roast probe for accurate
coo
king temperatures and best
results.

Slow Roasting
61
This cooking method is ideal for
cooking beef, pork, veal or lamb when
a t
ender result is desired.
First, using a cooktop sear the meat on
all sides t
o seal in the juices.
Then place the meat in a preheated
oven. It will be cooked at a low
temperature for an extended time
allowing the meat to become very
tender.
The meat will rest and the juices start to
cir
culate evenly throughout.
This gives the meat a very tender and
juicy result.
Tips
– Use fresh, lean meat that has been
trimmed. Remove the bones befor
e
cooking.
– When searing, use a suitable cooking
oil or fat that can withstand high
t
emperatures (e.g. clarified butter,
vegetable oil).
– Do not cover the meat during
cooking.
Cooking will take approx. 2-4 hours,
depending on the siz
e and weight of
the meat, as well as the desired
degree of doneness and browning.
Operation
Use the universal tray with the
gri
lling and roasting insert.
Place
the rack with the universal tray
on shelf level 3.
Selec
t Surround and a temperature of
265°F (130°C).
P
reheat the oven along with the
universal tray and wire rack for
approx. 15 minutes.
While
the oven is preheating, sear the
meat on all sides on the cooktop.
Danger of burns!
When the oven is hot use pot
ho
lders to insert, remove or turn the
food, or when adjusting the oven
shelves, etc.
Place
the seared meat on the
universal tray.
Reduce the t
emperature to 210°F
(100°C).
Continue cooking until the end of the
cooking time.
On models with a clock/timer, you can
set the cook
ing process to finish
automatically (see "Clock/Timer -
Setting the cooking duration").
Slow Roasting
62
After the cooking process
Because the cooking temperatures are
ver
y low:
– the meat can be carved immediately,
it does not nee
d to rest.
– the cooking result will not be affected
if the meat is left in the ove
n after the
program is complete. It can be kept
warm until you serve it.
– the meat is at an ideal temperature to
eat rig
ht away. Serve on heated
plates with a hot sauce or gravy to
keep it warm.
Cooking time / Core
t
emperatures
Always follow USDA guidelines on
food safety
.
Meat Time
[min]
Core
T
emp.
[°F / °C] **
Fillet of beef 80–100 138 / 59
Roast beef
– rare
– medium
– well done
50–70
100–130
160–190
118 / 48
135 / 57
156 / 69
Pork tenderloin 80–100 145 / 63
Smoked pork
chop *
140–170 154 / 68
Veal fillet 80–100 140 / 60
Veal loin * 100–130 145 / 63
Saddle of lamb * 50–80 140 / 60
*
boneless
**
I
f desired, use a roast probe to monitor
the core temperature.
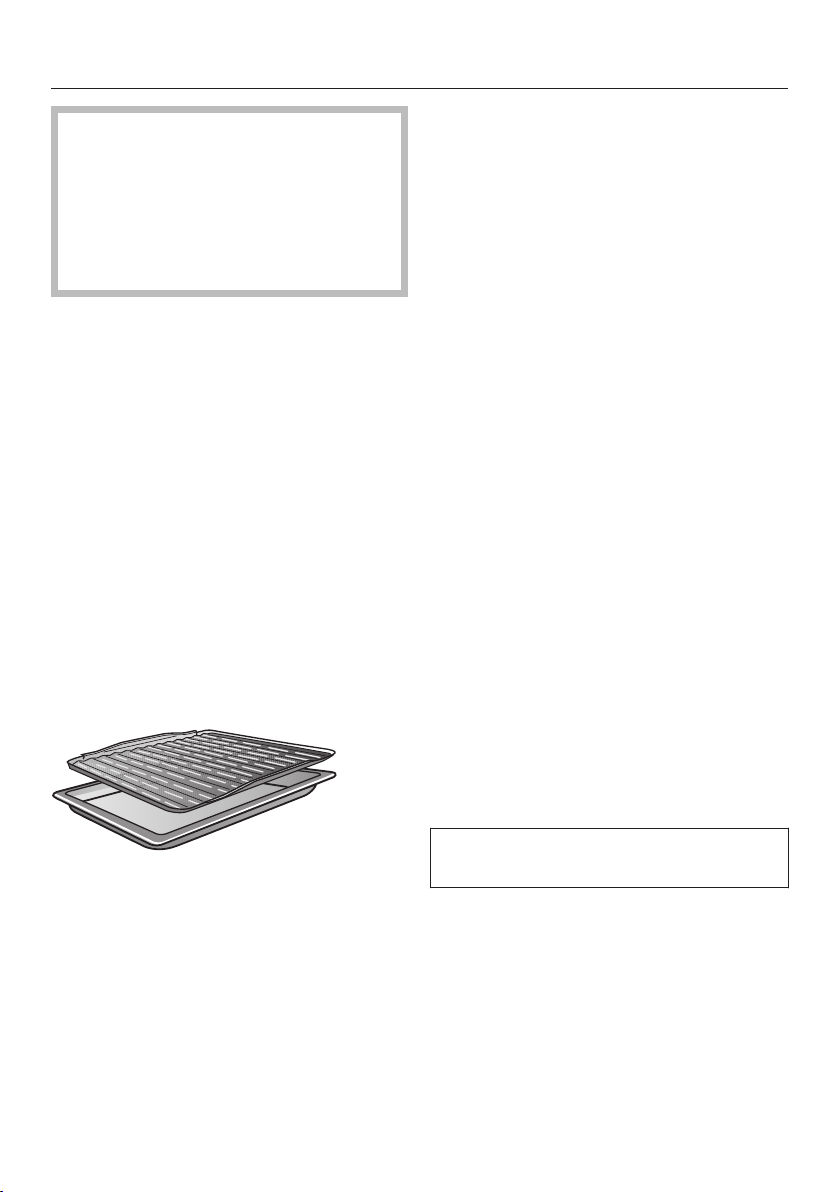
Broil
63
Danger of burns!
Br
oil with the oven door closed. If
you broil with the door open the hot
air will escape from the oven before
it has been cooled by the cooling
fan.
The controls will get hot.
Oven modes
Broil
For broiling thin cuts of meat and
br
owning.
The entire Browning / Broiling element
w
ill get hot and glow red.
Conv Broil (Convection Broil)
For broiling thicker items, e.g. roulades,
poultr
y pieces.
The Browning / Broiling element and
th
e fan turn on alternately.
Cooking accessories
Use the universal tray with a grilling and
r
oasting insert (if available) on top. The
insert protects the oven from splatter
and collects the juices underneath. The
juices can then be used for gravy and
sauces.
Temperature
As a general rule, select the lower
t
emperature given in the chart.
If higher temperatures are used, the
meat will brown on the outside, but will
not be properly cooked through.
Preheating
Always preheat the oven for about
5 minut
es with the door closed before
Broiling.
Shelf levels
Select the shelf level according to the
thickness of the food.
– Thin cuts: Shelf level 4 or 5
– Thick cuts: Shelf level 2 or 3
Broiling duration
Thick pieces of fish and meat take
appr
ox. 6-8 minutes per side. Thicker
pieces will take longer. It is best to broil
food that has a consistent thickness at
the same time so each piece cooks
evenly.
Testing doneness
Always follow USDA guidelines for
safe food t
emperatures.
Tip: If the sur
face of a thicker cut of
meat is browned but the center is still
raw, move the food to a lower level or
reduce the temperature and continue
cooking. This will stop the surface from
becoming too dark.

Broil
64
Preparing food for broiling
Rinse the meat under cold water and
pat d
ry. Do not season the meat with
salt before broiling, this will draw out
the juices.
Brush the meat with oil, if necessary.
Do not use other types of fat as they
can easi
ly burn and cause smoke.
Clean fish as usual. To enhance the
flavor
, salt or lemon can be added.
Broil
Place
the grilling and roasting insert
(if available) in the universal tray.
Place
the food on top.
Selec
t the Broil operating mode.
T
urn the temperature selector to .
P
reheat the Browning/Broiling
element for approx. 5 minutes with
the door closed.
Danger of burns!
When the oven is hot use pot
holders to insert, remove or turn the
food, or when adjusting the oven
shelves, etc.
Place
the food on the appropriate
shelf level (see the "Broiling chart").
Clo
se the door.
Turn the food halfway through
cooking.

Defrost
65
Use Conv Bake (Convection Bake)
without settin
g the temperature to
gently defrost food.
The fan will turn on and circulate air at
r
oom temperature around the oven
cavity.
Danger of salmonella poisoning!
Obser
ve proper hygiene rules when
defrosting poultry.
Do not use the defrosting liquid.
Tips
– If possible, remove the packaging
and put the food on the r
oasting pan
or a suitable dish.
– When defrosting poultry catch the
defr
osting liquid in a suitable dish.

Canning
66
Always follow the USDA canning
guidelines.
Canning containers
Danger of inj
ury!
Do not use the appliance to heat up
or can food in sealed jars or
containers. Pressure will build up
inside them and they can explode
causing damage to the appliance, as
well as the risk of injury and
scalding.
Only use jars designed for canning:
– Canning jars,
– Jars with twist-off lids.
Canning fruit and vegetables
The Conv Bake (Convection Bake)
mode is r
ecommended.
The instructions are for 6, 32 oz (1 liter)
glass jars.
Slide the universal tray onto shelf
level 3. Place the jars on the tray.
Selec
t Conv Bake (Convection Bake)
and a temperature of 300-340°F
(150-170°C).
W
ait until bubbles rise evenly in the
jars.
Then reduce the temperature to
avo
id a boil-over.
Fruit / Cucumbers
As soon as bubbles begin t
o rise
evenly in the jars, reduce the
temperature to the lowest setting.
Then, leave the jars in the warm oven
for an additional 25-30 minutes.
Vegetables
Reduce the t
emperature to 210°F
(100°C) as soon as bubbles are
visible in the jars.
Canning time
[min]
Asparagus 80–100
Carrots 50–70
Peas, Beans 80–100
Aft
er the canning time has finished,
reduce the temperature to the lowest
setting and leave the jars in the oven
for an additional 25-30 minutes.
After canning
Danger of burns!
U
se pot holders when removing the
jars from the oven.
Take the jars out of the oven.
Co
ver the jars with a towel and leave
to set for approx. 24 hours.
Mak
e sure all jars are closed properly
when storing them.

Dehydrate
67
Dehydrating is a traditional method of
pr
eserving fruit, certain vegetables and
herbs.
It is important that fruit and vegetables
ar
e ripe and not bruised before they are
dehydrated.
P
repare the food for dehydrating.
– Peel and core apples, and cut into
slices 1/4" (.5 cm) thick.
– Core plums if necessary.
– Peel, core and cut pears into
wedges.
– Peel and slice bananas.
– Clean mushrooms, then either halve
or slice them.
– Remove parsley and dill from the
stem.
Distri
bute the food evenly over the
roasting pan.
Selec
t Conv Bake (Convection Bake)
or Surround.
Selec
t a temperature of 175-210°F
(80–100°C).
Place the universal tray on shelf level
3.
When using Conv Bake (Convection
Bake) you can dehydrate on levels
1+3 at the same time.
Food Dehydrating time
Fruit 2–8 hours
Vegetables 3–8 hours
Herbs* 50–60 minutes
*
Use
Surround when dehydrating herbs.
Reduce the t
emperature if
condensation begins to form in the
oven.
Danger of burns!
U
se pot holders when removing the
dehydrated food from the oven.
Allo
w the fruit or vegetables to cool
down after dehydrating.
Dried fruit must be completely dry, but
also soft and elastic. Juice should not
escape when cut.
S
tore in sealed glass jars or tins.

Frozen food
68
Tips for pizza, French fries,
cr
oquettes and similar items
– For best results place frozen pizza on
par
chment paper on the wire rack.
– Small frozen items such as french
fries can
be cooked on the baking
tray or roasting pan.
– For small frozen items, use the lowest
t
emperature recommended by the
manufacturer.
– Turn small frozen items several times
during cooking.
Preparation
Eating food which has been cooked
co
rrectly is important for good
health.
Select the oven mode and
t
emperatures recommended by the
manufacturer.
P
reheat the oven.
Place
the food in the preheated oven
on the recommended shelf level.
Check the food at the end of the
shor
test time recommended on the
packaging.

Cleaning and care
69
Danger of burns!
Make sure the burners are turned off
and all
owed to cool completely.
Make sure the heating elements are
turne
d off and allowed to cool
completely.
Danger of inj
ury!
The steam from a steam cleaner
could reach electrical components
and cause a short circuit.
Do not use a steam cleaner to clean
the r
ange.
All surfaces can discolor or be
damaged if unsuitable cleaning
ag
ents are used. The front of the
oven, in particular, will be damaged
by oven cleaners and descalers.
All surfaces are susceptible to
scr
atches. Scratches on glass
surfaces could cause a breakage.
Remove any cleaning agent residues
imme
diately.
Cooktop: Unsuitable cleaning
agents
To better maintain your appliance avoid
the following:
– dishwashing liquid,
– cleaners containing soda, ammonia,
thinners, or chlorides,
– lime removers,
– stain and rust removers,
– abrasive cleaners,
– solvent-based cleaners,
– dishwasher soap (powder),
– grill and oven sprays,
– glass cleaning agents,
– hard, abrasive brushes or sponges,
e.g. pot scour
ers, brushes or
sponges that have been previously
used with abrasive cleaning agents,
– eraser sponges,
– sharp objects
(they could damage the seals
between the cer
amic and the frame
or between the frame and the
countertop).
To avoid lime scale deposits, after each
cleaning use a soft cloth to dry the
surfaces.

Cleaning and care
70
Ceramic surface
When cleaning with liquid dish soap,
no
t all contaminants and residues
are removed.
An invisible film forms, which causes
discol
oration of the ceramic. This
discoloration cannot be removed.
Clean the cooktop on a regular basis
with a special ce
ramic cleaner.
First wipe down the surface with a
damp cloth t
o loosen soiling, then
remove stubborn crusting with a glass
scraper.
Clean the cooktop with the Miele
cer
amic and stainless steel cleaner (see
"Optional accessories") or a
commercial ceramic cleaner and paper
towel or a clean cloth. Do not put the
cleaner on a hot cooktop since this may
cause spotting. Please follow the
manufacturer's instructions.
Then clean the cooktop with a damp
cloth
and dry it off. Cleaner residues
will burn into the cooktop during
subsequent uses, damaging the glass
ceramic. Make sure you remove all
residues.
Spots fr
om lime deposits, water, and
aluminum deposits (metallic spots) can
be removed with a glass ceramic and
stainless steel cleaner.
Danger of burns!
Risk of burns! Wear oven mitts and
use a gl
ass scraper to remove sugar,
plastic or aluminum residues from
the hot cooktop.
Should any sugar
, plastic or
aluminum foil spill or fall onto a hot
burner while it is in use, first turn off the
appliance. Then carefully scrape off
these residues from the cooktop
immediately while they are still hot,
using a shielded scraper blade. Allow
the appliance to cool down, and then
clean the cooktop when it has cooled
down as described above.

Cleaning and care
71
Oven: Unsuitable cleaning
agents
To better maintain your appliance avoid
the following:
– cleaners containing soda, ammonia,
thinners, or chlorides,
– cleaners containing descaling agents
or li
me removers,
– abrasive cleaners,
– solvent-based cleaners,
– stainless steel cleaners,
– dishwasher soap (powder),
– glass cleaning agents,
– ceramic cooktop cleaner,
– hard, abrasive brushes or sponges,
e.g. pot scour
ers, brushes or
sponges that have been previously
used with abrasive cleaning agents,
– eraser sponges,
– metal scrapers,
– steel wool,
– spot cleaners,
– oven cleaners,
– stainless steel spiral pads.
* Can be used to remove very heavy
soilin
g from PerfectClean treated
surfaces.
Soiling not removed immediately can
become
difficult to remove.
Continued use without cleaning will
make the oven much harder to clean.
Remove any soiling immediately.
The accessories are not dishwasher-
safe.
Tips
– Soiling caused by spilt juices and
cake mixtures is best removed while
the oven is still warm. Use caution
and make sure the oven is not too
hot - Danger of burns.
– To make cleaning easier you can
dismantle
the oven door, remove the
side runners and lower the Browning/
Broiling element.

Cleaning and care
72
Normal soiling
There is a seal around the oven
i
nterior which seals the inside of the
door.
Take care not to rub, damage or
move the gasket.
Re
move normal soiling immediately
using a clean sponge with warm
water and liquid dish soap applied
with a clean, damp microfiber cloth.
Aft
er cleaning, ensure that any
detergent residue is removed with
clean water.
This is particularly important when
cleaning surfaces treated with
PerfectClean enamel as detergent
residue can impair the non-stick
properties.
Aft
er cleaning, dry the surfaces with a
soft cloth.
Stubborn soiling
Spilled fruit and roasting juices may
permanen
tly discolor surfaces of the
oven. This discoloration is
permanent but will not affect the
performance of the oven. Do not use
force to remove these stains. Clean
using the instructions in this manual.
Bak
ed on deposits can be removed
with a glass scraper or a non-
abrasive stainless steel scrubbing
pad.
S
tubborn soiling on PerfectClean
surfaces can be cleaned using Miele
Oven Cleaner. It must only be applied
to cold surfaces in accordance with
the instructions on the packaging.
Non-Miele oven spray must only be
used in a cold oven and for no longer
than 10 mi
nutes.
If necessar
y, the rough side of a dish
sponge can be used to remove the
soiling.
Aft
er cleaning, remove all oven
cleaning agent residues thoroughly
with clean water, and dry with a soft
cloth.

Cleaning and care
73
Self Cleaning the oven interior
Instead of cleaning the oven by hand
you can
use the Self Clean program .
During self cleaning the oven interior is
heat
ed up to over 750°F (400°C). Any
residual soiling is broken down and
reduced to ash by the high
temperatures.
This oven has three levels for self
clean
ing, each with a different duration:
– Level 1 for light soiling,
– Level 2 for heavier soiling,
– Level 3 for very heavy soiling.
Once the Self Clean program has been
star
ted, the door will automatically
locked. The door cannot be opened
again until the program has ended.
If desired, the timer can be used to
delay the star
t of the Self Clean
program.
At the end of the program any residues,
such as ash from the cleaning process,
can be easily wiped away.
Preparing for the Self Clean program
The high temperatures used during
self cleaning will damage
acc
essories that are not designed for
cleaning in the Self Clean program.
Please remove these accessories
from the oven before starting the Self
Clean program. This also applies to
accessories purchased separately.
The following accessories are suitable
for cleaning during the Self Clean
pr
ogram and can remain in the oven:
– Shelf runners,
– Wire oven rack HBBR30-2.
T
ake all accessories that are not "Self
Clean safe" out of the oven.
Slide the wir
e oven rack into the top
shelf level.
If not removed, coarse soiling can
smoke and cause the Self Clean
program to turn itself off.
Remo
ve any coarse soiling before
running the Self Clean program.

Cleaning and care
74
Starting the Self Clean program
Risk of burns!
When
self cleaning the front of the
oven becomes hotter than with
normal oven use.
Prevent children from touching the
ove
n during the Self Clean program.
Select Clean (Self Clean).
appears in the display. The number
flashes.
Use or t
o select between ,
or .
Selec
t the Self Clean level desired.
Confirm with OK.
The Self Clean program will now start.
will appear in the display
.
will flash unti
l the door is locked.
The oven heating and the cooling fan
will then
turn on automatically.
The oven light will not turn on during
the Self Clea
n program.
To see how the Self Clean program is
pr
ogressing, highlight in the display.
Select OK.
If necessar
y, move the symbol
with or until it appears under .
The time remaining for the Self Clean
pr
ogram will appear in the display. The
duration cannot be altered.
If you have set a timer you will hear a
signal, will flash and the time will
coun
t down. Once you press OK, the
audible and visual signals will turn off.
and the number of the Self Clean
level chosen will reappear.

Cleaning and care
75
Delaying the start of the Self Clean
pr
ogram
Start the program as described and
then set the desir
ed finish time within
the first five minutes of starting the
program.
Select OK.
Move the symbol with or until
it appears under .
appears.
Confirm with OK.
The display will then show the finish
time calc
ulated from the current time of
day plus the duration of the selected
Self Clean program.
Set the desir
ed finish time using or
.
Confirm with OK.
The finish time is now set and has been
saved.
The oven heating will turn off.
The finish time can be changed at any
time up until the star
t time for the
program.
As soon as the start time is reached,
the oven heating and the cooling fan
will turn on
. The duration will appear in
the display.
At the end of the Self Clean program
h
, and will appear in the
display
.
The door is locked as long as the
symbol is lit up. The symbol will star
t
flashing as soon as the door lock has
been deactivated.
When the door lock has been
deactivat
ed:
– goes out,
– flashes,
– short signals will sound if the signal
t
one is activated (see "Settings –
").
T
urn the mode selector to Off.
Acoustic and visual signals are turned
off.
Danger of burns!
Danger of burns! Wait until the oven
has co
oled down before removing
any residual soiling left in the oven
compartment from the Self Clean
program.
W
ipe any residues (e.g.ash) left
behind after the Self Clean program
out of the oven compartment and off
of any accessories. The amount of
ash will vary depending on how dirty
the oven was.

Cleaning and care
76
Most soiling can be easily removed
using a clean, soft sponge and a mild
solu
tion of warm water and liquid dish
soap.
Depending on the degree of soiling
befor
e cleaning, there may be a visible
layer of soiling across the inner glass
pane on the door. This should be
removed using the scouring side of a
dish sponge or with a stainless steel
spiral sponge and liquid dish soap.
Please note:
– There is a seal around the oven
int
erior which seals the inside of the
door. Take care not to rub, damage
or move the gasket.
– Spilt fruit juices may cause lasting
discoloration to enameled surfaces.
This discoloration is permanent but
will not affect the efficiency of the
enamel. Do not attempt to remove
these marks.
The Self Clean program is canceled
If the Self Clean program is cancelled,
the oven door will remain locked until
the temperature inside the oven drops
to below 535°F (280°C). The
symbol will light up until the
temperature has dropped below this
level. The door can be opened as
soon as the symbol starts flashing.
The following will cause the Self Clean
pr
ogram to cancel:
– Turning the mode selector to Off.
Once the door has been unlocked,
will go out and the time of day will
r
eappear in the display. If necessary,
start the Self Clean program again.
– Turning the mode selector to a
differ
ent function.
and ap
pear in the display.
Once the door has been unlocked,
will go out and will flash.
– A power failure.
and ap
pear in the display.
Once the door has been unlocked,
will go out and will flash.
When power is restored will light
up until the t
emperature in the oven
has dropped below 535°F (280°C).
will then appear in the display. The
door lock releases and the time of
day reappears.
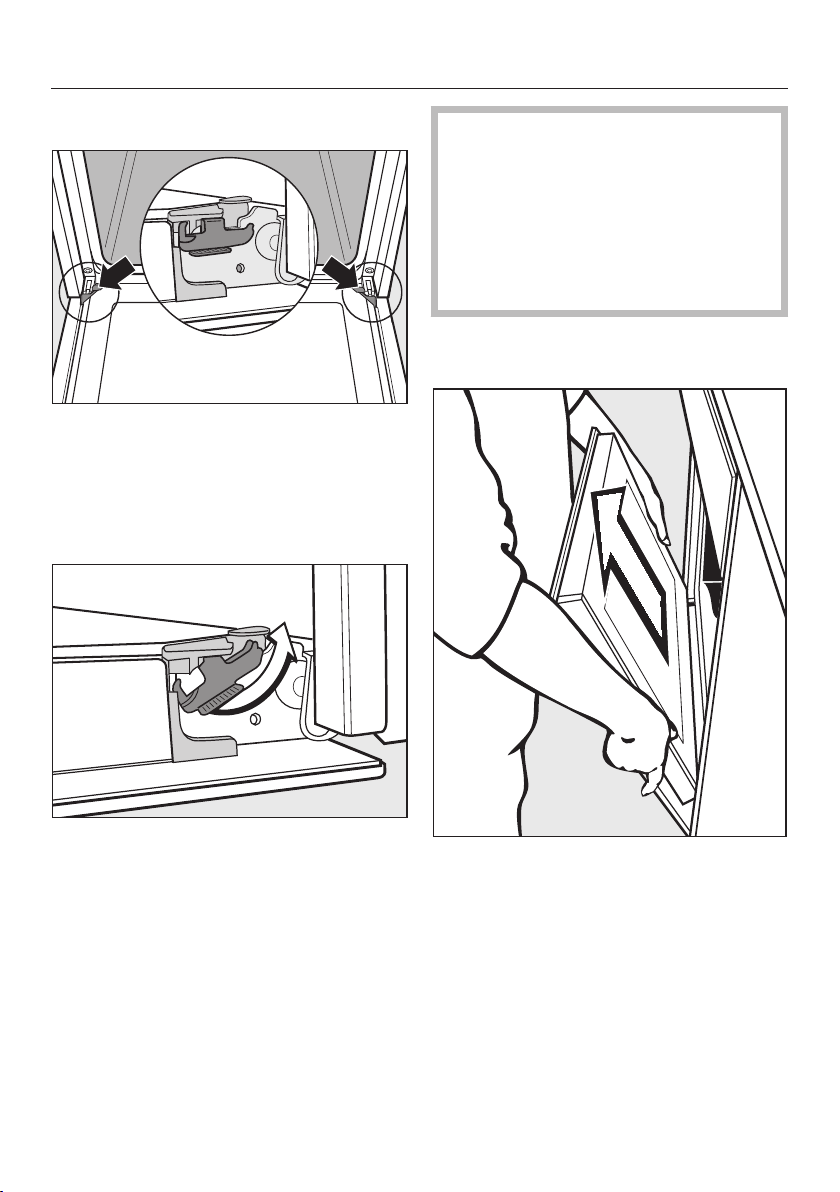
Cleaning and care
77
Removing the door
The door is connected with brackets on
each door hinge.
Befor
e the door can be removed the
hinges must first be unlocked.
Open the door fully
.
Release the locking clamps by
turning them as far as they will go.
Do not attempt to take the door off
the brackets when it is in the
horizontal position, the brackets will
spring back against the oven.
Do not use the handle to pull the
door off the brackets, the handle
could break.
Clo
se the door until it rests partially
open.
Ho
lding the door securely at both
sides, lift it straight upwards.
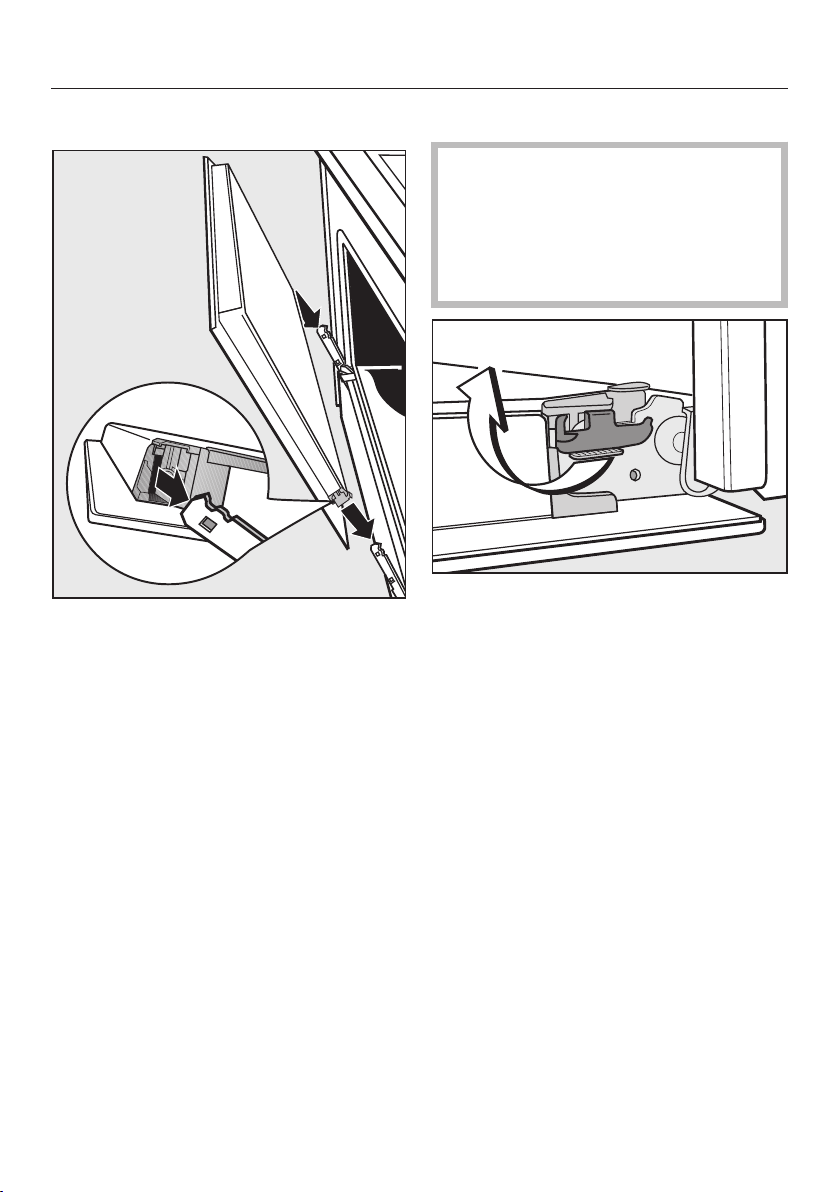
Cleaning and care
78
Reinstalling the door
Ho
ld both sides of the door securely
and carefully fit it onto the brackets of
the hinges.
Make sure that the door goes on
straight.
Open the door fully
.
If the locking clamps are not locked,
the door can easily become
detache
d from the brackets and be
damaged.
You must make sure that the locking
cla
mps are locked again.
T
o relock the locking clamps, turn
them back up to the horizontal
position as far as they will go.
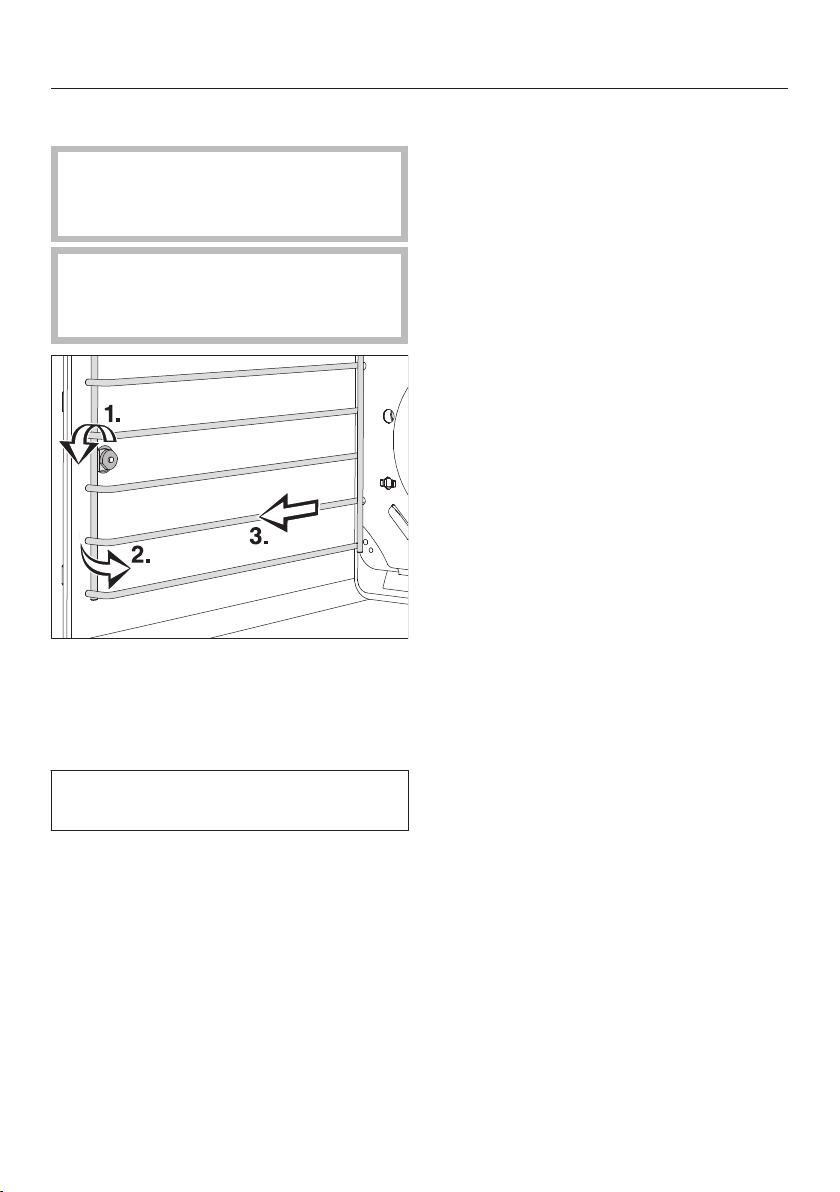
Cleaning and care
79
Removing the shelf runners
Dange
r of injury!
Do not use the oven without the
shelf runners correctly inserted.
Danger of burns! Mak
e sure the
heating elements are turned off and
that the oven cavity is cool.
L
oosen the screw (1.).
P
ull the runners out of the holder (2.)
at the front of the oven, and then pull
them out of the oven (3.).
The runners can be reinstalled in the
reverse order.
Be sur
e that all parts are installed
correctly.

Frequently asked questions
80
You can solve most problems that occur in daily operation by yourself. With the
aid of the follo
wing guide, the cause of a problem can be found and eliminated.
If necessary, contact Miele Service for assistance.
Danger of inj
ury! Unauthorized installation work and repairs could cause
personal injury or machine damage, for which Miele is not responsible.
Installation, repair and maintenance work should be performed by a Miele
authorized service technician.
Never open the housing of the range yourself.
Problem Possible cause and solution
Cooktop or burners
cannot be turned on.
There is no power to the appliance.
Che
ck if the circuit breaker has tripped. Contact
an electrician or Miele Service (for minimum fuse,
see data plate).
There may be a technical fault.
Discon
nect the appliance from the electric power
supply for approx. 1 minute by
– tripping the relevant circuit breaker or screwing
the fuse out complet
ely, or
– tripping the ground fault circuit interrupter
(GFCI).
If,
after resetting/replacing the fuse or the GFCI, it
still will not turn on, contact a qualified electrician
or Miele Service.
There is a strange smell
or vapors when the
appliance is being used
for the first time.
Metal components are protected by a conditioning
agent. Smells and vapor may occur when the
appliance is used for the first time. The smell and any
vap
ors do not indicate a faulty connection or a
defective appliance and are not harmful to your
health.
Frequently asked questions
81
Problem Possible cause and solution
The heating for one of
the burners turns on
and off.
The "cycling" of the heating is normal. It is caused by
the electr
onic temperature control (see "How the
burners work").
If the heating cycles at the highest power level, the
overheat protection has been triggered (see
"Overheat protection").
This display is dark. There is no power to the appliance.
Check if the cir
cuit breaker has tripped.
The oven does not heat
up.
Only an oven mode or a temperature has been
sel
ected.
Select a mode and
a temperature.
The system lock
is On.
T
urn off the system lock (see "System lock ").
There is no power to the appliance.
Check if the cir
cuit breaker has tripped. If it has,
contact a qualified electrician or Miele.
Demo mode has been activated.
appears in the
display.
The oven can be operated but does not heat up.
Deactiva
te Demo mode (see "Settings – ").
flashes in the
display
.
There has been a power failure.
Reset the time of day (see "Using for the first
time").
Cook
ing times will also need to be reset.
appears
une
xpectedly in this
display and the
symbol flashes at the
same time. The signal
may also be sounding.
The oven has been operating for an unusually long
peri
od of time, this has activated the "Safety switch-
off feature".
Turn the mode selector to OFF. The oven is now
ready to use.
appears in the
display
.
The Self Clean program door lock is not locking.
T
urn the mode selector to the Self Clean program
again.
If the problem persists, contact Miele Technical
Service.
Frequently asked questions
82
Problem Possible cause and solution
appears in the
display
.
The door lock for the Self Clean program will not
deacti
vate.
T
urn the mode selector to the Off position and turn
the oven off.
If the problem persists, contact Miele Technical
Service.
appears in the
display
.
A fault has occurred that you cannot resolve.
Co
ntact Miele Technical Service.
A noise is heard after
the cooking
process is
complete.
The cooling fan has turned on.
When the temperature in the oven has fallen
sufficiently the
cooling fan will turn off automatically.
The oven has turned
itself off.
The oven turns off automatically if a button is not
pr
essed after a certain amount of time or after a
cooking program has ended to save power.
T
urn the oven back on.
The oven lighting turns
off a
fter a short time.
The oven is factory set to turn off automatically after
15 seconds. This setting can be changed (see
"Settings ove
rview – ").
Baked goods are not
cook
ed properly after
following the times
given in the chart.
A different temperature than that given in the recipe
was used.
Sel
ect the temperature required for the recipe.
The ingredient quantities are different from those
given
in the recipe.
Double che
ck the recipe. The addition of more
liquid or more eggs will make a wetter mixture
which will take longer to cook.
The browning is
uneven.
The wrong temperature or shelf level was selected.
Ther
e will always be a slight unevenness. If the
unevenness is great, check whether the correct
temperature and shelf level were selected.
That material or color of the bakeware is not suitable
for the oven mode selected.
When using
Surround, use matte, dark colored
pans. Light colored, shiny pans will not produce
as desirable results.
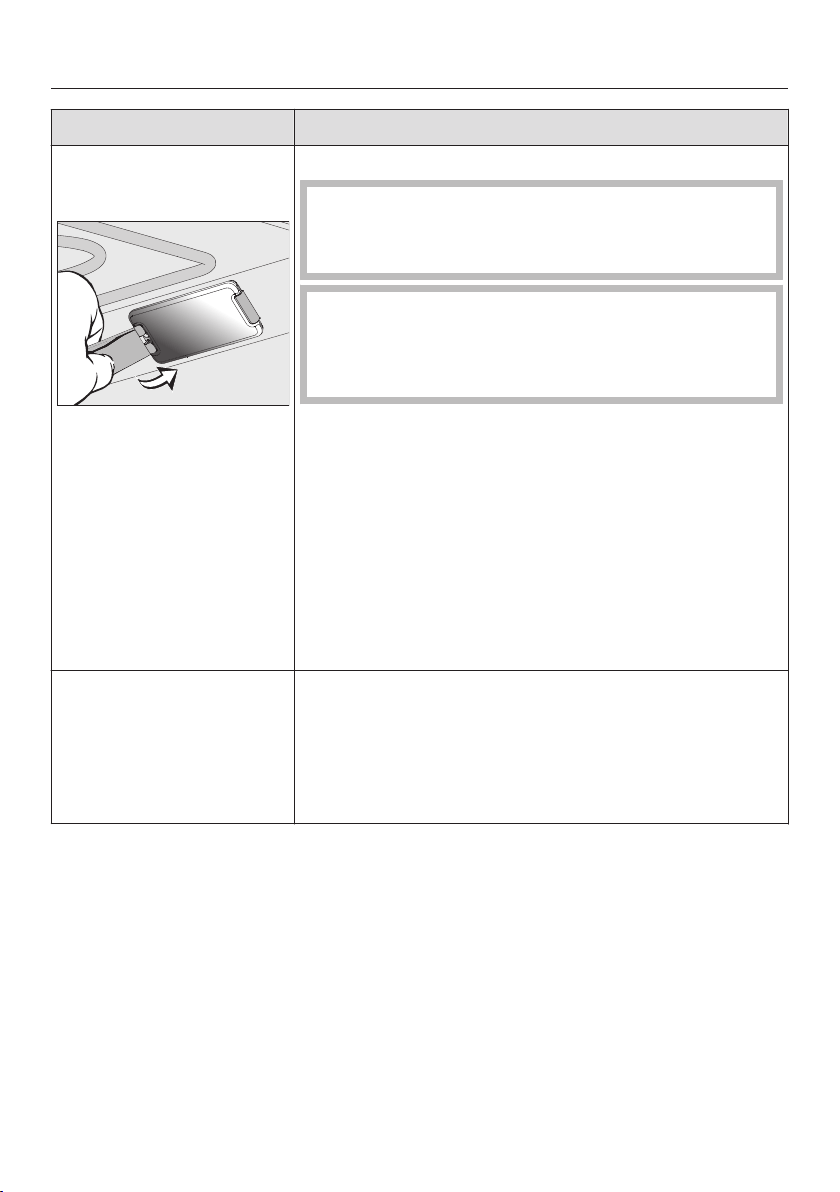
Frequently asked questions
83
Problem Possible cause and solution
The oven lighting does
not turn on.
The halogen bulb needs to be replaced.
Danger of burns!
Make sure the heating elements are turned off and
all
owed to cool completely.
The lamp cover may be damaged if it falls.
When removing the cover hold it firmly so that it
does no
t fall. Place a towel on the oven floor and
open door to avoid damage.
Discon
nect the appliance from the power supply.
L
oosen the bulb cover with the tool supplied at the
back of the frame.
Do not t
ouch the halogen blub with bare fingers.
Observe the manufacturers instructions.
Remove the halogen bulb.
Replace it with a new halogen bulb (Sylvania
66740, 120 V, 40 W, G9, FS1).
P
ress the bulb cover back into place.
Recon
nect the oven to the electrical supply.
There is soiling in the
over aft
er the Self Clean
program.
The Self Clean program burns off soiling in the oven
and leaves it as ash.
Using
a soft sponge, warm water and liquid dish
soap remove the ashes.
If coarse soiling remains, start the Self Clean
program again with a longer duration.

Technical Service
84
After sales service
In the event of a fault which you cannot
easil
y correct yourself, please contact:
– your Miele dealer, or
– the Miele Technical Service
Department.
See back cover for contact details.
Please quote the model and serial
number of your appliance when
contacting Miele.
You will find this information on the
data plat
e, which is behind the toe-kick
cover.
Warranty
For further information, please refer to
your warr
anty booklet.


9 Independence Way
Princeton, NJ 08540
Phone:
Fax:
www.mieleusa.com
U.S.A.
Miele, Inc.
National Headquarters
Please have the model and serial number
of your appliance available before
contacting Technical Service.
Canada
Importer
Miele Limited
Headquarters and Miele Centre
800-843-7231
609-419-9898
609-419-4298
Technical Service & Support
Nationwide
Phone:
Fax:
T
161 Four Valley Drive
Vaughan, ON L4K 4V8
www.miele.ca
800-999-1360
888-586-8056
Customer Care Centre
Phone:
800-565-6435
905-532-2272
Germany
Manufacturer
Miele & Cie. KG
Carl-Miele-Straße 29
33332 Gütersloh
85

M.-Nr. 09 897 980 / 00en-US
HR1421