Loading ...
Loading ...
Loading ...
1413
Outside Top Exhaust
Outside Top Exhaust
INSTALLATION
INSTALLATION
Place the mounting plate against the wall and
insert the toggle wings into the holes in the wall
to mount the plate.
NOTE: Before tightening toggle bolts and wood
screw, make sure the bottom of the mounting plate
touch the bottom of the cabinet when pushed
flush against the wall and that the plate is properly
centered under the cabinet.
CAUTION: Be careful to avoid pinching fingers
between the back of the mounting plate and the wall.
Tighten all bolts. Pull the plate away from the wall
to help tighten the bolts.
3
4
ATTACH THE MOUNTING
PLATE TO THE WALL
A1.
Attach the plate to the wall using toggle bolts.
At least one wood screw must be used to attach
the plate to a wall stud.
Remove the toggle wings from the bolts.
Insert the bolts into the mounting plate
through the holes designated to go into drywall
and reattach the toggle wings to 3/4" onto
each bolt.
1
INSTALLATION OVERVIEW
A1. Attach Mounting Plate to Wall
A2. Prepare Top Cabinet
Mount Microwave Oven
A5.
Adjust Exhaust Adaptor
A6.
Wall
Mounting
Plate
Spacing for Toggles
More Than Wall
Thickness
Bolt End
Toggle
Bolt
Toggle Wings
To use toggle bolts:
2
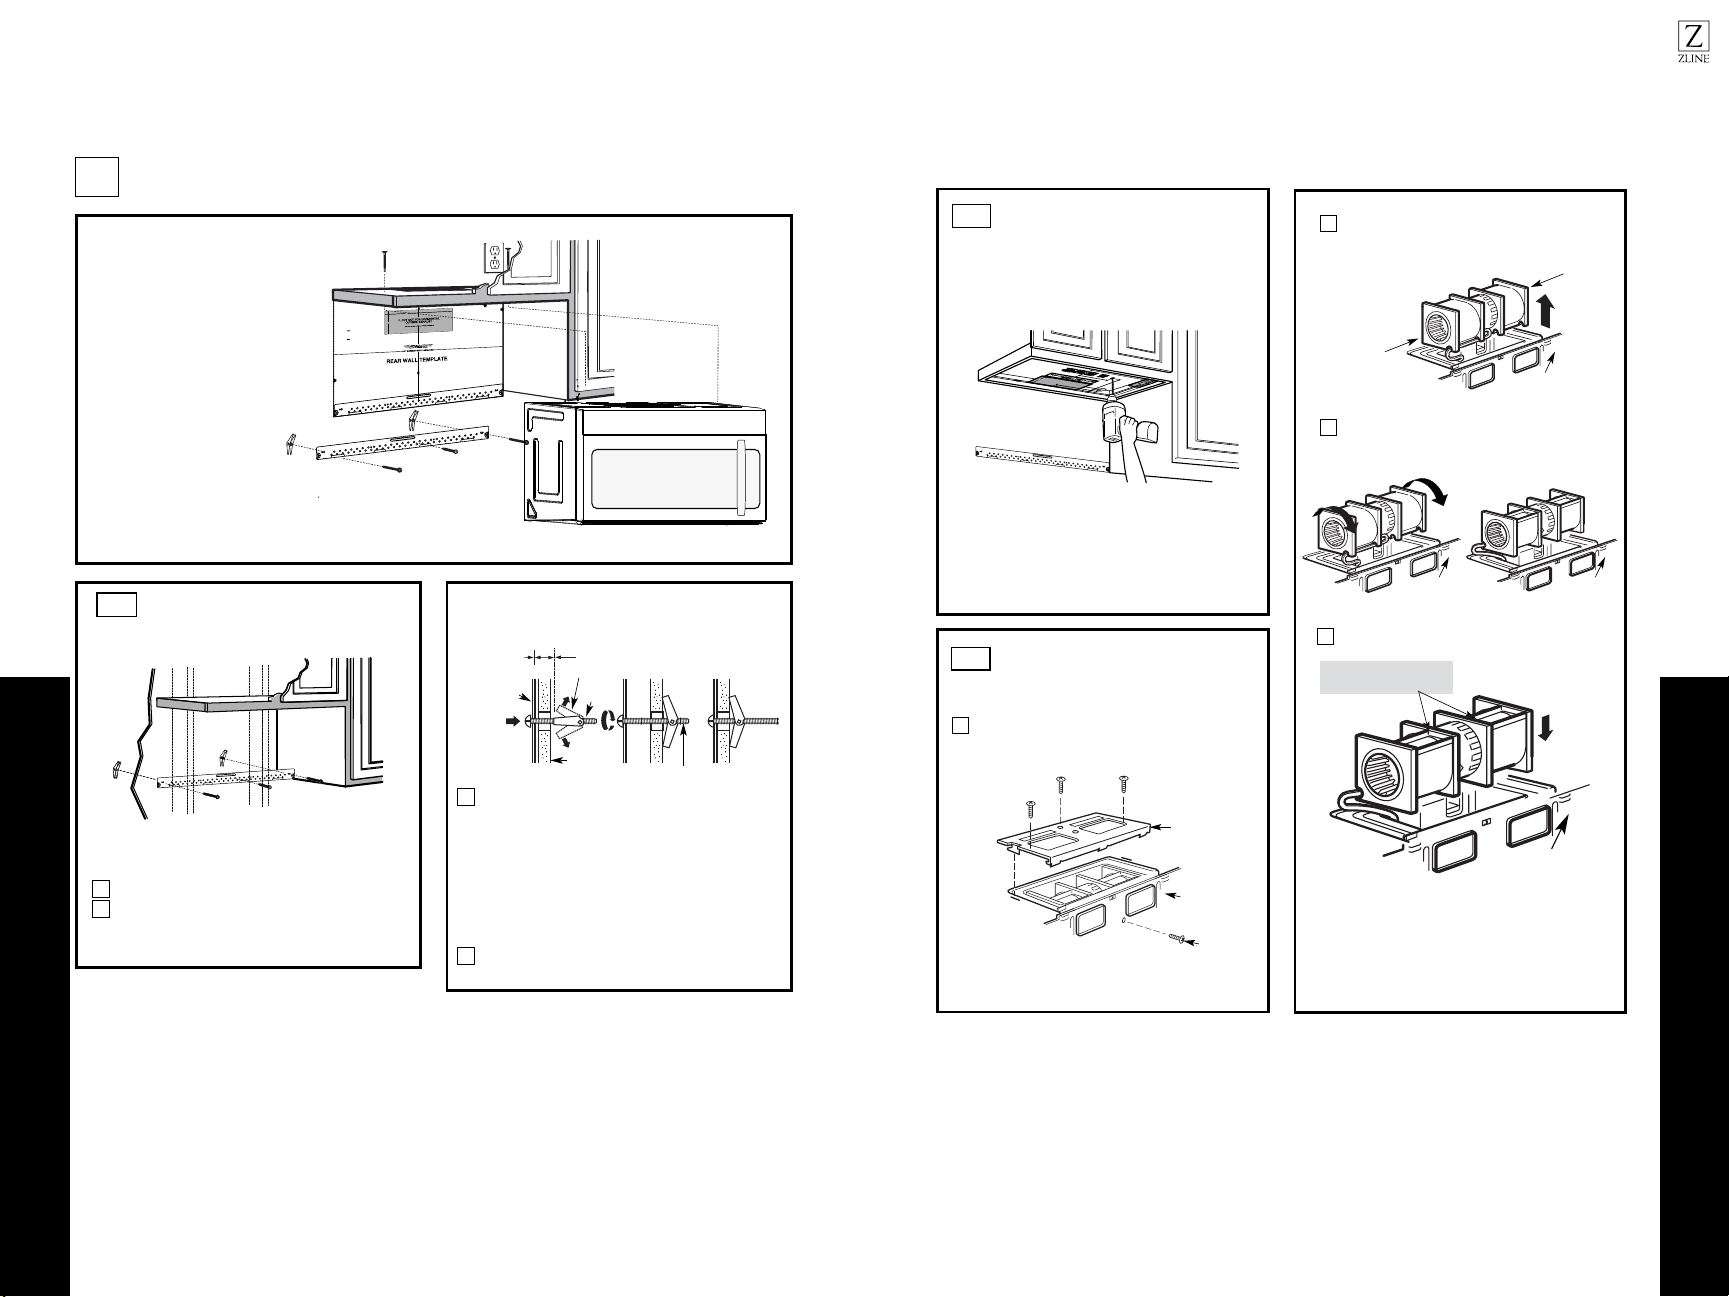
OUTSIDE TOP EXHAUST (Vertical Duct)
A
IMPORTANT NOTES:
•Make sure the screws for the
blower motor and blower plate
are securely tightened when
they are reinstalled. This will
help to prevent excessive
vibration.
•Make sure the motor wiring has
been properly routed and secured,
and that the wires are not pinched.
A7. Connect Ductwork
A3.
A4.
Check Damper Operation
Adapting Microwave Blower for
Outside Top Exhaust
12"
4"
NOTE: IT IS VERY IMPOR
TANT TO
READ AND FO
LLOWT HE DIRECTIO NS
IN THE INSTALLA TION INSTRU
CTI
ONS
BE
FORE PR O
CEEDING
WITH T HIS
REAR W ALL TEMPLA TE .
This R ea r Wall Te mpl ate s erves to p osition th e bottom
mounting plate a
nd to loc
ate the hor izon
ta
l exhaust
ou
tlet.
1. Use a lev
el
to
c
h
ec
k that the t
emplate is p os
itioned
accurately .
2. Loc
ate andmar k at leas t o u t s e
n
d on th r o t f e le
right s ide o f th e centerl ine.
It is importa nt to u se at leas t one wood
screw mo unted fi rmly in a s
tud
to supp
ort the we ight
of
the microwa ve. Mark t
w
o additional, ev en ly spa ced
locations f or the s uppl ied to ggle bol ts
.
3. Dri
ll holes in th e mark ed locatio ns.
Wher
e there is
a
s rd ,dut ill a 3/16" hole for wood sc rews . F or holes
that
do not lin h t i w pu
e a stud, d rill 5/8" holes for
toggle bolts .
DO
NOT INSTAL L T HE MOU NTING P L ATE
AT THIST IME.
4. Remov e th
e te
mplate from
the rear wall.
5.Re view the Ins ta
ll
a
t s n I n o i truc tion bo ok for y ou
r
install
a
tion situat ion .
Locate and m ark holes to align with holes in t
he
mounting
plate.
IMPORTANT :
LOCAT E AT LEAST ONE STUD
ON EI
THER SIDE OF
THE CENT ERLINE.
MARKT
HE LO
CATIONF OR 2 ADDIT
IO NAL, EV ENLY
SPACE D T
OGGLE
BOLTS IN THE MO UN
TING
PLATE
AREA.
Trim the r e
ar wall tem plat e along the do
tted line.
Darle vu elt a ala ho
ja
pa
rac ons ul tar la
v
e
rsión en E s paño l.
Locate and mar k
hole
s to ali gn with holes in t he
. e talp
g
n i tnu o m
IMPORTANT :
LOC
A
TE AT LEA ST O I E N O D U T S E NTHER SI D
E OF
THE
CENT
E
R
LI
N
E.
O
L E
H
TK R A MCATION FOR 2 ADDITION A L, EV ENL
Y
SPACED TOG GLE BO LTS IN THE MO UN
TING PLATE
AREA.
Trim the rear wall t em plat
e along
the dotted lin e.
3/8"TO EDG E
USE TOP CABINET TEMPLATE
FOR PREPARATION OF TOP
CABINET
You need to drill holes for the top support screws, a
hole large enough for the power cord to fit through,
and a cutout large enough for the exhaust adapter.
A2.
• Read the instructions on the TOP CABINET
TEMPLATE.
• Tape it underneath the top cabinet.
• Drill the holes, following the instructions on the
TOP CABINET TEMPLATE.
CAUTION: Wear safety goggles when drilling holes
in the cabinet bottom.
A3.
Remove the screw that holds the blower plate
to the microwave. Remove and save the screw
holding the blower motor to the microwave.
Blower Plate
Blower Motor
Screw
Back of
Microwave
2
Carefully pull out the blower unit. The wires
will extend far enough to allow you to adjust
the blower unit.
1
ADAPTING MICROWAVE
BLOWER FOR OUTSIDE
TOP EXHAUST
Roll the blower unit 90° so that fan blade
microwave.
3
Back of
Microwave
Before Rotation After Rotation
Back of
Microwave
openings are facing out the top of the
Back of
Microwave
AFTER: Fan Blade
Place the blower unit back into the opening.
Openings Facing Top
CAUTION: Do not pull or stretch the blower
unit wiring. Make sure the wires are not
pinched, and that they are properly secured.
4
with the top of the unit facing up.
Place the microwave in its upright position,
End B
End A
Back of
Microwave
Loading ...
Loading ...
Loading ...