customer service
1.888.880.8368
Duct Cover Extension
Z1C-00VS
For use with Layers Wall and Vista Wall range hood
ENGLISH..........................2
FRANÇAIS........................3
Mounting the duct cover
Fixation des cheminees

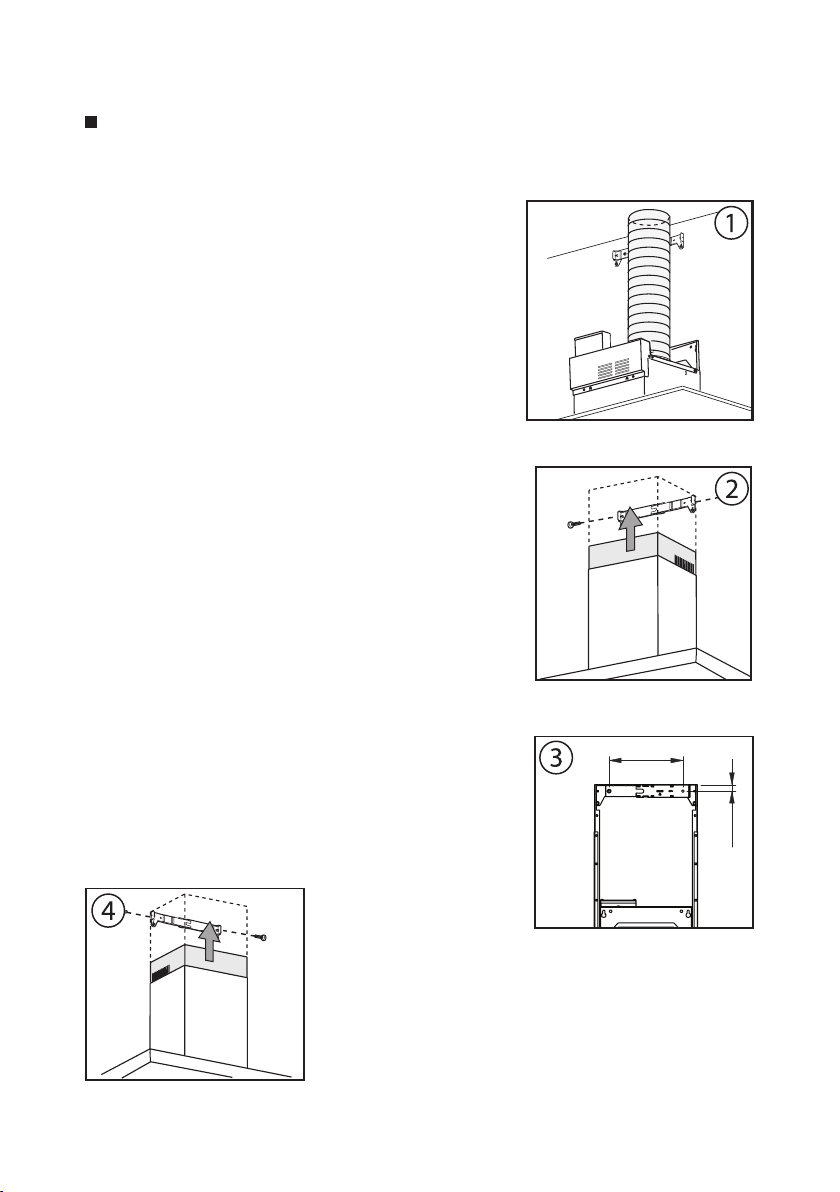
MOUNTING THE DUCT COVER
1. Install the electrical wiring and test hood for functions prior to installing the
duct covers.
2. If using hood in air recirculating mode make sure
to install the air diverter plate prior to mounting
the duct covers. See the manual included with
the recirculating kit for more instructions.
3. Adjust the width of the duct cover support
bracket so that it fits inside the top of the chim-
ney and observing the distance shown in Fig.1
4. Secure duct cover bracket to top of wall just below
the ceiling using (2) screws provided. See Fig. 2
5. Place ducting from ceiling over the collar on top
of the hood and secure using aluminum duct
tape. See Fig. 3
6. Insert top duct cover into bottom duct cover.
Seat the duct covers correctly on the hood.
7. Extend top duct cover up and secure to the duct
cover bracket using (2) screws. See Fig. 4
8”
3/4”
Installation - Mounting the Duct Cover
- 2 -
FIXATION DES CHEMINEES
1. Installez la connexion électrique et essayez le
fonctionnement de la hotte avant d’installer les
cheminées.
2. Si vous utilisez la hotte version recyclage,
assurez-vous d’installer le déviateur d’air avant
d’installer les cheminées. Pour de plus amples
instructions, consultez le manuel fourni avec le
kit de recyclage.
3. Réglez la largeur de l’étrier de support de la
cheminée afin qu’il s’insère à l’intérieur de la
cheminée supérieure et respectez la distance
indiquée dans la fig.1
4. Fixez l’étrier à la paroi à peine sous le plafond en
utilisant les (2) vis A. Fig. 2
5. Reliez le tuyau à partir du trou d’évacuation de
l’air au plafond à l’étrier sur la hotte et fixez-le
en utilisant un ruban aluminium. Fig.3
6. Insérez la cheminée supérieure à l’intérieur de la
cheminée inférieure. Positionnez les cheminées
dans le logement spécial sur la hotte.
7. Extraire le tube supérieur en le portant jusqu’à
l’étrier et le fixer avec les (2) vis. Fig. 4
8”
3/4”
Installation – Fixation De Cheminees
- 3 -
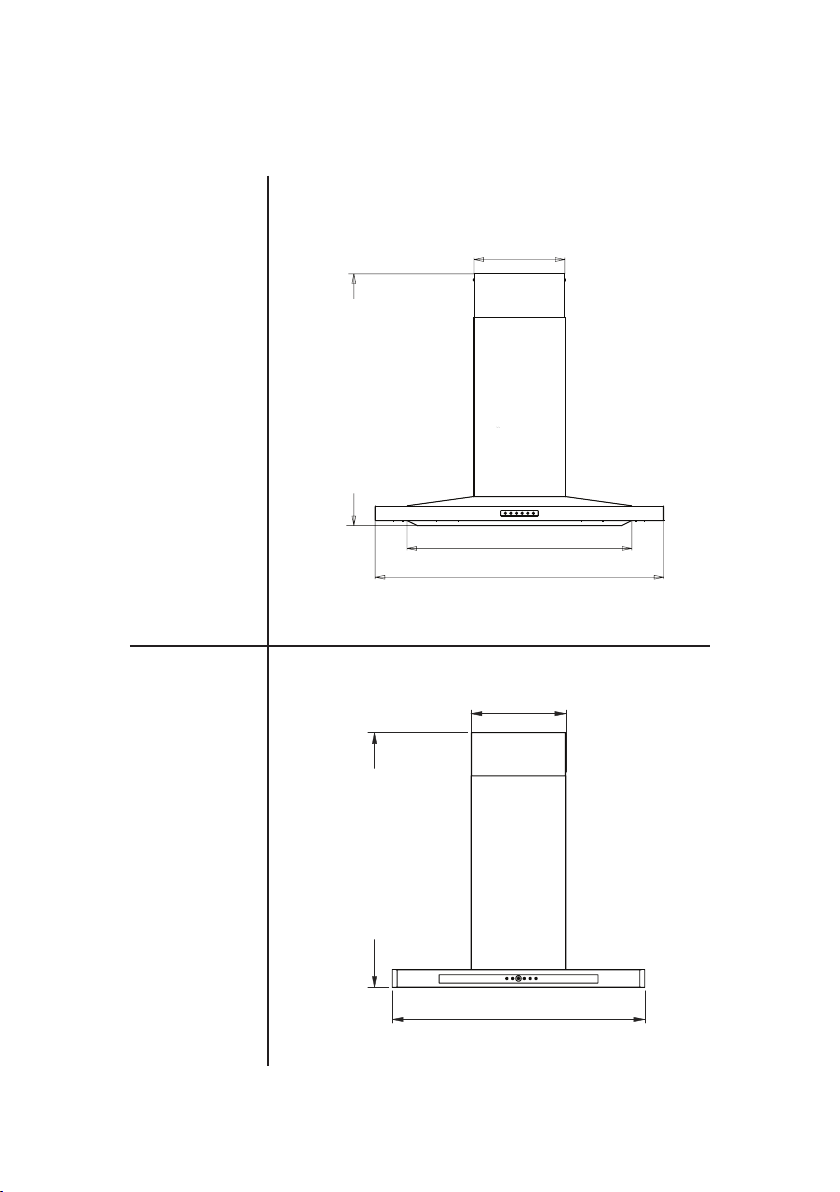
DUCT COVER EXTENSION SPECIFICATION
3011000133100.00
Layers Wall
Vista Wall
35-3/8”, 41-15/16”
27-9/16”
9-15/16”
16-1/2”
22”
3-9/16”
5/8”
1-3/4”
14-1/16”
18-1/8”
16-1/2”
3-1/2” (Ø 6'')
Internal Blower
4-5/16” (Ø 8")
Remote Blower
8”
3/4”
9-3/16”
16-15/16”
STANDARD
min. ducted - 27”
min. recirc. - 31”
max. - 44-1/2”
Z1C-00VS
min. ducted - 43-1/2”
min. recirc. - 47-1/2”
max. - 80”
11-1/8”
(
8")
(
6"
30” or 36”
11-1/4”
ST
ANDARD
min. duc
ted - 25-1/2”
min. recirc. - 29-1/2”
max. - 38-1/2”
Z1C-00VS
min. duc
ted - 42”
min. recirc. - 46”
max. - 78-1/2”
10-1/16”
18-7/8”
17-5/8”
13-9/16”
2-1/8”
18-7/8”
4-1/4”
Remote Blower
3-7/16”
(
Internal Blower
8”
3/4”
9-1/8”
16-7/16”
