
SNF301


1 DESCRIPTION
1.1 PURPOSE
This machine is used to remove and clear away snow from
pavements, gardens, driveways and other ground-level
surfaces.
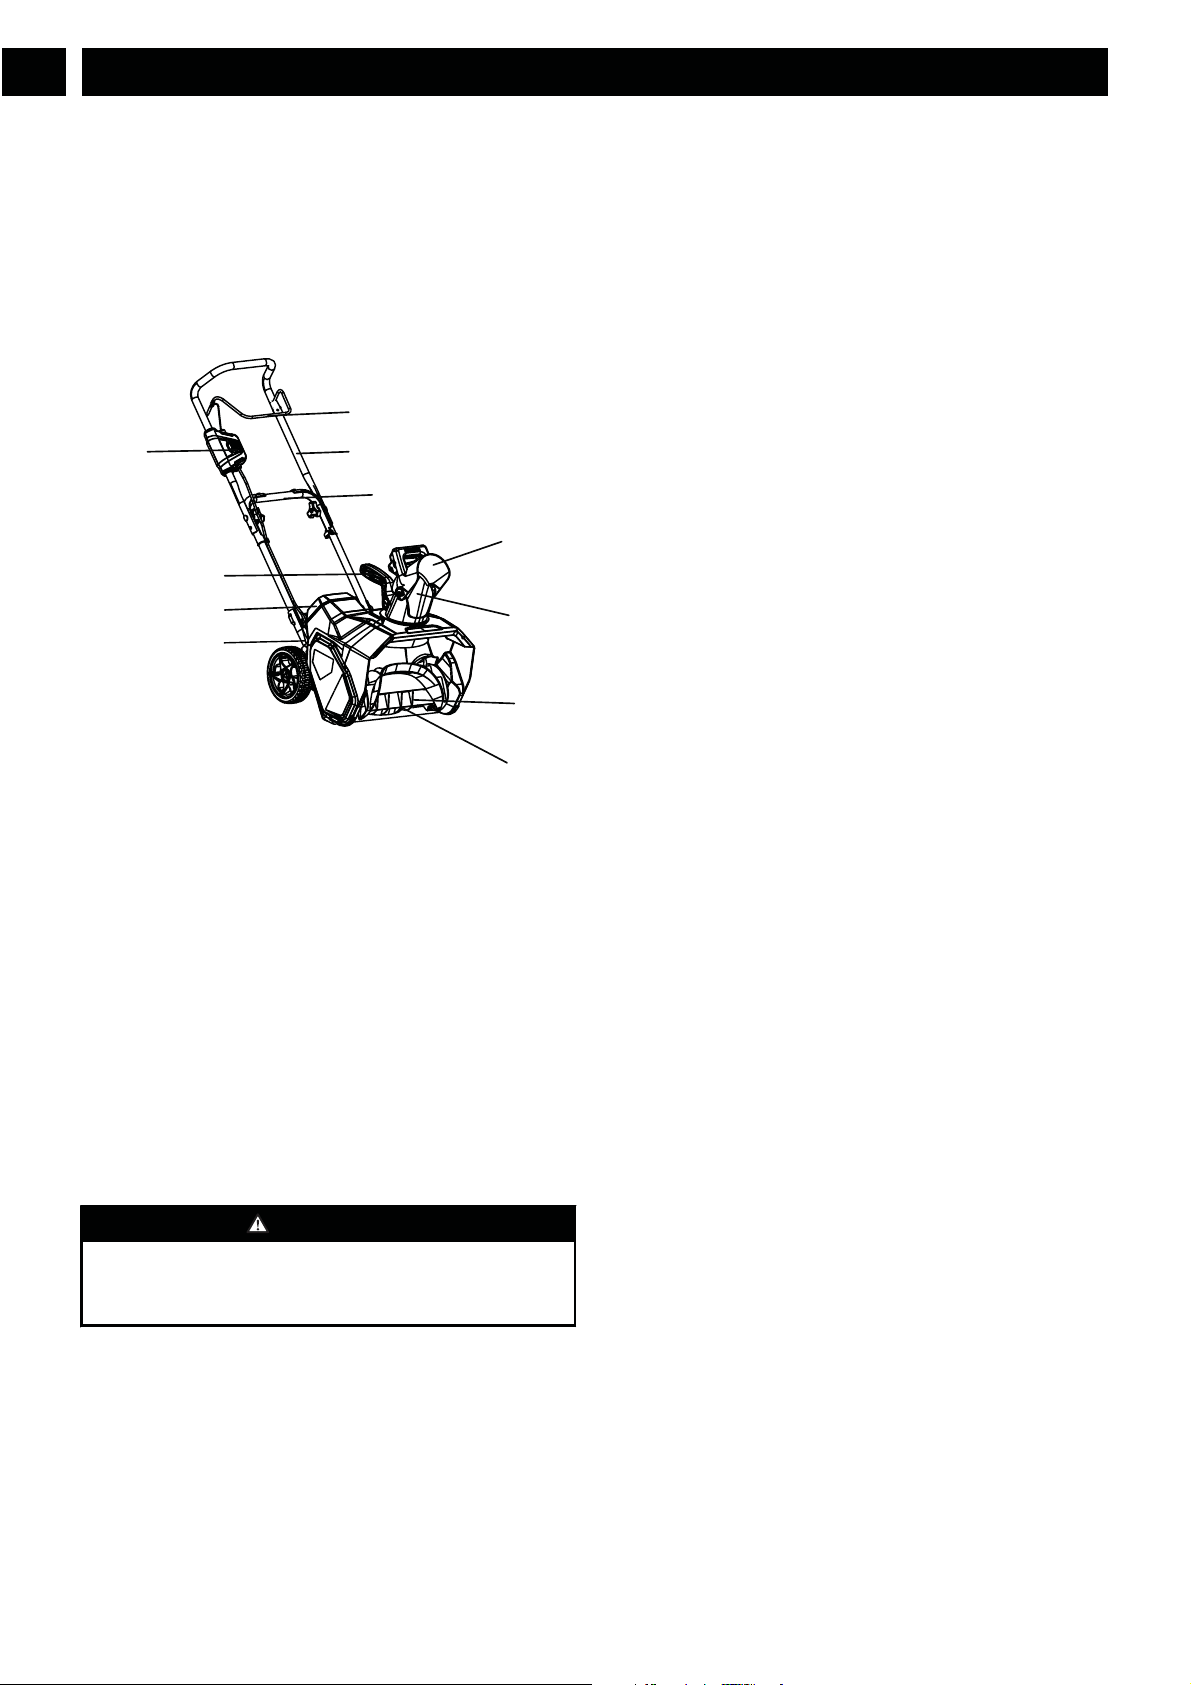
1.2 OVERVIEW
1
2
3
4
5
6
7
8
9
10
11
1
Bail switch
2
Upper handle
3
Middle handle
4
Chute deflector
5
Discharge chute
6
Impeller
7
Scraper
8
Lower handle
9
Battery door
10
Carrying or lifting handle
11
Safety switch button
2 GENERAL POWER TOOL
SAFETY WARNINGS
WARNING
Read all safety warnings and all instructions. Failure to
follow the warnings and instructions may result in electric
shock, fire and/or serious injury.
Save all warnings and instructions for future reference.
The term “power tool” in the warnings refers to your battery-
operated (cordless) power tool.
2.1 TRAINING
• Do not allow children under the age of 14 to operate this
tool. Children who are 14 years of age or older must read
and understand the operating instructions and safety rules
in this manual and must be trained and supervised by a
parent.
• Read the operating and service instruction manual
carefully. Be thoroughly familiar with the controls and
the proper use of the power tool. Know how to stop the
unit and disengage the controls quickly.
• Never allow children to operate the power tool. Never
allow adults to operate the power tool without proper
instruction.
• Keep the area of operation clear of all persons,
particularly small children, and pets.
• Exercise caution to avoid slipping or falling, especially
when operating in reverse.
• Do not use on graveled surfaces.
• Dress Properly – Do not wear loose clothing or jewelry.
They can be caught in moving parts.
• Wear appropriate boots when operating the snow thrower.
• Operation of the snow thrower in the hand-held position
is unsafe, except in accordance with the special
instructions for such use provided in the operator’s
manual.
2.2 PREPARATION
• Thoroughly inspect the area where the power tool is to be
used and remove all doormats, sleds, boards, wires, and
other foreign objects.
• Do not operate the power tool without wearing adequate
winter garments. Wear footwear, which will improve
footing on slippery surfaces.
• Adjust the housing height to clear gravel or crushed rock
surface.
• Never attempt to make any adjustments while the
machine is running (except where specifically
recommended by manufacturer).
• Always wear safety glasses or eye shields during
operation or while performing an adjustment or repair to
protect eyes from foreign objects that may be thrown
from the machine.
• Prevent unintentional starting. Ensure the switch is in the
off-position before connecting to battery pack, picking up
or carrying the appliance. Carrying the appliance with
your finger on the switch or energizing appliance that
have the switch on invites accidents.
• Disconnect the battery pack from the appliance before
making any adjustments, changing accessories, or storing
appliance. Such preventive safety measures reduce the
risk of starting the appliance accidentally.
• When battery pack is not in use, keep it away from other
metal objects,like paper clips, coins, keys, nails, screw or
other small metal objects, that can make a connection
from one terminal to another. Shorting the battery
terminals together may cause burns or a fire.
4
English
EN

㸦㸧
㸪
WARNING
If the battery pack cracks or breaks, with or without leaks,
do not recharge it and do not use. Discard it and replace
with a new battery pack. DO NOT TRY TO REPAIR IT! To
prevent injury and risk of fire, explosion, or electric shock,
and to avoid damage to the environment:
• Cover the terminals of the battery with heavy-duty
adhesive tape.
• DO NOT try to remove or destroy any of the battery
pack components.
• DO NOT try to open the battery pack.
• If a leak develops, the released electrolytes are
corrosive and toxic. DO NOT get the solution in the
eyes or on skin, and do not swallow it.
• DO NOT put these batteries in your regular household
trash.
• DO NOT incinerate.
• DO NOT put them where they will become part of any
waste landfill or municipal solid waste stream.
• Take them to a certified recycling or disposal center.
6 PROPOSITION 65
WARNING
This product contains a chemical known to the state of
California to cause cancer, birth defects or other
reproductive harm. Some dust created by power sanding,
sawing, grinding, drilling, and other construction activities
contains chemicals known to cause cancer, birth defects or
other reproductive harm. Some examples of these chemicals
are:
• Lead from lead-based paints;
• Crystalline silica from bricks and cement and other
masonry products;
• Arsenic and chromium from chemically treated lumber.
Your risk of exposure to these chemicals varies depending
on how often you do this type of work. To reduce your
exposure to these chemicals, work in a well-ventilated area,
and work with approved safety equipment, such as dust
masks that are specially designed to filter out microscopic
particles.
Save these instructions.
7 INSTALLATION
WARNING
Do not change or make accessories that are not
recommended by the manufacturer.
WARNING
Do not put in the safety key or the battery pack until you
assemble all the parts.
7.1 UNPACK THE MACHINE
WARNING
Make sure that you correctly assemble the machine before
use.
WARNING
• If the parts are damaged, do not use the machine.
• If you do not have all the parts, do not operate the
machine.
• If the parts are damaged or missing, speak to the service
center.
1. Open the package.
2. Read the documentation in the box.
3. Remove all the unassembled parts from the box.
4. Remove the machine from the box.
5. Discard the box and package in compliance with local
regulations.
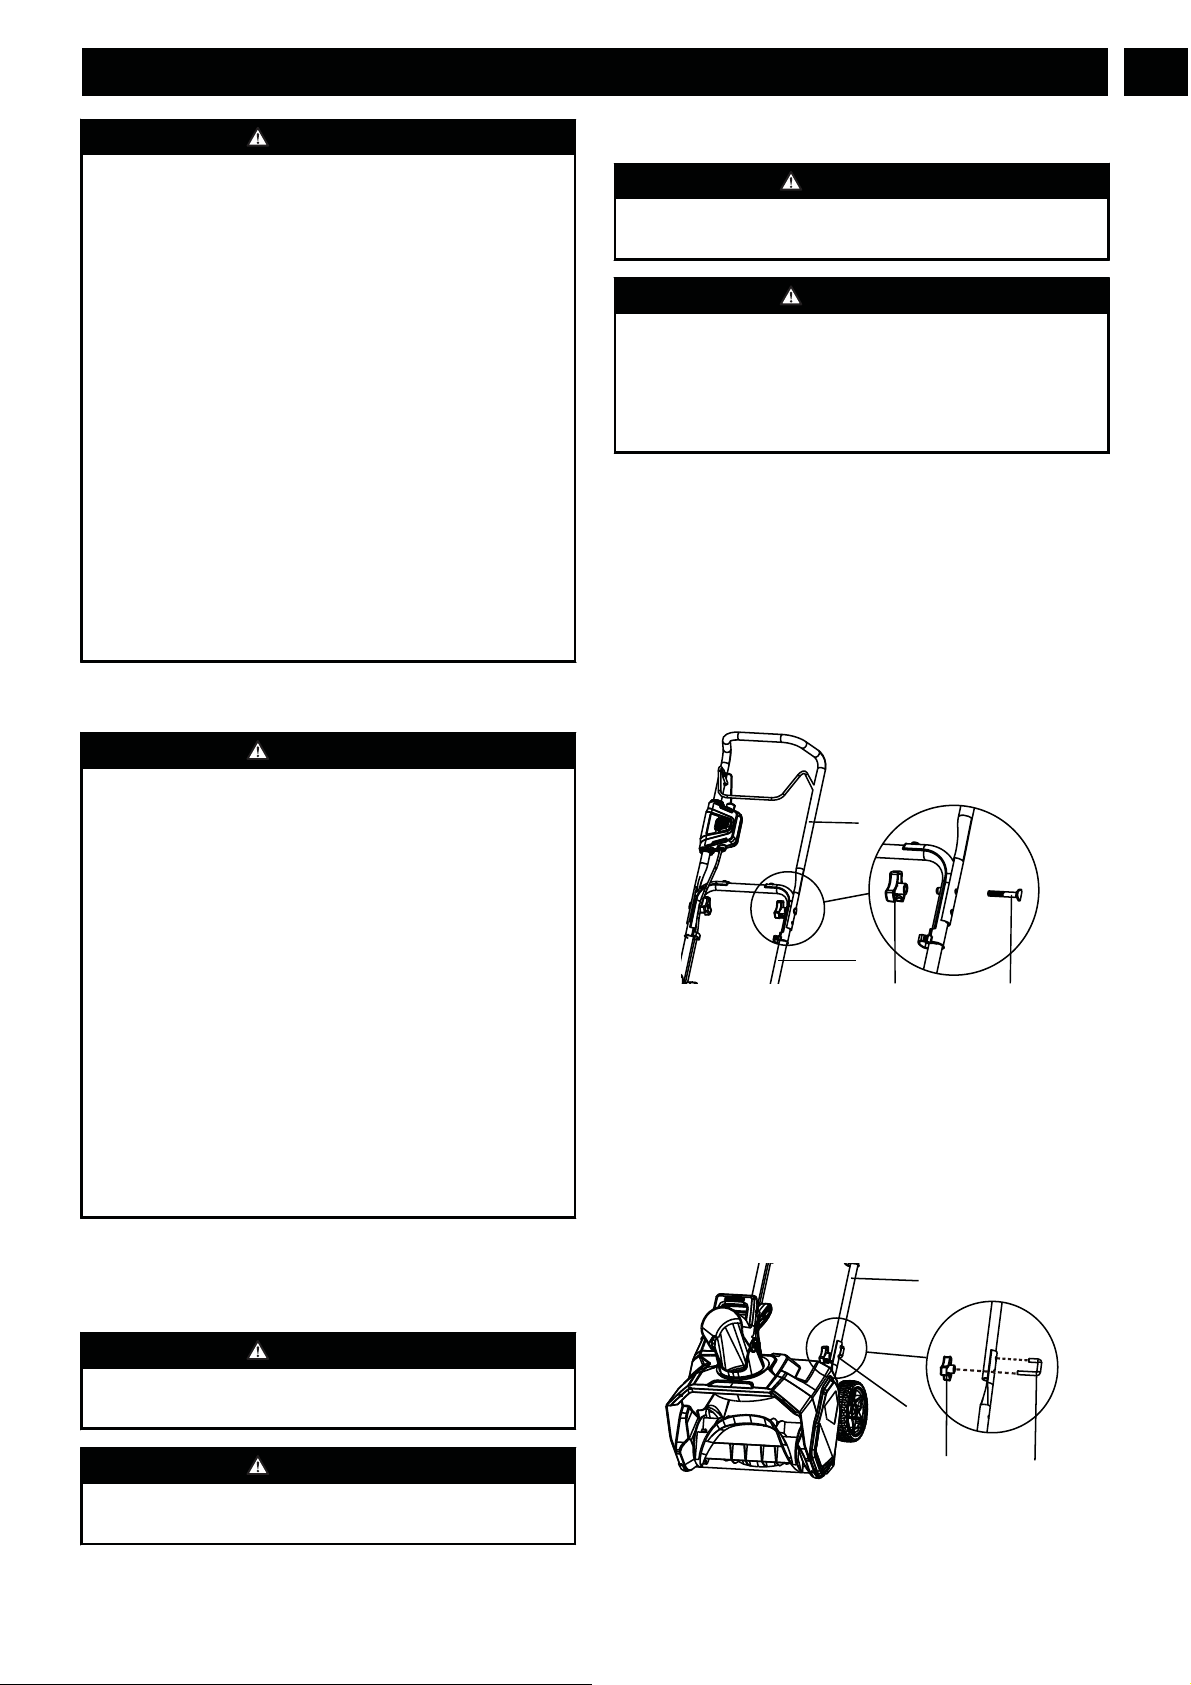
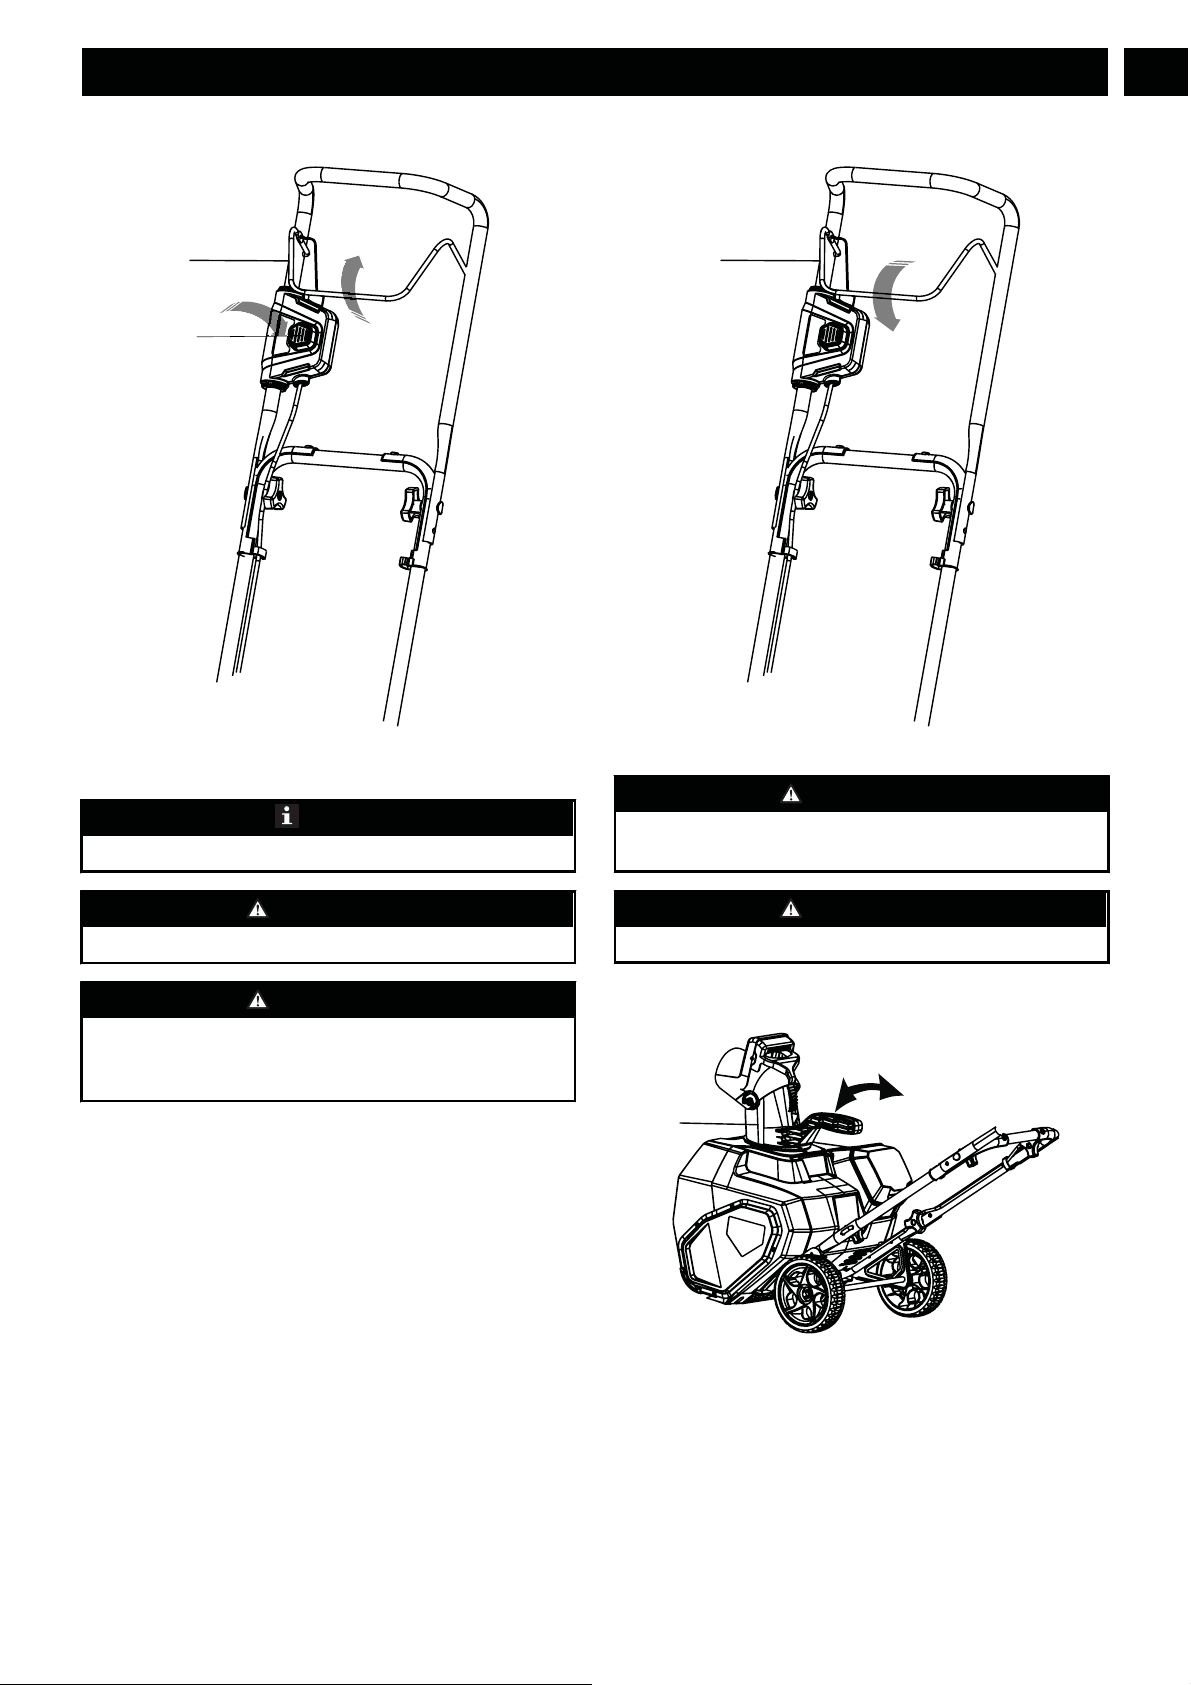
7.2 INSTALL THE UPPER HANDLE
12
13
2
3
1. Align the holes in the middle handle (3) and the upper
handle (2).
2. Insert the bolt (12) through the middle handle (3) and
upper handle (2).
3. Tighten the handle knob (13) onto the bolt (12).
4. Repeat for left/right side.
7.3 INSTALL THE MIDDLE HANDLE
12
13
3
8
1. Align the holes in the middle handle (3) and the lower
handle (8).
7
English
EN
2. Put the bolts (12) through the middle handle (3) and the
lower handle (8).
3. Tighten the handle knob (13) onto the bolt (12).
4. Repeat for left/right side.
7.4 INSTALL THE CHUTE
DEFLECTOR
4
1. Align the tabs (16) on to the slots (14) on one side first.
2. Once you have engaged one tab on one slot push until
you hear a click. Repeat on other side.
3. Push the chute deflector (4).
4. Make sure that the tabs (16) engage the slots (14) on the
two sides.
5. Make sure that the posts (17) engage the holes (15) on the
two sides.
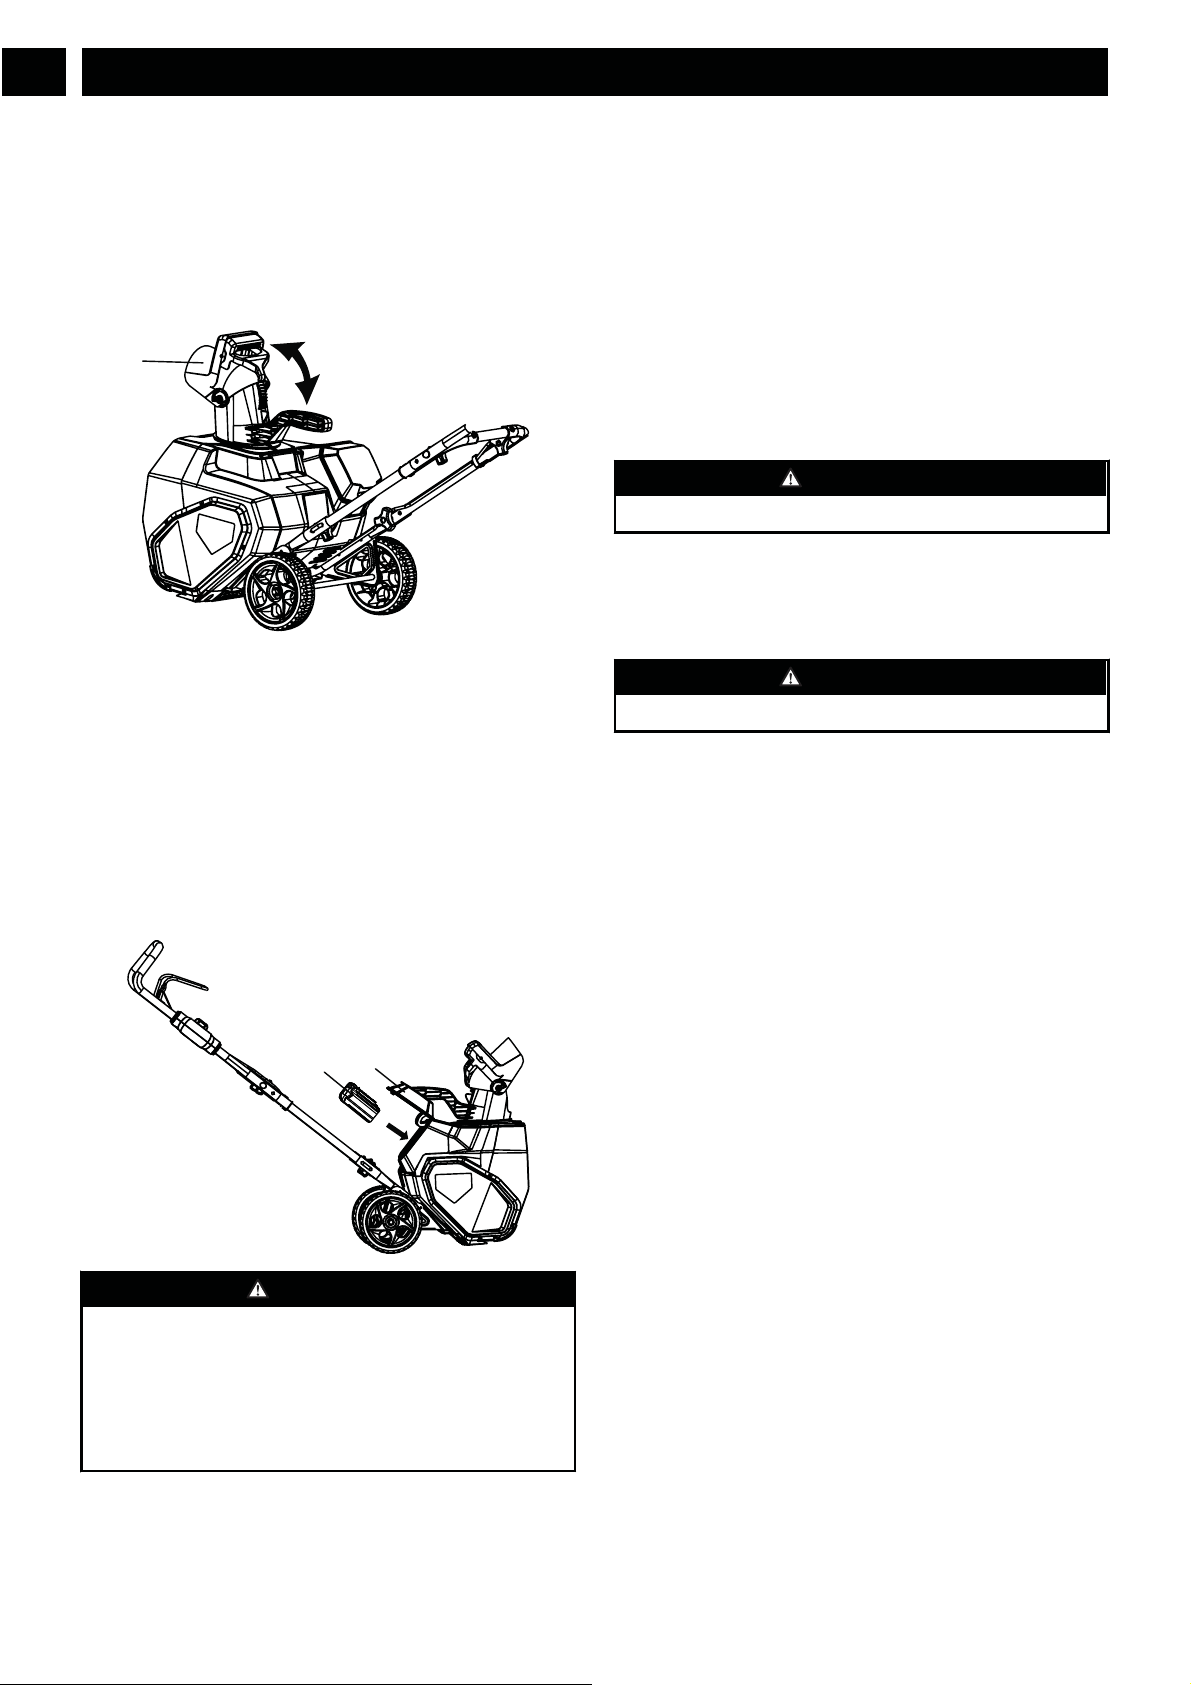
7.5 INSTALL THE BATTERY PACK
28
9
WARNING
• If the battery pack or charger is damaged, replace the
battery pack or the charger.
• Stop the machine and wait until the engine stops before
you install or remove the battery pack.
• Read, know, and do the instructions in the battery and
charger manual.
1. Open the battery door (9).
2. Align the lift ribs on the battery pack (28) with the
grooves in the battery compartment.
3. Push the battery pack (28) into the battery compartment
until the battery pack (28) locks into place.
4. When you hear a click, the battery pack is installed.
5. Close the battery door (9).
7.6 REMOVE THE BATTERY PACK
1. Open the battery door (9).
2. Push and hold the battery release button.
3. Remove the battery pack from the machine.
8 OPERATION
WARNING
Wear eye protection during operation.
8.1 COLD WEATHER OPERATION
The safe battery operation temperature ranges from 1°F
(-17°C) to 113°F (45°C).
WARNING
Do not store or charge battery outside.
Battery must be charged and stored indoors prior to use of the
machine.
If the machine does not start:
• remove the battery pack from the machine,
• charge the battery pack to 15 minutes in warm area, or
when the charging light turns green.
• Install the battery pack back in the unit.
8
English
EN
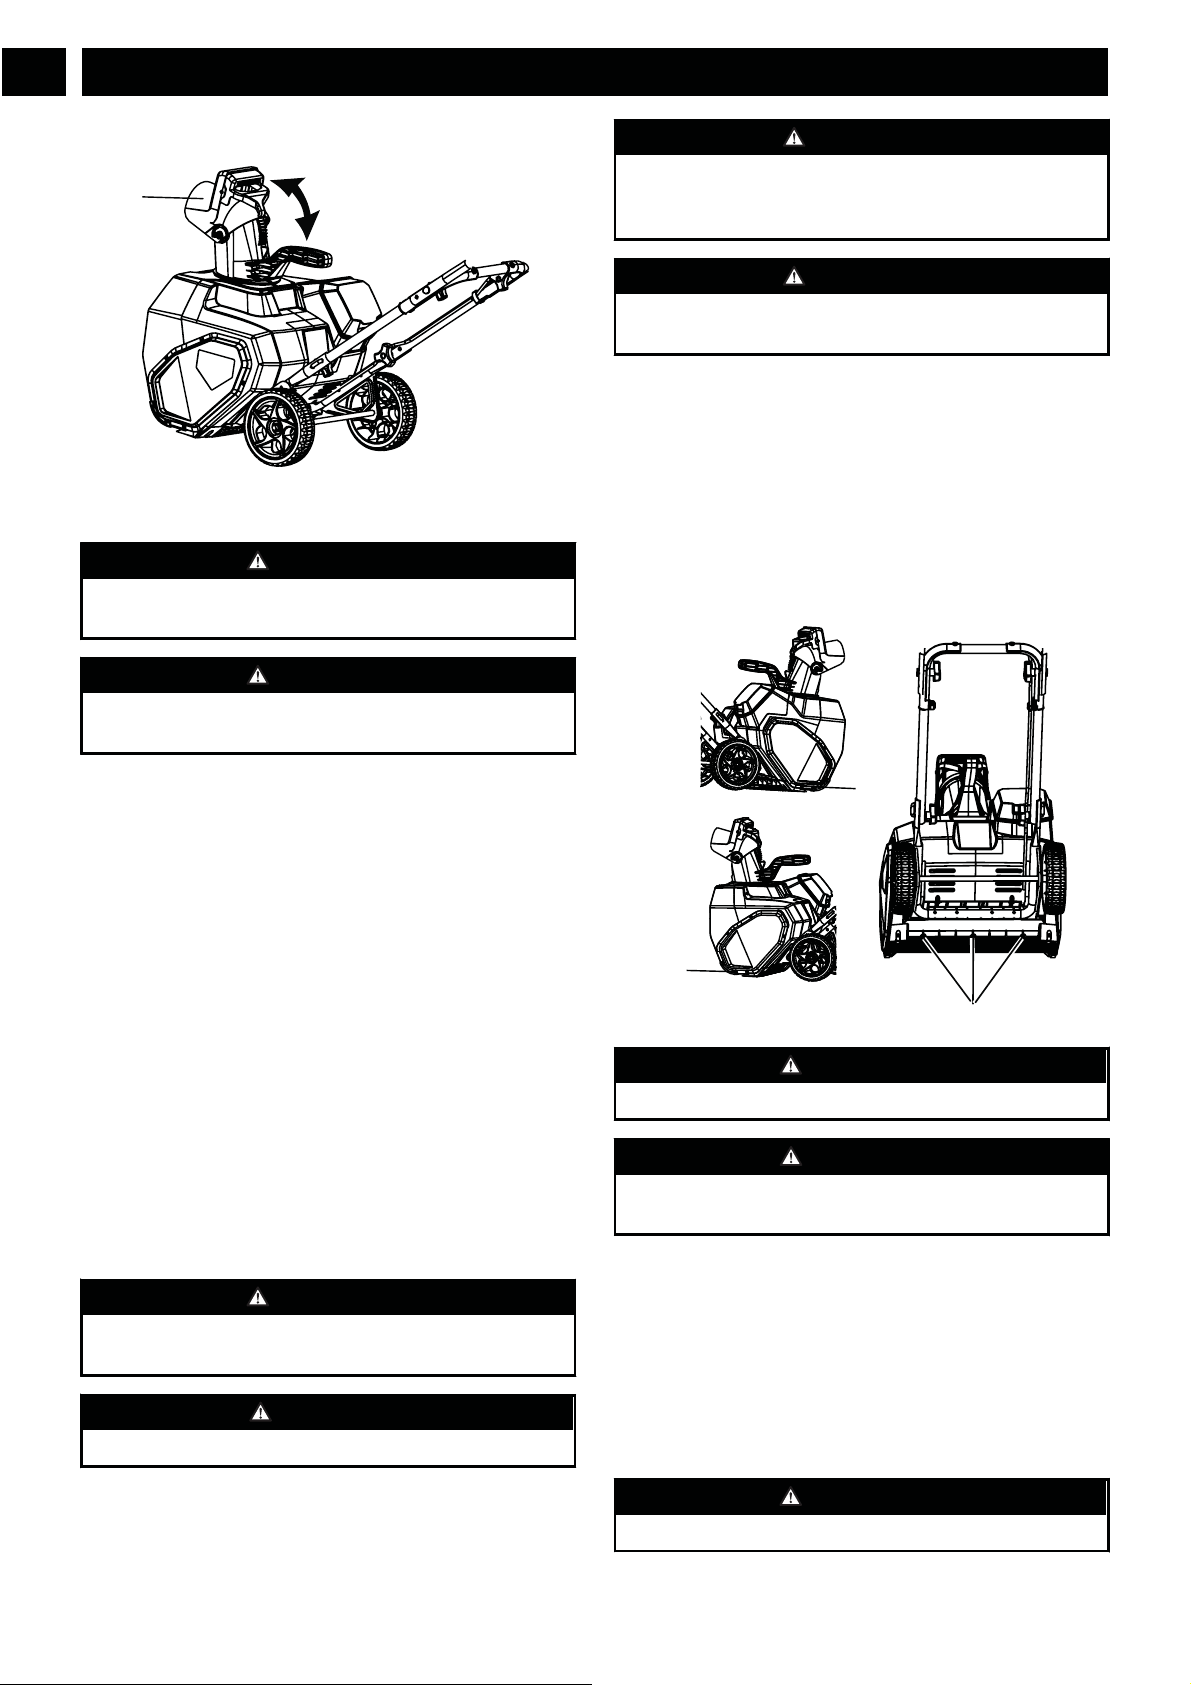
8.2 START THE MACHINE
1
11
1. While holding the safety switch button (11), pull the bail
lever (1) to start the machine.
NOTE
Lower the scraper to the ground to remove the snow.
WARNING
Keep bystanders a safe distance from the machine.
WARNING
Examine the work area. Remove all stones, sticks, wire,
bones, and other debris that can ricochet because of the
rotating impeller.
8.3 STOP THE MACHINE
1
1. Release the bail lever (1) to stop the machine.
WARNING
Wait until the impeller fully stops before you start the
machine again. Do not quickly turn the machine off and on.
WARNING
Remove the battery after you complete the work.
8.4 ADJUST THE DISCHARGE CHUTE
5
You can adjust the discharge chute 180° to change the snow
direction.
1. Turn the grip handle (10) left to move the discharge chute
(5) to the left.
2. Turn the grip handle (10) right to move the discharge
chute (5) to the right.
9
English
EN
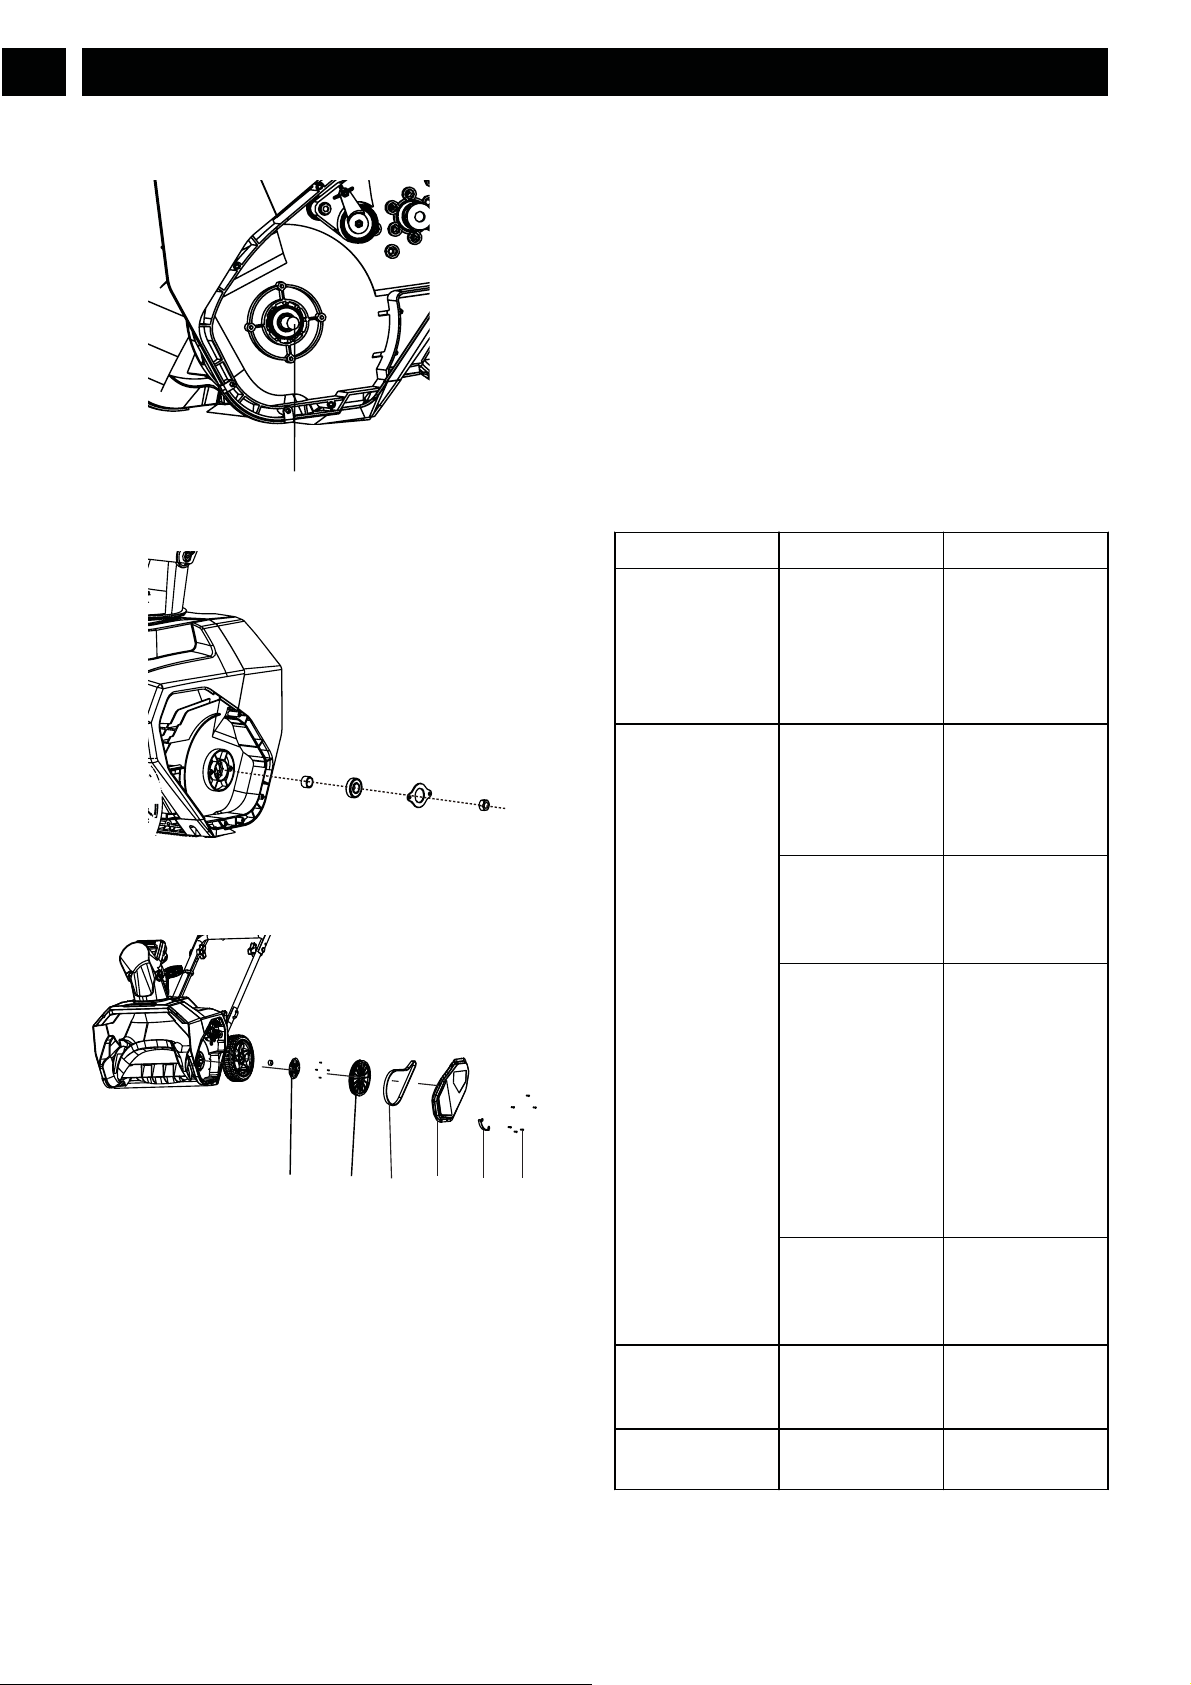
4
18
18
19
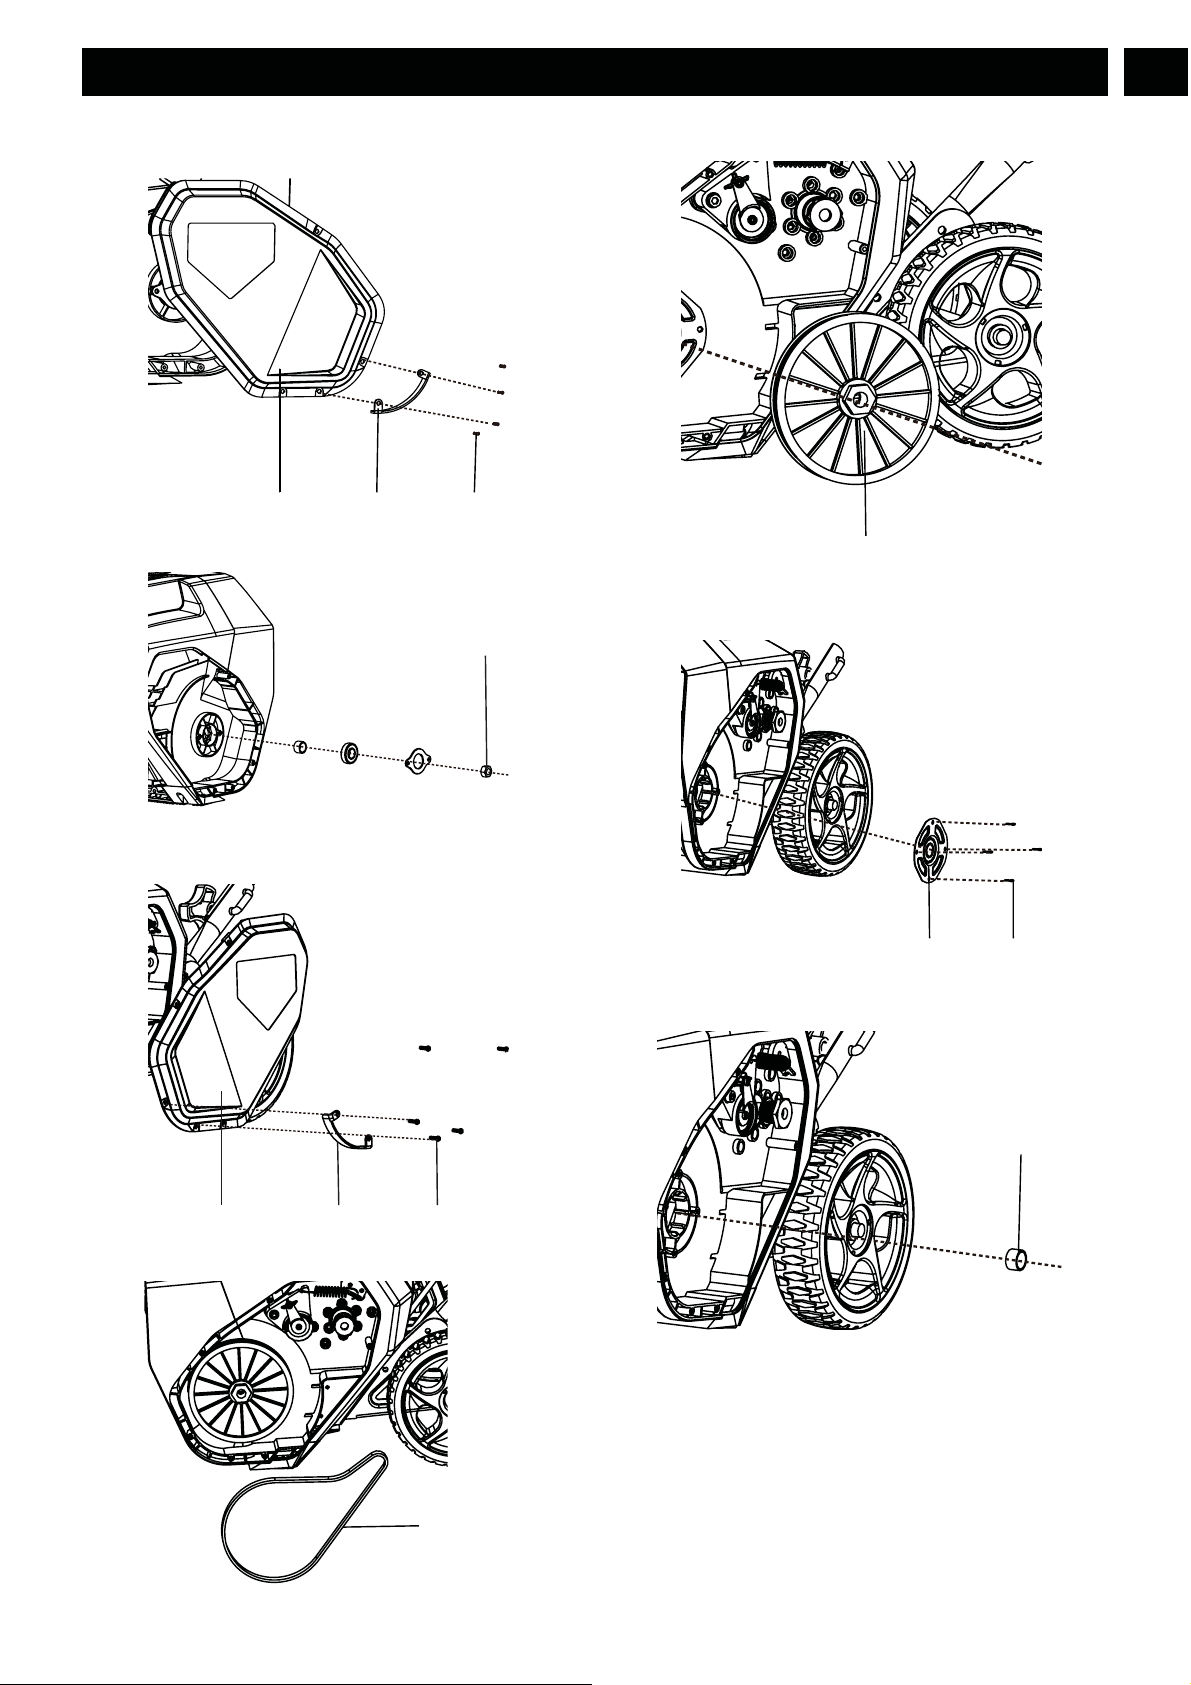
1. Remove the 5 screws (18) and side wear pad (20) that
secure the right side cover (25).
25 20 18
2. Remove the nut (21).
21
3. Remove the 5 screws (18) and side wear pad (20) that
secure the left side cover (25).
25 20 18
4. Remove the belt (22).
5. Using a socket wrench, remove the large pulley (23).
23
6. Remove the screws (18) that secure the left side plate
(26).
26 18
7. Remove the axle sleeve (27).
11
English
EN
22
27
8. Pull the axle (24) and remove the old impeller, install the
new impeller.
24
9. Reinstall the nut (27) and right side cover (25).
10. Reinstall the left side plate (26), large pulley (23), belt
(22) and left side cover (25).
9.4 STORE THE MACHINE
• Clean the machine before storage.
• Make sure the motor is not hot when you store the
machine.
• Make sure that the machine does not have loose or
damaged parts. If it is necessary, do these steps/
instructions:
• Replace the damaged parts.
• Tighten the bolts.
• Speak to a person at an approved service center.
• Store the machine in a dry area.
• Make sure that children cannot come near the machine.
10 TROUBLESHOOTING
Problem Possible cause Solution
The handle is not
in position.
The bolts are not
engaged correctly.
Adjust the height
of the handle and
make sure that the
knobs and bolts
are aligned cor-
rectly.
The machine does
not start.
The battery is not
charged.
Charge the battery
by following the
procedures in the
battery and charg-
er manual.
The switch is de-
fective.
Have the switch
replaced by an au-
thorized service
center.
Battery is too cold. Remove battery
from snow throw-
er. Place battery on
charger and allow
to charge for 10
minutes or until
the changing light
turns green. Re-
move from charger
and install in snow
thrower for use.
Battery may re-
quire service or re-
placement.
Call toll free help-
line, at
1-888-909-6757 or
replace battery.
The engine is on,
but the impeller
does not turn.
The belt is dam-
aged.
Replace the belt.
A thin layer of
snow stays behind.
The scraper is
damaged.
Replace the scra-
per.
12
English
EN
182025222326

* If you cannot find the solution to these problems, call
1-888-909-6757.
11 TECHNICAL DATA
12 LIMITED WARRANTY
YEAR
ANS
AÑOS
LIMITED WARRANTY
GARANTIE LIMITÉE
GARANTÍA
LIMITADA
3
Greenworks hereby warranties this product, to the original
purchaser with proof of purchase, for a period of three (3)
years against defects in materials, parts or workmanship.
Greenworks, at its own discretion will repair or replace any
and all parts found to be defective, through normal use, free
of charge to the customer. This warranty is valid only for
units which have been used for personal use that have not
been hired or rented for industrial/commercial use, and that
have been maintained in accordance with the instructions in
the owners’ manual supplied with the product from new.
ITEMS NOT COVERED BY WARRANTY:
1. Any part that has become inoperative due to misuse,
commercial use, abuse, neglect, accident, improper
maintenance, or alteration; or
2. The unit, if it has not been operated and/or maintained in
accordance with the owner's manual; or
3. Normal wear, except as noted below;
4. Routine maintenance items such as lubricants, blade
sharpening;
5. Normal deterioration of the exterior finish due to use or
exposure.
HELPLINE:
Warranty service is available by calling our toll-free helpline,
at 1-888-909-6757.
TRANSPORTATION CHARGES:
Transportation charges for the movement of any power
equipment unit or attachment are the responsibility of the
purchaser. It is the purchaser’s responsibility to pay
transportation charges for any part submitted for replacement
under this warranty unless such return is requested in writing
by Greenworks.
USA address: Canadian address:
Greenworks Tools
P.O. Box 1238
Mooresville, NC 28115
13
English
EN
Voltage 40 V
No load speed
Clearing width 16 in. (40.6 cm)
Clearing depth 10 in. (25.4 cm)
Impeller size 13 in. (33.02 cm)
Weight (without battery
pack)
Battery BAF705 and other BAF
series
Charger CAF806 and other CAF ser-
ies
1800 RPM
27.9 lbs (12.65 kg)
Greenworks Tools Canada Inc.
P.O.Box 93095, Newmarket,
Ontario
L3Y 8K3

13 EXPLODED VIEW
2
1
5
4
6
3
7
8
No. Part No. Qty Description
1 R0201563-00 1 Belt
2 R0201564-00 1 Impeller assembly
3 R0201565-00 1 Weather bar
4 R0200287-00 1 Wheel Assembly
5 R0201566-00 1 Scraper Kit
6 R0200284-00 1 Cam lock assembly
7 R0201567-00 1 Chute deflector assembly
8 R0201803-00 1 PCB board
14
English
EN
