
final page size: 8.5 x 5.5 in CRAFTSMAN
Personal Weather Station
CMXWDCR01543
INSTRUCTION MANUAL
IF YOU HAVE QUESTIONS OR COMMENTS, CONTACT US.
1-888-331-4569 WWW.CRAFTSMAN.COM
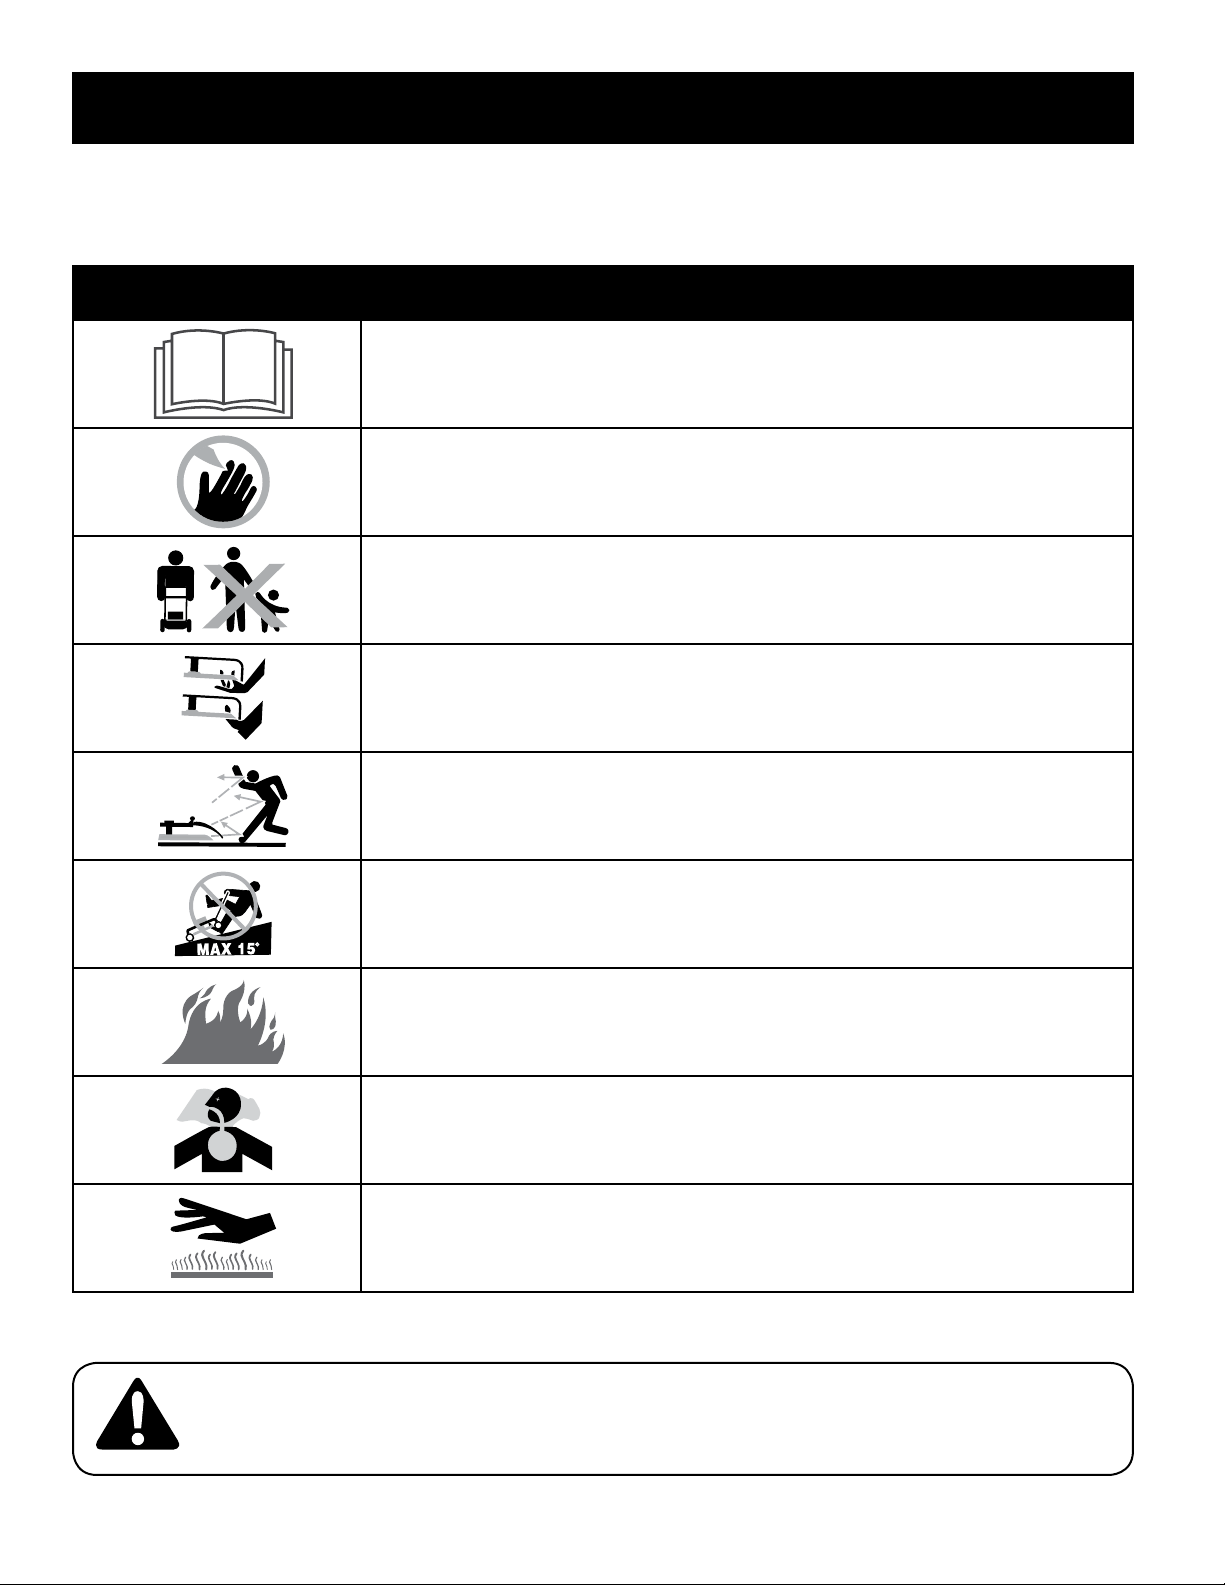
Definitions: Safety Alert Symbols and Words
This instruction manual uses the following safety alert symbols and words to alert you to hazardous situations and your risk
of personal injury or property damage.
DANGER: Indicates an imminently hazardous situation which, if not avoided, will result in death or seriousinjury.
WARNING: Indicates a potentially hazardous situation which, if not avoided, could result in death or seriousinjury.
CAUTION: Indicates a potentially hazardous situation which, if not avoided, may result in minor or moderateinjury.
(Used without word) Indicates a safety related message.
NOTICE: Indicates a practice not related to personal injury which, if not avoided, may result in propertydamage.
Read all safety warnings and all instructions before operating devices.
Compare the illustrations with the devices to familiarize yourself with the supplied components and setup instructions.
SAVE ALL WARNINGS AND INSTRUCTIONS FOR FUTURE REFERENCE

1
English (original instructions)
LangRef_U_NA_U_U-ENG
WARNING: GENERAL SAFETY
• Do not immerse device in water. This can cause electrical shock and damage the product.
• Do not disassemble device or tamper with internal components. Damage caused by disassembly is not covered
by the warranty. No user-serviceable parts are inside these devices.
• Avoid dropping device; this may damage internal components.
• Keep all parts and batteries out of the reach of children.
• Use care when mounting the Wireless Outdoor Sensor out of arm's reach. When using a ladder to mount, it must
be secure to avoid falls that may result in personal injury or property damage.
• Do not mount Wireless Outdoor Sensor near overhead power lines or other unsafe hanging areas.
WARNING: BATTERY SAFETY AND DISPOSAL BATTERY SAFETY
WARNING: MAINTENANCE AND CARE
• Clean devices with a soft, damp cloth. Do not use caustic cleaners or abrasives.
• Keep Indoor Display away from dust, dirt, and moisture. Clean ventilation ports regularly with a gentle puff of air.
• Replace device batteries when low battery icon is shown. Follow all battery recommendations, disposal, and safety
information detailed in this guide.
• Insects may cause obstructions and interrupt data by nesting in or on the Wireless Outdoor Sensor. To limit this problem,
spray sensor housing with a household insect repellent. Insect repellent should not be sprayed on the internal components
or into the sensor. Consult insect repellent instructions prior to use.
• Remove foreign matter from the outside of the Wireless Outdoor Sensor for free movement of the wind anemometer.
If needed, use a small amount of spray lubricant, clear silicone or graphite powder on the anemometer for improved
movement. Spray lubricant, clear silicone or graphite powder should not be sprayed on the internal components or into
the sensor.
BATTERY SAFETY
Clean the battery contacts and also those of the device prior to
battery installation. Remove batteries from device which is not
to be used for an extended period of time. Replace all batteries of
a set at the same time. Only batteries of the same or equivalent
type as recommended are to be used. Ensure the batteries are
installed with correct polarity (+ and -). Promptly remove dead
or expired batteries.
BATTERY DISPOSAL
Dispose of old or defective batteries in an environmentally
safe way and in accordance with your local laws
and regulations.
CAUTION: DO NOT mix old and new batteries or batteries
of different types. DO NOT use rechargeable batteries. DO
NOT recharge non-rechargeable batteries. DO NOT short-
circuit the supply terminals.
WARNING: DO NOT incinerate used batteries.
DO NOT dispose of batteries in fire, because they
could explode or leak.

2
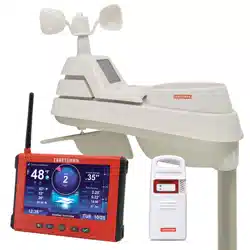
KNOW YOUR WEATHER STATION
Plan your day with confidence thanks to hyperlocal current and predictive weather information coming from the CRAFTSMAN
Personal Weather Station right in your own backyard. The weather station uses patented self-calibrating technology to provide
your personal forecast of 12- to 24-hour weather conditions including temperature, humidity, and wind speed. Self-calibrated
forecasting is generated from weather data measured by a sensor in your yard, giving you the most accurate forecast available for
your exact location.
Personal Weather Station
CMXWDCR01543
1
8
9
10
2
20
3
4
5
6
7
11 12 13
18
14
15
16
17
19
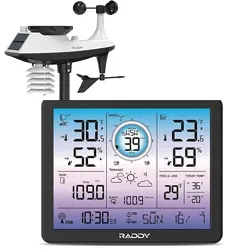
3
INDOOR DISPLAY FRONT
1
Current Outdoor Temperature
• Arrow icon indicates direction the temperature is trending
2
Wireless Outdoor Sensor Signal Strength
3
Wireless Outdoor Sensor Low Battery Indicator
4
Current Outdoor Humidity
• Arrow icon indicates the direction the humidity is trending
5
Indoor Display Low Battery Indicator
6
Clock
7
Date
8
Average Wind Speed
• Indicates the average of all speeds over the past 2 minutes
9
Current Wind Speed
10
Peak Wind Speed
• Indicates the highest speed from the last 60 minutes
11
Button
• For setup preferences
12
Button
• For setup preferences
13
and
^
Buttons
• For setup preferences and viewing high and low records
14
Current Indoor Temperature
• Arrow icon indicates direction the temperature is trending
15
Current Indoor Humidity
• Arrow icon indicates the direction the humidity is trending
16
12 to 24 Hour Weather Forecast
• Self-calibrating forecasting pulls data from the Wireless Outdoor Sensor to generate your personal forecast
17
Current Barometric Pressure
18
auto
Icon
• Indicates Indoor Display is in auto-dimming brightness mode (see page 7)
19
Button
• For momentary backlight and dimmer settings
20
Icon
• Indicates when a value has been calibrated
4
BACK OF INDOOR DISPLAY
1
Integrated Keyhole
• For easy wall mounting
2
RESET Button
• For full reset to factory defaults
3
Backup Battery Compartment
4
Fold-out Tabletop Stand
5
Power Adapter
6
Plug-in for Power Adapter
7
A-B-C Switch
• ID code that must match Wireless Outdoor Sensor’s A-B-C switch to ensure units synchronize
8
Battery Compartment Cover (not shown)
6 3 2
1
4
7
5
5
1
2
3
5
6
4
1
Temperature & Humidity Sensors (internal)
2
Release Lever for Battery Access
3
Mounting Point
4
Wind Speed Anemometer
5
Mounting Hardware
6
Mounting Bracket
7
A-B-C Switch (not shown)
WIRELESS OUTDOOR SENSOR
6
STEP 2
Indoor Display Setup
Set A-B-C switch to match Wireless Outdoor Sensor.
Insert Indoor Display batteries. Plug in power adapter.
NOTE:
Batteries are a backup power source to preserve records in the
event of a power outage. Power adapter is recommended as
the primary power source to enjoy the full functionality of this
product.
A B C
A B C
HOW TO SET UP YOUR WEATHER STATION
Setup Requires:
• Indoor Display with Tabletop Stand
• Power Adapter
• Wireless Outdoor Sensor
• Mounting Hardware
• Wireless Outdoor Sensor Mounting Bracket
• Instruction Manual
What You'll Need (Not Included)
• (4) AA batteries for the Wireless Outdoor Sensor and (3) AAA batteries (optional) for the Indoor Display
Be sure to use high-quality alkaline batteries. Heavy duty or rechargeable batteries are not recommended. Only use
Lithium batteries when the outdoor temperature is below -4ºF/-20ºC for extended periods of time. In general, alkaline
batteries perform poorly in very cold weather.
STEP 1
Wireless Outdoor Sensor Setup
Set A-B-C switch to match Indoor Display. Insert
Wireless Outdoor Sensor batteries.
7
STEP 4
Placement for Maximum Accuracy
CRAFTSMAN Wireless Outdoor Sensors are sensitive to
surrounding environmental conditions. Proper placement of
the Indoor Display and Wireless Outdoor Sensor is critical to
the accuracy and performance of this product.
Indoor Display Placement
Place the Indoor Display in a dry area free of dirt and dust.
Indoor Display stands upright for tabletop use or is wall-
mountable.
Wireless Outdoor Sensor Placement
The Wireless Outdoor Sensor is designed to remain outdoors
all year long. Choose an open location with no obstructions
above or around the Wireless Outdoor Sensor for the most
accurate measurements.
Important Placement Guidelines
• Indoor Display and Wireless Outdoor Sensor must be
within 330 feet (100 meters) of each other
• Place units away from large metallic items, thick walls,
metal surfaces, or other objects that may limit wireless
communication.
• Place units at least 3 feet (.9 m) away from electronic
devices (TV, computer, microwave, radio, etc.).
• Position Wireless Outdoor Sensor away from heaters,
air conditioners, chimneys, exhaust vents, asphalt and
concrete (surfaces that radiate heat).
• Avoid installing the Wireless Outdoor Sensor near
pools, spas, or other bodies of water. Water sources may
impact humidity accuracy.
• DO NOT install the Wireless Outdoor Sensor where it will
be sprayed by a sprinkler system. This may force water
inside the Wireless Outdoor Sensor.
• DO NOT mount the Wireless Outdoor Sensor with
obstructions around it. Consider a location that is a
wide open area, with few structures around to ensure
accurate wind measurement.
STEP 3
Set the Time, Date & Units
Press the “ ” button, located on the front of the Indoor
Display, to enter SET MODE. Once in set mode, the
preference you are currently setting will blink on the Indoor
Display.
To adjust the currently selected (flashing) item, press and
release the “
” or “
^
” buttons (press and HOLD to fast
adjust).
To save your adjustments, press and release the “OK” button
to adjust the next preference. The preference set order is as
follows:
• Auto DST (YES or NO)*
• Clock Hour
• Clock Minute
• Calendar Month
• Calendar Date
• Calendar Year
• Temperature Units (ºF or ºC)
• Wind Speed Units (mph, km/H, knots)
• Pressure Units (inHg or hPa)
NOTE:
*If you live in an area that observes Daylight Saving Time, DST
should be set to YES, even if it is not currently Daylight Saving
Time.
You will automatically exit SET MODE if no buttons are
pressed for 8 seconds. Enter SET MODE at any time by
pressing and holding the “
” button.
Indoor Display Backlight Settings
This weather station’s color Indoor Display features three
different lighting settings: High (100%) brightness, Medium
(60%) brightness and Low (15%) brightness. When Indoor
Display is powered with the power adapter, backlight
remains on at 100% brightness. Press the “
” button
once to dim to 60% brightness; press again to dim to 15%,
press a third time to enter AUTO-DIM mode. “
” will
appear next to the clock. When Indoor Display is powered
by battery only, backlight turns off to conserve power. Press
and release the "light" button to activate 10 seconds of
momentary backlight.
NOTE:
Pressing and holding the “ ” button for 5 seconds will
disable the backlight. Once any button is pressed, the backlight
will return to your selected setting.
Auto Dim Mode
Automatically adjusts Indoor Display brightness based
on time of day.
6:00 a.m. – 9:00 p.m. = 100% brightness
9:01 p.m. – 5:59 a.m.= 15% brightness
8
STEP 5
Wireless Outdoor Sensor Installation Guidelines
• Mount the Wireless Outdoor Sensor at a minimum height of 5 feet (1.5 meters) off the ground, in an open area. Higher is
better for wind measurements — the National Weather Service recommends 33 feet (10 meters) high!
• The included mounting bracket is designed to screw directly onto wooden posts or surfaces that are
2”x 4” or larger. The Wireless Outdoor Sensor can also be mounted directly to 3/4” steel pipe.
1. Fasten mounting base (included) to a post or pole (not included) using the 4 longer screws included in the hardware
bag.
2. Insert the mounting base into the hole on the bottom of the Wireless Outdoor Sensor.
3. Fasten the Wireless Outdoor Sensor into the mounting base using the 2 shorter screws included in the hardware bag.
WARNING:
Use care when mounting the Wireless Outdoor Sensor out of arm's reach. When using a ladder to mount, it must be secure to
avoid falls that may result in personal injury or property damage.
Setup is Complete
The Wireless Outdoor Sensor will now synchronize with the companion unit. It may take a few minutes for synchronization
to complete.
9
USING THE WEATHER STATION
Weather Forecast
Self-Calibrating Forecasting provides your personal forecast of weather conditions for the next 12 to 24 hours by collecting
data from the Wireless Outdoor Sensor in your backyard. It generates a forecast suggestion — personalized for your exact
location.
Barometric Pressure
Subtle variations in barometric pressure greatly affect the weather. This weather station displays the current pressure with an
arrow icon to indicate the direction the pressure is trending (FALLING, STEADY, or RISING).
High & Low Records
High and low records reflect the minimum and maximum temperature and humidity recorded since the unit was powered
on, since the batteries were replaced, or since the records were manually reset (whichever was most recent).
To view historical records, press and release the RECORDS button to cycle through all-time records. You will automatically exit
the records menu if no buttons are pressed for 5 seconds.
To view the LOW records, press and release the “
” button. The low record indicator appears on the Indoor Display next to
the low records. To view the HIGH records, press and release the “
^
” button. The high record indicator appears on the Indoor
Display next to the high records. To reset the LOW records, press AND HOLD the “
” button while viewing the low records.
Dashes will display to confirm all low records have been reset. To reset the HIGH records, press AND HOLD the “
^
” button
while viewing the high records. Dashes will display to confirm all high records have been reset.
Calibrate Temperature, Humidity & Barometric Pressure
The outdoor temperature and humidity readings, and barometric pressure can be calibrated on the Indoor Display to
improve accuracy. Calibration can improve accuracy when Wireless Outdoor Sensor placement or environmental factors
impact the data accuracy.
1. To access calibration mode, press AND HOLD the “
”, , and “
^
” buttons simultaneously for at least 5 seconds.
2. To adjust the currently selected (flashing) item, press and release the “
” or “
^
” buttons to calibrate the data value
higher or lower from the actual reading.
3. To save your adjustments, press and release the “
” button to adjust the next preference. The “ ” icon will remain
illuminated next to calibrated values.
The preference set order is as follows:
• Outdoor Temperature
• Outdoor Humidity
• Indoor Temperature
• Indoor Humidity
• Barometric Pressure (must be set to manual mode to calibrate)*
*To change from auto to manual pressure mode and vice versa, press AND HOLD the “
” button for 8-10 seconds. The
Indoor Display indicates the current pressure mode selected, “auto” or “manual”. After 5-10 seconds of inactivity, the Indoor
Display will save the adjustments and exit calibration mode.
NOTE:
Calibrations will be erased if the Indoor Display is reset or if batteries are removed and the power adapter is unplugged.
STORM
CONDITIONS
DEVELOPING
(Rain = Flashing)
SNOW
LIKELY
LIGHT RAIN
LIKELY
PARTLY
CLOUDY
CLEAR SKIES
CLOUDY

10
PROBLEM CORRECTION
No Wireless Outdoor
Sensor reception
If the wireless signal indicator shows no bars:
• Relocate the Indoor Display and/or Wireless Outdoor Sensor. The units must be within 330 ft (100m) of each other.
• Make sure all units are placed at least 3 feet (.9 m) away from electronics that may interfere with the wireless
communication (such as TVs, microwaves, computers, etc).
• Use standard alkaline batteries (or lithium batteries in Wireless Outdoor Sensor when temperature is below
-4ºF/-20ºC). Do not use heavy duty or rechargeable batteries.
NOTE: It may take a few minutes for Indoor Display and Wireless Outdoor Sensor to synchronize after batteries are replaced.
Indoor Display screen not
working
• Check that the power adapter is plugged into the Indoor Display and an electrical outlet.
• Check that the batteries are installed correctly. Batteries may need to be replaced.
• Reset the Indoor Display by pressing and HOLDING the “RESET” button, located on the back of the Indoor Display. Date
and time will need to be entered after a reset.
Temperature is showing
dashes
When the outdoor temperature is showing dashes, it may be an indication of wireless interference between the Wireless
Outdoor Sensor and Indoor Display.
• Make sure the A-B-C switch in the battery compartments of both the Indoor Display and Wireless Outdoor Sensor are
switched to the same letter. You may choose A, B or C, but both units must match to sync up. Sometimes changing to a
different channel can help.
Outdoor temperature
and/or humidity is
flashing or showing
dashes
Flashing of the outdoor temperature and/or humidity is generally an indication of wireless interference.
1. Bring the Wireless Outdoor Sensor indoors and remove batteries. Remove the power adapter and/or batteries from the
Indoor Display.
2. Reinstall the batteries into the Wireless Outdoor Sensor.
3. Reinstall the power adapter/batteries into the Indoor Display.
4. Let the units sit within a couple feet of each other for a few minutes to gain a strong connection.
Inaccurate temperature or
humidity
• Make sure both the Indoor Display and Wireless Outdoor Sensor are placed away from any heat sources or vents
(see page 7).
• Make sure both units are positioned away from moisture sources (see page 7).
• Make sure Wireless Outdoor Sensor is mounted at least 5 ft off of the ground.
Inaccurate wind readings • What is wind reading being compared to? Pro weather stations are typically mounted at 30 ft (9 m) high or more. Make
sure to compare data using a sensor positioned at the same mounting height.
• Check location of the Wireless Outdoor Sensor. Ensure it’s mounted a minimum of 5 ft (1.5 m) in the air with no
obstructions around it (within several feet).
• Ensure wind cups are spinning freely. If they hesitate or stop try lubricating with graphite powder or spray lubricant.
Inaccurate forecast • Weather Forecast icon predicts conditions for the next 12 to 24 hours, not current conditions.
• Allow unit to run continuously for 33 days. Battery removal or resetting the Indoor Display will restart Learning Mode.
After 14 days, forecast should be fairly accurate, however Learning Mode calibrates for a total of 33 days.
TROUBLESHOOTING

11
SPECIFICATIONS
Temperature range
Outdoor: -40ºF to 158ºF; -40ºC to 70ºC
Indoor: 32ºF to 122ºF; 0ºC to 50ºC
Humidity range 1% to 99%
Wind speed 0 to 99 mph; 0 to 159 km/h
Wireless range 330ft / 100m depending on home construction materials
Operating frequency 433 MHz
Power
Indoor Display: 5V, 100mA adapter 3 x AAA alkaline batteries (optional)
Wireless Outdoor Sensor: 4 x AA alkaline or lithium batteries
Data reporting
Indoor Display: Temperature & humidity: 60 second updates
Wireless Outdoor Sensor: Wind speed: 18 second updates; Outdoor temperature & humidity:
36 second updates
REGISTER ONLINE
Thank you for your purchase. Register your product nowfor:
• WARRANTY SERVICE: Registering your product will help you obtain more efficient warranty service in case there is a
problem with yourproduct.
• CONFIRMATION OF OWNERSHIP: In case of an insurance loss, such as fire, flood or theft, your registration of
ownership will serve as your proof ofpurchase.
• YOUR SAFETY: Registering your product will allow us to contact you in the unlikely event a safety notification is
required under the Federal Consumer SafetyAct.
Register online at www.craftsman.com/registration
12
FCC Radio Frequency Interference
This equipment has been tested and found to comply
with the limits for a Class B digital device, pursuant to Part
15 of the FCC Rules. These limits are designed to provide
reasonable protection against harmful interference in a
residential installation.
This equipment generates, uses and can radiate radio
frequency energy and, if not installed and used in
accordance with the instructions, may cause harmful
interference to radio communications. However, there
is no guarantee that interference will not occur in a
particular installation. If this equipment does cause
harmful interference to radio or television reception,
which can be determined by turning the equipment
off and on, the user is encouraged to try to correct the
interference by one or more of the following measures:
• Reorient or relocate the receiver’s antenna.
• Increase the distance between the equipment
and the receiver.
• Connect the equipment to an outlet on a circuit
different from that to which the receiver is connected.
• Consult the dealer or an experienced radio/TV
technician for help.
To assure continued appliance, any changes or
modifications not expressly approved by the party
responsible for compliance could voice the user's
authority to operate this equipment. (Example -use only
shielded interface cables when connecting to computer or
peripheral devices).
FCC Warning
Any Changes or modifications not expressly approved by
the party responsible for compliance could void the user's
authority to operate the equipment.
Note: This equipment has been tested and found to
comply with the limits for a Class B digital device, pursuant
to part 15 of the FCC Rules. These limits are designed
to provide reasonable protection against harmful
interference in a residential installation. This equipment
generates uses and can radiate radio frequency energy
and, if not installed and used in accordance with the
instructions, may cause harmful interference to radio
communications. However, there is no guarantee that
interference will not occur in a particular installation. If this
equipment does cause harmful interference to radio or
television reception, which can be determined by turning
the equipment off and on, the user is encouraged to try to
correct the interference by one or more of the following
measures:
• Reorient or relocate the receiving antenna.
• Increase the separation between the equipment
and receiver.
• Connect the equipment into an outlet on a circuit
different from that to which the receiver is connected.
• Consult the dealer or an experienced radio/TV
technician for help.
This equipment complies with FCC radiation exposure
limits set forth for an uncontrolled environment. This
equipment should be installed and operated with
minimum distance 20cm between the radiator and
your body.
REGULATORY INFORMATION
13
One-Year Limited Warranty
The Manufacturer will repair or replace, without charge, any
defects due to faulty materials or workmanship for one year
from the date of purchase. This warranty does not cover
part failure due to normal wear or tool abuse. For further
detail of warranty coverage and warranty repair information,
visit www.craftsman.com or call 1-888-331-4569. This
warranty does not apply to accessories or damage caused
where repairs have been made or attempted by others.
THIS LIMITED WARRANTY IS GIVEN IN LIEU OF ALL OTHERS,
INCLUDING THE IMPLIED WARRANTY OF MERCHANTABILITY
AND FITNESS FOR A PARTICULAR PURPOSE, AND EXCLUDES
ALL INCIDENTAL OR CONSEQUENTIAL DAMAGES. Some
states do not allow limitations on how long an implied
warranty lasts or the exclusion or limitation of incidental
or consequential damages, so these limitations may not
apply to you. This warranty gives you specific legal rights
and you may have other rights which vary in certain states
or provinces.
90-DAY MONEY BACK GUARANTEE
If you are not completely satisfied with the performance
of your Digital Refrigerator & Freezer Thermometer for any
reason, you can return it within 90 days from the date of
purchase with a receipt for a full refund – no questions
asked.
LATIN AMERICA: This warranty does not apply to products
sold in Latin America. For products sold in Latin America,
see country specific warranty information contained in
the packaging, call the local company or see website for
warranty information.

CRAFTSMAN®
is a registered trademark of Stanley Black & Decker, Inc., used under license.
© 2021 CRAFTSMAN
Product Manufactured by:
Chaney Instrument Company
Lake Geneva, WI 53147
U.S. & Canada Only
7/09 CMXWDCR01543