final page size: 8.5 x 5.5 in CRAFTSMAN
Weather Station with
High-Definition Display & Lightning Detection
CMXWDCR01069
INSTRUCTION MANUAL
IF YOU HAVE QUESTIONS OR COMMENTS, CONTACT US.
1-888-331-4569 WWW.CRAFTSMAN.COM

Definitions: Safety Alert Symbols and Words
This instruction manual uses the following safety alert symbols and words to alert you to hazardous situations and your risk
of personal injury or property damage.
DANGER: Indicates an imminently hazardous situation which, if not avoided, will result in death or seriousinjury.
WARNING: Indicates a potentially hazardous situation which, if not avoided, could result in death or seriousinjury.
CAUTION: Indicates a potentially hazardous situation which, if not avoided, may result in minor or moderateinjury.
(Used without word) Indicates a safety related message.
NOTICE: Indicates a practice not related to personal injury which, if not avoided, may result in propertydamage.
Read all safety warnings and all instructions before operating devices.
Compare the illustrations with the devices to familiarize yourself with the supplied components and setup instructions.
SAVE ALL WARNINGS AND INSTRUCTIONS FOR FUTURE REFERENCE
1
English (original instructions)
LangRef_U_NA_U_U-ENG
WARNING: GENERAL SAFETY
• Do not immerse device in water. This can cause electrical shock and damage the product.
• Do not disassemble device or tamper with internal components. Damage caused by disassembly is not covered
by the warranty. No user-serviceable parts are inside these devices.
• Avoid dropping device; this may damage internal components.
• Keep all parts and batteries out of the reach of children.
• Use care when mounting the Wireless Outdoor and Lightning Sensors out of arm's reach. When using a ladder to mount, it
must be secure to avoid falls that may result in personal injury or property damage.
• Do not mount Wireless Outdoor and Lightning Sensors near overhead power lines or other unsafe hanging areas.
WARNING: BATTERY SAFETY AND DISPOSAL BATTERY SAFETY
WARNING: MAINTENANCE AND CARE
• Clean devices with a soft, damp cloth. Do not use caustic cleaners or abrasives.
• Keep Indoor Display away from dust, dirt, and moisture. Clean ventilation ports regularly with a gentle puff of air.
• Replace device batteries when low battery icon is shown. Follow all battery recommendations, disposal, and safety
information detailed in this guide.
• Wireless Outdoor and Lightning Sensors are water-resistant and designed for general outdoor use. To extend its life, place in
an area protected from direct weather elements, including rain, snow, and frost. When using a ladder to mount, it must be
secure to avoid falls that may result in personal injury or property damage.
• Insects may cause obstructions and interrupt data by nesting in or on the Wireless Outdoor Sensor. To limit this problem,
spray sensor with a household insect repellent. Consult the insect repellent instructions prior to use.
• Clean the Wireless Outdoor Sensor Rain Collector Cup by emptying rain collector debris filter. The debris filter is located in the
rain collector funnel. Remove from the top by gently squeezing and pulling out. Note: If the rain collector cup fills with snow
and then melts, it will register as rain on the Indoor Display.
• Clean the Wireless Outdoor Sensor wind vane & anemometer by removing foreign matter from the outside of the sensor.
If needed, use a small amount of spray lubricant, clear silicone or graphite powder on the anemometer for improved
movement.
BATTERY SAFETY
Clean the battery contacts and also those of the device prior to
battery installation. Remove batteries from device which is not
to be used for an extended period of time. Replace all batteries of
a set at the same time. Only batteries of the same or equivalent
type as recommended are to be used. Ensure the batteries are
installed with correct polarity (+ and -). Promptly remove dead
or expired batteries.
BATTERY DISPOSAL
Dispose of old or defective batteries in an environmentally
safe way and in accordance with your local laws
and regulations.
CAUTION: DO NOT mix old and new batteries or batteries
of different types. DO NOT use rechargeable batteries. DO
NOT recharge non-rechargeable batteries. DO NOT short-
circuit the supply terminals.
WARNING: DO NOT incinerate used batteries.
DO NOT dispose of batteries in fire, because they
could explode or leak.
2
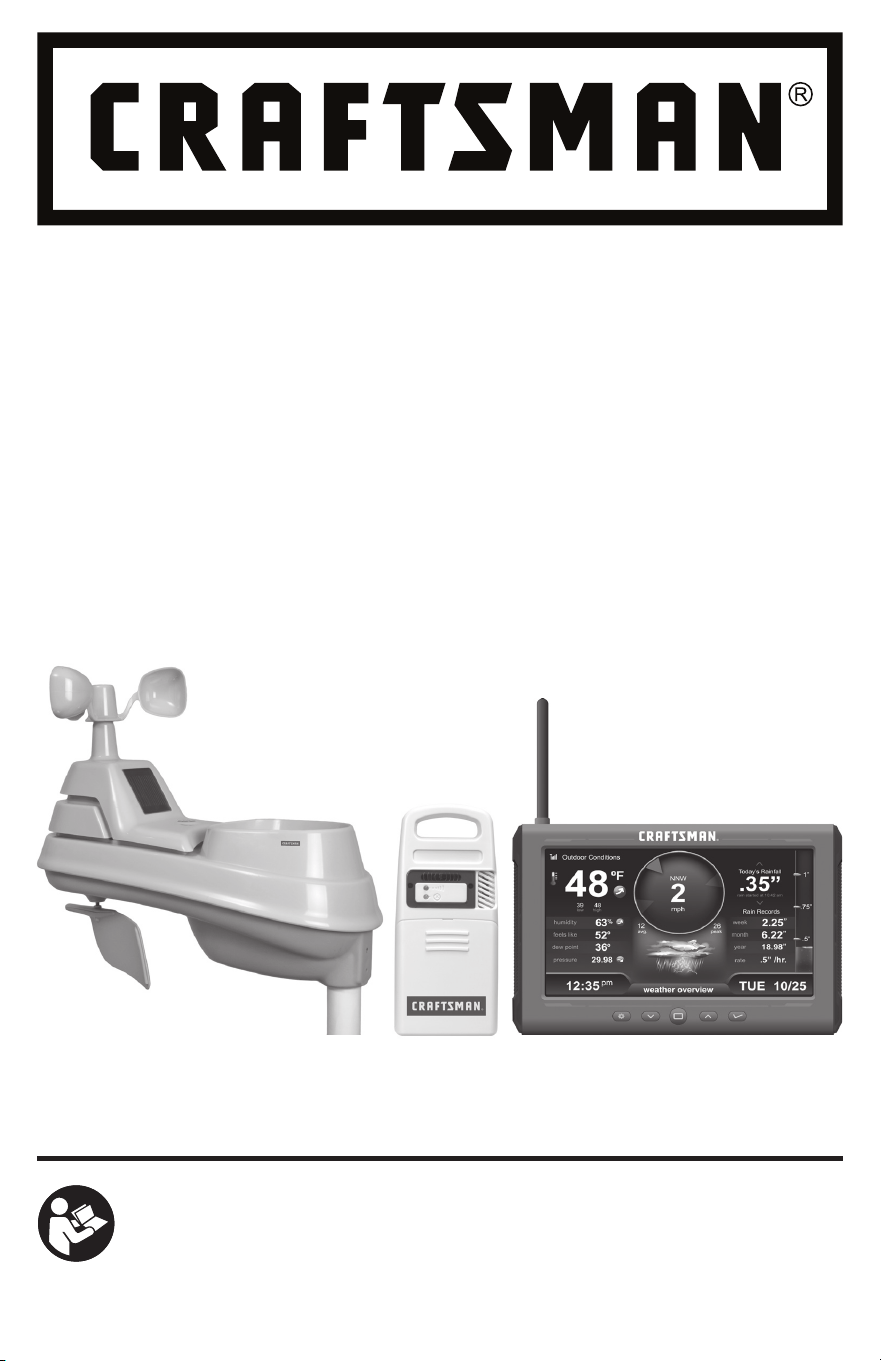
KNOW YOUR WEATHER STATION
The CRAFTSMAN Weather Station with High-Definition Display & Lightning Detection lets you keep track of the weather. You'll
always know when to move the pool party, barbecue, or little league baseball team indoors. CRAFTSMAN's Wireless Outdoor Sensor
measures wind speed, wind direction, temperature, humidity and offers a rain gauge. The Lightning Sensor tracks lightning strikes
up to 25 miles away and provides a visual and audible warning.
Weather Station
CMXWDCR01069
Records
47
1
2
3
4
5
7
6
1218 1316 141514 172022 1921
8
9
11
10
3
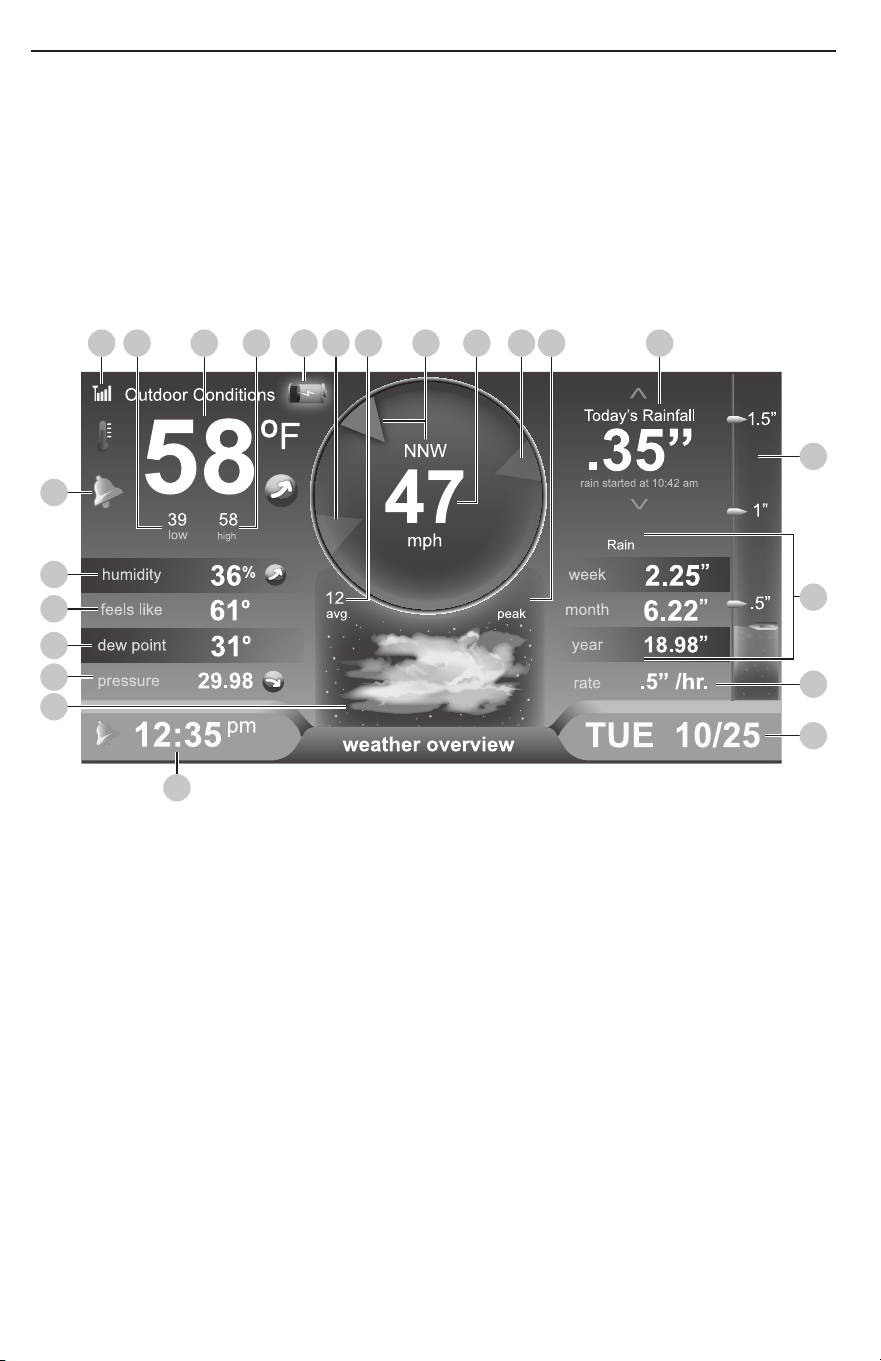
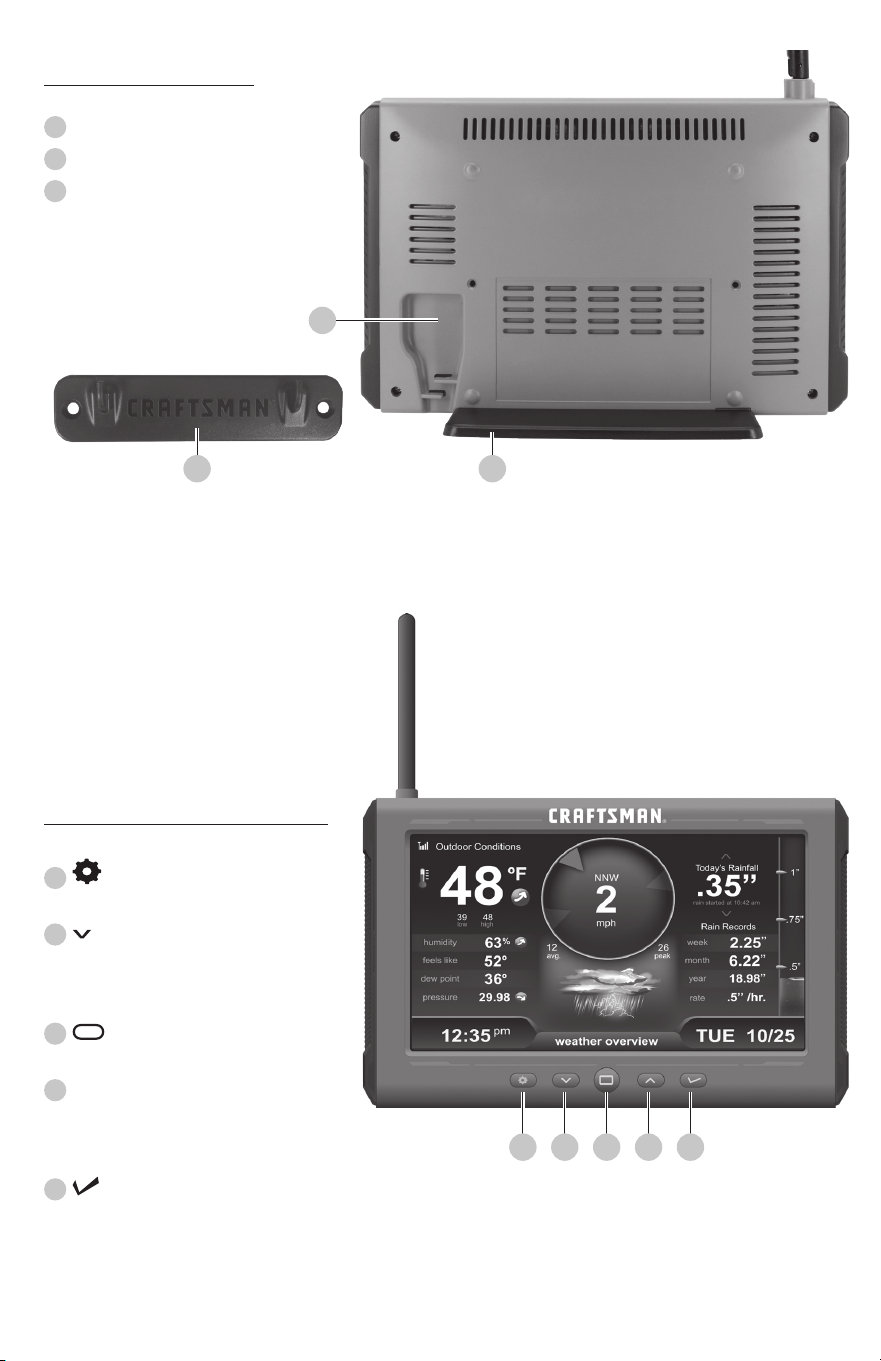
WEATHER OVERVIEW DASHBOARD
1
Alarm ON Indicator
• Indicates alarm is activated to emit an audible alert
when conditions exceed your presets (see page 10)
2
Current Outdoor Humidity
• Arrow icon indicates direction humidity is trending
3
Current “Feels Like” Temperature
4
Seasonal Information
• Heat Index calculation displays when temperature is
80°F (27°C) or higher
• Dew Point calculation displays when temperature is
79°F (26°C) or lower
• Wind chill calculation displays when temperature is 40°F
(4°C) or lower
5
Barometric Pressure
• Arrow icon indicates direction pressure is trending
6
12 to 24 Hour Weather Forecast
• Self-Calibrating Forecasting pulls data from your
Wireless Outdoor Sensor to generate your personal
forecast
7
Clock
8
Date & Day of the Week
9
Rainfall Rate/Most Recent Rainfall
• Displays rainfall rate of current rain event, or total from
the most recent rainfall
10
Rainfall History
• Displays rainfall records for current week, month & year
11
Today’s Rain Indicator
• Illustrates rainfall collection up to 2 inches (50 mm) once
rain is detected
12
Messages
• Displays weather information and messages
(see page 11)
13
Peak Wind Speed
• Highest speed from the last 60 minutes
14
Previous 2 Wind Directions
15
Current Wind Speed
• Background color changes based on current wind speed
16
Current Wind Direction
17
Average Wind Speed
• Average wind speed over the past 2 minutes
18
Wireless Outdoor Sensor Low Battery Indicator
19
Outdoor High Temperature Record
• Highest temperature recorded since midnight
20
Current Outdoor Temperature
• Arrow indicates direction temperature is trending
21
Outdoor Low Temperature Record
• Lowest temperature recorded since midnight
22
Wireless Outdoor Sensor Signal Strength
4
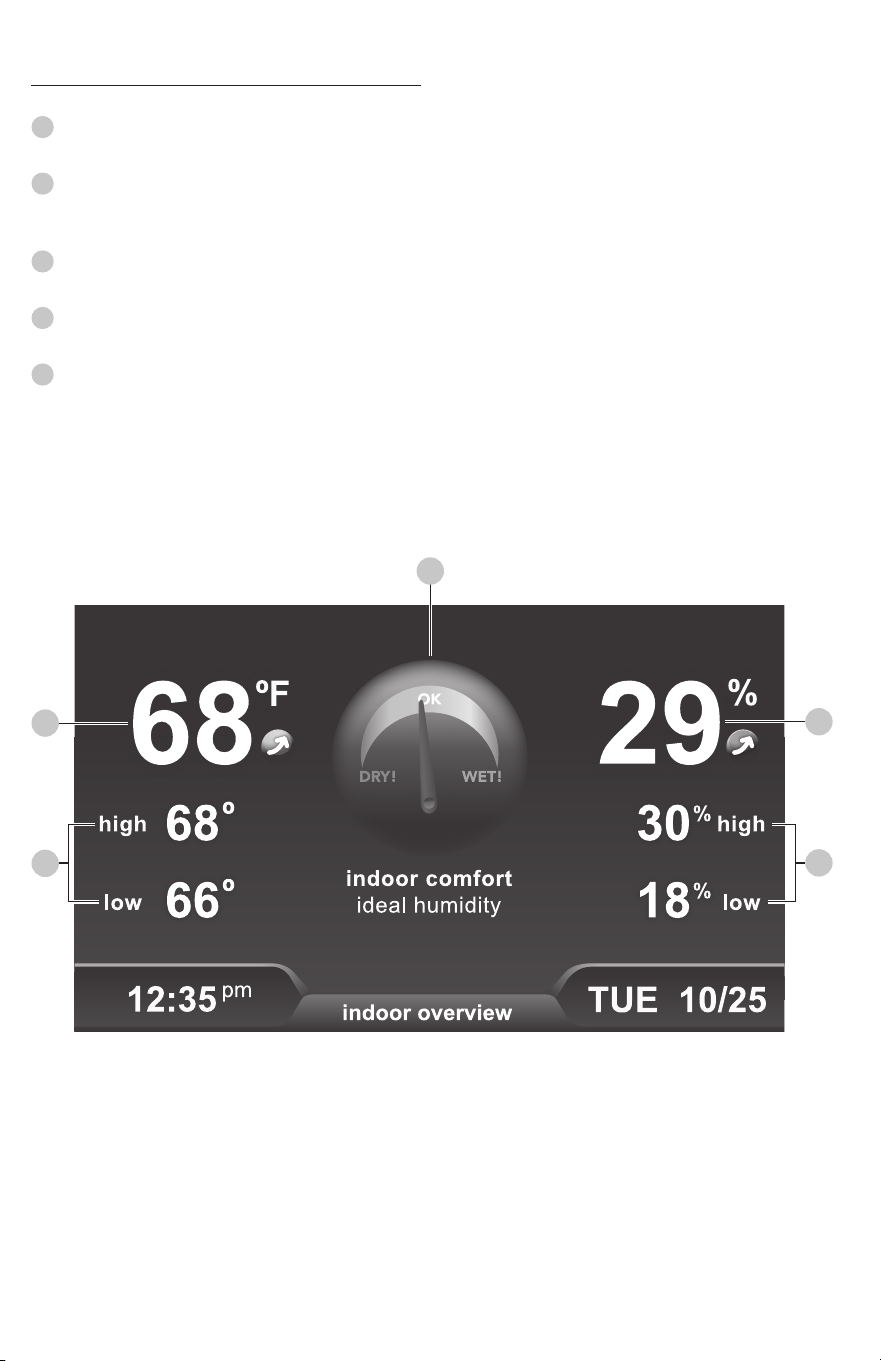
INDOOR OVERVIEW DASHBOARD
1
Current Indoor Temperature
• Arrow indicates direction temperature is trending
2
Daily High & Low Temperature Records
• Highest and lowest temperature recorded since
midnight
3
Daily High & Low Humidity Records
• Highest and lowest humidity recorded since midnight
4
Current Indoor Humidity
• Arrow indicates direction humidity is trending
5
Humidity Level Indicator
• Indicates a high, low or ideal humidity comfort level
1
2
5
4
3
5
4 5 6 7 8
BACK OF INDOOR DISPLAY
FRONT OF INDOOR DISPLAY
1
Plug-in for Power Adapter
2
Indoor Display Stand
3
Mounting Bracket
• For easy wall mounting
4
Button
• For menu access and setup preferences
5
Button
• For setup preferences and cycling
through messages on the Weather
Overview dashboard
6
Button
• Press to view a different dashboard
7
^
Button
• For setup preferences and cycling
through messages on the Weather
Overview dashboard
8
Button
• For setup preferences
3
1
2
6
10
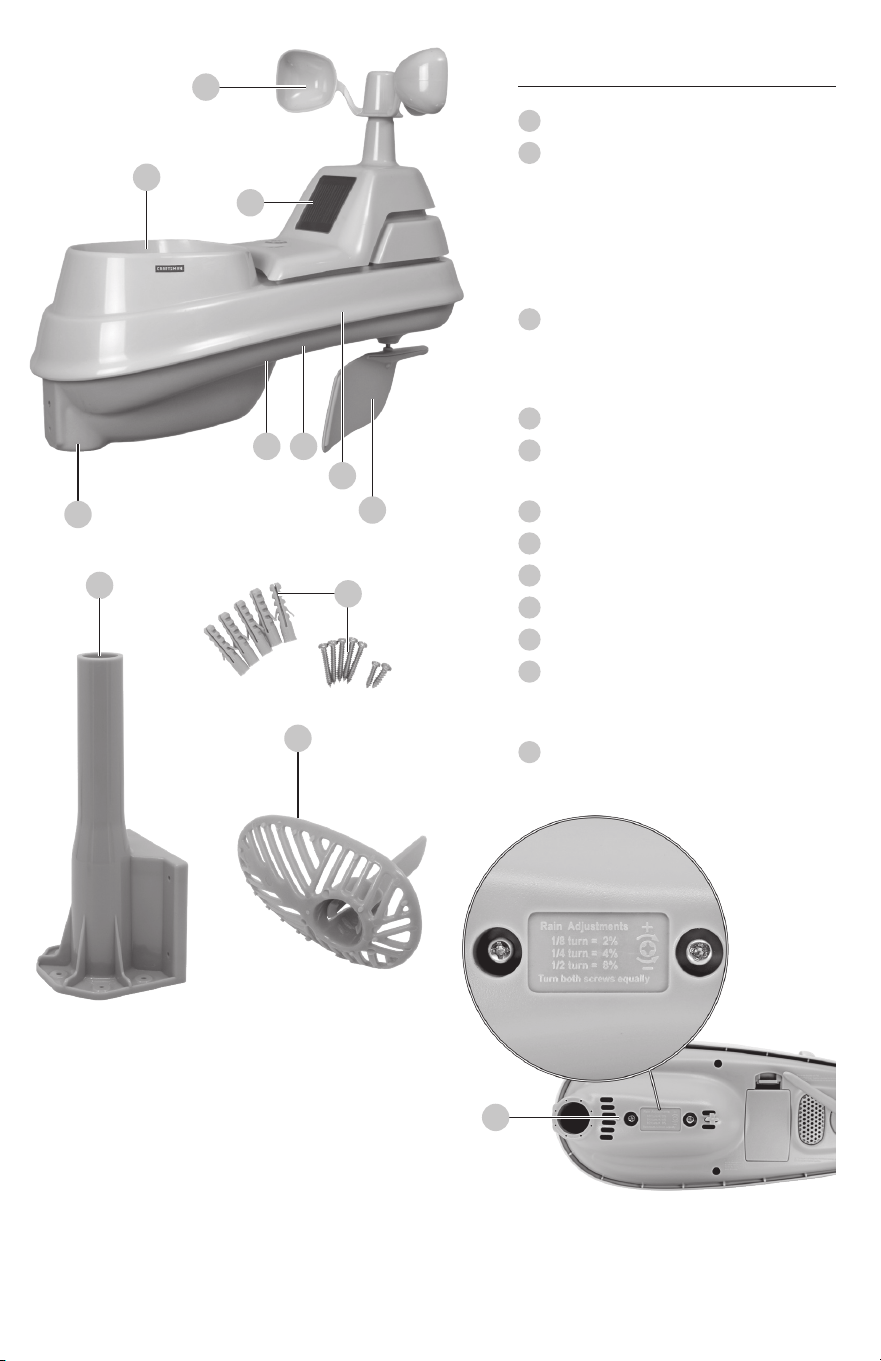
1
Rainfall Collector Funnel
2
Solar Cell Panel
• Converts sunlight into power to run internal
aspirating fan
• Internal Aspirating Fan (not shown) draws
ambient air into Wireless Outdoor Sensor to
reduce solar radiation heating, resulting in
more accurate temperature measurement
3
A-B-C Switch
• ID code that must match the Lightning
Sensor's A-B-C switch to ensure units
synchronize with the Indoor Display
4
Battery Compartment
5
Temperature & Humidity Sensors
(internal)
6
Mounting Point
7
Wind Speed Anemometer
8
Wind Direction Vane
9
Mounting Bracket
10
Mounting Hardware
11
Debris Filter
• Pre-installed to prevent debris from entering
the rain gauge
12
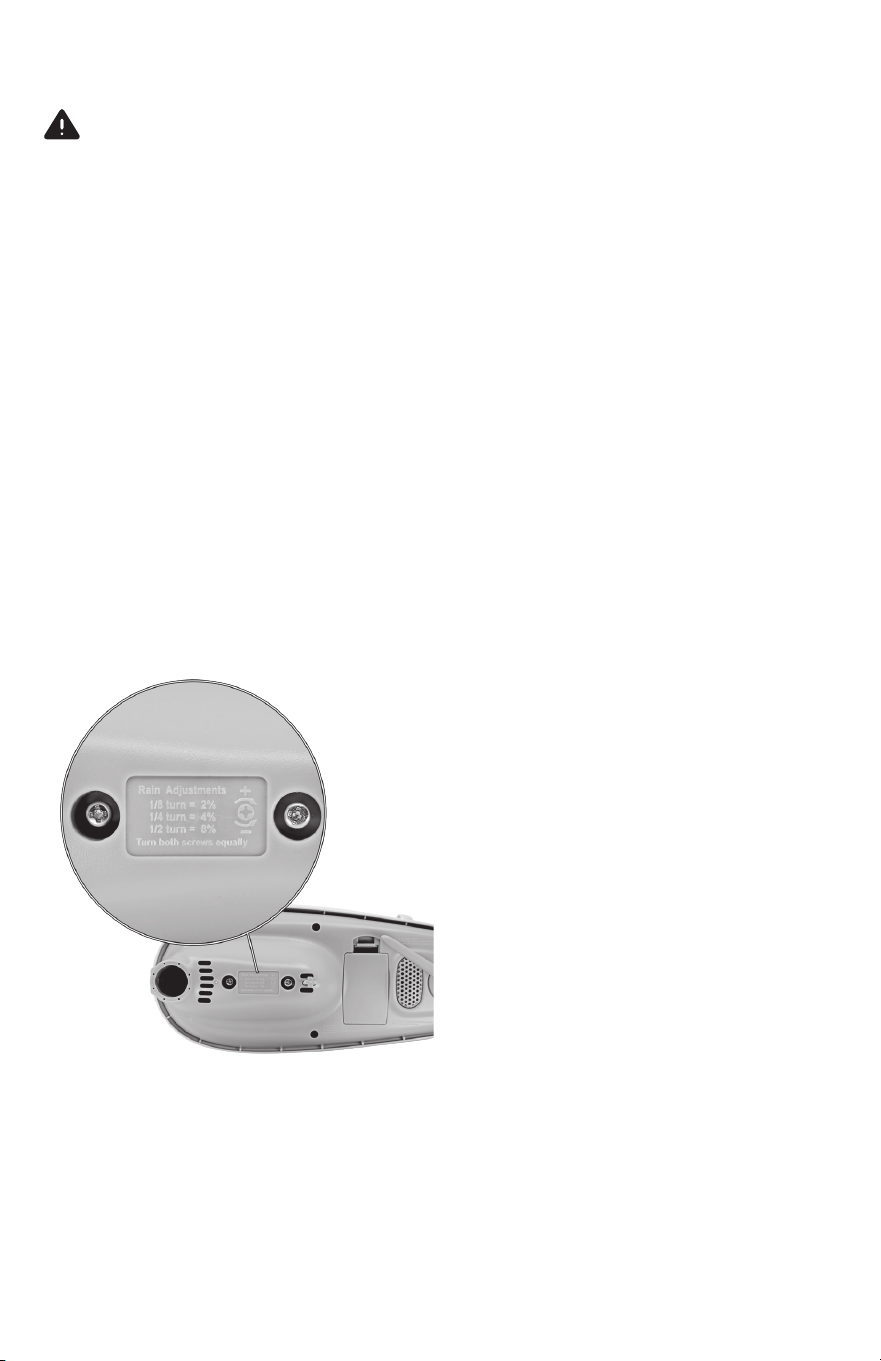
Calibration Screws
• Adjust rainfall accuracy
WIRELESS OUTDOOR SENSOR
9
7
1
2
3
6
8
4
5
11
12
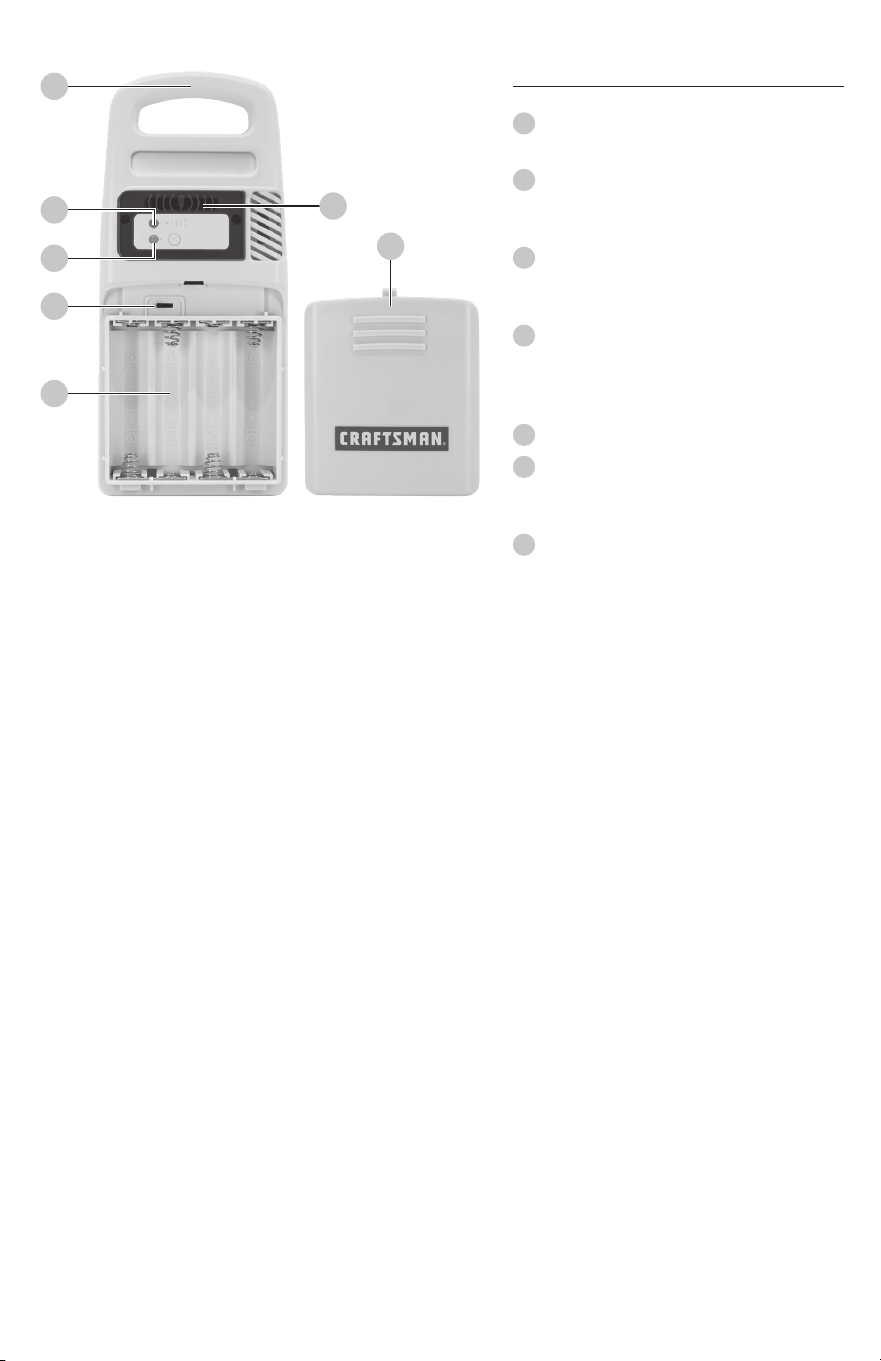
7
1
Integrated Hanger
• For easy placement
2
Wireless Signal Indicator
• Flashes when data is being sent to the
companion unit
3
Interference Indicator
• Flashes when interference is detected
(see page 9)
4
A-B-C Switch
• ID code that must match the Wireless
Outdoor Sensor's A-B-C switch to ensure units
synchronize with the Indoor Display
5
Battery Compartment
6
Lightning Strike Indicator
• Indicates a lightning strike has occurred within
25 miles (40 km)
7
Battery Compartment Cover
LIGHTNING SENSOR
1
2
3
4
5
6
7
DISCLAIMER OF LIABILITY: PLEASE READ: THIS IMPACTS YOUR LEGAL RIGHTS
Under no circumstances shall the Lightning Sensor, CRAFTSMAN, nor the manufacturer COMBEX, INC, be held responsible for any
damages whatsoever that may result from the use of or inability to use this product, including without limitation any indirect,
incidental, special, exemplary or consequential damages, all of which are expressly disclaimed. This disclaimer of liability applies
to any damages or injuries alleged to be caused by any failure of performance, error, omission, inaccuracy, interruption, deletion,
defect, delay in operation or transmission software virus, communication failure, theft or destruction or unauthorized access
to, alteration of, or use of the product, whether the allegation is for breach of contract, tortious behavior (including, without
limitation, negligence or strict liability), or under any other legal cause of action, to the fullest extent permissible by law. This
Disclaimer of Liability does not affect any statutory rights you may have which may not be disclaimed. Nor does this Disclaimer
of Liability affect the 1-Year Limited Warranty that accompanies this product. Finally, this Disclaimer of Liability does not apply to
claims for injuries or damages that are proven to be the result of the intentional and/or malicious conduct of CRAFTSMAN and/
or COMBEX, INC.
Subject to the 1-Year Limited Warranty accompanying this product, the contents of this product, including all lightning and
weather data are provided “as is” and “with all faults” without further warranty or condition of any kind, express or implied,
including, without limitation, any warranty of merchantability or fitness for a particular purpose. CRAFTSMAN and COMBEX,
INC do not warrant that this product or the data that it provides will be free of errors, interruptions, viruses or other harmful
components. Neither CRAFTSMAN nor COMBEX, INC warrant the accuracy or reliability of any lightning strike alerts, weather
data or other information provided by the product. CRAFTSMAN and COMBEX, INC reserve the right to alter the product or
withdraw it from the market at its sole discretion.

8
HOW TO SET UP YOUR WEATHER STATION
Setup Requires:
• Indoor Display with Tabletop Stand
• Wireless Outdoor Sensor
• Lightning Sensor
• Power Adapter
• Mounting Hardware
• Mounting Brackets
• Instruction Manual
What You'll Need (Not Included)
• (8) AA batteries) for the Wireless Outdoor Sensor
and Lightning Sensor
Be sure to use high-quality alkaline batteries. Heavy duty
or rechargeable batteries are not recommended. Only
use Lithium batteries when the outdoor temperature is
below -4ºF/-20ºC for extended periods of time. In general,
alkaline batteries perform poorly in very cold weather.
STEP 1
Wireless Outdoor Sensor Setup
Set A-B-C switch to match Lightning Sensor. Insert
Wireless Outdoor Sensor batteries. Locate and remove
the rain gauge stabilizer (plastic tab) taped into the
bottom of the Wireless Outdoor Sensor.
STEP 3
Indoor Display Setup
Plug Power Adapter into Electrical Outlet. After
powering on for the first time, the Indoor Display will
automatically enter setup mode. Follow the on-screen
instructions to set up the Indoor Display. To adjust the
currently selected item, press and release the
“
^
” or “ ” buttons. To save your adjustments, press
and release the “
” button again to adjust the next
preference. The preference set order is as follows:
• Time Zone (PST, MST, CST, EST, AST, HAST, NST, AKST)
• Auto DST (Daylight Saving Time YES or NO)*
• Clock Hour
• Clock Minute
• Calendar Month
• Calendar Date
• Calendar Year
• Pressure Units (inHg or hPa)
• Temperature Units (ºF or ºC)
• Wind Speed Units (mph, km/h, knots)
• Rainfall Units (inches or mm)
• Distance Units (miles or kilometers)
• Auto Dim (YES or NO)**
• Auto Cycle (OFF, 15 sec., 30 sec., 60 sec., 2 min., 5 min.)
• Alert Volume
NOTE:
*If you live in an area that observes Daylight Saving Time, DST
should be set to YES, even if it is not currently Daylight Saving
Time.
**For more information see page 10, under “Indoor
Display”.
Enter setup mode at any time by pressing the “
”
button to access the menu, then navigate to “Setup”
and press and release the “
” button.
STEP 2
Lightning Sensor Setup
Set A-B-C switch to match Wireless Outdoor Sensor.
Insert Lightning Sensor batteries.
A B C

9
STEP 4
Lightning Sensor Installation Guidelines
False Detection
This Lightning Sensor features advanced technology to
distinguish between lightning strikes and interference,
however in rare cases the Lightning Sensor may "false
detect" lightning activity due to interference. In these
situations, verify there is no lightning in the area and then
relocate the Lightning Sensor. If the false detections persist,
identify and relocate the source of interference or relocate
the Lightning Sensor.
Interference
The Lightning Sensor features enhanced interference
rejection capabilities to prevent false lightning detection.
When the Lightning Sensor cannot detect lightning due to
interference from nearby equipment, the Lightning Sensor's
interference indicator will flash.
• Electric motors (windshield wiper motor or fan motors
in cars, hard drive and optical drive motors on your PC
and AV equipment, well pumps, sump pumps)
• CRT monitors (PC monitors, TVs)
• Fluorescent light fixtures (turned off or on)
• Microwave ovens (while in use)
• Personal computers and mobile phones
WARNING:
Take shelter IMMEDIATELY when lightning is present, whether
or not it has been detected by the Lightning Sensor. If you are
concerned about lightning strikes, follow all safety precautions
to keep yourself and others safe. DO NOT rely on this Lightning
Sensor as your only source for warnings about potentially
deadly lightning strikes or other severe weather conditions.
STEP 5
Placement for Maximum Accuracy
CRAFTSMAN sensors are sensitive to surrounding
environmental conditions. Proper placement of the Indoor
Display, Wireless Outdoor Sensor and Lightning Sensor is
critical to the accuracy and performance of this product.
Indoor Display Placement
Place the Indoor Display in a dry area free of dirt and dust.
Indoor Display stands upright for tabletop use or is wall-
mountable.
Wireless Outdoor Sensor Placement
The Wireless Outdoor Sensor is designed to remain outdoors
all year long. Choose an open location with no obstructions
above or around the Wireless Outdoor Sensor for the most
accurate measurements.
Lightning Sensor Placement
Lightning Sensor must be placed outside to observe
outdoor conditions. Lightning Sensor is water resistant and
is designed for general outdoor use, however, to extend its
life place the Lightning Sensor in an area protected from
direct weather elements.
Hang the Lightning Sensor using the integrated hanger,
or by using string (not included) to hang it from a suitable
location, like a well covered tree branch. The best location
is 4 to 8 feet above the ground with permanent shade and
plenty of fresh air to circulate around the Lightning Sensor.
Important Placement Guidelines
• Indoor Display, Wireless Outdoor Sensor and Lightning
Sensor must be within 330 feet (100 meters) of each
other
• Place units away from large metallic items, thick walls,
metal surfaces, or other objects that may limit wireless
communication.
• Place units at least 3 feet (.9 m) away from electronic
devices (TV, computer, microwave, radio, etc.).
• Position sensors away from heaters, air conditioners,
chimneys, exhaust vents, asphalt and concrete (surfaces
that radiate heat).
• Avoid installing the sensors near pools, spas, or other
bodies of water. Water sources may impact humidity
accuracy.
• DO NOT install the sensors where it will be sprayed by a
sprinkler system. This may force water inside the sensor.
• DO NOT mount the sensors with obstructions around
it. Consider a location that is a wide open area, with
few structures around to ensure accurate wind
measurement.
10
SOUTH
(1.5 meters)
NO OBSTRUCTIONS
ABOVE OR AROUND
USING THE WEATHER STATION
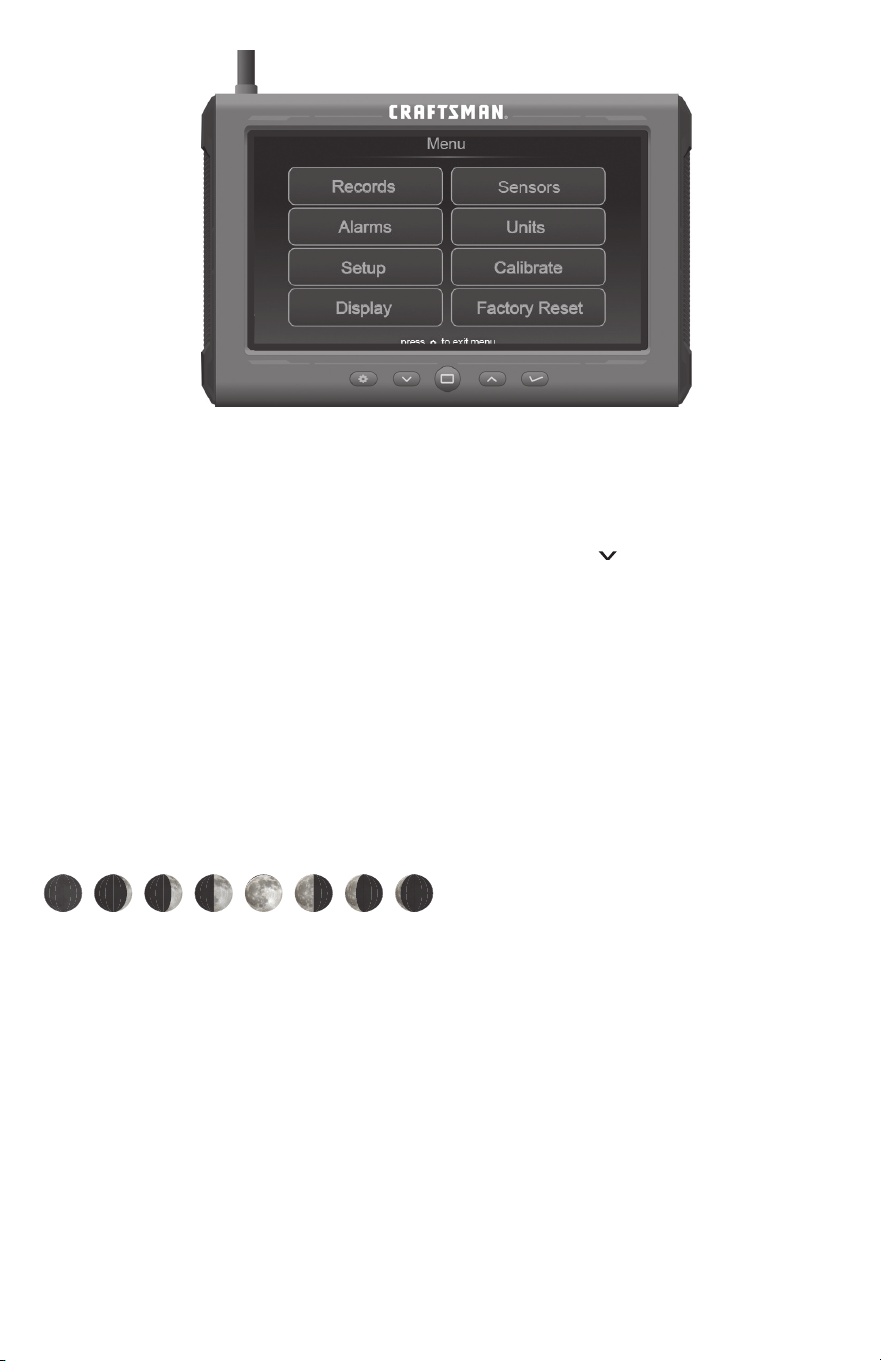
Navigate to the main menu at any time by pressing the “ ”
button. From the main menu, you can view records, set alarms,
setup an additional Wireless Outdoor Sensor and more.
Records
Access the “Records” sub-menu to view high and low values
recorded for each location by date and view trends for the
Wireless Outdoor Sensor’s readings on a graphic chart.
Alarms
Access the “Alarms” sub-menu to set and edit alarm values,
including temperature, humidity, wind speed and rainfall. The
Indoor Display also includes an alarm clock feature (time alarm)
and storm alarm (activated when barometric pressure drops).
Setup
Access the “Setup” sub-menu to enter the initial setup process.
Indoor Display
Access the “Display” sub-menu to adjust Indoor Display
settings (brightness, contrast, tint), display mode (screen
cycle) and backlight (auto dim, sleep mode).
When auto dim mode is activated in display setup, the
backlight automatically dims the brightness based on the
time of day. When “Sleep Mode” is activated, the Indoor
Display automatically dims during the timeframe you
choose and shows only the most important readings for
at-a-glance viewing.
Auto Dim Mode
Automatically adjusts Indoor Display brightness based
on time of day.
6:00 a.m. – 9:00 p.m. = 100% brightness
9:01 p.m. – 5:59 a.m.= 15% brightness
Wireless Outdoor Sensor
Access the “Sensor” sub-menu to add, remove or view
information about a Wireless Outdoor Sensor.
Units
Access the “Units” sub-menu to change measurement units
for barometric pressure, temperature, wind speed, rainfall
and distance.
Calibrate
Access the “Calibrate” sub-menu to adjust Indoor Display or
Wireless Outdoor Sensor data. First, select the Indoor Display
or Wireless Outdoor Sensor for which you wish to calibrate
readings. Second, select the reading you wish to calibrate.
Lastly, follow the on-screen prompts to adjust the value.
Factory Reset
Access the “Factory Reset” sub-menu to revert the Indoor
Display back to factory defaults. Follow the on-screen
prompts to perform the reset.
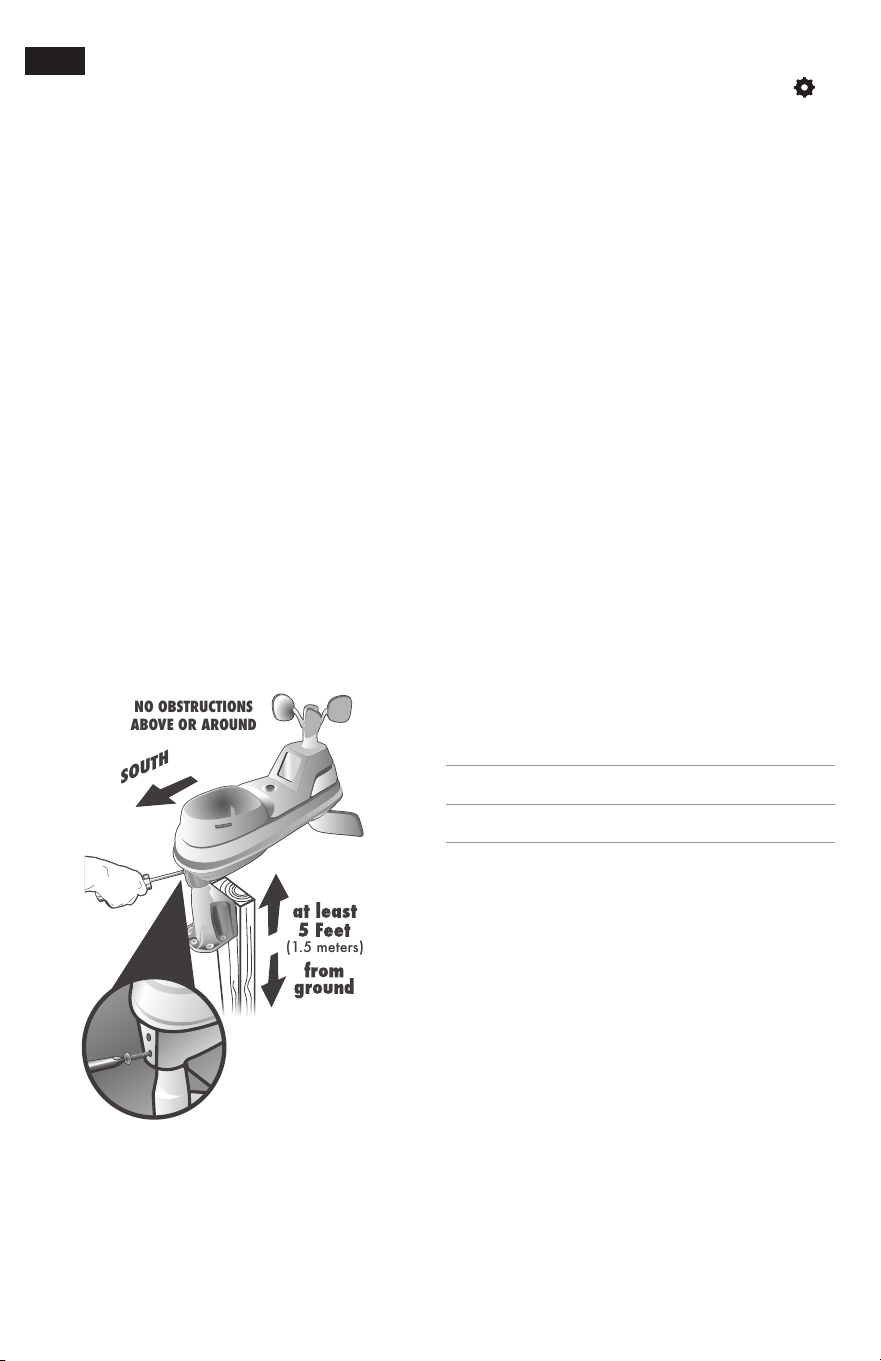
STEP 6
Wireless Outdoor Sensor Installation
Guidelines
• Mount the Wireless Outdoor Sensor at a minimum
height of 5 feet (1.5 meters) off the ground, in an open
area. Higher is better for wind measurements — the
National Weather Service recommends 33 feet (10
meters) high!
• The included mounting bracket is designed to screw
directly onto wooden posts or surfaces that are 2”x
4” or larger. The Wireless Outdoor Sensor can also be
mounted directly to 3/4” steel pipe.
• Install the Wireless Outdoor Sensor with the solar cell
facing SOUTH. This ensures the cell receives as much sun
as possible and orients wind direction.
1. Fasten mounting base (included) to a post or pole (not
included) using the 4 longer screws included in the
hardware bag.
2. Insert the mounting base into the hole on the bottom of
the Wireless Outdoor Sensor.
3. Make sure the arrows on the top of the Wireless Outdoor
Sensor are pointed in the proper direction and the
bubble level is centered. The solar cell should be facing
south to properly orient the wind direction.
4. Fasten the Wireless Outdoor Sensor into the mounting
base using the 2 shorter screws included in the
hardware bag.
Setup is Complete
The rain gauge and Lightning Sensor will now synchronize
with the Indoor Display. It may take a few minutes
for synchronization to complete. Please refer to the
troubleshooting section of this manual if anything appears
to be functioning improperly.
11
WEATHER OVERVIEW DASHBOARD
Weather Forecast
CRAFTSMAN’s patented Self-Calibrating Forecasting
provides your personal forecast of weather conditions for
the next 12 to 24 hours by collecting data from a Wireless
Outdoor Sensor in your backyard. It generates a forecast
suggestion — personalized for your exact location.
Self-Calibrating Forecasting uses a unique algorithm to
analyze changes in pressure over a time period (called
Learning Mode) to determine your altitude. After 14 days,
the self-calibrated pressure is tuned in to your location and
the unit is ready for superior weather prediction.
Moon Phase
The moon phase is displayed between 7:00 p.m. to 5:59 a.m.
when conditions allow for moon visibility. The phases of the
moon are conveyed through simple lunar phase icons:
Messages
This Indoor Display shows real-time weather information
and alert messages on the Weather Dashboard. Manually
cycle through all available messages by pressing and
releasing the “
^
” or “ ” buttons while viewing the
Weather Overview dashboard.
Default messages are pre-loaded as follows:
• Heat Index – XX
• Wind Chill – XX
• Dew Point – XX
• It Feels Like XX Outside
• Today’s High Humidity . . . Outdoor XX / Indoor XX
• Today’s Low Humidity . . . Outdoor XX / Indoor XX
• Today’s High Temp. . . Outdoor XXX / Indoor XXX
• Today’s Low Temp. . . Outdoor XXX / Indoor XXX
• 7 Day High Temp. XX – MM/DD
• 7 Day Low Temp. XX – MM/DD
• 30 Day High Temp. XX – MM/DD
• 30 Day Low Temp. XX – MM/DD
• All Time High Temp. XXX… Recorded MM/DD/YY
• All Time Low Temp. XXX… Recorded MM/DD/YY
• 24 Hour Temp. Change +XX
• All Time High Wind XX MPH… Recorded MM/DD/YY
• 7 Day Average Wind XX MPH
• Today’s Average Wind XX MPH
• New Low Temp. Record XX
• New High Temp. Record XX
• New Wind Record Today XX
• Wireless Outdoor Sensor Batteries Low
• Wireless Outdoor Sensor Signal Lost… Check Batteries
and Placement
• Caution – Heat Index Is XXX
• Caution – Wind Chill Is XXX
• Warmest Day This Week
• Coldest Day This Week
• Today’s Rainfall – XX
FULL
NEWWAXING
CRESCENT
WANING
CRESCENT
1ST
QUARTER
3RD
QUARTER

12
PROBLEM CORRECTION
No Lightning Sensor or
Wireless Outdoor Sensor
reception
If the wireless signal indicator shows no bars:
• Relocate the Indoor Display and/or the Lightning and Wireless Outdoor Sensors. The units must be within 330 ft
(100m) of each other.
• Make sure all units are placed at least 3 feet (.9 m) away from electronics that may interfere with the wireless
communication (such as TVs, microwaves, computers, etc).
• Use standard alkaline batteries (or lithium batteries in sensors when temperature is below -4ºF/-20ºC). Do not use
heavy duty or rechargeable batteries.
NOTE: It may take a few minutes for Indoor Display and sensors to synchronize after batteries are replaced.
Indoor Display screen not
working
Check that the power adapter is plugged into the Indoor Display and an electrical outlet.
Temperature is showing
dashes
When the outdoor temperature is showing dashes, it may be an indication of wireless interference between the Wireless
Outdoor Sensor and Indoor Display.
• Re-add Wireless Outdoor Sensor to Indoor Display by accessing the “Sensors” sub-menu (see page 10).
Outdoor temperature
and/or humidity is
flashing or showing
dashes
Flashing of the outdoor temperature and/or humidity is generally an indication of wireless interference.
1. Bring the Wireless Outdoor Sensor indoors and remove at least one battery. Remove the power adapter from the Indoor
Display.
2. Reinstall the battery into the Lightning Sensor.
3. Reinstall the power adapter into the Indoor Display.
4. Let the units sit within a couple feet of each other for a few minutes to gain a strong connection.
Inaccurate temperature or
humidity
Make sure the Lightning Sensor is placed out of direct sunlight and away from any heat sources or vents (see page 9).
Inaccurate wind readings • What is wind reading being compared to? Pro weather stations are typically mounted at 30 ft (9 m) high or more. Make
sure to compare data using a sensor positioned at the same mounting height.
• Check location of the Wireless Outdoor Sensor. Ensure it’s mounted a minimum of 5 ft (1.5 m) in the air with no
obstructions around it (within several feet).
• Ensure wind cups are spinning freely. If they hesitate or stop try lubricating with graphite powder or spray lubricant.
Inaccurate forecast • Weather Forecast icon predicts conditions for the next 12 to 24 hours, not current conditions.
• Allow unit to run continuously for 33 days. Removing power (adapter and back-up batteries) or resetting the Indoor
Display will restart Learning Mode. After 14 days, forecast should be fairly accurate, however Learning Mode calibrates
for a total of 33 days.
Interference Indicator is
flashing
• Relocate the Lightning Sensor.
• Make sure the Lightning Sensor is placed at least 3 feet (.9 m) away from electronics that may cause interference (see
page 9).
TROUBLESHOOTING
13
CALIBRATION
The rain gauge on the Wireless Outdoor Sensor can be calibrated to improve accuracy.
CAUTION: If the sensor is mounted out of arm's reach with a ladder it would be best to perform the calibration on a level
surface that is not out of arm's reach.
Items Needed: Wireless Outdoor Sensor, Indoor Display, plastic cup, pin, screw driver
1. First, ensure Wireless Outdoor Sensor is perfectly level using built-in bubble level.
2. Place Indoor Display close so you can monitor it during calibration.
3. Make a pin hole in the bottom of a plastic cup. Hold the cup over the rain gauge and fill it with exactly 1 cup (8oz)
of water, allowing the water to drip into the rain gauge. You should hear the internal buckets tip and see water drain
through the rain gauge.
4. A few seconds after each bucket tip, the Indoor Display displays rainfall in approximately 0.01” (.25 mm) or more
increments.
5. The cup of water should take more than 20 minutes to empty; a quicker period will result in inaccurate calibration. Try to
simulate a normal steady rainfall. When cup is empty of water, Indoor Display should register 1.06” (27 mm).
Tips
• There should be nearly an equal number of water drops (about 25 water drops) between bucket tips. If not, adjust the
calibration screws on the bottom of the Wireless Outdoor Sensor until an equal number of water drops are tipping the
buckets. Then, restart the calibration procedure.
• If you don’t hear the buckets tipping and see water dripping alternately out of each drain, there may be an issue with the
rain gauge or it’s adjustment. See Troubleshooting on page 16.
Adjustment
If the rain gauge doesn’t register close to 1.06” (27 mm), make an EQUAL adjustment to the two calibration screws on the
bottom of the Wireless Outdoor Sensor. Turning screws clockwise increases rainfall; counter clockwise decreases rainfall.
• To adjust the rainfall reading by 2% turn both screws 1/8 of a turn.
• To adjust the rainfall reading by 4% turn both screws 1/4 of a turn.
• To adjust the rainfall reading by 8% turn both screws 1/2 of a turn.

14
SPECIFICATIONS
Temperature range
Outdoor: -40ºF to 158ºF; -40ºC to 70ºC
Display Operating Temperature Range: 32ºF to 122ºF; 0ºC to 50ºC
Humidity range 1% to 99%
Wind speed 0 to 99 mph; 0 to 159 km/h
Wind direction indicators 16 points
Lightning detection range 1 - 25 miles / 1.6 - 40km
Rainfall measurement 0.01 inches (0.25 mm) and up
Wireless range 330ft / 100m depending on home construction materials
Operating frequency 433 MHz
Power
Indoor Display: 5V, 100mA adapter
Lightning Sensor: 4 x AA alkaline or lithium batteries
Wireless Outdoor Sensor: 4 x AA alkaline or lithium batteries
Data reporting
Indoor Display: Temperature & Humidity: 60 second updates.
Wireless Outdoor Sensor: Wind Speed: 18 second updates; Wind Direction, Temperature & Humidity: 36
second updates
REGISTER ONLINE
Thank you for your purchase. Register your product nowfor:
• WARRANTY SERVICE: Registering your product will help you obtain more efficient warranty service in case there is a
problem with yourproduct.
• CONFIRMATION OF OWNERSHIP: In case of an insurance loss, such as fire, flood or theft, your registration of
ownership will serve as your proof ofpurchase.
• YOUR SAFETY: Registering your product will allow us to contact you in the unlikely event a safety notification is
required under the Federal Consumer SafetyAct.
Register online at www.craftsman.com/registration

15

16
FCC Radio Frequency Interference
This equipment has been tested and found to comply
with the limits for a Class B digital device, pursuant to Part
15 of the FCC Rules. These limits are designed to provide
reasonable protection against harmful interference in a
residential installation.
This equipment generates, uses and can radiate radio
frequency energy and, if not installed and used in
accordance with the instructions, may cause harmful
interference to radio communications. However, there
is no guarantee that interference will not occur in a
particular installation. If this equipment does cause
harmful interference to radio or television reception,
which can be determined by turning the equipment
off and on, the user is encouraged to try to correct the
interference by one or more of the following measures:
• Reorient or relocate the receiver’s antenna.
• Increase the distance between the equipment
and the receiver.
• Connect the equipment to an outlet on a circuit
different from that to which the receiver is connected.
• Consult the dealer or an experienced radio/TV
technician for help.
To assure continued appliance, any changes or
modifications not expressly approved by the party
responsible for compliance could voice the user's
authority to operate this equipment. (Example -use only
shielded interface cables when connecting to computer or
peripheral devices).
FCC Warning
Any Changes or modifications not expressly approved by
the party responsible for compliance could void the user's
authority to operate the equipment.
Note: This equipment has been tested and found to
comply with the limits for a Class B digital device, pursuant
to part 15 of the FCC Rules. These limits are designed
to provide reasonable protection against harmful
interference in a residential installation. This equipment
generates uses and can radiate radio frequency energy
and, if not installed and used in accordance with the
instructions, may cause harmful interference to radio
communications. However, there is no guarantee that
interference will not occur in a particular installation. If this
equipment does cause harmful interference to radio or
television reception, which can be determined by turning
the equipment off and on, the user is encouraged to try to
correct the interference by one or more of the following
measures:
• Reorient or relocate the receiving antenna.
• Increase the separation between the equipment
and receiver.
• Connect the equipment into an outlet on a circuit
different from that to which the receiver is connected.
• Consult the dealer or an experienced radio/TV
technician for help.
This equipment complies with FCC radiation exposure
limits set forth for an uncontrolled environment. This
equipment should be installed and operated with
minimum distance 20cm between the radiator and
your body.
REGULATORY INFORMATION

17
One-Year Limited Warranty
The Manufacturer will repair or replace, without charge, any
defects due to faulty materials or workmanship for one year
from the date of purchase. This warranty does not cover
part failure due to normal wear or tool abuse. For further
detail of warranty coverage and warranty repair information,
visit www.craftsman.com or call 1-888-331-4569. This
warranty does not apply to accessories or damage caused
where repairs have been made or attempted by others.
THIS LIMITED WARRANTY IS GIVEN IN LIEU OF ALL OTHERS,
INCLUDING THE IMPLIED WARRANTY OF MERCHANTABILITY
AND FITNESS FOR A PARTICULAR PURPOSE, AND EXCLUDES
ALL INCIDENTAL OR CONSEQUENTIAL DAMAGES. Some
states do not allow limitations on how long an implied
warranty lasts or the exclusion or limitation of incidental
or consequential damages, so these limitations may not
apply to you. This warranty gives you specific legal rights
and you may have other rights which vary in certain states
or provinces.
90-DAY MONEY BACK GUARANTEE
If you are not completely satisfied with the performance
of your Digital Refrigerator & Freezer Thermometer for any
reason, you can return it within 90 days from the date of
purchase with a receipt for a full refund – no questions
asked.
LATIN AMERICA: This warranty does not apply to products
sold in Latin America. For products sold in Latin America,
see country specific warranty information contained in
the packaging, call the local company or see website for
warranty information.

CRAFTSMAN®
is a registered trademark of Stanley Black & Decker, Inc., used under license.
© 2021 CRAFTSMAN
Product Manufactured by:
Chaney Instrument Company
Lake Geneva, WI 53147
U.S. & Canada Only
7/09 CMXWDCR01069