Loading ...
Loading ...
Loading ...
8
© 2021 United States Stove Company
D. Minimum 7-foot (2.13m) clearance from any grade
when adjacent to public walkways.
E. Minimum 2-foot (0.61m) clearance above any grass,
plants, or other combustible materials.
F. Minimum 3-foot (0.91m) clearance from an forced
air intake of any appliance.
G. Minimum 2-foot (0.61m) clearance below eves or
overhang.
H. Minimum 1-foot (0.3m) clearance horizontally from
combustible wall.
I. Must be a minimum of 3 foot (0.91m) above the roof
and 2 foot (0.61m) above the highest point or the roof
within 10 feet (3.05m).
HORIZONTAL EXHAUST VENT
INSTALLATION
1. Locate your pellet stove in a location which meets the
requirements of this manual, but in an area where it
does not interfere with the house framing, wiring, etc.
2. Install a non-combustible hearth pad underneath the
pellet stove. This pad should extend at least 6” (152
mm) in front of the unit.
3. Place the pellet stove approximately 15” (381 mm)
away from the interior wall.
4. Locate the center of the exhaust pipe of your unit.
This point should then be extended to the interior
wall of your house. Once you have located the center
point, on the interior wall, cut a 7” (175 mm) diameter
hole through the wall.
5. The next step is to install the wall thimble, refer to
the instructions which come with the wall thimble for
this step.
6. Install the appropriate length of exhaust vent pipe
into the wall thimble. See steps 11 and 12 when
determining the correct length of exhaust vent to use.
7. Outside Fresh Air is Mandatory when installing
this pellet stove room heater in airtight homes and
mobile homes. Be sure that the outside air vent
has an approved cap on it to prevent rodents from
entering. Be sure to install in location that won’t
become blocked with snow, etc.
8. Connect the exhaust vent pipe to the exhaust outlet
of your pellet stove.
9. Secure all vent joint connections with 3 screws.
Seal the exhaust vent joint connections with high
temperature silicone sealant.
10. Push the unit straight back to the interior wall,
being sure to maintain the minimum clearances to
combustibles 2” (51 mm) to the back of the unit. Seal
the annular space of the wall thimble and around the
vent pipe with high temperature silicone sealant.
11. The exhaust vent pipe must extend at least 12” (300
mm) out past the exterior wall. Seal the annular
space of the wall thimble and around the vent pipe
with high temperature silicone sealant.
12. Install an approved horizontal termination cap or if
necessary install a 90° elbow and appropriate length
of vertical venting. An approved vertical vent cap is
recommended.
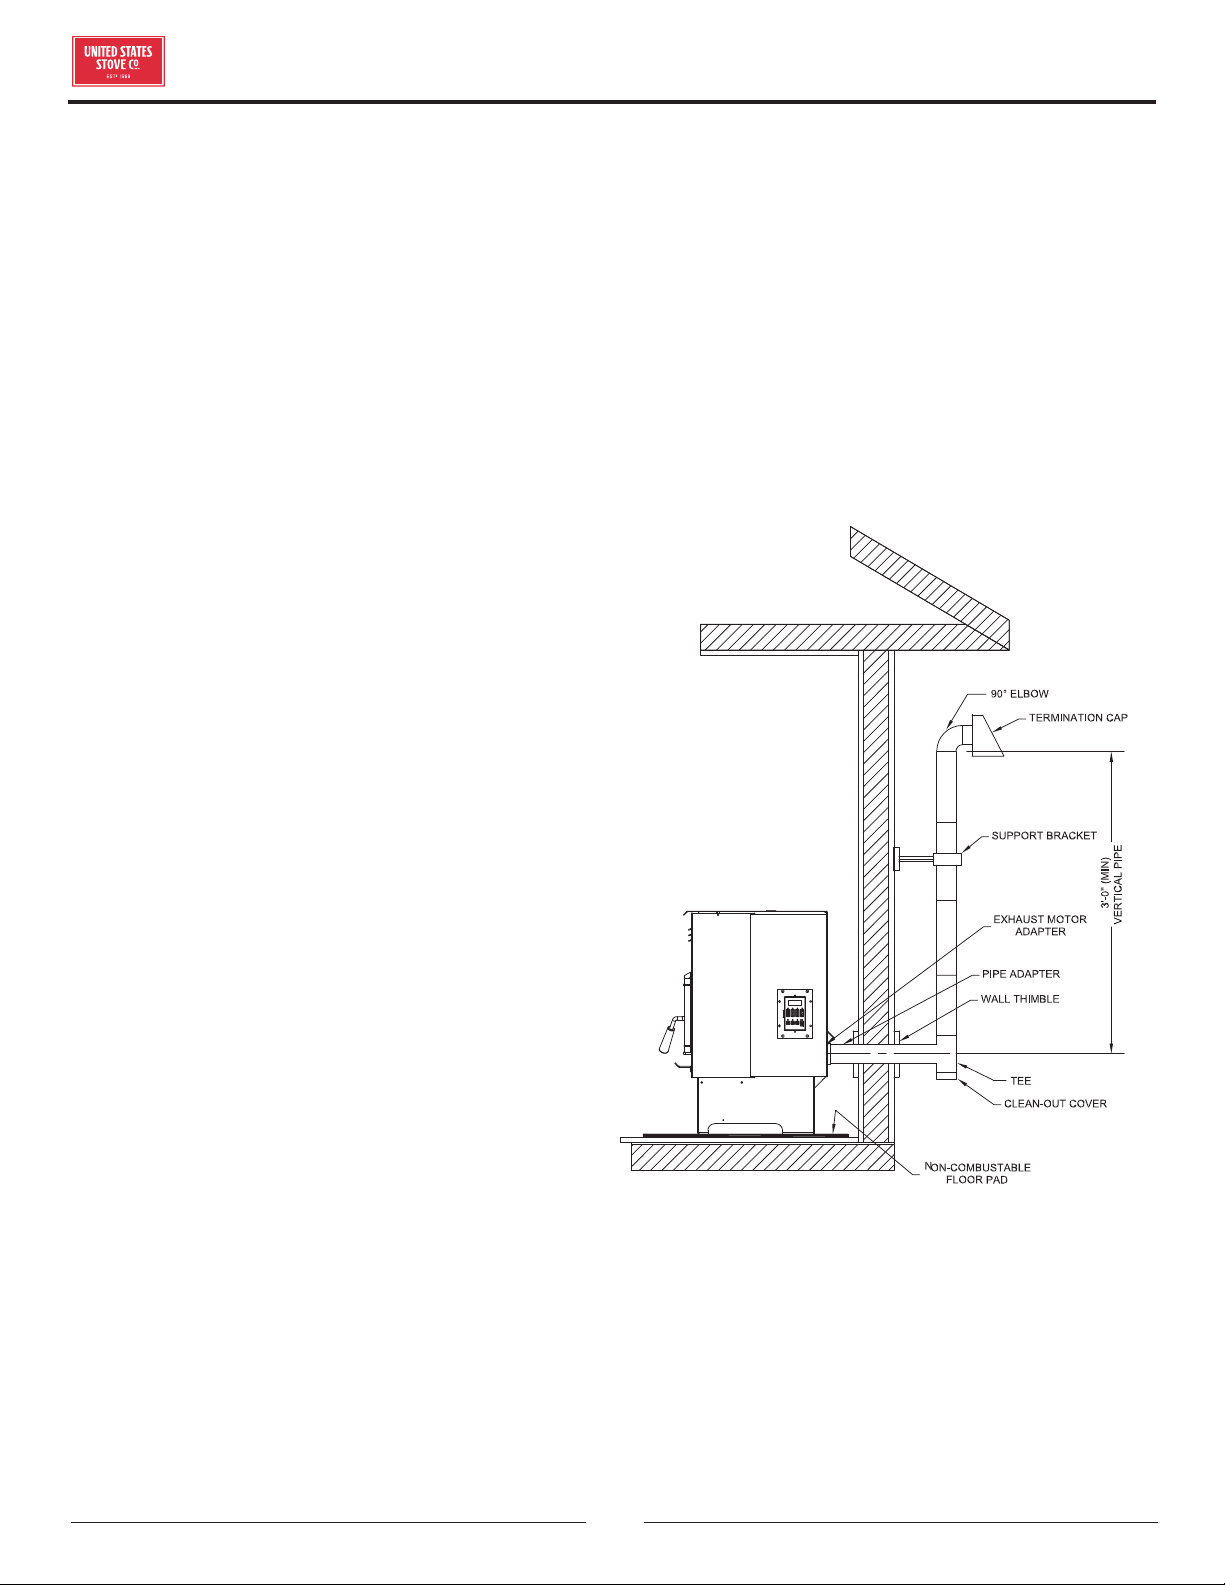
THROUGH THE WALL INSTALLATION
(RECOMMENDED INSTALLATION)
TYPICAL THROUGH THE
WALL INSTALLATION
Canadian installations must conform to CAN/CSA-B365.
To vent the unit through the wall, connect the pipe
adapter to the exhaust motor adapter. If the exhaust
adapter is at least 18” (457 mm) above ground level, a
straight section of pellet vent pipe can be used through
the wall. Your heater dealer should be able to provide
you with a kit that will handle most of this installation,
which will include a wall thimble that will allow the proper
clearance through a combustible wall. Once outside the
structure, a 3” (76 mm) clearance should be maintained
from the outside wall and a clean out tee should be
INSTALLATION
Loading ...
Loading ...
Loading ...