Loading ...
Loading ...
Loading ...
Burner Oven
Z Burner
Tube
"'J Waist-High BUI Lock Screw
Locking iLower (Self Clean Mo( AirShutter
; Orifice
Screw Ov_enBaffle _;4_mAir Shutter i Hood
Air Shutter --:::-"
Fig. 25
Orifice Hood i i -Lower Oven Bottom
(Spud) _ _ Air Shutter (Removable)
Fig. 23
Fig. 24
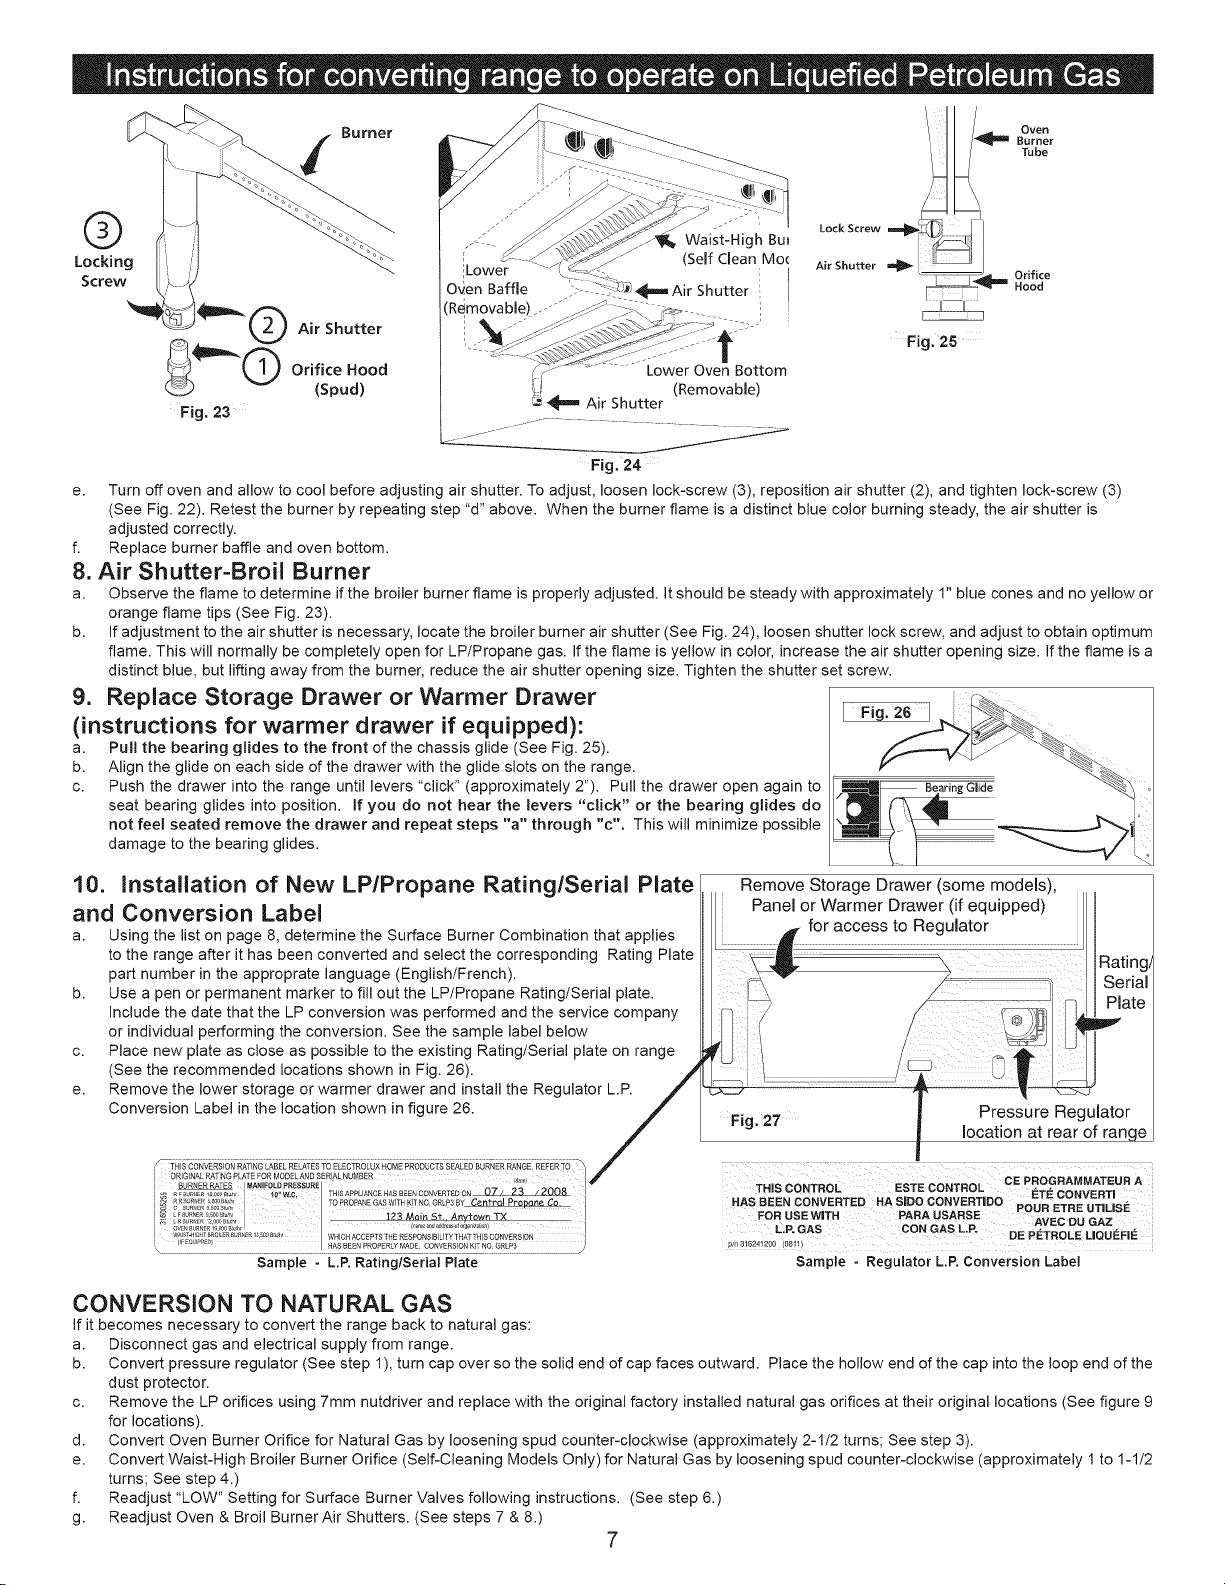
e. Turn off oven and allow to cool before adjusting air shutter. To adjust, loosen lock-screw (3), reposition air shutter (2), and tighten lock-screw (3)
(See Fig. 22). Retest the burner by repeating step "d" above. When the burner flame is a distinct blue color burning steady, the air shutter is
adjusted correctly.
f. Replace burner baffle and oven bottom.
8. Air Shutter=Broil Burner
a. Observe the flame to determine ifthe broiler burner flame is properly adjusted, it should be steady with approximately 1" blue cones and no yellow or
orange flame tips (See Fig. 23).
b. if adjustment to the air shutter is necessary, locate the broiler burner air shutter (See Fig. 24), loosen shutter lock screw, and adjust to obtain optimum
flame. This will normally be completely open for LP/Propane gas. if the flame is yellow in color, increase the air shutter opening size. if the flame isa
distinct blue, but lifting away from the burner, reduce the air shutter opening size. Tighten the shutter set screw.
9. Replace Storage Drawer or Warmer Drawer _._
(instructions for warmer drawer if equipped): I Fig.26 I
a. Pull the bearing glides to the front of the chassis glide (See Fig. 25). _,,,,,_-,--,_ ?_ "_\-_
b. Align the glide on each side of the drawer with the glide slots on the range.
c. Push the drawer into the range until levers "click" (approximately 2"). Pull the drawer open again to
seat bearing glides into position. If you do not hear the levers "click" or the bearing glides do
oo,,o.,.oa,o0.o ovo,,o0 a o ao0a
damage to the bearing glides.
10. installation of New LP/Propane Rating/Serial Plate Remove Storage Drawer (somemodels),
and Conversion Label Panel or Warmer Drawer (if equipped)
for access to Regulator
a. Using the list on page 8, determine the Surface Burner Combination that applies
to the range after it has been converted and select the corresponding Rating Plate
part number in the approprate language (English/French). Serial
b. Use a pen or permanent marker to fill out the LP/Propane Rating/Serial plate. Plate
include the date that the LP conversion was performed and the service company
or individual performing the conversion. See the sample label below
c. Place new plate as close as possible to the existing Rating/Serial plate on range
(See the recommended locations shown in Fig. 26). _
e. Remove the lower storage or warmer drawer and install the Regulator L.P.
Conversion Label in the location shown in figure 26. Fig. 27 Pressure Regulator
location at rear of ranc
Sample - L.P, Rating/Serial Plate
: E:_E::,T::L CE.ROOR,_.TEUR.
THIS CONTROL _ _U HU _eT_ CONVERT!
HAS BEEN CONVERTED HA S|DO CONVERTIDO POUR ETRE UT L S_
FOR USE WITH PARA USARSE . ........
p/n 316241200 (0811)
Sample - Regulator L.P. Conversion Label
CONVERSION TO NATURAL GAS
if it becomes necessary to convert the range back to natural gas:
a. Disconnect gas and electrical supply from range.
b. Convert pressure regulator (See step 1), turn cap over so the solid end of cap faces outward. Place the hollow end of the cap into the loop end of the
dust protector.
c. Remove the LP orifices using 7ram nutdriver and replace with the original factory installed natural gas orifices at their original locations (See figure 9
for locations).
d. Convert Oven Burner Orifice for Natural Gas by loosening spud counter-clockwise (approximately 2-1/2 turns; See step 3).
e. Convert Waist-High Broiler Burner Orifice (Self-Cleaning Models Only) for Natural Gas by loosening spud counter-clockwise (approximately 1 to 1-1/2
turns; See step 4.)
f. Readjust "LOW" Setting for Surface Burner Valves following instructions. (See step 6.)
g. Readjust Oven & Broil Burner Air Shutters. (See steps 7 & 8.)
7
Loading ...