Loading ...
Loading ...
Loading ...

RUSH™ MH10 Beam FX User Manual 15
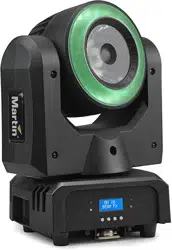
Fixture overview
1
2
2
3
4
5
6
7
8
1 – Display
2 – LEDs
Four LEDs provide status information.
• DMX: Valid DMX signal present.
• SLAVE: Fixture operating as a stand-alone slave.
• MASTER: Fixture operating as the stand-alone master.
• SOUND: Audio signal triggering stand-alone sequence.
3 – Control buttons
• MENU: Press to activate the menu. Within the menu, press to escape and
return to the previous level. Press and hold to exit the menu.
• DOWN: Press to scroll down through menu options.
• UP: Press to scroll up through menu options.
• ENTER: Press to confirm and save the menu selection.
4, 5 – XLR DMX input/output
For your convenience, 3 and 5-pin XLR sockets are provided for DMX input
and output (through to next fixture). Do not connect output cables to both the
3-pin and 5-pin output sockets at the same time as this may cause data errors
(in other words, you cannot use the two outputs on the fixture to split the DMX
line).
6 – Fuse
The T 2.0 A fixture fuse is located in a fuseholder next to the power
input/output connectors.
7 – AC mains power input
A yellow Neutrik True1 powerCON inlet connector is provided to connect the
fixture to mains power.
8 – AC mains power link output
A yellow Neutrik True1 powerCON outlet connector is provided to allow mains
power to be linked to the next fixture. Please refer to the section above
“Linking fixtures to power in a chain” for safe use of this connector.
Loading ...
Loading ...
Loading ...