Loading ...
Loading ...
Loading ...
8
CHECK TIRE PRESSURE
The tires on your tractor were overinflated at
the factory for shipping purposes. Correct
tire pressure is important for best cutting
performance.
• Reduce tire pressure to PSI shown on
tires.
CHECK DECK LEVELNESS
For best cutting results, mower housing
should be properly leveled. See “TO LEVEL
MOWER” in the Service and Adjustments
section of this manual.
✓CHECKLIST
Before you operate your new trac tor, we
wish to assure that you receive the best
per for mance and sat is fac tion from this
Quality Prod uct.
Please review the following checklist:
✓ All assembly instructions have been
completed.
✓ No remaining loose parts in carton.
✓ Battery is properly prepared and charged.
✓ Seat is adjusted comfortably and tight-
ened securely.
✓ All tires are properly inflated. (For ship-
ping purposes, the tires were overinflated
at the factory).
✓ Ensure mower deck is properly leveled
side-to-side/front-to-rear for best cutting
results. (Tires must be properly inflated
for leveling).
✓ Check mower and drive belts. Be sure
they are routed properly around pulleys
and inside all belt keepers.
✓ Check wiring. See that all con nec tions are
still secure and wires are properly clamped.
While learning how to use your tractor, pay ex-
tra attention to the following important items:
✓ Engine oil is at proper level.
✓ Fuel tank is filled with fresh, clean, regular
unleaded gasoline.
✓ Become familiar with all controls, their
location and function. Operate them
before you start the engine.
✓ Ensure brake system is in safe operating
condition.
✓ Ensure Operator Presence System and
Reverse Operation System (ROS) are
working properly (See the Operation and
Maintenance sections in this manual).
NOTE: You may now roll your tractor off the
skid. Continue using the instructions that
follow to remove the tractor from the skid.
WARNING: Before starting, read, un-
der stand and follow all in struc tions in the
Operation section of this manual. Be sure
tractor is in a well-ventilated area. Be sure
the area in front of tractor is clear of other
people and objects.
TO ROLL TRACTOR OFF SKID (See
Op er a tion section for location and
function of con trols)
1. Raise at tach ment lift lever to its highest
po si tion.
2. Release parking brake by depressing
clutch/brake ped al.
3. Place gearshift lever in neutral po si tion.
4. Roll tractor forward off skid.
5. Remove banding holding the de flec tor
shield up against tractor.
Continue with the instructions that follow.
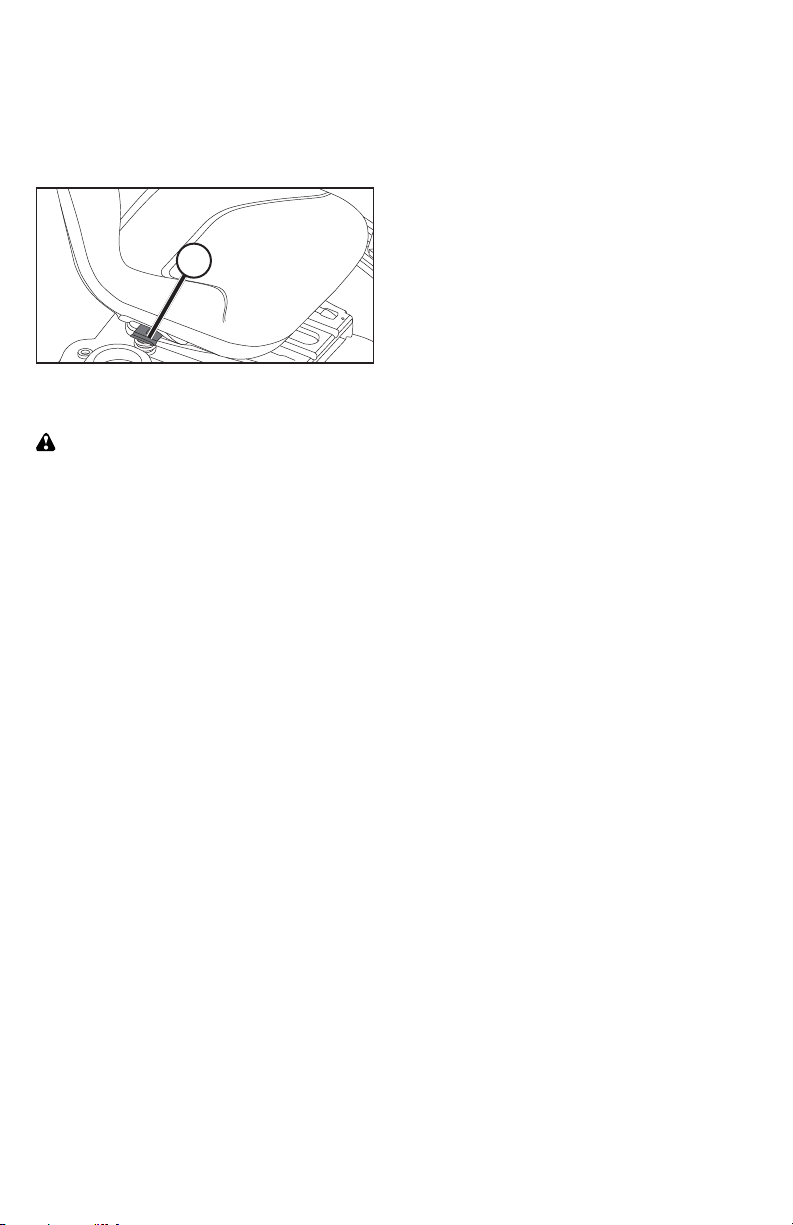
ADJUST SEAT
1. Sit in seat.
2. Lift up adjustment lever (A) and slide seat
until a comfortable position is reached
which allows you to press clutch/brake
pedal all the way down.
3. Release lever to lock seat in position.
A
CHECK FOR PROPER POSITION
OF ALL BELTS
See the figures that are shown for replac-
ing motion and mower blade drive belts in
the Service and Adjustments sec tion of this
manual. Verify that the belts are routed
cor rect ly.
CHECK BRAKE SYSTEM
After you learn how to operate your tractor,
check to see that the brake is operating
properly. See “TO CHECK BRAKE” in the
Service and Adjustments section of this
manual.
61
IDENTIFICACIÓN DE PROBLEMAS:
Vea la sección apropiada en el manual a menos que esté dirigido a un centro de servicio Sears.
PROBLEMA CAUSA CORRECCIÓN
No arranca
1.
Sin combustible.
1.
Llene el estanque de combustible.
2.
Motor sin la “ESTRANGULACIÓN”
(CHOKE) adecuada.
2.
Vea “PARA HACER ARRANCAR EL MO-
TOR” en la sección de operación.
3.
Motor ahogado.
3.
Espere varios minutos antes detratar de
arrancar.
4.
Bujía mala.
4.
Cambie la bujía.
5.
Filtro de aire sucio.
5.
Limpie/cambie el filtro de aire.
6.
Filtro de combustible sucio.
6.
Cambie el filtro de combustible.
7.
Agua en el combustible.
7.
Vaciar el estanque de combustible y el
carburador, vuelva a llenar el estanque
con gasolina nueva cambie el filtro de
combustible.
8.
Alambrado suelto o dañado.
8.
Revise todo el alambrado.
9.
Válvulas del motor desajustadas.
9.
Pongase en contacto con un centro de
servicio cualificado.
Difícil de
arrancar
1.
Filtro de aire sucio.
1.
Limpie/cambie el filtro de aire.
2.
Bujía mala.
2.
Cambie la bujía.
3.
Batería baja o descargada.
3.
Vuelva a cargar o cambie la batería.
4.
Filtro de combustible sucio.
4.
Cambie el filtro de combustible.
5.
Combustible rancio o sucio.
5.
Vaciar el estanque de combustible y vuelva
a llenarlo con gasolina nueva.
6.
Alambrado suelto o dañado.
6.
Revise todo el alambrado.
7.
Válvulas del
motor desajustadas.
7.
Pongase en contacto con un centro de
servicio cualificado.
El motor no
la vuelta
1.
Pedal del freno no presionado.
1.
Presione el pedal del freno.
2.
El embrague del accesorio está enganchado.
2.
Desenganche el embrague del accesorio.
3.
Batería baja o descargada.
3.
Vuelva a cargar o cambie la batería.
4.
Fusible quemado.
4.
Cambie el fusible.
5.
Terminales de la batería corroídos.
5.
Limpie los terminales de la batería.
6.
Alambrado suelto o dañado.
6.
Revise todo el alambrado.
7.
Interruptor de la ignición fallado.
7.
Revise/cambie el interruptor de la ignición.
8.
Solenoide o arrancador fallados.
8.
Revise/cambie el solenoide o arrancador.
9.
Interruptor(es) que exige(n) la presencia
del operador fallado.
9.
Pongase en contacto con un centro de
servicio cualificado.
El motor
suena pero
no arranca
1.
Batería baja o descargada
1.
Vuelva a cargar o cambie la bate
ría.
2.
Terminales de la batería corroídos.
2.
Limpie los terminales de la batería.
3.
Alambrado suelto o dañado.
3.
Revise todo el alambrado.
4.
Solenoide o arrancador fallados.
4.
Revise/cambie el solenoide o arrancador.
Pérdida de
fuerza
1.
Corta mucho césped, muy rápido.
1.
Eleve la altura de corte/reduzca la velocidád
2.
Aceleración en la posición de
“ESTRAN-
GULACIÓN” (CHOKE).
2.
Ajuste el control de la aceleración.
3.
Acumulación de césped, hojas y basura
debajo de la segadora.
3.
Limpie la parte inferior de la cajade la
segadora.
4.
Filtro de aire sucio.
4.
Limpie/cambie el filtro de aire.
5.
Nivel de aceite bajo/aceite sucio.
5.
Revise el nivel de aceite/cambie el aceite.
6.
Bujía fallada.
6.
Limpie y vuelva a ajustar la abertura o
cambie la bujía.
7.
Filtro de combustible sucio.
7.
Cambie el filtro de combustible.
8.
Combustible rancio o sucio.
8.
Vaciar el estanque de combustible y vuelva
a llenarlo con gasolina nueva.
Loading ...
Loading ...
Loading ...