Loading ...
Loading ...
Loading ...
12
TO ADJUST GAUGE WHEELS
Gauge wheels are prop er ly ad just ed when
they are slight ly off the ground when mower
is at the desired cutting height in operating
position. Gauge wheels then keep the deck
in proper position to help prevent scalping
in most terrain conditions.
NOTE: Adjust gauge wheels with tractor on
a flat level surface.
1. Adjust mower to desired cutting height
(See “TO AD JUST MOWER CUT TING
HEIGHT” in this sec tion of manual).
REVERSE OPERATION SYSTEM (ROS)
Your tractor is equipped with a Reverse
Operation System (ROS). Any attempt by
the operator to travel in the reverse direction
with the attachment clutch engaged will shut
off the engine unless ignition key is placed
in the ROS "ON" position.
WARNING: Backing up with the at-
tachment clutch engaged while mowing is
strongly discouraged. Turning the ROS "ON",
to allow reverse operation with the attach-
ment clutch engaged, should only be done
when the operator decides it is necessary to
reposition the machine with the attachment
engaged. Do not mow in reverse unless
absolutely necessary.
A
3/4”
9/16”
TO OPERATE MOWER
Your tractor is equipped with an operator
presence sensing switch. Any attempt
by the operator to leave the seat with the
engine running and the attachment clutch
engaged will shut off the engine. You must
remain fully and centrally positioned in the
seat to prevent the engine from hesitating or
cutting off when operating your equipment
on rough, rolling terrain or hills.
1. Select desired height of cut with attach-
ment lift lever.
2. Start mower blades by engaging at tach-
ment clutch control.
TO STOP MOWER BLADES
Disengage at tach ment clutch con trol.
CAUTION: Do not operate the mower
without either the en tire grass catcher, on
mowers so equipped, or the deflector shield
in place.
TO ADJUST MOWER CUT TING HEIGHT
The po si tion of the at tach ment lift le ver (A)
de ter mines the cut ting height.
• Put attachment lift lever in desired cutting
height slot.
The cutting height range is ap prox i mate ly 1
to 4" (25,4 to 101,6 mm). The heights are
measured from the ground to the blade tip
with the engine not running. These heights
are approximate and may vary depending
upon soil conditions, height of grass and
types of grass being mowed.
• The average lawn should be cut to approxi-
mately 2-1/2" (63,5 mm) during the cool
season and to over 3" (76,2 mm) during
hot months. For healthier and better look-
ing lawns, mow often and after moderate
growth.
• For best cutting performance, grass over
6" (152,4 mm) in height should be mowed
twice. Make the first cut relatively high; the
second to de sired height.
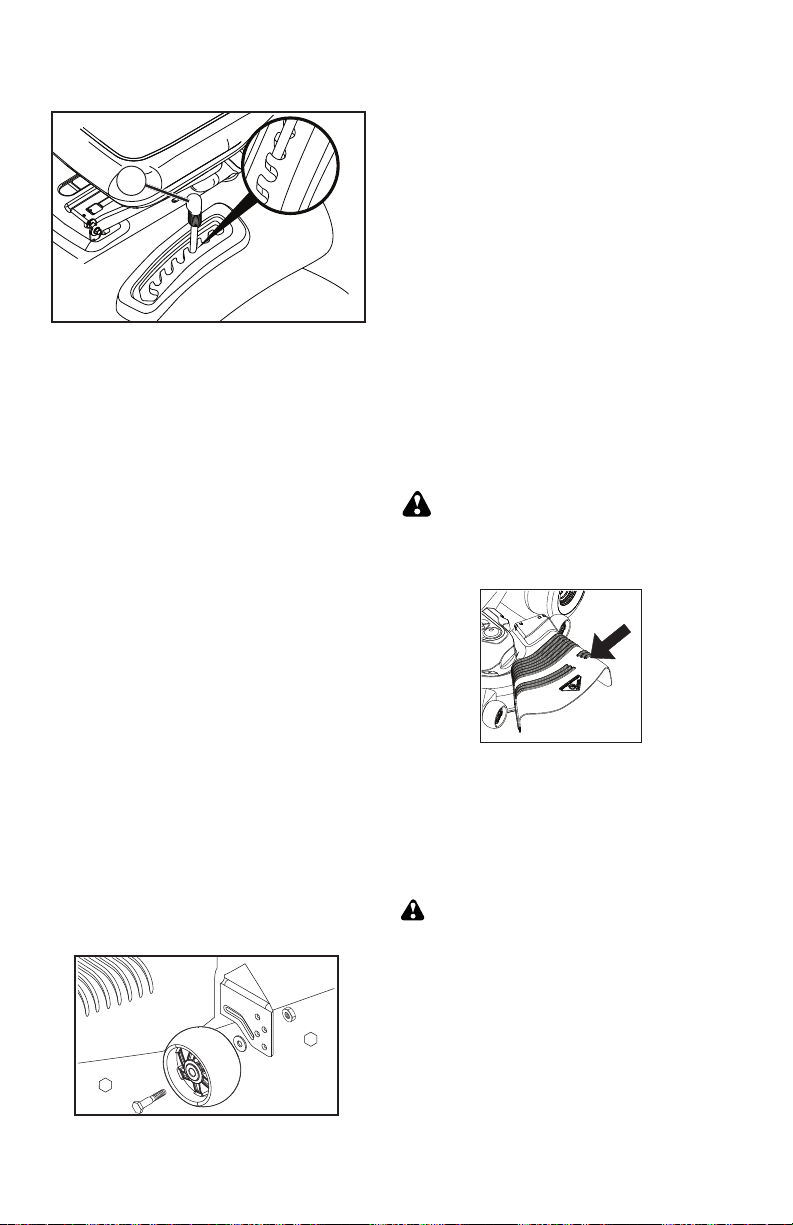
2. With mower in desired height of cut po si-
tion, gauge wheels should be assembled
so they are slightly off the ground. In stall
gauge wheel in ap pro pri ate hole. Tighten
se cure ly.
3. Repeat for all, installing gauge wheel in
same adjustment hole.
57
VERIFIQUE EL FRENO
Si el tractor exige más 1,5 m (cinco (5) pies) para
pararse a una velocidad más alta en el cambio
más alto en una superficie nivelada de hormigón
seco o pavimentada, entonces se debe controlar
y ajustar el freno.
CONTROL DEL FRENO
1. Aparcar el tractor en una superficie nivelada
de hormigón seco o pavimentada, presionar
el pedal del freno hasta el fondo y accionar
el freno de estacionamiento.
2. Desembragar la transmisión colocando el
mando de la rueda libre en la posición “trans-
misión desembragada”. Tirar el mando de la
rueda libre fuera y dentro la ranura y soltar
así se coloca en la posición desembragada.
Las ruedas traseras tiene que bloquearse y pati-
nar cuando se intenta empujar hacia adelante el
tractor manualmente. Sustituir las zapatas del fre-
no o contactar otro centro de servicio cualificado.
0
0
663
Llave Cuadrada (rueda
trasera solamente)
Arandelas
Anillo de
Retención
Cubierta
del eje
PARA REMOVER LAS RUEDAS
1. Bloquee el eje en forma segura.
2. Remueva la cubierta del eje, el anillo de reten-
ción y las arandelas para permitir la remoción
de las ruedas (la rueda trasera contiene una
llave cuadrada - no la pierda).
3. Repare la llanta y vuélvala a montar.
AVISO: En las ruedas traseras solamente: alinee
las ranuras en el cubo de la rueda trasera en el
eje. Inserte la llave cuadrada.
4. Vuelva a colocar las arandelas e inserte el
anillo de retención en forma segura en la
ranura del eje.
5. Vuelva a colocar la cubierta del eje.
AVISO: Para arreglar las llantas perforadas
y péra prevenir que tenga llantas pinchadas a
causa de pequeñas fugas, comprar de su com-
merciante Sears y utilizar el sello para llantas.
Elsello previene que las llantas se sequen y
también la corrosión.
IMPRESIÓN / INCLINACIÓN DE LAS RUEDAS
DELANTERAS
La impresión e inclinación de las ruedas delan-
teras de su nuevo tractor vienen así de fábrica y
son normales. La impresión y la inclinación de las
ruedas delanteras no son regulables. En caso
que se produzca algún daño que afecte la im-
presión o la inclinación de las ruedas delanteras
tal como vinieron de fábrica, póngase en contacto
con un centro de servicios Sears u otro centro de
servicios autorizado.
REGULACIÓN DE LA PALANCA DE CONTROL
DEL MOVIMIENTO NEUTRO DEL CAMBIO
MECÁNICO
La palanca de control del movimiento del cam-
bio mecánico ya viene predefinida por la Casa
constructora y por lo tanto no requiere ulteriores
regulaciones.
1. Aflojar ligeramente el perno de regulación en
la parte an te ri or de la rueda posterior derecha;
2. Poner en marcha el motor y mover la palanca
de control del movimiento del cambio mecáni-
co hasta llevarla en una posición en la que no
se pueda mover ni adelante ni atrás;
3. Mantener la palanca de control del mov-
imiento del cambio mecánico en esta posición
y apagar el motor;
4. Manteniendo la palanca en la posición arriba
indicada, aflojar el perno de regulación;
5. Mover la palanca de control del movimiento
en posición neutro (cierre metálico);
6. Enroscar bien el perno de regulación.
AVISO: Desplazar el plano de trabajo de la sega-
dora hasta la posición más baja para aumentar el
juego al fin de acceder al perno de regulación.
Si el tractor sigue deslizándose adelante y atrás,
después de esta regulación y con la palanca en
posición neutro, efectuar las operaciones indica-
das de seguida.
1. Aflojar el perno de regulación.
2. Mover la palanca de control del movimiento de
1/4 o 1/2 pulgar en la dirección de deslizamiento.
3. Enroscar bien el perno de regulación.
4. Poner en marcha el motor y probarlo.
5. Si el tractor sigue deslizando, repetir las
operaciones arriba indicadas hasta alcanzar
los resultados deseados.
Palanca de control
de Movimiento
Neutro Cierre
Metálico
0
2
2
3
9
Perno de
Velocidades
Loading ...
Loading ...
Loading ...