Loading ...
Loading ...
Loading ...
56
PARA CAMBIAR LA CORREA DE IMPULSIÓN
DE LA CUCHILLA SEGADORA
La correa de impulsión de la cuchilla segadora
se puede cambiar sin herramientas. Estacione el
tractor en una superficie nivelada. Enganche el
freno de estacionamiento.
REMOCIÓN DE LA CORREA –
1. Remueva la segadora del tractor (Vea “PARA
REMOVER LA SEGADORA” de esta sección
de este manual).
2. Haga salir la correa de las poleas del mandril
y de las poleas de guía.
3. Tire la correa alejándola de la segadora.
INSTALACIÓN DE LA CORREA
1. Haga rodar la correa alredeor de ambas
poleas del mandrin y de las poleas-guías.
2. Asegúrese las correas esten en todas las
ranuras de las peleas y al interior todas las
guías de la correa.
3. Instale la segadora (véa “ PARA INSTALAR LA
SEGADORA “ en esta sección de este manual).
Poleas de
Guía
Polea del Man dril
Polea del
Man dril
PARA CAMBIAR LA CORREA DE
IMPULSIÓN DE MOVIMIENTO
Estacione el tractor en una superficie nivelada.
Ponga el freno de mano. Si necesita asistencia,
del lado de abajo del apoyapiés hay una guía
práctica para el montaje de la correa.
DESMONTAJE DE LA CORREA
1. Desmonte la cortadora (Ver “PARA DES-
MONTAR LA CORTADORA” en este capítulo
del manual).
NOTA: Observe toda la correa de impulsión de
movimiento y la posición de todas las guías y
guardacorreas.
2. Retire la correa del piñón estacionario (A) y
del piñón de embrague (B).
3. Retire la correa del piñón central (C).
4. Jale el cable de la correa hacia la parte de
atrás del tractor. Con mucho cuidado, retire
la correa de la polea de entrada de la trans-
misión, moviéndola hacia arriba y pasándola
por encima de las paletas del ventilador (D).
5. Retire la correa de la polea del motor movié-
ndola hacia abajo (E).
6. Deslice la correa hacia la parte de atrás del
tractor, retírela de la placa de dirección (F) y
quítela del tractor.
MONTAJE DE LA CORREA
1. Instale la correa nueva de la parte de atrás
a la parte de adelante del tractor, pasándola
por encima de la placa de dirección (F) y del
vástago del pedal del embrague / freno (G).
2. Jale la correa hacia la parte de adelante del
tractor y páselo por sobre la polea del motor (E).
3. Jale la correa hacia la parte de atrás del
tractor. Con mucho cuidado, mueva la correa
hacia abajo y pásela alrededor del ventilador
de transmisión y por encima de la polea de
entrada (D). Cerciórese de que la correa esté
calzada dentro del guardacorrea.
4. Coloque la correa sobre el piñón central (C).
5. Pase la correa a través del piñón estacionario
(A) y del piñón del embrague (B).
6. Asegúrese de que la correa calce en todas
las ranuras de las poleas y dentro de todas
las guías y guardacorreas..
7. Instale la SEGADORA (Ver “PARA MONTAR
LA SEGADORA” en este capítulo del manual).
02952
A
B
C
D
E
F
G
13
TOWING CARTS AND OTHER AT TACH-
MENTS
Tow only the attachments that are rec om-
mend ed by and comply with spec i fi ca tions
of the manufacturer of your tractor. Use
common sense when tow ing. Too heavy of
a load, while on a slope, is dangerous. Tires
can lose traction with the ground and cause
you to lose control of your tractor.
TO OPERATE ON HILLS
WARNING: Do not drive up or down
hills with slopes greater than 15° and do not
drive across any slope. Use the slope guide
provided at the back of this manual.
• Choose the slowest speed before starting
up or down hills.
• Avoid stopping or changing speed on
hills.
• If stopping is absolutely necessary, push
clutch/brake pedal quickly to brake position
and engage parking brake.
• Move motion control lever to neutral posi-
tion.
IMPORTANT: The motion control lever does
not return to neutral position when the clutch/
brake pedal is de pressed.
• To restart movement, slowly re lease park-
ing brake and clutch/brake ped al.
• Slowly move motion control lever to
slowest setting.
• Make all turns slowly.
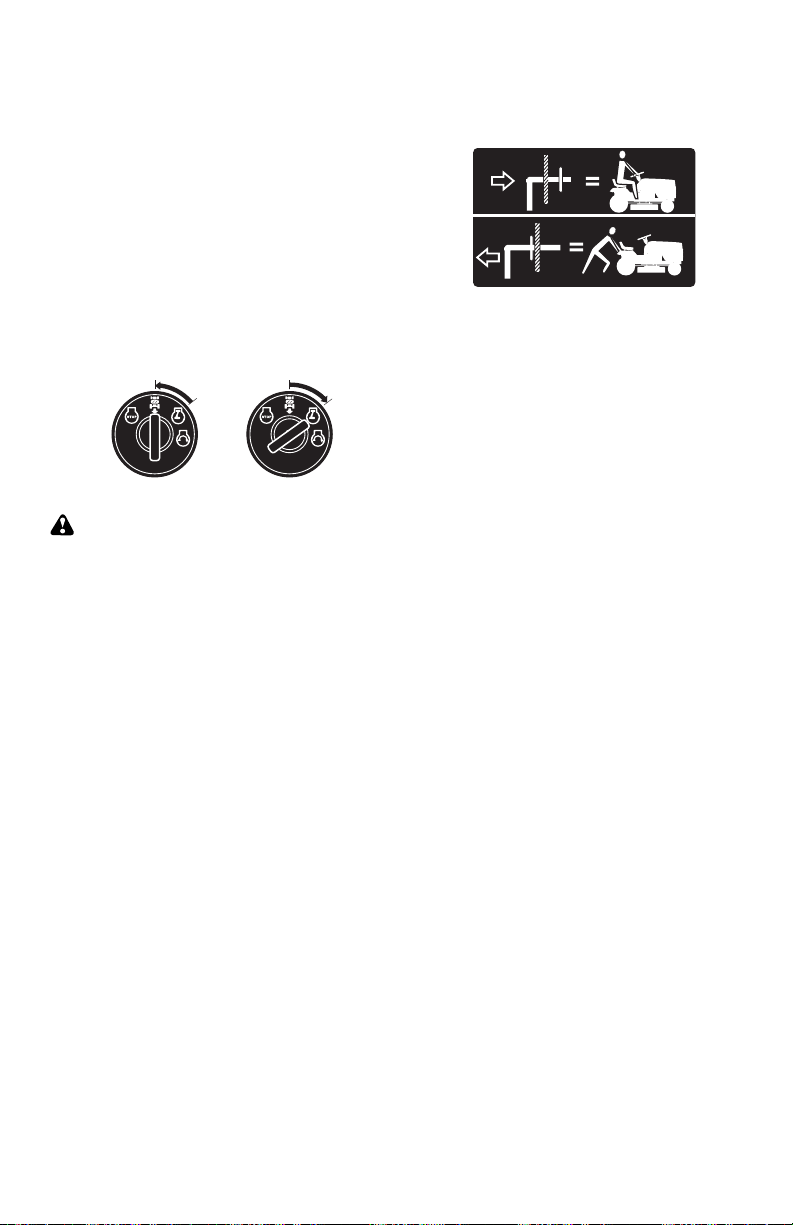
0
2
8
2
8
ROS "ON"
Position
Engine "ON" Position
(Normal Operating)
USING THE REVERSE OPERATION
SYSTEM -
Only use if you are certain no children or other
bystanders will enter the mowing area.
1. Move motion control lever to neutral
position.
2. With engine running, turn ignition key
counterclockwise to ROS "ON" position.
3. Look down and behind before and while
backing.
4. Slowly move motion control lever to
reverse (R) po si tion to start movement.
5. When use of the ROS
is no longer needed,
turn the ignition key clockwise to engine
"ON" position.
TO TRANSPORT
When pushing or towing your tractor, be
sure to disengage transmission by placing
freewheel control in free wheel ing po si tion.
Free wheel control is located at the rear
drawbar of tractor.
1. Raise attachment lift to highest position
with at tach ment lift control.
2. Pull freewheel control out and into the slot
and release so it is held in the disengaged
position.
• Do not push or tow tractor at more than
two (2) mph (3,2 km/h).
• To reengage transmission, reverse above
procedure.
Transmission Engaged
Transmission Disengaged
NOTE: To protect hood from damage when
transporting your tractor on a truck or a trailer,
be sure hood is closed and secured to tractor.
Use an appropriate means of tying hood to
tractor (rope, cord, etc.).
BEFORE STARTING THE ENGINE
CHECK ENGINE OIL LEVEL
The engine in your tractor has been shipped
from the factory already filled with sum mer
weight oil.
1. Check engine oil with tractor on level
ground.
2. Remove oil fill cap/dipstick and wipe
clean, reinsert the dipstick and screw cap
tight, wait for a few seconds, remove and
read oil level. If nec es sary, add oil until
“FULL” mark on dipstick is reached. Do
not overfill.
• For cold weather operation you should
change oil for easier starting (See the oil
viscosity chart in the Main te nance sec tion
of this man u al).
• To change engine oil, see the Main te nance
section in this manual.
Loading ...
Loading ...
Loading ...