
UB-286, UB-289
Coffee Brewer
This manual contains important information regarding your Admiral Craft
unit. Please read this manual thoroughly prior to equipment set-up,
operation and maintenance. Failure to comply with regular maintenance
guidelines outlined in this manual may void the warranty.
MUST READ!!!

2
Warnings:
• Do not touch any hot surfaces
• Do not plug or unplug unit with wet hands
• Do not immerse unit, cord or plug in liquid at any time
• Unplug cord from outlet when not in use and before cleaning
• Do not operate unattended
• Do not use this unit for anything other than intended use
• Never pour Hot Water, Coffee, or Coffee Powder into the Water Reservoir.
• Never pour more than 2.2 liter of water into the Water Reservoir
• Do not use outdoors
• Always use on a firm, dry and level surface at least 12” from walls or any other obstruction
• Do not use if unit has a damaged cord or plug, in the event the appliance malfunctions, or has been
damaged in any manner
• Keep children and animals away from unit
• Any incorrect installation, alterations, adjustments and/or improper maintenance can lead to property
loss and injury. All repairs should be done by authorized professionals only
• Ensure that the designated power supply is adequate for continual usage and the voltage is correct
Installation:
*Note - Please check that your Brew Cone is assembled correctly, with the spring wedged firmly at the bottom
of the Filter Basket.
1. Place the Machine on a firm and horizontal surface with plenty of room above to allow easy and safe filling of
the water tank.
2. Plume UB series to water connection. A quality water filter is recommended.
Water line must have water pressure of between 20 and 90PSI.
3. Plug machine into power.
4. Place an empty pot at correct position under the Filter Basket.
5. Turn the power switch ON. Press the brew button and the “Filling” indicator will light up and off when
reservoir is full. The “Heating” indicator will light up continued.
6. HOT WATER should start to flow into pot in approximately 90 seconds.
7. About 4~5 minutes later, the "Heating" Indicator will off indicating the brewing process has ended. Do not
remove vessel or Brew Cone until water stops flowing.
8. You should repeat the above process twice to clean the internal parts of the machine before brewing coffee
for first time.
9. During above operation, it is normal to hear some brewing and pumping sounds and to see some water
vapor coming out of the machine.
*NOTE - If operated incorrectly or water over flows, please TURN-OFF
the power switch immediately to STOP
the brewing procedure.

3
Operation
1. Remove the Filter Basket, and place a Filter Paper into the Filter Basket. Put appropriate amount of
coffee in the Filter Paper (your coffee supplier should be able to provide you with information about
correct yields).
2. Slide the Filter Basket into position.
3. Place the empty decanter (Pot or Airpot) at the correct position under Filter Basket.
4. Turn the power switch ON. Press the Brew button; the “Filling” & “Heating” indicator will light.
5. Coffee will start to flow into the pot in approximately 90 seconds.
6. When the "Heating" indicator light turns off, the brewing cycle has completed. Do not remove vessel
or Filter Basket away until coffee stops flowing.
7. Brew cycle is completed.
8. Dispose of used grounds coffee and filter paper; rinse Filter Basket in clean water.
*Note -
- The tank must be full of water before connecting the brewer to electrical power.
- Water will always remain in the hoses and boiler of the unit. If the brewer should be
moved or removed for service, be sure to pour out the remaining water. Failure to comply can cause
serious burns.
- To avoid splashing or overflowing hot liquids, always place an empty airpot or server under the
filter pan before starting the brew cycle. Failure to comply can cause serious burns
CLEANING – NOTE: To maintain cleanliness and increase service life, the brewer should be cleaned daily. Do
not immerse the unit in water or any other liquid. If liquid enters the electrical compartment it may cause a
short circuit or electrical shock.
1. Allow unit to completely cool before cleaning.
2. Disconnect the cord from the outlet.
3. The Coffee Maker must not be cleaned by a water jet.
4. Wipe the outside of the unit with a damp cloth, then wipe dry.
5. To avoid damage, do not use abrasive cleaners or scouring pads.
6. If soap or chemical cleaners are used, be sure they are completely rinsed away with clear water
immediately after cleaning. Chemical residue could damage or corrode the surfaces of the unit.

4
De-sediments
On areas in the water boiler, hard water will cause calcium and limestone to accumulate when the machine is
used. To keep the Machine in the best operating condition and ensure each coffee brewing resulted in the best
taste, we recommend that of the Machine has successively brewed at least 200 times or used for 6 months.
1. Add 300 ml fresh lemon juice or condensed lemon juice to 1 liter of water.
2. Place filter basket in proper position.
3. Place an empty pot at the correct position under the filter basket.
4. Pour the lemon juice solution into the Water Reservoir.
5. Turn the power switch ON and Push the “Brew Button” once.
6. Some of hot water will drop into the jug, until the solution of lemon juice push out the water remained
inside of the Machine and there are some solutions of lemon juice start to drop into the jug, than turn
the Switch OFF.
7. Wait for 5~6 minutes to enable the rest of solution to run through with sediments, then turn the Switch
ON and Push the “Brew Button” once again for the unit to complete the brew cycle.
8. When solution of lemon juice is no longer dripping out, set switch OFF and flush the solution away.
9. Since some solution of lemon juice will remain in the Machine, we must run brewing cycles several
times with water only until there is no more taste and smell of lemon juice in the hot water that flow
out from the Machine.
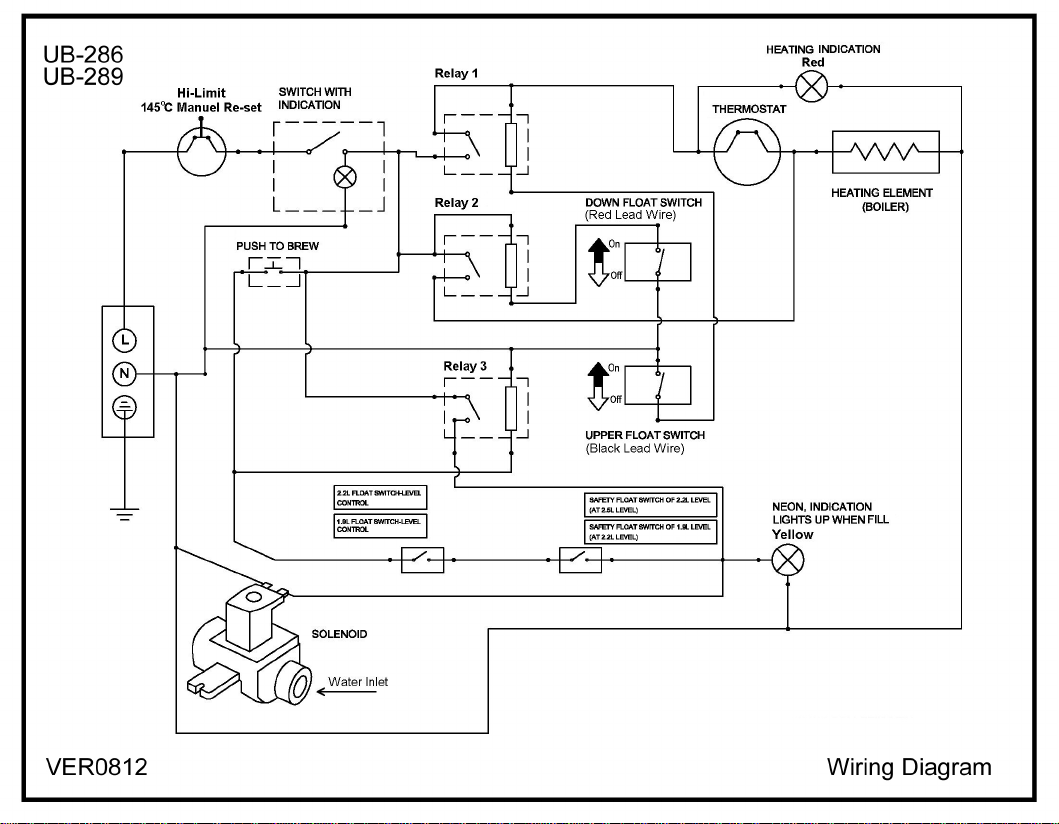
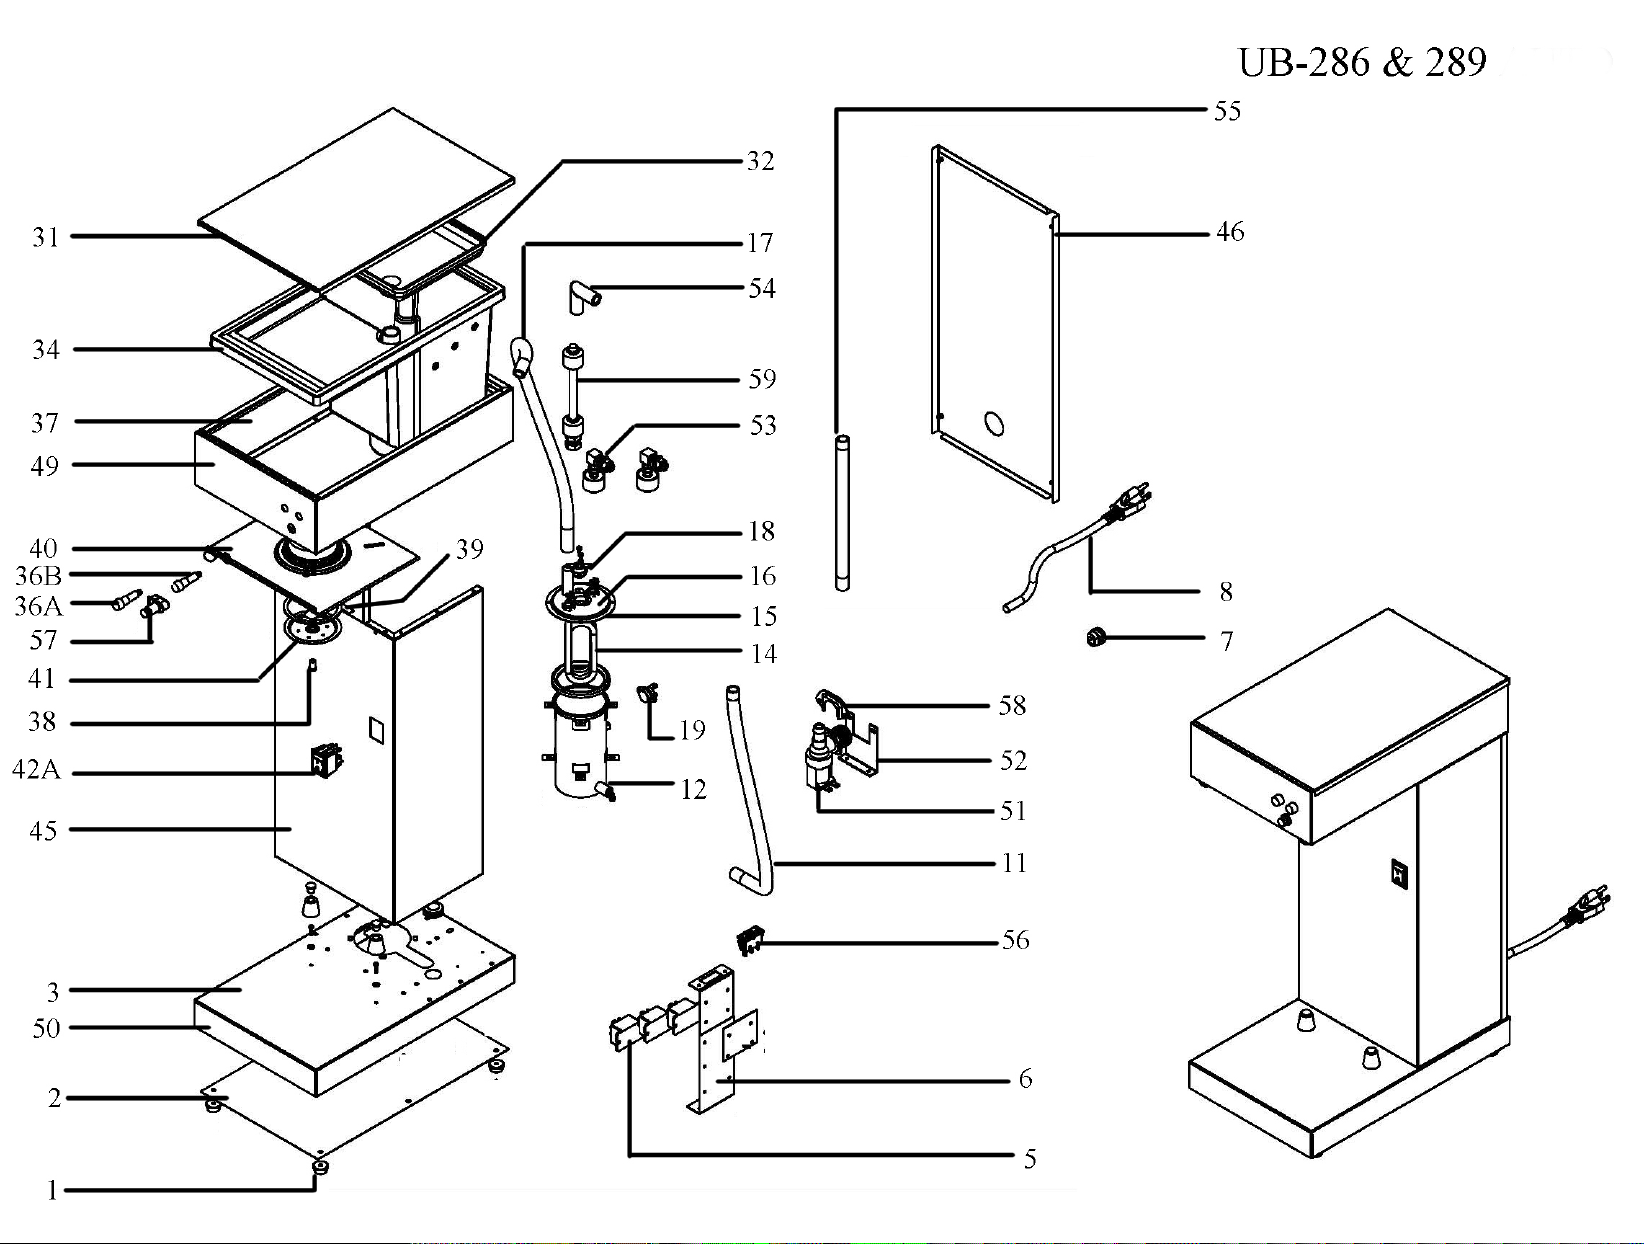

Coffee Brewer - UB-286, UB-289
Reference
Number Description
1 Foot
2 Bottom Cover
3 Base Frame
5 Relay
6 Relay Holder
7 Wire Clip
8 Power Cord and Plug
11 Inflow Pipe
12 Boiler Tank
14 Main Heater
15 Boiler Gasket
16 Boiler Tank Lid
17 Outflow Pipe
18 Auto Thermostat
19 Manual Thermostat
31 Upper Cover
32 Waterproof Panel
34 Water Reservoir
35 Filling Indicator - Orange
36 Heating Indicator - Red
37 Upper Frame
38 Sprinkler Screw
39 Sprinker Gasket
40 Sprinkler Holder
41 Sprinkler
42 Power Switch Single
45 Body Frame
46 Rear Cover
49 Upper Panel
50 Lower Panel
51 Solenoid Valve
52 Solenoid Fixer
53 Level Switch
54 Elbow in Tank
55 Inflow Pipe
56 Function Switch
57 Push Switch
58 Solenoid Valve Holder
59 Double Float Switch
VER811

ACE
Equipment
One Year Limited
Warranty
Admiral Craft Equipment Corp. (ACE) warrants its equipment against defects in materials and workmanship, subject
to the following conditions:
ACE Equipment is warranted for one year, effective from the date of purchase by the original owner. A copy of the
original receipt or other proof of purchase is required to obtain warranty coverage. This warranty applies to the original
owner only, and is not assignable.
Should any product fail to function in its intended manner under normal use within the limits defined in this
warranty, at ACE’s discretion, such product will be repaired, replaced with a refurbished unit, or replaced with a new
unit by ACE, after defective unit has been inspected and defect has been confirmed. ACE does not assume any liability
for extended delays in replacing any item beyond its control. This warranty does not apply to rubber and non-metallic
synthetic parts that may need to be replaced due to normal usage, wear or lack of preventative maintenance.
This warranty covers products shipped into the 48 contiguous United States, Hawaii, and metropolitan areas of Alaska
and Canada. Warranty coverage on products used outside the 48 contiguous United States, Hawaii and metropolitan
areas of Alaska and Canada may vary. Contact ACE for details at 1-800-223-7750
The following conditions are not covered by warranty:
•
Equipment failure relating to improper installation, improper utility connection or supply and problems due to
improper ventilation.
•
Equipment that has not properly been maintained, damage from improper cleaning, and water damage
to controls.
•
Equipment that has not been used in an appropriate manner, or has been subject to misuse, neglect, abuse,
accident, alteration, negligence, damage during transit, delivery or installation, fire, flood, riot, or act of God.
•
Equipment that has the model number or serial number removed or altered.
•
Equipment on which the security seal has been broken.
If the equipment has been changed, altered, modified, or repaired without express written permission from ACE, then the
manufacturer shall not be liable for any damages to any person or to any property, which may result from the use of this
equipment thereafter.
This equipment is intended for commercial use only and this warranty is void if equipment is used in other than a
commercial application.
For warranty and non-warranty related issues please call ACE at 1-800-223-7750 ext 3 to speak to technical support.
When calling please have your model number, serial number and proof of purchase ready. To purchase replacement
parts, receive online technical support or fill out a warranty claim visit
www.admiralcraftequipment.com. It is not
necessary to contact the place where you originally purchased your product from.
“THE FOREGOING WARRANTY IS IN LIEU OF ANY AND ALL WARRANTIES EXPRESSED OR IMPLIED
INCLUDING ANY IMPLIED WARRANTY OF MERCHANTABILTY OR FITNESS FOR PARTICULAR
PURPOSES AND CONSTITUES THE ENTIRE LIABILITY OF ACE. IN NO EVENT DOES THE LIMITED
WARRANTY EXTEND BEYOND THE TERMS STATED HEREIN.”
VER0112