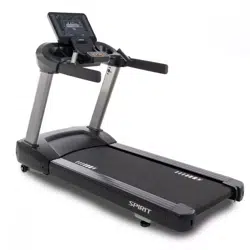

C T 900ENT TREADMILL
OWNER’S MANUAL
Spirit Fitness

www.spirittness.com
TABLE OF CONTENTS
3 IMPORTANT SAFETY INSTRUCTIONS
4 IMPORTANT ELECTRICAL INSTRUCTIONS
5 IMPORTANT OPERATION INSTRUCTIONS
6 PRODUCT REGISTRATION
7 CT900ENT ASSEMBLY INSTRUCTIONS
13 CONSOLE OPERATION
22 TOUCH SCREEN OPERATION
30 PROGRAMMING THE CONSOLE
48 GENERAL MAINTENANCE
49 MANUFACTURER’S LIMITED WARRANTY
Thank you for purchasing our product, please save these instructions. Please do not perform or attempt any
customizing, adjustments, repair or maintenance that is not described in this manual.

2
Spirit Fitness
Congratulations on your new treadmill and welcome to the Spirit Fitness family!
Thank you for your purchase of this quality treadmill from Spirit Fitness. Your new treadmill was
manufactured by one of the leading tness manufacturers in the world and is backed by one of
the most comprehensive warranties available. Through your dealer, Spirit Fitness will do all we
can to make your ownership experience as pleasant as possible for many years to come. If not
purchased directly from Spirit Fitness, the local dealership where you purchased this treadmill is your
administrator for all Spirit Fitness warranty and service needs. Their responsibility is to provide you
with the technical knowledge and service personnel to make your experience more informed and any
difculties easier to remedy.
Please take a moment at this time to record the name of the dealer, their telephone number, and the
date of purchase below to make any future, needed contact easy. We appreciate your support and we
will always remember that you are the reason we are in business.
Yours in health,
Spirit Fitness
NAME OF DEALER _____________________________________
DEALER PHONE # _____________________________________
PURCHASE DATE _____________________________________

3
www.spirittness.com
IMPORTANT SAFETY
INSTRUCTIONS
DANGER —To reduce the risk of electric shock,
always unplug this treadmill from the electrical
outlet immediately after using and before cleaning.
WARNING
To reduce the risk of burns, re electric shock, or
injury to persons:
• Before beginning this or any exercise program,
consult a physician. This is especially important for
persons over the age of 35 or persons with pre-
existing health conditions.
• Keep children away from the treadmill. There are
obvious pinch points and other caution areas that can
cause harm.
• Keep hands away from all moving parts.
• Never drop or insert any object into any openings.
• Do not use outdoors.
• Do not attempt to use your treadmill for any purpose
other than for the purpose it is intended.
• The hand pulse sensors are not medical devices.
Various factors, including the user’s movement, may
affect the accuracy of heart rate readings. The pulse
sensors are intended only as exercise aids in determining
heart rate trends in general.
• Wear proper shoes. High heels, dress shoes, sandals,
or bare feet are not suitable for use on your elliptical.
Quality athletic shoes are recommended to avoid leg
fatigue.
• Maximum User Weight: 450 lbs,
• This appliance is not intended for use by persons with
reduced physical, sensory or mental capabilities, or lack
of experience and knowledge, unless they have been
given supervision or instruction concerning use of the
appliance by a person responsible for their safety.
• Keep children under the age of 13 away from this
machine.
• Never operate this treadmill if it has a damaged cord or
plug, if it is not working properly, if it has been dropped
or damaged, or dropped into water.
• Keep the cord away from heated surfaces.
• Do not operate where aerosol (spray) products are being
use or where oxygen is being administered.
• Connect this treadmill to a properly grounded outlet only.
See Grounding Instructions.

4
Spirit Fitness
• ASTM F2115-05 Specications 6.1.2.11—The
recommended minimum clearance required around
each treadmill for access to, passage around, and
emergency dismount shall be stated. The minimum
dimensions are to be: 0.5 m (19.7 in.) on each
side of the treadmill, and 1 m (39 in.) behind the
machine.
SAVE THESE INSTRUCTIONS - THINK SAFETY!
IMPORTANT ELECTRICAL
INSTRUCTIONS
WARNING
NEVER use a ground fault circuit interrupt (GFCI)
wall outlet with this treadmill. As with any appliance
with a large motor, the GFCI will trip often. Route
the power cord away from any moving part of the
treadmill including the elevation mechanism and
transport wheels.
NEVER remove any cover without rst disconnecting
AC power. If voltage varies by ten percent (10%)
or more, the performance of your treadmill may be
affected. Such conditions are not covered under your
warranty. If you suspect the voltage is low, contact
your local power company or a licensed electrician
for proper testing.
NEVER expose this treadmill to rain or moisture.
This product is NOT designed for use outdoors,
near a pool or spa or in any other high humidity
environment. The operating temperature specication
is 40 to 120 degrees Fahrenheit, and humidity is
95% non-condensing (no water drops forming on
surfaces).
Circuit Breakers: Some circuit breakers are not
rated for high inrush currents that can occur when a
treadmill is rst turned on or even during use. If your
treadmill is tripping the circuit breaker (even though
it is the proper current rating) but the circuit breaker
on the treadmill itself does not trip, you will need to
replace the facility breaker with a high inrush type.
This is not a warranty defect. This is a condition we
as a manufacture have no ability to control. This part
is available through most electrical supply stores. The
electrical outlet used should have a dedicated 20
amp circuit breaker.

5
www.spirittness.com
GROUNDING INSTRUCTIONS
This product must be grounded. If the treadmill should
malfunction or break down, grounding provides a
path of least resistance for electric current, reducing
the risk of electric shock. This product is equipped
with a cord having an equipment-grounding plug.
The plug must be plugged into an appropriate
outlet that is properly installed and grounded in
accordance with all local codes and ordinances.
DANGER – Improper connection of the equipment-
grounding conductor can result in a risk of electric
shock. Check with a qualied electrician or
serviceman if you are in doubt as to whether the
product is properly grounded. Do not modify the
plug provided with the product if it will not t the
outlet; have a proper outlet installed by a qualied
electrician.
This product is for use on a nominal 110 volt/20
amp dedicated circuit, and has a grounding plug
that looks like the plug illustrated below. A temporary
adapter that looks like the adapter illustrated may be
used to connect this plug to a 2-pole receptacle as
shown if a properly grounded outlet is not available.
The temporary adapter should be used only until
a properly grounded outlet can be installed by a
qualied electrician. The green colored rigid ear-
lug, or the like, extending from the adapter, must be
connected to a permanent ground such as a properly
grounded outlet box cover. Whenever the adapter is
used, it must be held in place by a metal screw.
IMPORTANT OPERATION
INSTRUCTIONS
• NEVER operate this treadmill without reading
and completely understanding the results of any
operational change you request from the computer
console.
• Understand that changes in speed or incline do
not occur immediately. Set your desired speed or
incline level on the computer console and release
the adjustment key. The computer will obey the
command gradually.
• Use caution while participating in other activities
while on your Treadmill; such as watching television,
reading, etc. These distractions may cause you to
lose balance which may result in serious injury.
• Do not use excessive pressure on console control
keys. They are precision-set to function properly with
little nger pressure.

6
Spirit Fitness
WARNING
This product can expose you to chemicals including Toluene and Acrylamide which are known to the State
of California to cause Cancer and birth defects or other reproductive harm. For more information, go to
www.P65Warnings.ca.gov
RECORD YOUR SERIAL NUMBER
Please record the serial number of this tness product in the space provided below. The serial number is
located at the front of the treadmill by the Power switch.
SERIAL NUMBER:
REGISTER YOUR PURCHASE
The self-addressed product registration card must be completed in full and returned to Spirit Fitness. You can
also go to www.spirittness.com/commercialwarrantyregistration.html under the Support tab to register online.

7
www.spirittness.com
CT900ENT PRE-ASSEMBLY
TOOLS INCLUDED:
8mm Allen Wrench
2 Phillips Screwdrivers
PARTS INCLUDED:
1 Main Frame
2 Uprights
1 Main Panel
1 Console
1 Console Bracket Cover
4 Handrail Covers
2 Upright Covers
2 End Caps
UNPACKING
1. Cut the straps and open box.
2. Locate the hardware package. The hardware is separated into four steps. Remove
the tools rst. Remove the hardware for each step as needed to avoid confusion.
The numbers in the instructions that are in parenthesis (#) are the item number from
the assembly drawing for reference.
8
Spirit Fitness
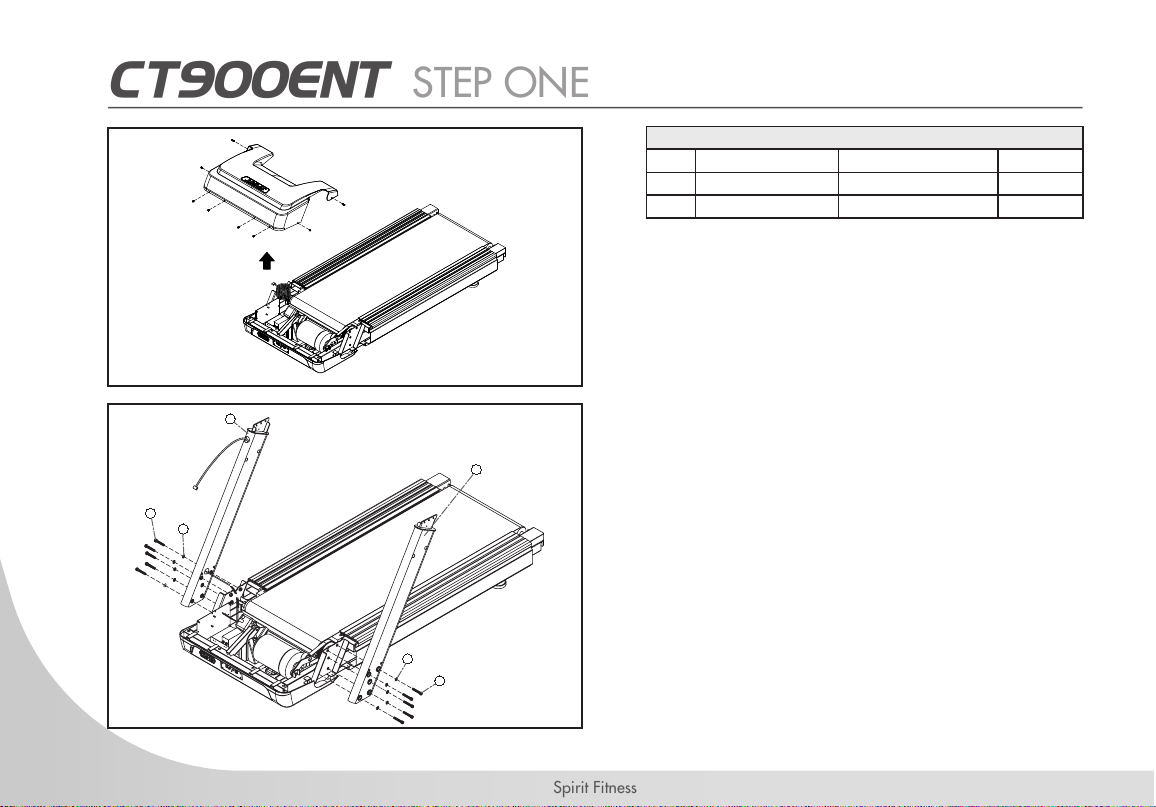
CT900ENT STEP ONE
HARDWARE FOR STEP 1
PART TYPE DESCRIPTION QTY
65 BOLT M10x1.5x60mm 10
79 LOCK WASHER 10 10
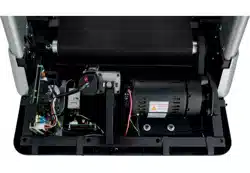
1. Loosen the 8 screws holding the motor cover in
place and remove the cover.
2. Uncoil wiring harness and run wires through the
RIGHT UPRIGHT (7).
3. Use 5 BOLTS (65) and 5 LOCK WASHERS (79)
to attach the RIGHT UPRIGHT (7) to the MAIN
FRAME (1). Do not pinch wires. Do not tighten
before putting the console on.
4. Use 5 BOLTS (65) and 5 LOCK WASHERS (79)
to attach the LEFT UPRIGHT (8) to the MAIN
FRAME (1). Do not tighten before putting the
console on.
65
79
65
79
7
8
9
www.spirittness.com
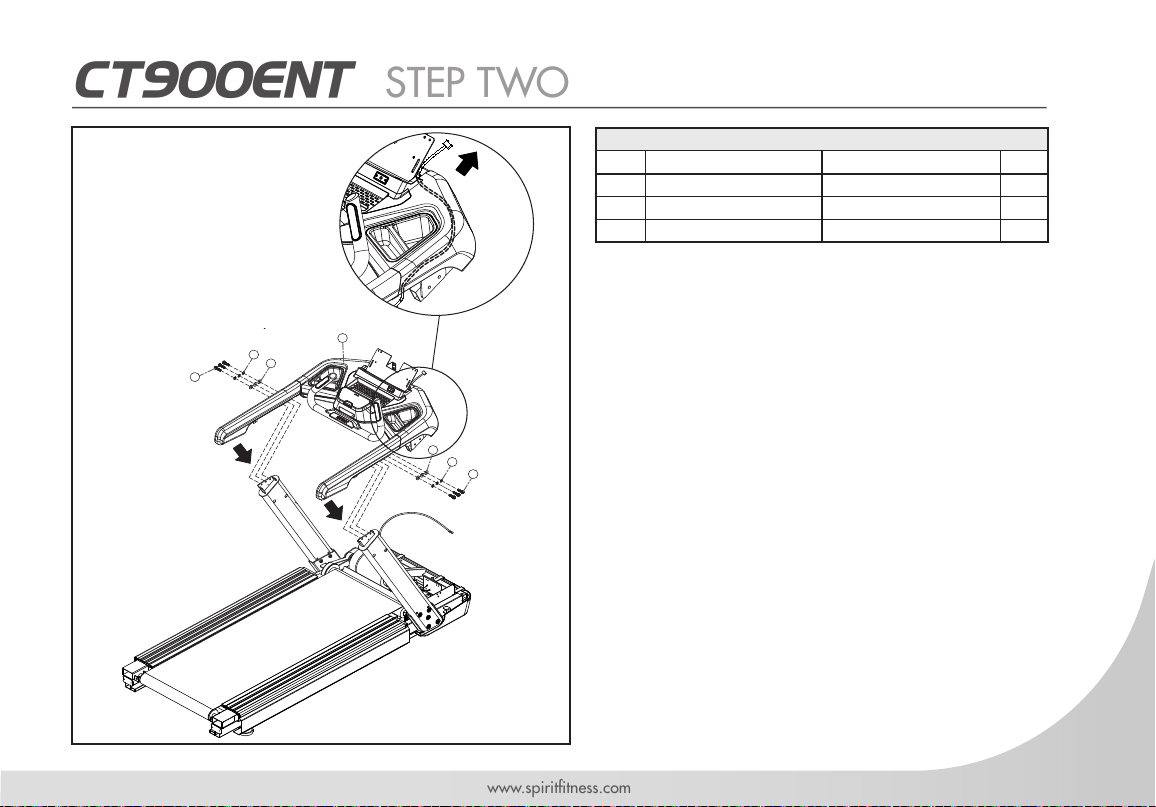
CT900ENT STEP TWO
HARDWARE FOR STEP 2
PART TYPE DESCRIPTION QTY
63 BOLT M10x1.5x35mm 6
74 FLAT WASHER 3/8"x 2.5 6
79 LOCK WASHER 10 6
1. Install MAIN PANEL (3) onto the uprights using 6
BOLTS (63), 6 LOCK WASHERS (79) and 6 FLAT
WASHERS (74).
2. Run the wiring harness through the MAIN PANEL
(3) as shown in the illustration.
3. Tighten all bolts and washers on both uprights
(7 and 8) from previous step.
68
79
63
74
74
79
63
3
10
Spirit Fitness
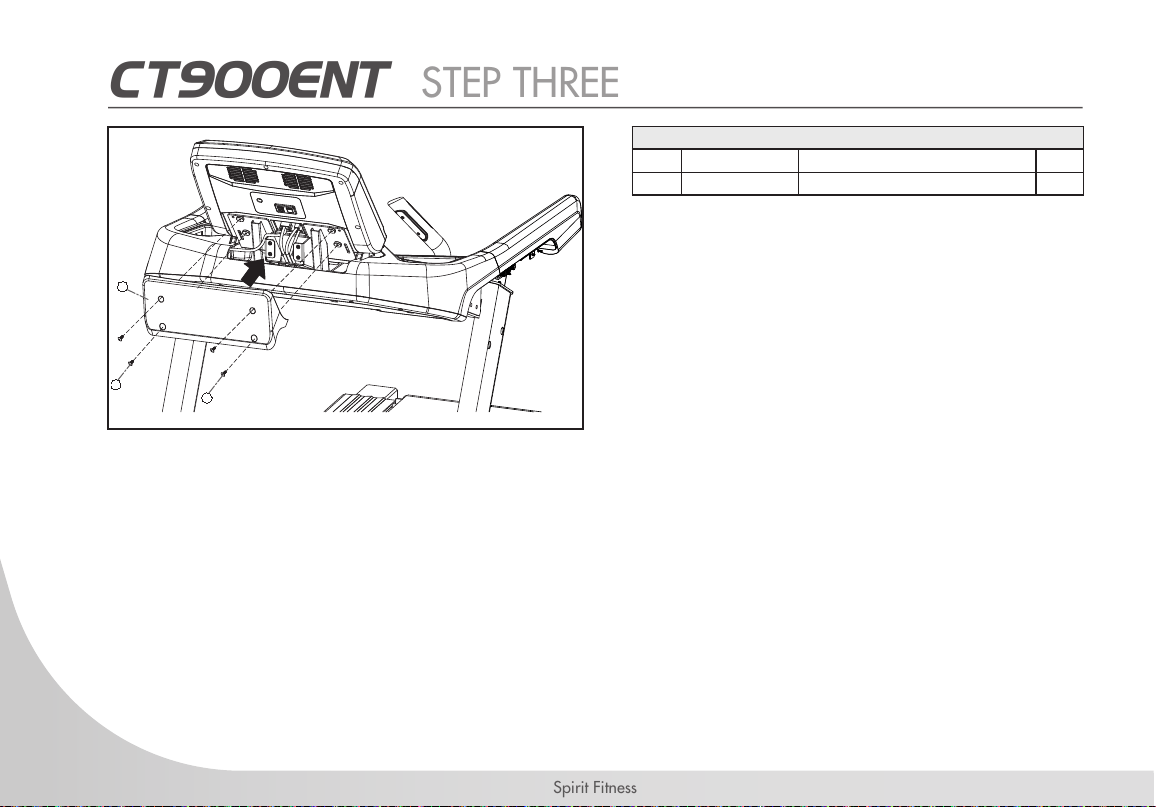
CT900ENT STEP THREE
68
68
49
HARDWARE FOR STEP 3
PART TYPE DESCRIPTION QTY
68 BOLT
M5x8x12mm
8
1. Wires should be away from the console mounting
bracket.
2. Install the CONSOLE (54) using 4 BOLTS (68).
3. Connect wiring harness to CONSOLE (54).
4. Attach CONSOLE BRACKET COVER (49) to MAIN
PANEL using 4 BOLTS (68).
11
www.spirittness.com
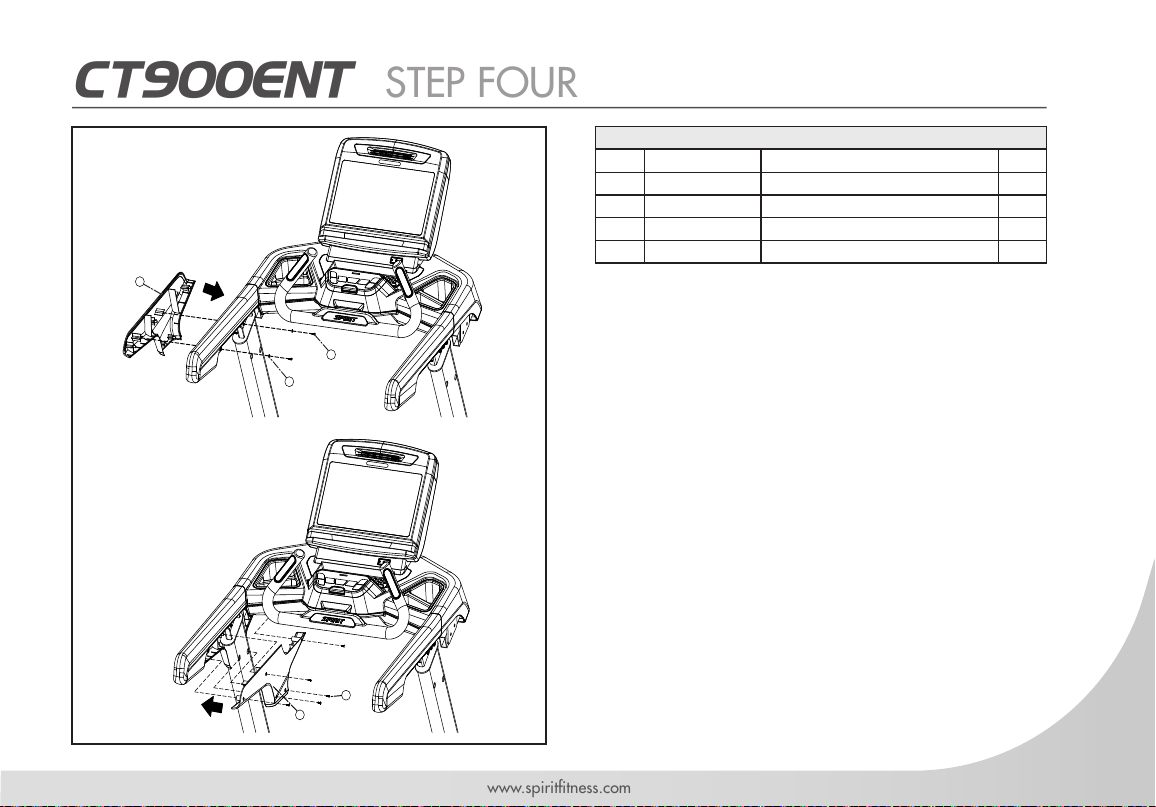
CT900ENT STEP FOUR
83
83
75
48
47
HARDWARE FOR STEP 4
PART TYPE DESCRIPTION QTY
68 SCREW M5x.8x12mm 4
69 SCREW M5x.8x25mm 2
75 FLAT WASHER 5.5x19x1.5 4
83 SCREW 3.5x12mm 18
1. Attach LEFT OUTER HANDRAIL COVER (48) to
MAIN PANEL using 2 SCREWS (83) and 2 FLAT
WASHERS (75).
12
Spirit Fitness
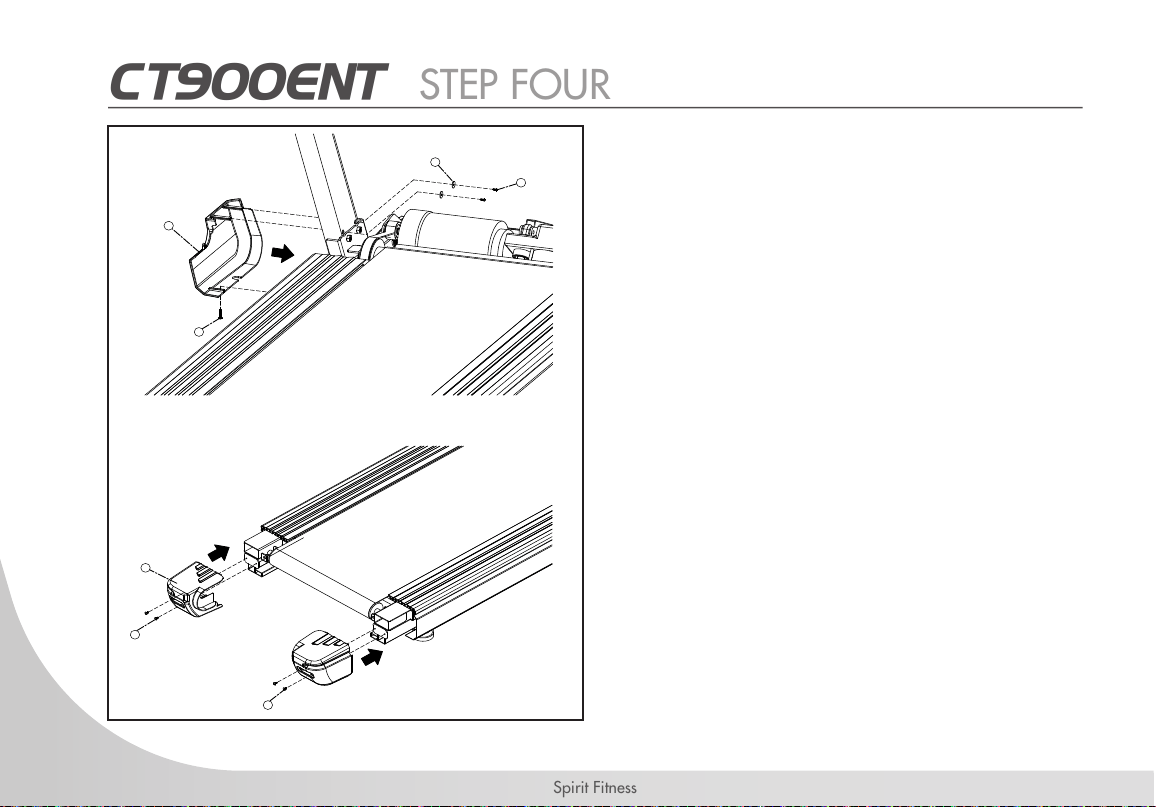
CT900ENT STEP FOUR
2. Attach LEFT INNER HANDRAIL COVER (47) to MAIN
PANEL using 5 SCREWS (83).
3. Attach LEFT LOWER UPRIGHT COVER (40) to MAIN
FRAME (1) using 2 SCREWS (83), 2 FLAT WASHERS
(75), and 1 long SCREW (69).
4. Attach LEFT END CAP (42) to MAIN FRAME (1) using
2 SCREWS (68).
5. Repeat to install right side covers (45, 46, 39, 41).
6. Reinstall the MOTOR COVER (37) using the bolts
removed in Step 1.
69
68
68
83
75
40
42

13
www.spirittness.com
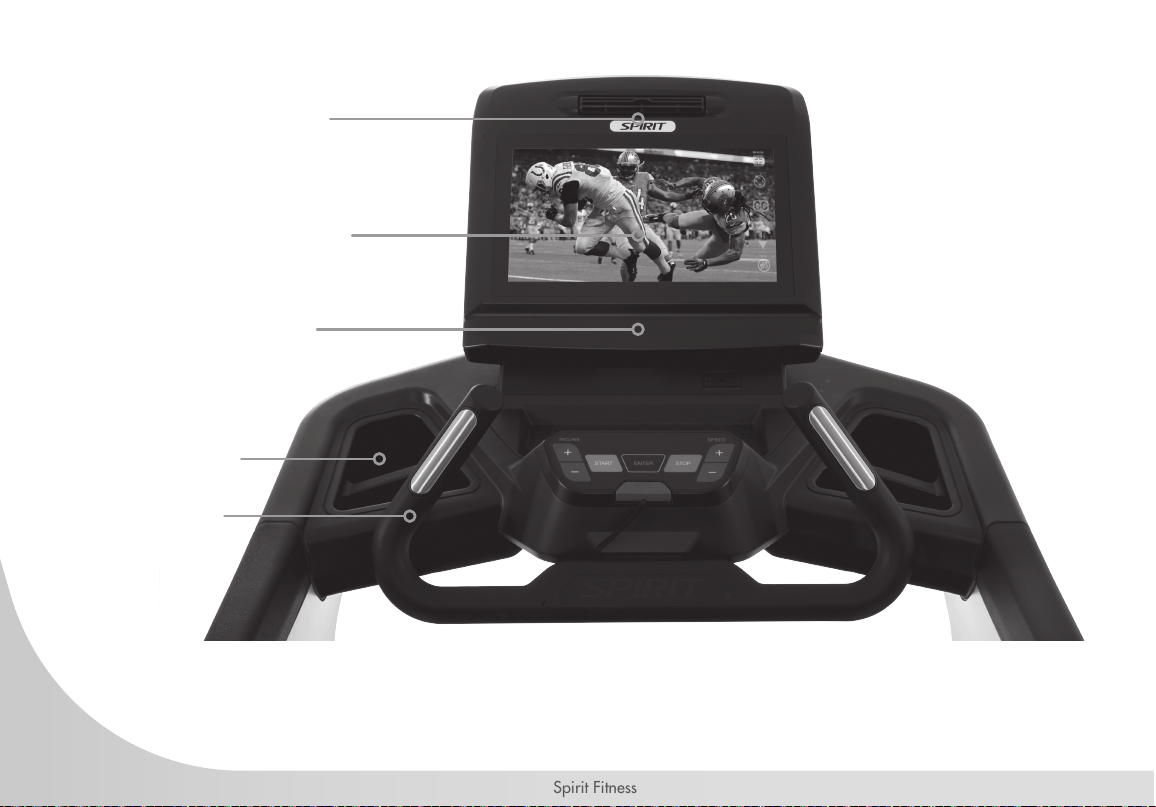
CT900ENT CONSOLE OPERATION
14
Spirit Fitness
Integrated adjustable fan
for workout comfort
Ergonomically
friendly hand grips
for pulse tracking
Tablet friendly
reading rack holder
Accessory trays for
secure placement of
water bottles, keys,
smartphones, etc.
15.6” touchscreen display with
multiple viewing modes
15
www.spirittness.com
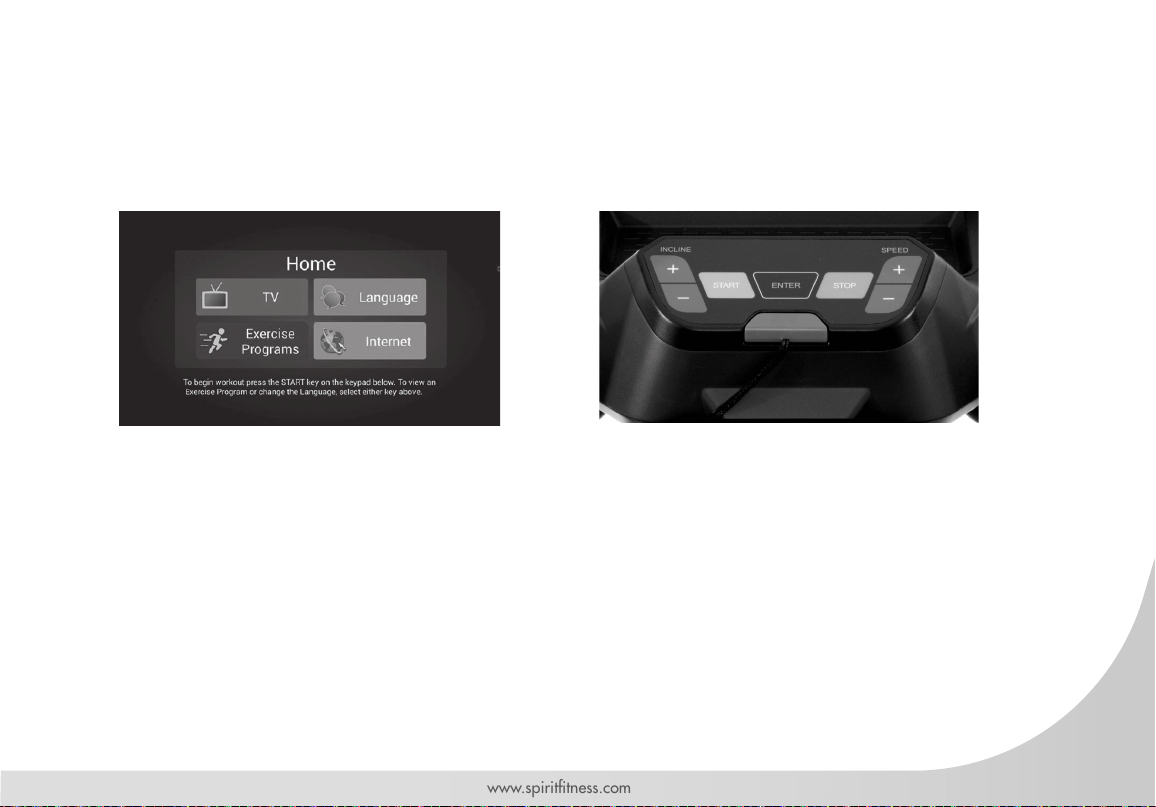
STARTING OPERATION
Plug in the power cord located at the front base of the unit. When the power is turned on, the screen
will show the initial image and then enter the Home screen.
Quick operating buttons are conveniently located
for basic treadmill functions.
Home Screen: Begin operation by touching the icons.
16
Spirit Fitness
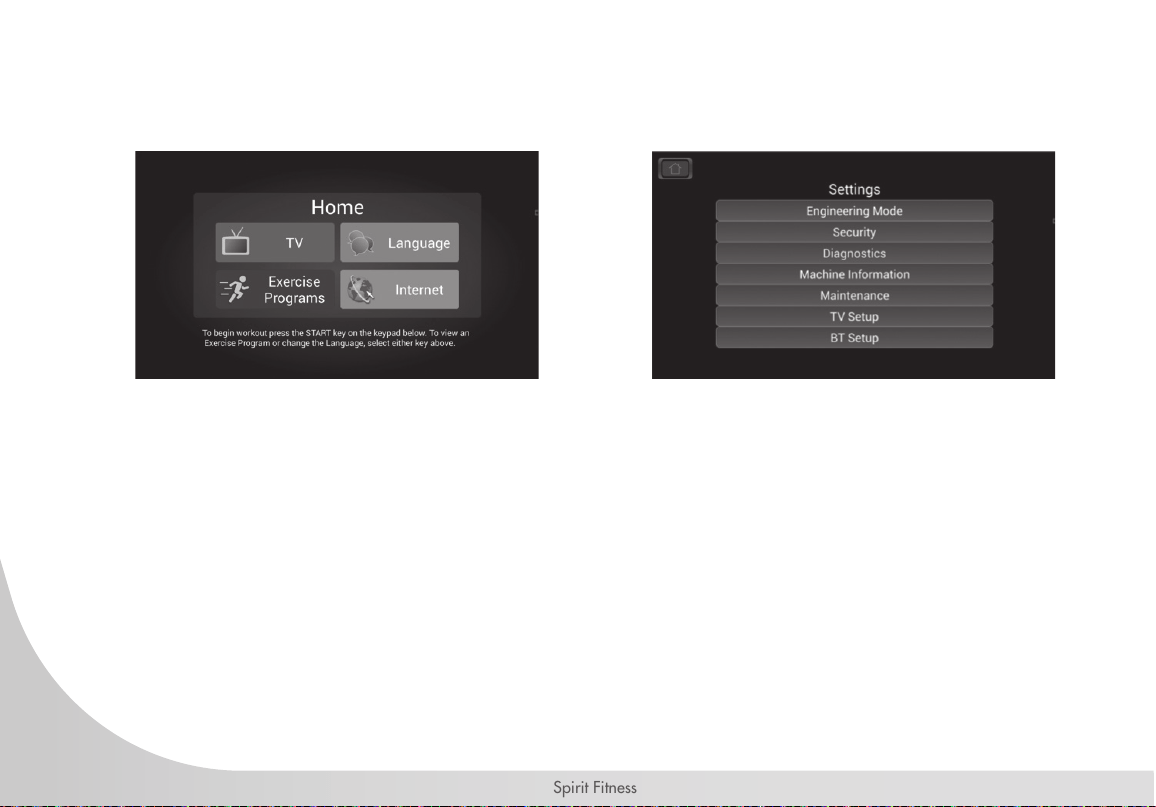
SETTINGS
Press the Home icon ten consecutive repetitions to enter the Maintenance suite.
The two most commonly used menus for setting up the exercise machine are described below; the TV
Setup and Maintenance menus. For information on other sections of the Maintenance suite refer to the
technical service manual or call Spirit service.

17
www.spirittness.com
TV SETUP
1. Begin by selecting either TV or HDMI as the tuner source.
2. Press OSD Menu. The rst highlighted item on the menu is
Air/Cable and then Cable or Air afterward. Press the
OSD Enter to change the selection between Cable and Air
Signal source, usually Cable).
3. After selecting Cable or Air use the arrows located below
the OSD Exit button to navigate down to Auto Scan
then press OSD Enter. The tuner will now scan for all
available channels. Press OSD Exit when done. You can
modify the channels by pressing the Update Channel List.
4. The OSD Command button is for engineering use only.
18
Spirit Fitness
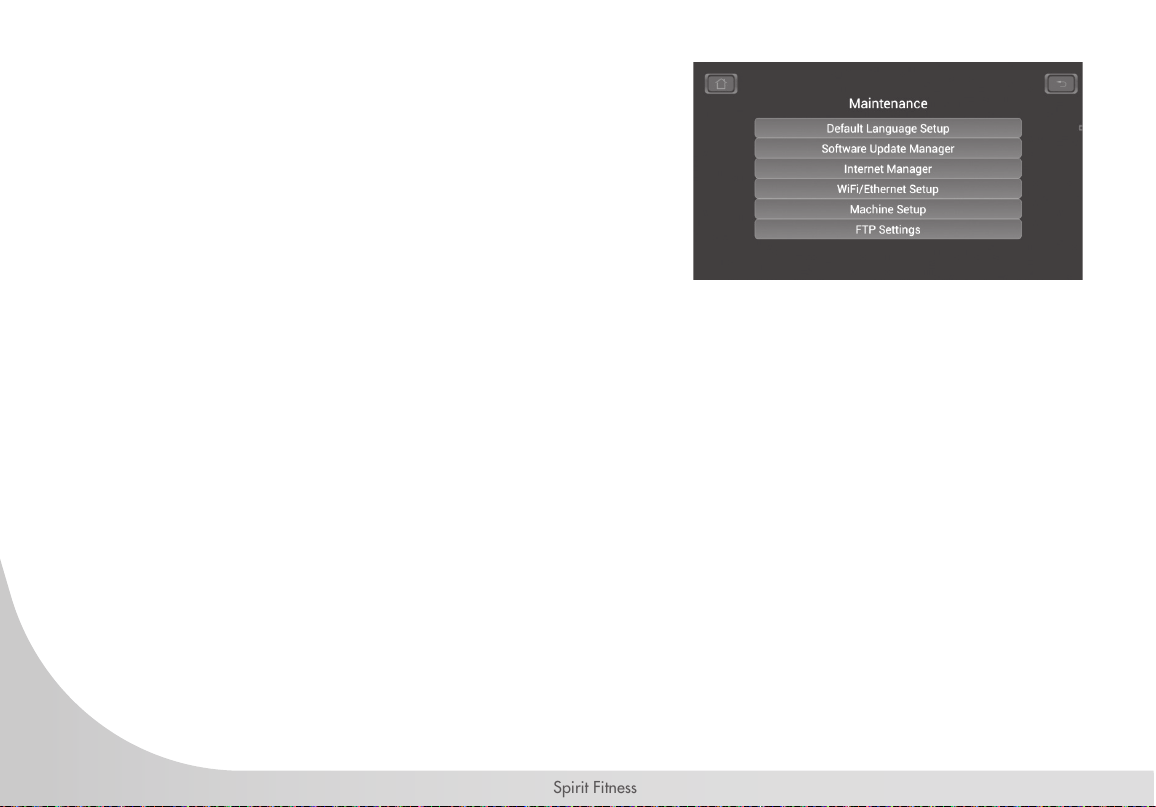
MAINTENANCE MENU
• The Default language setup allows you to select the main
language that will be shown when the console is turned on.
You are able to select the language in the Home menu, but
once the user nishes using the machine the console will return
to this default language.
• Software Update Manager is used to install new versions of
the application software.
• Internet Manager allows you to modify the internet sites that are
shown in the Internet menu.
• Wi/Ethernet Setup is for selecting a Wi signal or
Ethernet addresses.
• Machine Setup allows you to select whether the Csafe port is
used for Csafe or CAB TV Tuner. This menu also allows you to
set the screen brightness.
• FTP Settings is the Spirit FTP site address where Error logs and
remote troubleshooting can be managed.
19
www.spirittness.com
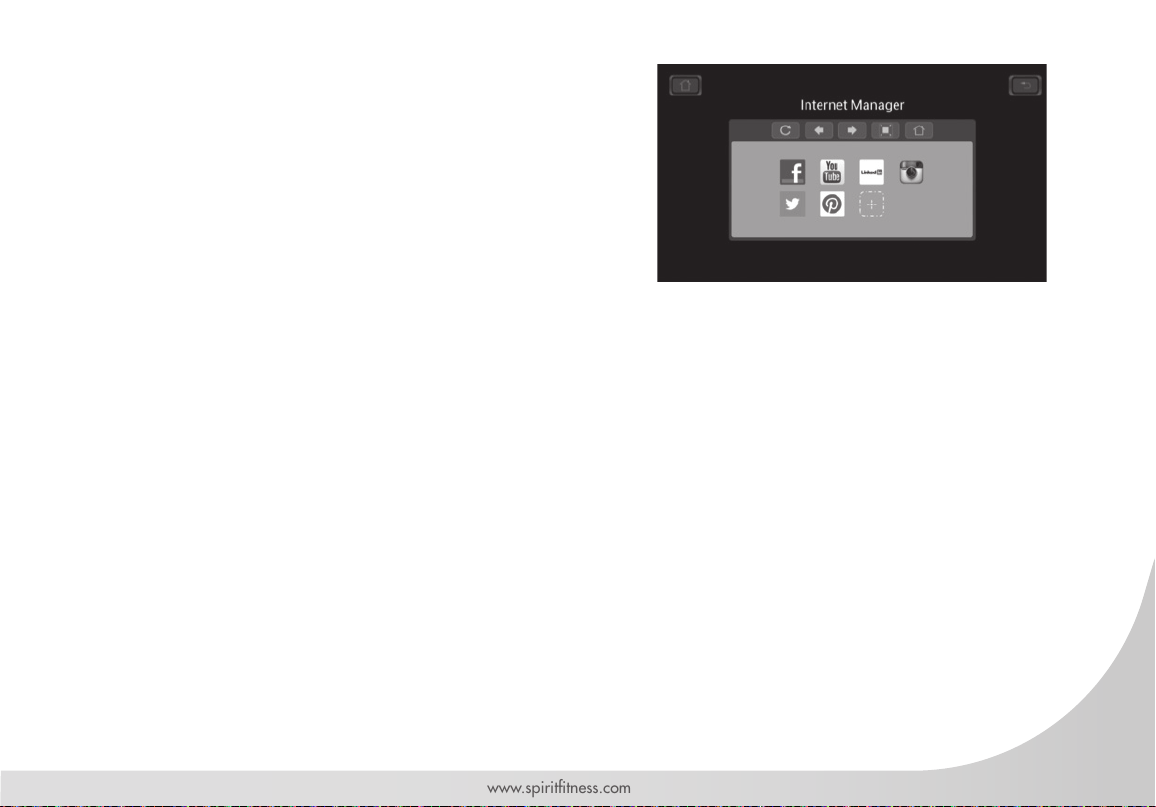
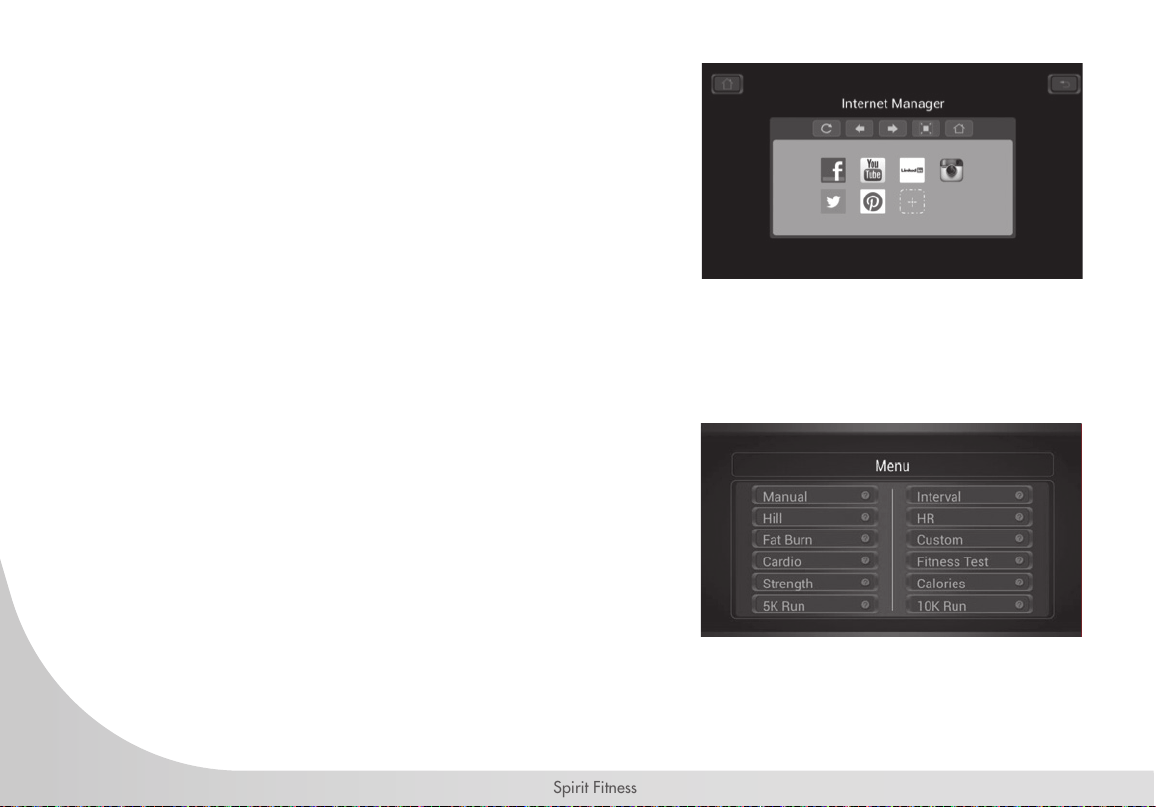
INTERNET MANAGER
1. Remove a link by pressing the icon of the site you want to
remove for two seconds. A pop-up window will ask you to
conrm the removal.
2. To add a website press the dotted outline box. A pop-up
window will ask you to enter the web address and upload a
picture for the nal button if you wish. You could also just use a
default-look button and type in the name of the site, which will
then be the button icon.
20
Spirit Fitness
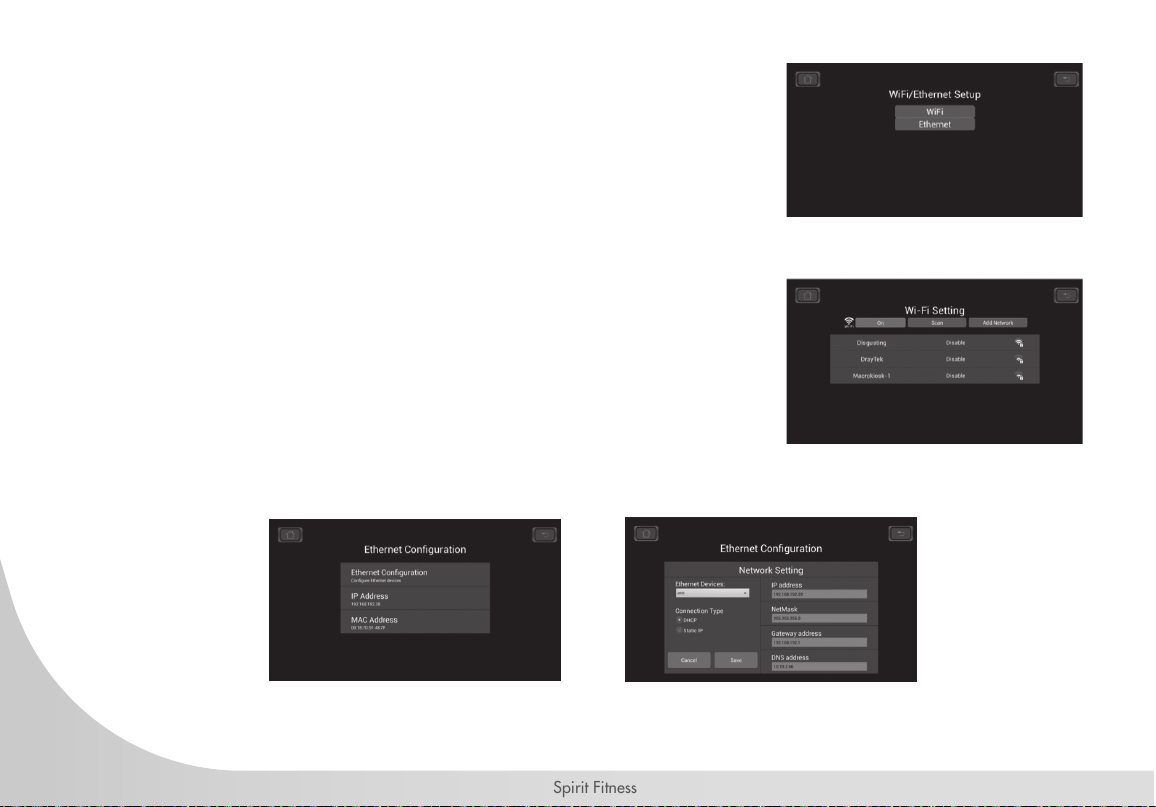
WIFI/ETHERNET SETUP
Press the desired button for setting up Wi or Ethernet.
WIFI SETUP
Turn Wi on and press scan for available Wi connections. Press
desired connection and follow the on-screen directions.
ETHERNET SETUP
Select DHCP to search for connection
or Static IP to enter manually
Press Ethernet Conguration to set
up a new connection.
21
www.spirittness.com
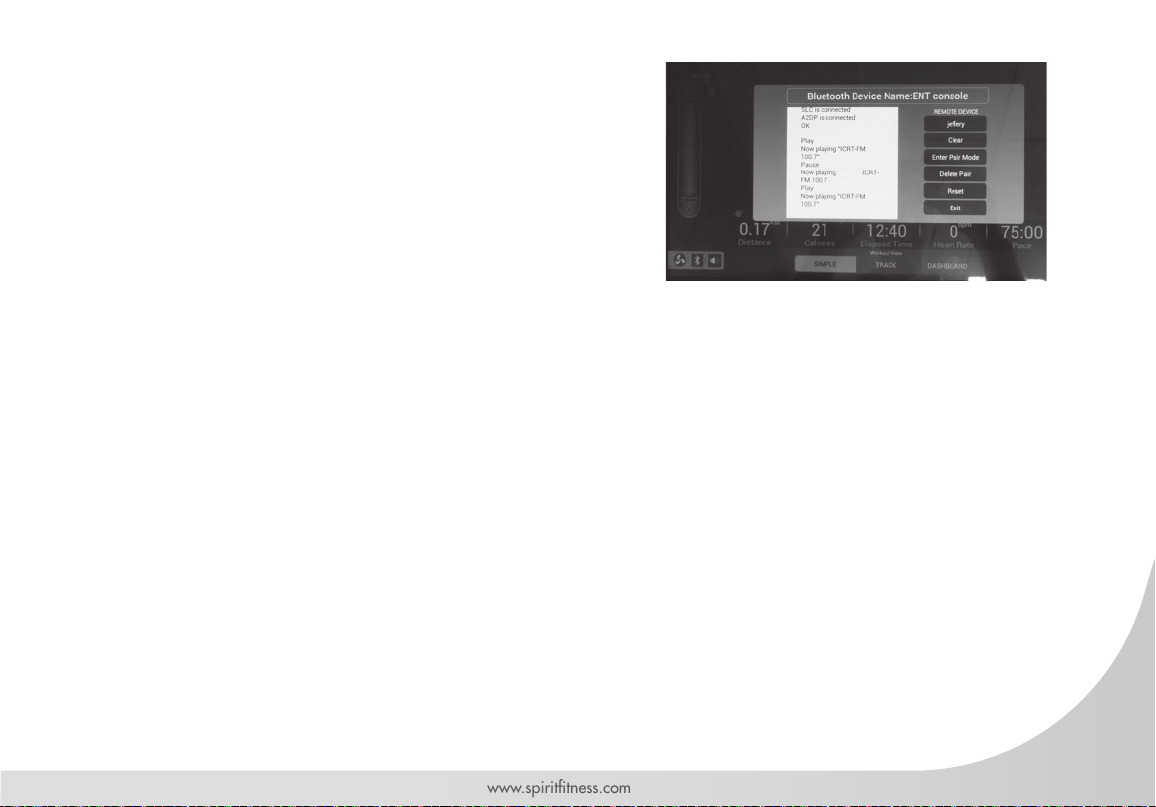
BLUETOOTH PAIRING PROCEDURE
1. Press the Blue Tooth (BT) icon on the bottom left of the screen.
2. The BT pop-up screen will appear. Turn on Phone/tablet BT and
then press Pair Mode on ENT Menu.
3. The menu with show Entering Pairing mode and the phone will
show A2DP as an available device.
4. The A2DP console and phone will ask you to conrm pairing,
press OK.
5. Pairing complete
6. Open audio APP on phone and the audio will be played
through the headphone port on the ENT console.
22
Spirit Fitness
TOUCH SCREEN OPERATION
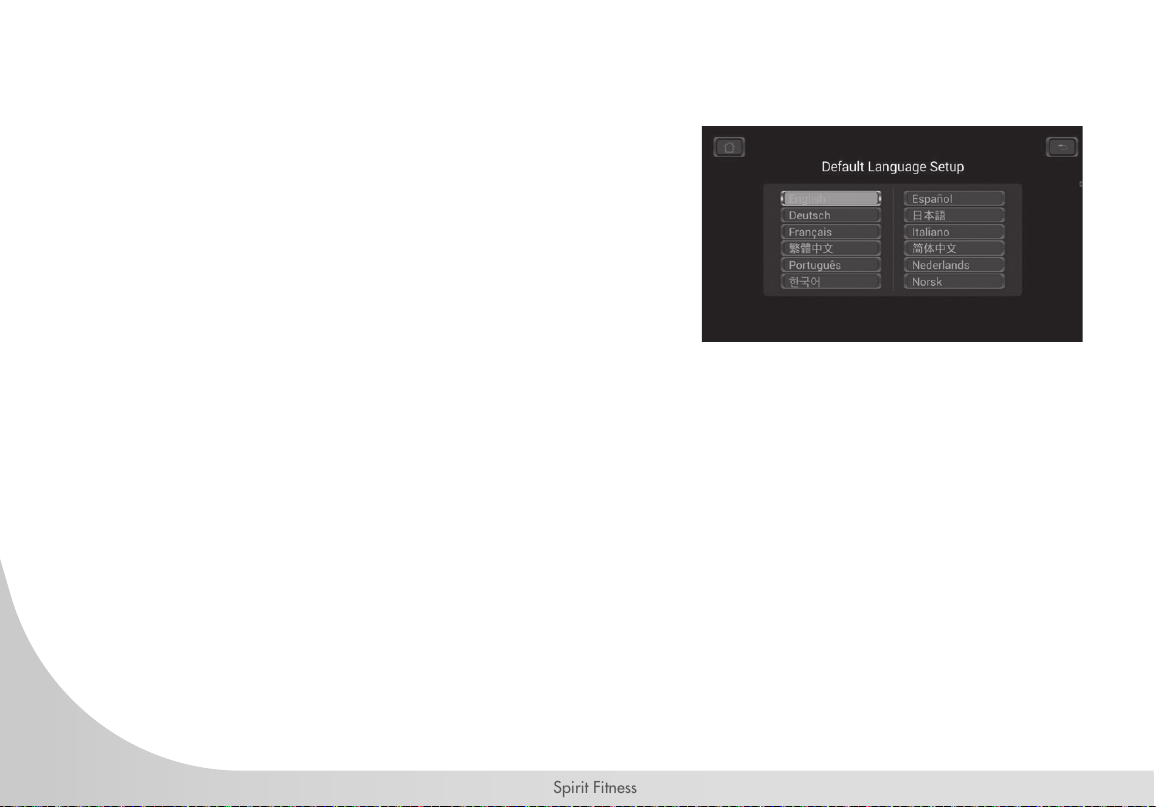
LANGUAGE
When you press the Language button on Home screen, it
enters the menu with all language options.
There are 12 languages to choose from. Touch the desired
language and the system will return to the Home screen which
will now be in the chosen language.

23
www.spirittness.com
TV
When the TV button on the Home screen is pressed, it directly
enters TV interface.
Now you can enjoy TV programs. If you want to enjoy TV
while exercising, press Start button at front of the treadmill to
initiate Quick Start or press Programs to select a workout.
You can change the TV channels by pressing the channel up/
down buttons on the right side of the screen. You can also use
the Volume Up/Down buttons to change the sound levels. If
you want to silence the audio touch Mute button. Touch the Max
Screen to switch to full screen viewing. Touching anywhere on the
screen will return it to the original screen size.
24
Spirit Fitness
INTERNET
When the Internet button on the Home page is pressed, you
are directed to Internet interface.
There are 6 basic internet sites to choose from. You may
change or add other sites through the Maintenance program
(more on this later in the manual in the System Maintenance
Suite section).
NOTE: An internet cable connection or WIFI connection is
required.
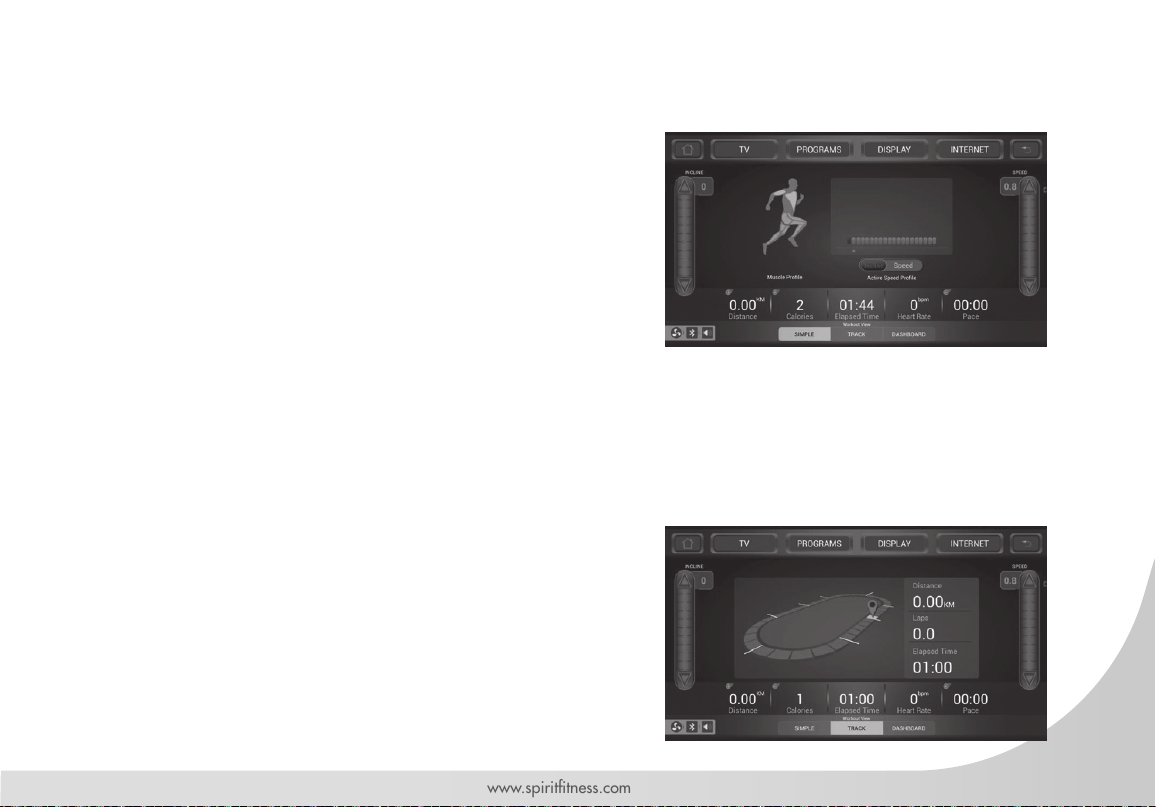
EXERCISE PROGRAMS
When the Exercise Program button on the Home page is
pressed, the tness program menu appears.
There are 12 programs to choose from. Press the desired
program button and follow the on-screen directions. For Manual
Program as an example, just touch Manual button on the
screen to enter the programming for Manual.

25
www.spirittness.com
FUNCTIONS OF THIS TREADMILL
The Touch-control screen is used for operating all functions of the treadmill. You can directly touch any
button on the screen or through quick buttons on the forward pod to control functions. On the forward pod,
there are Fast/Slow buttons to control the speed, Start button to begin the workout, Stop button to pause/
stop running, Incline Up/Down buttons to control the incline of the treadmill.
QUICK START
Press any button to wake display up if not already on.
• Press the Start button to begin belt movement at 0.5 mph then adjust to the desired speed using the Speed +/–
button, or by typing the desired speed on the numeric keypad. Once setting desired is selected press Enter.
• To stop the treadbelt press and release Stop button.

26
Spirit Fitness
PAUSE/STOP/RESET
When the treadmill is running the pause feature may be utilized by pressing the red Stop button once. This will
slowly decelerate the treadbelt to a stop. The incline will go to zero percent. The Time, Distance and Calorie
readings will hold while the unit is in the pause mode. After 5 minutes the display will reset and return to the
start-up screen.
• To resume your exercise when in Pause mode, press the Start button. The speed and incline will return to their
previous settings.
• Pressing the Stop button twice will end the program and a workout summary will be displayed. If the Stop button is
pressed a third time, the console will return to the idle mode (start-up screen).
• If the Stop button is held down for more than three seconds the console will reset.
• When you are setting data, such as age and time, for a program pressing the Stop button will allow you to go
back one step for each button press.
INCLINE
• Incline may be adjusted any time after the belt starts moving.
• Press and hold the adjustment Incline +/– buttons to achieve desired level of incline.
• The display will indicate incline numbers as percent of grade (the same as grade of a road) as adjustments are made.
27
www.spirittness.com
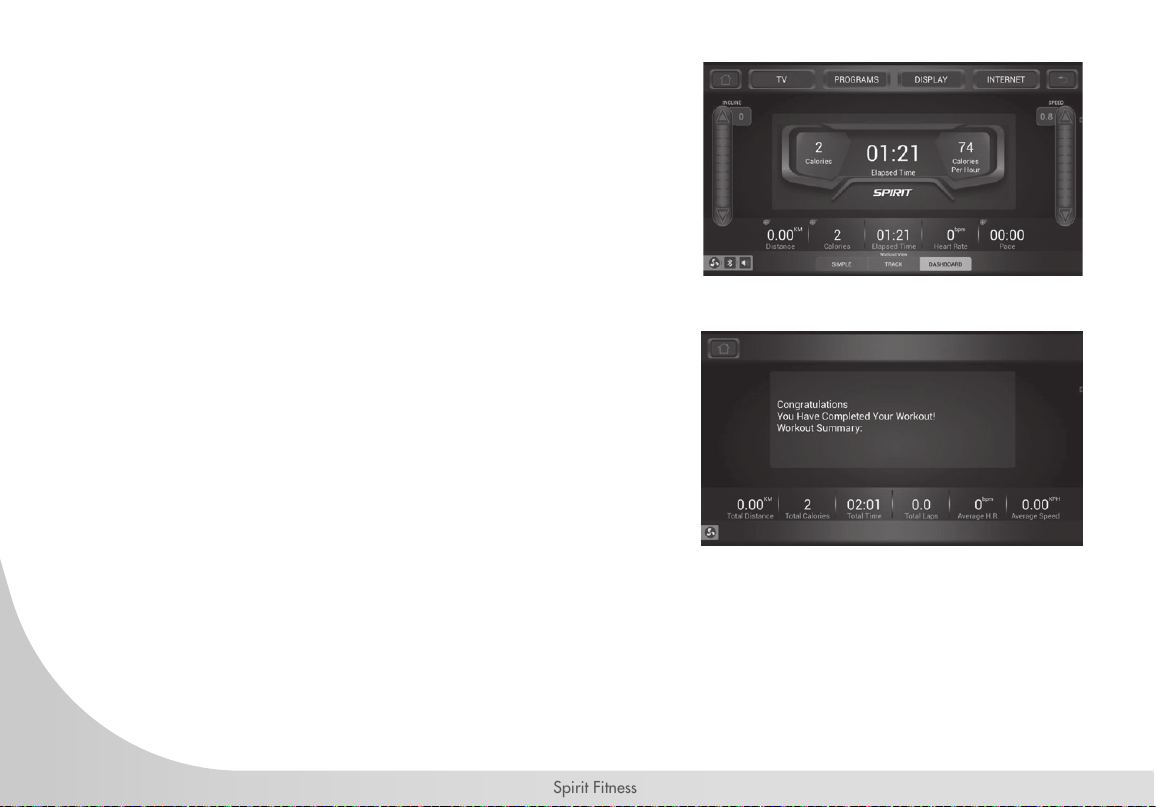
DISPLAY OPTIONS
SIMPLE
The default display at the start of a program is a Simple
display. The prole window shows the work level graphically.
All your workout values are displayed on the bottom of the
screen. Some of the data windows have a + sign at the top
indication more data available. Press the data window to see
other information available.
Below the prole window are buttons that allow you to switch
the display between the speed and incline proles. Below the
data displays are Track and Dashboard buttons for selecting
other display options. A muscle prole displays active muscle
groups as workloads change.
TRACK
The Track display gives a graphical representation of your
position on a virtual track. The image shows the track with
a lap counter and other values.
28
Spirit Fitness
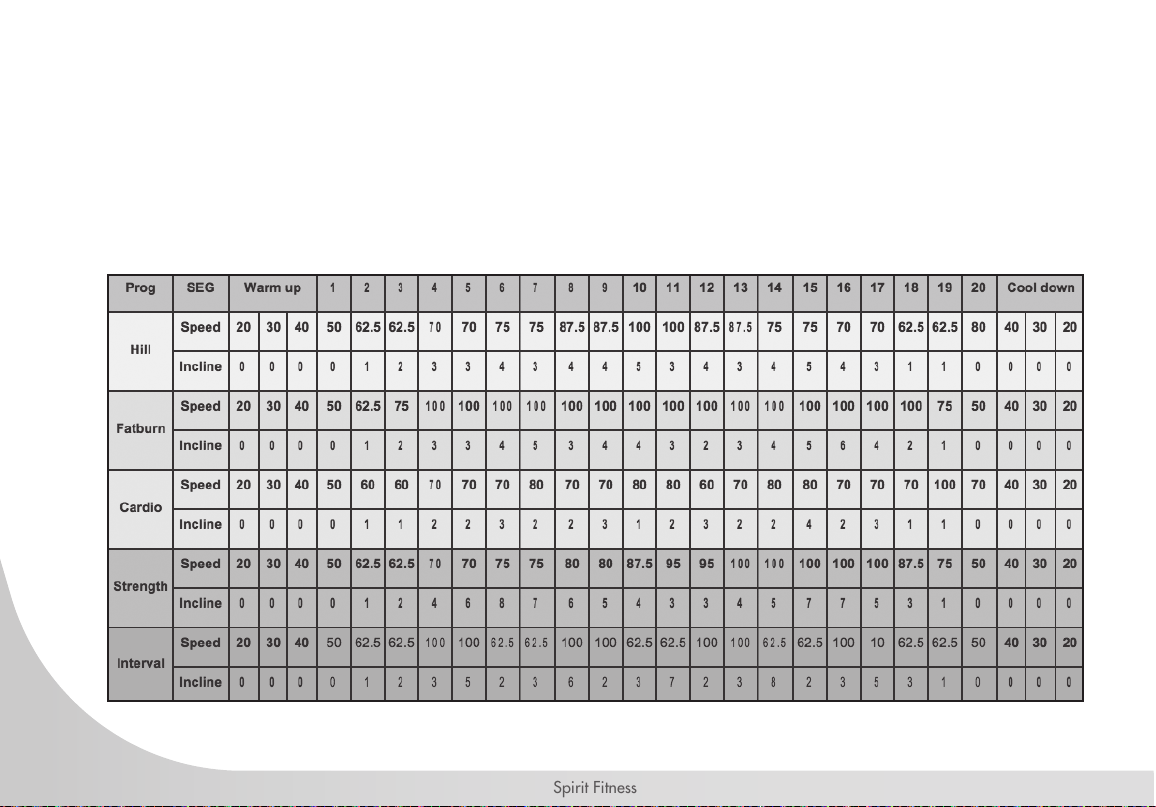
DASHBOARD
The Dashboard display shows a larger display area of
key information.
STOP BUTTON
When using the Stop button to end the program, it enters the
summary screen.
On the summary screen, all accumulated values concerning
the workout are displayed. You can touch the Home button at
left top or press Stop button to return to the home screen.

29
www.spirittness.com
HEART RATE FEATURE
The Pulse (Heart Rate) on the screen shows the current value of the heart beats per minute. You must use
both left and right stainless steel sensors to pick up your pulse. Pulse values are displayed anytime the
computer is receiving a Grip pulse signal. You may use the Grip pulse feature while in Heart Rate Control.
The CT900ENT will also pick up wireless heart rate transmitters that are Polar compatible.
TO TURN TREADMILL OFF:
The screen will automatically turn off (go to sleep) after 30 minutes of inactivity. This function is called sleep
mode. In sleep mode, the treadmill will power down most everything except for a minimum of circuitry
for detecting button presses and the safety key so it will start up again if these are activated. There is only
a tiny amount of current used in sleep mode (about the same as your TV when it is turned off) and it is
perfectly ne to leave the main power switch on in sleep mode. Of course you may also remove the safety
key or turn off the main power switch to power down the treadmill.

30
Spirit Fitness
PROGRAMMING THE CONSOLE
Each of the programs can be customized with your personal information and changed to suit your needs.
Some of the information asked for is necessary to ensure the readouts are correct. You will be asked for
your Age and Weight. Entering your Age ensures that the Heart Rate bar graph shows the correct number.
Your Age is also necessary during the Heart Rate control program to ensure the correct settings are in the
program for your Age. Otherwise the work settings could be too high or low for you; entering your Weight
aides in calculating a more correct Calorie reading. Although we cannot provide an exact calorie count
we do want to be as close as possible.
CALORIE NOTE: Calorie readings on every piece of exercise equipment, whether it is in a gym or at
home, are not accurate and tend to vary widely. They are meant only as a guide to monitor your progress
from workout to workout. The only way to measure your calorie burn accurately is in a clinical setting
connected to a host of machines. This is because every person is different and burns calories at a different
rate. Some good news is that you will continue to burn calories at an accelerated rate for at least an hour
after you have nished exercising!

31
www.spirittness.com
ENTERING A PROGRAM & CHANGING SETTINGS
The Spirit Fitness CT900ENT offers a variety of exercise program options to choose from: Manual, Hill, Fat
Burn, Cardio, Strength, 5k Run, Interval, HR, Custom, Fitness Test (Air Force, Army, Coast Guard, Gerkin,
PEB, Marine Corps, Navy, WFI), Calories, and 10k Run. To select and start a preset program:
1. Select a preset program button then press Enter to begin customizing the program with your personal data, or just
press the Start button to begin the program with the default settings.
2. After selecting a program and pressing enter to set your personal data, the Message window will prompt you
through the settings starting with time. The default value of 20 minutes will be displayed and you may press Enter to
accept or change it using the keypad and just press Enter to move to the next step
3. The Age window will now be displaying a value indicating your Age. (Entering the correct Age will affect the
Heart rate bar graph accuracy and also needed for the HR programs. Use numeric key pads to make adjustments,
and then press Enter conrm. Default age is 30 years old. Range=10 to 110).
4. The Weight window will now be showing a value indicating your Bodyweight. (Entering your correct bodyweight
affects the Kcal readout accuracy. Use the numeric key pad to make adjustments, and press the Enter button to
conrm. (Default weight is 70KG. Range=10 to 150).
5. The Message Window will now be showing the preset top speed of the selected program. Use the keypad to adjust
and then press Enter. Each program has various speed changes throughout; this allows you to limit the highest speed
the program will attain during your workout.
6. Now press the Start button to begin your workout, or the Stop button to return to the previous screen.
7. There will be a 3-minute warm-up to begin. You can press the Start button to bypass this and go straight
to the workout. During the warm-up the clock will count down from three minutes.
32
Spirit Fitness
P1= HILL; P2= FAT BURN; P3= CARDIO; P4= INTERVAL
PRESET PROGRAMS SPEED/INCLINE SETTINGS
The preset program Speed and Incline levels are shown in the chart below. The Speed numbers shown in
the chart indicate a percentage of the top speed of the program. For instance, the rst Speed setting for P1
(Program 1, HILL) shows the number 20.This means that this segment of the program will have a speed that
is 20% of the top speed for the program (The user sets the top speed in the procedure above). If the user
sets the top speed to 10 mph, then the rst segment will be 2 mph. You will notice that segment 12 shows
100 which means the speed will be set to 100% of 10 mph or simply 10 mph.

33
www.spirittness.com
MANUAL
Both Speed and Incline are controlled by the user. Increase
or decrease levels at any time during your workout.
HILL
Speed: This program follows a triangle or pyramid type of gradual
progression from approximately 10% of maximum effort (the level
that you choose before starting this program) up to a maximum
effort which lasts for 10% of the total workout time, then a gradual
regression of Speed back to approximately 10% of maximum effort
Incline: The deck elevation is a more gradual and sustained
progression. Maximum elevation is in the middle of the workout
and lasts for 10% of the duration.
FAT BURN
Speed: This program follows a quick progression up to the
maximum speed level (default or user input level) that is sustained
for 2/3 of the workout. This program will challenge your ability to
sustain your energy output for an extended period of time.
Incline: The deck elevation is a quick and sustained progression up
to the maximum value (default or user input) for 90% of the workout
duration.
34
Spirit Fitness
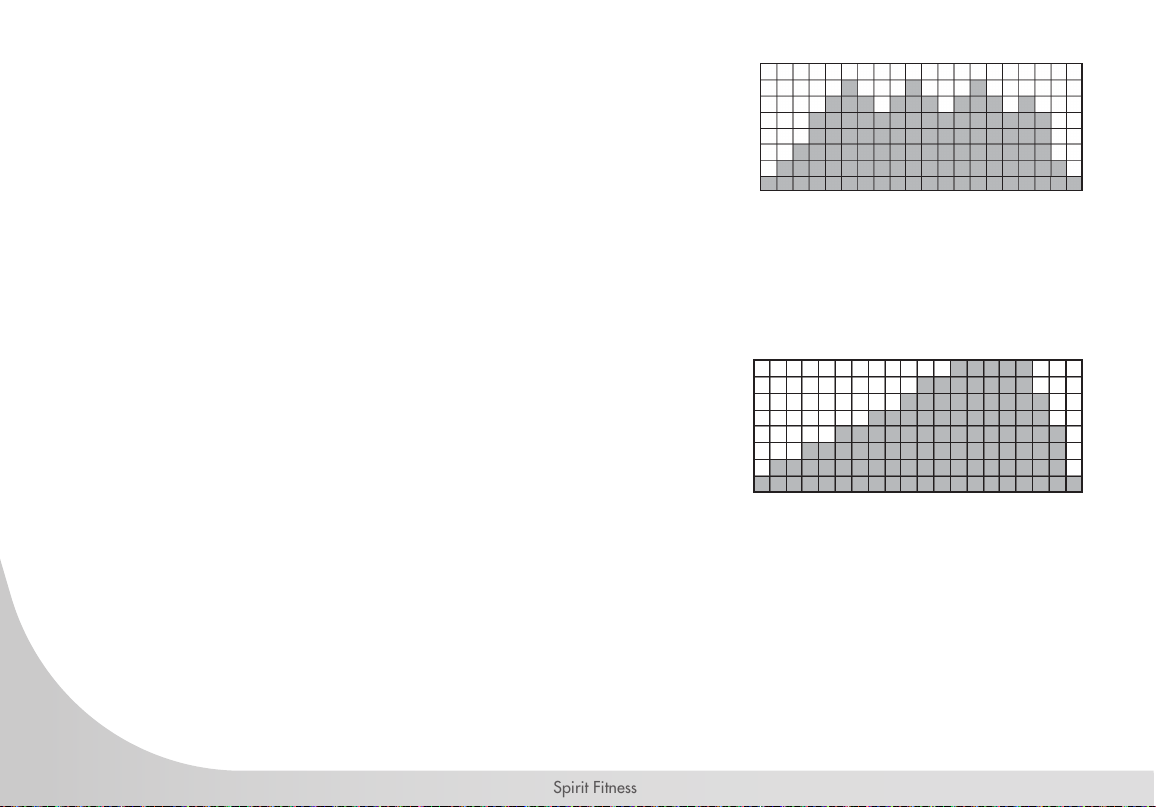
CARDIO
Speed: This program presents a quick progression up to near maximum
speed level (default or user input level). It has slight uctuations up and
down to allow heart rate to elevate, and then recover repeatedly,
before beginning a quick cool down. This will build up your heart
muscle and increase blood ow and lung capacity.
Incline: The elevation in this program is moderate. There are several
elevation spikes at different points of the workout. Segments 4, 9,
and 14 are maximum elevation for this program.
STRENGTH
Speed: This program has a gradual progression of speed up to
100% of maximum effort that is sustained from 25% of workout
duration. This will help build strength and muscular endurance in
the lower body and gluten. A brief cool down follows.
Incline: There is a quick climb to a moderate, sustained elevation
that lats the majority of the workout length.
5K RUN
Both speed and incline are controlled by the user. Increase or
decrease levels at any time during your workout. The track display
will set the distance of 1 lap to 5 kilometers (metric) or 3.1 miles
(standard measurement).

35
www.spirittness.com
INTERVAL
Speed: This program takes you through high levels of intensity
followed by recovery periods of low intensity. This program utilizes
and develops your “Fast Twitch” muscle bers which are used
when performing tasks that are intense and short in duration. These
deplete your oxygen level and spike your heart rate, followed by
periods of recovery and heart rate drop to replenish oxygen.
Incline: All of your lower extremity muscles will be equally
challenged throughout this program. The incline alternates
between 25% and 65% of maximum elevation.
HR
The default value is 65% of your projected rate maximum. You
have the option of changing your target heart rate. The machine
will attempt to keep you within ve beats of your target heart rate.
CUSTOM
You will create the desired speed and incline levels for each of the
20 segments of the program using the pop out keyboard on the
screen. After the program has started, you still have the ability of
changing these levels whenever you desire.
36
Spirit Fitness
FITNESS TEST
When the Fit test button is pressed the DM displays: GERKIN. This is the rst of 8 different tests available:
Air Force, Army, Coast Guard, Gerkin, PEB, Marine Corps, Navy, and WFI. The initial test is GERKIN; to
select a different test press the Fitness Test button again and the next test will be shown. Continue to press the
Fitness test button until the test you want is shown in the message window. To select your desired tness test,
press Enter.
Fit Test Operation:
1. For each program the Message Window will prompt you to enter your personal data such as Age, Weight,
Height, Gender. You may adjust the settings using the keypad or Up and Down buttons then press the Enter
button to accept the new number and proceed on to the next screen.
2. After all required data is entered you may now press Start to begin the test.
AIR FORCE
A timed 1.5 mile run. You control the speed manually. Maximum time allowed to pass the test:
For more detailed information, visit: http://bit.ly/SF-AirForce
37
www.spirittness.com
ARMY
A timed 2 mile run. You control the speed manually. Maximum time allowed to pass the test.
For more detailed information, visit: http://bit.ly/SF-Army
NAVY
A timed 1.5 mile run. You control the speed manually. Maximum time allowed to pass the test:
For more detailed information, visit: http://bit.ly/SF-Navy
38
Spirit Fitness
MARINES
A timed 3 mile run. You control the speed manually. Maximum time allowed to pass the test:
For more detailed information, visit: http://bit.ly/SF-Marines
39
www.spirittness.com
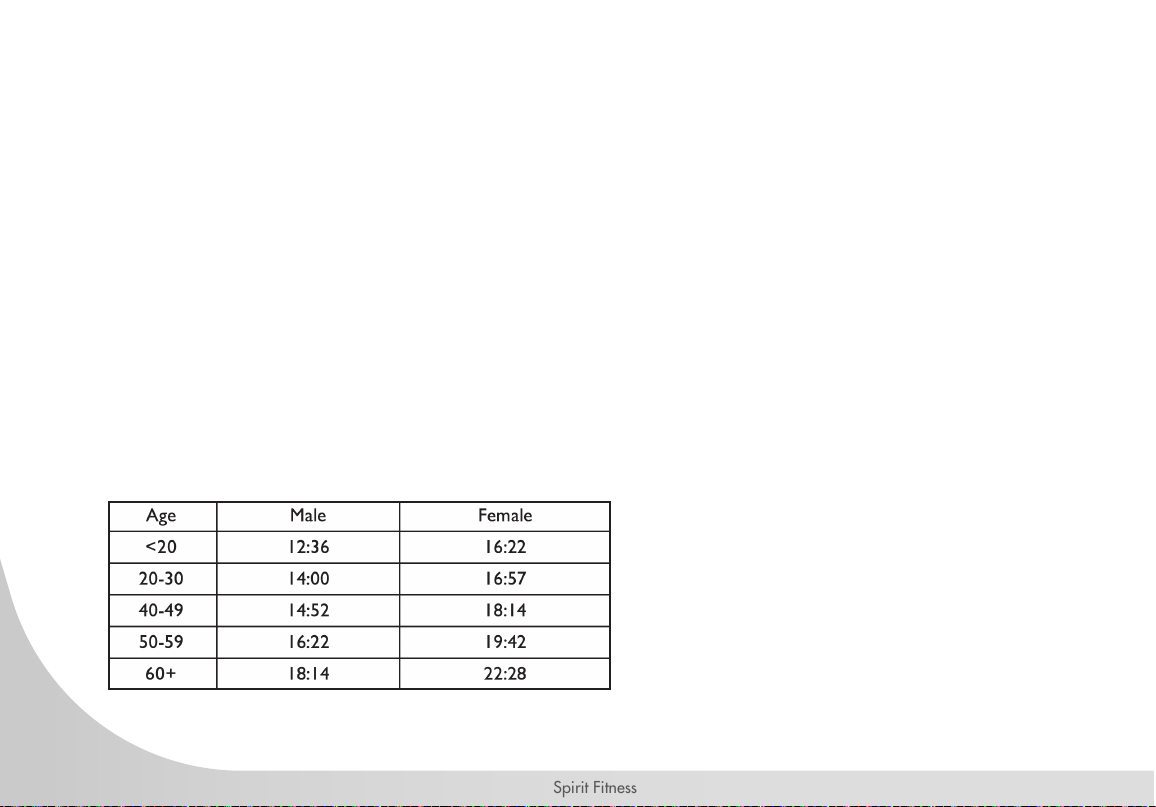
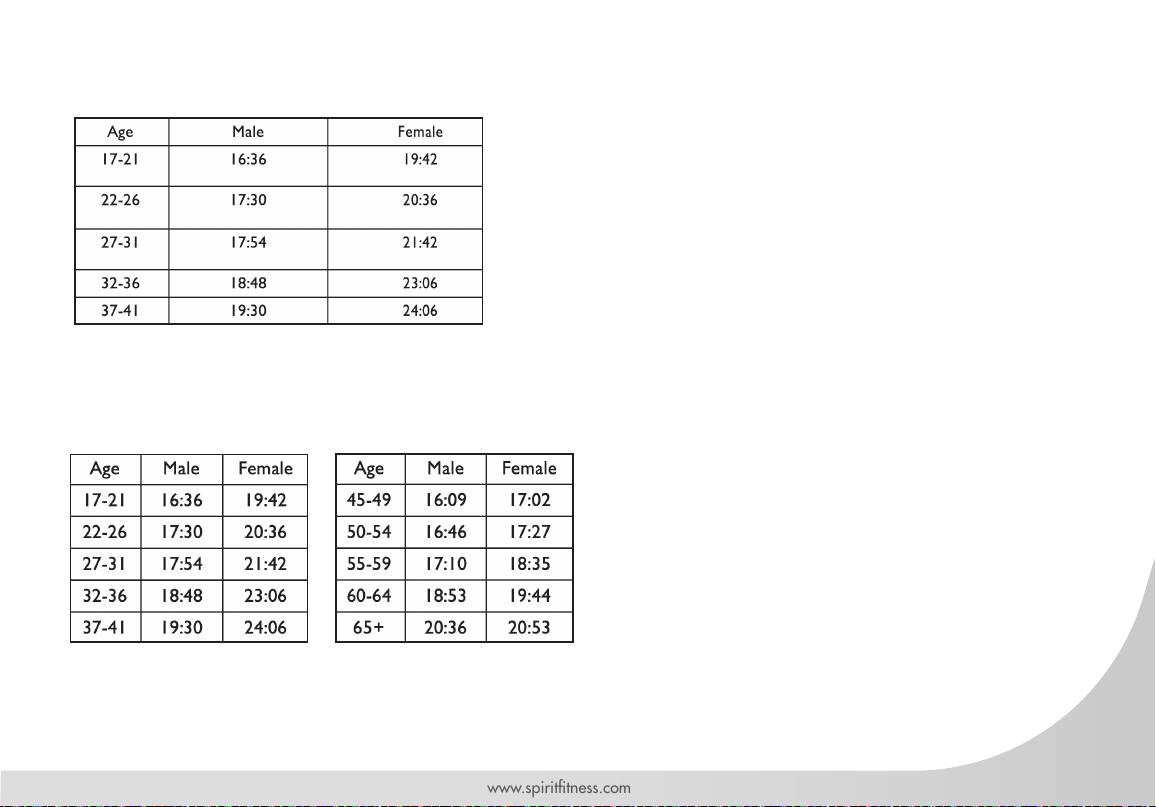
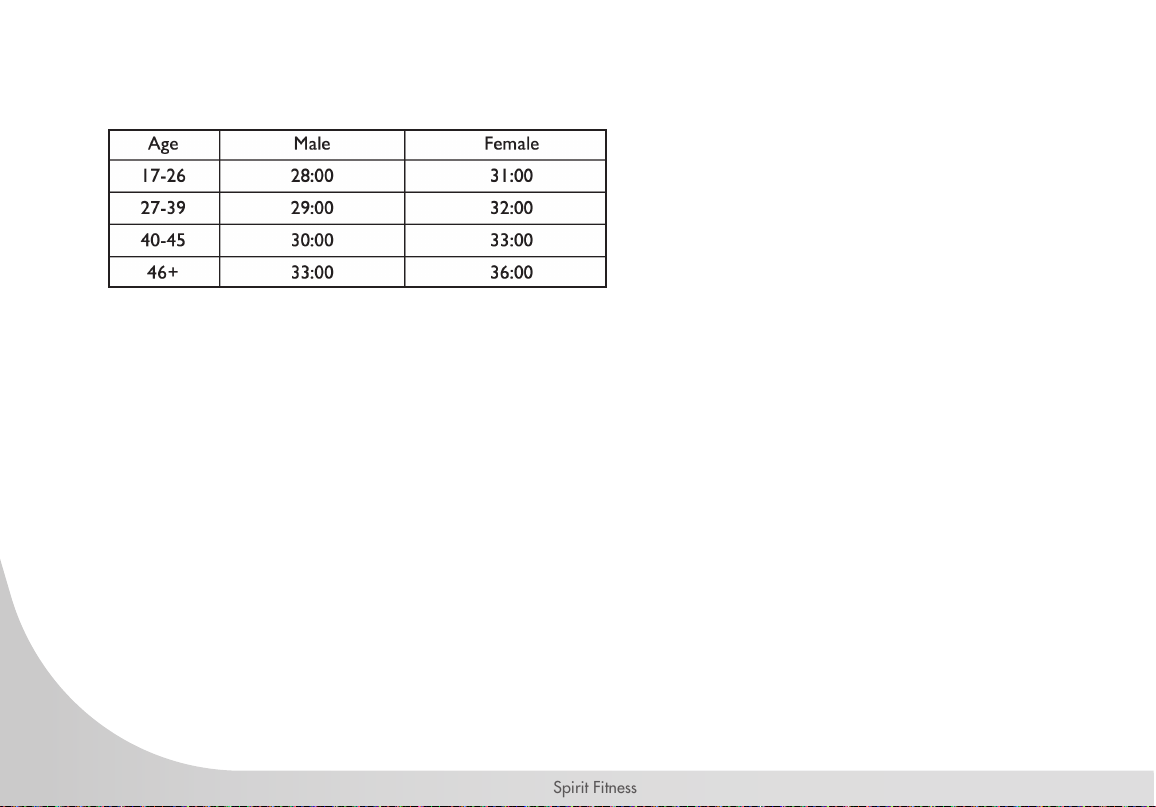
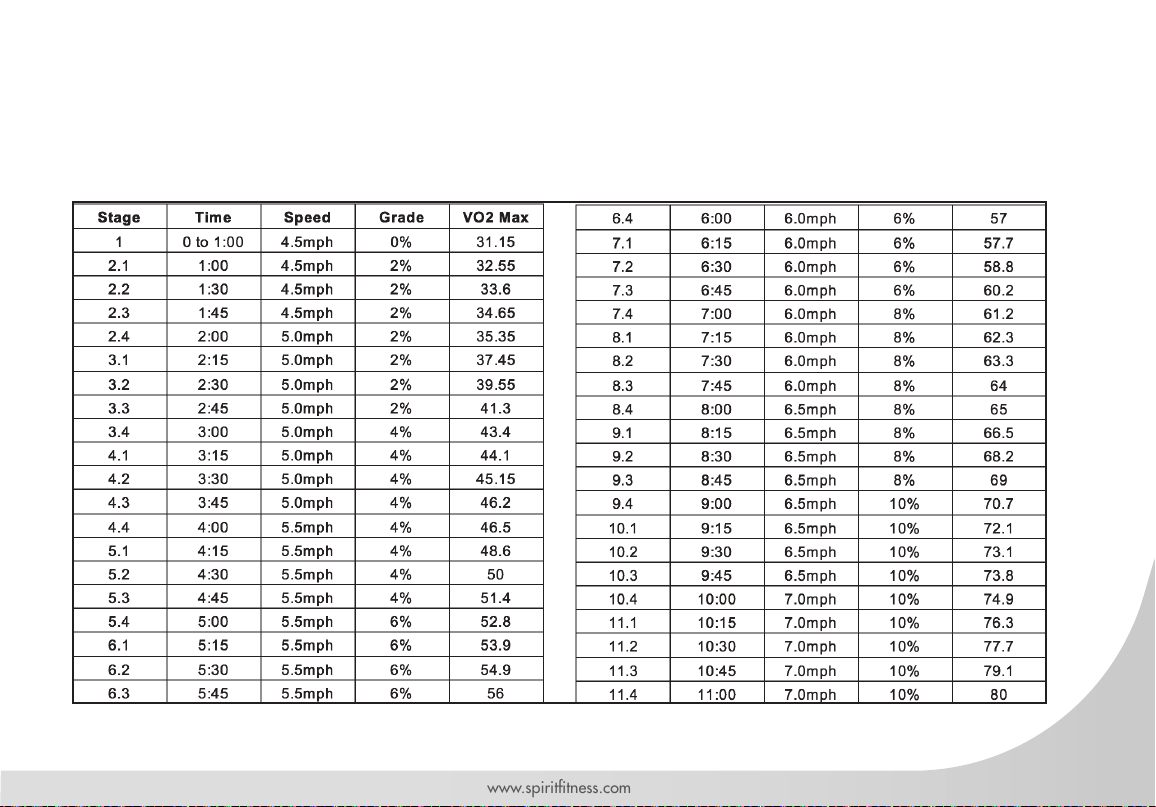
GERKIN
The Gerkin protocol, also known as the reman’s protocol, is a sub-max Vo2 (volume of oxygen) test. The
test will increase speed and elevation alternately until you reach 85% of your Max heart rate. The time it
takes for you to reach 85% determines the test score (VO2max) as shown in the chart below.

40
Spirit Fitness
Before The Test:
• Make sure you are in good health; check with your physician before performing any exercise if you are over the
age of 35 or persons with pre-existing health conditions.
• Make sure you have warmed up and stretched before taking the test.
• Do not take in caffeine before the test.
• Hold the hand grips gently, do not tense up.
During the Test:
• The console must be receiving a steady heart rate for the test to begin. You may use the hand pulse sensors or
wear a heart rate chest strap transmitter.
• The test will start with a 3-minute warm-up at 3 MPH before the actual test begins.
• The data shown during the test is:
1. Time indicates total elapsed time
2. Incline in percent grade
3. Distance in miles or kilometers depending on preset parameter.
4. Speed in mph or kph depending on preset parameter.
5. Target heart rate and Actual heart rate are shown in the Message window.
After the Test:
• Cool down for about one to three minutes.
• Take note of your score because the console will automatically return to the start-up mode after a few minutes.
41
www.spirittness.com
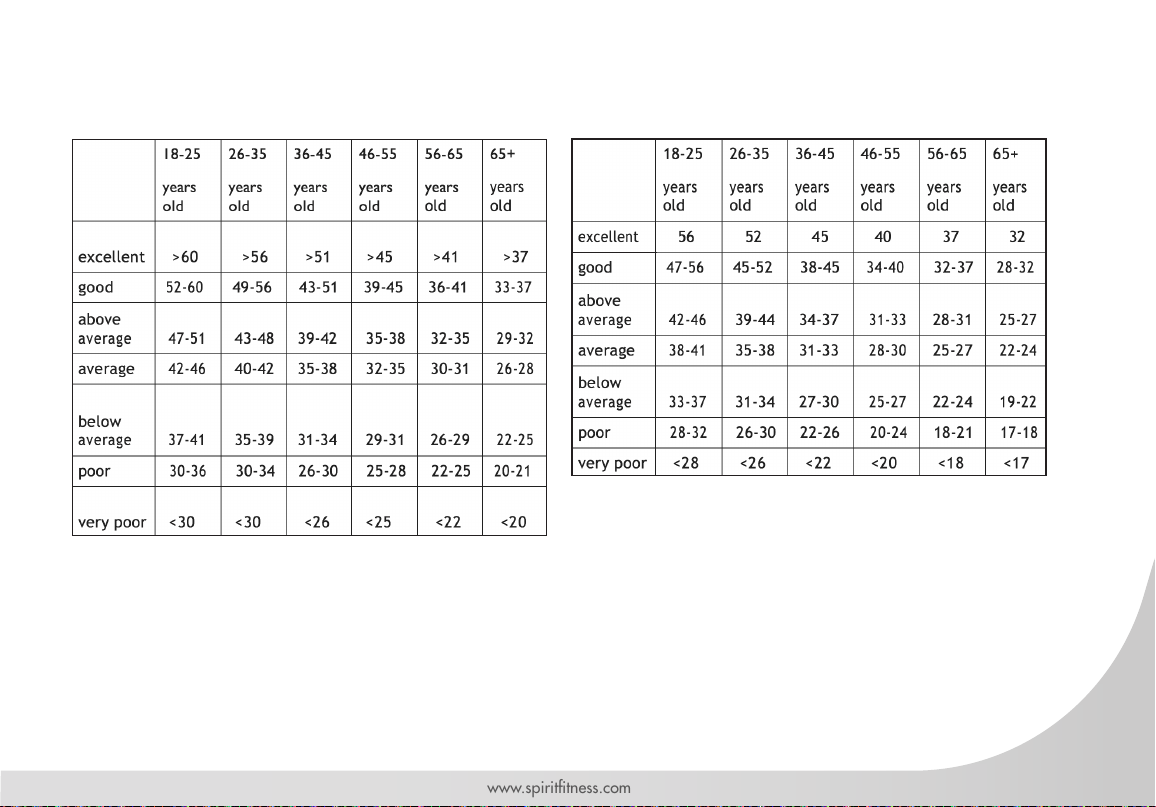
What Your Score Means:
VO2MAX CHART FOR FEMALES AND DECONDITIONED MALESVO2MAX CHART FOR MALES AND VERY FIT FEMALES

42
Spirit Fitness
CALORIE PROGRAM
Speed: This program follows a progression up to the maximum speed level (default or user inout level) that is
sustained for 2/3 of the workout. This program will challenge your ability to sustain your energy output for an
extended period of time.
Incline: The treadmill elevation is a quick and sustained progression yup to the maximum value (default or user
input) for 90% of the workout duration.
10K RUN
Both speed and Incline are controlled by the user. Increase or decrease levels at any time during your workout. The
track Display will set the distance of 1 Lap to 10 kilometers (metric) or 6.2 miles (standard measurement).

43
www.spirittness.com
HEART RATE PROGRAM
Heart Rate Control (HRC) uses your treadmill’s incline system to control your heart rate via information from pulse grips or
wireless chest strap. Increases and decreases in elevation affect heart rate much more efciently than changes in speed
alone. The HRC program automatically changes elevation gradually to achieve the programmed target heart rate.
Selecting a Heart Rate Control Program:
You have the option, during the set up mode, to choose either the Weight control (HR 1) program or the Cardiovascular
(HR 2) program. The Weight control program will attempt to maintain your heart rate at 60% of your Maximum Heart
Rate. The Cardiovascular program will attempt to maintain your heart rate at 85% of your Maximum Heart Rate.
Your Maximum Heart Rate is based upon a formula that subtracts your age from a constant of 220.Your HR setting is
automatically calculated during the setup mode when you enter your age.
Heart Rate Control programming:
1. Press HR button to enter heart rate program.
2. Now the window will show PRESS ENTER TO MODIFY OR START TO BEGIN WORKOUT. You can either press
the Enter button for settings or press the Start button to execute the program.
3. When the Enter button is pressed, the Message window shows PRESS 1 OR 2 TO SELECT THEN PRESS ENTER.
At the same time, the dot matrix window is showing “1” and you can press numeric keypad 1 or 2 and then the
Enter button.
4. Now Message Window is showing ADJUST TIME THEN PRESS ENTER with Time Window blinking. Use
Up/Down buttons or numeric keys to adjust. After setting time, press the Enter button again.
5. Now Message window is showing ADJUST AGE THEN PRESS ENTER with Incline Window blinking. Use
Up/Down/ Fast/Slow buttons or numeric keys to adjust. Adjusting age will change HR value (as the HR formula
described previously). After age is set, press the Enter button again.

44
Spirit Fitness
6. Now Message window is showing ADJUST BODY WEIGHT THEN PRESS ENTER with Incline Window blinking.
Use Up/Down buttons or numeric keys to adjust. After the weight is set, press Enter button again.
7. Now Message window is showing ADJUST HEART RATE THEN PRESS ENTER with Speed Window blinking.
Use Up/Down buttons or Numeric keys to adjust. After the target heart rate value is set, press the Enter button again.
8. The Message window is then showing PRESS START TO BEGIN WORKOUT OR ENTER TO MODIFY. Press Start
button to begin the workout or Stop button to return to the previous screen.
Note: When the Message Window is showing CHECK PULSE, there is no pulse signal received and the program cannot
be performed. Please check and make sure that heart rate strap functions normally.
SAFETY TETHER CORD
A safety tether cord is provided with this unit. It is a simple magnetic design that should be used at all times. It
is for your safety should you fall or move too far back on the treadbelt. Pulling this safety tether cord will stop
treadbelt movement. To Use:
1. Place the magnet into position on the round metal portion of the console control head. Your treadmill will not start
and operate without this. Removing the magnet also secures the treadmill from unauthorized use.
2. Fasten the plastic clip onto your clothing securely to assure good holding power. NOTE: The magnet has strong
enough power to minimize accidental, unexpected stopping. The clip should be attached securely to make certain
it does not come off. Be familiar with its function and limitations. The treadmill will stop, depending on speed,
with a one to two step coast anytime the magnet is pulled off the console. Use the Stop/Pause button in
normal operation.
45
www.spirittness.com
BELT/DECK
Your treadmill uses a very highly efcient, low-friction, hard waxed deck. Performance is maximized
when the deck is kept as clean as possible. Use a soft, damp cloth, or paper towel, wipe the edge of
the belt and the area between the belt edge and the frame. Also reach as far as practical directly under
the belt edge. This should be done once a month to extend belt and deck life. A mild soap and water
solution along with a nylon scrub brush will clean the top of the textured belt. Allow to dry before using.
The low maintenance (routine monthly cleaning) dual-sided, hard-wax deck is designed to withstand up
to 20,000 miles on each side. If the original side of the deck shows signicant wear, it needs to be
ipped. Contact your service technician for assistance. Do not apply any type of lubricant or wax to the
surface.
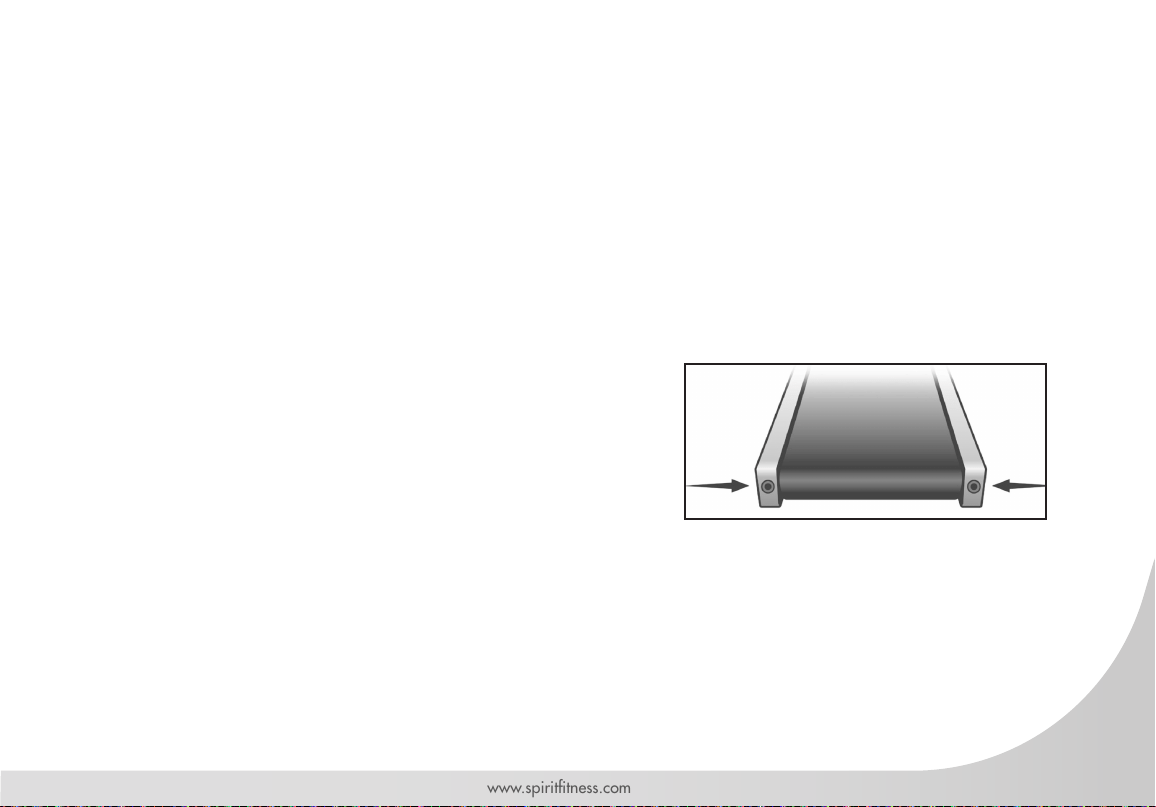
BELT ADJUSTMENTS
Belt tension important for joggers and runners in order to provide
a smooth, steady running surface. Adjustment must be made from
the rear roller with the 8mm Allen wrench provided in the parts
package. The adjustment bolts are located at the end of the step
rails as shown in the diagram below.
Tighten the rear roller only enough to prevent slippage at the front roller. Turn the treadbelt tension adjusting
bolts 1/4 turn each and inspect for proper tension by walking on the belt and making sure it is not
slipping or hesitating with each step. When an adjustment is made to the belt tension, you must be sure
to turn the bolts on both sides evenly or the belt could start tracking to one side instead of running in the
middle of the deck.

46
Spirit Fitness
DO NOT OVER TIGHTEN – Over tightening will cause belt damage and premature bearing failure. If you
tighten the belt a lot and it still slips, the problem could actually be the drive belt (located under the motor
cover) that connects the motor to the front roller. If drive belt is loose it feels similar to the walking belt being
loose. Tightening the motor belt should be done by a trained service person.
47
www.spirittness.com
TREADBELT TRACKING ADJUSTMENT
The treadmill is designed so that the treadbelt remains reasonably centered while in use. It is normal for some
belts to drift near one side while in use, depending on a user’s gait and if they favor one leg. But if during use
the belt continues to move toward one side, adjustments are necessary.
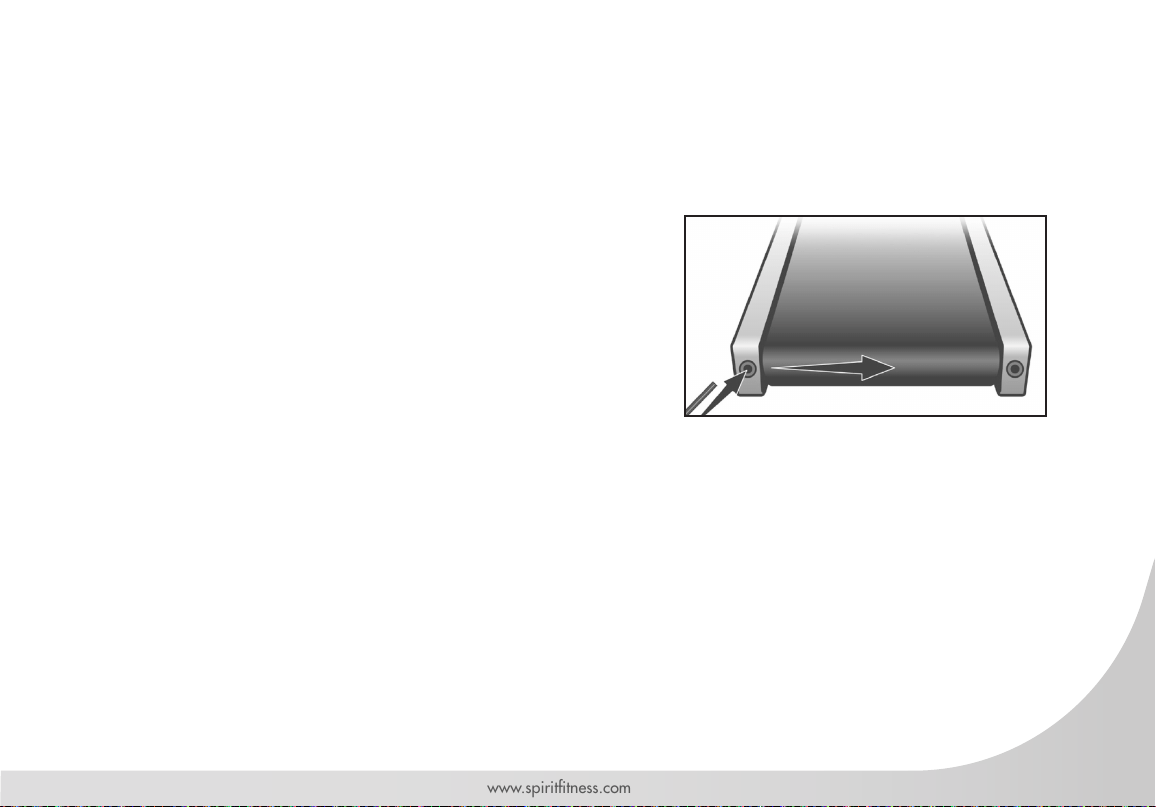
SETTING TREADBELT TRACKING
An 8mm Allen wrench is provided for this adjustment. Make
tracking adjustments on the left side bolt. Set the belt speed to
3 mph. Be aware that a small adjustment can make a dramatic
difference which may not be apparent right away. If the belt is
too close to the left side, then turn the bolt only a 1/4 turn to the
right (clockwise) and wait a few minutes for the belt to adjust itself.
Continue to make 1/4 turns until the belt stabilizes in the center of
the running deck.
If the belt is too close to the right side, turn the bolt counter-clockwise. The belt may require periodic tracking
adjustment depending on use and walking/running characteristics. Some users may affect tracking differently.
Expect to make adjustments as required to center the treadbelt. Adjustments will become less of a maintenance
concern as the belt is used. Proper belt tracking is an owner responsibility common with all treadmills.

48
Spirit Fitness
TROUBLESHOOTING
PROBLEM CAUSE
Display does not light 1. Tether cord not in position.
2. Circuit breaker on front grill tripped. Push circuit breaker in until it locks.
3. Plug is disconnected. Make sure plug is rmly pushed into115 VAC wall outlet.
4. Breaker panel circuit breaker may be tripped.
Treadbelt does not stay centered Treadmill belt
hesitates when walked/run on
The user may be walking while favoring or putting more weight on either the left or right foot. If this walking pattern
is natural, track the belt slightly off-center to the side opposite from the belt movement. See General Maintenance
section on Treadbelt Tension. Adjust as necessary.
Motor is not responsive after pressing start Reset power. If still unresponsive, contact service.
Circuit breaker trips, but not the treadmill circuit
breaker
Need to replace the breaker with a “High in-rush current” type breaker (see page 4 for details)
Treadmill will only achieve approximately 7 mph
but shows higher speed on display
This indicates motor should be receiving power to operate. Do not use an extension cord. If an extension cord is
required, it should be as short as possible and heavy duty, 16-gauge minimum, low voltage. Contact an electrician
or your Spirit Fitness dealer. A minimum of 110-volt AC current is required.
Treadbelt stops quickly/suddenly when tether
cord is pulled
High belt/deck friction. See General Maintenance section on cleaning the deck. If cleaning doesn’t prevent this
from reoccurring, check to see if there is signicant wear of the deck. If so, the deck may need to be ipped if it is
on its original side.
Treadmill trips on board 20 amp circuit High belt/deck friction. See General Maintenance. If cleaning doesn’t prevent this from reoccurring, check the amp
draw of the motor. If this is high and there are signs of signicant wear of the deck, it may need to be ipped on its
original side.
Computer shuts off when console is touched
(on a cold day) while walking/running
Treadmill may not be grounded. Static electricity is crashing the computer. Refer to Grounding Instructions.
49
www.spirittness.com
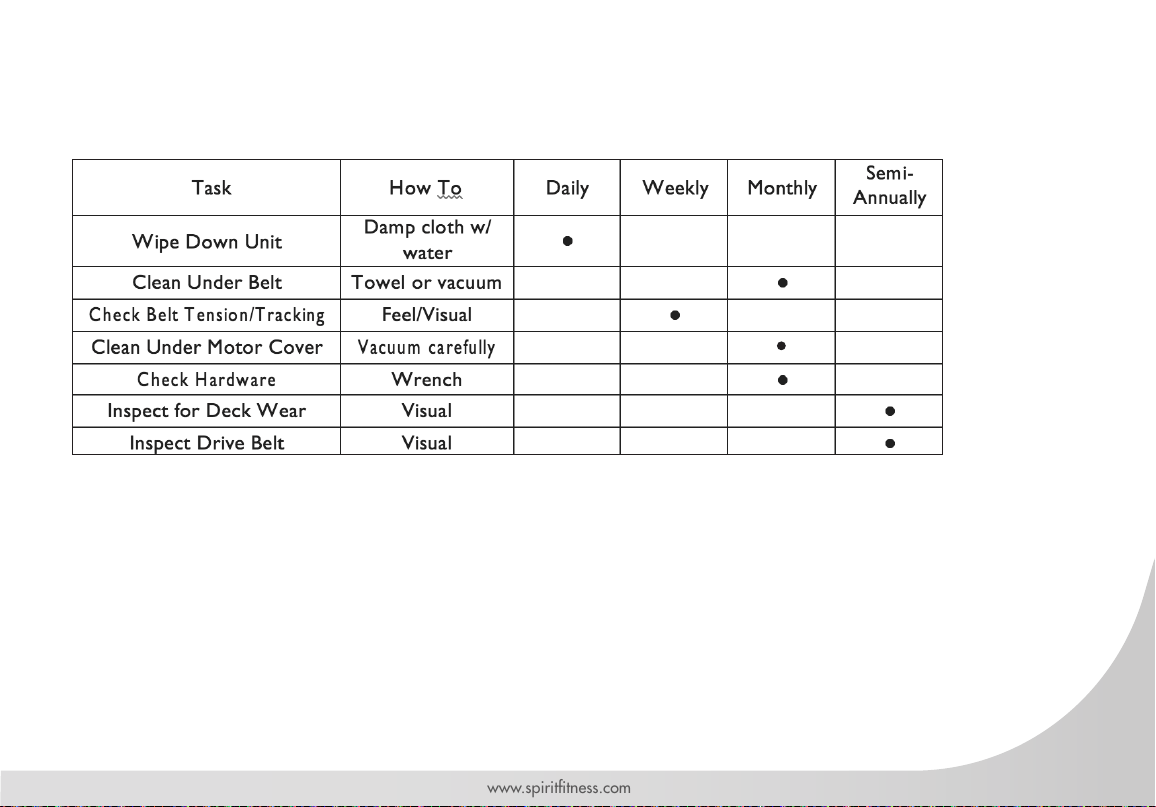
GENERAL MAINTENANCE
Unplug treadmill before performing any maintenance.

50
Spirit Fitness
TREADMILL WARRANTY EFFECTIVE JANUARY 1, 2017
Spirit Fitness warrants all its treadmill parts for a period of time listed below from the date of sale, as
determined by sale receipt, or in the absence of a sales receipt eighteen (18) months from the original
factory shipping date. Spirit Fitness’ responsibilities include providing new or remanufactured parts, at
Spirit Fitness’ option, and technical support to our independent dealers and servicing organizations. In the
absence of a dealer or service organization, these warranties will be administered by Spirit Fitness directly
to a consumer. The warranty period applies to the following components:
NORMAL RESPONSIBILITIES OF THE FACILITY
The facility is responsible for the items listed below:
1. The warranty registration card must be completed and returned to the address listed on the card within 10 days of
the original purchase or completed online to validate the manufacturer’s limited warranty.
2. Proper use of the tness equipment in accordance with the instructions provided in this manual.
3. Proper installation in accordance with instructions provided with the tness equipment and with all local electric codes.
4. Proper connection to a grounded power supply of sufcient voltage, replacement of blown fuses, repair of loose
connections or defects in house or facility wiring.
5. Expenses for making the tness equipment accessible for servicing, including any item that was not part of the tness
equipment at the time it was shipped from the factory.
6. Damages to the tness equipment nish during shipping, installation or following installation.
7. Routine maintenance of this unit as specied in this manual.
WARRANTY
Commercial
FRAME
Lifetime
DRIVE MOTOR
10 Years
PARTS
3 Year
LABOR
3 Years

51
www.spirittness.com
EXCLUSIONS
This warranty does not cover the following:
1. CONSEQUENTIAL, COLLATERAL, OR INCIDENTAL DAMAGES SUCH AS PROPERTY DAMAGE AND INCIDENTAL
EXPENSES RESULTING FROM ANY BREACH OF THIS WRITTEN OR ANY IMPLIED WARRANTY.
NOTE: Some states do not allow the exclusion or limitation of incidental or consequential damages, so this limitation
or exclusion may not apply to you.
2. Service call reimbursement to the consumer. Service call reimbursement to the dealer that does not involve malfunction
or defects in workmanship or material, for units that are beyond the warranty period, for units that are beyond the
service call reimbursement period, for tness equipment not requiring component replacement, or tness equipment not
in non-dues paying facility or household use.
3. Damages caused by services performed by persons other than authorized Spirit Fitness service companies; use of
parts other than original Spirit Fitness parts; or external causes such as corrosion, discoloration of paint or plastic,
alterations, modications, abuse, misuse, accident, improper maintenance, inadequate power supply or acts of God.
4. Products with original serial numbers that have been removed or altered.
5. Products that have been sold, transferred, bartered or given to a third party.
6. Products that do not have a warranty registration card on le at Spirit Fitness. Spirit Fitness reserves the right to request
proof of purchase if no warranty record exists for the product.
7. THIS WARRANTY IS EXPRESSLY IN LIEU OF ALL OTHER WARRANTIES EXPRESSED OR IMPLIED, INCLUDING THE
WARRANTIES OF MERCHANTABILITY AND/OR FITNESS FOR A PARTICULAR PURPOSE.
8. Product used in prisons and correctional facilities
Warranties outside of the United States may vary. Please contact your local dealer for details.

52
Spirit Fitness
SERVICE
Keep your bill of sale twelve (12) months from the date on the bill of sale or eighteen (18) months from the
date of factory shipping as determined by the serial number establishes the labor warranty period should
service be required. If service is performed, it is in your best interest to obtain and keep all receipts. This
written warranty gives you specic legal rights. You may also have other rights that vary from state to state.
Service under this warranty must be obtained by following these steps, in order:
1. Contact your selling authorized Spirit Fitness dealer. OR
2. Contact your local authorized Spirit Fitness service organization.
3. If there is a question as to where to obtain service, contact our service department at (870) 935-1107.
4. Spirit Fitness’ obligation under this warranty is limited to repairing or replacing, at Spirit Fitness’ option, the product
through one of our authorized service centers. All repairs must be preauthorized by Spirit Fitness.
5. The owner is responsible for adequate packaging upon return to Spirit Fitness. Spirit Fitness is not responsible for
damages in shipping. Make all freight damage claims with the appropriate freight carrier. DO NOT SHIP ANY
UNIT TO OUR FACTORY WITHOUT A RETURN AUTHORIZATION NUMBER. All units arriving without a return
authorization number will be refused.
6. For any further information, or to contact our service department by mail, send your correspondence to:
SPIRIT FITNESS, INC.
P.O. Box 2037
Jonesboro, AR 72402-2037
Product features or specications as described or illustrated are subject to change without notice. All warranties are made by Spirit Manufacturing, Inc.
This warranty applies only in the 48 contiguous United States. NOTE: This does not apply to Alaska or Hawaii.

53
www.spirittness.com
NOTES

800.258.4555
spiritservice@spirittness.com
www.spirittness.com
Spirit Fitness
3000 Nestle Road
Jonesboro, AR 72401
CT900ENT Owners Manual
© 2018 All Rights Reserved
Revision: 08.07.2018