
Revotech® copyright
Revotech® copyright
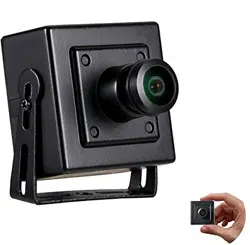
IP Camera
, ,,Simple Instruction

Revotech® copyright
Revotech® copyright
1. Overview
An IP camera (hereinafter referred to as IPC) is a new product integrating
network video technologies into a traditional camera. The IPC can
realizesimpler monitoring (particularly remote monitoring), easier construction
and maintenance, better audio and alarm linkage, more flexible record
storage,more enriched product selection, much clearer video effect, and more
perfect monitoring management. In addition, the IPC supports access by WiFi,
3G/4G/5G and optical fiber, and PoE (Power over Ethernet, or network power
supply).
With the rapid development of network, network products have gradually
spread to every corner of our life. The developing and innovative IPC has been
widely applied to the education, commerce, medical treatment, public services,
and other fields.
Common audio and video cameras used at the places such as banks,
supermarkets, companies, residences, and households have gradually
replaced by IPCs whose videos can be uploaded to the network. You can view
public or private real-time pictures or dynamic videos at home or any place
where network is available.
Revotech® copyright
Revotech® copyright
2. How to connect the camera with
computer?
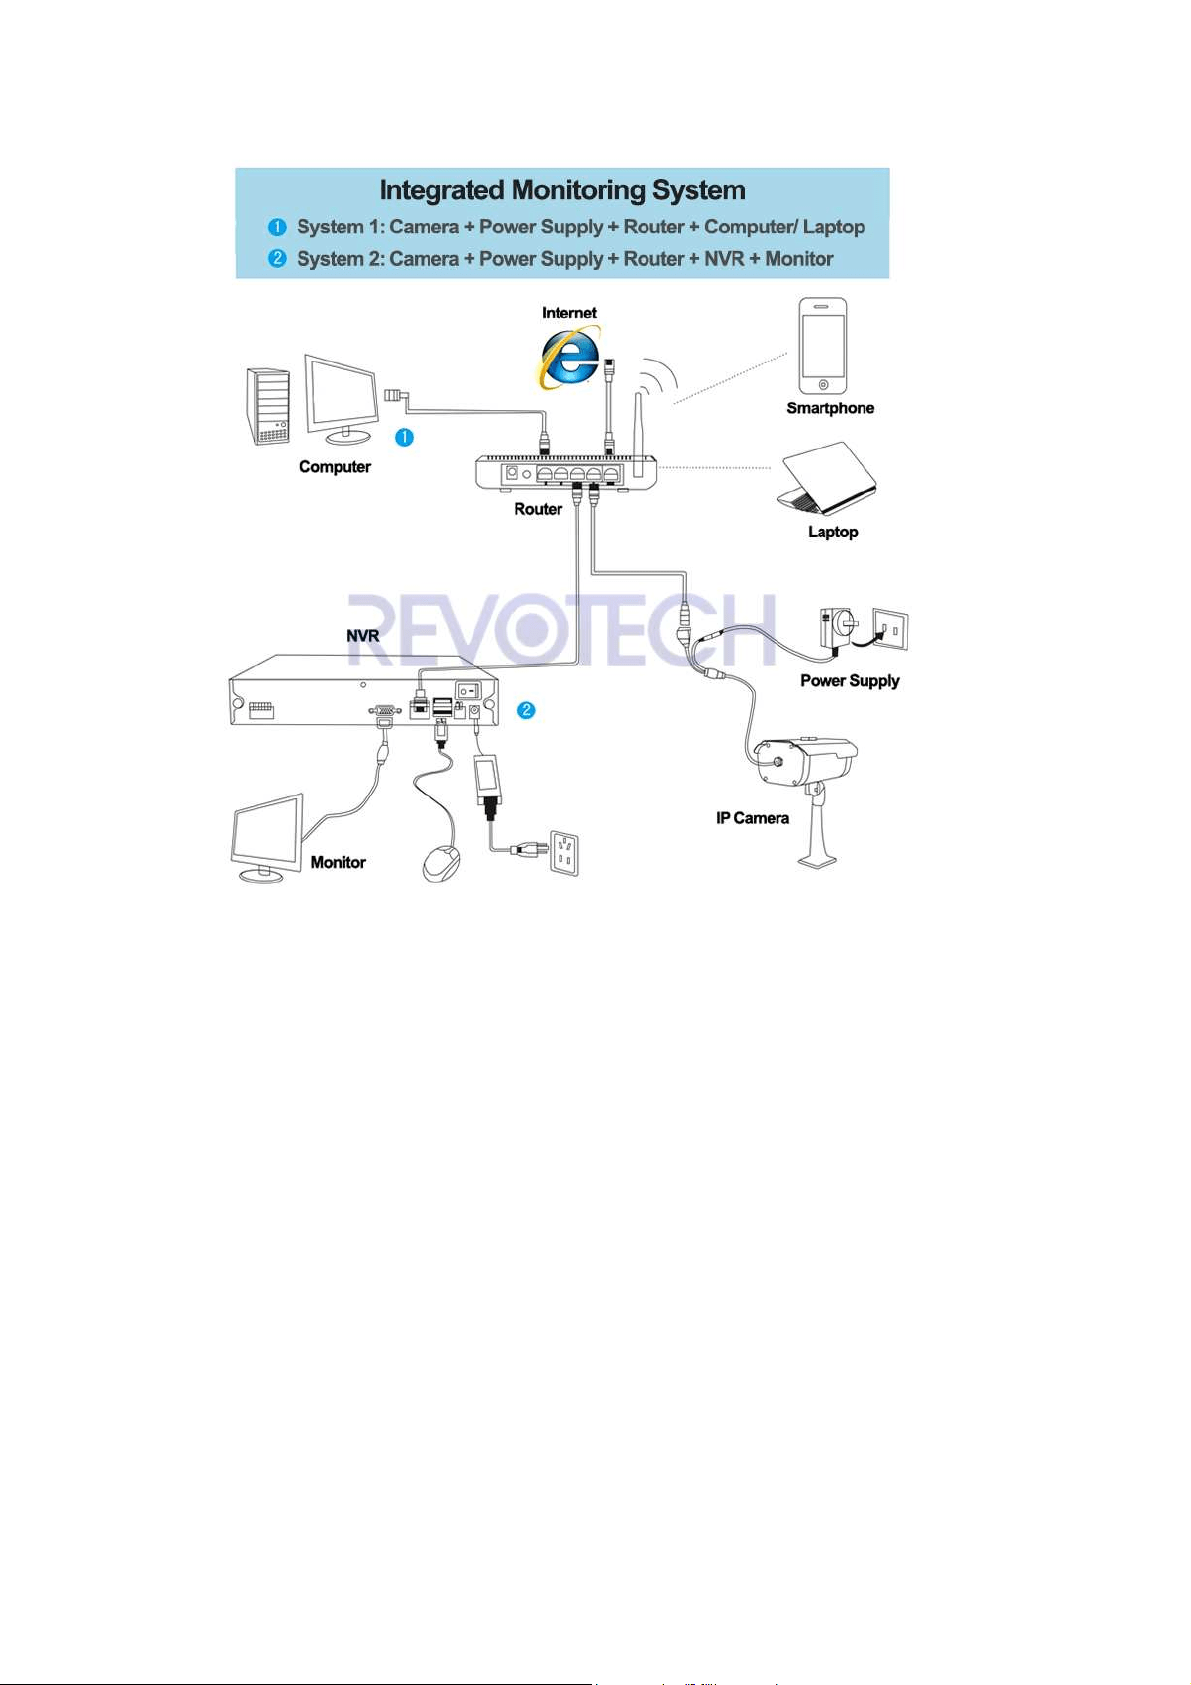
1. Connect the camera.
Connect the camera with power supply and connect the camera to the Router
with network cable.
Note: (1). 12V/2A power adapter will be better. (2). If your camera support POE
function, then you need to connect it with a 802.3af Standard POE Switch.
2. Install CMS software.
(1). Download the “CMS” software.
Revotech® copyright
Revotech® copyright
(2). Uncompress and install the software, please choose English language.
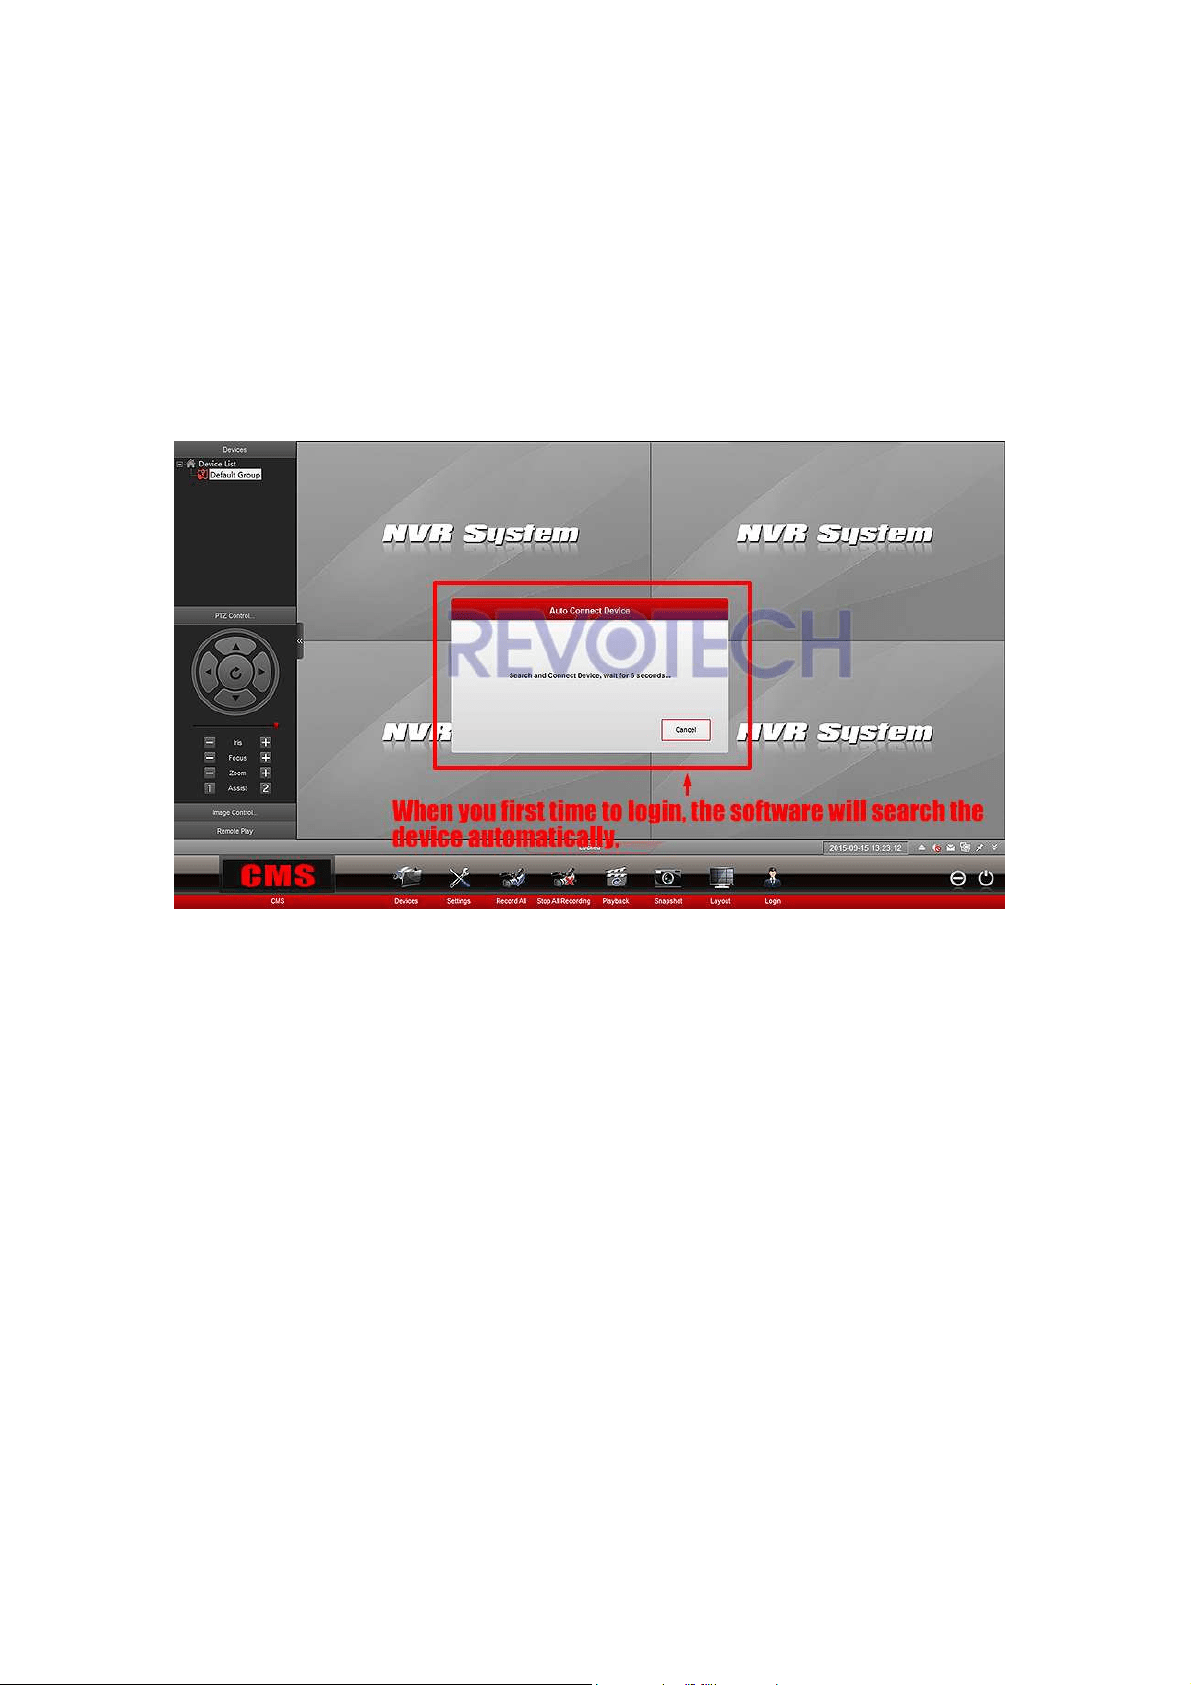
3. Connecting
(1) When you open the software, it will auto search and connect with the
devices in the LAN.
(2) If it do not connect automatically, you need to connect yourself. Click any
button and it need to login.
User name is "
admin" and the password is nothing, you do not need to input
anything, just click "Ok".
Revotech® copyright
Revotech® copyright
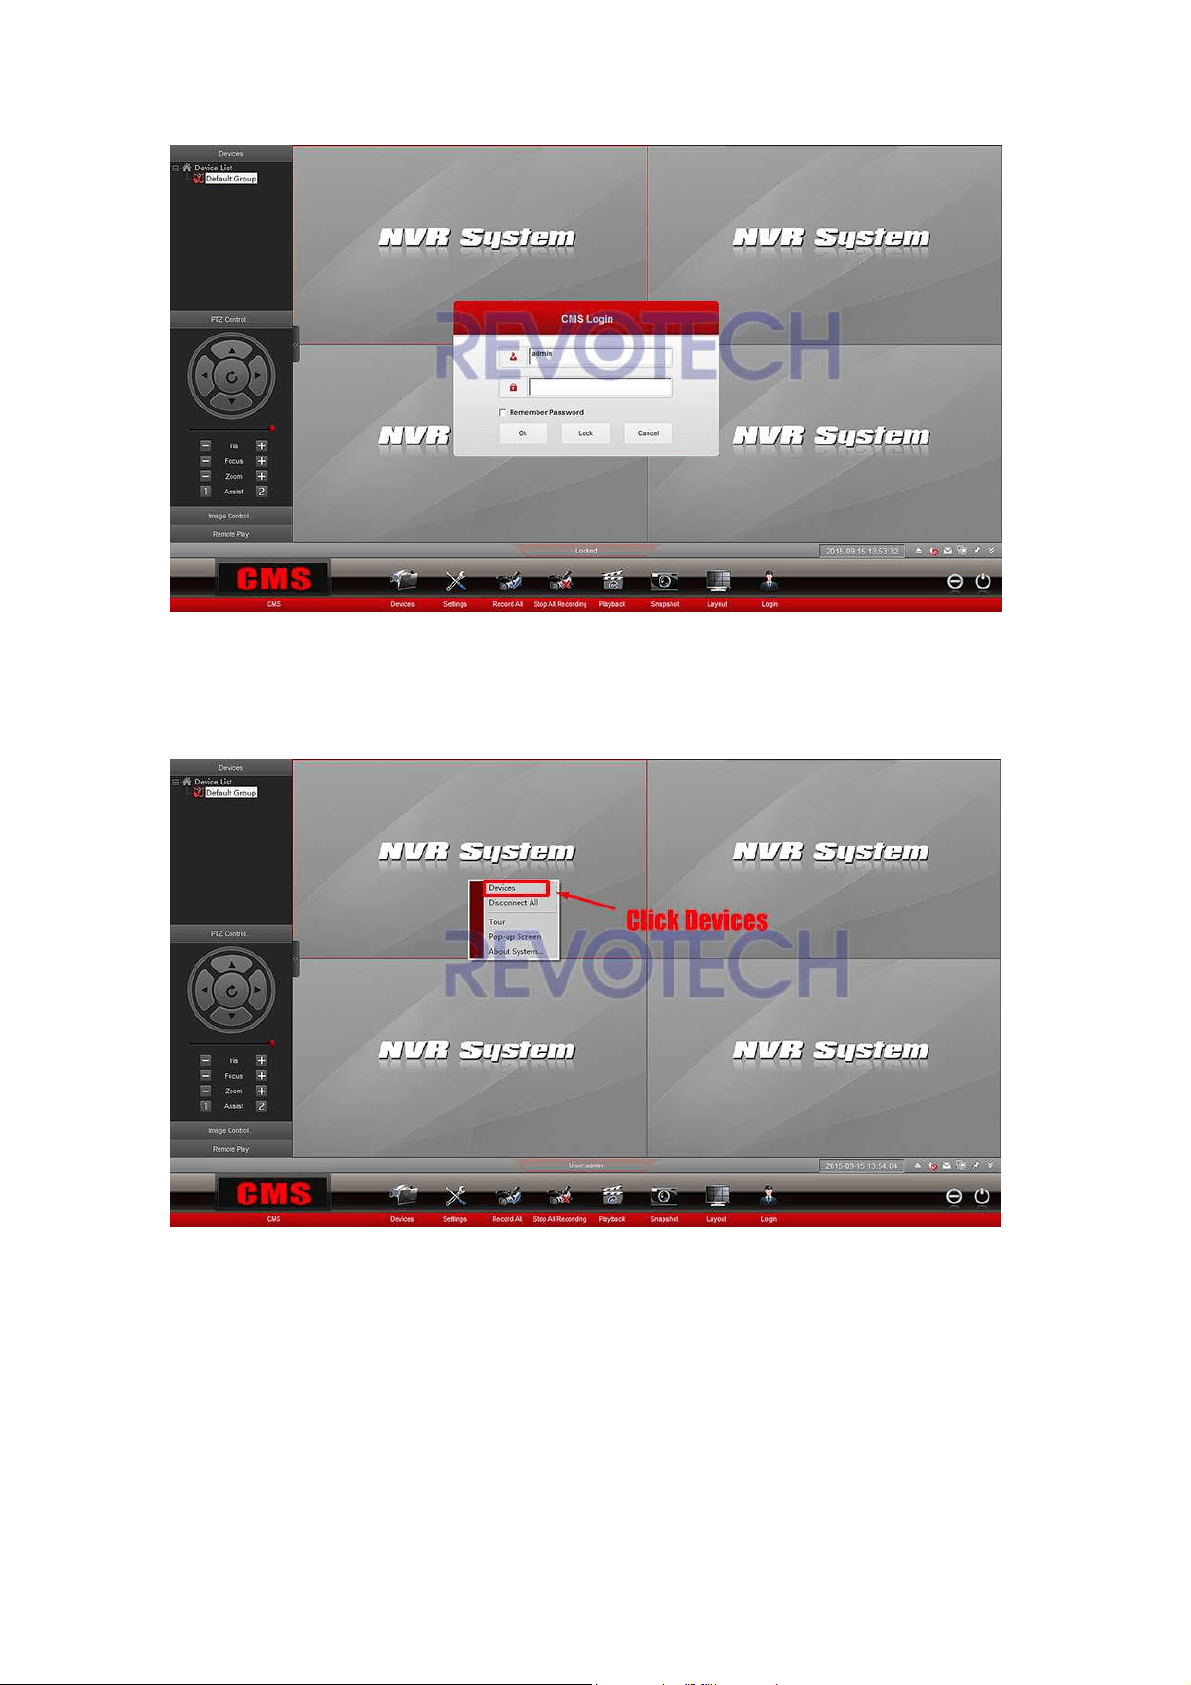
(3) Right click, and click “Devices”.
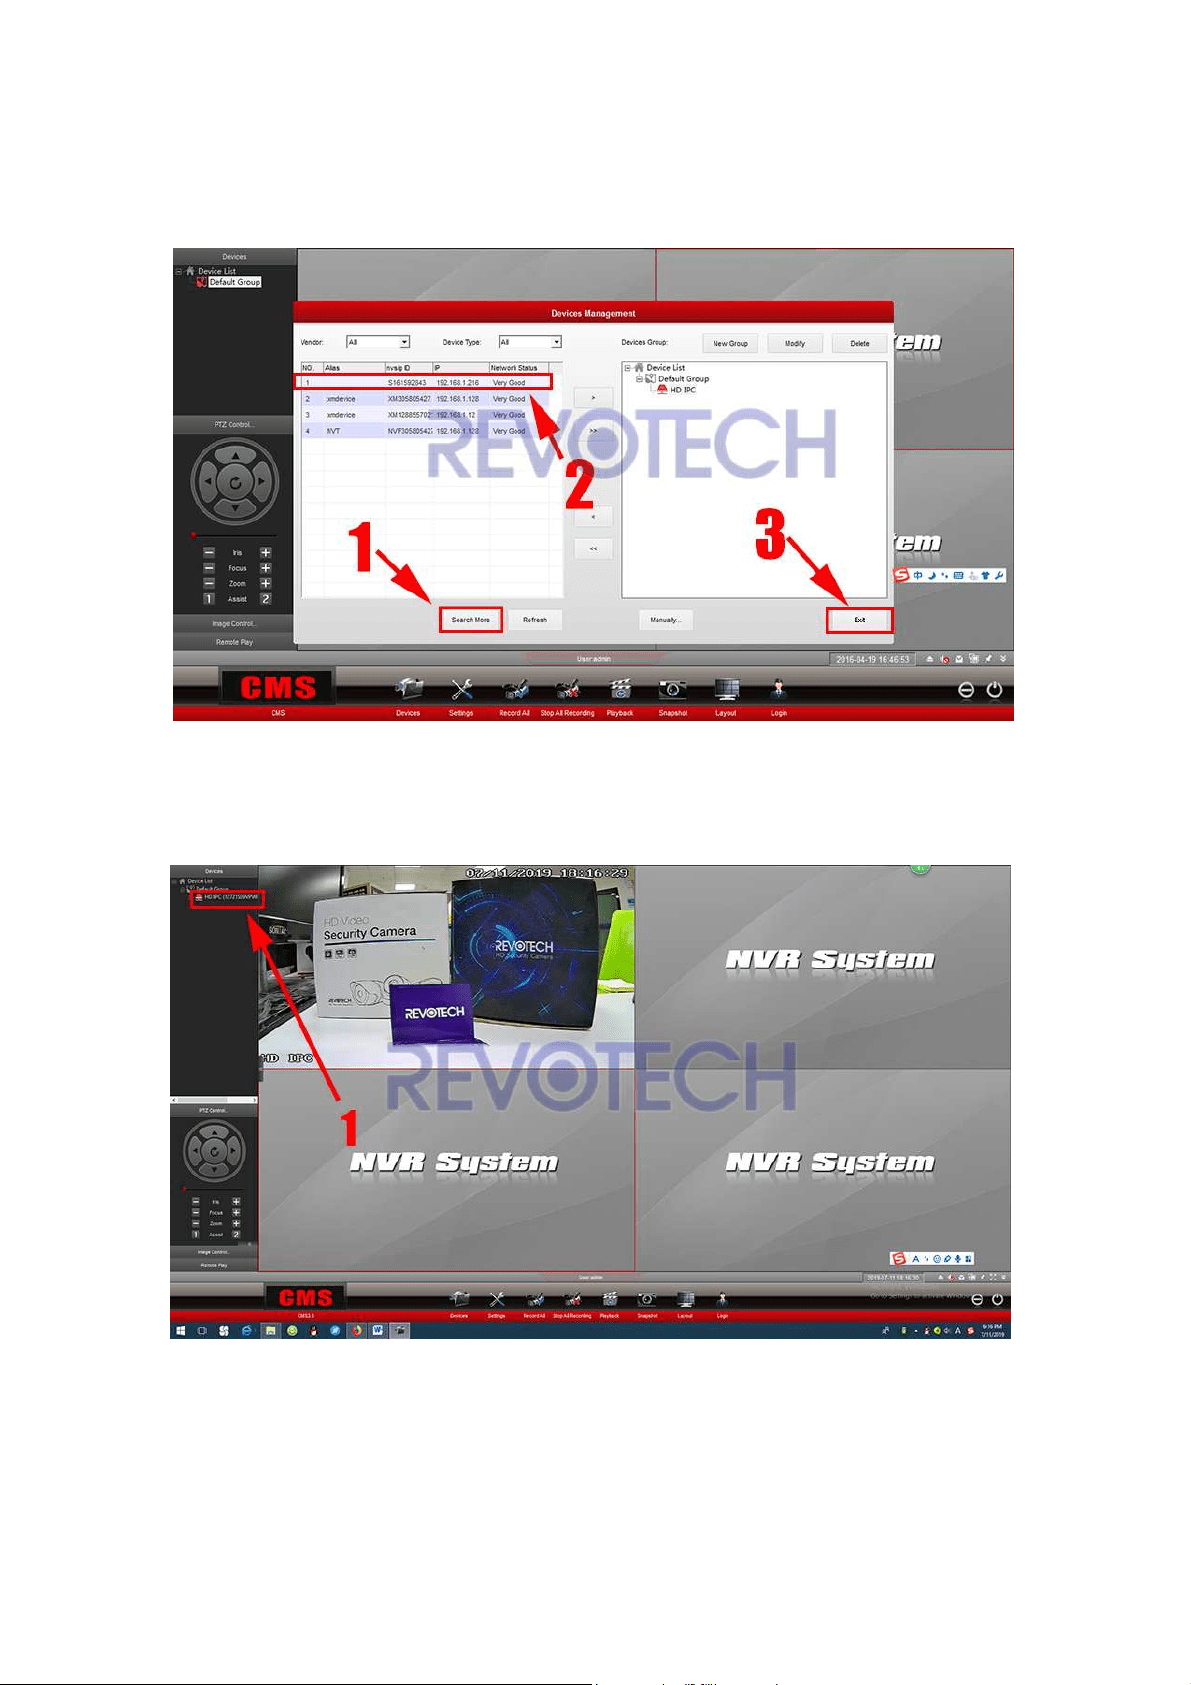
Revotech® copyright
Revotech® copyright
(4) Click “Search More” and find your camera, double click it and then click
"exit".
(5) Right click the Device that you just add, and click "Connect
All Channel".
Then you can get the image of your camera now.
Revotech® copyright
Revotech® copyright
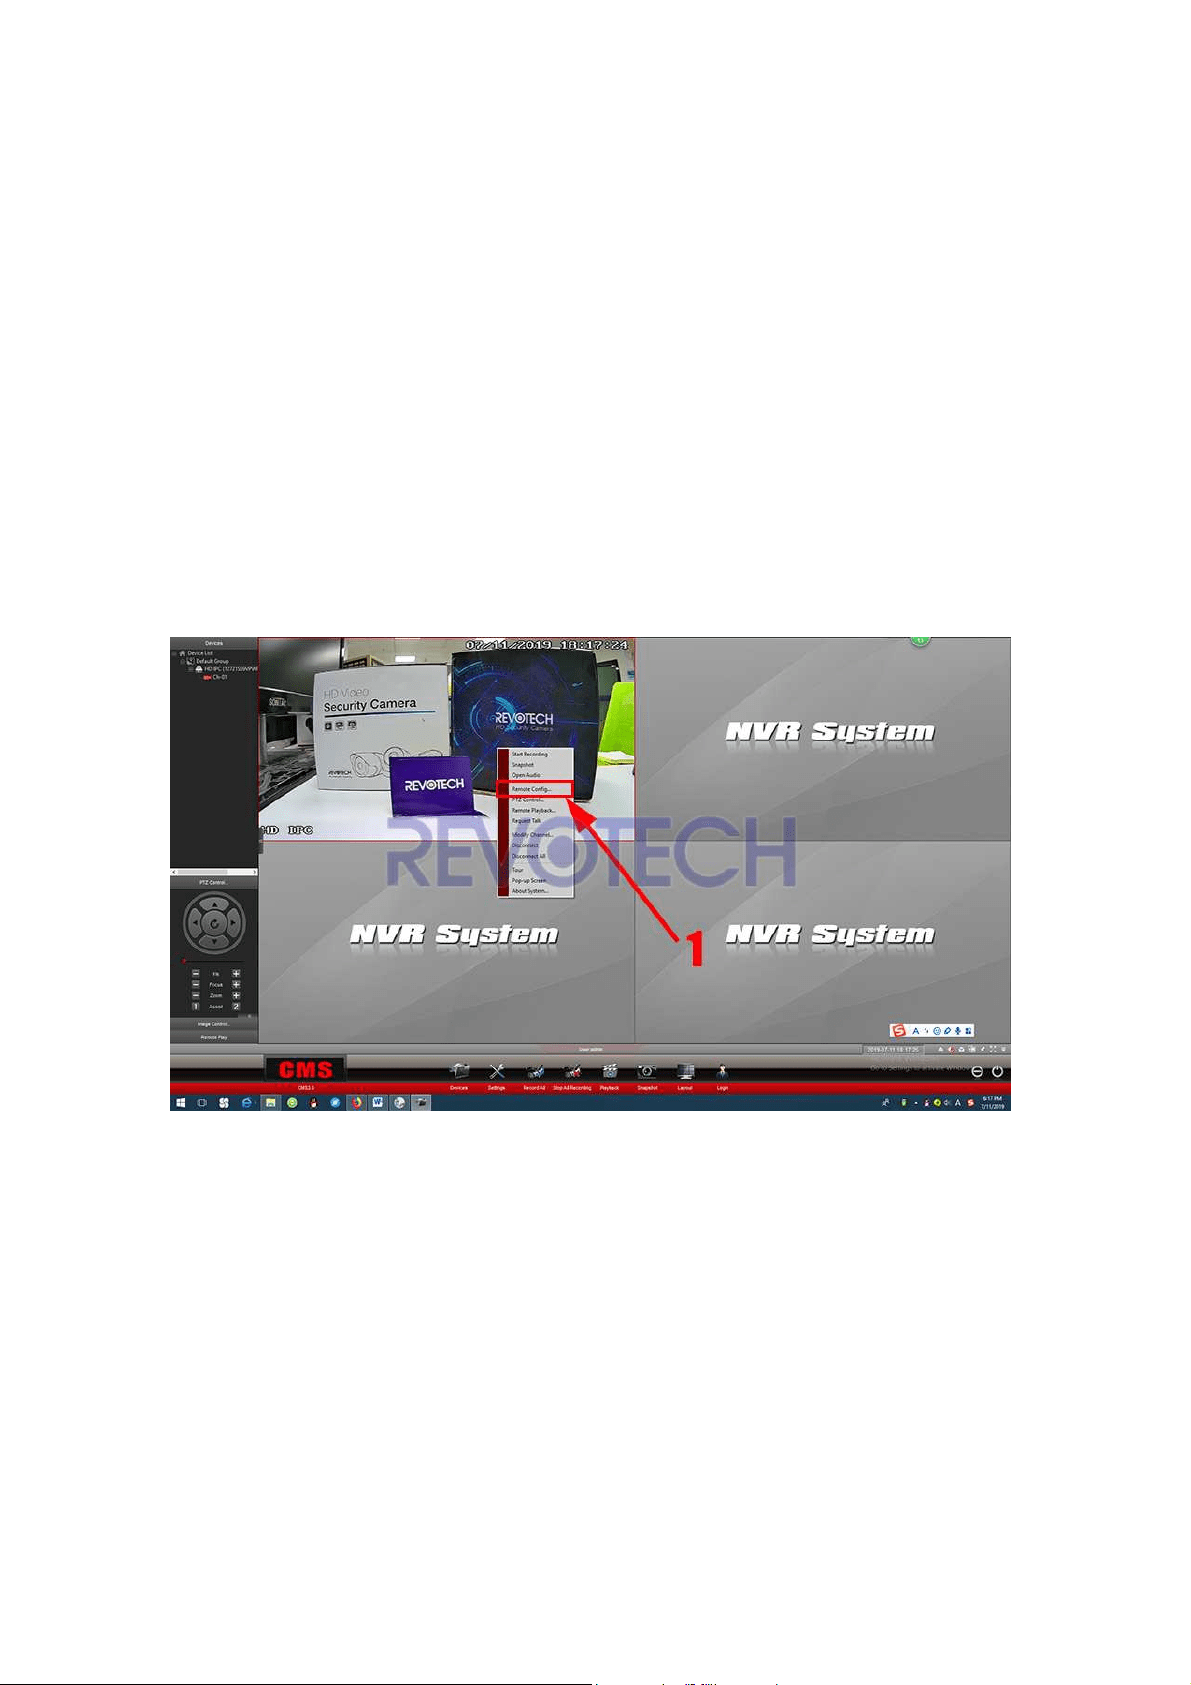
3. What is Device ID and how to get
it?
Device ID is a unique ID of our IP Camera, we can use it to connect with the
CMS Software and smartphone.
We can get it from the CMS software.
Path: Remote configuration – System – Device ID.
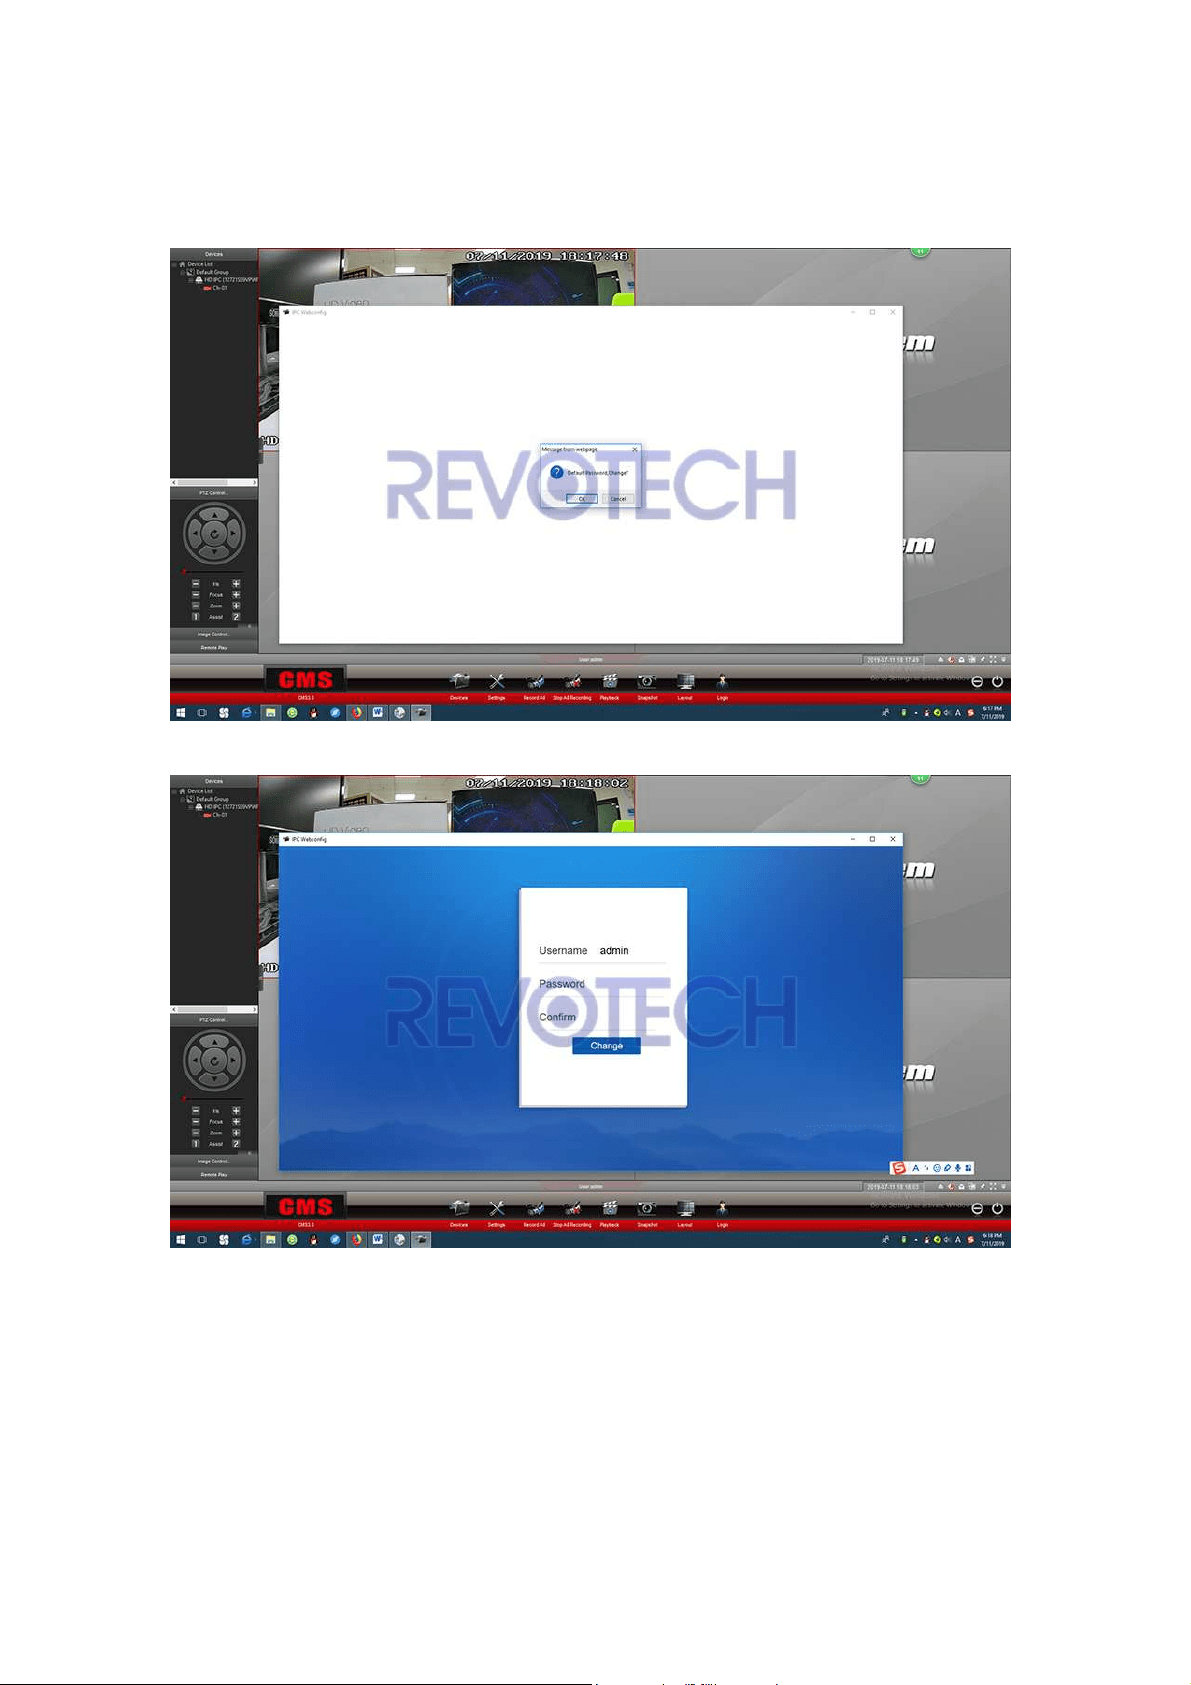
(1) Right click the camera and click “Remote configuration”.
Revotech® copyright
Revotech® copyright
(2) It will ask you to change the password, you can click “OK” to change the
password or just click “Cancel”.
Notice: The password of the camera must be numbers or letters, can not be the
special character like “@#$%^”. And the length of the password can not longer
than 12 digit.

Revotech® copyright
Revotech® copyright
(3) After you go into the menu of the camera, click “System”, and you can get
the ID of the camera now.
4. How to download and use the
Smartphone APP?
IMPORTANT NOTE: Recently our P2P service is having problem sometimes, if
you can not connect the camera via NVSEE Int’l (show offline), please contact
with us (revote[email protected]) or contact with the retailer for help to make
the device online. Sorry for the inconvenient.
1. Download and Install
Go to Apple Store or Google Play, search "NVSEE Int’l", and then download
and install it.

Revotech® copyright
Revotech® copyright
Or you can scan this two-dimension code to download it.

Revotech® copyright
Revotech® copyright
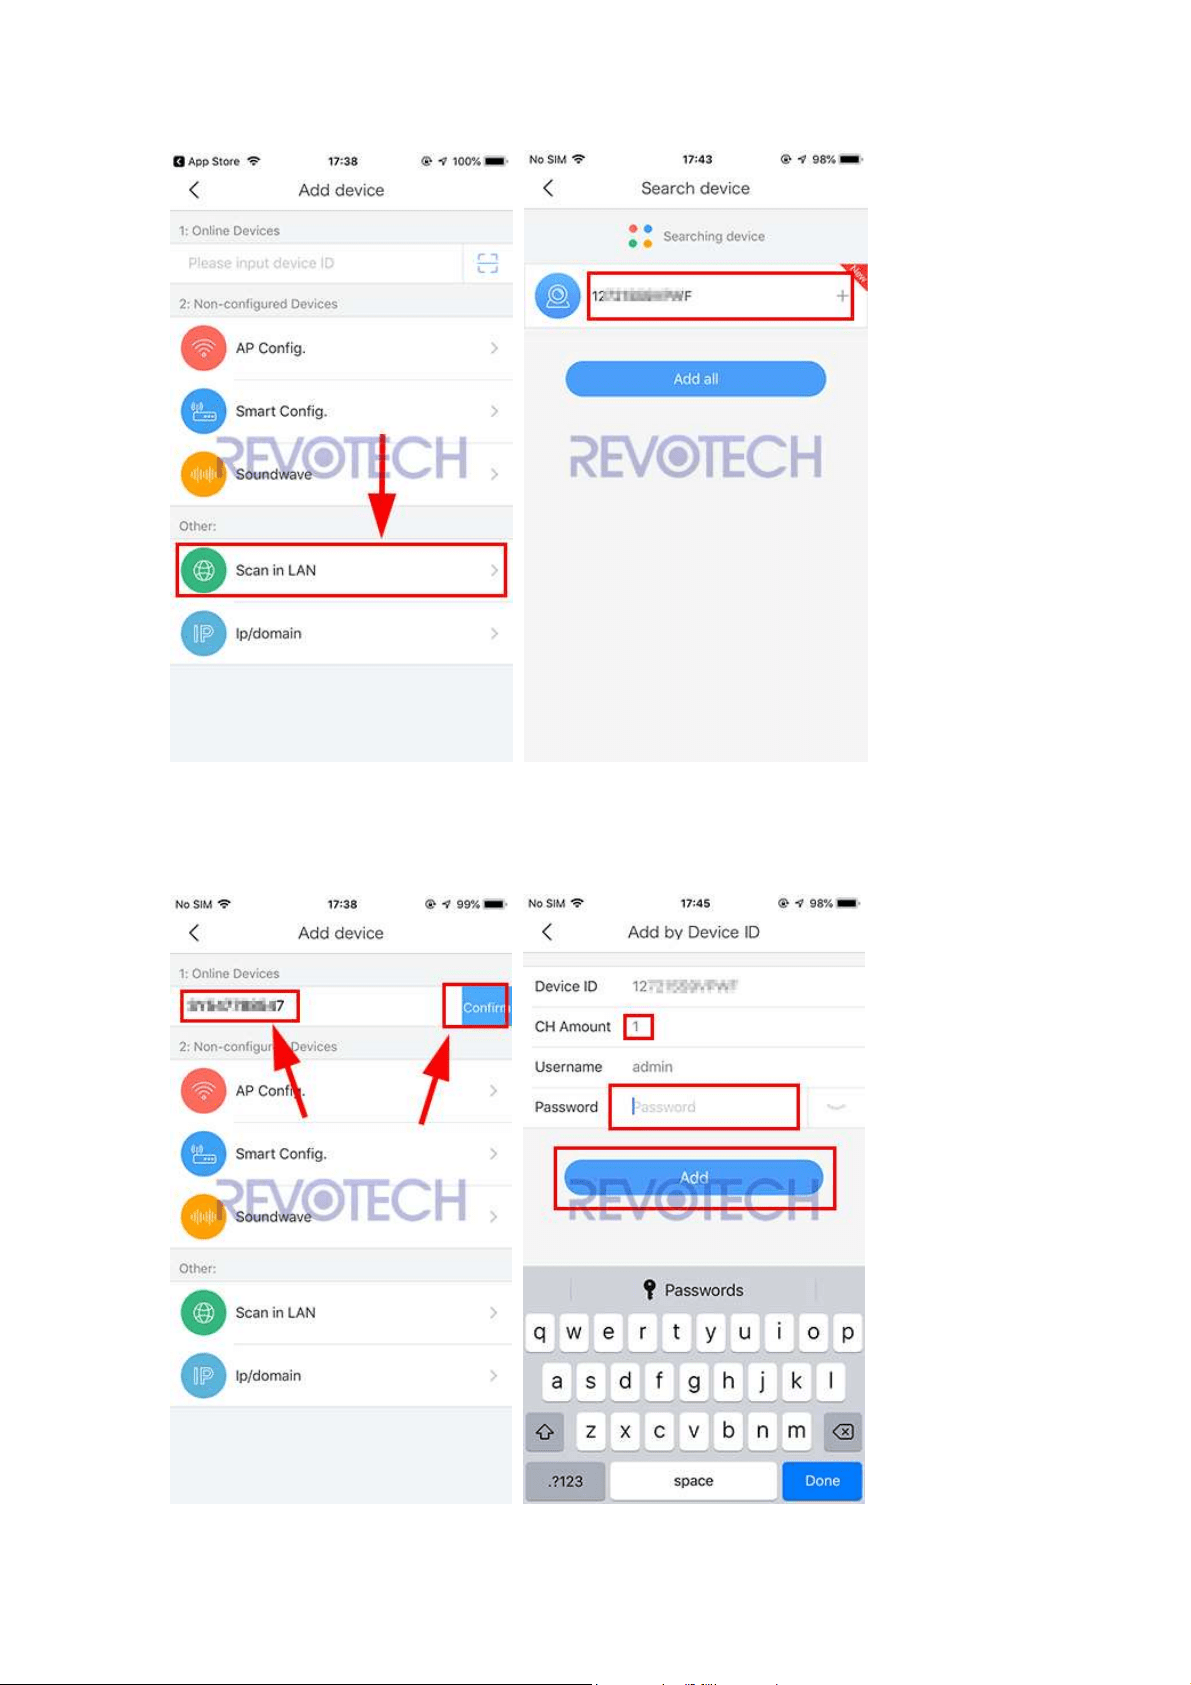
2. Open the APP and Add a Device
(1) Sign up and login in the app, and then click “+” to add a camera.
.
(2) Make the camera and the smartphone in the same network, and click “Scan
in LAN”, after the app find the camera, click “+” to add it.
Revotech® copyright
Revotech® copyright
Or input the Device ID Manually and click “Confirm”. Input “1” for “CH Amount”
and input the password, and then click “Add”.

Revotech® copyright
Revotech® copyright
(3) And then click the camera you just add and you can check the image of your
camera now.
Notice:
1. One device can only bind to one app account, for other app account, need to
use the first account share to other account. One device support 1 binding
account and 10 sharing account.
2. Delete the device from the list of binding account, and the device will be
unbind. If you can not find the binding account and you want to unbind the
device, please send the device ID (Check point 3) to the device seller, and they
will help you to unbind the device.
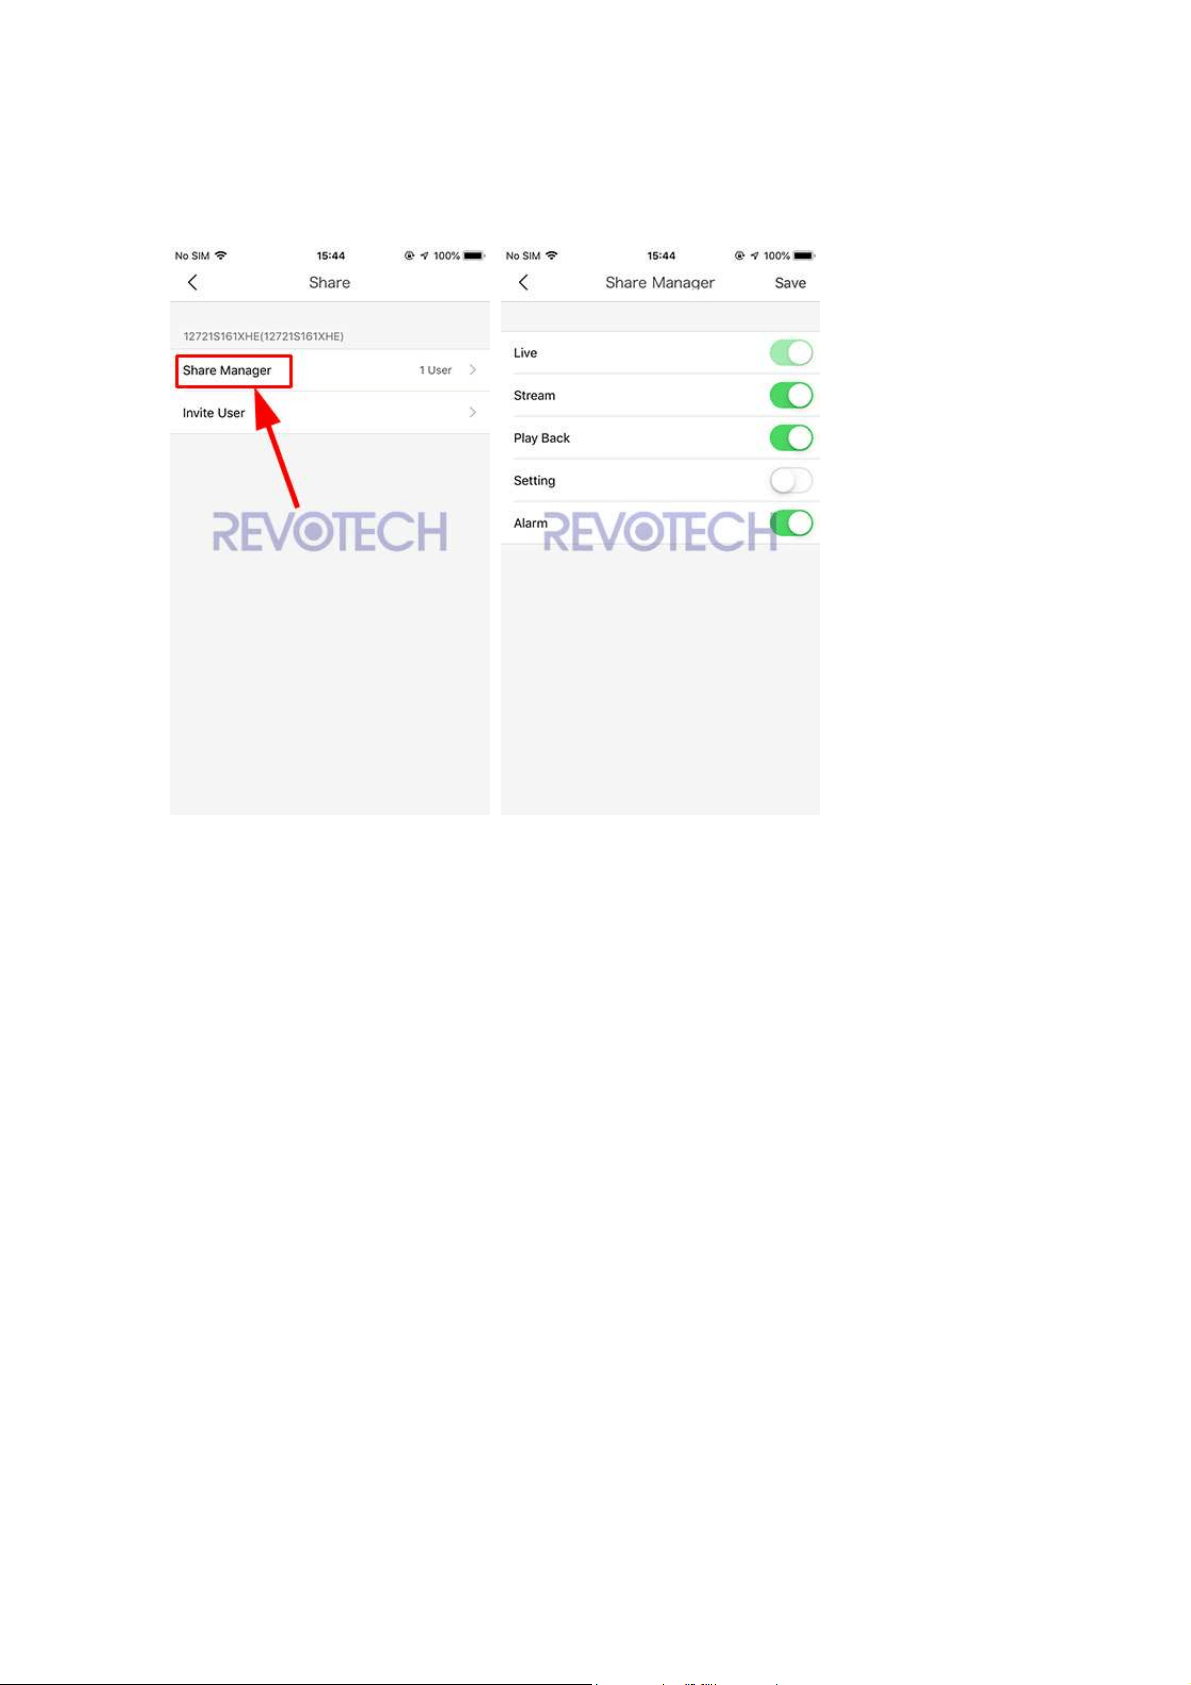
5. How to Share the camera.
(1) Click the share button of the camera, then click “Invite User”.

Revotech® copyright
Revotech® copyright
(2) Then you can got a QR Code of the camera, share that QR code to other
account, use the scan function of the NVSEE app then the account can add the
camera.
Revotech® copyright
Revotech® copyright
(3) Click the “Share Manager”, and you can edit the authority of the sharing
account or delete the sharing account.
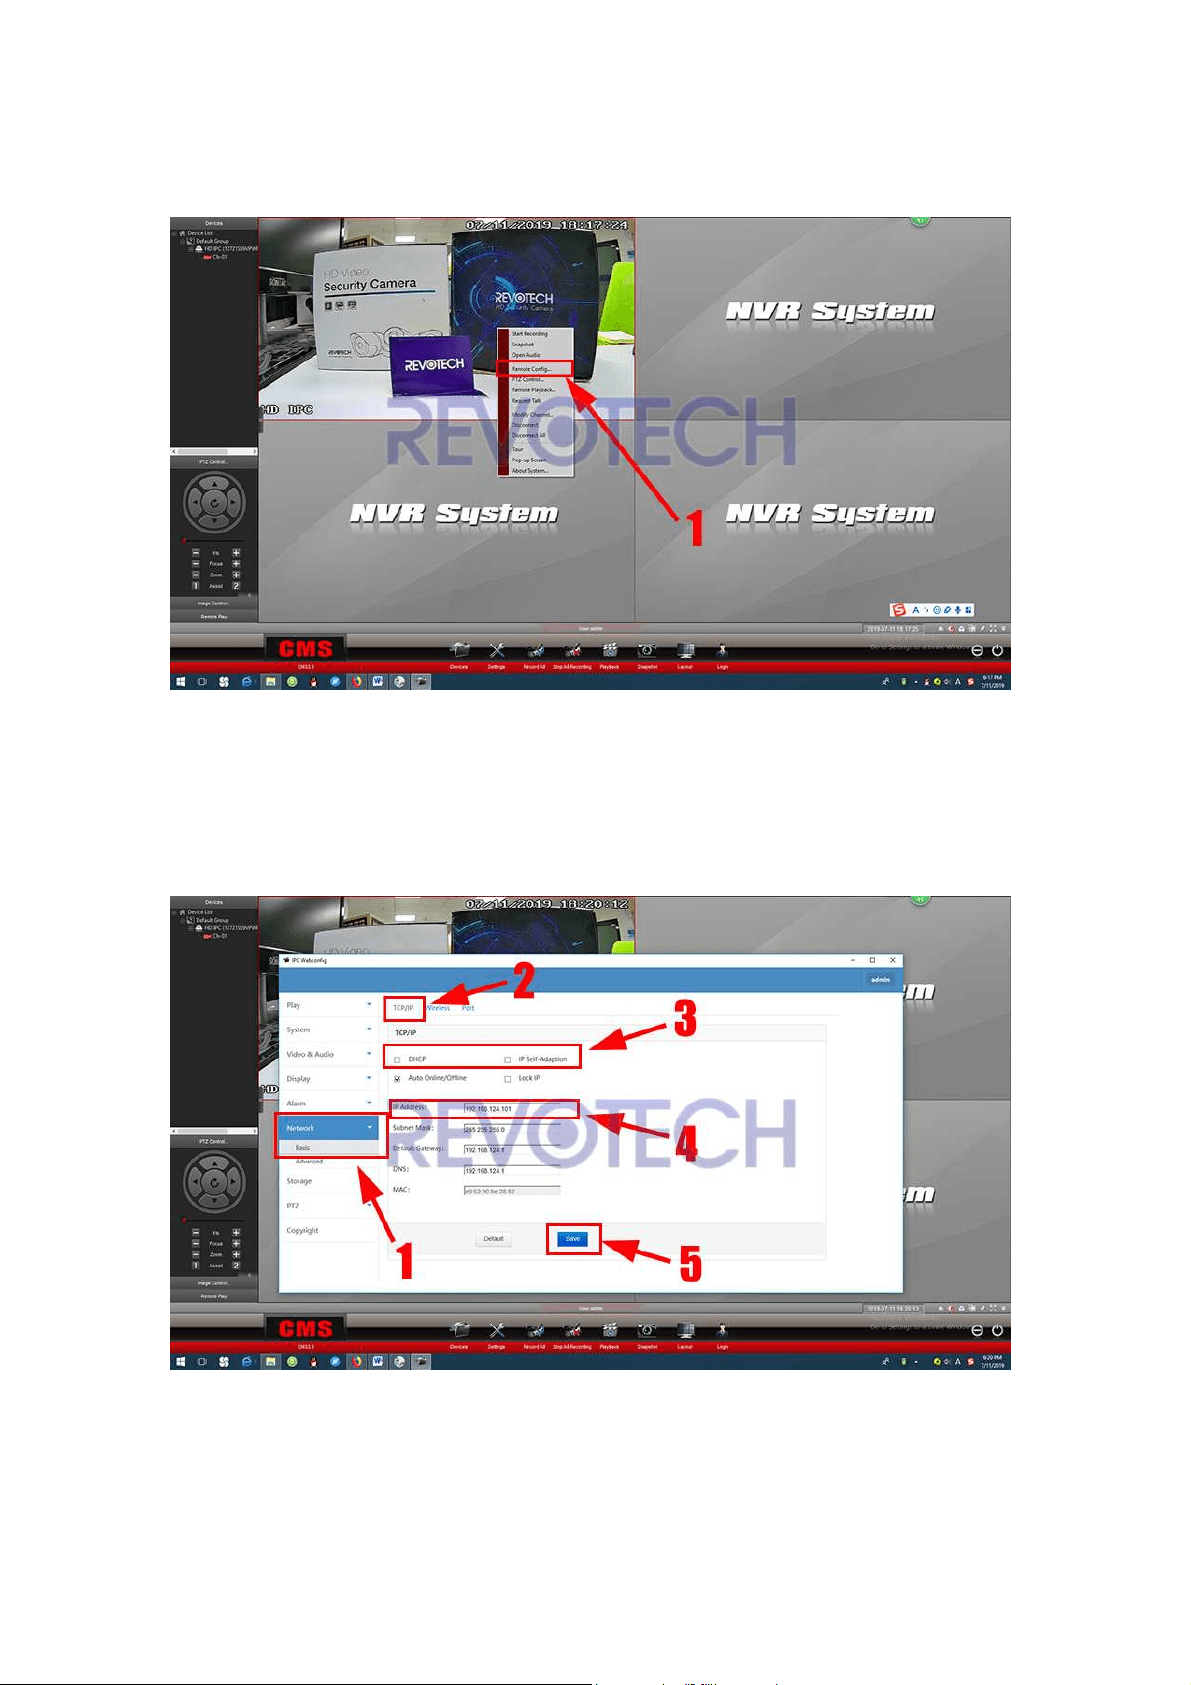
6. How to change the camera into
static IP address.
The camera is default dynamic IP address, if you need to change it into static IP
address, please check here:
Revotech® copyright
Revotech® copyright
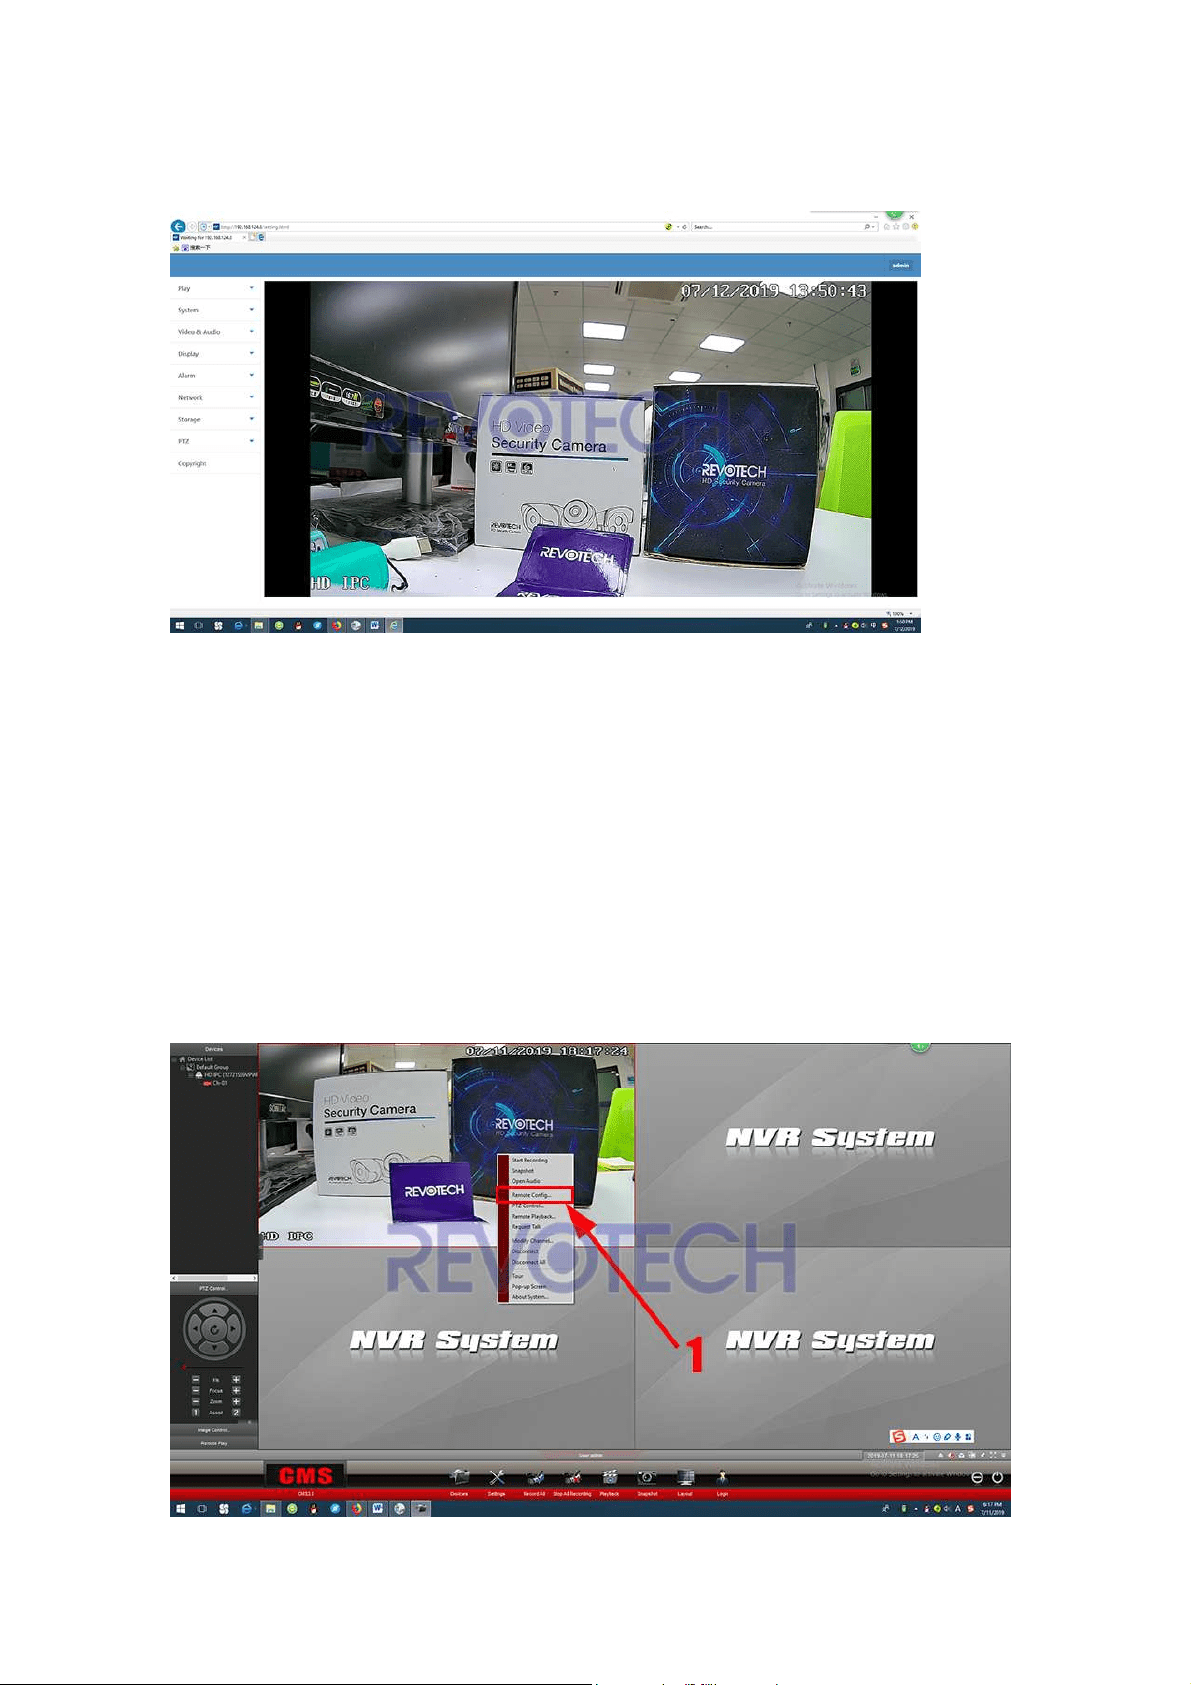
(1) Right click the camera and click “Remote configuration”.
(2) Click “Network” – “Basic” – “TCP/IP”, cancel the “DHCP” and “IP Self
Adaption”. And change the IP address into what you want, and then click “Save”.
Then the IP address change into Static IP address now.
Revotech® copyright
Revotech® copyright
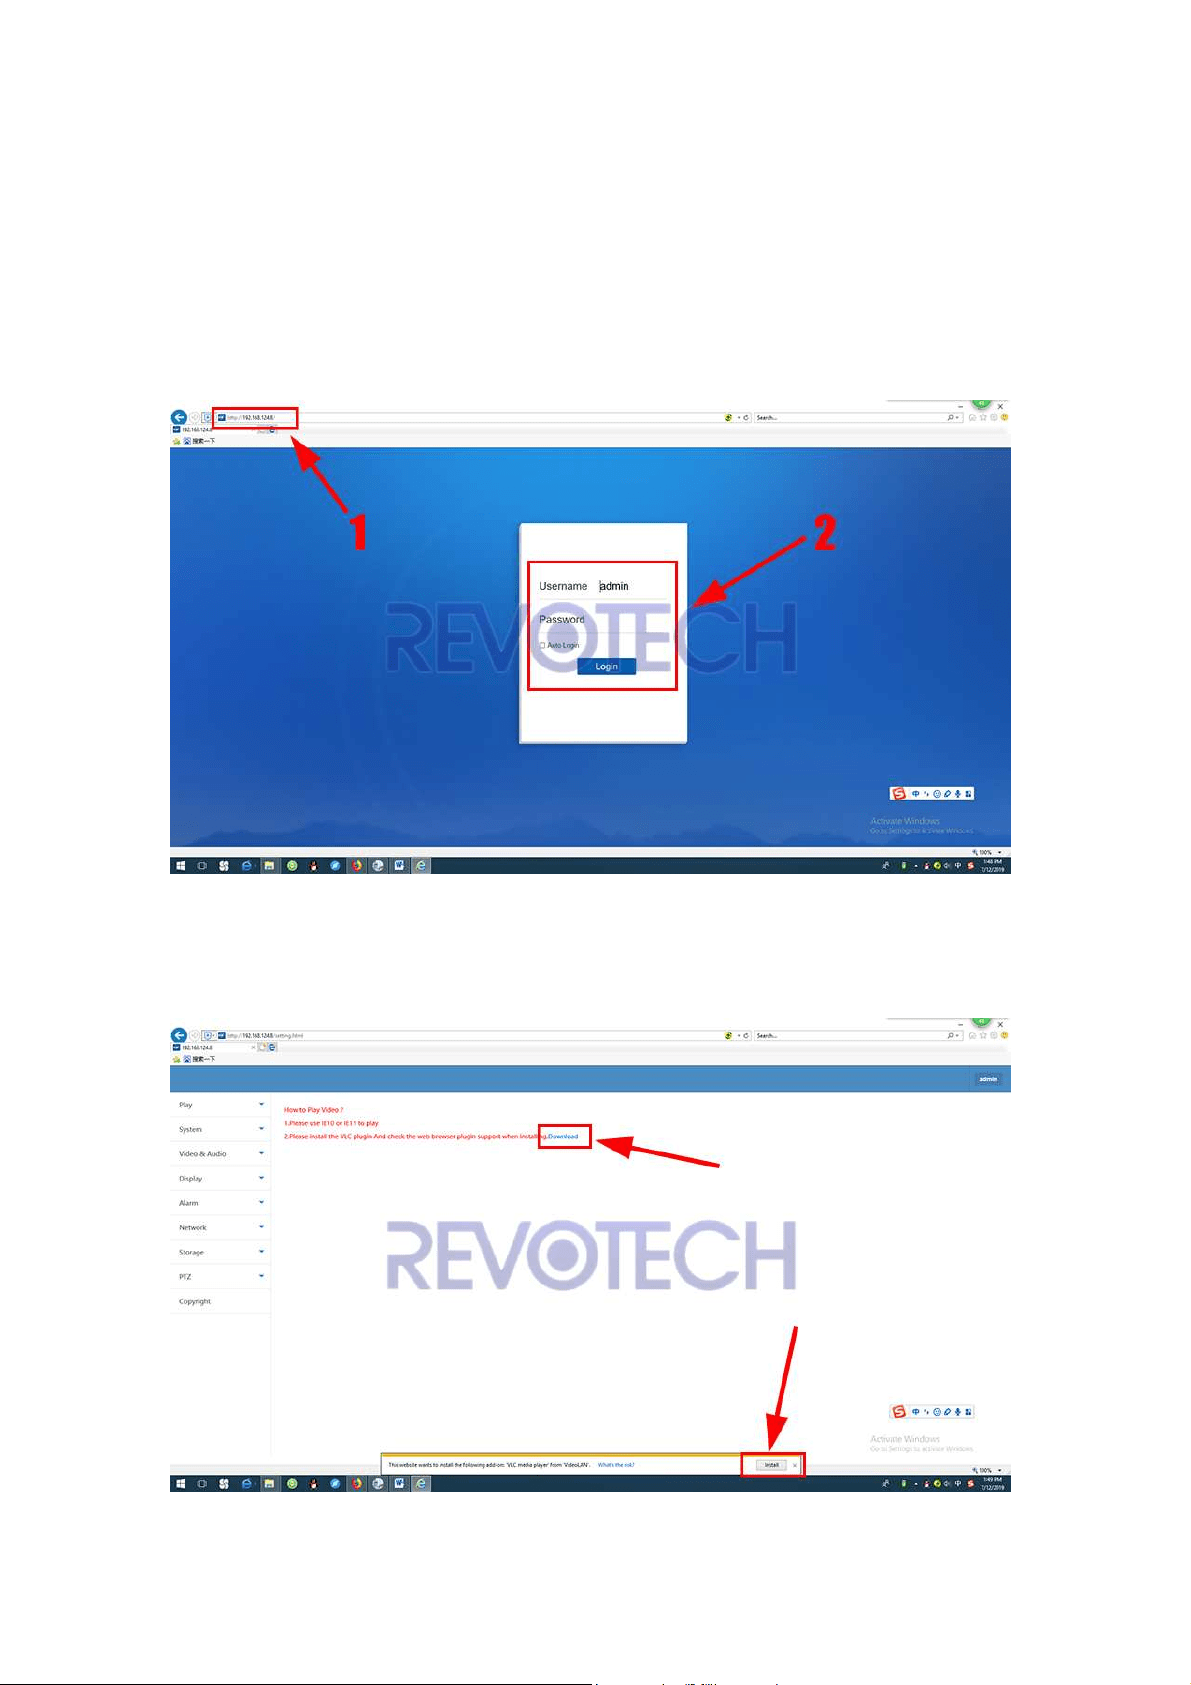
7. How to connect the camera via
the browser.
(1) Get the IP address from the network setting via our CMS software and
input it in the IE browser (IE10 or IE11), and login in the camera.
(2) Install the “VLC media player”. (If it do not show the installation message,
you can click “Download” to download it and install it)
Revotech® copyright
Revotech® copyright
(3) You can get the image and all setting of the camera now.
8. How to set the motion alarm
function?
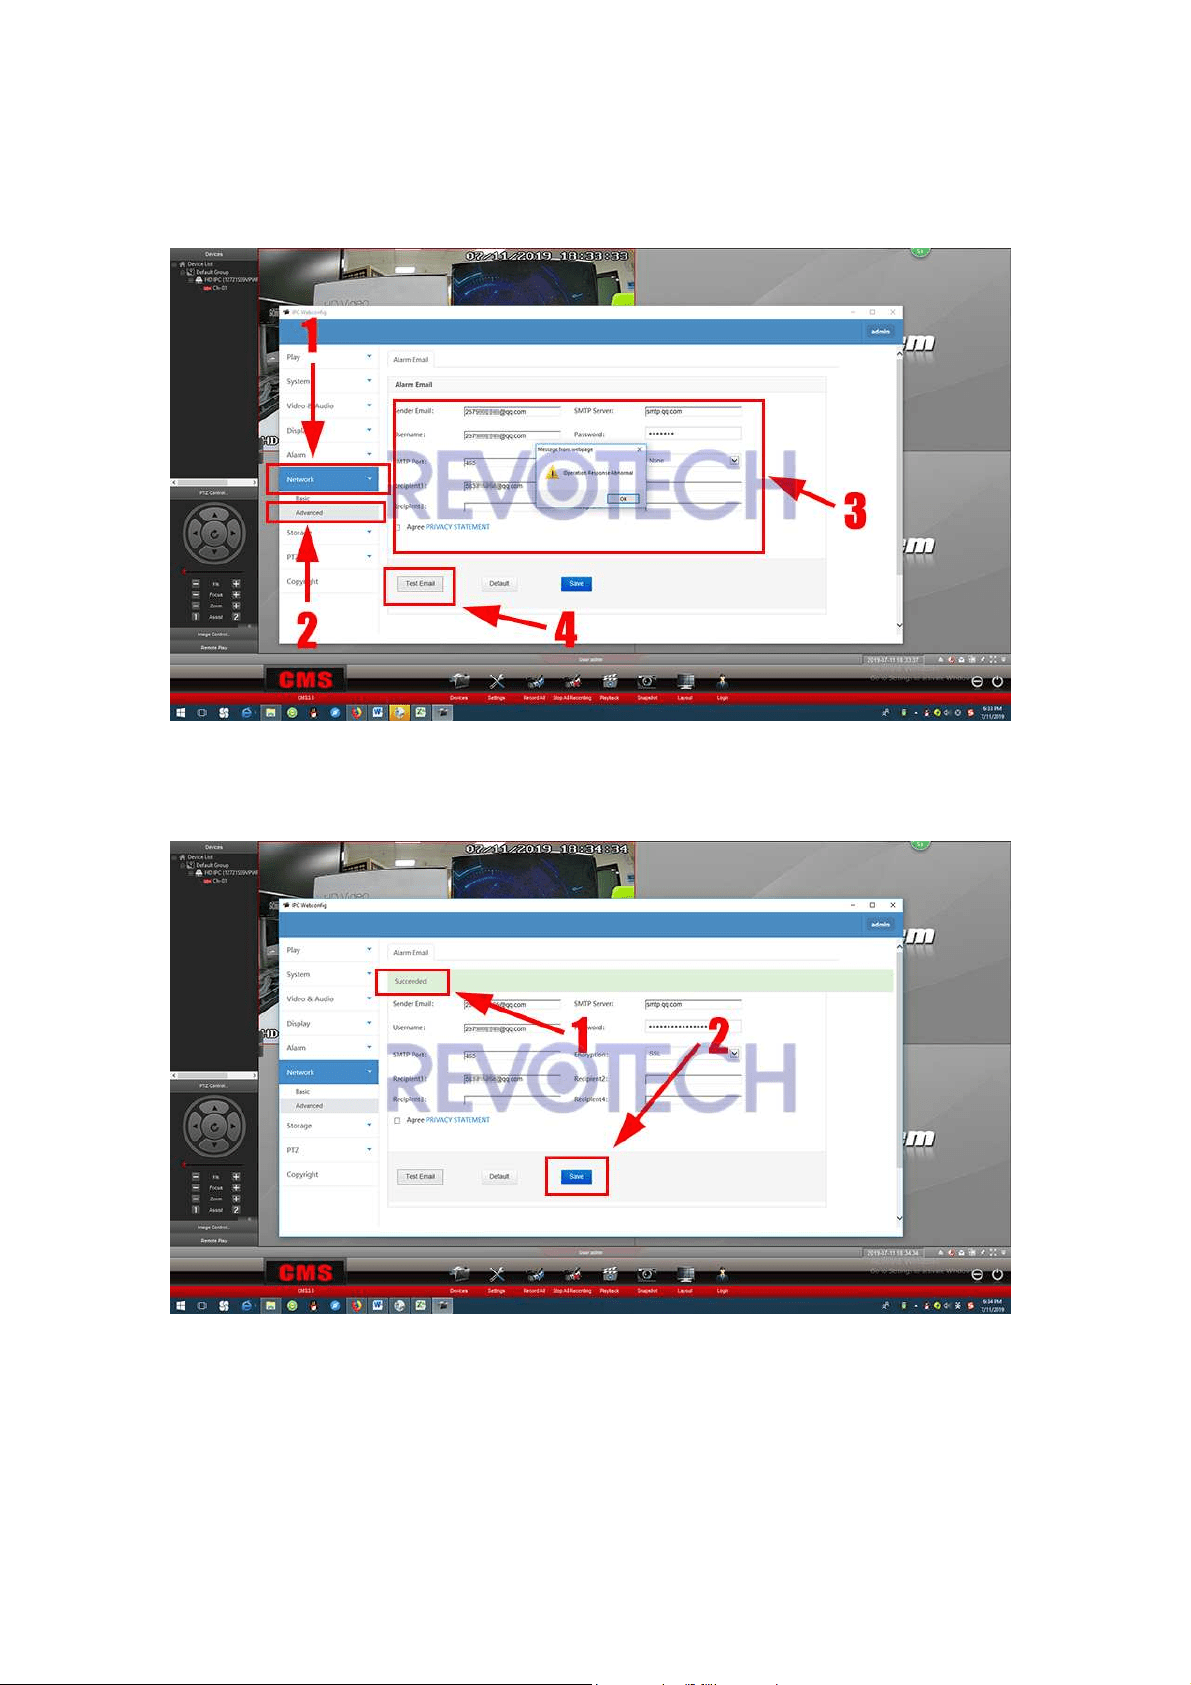
1. Set the email alarm.
(1) Right click the camera and click “Remote configuration”.
Revotech® copyright
Revotech® copyright
(2) Click “Network” – “Advanced”, and input the smtp parameter of your email
and click “Test Email”.
(3) After it show the “Succeeded” information, click “Save”.
Revotech® copyright
Revotech® copyright
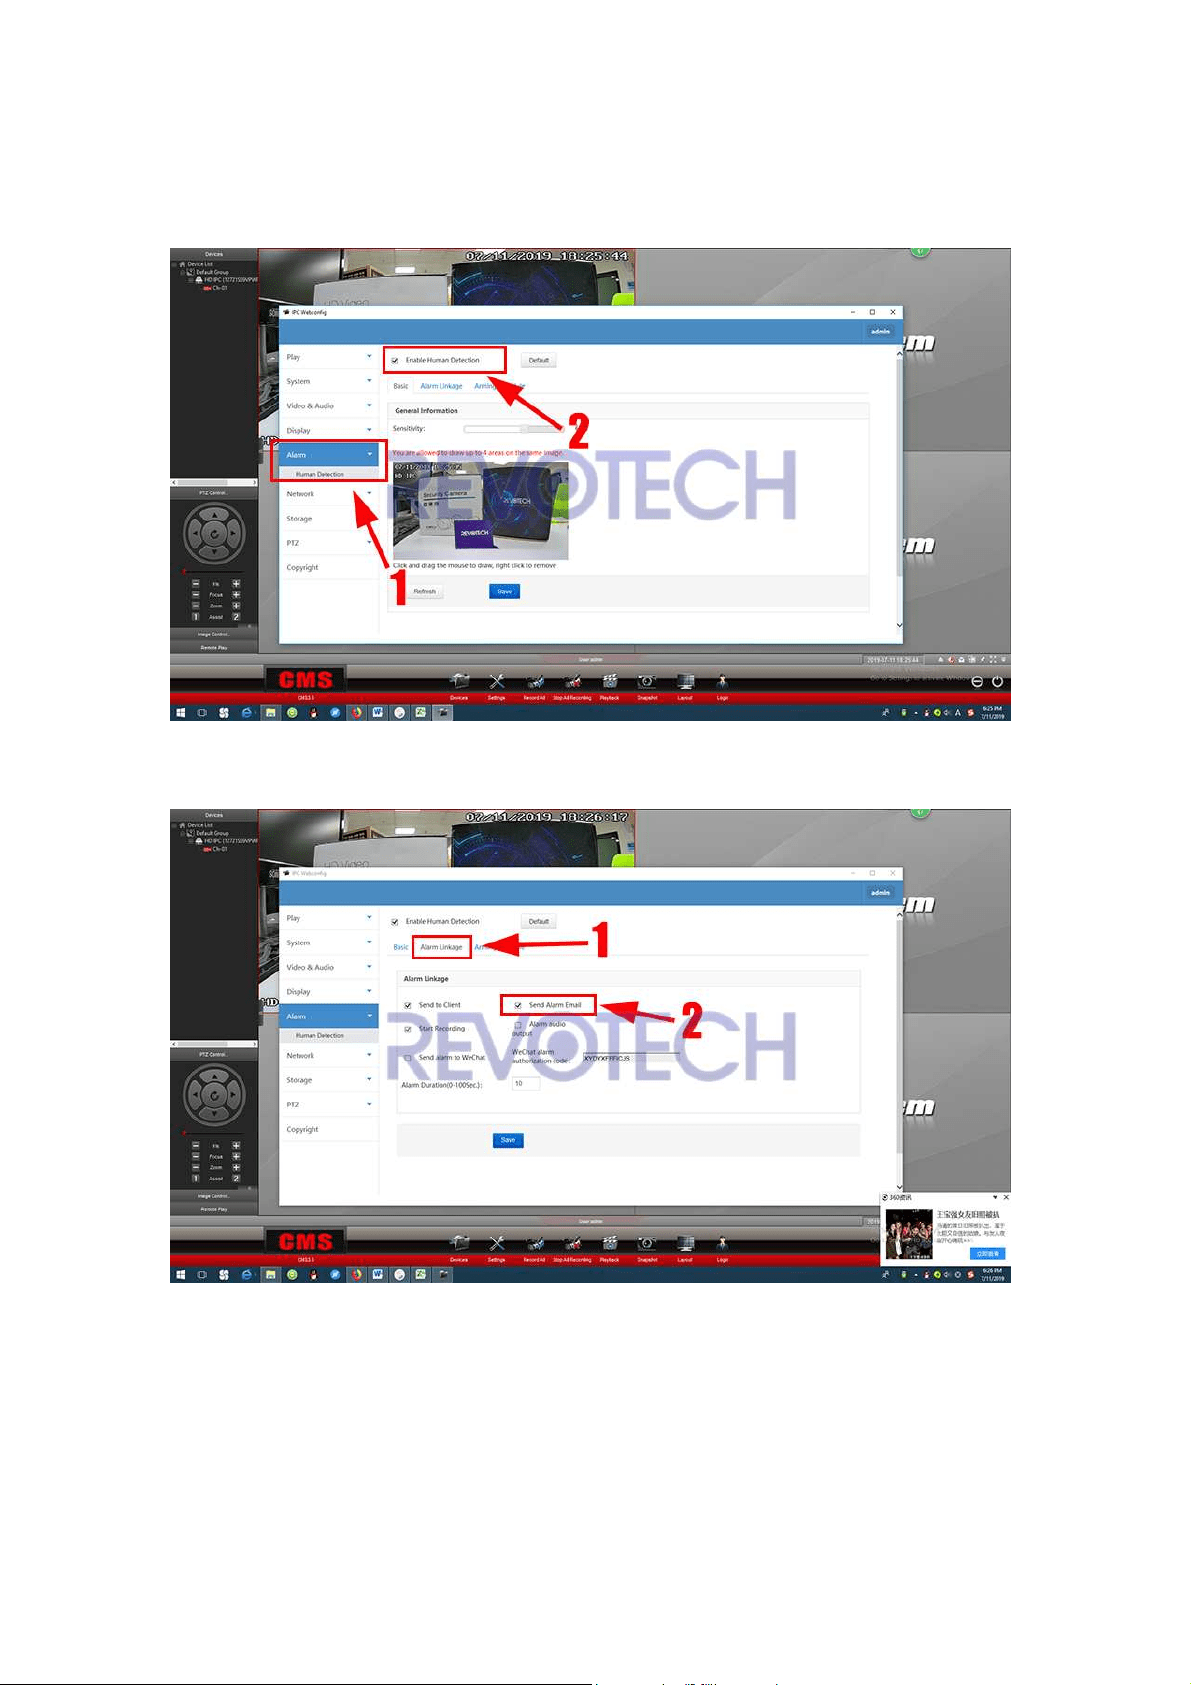
2. Set the motion detection function.
(1) Click “Alarm” and “Enable Human Detection”.
(2) Click “Alarm Linkage” and click “Send Alarm Email”.
The motion detection function is enable now, anything move from the camera, it
will send you a email with a screenshot.
Note:
Q: I have set the function as the instruction, but I can’t receive the message?
Revotech® copyright
Revotech® copyright
A: Please check the camera logs (Path: Remote configuration– system - Logs),
you can see if the camera have sent the email. And if it have sent, then the
email may intercept by the system of Inbox, please check the setting of the
Inbox.
9. How to set the motion record
function?
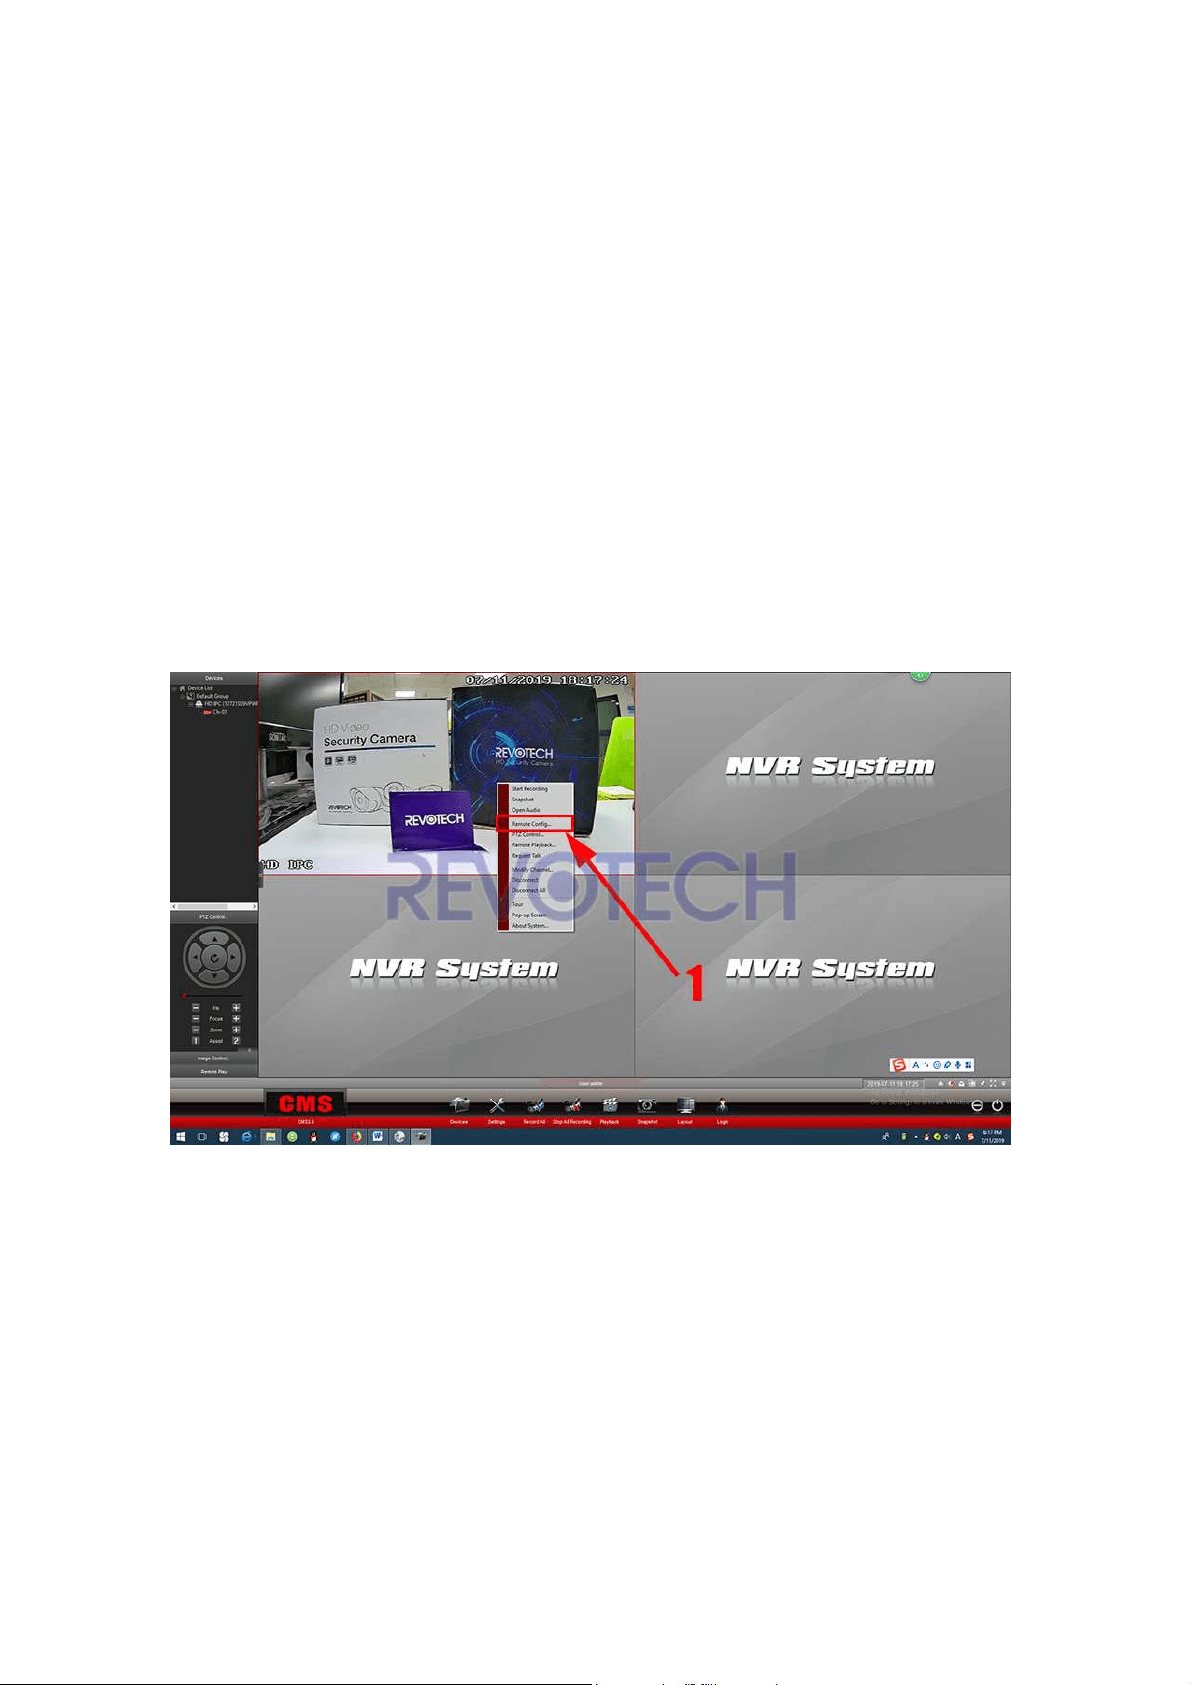
1. Set the motion detection function.
(1) Right click the camera and click “Remote configuration”.
Revotech® copyright
Revotech® copyright
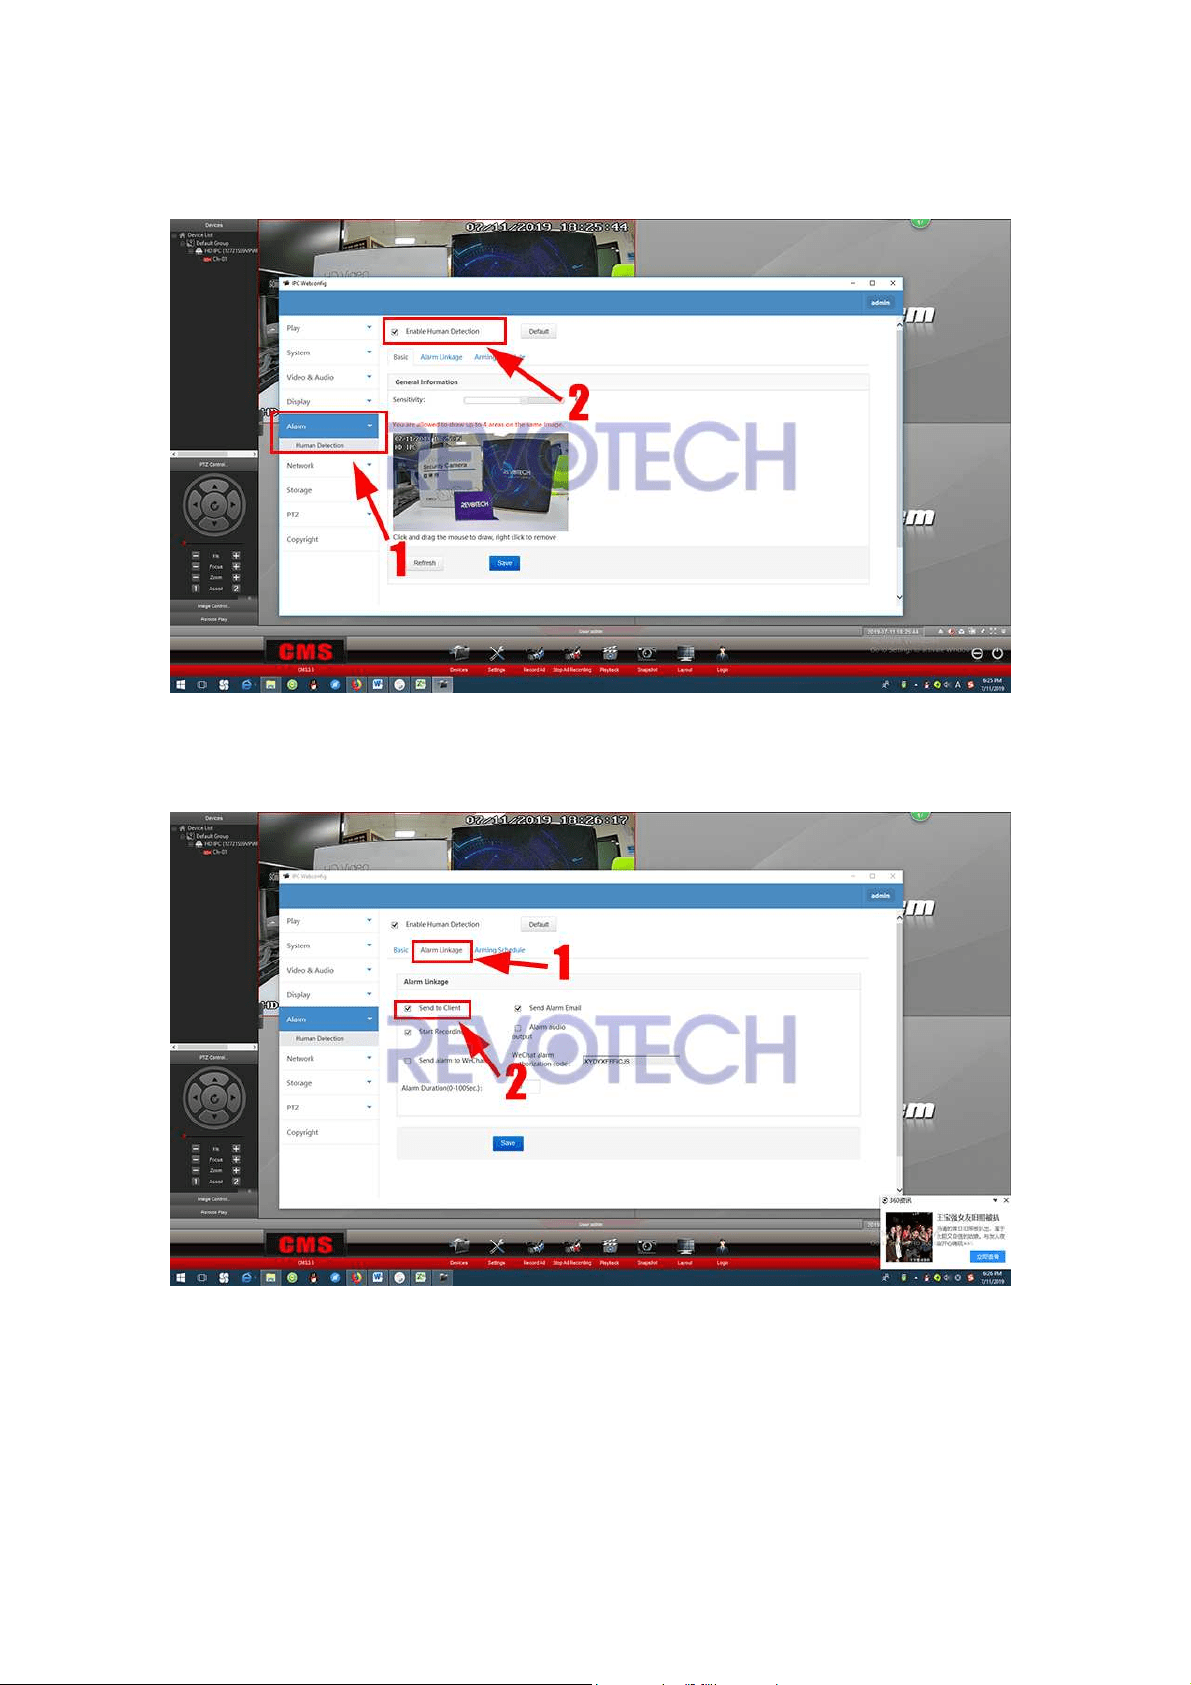
(2) Click “Alarm” and “Enable Human Detection”.
(3) Click “Alarm Linkage” and click “Send to Client”.
Revotech® copyright
Revotech® copyright
2. Set the motion record function.
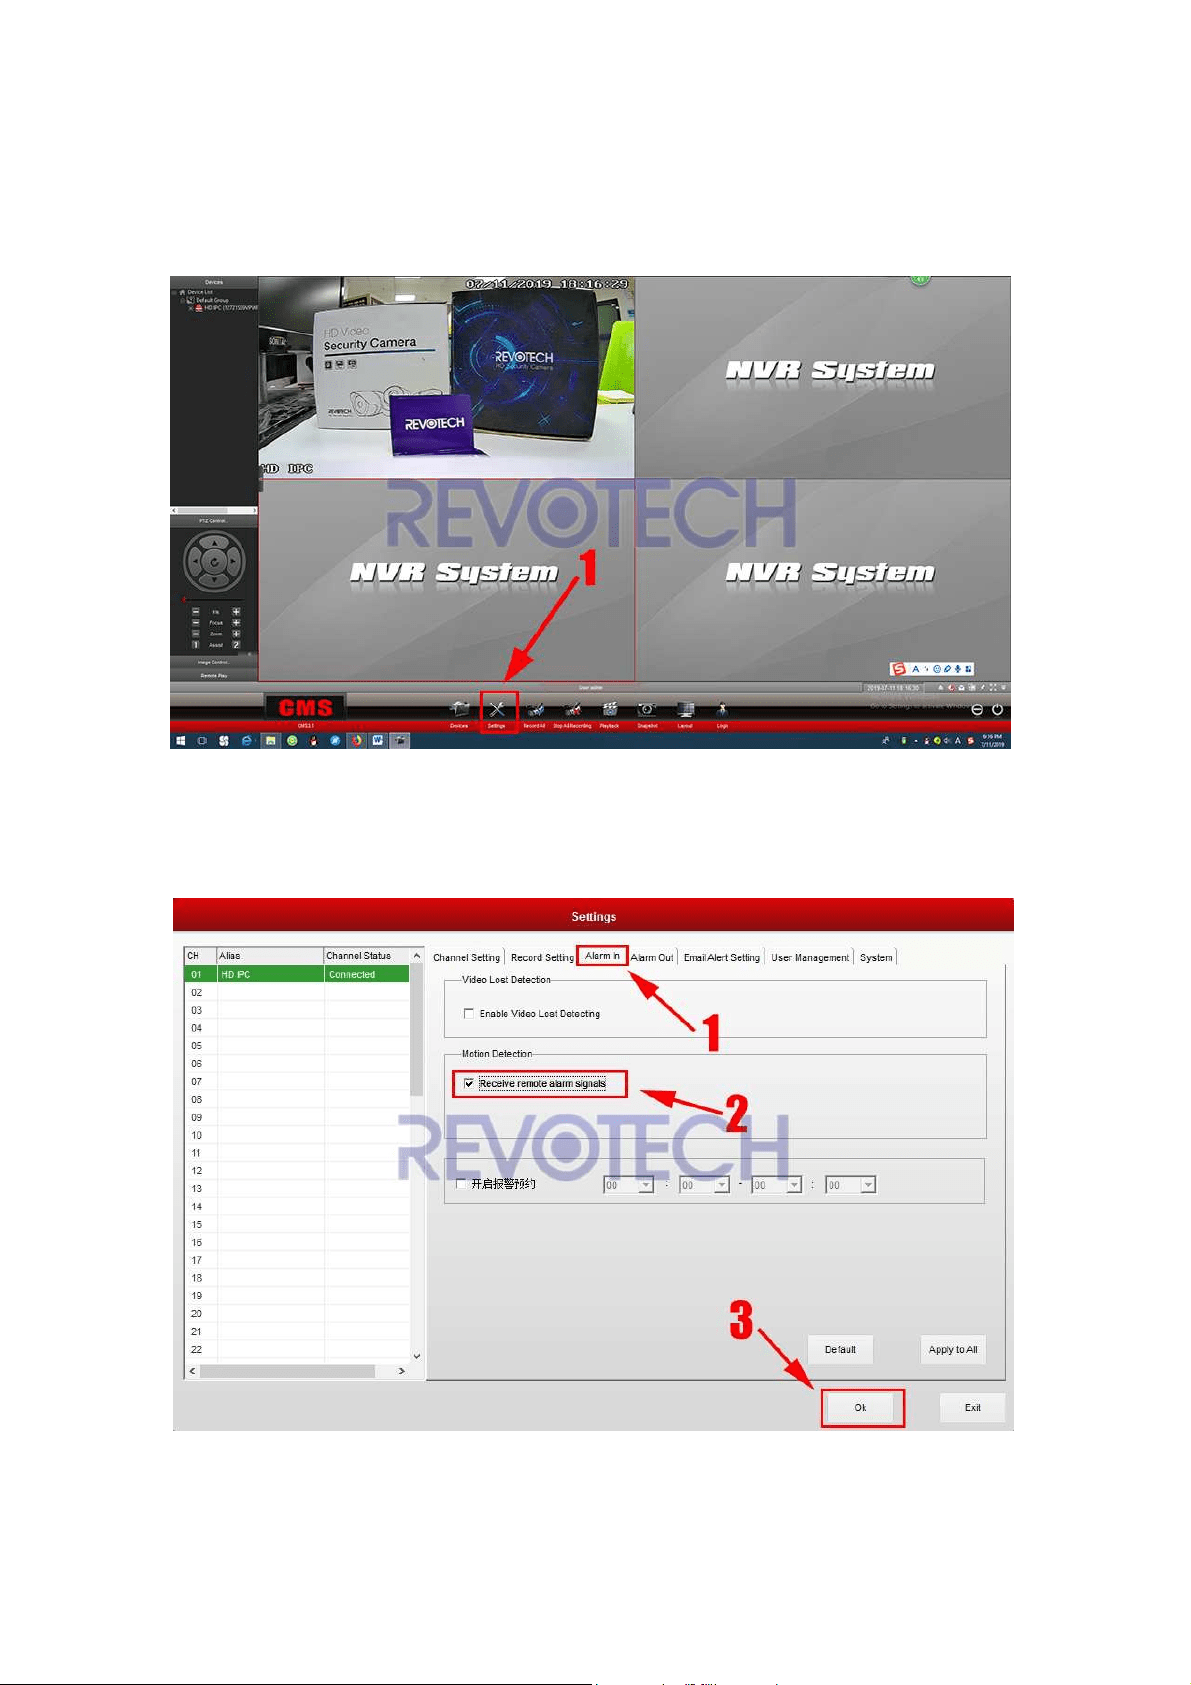
(1) Click “Setting”
(2) Click “Alarm In”.
* Click “Receive remote alarm signals”
* Click “Ok”.
Revotech® copyright
Revotech® copyright
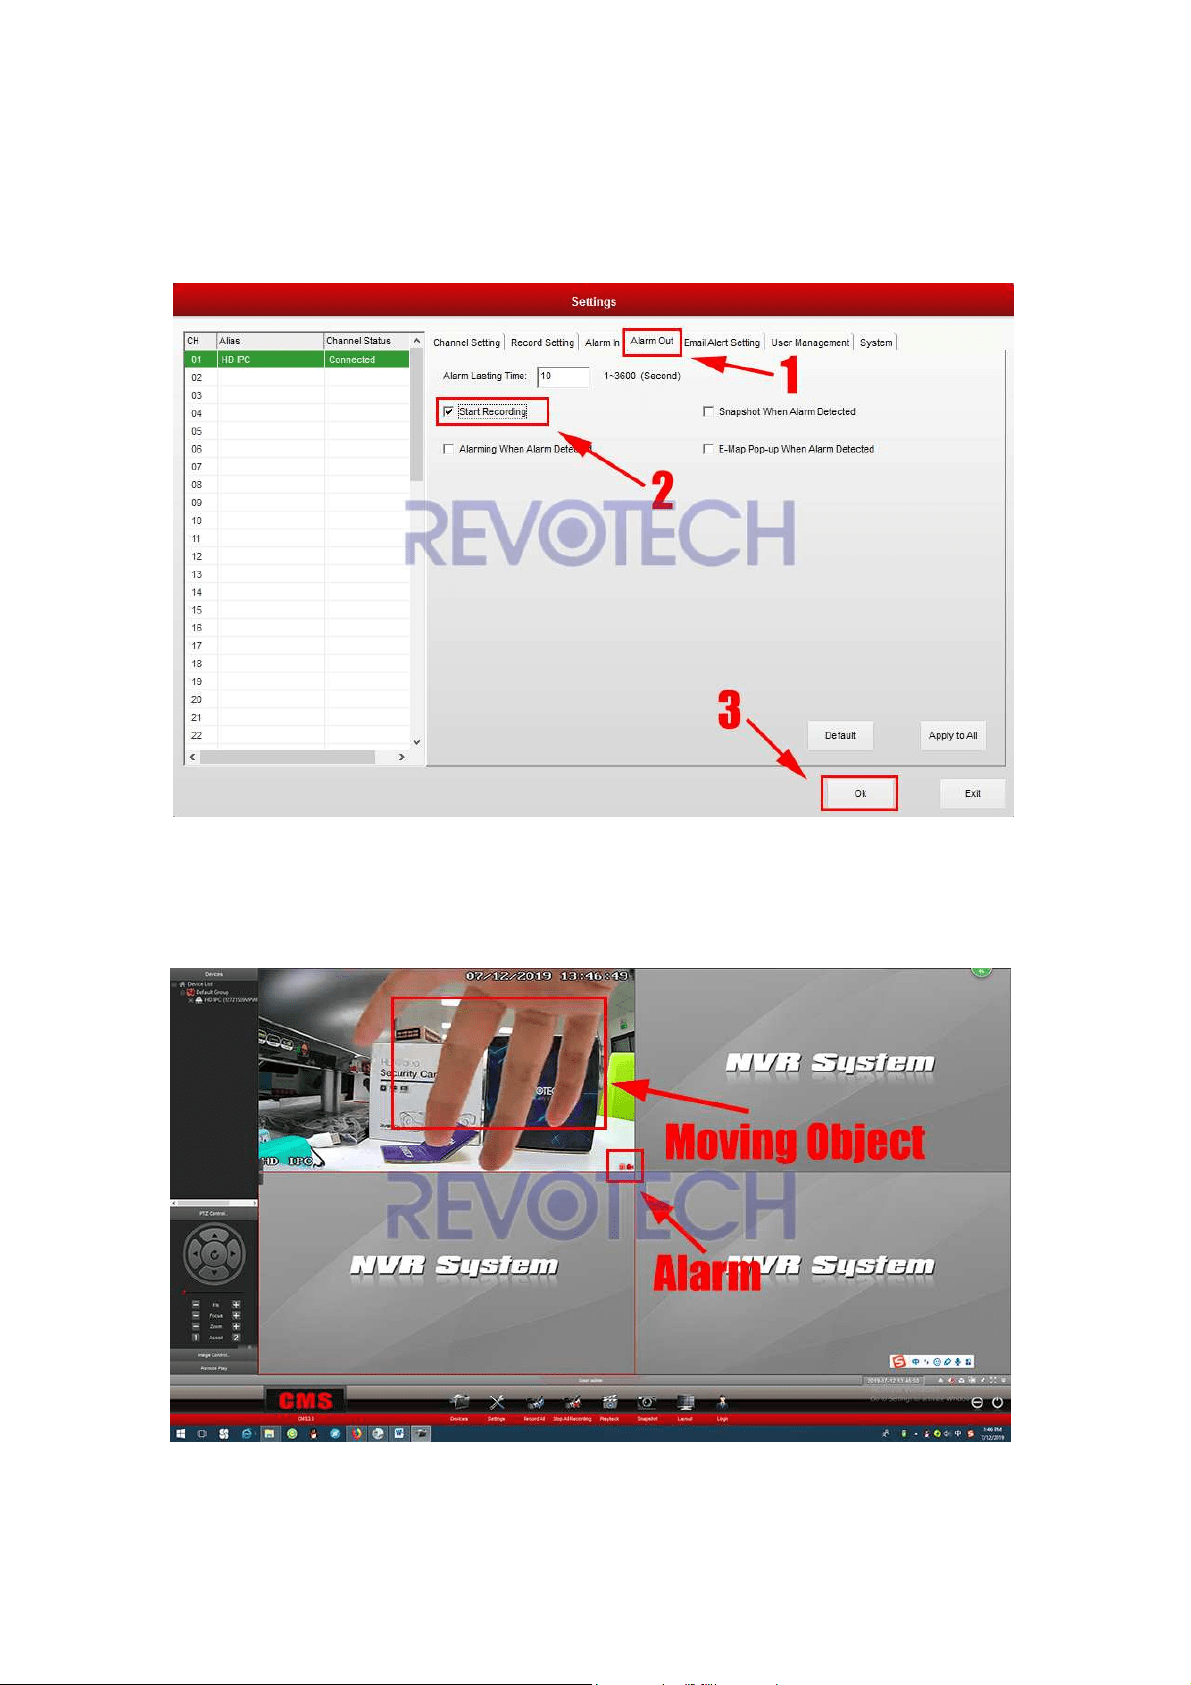
(3) Click “Alarm Out”.
* Input Alarm Lasting time (Record Lasting Time)
* Click “Start Recording”
* Click “Ok”.
(4) The motion record function is successfully setup, and if anything move from
the camera, it will trigger the alarm function and start record.

Revotech® copyright
Revotech® copyright
(5) You can set the File storage path in “Setting” – “Record Setting” and find the
record file in your computer (Folder name:
JdvrFile).

Revotech® copyright
Revotech® copyright
10. Other information
PORT Information
For 16EV2 camera version:
HTTP Port: 80
Onvif Port: 80
RTSP Port: 8554
For FHW camera version:
HTTP Port: 80
Onvif Port: 6688
RTSP Port: 8554
Notice: The HTTP port of FHW version can not be changed, please do not
change it in the setting. If you change it, please contact with the support to reset
the camera.
URL for RTSP(Port 8554):
For 16EV2 camera version:
rtsp://IPAddress:8554/live0.265 (Main Stream)
rtsp://IPAddress:8554/live1.265 (Second Stream)
rtsp://IPAddress:8554/live2.265 (Internet Stream)
rtsp://username:password@IPAddress:8554/live0.265 (Password been Set)
For FHW camera version:
rtsp://IPAddress:8554/profile0 (Main Stream)
rtsp://IPAddress:8554/profile1 (Second Stream)
rtsp://username:password@IPAddress:8554/profile0 (Password been Set)
Snapshot URL:
For 16EV2 camera version:
http://IPAddress/cgi-bin/getsnapshot.cgi
For FHW camera version:
http://IPAddress:6688/snapshot/PROFILE_000