Loading ...
Loading ...
Loading ...
9
Reverse Osmosis Water Supply
IMPORTANT: The pressure of the water supply coming out of
a reverse osmosis system going to the water inlet valve of the
refrigerator needs to be between 35 psi and 120 psi (241 kPa
and 827 kPa).
If a reverse osmosis water ltration system is connected to your
cold water supply, the water pressure to the reverse osmosis
system needs to be a minimum of 40 psi to 60 psi (276 kPa to
414 kPa).
■ Check to see whether the sediment lter in the reverse
osmosis system is blocked. Replace the lter if necessary.
■ Allow the storage tank on the reverse osmosis system to rell
after heavy use. The tank capacity could be too small to keep
up with the requirements of the refrigerator.
NOTE: Faucet mounted reverse osmosis systems are not
recommended.
■ If your refrigerator has a water lter, it may further reduce
the water pressure when used in conjunction with a reverse
osmosis system. Remove the water lter. See “Water
Filtration System.”
If you have questions about your water pressure, call a licensed,
qualied plumber.
Connect the Water Supply
Read all directions before you begin.
IMPORTANT:
■ Connect to potable water supply only.
■ Plumbing shall be installed in accordance with the
International Plumbing Code and any local codes and
ordinances.
■ The gray water tubing on the back of the refrigerator (which
is used to connect to the household water line) is a PEX
(cross-linked polyethylene) tube. Copper and PEX tubing
connections from the household water line to the refrigerator
are acceptable, and will help avoid off-taste or odor in your
ice or water. Check for leaks.
If PEX tubing is used instead of copper, we recommend
the following Whirlpool Part Numbers: W10505928RP (7 ft
[2.14 m] jacketed PEX), 8212547RP (5 ft [1.52 m] PEX), or
W10267701RP (25 ft [7.62 m] PEX).
■ Install tubing only in areas where temperatures will remain
above freezing.
TOOLS NEEDED:
Gather the required tools and parts before starting installation.
■ Flat-blade screwdriver
■ 7/16" and 1/2" open-end wrenches or two adjustable
wrenches
■ 1/4" nut driver
NOTE: Do not use a piercing-type or 3/16" (4.76 mm) saddle
valve which reduces water ow and clogs easier.
Connect to Water Line
IMPORTANT: If you turn the refrigerator on before the water is
connected, turn the ice maker OFF.
1. Unplug refrigerator or disconnect power.
2. Turn OFF main water supply. Turn ON nearest faucet long
enough to clear line of water.
3. Use a quarter-turn shutoff valve or the equivalent, served by
a 1/2" household supply line.
NOTE: To allow sufcient water ow to the refrigerator, a
minimum 1/2" size household supply line is recommended.
A. Sleeve C. Copper tubing (to refrigerator)
B. Nut D. Household supply line (1/2" minimum)
4. Now you are ready to connect the copper tubing to the
shutoff valve. Use 1/4" (6.35 mm) OD soft copper tubing to
connect the shutoff valve and the refrigerator.
■ Ensure that you have the proper length needed for the job.
Be sure both ends of the copper tubing are cut square.
■ Slip compression sleeve and compression nut onto
copper tubing as shown. Insert end of tubing into outlet
end squarely as far as it will go. Screw compression nut
onto outlet end with adjustable wrench. Do not
overtighten.
A. Compression sleeve C. Copper tubing
B. Compression nut
5. Place the free end of the tubing into a container or sink, and
turn on main water supply to ush out tubing until water is
clear. Turn off shutoff valve on the water pipe.
NOTE: Always drain the water line before making the nal
connection to the inlet of the water valve, to avoid possible
water valve malfunction.
6. Bend the copper tubing to meet the water line inlet, which
is located on the back of the refrigerator cabinet as shown.
Leave a coil of copper tubing to allow the refrigerator to be
pulled out of the cabinet or away from the wall for service.
Connect to Refrigerator
Follow the connection instructions specific to your model.
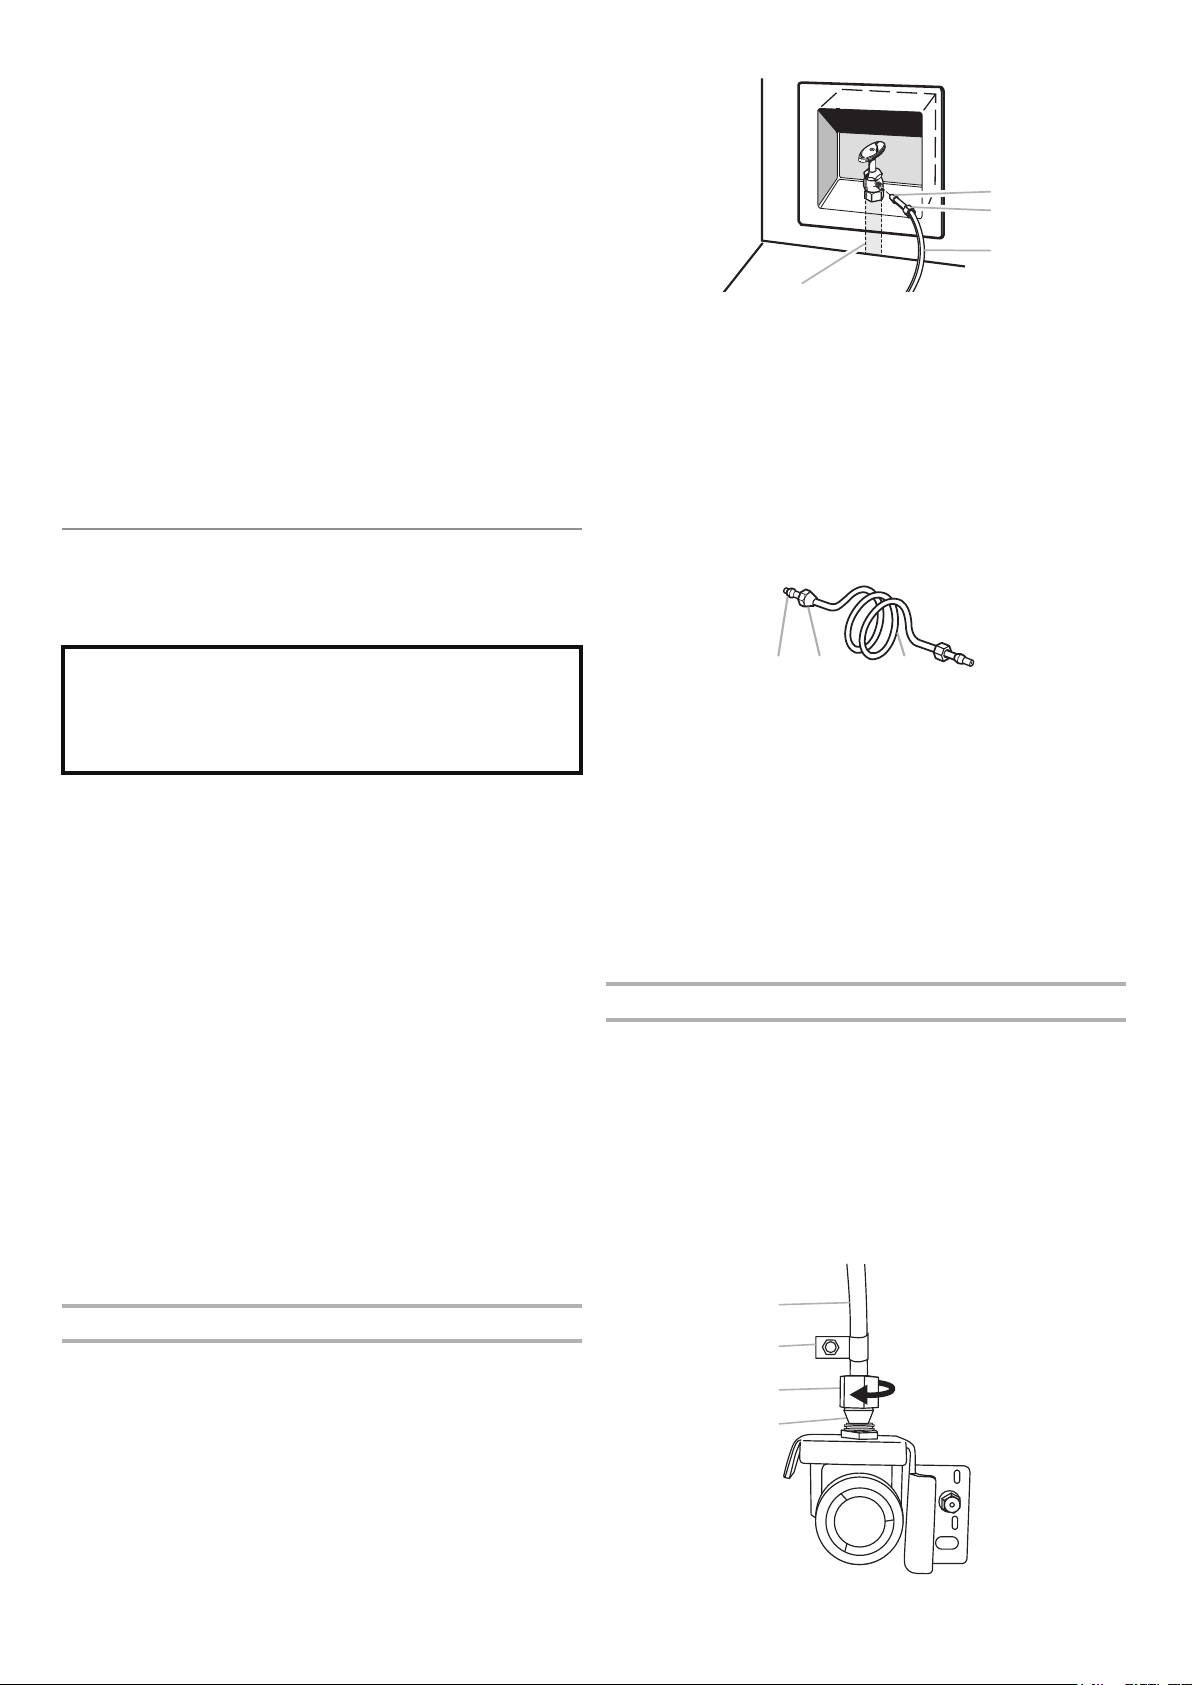
Style 1
1. Remove plastic cap from water valve inlet port. Attach the
copper tube to the valve inlet using a compression nut
and sleeve as shown. Tighten the compression nut. Do not
overtighten. Conrm copper tubing is secure by pulling on
copper tubing.
2. Create a service loop with the copper tubing. Avoid kinks
when coiling the copper tubing. Secure copper tubing to
refrigerator cabinet with a “P” clamp.
Do not use with water that is microbiologically unsafe or
of unknown quality without adequate disinfection before
or after the system. Systems certified for cyst reduction
may be used on disinfected waters that may contain
filterable cysts.
A
B
D
C
B CA
B
A
C
D
A. Copper tubing
B. “P” clamp
C. Compression nut
D. Compression sleeve
Loading ...
Loading ...
Loading ...